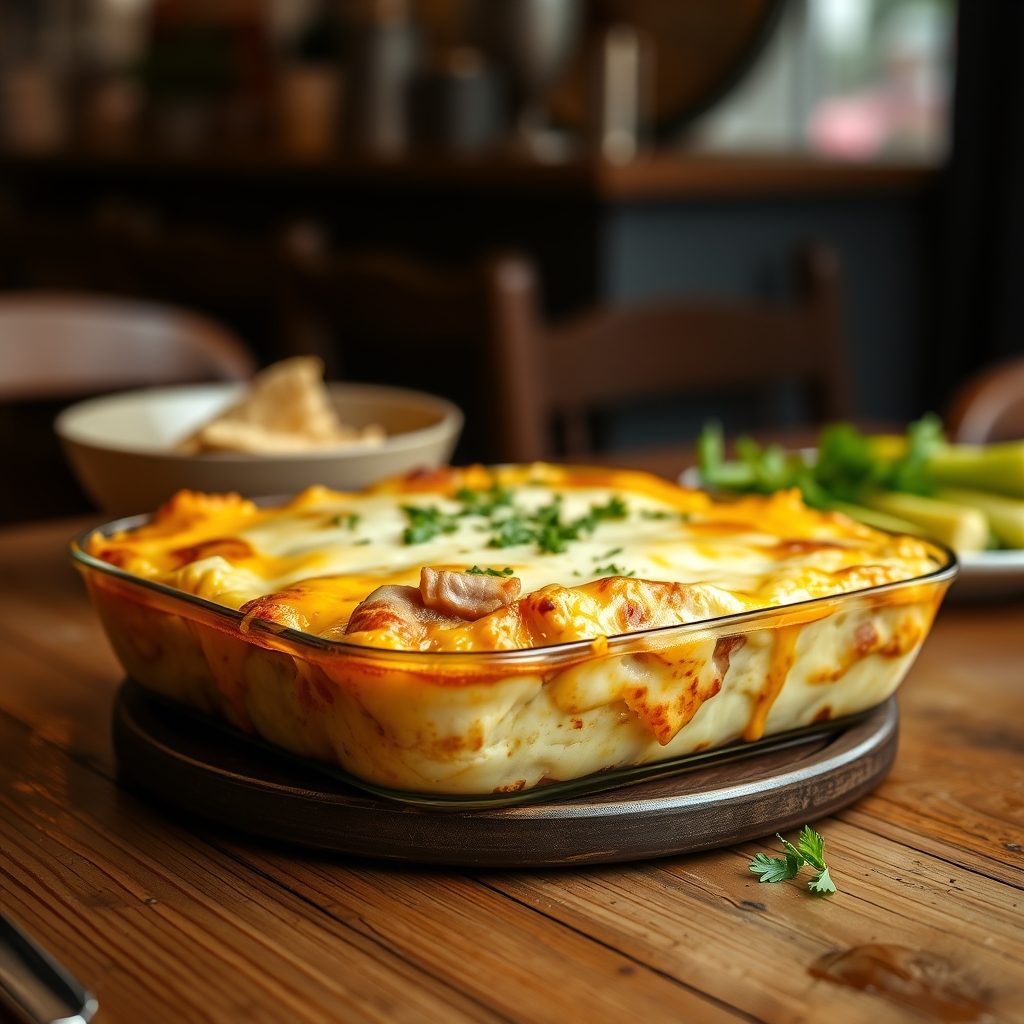
Cheesy Ham & Egg Casserole
There’s something undeniably comforting about a warm, cheesy ham and egg casserole straight from the oven. Whether you’re hosting a brunch, feeding a crowd, or simply craving a hearty breakfast, this dish delivers on flavor, texture, and ease. With layers of savory ham, creamy eggs, and melty cheese, it’s a breakfast casserole that feels indulgent yet comes together effortlessly. Let’s dive into why this recipe deserves a permanent spot in your breakfast rotation.
Why You’ll Love This Recipe
First, this cheesy ham and egg casserole is a one-pan wonder, meaning minimal cleanup and maximum flavor. No need to juggle multiple skillets or worry about timing—everything bakes together in perfect harmony.
Second, it’s incredibly versatile. Whether you’re using leftover holiday ham, deli slices, or even turkey, this recipe adapts beautifully. Plus, it’s easy to tweak for different dietary needs without sacrificing taste.
Third, it’s a crowd-pleaser. The combination of fluffy eggs, salty ham, and gooey cheese is universally loved, making it a reliable choice for family gatherings or potlucks.
Fourth, it’s meal-prep friendly. Assemble it the night before, pop it in the fridge, and bake it in the morning for a stress-free breakfast or brunch.
Finally, it’s comfort food at its best. There’s something nostalgic about a warm, cheesy casserole that makes it feel like a hug on a plate.
Ingredients Breakdown
Let’s take a closer look at the key ingredients that make this cheesy ham and egg casserole so delicious:
Eggs: The star of the dish, eggs provide structure and richness. Fresh, high-quality eggs will yield the best texture.
Ham: Diced ham adds a salty, savory depth. Leftover baked ham works wonderfully, but deli ham or even Canadian bacon can be substituted.
Cheese: A blend of sharp cheddar and Monterey Jack creates the perfect melt and flavor balance. Feel free to experiment with Gruyère, Swiss, or pepper jack for a twist.
Milk or Half-and-Half: This ensures the eggs stay creamy and tender. For extra richness, heavy cream can be used.
Bread: Cubed bread soaks up the egg mixture, adding a soft, custardy texture. Day-old French or sourdough bread works best.
Seasonings: A simple mix of salt, pepper, and a pinch of mustard powder enhances the flavors without overpowering them.
How to Make Cheesy Ham & Egg Casserole
Follow these steps for a foolproof cheesy ham and egg casserole:
Step 1: Prepare the Bread – Cube your bread into bite-sized pieces and spread them evenly in a greased 9×13-inch baking dish.
Step 2: Layer the Ham and Cheese – Scatter the diced ham over the bread, then sprinkle half of the shredded cheese on top.
Step 3: Whisk the Egg Mixture – In a large bowl, whisk together the eggs, milk, salt, pepper, and mustard powder until well combined.
Step 4: Pour and Soak – Slowly pour the egg mixture over the bread, ham, and cheese. Press down gently to ensure everything is evenly soaked.
Step 5: Top with Remaining Cheese – Sprinkle the rest of the cheese over the top for a golden, bubbly finish.
Step 6: Bake – Cover with foil and bake at 350°F for 30 minutes. Remove the foil and bake for another 15–20 minutes until the center is set and the top is golden brown.
Step 7: Rest and Serve – Let the casserole sit for 5–10 minutes before slicing. This helps it hold its shape.
Pro Tips for the Best Results
For the best cheesy ham and egg casserole, keep these expert tips in mind:
Use stale bread – Fresh bread can turn mushy, while day-old bread absorbs the custard better without falling apart.
Don’t skip the resting time – Allowing the casserole to rest after baking ensures clean slices and a perfect texture.
Customize the cheese blend – Mixing different cheeses adds complexity. Try adding a smoky Gouda or a tangy feta for extra depth.
Add veggies for freshness – Spinach, bell peppers, or sautéed onions can brighten up the dish and add nutrients.
Make it ahead – Assemble the casserole the night before and refrigerate. Just add 5–10 extra minutes to the baking time if starting cold.
Variations and Substitutions
This recipe is wonderfully adaptable. Here are some delicious variations:
Vegetarian Option – Skip the ham and add sautéed mushrooms, spinach, or sun-dried tomatoes.
Gluten-Free – Use gluten-free bread or substitute with diced potatoes or sweet potatoes.
Spicy Kick – Add diced jalapeños, a dash of hot sauce, or pepper jack cheese.
Dairy-Free – Swap the cheese for dairy-free alternatives and use almond or oat milk.
Meat Variations – Try cooked bacon, sausage, or even smoked salmon instead of ham.
What to Serve With It
This cheesy ham and egg casserole pairs beautifully with a variety of sides:
Fresh Fruit Salad – A light, refreshing contrast to the rich casserole.
Roasted Potatoes – Crispy breakfast potatoes add a satisfying crunch.
Green Salad – A simple arugula or spinach salad with a lemony dressing balances the dish.
Toast or Biscuits – For extra carbs, serve with warm buttery toast or flaky biscuits.
Hot Coffee or Fresh Juice – A steaming cup of coffee or a glass of orange juice completes the meal.
How to Store and Reheat
Leftovers can be stored in an airtight container in the fridge for up to 3 days. To reheat, place individual portions in the microwave for 1–2 minutes or warm slices in a 350°F oven for 10–15 minutes until heated through.
For longer storage, freeze the baked casserole in slices or as a whole. Wrap tightly in foil and plastic wrap, then freeze for up to 2 months. Thaw overnight in the fridge before reheating.
Frequently Asked Questions (FAQs)
Can I use frozen hash browns instead of bread? Yes, frozen shredded hash browns work well as a substitute for bread. Just pat them dry before using to prevent excess moisture.
Can I make this without cheese? Absolutely. The casserole will still be flavorful, though less rich. Consider adding extra herbs or spices to compensate.
How do I know when the casserole is done? The center should be set, not jiggly, and a knife inserted should come out clean. The top should be golden brown.
Can I use egg whites only? Yes, but the texture will be less rich. Substitute 2 egg whites for every whole egg.
Is this recipe freezer-friendly? Yes, it freezes well. Cool completely before wrapping and freezing for best results.
Final Thoughts
This cheesy ham and egg casserole is more than just a breakfast dish—it’s a reliable, comforting meal that brings people together. Whether you’re serving it for a lazy weekend brunch or a holiday gathering, it’s guaranteed to earn rave reviews. The best part? It’s endlessly customizable, so you can make it your own. Give it a try, and I bet it’ll become a staple in your kitchen too. Happy cooking!
Print
Cheesy Ham & Egg Casserole
Description
A hearty and delicious breakfast casserole packed with fluffy eggs, savory ham, and melted cheese. Perfect for feeding a crowd or meal prepping for the week.
Ingredients
For the Crust:
- For the casserole:
- 8 large eggs
- 1 cup whole milk
- 1/2 cup heavy cream
- 1 teaspoon salt
- 1/2 teaspoon black pepper
- 1 teaspoon garlic powder
- 1 teaspoon onion powder
- For the mix-ins:
- 2 cups diced cooked ham
- 1 1/2 cups shredded cheddar cheese
- 1/2 cup shredded mozzarella cheese
- 1/4 cup grated Parmesan cheese
- 1/2 cup diced green bell pepper
- 1/2 cup diced onion
- For garnish:
- 2 tablespoons chopped fresh parsley
- 1/4 teaspoon paprika
Instructions
1. Prepare the Crust:
- 1. Preheat oven to 375°F (190°C). Grease a 9×13-inch baking dish.
- 2. In a large bowl, whisk together eggs, milk, cream, salt, pepper, garlic powder, and onion powder until well combined.
- 3. Stir in ham, cheddar cheese, mozzarella cheese, Parmesan cheese, bell pepper, and onion.
- 4. Pour mixture into prepared baking dish, spreading evenly.
- 5. Bake for 35-40 minutes, or until eggs are set and top is lightly golden.
- 6. Let cool for 5 minutes before slicing.
- 7. Garnish with parsley and paprika before serving.
Notes
For a lighter version, substitute whole milk with 2% milk and omit heavy cream. Can be assembled the night before and refrigerated overnight before baking. Leftovers keep well in refrigerator for 3-4 days.