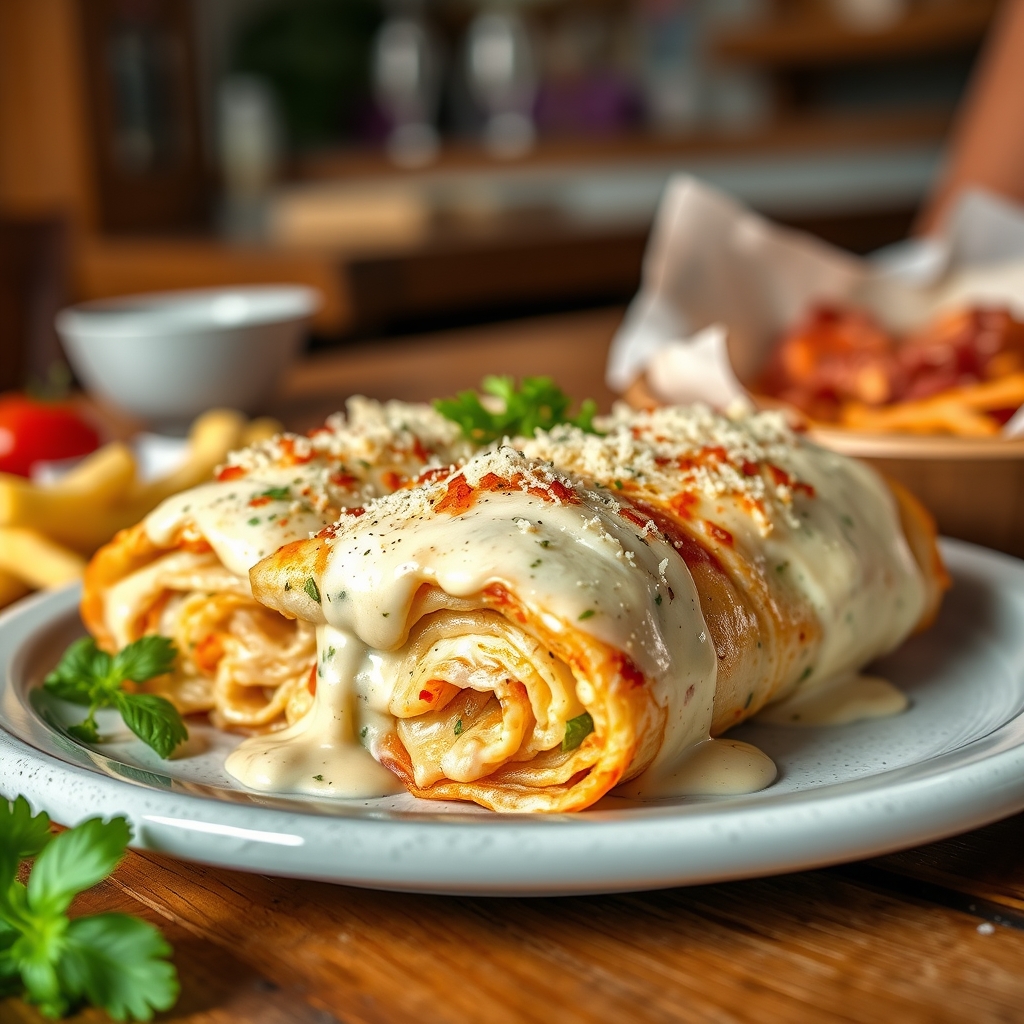
Chicken Alfredo Lasagna Roll-Ups
If you love the creamy indulgence of chicken alfredo and the comforting layers of lasagna, this recipe is about to become your new favorite. Chicken Alfredo Lasagna Roll-Ups combine the best of both worlds—tender pasta rolled around a rich, cheesy filling and smothered in a velvety alfredo sauce. Whether you’re hosting a dinner party or simply craving a cozy weeknight meal, these roll-ups deliver restaurant-quality flavor with a homemade touch. Let’s dive into why this dish is so irresistible and how to make it perfectly every time.
Why You’ll Love This Recipe
First, let’s talk about what makes Chicken Alfredo Lasagna Roll-Ups stand out from the crowd. Here are a few reasons why this recipe is a guaranteed hit:
- Elegant yet easy: These roll-ups look impressive on the plate but are surprisingly simple to assemble. They’re perfect for special occasions or when you want to elevate a casual meal.
- Creamy, cheesy goodness: The combination of alfredo sauce, ricotta, and mozzarella creates a luscious filling that melts in your mouth.
- Perfect for leftovers: Unlike traditional lasagna, these individual roll-ups reheat beautifully, making them ideal for meal prep or next-day lunches.
- Customizable: You can easily adapt the recipe to include your favorite veggies, proteins, or even swap out the sauce for a different flavor profile.
- Crowd-pleaser: Kids and adults alike adore this dish, making it a reliable choice for family dinners or potlucks.
Ingredients Breakdown
Understanding the role of each ingredient will help you make the most of this recipe. Here’s what you’ll need and why it matters:
- Lasagna noodles: The foundation of the dish. Opt for no-boil noodles to save time, or traditional ones if you prefer a slightly firmer texture.
- Cooked chicken: Adds protein and heartiness. Rotisserie chicken works wonderfully for convenience, or you can grill or bake your own.
- Ricotta cheese: Provides a creamy, slightly tangy base for the filling. Whole-milk ricotta yields the best texture.
- Parmesan cheese: Brings a salty, nutty depth to the filling and sauce. Freshly grated is always best.
- Mozzarella cheese: Melts beautifully, creating that signature stretchy, gooey goodness.
- Alfredo sauce: Homemade or store-bought, this rich sauce ties everything together. For homemade, butter, cream, and garlic are key.
- Garlic and herbs: Fresh garlic, basil, or parsley enhance the flavor profile and add brightness.
- Spinach (optional): Adds color, nutrients, and a subtle earthy note. Thawed frozen spinach works well too.
How to Make Chicken Alfredo Lasagna Roll-Ups
Now, let’s walk through the step-by-step process to create these delicious roll-ups:
- Prep the noodles: Cook lasagna noodles according to package instructions until al dente. Drain and lay them flat on a parchment-lined baking sheet to prevent sticking.
- Make the filling: In a bowl, combine ricotta, shredded mozzarella, grated Parmesan, chopped cooked chicken, minced garlic, and chopped herbs. Season with salt and pepper. If using spinach, squeeze out excess moisture and fold it in.
- Assemble the roll-ups: Spread a generous spoonful of filling evenly over each noodle, leaving a small border at the edges. Roll up tightly from one end to the other.
- Prepare the baking dish: Spread a thin layer of alfredo sauce on the bottom of a baking dish to prevent sticking. Arrange the roll-ups seam-side down in the dish.
- Top with sauce and cheese: Pour the remaining alfredo sauce over the roll-ups, ensuring they’re well-coated. Sprinkle with extra mozzarella and Parmesan for a golden, bubbly finish.
- Bake: Cover with foil and bake at 375°F for 20 minutes. Remove the foil and bake for another 10-15 minutes until the cheese is melted and slightly browned.
- Rest and serve: Let the roll-ups sit for 5-10 minutes before serving to allow the sauce to thicken slightly.
Pro Tips for the Best Results
Want to take your Chicken Alfredo Lasagna Roll-Ups to the next level? Try these expert tips:
- Undercook the noodles: Boil them for 1-2 minutes less than the package suggests. They’ll finish cooking in the oven and won’t turn mushy.
- Use room-temperature cheeses: Cold ricotta can make the filling lumpy. Let it sit out for 30 minutes before mixing.
- Add a splash of pasta water: If your alfredo sauce seems too thick, thin it with a little starchy pasta water for a silky consistency.
- Broil for color: For an extra-golden top, switch to broil for the last 2-3 minutes of baking—just watch closely to prevent burning.
- Fresh herbs at the end: Sprinkle chopped basil or parsley over the baked roll-ups for a pop of color and freshness.
Variations and Substitutions
This recipe is wonderfully adaptable. Here are some creative twists to try:
- Vegetarian version: Skip the chicken and add sautéed mushrooms, roasted red peppers, or artichoke hearts.
- Gluten-free: Use gluten-free lasagna noodles and check that your alfredo sauce is GF.
- Spicy kick: Add red pepper flakes to the filling or mix in a dash of hot sauce with the alfredo.
- Different proteins: Substitute cooked shrimp, turkey, or even crumbled bacon for the chicken.
- Lighter option: Use low-fat ricotta, skim milk in the alfredo sauce, and increase the spinach ratio.
What to Serve With It
While these roll-ups are satisfying on their own, here are some perfect pairings:
- Garlic bread: For soaking up every last bit of sauce.
- Crisp green salad: A simple arugula or Caesar salad balances the richness.
- Roasted vegetables: Asparagus, broccoli, or zucchini add color and nutrition.
- White wine: A buttery Chardonnay or crisp Pinot Grigio complements the flavors beautifully.
- Lemon sorbet: For dessert, its brightness cuts through the creamy pasta.
How to Store and Reheat
Leftovers (if you have any!) store wonderfully:
- Refrigeration: Store in an airtight container for up to 4 days.
- Freezing: Assemble unbaked roll-ups in a freezer-safe dish, wrap tightly, and freeze for up to 3 months. Thaw overnight before baking.
- Reheating: Microwave individual portions with a splash of water to prevent drying out. For larger portions, cover with foil and reheat at 350°F until warmed through (about 20 minutes).
Frequently Asked Questions (FAQs)
Let’s address some common questions about Chicken Alfredo Lasagna Roll-Ups:
Can I make these ahead of time?
Absolutely! Assemble the roll-ups up to a day in advance, cover, and refrigerate. Add 5-10 minutes to the baking time if starting cold.
Why are my roll-ups falling apart?
This usually happens if the noodles are overcooked or the filling is too wet. Ensure noodles are al dente and squeeze all excess moisture from spinach if using.
Can I use jarred alfredo sauce?
Yes, for convenience, but homemade will always taste better. If using jarred, doctor it up with extra garlic, black pepper, and a sprinkle of Parmesan.
How many roll-ups per serving?
Most adults enjoy 2-3 roll-ups as a main course. Plan for 1-2 per person if serving multiple courses.
Can I skip the ricotta?
Yes, substitute cottage cheese (blended smooth) or béchamel sauce for a different texture.
Final Thoughts
Chicken Alfredo Lasagna Roll-Ups are the kind of dish that turns an ordinary dinner into something memorable. They’re comforting yet elegant, simple enough for weeknights but special enough for company. The beauty of this recipe lies in its versatility—you can keep it classic or get creative with your favorite add-ins. Whether you’re cooking for a family dinner, meal prepping for the week, or bringing a dish to share, these roll-ups deliver on flavor, presentation, and pure satisfaction. So grab your favorite baking dish, put on some music, and enjoy the process of creating a meal that’s sure to earn compliments. Happy cooking!
Print
Chicken Alfredo Lasagna Roll-Ups
Description
A delicious twist on classic lasagna, these roll-ups feature tender chicken, creamy Alfredo sauce, and gooey cheese rolled in lasagna noodles for an elegant yet easy-to-make dish.
Ingredients
For the Crust:
- For the Roll-Ups:
- 12 lasagna noodles
- 2 cups cooked chicken, shredded
- 1 1/2 cups ricotta cheese
- 1 cup shredded mozzarella cheese
- 1/2 cup grated Parmesan cheese
- 1 large egg
- 1 teaspoon garlic powder
- 1 teaspoon dried basil
- 1/2 teaspoon salt
- 1/4 teaspoon black pepper
- For the Alfredo Sauce:
- 1/2 cup unsalted butter
- 2 cups heavy cream
- 2 cloves garlic, minced
- 1 1/2 cups grated Parmesan cheese
- 1/4 teaspoon nutmeg
- Salt and pepper to taste
- For Topping:
- 1 cup shredded mozzarella cheese
- 1/4 cup grated Parmesan cheese
- 2 tablespoons chopped fresh parsley
Instructions
1. Prepare the Crust:
- 1. Preheat oven to 375°F (190°C). Lightly grease a 9×13-inch baking dish.
- 2. Cook lasagna noodles according to package instructions until al dente. Drain and lay flat on a clean towel.
- 3. In a large bowl, combine shredded chicken, ricotta, mozzarella, Parmesan, egg, garlic powder, basil, salt, and pepper.
- 4. Spread about 2 tablespoons of the chicken mixture evenly over each lasagna noodle. Roll up tightly and place seam-side down in the prepared baking dish.
- 5. For the Alfredo sauce: Melt butter in a saucepan over medium heat. Add garlic and cook for 1 minute until fragrant.
- 6. Stir in heavy cream and bring to a simmer. Reduce heat and whisk in Parmesan cheese until melted and smooth. Season with nutmeg, salt, and pepper.
- 7. Pour Alfredo sauce evenly over the roll-ups in the baking dish. Sprinkle with remaining mozzarella and Parmesan cheeses.
- 8. Cover with foil and bake for 20 minutes. Remove foil and bake for another 10 minutes until bubbly and golden.
- 9. Garnish with fresh parsley before serving.
Notes
For a crispier top, broil for 1-2 minutes after baking. Substitute rotisserie chicken for quick prep. Leftovers keep well refrigerated for 3 days.