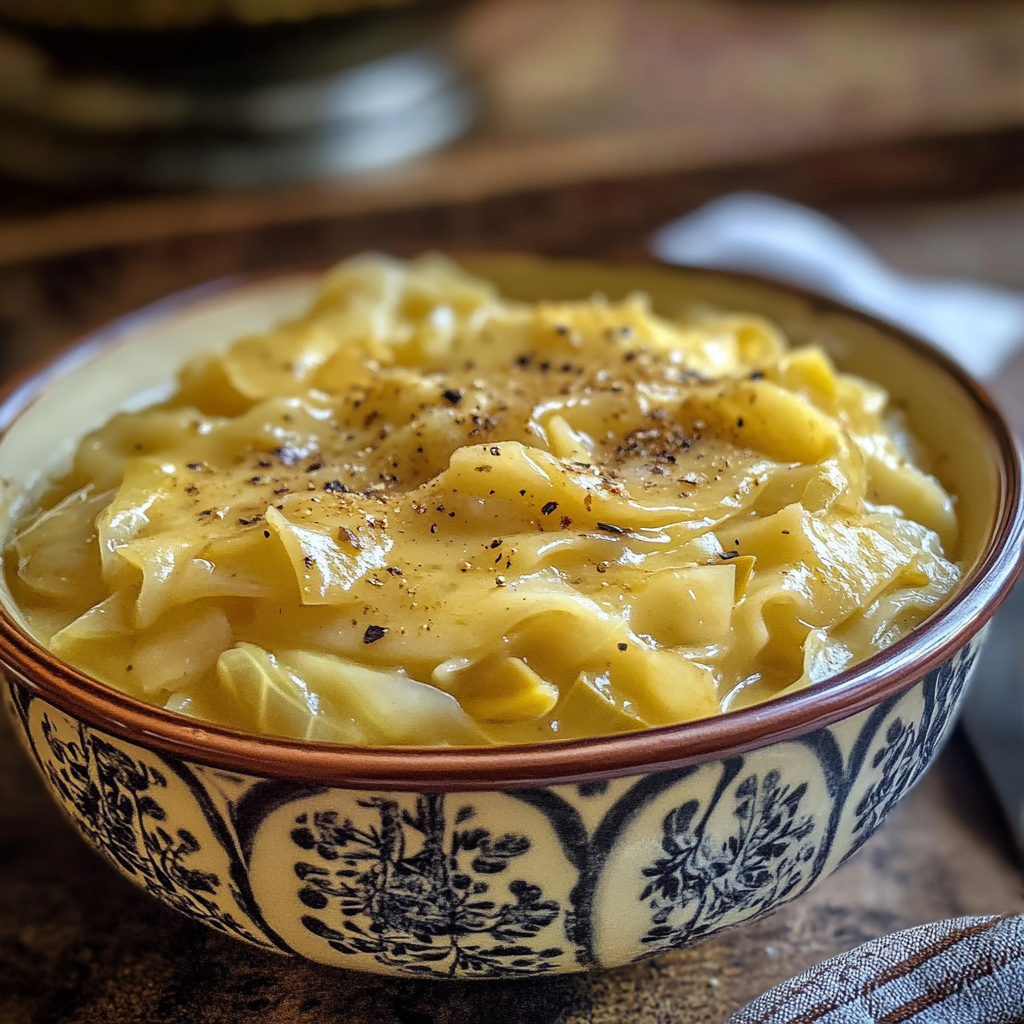
Snickers Salad: A Sweet and Creamy Dessert Perfect for Potlucks

candy bar salad, apple Snickers salad, Snickers dessert salad, Snickers and apple salad, creamy Snickers salad, easy Snickers salad

Snickers Salad: A Sweet and Crunchy Potluck Favorite

Snickers salad is one of those nostalgic dishes that blends the best of two worlds—fruity freshness and candy bar indulgence. This Midwestern dessert salad is incredibly simple to make, combining Granny Smith apples, Snickers bars, and whipped topping for a creamy, sweet treat that delights at any gathering. If you’ve never made it, you’re in for a surprise. It’s the perfect dish to bring to potlucks, family get-togethers, or even just to satisfy a sudden craving for something sweet and refreshing.

Despite its name, Snickers salad doesn’t resemble your typical salad—there are no leafy greens here. Instead, the dish showcases a clever combination of flavors and textures, where the tartness of the apples balances the sweetness of the Snickers, all wrapped in a creamy, fluffy whipped topping. For a variation on this classic dessert, you can explore Mom On Timeout’s Snickers Salad Recipe, which offers a step-by-step guide to perfecting this crowd-pleaser.


Why Snickers Salad is a Crowd-Pleaser

Snickers salad has earned its place as a go-to dessert for many reasons:

  • Sweet and Tart Balance: The combination of sweet Snickers bars and tart Granny Smith apples creates a perfect balance that satisfies both sweet tooths and those who prefer more subdued flavors.
  • Easy to Make: With just a handful of ingredients and minimal prep work, this salad is as simple as it is delicious.
  • Customizable: You can easily modify this recipe by adding marshmallows, swapping out the apples for other fruits, or experimenting with different candy bars. If you’re looking for a twist on the traditional recipe, check out this Candy Bar Apple Salad for a fun variation.

Key Ingredients for Snickers Salad

Here’s what you need to make the perfect Snickers salad:

  • Snickers Bars: Chopped Snickers bars are the star of the dish, adding chewy nougat, caramel, and crunchy peanuts.
  • Granny Smith Apples: The tartness of Granny Smith apples complements the sweetness of the candy bars while providing a crisp texture.
  • Whipped Topping or Cool Whip: A creamy base that ties everything together. You can substitute Greek yogurt or even vanilla pudding for a thicker consistency.
  • Vanilla Pudding Mix (Optional): Adding instant vanilla pudding mix to the whipped topping creates a thicker, more indulgent base.
  • Caramel Sauce (Optional): Drizzling caramel sauce on top gives the salad an extra layer of richness.

Step-by-Step Recipe for Snickers Salad

This recipe is quick and easy to make, perfect for those who want to whip up something delicious in a short amount of time:

Step 1: Chop the Snickers Bars

  • Start by chopping the Snickers bars into small chunks. The goal is to have each bite include a bit of nougat, caramel, and peanuts. Set them aside.

Step 2: Prepare the Apples

  • Wash, core, and chop the Granny Smith apples into bite-sized pieces. There’s no need to peel the apples unless you prefer a smoother texture. Toss the apples in lemon juice to prevent browning if you’re making the salad ahead of time.

Step 3: Prepare the Creamy Base

  • In a large mixing bowl, fold the whipped topping and, if using, the vanilla pudding mix until smooth and creamy. The pudding mix adds a velvety texture and extra flavor to the base.

Step 4: Combine the Ingredients

  • Gently fold the chopped apples and Snickers into the whipped topping mixture. Make sure everything is evenly coated in the creamy base.

Step 5: Add Caramel Drizzle

  • For an indulgent touch, drizzle caramel sauce on top of the salad before serving. This is optional but highly recommended for those who want extra sweetness.

Recipe Variations for Snickers Salad

While the classic version of Snickers salad is delicious on its own, you can experiment with these variations to suit your tastes:

  • Peanut Butter Snickers Salad
    • Add a swirl of peanut butter into the whipped topping for a richer, nuttier flavor that complements the Snickers bars.
  • Snickers Salad with Marshmallows
    • Toss in mini marshmallows for a light, fluffy addition that gives the salad more texture.
  • Healthier Snickers Salad
    • For a lighter version, replace the Cool Whip with Greek yogurt or whipped cream made from scratch. You can also cut back on the number of Snickers bars to reduce the sugar content.
  • Snickers Salad with Grapes or Strawberries
    • Add fresh grapes or strawberries for a fruitier take on the classic recipe. The added sweetness and color will brighten up the dish.

Serving Suggestions for Snickers Salad

Here are a few ideas to make your Snickers salad even more delightful:

  • Serve as a Dessert: This salad works perfectly as a standalone dessert, especially for potlucks, picnics, or family gatherings. It’s sure to be a hit with kids and adults alike.
  • Pair with a Savory Main Dish: The sweet and tart flavors of Snickers salad complement savory dishes like grilled meats or barbecue. Serve it alongside burgers or grilled chicken for a balanced meal.
  • Chilled for Best Flavor: For the best results, chill the salad for at least an hour before serving. This helps the flavors meld together and gives the salad a refreshing, cool texture.

Tips for Making the Best Snickers Salad

Here are a few tips to help you perfect your Snickers salad:

  • Use Fresh Apples: For the best crunch, use fresh Granny Smith apples. They provide the perfect tartness that balances the sweetness of the Snickers bars.
  • Chop Ingredients Evenly: To ensure every bite has a little bit of everything, make sure the apples and Snickers are chopped into evenly-sized pieces.
  • Serve Chilled: Snickers salad is best served cold. Be sure to refrigerate it for at least an hour before serving to allow the flavors to meld.
  • Prevent Apples from Browning: Toss the chopped apples in lemon juice to keep them from browning if you’re making the salad ahead of time.

Frequently Asked Questions (FAQs)

1. Can I make Snickers salad ahead of time?

Yes, you can make Snickers salad a few hours ahead of time. Just store it in the fridge and toss the apples in lemon juice to prevent browning.

2. What apples work best for Snickers salad?

Granny Smith apples are the most commonly used because their tartness balances the sweetness of the Snickers bars. However, you can also use Honeycrisp or Fuji apples for a slightly sweeter version.

3. Can I substitute the whipped topping?

Yes, you can substitute Cool Whip with whipped cream or Greek yogurt for a lighter, tangier version of the dish.

4. Can I freeze Snickers salad?

No, freezing is not recommended because the whipped topping and apples will lose their texture after thawing.

5. How long can Snickers salad be stored in the fridge?

Snickers salad can be stored in the refrigerator for up to 3 days. Be sure to cover it tightly to maintain freshness.


Conclusion: A Sweet Twist on a Classic Dessert

Snickers salad is the ultimate blend of tart, crunchy apples and sweet, chewy candy bars, making it a crowd-pleasing dessert for any occasion. Whether you’re looking for a fun dish to bring to a potluck or a simple dessert to serve after dinner, this salad is a guaranteed hit. For more variations on this dessert, check out Allrecipes’ Snickers Apple Salad for even more ideas on how to elevate this sweet treat.

Baked French Fries: Crispy, Healthy, and Easy to Make at Home

Baked French Fries

Baked French Fries: A Healthy and Delicious Alternative

Baked French fries are a tasty and healthier option to their deep-fried counterparts. By opting to bake your fries, you reduce the oil content without sacrificing the crispiness and flavor that everyone loves. Whether you’re looking for a side dish to go with burgers or simply a healthier snack, baked French fries can easily become a staple in your kitchen.

Many home cooks are turning to baked fries for their convenience and health benefits. Baking requires less oil, less mess, and yields crispy fries that taste just as good as fried ones. For more tips on getting perfectly crispy fries, you can check out the Serious Eats Guide to Crispy Baked French Fries, which covers some advanced techniques for achieving restaurant-quality fries at home.


Why Choose Baked French Fries?

There are several reasons why baked French fries are a great choice:

  • Healthier Alternative: Baking fries significantly reduces the amount of oil used, making them a lighter, lower-fat option compared to deep-frying. Instead of soaking your potatoes in oil, you can use just a light coating of olive oil to achieve the perfect crisp.
  • Easy Cleanup: No need to deal with greasy oil or leftover frying residue. Baking fries on a sheet pan results in much less mess, making cleanup a breeze.
  • Crispy and Flavorful: With the right technique, you can achieve crispy fries that are just as satisfying as the fried version. A few key tricks—like parboiling the potatoes with vinegar—help ensure the fries have a golden, crispy exterior.

For additional inspiration on achieving perfectly crispy fries, you can visit The Kitchn’s Baked French Fries Recipe, which offers a detailed guide on baking golden fries.


Ingredients for Perfect Baked French Fries

To create crispy and delicious baked French fries, you’ll need the following ingredients:

  • Potatoes: Russet potatoes are ideal because of their high starch content, which helps create a crispy exterior and fluffy interior. Yukon Gold potatoes are also a great option for a more buttery flavor.
  • Olive Oil: A light coating of extra virgin olive oil helps the fries achieve a golden brown color and adds flavor.
  • Vinegar: Adding a splash of vinegar to the parboiling water helps the potatoes maintain their structure while crisping up perfectly in the oven.
  • Salt and Seasonings: Sea salt is a must, but you can also add garlic powder, paprika, or other spices based on your preferences.

Step-by-Step Recipe for Baked French Fries

Follow these steps to create crispy and flavorful baked French fries:

Step 1: Prepare the Potatoes

  • Scrub and wash Russet potatoes well. Peel the potatoes if desired, but leaving the skin on adds texture and flavor. Cut the potatoes into uniform sticks, about 1/2 inch thick, for even cooking.

Step 2: Parboil the Potatoes

  • In a large pot, bring water to a boil and add a tablespoon of white vinegar. Parboil the cut potatoes for about 5 minutes. This step helps soften the potatoes and ensures they’ll be crispy on the outside while remaining tender inside.

Step 3: Dry the Potatoes

  • Drain the potatoes and spread them on a wire rack to cool and dry completely. Allowing them to dry thoroughly is key to getting crispy fries in the oven. This process should take at least 30 minutes.

Step 4: Season and Coat the Potatoes

  • Preheat your oven to 435°F (225°C). Toss the dried potato sticks in olive oil and season with sea salt. If you want to add more flavor, you can also toss them with garlic powder, paprika, or black pepper.

Step 5: Bake the Fries

  • Arrange the potatoes on a parchment-lined baking sheet in a single layer, making sure they don’t overlap. Bake for 10 minutes, then flip the fries and bake for an additional 15-20 minutes, or until golden brown and crispy.

Step 6: Serve the Fries

  • Once baked, transfer the fries to a plate or bowl lined with paper towels to absorb any excess oil. Season with more salt if needed, and serve hot with your favorite dipping sauces.

Recipe Variations for Baked French Fries

The beauty of baked French fries is that you can customize them to suit your taste. Here are some popular variations:

  • Garlic Parmesan Baked Fries
    • Toss the fries with minced garlic and freshly grated Parmesan cheese right after baking for a rich, savory flavor.
  • Spicy Baked Fries
    • Add a pinch of cayenne pepper, chili powder, or paprika to the olive oil before baking for a kick of heat.
  • Sweet Potato Baked Fries
    • Swap Russet potatoes for sweet potatoes to create a slightly sweet and healthier alternative. Sweet potatoes are naturally rich in vitamins and minerals.
  • Herb-Crusted Baked Fries
    • Add fresh herbs like rosemary, thyme, or oregano to the olive oil and toss with the fries before baking. This adds an aromatic, earthy flavor that pairs well with roasted meats or grilled vegetables.

Serving Suggestions for Baked French Fries

Here are some great ideas to serve alongside your baked French fries:

  • Dipping Sauces: Serve your fries with a variety of dipping sauces such as ketchup, ranch dressing, spicy aioli, or even a tangy barbecue sauce. You can mix and match depending on your flavor preferences.
  • Classic Pairings: Baked fries are the perfect side dish for burgers, grilled sandwiches, or even alongside a hearty steak.
  • Loaded Fries: For a more indulgent treat, turn your baked fries into loaded fries. Top them with melted cheddar cheese, bacon bits, sour cream, and green onions for an irresistible appetizer or side dish.

Tips for Perfecting Baked French Fries

  • Cut Potatoes Evenly: To ensure even cooking, make sure the fries are cut to the same thickness. Thinner fries will bake faster, while thicker fries will take longer to become crispy.
  • Don’t Overcrowd the Pan: Spread the fries out on the baking sheet in a single layer, making sure they don’t touch. Overcrowding causes them to steam rather than bake, resulting in soggy fries.
  • Reheating Leftovers: To reheat leftover fries, preheat the oven to 400°F (200°C) and bake for 5-10 minutes. This helps restore their crispy texture.

Frequently Asked Questions (FAQs)

1. Why Are My Baked French Fries Soggy?

Soggy fries can occur when the potatoes aren’t dried enough after parboiling, or if the baking sheet is overcrowded. Make sure the fries are spaced out and completely dry before baking.

2. What Type of Potato Should I Use?

Russet potatoes are ideal for baked fries because they have a high starch content, which helps them crisp up beautifully. However, you can also experiment with Yukon Gold or sweet potatoes for different flavors and textures.

3. Do I Have to Peel the Potatoes?

Peeling is optional. Leaving the skin on adds a rustic touch and extra texture, while peeled fries will have a smoother texture.

4. Can I Make Baked Fries Ahead of Time?

Yes! You can cut and parboil the potatoes in advance. Store the pre-boiled potatoes in the fridge for up to a day before baking them fresh when needed.

5. How Do I Store Leftover Fries?

Store leftover fries in an airtight container in the fridge for up to 3 days. Reheat in the oven to maintain their crispiness.


Conclusion: A Healthier Take on a Classic Favorite

Baked French fries offer the perfect balance between flavor, texture, and health. With just a fraction of the oil used in traditional frying, these fries deliver all the crispy goodness you crave. Whether you prefer them seasoned with herbs, loaded with cheese, or served with a spicy dipping sauce, baked fries are a versatile side dish that works with nearly any meal. For more detailed guidance on how to achieve perfect fries every time, check out this Perfect Oven-Baked French Fries recipe.

Enjoy this healthier alternative to deep-fried fries and impress your friends and family with homemade crispy fries that are as tasty as they are nutritious!

Pappardelle with Italian Sausage: A Hearty and Flavorful Pasta Dish

Italian sausage pasta, sausage and pappardelle, sausage pasta recipe, sausage ragu, Tuscan pappardelle with sausage

Pappardelle with Italian Sausage: A Hearty and Flavorful Pasta Dish

If you’re looking for a comforting and flavorful pasta dish, Pappardelle with Italian Sausage is a perfect choice. This traditional Italian recipe combines wide, ribbon-like pappardelle pasta with savory, seasoned Italian sausage in a rich tomato-based sauce. The dish is rustic, satisfying, and ideal for everything from weeknight dinners to special occasions.

The combination of Italian sausage and fresh herbs makes this dish irresistible. The rich, meaty flavor pairs beautifully with the wide pappardelle noodles, which are designed to hold onto the sauce. If you’re interested in exploring variations of this classic dish, you can check out Jamie Oliver’s Sausage Pappardelle for a slightly different take on the recipe.


Why Pappardelle with Italian Sausage is a Must-Try Dish

This classic Italian dish has several key qualities that make it a favorite:

  • Rich and Savory Flavor: The combination of Italian sausage, tomato sauce, and fresh herbs creates a depth of flavor that’s both rich and comforting.
  • Perfect Pasta Pairing: The wide, flat ribbons of pappardelle are ideal for soaking up thick, hearty sauces, ensuring every bite is flavorful.
  • Easy to Customize: You can tailor this recipe to your taste, swapping out ingredients or adding extras like mushrooms or spinach. If you’re looking for more inspiration, check out this Classic Sausage and Pappardelle Recipe for more tips.

Key Ingredients for Pappardelle with Italian Sausage

To create a delicious Pappardelle with Italian Sausage, you’ll need a few essential ingredients:

  • Pappardelle Pasta: These wide ribbons are perfect for holding onto the sauce.
  • Italian Sausage: Choose between sweet or spicy Italian sausage, depending on your flavor preference.
  • Tomatoes: Use canned crushed tomatoes or tomato sauce for a rich base.
  • Onions and Garlic: These aromatics form the flavorful foundation of the sauce.
  • Wine: A splash of white or red wine adds depth to the sauce. You can also substitute with chicken broth if you prefer.
  • Herbs: Fresh basil, oregano, and parsley bring an authentic Italian flavor to the dish.
  • Grated Parmesan: Top the dish with Parmesan cheese for added richness.

Step-by-Step Recipe for Pappardelle with Italian Sausage

Follow these steps to make a mouth-watering Pappardelle with Italian Sausage:

Step 1: Cook the Pappardelle

  • Bring a large pot of salted water to a boil. Cook the pappardelle according to the package instructions, usually about 8-10 minutes. Drain and set aside, reserving some of the pasta water.

Step 2: Brown the Italian Sausage

  • In a large skillet over medium heat, cook the Italian sausage until browned and cooked through. Break it up with a spoon as it cooks. Drain excess fat and set the sausage aside.

Step 3: Prepare the Sauce

  • In the same skillet, add a drizzle of olive oil and sauté onions and garlic until softened and fragrant. Pour in the white or red wine to deglaze the pan, scraping up any browned bits. Add the crushed tomatoes and season with salt, pepper, and fresh oregano. Simmer the sauce for 10-15 minutes until it thickens slightly.

Step 4: Combine the Pasta and Sauce

  • Add the browned sausage back into the skillet with the tomato sauce. Stir to combine. Toss the cooked pappardelle into the skillet and gently toss to coat the pasta in the sauce. If needed, add a bit of reserved pasta water to loosen the sauce.

Step 5: Garnish and Serve

  • Top the dish with freshly chopped basil, grated Parmesan cheese, and a pinch of red pepper flakes for extra heat. Serve hot and enjoy!

Recipe Variations for Pappardelle with Italian Sausage

This versatile dish can be easily customized to suit your taste. Here are a few popular variations:

  • Spicy Italian Sausage Pappardelle
    • Use spicy Italian sausage and increase the amount of red pepper flakes for a fiery kick.
  • Creamy Pappardelle with Sausage
    • Add a splash of heavy cream to the sauce at the end of cooking for a creamy twist.
  • Vegetarian Pappardelle
    • Replace the sausage with sautéed mushrooms or eggplant to create a vegetarian-friendly version of the dish.
  • Pappardelle with White Wine Sauce
    • Skip the tomatoes and create a lighter sauce with white wine, garlic, and fresh herbs. Toss with sausage and serve.

Serving Suggestions for Pappardelle with Italian Sausage

To complete the meal, here are a few side dishes and serving ideas:

  • Arugula Salad: Serve with a simple arugula salad dressed in lemon vinaigrette to balance the richness of the pasta.
  • Garlic Bread: Pair the pasta with warm, crispy garlic bread to soak up the extra sauce.
  • Wine Pairing: Enjoy with a glass of Chianti or Sangiovese to complement the savory flavors of the dish.

Tips for Perfecting Pappardelle with Italian Sausage

  • Cook the Pasta Al Dente: Make sure to cook the pappardelle to al dente so it holds up well in the sauce.
  • Use Fresh Herbs: Fresh basil and oregano add bright, authentic flavors to the dish.
  • Don’t Skip the Wine: Adding a splash of wine helps to deglaze the pan and adds depth to the sauce.
  • Reserve Pasta Water: Always save some pasta water to thin out the sauce if necessary.

Frequently Asked Questions (FAQs)

1. Can I use a different pasta?

Yes, while pappardelle is ideal, other wide pasta like fettuccine or tagliatelle will also work.

2. What kind of wine should I use?

Both red and white wine work well. Chianti or Pinot Grigio are good options depending on your preference.

3. Can I make this dish ahead of time?

Yes, you can prepare the sauce in advance and cook the pasta just before serving.

4. How can I make this dish gluten-free?

Use gluten-free pappardelle or another gluten-free pasta option.

5. How do I store leftovers?

Store leftovers in an airtight container in the fridge for up to 3 days. Reheat with a splash of water or broth to keep the sauce from drying out.


Conclusion: A Hearty Italian Classic

Pappardelle with Italian Sausage is a flavorful, hearty pasta dish that brings together the rich taste of sausage with a robust tomato sauce. Whether you’re looking for a quick weeknight dinner or a dish to impress guests, this recipe is both simple to make and incredibly satisfying. For more variations and ideas on how to elevate this dish, check out The Pasta Project’s Pappardelle with Sausage.

With its balance of robust flavors and comforting textures, this dish is bound to become a staple in your home. Enjoy!

Homemade Mac and Cheese Casserole: Creamy, Cheesy Comfort in Every Bite

Homemade Mac and Cheese Casserole

Homemade Mac and Cheese Casserole: The Ultimate Comfort Food

Few dishes can rival the comforting, creamy, and cheesy indulgence that homemade mac and cheese casserole offers. Whether you’re serving it as a side dish during a holiday meal or making it the star of a weeknight dinner, mac and cheese casserole is a dish loved by kids and adults alike. With its golden crispy top and creamy interior, this baked version of the classic stovetop mac and cheese takes comfort food to a new level.

Instead of relying on boxed versions, making this dish from scratch allows you to control the ingredients, texture, and flavor, resulting in a much richer, satisfying experience. For a twist on the classic recipe, you can explore the Best Baked Mac and Cheese Recipe, which highlights unique flavor combinations and creative spins on the dish.


Why Homemade Mac and Cheese Casserole is a Family Favorite

Mac and cheese is a dish that holds a special place in the hearts of many, and its appeal goes beyond simple convenience:

  • Rich, Creamy Flavor: Homemade versions use real cheese, creating a creamy texture that boxed mixes can’t replicate.
  • Versatile: You can customize your casserole with different cheeses, proteins like bacon or lobster, and vegetables to suit your family’s preferences.
  • Great for Gatherings: Whether you’re making it for a family dinner or a potluck, mac and cheese casserole is easy to make in large quantities and can be prepped in advance. For more ideas on perfecting your version, take a look at this Poole’s Diner Mac and Cheese Recipe, which emphasizes richness and a crispy golden topping.

Ingredients for Homemade Mac and Cheese Casserole

To make the perfect mac and cheese casserole, you’ll need the following ingredients:

  • Pasta: Traditional elbow macaroni works best, but feel free to use rotini or penne if you prefer more texture.
  • Cheese: A combination of sharp cheddar, Gruyère, and Parmesan gives the dish depth of flavor. You can also add mozzarella for extra creaminess.
  • Milk and Cream: Use a combination of whole milk and heavy cream to achieve the silky sauce that coats the pasta.
  • Butter and Flour (Roux): These ingredients form the base of the sauce, thickening it and adding richness.
  • Breadcrumbs: Buttered panko breadcrumbs create the perfect crunchy topping that contrasts beautifully with the creamy interior.

Step-by-Step Recipe for Homemade Mac and Cheese Casserole

Follow this recipe to create a casserole that’s crispy on the outside and creamy on the inside:

Step 1: Cook the Pasta

  • Bring a large pot of salted water to a boil. Cook the elbow macaroni until just al dente, then drain and set aside. It’s important not to overcook the pasta, as it will continue to soften in the oven.

Step 2: Make the Cheese Sauce

  • In a saucepan, melt butter over medium heat. Whisk in flour to create a roux and cook for 1-2 minutes until lightly golden. Gradually add whole milk and heavy cream, stirring continuously until the mixture thickens. Add the shredded cheddar, Gruyère, and Parmesan, stirring until the cheese is fully melted and the sauce is smooth.

Step 3: Combine with the Pasta

  • Mix the cooked pasta into the cheese sauce, ensuring that every piece of pasta is well coated. Taste the mixture and season with salt, pepper, and a dash of paprika or garlic powder if desired.

Step 4: Assemble the Casserole

  • Preheat your oven to 350°F (175°C). Transfer the pasta and cheese mixture into a greased 9×13-inch baking dish. Top with extra shredded cheddar and sprinkle buttered panko breadcrumbs evenly over the top.

Step 5: Bake

  • Bake the casserole for 25-30 minutes, or until the top is golden brown and crispy. Let the casserole rest for 5 minutes before serving to allow the sauce to set.

Recipe Variations for Homemade Mac and Cheese

There are many ways to customize your mac and cheese casserole to suit your tastes:

  • Bacon Mac and Cheese: Add crispy bacon bits into the cheese sauce or sprinkle them on top before baking for a smoky flavor.
  • Lobster Mac and Cheese: Stir in chunks of lobster meat to elevate the dish and make it more indulgent.
  • Vegetarian Mac and Cheese: Incorporate roasted vegetables like broccoli, cauliflower, or spinach to add texture and a nutritional boost.
  • Gluten-Free Mac and Cheese: Use gluten-free pasta and swap out the flour in the roux for gluten-free flour or cornstarch to create a gluten-free version.

Serving Suggestions for Homemade Mac and Cheese Casserole

Mac and cheese casserole is a versatile dish that pairs well with many sides:

  • Fresh Salad: Balance the richness of the casserole with a light, fresh Caesar salad or mixed greens with a tangy vinaigrette.
  • Garlic Bread: Serve with crunchy garlic bread to complement the creamy pasta with a crispy bite.
  • Toppings: Garnish with chopped parsley, chives, or even a sprinkle of red pepper flakes for a bit of heat.

Tips for Perfecting Homemade Mac and Cheese Casserole

  • Don’t Overcook the Pasta: Undercook the pasta slightly to keep it firm, as it will absorb the sauce and cook further in the oven.
  • Use Plenty of Sauce: Make sure there’s enough sauce to keep the dish moist. You don’t want the casserole to dry out during baking.
  • Crispy Topping: For an extra-crispy topping, toss the panko breadcrumbs in melted butter before sprinkling them over the casserole.
  • Make-Ahead Option: Assemble the casserole ahead of time, refrigerate it, and then bake it just before serving. To reheat leftovers, add a splash of milk to the dish to prevent the casserole from drying out.

Frequently Asked Questions (FAQs)

1. Can I freeze mac and cheese casserole?

Yes, you can freeze mac and cheese before baking. Prepare the casserole, wrap it tightly in plastic wrap and foil, and freeze for up to 3 months. Thaw in the fridge overnight before baking.

2. How do I keep my mac and cheese from drying out?

Ensure there’s enough cheese sauce, and cover the casserole with foil for the first half of baking. This traps moisture and prevents the top from browning too quickly.

3. Can I use different types of cheese?

Yes! Cheddar is classic, but you can add Gruyère, Parmesan, or mozzarella for different flavors and textures.

4. What’s the best pasta for mac and cheese?

Elbow macaroni is traditional, but rotini, penne, or cavatappi work well too. Choose a pasta shape that holds the sauce well.

5. Can I make mac and cheese ahead of time?

Absolutely. Assemble the casserole, cover it, and refrigerate for up to 24 hours. When ready to serve, bake as usual.


Conclusion: The Ultimate Comfort Dish

Few dishes are as comforting or crowd-pleasing as Homemade Mac and Cheese Casserole. This recipe allows you to create a creamy, cheesy, and crispy dish that’s far superior to anything you’ll find in a box. Whether you’re adding bacon for a smoky touch, lobster for a luxurious twist, or keeping it simple with just cheese, this casserole is sure to be a hit.

For even more inspiration on how to elevate your mac and cheese, explore the Ultimate Mac and Cheese Recipe from the New York Times, which offers tips and tricks to perfect this beloved dish.

Chicken Tetrazzini: A Creamy, Comforting Pasta Casserole for Any Occasion

creamy chicken casserole, chicken pasta bake, chicken and mushroom tetrazzini, cheesy chicken casserole, baked chicken tetrazzini, easy chicken tetrazzini recipe

Chicken Tetrazzini: A Creamy Comfort Food Classic

Chicken Tetrazzini is a classic pasta casserole dish that combines tender shredded chicken, creamy sauce, and melted cheese, all baked together for a warm and comforting meal. This dish is a staple in many households because it’s easy to make, customizable, and perfect for feeding a crowd. Whether you’re making it for a family dinner or a potluck, Chicken Tetrazzini never disappoints.

This dish is also incredibly versatile. Not only can you use leftover chicken or turkey, but the combination of creamy sour cream, rich cream of chicken soup, and layers of melted cheese make it a crowd-pleaser. If you’re looking for a classic Chicken Tetrazzini recipe, this Belly Full Chicken Tetrazzini Recipe is a great resource to get started.


Why Chicken Tetrazzini is a Family Favorite

There are several reasons why Chicken Tetrazzini has remained a popular dish for decades:

  • Rich, Creamy Flavor: The combination of cream of mushroom soup, cream of chicken soup, and sour cream creates a luscious sauce that coats the pasta and chicken perfectly.
  • Easy to Customize: This recipe can easily be adapted to your taste preferences. You can use rotisserie chicken, add vegetables like mushrooms or peas, or experiment with different cheeses.
  • Great for Leftovers: Chicken Tetrazzini is also an ideal dish for using up leftover chicken or turkey from previous meals. For those looking for a slightly different take, this Spend With Pennies Easy Chicken Tetrazzini offers another quick and simple approach to this classic dish.

Ingredients for Chicken Tetrazzini

To make the perfect Chicken Tetrazzini, you will need the following ingredients:

  • Chicken: Use pre-cooked, shredded chicken. Rotisserie chicken works perfectly for this dish.
  • Pasta: Thin spaghetti is the traditional pasta used in Tetrazzini, but you can substitute with fettuccine or linguine if preferred.
  • Cream of Chicken Soup and Cream of Mushroom Soup: These canned soups form the base of the sauce, adding creaminess and flavor.
  • Sour Cream: Sour cream adds a slight tang and creaminess that complements the richness of the soups.
  • Cheese: A combination of mozzarella, cheddar, and Parmesan cheeses is used to top the casserole, creating a golden, bubbly crust.
  • Vegetables: Peas, mushrooms, and even carrots can be added for flavor, color, and texture. Frozen peas work best for convenience.
  • Seasonings: Salt, pepper, and garlic powder round out the flavors of the dish.

Step-by-Step Recipe for Chicken Tetrazzini

Follow these steps to create the perfect Chicken Tetrazzini:

Step 1: Cook the Chicken

  • If you’re using raw chicken, cook it in boiling water until it’s fully cooked. Shred the chicken into bite-sized pieces once it has cooled slightly. You can also use leftover chicken or rotisserie chicken to save time.

Step 2: Boil the Pasta

  • Bring a large pot of salted water to a boil and cook the pasta according to package instructions. Be sure to cook the pasta al dente (slightly firm) since it will continue to cook in the oven. Drain the pasta and set aside.

Step 3: Prepare the Sauce

  • In a large mixing bowl, whisk together the cream of chicken soup, cream of mushroom soup, sour cream, melted butter, and chicken broth. Add in the seasonings: salt, pepper, and garlic powder. Stir until fully combined.

Step 4: Combine the Ingredients

  • Gently fold in the shredded chicken, cooked pasta, and peas (if using) into the sauce mixture. Toss everything until the pasta and chicken are fully coated with the sauce.

Step 5: Assemble the Casserole

  • Preheat the oven to 350°F (175°C). Grease a 9×13-inch casserole dish with non-stick cooking spray. Pour the chicken and pasta mixture into the prepared dish, spreading it out evenly.

Step 6: Add the Cheese

  • Sprinkle a combination of mozzarella, cheddar, and Parmesan cheese over the top of the casserole. This creates a golden, cheesy crust as the dish bakes.

Step 7: Bake the Casserole

  • Cover the casserole dish with aluminum foil and bake for 30 minutes. Remove the foil and bake for an additional 15 minutes until the cheese is bubbly and golden brown.

Step 8: Let It Rest and Serve

  • Remove the casserole from the oven and allow it to rest for 5-10 minutes before serving. This helps the sauce to thicken and allows the flavors to meld together.

Recipe Variations for Chicken Tetrazzini

One of the best things about Chicken Tetrazzini is that it’s highly adaptable. Here are a few variations to try:

  • Turkey Tetrazzini: Perfect for using up leftover turkey after Thanksgiving. Substitute the chicken with shredded turkey for a tasty post-holiday meal.
  • Vegetarian Tetrazzini: Skip the chicken and add in sautéed mushrooms, broccoli, and spinach for a veggie-packed version of this casserole.
  • Seafood Tetrazzini: Replace the chicken with shrimp or crab for a seafood-inspired twist.
  • Keto-Friendly Tetrazzini: Swap out the pasta for zucchini noodles or spaghetti squash to make a low-carb version of this creamy dish.

Serving Suggestions for Chicken Tetrazzini

Chicken Tetrazzini is a rich and satisfying dish on its own, but it pairs beautifully with lighter sides. Here are a few ideas:

  • Garlic Bread: Serve with warm, crispy garlic bread to soak up the creamy sauce.
  • Roasted Vegetables: Balance the richness of the dish with simple roasted carrots, broccoli, or asparagus.
  • Simple Green Salad: A crisp green salad with a light vinaigrette is the perfect way to cut through the creaminess of the casserole.

Tips for Perfecting Chicken Tetrazzini

  • Don’t Overcook the Pasta: Be sure to cook the pasta al dente. Overcooked pasta can become mushy after baking.
  • Customize Your Vegetables: Add mushrooms, spinach, or even sun-dried tomatoes to boost the flavor and nutritional value.
  • Add a Crunchy Topping: For a crunchy finish, sprinkle buttered breadcrumbs or crushed Ritz crackers over the cheese layer before baking.
  • Freezer-Friendly: Chicken Tetrazzini freezes well, making it a great option for meal prep. To freeze, assemble the casserole without baking, wrap tightly in foil, and freeze for up to 2 months. When ready to cook, thaw overnight in the fridge and bake as directed.

Frequently Asked Questions (FAQs)

1. Can Chicken Tetrazzini be made ahead of time?

Yes! You can assemble the casserole up to 24 hours in advance. Simply cover it and store it in the fridge, then bake it when ready.

2. Can I freeze Chicken Tetrazzini?

Absolutely. Chicken Tetrazzini is freezer-friendly. Assemble the casserole and freeze it before baking. Thaw overnight in the fridge and bake as directed.

3. What’s the best pasta to use for Chicken Tetrazzini?

Thin spaghetti is traditional, but linguine or fettuccine are great substitutes.

4. Can I make Chicken Tetrazzini without canned soup?

Yes, you can make your own sauce by using a roux of butter, flour, and chicken broth instead of the canned soups.

5. How do I prevent my Chicken Tetrazzini from drying out?

Make sure to cover the casserole with foil while baking to trap moisture. Remove the foil for the last 15 minutes to let the cheese brown.


Conclusion: A Comfort Food Favorite

Chicken Tetrazzini is a classic comfort food that’s rich, creamy, and full of flavor. Whether you’re making it for a family dinner, holiday gathering, or simply as a freezer-friendly meal prep option, this dish is guaranteed to be a hit. The combination of tender chicken, creamy sauce, and melted cheese creates a satisfying meal that everyone will love.

For more inspiration on this comforting dish, check out this AllRecipes Classic Chicken Tetrazzini, which offers a traditional take on this beloved recipe.