The Best Apple Dumplings: A Classic Dessert Recipe for Every Occasion

apple dumplings recipe, baked apple dumplings, easy apple dumplings, homemade apple dumplings, cinnamon apple dumplings, classic apple dumplings

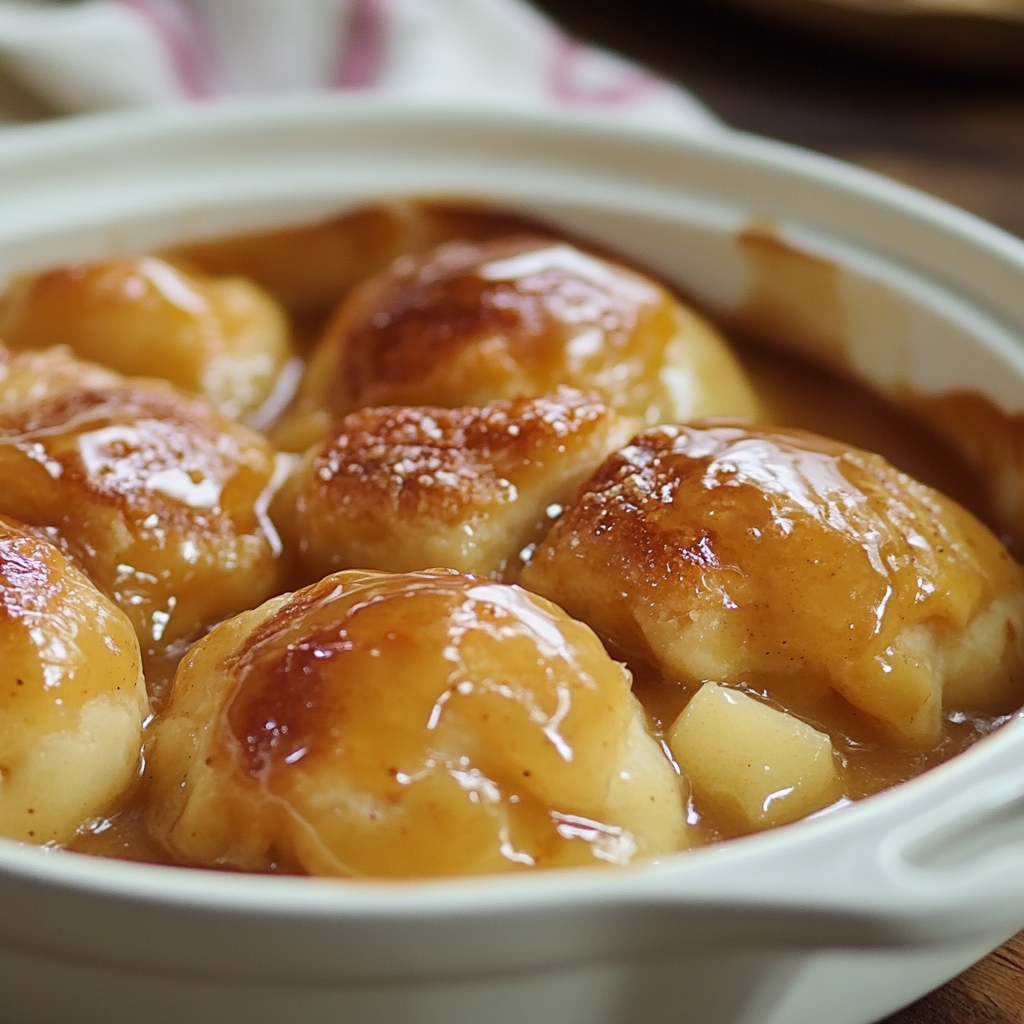
The Best Apple Dumplings: A Cozy Dessert for Any Season

There’s something timeless about apple dumplings—a warm, comforting dessert with tender apples wrapped in flaky pastry and baked in a spiced, buttery sauce. The blend of tart apples, sweet filling, and crisp crust creates a satisfying balance that’s hard to resist. Whether you’re preparing this dish for a holiday gathering, a family dinner, or just a cozy night at home, apple dumplings are a treat that will impress both in flavor and presentation.

Apple dumplings have long been a staple of traditional American baking, particularly in the fall when apples are at their peak. But the best part about this dessert? It’s surprisingly easy to make. For those looking to create this warm and delicious dish at home, check out the Taste of Home Classic Apple Dumplings Recipe for inspiration.


What Are Apple Dumplings?

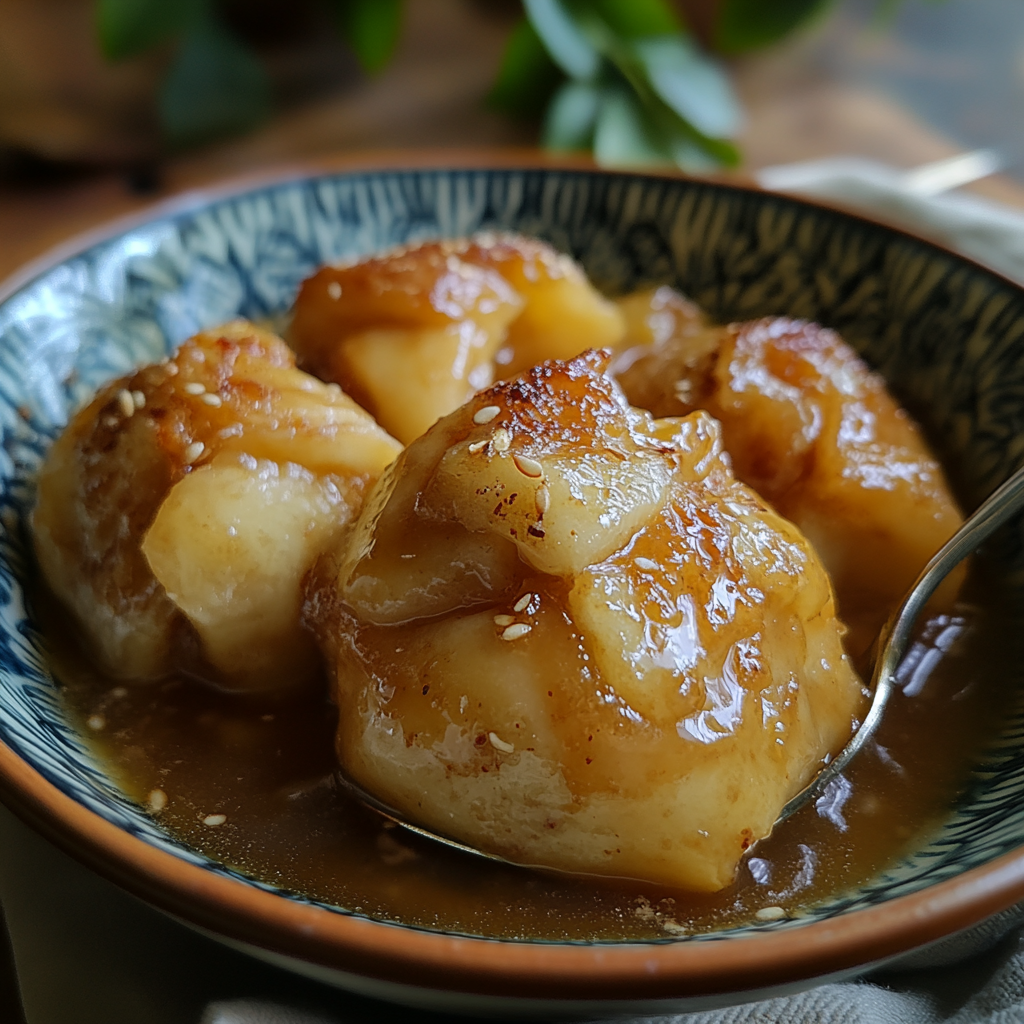
Apple dumplings are a classic dessert that features whole apples—peeled, cored, and stuffed with sugar, cinnamon, and sometimes nuts—wrapped in pie dough or pastry, and then baked in a rich, syrupy sauce. The result is a delightful combination of tender apples, sweet cinnamon-spiced filling, and flaky pastry, all served warm from the oven.

Unlike apple pie, which requires slicing and arranging the apples, apple dumplings present the fruit whole, making it a fun, rustic dessert. It’s easy to customize this recipe with different fruits or fillings, and the dessert can be topped with anything from vanilla ice cream to caramel sauce.

For more detailed instructions on making this classic, check out The Spruce Eats Apple Dumplings Recipe.


Key Ingredients for The Best Apple Dumplings

Here’s a breakdown of the essential ingredients needed for making the best apple dumplings:

  • Apples: Granny Smith or Honeycrisp apples work best because of their firm texture and tart flavor, which balance the sweetness of the filling.
  • Pie Crust: Use either store-bought or homemade pie crust as the wrapping for the apples.
  • Butter: Butter adds richness to both the filling and the sauce.
  • Sugars: A mix of brown sugar and white sugar is used for the filling and sauce to create depth in flavor.
  • Cinnamon and Nutmeg: These spices enhance the flavor of the apples and add that quintessential autumn warmth.
  • Vanilla Extract: A touch of vanilla rounds out the sweetness and complements the fruit’s natural flavor.

Step-by-Step Recipe for The Best Apple Dumplings

Making apple dumplings may seem intimidating, but it’s actually quite simple. Here’s a step-by-step guide to creating the perfect batch:

Step 1: Prepare the Apples

  • Peel and core 6 large Granny Smith apples. Make sure to leave the apples whole, but remove the core to create a hollow center for the filling.

Step 2: Roll Out the Dough

  • On a lightly floured surface, roll out your pie dough and cut it into 6 squares, large enough to wrap each apple completely.

Step 3: Fill the Apples

  • In a small bowl, combine brown sugar and cinnamon. Stuff the center of each apple with this mixture, then add a small piece of butter on top of the filling.

Step 4: Wrap the Apples

  • Place each apple in the center of a dough square. Fold the dough around the apple, pressing the edges to seal them completely. Transfer the wrapped apples to a greased baking dish.

Step 5: Make the Sweet Sauce

  • In a saucepan, combine 1 cup of water, 1 cup of granulated sugar, ½ cup of brown sugar, and 1 teaspoon of vanilla extract. Bring the mixture to a boil, then pour it over the wrapped apples in the baking dish.

Step 6: Bake the Dumplings

  • Bake the dumplings in a preheated oven at 375°F for 35-40 minutes, or until the pastry is golden and the apples are tender when pierced with a fork.

Recipe Variations for Apple Dumplings

One of the best things about apple dumplings is how easily you can customize them. Here are a few popular variations:

  • Caramel Apple Dumplings
    • Add a drizzle of caramel sauce over the dumplings before serving for a rich, decadent finish.
  • Nut-Stuffed Apple Dumplings
    • For added texture, mix chopped walnuts or pecans with the brown sugar and cinnamon filling.
  • Crescent Roll Apple Dumplings
    • Use crescent roll dough instead of pie crust for a faster, easier version of this dessert.
  • Gluten-Free Apple Dumplings
    • Use a gluten-free pie crust to make the recipe suitable for those with dietary restrictions.

Tips for Making the Best Apple Dumplings

To ensure your apple dumplings come out perfectly every time, keep these tips in mind:

  • Choose Firm Apples: Using apples like Granny Smith or Honeycrisp will help the apples hold their shape while baking, preventing them from becoming too mushy.
  • Don’t Overfill the Apples: Be sure to fill the apples with just enough sugar and spice. Overfilling can cause the filling to leak out during baking, leading to a soggy crust.
  • Seal the Dough Well: Properly sealing the dough around the apple is crucial to keeping the filling intact and ensuring the pastry bakes evenly.
  • Serve with Vanilla Ice Cream: The combination of warm dumplings and cold vanilla ice cream creates the perfect contrast of flavors and textures.

Serving Suggestions for Apple Dumplings

There are countless ways to serve apple dumplings, but here are a few ideas to make this dessert even more irresistible:

  • With Vanilla Ice Cream: Serve each dumpling with a scoop of vanilla ice cream for the ultimate combination of warm and cold.
  • With Whipped Cream: If you’re looking for a lighter alternative to ice cream, whipped cream adds a touch of sweetness without overwhelming the flavors.
  • With Caramel Sauce: Drizzle warm caramel sauce over the dumplings for an extra layer of indulgence. This is especially delicious when paired with tart apples like Granny Smith.

Frequently Asked Questions (FAQs)

1. What type of apples are best for apple dumplings?

The best apples for apple dumplings are those that hold their shape well during baking. Granny Smith apples are a popular choice because of their firm texture and tart flavor, which balances the sweetness of the filling and sauce. Honeycrisp apples are another excellent option.

2. Can I use store-bought pie crust for apple dumplings?

Yes, store-bought pie crust is a great option if you’re short on time. It’s convenient and works just as well as homemade dough.

3. How should I store leftover apple dumplings?

Leftover apple dumplings should be stored in an airtight container in the refrigerator. They will keep for up to 3 days. To reheat, warm them in the oven to retain the crispness of the pastry.

4. Can I freeze apple dumplings?

Yes, apple dumplings freeze well. To freeze, assemble the dumplings and wrap them tightly in plastic wrap and aluminum foil before baking. When ready to bake, place them directly in the oven from the freezer, adding 10-15 minutes to the baking time.

5. Can I make apple dumplings ahead of time?

Yes, you can prepare apple dumplings a few hours ahead and store them in the refrigerator until you’re ready to bake. This is a great option for holidays or dinner parties when you want to minimize last-minute preparations.


Conclusion: A Comforting Classic Dessert

Apple dumplings are the ultimate comfort food—a dessert that combines warm, spiced apples, buttery pastry, and a rich syrupy sauce into one perfect package. Whether you’re serving them for a special occasion or simply indulging in a cozy dessert at home, apple dumplings are sure to impress. For more ideas on how to make this classic dessert, visit the AllRecipes Old-Fashioned Apple Dumplings for inspiration.

Granny’s Famous Coconut Cake: A Southern Classic for Special Occasions

homemade coconut cake, Southern coconut cake, coconut cake recipe, best coconut cake, moist coconut cake, old-fashioned coconut cake, easy coconut cake, coconut layer cake

Granny’s Famous Coconut Cake: A Southern Tradition

There’s something undeniably special about Granny’s Famous Coconut Cake. This traditional dessert, often passed down through generations, embodies the heart of Southern baking. With its moist cake layers, rich coconut flavor, and fluffy meringue frosting, this cake is a showstopper at any gathering. Whether you’re serving it for a holiday, birthday, or Sunday dinner, it’s a recipe that brings people together. For more inspiration on Southern classics like this, check out the Just A Pinch Granny’s Famous Coconut Cake.


What Makes Coconut Cake So Special?

Coconut cake is a beloved dessert in Southern cuisine, often making appearances at special family gatherings and celebrations. But Granny’s Famous Coconut Cake takes things up a notch. The layers of tender cake are infused with the rich flavor of coconut, while the fluffy meringue frosting provides the perfect light and sweet contrast.

One of the secrets to this recipe’s success is the use of fresh shredded coconut and coconut extract, which intensify the flavor without overwhelming the palate. Unlike more modern versions that rely on shortcuts, Granny’s recipe sticks to tried-and-true methods, such as whipping up a homemade meringue frosting from scratch.

For those looking to explore other variations, Taste of Home Coconut Cake Recipe offers great ideas on coconut desserts and cake variations.


Key Ingredients for Granny’s Famous Coconut Cake

Here’s what you’ll need to make this decadent cake:

  • Cake Flour: Light and airy, cake flour creates a tender crumb that’s ideal for layer cakes.
  • Butter: Softened unsalted butter provides the richness that balances the sweetness of the cake.
  • Buttermilk: This adds moisture and a slight tang that complements the coconut flavor.
  • Coconut Extract and Vanilla Extract: These flavorings enhance the tropical notes of the cake.
  • Egg Whites: Used to create the light, fluffy meringue frosting.
  • Shredded Coconut: Fresh or sweetened coconut is used both in the batter and as a garnish.

Step-by-Step Recipe for Granny’s Famous Coconut Cake

Step 1: Prepare the Cake Batter

  1. Cream the Butter and Sugar:
    • In a large mixing bowl, cream together 1 cup of unsalted butter and 2 cups of granulated sugar until light and fluffy. This step is essential for incorporating air into the batter, which will help create a light texture.
  2. Add the Eggs:
    • Add 4 large eggs one at a time, beating well after each addition. This ensures that the batter remains smooth and well-emulsified.

Step 2: Combine the Dry Ingredients

  1. Sift the Dry Ingredients:
    • Sift together 3 cups of cake flour, 2 teaspoons of baking powder, and a pinch of salt. Sifting helps aerate the flour and makes for a lighter cake.
  2. Alternate Wet and Dry:
    • Gradually add the dry ingredients to the butter mixture, alternating with 1 cup of buttermilk. Start and end with the dry ingredients to ensure the batter remains smooth.

Step 3: Add Flavorings

  1. Stir in the Extracts:
    • Mix in 1 teaspoon of vanilla extract and 1 teaspoon of coconut extract to enhance the flavor of the cake.

Step 4: Bake the Cake Layers

  1. Prepare the Cake Pans:
    • Grease and flour three 9-inch round cake pans. Divide the batter evenly between the pans.
  2. Bake:
    • Bake at 350°F (175°C) for 20-25 minutes or until a toothpick inserted into the center comes out clean. Let the cakes cool in the pans for 10 minutes, then transfer them to a wire rack to cool completely.

Make the Meringue Frosting

  1. Whisk the Egg Whites:
    • In a heatproof bowl, whisk together 4 large egg whites, 1 ½ cups of sugar, and ¼ teaspoon of cream of tartar. Place the bowl over a pot of simmering water, whisking constantly until the sugar dissolves and the mixture reaches 160°F (71°C).
  2. Beat Until Stiff Peaks Form:
    • Remove the bowl from the heat and beat the mixture on high speed with an electric mixer until stiff, glossy peaks form. This can take about 5-7 minutes.
  3. Add Vanilla:
    • Stir in 1 teaspoon of vanilla extract for added flavor.

Assemble and Frost the Cake

  1. Layer the Cake:
    • Place one cake layer on a serving plate and spread a generous amount of meringue frosting over the top. Sprinkle with shredded coconut.
  2. Stack and Frost:
    • Add the next layer of cake and repeat with frosting and coconut. Frost the sides and top of the cake with the remaining meringue and finish with a final sprinkling of shredded coconut.

Recipe Variations for Coconut Cake

Looking to put your own spin on this classic recipe? Here are some variations:

  • Lemon-Coconut Cake
    • Add lemon zest and a tablespoon of lemon juice to the cake batter for a bright, citrusy twist that pairs perfectly with the coconut.
  • Chocolate Coconut Cake
    • For chocolate lovers, add ¼ cup of cocoa powder to the dry ingredients and create a chocolate version of this coconut cake.
  • Pineapple-Coconut Cake
    • Fold in crushed pineapple into the batter for added moisture and a tropical flavor that complements the coconut.
  • Gluten-Free Coconut Cake
    • Substitute the cake flour with a gluten-free flour blend to make this recipe accessible for those with gluten sensitivities.

Tips for Making the Best Coconut Cake

  • Use Fresh Ingredients:
    Fresh eggs, high-quality coconut extract, and real butter make all the difference in achieving the best flavor.
  • Don’t Overmix:
    When mixing the batter, stop as soon as the ingredients are combined. Overmixing can lead to a dense cake.
  • Let the Cake Cool Completely:
    Make sure the cake layers are fully cooled before frosting, as frosting a warm cake will cause the meringue to melt.
  • Toasted Coconut:
    For a deeper coconut flavor, lightly toast the shredded coconut before sprinkling it over the cake.

Serving Suggestions for Coconut Cake

Here are some ideas for serving this decadent coconut cake:

  • With Fresh Fruit:
    Pair slices of cake with a tropical fruit salad made with pineapple, mango, and kiwi for a light and refreshing contrast to the rich cake.
  • With Coffee or Tea:
    The light sweetness of the cake pairs wonderfully with a cup of black coffee or herbal tea.
  • Garnish with Berries:
    Add a few fresh berries or mint sprigs on top of the cake slices for a pop of color and extra flavor.

Frequently Asked Questions (FAQs)

1. How long will coconut cake last?

Coconut cake will last at room temperature for up to 2 days if stored in an airtight container. For longer storage, refrigerate the cake, where it will keep for up to 5 days.

2. Can I freeze coconut cake?

Yes, coconut cake freezes well. Wrap the cake tightly in plastic wrap and then in aluminum foil before freezing. It will keep in the freezer for up to 3 months. Thaw the cake in the refrigerator overnight before serving.

3. What’s the difference between coconut cake and coconut cream cake?

Coconut cream cake is typically made with coconut milk or cream of coconut in the batter, which gives it a richer coconut flavor compared to traditional coconut cake, which uses shredded coconut and coconut extract.

4. Can I make this cake without eggs?

Yes, you can make an egg-free version by using egg substitutes or aquafaba (the liquid from canned chickpeas) in the frosting. The texture will still be light and fluffy.

5. How should I store leftover coconut cake?

Leftover coconut cake should be stored in an airtight container at room temperature for up to 2 days or in the refrigerator for up to 5 days. You can also freeze individual slices for longer storage.


Conclusion: A Coconut Lover’s Dream Dessert

Granny’s Famous Coconut Cake is a timeless dessert that brings family and friends together. Its delicate layers, combined with rich coconut flavor and fluffy meringue frosting, make it the perfect cake for special occasions. Whether you’re enjoying it at a holiday gathering or making it for a birthday, this cake is sure to impress. For more coconut cake inspiration, be sure to check out the AllRecipes Best Coconut Cake.

Easy Cobbler Recipe: A Quick and Delicious Dessert for Any Occasion

simple cobbler, fruit cobbler recipe, homemade cobbler, quick cobbler dessert, easy fruit cobbler, Southern cobbler recipe, easy peach cobbler, berry cobbler

Easy Cobbler: The Perfect Dessert for Any Occasion

When it comes to comfort desserts, nothing beats a classic cobbler. The best part about cobblers is their versatility and simplicity. With just a few ingredients, you can create a warm, fruity dessert that’s perfect for any time of the year. Whether you’re using fresh, frozen, or canned fruits, this easy cobbler recipe will deliver a delicious and comforting treat every time.

Cobblers are especially popular because of their rustic, home-style appeal. They offer the ideal balance between a sweet, fruit-filled base and a tender, biscuit-like topping. Whether you’re making a peach cobbler, apple cobbler, or a berry blend, cobblers can be customized to suit your favorite fruits and flavors. For more creative twists on this classic dessert, check out the AllRecipes Easy Peach Cobbler.


What Is a Cobbler?

Cobblers are a traditional American dessert, typically consisting of a fruit filling topped with a biscuit or batter crust. Unlike pies, which have a more structured bottom crust, cobblers are often free-form, with the topping being spooned or dolloped over the fruit. When baked, the fruit becomes juicy and tender, while the topping turns golden and crisp.

The name “cobbler” is believed to come from the fact that the biscuit topping resembles cobblestones when dropped unevenly over the fruit. This dessert is deeply rooted in Southern cuisine and is especially popular during the summer months when fresh fruits like peaches and berries are in season. However, cobblers can easily be adapted for fall with ingredients like apples or pumpkin.

For an alternative approach to cobblers using berries, visit Taste of Home Simple Berry Cobbler.


Key Ingredients for an Easy Cobbler

Cobblers are known for their simplicity, and this recipe requires just a few basic ingredients:

  • Fruit Filling: The fruit is the star of the cobbler. Use fresh, frozen, or canned fruits like peaches, blueberries, apples, or cherries.
  • Flour: Provides structure for the cobbler topping. All-purpose flour works perfectly for this recipe.
  • Sugar: You’ll need granulated sugar to sweeten both the fruit filling and the topping. You can also add a bit of brown sugar for extra depth.
  • Butter: Melted butter adds richness to the topping and helps it turn golden and crisp.
  • Milk: Combines with the flour and butter to form a smooth batter for the topping.
  • Baking Powder: Gives the topping a light, airy texture by helping it rise during baking.
  • Spices: Classic spices like cinnamon and nutmeg can be added to enhance the flavor of the fruit.

Step-by-Step Recipe for Easy Cobbler

This simple cobbler recipe is easy to follow and can be made with any fruit of your choice. Here’s how to do it:

Step 1: Preheat the Oven

  • Preheat your oven to 350°F (175°C) and grease a medium-sized baking dish with butter or cooking spray.

Step 2: Prepare the Fruit Filling

  • In a mixing bowl, combine 4 cups of your preferred fruit (fresh, frozen, or canned) with ½ cup of granulated sugar and 2 tablespoons of flour or cornstarch. The flour helps thicken the juices as the fruit bakes. For extra flavor, you can add 1 teaspoon of cinnamon and ¼ teaspoon of nutmeg.

Step 3: Make the Cobbler Topping

  • In another bowl, whisk together 1 cup of all-purpose flour, 1 cup of sugar, 1 tablespoon of baking powder, and a pinch of salt. Add 1 cup of milk and ½ cup of melted butter, stirring until a smooth batter forms.

Step 4: Assemble the Cobbler

  • Pour the fruit mixture into the prepared baking dish, spreading it evenly. Then, drop spoonfuls of the batter on top of the fruit. Don’t worry about making it perfect—the topping should look rustic.

Step 5: Bake the Cobbler

  • Bake the cobbler for 30-40 minutes, or until the topping is golden brown and the fruit is bubbly. The biscuit topping should be crisp on the outside and soft on the inside.

Step 6: Serve

  • Allow the cobbler to cool for 5-10 minutes before serving. Top with a scoop of vanilla ice cream or a dollop of whipped cream for an extra touch of indulgence.

Popular Cobbler Variations

Cobbler is one of those desserts that lends itself well to creativity. Here are some popular variations you can try:

  • Peach Cobbler
    • This Southern classic is made with fresh or canned peaches. For a more decadent version, top the cobbler with whipped cream or vanilla ice cream.
  • Apple Cobbler
    • A fall favorite, apple cobbler is made with sliced apples and spiced with cinnamon and nutmeg. Pair it with a drizzle of caramel sauce for a luxurious twist.
  • Berry Cobbler
    • A combination of blueberries, blackberries, and raspberries makes for a deliciously sweet-tart cobbler. Use frozen berries to make this dish all year round.
  • Chocolate Cobbler
    • For a unique spin, make a rich chocolate cobbler by using a brownie-like topping and serving it with ice cream. It’s a decadent dessert that will satisfy any chocolate lover.

For more creative cobbler variations, check out the The Pioneer Woman Blackberry Cobbler Recipe.


Tips for Making the Perfect Cobbler

Here are some essential tips to ensure your cobbler turns out perfectly every time:

  • Choose Fresh, Ripe Fruit: While you can use frozen or canned fruit, fresh fruit gives the best flavor and texture.
  • Don’t Overmix the Topping: Overmixing the batter can result in a tough or dense topping. Mix just until the ingredients are combined for a light and fluffy texture.
  • Add a Crunchy Topping: For a little extra texture, sprinkle the topping with coarse sugar or chopped nuts before baking.
  • Watch the Baking Time: Check your cobbler towards the end of the baking time to make sure the topping doesn’t overbrown. The fruit should be bubbling, and the topping should be golden and firm.

Serving Suggestions for Easy Cobbler

Cobbler is delicious on its own, but these serving ideas will take it to the next level:

  • With Vanilla Ice Cream: The classic pairing of warm cobbler and cold vanilla ice cream creates a perfect contrast of flavors and textures.
  • With Whipped Cream: If you prefer something lighter than ice cream, try topping your cobbler with a dollop of lightly sweetened whipped cream.
  • With Caramel Sauce: Drizzle warm caramel sauce over your cobbler for an added layer of sweetness, especially when serving apple cobbler.

Frequently Asked Questions (FAQs)

1. Can I use frozen or canned fruit for cobbler?

Yes, you can use both frozen and canned fruit in this cobbler recipe. If using frozen fruit, thaw it beforehand and drain any excess liquid to prevent the cobbler from becoming too soggy.

2. What’s the difference between cobbler and crisp?

While both desserts feature a fruit base, the main difference is in the topping. Cobblers have a biscuit-like or batter topping, while crisps have a crumbly topping made from oats, butter, and sugar.

3. Can I make cobbler ahead of time?

Yes, you can make the fruit filling and the topping separately, then assemble and bake the cobbler when you’re ready to serve. Alternatively, you can bake the cobbler ahead of time and reheat it before serving.

4. How should I store leftover cobbler?

Store leftover cobbler in an airtight container in the refrigerator for up to 3 days. Reheat in the oven or microwave before serving.

5. Can I freeze cobbler?

Yes, cobbler freezes well. Once it has cooled, cover it tightly with plastic wrap and aluminum foil before freezing. When you’re ready to serve, thaw it overnight in the refrigerator and reheat it in the oven.


Conclusion: The Ultimate Comfort Dessert

Cobblers are one of the most versatile and easy-to-make desserts, offering endless possibilities for flavor combinations. Whether you prefer peach cobbler, apple cobbler, or a mixture of berries, this recipe is simple, delicious, and always crowd-pleasing. With a warm, fruit-filled base and a tender, golden topping, easy cobbler is the perfect dessert for any occasion.

For more cobbler recipes, check out Taste of Home Simple Berry Cobbler.

Biscuits & Gravy Casserole: The Ultimate Hearty Breakfast Recipe

breakfast casserole, sausage gravy casserole, Southern breakfast recipe, biscuits and gravy bake, cheesy sausage casserole, brunch casserole

Biscuits & Gravy Casserole: A Hearty Southern Breakfast Classic

Biscuits & gravy casserole is the ultimate comfort food. This casserole version takes the beloved Southern classic and transforms it into a one-dish meal that’s perfect for brunches, holiday gatherings, or just a cozy family breakfast. With layers of fluffy biscuits, savory sausage, creamy gravy, and melted cheese, this dish is sure to satisfy anyone craving hearty, homemade goodness.

The beauty of this casserole lies in its simplicity. It brings together everything you love about Southern biscuits and gravy, but with the ease of preparing it in one pan. Whether you’re using store-bought ingredients or making everything from scratch, this casserole is adaptable to any skill level. For an added twist, you can check out the Delish Biscuits and Gravy Casserole Recipe.


What Is Biscuits & Gravy Casserole?

The traditional Southern biscuits and gravy consists of fluffy, buttery biscuits topped with rich sausage gravy. But when you turn this dish into a casserole, it becomes something even more special.

In this version, layers of buttermilk biscuits are combined with crumbled sausage, eggs, shredded cheese, and thick, creamy gravy. The ingredients meld together beautifully as they bake, resulting in a casserole that’s both indulgent and comforting. This dish is versatile—you can easily customize it to suit your preferences by adding bacon, extra cheese, or even some vegetables for added texture.

For another take on a classic breakfast dish, visit AllRecipes Sausage Gravy Breakfast Casserole.


Key Ingredients for Biscuits & Gravy Casserole

Here’s a breakdown of the essential ingredients you’ll need to make biscuits & gravy casserole:

  • Biscuits: You can use either store-bought canned biscuits or make your own from scratch. Buttermilk biscuits are a great option for a classic Southern flavor.
  • Sausage: Ground pork sausage works best, whether you prefer mild, hot, or maple-flavored varieties. The sausage provides richness and flavor.
  • Gravy Mix: Using peppered gravy mix is a time-saver, but you can also make homemade gravy for a more personal touch.
  • Eggs: Eggs add protein and help bind the ingredients together, making the casserole more filling.
  • Shredded Cheese: Cheddar or Monterey Jack cheese works well for melting and adding a layer of creaminess.

Step-by-Step Recipe for Biscuits & Gravy Casserole

Step 1: Preheat the Oven

  • Preheat your oven to 350°F (175°C). Grease a 9×13-inch baking dish with cooking spray or butter to ensure the casserole doesn’t stick.

Step 2: Prepare the Biscuits

  • Cut the biscuit dough into 1-inch pieces and place them evenly in the bottom of the prepared baking dish.

Step 3: Cook the Sausage

  • In a skillet over medium heat, brown 1 pound of ground sausage, breaking it into small crumbles as it cooks. Once fully cooked, drain any excess fat.

Step 4: Layer the Ingredients

  • Spread the cooked sausage evenly over the biscuit pieces in the dish. Sprinkle shredded cheese over the sausage layer.

Step 5: Make the Egg Mixture

  • In a mixing bowl, whisk together 6 large eggs and ½ cup of milk. Season with salt and pepper, then pour the egg mixture over the biscuits, sausage, and cheese.

Step 6: Prepare the Gravy

  • Prepare 2 cups of peppered gravy mix according to package directions. Pour the gravy evenly over the top of the casserole.

Step 7: Bake the Casserole

  • Bake the casserole for 35-45 minutes, or until the biscuits are golden brown, and the eggs are fully set. If the top starts to brown too quickly, cover it with foil for the last 10 minutes of baking.

Step 8: Let It Rest and Serve

  • Allow the casserole to rest for 5-10 minutes before serving to let the flavors meld together. Serve hot, with extra gravy on the side if desired.

Recipe Variations for Biscuits & Gravy Casserole

This recipe can be customized in countless ways to suit your taste. Here are a few ideas to get you started:

  • Bacon Biscuits & Gravy Casserole
    • For a variation with extra flavor, swap the sausage for crispy bacon or use both sausage and bacon in the same dish.
  • Vegetarian Biscuits & Gravy Casserole
    • To make a meat-free version, replace the sausage with plant-based sausage or sautéed vegetables like mushrooms, onions, and bell peppers for a hearty alternative.
  • Crescent Roll Casserole
    • Instead of using biscuit dough, try using crescent roll dough for a lighter, flakier texture. This can add a buttery sweetness to the dish.
  • Spicy Sausage Casserole
    • Use hot sausage or add a pinch of cayenne pepper or red pepper flakes to the egg mixture for a kick of heat.

Tips for Making the Best Biscuits & Gravy Casserole

Here are some helpful tips to ensure your casserole turns out perfectly:

  • Prepare Ahead of Time: You can assemble the casserole the night before and store it in the refrigerator. When you’re ready to bake, add an extra 10-15 minutes to the baking time if starting from chilled.
  • Watch for Over-Browning: If the top of the casserole starts to brown too quickly, cover it with foil for the last 10-15 minutes of baking.
  • Extra Gravy: If you’re a gravy lover, consider doubling the amount of gravy and serving extra on the side. This ensures every bite is saucy and satisfying.
  • Let It Rest: After baking, let the casserole rest for 5-10 minutes to allow the ingredients to settle, making it easier to slice and serve.

Serving Suggestions for Biscuits & Gravy Casserole

Here are a few ways to serve this hearty casserole:

  • With Fresh Fruit: A light fruit salad with berries and melon balances the richness of the casserole and adds a refreshing element to your meal.
  • Serve with Toast or Cinnamon Rolls: Add a side of toast or cinnamon rolls for extra carbs and sweetness to complement the savory flavors.
  • Top with Hot Sauce: For those who love a little heat, drizzle the casserole with hot sauce or serve with salsa on the side.

Frequently Asked Questions (FAQs)

1. Can I make biscuits and gravy casserole ahead of time?

Yes, you can assemble the casserole the night before. Store it covered in the refrigerator, then bake it the next morning. Just be sure to add an additional 10-15 minutes to the cooking time if baking from cold.

2. What kind of sausage works best for this casserole?

Any type of sausage works well, including breakfast sausage, hot sausage, or even turkey sausage. Choose based on your flavor preference or dietary needs.

3. Can I freeze biscuits and gravy casserole?

Yes! You can freeze the casserole either before or after baking. To freeze before baking, assemble the casserole and wrap it tightly in plastic wrap and foil. Thaw in the refrigerator before baking.

4. Can I use homemade gravy?

Absolutely! You can make gravy from scratch using sausage drippings, flour, and milk. Just make sure you have at least 2 cups of gravy for the casserole.

5. How should I store leftovers?

Leftovers can be stored in an airtight container in the refrigerator for up to 3 days. Reheat individual portions in the microwave or oven for the best results.


Conclusion: A Hearty Breakfast That’s Perfect for Any Occasion

Biscuits & gravy casserole is a comforting, filling dish that’s perfect for breakfast, brunch, or holiday gatherings. With its layers of biscuits, sausage, eggs, cheese, and creamy gravy, this dish is sure to become a family favorite. Whether you customize it with extra bacon, spice it up with hot sausage, or stick to the classic version, this casserole offers endless possibilities for deliciousness.

For more ideas on breakfast casseroles, check out The Spruce Eats Biscuits and Gravy Casserole.

Homemade Apple Dumplings: A Classic Fall Dessert Recipe

apple dumplings recipe, baked apple dumplings, easy apple dumplings, traditional apple dumplings, best apple dumplings, cinnamon apple dumplings, classic fall dessert

Homemade Apple Dumplings: A Cozy Fall Classic

There’s something special about homemade apple dumplings—a warm, flaky crust wrapped around sweet, spiced apples, all baked in a rich, buttery sauce. This classic dessert is the perfect way to embrace the flavors of fall, making it a favorite for family gatherings, holiday dinners, or just a cozy treat on a crisp evening. The combination of tender apples, buttery pastry, and cinnamon-spiced syrup makes each bite indulgent and comforting.

While apple dumplings might seem complicated to make, they are surprisingly simple, especially if you use ready-made pie crust. For those who love the process of baking from scratch, a homemade pastry is always an excellent choice. Whether you serve these dumplings with a scoop of vanilla ice cream or drizzle them with caramel sauce, they’re sure to be a hit. For more inspiration on traditional apple desserts, check out the AllRecipes Old-Fashioned Apple Dumplings.


What Are Apple Dumplings?

Apple dumplings are a classic dessert made by wrapping whole or sliced apples in a pastry crust and baking them in a sweet sauce. The apples are usually spiced with cinnamon and nutmeg and sometimes stuffed with butter, sugar, and other flavorings before being wrapped in dough. As the dumplings bake, the sauce thickens and infuses the apples and pastry with flavor, creating a dessert that’s both simple and decadent.

Apple dumplings are a nostalgic favorite for many, evoking memories of autumn and family gatherings. They’re often served warm, straight from the oven, with ice cream or whipped cream on top. This dessert is especially popular in the fall, as it highlights the natural sweetness of in-season apples and makes use of warming spices.

For more detailed step-by-step instructions on how to make classic apple dumplings, check out the The Spruce Eats Apple Dumplings Recipe.


Key Ingredients for Homemade Apple Dumplings

Here’s a breakdown of the essential ingredients you’ll need to make homemade apple dumplings:

  • Apples: Tart apples, such as Granny Smith or Honeycrisp, are ideal for this recipe as they maintain their structure during baking while offering a nice balance of sweetness and tartness.
  • Pie Crust: You can use store-bought or homemade pie crust. If you’re in a hurry, pre-made dough is a great time-saver.
  • Butter: A small pat of butter is placed inside each apple or apple half, adding richness to the filling.
  • Sugar: A mix of granulated sugar and brown sugar is used to sweeten both the apple filling and the sauce.
  • Cinnamon and Nutmeg: These classic spices give the dumplings a warm, cozy flavor that’s perfect for fall.
  • Water and Vanilla Extract: These form the base of the sauce that’s poured over the dumplings before baking.

Step-by-Step Recipe for Homemade Apple Dumplings

Follow these steps to create the perfect apple dumplings at home:

Step 1: Prepare the Apples

  • Start by peeling and coring 6 large Granny Smith apples. You can keep the apples whole or cut them in half if you prefer smaller dumplings.

Step 2: Roll Out the Dough

  • Roll out your pie crust on a lightly floured surface and cut it into squares. Each square should be large enough to completely wrap around an apple or apple half.

Step 3: Fill the Apples

  • Place an apple (or apple half) in the center of each dough square. Sprinkle the apple with cinnamon sugar and add a small pat of butter inside the core or on top. Wrap the dough around the apple, pinching the edges together to seal.

Step 4: Make the Sweet Sauce

  • In a small saucepan, combine 1 cup of water, 1 cup of sugar, ½ cup of brown sugar, and 1 teaspoon of vanilla extract. Bring to a boil, then reduce heat and simmer for 2-3 minutes until the sugar dissolves and the mixture thickens slightly.

Step 5: Bake the Dumplings

  • Arrange the wrapped apples in a greased baking dish and pour the sauce over them. Bake at 375°F (190°C) for 35-40 minutes, or until the pastry is golden and crisp and the apples are tender when pierced with a fork.

Step 6: Serve

  • Serve the dumplings warm, topped with a drizzle of the sweet sauce from the baking dish and a scoop of vanilla ice cream.

Recipe Variations for Apple Dumplings

Here are a few ways you can customize your homemade apple dumplings to suit your taste:

  • Caramel Apple Dumplings
    • Drizzle the dumplings with caramel sauce after baking for a richer, more decadent version.
  • Nut-Stuffed Apple Dumplings
    • Add a mixture of chopped pecans and brown sugar inside the core of each apple for a nutty, crunchy filling.
  • Cinnamon Roll Apple Dumplings
    • Use cinnamon roll dough instead of pie crust to give the dumplings a sweeter, spiced twist.
  • Gluten-Free Apple Dumplings
    • Use a gluten-free pie crust or make a crustless version by baking the apples in a greased dish without pastry for a gluten-free treat.

Tips for Making the Best Apple Dumplings

To ensure your apple dumplings turn out perfectly every time, here are some useful tips:

  • Choose the Right Apples: Tart apples like Granny Smith or Honeycrisp work best because they hold their shape during baking and balance the sweetness of the sauce.
  • Seal the Dough Properly: Make sure the dough is sealed tightly around each apple to prevent the filling from leaking out during baking.
  • Don’t Overfill the Apples: If you’re adding nuts or extra sugar, be careful not to overfill the apples, as this can cause the dough to tear.
  • Serve with Ice Cream: For the ultimate dessert experience, serve the warm dumplings with a scoop of vanilla ice cream. The contrast between the warm dumpling and the cold ice cream is unbeatable.

Serving Suggestions for Apple Dumplings

These serving suggestions will take your homemade apple dumplings to the next level:

  • With Vanilla Ice Cream: The classic pairing of warm apple dumplings and cold vanilla ice cream is a must-try. The ice cream melts over the dumpling, creating a delicious blend of textures and flavors.
  • With Whipped Cream: A lighter option, whipped cream adds a fluffy contrast to the rich, buttery pastry.
  • With Caramel Sauce: Drizzle a generous amount of caramel sauce over the dumplings for an extra layer of sweetness.

Frequently Asked Questions (FAQs)

1. Can I use store-bought pie crust for homemade apple dumplings?

Yes! Store-bought pie crust is a time-saving option and works just as well as homemade dough. For a more personal touch, feel free to use a homemade crust.

2. What type of apples are best for apple dumplings?

Granny Smith apples are the best choice due to their tart flavor and firm texture, which holds up well during baking. Other good options include Honeycrisp and Fuji apples.

3. Can I make apple dumplings ahead of time?

Yes! You can prepare the dumplings ahead of time, cover them, and store them in the refrigerator for up to 24 hours before baking.

4. How should I store leftover apple dumplings?

Store leftover dumplings in an airtight container in the refrigerator for up to 3 days. Reheat them in the oven to restore the crispness of the pastry.

5. Can I freeze apple dumplings?

Yes, apple dumplings can be frozen. Wrap them tightly in plastic wrap and foil, then freeze for up to 2 months. When ready to serve, thaw in the refrigerator and bake as directed.


Conclusion: A Comforting Classic for Any Occasion

Homemade apple dumplings are a comforting, nostalgic dessert that’s perfect for fall or any time of year. Whether you’re serving them for a holiday gathering or a cozy family dinner, these dumplings are sure to impress with their flaky crust, tender apples, and sweet sauce. For more apple dessert inspiration, check out the Delish Cinnamon Apple Dumplings Recipe.