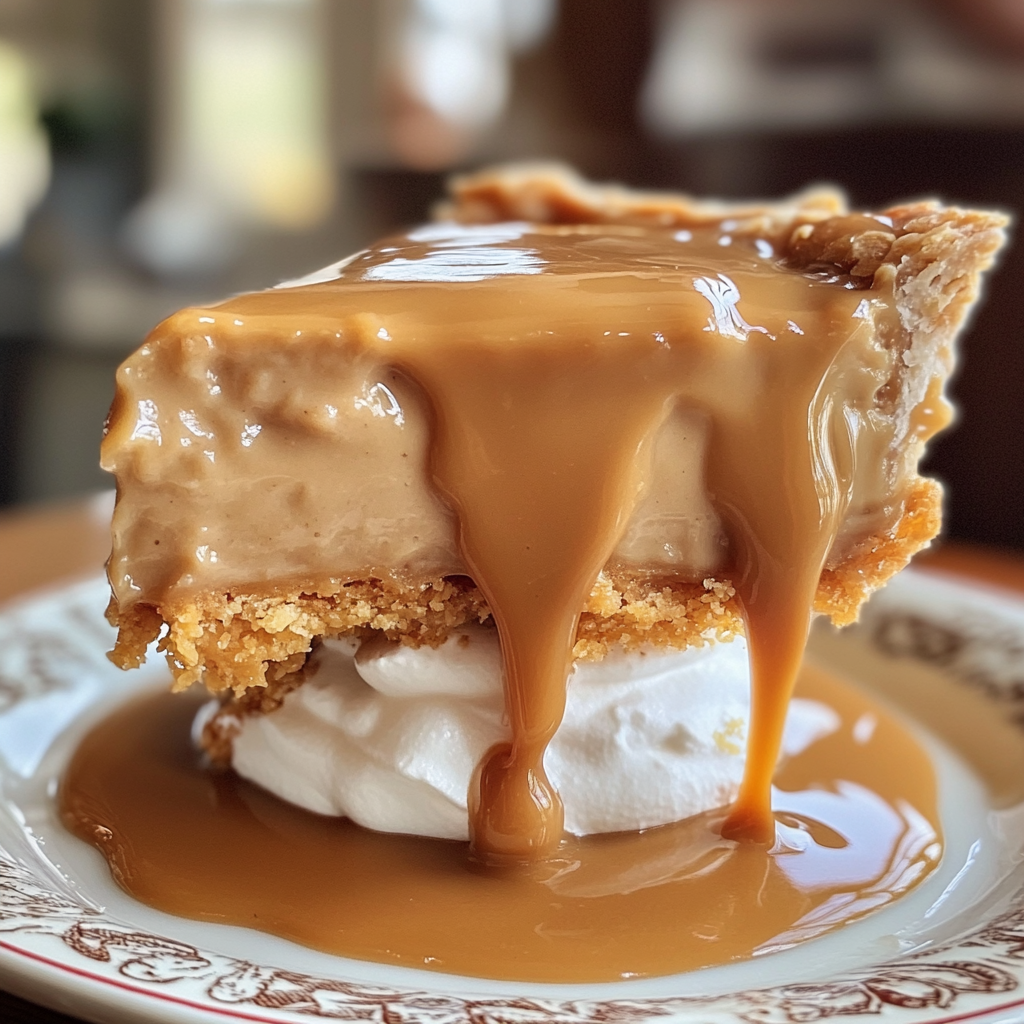
Granddaddy’s Cornbread Dressing Recipe: A Southern Classic

southern cornbread dressing, old fashioned cornbread dressing, traditional cornbread stuffing, homemade cornbread dressing, classic cornbread dressing

Granddaddy’s Cornbread Dressing: A Southern Tradition

Cornbread dressing is a beloved dish in Southern cooking, often served during Thanksgiving or Christmas. This family recipe, known as Granddaddy’s Cornbread Dressing, has been passed down through generations and is cherished for its rich flavor, moist texture, and classic combination of herbs and savory ingredients. Whether you’re new to making cornbread dressing or you’re looking to perfect a family favorite, this guide will walk you through the entire process.

Cornbread dressing is more than just a side dish—it’s a centerpiece at many Southern holiday gatherings. While it’s often confused with stuffing, the two are different. Dressing is usually baked outside the turkey, allowing it to develop a crisp golden top while staying moist inside. For a perfect result, choosing the right ingredients and preparation steps is essential.

For additional tips on how to make the best homemade cornbread, check out this guide on Making homemade cornbread, which offers helpful insights into creating the base for your dressing.

Why Granddaddy’s Cornbread Dressing is a Must-Have

This recipe is special because it brings together simple ingredients in a way that evokes memories of family gatherings and Southern tradition. The flavors of freshly baked cornbread, rich broth, and aromatic herbs combine to create a dish that is hearty, flavorful, and perfect for any occasion.

If you’re looking for a dish that embodies Southern hospitality, Granddaddy’s Cornbread Dressing is it. The best part is that it’s versatile enough to tweak to your liking. You can add sausage for extra flavor or even a handful of cheddar cheese for a modern twist.

Ingredients for Granddaddy’s Cornbread Dressing

Here are the ingredients you’ll need for the classic version of Granddaddy’s Cornbread Dressing:

For the Cornbread:

  • 2 cups cornmeal
  • 1 cup all-purpose flour
  • 1 tablespoon sugar (optional)
  • 2 teaspoons baking powder
  • ½ teaspoon baking soda
  • 1 teaspoon salt
  • 1 ½ cups buttermilk
  • 2 large eggs
  • 4 tablespoons melted butter

For the Dressing:

  • 6 cups crumbled cornbread (homemade or store-bought)
  • 2 cups crumbled biscuits or white bread
  • 1 large onion, diced
  • 1 ½ cups celery, finely chopped
  • 2 cloves garlic, minced
  • 2 teaspoons dried sage
  • 1 teaspoon dried thyme
  • 1 teaspoon black pepper
  • 1 teaspoon salt
  • 2-3 cups chicken or turkey broth
  • 2 large eggs, beaten
  • 4 tablespoons unsalted butter, melted

Optional Add-Ins:

  • Cooked sausage for extra flavor
  • Chopped fresh parsley or rosemary
  • Sautéed mushrooms for a savory touch

Step-by-Step Guide to Making Granddaddy’s Cornbread Dressing

1. Making the Cornbread

The base of cornbread dressing is, of course, the cornbread. Making it from scratch gives the dressing an authentic flavor that’s hard to achieve with store-bought options.

Instructions:

  1. Preheat the Oven: Preheat your oven to 425°F (220°C). Grease a cast-iron skillet or baking dish with butter.
  2. Mix Dry Ingredients: In a large bowl, combine cornmeal, flour, sugar, baking powder, baking soda, and salt.
  3. Add Wet Ingredients: In a separate bowl, whisk together buttermilk, eggs, and melted butter. Add the wet ingredients to the dry ingredients and mix until just combined.
  4. Bake: Pour the batter into the prepared skillet and bake for 20-25 minutes, or until golden brown and a toothpick inserted in the center comes out clean.
  5. Cool and Crumble: Let the cornbread cool completely before crumbling it into small pieces for the dressing.

If you prefer a lighter or fluffier cornbread, visit Making homemade cornbread for tips on adjusting the recipe to your taste.

2. Preparing the Aromatics

The next step is preparing the aromatic base, which includes sautéed onions, celery, and garlic. These vegetables add depth and complexity to the dressing, balancing the richness of the cornbread and broth.

Instructions:

  1. Sauté the Vegetables: Heat 2 tablespoons of butter in a large skillet over medium heat. Add the diced onions and chopped celery, cooking until soft and translucent, about 5-7 minutes.
  2. Add Garlic: Stir in the minced garlic and cook for another minute, being careful not to let the garlic burn.
  3. Season: Add salt, pepper, sage, and thyme, stirring to combine. The herbs should become fragrant as they cook.

To learn more about how to sauté vegetables to perfection, visit Sautéing vegetables for cornbread dressing.

3. Crumbling the Cornbread and Mixing the Ingredients

Now it’s time to bring everything together.

Instructions:

  1. Crumble the Cornbread: In a large mixing bowl, crumble the cornbread into small, bite-sized pieces. Add the crumbled biscuits or bread to the bowl.
  2. Add the Sautéed Vegetables: Pour the sautéed onion, celery, and garlic mixture over the cornbread. Stir gently to combine.
  3. Add Broth and Eggs: Gradually pour in the chicken or turkey broth, mixing as you go, until the dressing is moist but not soggy. Stir in the beaten eggs for richness.
  4. Season Again: Taste the mixture and adjust the seasoning with salt, pepper, and additional herbs if necessary.

4. Baking the Cornbread Dressing

The final step is baking the dressing to achieve a crispy, golden crust with a soft interior.

Instructions:

  1. Preheat the Oven: Preheat your oven to 350°F (175°C). Butter a large baking dish.
  2. Transfer and Bake: Pour the dressing mixture into the prepared dish, spreading it evenly. Drizzle the melted butter over the top for added flavor and crispiness.
  3. Bake: Bake the dressing for 30-40 minutes, or until the top is golden brown and the edges are crispy.

For the best results, avoid overbaking. The dressing should be moist inside with a slightly crisp top.

Variations of Granddaddy’s Cornbread Dressing

Once you’ve mastered the traditional version of Granddaddy’s Cornbread Dressing, there are several variations you can try to suit your taste.

1. Traditional Southern Cornbread Dressing

For a more classic Southern take, you can keep the recipe simple by sticking to cornbread, onions, celery, and sage. This variation lets the traditional flavors shine.

2. Granddaddy’s Sausage Cornbread Dressing

If you want to add a savory twist, try incorporating cooked sausage into the dressing. Spicy or mild sausage can add an extra layer of flavor.

Instructions:

  • Brown 1 lb of sausage in a skillet, breaking it up into crumbles. Drain any excess fat and add the cooked sausage to the cornbread mixture before baking.

3. Cheesy Cornbread Dressing

For a richer, creamier version, try adding cheese to the dressing. Cheddar cheese works particularly well in this dish.

Instructions:

  • Add 1 cup of shredded cheddar cheese to the cornbread mixture before baking. The cheese will melt into the dressing, adding a gooey, delicious texture.

FAQs About Granddaddy’s Cornbread Dressing

1. Can I make the dressing ahead of time?

Yes! You can prepare the dressing a day in advance and refrigerate it unbaked. On the day of your event, simply bake it as directed. This makes it a convenient option for busy holidays like Thanksgiving.

2. What’s the best type of cornbread to use?

Homemade buttermilk cornbread is ideal because it’s less sweet and has a firmer texture, which holds up well in the dressing. However, if you’re short on time, store-bought cornbread will work as long as it’s not too sweet.

3. Can I freeze cornbread dressing?

Yes, you can freeze unbaked cornbread dressing for up to 3 months. When you’re ready to bake, let it thaw in the refrigerator overnight before placing it in the oven.

4. How do I make this dressing vegetarian?

To make a vegetarian version, substitute vegetable broth for the chicken or turkey broth. You can also add more vegetables like mushrooms or bell peppers for extra flavor.

Conclusion: A Comforting Classic for Any Occasion

Granddaddy’s Cornbread Dressing is a timeless Southern dish that brings together savory flavors, tender textures, and the warmth of family traditions. Whether you’re making it for Thanksgiving or a Sunday dinner, this recipe will become a staple in your kitchen. With its rich flavors and adaptability, you can customize the dressing to your preferences—whether adding sausage, cheese, or extra herbs.

Serve your cornbread dressing with roasted turkey, gravy, and cranberry sauce for a complete holiday meal. Don’t forget to enjoy a slice of homemade cornbread on the side for an extra taste of Southern comfort.

Old Fashioned Cabbage and Noodles with Kielbasa: A Comforting Classic Recipe

cabbage and kielbasa recipe, cabbage noodles with sausage, kielbasa with cabbage and noodles, easy cabbage and noodles, traditional cabbage and kielbasa, kielbasa and egg noodles

Old Fashioned Cabbage and Noodles with Kielbasa: A Hearty Classic

Old fashioned cabbage and noodles with kielbasa is a classic Eastern European dish that brings together smoky sausage, tender cabbage, and buttery noodles for a comforting and filling meal. This dish has been a favorite for generations, known for its simplicity, rich flavors, and affordability. Perfect for weeknight dinners or family gatherings, this dish is both easy to prepare and deeply satisfying.

In this guide, we will walk you through every step of creating this delicious dish, from choosing the right ingredients to mastering the cooking process. We’ll also explore different variations of the recipe and answer common questions to ensure your cabbage and noodles with kielbasa turns out perfectly every time.

Why This Dish Is a Family Favorite

Cabbage and noodles with kielbasa is a popular dish in many Eastern European households, often referred to as “haluski” in some regions. The combination of savory smoked kielbasa, sweet and tender cabbage, and buttery egg noodles creates a comforting, hearty meal that everyone loves. It’s perfect for those looking for a filling, affordable dish that uses simple ingredients.

If you’re new to this recipe, choosing the right kielbasa and cabbage is key to achieving the best flavor. For helpful tips on choosing the best sausage, check out Choosing the best kielbasa for cooking. The smoky, savory flavors of the kielbasa are what elevate this dish from simple to spectacular.

Ingredients for Cabbage and Noodles with Kielbasa

The ingredients for cabbage and noodles with kielbasa are simple, but together they create a robust and flavorful meal. Here’s what you’ll need:

For the Dish:

  • 1 medium head of green cabbage, chopped
  • 1 lb kielbasa, sliced
  • 12 oz wide egg noodles
  • 1 medium onion, diced
  • 3 cloves garlic, minced
  • 4 tablespoons butter
  • Salt and black pepper, to taste
  • Optional: Paprika, fresh parsley for garnish

These basic ingredients are all you need to create a hearty and satisfying meal. The butter helps add richness, while the kielbasa provides a smoky, savory flavor that contrasts nicely with the sweetness of the cabbage.

Step-by-Step Guide to Making Cabbage and Noodles with Kielbasa

1. Preparing the Kielbasa

Start by cooking the kielbasa, which will serve as the base of the dish’s flavor.

Instructions for Cooking Kielbasa:

  1. Slice and Brown the Kielbasa: In a large skillet, heat 1 tablespoon of butter over medium-high heat. Add the sliced kielbasa and cook until browned on both sides, about 5 minutes. Remove the kielbasa from the skillet and set aside.
  2. Render the Fat: Leave a small amount of the rendered fat in the skillet, as this will add flavor to the cabbage and onions.

Browning the kielbasa intensifies its smoky flavor and helps give it a satisfying, crispy texture. If you want to know more about preparing sausage for recipes, read this article on Choosing the best kielbasa for cooking.

2. Cooking the Cabbage and Onions

Next, you’ll sauté the cabbage and onions, which form the backbone of this dish.

Instructions for Cooking Cabbage and Onions:

  1. Sauté the Onions: In the same skillet, add 1 tablespoon of butter. Add the diced onions and cook until they become soft and translucent, about 5 minutes.
  2. Add the Garlic: Stir in the minced garlic and cook for an additional minute until fragrant.
  3. Cook the Cabbage: Add the chopped cabbage to the skillet. Cook, stirring frequently, until the cabbage softens and begins to caramelize, about 10-12 minutes. Season with salt, pepper, and paprika (if using).

Sautéing the cabbage until it’s tender and slightly caramelized is essential for bringing out its sweetness. You can add extra seasoning like smoked paprika or caraway seeds to enhance the flavor further.

3. Boiling the Noodles

While the cabbage is cooking, you can prepare the noodles.

Instructions for Boiling Noodles:

  1. Boil the Egg Noodles: Bring a large pot of salted water to a boil. Add the egg noodles and cook according to package instructions, usually about 8 minutes.
  2. Drain and Set Aside: Once cooked, drain the noodles and set them aside, ready to mix with the cabbage and kielbasa.

Egg noodles are the traditional choice for this dish because of their light and delicate texture, which contrasts nicely with the heartier ingredients.

4. Combining the Ingredients

Once the cabbage, kielbasa, and noodles are ready, it’s time to combine everything.

Instructions for Combining Ingredients:

  1. Mix the Cabbage, Kielbasa, and Noodles: Return the kielbasa to the skillet with the cabbage and onions. Add the cooked noodles to the skillet and gently toss to combine.
  2. Add Butter for Flavor: Stir in the remaining butter, allowing it to melt and coat the ingredients.
  3. Adjust Seasoning: Taste the dish and add additional salt, pepper, or paprika as needed.

This final step allows all the flavors to meld together, creating a rich, buttery dish. The combination of noodles, cabbage, and kielbasa is not only filling but also deeply flavorful.

5. Garnishing and Serving

For a final touch, garnish the dish with fresh parsley or dill.

Instructions for Serving:

  1. Garnish with Fresh Herbs: Sprinkle freshly chopped parsley or dill over the top of the dish before serving. This adds brightness and color.
  2. Serve Hot: Enjoy the dish immediately while it’s hot. Serve with a side of crusty bread or pickles for a complete meal.

Variations of Cabbage and Noodles with Kielbasa

One of the best things about this dish is its versatility. You can easily adapt it to suit your tastes or dietary preferences.

1. Adding Bacon for Extra Flavor

If you love the flavor of bacon, try adding some to the dish for extra richness.

  • Instructions: Cook diced bacon in the skillet before cooking the kielbasa. Use the bacon fat to sauté the cabbage and onions. The crispy bacon adds a smoky, savory depth to the dish.

2. Vegetarian Version

For a meatless option, you can make a vegetarian version of this dish.

  • Instructions: Replace the kielbasa with plant-based sausage or mushrooms. Mushrooms add a meaty texture, while vegetarian sausage keeps the dish hearty.

3. Spicy Cabbage and Noodles

For those who like a little heat, spice things up!

  • Instructions: Add red pepper flakes or diced jalapeños to the cabbage while it’s cooking. You can also use a spicy kielbasa to increase the heat.

FAQs About Cabbage and Noodles with Kielbasa

1. Can I use a different type of sausage?

Yes, you can substitute kielbasa with other smoked sausages like bratwurst, chorizo, or even turkey sausage. Each will provide a slightly different flavor but still complement the cabbage and noodles.

2. What type of cabbage works best for this dish?

Green cabbage is the most commonly used variety, but savoy cabbage works well too. Savoy cabbage is milder and has a more tender texture, which some people prefer.

3. Can I make this dish ahead of time?

Yes! You can prepare this dish a day ahead and store it in the refrigerator. Reheat it on the stovetop or in the oven before serving, and add a little extra butter or broth to keep it from drying out.

4. How do I store leftovers?

Store leftovers in an airtight container in the fridge for up to 3 days. Reheat in a skillet with a bit of butter or in the microwave before serving.

5. What can I serve with cabbage and noodles?

Cabbage and noodles with kielbasa is a complete meal on its own, but it pairs well with crusty bread, pickles, or a green salad. For a more traditional side, try serving it with sauerkraut or potato pancakes.

Conclusion: A Comforting Classic

Cabbage and noodles with kielbasa is a simple yet satisfying dish that’s perfect for cold nights or when you need a comforting meal. The combination of savory sausage, tender cabbage, and buttery noodles is sure to please. Plus, with the flexibility to customize the recipe with different variations, you can make it your own.

Enjoy this old fashioned cabbage and noodles dish with a cold beer or apple cider, and savor the flavors of a timeless family favorite.

Print
clock clock iconcutlery cutlery iconflag flag iconfolder folder iconinstagram instagram iconpinterest pinterest iconfacebook facebook iconprint print iconsquares squares iconheart heart iconheart solid heart solid icon

Old Fashioned Cabbage and Noodles with Kielbasa: A Comforting Classic Recipe

  • Author: Chef Ema

Description

This Old Fashioned Cabbage and Noodles with Kielbasa is a hearty, flavorful dish that’s simple to make and comforting to eat. Tender cabbage, savory kielbasa, and soft egg noodles come together in one pot for a classic family favorite.


Ingredients

Scale

For the Cabbage, Noodles & Kielbasa:

  • 1 lb kielbasa sausage, sliced into rounds
  • 1 medium head of cabbage, chopped
  • 12 oz egg noodles (or any pasta you prefer)
  • 1 medium onion, diced
  • 3 cloves garlic, minced
  • 2 tbsp olive oil
  • 1/2 tsp salt
  • 1/2 tsp black pepper
  • 1 tsp caraway seeds (optional, for extra flavor)
  • 1 tbsp apple cider vinegar (optional, for tang)
  • 1/2 tsp paprika (optional)

For the Broth (Optional):


  • 1/2 cup chicken broth (or vegetable broth)
  • 1/2 cup water

Instructions

1. Cook the Kielbasa:

  1. Heat olive oil in a large skillet or pot over medium heat.
  2. Add the sliced kielbasa and cook until browned, about 5-7 minutes. Remove the kielbasa and set aside.

2. Sauté the Vegetables:

  1. In the same pot, add the diced onion and cook for 3-4 minutes until softened.
  2. Add minced garlic and cook for another 30 seconds, until fragrant.

3. Add the Cabbage:

  1. Add the chopped cabbage to the pot. Stir to combine and cook for 5-7 minutes, until the cabbage begins to soften.

4. Cook the Noodles:

  1. While the cabbage is cooking, bring a pot of salted water to a boil.
  2. Cook the egg noodles according to package instructions (about 7-8 minutes), then drain and set aside.

5. Combine & Simmer:

  1. Once the cabbage is softened, return the cooked kielbasa to the pot.
  2. Add the cooked noodles, and stir everything to combine.
  3. Season with salt, black pepper, caraway seeds, and paprika (if using).
  4. Add the apple cider vinegar and a splash of chicken broth or water to create a light broth. Stir to combine and let everything simmer together for 5-10 minutes, until heated through.

6. Serve & Enjoy:


  1. Serve hot and enjoy the classic flavors of this comforting dish. You can garnish with extra paprika or a sprinkle of fresh parsley if desired.

Notes

This Old Fashioned Cabbage and Noodles with Kielbasa is the perfect cozy meal with hearty flavors and minimal prep. It’s quick to make and will warm you up from the inside out!


#CabbageAndNoodles #KielbasaRecipes #ComfortFood #HeartyMeals #OnePotDinner

Dorito Taco Salad Recipe: A Crunchy and Flavorful Dish for Any Occasion

taco salad with Doritos, taco salad recipe, easy Dorito taco salad, taco salad with ground beef, crunchy taco salad, Dorito salad

Dorito Taco Salad: A Delicious and Easy Recipe for Any Occasion

Dorito Taco Salad is the perfect blend of crunchy, savory, and fresh ingredients. This dish brings together classic taco flavors, refreshing vegetables, and the iconic crunch of nacho cheese-flavored Doritos. Whether you’re hosting a summer potluck, looking for a quick dinner idea, or need a crowd-pleasing side dish, Dorito Taco Salad is a simple, delicious solution.

This guide will take you through every step of making Dorito Taco Salad, from choosing the right ingredients to creative variations and useful tips. We’ll also answer common questions about this salad, making sure you have everything you need for a successful dish.

Why Dorito Taco Salad is a Hit

Dorito Taco Salad is a beloved dish because of its bold flavors and easy preparation. The combination of crunchy Doritos, seasoned beef, fresh vegetables, and creamy dressing makes for a flavorful and satisfying meal. It’s also customizable—whether you want to stick with the classic ingredients or switch things up by using grilled chicken or a different dressing, this recipe offers endless versatility.

For tips on selecting the best ground beef for this recipe, check out this guide on Choosing the best ground beef for taco salad. Using quality ingredients is key to making your Dorito Taco Salad extra delicious.

Ingredients for Dorito Taco Salad

The ingredients for Dorito Taco Salad are simple, but together, they create a powerful flavor combination.

For the Salad:

  • 1 bag of nacho cheese Doritos (Cool Ranch or Spicy Nacho are great alternatives)
  • 1 lb ground beef (or chicken, if preferred)
  • 1 packet taco seasoning (or make your own with chili powder, cumin, and garlic powder)
  • 1 head of lettuce (romaine or iceberg)
  • 2 cups cherry tomatoes, halved
  • 1 cup shredded cheddar cheese
  • 1 bell pepper, diced (optional)
  • ½ red onion, diced
  • 1 can black beans, rinsed and drained (optional)
  • 1 avocado, diced (optional)

For the Dressing:

  • 1 cup Catalina dressing (or substitute with ranch or French dressing)
  • ½ cup sour cream (optional)

Having all your ingredients ready and prepared will make assembling the salad much easier and faster.

Step-by-Step Guide to Making Dorito Taco Salad

1. Cooking the Ground Beef

The first step in making your Dorito Taco Salad is cooking the ground beef.

Instructions for Cooking Ground Beef:

  1. Brown the Ground Beef: Heat a skillet over medium-high heat. Add the ground beef and cook, breaking it up with a spatula until browned and fully cooked (about 7-10 minutes).
  2. Add Taco Seasoning: Drain any excess fat from the beef, then stir in the taco seasoning and a splash of water. Let the beef simmer for 5 minutes until well-seasoned and flavorful.
  3. Set Aside: Remove the beef from the heat and allow it to cool slightly while you prepare the rest of the ingredients.

The beef can be prepared in advance and stored in the fridge until you’re ready to assemble the salad. If you’re looking for tips on getting the perfect taco-flavored beef, visit Choosing the best ground beef for taco salad.

2. Preparing the Vegetables

Next, prepare your fresh vegetables, which will add crunch and brightness to the salad.

Instructions for Preparing Vegetables:

  1. Chop the Lettuce: Wash and dry the lettuce thoroughly, then chop it into bite-sized pieces. Lettuce forms the base of your salad, so use a large serving bowl.
  2. Dice the Tomatoes, Bell Pepper, and Onion: Slice the cherry tomatoes in half, dice the bell pepper, and finely chop the red onion. You can add or subtract veggies based on your preferences.
  3. Optional Add-Ins: Black beans and avocado make great additions. Drain and rinse a can of black beans, and dice the avocado just before serving to prevent browning.

3. Assembling the Salad

Once all the ingredients are prepped, it’s time to assemble your salad.

Step-by-Step Assembly:

  1. Layer the Vegetables: Start with a bed of lettuce, followed by layers of chopped tomatoes, bell peppers, and onions. Add black beans and avocado if desired.
  2. Add the Ground Beef: Spoon the cooked, slightly cooled ground beef on top of the vegetables.
  3. Add Doritos: Right before serving, crush the Doritos slightly and sprinkle them over the top of the salad. Don’t over-crush them—you want to maintain their crunchy texture.
  4. Top with Cheese: Sprinkle shredded cheddar cheese over the salad.

4. Adding the Dressing

The dressing is what ties the whole salad together. Catalina dressing is the classic choice for Dorito Taco Salad, but ranch or French dressing also work well.

Instructions for Adding Dressing:

  1. Toss with Dressing: Drizzle the Catalina dressing over the top of the salad. Toss gently to combine, being careful not to crush the Doritos too much.
  2. Optional Sour Cream: For added creaminess, mix in a dollop of sour cream with the dressing before tossing.

To learn more about making your own Catalina dressing at home, check out How to make homemade Catalina dressing. A homemade dressing adds a fresh touch to your Dorito Taco Salad.

Variations of Dorito Taco Salad

One of the best things about Dorito Taco Salad is its versatility. You can switch up the ingredients and flavors to suit your preferences.

1. Taco Salad with Chicken

For a lighter version, swap the ground beef with grilled or shredded chicken. Season the chicken with taco seasoning or simply grill it with olive oil, salt, and pepper.

2. Vegetarian Dorito Taco Salad

To make this salad vegetarian, simply omit the ground beef and add extra beans (black beans, kidney beans) or a plant-based meat alternative. The result is just as hearty and delicious!

3. Dorito Taco Salad with Ranch Dressing

If you prefer a creamier dressing, try using ranch instead of Catalina. You can also mix ranch with a little salsa for a Southwest twist.

These variations allow you to customize your Dorito Taco Salad to fit your dietary needs and flavor preferences.

Frequently Asked Questions About Dorito Taco Salad

1. Can I make Dorito Taco Salad ahead of time?

Yes, but it’s best to keep the Doritos and dressing separate until you’re ready to serve. This prevents the Doritos from becoming soggy.

2. What type of Doritos work best in taco salad?

Nacho Cheese Doritos are the classic choice, but you can use Cool Ranch, Spicy Nacho, or any flavor you like for a twist.

3. Can I substitute Catalina dressing with something else?

Yes, ranch and French dressing are popular alternatives. You can also make your own Catalina dressing for a fresher flavor.

4. How long does Dorito Taco Salad last in the fridge?

Dorito Taco Salad can be stored in the fridge for up to 2 days, but the Doritos will lose their crunch over time.

5. Can I add more vegetables to the salad?

Definitely! Feel free to add cucumbers, radishes, corn, or jalapeños for added texture and flavor.

Conclusion: Enjoy Your Crunchy Dorito Taco Salad

Dorito Taco Salad is a simple yet flavorful dish that’s perfect for any occasion. Whether you’re making it for a party or a weeknight meal, it’s sure to be a hit with its crunchy Doritos, seasoned beef, fresh veggies, and tangy dressing. Customize it with different proteins, veggies, or dressings to make it your own.

Enjoy your Dorito Taco Salad fresh and crunchy, and don’t be afraid to get creative with variations and serving ideas!

How to Cook Juicy Steaks in the Oven: A Step-by-Step Guide

oven-baked steaks, juicy steak recipe, easy steak in the oven, oven-cooked steaks, best steaks in the oven, perfect steak recipe

The Ultimate Guide to Cooking Juicy Steaks in the Oven

Cooking steaks in the oven is an excellent method for achieving a juicy, perfectly cooked steak without needing a grill or smoker. Whether you prefer a ribeye, filet mignon, or sirloin, this oven-baking method will give you the results you want every time. By combining stovetop searing with oven roasting, you’ll achieve the perfect crust on the outside while maintaining tender, juicy meat on the inside.

In this comprehensive guide, we’ll go over each step in detail, from selecting the best steak cuts to ensuring your steak reaches the right temperature for your desired level of doneness. You’ll also learn the best sides and sauces to pair with your steaks, along with answers to common steak-cooking questions.

Why Cook Steaks in the Oven?

The oven provides a controlled environment for cooking steaks evenly and thoroughly, making it an ideal method for both beginners and experienced home cooks. Unlike grilling, where flare-ups and inconsistent heat can lead to unevenly cooked steaks, oven cooking allows you to control the temperature precisely.

If you’re looking for more insights on achieving perfect steak every time, check out this guide on Cooking steak perfectly every time. With this method, you’ll be able to enjoy restaurant-quality steaks in the comfort of your own home.

Best Cuts of Steak for Oven Cooking

The type of steak you choose will significantly impact the texture, flavor, and overall experience of your meal. Certain cuts are better suited for oven cooking, as they remain tender and juicy even after high-heat exposure.

Recommended Steak Cuts:

  • Ribeye: Known for its rich marbling and intense flavor, ribeye is one of the best cuts for oven cooking. The fat content ensures a juicy, flavorful steak.
  • Filet Mignon: A leaner cut, filet mignon is tender and delicate. It’s ideal for those who prefer a softer texture.
  • Sirloin: More affordable than ribeye or filet mignon, sirloin is a flavorful, versatile cut that cooks well in the oven.
  • New York Strip: This cut offers a balance between marbling and tenderness, making it a popular choice for oven-cooked steaks.

When selecting your steak, look for fresh, high-quality cuts with good marbling. If you’re unsure about which cut to choose, this guide on Best steak cuts for the oven offers helpful insights.

Preparing Your Steak

Before cooking your steak, proper preparation is key to achieving the best results.

Step 1: Bring Steak to Room Temperature

Allow your steak to rest at room temperature for 30 minutes before cooking. This helps the steak cook more evenly, preventing the outside from overcooking while the inside remains underdone.

Step 2: Pat the Steak Dry

Using paper towels, gently pat the steak dry to remove any excess moisture. This step is crucial because it helps the steak develop a beautiful crust when seared.

Step 3: Season the Steak

Generously season your steak with olive oil, salt, and freshly cracked black pepper. If you want to add extra flavor, consider rubbing the steak with garlic powder, rosemary, or thyme.

By preparing your steak this way, you’ll ensure it cooks evenly and develops rich flavors. For more details on seasoning and preparing steak, this resource on Best steak seasoning for oven cooking is a great place to start.

Searing Your Steak on the Stovetop

Searing the steak on the stovetop before transferring it to the oven is essential for creating that coveted crust, which enhances the flavor and texture.

Instructions for Searing:

  1. Heat the Skillet: Preheat a heavy skillet (such as cast iron) over medium-high heat for 2-3 minutes. Cast iron retains heat well and is ideal for achieving a proper sear.
  2. Sear the Steak: Add a tablespoon of olive oil to the skillet. Place the steak in the pan and sear for 2-3 minutes on each side until a golden-brown crust forms. Avoid overcrowding the pan, as this can prevent the steak from browning properly.
  3. Optional Basting: During the last minute of searing, you can baste the steak with butter, garlic, and fresh herbs for added richness.

Searing locks in the juices and adds complexity to the flavor profile. Be careful not to flip the steak too early, as a good sear requires uninterrupted contact with the hot surface.

Finishing the Steak in the Oven

Once you’ve seared the steak, transfer it to the oven to finish cooking. This step ensures the steak cooks evenly, resulting in a juicy center and a perfectly cooked exterior.

Oven Cooking Instructions:

  1. Preheat the Oven: Set the oven to 400°F (200°C).
  2. Transfer the Steak: Place the skillet with the seared steak directly into the oven. If your skillet isn’t oven-safe, transfer the steak to a baking sheet.
  3. Cook to Desired Doneness:
    • For rare: 5-6 minutes (120°F internal temp)
    • For medium-rare: 7-8 minutes (130°F internal temp)
    • For medium: 9-10 minutes (140°F internal temp)
    • For well-done: 11-12 minutes (150°F internal temp)

Use a meat thermometer to check for doneness, ensuring the steak reaches your preferred temperature. For more tips on using a meat thermometer, check out this guide on Using a meat thermometer for steak.

Resting the Steak

Resting your steak is crucial to maintaining its juiciness. After cooking, tent the steak loosely with foil and let it rest for 5-10 minutes. Resting allows the juices to redistribute, ensuring every bite is moist and flavorful.

Serving Suggestions

Steaks are delicious on their own, but they pair beautifully with a variety of side dishes and sauces.

Suggested Side Dishes:

  • Mashed Potatoes: Creamy mashed potatoes complement the richness of the steak.
  • Roasted Vegetables: Try roasted asparagus, carrots, or Brussels sprouts for a healthy side.
  • Salads: A fresh green salad with a light vinaigrette helps balance the richness of the steak.

Optional Pan Sauce:

After removing the steak from the skillet, use the leftover drippings to make a quick pan sauce. Add butter, minced garlic, fresh herbs, and a splash of wine or balsamic vinegar to the skillet, and simmer until thickened. Pour the sauce over the steak before serving.

Flavor Variations for Oven Steaks

Once you’ve mastered the basics, you can experiment with different flavors to keep things exciting.

1. Garlic Herb Butter Steak

For a classic steakhouse experience, add garlic and herb butter during the final minutes of cooking. Simply mix softened butter with minced garlic, parsley, and thyme, and let it melt over the steak as it rests.

2. Peppercorn-Crusted Steak

Press cracked black peppercorns into the steak before searing. This method creates a bold, peppery crust that pairs well with a creamy sauce.

3. Balsamic Glazed Steak

For a tangy twist, finish the steak with a balsamic glaze. Brush the steak with balsamic vinegar during the last few minutes of oven cooking, allowing the vinegar to caramelize.

FAQs About Cooking Juicy Steaks in the Oven

1. How do I prevent the steak from drying out in the oven?

Searing the steak before baking helps lock in moisture. Additionally, using a meat thermometer ensures you don’t overcook the steak, which can lead to dryness.

2. Can I cook steak in the oven without searing it first?

Yes, but searing the steak first adds depth of flavor and creates a delicious crust. If you prefer not to sear, you can broil the steak at the end of cooking to achieve a similar result.

3. How do I know when my steak is done without a thermometer?

You can use the touch test to check for doneness: rare steaks feel soft, medium-rare steaks are slightly springy, and well-done steaks are firm.

4. Should I marinate my steak before cooking it in the oven?

Marinating is optional. While it can add flavor, especially to tougher cuts, most high-quality steaks don’t need marinating. A simple seasoning with salt, pepper, and olive oil is often enough.

5. What’s the best way to reheat leftover steak?

To maintain moisture, reheat leftover steak in the oven at 250°F (120°C) until warmed through. You can also slice the steak thinly and use it in sandwiches or salads.

Conclusion: Enjoy Your Juicy Oven Baked Steak

Cooking juicy steaks in the oven is an easy and effective method that allows you to achieve restaurant-quality results at home. By following these simple steps—selecting the right cut, searing the steak, finishing in the oven, and resting it—you’ll be able to enjoy perfectly cooked steaks every time.

Pair your steak with your favorite sides, and don’t forget to experiment with different flavors and sauces. With practice and patience, you’ll master the art of cooking juicy steaks in the oven.

How to Make the Best Oven Baked Ribs: Tender and Flavorful Every Time

baked ribs recipe, BBQ ribs in the oven, easy oven baked ribs, tender ribs, fall-off-the-bone ribs, pork ribs recipe, slow baked ribs

The Ultimate Guide to Oven Baked Ribs

There’s nothing quite like a rack of oven baked ribs—tender, juicy, and full of flavor. Baking ribs in the oven provides a simple and convenient way to achieve fall-off-the-bone perfection without the need for a grill or smoker. With the right techniques, seasonings, and patience, you can create ribs that rival those from a top-notch BBQ joint.

This article will walk you through every step of making oven baked ribs, from choosing the right ribs to applying the perfect dry rub, and finally, mastering the cooking process. We’ll also answer common questions and offer some flavorful variations to try.

Why Oven Baked Ribs?

While many people associate ribs with grilling or smoking, baking them in the oven is a fantastic alternative, especially for those who don’t have outdoor cooking equipment or prefer a hassle-free approach. The oven allows for consistent, even cooking, which results in juicy, tender meat that can easily be flavored to your liking.

If you want to learn more about how to cook ribs perfectly without a grill, take a look at How to cook ribs in the oven. Baking ribs is also perfect for cooking year-round, no matter the weather.

Ingredients for Oven Baked Ribs

Here’s a list of ingredients you’ll need for basic oven baked ribs:

For the Ribs:

  • 1 rack of pork ribs (baby back ribs or spareribs)
  • 2 tablespoons olive oil

For the Dry Rub:

  • ¼ cup brown sugar
  • 1 tablespoon smoked paprika
  • 1 teaspoon garlic powder
  • 1 teaspoon onion powder
  • 1 teaspoon ground black pepper
  • 1 teaspoon salt
  • ½ teaspoon cayenne pepper (optional for heat)

For the Barbecue Sauce:

  • 1 cup barbecue sauce (store-bought or homemade)

Step-by-Step Guide to Preparing Oven Baked Ribs

1. Choosing the Right Ribs

The first step in making great oven baked ribs is choosing the right type of ribs. There are a few popular options:

  • Baby Back Ribs: These are smaller and more tender than other cuts, making them a great choice for quicker cooking. They have less fat, but their tenderness is unmatched.
  • Spareribs: These are meatier and fattier, which gives them a richer flavor. They take longer to cook, but the result is incredibly flavorful ribs.
  • St. Louis-Style Ribs: A cut of spareribs that has been trimmed for a more uniform shape, ideal for even cooking.

When selecting ribs, make sure they are fresh, meaty, and well-marbled for the best flavor and texture.

2. Preparing the Ribs

Before baking, the ribs need to be properly prepped.

Step-by-Step Preparation:

  1. Remove the Membrane: The membrane is a thin, tough layer found on the bone side of the ribs. Removing it allows the seasoning to penetrate the meat and ensures a tender texture. Use a knife to lift a corner of the membrane, then grab it with a paper towel and peel it off.
  2. Rinse and Dry the Ribs: Rinse the ribs under cold water, then pat them dry with paper towels. Drying the ribs is essential to ensure that the dry rub sticks well.

For a more in-depth explanation of selecting ribs, check out How to choose the best pork ribs for baking.

3. Creating a Flavorful Dry Rub

A good dry rub is essential for oven baked ribs as it adds layers of flavor to the meat. A balance of sweet, savory, and spicy is ideal.

Basic Dry Rub Recipe:

  1. Mix the Ingredients: In a bowl, combine brown sugar, smoked paprika, garlic powder, onion powder, black pepper, salt, and cayenne pepper. Adjust the spices to your taste preference.
  2. Rub the Ribs: Coat the ribs with olive oil, then generously rub the seasoning mix onto both sides of the ribs. Let the ribs sit with the dry rub for at least 30 minutes, or refrigerate them overnight for maximum flavor.

4. Baking the Ribs

The secret to perfect oven baked ribs is low and slow cooking. This ensures the ribs become tender and flavorful.

Instructions for Baking:

  1. Preheat the Oven: Set the oven to 275°F (135°C). Low temperatures help break down the collagen in the ribs, making them melt-in-your-mouth tender.
  2. Wrap the Ribs in Foil: Wrap the ribs tightly in aluminum foil to seal in moisture. This method, often referred to as the “Texas crutch,” ensures the ribs remain juicy and tender throughout the cooking process.
  3. Bake the Ribs: Place the foil-wrapped ribs on a baking sheet and bake for 2.5 to 3 hours. The ribs are done when the meat pulls away from the bone easily.

5. Adding Barbecue Sauce

Barbecue sauce adds a finishing touch to oven baked ribs, caramelizing and enhancing the smoky flavor of the dry rub.

Instructions for Adding Sauce:

  1. Increase the Oven Temperature: After the ribs are done baking, remove them from the oven and increase the temperature to 400°F (200°C).
  2. Unwrap and Sauce the Ribs: Carefully unwrap the foil and discard any excess liquid. Brush a generous amount of barbecue sauce onto the ribs.
  3. Bake Again: Place the ribs back in the oven, uncovered, for 15 minutes. This helps the sauce caramelize and creates a slightly sticky, flavorful glaze.

Variations of Oven Baked Ribs

Once you’ve mastered the basic recipe, here are a few fun variations to try:

1. Spicy BBQ Ribs

For a spicy kick, add cayenne pepper and crushed red pepper flakes to the dry rub. You can also mix some hot sauce into the barbecue sauce before applying it to the ribs.

2. Honey Garlic Ribs

If you prefer a sweeter flavor, try making honey garlic ribs. Mix ¼ cup honey with minced garlic and add this mixture to your barbecue sauce for a rich, sweet glaze.

3. Dry Rub Only

For those who prefer ribs without sauce, you can simply skip the barbecue sauce and let the dry rub work its magic. These dry-rub-only ribs are perfect for those who love a more savory, crusty exterior.

Serving Suggestions

Oven baked ribs pair well with a variety of sides. Here are a few options to complete your meal:

  • Coleslaw: The crunch and tanginess of coleslaw balance the richness of the ribs.
  • Baked Beans: A smoky, sweet side that complements the flavor of the ribs.
  • Cornbread: A warm, buttery side that adds a comforting touch to any BBQ meal.
  • Roasted Vegetables: Serve with roasted potatoes, carrots, or Brussels sprouts for a hearty side.
  • Mashed Potatoes: Creamy mashed potatoes provide the perfect comfort food pairing.

For more serving ideas, see Best homemade BBQ sauce recipe for creative ways to use barbecue sauce beyond ribs.

FAQs About Oven Baked Ribs

1. What is the best temperature to bake ribs?

The best temperature for baking ribs is 275°F (135°C). This low-and-slow method ensures tender, juicy ribs.

2. Should I wrap ribs in foil when baking?

Yes, wrapping the ribs in foil traps moisture and prevents them from drying out. This method is known as the “Texas crutch” and is essential for achieving tender ribs.

3. How long should I bake ribs for?

Bake the ribs for 2.5 to 3 hours at 275°F, then finish by applying barbecue sauce and baking uncovered for an additional 15 minutes at 400°F.

4. How do I know when the ribs are done?

The ribs are done when the meat easily pulls away from the bone. You can also check the internal temperature with a meat thermometer (165°F is ideal).

5. Can I store and reheat leftover ribs?

Yes! Store leftover ribs in an airtight container in the refrigerator for up to 3 days. To reheat, place them in the oven at 300°F until warmed through.

Conclusion: Enjoy Your Perfect Oven Baked Ribs

With the right preparation and techniques, oven baked ribs can rival those from your favorite BBQ restaurant. By choosing the right ribs, applying a flavorful dry rub, and cooking them low and slow, you can achieve tender, fall-off-the-bone ribs every time. Whether you prefer them saucy, spicy, or dry-rubbed, oven baked ribs are sure to become a household favorite.

Don’t forget to pair your ribs with classic sides like coleslaw, baked beans, and cornbread for the ultimate BBQ experience!