One Pan Turkey Dinner: A Simple and Delicious Meal for Any Occasion

sheet pan turkey dinner, easy turkey dinner, turkey and vegetables one pan, simple turkey meal, one pot turkey dinner

One Pan Turkey Dinner: A Simple and Flavorful Meal for Any Occasion

Cooking a one pan turkey dinner is the perfect solution for busy families or anyone looking for a simple, yet flavorful, meal that doesn’t require hours of preparation or cleanup. By combining turkey, vegetables, and herbs in one roasting pan, you save time without sacrificing any of the delicious flavors you would expect from a full, traditional meal.

This meal is ideal for smaller gatherings, weeknight dinners, or even a simplified Thanksgiving or holiday dinner. With the convenience of one-pan cooking, you’ll enjoy the succulent flavors of roasted turkey breast and perfectly seasoned vegetables, all cooked together to create a balanced, hearty dish. For another easy take on this recipe, you can check out this simple one pan turkey dinner recipe for step-by-step guidance.


Ingredients for One Pan Turkey Dinner

A one pan turkey dinner requires just a handful of simple ingredients, most of which you probably already have in your kitchen. These fresh ingredients, paired with a few herbs and spices, create a meal that’s both hearty and nutritious.

Core Ingredients:

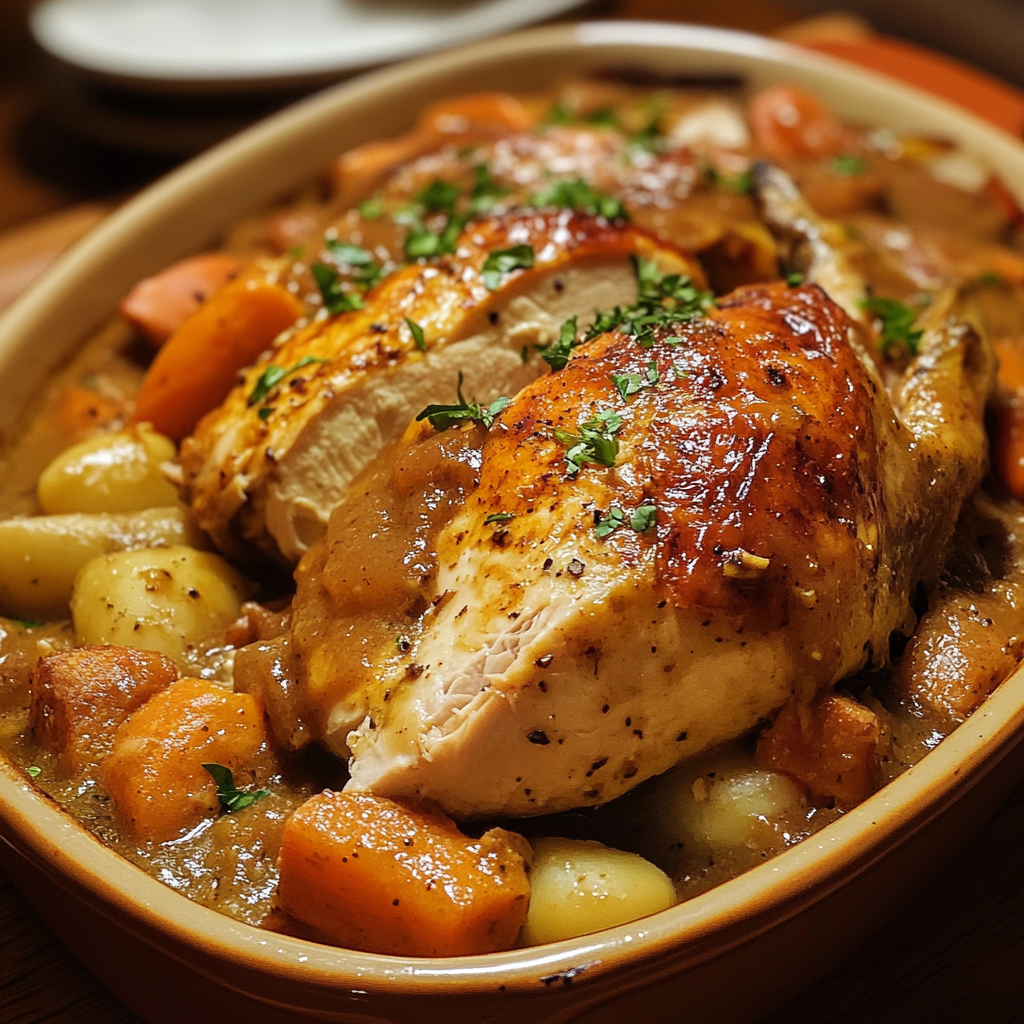
  • Turkey breast: Skin-on and bone-in turkey breast for the best flavor and juiciness.
  • Potatoes: Yukon gold or baby potatoes, halved.
  • Carrots: Peeled and cut into chunks.
  • Brussels sprouts: Halved or quartered, depending on size.
  • Onions: Red or yellow, sliced thickly.
  • Olive oil: For drizzling over the turkey and vegetables.
  • Fresh herbs: Rosemary, thyme, and sage for classic holiday flavors.
  • Garlic: Fresh cloves, minced or crushed, for extra depth of flavor.
  • Salt and pepper: To taste.

Optional Additions:

  • Cranberries: Adds a touch of tartness to the dish.
  • Gravy: Serve with homemade or store-bought gravy for added richness.
  • Stuffing: You can even prepare a small portion of stuffing on the same pan by creating a foil packet and placing it alongside the turkey.

These ingredients create a well-balanced meal that’s packed with flavors, making it a great option for a weekday dinner or a holiday meal. For an alternative version, check out this easy sheet pan Thanksgiving dinner.


Step-by-Step Guide to Making a One Pan Turkey Dinner

Making a one pan turkey dinner is a breeze. Below is a step-by-step guide to help you prepare a delicious, perfectly cooked turkey and vegetables in one roasting pan.

1. Preparing the Turkey

The turkey is the star of the dish, and with a few simple steps, you can ensure it turns out perfectly juicy and flavorful.

Instructions:

  1. Choose your turkey: A bone-in turkey breast works best for this recipe as it cooks evenly and remains juicy throughout the process.
  2. Season the turkey: Rub the turkey with olive oil, minced garlic, salt, and pepper. Tuck fresh rosemary, thyme, and sage under the skin for added flavor.
  3. Marinate (optional): If you have time, let the turkey marinate in the fridge for 1-2 hours to infuse the flavors.

2. Preparing the Vegetables

The vegetables cook alongside the turkey, soaking up the juices and herbs as they roast. Choose vegetables that complement the turkey and cook at a similar rate.

Instructions:

  1. Chop the vegetables: Slice the potatoes in half, cut the carrots into large chunks, and halve the Brussels sprouts.
  2. Season the vegetables: Toss the vegetables with olive oil, garlic, salt, and pepper. Add fresh rosemary or thyme for extra flavor.
  3. Arrange on the pan: Scatter the vegetables around the turkey breast in the roasting pan. Try to keep the vegetables in a single layer for even cooking.

3. Cooking the One Pan Dinner

Once the turkey and vegetables are prepared, it’s time to roast everything together in the oven.

Instructions:

  1. Preheat the oven: Preheat your oven to 400°F (200°C).
  2. Roast the turkey and vegetables: Place the roasting pan in the oven and cook for 40-50 minutes, or until the turkey breast reaches an internal temperature of 165°F.
  3. Rest the turkey: Once the turkey is fully cooked, remove the pan from the oven and let the turkey rest for 10-15 minutes to allow the juices to redistribute.

4. Serving and Storing the Meal

After resting, your one pan turkey dinner is ready to be served. Here’s how to present it:

Instructions:

  1. Slice the turkey: Carve the turkey breast into thick slices and serve with the roasted vegetables.
  2. Serve with gravy: Drizzle gravy over the turkey and vegetables for extra flavor.
  3. Storing leftovers: Store any leftovers in an airtight container in the refrigerator for up to 3 days. Reheat in the oven to maintain crispness.

Variations of One Pan Turkey Dinners

One of the great things about one pan turkey dinners is their versatility. You can easily change up the recipe to suit your tastes or dietary preferences. Below are a few variations to try.

1. Herb-Crusted One Pan Turkey Dinner

This version uses an herb crust to elevate the flavor of the turkey.

Instructions:

  • Use fresh herbs: Rub the turkey breast with a mix of rosemary, thyme, and sage before roasting.
  • Serve with roasted potatoes: This variation pairs well with crispy roasted potatoes and a simple green salad.

2. Cranberry-Glazed One Pan Turkey Dinner

Add a touch of sweetness with cranberry glaze.

Instructions:

  • Cranberry glaze: Halfway through roasting, brush the turkey breast with cranberry sauce for a sweet, tangy flavor.
  • Serve with sweet potatoes: This variation goes perfectly with roasted sweet potatoes and Brussels sprouts.

3. Maple-Roasted One Pan Turkey Dinner

For a slightly sweet and savory twist, add maple syrup to your turkey dinner.

Instructions:

  • Maple glaze: Combine olive oil, maple syrup, and herbs, and rub it onto the turkey breast before roasting.
  • Serve with roasted carrots: The maple glaze complements the sweetness of roasted carrots and butternut squash.

FAQs About One Pan Turkey Dinner

1. Can I use turkey thighs instead of turkey breast?

Yes, turkey thighs work well for one pan turkey dinners. Just make sure to adjust the cooking time, as thighs may take slightly longer to cook than breasts.

2. What vegetables can I use in a one pan turkey dinner?

You can use a variety of vegetables, such as carrots, Brussels sprouts, potatoes, sweet potatoes, and onions. Just make sure they are cut into similar sizes to ensure even cooking.

3. How can I prevent the vegetables from getting too soft?

To avoid overly soft vegetables, chop them into larger pieces and add them to the roasting pan after the turkey has been cooking for about 10 minutes.

4. Can I make this meal ahead of time?

Yes, you can prepare the ingredients ahead of time. Marinate the turkey and chop the vegetables the night before. On the day of cooking, simply arrange everything on the pan and roast.


Conclusion: A Simple, Delicious One Pan Turkey Dinner

Making a one pan turkey dinner is a convenient and flavorful way to enjoy a wholesome, balanced meal without spending hours in the kitchen. By roasting the turkey alongside vegetables in one pan, you save time on both prep and clean-up while ensuring that all the ingredients are infused with the delicious flavors of fresh herbs and seasonings.

For more ideas and variations, you can follow this one pot Thanksgiving dinner guide and customize your one pan meal to suit your preferences. Whether you’re cooking for a small family dinner or a holiday feast, this recipe will surely impress.

Homemade Pecan Pie Recipe: A Classic Southern Dessert for Every Occasion

classic pecan pie, easy pecan pie recipe, Southern pecan pie, pecan pie with corn syrup, best pecan pie recipe

Homemade Pecan Pie Recipe: A Classic Southern Dessert

Pecan pie is a staple of Southern cuisine, especially during the holidays like Thanksgiving and Christmas. With its gooey, sweet filling, flaky crust, and crunchy pecans, this dessert is the epitome of indulgence. Whether you’re making it for the first time or perfecting your family recipe, homemade pecan pie offers a rich and satisfying experience that everyone will love.

If you’re looking to take your pecan pie to the next level, you can experiment with variations like bourbon pecan pie or chocolate pecan pie. This guide will provide you with a foolproof recipe for classic pecan pie, as well as tips on how to customize it to fit your preferences. For more pie inspiration, you can also check out this best classic pecan pie recipe for step-by-step instructions.


Ingredients for Homemade Pecan Pie

Creating the perfect pecan pie starts with high-quality ingredients. The balance of sweetness, texture, and richness is what makes this dessert so irresistible. Below are the essential ingredients you’ll need:

Core Ingredients:

  • 1 ½ cups pecans: Fresh, whole pecans are essential for both texture and flavor.
  • 1 cup light corn syrup: This is the key to the gooey, sweet filling that pecan pie is known for.
  • 1 cup brown sugar: Adds depth to the sweetness and enhances the flavor of the pecans.
  • 3 large eggs: The eggs act as a binder, helping to set the pie.
  • ¼ cup unsalted butter: Melted and slightly cooled, butter adds richness to the filling.
  • 1 teaspoon vanilla extract: Brings warmth and depth to the overall flavor.
  • 1 unbaked pie crust: You can use a store-bought pie crust, but making one from scratch will add an extra layer of flakiness and flavor.

Optional Add-Ins:

  • 1-2 tablespoons bourbon: Adds a slight kick and a richer flavor to the filling.
  • ½ cup chocolate chips: For a more decadent twist, mix in chocolate chips with the pecans.
  • Maple syrup: Swap out some or all of the corn syrup for maple syrup to give your pie a unique, autumn-inspired flavor.

The combination of these ingredients creates a gooey, sweet, and crunchy dessert that’s perfect for any occasion. For another take on pecan pie variations, check out this pecan pie recipe with variations to explore more ways to elevate your dessert.


Step-by-Step Guide to Making Pecan Pie

Follow these instructions to make a classic pecan pie that’s rich, gooey, and full of flavor.

1. Preparing the Pie Crust

The pie crust is the foundation of any great pecan pie. A buttery, flaky crust helps balance the sweetness of the filling.

Instructions:

  1. Homemade vs Store-Bought Crust: If you’re using store-bought pie crust, roll it out into a 9-inch pie dish. If making your own, combine 1 ¼ cups all-purpose flour, ½ teaspoon salt, ½ cup cold unsalted butter (cut into cubes), and 3-4 tablespoons ice water. Mix until the dough comes together, then roll it out and transfer it to the pie dish.
  2. Blind Baking: For a crisper crust, consider blind baking. To do this, preheat the oven to 350°F, line the crust with parchment paper, fill with pie weights or beans, and bake for 10-12 minutes until lightly golden.

2. Preparing the Pecan Filling

The filling is what gives pecan pie its iconic gooey texture. Here’s how to make it:

Ingredients:

  • 1 cup light corn syrup
  • 1 cup brown sugar
  • 3 large eggs
  • ¼ cup unsalted butter, melted
  • 1 teaspoon vanilla extract
  • 1 ½ cups pecans, chopped or whole

Instructions:

  1. Mix the Filling: In a medium bowl, whisk together the corn syrup, brown sugar, eggs, melted butter, and vanilla extract until smooth.
  2. Add the Pecans: Stir in the pecans, ensuring that they are evenly coated in the mixture. You can use whole or chopped pecans, depending on your preference for texture.

3. Assembling and Baking the Pie

Once your crust and filling are ready, it’s time to assemble the pie.

Instructions:

  1. Pour the Filling: Pour the pecan mixture into the prepared pie crust, spreading it evenly across the bottom.
  2. Bake the Pie: Preheat your oven to 350°F. Place the pie in the oven and bake for 50-60 minutes, or until the filling is set but slightly jiggly in the center. If the crust is browning too quickly, cover the edges with aluminum foil to prevent burning.
  3. Cooling: Let the pie cool for at least 2 hours before slicing. This allows the filling to set completely.

4. Serving and Storing the Pie

Pecan pie is best served warm or at room temperature, with a scoop of vanilla ice cream or a dollop of whipped cream.

Instructions:

  • Serving Suggestions: Serve your pecan pie with whipped cream or a drizzle of caramel sauce for extra indulgence.
  • Storing the Pie: Store leftovers at room temperature for up to 2 days. If you want to store it longer, refrigerate the pie for up to 5 days.
  • Freezing Tips: Pecan pie freezes well. Wrap it tightly in plastic wrap and aluminum foil, and freeze for up to 3 months. Thaw in the fridge overnight before serving.

Variations of Pecan Pie

Pecan pie is a versatile dessert that can be customized with different flavors and ingredients. Here are some popular variations to try:

1. Chocolate Pecan Pie

For a rich and indulgent twist, add chocolate chips to the filling.

Instructions:

  • Add Chocolate Chips: Mix ½ cup of semi-sweet or dark chocolate chips into the filling before baking.
  • Serving Suggestions: Serve with vanilla ice cream for a decadent dessert.

2. Bourbon Pecan Pie

Adding bourbon to the filling gives pecan pie a deeper, more complex flavor.

Instructions:

  • Add Bourbon: Stir 1-2 tablespoons of bourbon into the filling before baking.
  • Serving Suggestions: This version pairs well with a glass of bourbon or coffee.

3. Maple Pecan Pie

For a unique fall-inspired twist, replace some or all of the corn syrup with maple syrup.

Instructions:

  • Use Maple Syrup: Substitute ½ cup of corn syrup with pure maple syrup for a more natural sweetness.
  • Serving Suggestions: Garnish with toasted pecans for added texture and flavor.

FAQs About Homemade Pecan Pie

1. Can I make pecan pie in advance?

Yes, pecan pie can be made up to 2 days in advance. Store it at room temperature or in the refrigerator, covered with plastic wrap.

2. Why is my pecan pie runny?

If your pecan pie is runny, it may not have been baked long enough. Make sure the filling is set, with just a slight jiggle in the center. Another reason could be an incorrect ratio of eggs to liquid ingredients.

3. Can I freeze pecan pie?

Yes, pecan pie freezes very well. Simply wrap it tightly in plastic wrap and then in aluminum foil, and store it in the freezer for up to 3 months.

4. Can I substitute corn syrup in pecan pie?

Yes, you can replace corn syrup with maple syrup, honey, or a mixture of brown sugar and water. These alternatives may slightly alter the texture, but they provide a natural sweetness.


Conclusion: The Perfect Pecan Pie for Every Occasion

Homemade pecan pie is a true Southern classic that’s perfect for holidays, special occasions, or simply when you’re craving something sweet and indulgent. Whether you stick to the traditional recipe or add your own twist with chocolate, bourbon, or maple syrup, pecan pie is always a crowd-pleaser. With a flaky crust, gooey filling, and crunchy pecans, this dessert is sure to become a favorite in your household.

For more ways to enhance your pecan pie, you can follow this step-by-step guide to making pecan pie and explore additional variations to suit your taste.

Homemade Poutine: The Ultimate Comfort Food with Fries, Cheese Curds, and Gravy

classic poutine, homemade poutine recipe, Canadian poutine, fries with gravy and cheese curds, easy poutine recipe

Homemade Poutine: A Deliciously Canadian Comfort Food

Poutine is a beloved Canadian dish that combines crispy fries, squeaky cheese curds, and rich, flavorful gravy into one indulgent experience. It’s the ultimate comfort food that has gained international recognition for its delicious simplicity. Whether you’re enjoying poutine as a snack or a full meal, the combination of flavors and textures makes it an irresistible treat.

If you’ve never had the pleasure of making homemade poutine before, you’re in for a treat. This guide will walk you through everything you need to know, from preparing the perfect fries to making a rich gravy and assembling your poutine with authentic cheese curds. For more tips on variations, check out this helpful simple homemade poutine recipe to discover other ways to elevate your dish.


Ingredients for Homemade Poutine

Poutine may seem like a simple dish, but each component requires attention to detail. Here’s a breakdown of the ingredients you’ll need to create authentic homemade poutine:

Core Ingredients:

  • French Fries: Crispy, golden fries are essential for the perfect poutine. Use fresh potatoes for the best results, or opt for frozen fries if you’re short on time.
  • Cheese Curds: Fresh cheese curds are key. These slightly squeaky curds add a unique texture and melt slightly when covered in hot gravy.
  • Gravy: A rich, flavorful beef or chicken gravy is essential. You can use store-bought or make your own from scratch.

Optional Toppings:

  • Pulled Pork: Add savory, smoky pulled pork for a heartier meal.
  • Caramelized Onions: For a sweet and savory balance, add caramelized onions.
  • Mushrooms: Sautéed mushrooms bring an earthy flavor to the dish.

Each of these ingredients plays a key role in creating the ultimate homemade poutine. To enhance the richness of your gravy, you can follow this authentic poutine recipe for a step-by-step guide to making the perfect gravy from scratch.


Step-by-Step Guide to Making Homemade Poutine

Follow these detailed steps to prepare your own poutine at home. Each component can be customized based on your preferences, but sticking to the basics will yield the most authentic results.

1. Preparing the Fries

The fries are the foundation of any good poutine. Crispy, golden fries provide the perfect base for cheese curds and gravy.

Instructions:

  1. Choose your potatoes: Russet or Yukon Gold potatoes work best due to their starch content.
  2. Cut the fries: Slice the potatoes into thin fries (about ¼ inch thick). Soak them in cold water for 30 minutes to remove excess starch.
  3. Double-fry the potatoes: For the crispiest fries, fry the potatoes twice. First, fry them at 325°F until tender. Then increase the temperature to 375°F and fry again until golden and crispy.
  4. Season: Once fried, season with salt immediately.

Double frying ensures that the fries stay crispy even after being covered in gravy. For a faster option, you can use frozen fries, but freshly made fries will always deliver a better result.


2. Making the Gravy

The gravy is the heart of poutine. A thick, savory gravy brings the fries and cheese curds together. Here’s how to make a classic gravy for poutine:

Ingredients:

  • 2 cups beef or chicken broth: For a rich, savory base.
  • 2 tablespoons butter: Adds depth to the gravy.
  • 2 tablespoons all-purpose flour: Helps thicken the gravy.
  • 1 teaspoon Worcestershire sauce: For umami flavor.
  • Salt and pepper: To taste.

Instructions:

  1. Melt the butter: In a medium saucepan, melt the butter over medium heat.
  2. Create a roux: Add the flour and whisk continuously for about 1 minute until the mixture is smooth and golden.
  3. Add the broth: Gradually pour in the broth while whisking to prevent lumps.
  4. Simmer and season: Bring the mixture to a simmer, then add Worcestershire sauce, salt, and pepper. Let the gravy cook for about 10 minutes until thickened.

This simple gravy recipe works well with both beef and chicken stock. If you’re looking for an even deeper flavor, try this step-by-step poutine recipe to explore different gravy variations.


3. Assembling the Poutine

Once your fries and gravy are ready, it’s time to bring everything together.

Instructions:

  1. Layer the fries: Place a generous portion of fries on a plate.
  2. Add the cheese curds: Scatter a handful of fresh cheese curds over the fries.
  3. Pour the gravy: Ladle hot gravy over the fries and cheese curds, ensuring the curds soften slightly without fully melting.
  4. Serve immediately: Poutine is best enjoyed while the fries are still crispy and the gravy is hot.

For those looking to elevate their poutine, consider adding pulled pork, caramelized onions, or mushrooms for a heartier dish.


Variations of Homemade Poutine

While traditional poutine is delicious, there are many variations you can try depending on your preferences. Here are a few options:

1. Pulled Pork Poutine

Adding pulled pork to your poutine introduces a smoky, savory element that complements the richness of the gravy.

Instructions:

  • Prepare the pulled pork: Slow-cook pork shoulder with spices and BBQ sauce, then shred it.
  • Assemble: Layer fries, cheese curds, and gravy as usual, but top with pulled pork before serving.

2. Vegetarian Poutine

If you’re looking for a meat-free option, vegetarian poutine is just as satisfying.

Instructions:

  • Use vegetable gravy: Replace the beef or chicken stock with a rich vegetable-based gravy.
  • Add mushrooms: Sautéed mushrooms make an excellent topping for a meat-free poutine.
  • Assemble: Follow the same process as traditional poutine but with vegetable gravy and added mushrooms.

3. Spicy Poutine

For those who love heat, spicy poutine offers a flavorful twist.

Instructions:

  • Add jalapeños: Thinly slice fresh jalapeños and sprinkle them over the fries.
  • Drizzle hot sauce: Choose your favorite hot sauce to drizzle over the assembled poutine.
  • Serve with a spicy gravy: Add a pinch of cayenne pepper to your gravy for an extra kick.

FAQs About Homemade Poutine

1. Can I use frozen fries for poutine?

Yes, frozen fries are a convenient option if you’re short on time. Just be sure to bake or fry them until crispy to ensure they hold up well under the gravy.

2. What if I can’t find cheese curds?

If cheese curds aren’t available, fresh mozzarella cut into small cubes is a decent substitute. However, it won’t have the same squeaky texture that authentic cheese curds provide.

3. How do I make vegan poutine?

To make vegan poutine, use vegan cheese and a vegetable-based gravy. There are many store-bought vegan cheese options available that melt similarly to traditional cheese curds.

4. Can I prepare poutine in advance?

Poutine is best enjoyed fresh, but you can prepare the gravy in advance and reheat it when ready to serve. The fries should be cooked just before assembling the dish to maintain their crispness.


Conclusion: A Canadian Classic in Your Kitchen

Homemade poutine is the perfect dish for those who love indulgent comfort food. With crispy fries, melty cheese curds, and rich gravy, it’s no wonder this dish has become a favorite far beyond Canada’s borders. Whether you stick to the classic recipe or experiment with variations like pulled pork or vegetarian options, poutine is a versatile dish that you can enjoy any time.

For more variations and ideas on how to make the best poutine, check out this authentic poutine recipe and start experimenting with different toppings and flavors today.

Crock Pot Stuffing: Easy and Delicious Slow Cooker Stuffing Recipe

slow cooker stuffing, Thanksgiving stuffing, easy stuffing recipe, crockpot stuffing, holiday stuffing recipe

Crock Pot Stuffing: A Perfect Side Dish for the Holidays

Stuffing is an essential side dish for Thanksgiving and Christmas feasts. Using a crock pot to prepare this delicious dish not only saves oven space but also ensures that the stuffing stays moist, tender, and flavorful. It’s a convenient, hands-free way to enjoy a rich and satisfying classic without the hassle of constant monitoring.

Whether you prefer a traditional recipe with bread cubes, herbs, and broth or you’re looking to add modern twists like apples or sausage, this crock pot stuffing recipe is easy to customize for your holiday table. If you are looking for an even more detailed guide on variations, check out this helpful simple slow cooker stuffing recipe.


Ingredients for Crock Pot Stuffing

Here are the key ingredients you’ll need to create a flavorful and perfectly textured stuffing using your crock pot:

For the Stuffing:

  • 1 loaf of dried bread cubes: You can use white, sourdough, or whole grain. Stale bread works best.
  • 1 cup butter: Adds richness and helps cook the vegetables.
  • 1 large onion: Diced.
  • 2-3 stalks celery: Chopped.
  • 2 teaspoons dried sage: A classic herb in stuffing.
  • 1 teaspoon dried thyme: Adds earthy flavor.
  • ½ teaspoon dried parsley: For added freshness.
  • 2 ½ cups chicken broth: Keeps the stuffing moist.
  • Salt and pepper to taste: Season to your liking.

Optional Add-ins:

  • 1 cup sausage (optional): Adds a savory, rich element.
  • 1 apple, diced: For a sweet and tart flavor.
  • ½ cup dried cranberries: Adds a pop of color and sweetness.

This ingredient list provides a great base for classic stuffing, but you can easily mix in other elements to customize the dish to your preferences. For another great variation, you can follow this best crock pot stuffing recipe which includes sausage and herbs.


Step-by-Step Guide to Making Crock Pot Stuffing

Follow these steps to make sure your stuffing turns out perfectly every time.

1. Preparing the Bread

The key to great stuffing is properly dried-out bread. This ensures that the bread soaks up the flavors without becoming mushy.

Instructions:

  1. Dry the bread: If you’re using fresh bread, cube it and leave it out overnight to dry, or bake the cubes in a 300°F oven for 20 minutes until they’re crisp and dry.
  2. Prepare the vegetables: Dice the onion and chop the celery. For more flavor, you can also dice an apple or brown some sausage to add to the stuffing mix.

2. Cooking the Aromatics

To give your stuffing the best flavor, cook the vegetables and herbs in butter before adding them to the bread.

Instructions:

  1. Melt the butter: Heat the butter in a large skillet over medium heat.
  2. Sauté the onions and celery: Add the chopped onions and celery to the skillet and sauté for about 10 minutes until they’re soft and translucent.
  3. Add herbs: Stir in the sage, thyme, and parsley. Let the herbs cook for another minute to release their flavors.

3. Combining the Ingredients

Now that your bread is ready and your vegetables are cooked, it’s time to bring everything together.

Instructions:

  1. Mix the bread and vegetables: In a large bowl, combine the dried bread cubes with the sautéed vegetables. Stir well to coat the bread cubes with the buttery vegetable mixture.
  2. Add broth: Gradually pour the chicken broth over the mixture, stirring gently as you go. You want the bread cubes to be moistened but not soggy. Add more or less broth depending on your desired consistency.

4. Cooking the Stuffing in the Crock Pot

The slow cooker does the rest of the work, allowing the flavors to meld together beautifully.

Instructions:

  1. Transfer to the crock pot: Pour the bread and vegetable mixture into your greased crock pot, spreading it out evenly.
  2. Cook on LOW: Cover and cook on LOW for 3-4 hours, stirring occasionally to prevent the stuffing from sticking.
  3. Check for doneness: The stuffing should be moist and flavorful, with a slightly crisp top. If it looks too dry, stir in a little more broth.

For a more detailed breakdown of the process, including tips on making the stuffing more savory or sweet, you can check out this traditional slow cooker stuffing recipe.


Variations of Crock Pot Stuffing

One of the great things about stuffing is how versatile it is. Here are a few variations you can try based on your family’s preferences.

1. Sausage and Herb Crock Pot Stuffing

Adding sausage makes the stuffing even heartier, with a savory depth that pairs perfectly with traditional herbs.

Instructions:

  • Brown the sausage: Cook the sausage in a skillet before adding it to the bread mixture. Make sure to drain off excess fat.
  • Mix with the bread and vegetables: Stir the sausage into the stuffing mixture before adding the broth.
  • Cook as directed: Follow the same instructions for cooking in the crock pot.

2. Apple and Cranberry Stuffing

This variation adds a sweet and tart flavor that complements the richness of the stuffing.

Instructions:

  • Add diced apples and dried cranberries: Mix these into the stuffing along with the bread and sautéed vegetables. You can also add a pinch of cinnamon for extra warmth.
  • Cook as directed: This version is perfect for holiday meals when you want something a little special.

3. Gluten-Free Crock Pot Stuffing

For those with dietary restrictions, gluten-free stuffing is easy to make with the right ingredients.

Instructions:

  • Use gluten-free bread: Substitute regular bread cubes with a gluten-free variety. Make sure to dry the bread well to avoid mushy stuffing.
  • Check the broth: Be sure your chicken broth is gluten-free as well.

FAQs About Crock Pot Stuffing

1. Can I prepare crock pot stuffing in advance?

Yes, you can prepare the stuffing mixture ahead of time. Assemble all the ingredients the day before, then store the mixture in the refrigerator overnight. On the day of serving, cook the stuffing in the crock pot as directed.

2. How do I keep my stuffing from getting soggy?

The key to avoiding soggy stuffing is to use the right amount of broth. Start with less broth and add more as needed to moisten the bread cubes. Stir the stuffing halfway through cooking to ensure even moisture distribution.

3. Can I cook the stuffing on HIGH?

While cooking on LOW allows the flavors to develop more fully, you can cook the stuffing on HIGH for 2-3 hours if you’re short on time.

4. What type of bread is best for stuffing?

Stale, firm bread works best for stuffing. White bread, sourdough, or a combination of different types of bread will add texture and flavor to the dish.


Conclusion: A Holiday Staple Made Easy

Crock pot stuffing is the perfect solution for busy holiday kitchens. By freeing up oven space and ensuring that the stuffing stays moist and flavorful, the slow cooker does all the hard work for you. Whether you stick to a classic recipe or add your own twists like sausage, apples, or cranberries, this dish is sure to become a favorite on your Thanksgiving or Christmas table.

For even more ways to make your stuffing shine, check out this best crock pot stuffing recipe and try experimenting with different ingredients to suit your family’s taste.

Easy Air Fryer Donuts: A Quick and Delicious Treat

air fryer biscuit donuts, quick air fryer donuts, homemade air fryer donuts, air fryer glazed donuts, easy air fryer donut recipe

Easy Air Fryer Donuts: A Deliciously Simple Recipe

Air fryer donuts offer a fantastic way to enjoy a sweet treat without the extra oil and calories from deep frying. These donuts are light, fluffy, and incredibly easy to make—perfect for beginners and seasoned cooks alike. Whether you use store-bought biscuit dough for convenience or whip up your own homemade yeast dough, this recipe will yield delicious results every time.

Air fryers are a game-changer when it comes to healthier versions of fried foods, and donuts are no exception. With the ability to create golden-brown exteriors and soft interiors, air fryer donuts are a great alternative to the traditional deep-fried versions. If you are looking for a quick, foolproof method, check out this simple air fryer donuts recipe for more tips and tricks.


Ingredients for Easy Air Fryer Donuts

Here’s what you’ll need to create easy air fryer donuts with minimal effort:

For the Donuts:

  • Store-bought biscuit dough: A quick and easy option for making air fryer donuts.
  • Butter: Melted, for brushing the donuts and adding a golden-brown finish.
  • Cinnamon-sugar mix: For coating the donuts, made by mixing ½ cup of granulated sugar with 1 tablespoon of cinnamon.
  • Powdered sugar: For a classic powdered sugar donut, if desired.

Optional Glaze:

  • Powdered sugar: To create a smooth, sweet glaze.
  • Milk: To thin out the glaze to the desired consistency.
  • Vanilla extract: For added flavor.

This ingredient list ensures that your donuts turn out crispy on the outside and soft and fluffy on the inside. For a more homemade touch, you can prepare your own yeast dough for the air fryer, which you can find in this air fryer donuts from scratch recipe.


Step-by-Step Guide to Making Air Fryer Donuts

1. Preparing the Dough

The easiest way to make air fryer donuts is by using store-bought biscuit dough, but you can also use homemade dough if you prefer a more personalized touch.

Instructions:

  1. Open the biscuit dough: If you’re using store-bought dough, remove it from the canister and separate the individual biscuits.
  2. Cut out donut shapes: Using a small round cutter, remove the center of each biscuit to create the donut shape. The leftover dough circles can be used to make donut holes.
  3. Preheat the air fryer: Preheat your air fryer to 350°F (175°C) to ensure even cooking.

2. Air Frying the Donuts

Air frying the donuts is quick and easy, and requires only a few minutes of cooking time.

Instructions:

  1. Place the donuts in the air fryer: Arrange the donuts in the basket in a single layer, ensuring that they don’t touch. You may need to cook in batches depending on the size of your air fryer.
  2. Air fry the donuts: Cook the donuts at 350°F (175°C) for 6-8 minutes, flipping them halfway through to ensure even browning.
  3. Check for doneness: The donuts should be golden brown and puffed up. If they’re not fully cooked, air fry for an additional 1-2 minutes.

If you’re curious about other ways to make these donuts, such as using homemade dough, this glazed air fryer donuts recipe provides more options for you to try.


3. Glazing and Topping the Donuts

Once your donuts are perfectly air fried, it’s time to glaze and top them.

Instructions:

  1. Brush with butter: For extra flavor, brush the warm donuts with melted butter immediately after they come out of the air fryer.
  2. Coat with cinnamon sugar: Roll the donuts in the cinnamon-sugar mixture while they are still warm for a classic coating.
  3. Create a powdered sugar glaze: If you prefer glazed donuts, mix powdered sugar with a small amount of milk and vanilla extract to create a glaze. Dip the donuts into the glaze and allow them to set on a cooling rack.

Feel free to experiment with other toppings such as chocolate glaze, sprinkles, or even drizzled caramel for a gourmet touch.


4. Storing and Serving Air Fryer Donuts

For best results, serve your air fryer donuts warm, but they can also be stored for later.

Instructions:

  • Serve immediately: Air fryer donuts taste best when served warm and fresh.
  • Storing leftovers: Store any leftover donuts in an airtight container at room temperature for up to 2 days. To refresh their texture, reheat them in the air fryer for a few minutes before serving.
  • Freezing donuts: If you’d like to save donuts for later, freeze unglazed donuts in an airtight container for up to 2 months. Thaw at room temperature before reheating in the air fryer.

Variations of Air Fryer Donuts

While the basic air fryer donuts are delicious, there are many variations to try based on your flavor preferences.

1. Cinnamon Sugar Air Fryer Donuts

For those who love the combination of cinnamon and sugar, this variation is perfect.

Instructions:

  • Toss with cinnamon-sugar: After air frying, immediately coat the donuts in melted butter and roll them in cinnamon-sugar.
  • Serve with coffee or tea: These donuts are especially delicious served alongside a hot cup of coffee or tea.

2. Chocolate-Glazed Air Fryer Donuts

For a richer, more indulgent treat, chocolate-glazed donuts are always a hit.

Instructions:

  • Melt chocolate: Melt dark or milk chocolate and dip the warm donuts into the melted chocolate.
  • Top with sprinkles: For a fun finish, add colorful sprinkles or chopped nuts while the chocolate is still wet.

3. Air Fryer Donut Holes

Don’t throw away the centers of your donuts! Use them to make donut holes instead.

Instructions:

  • Air fry the donut holes: Cook the leftover donut centers in the air fryer for 4-5 minutes, flipping halfway through.
  • Coat with sugar: Roll them in powdered sugar or cinnamon-sugar for a sweet finish.

FAQs About Air Fryer Donuts

1. Can I make air fryer donuts with homemade dough?

Yes, you can! For a more homemade approach, you can make air fryer donuts with yeast-based dough. This requires some extra time for proofing, but the end result is soft, fluffy donuts that are just as good as those from a bakery.

2. Do I need to preheat the air fryer for donuts?

Preheating the air fryer helps ensure that the donuts cook evenly and develop a golden-brown crust. Set the air fryer to 350°F for about 3-5 minutes before adding the donuts.

3. Can I freeze air fryer donuts?

Yes, you can freeze air fryer donuts! However, it’s best to freeze them unglazed. When ready to eat, thaw the donuts at room temperature and reheat them in the air fryer before adding the glaze or toppings.

4. What toppings work best on air fryer donuts?

Air fryer donuts pair well with a variety of toppings, from powdered sugar and cinnamon-sugar to chocolate glaze and sprinkles. You can even drizzle caramel or fruit compote over the top for an extra burst of flavor.


Conclusion: A Healthier and Easier Way to Enjoy Donuts

Air fryer donuts offer a healthier, quicker alternative to traditional deep-fried donuts. Whether you choose to use store-bought biscuit dough or make your own yeast dough, these donuts come together easily in the air fryer, resulting in a light and fluffy treat that everyone will love.

For more ways to enhance your air fryer donuts, check out this simple air fryer donuts recipe or try experimenting with different glazes and toppings to suit your taste. Whatever you choose, air fryer donuts are sure to become a go-to recipe for any occasion.