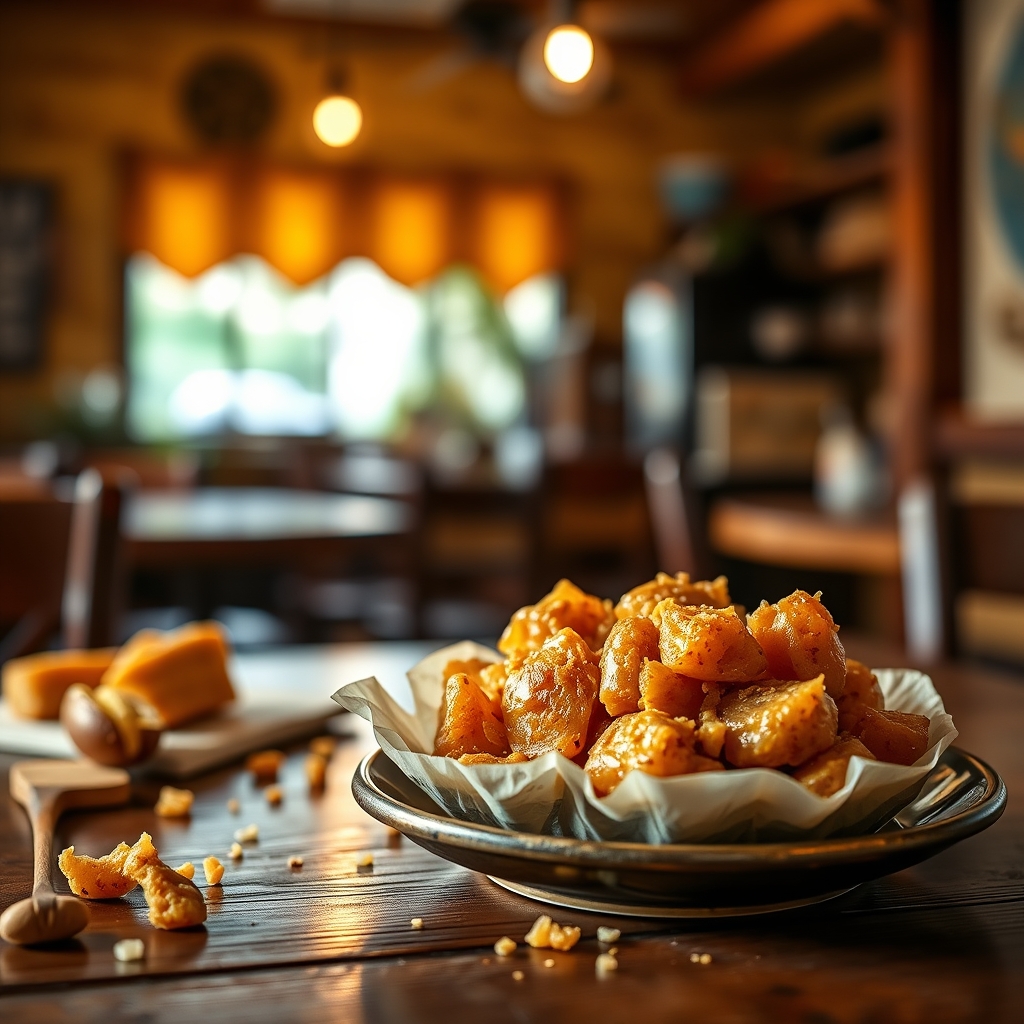
Vintage Peanut Butter Potato Candy
There’s something undeniably charming about vintage recipes, especially those that have stood the test of time. Vintage peanut butter potato candy is one of those delightful old-fashioned treats that brings nostalgia to every bite. This unique confection combines creamy peanut butter with a surprisingly soft and sweet potato-based dough, rolled into delicate pinwheels that melt in your mouth. Whether you grew up enjoying this candy or are discovering it for the first time, this recipe is a must-try for anyone who loves classic sweets with a twist.
Why You’ll Love This Recipe
If you’re still on the fence about making this vintage peanut butter potato candy, here are a few reasons why it’s worth whipping up in your kitchen:
- Nostalgic Flavor: This candy is a beloved classic, often passed down through generations, making it a sentimental favorite for many families.
- Unique Texture: The combination of mashed potato and powdered sugar creates an incredibly soft and smooth dough that contrasts beautifully with the rich peanut butter filling.
- Simple Ingredients: You likely already have most of the ingredients in your pantry, making it an easy and budget-friendly treat.
- Perfect for Sharing: These bite-sized candies are ideal for holiday platters, bake sales, or gifting to friends and family.
- Surprisingly Delicious: Don’t let the potato scare you—it adds moisture and sweetness without any starchy taste, resulting in a candy that’s irresistibly good.
Ingredients Breakdown
Understanding the role of each ingredient will help you achieve the perfect vintage peanut butter potato candy. Here’s what you’ll need:
- Russet Potato: A small, cooked, and peeled russet potato forms the base of the dough. It provides moisture and structure without overpowering the sweetness.
- Powdered Sugar: This dissolves easily into the potato, creating a smooth, pliable dough that holds its shape when rolled.
- Vanilla Extract: A touch of vanilla enhances the overall flavor, adding warmth and depth to the candy.
- Peanut Butter: Creamy peanut butter is the star of the filling, offering a rich, nutty contrast to the sweet dough. Natural peanut butter works, but a stabilized variety (like Skippy or Jif) holds up better.
- Salt: A pinch of salt balances the sweetness and intensifies the peanut butter flavor.
How to Make Vintage Peanut Butter Potato Candy
Follow these step-by-step instructions to create this nostalgic treat with ease:
- Prepare the Potato: Start by boiling a small russet potato until tender. Drain, peel, and mash it thoroughly until completely smooth. Let it cool to room temperature.
- Make the Dough: In a large mixing bowl, combine the mashed potato with powdered sugar, a splash of vanilla extract, and a pinch of salt. Mix until a soft, pliable dough forms. If the dough is too sticky, add a bit more powdered sugar.
- Roll Out the Dough: Place the dough between two sheets of parchment paper and roll it into a thin rectangle, about ¼-inch thick. Remove the top parchment sheet.
- Add the Peanut Butter: Spread an even layer of creamy peanut butter over the entire surface of the dough, leaving a small border around the edges.
- Roll Into a Log: Starting from one of the longer sides, carefully roll the dough into a tight log, using the parchment paper to help guide it. Wrap the log in plastic wrap and refrigerate for at least 2 hours to firm up.
- Slice and Serve: Once chilled, unwrap the log and use a sharp knife to slice it into ½-inch pieces. Arrange the pinwheels on a serving platter and enjoy!
Pro Tips for the Best Results
For flawless vintage peanut butter potato candy every time, keep these expert tips in mind:
- Use a Fine-Mesh Sieve: For the smoothest dough, press the mashed potato through a fine-mesh sieve to eliminate any lumps before mixing.
- Chill Before Slicing: Letting the rolled log chill thoroughly ensures clean, neat slices without squishing the layers.
- Adjust Consistency: If the dough feels too wet, add powdered sugar a tablespoon at a time. If it’s too dry, a tiny splash of milk will help.
- Work Quickly: The dough becomes stickier as it warms up, so roll and fill it while it’s still cool for easier handling.
Variations and Substitutions
While the classic version is heavenly, feel free to experiment with these fun twists:
- Chocolate Drizzle: Melt some chocolate chips and drizzle over the sliced candies for an extra indulgent touch.
- Almond or Cashew Butter: Swap peanut butter for another nut butter if you prefer a different flavor profile.
- Coconut Flour Dusting: Lightly dust the rolled log with coconut flour before slicing for a subtle tropical flair.
- Gluten-Free Option: Ensure your powdered sugar is gluten-free if needed, as some brands contain trace amounts of gluten.
What to Serve With It
Vintage peanut butter potato candy is delightful on its own, but it also pairs wonderfully with:
- A hot cup of coffee or tea to balance the sweetness.
- A scoop of vanilla ice cream for an over-the-top dessert.
- A charcuterie board featuring salty cheeses and fresh fruit for contrast.
How to Store and Reheat
To keep your peanut butter potato candy fresh:
- Room Temperature: Store in an airtight container at room temperature for up to 3 days.
- Refrigerator: For longer storage, refrigerate for up to a week. Let slices come to room temperature before serving for the best texture.
- Freezer: Wrap the unsliced log tightly in plastic wrap and freeze for up to 2 months. Thaw in the fridge before slicing.
Frequently Asked Questions (FAQs)
Can I use sweet potatoes instead of russet potatoes?
While russet potatoes are traditional, sweet potatoes can be used for a slightly different flavor and color. The texture may be a bit softer, so adjust powdered sugar as needed.
Why is my dough too sticky?
Stickiness usually means the potato was too moist or you need more powdered sugar. Add sugar gradually until the dough is workable.
Can I make this ahead of time?
Absolutely! The rolled log can be refrigerated for up to 3 days before slicing, making it a great make-ahead treat.
Is there a way to make this vegan?
Yes, use a vegan powdered sugar (some contain bone char) and a plant-based peanut butter without additives.
Final Thoughts
Vintage peanut butter potato candy is more than just a recipe—it’s a bite of history. Whether you’re making it to honor family traditions or simply to try something wonderfully unique, this candy is sure to become a favorite. The soft, sweet dough and creamy peanut butter filling create a harmony of flavors and textures that’s hard to resist. So gather your ingredients, roll up your sleeves, and treat yourself to a taste of the past. Happy baking!
Print
Vintage Peanut Butter Potato Candy
Description
A nostalgic Depression-era treat that combines mashed potatoes, peanut butter, and powdered sugar for a surprisingly delicious candy. These sweet rolls are sliced to reveal a beautiful swirl pattern.
Ingredients
For the Crust:
- For the dough:
- 1/2 cup mashed potatoes (cooled, no butter/milk added)
- 1 teaspoon vanilla extract
- 1/4 teaspoon salt
- 4 cups powdered sugar (plus extra for dusting)
- For the filling:
- 3/4 cup creamy peanut butter
- 2 tablespoons powdered sugar
- 1/4 teaspoon cinnamon (optional)
Instructions
1. Prepare the Crust:
- 1. Prepare mashed potatoes (ensure they’re completely cooled and free of any butter/milk).
- 2. In a large bowl, mix mashed potatoes, vanilla, and salt until smooth.
- 3. Gradually add powdered sugar 1 cup at a time, mixing until a stiff dough forms (about 4 cups total).
- 4. On a powdered sugar-dusted surface, roll dough into a 12×10 inch rectangle.
- 5. Mix peanut butter, 2 tbsp powdered sugar, and cinnamon (if using) until smooth.
- 6. Spread peanut butter mixture evenly over dough rectangle.
- 7. Tightly roll dough lengthwise into a log, using parchment to help if sticky.
- 8. Wrap log in wax paper and chill for 2+ hours until firm.
- 9. Slice into 1/2-inch pieces with a sharp knife, cleaning between cuts.
- 10. Store between wax paper in an airtight container at room temperature.
Notes
For best results, use russet potatoes. The dough should be play-doh consistency – add more powdered sugar if too sticky. Vintage recipes suggest letting slices ‘cure’ 24 hours for optimal texture.