Sweet Alabama Pecan Bread: A Delicious Southern Treat to Make at Home”

pecan bread recipe, Alabama pecan bread, sweet pecan loaf, Southern pecan bread, homemade pecan dessert

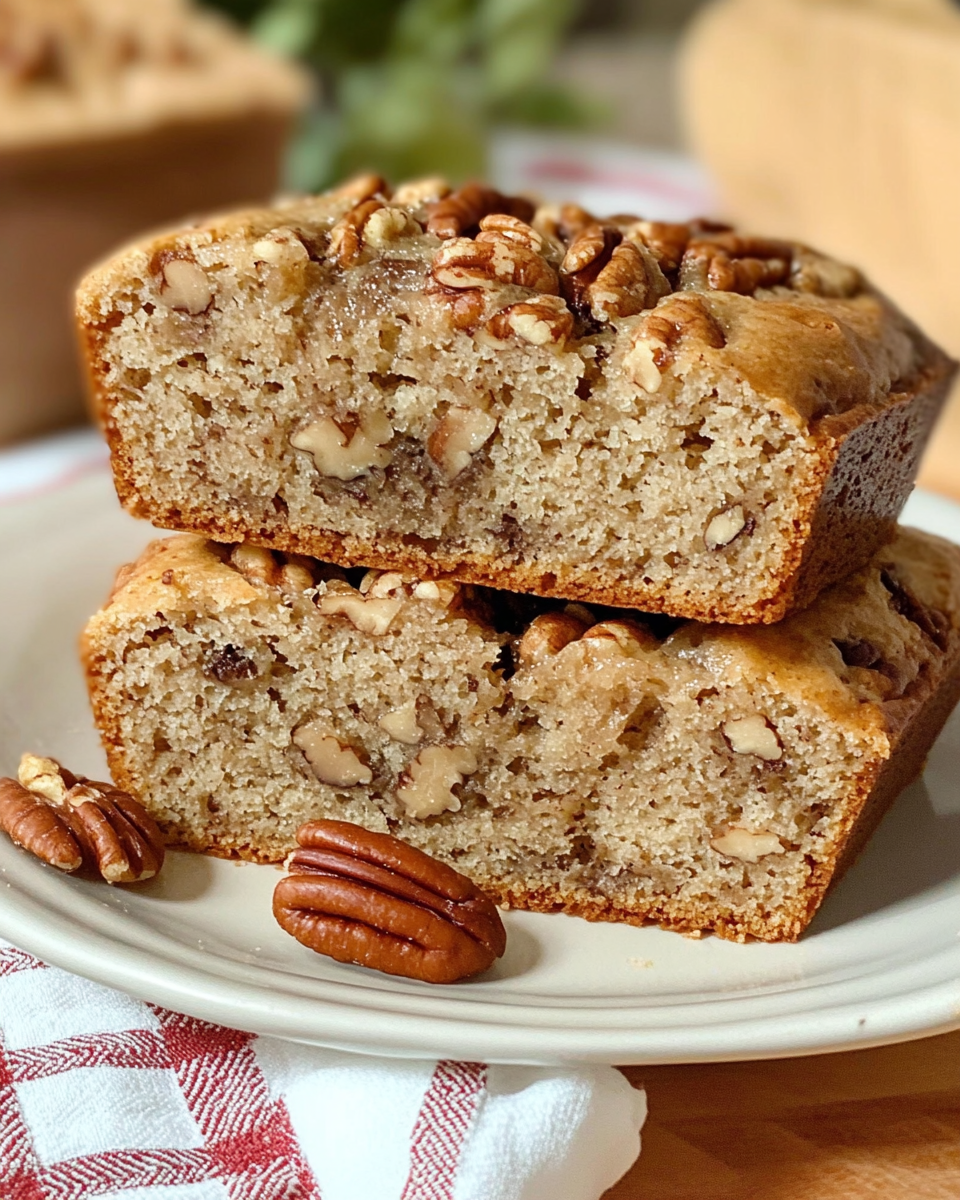
Sweet Alabama Pecan Bread: A Southern Delight You Can Make at Home

Sweet Alabama pecan bread is a Southern classic with a moist, tender crumb and a nutty, caramelized flavor. Perfect for holiday gatherings or weekend brunch, this pecan bread combines the richness of pecans with a sweet, buttery batter. With this guide, you’ll learn everything from ingredient selection to baking tips, so you can make the ultimate pecan bread at home.

If you’re interested in Southern desserts, be sure to try our Kentucky Butter Cake—another treat full of rich, buttery goodness.


Essential Ingredients for Sweet Alabama Pecan Bread

To make the best Sweet Alabama Pecan Bread, you’ll need a few key ingredients:

  • Pecans: Use fresh, high-quality pecans for the best flavor.
  • Self-Rising Flour: This flour simplifies the recipe and ensures the bread has a soft rise.
  • Sugars: A mix of granulated and brown sugar enhances sweetness and moisture.
  • Butter: Adds a rich, buttery flavor to the bread.
  • Eggs: Essential for binding the ingredients and adding structure.
  • Vanilla Extract: Provides depth and a hint of sweetness.

For a similar nutty twist, you might enjoy our Butter Pecan Pound Cake which also highlights the delicious flavor of pecans.


Step-by-Step Guide to Making Sweet Alabama Pecan Bread

1. Prepare the Ingredients

  • Preheat your oven to 350°F (175°C) and grease a loaf pan. Chop the pecans, ensuring they’re evenly sized to distribute throughout the bread.

2. Cream Butter and Sugar

  • In a large bowl, beat softened butter, granulated sugar, and brown sugar until creamy. This step adds air to the batter, creating a lighter texture.

3. Add Wet Ingredients

  • Mix in eggs, one at a time, followed by vanilla extract. Each addition should be fully incorporated to ensure a smooth batter.

4. Combine with Dry Ingredients

  • Gradually add self-rising flour to the wet mixture, mixing until just combined. Overmixing can make the bread dense, so stir gently.

5. Fold in Pecans

  • Carefully fold in the chopped pecans, spreading them evenly in the batter. This adds a delightful crunch to each slice.

6. Bake and Cool

  • Pour the batter into the greased pan and bake for 50–60 minutes, or until a toothpick comes out clean. Cool in the pan for 10 minutes, then transfer to a wire rack.

For more tips on baking with nuts, see How to Bake with Pecans for insights on achieving the best texture and flavor.


Tips for the Perfect Sweet Alabama Pecan Bread

Achieving the ideal texture and flavor in pecan bread requires attention to detail:

  • Use Fresh Pecans: Stale pecans can taste bitter. Toasting them lightly before baking brings out their flavor.
  • Measure Flour Accurately: Too much flour can make the bread dense, so use the spoon-and-level method.
  • Room Temperature Ingredients: This helps the ingredients blend more smoothly, resulting in a consistent texture.
  • Don’t Overmix: Overmixing develops gluten, which can make the bread tough.

For a soft and tender crumb, try our Perfect Banana Bread Recipe which includes more tips on achieving the perfect consistency.


Variations and Flavor Enhancements for Sweet Alabama Pecan Bread

This versatile recipe can be customized with various add-ins and flavor tweaks:

  1. Cinnamon Pecan Bread: Add a teaspoon of cinnamon for a cozy, spiced flavor.
  2. Maple Pecan Bread: Substitute part of the sugar with maple syrup for added depth.
  3. Cranberry Pecan Bread: Fold in dried cranberries for a tart contrast to the sweetness.
  4. Walnut Pecan Bread: Use a mix of pecans and walnuts for a more complex flavor profile.

If you enjoy experimenting with recipes, try our Cinnamon Sugared Doughnut Drops for another sweet twist on a classic.


Serving Suggestions for Sweet Alabama Pecan Bread

Here are some ways to serve this delightful pecan bread:

  • Breakfast Toast: Warm a slice in the toaster and top with butter or cream cheese.
  • Dessert: Serve with whipped cream or a drizzle of caramel sauce.
  • Holiday Brunch: Pair with coffee or tea for a perfect holiday spread.
  • Gift Idea: Wrap slices individually for a delicious homemade gift.

For a delicious pairing, consider our Homemade Pumpkin Spice Latte, which complements the nutty, sweet flavor of pecan bread.


Storage and Freezing Tips

To keep your Sweet Alabama Pecan Bread fresh:

  • At Room Temperature: Store in an airtight container for up to 3 days.
  • In the Refrigerator: Extend freshness to 5-7 days by refrigerating, though this may dry it out slightly.
  • Freezing: Wrap in plastic wrap and foil, then store in a freezer-safe bag for up to 3 months.
  • Reheating: For a fresh-baked taste, reheat slices in the oven at 300°F (150°C) for about 10 minutes.

For more freezer-friendly ideas, our Ultimate Big Freezer Meal Prep Guide provides tips on storing homemade baked goods.


Frequently Asked Questions (FAQs)

Here are answers to common questions about making Sweet Alabama Pecan Bread:

1. Can I use all-purpose flour instead of self-rising flour?

  • Yes, add 1 ½ teaspoons of baking powder and ¼ teaspoon salt per cup of all-purpose flour to make your own self-rising flour substitute.

2. How do I prevent the bread from being too dense?

  • Ensure you measure the flour correctly and avoid overmixing the batter, as this can make the bread tough.

3. Can I make this recipe with other nuts?

  • Absolutely! Walnuts and almonds work well, though the flavor will differ slightly.

4. How long can I store pecan bread?

  • It stays fresh at room temperature for 3 days, up to a week in the fridge, or up to 3 months in the freezer.

5. Can I add fresh fruit to this recipe?

  • Yes, try adding chopped apples or mashed bananas for a fruity twist. Adjust the baking time as needed for additional moisture.

For additional tips on baking quick breads, check out Tips for Perfect Quick Breads.


Nutritional Information

Each slice of Sweet Alabama Pecan Bread provides:

  • Calories: 220
  • Protein: 3g
  • Carbohydrates: 28g
  • Fat: 11g

For a lighter option, you can reduce the sugar or use a low-fat butter substitute. Our Healthy Avocado Egg Salad Roll-Ups is another excellent choice for a balanced snack option.


Health Benefits of Pecans in Baking

Using pecans in baked goods adds both flavor and nutrition:

  • Healthy Fats: Pecans are rich in monounsaturated fats, which support heart health.
  • Antioxidants: Pecans contain vitamins and minerals, including vitamin E, which is known for its antioxidant properties.
  • Fiber: They are a good source of dietary fiber, which supports digestive health.

For more on the nutritional benefits of pecans, see The Health Benefits of Pecans.


Conclusion: Enjoy the Taste of the South with Sweet Alabama Pecan Bread

Sweet Alabama Pecan Bread is a classic Southern treat that’s perfect for breakfast, brunch, or dessert. With its moist, nutty texture and sweet flavor, it’s a versatile recipe that’s sure to become a favorite in your home. Experiment with the variations and enjoy each bite of this comforting bread.

For more Southern-inspired recipes, don’t miss our Classic Southern Banana Pudding—a creamy dessert that pairs perfectly with pecan bread.

Beef Tips and Noodles: The Ultimate Comfort Food Recipe

tender beef tips recipe, beef tips in gravy, easy beef tips and noodles, hearty beef noodles, beef and egg noodles recipe

Beef Tips and Noodles: A Comforting Classic Dish

Beef tips and noodles is a hearty dish with tender beef tips in a rich, savory gravy served over egg noodles. This easy-to-follow recipe brings together simple ingredients for a comforting meal perfect for any occasion. Whether it’s a cozy dinner at home or a meal for family gatherings, beef tips and noodles are sure to satisfy.

For more comfort foods, check out our Slow Cooker Baked Ziti, which offers a delicious and effortless dinner option.


Key Ingredients for Beef Tips and Noodles

To make the best beef tips and noodles, you’ll need the following ingredients:

  • Beef Tips: Choose a tender cut like sirloin, chuck, or stew meat.
  • Beef Broth: Provides a deep, savory base for the gravy.
  • Onions and Garlic: Adds flavor and aroma to the dish.
  • Worcestershire Sauce: Enhances the umami flavor.
  • Cornstarch or Flour: Used to thicken the gravy.
  • Egg Noodles: The perfect base for soaking up the rich gravy.

For another delicious recipe that pairs well with egg noodles, try our Chicken Tetrazzini.


Step-by-Step Guide to Making Beef Tips and Noodles

1. Preparing the Beef

  • Begin by cutting the beef into bite-sized pieces and season with salt, pepper, and garlic powder. This ensures the meat is flavorful and tender.

2. Sear the Beef

  • Heat a skillet or Dutch oven with oil and sear the beef on all sides until browned. This step locks in the flavor and adds depth to the gravy.

3. Sauté the Onions and Garlic

  • In the same pan, add chopped onions and garlic. Cook until soft and fragrant, enhancing the dish’s flavor profile.

4. Add the Broth and Worcestershire Sauce

  • Pour in the beef broth and Worcestershire sauce. Stir to combine, scraping up any browned bits for added flavor.

5. Simmer and Thicken the Gravy

  • Bring to a simmer and cook until the beef is tender. Create a cornstarch slurry by mixing cornstarch with water, then add to the gravy to thicken.

For more tips on thickening sauces and gravies, read Tips for Thickening Gravy.


Tips for Perfect Beef Tips and Noodles

To make sure your beef tips and noodles turn out perfectly, keep these tips in mind:

  • Choose the Right Beef: Sirloin and chuck are ideal cuts as they become tender during cooking.
  • Low and Slow Cooking: Allow time for the beef to simmer, which enhances tenderness.
  • Season Generously: The right balance of salt, pepper, and Worcestershire sauce makes a big difference.

For more on cooking techniques with beef, check out our guide on Perfect Ribeye Steak Cooking.


Variations of Beef Tips and Noodles

Beef tips and noodles are versatile, and you can customize them with different flavors and ingredients:

  1. Creamy Beef Tips and Noodles: Add a dollop of sour cream or heavy cream for a creamy texture.
  2. Spicy Beef Tips: Mix in crushed red pepper or paprika for a spicy twist.
  3. Gluten-Free Option: Use gluten-free noodles and cornstarch to make the recipe gluten-free.

If you enjoy experimenting with comfort food recipes, try our Classic Beef Stew, which is another hearty meal perfect for cold days.


Serving Suggestions for Beef Tips and Noodles

Beef tips and noodles are satisfying on their own, but they can also be served with a variety of sides:

  • Garlic Bread: Perfect for soaking up the rich gravy.
  • Green Salad: Adds freshness and balances the richness of the dish.
  • Steamed Vegetables: Serve with steamed broccoli, carrots, or peas for added nutrients.

For a side dish that complements the flavors, try our Twice Baked Potato Casserole.


Storing and Reheating Beef Tips and Noodles

Here’s how to store and reheat beef tips and noodles for later enjoyment:

  • Refrigeration: Store in an airtight container in the refrigerator for up to 3 days.
  • Freezing: Place leftovers in a freezer-safe container for up to 2 months.
  • Reheating: Warm on the stovetop over low heat or in the microwave, adding a splash of beef broth if needed.

If you’re interested in meal prep, check out our Big Freezer Meal Prep Guide for more tips on storing and reheating homemade meals.


Frequently Asked Questions (FAQs)

Here are some commonly asked questions to help with this recipe:

1. Can I use a different cut of beef?

  • Yes, chuck roast, stew meat, or sirloin work well for this recipe. Just ensure they’re cut into bite-sized pieces.

2. How do I make the beef extra tender?

  • Cooking slowly over low heat or using a slow cooker can make the beef tender and flavorful.

3. Can I make this in a slow cooker?

  • Yes, sear the beef and sauté the onions first, then transfer to a slow cooker with broth and seasonings. Cook on low for 6-8 hours.

4. What’s the best way to thicken the gravy?

  • Use a cornstarch slurry or flour mixture to reach the desired consistency.

5. Can I make beef tips without noodles?

  • Absolutely! Serve over mashed potatoes, rice, or even cauliflower rice for a low-carb option.

For more on thickening methods, refer to our Perfect Brown Gravy Guide, which offers additional tips for achieving the right consistency.


Nutritional Information

Each serving of beef tips and noodles provides:

  • Calories: 450
  • Protein: 28g
  • Carbohydrates: 35g
  • Fat: 20g

To lighten the dish, consider using lean beef and reducing the amount of butter or oil. For a healthier, balanced meal, try our Healthy Avocado Egg Salad Roll-Ups, a nutritious choice for any meal.


Health Benefits of Beef and Egg Noodles

Beef is a rich source of protein, iron, and vitamin B12, making it an essential component of a balanced diet. Egg noodles provide carbohydrates for energy, making them a great pairing for beef in this meal. Including vegetables as a side dish can add vitamins and fiber, rounding out this meal into a wholesome, nutritious option.

For more comforting and nutritious meals, explore our Chicken Spaghetti for a pasta alternative packed with protein and flavor.


Conclusion: Enjoy the Comfort of Beef Tips and Noodles

Beef tips and noodles bring together tender beef, flavorful gravy, and comforting egg noodles into a delicious meal that’s perfect for any season. Whether you’re serving this at a family dinner or enjoying it solo, it’s a dish that delivers both flavor and comfort. Customize it with your favorite herbs, spices, or sides, and enjoy this classic recipe that’s sure to become a household favorite.

For more dinner inspiration, don’t miss our Homemade Chicken Pot Pie Casserole – another satisfying comfort food dish that’s easy to make and perfect for sharing.

Blueberry Cream Cheese Bites: Easy, Delicious, and Perfect for Any Occasion

blueberry cheesecake bites, mini blueberry cream cheese desserts, blueberry pastry bites, blueberry cream cheese snacks, blueberry bites recipe

Blueberry Cream Cheese Bites: A Delicious, Easy-To-Make Treat

Blueberry cream cheese bites offer a perfect blend of creamy, tangy, and fruity flavors, all wrapped up in a delightful bite-sized treat. They’re an ideal addition to any brunch, dessert table, or snack rotation. Made with fresh blueberries, cream cheese, and a tender crust, these bites are simple enough for beginners but delicious enough to impress.

For more recipes that incorporate cream cheese, check out our Cinnamon Roll Cake with Cream Cheese Glaze, a rich dessert perfect for gatherings.


Ingredients for Blueberry Cream Cheese Bites

The ingredients for these bites are simple, yet each plays a crucial role in achieving the perfect balance of flavors:

  • Cream Cheese: The base of the filling, providing a smooth and creamy texture.
  • Fresh Blueberries: A burst of fruity flavor that pairs wonderfully with cream cheese.
  • Pastry Dough: Crescent rolls or phyllo dough are ideal for a light, flaky crust.
  • Sugar and Vanilla: Adds sweetness and depth to the filling.
  • Lemon Zest (optional): Adds a hint of citrus to brighten up the flavor.

For a similar light and delicious dessert, consider our Easy Apple Hand Pies, a fun twist on a classic pie that’s perfect for any occasion.


Step-by-Step Guide to Making Blueberry Cream Cheese Bites

1. Prepare the Filling

  • In a mixing bowl, beat the cream cheese, sugar, and vanilla extract until smooth and creamy. Add lemon zest for extra flavor.

2. Assemble the Bites

  • Roll out the pastry dough and cut it into squares or circles, depending on your preference. Place a small spoonful of the cream cheese mixture in the center of each square, followed by a few fresh blueberries.

3. Fold and Seal

  • Fold the dough over the filling and seal the edges with a fork. This step helps prevent the filling from leaking out during baking.

4. Bake Until Golden

  • Arrange the bites on a baking sheet lined with parchment paper. Bake at 375°F (190°C) for 10–12 minutes, or until golden brown and bubbly.

5. Cool and Serve

  • Allow the bites to cool slightly before serving. For a sweet touch, dust with powdered sugar or drizzle with a simple glaze.

If you enjoy bite-sized desserts, you might also love our Strawberry Bombs, which offer a sweet and tangy burst of flavor.


Tips for Perfect Blueberry Cream Cheese Bites

To make the best blueberry cream cheese bites, follow these tips:

  • Use Fresh Ingredients: Fresh blueberries offer the best flavor and texture.
  • Seal Properly: Prevent leakage by pressing the edges firmly with a fork.
  • Avoid Overfilling: A small amount of filling goes a long way, as it expands during baking.
  • Cool on a Wire Rack: This helps the bites maintain their crispness.

For more pastry tips, see our guide on Using Phyllo Dough, which can be a great alternative for this recipe.


Blueberry Cream Cheese Bite Variations

These bites are versatile and can be customized to suit different tastes and dietary needs:

  1. Mixed Berry Cream Cheese Bites: Use a combination of raspberries, strawberries, and blueberries.
  2. Lemon Blueberry Bites: Add extra lemon zest and a small dollop of lemon curd to the filling.
  3. Mini Cheesecake Bites: Bake in mini muffin tins with graham cracker crusts for a cheesecake-like texture.

If you’re looking for more easy and delicious snacks, try our Cinnamon Sugared Doughnut Drops, which pair well with these bites for a sweet dessert spread.


Serving Suggestions for Blueberry Cream Cheese Bites

These bites are wonderful on their own but can be paired with other treats to enhance the experience:

  • Whipped Cream: Serve with a dollop of whipped cream or a scoop of vanilla ice cream.
  • Coffee or Tea: Perfect as a light dessert or snack with a hot beverage.
  • Fruit Salad: Pair with a fresh fruit salad for a delightful brunch spread.

For a classic coffee pairing, try our Blue Ribbon Blueberry Coffee Cake for a rich, comforting combination.


Storing and Freezing Blueberry Cream Cheese Bites

Here’s how to store these bites for maximum freshness:

  • Refrigeration: Store leftovers in an airtight container in the fridge for up to 3 days.
  • Freezing: Freeze individually wrapped bites in a freezer-safe container for up to 2 months.
  • Reheating: Warm in the oven at 300°F (150°C) for about 10 minutes to revive their crispness.

If you’re into meal prepping or batch cooking, our Big Freezer Meal Prep Guide provides great tips for making and storing desserts and snacks.


FAQs About Blueberry Cream Cheese Bites

Here are some frequently asked questions to help you make the most of this recipe:

1. Can I make these bites with frozen blueberries?

  • Yes, but thaw and drain them first to avoid excess moisture.

2. What’s the best way to prevent the filling from leaking?

  • Be sure to press the edges firmly with a fork and avoid overfilling the dough.

3. Can I prepare the bites in advance?

  • You can prepare and refrigerate the bites a day before baking, then bake fresh.

4. Can I substitute the blueberries with another fruit?

  • Absolutely! Strawberries, raspberries, or mixed berries work well.

5. How do I get a flaky pastry?

  • Using cold ingredients and chilling the assembled bites before baking helps create a flaky crust.

For more fruit-based desserts, check out our Best Blueberry Pie recipe, which offers another delicious way to enjoy blueberries.


Nutritional Information

Each blueberry cream cheese bite typically contains:

  • Calories: 150
  • Carbohydrates: 18g
  • Protein: 2g
  • Fat: 7g

For a lighter version, you can reduce the sugar in the filling or use low-fat cream cheese. Another great light dessert option is our Healthy Avocado Egg Salad Roll-Ups, ideal for balanced snacking.


Health Benefits of Blueberries and Cream Cheese

Using blueberries and cream cheese in this recipe provides a variety of health benefits:

  • Blueberries: Packed with antioxidants, vitamin C, and fiber, blueberries support immune health and aid digestion.
  • Cream Cheese: A source of protein and calcium, cream cheese can be enjoyed in moderation for a balanced diet.

For more on the benefits of blueberries, see Health Benefits of Blueberries.


Conclusion: Enjoy Delicious Blueberry Cream Cheese Bites Anytime

Blueberry cream cheese bites are a delightful, versatile treat that’s easy to make and perfect for sharing. Whether you’re serving them at brunch, as a dessert, or simply as a snack, these bites are sure to be a hit. Enjoy experimenting with different flavors, toppings, and ways to serve this delicious recipe.

For more delicious dessert ideas, don’t miss our Overnight Creme Brulee French Toast for a decadent addition to your breakfast or brunch table.

Soft Pretzels: Easy Homemade Recipe for Perfectly Chewy Pretzels

homemade pretzels, chewy soft pretzels, easy soft pretzel recipe, baking soda pretzel recipe, classic soft pretzels

Soft Pretzels: How to Make the Perfect Homemade Treat

Soft pretzels are a beloved snack known for their golden-brown exterior, chewy texture, and distinct salty flavor. Whether you enjoy them plain, with mustard, or alongside a savory cheese dip, homemade soft pretzels are a fun, rewarding treat. This guide will walk you through each step, providing tips, techniques, and variations for making the perfect pretzel.

If you’re looking for an appetizer with a similar texture, try our Garlic Bacon Kale—a flavorful dish that pairs well with soft pretzels for any gathering.


Why Make Soft Pretzels at Home?

Homemade soft pretzels are rewarding for a few reasons:

  • Better Texture and Flavor: Freshly baked pretzels are warm, soft, and have that classic chewy texture.
  • Customizable: With homemade pretzels, you control the toppings and flavors.
  • Fun Activity: Shaping and twisting the dough can be a fun activity for family and friends.

If you enjoy experimenting with dough recipes, our Ultimate Guide to Baking Yeast Bread can help you master various bread techniques.


Essential Ingredients for Soft Pretzels

The ingredients for soft pretzels are simple, but each one is key to achieving the right flavor and texture:

  • Flour – All-purpose flour works well, but bread flour can add extra chewiness.
  • Yeast – Active dry yeast or instant yeast for a reliable rise.
  • Warm Water – Activates the yeast and helps the dough come together.
  • Salt and Sugar – Salt adds flavor, while sugar activates the yeast.
  • Baking Soda – A baking soda bath gives pretzels their signature golden color and chewy exterior.
  • Butter – Adds richness and helps create a soft texture.

For an alternative snack, try our Savory Bacon Bread, which also combines a rich, chewy bread with savory flavors.


Step-by-Step Guide to Making Soft Pretzels

1. Activate the Yeast

  • In a bowl, combine warm water and sugar, stirring to dissolve. Sprinkle yeast over the top and let it sit for about 5 minutes until it becomes foamy.

2. Prepare the Dough

  • In a large bowl, mix flour and salt. Add the yeast mixture, stirring until the dough forms. Knead on a floured surface until the dough is smooth and elastic, about 5–7 minutes.

3. Let the Dough Rise

  • Place the dough in a greased bowl, cover, and let it rise for about an hour or until it doubles in size.

4. Divide and Shape

  • Preheat the oven to 450°F (230°C) and line baking sheets with parchment paper. Punch down the dough and divide it into equal portions. Roll each piece into a long rope and shape into a pretzel twist.

5. Baking Soda Bath

  • Boil a pot of water and add baking soda. Dip each pretzel in the baking soda bath for 15–20 seconds before placing on the baking sheet. This step is crucial for a golden-brown, chewy crust.

6. Bake and Enjoy

  • Sprinkle each pretzel with coarse salt and bake for 12–15 minutes until golden brown. Brush with melted butter for an extra-soft texture and flavor.

For a fun twist on dough recipes, check out our Easy French Bread Pizza recipe, which also delivers a satisfying crust.


Tips for Perfect Soft Pretzels

To ensure your homemade soft pretzels turn out just right, keep these tips in mind:

  • Knead the Dough Well: Proper kneading helps create a chewy texture.
  • Use a Baking Soda Bath: This creates the distinctive golden-brown crust.
  • Brush with Butter: Adds softness and enhances flavor.

If you’re interested in mastering dough techniques, explore our Ultimate Guide to Baking for more baking insights.


Soft Pretzel Variations and Flavor Additions

Homemade soft pretzels can be customized with a variety of toppings and flavors:

  1. Cinnamon Sugar Pretzels: Brush baked pretzels with butter and dip in cinnamon sugar.
  2. Cheddar Cheese Pretzels: Mix shredded cheddar into the dough for a cheesy flavor.
  3. Garlic Parmesan Pretzels: Add garlic powder to the dough and sprinkle with Parmesan after baking.

For another unique snack, try our Loaded Potato Skins, which offers a savory, cheesy flavor perfect for pairing with soft pretzels.


Serving Suggestions for Soft Pretzels

Soft pretzels are versatile and pair well with various dips and sides:

  • Dipping Sauces: Serve with honey mustard, cheese dip, or chocolate sauce.
  • Complementary Sides: Pair with a light salad or a warm soup, like our Creamy Garlic Parmesan Chicken Soup.
  • Party Platter: Include soft pretzels as part of a charcuterie board with meats, cheeses, and fruits.

If you’re planning a party, our Cheesy Bacon Jalapeno Corn Dip also makes a great addition alongside soft pretzels.


Storage and Reheating Tips for Soft Pretzels

Keep your soft pretzels fresh with these storage and reheating tips:

  • Storage: Place pretzels in an airtight container at room temperature for up to two days.
  • Freezing: Wrap pretzels individually in plastic wrap and store in a freezer bag for up to two months.
  • Reheating: Reheat in the oven at 300°F (150°C) for about 10 minutes.

For make-ahead snacks, our Ultimate Bacon Potato Casserole is another great recipe that can be prepared in advance.


FAQs About Soft Pretzels

Here are some commonly asked questions to help make your soft pretzel experience easier:

1. Can I make soft pretzels without yeast?

  • Yes, but they may not have the same fluffy texture. Consider a quick baking soda and yogurt dough as an alternative.

2. How do I prevent my pretzels from becoming too hard?

  • Make sure to brush with butter after baking to keep them soft. Avoid over-baking, as this can make them dry.

3. Can I use whole wheat flour?

  • Yes, but it may create a denser pretzel. Consider using a mix of whole wheat and all-purpose flour.

4. What should I do if my dough is too sticky?

  • Add a bit more flour while kneading until the dough is smooth and manageable.

5. How can I store leftover pretzel dough?

  • Wrap in plastic wrap and refrigerate for up to two days, or freeze for up to a month.

For more baking insights, check our guide on Perfecting Dough Consistency for best results.


Nutritional Information

Each soft pretzel provides approximately:

  • Calories: 200
  • Carbohydrates: 40g
  • Protein: 5g
  • Fat: 3g

To make them healthier, consider using less butter or swapping in some whole wheat flour for added fiber. Our Healthy Avocado Egg Salad Roll-Ups are another tasty option for a balanced snack.


Conclusion: Enjoy Homemade Soft Pretzels Any Time

Soft pretzels are a versatile, delicious snack that’s easy to make at home. Whether you like them sweet, salty, or with a cheesy twist, there’s a version for everyone. Serve them fresh from the oven and enjoy the rewarding process of creating this classic treat.

For more homemade snack ideas, don’t miss our Easy Breakfast Casserole for a hearty start to your day or our Classic Beef Stew for a comforting dinner option.

Cheesy Garlic Butter Mushroom Stuffed Chicken: Flavor-Packed and Easy to Make

garlic butter stuffed chicken, mushroom stuffed chicken breast, creamy cheese stuffed chicken, garlic chicken recipe, mushroom cheese chicken

Cheesy Garlic Butter Mushroom Stuffed Chicken: A Flavor-Packed Dinner Recipe

The cheesy garlic butter mushroom stuffed chicken combines juicy chicken breast with a rich, savory filling of garlic mushrooms and melted cheese, all wrapped in buttery goodness. This recipe creates an impressive, restaurant-style dish perfect for a special occasion or a cozy dinner. It’s quick to prepare, easy to customize, and sure to impress with its incredible flavors.

For another hearty, comforting meal, try pairing this dish with our Twice Baked Potato Casserole as a side. The creamy and cheesy potato flavors complement the stuffed chicken beautifully.


Ingredients for Cheesy Garlic Butter Mushroom Stuffed Chicken

The ingredients for this dish are simple but yield extraordinary flavor. Here’s what you’ll need:

  • Chicken Breasts – Large, boneless, and skinless, ideal for stuffing.
  • Mushrooms – Button or cremini mushrooms work well for a rich, earthy flavor.
  • Garlic – Freshly minced garlic for aromatic, pungent notes.
  • Butter – Essential for the garlic butter flavor.
  • Mozzarella Cheese – Melts beautifully, adding creaminess.
  • Parmesan Cheese – Adds sharpness and depth.
  • Salt, Pepper, and Herbs – Enhances the flavors, with options for fresh parsley or thyme.

For more on garlic’s versatility in savory dishes, read our tips in Cooking with Garlic: Tips and Techniques.


Step-by-Step Guide to Making Cheesy Garlic Butter Mushroom Stuffed Chicken

1. Prepare the Chicken

  • Start by preparing the chicken breasts. Slice them open horizontally without cutting all the way through, creating a “pocket” for the filling. Season the inside and outside with salt, pepper, and Italian herbs.

2. Make the Mushroom Filling

  • Melt butter in a skillet over medium heat. Add minced garlic and cook until fragrant. Add the mushrooms and cook until they’re soft and golden. Stir in chopped parsley and season to taste.

3. Add the Cheese

  • Once the mushrooms are cooked, transfer them to a bowl. Stir in mozzarella and Parmesan cheeses, allowing them to blend with the mushrooms.

4. Stuff the Chicken Breasts

  • Carefully fill each chicken breast with the mushroom-cheese mixture. Secure with toothpicks to keep the filling inside while cooking.

5. Sear and Bake

  • In the same skillet, add a bit more butter and sear each chicken breast on both sides until golden brown. Transfer to a baking dish and bake at 375°F (190°C) for 20–25 minutes until the chicken is fully cooked and the cheese is melted.

This delicious dish can be served with a light salad or mashed potatoes. For a side, consider our Garlic Bacon Kale, which pairs perfectly with this hearty meal.


Tips for Perfectly Cooked Stuffed Chicken

Follow these tips to make sure your cheesy garlic butter mushroom stuffed chicken turns out perfectly:

  • Use Fresh Ingredients: Fresh mushrooms and garlic make a big difference in flavor.
  • Secure with Toothpicks: Keep the filling intact while cooking.
  • Don’t Overstuff: Filling the chicken breast too full can cause it to burst during cooking.
  • Use an Oven-Safe Skillet: It allows you to sear the chicken and transfer it directly to the oven for baking.

For more on choosing ingredients, see our Ultimate Guide to Cooking with Fresh Herbs.


Flavor Variations and Recipe Customizations

Cheesy garlic butter mushroom stuffed chicken is delicious on its own, but here are some variations to change things up:

  1. Spinach and Mushroom Stuffed Chicken: Add sautéed spinach to the filling for extra greens and nutrition.
  2. Spicy Cheese Option: Use pepper jack cheese for a kick of heat.
  3. Cream Cheese Addition: Mix in a bit of cream cheese for an ultra-creamy filling.

If you love dishes with a cheesy twist, try our Ultimate Cheesy Bacon Jalapeno Corn Dip for a fun and spicy appetizer.


Serving Suggestions for Cheesy Garlic Butter Mushroom Stuffed Chicken

This stuffed chicken dish pairs well with a variety of sides, from light salads to hearty potatoes:

  • Mashed Potatoes: Creamy mashed potatoes are a classic choice.
  • Caesar Salad: The freshness of romaine lettuce and a tangy dressing balances the richness of the chicken.
  • Garlic Bread: Toasted garlic bread adds crunch and is perfect for dipping in any leftover sauce.

For more side ideas, check out our Perfect Potato Salad with Olive Garden Italian Dressing for a refreshing, easy-to-make accompaniment.


Storage and Reheating Tips for Stuffed Chicken

Leftover stuffed chicken can be just as delicious the next day. Here’s how to store and reheat it:

  • Storage: Keep leftovers in an airtight container in the refrigerator for up to 3 days.
  • Reheating: Place in a preheated oven at 300°F (150°C) until warmed through, or use a microwave on low heat.
  • Freezing: Wrap individual portions in plastic wrap and store in a freezer-safe container for up to 2 months.

For a quick side that reheats well, try our Savory Bacon Bread for a warm, satisfying accompaniment.


FAQs About Cheesy Garlic Butter Mushroom Stuffed Chicken

Here are some frequently asked questions to help make this dish perfect every time:

1. Can I make this dish ahead of time?

  • Yes, you can assemble the chicken with the filling and refrigerate for up to a day before cooking. This is a great way to prep in advance for a gathering.

2. What’s the best cheese to use for this stuffed chicken?

  • Mozzarella melts well, while Parmesan adds a slightly salty, nutty flavor. Feel free to experiment with other melting cheeses, like Gruyère or Fontina.

3. Can I use different mushrooms?

  • Button, cremini, or even portobello mushrooms work well. Each type adds its own unique flavor to the filling.

4. How do I keep the filling from falling out?

  • Use toothpicks or kitchen twine to secure the opening of each chicken breast. This will help keep the filling in place during cooking.

5. How can I tell when the chicken is done?

  • The internal temperature should reach 165°F (74°C) to ensure safe eating. A meat thermometer is useful here.

For additional tips on cooking with mushrooms, see our Health Benefits of Mushrooms.


Nutritional Information

Each serving of this cheesy garlic butter mushroom stuffed chicken provides approximately:

  • Calories: 400
  • Protein: 35g
  • Carbohydrates: 4g
  • Fat: 25g

For a lighter version, try using reduced-fat cheese or using less butter in the filling. This helps maintain flavor without sacrificing health benefits.


Health Benefits of Mushrooms and Lean Chicken Breast

Using mushrooms and lean chicken breast in this dish provides several health benefits:

  • Mushrooms: Rich in antioxidants, vitamins, and minerals, mushrooms add fiber and a savory depth of flavor.
  • Chicken Breast: A lean source of protein, chicken breast is low in fat and high in essential nutrients like B vitamins.

If you’re looking to add more healthy recipes to your menu, check out our Healthy Avocado Egg Salad Roll-Ups for a light, nutrient-dense option.


Conclusion: Try Cheesy Garlic Butter Mushroom Stuffed Chicken for Your Next Meal

Cheesy garlic butter mushroom stuffed chicken is a savory, comforting dish that’s easy enough for weeknight dinners but special enough for guests. With creamy cheese, earthy mushrooms, and juicy chicken breast, this recipe is sure to become a favorite. Customize it with your preferred cheeses and herbs, and enjoy the rich flavors of this delicious meal.

For more cozy and filling dinner ideas, you might also love our Classic Beef Stew, perfect for chilly evenings and packed with hearty ingredients.