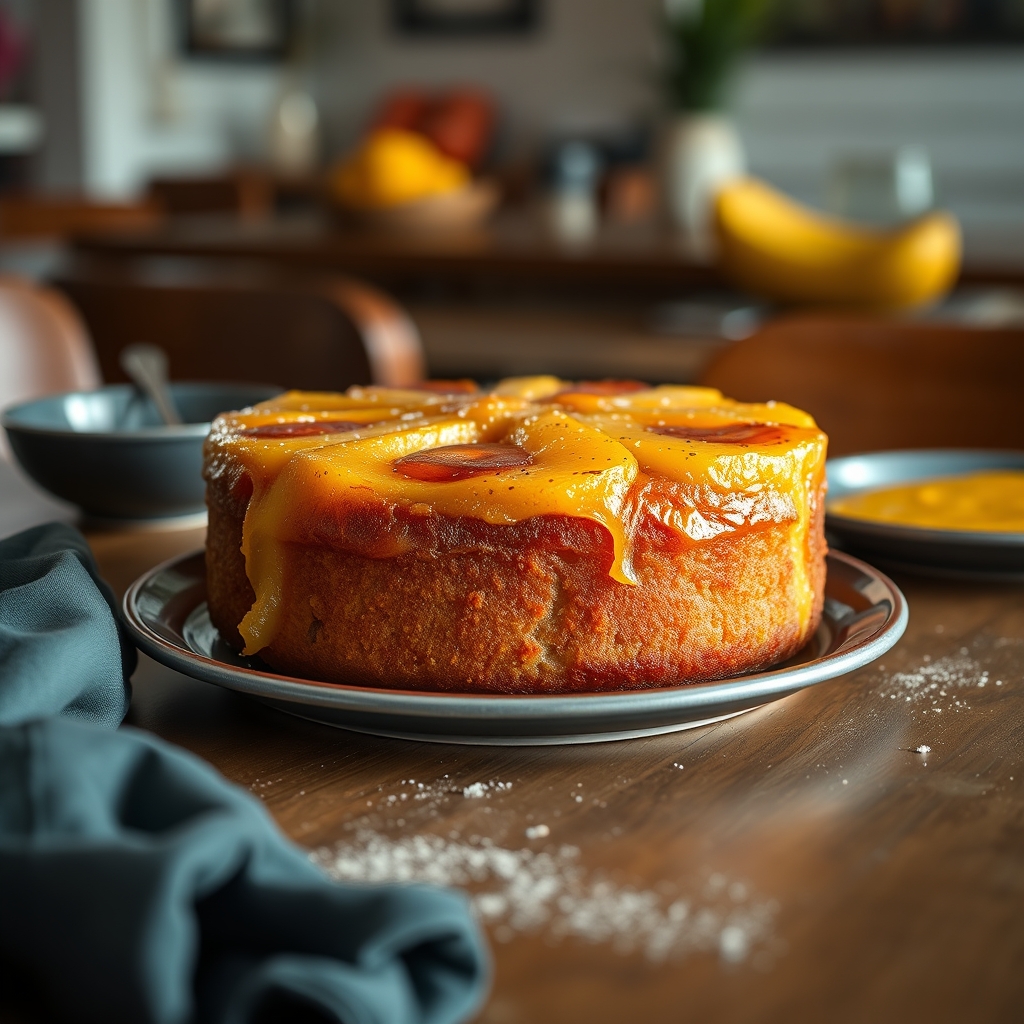
Vintage Pineapple Upside-Down Cake
There’s something undeniably nostalgic about a Vintage Pineapple Upside-Down Cake. This golden, caramelized dessert brings back memories of family gatherings, Sunday suppers, and the comforting aroma of pineapple and brown sugar filling the kitchen. Whether you’re a seasoned baker or just starting out, this classic recipe is a must-try. With its buttery cake base, juicy pineapple rings, and sticky-sweet topping, it’s a dessert that never goes out of style.
Why You’ll Love This Recipe
This Vintage Pineapple Upside-Down Cake is more than just a dessert—it’s a celebration of timeless flavors and simple baking joy. Here’s why it’s a winner:
- Retro charm with modern appeal: The combination of caramelized pineapple and tender cake is a crowd-pleaser, whether served at a potluck or a dinner party.
- Easy to make with pantry staples: No fancy ingredients required—just butter, sugar, flour, and pineapple.
- Visually stunning: The glossy pineapple rings and maraschino cherries create a beautiful presentation that looks as good as it tastes.
- Perfect for any occasion: This cake works just as well for a weeknight treat as it does for a holiday centerpiece.
- Customizable: Swap in different fruits, spices, or toppings to make it your own.
Ingredients Breakdown
Understanding the role of each ingredient ensures your Vintage Pineapple Upside-Down Cake turns out perfectly every time.
- Butter: Used in both the topping and the batter, butter adds richness and moisture. Unsalted butter is best for controlling the sweetness.
- Brown sugar: Creates the signature caramelized topping. Dark brown sugar adds a deeper molasses flavor, while light brown sugar keeps it milder.
- Pineapple rings: Canned pineapple in juice (not syrup) works best for consistent sweetness and texture. Fresh pineapple can be used but requires extra prep.
- Maraschino cherries: These bright red cherries nestle into the pineapple rings, adding pops of color and sweetness.
- All-purpose flour: The foundation of the cake, providing structure. For a lighter texture, sift it before mixing.
- Granulated sugar: Balances the brown sugar’s richness in the batter.
- Eggs: Bind the ingredients together and contribute to the cake’s tender crumb.
- Milk: Adds moisture and helps create a soft, fluffy texture.
- Vanilla extract: Enhances the overall flavor with warm, aromatic notes.
- Baking powder: Gives the cake its rise, ensuring it’s light and airy.
How to Make Vintage Pineapple Upside-Down Cake
Follow these step-by-step instructions for a flawless Pineapple Upside-Down Cake every time.
- Preheat and prepare: Preheat your oven to 350°F. Grease a 9-inch round cake pan or a cast-iron skillet for even baking.
- Make the caramel topping: Melt 4 tablespoons of butter in the pan over low heat. Sprinkle ¾ cup of brown sugar evenly over the melted butter, then remove from heat. Arrange pineapple rings in a single layer, placing a cherry in the center of each ring.
- Prepare the batter: In a mixing bowl, cream ½ cup softened butter with ¾ cup granulated sugar until light and fluffy. Beat in 2 eggs, one at a time, followed by 1 teaspoon vanilla extract.
- Combine dry ingredients: In a separate bowl, whisk together 1½ cups flour, 1½ teaspoons baking powder, and ¼ teaspoon salt.
- Alternate wet and dry: Gradually add the dry ingredients to the butter mixture, alternating with ½ cup milk, beginning and ending with the flour mixture. Mix just until combined.
- Bake: Pour the batter over the pineapple layer, spreading it evenly. Bake for 40–45 minutes, or until a toothpick inserted in the center comes out clean.
- Cool and invert: Let the cake cool in the pan for 10 minutes, then run a knife around the edges. Place a serving plate over the pan and carefully flip it to release the cake. Serve warm or at room temperature.
Pro Tips for the Best Results
- Use room temperature ingredients: Cold eggs or milk can cause the batter to curdle. Let them sit out for 30 minutes before baking.
- Don’t overmix: Stir the batter just until combined to avoid a dense cake.
- Pat pineapple dry: Blot excess juice from the pineapple rings to prevent a soggy cake.
- Invert while warm: If the cake cools completely, the caramel may stick to the pan.
- Add a splash of rum: For a grown-up twist, brush the baked cake with a tablespoon of dark rum before serving.
Variations and Substitutions
This Vintage Pineapple Upside-Down Cake is versatile. Try these twists to suit your taste:
- Fruit swaps: Use peach slices, apple rings, or even mango instead of pineapple.
- Gluten-free: Substitute all-purpose flour with a 1:1 gluten-free baking blend.
- Dairy-free: Replace butter with coconut oil and use almond milk instead of regular milk.
- Spiced version: Add ½ teaspoon cinnamon or nutmeg to the batter for warmth.
- Coconut twist: Sprinkle shredded coconut over the caramel layer before adding the batter.
What to Serve With It
This cake is delightful on its own, but pairing it with the right accompaniments can elevate the experience.
- Whipped cream: A dollop of freshly whipped cream balances the cake’s sweetness.
- Vanilla ice cream: The contrast of warm cake and cold ice cream is irresistible.
- Caramel sauce: Drizzle extra caramel sauce for a decadent finish.
- Coffee or tea: A cup of strong coffee or Earl Grey tea complements the cake’s richness.
- Tropical fruit salad: Serve with fresh mango, kiwi, and passionfruit for a refreshing contrast.
How to Store and Reheat
Keep your Vintage Pineapple Upside-Down Cake fresh with these storage tips.
- Room temperature: Store covered at room temperature for up to 2 days.
- Refrigerate: For longer storage, refrigerate in an airtight container for up to 5 days.
- Freeze: Wrap individual slices in plastic wrap and freeze for up to 3 months. Thaw at room temperature before serving.
- Reheat: Warm slices in the microwave for 15–20 seconds or in a 300°F oven for 10 minutes.
Frequently Asked Questions (FAQs)
Can I use fresh pineapple instead of canned?
Yes, but fresh pineapple contains enzymes that can break down the cake’s texture. To prevent this, lightly cook the pineapple rings before using or opt for canned pineapple in juice.
Why did my cake stick to the pan?
If the cake cools too long before flipping, the caramel hardens and sticks. Invert it after 10 minutes of cooling, while still slightly warm.
Can I make this cake ahead of time?
Absolutely. Bake it a day in advance, store it covered at room temperature, and gently reheat before serving.
What’s the best pan to use?
A 9-inch round cake pan or a well-seasoned cast-iron skillet works best for even heat distribution.
Can I double the recipe?
Yes, double the ingredients and use a 9×13-inch baking dish. Adjust baking time to 50–55 minutes.
Final Thoughts
There’s a reason the Vintage Pineapple Upside-Down Cake has stood the test of time. Its simple yet stunning presentation, irresistible flavor, and comforting nostalgia make it a dessert worth mastering. Whether you’re baking it for a special occasion or just because, this cake is sure to bring smiles to the table. So preheat that oven, gather your ingredients, and let the sweet aroma of caramelized pineapple fill your kitchen. Happy baking!
Print
Vintage Pineapple Upside-Down Cake
Description
A nostalgic dessert featuring caramelized pineapple rings and maraschino cherries atop a moist vanilla cake. This retro favorite is perfect for potlucks or family gatherings.
Ingredients
For the Crust:
- For the topping:
- 1/2 cup unsalted butter
- 1 cup packed light brown sugar
- 1 (20 oz) can pineapple rings (juice drained and reserved)
- 10–12 maraschino cherries (halved)
- For the cake:
- 1 1/2 cups all-purpose flour
- 1 1/2 teaspoons baking powder
- 1/4 teaspoon salt
- 1/2 cup unsalted butter (softened)
- 3/4 cup granulated sugar
- 2 large eggs
- 1 teaspoon vanilla extract
- 1/2 cup reserved pineapple juice
Instructions
1. Prepare the Crust:
- 1. Preheat oven to 350°F (175°C).
- 2. Melt 1/2 cup butter in 10-inch cast iron skillet over medium heat. Stir in brown sugar until dissolved, then remove from heat.
- 3. Arrange pineapple rings in single layer over sugar mixture. Place cherry halves in center of rings and between them.
- 4. Whisk flour, baking powder, and salt in bowl. In separate bowl, beat 1/2 cup butter with granulated sugar until fluffy.
- 5. Beat in eggs one at a time, then vanilla. Alternately add flour mixture and pineapple juice, beginning and ending with flour.
- 6. Carefully spread batter over pineapple layer in skillet.
- 7. Bake 40-45 minutes until toothpick comes clean. Cool 5 minutes in skillet, then invert onto serving plate.
Notes
For best results, use fresh pineapple rings if available. The cake may stick if inverted too soon – wait exactly 5 minutes. Store covered at room temperature for up to 3 days.