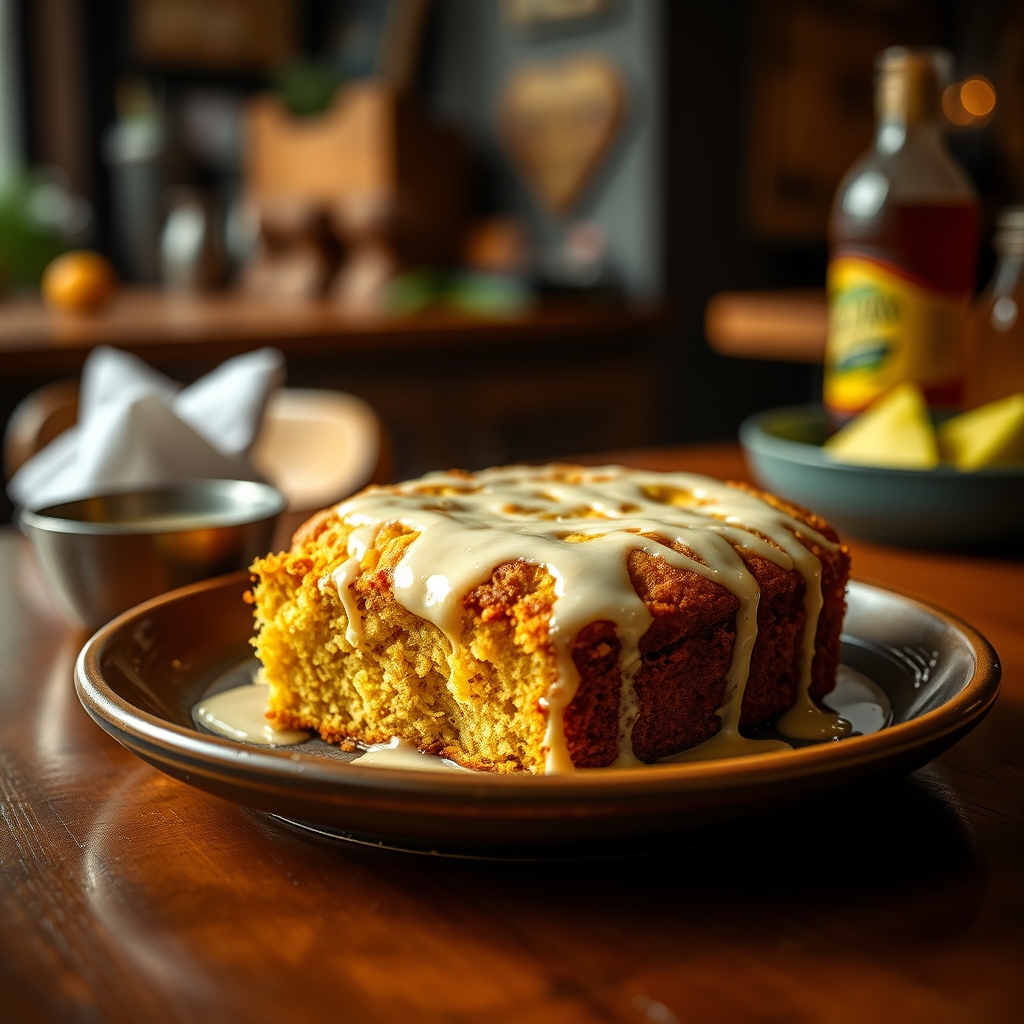
Harvey Wallbanger Cake
If you’re looking for a dessert that’s bursting with retro charm and irresistible flavor, the Harvey Wallbanger Cake is your answer. Inspired by the classic cocktail of the same name, this cake brings together the zesty brightness of orange, the subtle warmth of vanilla, and the herbal kick of Galliano liqueur. It’s a showstopper that’s as fun to make as it is to serve—perfect for parties, potlucks, or just indulging in a slice with your afternoon coffee. Let’s dive into why this cake deserves a spot in your baking repertoire.
Why You’ll Love This Recipe
First, the Harvey Wallbanger Cake is a nostalgic trip back to the 1970s, when this cocktail-inspired dessert first gained popularity. It’s a conversation starter, guaranteed to spark memories or curiosity at any gathering.
Second, the flavor profile is anything but ordinary. The combination of citrusy orange juice, rich vanilla, and the unique anise-like notes of Galliano creates a sophisticated yet approachable taste that stands out from typical cakes.
Third, it’s incredibly moist. Thanks to the addition of oil and orange juice in the batter, this cake stays tender and luscious for days—if it lasts that long.
Fourth, it’s versatile. Whether you’re serving it as a Bundt cake, loaf cake, or even cupcakes, the recipe adapts beautifully to different forms.
Finally, it’s surprisingly easy to make. Despite its gourmet taste, the Harvey Wallbanger Cake comes together with simple mixing techniques, making it a great choice for bakers of all levels.
Ingredients Breakdown
Understanding the role of each ingredient will help you appreciate why this cake works so well.
All-purpose flour: The foundation of the cake, providing structure. For a lighter texture, you can sift it before mixing.
Sugar: Granulated sugar sweetens the cake while helping to create a tender crumb.
Vegetable oil: Unlike butter, oil keeps the cake incredibly moist and ensures a soft texture even after refrigeration.
Eggs: They bind the ingredients together and contribute to the cake’s richness.
Orange juice: Freshly squeezed is best, as it delivers a vibrant citrus flavor that balances the sweetness.
Galliano liqueur: The star of the show, this herbal Italian liqueur adds depth and a subtle licorice note. If you don’t have Galliano, a vanilla liqueur or even a splash of vanilla extract can work in a pinch.
Vanilla extract: Enhances the overall warmth and sweetness of the cake.
Baking powder and baking soda: These leavening agents ensure the cake rises beautifully.
Salt: A small amount balances the sweetness and enhances all the flavors.
How to Make Harvey Wallbanger Cake
Follow these steps for a foolproof Harvey Wallbanger Cake every time.
Step 1: Preheat and Prepare
Preheat your oven to 350°F (175°C). Generously grease a Bundt pan or loaf pan with butter or non-stick spray, ensuring every nook is coated to prevent sticking.
Step 2: Mix Dry Ingredients
In a large bowl, whisk together the flour, sugar, baking powder, baking soda, and salt. Set aside.
Step 3: Combine Wet Ingredients
In another bowl, beat the eggs lightly before adding the oil, orange juice, Galliano, and vanilla extract. Whisk until fully combined.
Step 4: Blend Wet and Dry Mixtures
Gradually pour the wet ingredients into the dry ingredients, stirring gently until just combined. Overmixing can lead to a dense cake, so stop as soon as no flour streaks remain.
Step 5: Bake to Perfection
Pour the batter into your prepared pan and smooth the top. Bake for 45-55 minutes (for a Bundt pan) or until a toothpick inserted into the center comes out clean. Smaller loaf pans may require less time, so check at the 35-minute mark.
Step 6: Cool and Glaze
Let the cake cool in the pan for 10 minutes before inverting it onto a wire rack. Once completely cool, drizzle with an optional orange-Galliano glaze for extra decadence.
Pro Tips for the Best Results
For an ultra-moist crumb, substitute half the orange juice with buttermilk. The acidity tenderizes the gluten, resulting in a softer texture.
If you don’t have Galliano, try using a combination of vanilla extract and a splash of anise-flavored liqueur like Sambuca for a similar effect.
For a glossy, professional finish, brush the warm cake with a simple syrup made from equal parts orange juice and sugar before glazing.
Always use room-temperature eggs for better emulsification, which helps create a uniform batter.
To prevent the cake from browning too quickly, tent it loosely with aluminum foil halfway through baking.
Variations and Substitutions
For a non-alcoholic version, replace the Galliano with orange extract or an extra teaspoon of vanilla. You can also use orange-flavored sparkling water for a subtle fizz.
Turn this into cupcakes by dividing the batter into a lined muffin tin and baking for 18-22 minutes. Top with whipped cream and orange zest.
Add a cup of toasted walnuts or pecans to the batter for a nutty crunch.
For a tropical twist, replace half the orange juice with pineapple juice and add shredded coconut to the batter.
If you love chocolate, fold in a half-cup of mini chocolate chips for a citrus-chocolate combo.
What to Serve With It
This cake pairs wonderfully with a cup of strong coffee or espresso, balancing the sweetness with a bitter contrast.
For a dessert spread, serve alongside vanilla bean ice cream or a dollop of whipped cream infused with a hint of Galliano.
Fresh berries, such as raspberries or strawberries, add a refreshing contrast to the rich cake.
If serving at a brunch, offer it with a mimosa or a Harvey Wallbanger cocktail for a full thematic experience.
How to Store and Reheat
Store the cake in an airtight container at room temperature for up to 3 days. If your kitchen is warm, refrigerate it to prevent spoilage, though this may slightly dry the cake.
To freeze, wrap individual slices or the whole cake tightly in plastic wrap and aluminum foil. Freeze for up to 3 months. Thaw overnight in the fridge before serving.
To refresh leftover cake, warm individual slices in the microwave for 10-15 seconds or in a 300°F oven for 5 minutes.
Frequently Asked Questions (FAQs)
Can I make this cake without alcohol?
Absolutely. Simply replace the Galliano with an extra teaspoon of vanilla extract or orange zest for flavor.
What can I use instead of a Bundt pan?
A 9×5-inch loaf pan or two 8-inch round cake pans work well. Adjust baking times accordingly.
Why did my cake stick to the pan?
Ensure you grease every crevice of the Bundt pan thoroughly. Dusting with flour after greasing can also help.
Can I make this cake ahead of time?
Yes, it actually tastes better the next day as the flavors meld. Bake it a day before serving and store it covered.
Is there a substitute for vegetable oil?
Melted coconut oil or a light olive oil can be used, though they may impart a slight flavor difference.
Final Thoughts
The Harvey Wallbanger Cake is more than just a dessert—it’s a celebration of bold flavors and retro fun. Whether you’re baking it for a special occasion or just to satisfy a sweet craving, this cake delivers on every level. Its moist texture, vibrant citrus notes, and hint of herbal sophistication make it a standout choice. So, preheat that oven, pour yourself a little Galliano to sip while you bake, and get ready to enjoy a slice of culinary history. Happy baking!
Print
Harvey Wallbanger Cake
Description
A fun and boozy twist on the classic bundt cake, inspired by the famous Harvey Wallbanger cocktail. This cake features the flavors of orange juice, vanilla, and Galliano liqueur for a moist, flavorful dessert that’s perfect for parties.
Ingredients
For the Crust:
- For the cake:
- 1 (15.25 oz) package yellow cake mix
- 1 (3.4 oz) package instant vanilla pudding mix
- 4 large eggs
- 1/2 cup vegetable oil
- 1/4 cup Galliano liqueur
- 1/4 cup vodka
- 3/4 cup orange juice
- For the glaze:
- 1 cup powdered sugar
- 2 tablespoons orange juice
- 1 tablespoon Galliano liqueur
- 1 tablespoon vodka
Instructions
1. Prepare the Crust:
- Preheat oven to 350°F (175°C). Grease and flour a 10-inch bundt pan.
- In a large bowl, combine cake mix, pudding mix, eggs, oil, Galliano, vodka, and orange juice. Beat with an electric mixer for 2 minutes until smooth.
- Pour batter into prepared bundt pan and bake for 45-50 minutes, or until a toothpick inserted comes out clean.
- Let cake cool in pan for 10 minutes, then invert onto a wire rack to cool completely.
- For the glaze: Whisk together powdered sugar, orange juice, Galliano, and vodka until smooth. Drizzle over cooled cake.
Notes
For a non-alcoholic version, substitute orange juice for the Galliano and vodka in both the cake and glaze. The cake can be stored covered at room temperature for up to 3 days.