Lemon Tiramisu with Lemon Curd – A Zesty Twist on Classic Tiramisu

citrus tiramisu, lemon curd dessert, no-bake lemon tiramisu, mascarpone lemon recipe, lemon dessert ideas

Lemon Tiramisu with Lemon Curd – A Refreshing Citrus Twist on a Classic Dessert

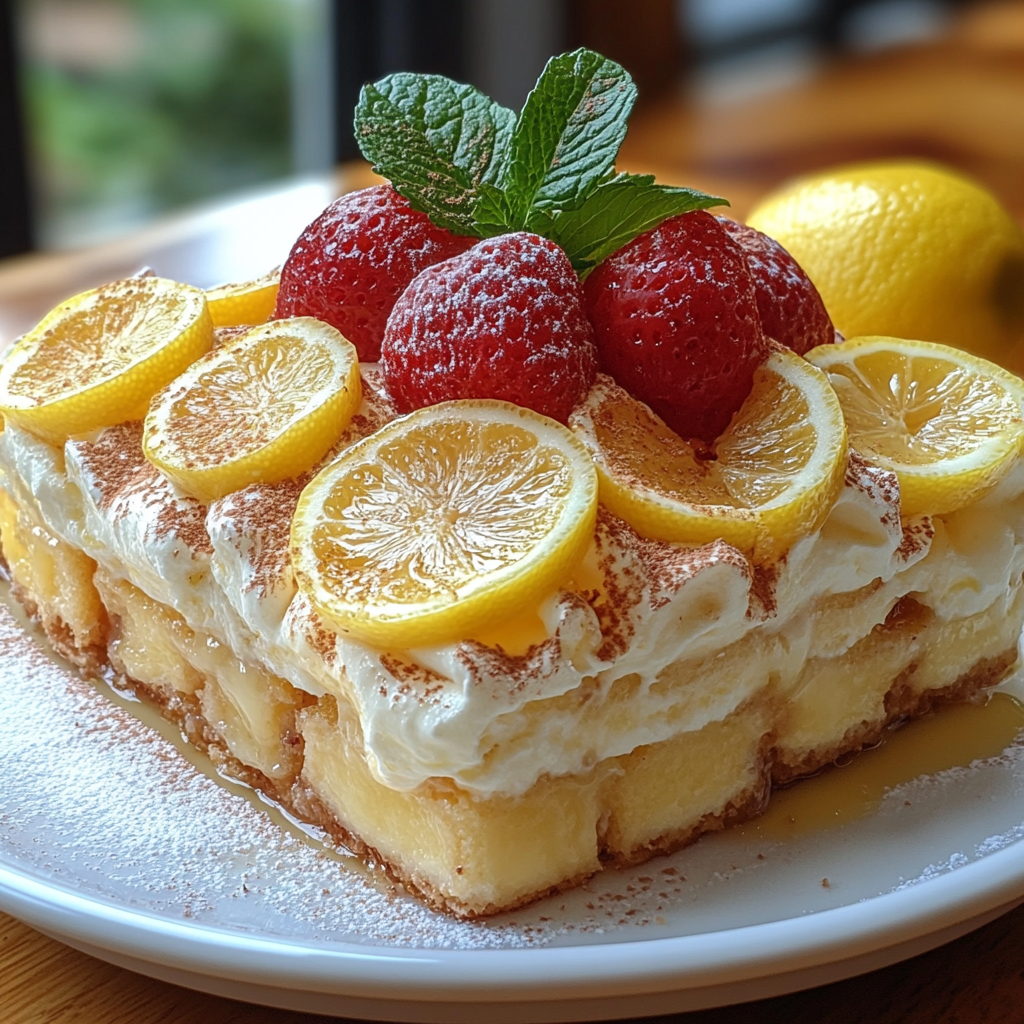
Lemon Tiramisu with Lemon Curd is an elegant, refreshing take on the traditional Italian dessert, offering a bright, tangy twist perfect for spring and summer gatherings. This no-bake treat combines the creamy richness of mascarpone and whipped cream with the zesty flavor of lemon curd, creating a unique dessert that stands out.

For more delightful lemon-based treats, consider our Two-Ingredient Lemon Pie Filling, an easy dessert for any occasion, or the Lemon Buttermilk Sheet Cake, which provides a rich, moist lemony taste in every bite.


Why Try Lemon Tiramisu with Lemon Curd?

This dessert is a fantastic choice because it:

  • Offers a Bright, Citrusy Flavor: A perfect light option compared to the classic coffee-flavored tiramisu.
  • Combines Simple Ingredients: Requires basic pantry items like ladyfingers, lemon curd, mascarpone, and heavy cream.
  • No-Bake and Easy to Prepare: Ideal for summer gatherings when oven use is minimized.

For more no-bake ideas, try our No-Bake Pumpkin Cheesecake, a perfect autumn-inspired treat that’s simple and delicious.


Ingredients for Lemon Tiramisu with Lemon Curd

Each ingredient brings something unique to this dessert, balancing flavors and creating a smooth, creamy texture.

Core Ingredients

  1. Ladyfingers: A classic tiramisu base that absorbs the lemon flavors beautifully.
  2. Mascarpone Cheese: Adds creamy richness and balances the tartness.
  3. Lemon Curd: Provides a zesty, vibrant flavor and a pop of color.
  4. Heavy Cream: Whipped to add lightness to the mascarpone layer.
  5. Limoncello (or Lemon Juice): Used for dipping ladyfingers, enhancing the lemony notes.

Tip: You can use store-bought lemon curd or make your own for a fresher taste.

For a more indulgent dessert with similar layering, explore our Raspberry Lemon Bars with Shortbread Crust, a sweet and tangy treat.


Step-by-Step Recipe for Lemon Tiramisu

1. Preparing the Ingredients

  • Soften Mascarpone: This ensures easy blending for a smooth texture.
  • Whip the Heavy Cream: Whip until soft peaks form, which will add lightness to the mascarpone mixture.

2. Layering the Tiramisu

  • Dip the Ladyfingers: Lightly dip each ladyfinger in limoncello or lemon juice and arrange in a single layer in the serving dish.
  • Layer with Lemon Curd and Mascarpone Mixture: Spread lemon curd and the whipped mascarpone cream mixture over the ladyfingers.

3. Chilling and Serving

  • Refrigerate for 4-6 Hours: Chilling allows the flavors to meld, creating a rich, cohesive taste.
  • Garnish with Zest and Mint: Before serving, add lemon zest and mint leaves for an extra touch of freshness.

For another refreshing dessert idea, try our Overnight Creme Brulee French Toast, perfect for breakfast or dessert.


Creative Variations of Lemon Tiramisu

Alternative Ingredients

  • Use Pound Cake Instead of Ladyfingers: This will create a denser, richer layer.
  • Swap Lemon Curd for Orange Curd: For a citrus variation that adds a different flavor profile.

Dairy-Free Version

  • Use Coconut Cream Instead of Heavy Cream: For a dairy-free option that pairs well with lemon.

For more fruity variations, check out Classic Apple Dumplings, a comforting option that combines fruit and pastry.


Tips for Perfect Lemon Tiramisu

  1. Choose Quality Ingredients: Fresh, high-quality mascarpone and lemon curd make a significant difference in flavor.
  2. Don’t Over-Soak the Ladyfingers: A quick dip in limoncello or lemon juice prevents the dessert from becoming soggy.
  3. Make Ahead: Tiramisu tastes better when allowed to sit, so plan to make this dessert at least a few hours ahead.

If you enjoy make-ahead desserts, try our No-Bake Banana Pudding Cheesecake for another easy, impressive option.


Serving Suggestions

  • Individual Glasses or Dessert Cups: Serve in small glasses for a modern, elegant presentation.
  • Garnish Ideas: Add powdered sugar, lemon zest, or fresh mint leaves.
  • Pairing Options: Serve with sparkling water, prosecco, or a light white wine.

For another visually appealing treat, our Mini Pineapple Coconut Milk Cheesecakes also make delightful individual servings.


Frequently Asked Questions (FAQs)

1. Can I make lemon tiramisu without alcohol?
Yes, simply replace limoncello with lemon juice for a non-alcoholic version.

2. What’s the difference between lemon tiramisu and classic tiramisu?
Lemon tiramisu features a citrus base, while classic tiramisu uses coffee and cocoa for flavor.

3. Can I use cream cheese instead of mascarpone?
Yes, though mascarpone has a creamier, less tangy taste than cream cheese.

4. How do I prevent the layers from becoming soggy?
Avoid over-soaking the ladyfingers, which can lead to excess moisture.

For more tips on dessert layering, see our Ultimate Guide to Perfect French Bread Pizza, which also discusses managing textures.


LSI and NLP Keywords for SEO Optimization

Incorporate these keywords to improve SEO:

  • best lemon tiramisu recipe
  • mascarpone lemon dessert
  • easy lemon desserts
  • no-bake tiramisu
  • limoncello tiramisu
  • refreshing citrus dessert
  • lemon curd recipes

For additional lemon-based recipes, try Lemon Cream Pie, which offers a classic, creamy citrus taste.


Conclusion

Lemon Tiramisu with Lemon Curd is a light, refreshing alternative to traditional tiramisu, perfect for warm weather or any occasion when you crave a citrusy twist. With layers of creamy mascarpone, vibrant lemon curd, and delicate ladyfingers, this dessert is sure to impress.

For more citrusy and creamy desserts, don’t miss our Easy Apple Cheesecake Tacos or Strawberry Lemonade Bars if you’re looking for a refreshing, tangy finish to your meal.

Cranberry Feta Pinwheels with Cream Cheese – Festive and Easy Holiday Appetizer

holiday pinwheel appetizers, cranberry feta roll-ups, cream cheese pinwheels, festive appetizers, easy holiday snacks, cranberry pinwheel recipe

Cranberry Feta Pinwheels with Cream Cheese – A Festive Holiday Appetizer

Craving an appetizer that’s both visually striking and incredibly tasty? These Cranberry Feta Pinwheels with Cream Cheese are the perfect answer. With their vibrant red cranberries, creamy cheese, and savory feta, these pinwheels bring a beautiful balance of flavors to any holiday table. They’re easy to make, loved by all, and an ideal snack for potlucks, parties, and cozy nights in.

For more delightful appetizer ideas, check out Cheesy Bacon Jalapeno Corn Dip or Dorito Pizza Rolls for unique flavors that guests will love.


Why Cranberry Feta Pinwheels are a Holiday Favorite

These pinwheels make an excellent addition to holiday spreads because:

  • Quick and Easy: They require minimal ingredients and only a few steps.
  • Festive Colors: The cranberries add a pop of red that’s perfect for holiday gatherings.
  • Perfect Balance of Flavors: The tart cranberries, salty feta, and creamy cheese complement each other beautifully.

If you’re looking for another festive dish, consider Apple Cranberry Walnut Salad, a salad that also captures holiday flavors.


Ingredients for Cranberry Feta Pinwheels with Cream Cheese

Creating these pinwheels is simple, with each ingredient bringing unique flavor and texture.

Core Ingredients

  1. Tortillas or Puff Pastry: A soft base for rolling up the filling.
  2. Cream Cheese: Adds smooth texture and mild flavor.
  3. Feta Cheese: Provides a salty and tangy element.
  4. Dried Cranberries: For a sweet and tart contrast.
  5. Green Onions: Adds a touch of freshness and color.

Tip: For additional flavor, consider adding chopped pecans or walnuts.

Optional Additions

  • Fresh Herbs: Chopped parsley or basil for color and added flavor.
  • Honey: A drizzle to enhance the sweetness of cranberries.
  • Chopped Nuts: For added crunch.

For a similar savory snack with a touch of sweetness, try our Raspberry Cheesecake Brownie Bites.


Step-by-Step Recipe for Cranberry Feta Pinwheels

1. Prepare the Ingredients

  • Chop the Cranberries: Slice dried cranberries into smaller pieces for easier mixing and more even distribution in each bite.
  • Soften the Cream Cheese: This makes it easier to spread, ensuring smooth layering.

2. Mixing the Filling

  • Combine Cream Cheese, Feta, and Cranberries: Use a bowl to mix softened cream cheese, crumbled feta, and chopped cranberries.
  • Add Green Onions: Stir in chopped green onions for a bit of crunch and a mild onion flavor.

For an additional festive appetizer idea, consider our Healthy Avocado Egg Salad Roll-Ups, which offer a healthy and delicious alternative.

3. Assembling and Rolling the Pinwheels

  • Spread the Filling: Lay out the tortillas and spread an even layer of the filling.
  • Roll Tightly: Roll each tortilla or pastry tightly to ensure compact pinwheels.

4. Chilling and Slicing

  • Chill for at Least an Hour: This helps the filling set, making the pinwheels easier to slice.
  • Slice and Serve: Slice the rolls into 1-inch pieces, arrange on a platter, and enjoy!

Serving Suggestions and Presentation Ideas

  • Arrange Festively: Display pinwheels in a circular or holiday wreath shape on a platter.
  • Garnish with Fresh Herbs: Add sprigs of parsley or pomegranate seeds for a festive touch.
  • Pair with Other Dips: Serve with Garlic Bacon Kale or other veggie dips to balance the rich flavors.

Creative Variations for Cranberry Feta Pinwheels

Alternative Cheeses

  • Goat Cheese: For a creamier and slightly tangier flavor.
  • Brie: Adds a creamy, mild taste that pairs well with cranberries.

Try Different Bases

  • Puff Pastry: For a flakier, golden-baked option.
  • Lettuce Wraps: A lighter, gluten-free choice.

For a unique twist on appetizers, try our Smoked Gouda Mac and Cheese Balls as a complementary savory snack.


Frequently Asked Questions (FAQs)

1. Can I make cranberry feta pinwheels with puff pastry instead of tortillas?
Yes, puff pastry will add a flaky texture. Bake at 375°F for 10–12 minutes until golden.

2. What can I use instead of feta cheese?
Try goat cheese or cream cheese for a milder flavor.

3. How can I keep the pinwheels from unrolling?
Chill them before slicing and secure with a toothpick if needed.

4. Are there any dairy-free alternatives for this recipe?
Use vegan cream cheese and omit feta for a dairy-free version.

For other make-ahead appetizer options, see our Ultimate Guide to Perfect French Bread Pizza.


LSI and NLP Keywords for SEO Optimization

Including these related keywords will help improve SEO:

  • holiday appetizers
  • easy pinwheel recipe
  • cranberry feta roll-ups
  • festive finger food
  • cream cheese appetizers
  • party snacks
  • holiday potluck ideas

If you’re looking for more holiday treats, try Salted Caramel Rice Krispie Treats for a sweet end to your appetizer spread.


Nutrition and Storage Tips

Cranberry Feta Pinwheels are:

  • Rich in Protein: Feta and cream cheese provide a boost of protein.
  • Moderate in Calories: Depending on the type of wrap, they can be a lighter option.
  • Great for Prep-Ahead: These pinwheels can be made up to 24 hours in advance.

Storage Tips

  • Refrigerate: Store in an airtight container for up to 3 days.
  • Avoid Freezing: Freezing can alter the texture of the cheese.

For other make-ahead snacks, consider our Chocolate Magic Shell Yogurt Cup for a quick, refreshing dessert.


Conclusion

Cranberry Feta Pinwheels with Cream Cheese are a festive and flavorful addition to any holiday table. With their delightful mix of colors, textures, and flavors, they’re sure to become a new favorite. Customize them with your preferred ingredients, and enjoy a delicious appetizer that’s easy to make and even easier to enjoy.

For more holiday appetizer ideas, don’t miss our Ultimate Loaded Sweet Potato Nachos or Raspberry Lemon Bars for a tangy-sweet treat to pair with these pinwheels.

Red Velvet Cupcakes with Cream Cheese Frosting – Perfect for Any Occasion

moist red velvet cupcakes, classic red velvet cupcakes, homemade red velvet recipe, red velvet cream cheese cupcakes, easy red velvet cupcakes

Classic Red Velvet Cupcakes – A Timeless Treat

Red Velvet Cupcakes are a delightful combination of color, texture, and taste, making them a favorite for special occasions and everyday indulgence. The deep red hue, tender crumb, and the tangy cream cheese frosting create a perfectly balanced dessert that’s as pleasing to the eyes as it is to the palate. In this article, we’ll explore every aspect of making Red Velvet Cupcakes at home.

For similar indulgent dessert recipes, take a look at Decadent Caramel Chocolate Cupcakes, which offer a rich, chocolatey twist, or No-Bake Banana Pudding Cheesecake for a refreshing no-bake option.


What Makes Red Velvet Cupcakes So Special?

The beauty of red velvet lies in its balance:

  • Visual Appeal: The vibrant red color makes these cupcakes eye-catching and festive.
  • Unique Flavor Profile: A mild cocoa base with a slight tang from buttermilk and vinegar sets red velvet apart from traditional chocolate cakes.
  • Perfect Pairing with Cream Cheese Frosting: The tangy cream cheese frosting complements the soft, fluffy texture of the cupcakes.

Red Velvet’s popularity spans from holiday treats to wedding cakes. For a delicious twist on traditional flavors, try Classic Homemade Donuts as a fun alternative dessert.


Ingredients for Red Velvet Cupcakes

Creating these delicious cupcakes requires simple ingredients, each playing a vital role in achieving the signature red velvet texture and taste.

Core Ingredients

  1. Flour: All-purpose flour provides structure.
  2. Cocoa Powder: Use a small amount of unsweetened cocoa for that hint of chocolate.
  3. Sugar: Adds sweetness and moistness to the cupcakes.
  4. Buttermilk: The acidity enhances flavor and tenderness.
  5. Vinegar: Reacts with baking soda to help the cupcakes rise and remain soft.
  6. Red Food Coloring: For the vibrant red hue; natural alternatives like beet powder work as well.
  7. Cream Cheese Frosting Ingredients: Cream cheese, butter, powdered sugar, and vanilla for a classic tangy, sweet finish.

Optional Additions

  • Vanilla Extract: Enhances the overall flavor.
  • Salt: Balances sweetness.
  • Oil or Butter: Adds richness and moisture.

For a rich, chocolaty dessert variation, try our Chocolate Magic Shell Yogurt Cup as a topping or filling idea.


Step-by-Step Recipe for Red Velvet Cupcakes

1. Preparing the Ingredients

  • Sift Dry Ingredients: Sift flour, cocoa, and salt together.
  • Mix Wet Ingredients: In a separate bowl, blend buttermilk, vinegar, and food coloring.

2. Mixing the Batter

  • Cream Butter and Sugar: Cream until light and fluffy.
  • Incorporate Dry and Wet Ingredients: Alternate adding dry and wet ingredients, mixing just until combined.

3. Baking the Cupcakes

  • Bake at 350°F for 15–18 minutes: Test with a toothpick to ensure they’re baked through.

For other baking tips, our Raspberry Lemon Bars with Shortbread Crust offers insights on achieving a balanced texture in baked goods.


Cream Cheese Frosting for Red Velvet Cupcakes

Ingredients for Cream Cheese Frosting

  1. Cream Cheese: Softened for a smooth consistency.
  2. Butter: Adds richness.
  3. Powdered Sugar: Sweetens and thickens the frosting.
  4. Vanilla Extract: Complements the frosting’s tang.

Making the Frosting

  1. Beat Cream Cheese and Butter: Cream until fluffy.
  2. Add Powdered Sugar Gradually: Blend to avoid lumps.
  3. Incorporate Vanilla: Mix until smooth.

Frosting the Cupcakes

Using a piping bag, frost each cupcake. For a decorative finish, try topping with red sprinkles or shaved chocolate. Another variation could be adding Salted Caramel Rice Krispie Treats as a sweet garnish.


Baking Tips for Perfect Red Velvet Cupcakes

Maintaining the Vibrant Red Color

  • Use Quality Food Coloring: Gel or liquid food colorings yield a consistent color.
  • Avoid Overmixing: Too much mixing can dull the color.

Achieving a Moist Texture

  • Don’t Overbake: Monitor closely in the last few minutes to prevent dryness.
  • Oil or Butter: Either can be used, depending on the desired richness.

For more tips on achieving moist, fluffy results, our Classic Apple Dumplings recipe includes tricks for ensuring tender baked goods.


Frequently Asked Questions (FAQs)

1. Can I make red velvet cupcakes without food coloring?
Yes, natural alternatives like beet powder can provide a red hue without artificial coloring.

2. What is the difference between red velvet and chocolate cupcakes?
Red velvet has a milder cocoa flavor, a slightly tangy taste from buttermilk, and its signature red color.

3. Can I use this recipe to make a red velvet cake?
Absolutely! This batter works well for cakes; just adjust the baking time accordingly.

4. How should I store red velvet cupcakes?
Store in an airtight container at room temperature for up to 2 days or refrigerate for longer storage.

5. Why do I need vinegar in red velvet cupcakes?
Vinegar reacts with baking soda to help the cupcakes rise and maintain a fluffy texture.


Keyword Optimization

To enhance searchability, use related keywords throughout the article:

  • Best red velvet cupcake recipe
  • Moist red velvet cupcakes
  • Homemade red velvet cupcakes
  • Cream cheese frosting for cupcakes
  • Valentine’s Day cupcake ideas
  • Easy red velvet recipe
  • Classic cupcake recipes

For more cupcake varieties, try Easy Apple Cheesecake Tacos for a fruity, festive treat.


Nutrition and Storage Tips

Red velvet cupcakes provide:

  • Moderate Sugar Content: Balanced with tangy cream cheese frosting.
  • Calcium: Buttermilk adds calcium, beneficial for bones.
  • Vitamin A: Cream cheese contributes to vitamin A intake.

Storage Tips

  • Room Temperature: Store in an airtight container for up to 2 days.
  • Refrigeration: For longer storage, keep in the refrigerator for up to 5 days.

For other storage-friendly treats, try Reese’s Pieces Chocolate Chip Cookie Bars, which are equally delicious and easy to store.


Conclusion

Red Velvet Cupcakes bring joy with every bite. Their festive appearance, moist texture, and rich frosting make them perfect for any celebration. Whether you’re making them for Valentine’s Day, a holiday gathering, or just as a treat, this recipe will deliver the deliciously indulgent cupcakes you’re after.

For more delectable dessert ideas, explore Peanut Butter Blossoms for a peanut butter twist on classic cookies or Ultimate Peanut Butter Pie if you’re in the mood for a no-bake dessert.

Thanksgiving Leftover Turkey and Cranberry Pizza – A Festive Post-Holiday Treat

leftover turkey pizza, cranberry sauce pizza, Thanksgiving pizza recipe, holiday leftover ideas, post-Thanksgiving recipes

Thanksgiving Leftover Turkey and Cranberry Pizza 

Thanksgiving leftovers offer endless possibilities for creative recipes, and this Thanksgiving Leftover Turkey and Cranberry Pizza is a standout. It brings together savory turkey, tangy cranberry sauce, and creamy cheese atop a crisp crust. This pizza is a great way to transform holiday ingredients into a fresh, delicious meal the whole family will enjoy.

For more comforting pizza ideas, check out Family Night Favorite Easy French Bread Pizza or the classic Homemade Chicago-Style Deep Dish Pizza for additional inspiration.


Why Make Thanksgiving Leftover Pizza?

This pizza is ideal for the days after Thanksgiving because it’s:

  • Effortlessly Flavorful: Turkey and cranberry make a fantastic flavor combination that’s savory and slightly sweet.
  • Quick and Easy: With leftovers as the main ingredients, this pizza requires minimal preparation.
  • A Fun Twist on Tradition: Repurpose Thanksgiving flavors in a unique way that everyone will love.

If you’re looking for another creative way to use Thanksgiving leftovers, try our One-Pan Turkey Dinner, which simplifies classic holiday flavors.


Ingredients for Thanksgiving Leftover Pizza

Core Ingredients

  1. Pizza Crust: Choose pre-made crust, naan bread, or even French bread for a sturdy base.
  2. Leftover Turkey: Shredded or diced for easy topping distribution.
  3. Cranberry Sauce: Adds a tangy sweetness that pairs well with turkey.
  4. Cheese: Options include mozzarella, goat cheese, or brie, all of which melt beautifully.

Tip: You can add a layer of cream cheese or ricotta for added creaminess.

Optional Toppings

  • Stuffing: Adds texture and familiar holiday flavors.
  • Sliced Onions or Spinach: For an extra layer of flavor and nutrition.
  • Herbs: Fresh sage, rosemary, or thyme for a festive touch.

For more Thanksgiving-inspired dishes, check out our Ultimate Guide to Perfect French Bread Pizza for easy, customizable ideas.


Step-by-Step Recipe for Thanksgiving Leftover Pizza

1. Prepare the Ingredients

  • Shred or Dice Turkey: Using cooked turkey makes preparation easier, so shred or dice it into bite-sized pieces.
  • Prepare the Crust: Preheat the oven according to crust instructions, ensuring it’s ready for baking.

2. Layer the Ingredients

  • Spread Cranberry Sauce: Use it as the “sauce” layer for the pizza.
  • Add Turkey and Cheese: Sprinkle turkey evenly, followed by your choice of cheese.

For another easy holiday-inspired recipe, try our Classic Beef Stew Recipe, which is equally warm and satisfying.

3. Bake the Pizza

  • Baking Instructions: Bake according to crust directions or until cheese is melted and bubbly.

4. Garnish and Serve

  • Add Fresh Herbs: Sprinkle with fresh herbs like rosemary or sage for an aromatic finish.
  • Serve Warm: Slice and serve hot for best results.

Presentation and Serving Ideas

  • Festive Pizza Bar: Offer a variety of toppings so guests can personalize their own slices.
  • Pair with Light Side Dishes: Serve alongside a simple salad or roasted veggies.
  • Cut in Small Squares: Ideal for holiday gatherings or game day snacks.

For a unique side, consider pairing this pizza with Apple Cranberry Walnut Salad for complementary flavors.


Variations and Customizations

Try Different Bases

  • Flatbread: Works well for a thin and crispy base.
  • Stuffed Crust: Add an extra layer of cheese in the crust for a cheesy surprise.
  • Cauliflower Crust: For a low-carb option.

Substitute Cranberry Sauce

  • Barbecue Sauce: Pairs well with turkey for a smoky, sweet twist.
  • Alfredo Sauce: Adds creaminess and richness to each bite.

For more unique pizza ideas, explore our Pizza Roll-Ups Recipe, which turns pizza into a fun, handheld snack.


Frequently Asked Questions (FAQs)

1. Can I make this pizza ahead of time?
Yes, you can assemble the pizza ahead of time and refrigerate it. Bake when ready to serve.

2. What’s the best way to reheat leftover pizza?
Reheat in the oven or air fryer to maintain crispiness, avoiding the microwave if possible.

3. Can I use ham instead of turkey?
Absolutely! Ham works well as a substitute and brings a savory, smoky flavor.

4. What cheese pairs best with cranberry sauce?
Goat cheese, brie, or mozzarella are great options due to their mild flavors that complement the tart cranberry sauce.


LSI and NLP Keywords for SEO Optimization

Incorporate these keywords throughout the article for improved SEO:

  • leftover Thanksgiving recipes
  • creative turkey recipes
  • holiday pizza ideas
  • easy holiday leftover meals
  • Thanksgiving leftover ideas
  • cranberry pizza topping
  • turkey and cranberry recipes
  • quick pizza ideas

Nutrition and Serving Sizes

This pizza is a balanced meal that’s:

  • High in Protein: Turkey provides protein.
  • Rich in Vitamins: Spinach, onions, and cranberries offer vitamins and fiber.
  • Moderate in Calories: Use light cheese options for a healthier twist.

If you’re looking for more healthy holiday recipes, try our Healthy Avocado Egg Salad Roll-Ups for a nutritious appetizer or snack.


Conclusion

Transforming Thanksgiving leftovers into a Turkey and Cranberry Pizza is a delicious and easy way to enjoy holiday flavors in a new form. With its balance of sweet cranberry sauce, savory turkey, and melted cheese, this pizza will be a post-holiday favorite. Experiment with toppings, sauces, and crusts to make it your own and enjoy a slice of Thanksgiving spirit!

For more festive meal ideas, explore our Taco Bell-Inspired Mexican Pizza Casserole or Garlic Bacon Kale Recipe, perfect for adding variety to your holiday spread.

Christmas Salad – Festive, Fresh, and Full of Flavor

holiday salad, festive Christmas salad, Christmas fruit salad, winter holiday salad, healthy holiday side, colorful Christmas side

Christmas Salad – Festive, Fresh, and Full of Flavor!

Adding a vibrant Christmas Salad to your holiday table brings a delightful mix of color, texture, and fresh flavors. This Christmas Salad combines seasonal ingredients like pomegranate seeds, mandarin oranges, and mixed greens, making it a perfect addition to rich holiday meals.

For a variety of fresh, festive sides, you might also enjoy Apple Cranberry Walnut Salad or Healthy Avocado Egg Salad Roll-Ups, which complement the salad’s lightness.


Why Add a Christmas Salad to Your Holiday Spread?

This salad is ideal for the holiday season because it’s:

  • Light and Refreshing: It balances out the heavier holiday dishes.
  • Colorful and Festive: The bright colors from fruits and greens add visual appeal to your table.
  • Nutritious: Packed with vitamins, fiber, and healthy fats.

For another festive salad, try Fresh Summer Melon Prosciutto Salad, which also uses fruits for a sweet and savory experience.


Ingredients for Christmas Salad

Core Ingredients

  1. Mixed Greens: Use a blend of arugula, spinach, or baby greens for a base that’s mild yet flavorful.
  2. Seasonal Fruits: Pomegranate seeds, mandarin oranges, and cranberries add a sweet, tangy balance.
  3. Crunchy Elements: Toasted pecans or walnuts bring texture.
  4. Cheese: Options like goat cheese or feta add a creamy contrast.
  5. Festive Dressing: A homemade honey-mustard or balsamic dressing ties the flavors together.

Tip: Swap out fruits and nuts based on preference, or add a drizzle of Balsamic Glaze for extra depth.


Step-by-Step Recipe for Christmas Salad

1. Prepare the Ingredients

  • Wash the Greens: Rinse and dry the greens thoroughly.
  • Prep the Fruit: Peel and segment oranges, deseed pomegranates, and prepare any other fruits.

2. Assemble the Salad

  • Layer the Ingredients: Start with the greens, add fruits, sprinkle nuts, and crumble cheese on top.

3. Make the Dressing

  • Simple Vinaigrette: Mix olive oil, honey, mustard, and a splash of balsamic vinegar.

For an additional sweet twist, try pairing this with Raspberry Cheesecake Brownie Bites, which offer a creamy and tangy contrast.

4. Toss and Serve

  • Add Dressing: Pour dressing over the salad just before serving to keep it fresh and crisp.

Presentation and Serving Ideas

Arrange Festively

  • Holiday Wreath: Shape the salad in a wreath form on a round platter, decorating with pomegranate seeds and nuts.

Pairing with Main Dishes


Variations and Customizations

Add Grains

  • Quinoa or Farro: For extra protein and texture, sprinkle cooked grains into the salad.

Vegan Version

  • Skip the Cheese: Use avocado or toasted seeds for richness in place of cheese.

If you’re looking for another vegan-friendly option, consider the Ultimate Guide to Perfect French Bread Pizza, which is customizable and versatile.


Frequently Asked Questions (FAQs)

1. Can I make the salad ahead of time?
Yes, prepare the ingredients and dressing separately. Assemble just before serving to keep the salad fresh.

2. What’s the best way to add a festive touch?
Arrange it in a holiday wreath shape or add colorful ingredients like pomegranate seeds.

3. Can I use a different dressing?
Absolutely! A citrus vinaigrette or a creamy poppy seed dressing also works well.

4. How can I make this salad more filling?
Add a protein, like grilled chicken or chickpeas, to turn it into a hearty main dish.


LSI and NLP Keywords

To optimize SEO, consider incorporating related keywords, such as:

  • holiday green salad
  • Christmas dinner sides
  • seasonal fruit salad
  • easy holiday salad recipes
  • healthy Christmas recipes
  • winter salad ideas
  • festive fruit salads
  • Christmas side dishes

Nutrition and Serving Sizes

This salad offers balanced nutrition:

  • Rich in Vitamins: Greens and fruits provide vitamins A, C, and K.
  • Healthy Fats: Nuts and olive oil add heart-healthy fats.
  • Fiber-Packed: Seasonal fruits contribute to daily fiber needs.

For additional healthy holiday recipes, check out Salted Caramel Rice Krispie Treats as a lighter dessert option.


Conclusion

A Christmas Salad is an easy, festive addition that elevates any holiday meal with its fresh ingredients, vibrant colors, and balanced flavors. Customize it to suit your table, and enjoy a delightful mix of textures and flavors that will brighten any gathering.

For more festive recipes, explore Easy Apple Hand Pies or Cranberry Walnut Salad for additional crowd-pleasers. Enjoy your holiday feast!