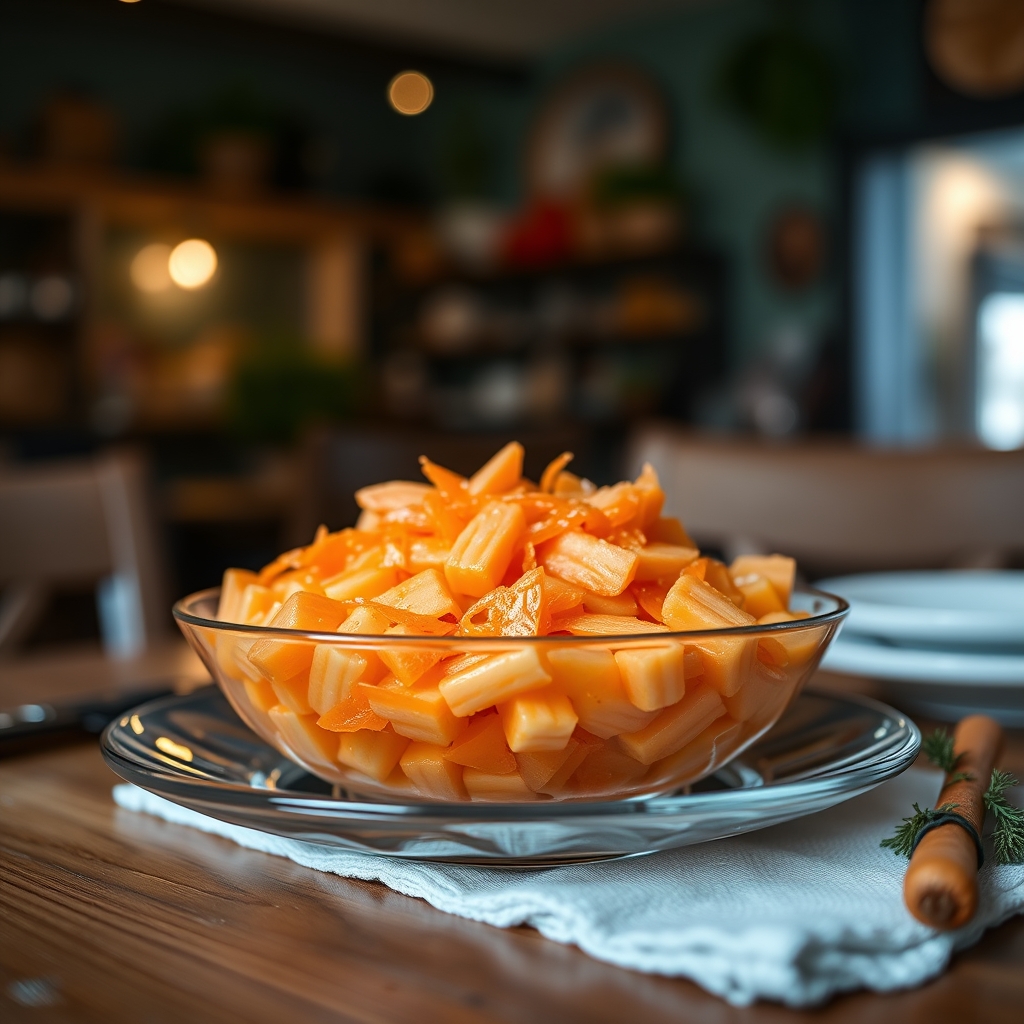
Classic Carrot Gelatin Salad
There’s something undeniably nostalgic about a classic carrot gelatin salad. This retro dish, often found at potlucks and family gatherings, brings together the sweetness of carrots, the tang of pineapple, and the smooth texture of gelatin into a refreshing side that’s as vibrant as it is delicious. Whether you’re revisiting a childhood favorite or discovering it for the first time, this recipe is a must-try for anyone who loves a balance of flavors and textures in their salads.
Why You’ll Love This Recipe
If you’re on the fence about making this vintage-inspired dish, here are a few reasons why it deserves a spot on your table:
- Perfect Balance of Sweet and Tangy: The natural sweetness of carrots and pineapple pairs beautifully with the slight tartness of lemon or lime gelatin, creating a harmonious flavor profile.
- Light and Refreshing: Unlike heavy side dishes, this carrot gelatin salad is light, making it ideal for summer picnics or as a palate cleanser during rich meals.
- Easy to Make Ahead: Since it needs time to set, you can prepare it the night before, freeing up your time on the day of serving.
- Versatile Crowd-Pleaser Whether served at a holiday dinner, potluck, or weeknight meal, this salad appeals to both kids and adults alike.
- Vibrant Presentation: The bright orange hue makes it a visually appealing addition to any spread, guaranteed to catch the eye.
Ingredients Breakdown
Understanding the role of each ingredient will help you make the best version of this classic carrot gelatin salad. Here’s what you’ll need:
- Carrots: Freshly grated carrots add a natural sweetness and a satisfying crunch. Opt for young, tender carrots for the best texture.
- Pineapple: Canned crushed pineapple provides moisture and a tropical tang. Be sure to drain it well to avoid a watery salad.
- Lemon or Lime Gelatin: This forms the base of the salad, giving it structure and a zesty flavor. You can use sugar-free gelatin if preferred.
- Cottage Cheese or Cream Cheese: Adds creaminess and richness. Cottage cheese keeps it light, while cream cheese makes it denser and more indulgent.
- Whipped Topping or Mayonnaise: Whipped topping keeps the salad airy, while mayonnaise adds a savory depth. Choose based on your preference.
- Optional Add-ins: Chopped nuts, marshmallows, or shredded coconut can be included for extra texture and flavor.
How to Make Classic Carrot Gelatin Salad
Follow these simple steps to create a flawless carrot gelatin salad every time:
- Prepare the Gelatin: Dissolve the lemon or lime gelatin in boiling water according to package instructions. Allow it to cool slightly but not set.
- Mix the Ingredients: In a large bowl, combine the grated carrots, well-drained pineapple, and cottage cheese (or cream cheese). Stir gently to distribute evenly.
- Fold in the Gelatin: Pour the slightly cooled gelatin over the carrot mixture. Stir well to ensure everything is evenly coated.
- Add the Whipped Topping or Mayonnaise: Gently fold in the whipped topping or mayonnaise until fully incorporated. Be careful not to overmix if using whipped topping to maintain fluffiness.
- Chill to Set: Transfer the mixture to a serving dish or mold. Refrigerate for at least 4 hours, preferably overnight, until fully set.
- Serve and Enjoy: Once set, garnish with additional shredded carrots or a sprinkle of nuts before serving.
Pro Tips for the Best Results
- Use Freshly Grated Carrots: Pre-shredded carrots can be dry and lack flavor. Grating them fresh ensures a juicier, more vibrant result.
- Drain Pineapple Thoroughly: Excess liquid can prevent the gelatin from setting properly. Press the pineapple in a sieve or cheesecloth to remove as much juice as possible.
- Cool Gelatin Before Mixing: If the gelatin is too hot, it can melt the whipped topping or curdle the dairy ingredients. Let it cool to room temperature first.
- Experiment with Texture: For a chunkier salad, use small pineapple tidbits instead of crushed pineapple.
- Chill the Bowl: If working in a warm kitchen, chill your mixing bowl beforehand to help the salad set faster.
Variations and Substitutions
This classic carrot gelatin salad is wonderfully adaptable. Here are some creative twists to try:
- Citrus Swap: Use orange gelatin for a sweeter, fruitier version.
- Dairy-Free Option: Substitute coconut cream for whipped topping and use a vegan cream cheese alternative.
- Crunchy Additions: Stir in chopped pecans, walnuts, or sunflower seeds for extra texture.
- Tropical Twist: Add shredded coconut or diced mango for a more exotic flavor.
- Savory Version: Skip the whipped topping and use mayonnaise with a pinch of black pepper for a more traditional midwestern-style salad.
What to Serve With It
This salad pairs beautifully with a variety of dishes. Here are some serving suggestions:
- Holiday Meals: Serve alongside glazed ham, roasted turkey, or baked chicken for a festive touch.
- BBQ Spreads: Its refreshing quality balances the smokiness of grilled meats like ribs or pulled pork.
- Light Lunches: Pair with a simple sandwich or quiche for a satisfying midday meal.
- Potluck Favorites: Complement other retro dishes like green bean casserole or deviled eggs.
How to Store and Reheat
Since this is a chilled salad, proper storage is key to maintaining its texture and flavor:
- Refrigeration: Store in an airtight container for up to 5 days. Keep it covered to prevent absorbing other fridge odors.
- Freezing Not Recommended: Gelatin salads tend to weep and lose their texture when frozen and thawed.
- Serving After Storage: If the salad becomes too firm, let it sit at room temperature for 10 minutes before serving to soften slightly.
Frequently Asked Questions (FAQs)
Can I use fresh pineapple instead of canned?
Fresh pineapple contains enzymes that can prevent gelatin from setting. If using fresh, briefly heat the pineapple to deactivate these enzymes before adding it to the salad.
Can I make this salad sugar-free?
Absolutely! Substitute sugar-free gelatin and use a sugar-free whipped topping for a lighter version.
Why is my salad too watery?
This usually happens if the pineapple wasn’t drained well or if the gelatin wasn’t allowed to set fully. Always drain ingredients thoroughly and refrigerate long enough.
Can I use a different vegetable?
While carrots are traditional, finely grated zucchini or jicama can work for a different twist.
How do I unmold the salad cleanly?
Dip the mold briefly in warm water, then place a plate on top and invert it quickly. A light greasing of the mold beforehand can also help.
Final Thoughts
There’s a reason this classic carrot gelatin salad has stood the test of time. It’s simple yet flavorful, nostalgic yet adaptable, and always a hit at gatherings. Whether you’re making it for a special occasion or just to brighten up a weeknight dinner, this salad is sure to bring smiles to the table. Don’t be afraid to put your own spin on it—after all, the best recipes are the ones that evolve with your tastes. Happy cooking!
Print
Classic Carrot Gelatin Salad
Description
A nostalgic gelatin salad featuring shredded carrots suspended in a sweet, citrus-flavored gelatin base. Perfect for potlucks and holiday gatherings.
Ingredients
For the Crust:
- For the gelatin base:
- 1 (3 oz) package orange gelatin
- 1 (3 oz) package lemon gelatin
- 2 cups boiling water
- 1 cup cold water
- For the carrot mixture:
- 2 cups finely shredded carrots (about 4 medium)
- 1 (8 oz) can crushed pineapple, drained
- 1/2 cup chopped pecans
- For the topping (optional):
- 1/2 cup mayonnaise
- 1/4 cup sour cream
- 1 tablespoon honey
Instructions
1. Prepare the Crust:
- 1. In a large bowl, dissolve both gelatin packages in boiling water, stirring for 2 minutes until completely dissolved.
- 2. Stir in cold water and refrigerate for 45-60 minutes until slightly thickened (consistency of egg whites).
- 3. Fold in shredded carrots, drained pineapple, and pecans until evenly distributed.
- 4. Pour into a 6-cup mold or 9×9 inch dish. Refrigerate for at least 4 hours or until firm.
- 5. For optional topping: Whisk together mayonnaise, sour cream, and honey. Serve alongside or spread over set gelatin.
- 6. To unmold: Briefly dip mold in warm water, then invert onto serving plate.
Notes
For best texture, shred carrots using the fine side of a box grater. Can substitute walnuts for pecans if preferred. Gelatin sets faster in metal pans than glass.