Delicious Cajun Shrimp Loaded Baked Potato Recipe for Food Lovers

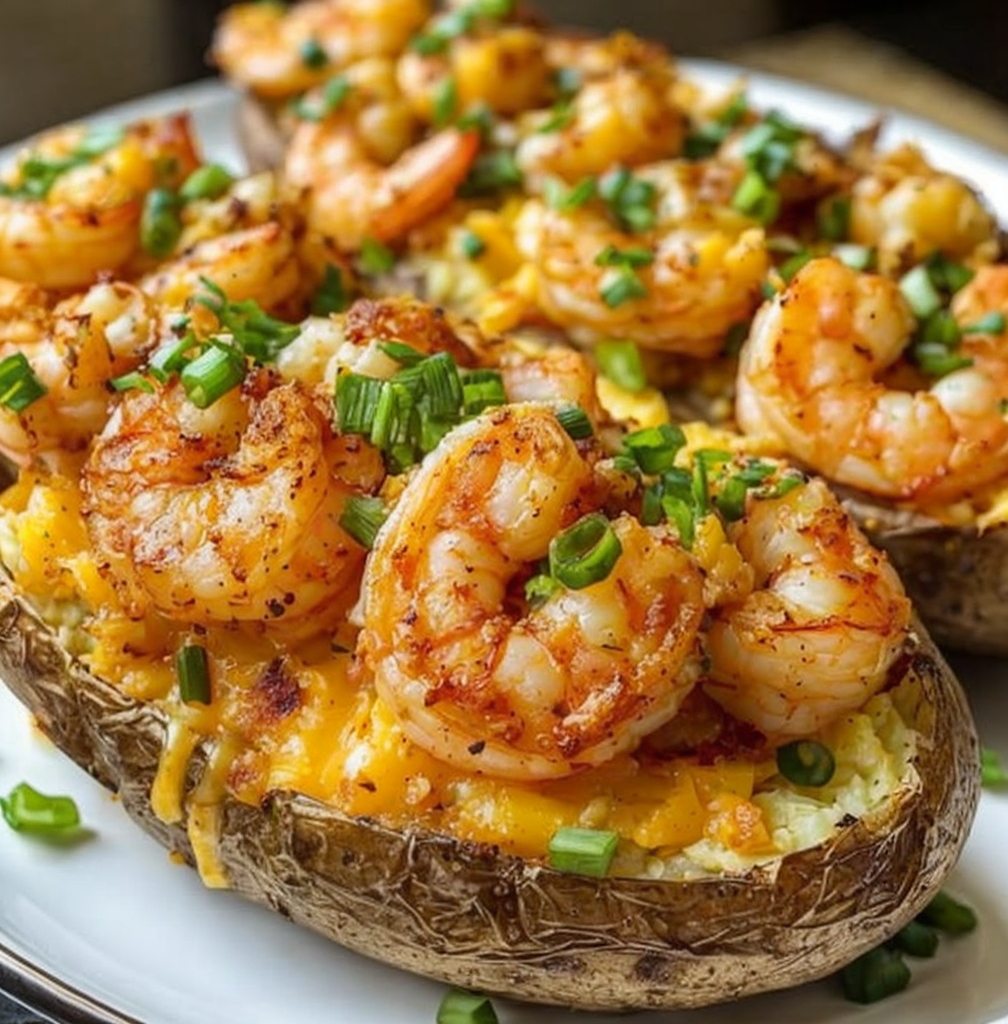
Flavorful Cajun Shrimp Loaded Baked Potato: A Delicious Fusion!

⚖️
Difficulty
Medium

⏲️
Prep Time
20 mins

🕒
Cook Time
40 mins

⏱️
Total Time
60 mins

🍽️
Servings
4

Get ready to dive into a vibrant culinary experience with our Flavorful Cajun Shrimp Loaded Baked Potato recipe! This irresistible dish brings together the rich, spicy allure of Cajun shrimp and the comforting, hearty satisfaction of a loaded baked potato. Each bite delivers a delightful dance between creamy, buttery textures and the zesty kick of authentic Cajun spices. Perfect for spice lovers and comfort food enthusiasts alike, this recipe transforms a simple potato into a mouth-watering masterpiece.

Experience the ultimate flavor explosion with the Cajun shrimp that tops our loaded baked potatoes. Each succulent shrimp is infused with a symphony of spices, creating a savory yet fiery taste sensation. Combined with the fluffy, buttery goodness of baked potatoes, this dish will elevate your meal to new heights. Whether served as a hearty main course or a show-stopping side, these loaded potatoes are sure to impress your family and friends with their bold flavors and unique twist.

Prepare to awaken your senses with the aromatic symphony unleashed in this dish. The Cajun spices emanate a tantalizing aroma, mingling with the warm, earthy scent of baked potatoes. As the shrimp sizzles in the skillet, the kitchen fills with the irresistible fragrance of seasoned seafood, promising a captivating culinary adventure. The visual presentation is equally enticing, showcasing a vibrant medley of colors and textures that charm both the eyes and the palate.

Quick Recipe Highlights

  • Flavor Profile: The rich, spicy Cajun shrimp contrasted with creamy, buttery baked potato yields a balanced blend of heat and comfort.
  • Texture: The crisp exterior of the potatoes meets the tender, juicy shrimp for an exciting mouthfeel.
  • Aroma: Each element releases a heady aroma of spices, butter, and warm, baked potatoes.
  • Visual Appeal: A riot of colors from the golden potatoes to the vibrant shrimp and toppings creates an appetizing presentation.
  • Skill Level Needed: Medium-level skills are required, involving seasoning, sautéing, and baking techniques.
  • Special Equipment: A baking sheet, skillet, and mixing bowls are essential for preparation.

Recipe Overview

  • Difficulty Level: This dish is moderately challenging, requiring seasoning accuracy and precise baking techniques to achieve perfect textures and flavor balance.
  • Category: Ideal as a filling main course or a hearty side, it fits well into both casual and formal dining scenarios.
  • Cuisine: With its roots in Cajun tradition, this recipe highlights the vibrant spices native to Louisiana culinary practices.
  • Cost: Using accessible ingredients like potatoes and shrimp, this dish is budget-friendly while still offering a taste of luxury.
  • Season: Enjoy this comforting dish year-round, with its hearty ingredients providing warmth in winter and its vibrant spices enlivening any summer meal.
  • Occasion: Perfect for special dinners with friends, family gatherings, or even a lush weekday dinner treat.

Why You’ll Love This Recipe

The succulent Cajun shrimp on our loaded baked potatoes deliver a tantalizing taste experience that keeps you coming back for more. The marriage of vibrant Cajun spices and creamy potatoes creates a robust yet comforting dish. Each mouthful delivers a symphony of flavors, from smoky and spicy to creamy and satisfying, tempting your taste buds with an explosion of culinary delight. The appealing texture contrast between the tender shrimp and the crispy potato skin adds another level of enjoyment to this recipe.

Our Cajun Shrimp Loaded Baked Potato offers a seamless preparation process, making it convenient for both weeknight dinners and special occasions. Minimal prep work is required, with the recipe flowing effortlessly from seasoning to baking. Whether you’re a kitchen novice or a seasoned chef, this recipe guarantees a rewarding and straightforward cooking experience. The relatively short overall cooking time ensures you spend more time relishing in the dish than making it.

Not only does this dish tantalize the senses, but it also offers nutritious advantages by incorporating wholesome ingredients. Potatoes are a good source of vitamins and fiber, while shrimp provides lean protein and essential omega-3 fatty acids. Each ingredient contributes beneficial nutrients to this riveting recipe, all while delivering satisfying flavors. Consider this dish as a go-to for a delightful yet nourishing meal that doesn’t compromise on taste.

The versatile nature of this Cajun Shrimp Loaded Baked Potato makes it a social centerpiece, inviting conversation and connection. Whether you’re serving it at a cozy dinner party, family gathering, or casual get-together, this dish features bold flavors that spark interest and enjoyment among guests. Its robust combination of spices and textures transforms any occasion into a memorable dining experience.

Enjoy the delicious, flavor-packed experience of this Cajun-inspired dish without breaking the bank. The affordability of key ingredients like potatoes and shrimp makes it accessible for home cooks on a budget. This recipe captures the essence of Cajun cuisine with economically friendly elements, bridging the gap between gourmet and everyday cooking beautifully. Enjoy the brilliance of quality ingredients without compromising on cost.

Historical Background and Cultural Significance

Our Cajun Shrimp Loaded Baked Potato is a modern fusion of classic Cajun flavors with traditional American comfort foods. The origins of Cajun cuisine lie deep in the history of French Acadians, who settled in Louisiana and brought a unique blend of French, African, and Spanish influences to their cooking. This dish pays homage to that rich cultural tradition by foregrounding the spices and ingredients that are pivotal to authentic Cajun culinary practice.

Cajun food holds a place of reverence within Southern culture, celebrated for its bold flavors and hearty ingredients. It often reflects a flavorful ingenuity borne of necessity, with communities utilizing local resources like seafood to create vibrant, soul-warming dishes. The Cajun Shrimp Loaded Baked Potato exemplifies this tradition by pairing humble potatoes with exceptional spice and technique, framing an illustrious extension of that cultural narrative.

While the concept of combining seafood with potatoes might seem novel, it has been a characteristic element of regional adaptations in Cajun cooking. Recent years have seen an evolution towards integrating classic flavors into dynamic new presentations, like our loaded potato variation. Today’s iteration of Cajun cuisine frequently marries tradition with innovation, yielding dishes that respect history while appealing to contemporary palates.

Across the South and beyond, this recipe highlights regional variations that borrow elements from nearby culinary traditions. The influence of Creole cooking might see tomatoes or peppers added to the mix, while Southern hospitality dictates generous portions and deep flavors. This sensibility of adaptation highlights the flexible nature of Cajun cooking, allowing home chefs to bring their interpretations to life.

Ingredient Deep Dive

Potatoes, the base of our recipe, have been staple crops throughout human history, valued for their versatility and sustenance. First cultivated in South America, potatoes made their way to Europe before becoming a beloved component of Southern comfort foods. When choosing potatoes for this dish, opt for large, starchy varieties like Russets. Their fluffy interior makes them ideal for absorbing buttery flavors and topping ingredients.

Shrimp are a quintessential addition to Cajun dishes, bringing a burst of flavor and fulfilling the code of fresh seafood central to local cuisine. Rich in lean protein, shrimp also provide an abundant source of vitamins and minerals while maintaining a low calorie count. Fresh shrimp are best for this recipe, although frozen are convenient; simply thaw before seasoning and cooking. Select firm, translucent shrimp without offensive odor for optimal freshness.

Cajun seasoning is the heart of this dish, highlighting the vibrant zest characteristic of the cuisine. Its blend of spices like paprika, cayenne, garlic, and herbs creates a smoky, piquant result that excites the palate. While pre-packaged versions are available, creating your blend with custom ratios offers personalized heat and depth. To preserve integrity, store Cajun spice blends in airtight containers away from moisture.

When it comes to butter, an essential accouterment for baked potatoes, selecting high-quality varieties is key to achieving luscious, creamy results. Butter enriches the dish’s flavor profile while aiding in the caramelization of shrimp. Unsalted butter allows for greater control over seasoning and salt contents. Although margarine may serve as a substitute, it loses some richness, rendering melted flavors less opulent.

Cheese adds another dimension of flavor and texture to baked potatoes, delivering the ooey-gooey experience that characterizes loaded options. Cheddar is a popular choice for its sharp, tangy essence that melds seamlessly with potato interiors. Grate cheese fresh from blocks to ensure even melting and prevent the waxy coatings on pre-shredded varieties that impede blendability.

Common Mistakes to Avoid

  • Overcooking the shrimp can result in a rubbery texture, ruining the tenderness crucial to this dish. Ensure shrimp are pink and just opaque before removing from heat.
  • Neglecting to season properly leads to bland results. Adjust spice levels to suit your family’s heat tolerance while respecting the core Cajun elements.
  • Baking the potatoes too quickly at high temperatures prevents even cooking. Start them low and slow for a fluffy interior with crisp skin.
  • Using cold potatoes from the fridge can lead to uneven cooking. Always bring potatoes to room temperature before baking to ensure proper doneness.
  • Failing to dry potatoes well after washing can cause steaming instead of roasting, leading to soft skins. Pat them dry thoroughly after any rinse.
  • Forgetting the foil wrap insulates potatoes, but excess foil can trap moisture. Wrapping too tightly might result in steamed instead of roasted potatoes.
  • Crowding the baking sheet affects the even circulation of heat. Maintain enough space between potatoes to allow hot air to surround each one fully.
  • Over-salting the dish dwarfs its myriad flavors. Taste as you go and remember that you can always add more seasoning, but it’s harder to fix an over-seasoned dish.

Essential Techniques

Baking potatoes to perfection is a gateway technique crucial to this recipe. Ensuring the ideal combination of fluffy interior and crispy skin requires mastery of baking techniques. Begin by scrubbing potatoes clean and piercing with a fork to allow steam to escape during cooking; otherwise, you may face a ruptured spud. Preheat the oven to 400°F, enhancing the development of a crispy exterior, and avoid crowding to promote even heat exposure.

Achieving just the right sear on shrimp is integral to texture and flavor. Start by patting shrimp dry before seasoning them to help the spices adhere and minimize moisture. When sautéing, use medium-high heat and a single layer of shrimp in the skillet. Watch closely as color transitions to pink; slight char on the edges indicates a successful sear. One or two minutes per side will be enough; patience is key to avoiding overcooking.

Creating a robust Cajun seasoning blend requires an understanding of balancing spices for optimal flavor harmony. Begin with quality spices to create a fresh and vibrant blend, typically involving paprika, cayenne, onion powder, garlic powder, and dried herbs like thyme or oregano. Make small-batch adjustments to your own taste preferences and store in an airtight container. Always taste your dish and adjust spice levels throughout cooking to enliven rather than overwhelm.

Melding buttery interiors with the crispy exterior of potatoes calls for strategic mashing and layering techniques. Upon baking, cut each potato lengthwise and gently fluff the flesh with a fork to preserve airiness. Add butter, cheese, and seasonings in stages, folding gently to achieve even distribution without compacting the light, fluffy interior.

The art of plating involves thoughtful assembly and garnish for maximum visual and taste appeal. Whenever possible, present loaded potatoes with an attractive finish, ensuring balanced proportions of shrimp and potato visible on each serving. Enhance presentation with fresh herbs, perhaps a scatter of chopped chives or parsley, for added pop and a fresh burst contrasting with the rich profile.

Pro Tips for Perfect Flavorful Cajun Shrimp Loaded Baked Potato

Use large Russet potatoes known for their fluffy interiors, providing a perfect base for absorbing butter and deliciously melding with toppings.

Sauté shrimp on high heat momentarily to avoid rubbery texture – aim for just pink, about 2 minutes per side.

Grate cheese fresh from the block to prevent waxy finishes and ensure smooth melting.

Customize your Cajun spice blend for optimal control over flavor intensity.

Rest baked potatoes for a few minutes post-baking; this helps centers settle and cool, avoiding overly dense results.

Peel shrimp ahead of time and pat dry thoroughly, ensuring spices stick and sear outcomes in an ideal texture.

Layer Cajun spices incrementally throughout cooking to build gradual flavor.

Consider adding a hint of lemon or lime juice before serving to brighten the rich flavors beautifully.

Variations and Adaptations

Regional influences may amplify Creole roots by incorporating a tomato-based shrimp Creole topping – a hearty stew built with bell peppers, onions, and tomatoes adds complexity.

Tailor the recipe for seasonality by substituting ingredients with what’s fresh and vibrant in different periods; stow corn or avocado in summer and hearty greens like kale in winter.

Vary flavor intensity using different levels of cayenne in the Cajun mix, or introduce smoky elements via paprika or chipotle.

Textures may adapt by adding varied vegetable toppings; think sweet corn for crunch or diced tomatoes for freshness, enhancing mouthfeel.

Transform these loaded baked potatoes into a festive visual spectacle – alternate potatoes with sea salt sprinkles and drizzles of creamy remoulade sauce.

Serving and Presentation Guide

To serve these potatoes beautifully, cut each into quarters to showcase the vibrancy of shrimp contrasting against creamy innards.

Garnish with chopped chives or fresh parsley for a burst of color and flavor.

Complementary sides add dimension, such as a bright green salad or roasted vegetables to balance hearty potato richness.

For a contemporary take, serve potatoes in individually plated bras or bowls with shrimp artfully arranged atop, emphasizing elegance.

It’s crucial to keep the potatoes warm but not scalding; aim for a gentle temperature suitable for instant enjoyment upon service.

To control portions, factor one loaded potato as a main serving, while smaller slices under highlight it as a side and prevent excess.

Wine and Beverage Pairing

Pair these spicy, loaded baked potatoes with a crisp white wine such as Sauvignon Blanc, accentuating citrus notes that balance hearty richness.

For those seeking non-alcoholic alternatives, iced tea with hints of mint or lemon offers refreshment against the spicy profile.

Consider pairing strong coffee or robust black tea if you prefer warming beverages complementing the savory components.

Serve wine and juices at optimal temperature – white wines chilled, while teas benefit from slight cooling after brew.

Provide beverage refills throughout your meal progression, maintaining balance and pleasure alongside this flavorful dish.

Storage and Shelf Life

Store leftover potatoes in airtight containers to maintain freshness, keeping shrimp separate to prevent sogginess.

Refrigerate at temperatures below 40°F for improved longevity, ensuring safety and quality retention.

Choose glass or BPA-free containers for storing, promoting ease of heating directly in the oven or microwave.

Monitor for spoilage signs, such as unbidden odors or discoloration, promptly discarding any compromised remains.

Reheat shrimp and potatoes separately to retain textures; heat shrimp briefly on a skillet while allowing potatoes to warm longer.

For future enjoyment, consider freezing the prepared base (without shrimp), reheating on demand weeks later.

Make Ahead Strategies

Prepare shrimp spice mixture ahead of time, using an airtight container for preservation for up to a week.

Pre-bake potatoes and reheat at mealtime familiarity, allowing storage within the fridge for several days pending.

Maintain peak freshness by storing uncooked shrimp in the fridge till ready for use on the same day, limiting stasis.

Ore-prepared toppings like chopped vegetables or shredded cheese in airtight containers, streamlining assembly.

Reaching pre-cooked elements like potatoes is achievable in the oven or briefly in the microwave; add toppings post-heating.

For final presentation and peak freshness, slice chives or garnish immediately before serving, ensuring vibrancy and color retention.

Scaling Instructions

For smaller gatherings, simply halve the ingredients while maintaining consistent methods – no unique adjustments needed.

Enlarge recipe quantities proportionately, ensuring larger ovens accommodate increased potato numbers and expanded shrimp batches.

Adjust cookware accordingly; often scaling up requires larger baking sheets or skillet proportions to handle mass.

If time is constrained, consider working in batches with consistent timing structures for each item and maintain recipe integrity.

Preserve the same storage strategies when considering extensions of cooked results, ensuring airtight containers sanction reuse.

Nutritional Deep Dive

These loaded baked potatoes offer a satisfying carb intake through fiber-rich Russets, ideal for sustainable energy sources.

Shrimp likewise align with lean protein choices, featuring omega-3 fatty acids beneficial to heart health while remaining low-calorie.

Cajun spices may harbor antioxidants derived from key components like paprika and cayenne, contributing beneficial anti-inflammatory potential.

Consider savory balance and success achieved without excessive sodium; alternative lighter variations minimize rich butter/cheese accouterments.

Portion analysis garners insights into bodily intake, effectively balancing taste alongside dietary intentions.

Incorporate this meal within managed eating plans, respecting macro guidelines while prioritizing nutrient-dense selection.

Dietary Adaptations

For a gluten-free adaptation, confirm spice blend components omit gluten derivatives, using gluten-free flour or starch where required.

A dairy-free variant can be accomplished without cheese, instead opting for plant-based cheese substitutes or ghee for butter.

Vegans may substitute shrimp for protein-rich grilled tofu or tempeh, aligning elements consistent with ethical choices.

To adhere to low-carb diets, omit potatoes for cauliflower mash, leveraging identical flavor accents with a reduced carb focus.

Keto enthusiasts may similarly adapt, embracing high-fat alterations while limiting carb intake, maintaining full flavor elements.

Paleo practitioners can mimic flavors using sweet potatoes and avoiding non-compliant additives hidden in spice mixes.

Low-FODMAP omissions apply to spices or vegetables known for possible digestive intolerance, so be discerning in selections.

Across culinary flexibility, specific diets can tailor suitability while ensuring adherence to constraints with necessary ingredient shifts.

Troubleshooting Guide

If shrimp texture is overly chewy, reduce heat exposure time to preserve tenderness, avoiding high-heat underdense cooking approaches.

When flavors appear unbalanced among salt and spices, opt for incremental additions rather than wholesale incorporations, modifying as required.

Temperature complications arise if stove-top heat isn’t consistent; prioritize monitoring shrimp ochre color transitions throughout cooking.

Equipment inefficacy calls for attention; maintain kitchen tools like mixers and blenders to promote optimal results, undeterred by mechanical gaps.

Ingredient substitutions challenge recipe harmony; ensure complementary properties wherever switching flourishes, without altering taste outcomes adversely.

Timing concerns abound when cooking events permute unexpectedly. Others involve coordinated management to prevent slipping schedules.

Recipe Success Stories

Numerous followers of our recipes have reached out with joyous accounts of their Cajun Shrimp Loaded Baked Potato journey, reveling in vibrant tastes.

One of our members modified the seasoning level, delighting family while maintaining characteristic Cajun zest — demonstrating versatility.

Innovative readers incorporated additional toppings like jalapenos, introducing new layers of heat to thrilling conclusion.

Creative commentary around the community fostered suggestions encouraging many to personalize their recipe blends effortlessly.

Photography shared through our social media channels illustrated artistic plating mastery, ultimately tantalizing our broader community and piquing culinary interests.

Frequently Asked Questions

Can I use pre-cooked shrimp? Yes, but the result may differ in tenderness and taste. Lightly reheat pre-cooked shrimp to avoid further cooking, but fresh shrimp yield the best results.

Is there an alternative to Cajun spice for those who prefer milder flavors? Absolutely, consider using a milder version of your spice blend by reducing cayenne or incorporating paprika with Italian herbs for a fully-bodied result without as much heat.

Why bake potatoes for a loaded version? Baking offers key benefits for fluffy insides and crisped shell exteriors, essential for complementing rich shrimp toppings; other methods don’t offer the ideal textural synergies.

Are sweet potatoes a viable substitute? They certainly are! Sweet potatoes align with the flavor components while offering additional nutrients, achieving another layer of sweetness contrasted deliciously with shrimp.

How can I serve this dish elegantly? Cut each loaded potato cross-sectional to visualize fillings artfully. Utilize small gathering bowls or style individual portions on plates, garnished with chopped herbs or citrus zest.

Can I freeze leftovers comfortably? While potatoes themselves freeze adequately when baked, shrimp and topping additions often consist of elements struggling through freezing parameters; allow discretion with sealed storage.

What’s the best way to reheat this dish? When reheating, separate potatoes from shrimp to assure even rewarming without toughening shrimp into rubbery results; microwave or light oven heat works perfectly.

Is there a substitute for cheese I can use? Dairy-free cheese alternatives exist serenely as they align with plant-based econcepts, offering creamy, dreamy, cheesy notes, non-dairy variation, seamlessly mimicking former flavors.

How much spice is too much for a family meal? Typically, Cajun recipes push boundaries regarding heat levels; taste throughout preparation adjusting spicy balance ensures palatability without overwhelming variance among diners.

Can the potatoes be prepared ahead? Pre-staging baked potatoes (without final topping additions) aids workflow advance around day structures, reheating as needed without compromising the end product’s integrity!

Additional Resources

Explore related recipes like Cajun Shrimp Pasta or Cajun Spice-Rubbed Chicken for further zest-packed adventures in flavor.

For technique guides into perfecting baked potato techniques, check our mastery-focused baking pointers ensuring fluffy, ideal outcomes for full recipe optimization.

Access ingredient information resources ensuring proper ingredient selection at your market without duplicating efforts, reducing single-use components waste.

Recommendations for equipment ensure kitchen performance enhancement, from options for specific spices and skillets to bakeware, supporting recipe execution to success.

Learn about seasonal variations adapting at various times or circumstances, aligning ingredients within wider calendar contexts while offering ongoing culinary exploration.

Join the Conversation

Join our social media explorations, sharing your take on this feature recipe, capturing photography expressing artistic creativity encapsulated within Cajun warmth and heart.

Initiate open dialogues through discussions, rating experiences with our community options, ensuring welcoming platforms reinforce mutual encouragement.

Allow conversational exchanges envelop encouragement for home-based diverse chef explorations, emphasizing recipe adaptations reflecting unique styling and culinary focus’intérêt.

Reflect your variation stories into communal feedback, promoting integrated sharing fostering variety, personal touches express distinctions held within tastes regarded.

Techniques, intriguing thoughts, and ideas stem further participation within core engagement spheres, anchoring collective experiments into far-reaching exploration directed toward evolving awareness!

The Recipe

Flavorful Cajun Shrimp Loaded Baked Potato

Serves: 4

Prep Time: 20 mins

Cook Time: 40 mins

Total Time: 60 mins

Kitchen Equipment Needed

  • Baking sheet
  • Medium skillet
  • Mixing bowls
  • Spatula
  • Fork

Ingredients

  • 4 large Russet potatoes
  • 1 lb raw shrimp, peeled and deveined
  • 2 tablespoons Cajun seasoning
  • 1/4 cup butter, melted
  • 1 cup shredded cheddar cheese
  • Salt and pepper to taste
  • 2 tablespoons olive oil
  • Chopped chives for garnish

Directions

  1. Preheat the oven to 400°F (200°C). Wash and dry the Russet potatoes, then pierce each one several times with a fork.
  2. Place potatoes on a baking sheet and bake for about 45 minutes until tender.
  3. In a mixing bowl, combine the shrimp with Cajun seasoning and olive oil, coating evenly.
  4. Heat a skillet over medium-high heat and sauté the shrimp until pink and opaque, about 2-3 minutes per side. Set aside.
  5. Once potatoes are baked, remove from the oven and let cool slightly. Cut each potato open lengthwise and fluff the interior with a fork.
  6. Pour melted butter over the fluffy interiors and sprinkle with cheese, allowing it to melt.
  7. Top the loaded potatoes with cooked Cajun shrimp and garnish with chives. Season with salt and pepper as needed.
  8. Serve warm and enjoy the flavorful contrast of spices with rich, buttery potatoes.

Recipe Notes

  • Consider adding a dose of sour cream for added creaminess.
  • For a spicier kick, increase Cajun seasoning or add diced jalapenos.
  • Explore seafood alternatives, such as scallops or lobster, for variation.

Spice Up Your Dinner with Thai Curry Chicken Skewers Recipe

Thai Curry Chicken Skewers: A Deliciously Exotic Dish

⚖️
Difficulty
Easy

⏲️
Prep Time
20 mins

🕒
Cook Time
15 mins

⏱️
Total Time
35 mins

🍽️
Servings
4

Thai Curry Chicken Skewers are a delightful fusion of spicy, savory, and slightly sweet flavors that capture the essence of Thai cuisine. Grilled to perfection, these skewers allow the mouthwatering aroma of coconut milk, curry paste, and lemongrass to fill your kitchen. This easy yet elegant dish is perfect for family gatherings or a simple weeknight dinner. Plus, the vibrant colors of the skewered ingredients create a feast for the eyes.

Quick Recipe Highlights

  • Flavor Profile: A harmonious blend of spicy, savory, and slightly sweet flavors that define classic Thai cuisine.
  • Texture: Succulent chicken with crispy charred edges contrasts with tender vegetables.
  • Aroma: Freshly chopped lemongrass and aromatic curry paste create an enchanting fragrance.
  • Visual Appeal: The combination of the vibrant red curry and green herbs dazzles on the plate.
  • Skill Level Needed: Basic grilling skills and familiarity with skewering techniques are sufficient.
  • Special Equipment: Simple skewers and a grill pan or BBQ are all you need for this recipe.

Recipe Overview

  • Difficulty Level: Designed for simplicity, this recipe makes it easy to master bold Thai flavors at home with minimal expertise.
  • Category: Ideal for appetizers, light dinners, or a delightful addition to a summer barbecue.
  • Cuisine: Deeply rooted in Thai culinary traditions, this dish seamlessly marries spices with fresh ingredients.
  • Cost: Economical ingredients such as chicken, coconut milk, and fresh herbs make this recipe budget-friendly.
  • Season: Perfect for summer grilling, yet enjoyable year-round, thanks to its balanced flavor profile.
  • Occasion: Suitable for casual gatherings, family meals, or a unique menu highlight at dinner parties.

Why You’ll Love This Recipe


Thai Curry Chicken Skewers tantalize your taste buds with a vibrant and exotic blend of flavors. The tender, juicy chicken absorbs a fragrant mix of coconut milk and red curry paste, while fresh lemongrass and ginger provide a refreshing contrast. The ease and quickness of preparing this dish will impress without overwhelming you, making it perfect for both weekday dinners and weekend parties.

Convenience is key, as this recipe allows for pre-preparation steps that make cooking a breeze. Simply marinate the chicken in advance, and all that remains is to grill the skewers to delicious perfection, saving you precious time during busy weeknights.

Nutritionally, this dish is packed with protein from the chicken and beneficial antioxidants from the herbs and spices, offering a balanced meal option. It’s low in processed ingredients, aligning with a healthier diet plan while indulging in rich, vibrant flavors.

Adding social and entertaining value, Thai Curry Chicken Skewers become the center of attention at social gatherings and cookouts, igniting culinary curiosity among friends and family. The unique aroma alone invites people to gather and enjoy the communal grilling process.

Finally, the cost-effectiveness and accessibility of ingredients make this recipe not just a treat for your palate but also for your wallet. You’ll easily find needed ingredients in your local grocery store, ensuring you can bring a taste of Thailand into your home without any hassle.

Historical Background and Cultural Significance


Emerging from the rich culinary traditions of Thailand, curry skewers are a modern take on age-old flavors. Thai cuisine, celebrated for its intricate balance of taste sensations, has captivated palates worldwide due to its inventive use of native herbs and spices. The fusion of sweet, salty, sour, and spicy elements in this dish reflects the hallmark of Thai food culture, which has evolved over centuries.

Culturally, curry dishes maintain profound significance in Thailand, often associated with celebratory occasions and family gatherings. The introduction of the skewer, a traditionally Middle Eastern cooking method, marks a global culinary exchange, demonstrating the adaptability and creativity of Thai chefs in presentation and technique.

This recipe is the evolution of traditional curry into a format more manageable for home cooks seeking exotic flavors without the intricate processes traditionally required. The dish encapsulates the heart of Thai cooking, where simplicity meets depth, resonating with a global audience embracing fusion cuisines.

Regional variations of curry also contribute to this recipe’s cultural richness, with adaptations incorporating local tastes while maintaining core elements. Each regional spin upholds the valued culinary practice of using seasonal produce, underscoring Thailand’s connection with its agricultural roots and varied ecosystems.

Ingredient Deep Dive


Chicken: In Thai culture, chicken symbolizes prosperity and abundance, making it a common choice for family meals and gatherings. Nutritionally, chicken provides a lean source of protein, essential for muscle repair and growth. When selecting, choose fresh, organic chicken for the best quality and flavor. Store chicken at a cool temperature and cook thoroughly to eliminate bacteria risks. To substitute, use tofu or tempeh for a vegetarian twist.

Red Curry Paste: Originating from central Thailand, red curry paste is a culinary staple, revered for its bold flavor. It consists of aromatic herbs and spices like red chilies, garlic, ginger, and lemongrass, offering antioxidants and anti-inflammatory benefits. Opt for fresh paste over canned for superior flavor. Keep your paste refrigerated and use it within a week to preserve its freshness. For a milder variant, use green curry paste or suspend chili content according to personal heat tolerance.

Common Mistakes to Avoid

  • Over-marinating the chicken can lead to an overpowering taste. Stick to the suggested marinating time for optimal flavor balance.
  • Using low-fat coconut milk might not provide the rich, creamy texture associated with traditional Thai curries.
  • Forgoing the use of fresh herbs significantly diminishes the fragrance and authentic taste of the skewers.
  • Incorrect skewer soaking can lead to burning and scorching on the grill.
  • Overcrowding the skewers prevents even cooking and crisp edges.
  • Grilling on too high heat might char the exterior while leaving the inside undercooked.
  • Neglecting to rest the chicken skewers after they’re cooked can result in less juicy meat.
  • Substituting key ingredients like lemongrass with less fragrant options reduces depth of aroma and flavor.
  • Essential Techniques


    Marinating: Marinating the chicken infuses it with deep, robust flavors. Use a resealable bag to ensure the chicken is thoroughly coated and marinate for a minimum of 30 minutes. Patience is key to achieving tender, juicy results. Avoid metal containers as they can react with the marinade ingredients.

    Grilling: Mastering the grill involves attention to heat levels and timing. Preheat the grill to medium, and always grease it before placing the skewers to prevent sticking. Cook on each side for about 4–5 minutes, looking for grill marks as a juicy doneness indicator, while avoiding frequent turning.

    Skewering: Soak wooden skewers in water for at least 30 minutes to prevent burning. Thread chicken and vegetables evenly, ensuring no overcrowding to allow even browning. Firmly secure each piece for an attractive presentation.

    Pro Tips for Perfect Thai Curry Chicken Skewers


    For an extra layer of flavor, brush the chicken with additional curry paste during the last few minutes of grilling. This enhances the dish’s visual appeal and adds a glaze-like texture to the skewers.

    Consider adding a squeeze of lime and a sprinkle of fresh cilantro upon serving to boost freshness and the citrusy profile that brightens the entire dish.

    When selecting vegetables for the skewers, think color variety. Bell peppers, red onions, and zucchini not only add flavor diversity but also make for a stunning presentation.

    To enhance the creamy texture, mix coconut cream into your marinade, ensuring each piece of chicken is lusciously coated.

    If time allows, marinate your chicken overnight in the refrigerator. This additional time intensely mingles the flavors.

    Use a kitchen thermometer to ensure internal chicken temperature reaches 165°F, preventing overcooking and ensuring safety.

    Variations and Adaptations


    Regional Variations: Embrace regional Thai influences by incorporating ingredients like tamarind paste or kaffir lime leaves to create different flavor nuances.

    Seasonal Adaptations: Swap in seasonal vegetables, such as summer squash or cherry tomatoes, to add a local, seasonal twist to your skewers.

    Dietary Modifications: To make this dish vegan-friendly, replace chicken with tofu or seitan. For a keto option, pair the skewers with low-carb vegetables.

    Flavor Variations: Experiment with paste heat levels by adding fresh chili peppers or using more lemongrass for a fragrant citrus hit.

    Texture Modifications: For crispier chicken, grill over a higher temperature for a shorter time but monitor closely to avoid charring.

    Presentation Alternatives: Present skewers over a bed of jasmine rice or a fresh Thai salad for a complete meal presentation.

    Serving and Presentation Guide


    Plating Techniques: Arrange skewers on a platter in a fan shape for an appealing centerpiece. Garnish with lime wedges and fresh basil to complement the meal visually.

    Garnishing Ideas: Top with chopped peanuts for a crunchy lift, adding experience to both taste and texture.

    Traditional Accompaniments: Thai sticky rice or a side of fresh spring rolls are excellent companions, enhancing the meal’s Thai authenticity.

    Modern Serving Suggestions: Serve as a wrap using lettuce leaves or flatbread for an innovative approach to enjoy the skewer’s flavors.

    Temperature Considerations: Serve skewers hot off the grill to maximize their freshly grilled aroma and tenderness.

    Portion Control Tips: One or two skewers per person, complemented by sides, ensure balanced meal distribution without waste.

    Wine and Beverage Pairing


    Wine Pairings: Pair with a crisp white wine like Sauvignon Blanc or a floral Riesling to balance the dish’s robust flavors with a refreshing finish.

    Non-Alcoholic Alternatives: For a non-alcoholic option, serve with Thai iced tea or a fresh lemongrass and ginger iced drink.

    Coffee/Tea Pairings: If serving at brunch, consider accompanying the meal with a light, citrus-infused green tea.

    Temperature Considerations: Keep beverages chilled, particularly when serving in warm climates or during outdoor gatherings.

    Serving Suggestions: Present in chilled glasses for wines, or in elegant, clear glassware to showcase non-alcoholic pairings professionally.

    Storage and Shelf Life


    Storage Methods: Once cooled, store skewers in an airtight container to preserve moisture and prevent odor absorption in the fridge.

    Temperature Requirements: Maintain at or below 40°F in the refrigerator to ensure freshness and longevity for up to three days.

    Container Recommendations: Use stackable containers with minimal airspace to maintain flavor profile and texture intact.

    Signs of Spoilage: Look out for any off-odors or changes in color to ensure the dish remains appetizing and safe to consume.

    Reheating Instructions: Reheat on a grill or oven to retain the freshly-charred texture. Avoid microwaves as they can toughen the chicken.

    Freezing Guidelines: While fresh is best, you can freeze cooked skewers for up to a month. Thaw in the fridge overnight before gently reheating.

    Make Ahead Strategies


    Prep Timeline: Prepare and marinate the chicken a day in advance for easy day-of cooking, liberating your schedule and reducing stress.

    Storage Between Steps: Keep marinated chicken sealed in airtight containers in the fridge to maintain freshness.

    Quality Impact Assessment: The marinade deepens in flavor over time, enhancing the dish rather than degrading its quality.

    Assembly Tips: Skewer the marinated chicken and vegetables shortly before cooking, stabilizing their structure and minimizing mess.

    Reheating Guidelines: Pre-grill skewers up to a day ahead, then finish on the grill to crisp up and heat through, ensuring meal freshness.

    Fresh Element Additions: Add garnishes and fresh herbs right before serving to maintain brightness in flavor and color.

    Scaling Instructions


    Halving the Recipe: Simply halve ingredient quantities for smaller servings without impacting flavor or texture balance.

    Doubling or Tripling: Increase marinade quantities proportionally when increasing recipe size to maintain flavor consistency.

    Equipment Adjustments: Utilize larger trays or grilling racks to accommodate more skewers without sacrificing cooking quality.

    Timing Modifications: Adjust grill time slightly for larger batches to ensure each skewer achieves proper doneness.

    Storage Considerations: When prepping in bulk, consider additional storage containers to separate each serving batch to maintain freshness.

    Nutritional Deep Dive


    Macro Breakdown: High in protein thanks to lean chicken, this recipe supports muscle growth and repair, with moderate fat from coconut milk.

    Micronutrient Analysis: Packed with vitamins from fresh herbs and spices, these skewers boost immune function and overall health.

    Health Benefits: Infused with fiber and antioxidants from vegetables, this dish contributes to a balanced, health-supportive diet.

    Dietary Considerations: Low in carbohydrates, primarily due to vegetable inclusion. Adjustable to support various dietary needs.

    Portion Analysis: Adjustable based on dietary goals, each skewer offers a manageable serving of macronutrients.

    Weight Management Tips: Pair with a large salad or steamed vegetables to add bulk and satiety without excessive calories.

    Dietary Adaptations


    Gluten-Free: This recipe naturally aligns with gluten-free diets. Verify that all sauces and spices you use are certified gluten-free.

    Dairy-Free: Ensure that the coconut milk used is full-fat and free of any dairy contamination.

    Vegan: Replace chicken with tofu or seitan for a vegan-preferred version without sacrificing the core flavor elements.

    Low-Carb: Adjust vegetable selections to low-carb options like cauliflower or green beans while retaining the flavorful curry base.

    Keto: Moderate consumption fits keto requirements by maintaining low-carb inclusiveness and nutrient-dense ingredients.

    Paleo: Embrace this dish in the paleo lifestyle, focusing on wholesome, unprocessed components.

    Low-FODMAP: Utilize low-FODMAP garlic substitutes and limit onion use for an adaptable, gut-friendly interpretation.

    Troubleshooting Guide


    Texture Issues: If the chicken is too tough, reassess marination time or check internal temperature during grilling.

    Flavor Balance: If overly spicy, calibrate heat elements by balancing with more coconut milk or substituting milder curry paste.

    Temperature Problems: Maintain grill at medium heat; spikes or low temperature can affect chicken moisture retention.

    Equipment Challenges: Use proper grill utensils and ensure skewers are adequately soaked to prevent burning.

    Ingredient Substitutions: Should ingredients be unavailable, focus on matching flavor profiles with similar alternatives like Thai basil for cilantro.

    Timing Concerns: Adjust cooking schedules if marinating or assembling tightly in your timeline by completing prep steps in advance.

    Recipe Success Stories


    Community Feedback: Many readers have shared how these skewers have become a staple at their summer barbecues, citing great approval from both kids and adults.

    Variation Successes: One reader successfully substituted shrimp for chicken, adding a maritime twist delighting seafood aficionados.

    Adaptation Stories: A gluten-free kitchen adapted the recipe using tamari instead of soy sauce, achieving excellent flavor harmony.

    Reader Suggestions: Long-time readers suggest adding pineapple chunks for a sweet, tropical flavor boost.

    Photography Tips: Highlight vibrant contrasts by photographing skewers on a dark slate plate for ultimate visual impact.

    Frequently Asked Questions

    Can I use a different type of meat for this recipe?

    Yes, this recipe is versatile. Pork, beef, or shrimp can replace chicken to suit your preference, keeping adjustments to marinade times in mind for optimal flavor absorption.

    How can I make the dish less spicy?

    Simply reduce the amount of red curry paste or add extra coconut milk to dilute the spiciness while maintaining the creamy consistency.

    What type of skewers are best to use?

    Both metal and bamboo skewers work, but bamboo must be soaked in water to prevent burning when grilled.

    Is there a gluten-free alternative for soy sauce?

    Tamari or coconut aminos are excellent gluten-free substitutes that won’t compromise on taste.

    How do I keep the meat juicy during grilling?

    Make sure to maintain medium grill heat and avoid overcooking, ensuring tasty, succulent chicken.

    Can I prepare the skewers in advance for a party?

    Absolutely, prep the day before and store marinated chicken in the fridge to save time during the event.

    What should I do if I can’t find fresh lemongrass?

    Substitute with lemongrass paste, adjusting for intensity, or lemon zest with a hint of ginger as a last resort.

    What’s the best way to reheat leftovers?

    Gently reheat on a grill or oven to revitalize texture and flavor, steering clear of microwaves which can toughen chicken.

    Can I freeze leftover skewers?

    Yes, freeze them in an airtight container, then thaw thoroughly before reheating to preserve texture.

    What can I pair with this dish for a complete meal?

    Pair with jasmine rice, cucumber salad, or Thai spring rolls for a satisfying, complementary menu.

    Additional Resources


    Explore Related Recipes: Interested in exploring more Thai cuisines? Try our classic Pad Thai or fragrant Tom Yum Soup recipes, both showcasing authentic flavors of Thailand.

    Technique Guides: New to grilling? Our beginner’s guide to grilling offers tips, tricks, and techniques to help you achieve perfect results every time.

    Ingredient Information: Visit our pantry staple guide for a comprehensive list of Asian ingredients along with their uses and storage tips.

    Equipment Recommendations: Obtain a tried and trusted grill pan and bamboo skewers that withstand frequent use to ensure high-quality cooking.

    Seasonal Variations: Curious about adjusting flavors based on seasonality? Discover our summer to winter transformation guide for adaptable recipes.

    Join the Conversation


    Social Media Sharing: Share your Thai Curry Chicken Skewers on social media using #ThaiSkewerDelight to feature on our page and inspire others.

    Photography Tips: Capture the beauty of your dish by utilizing natural light and a simple background, focusing on vibrant colors and textures.

    Recipe Reviews: Let us know your thoughts and experiences with this dish in our comments section, engaging with other culinary enthusiasts.

    Community Engagement: Join our online community for cookbook giveaways, cooking challenges, and opportunities to showcase your cooking adventures.

    Recipe Variations: Have your creative version? Share it with us, showcasing your unique adaptations and flavorful inspirations.

    The Recipe

    Thai Curry Chicken Skewers

    Serves: 4

    Prep Time: 20 mins

    Cook Time: 15 mins

    Total Time: 35 mins

    Kitchen Equipment Needed

    • Mixing bowl
    • Grill or grill pan
    • Wooden or metal skewers
    • Basting brush

    Ingredients

    • 500g chicken breast, cut into 1-inch pieces
    • 3 tablespoons red curry paste
    • 1/2 cup coconut milk
    • 2 tablespoons fish sauce
    • 1 tablespoon brown sugar
    • 1 stalk of lemongrass, finely chopped
    • 1 tablespoon ginger, grated
    • 1 red bell pepper, diced
    • 1 zucchini, sliced
    • Fresh cilantro for garnish
    • 4 bamboo skewers, soaked

    Directions

    1. In a mixing bowl, combine red curry paste, coconut milk, fish sauce, brown sugar, lemongrass, and ginger. Mix well.
    2. Add the chicken pieces to the marinade, ensuring they are fully coated. Marinate for at least 30 minutes or overnight for stronger flavor.
    3. Prepare the grill to medium heat.
    4. Thread chicken pieces alternately with red bell pepper and zucchini onto each skewer.
    5. Place skewers on the grill and cook for about 5-7 minutes on each side, until chicken is fully cooked and charred edges appear.
    6. Garnish with chopped fresh cilantro and serve hot.

    Recipe Notes

    • For deeper flavor, marinate the chicken overnight.
    • Balance spiciness by adjusting red curry paste according to taste.
    • Feel free to add pineapple for a hint of sweetness.

    Irresistible Pecan Pie Bark Recipe: A Sweet Holiday Treat

    Pecan Pie Bark: A Delightful Twist on a Classic Dessert

    ⚖️
    Difficulty
    Easy

    ⏲️
    Prep Time
    10 mins

    🕒
    Cook Time
    25 mins

    ⏱️
    Total Time
    35 mins

    🍽️
    Servings
    8

    Indulge in a bite-sized version of a dessert classic with this Pecan Pie Bark. This recipe brings together the rich, buttery flavors of traditional pecan pie with a delightful, crunchy twist. Perfect for holiday gatherings or a special treat, each piece of pecan pie bark is a symphony of nutty, caramel goodness that melts in your mouth. Designed for ease and speed, it captures the essence of pecan pie with minimal effort—ideal for those looking to impress without stressing in the kitchen.

    Dive into luscious layers of toasted pecans nestled within a golden brown sugar caramel glaze. The texture is just as impressive as the taste—crispy, creamy, and irresistibly crunchy. The aroma, with its hints of roasted nuts and sweet caramel, fills your kitchen with warmth and comfort, making every bite of this pecan pie bark feel like a cozy embrace.

    Quick Recipe Highlights

    • Flavor Profile: The pecan pie bark combines nutty, caramel-like sweetness with hints of buttery richness.
    • Texture: Expect a satisfying crunch from the toasted pecans, complemented by a smooth caramel layer.
    • Aroma: A warm, inviting scent of roasted pecans and caramelized sugars wafts through your kitchen.
    • Visual Appeal: Shiny caramel-coated pecans create a tempting mosaic of golden browns.
    • Skill Level Needed: Easy—perfect for beginners or anyone short on time.
    • Special Equipment: A baking sheet, parchment paper, and a sturdy saucepan for the caramel.

    Recipe Overview

    • Difficulty Level: This easy recipe leverages simple techniques to achieve that classic pecan pie taste.
    • Category: Dessert, perfect for snacks or post-dinner indulgence.
    • Cuisine: A delicious take on Southern dessert traditions, adapted for modern convenience.
    • Cost: Budget-friendly, as pecans and sugar are the primary cost factors.
    • Season: Ideal for fall and winter when pecans are in season, but delicious year-round.
    • Occasion: Great for holidays, parties, or as a homemade gift.

    Why You’ll Love This Recipe


    One of the most beloved aspects of pecan pie bark is its irresistible taste and texture combination. Each bite is a masterclass in flavor balance—sweet, nutty, and slightly salty, providing a depth that keeps palates intrigued. It’s a convenient dessert to whip up, requiring minimal prep and cleanup, ideal for busy festivities.

    Nutritionally, while still a treat, pecan pie bark offers the benefits of pecans, a good source of healthy fats and proteins. It’s a superb choice for social gatherings, offering portioned servings that guests can easily enjoy without utensils. The cost-effectiveness of this dessert cannot be overlooked; a little goes a long way, and its ingredients are straightforward and easily accessible at most grocery stores.

    Historical Background and Cultural Significance


    Pecan pie, the inspiration for this recipe, hails from the American South, where pecans grow abundantly. Originally a staple in American households, variations like pecan pie bark surfaced for their convenience and portability. This dessert embodies a cultural tradition of Southern hospitality and sweet indulgence that transcends generations.

    The pecan pie’s evolution involves adapting the classic pie into simpler confections like this bark, appealing to time-strapped cooks while preserving essential flavors. Regional variations have emerged, with some adding chocolate or sea salt to the traditional recipe, each tweak reflecting local tastes and creativity.

    Ingredient Deep Dive


    The star of the show, pecans, are steeped in history as an indigenous nut variety native to North America. Rich in heart-healthy fats, vitamin E, and antioxidants, they lend both cultural significance and nutritional value to the recipe. Select pecans that are plump and shiny for the freshest flavor, and store them in a cool, dry place to maintain their quality.

    Brown sugar, the sweetener of choice for the caramel, imparts a deep molasses note that elevates the flavor profile of pecan pie bark. Store brown sugar in an airtight container to prevent it from hardening, and if you run out, white sugar mixed with molasses can serve as an effective substitute.

    Common Mistakes to Avoid

    • Overcooking the caramel: Keep a close eye on the temperature to prevent burning.
    • Skipping the parchment: Always line your baking sheet to prevent sticking and ensure easy removal.
    • Not pre-toasting pecans: Adds depth to their flavor, ensuring a robust taste.
    • Using old pecans: Can be bitter—always ensure they are fresh.
    • Incorrect caramel consistency: Too thick, and it won’t spread; too thin, it won’t set.
    • Burning the caramel: Use medium heat and stir constantly to avoid scorching.
    • Cutting while hot: Allow it to cool completely before breaking it into pieces.
    • Improper storage: Seal it tightly to keep it crisp; exposure to air can lead to sogginess.
    • Ignoring portions: Overindulgence is easy, so remember balance when serving.
    • Neglecting garnishes: Optional, but sea salt or chocolate can enhance flavors.

    Essential Techniques


    Creating the perfect caramel requires patience and attention at every stage. Begin by combining butter and brown sugar in a saucepan, stirring until fully dissolved and bubbling. The key is to achieve a smooth, glossy consistency without graininess—this involves a gentle simmer and consistent stirring. Overheating can cause the sugars to crystallize, resulting in a gritty texture.

    Mastering the art of toasting nuts depends on achieving an even golden-brown hue. Spread pecans in a single layer on a baking sheet and toast briefly until their aroma is released, enhancing their natural sweetness and adding a richer flavor to the bark.

    Pro Tips for Perfect Pecan Pie Bark


    Pre-toast your pecans to bring out their flavor and add a layer of textural complexity to your pecan pie bark. When preparing the caramel, be sure to use a candy thermometer to monitor the temperature closely, ensuring it doesn’t exceed the soft ball stage. This will result in a perfectly spreadable and set caramel.

    For added indulgence, sprinkle a pinch of flaky sea salt over the caramel while it’s still warm, introducing a delightful contrast to the sweetness. If you’re feeling adventurous, consider drizzling melted dark chocolate over the baked bark for an elegant touch.

    Variations and Adaptations


    Distinct regional variations of pecan pie bark include the addition of bourbon for a Southern twist or a sprinkle of cinnamon for a holiday flavor profile. Adapt it seasonally by incorporating dried cranberries in winter or a zest of citrus in the summer months.

    To accommodate dietary needs, consider using coconut sugar instead of brown sugar, or opt for dairy-free butter for a vegan version. Further flavor experiments can include adding a hint of vanilla extract to the caramel or even infusing the syrup with fresh rosemary for a fragrant herbal note.

    Serving and Presentation Guide


    For a charming presentation, break your pecan pie bark into rustic shards and arrange them on a decorative plate lined with parchment. Dust lightly with powdered sugar for a snowy effect or garnish with a scattering of edible flowers for a festive touch.

    Pair this crisp dessert with contrasting soft elements such as whipped cream or vanilla ice cream, which can enhance the richness and balance the sweetness of the bark. Temperature plays a crucial role—serve at room temperature for the best texture.

    Wine and Beverage Pairing


    Pairing this pecan pie bark with a robust, oaky Chardonnay or a sweet late-harvest Riesling complements its nutty flavors and caramel sweetness. When opting for non-alcoholic options, a freshly brewed cup of strong coffee or a creamy chai latte can balance the bark’s intensity.

    If serving with tea, consider a nutty Assam or a fragrant Earl Grey to enhance its aromatic profile. Ensure all beverages are served at a suitable temperature to enrich the overall tasting experience.

    Storage and Shelf Life


    Store your pecan pie bark in an airtight container to preserve its crunch and flavor. Keep it at room temperature for about a week, or refrigerate for longer freshness. Check for any signs of spoilage, like off-odors or changes in texture, before serving.

    To reheat, place in a low oven briefly or allow it to return to room temperature naturally. For extended storage, wrap tightly and freeze for up to three months.

    Make Ahead Strategies


    Prepare the caramel sauce a day in advance and store it in the refrigerator to cut down on preparation time. You can also chop and toast the pecans ahead; just keep them sealed to retain freshness. When ready to assemble, gently reheat the caramel until pourable.

    Assemble the bark when you’re serving close to the occasion, ensuring the freshest crunch and flavor. If there are delicate garnishes involved, add those just before serving to maintain their appeal and texture.

    Scaling Instructions


    This recipe can be halved easily for smaller gatherings or doubled if you’re serving to a crowd. When scaling, use appropriately sized baking sheets to avoid overcrowding, which can impact texture. Adjust cooking times slightly if using thicker layers of caramel or pecans.

    Mind the caramel’s temperature and consistency with each alteration, as thicker batches may require more attention to prevent burning. Storage solutions remain unchanged in terms of container type and method, although space considerations might necessitate multiple containers when scaling up.

    Nutritional Deep Dive


    Pecan pie bark is a delicious treat that, while indulgent, offers the health benefits embedded in its main ingredients. Pecans provide healthy monounsaturated fats and protein, making this dessert more than just empty calories. A macro, micro, and caloric breakdown can guide those mindful of intake.

    While enjoying pecan pie bark in moderation, its health score can be improved by choosing organic ingredients or substituting refined sugars. This conscious consumption approach helps integrate this delightful dessert into a balanced diet.

    Dietary Adaptations


    To make this recipe gluten-free, ensure all added toppings comply with gluten-free standards, including caramel and chocolate variations. For a vegan version, substitute butter with coconut oil or a plant-based alternative, and replace traditional sugars with agave or maple syrup.

    For those observing a keto diet, replace brown sugar with a low-carb sweetener, and ensure all components fit within carb constraints. Adaptations for dietary needs are straightforward and ensure everyone can enjoy your pecan pie bark.

    Troubleshooting Guide


    If the caramel is too hard, reheating slowly and adding a splash of cream can soften it to the desired texture. Lacking flavor depth may be due to under-toasted nuts—ensure proper toasting to bring out the best in pecans. Burnt caramel issues often stem from overheating; maintain moderate heat and constant stirring.

    Should your bark not set properly, revisit ingredient ratios to ensure correct proportions, especially the butter-to-sugar ratio in caramel. Equipment variations might necessitate technique adjustments—always tailor steps to available tools.

    Recipe Success Stories


    Home cooks have found joy in adapting pecan pie bark, enhancing it with personal twists like adding spices or different nut combinations. Community feedback highlights its ease, taste, and reception at gatherings. Share your photos and stories, inspiring others to tailor the recipe to their tastes.

    Consider trying variations shared by others, such as incorporating caramel shards into ice cream, presenting an innovative take on traditional flavors. The possibilities are as endless as the creativity they inspire.

    Frequently Asked Questions

    Can I use other nuts besides pecans? Absolutely, walnuts or almonds make delightful alternatives, though the flavor profile will vary.

    How do I prevent my caramel from crystallizing? Ensure constant stirring and gentle heating to avoid sugar reformation into crystals.

    What’s the best way to store pecan pie bark? An airtight container at room temperature is ideal; for longer storage, refrigeration is recommended.

    Why is my bark sticky? It may not have cooled enough. Allow it to set completely before breaking it into pieces.

    Is it possible to use dark chocolate instead? Yes, dark chocolate pairs beautifully with the sweet, nutty flavors.

    Can I make this sugar-free? Use sugar alternatives like erythritol, but adjust quantities to avoid overwhelming sweetness.

    What should I do if my caramel burns? Start again, and use lower heat, monitoring closely with a candy thermometer.

    Are there any dairy-free options? Replace butter with coconut or a dairy-free alternative for a lactose-friendly version.

    Additional Resources


    Explore related recipes such as traditional pecan pie, caramel-coated nuts, or holiday-themed barks. Dive into technique guides for perfect caramel making, or ingredient deep dives that enhance understanding of nuts’ roles in other culinaries.

    Additionally, understanding seasonal influences can help tailor this recipe to various times of year, adapting not just ingredients but perhaps even presentation. Find equipment recommendations to optimize your cooking experience, ensuring success with each attempt.

    Join the Conversation


    Engage with our community by sharing your pecan pie bark creations on social media, tagging #PecanPieBarkDelight. Exchange tips and variations in the comments and discover how others are creatively adapting this classic. Leave a review to inspire others and bolster their confidence in trying this delightful recipe. Join now and be part of a vibrant culinary journey that spans taste, culture, and tradition.

    The Recipe

    Pecan Pie Bark

    Serves: 8

    Prep Time: 10 mins

    Cook Time: 25 mins

    Total Time: 35 mins

    Kitchen Equipment Needed

    • Baking sheet
    • Parchment paper
    • Medium saucepan
    • Mixing spoon
    • Candy thermometer

    Ingredients

    • 2 cups pecans, coarsely chopped
    • 1 cup unsalted butter
    • 1 cup brown sugar, packed
    • Pinch of sea salt (optional)

    Directions

    1. Preheat your oven to 350°F (175°C) and line a baking sheet with parchment paper.
    2. Spread pecans in a single layer on the prepared sheet and toast in the oven for about 5-7 minutes or until fragrant.
    3. In a medium saucepan, melt the butter over medium heat. Add the brown sugar and stir until fully dissolved and bubbling. Maintain a gentle boil for 3-4 minutes, stirring constantly.
    4. Remove from heat and pour the caramel over the toasted pecans, using a spatula to spread it evenly.
    5. Let it cool completely before breaking it into pieces.

    Recipe Notes

    • For added flavor, sprinkle a pinch of sea salt over the caramel while it’s still warm.
    • The pecan pie bark stores well; keep it in a cool, dry place for up to a week.

    Delicious Turkey Cranberry Meatballs with Homemade Cranberry BBQ Sauce

    Turkey Cranberry Meatballs with Cranberry BBQ Sauce: A Festive Delight

    ⚖️
    Difficulty
    Moderate

    ⏲️
    Prep Time
    15 mins

    🕒
    Cook Time
    25 mins

    ⏱️
    Total Time
    40 mins

    🍽️
    Servings
    4

    Experience the heartwarming flavors of the holidays with our Turkey Cranberry Meatballs drizzled in a luscious Cranberry BBQ Sauce. Combining the lean richness of ground turkey with the tartness of cranberries, this recipe captures the essence of festive dining with a twist. The Cranberry BBQ Sauce adds another layer of complexity, offering sweet, tangy, and smoky notes that complement the meatballs perfectly. Whether you’re entertaining guests or enjoying a cozy meal at home, these meatballs promise to be a highlight on your table.

    The dish begins with juicy turkey meat, renowned for its light flavor and nutritional benefits. Finely chopped cranberries are blended into the meat mixture, ensuring every bite bursts with a subtle tartness. As you cook, the aromatic journey unfolds — warm spices mingle with the scent of roasting turkey, creating an inviting atmosphere. Once plated, the vibrant red sauce cloaks the meatballs in a glossy, appetizing finish, boosting both flavor and visual appeal.

    Best of all, these turkey cranberry meatballs are straightforward enough for a weekday meal yet impressive enough for holiday gatherings. Even novice cooks can master this dish, making it an excellent recipe for those looking to expand their culinary horizons.

    Quick Recipe Highlights

    • Flavor Profile: These meatballs boast a delightful balance of savory turkey and tangy cranberries, enhanced by a sweet and smoky BBQ sauce.
    • Texture: Expect a juicy interior with a firm outer crust, complimented by the smooth, rich sauce.
    • Aroma: The meatballs offer inviting aromas of roasted turkey and spices, with a sweet undertone from the sauce.
    • Visual Appeal: Serve these vibrant, red-glazed meatballs for an eye-catching presentation that delights the senses.
    • Skill Level Needed: Culinary skills required are basic chopping and mixing, alongside simple baking.
    • Special Equipment: Basic kitchen appliances like a baking sheet and mixing bowl suffice for this recipe.

    Recipe Overview

    • Difficulty Level: The recipe’s moderate skill level grants you the opportunity to practice forming meatballs and adjusting oven settings, all of which are foundational cooking skills.
    • Category: This dish fits perfectly into the main course category, especially on festive and holiday tables.
    • Cuisine: While inherently American, the influences of BBQ sauce introduce elements of Southern cuisine.
    • Cost: Typically affordable, the main ingredients like ground turkey, cranberries, and BBQ sauce are budget-friendly, especially in season.
    • Season: Best enjoyed in the fall and winter months when cranberries are fresh and Thanksgiving gatherings abound.
    • Occasion: Ideal for holiday celebrations, family dinners, or casual get-togethers requiring a cozy and flavor-packed meal.

    Why You’ll Love This Recipe


    The harmony of taste and texture in Turkey Cranberry Meatballs with Cranberry BBQ Sauce is truly unforgettable. The earthiness of turkey marries exceptionally well with the cranberry’s sharp tang, creating a dynamic flavor profile that dances on the palate. Texturally, the meatballs are moist and tender with just the right amount of firmness, enveloped in a luscious sauce that spreads in warm waves across your tongue.

    Convenience is a standout feature of this recipe. Within 40 minutes, you can have a holiday-worthy dish that doesn’t demand hours of preparation. The meatballs are baked, reducing the mess typically associated with frying, and the sauce can be made ahead of time, freeing you to focus on other aspects of dinner preparation.

    Nutritionally, this meal is a winner. Turkey is a lean protein, low in fat but high in essential nutrients, making it an excellent choice for those mindful of health. Cranberries contribute antioxidants, while the homemade sauce allows for controlled sweetness and sodium levels compared to store-bought alternatives.

    When it comes to social gatherings, these meatballs shine. They are an impressive appetizer or main course, sparking conversation and satisfying diverse culinary preferences, from children to adults. The recipe can be easily doubled to accommodate larger groups, making it a perennial favorite for entertainers.

    Finally, the accessibility and cost-effectiveness of the ingredients make it a go-to option for any home cook. You won’t struggle to find turkey and cranberries, especially as their popularity peaks during the fall. This recipe’s simplicity ensures you won’t overspend, and it can be made from readily available pantry staples, keeping your grocery list manageable.

    Historical Background and Cultural Significance


    The love affair with turkey and cranberries is deeply entrenched in American culinary history, marking a cornerstone of traditional Thanksgiving feasts. Turkey, native to North America, has been a symbol of bounty long before it graced the Pilgrim’s table. Coupled with cranberries, another indigenous ingredient, the pairing was inevitable and harmonious, overcoming centuries to remain a staple today.

    Cranberries, initially used by Native American tribes for culinary and medicinal purposes, gained traction in European-influenced dishes soon after the settlers arrived. The cranberry sauce, as we know it, didn’t become mainstream until the 19th century, aligning with Thanksgiving’s rise in popularity as an official holiday.

    Turkey meatballs provide a modern twist on these age-old ingredients, showcasing the evolution of American culinary traditions. They embody the nation’s diverse gastronomic influences, from European immigrants to regional American cuisine innovations such as BBQ sauce, which hints at Southern inspiration.

    While traditionally featured during the colder months, regional variations of turkey cranberry dishes have appeared across the country, each reflecting local tastes and available ingredients. From New England’s more straightforward preparations to the hearty, spiced variations seen further south, this pairing has seamlessly adapted, maintaining its relevance through centuries of cuisine transformation.

    Ingredient Deep Dive


    Turkey serves as the heart of this recipe, chosen for its lean protein that is lower in cholesterol compared to red meat. It has been a dietary staple across many cultures, celebrated for its versatility and ability to capture flavors. When selecting turkey, opt for ground turkey to ensure an even mix of dark and lean meat, offering an ideal balance of moisture.

    Cranberries lend color and a tangy zest to the meatballs, acting as a natural tenderizer and flavor enhancer. They are rich in antioxidants, which contribute to cardiovascular health and boast anti-inflammatory properties. For the best flavor, use fresh or frozen cranberries, avoiding dried versions that contain added sugar, which might overpower the dish’s balance.

    The Cranberry BBQ Sauce is the key differentiator here, contributing layers of flavor. When crafting this sauce, the quality of the base BBQ sauce is crucial — look for a brand with recognizable ingredients and lower sugar content to perfectly complement the cranberries. Adding fresh cranberries into the mix helps in amplifying the tartness while providing texture.

    To ensure the perfect texture, a binding agent such as breadcrumbs is essential. Opt for panko breadcrumbs for a lighter texture and superior moisture retention, ensuring your meatballs are juicy and cohesive. For added flavor depth, experiment with fresh herbs like thyme or sage, harmonizing with the dish’s savory notes.

    Common Mistakes to Avoid

    • Overmixing: Avoid overmixing the turkey mixture, which can result in tough and dry meatballs.
    • Using Low-Quality Ingredients: The quality of the cranberries and BBQ sauce directly affects the overall taste.
    • Cooking at High Temperature: Higher heat might cook the exterior too fast, leaving the inside undercooked.
    • Skipping Binding Agents: Not using enough breadcrumbs can cause the meatballs to fall apart.
    • Undercooking: Ensure the meatballs reach an internal temperature of 165°F to guarantee they’re fully cooked.
    • Not Seasoning Enough: Failing to season the meat means missing out on depth and richness in flavor.
    • Ignoring Sauce Consistency: A too-thick or too-thin sauce can disrupt the desired balance and texture.
    • Missing the Resting Step: Allow meatballs to rest briefly after baking to help flavors meld.

    Essential Techniques


    Perfect rolling is crucial for uniform cooking. Use clean hands or a scoop to ensure each meatball is the same size, allowing them to cook evenly and maintain a consistent texture. If they’re too big or small, the cooking time will vary, and consistency will suffer.

    Preparation of the Cranberry BBQ Sauce is another key technique. Simmer the sauce until it’s reduced to your preferred thickness. Reduction naturally thickens the sauce, intensifying its flavors without the need for artificial thickeners. Taste as you go, adjusting sugar and spices to suit personal preferences but avoiding overpowering the sour notes.

    Baking instead of frying is both a health-conscious choice and a method to achieve a consistent brown crust while keeping the interior juicy. Preheat your oven fully before baking to ensure the meatballs cook through evenly. Use a wire rack on top of a baking tray to allow air circulation, ensuring even browning.

    Temperature control is another fundamental aspect. While the meatballs bake, monitor your sauce’s simmering heat; too high, it will burn or reduce too quickly. A gentle simmer is ideal for a sauce with a rich, deep flavor.

    Pro Tips for Perfect Turkey Cranberry Meatballs

    Adding a small amount of fat to the turkey helps prevent dryness, offering moisture and flavor. Consider blending a dash of olive oil or melted butter into the mixture.

    When forming meatballs, lightly wetting your hands prevents sticking and helps create a smooth, consistent surface texture.

    Fresh parsley or cilantro sprinkled as a finishing touch not only enhances aesthetics but brightens the flavor profile, cutting through the richness of the inbuilt sauce.

    Testing  one meatball before committing to the entire batch can serve as an invaluable checkpoint, refining seasoning to taste and texture to your exact preference.

    Chill the meatball mixture briefly before rolling; this makes handling easier and helps the balls retain their shape while baking.

    Infusing the sauce with a hint of smoked paprika adds depth of flavor, mimicking the barbecue taste in the absence of an actual grill.

    Serving your dish alongside a vibrant green vegetable, such as roasted Brussels sprouts or broccolini, balances the meal nutritionally and complements the red hue of the sauce beautifully.

    Variations and Adaptations

    For a regional Southern-inspired twist, integrate smoked sausage into the meat mixture, introducing a smoky undertone that complements the BBQ sauce beautifully.

    In the summer, swap out cranberries for fresh cherries, offering a sweeter, less tart variant that still delivers a strong flavor punch.

    Low-carb and gluten-free enthusiasts can substitute almond flour for breadcrumbs, maintaining the binding function while adhering to dietary restrictions.

    A flavor twist can be achieved by incorporating hints of orange zest into the sauce, adding a citrus contrast that brightens the overall dish.

    For those preferring a spicier version, try infusing the sauce with chili flakes or cayenne pepper to introduce heat and keep the profile interesting.

    Modify the meatball texture with the addition of finely diced vegetables, such as zucchini or mushrooms, which add moisture and depth to each bite.

    < br >

    Serving and Presentation Guide

    Embrace using a white platter with ample space to arrange the meatballs in a circle or neat rows, complementing their rich color with a stark backdrop for visual contrast.

    Generously ladling the Cranberry BBQ Sauce over the meatballs right before serving ensures they remain succulent and beautifully glazed.

    Consider traditional garnishes such as freshly chopped parsley or chives, offering a splash of color and adding subtle flavor notes.

    For modern twists, a sprinkle of toasted sesame seeds or crumbled feta over the meatballs can offer unexpected textures and flavors.

    When serving with accompaniments, think beyond cranberry sauce alone, integrating options like mashed sweet potatoes or a grain medley for a well-rounded meal alongside the turkey delights.

    Serve the dish at a warm, but not too hot, temperature to ensure the sauce maintains its consistency and does not run excessively, detracting from presentation.

    Wine and Beverage Pairing

    The mild sweetness and acidity of a Pinot Noir pair seamlessly with these meatballs, balancing out the tart cranberry and rich turkey flavors without overshadowing them.

    For non-alcoholic alternatives, a spiced cranberry iced tea or berry-infused seltzer water can provide refreshing undertones that complement the dish’s profile.

    In cooler months, consider serving a warm mulled cider or spiced cranberry punch, which echoes the festive notes in the Cranberry BBQ sauce and enhances the meal’s feel.

    For lighter pairings, a sparkling white wine or dry rosé can offer crispness and a clean finish, refreshing the palate between bites and enhancing the dining experience.

    Storage and Shelf Life

    Store leftover meatballs in an airtight container within two hours of cooking to maintain freshness; they typically last up to three days in the refrigerator.

    Ensure the Cranberry BBQ Sauce is also stored separately in a sealed container to maintain its consistency and flavor without cross-contamination.

    When freezing, position meatballs individually on a lined baking sheet to prevent sticking, then transfer them to a freezer bag once solid. They can be stored frozen for up to three months.

    Signs of spoilage include off odors, changes in texture, or color, indicating they should not be consumed and are better discarded.

    For reheating, use a low oven or steam to gently warm through, ideally introducing additional sauce to maintain moisture.

    Make Ahead Strategies

    Prepare the meatball mixture up to a day in advance, storing it in the refrigerator to allow flavors to meld and make assembly on cooking day smoother.

    Pre-made sauce can be refrigerated for up to a week or frozen for up to a month, allowing reheating during the meal assembly stage for added convenience.

    Quality is not compromised by making the Cranberry BBQ Sauce ahead, as its flavors intensify over time, allowing a deeper, richer taste.

    Reheat the sauce separately in a saucepan on low heat rather than combining it during the meatball warming process to retain its intended texture and flavor.

    Adding fresh elements like a sprinkle of fresh herbs or a squeeze of citrus juice right before serving can reinvigorate the dish and maintain an appealing taste.

    Scaling Instructions

    Halving the recipe is straightforward, just adjust all measured ingredients accordingly while maintaining original cooking times and temperatures.

    Doubling or tripling ensures dinner party success, but be mindful of oven space, potentially cooking in batches to prevent overcrowding.

    Adjust equipment appropriately, ensuring larger bowls or pans are available to accommodate increased ingredient quantities without compromising on mixture quality.

    Extended cooking times might be necessary for larger batches, particularly in oven baking steps, requiring regular internal temperature checks to ensure thorough cooking.

    Ensure ample storage space if preparing ahead in larger quantities, considering airtight containers or freezer space for optimal preservation.

    Nutritional Deep Dive


    Turkey cranberry meatballs deliver a balance of macronutrients, offering high protein from turkey alongside fiber and carbohydrates from cranberries and sauce.

    Micronutrient benefits include B vitamins, iron, and selenium from turkey, alongside vitamin C and antioxidants from cranberries, supporting immune health and energy levels.

    Health benefits stem from lean protein intake, supporting muscle repair and growth at lower fat levels than red meats, appealing to a broad spectrum of dietary preferences.

    Portion-wise, each serving delivers a satisfying meal without excess, aligning with balanced diets and healthy eating goals.

    Those conscious of weight management will find this dish meets needs through lean protein and balanced, flavorful components that satisfy without overconsumption.

    Dietary Adaptations

    For a gluten-free adaptation, substitute gluten-free breadcrumbs without compromising meatball structure or flavor.

    Achieve a dairy-free version effortlessly as the recipe inherently lacks dairy requirements, maintaining its approachability for those with lactose intolerance.

    Explore vegan avenues by substituting turkey with plant-based meat alternatives and using flaxseed or chia seeds in place of eggs for binding.

    For keto preferences, replace breadcrumbs with almond meal to meet low-carb guidelines while sustaining essential binding qualities.

    Paleo adaptations involve utilizing almond flour and ensuring BBQ sauce ingredients align with grain and refined-sugar-free criteria, adjusting as necessary.

    A Low-FODMAP adaptation focuses on removing garlic and onion usually present in BBQ sauce, opting for certified low-FODMAP alternatives instead.

    Troubleshooting Guide

    Texture concerns often arise from overmixing turkey, so ease off once ingredients are combined to prevent graininess within the mixture.

    Flavor imbalances can be corrected by gradually incorporating additional seasoning or spices, but begin with minimal increases to avoid overpowering the natural flavors.

    Overcooking can be solved by sticking to the recommended baking times and utilizing a meat thermometer to avoid exceeding 165°F internal temperature.

    Equipment challenges, such as uneven browning, can be rectified by rotating the baking tray midway through the cooking process for consistent heating.

    If ingredients appear incompatible, consider additional binding agents like eggs or panko to achieve desired coherence within the meatball structure.

    Proper timing is addressed by preparing ingredients in advance, ensuring everything is prepped and ready for cooking, avoiding unforeseen delays during assembly.

    Recipe Success Stories

    Our readers have shared delightful experiences with this turkey cranberry meatball recipe, often noting its adaptable nature to various festive menus.

    Numerous adaptations have involved substituting cranberries with other seasonal fruits, like pomegranate arils or currants, each offering a unique tangy twist.

    Particular success stories come from those experimenting with sauces, introducing jalapeno or mustard variations for an added layer of complexity and personal touch.

    Photography enthusiasts contribute insights, highlighting how the vibrant reds and greens of garnishes dramatically elevate presentation, making it an Instagram-worthy dish.

    Shared suggestions emphasize the versatility of side options, ranging from creamy mash to grain salads, each complementing the succulent meatballs differently.

    Frequently Asked Questions

    Q: Can I prepare the meatballs in advance?
    A: Absolutely! The meatball mixture can be prepared a day ahead and stored in the refrigerator until ready to cook. The assembled balls can also be frozen for meal prep ease.

    Q: Are there alternatives for cranberries if they are out of season?
    A: Fresh or frozen cranberries are best, but alternatives like tart cherries or apricots can offer a different yet delightful twist. Dried versions can work but note the sweetness adjustments needed.

    Q: How can I make this recipe spicier?
    A: Incorporating chili flakes or cayenne pepper into the sauce or mixture will heighten the heat level, adding a subtle kick ideal for spice lovers.

    Q: Do I need to oil the baking sheet?
    A: For easier cleanup and to prevent sticking, using parchment paper on the baking tray is recommended, negating additional oil requirements.

    Q: What’s the best way to serve the meatballs at a large party?
    A: Consider serving them in a slow cooker to maintain warmth throughout the duration, with the sauce kept in a separate dish for guests to add as they prefer.

    Q: Can leftover sauce be repurposed?
    A: Absolutely, it’s a versatile sauce that pairs wonderfully with grilled chicken, ribs, or even as a flavorful base in sandwiches.

    Q: How do I prevent the meatballs from drying out when reheating?
    A: Reheat with a portion of sauce in a covered dish or gently steam them to retain moisture. Avoid microwaving directly, as this might overcook them.

    Q: Is it suitable for themed parties?
    A: Given the recipe’s vibrant colors and versatile flavor, it complements Thanksgiving or Christmas gatherings, but can symbolize any fall-themed event.

    Q: What if I’m allergic to cranberries?
    A: Substitute cranberries with other tart fruits or create a different complementary sauce using fruit you’re not allergic to.

    Q: Do these freeze well?
    A: Yes, they freeze exceptionally well. Lay them on a tray to freeze individually before transferring them to a storage container, ensuring they remain intact and quality is preserved.

    Additional Resources

    For similar meat-based recipes, explore our section on festive meatloaf variations, offering unique spins on classic comfort food.

    Our BBQ sauce guide dives into a range of barbecue sauce styles, helping refine your homemade sauce skills and encouraging experimentation.

    Visit ingredient breakdowns that delve into turkey and cranberry’s history to appreciate their traditional and modern roles within American cuisine.

    Harness the knowledge of professional kitchen equipment recommendations here, aligning your adventures in home cooking with useful and effective appliances.

    If seasonal variations interest you, explore our ultimate season-based recipe collection, highlighting perfect dishes for holiday tables and cool-weather feasting.

    Join the Conversation

    Join our community of cooking enthusiasts by sharing your turkey cranberry meatball creations on social media, utilizing the hashtag #TurkeyCranberryCreatives for a chance to be featured.

    For photography tips, reference our article on capturing the essence of food beauty, guiding you to showcase the vibrant colors and textures of your culinary efforts engagingly.

    We encourage you to leave recipe reviews, documenting your personal adaptations of this dish, or connecting with others who share your love for home-cooked meals.

    Engage with our network by adopting and modifying this recipe, recognizing your twists and turns in our community portal for shared innovation and culinary exploration.

    Finally, if new ideas for side dishes intrigue you, connect with our latest posts, offering pairing suggestions from the seasonal harvest to round out your Turkey Cranberry Meatball meal.

    The Recipe

    Turkey Cranberry Meatballs with Cranberry BBQ Sauce

    Serves: 4

    Prep Time: 15 mins

    Cook Time: 25 mins

    Total Time: 40 mins

    Kitchen Equipment Needed

    • Baking sheet
    • Mixing bowls
    • Wire rack
    • Small saucepan
    • Measuring spoons
    • Spoon or scoop for forming meatballs

    Ingredients

    • 1 lb ground turkey
    • 1/2 cup chopped fresh cranberries
    • 1/4 cup panko breadcrumbs
    • 1 egg, lightly beaten
    • 2 cloves garlic, minced
    • 1 teaspoon salt
    • 1/2 teaspoon black pepper
    • 1 cup BBQ sauce
    • 1/2 cup fresh cranberries, for sauce
    • 1 tablespoon brown sugar
    • 1 teaspoon smoked paprika

    Directions

    1. Preheat your oven to 375°F (190°C) and line a baking sheet with parchment paper.
    2. In a mixing bowl, combine turkey, chopped cranberries, breadcrumbs, egg, garlic, salt, and pepper. Mix until just combined.
    3. Form the mixture into 1-inch meatballs using a spoon or scoop, arranging them evenly on the prepared baking sheet.
    4. Bake for 20-25 minutes until the meatballs are browned and cooked through.
    5. Meanwhile, prepare the Cranberry BBQ Sauce: In a small saucepan over medium heat, combine the BBQ sauce, 1/2 cup cranberries, brown sugar, and smoked paprika.
    6. Simmer, stirring occasionally until the cranberries burst and the sauce thickens slightly, about 10 minutes.
    7. Remove the cooked meatballs from the oven and toss them in the prepared Cranberry BBQ Sauce, ensuring they’re well-coated before serving.

    Recipe Notes

    • For a richer flavor, consider adding a couple of tablespoons of diced onions or bell peppers to the meat mixture.
    • Leftover sauce can be refrigerated and used within a week; it pairs wonderfully with grilled meats or sandwiches.
    • Ensure meatballs are evenly sized for consistent cooking results.

    Experience the Ultimate Hawaiian Grilled Teriyaki Chicken Delight Today

    Tremendous Hawaiian Grilled Teriyaki Chicken Feast: A Flavorful Adventure

    ⚖️
    Difficulty
    Medium

    ⏲️
    Prep Time
    30 mins

    🕒
    Cook Time
    20 mins

    ⏱️
    Total Time
    50 mins

    🍽️
    Servings
    4

    Embark on a gastronomic journey with our Tremendous Hawaiian Grilled Teriyaki Chicken Feast, a culinary delight that brings the exotic flavors of the Pacific Islands straight to your table. This dish combines succulent, juicy chicken marinated in a rich blend of teriyaki sauce, infused with pineapple’s sweet notes, and grilled to perfection, producing a visually stunning and palate-pleasing masterpiece. Experience the harmony of sweet, savory, and tangy flavors, bound to make your taste buds dance with joy.

    The tropical aroma of our Tremendous Hawaiian Grilled Teriyaki Chicken Feast is irresistible, making it an ideal choice for both casual family dinners and festive gatherings alike. The visually striking presentation—featuring a glossy teriyaki glaze and vibrant garnishes—is guaranteed to wow your guests and transport them to a tropical paradise with every bite. Prepare to indulge in a meal that offers the perfect blend of flavor, texture, and aroma.

    Quick Recipe Highlights
    – Flavor Profile: This dish marries the sweetness of pineapple with the savory undertones of soy, enriched with ginger and garlic for a delightful Asian-inspired taste.
    – Texture: The chicken boasts a moist interior with a slightly crispy exterior, courtesy of the caramelized teriyaki glaze.
    – Aroma: The fragrant notes of ginger and garlic paired with the smoky hint from the grill create an aromatic bouquet that fills the kitchen.
    – Visual Appeal: Featuring a glossy, caramelized finish with vibrant pineapple and scallion garnishes, this dish is a feast for the eyes.
    – Skill Level Needed: Intermediate; requires knowledge of marinating and grilling techniques for optimal results.
    – Special Equipment: A grill or grill pan is essential for achieving the ideal char and glaze on the chicken.

    Recipe Overview
    – Difficulty Level: This recipe is medium in difficulty, perfectly balancing the need for timing precision in marinating and grilling with simple ingredient preparation.
    – Category: Entree, Main Dish
    – Cuisine: Origins span both Hawaiian and Japanese influences, with teriyaki traditional in Japanese cuisine and pineapple providing a Hawaiian twist.
    – Cost: Reasonably inexpensive, with ingredients like chicken and pineapple being budget-friendly and readily available.
    – Season: Best enjoyed during warmer months or summer, aligning with grilling season for an authentic outdoor cooking experience.
    – Occasion: Ideal for barbecues, family dinners, or festive summer gatherings.

    Why You’ll Love This Recipe
    Taste and Texture Appeal
    Our Tremendous Hawaiian Grilled Teriyaki Chicken Feast provides a delightful taste and texture combination that captivates every palate. The sweet and tangy teriyaki sauce complements the juicy, tender chicken perfectly, offering a balanced taste that is both daring and comforting. The texture contrasts between the tender interior and the mildly crispy exterior create an enjoyable eating experience, leaving you craving more with every bite.

    Convenience and Preparation Benefits
    Despite its impressive presentation, this dish is surprisingly straightforward to prepare. With simple, easily accessible ingredients and a few household staples, this recipe can be put together with minimal effort. The marinade can be made in advance, allowing for efficient planning and preparation, ensuring a hassle-free cooking experience.

    Nutritional Advantages
    This dish boasts a nutritious profile, high in protein from the lean chicken, with added vitamins from the pineapple and scallions. It offers a healthy option, especially when paired with whole grains or a fresh salad, making it an ideal choice for balanced, wholesome meals.

    Social and Entertaining Value
    Hosting a barbecue or party becomes an effortless affair with the introduction of this recipe. Its exotic flavors and eye-catching presentation are a surefire way to impress guests, sparking conversations and creating a memorable dining experience. Whether it’s a backyard family gathering or a festive celebration, this dish is a guaranteed crowd-pleaser.

    Cost-effectiveness and Accessibility
    The ingredients for this recipe are budget-friendly and widely available, making it an accessible option for all households. With such a cost-efficient dish, you can host festive feasts without the worry of overspending, ensuring quality flavor and nutritional value within an affordable range.

    Historical Background and Cultural Significance
    Origin Story
    Teriyaki is a staple in Japanese cuisine, characterized by its glossy sweetness and savory profile. Originally, the technique involved broiling fish with soy sauce, mirin, and sugar, later evolving to accommodate chicken and beef, making it a versatile culinary delight.

    Cultural Importance
    In Hawaii, the fusion of teriyaki with local ingredients like pineapple is a testament to the state’s rich cultural tapestry, where Asian and Pacific Islander culinary influences meld seamlessly into a unique gastronomic tradition.

    Evolution of the Recipe
    The blending of traditional teriyaki sauce with locally grown Hawaiian produce marks its evolution, morphing from a Japanese staple into a beloved island classic. Its adaptability over time showcases the innovative spirit of Hawaiian cuisine, popularizing teriyaki beyond its origins to a global audience.

    Regional Variations
    Globally, teriyaki-inspired dishes vary in spices and sweetening agents. In some regions, honey or brown sugar replace traditional mirin for a distinct flavor twist, while others incorporate regional ingredients for a personalized culinary signature reflective of local tastes.

    Ingredient Deep Dive
    Chicken
    Chicken holds significant value across various cultures due to its versatility and affordability. Rich in protein and low in fat, it serves as a primary source of essential nutrients, making it a focus in many health-conscious diets. Selecting fresh, quality chicken enhances the overall flavor, with free-range varieties offering superior taste and texture.

    Cultural Significance and History
    In Hawaiian cuisine, chicken is often roasted or grilled, celebrating the traditional cooking techniques of Pacific Island culture. Its role in diverse dishes showcases its adaptability, proving its enduring presence in kitchen traditions worldwide.

    Selection Tips
    Choose fresh, plump chicken with no discoloration for the best results. Opt for skinless, boneless cuts for easy preparation and consistent cooking.

    Storage Recommendations
    Chicken should be refrigerated promptly and consumed within a couple of days. For longer storage, freezing it in an airtight container maintains its quality.

    Substitution Options
    Turkey or tofu can serve as alternative protein options, offering similar texture and versatility for dietary preferences.

    Common Mistakes to Avoid
    1. Skipping the Marinade: The key to flavorful teriyaki chicken is adequate marination. Allow enough time for the marinade to work its magic.
    2. Overcooking: Watch your grill time to avoid drying out the chicken. Aim for a juicy, moist consistency.
    3. Inconsistent Cutting: Ensure even-sized chicken cuts for uniform cooking.
    4. Neglecting Resting Time: Allow the chicken to rest before serving to preserve its juices.
    5. Using Low Heat: High heat ensures a crispy outer texture while retaining moisture inside.
    6. Incorrect Storage: Store leftovers properly to avoid spoilage and maintain texture.
    7. Ignoring Temperature: Use a meat thermometer to ensure chicken is cooked to 165°F for safety.
    8. Rushing the Process: Take your time to enjoy the cooking process; patience will reward you with a rich flavor profile.

    Essential Techniques
    Grilling Mastery
    Grilling requires precision to achieve the right level of char without overcooking. Opt for medium-high heat and monitor closely, flipping once halfway through. Visual cues include distinct grill marks and a slightly caramelized sauce for a picture-perfect outcome.

    Marination Perfection
    Effective marination infuses the chicken with flavor, enhancing every bite. Combine soy sauce, pineapple juice, ginger, garlic, and brown sugar for a balanced base. Let the chicken soak for at least 30 minutes, allowing flavors to penetrate evenly.

    Pro Tips for Perfect Tremendous Hawaiian Grilled Teriyaki Chicken Feast
    1. Use a meat mallet to flatten chicken breasts for even grilling.
    2. Allow chicken to marinate overnight for deeper flavor infusion.
    3. Refrigerate leftover marinade for a flavor-enhancing basting sauce.
    4. Pat chicken dry before grilling for better charring.
    5. Introduce unique flavors with grilled pineapples as a side dish.
    6. Let chicken rest under foil post-grilling to retain juices.
    7. Serve with a touch of fresh lime juice for an added zesty finish.
    8. Experiment with different wood chips for a smoky flavor twist.

    Variations and Adaptations
    Regional Variations
    Incorporate tropical fruits like mango or papaya into the marinade for a refreshing flavor twist, highlighting a fusion of regional tastes from the Pacific Islands.

    Seasonal Adaptations
    During cooler months, consider broiling as an alternative to grilling, ensuring residual warmth maintains a cozy dining ambiance.

    Dietary Modifications
    For a low-sodium version, use reduced-sodium soy sauce and minimize additional salt. Try tofu for a vegetarian adaptation, preserving protein-rich benefits while accommodating dietary preferences.

    Flavor Variations
    Enhance the flavor profile with chili flakes or sriracha for a subtle spice, introducing a heat element for those who enjoy bolder tastes.

    Texture Modifications
    Add corn flour to the marinade for a thicker glaze, catering to those who prefer a more substantial coating.

    Presentation Alternatives
    Serve over a bed of jasmine rice or coconut-infused quinoa for a fusion of flavors, offering a sophisticated dining experience with varied textures and taste complexities.

    Serving and Presentation Guide
    Plating Techniques
    Arrange the grilled chicken slices artfully over rice with pineapple chunks for a vibrant plate, highlighting the colorful contrast of ingredients.

    Garnishing Ideas
    Finish with a sprinkle of toasted sesame seeds and chopped green onions for added texture and flavor, offering a visually pleasing garnish.

    Traditional Accompaniments
    Serve with classic Hawaiian sides like mac salad or coleslaw for a balanced feast, presenting a harmony of tastes and textures.

    Modern Serving Suggestions
    Introduce avocado slices and seaweed salad for a contemporary Hawaiian dish, expanding the flavor palette with varied taste profiles.

    Temperature Considerations
    Serve warm for optimal flavor; cold servings diminish aromatic notes, affecting overall enjoyment.

    Portion Control Tips
    Slice servings to half a breast per person, pairing with ample sides for a satisfying meal without overindulgence.

    Wine and Beverage Pairing
    Wine Pairings
    Opt for a crisp, chilled Riesling to balance the sweet and savory notes of teriyaki with its floral undertones, enhancing the dish’s dynamic flavors.

    Non-alcoholic Alternatives
    Infuse sparkling water with lime and mint for a refreshing complement, offering a clean, citrusy finish that enhances flavors.

    Coffee/Tea Pairings
    A light, floral green tea pairs seamlessly, accentuating the dish’s aromatic qualities while providing a balanced palate cleanse.

    Temperature Considerations
    Serve beverages chilled or at room temperature for optimal refreshment, aligning with the meal’s tropical flair.

    Serving Suggestions
    Consider meticulously laying of drinks and garnishes alongside the dish for a curated dining aesthetic, enhancing the overall sensory experience.

    Storage and Shelf Life
    Storage Methods
    Store grilled chicken in an airtight container in the refrigerator, retaining freshness and flavor for up to 3 days.

    Temperature Requirements
    Maintain a consistent fridge temperature to preserve quality, avoiding fluctuations that could compromise taste and texture.

    Container Recommendations
    Choose shallow, airtight containers for even cooling and preventing moisture loss, safeguarding flavor integrity.

    Signs of Spoilage
    Watch for off-odors, slime, or discoloration as spoilage indicators, ensuring safe consumption by spotting these signs early.

    Reheating Instructions
    Microwave on low heat to prevent drying out, or warm gently in an oven covered with foil to maintain moisture.

    Freezing Guidelines
    Allow chicken to cool before freezing; secure in double-wrapped foil or freezer bags to prevent freezer burn, preserving taste and consistency.

    Make Ahead Strategies
    Prep Timeline
    Prepare the marinade and start soaking the chicken the night before for maximum flavor absorption, streamlining meal preparation.

    Storage Between Steps
    Store marinated chicken in the refrigerator until needed, minimizing last-minute rush and allowing the plan to progress smoothly.

    Quality Impact Assessment
    Shortening marination time can impact flavor depth, but using fresh, quality ingredients ensures satisfaction despite time constraints.

    Assembly Tips
    Slice garnishes and prepare sides ahead, storing in separate containers to maintain freshness, enabling swift final assembly.

    Reheating Guidelines
    Warm leftovers carefully to restore original quality, using a gentle approach that retains moisture and ensures culinary enjoyment.

    Fresh Element Additions
    Incorporate fresh herbs or diced fruits just before serving, elevating the appearance and taste by introducing elements of brightness.

    Scaling Instructions
    Halving the Recipe
    Adjust ingredient quantities accordingly, maintaining consistency across sections, but don’t alter marination time, which remains vital for flavor.

    Doubling or Tripling
    Ensure adequate marination space in containers and consider grill capacity, cooking in batches if necessary, to maintain quality.

    Equipment Adjustments
    For expanded versions, larger mixing bowls or grilling surfaces ensure efficiency in preparation and cooking processes.

    Timing Modifications
    When multiplying recipes, maintain consistent timing but increase monitoring frequency for perfect grilling precision.

    Storage Considerations
    Ensure ample storage space for scaled portions, considering freezer or fridge capacity based on portion increases.

    Nutritional Deep Dive
    Macro Breakdown
    High in protein, moderate fat, and low carbohydrate content, this dish provides balanced energy and supports muscle development and maintenance.

    Micronutrient Analysis
    Packed with vitamins C from pineapple and B6 from chicken, this dish also delivers key minerals, supporting overall well-being.

    Health Benefits
    Rich in lean protein and vitamins, the dish supports muscle growth and a healthy immune system, aiding an active lifestyle.

    Dietary Considerations
    Low in low-carbohydrate, suitable for gluten-intolerance with gluten-free soy sauce, aligns with multiple dietary regimes.

    Portion Analysis
    Each serving delivers nutrient density and maintains calorie control, making it ideal for balanced, nutritional intake.

    Weight Management Tips
    Portion control is crucial; maintain balance by pairing with plant-based sides, sustaining energy without excess calorie consumption.

    Dietary Adaptations
    Gluten-Free
    Opt for gluten-free soy sauce, preserving the traditional flavor while accommodating gluten sensitivities without compromising taste.

    Dairy-Free
    The recipe is naturally dairy-free—perfect for those avoiding lactose or seeking allergy-friendly options.

    Vegan
    For plant-based diets, substitute tofu for chicken, using the same flavorful marinade to accommodate personal preferences.

    Low-Carb
    Reduce pineapple for a low-carb version, focusing on protein-dense chicken and maintaining flavor integrity without excess sugars.

    Keto
    Emphasize high-fat vegetable pairings, such as avocado or olive oil-based dressings, for keto dining without compromising richness.

    Paleo
    Use coconut aminos instead of soy sauce, aligning with paleo principles for a healthier, primal-friendly delight.

    Low-FODMAP
    Omit garlic and onion for low-FODMAP compliance, still delivering rich flavor through suitable substitute marinades.

    Other Specific Diets
    Adjust salt or sweetening elements for a heart-friendly version, enhancing health outcomes while retaining taste.

    Troubleshooting Guide
    Texture Issues
    Ensure adequate marination; the chicken should be juicy, not rubbery. Monitor grill temperature to avoid overcooking, which can toughen the meat.

    Flavor Balance
    Balance sweetness with soy sauce and acid from the pineapple; adjust quantities based on personal preference, avoiding excessive sugar.

    Temperature Problems
    Monitor cooking time, ensuring chicken reaches 165°F internally for safety and optimal tenderness.

    Equipment Challenges
    Ensure your grill is adequately heated before use for effective searing. Preheat adequately, ensuring consistent cooking conditions.

    Ingredient Substitutions
    Maintain flavor by opting for equivalent taste substitutes; for soy sauce, use coconut aminos as a gluten-free alternative.

    Timing Concerns
    Account for adequate marination time to impart a rich profile, hurried preparations compromise depth of flavor.

    Recipe Success Stories
    Community Feedback
    Readers rave about the simplicity and vibrant flavors, praising the meal’s ability to transform ordinary meals into an exotic dining experience.

    Variation Successes
    Culinary enthusiasts share creative adaptations, incorporating regional herbs for personalized taste profiles and showcasing global adaptation.

    Adaptation Stories
    From smoked versions to slow-cooked adaptations, readers creatively navigate cooking methods, extending the recipe’s versatility.

    Reader Suggestions
    Utilize reader feedback to enhance recipes, offering collective insights for shared culinary successes and improved outcomes.

    Photography Tips
    Capture the colorful, glazed finish under natural light for authenticity, emphasizing gloss and vibrant garnishes for visual appeal.

    Frequently Asked Questions

    What is the best chicken type for this recipe?
    Use skinless, boneless chicken breasts for even cooking and optimal marinade absorption, ensuring a tender, juicy finish.

    Can I prepare this recipe without a grill?
    Yes, a grill pan or broiler can replicate the desired textures, offering similar flavor notes through an indoor cooking setup.

    Is it okay to use canned pineapple?
    Fresh pineapple contributes superior flavor, but canned is an acceptable substitute, ensuring an equally satisfying outcome.

    What can I serve as sides?
    Pair this dish with jasmine rice, mac salad, or grilled vegetables, supplying complementary textures and flavors for a balanced meal.

    How do I avoid a burnt glaze?
    Moderate heat and attentive grilling prevent excessive caramelization, preserving a bite-worthy texture without bitterness.

    Why is my chicken not absorbing the marinade?
    Marinate sufficiently and ensure the chicken is fully submerged, allowing flavors to penetrate evenly for enhanced taste.

    Can this recipe be adapted for children?
    Adjust soy sauce and pineapple quantities for a milder flavor, providing a kid-friendly meal that satisfies all palates.

    How long will leftovers last?
    Stored adequately in an airtight container, leftovers maintain quality for up to 3 days, providing convenient meal options.

    Is reheating safe?
    Reheat gently, reaching an internal temperature of 165°F for food safety standards, ensuring flavorful, safe consumption.

    Which other fruits pair well with this dish?
    Add mango or papaya for a tropical twist, enhancing the dish’s fruity contrasts and offering varied texture components.

    Additional Resources
    Related Recipes
    Explore other Hawaiian-inspired dishes, such as Kalua pork or lomi-lomi salmon, for a comprehensive culinary experience.

    Technique Guides
    Learn expert grilling tips through specialized guides, enhancing proficiency and understanding of the cooking style exemplified in this recipe.

    Ingredient Information
    Dive into the history and nutritional value of key ingredients, understanding the elements’ roles in elevating your cooking.

    Equipment Recommendations
    Discover recommended grilling accessories for flawless execution, ensuring optimal outcomes and enriched cooking experiences.

    Seasonal Variations
    Adapt this recipe according to ingredient availability, aligning your dining experiences with seasonal bounty and logical adjustments.

    Join the Conversation
    Social Media Sharing
    Share your versions via social platforms, showcasing unique adaptations and gaining inspiration through community exchanges.

    Photography Tips
    Capture the essence of this dish through strategic photography, emphasizing vibrant hues and mouthwatering textures for captivating imagery.

    Recipe Reviews
    Contribute feedback for continued refinement, supporting collective recipe development through shared experiences and successful cookery.

    Community Engagement
    Join discussions surrounding Hawaiian culinary creations, encouraging collaborative dialogue and expanding your gastronomical knowledge base.

    Recipe Variations
    Introduce your personal touches to the recipe, increasing family appeal or adapting to dietary needs, demonstrating culinary creativity.

    The Recipe

    Tremendous Hawaiian Grilled Teriyaki Chicken Feast

    Serves: 4

    Prep Time: 30 mins

    Cook Time: 20 mins

    Total Time: 50 mins

    Kitchen Equipment Needed

    • Grill or grill pan
    • Mixing bowl
    • Sharp knife
    • Cutting board
    • Meat thermometer

    Ingredients

    • 4 boneless, skinless chicken breasts
    • 1 cup teriyaki sauce
    • 1/2 cup pineapple juice
    • 1 tablespoon soy sauce
    • 1 tablespoon brown sugar
    • 1 tablespoon minced garlic
    • 1 tablespoon grated ginger
    • 1 tablespoon olive oil
    • 1/2 teaspoon black pepper
    • 1/2 cup fresh pineapple chunks
    • Chopped green onions, for garnish

    Directions

    1. In a mixing bowl, combine teriyaki sauce, pineapple juice, soy sauce, brown sugar, garlic, ginger, olive oil, and black pepper to form the marinade.
    2. Add chicken breasts to the marinade, ensuring they are fully submerged. Marinate for at least 30 minutes, or overnight for best flavor.
    3. Preheat grill to medium-high heat. Remove chicken from marinade and let excess drip off.
    4. Grill chicken for 6-7 minutes on each side, or until cooked through and grill marks appear. Use a meat thermometer to ensure internal temperature reaches 165°F.
    5. During the final minutes of grilling, add fresh pineapple chunks to the grill for 2-3 minutes until caramelized.
    6. Arrange grilled chicken on a serving platter and top with grilled pineapple and chopped green onions. Serve immediately.

    Recipe Notes

    • For extra flavor, reserve some marinade before soaking the chicken to basting or serve as a dipping sauce.
    • Adjust the chili flakes to taste for a spicier kick.