Deliciously Easy Green Olive and Feta Cheese Dip Recipe

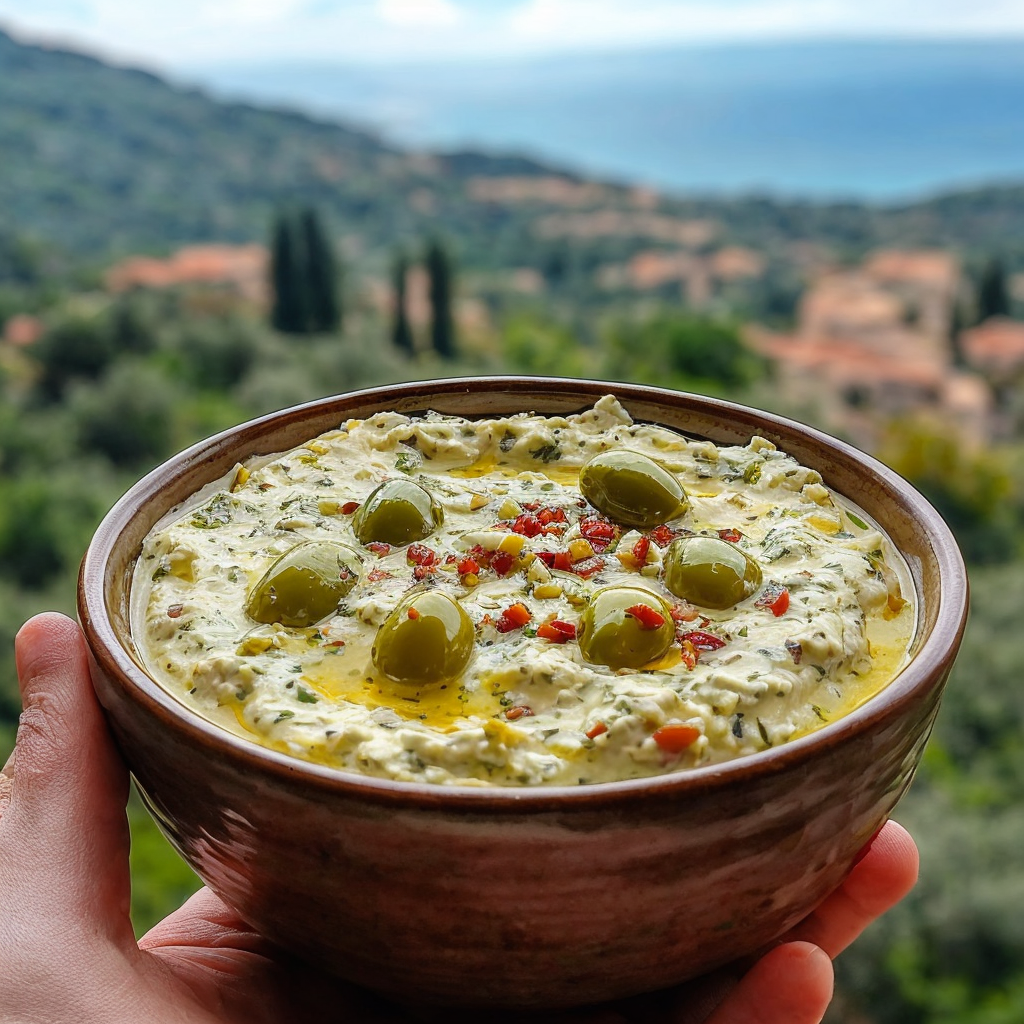
Green Olive and Feta Cheese Dip: A Delightful Mediterranean Experience

⚖️
Difficulty
Easy

⏲️
Prep Time
10 mins

🕒
Cook Time
5 mins

⏱️
Total Time
15 mins

🍽️
Servings
4

This Green Olive and Feta Cheese Dip is a must-try for anyone who appreciates the rich, distinct flavors of the Mediterranean. The combination of tangy feta cheese with the briny goodness of green olives creates a dip that is not only perfect for parties but also makes for an extraordinary snack on a slow afternoon. With fresh herbs and a hint of lemon zest, this dip promises an exciting burst of flavors that will transport you to the sun-soaked shores of Greece.

Whether you are new to making dips or a seasoned culinary enthusiast, this recipe is designed to be accessible and enjoyable. The key is in the balance of flavors—the saltiness of feta, the tang of the olives, and the aromatic hit of fresh herbs. Not only does this dip serve as a chic appetizer when entertaining guests, but its simplicity ensures that you can whip it up without breaking a sweat.

Quick Recipe Highlights

  • Flavor Profile: This dip is a bold blend of salty, tangy, and savory notes, with olives adding a briny zest and feta providing a creamy undertone.
  • Texture: Smooth and creamy with small chunks of olive that add an interesting texture contrast, making every bite delightful.
  • Aroma: A blend of aromatic herbs combined with the rich smell of feta, finished with the fruity fragrance of olive oil.
  • Visual Appeal: A creamy base dotted with vibrant green olives and herbs, offering a picturesque addition to any platter.
  • Skill Level Needed: Beginner-friendly; just a simple blend of ingredients that doesn’t require advanced techniques.
  • Special Equipment: A food processor or a blender is all you need to achieve the perfect consistency.

Recipe Overview

  • Difficulty Level: This recipe is rated ‘easy’ due to its minimal preparation and cooking steps, making it perfect for novice cooks.
  • Category: Ideal as a snack or appetizer, it also serves well as a party dip or a picnic favorite.
  • Cuisine: Rooted in Mediterranean traditions, it showcases the fresh, vibrant ingredients typical of this region.
  • Cost: Budget-friendly, primarily using pantry staples, olives, and feta—all accessible and affordable ingredients.
  • Season: Suitable for year-round enjoyment but particularly refreshing in spring and summer with fresh herbs.
  • Occasion: Perfect for social gatherings, outdoor picnics, or even as a light appetizer before a meal.

Why You’ll Love This Recipe

The taste and texture of the Green Olive and Feta Cheese Dip are sure to win over even the toughest critics. The smooth creaminess from the feta pairs beautifully with the chunky, briny olives, creating a dynamic and decadent mouthfeel. The herbal and zesty aromas elevate the dip, leaving a fresh aftertaste that lingers pleasantly.

Preparing this dip is incredibly convenient. With only a few simple steps and basic kitchen tools, you can create an impressive appetizer or snack that doesn’t eat up your time. Whether you’re planning a quick hangout or a last-minute gathering, this recipe is a reliable go-to option.

Nutritionally, this dip is a blessing. Feta cheese and olives both provide beneficial fats, while the herbs offer a plethora of antioxidants. It’s a savory option that’s both nourishing and satisfying, allowing you to indulge without the guilt.

In a social setting, this dip is a versatile hero. It pairs well with various dippers like pita, crisp veggies, or crackers, making it a hit at parties. The dip’s vibrant flavors and pleasing aroma naturally invite conversation and camaraderie among guests.

Lastly, the cost-effectiveness of the Green Olive and Feta Cheese Dip cannot be overlooked. It’s a luxurious-tasting dip that’s affordable to make. Even if you’re hosting a large party, these ingredients won’t break the bank. With its accessibility and ease, this dip is a hidden gem waiting to impress.

Historical Background and Cultural Significance

The origins of this Green Olive and Feta Cheese Dip are firmly planted in the heart of the Mediterranean region. Known for their rich cultural heritage revolving around communal dining and fresh, local ingredients, Greek culinary practices have always embraced simple yet flavorful combinations such as this.

Cultural significance is intertwined with olives and cheese—traditional Greek symbols of fertility and prosperity. The olive tree, in particular, has strong mythological connections, regarded as a gift from the gods to humans, symbolizing peace and wealth.

Over the years, this recipe has evolved, with iterations found in many Mediterranean countries adapting local flavors and techniques. Ingredients like herbs and lemon have been added not just for flavor, but also for their preservative qualities in ancient times.

Regionally, the dip showcases the unique ingredients of each area. In Greece, olives are often locally harvested, with distinct regional flavors that add depth and character to the dish. Similarly, feta’s creamy texture provides a universal appeal and adaptability that transcends cultures.

Ingredient Deep Dive

Olives, particularly the green variety in this dip, hold a venerable place in Mediterranean cuisine. Celebrated for their robust, earthy flavor, they’re a staple in various dishes. Nutritionally, olives contribute healthy fats and antioxidants, making them an excellent choice for heart health. When selecting olives, opt for those that are firm and vibrant green. Store them in their brine for long-lasting freshness.

Feta cheese is another star ingredient, rich in history and tradition. Originating from Greece, feta offers a tangy, salty flavor profile that enhances any dish. It’s exceptionally nutritious, offering protein, calcium, and beneficial probiotics. When choosing feta, look for creamy white blocks that crumble easily, ensuring quality and freshness. For storage, keep it immersed in its brine or olive oil to maintain moisture.

Common Mistakes to Avoid

  • Avoid using pre-grated or flavored feta; it disrupts the authentic flavor balance.
  • Don’t over-process the dip; aim for a chunky texture with visible olive bits.
  • Steer clear of adding too much lemon juice as it can overpower the delicate flavors.
  • Avoid using dried herbs over fresh ones; fresh herbs offer much brighter fragrances.
  • Ensure that olives are pitted before processing to avoid bitter taste and equipment damage.
  • Do not skip the resting time; letting the dip sit enhances flavor melding.
  • Avoid using low-quality olive oil as it impacts overall taste and aroma.
  • Balance salt levels cautiously, considering the natural brininess of olives and feta.

Essential Techniques

To achieve the dip’s perfect consistency, pulsing is key. Pulsing allows for controlled processing, ensuring olives are adequately chopped without turning into a puree. Watch for the visual cue of small chunky bits rather than a smooth paste, ensuring a delightful texture with each bite.

Folding in herbs instead of blending them is crucial to retain their fresh aroma and natural color in the dip. This ensures each spoonful contains bursts of herbaceous flavor without overwhelming the palate. Mastering these techniques will elevate your dip and enhance its enjoyment.

Pro Tips for Perfect Green Olive and Feta Cheese Dip

1. Use Kalamata olives for an added depth of flavor, providing a slightly different yet intriguing taste profile.
2. Don’t shy away from experimenting with herb blends like dill and mint for an exciting twist.
3. For richer creaminess, incorporate a tablespoon of Greek yogurt into the blend.
4. If the dip is too thick, adjust with a splash of reserved olive brine for extra authenticity.
5. Garnish with a drizzle of high-quality olive oil and a sprinkle of paprika for a visually appealing finish.
6. Allow the finished dip to rest for at least 30 minutes before serving to enhance flavor melding naturally.

Variations and Adaptations

Regional variations of this dip include using different olive types which can transform the flavor profile substantially. Exploring Spanish or Italian olives adds unique flavor characteristics reflective of their terroir.

In seasonal adaptations, consider using sun-dried tomatoes or roasted red peppers during summer to add sweet and tangy notes. Dietary modifications are simple; for a vegan version, use blended tofu or almond cheese in place of feta, providing a similar creamy texture.

For added flavors, spices such as cayenne or smoked paprika offer heat, while texture modifications with chopped nuts like almonds provide an added crunch. Presentation alternatives include serving in phyllo cups or as a layered dip with hummus for a visually striking platter.

Serving and Presentation Guide

For plating, use shallow bowls that allow for swirls of olive oil and scattered herbs. Elevate the dish with garnishes like crushed red pepper flakes or lemon zest to add color and an aromatic punch.

Serve this dip with traditional accompaniments like pita bread triangles or modern additions such as gluten-free crackers. When serving, ensure the dip is at room temperature; it enhances the flavors, making it more appealing.

Consider portion control tips for gatherings to avoid overwhelm; pre-scooping individual portions can aid in maintaining a clean serving environment.

Wine and Beverage Pairing

Pair this dip with a crisp, dry white wine like Sauvignon Blanc or a chilled rosé, both complementing the tangy, salty flavors perfectly. For a non-alcoholic option, a chilled cucumber-infused water adds a refreshing balance.

If serving as part of a brunch, a light herbal tea such as mint or chamomile pairs well, enhancing the dip’s fresh herbaceous notes. Keep temperatures well-adjusted; wines should be lightly chilled for optimal enjoyment.

Storage and Shelf Life

Store the dip in an airtight container in the refrigerator, maintaining freshness for up to three days. Ensure the container is glass or non-reactive metal to prevent flavor absorption.

Signs of spoilage include an off-smell or flavor, or discolored patches, indicating it’s time to discard. For reheating, allow it to reach room temperature naturally; microwaving can alter the texture adversely.

Freezing is possible, though not recommended, as it can compromise feta’s creaminess. If frozen, thaw in the fridge overnight before serving.

Make Ahead Strategies

This dip is perfect for making ahead of time. Prepare a day in advance and store it in the fridge, allowing flavors to meld beautifully. Ensure to cover tightly with plastic wrap to prevent air exposure.

If preparing in stages, chopping ingredients the night before can save time. Assembling is quick and straightforward thereafter. When ready to serve, freshen up the dip with some freshly chopped herbs.

Reheating isn’t usually needed, but if so, stir the dip gently to prevent separation and ensure even flavor distribution before serving.

Scaling Instructions

To halve the recipe, consider ingredient ratios carefully to maintain flavor balance; use a smaller food processor to ensure even mixing. Doubling or tripling requires slightly longer pulsing times and possibly larger equipment like a full-sized food processor to accommodate increased volume.

Timing adjustments are minor in larger batches, with slightly longer blending times to achieve the same consistency. Consider storage options ahead of parties; prepare and store in several containers to be easily ready-to-serve.

Nutritional Deep Dive

The Green Olive and Feta Cheese Dip is low in carbohydrates, making it friendly for low-carb diets. Its protein content from feta is commendable, while olives supply heart-healthy monounsaturated fats and vitamin E, beneficial for skin health.

Ensure portion control by serving with vegetable sticks for a balanced meal inclusion. Paying attention to overall sodium levels is wise, balancing with lower-salt foods elsewhere in meals.

Dietary Adaptations

For a gluten-free adaptation, simply ensure any accompanying dippers are certified gluten-free options like rice crackers. To create a dairy-free version, substitute feta with a creamy vegan cheese for similar results.

Adapting for a low-carb lifestyle involves pairing with low-carb vegetables, such as cucumber or celery, enhancing the nutritional profile in a keto-friendly manner. By making small adjustments, this dish can easily fit diverse dietary needs.

Troubleshooting Guide

For texture issues, if the dip is too runny, incorporate extra feta to thicken naturally. Conversely, if too thick, a splash of olive brine will adjust the consistency appropriately.

Balancing flavors is key; if too salty, adding a dab of yogurt or cream cheese softens the impact. Temperature problems often resolve by serving at room temperature; cold dips can taste less flavorful.

If equipment challenges arise, using a hand blender can achieve desired results, ensuring ingredients are evenly spread. Substitutions for unavailable ingredients also play a role, ensuring taste adapts without compromise.

Timing concerns include resting the dip post-preparation, allowing flavors to meld before serving for optimal taste.

Recipe Success Stories

Feedback from our community highlights the dip’s versatility in various settings. Users have successfully customized the flavor profile with personal spice blends without affecting its traditional Mediterranean essence.

Adaptation stories reflect dietary needs and preferences, such as creating vegan-friendly versions that maintain the beloved taste and consistency. Readers suggest pairing with freshly baked baguettes or crostinis, amplifying its elegant presentation.

Photography tips from our community emphasize natural lighting and bright-colored dishes to showcase the vibrant appeal of this culinary favorite.

Frequently Asked Questions

Can I use black olives instead of green?

Absolutely! Black olives offer a milder flavor, which might alter the overall taste, but they pair well with feta, providing a subtle sweetness that some may find delightful.

How should I store leftover dip?

Store leftovers in an airtight container in the fridge. It keeps well for up to three days. Ensure it’s covered properly to prevent the dip from absorbing other fridge odors.

What can I pair with this dip?

This dip pairs wonderfully with pita chips, vegetable sticks, or as a spread on sandwiches and wraps. It also complements grilled meats as a flavorful condiment.

Can I make this dip in advance?

Yes, making this dip a day ahead is perfect. It allows flavors to meld beautifully. Just ensure it’s stored properly and given a good stir before serving.

Is this dip freezer-friendly?

While possible, freezing can alter feta’s texture. If necessary, freeze in airtight containers, and thaw in the fridge for the best consistency. Re-stir before serving.

Can I adjust the flavor to be less salty?

Indeed! Adjusting the quantity of feta, or balancing with a little cream cheese, can mellow out the saltiness without sacrificing flavor.

How do I handle leftovers safely?

For safe handling, store leftovers in the fridge promptly after serving. Avoid leaving at room temperature for extended periods to prevent spoilage.

What’s a good non-alcoholic pairing?

Iced teas, especially those flavored with citrus or herbs, complement the dip well. A cucumber-infused soda water adds a refreshing balance too.

Which herbs work best in this recipe?

Fresh dill or parsley enhances the dip’s flavor, but feel free to experiment with cilantro or mint based on personal preference and availability.

Do I need to use a specific type of feta?

No specific type is necessary, but opting for Greek feta ensures authentic taste. Sheep’s milk feta can offer a richer flavor than cow’s milk options.

Additional Resources

Explore related recipes that complement this dip, like classic hummus or roasted red pepper spreads, enhancing your Mediterranean platter.

Technique guides on blending and chopping provide useful tips for consistent results every time, elevating your culinary skills. You’ll also find ingredient insights, like the nutritional benefits of olives and cheese, highlighting their value in a balanced diet.

Join the Conversation

We invite you to share your experience making this Green Olive and Feta Cheese Dip on social media or in the comments below! Share your unique twists on this recipe and how it’s become a staple at your gatherings.

Photography enthusiasts, showcase your platter ideas and presentation skills. Join our community in sharing tips and engaging discussions around everyone’s favorite Mediterranean-inspired recipe creations.

The Recipe

Green Olive and Feta Cheese Dip

Serves: 4

Prep Time: 10 mins

Cook Time: 5 mins

Total Time: 15 mins

Kitchen Equipment Needed

  • Food processor or blender
  • Spoon or spatula for mixing

Ingredients

  • 1 cup green olives, pitted
  • 1 cup feta cheese, crumbled
  • 2 tablespoons olive oil
  • 1 tablespoon fresh lemon juice
  • 1 clove garlic, minced
  • 1 tablespoon fresh parsley, chopped
  • 1 teaspoon lemon zest
  • Salt and pepper to taste

Directions

  1. In a food processor, combine olives, feta, olive oil, lemon juice, and garlic.
  2. Pulse until the mixture is well combined but still chunky.
  3. Transfer to a serving bowl and fold in parsley and lemon zest.
  4. Season with salt and pepper to taste.
  5. Allow to rest for 15-30 minutes for flavors to meld.
  6. Serve with pita bread or vegetable sticks.

Recipe Notes

  • Opt for Greek feta for a more authentic flavor.
  • Can substitute fresh parsley with fresh dill for a different aromatic profile.
  • Adjust texture by adding more olive oil as desired.

Savory Steak and Potatoes Recipe for the Perfect Dinner

Steak with Potatoes: A Timeless Culinary Delight

⚖️
Difficulty
Moderate

⏲️
Prep Time
15 mins

🕒
Cook Time
25 mins

⏱️
Total Time
40 mins

🍽️
Servings
4

Indulge in the comforting and classic combination of Steak with Potatoes. This recipe brings together tender, juicy steak paired with flavorful roasted potatoes. Perfect for any occasion, it’s a dish that transcends seasonality, offering warmth in winter and lightness in summer. With the right balance of herbs and spices, this meal excites your taste buds and provides a hearty satisfaction that only steak and potatoes can deliver.

Quick Recipe Highlights

  • Flavor Profile: Savory and rich, with hints of garlic and rosemary that elevate the meatiness of the steak and the earthy character of the potatoes.
  • Texture: Juicy, tender steak with perfectly crisp and fluffy potatoes provide an exciting contrast.
  • Aroma: The mouthwatering scent of sizzling steak and buttered potatoes, accented by fragrant herbs and garlic.
  • Visual Appeal: A vibrant and inviting plate featuring golden brown potatoes, a succulent steak, and vibrant green herbs.
  • Skill Level Needed: Requires moderate cooking expertise, mainly focusing on timing and temperature control for the steak.
  • Special Equipment: A cast-iron skillet for the best sear on your steak and a heavy baking sheet for evenly roasting potatoes.

Recipe Overview

  • Difficulty Level: Set at moderate due to the need for precise temperature control and timing to ensure a perfectly cooked steak and appropriately crisped potatoes.
  • Category: A classic main course that can serve as a robust lunch or a sumptuous dinner.
  • Cuisine: Rooted in Western culinary tradition, drawing from rustic inspirations and modern techniques.
  • Cost: Relatively economical, especially when considering the luxurious feel of steak; potatoes are cost-effective and filling.
  • Season: Available year-round, though particularly delightful during cooler months when a hearty meal is most satisfying.
  • Occasion: Suitable for both casual family dinners and more formal gatherings owing to its classic appeal.

Why You’ll Love This Recipe


Imagine the satisfaction of slicing into a perfectly cooked steak, the rich juices draping over the sides as you pair each bite with a forkful of seasoned roasted potatoes. The savory depth of flavor is complemented by the subtle hints of garlic and rosemary that intensify with every chew. This recipe offers convenience through its straightforward preparation steps, easily allowing you to balance full-bodied flavors with an elegant presentation. Nutritionally, the high-quality protein source in steak and the potassium-rich potatoes create a wholesome meal. It’s perfect for social gatherings or intimate dinners, offering a sense of luxury without breaking the bank.

Historical Background and Cultural Significance


Steak with Potatoes has an ancestry rich in culinary history, with roots that trace back to the pastoral staples of early European settlers. Over centuries, it evolved to become a hallmark of hearty, family-centered dining experiences. The cultural significance lies in its ability to bridge rustic traditions with modern tastes, adapting over time to various dietary preferences and cooking advancements. This dish boasts countless regional variations, each adding unique touches that reflect local spices and cooking methods.

Ingredient Deep Dive


The steak selection is crucial; historically prized cuts like ribeye or sirloin bring both flavor and texture to the table. Opt for thick, marbled cuts that promise tenderness and richness. Potatoes, often viewed as a humble side, carry their own legacy as versatile and nutritious staples, celebrated for their energy-giving carbohydrates and adaptable flavor profile. Choosing the right potato variety, such as Yukon Golds, ensures a perfect balance of texture and taste.

Common Mistakes to Avoid

  • Overcooking the steak can result in a tough and dry texture. Invest in a meat thermometer to monitor internal temperatures accurately.
  • Not allowing the steak to rest post-cooking leads to a loss of flavorful juices. Rest the steak for at least 5 minutes before slicing.
  • Crowding the pan when roasting potatoes can cause steaming rather than crisping. Use a larger baking sheet or cook in batches.
  • Skipping the seasoning step reduces the flavor profile. Ensure both steak and potatoes are well-seasoned prior to cooking.
  • Using cold steak can result in uneven cooking. Let it reach room temperature before starting the cooking process.
  • Incorrect oil or butter use may cause burning. Utilize fats with high smoke points for best results.
  • Underestimating the power of herbs. Fresh rosemary and thyme can dramatically boost the dish’s aromatic qualities.
  • Forgetting to preheat the skillet limits the valuable searing effect. A hot pan ensures optimal caramelization.

Essential Techniques


Mastering the art of searing is pivotal to achieving that signature crust on your steak. Begin with a searing-hot cast iron skillet to lock in juices quickly, turning only once during cooking for an even crust. Roasting the potatoes requires patience and space; giving them room to breathe on the baking sheet ensures a crisp exterior. Achieve ultimate success by using visual cues such as golden hues and audible sizzling sounds.

Pro Tips for Perfect Steak with Potatoes


Season your steak generously and allow it to rest at room temperature to ensure even cooking. Use a cast-iron skillet for a superior sear, and remember not to move the steak prematurely, which may affect the crust formation. For potatoes, opt for parboiling before roasting to achieve a fluffy interior and crispy outside. Using fresh herbs at the end of cooking enhances flavor without overpowering the dish. Basting the steak with butter towards the end of cooking adds complexity. Monitor internal temperatures closely for desired doneness.

Variations and Adaptations


Explore regional spins by incorporating local spices or marinades suitable to your taste. In cooler seasons, consider heartier cuts or root vegetables like carrots along with potatoes. For dietary needs, swap traditional potatoes with sweet potatoes or cauliflower for a low-carb version. Enhance flavors by experimenting with different herb combinations such as sage or tarragon. Encourage creativity in presentation by slicing steak thin for wraps or tacos.

Serving and Presentation Guide


Elegantly plate by arranging steak slices over a bed of potatoes, accented by rosemary sprigs for a touch of color and fragrance. Garnishing with a sprinkle of sea salt and fresh herbs elevates the dish’s presentation. Traditional sides, like a simple green salad or a crusty bread loaf, complement the main dish, while contemporary ideas could include a balsamic reduction or chimichurri drizzle. Serve steak and potatoes straight away for optimal warmth and texture.

Wine and Beverage Pairing


Pair this meal with a robust red wine such as a Cabernet Sauvignon or Merlot, which complements the steak’s richness. For non-alcoholic options, consider a rich grape juice or a bold herbal tea. If coffee or tea is preferred after the meal, opt for a strong espresso or black tea to match the dish’s intensity. Always serve beverages at their ideal temperatures for maximum enjoyment and freshness.

Storage and Shelf Life


Preserve leftovers effectively using airtight containers stored in the refrigerator for up to 3 days. For optimal taste, reheat in the oven or on the stovetop rather than a microwave, which may alter textures. Freezing leftovers is possible, but note that potatoes may lose their crispness. Defrost thoroughly before reheating, adjusting seasonings as needed. Be mindful of signs of spoilage, including off smells or discoloration.

Make Ahead Strategies


Streamline dinner preparations by marinating the steak a day in advance and pre-boiling potatoes. Store components separately until you’re ready to cook. Prepped ingredients stay fresh longer in airtight containers; ensure potatoes are dried to prevent excessive moisture. Reheating methods should avoid drying out the steak by utilizing gentle heat with covering to retain moisture. Introduce any fresh, crisp elements just prior to serving.

Scaling Instructions


Modifying the recipe to suit larger gatherings or intimate dinners is straightforward. Doubling requires proportionate increases in steak and potatoes, with larger or additional equipment to accommodate. Conversely, halving maintains ingredient harmony while cuts may need shorter cooking times. Storage must accommodate changes, particularly where freezer or refrigerator space is concerned. Note that consistent results depend on adherence to proper cooking times and conditions.

Nutritional Deep Dive


A generous serving of protein-rich steak contributes to muscle maintenance and repair, while potatoes provide essential energy through carbohydrates and dietary fiber. Key micronutrients, such as vitamin B6 and potassium in potatoes, expand this meal’s health profile. Conscious portioning can aid in weight management, focusing on balance and moderation. Understanding nutrient contributions enables adaption for specific dietary needs while ensuring nutrient variety.

Dietary Adaptations


For a gluten-free meal, ensure all seasonings and marinades are devoid of gluten. Create a dairy-free version by omitting butter and opting for olive oil instead. Vegan alternatives could utilize plant-based protein, with tofu slabs or portobello mushrooms replacing steak. Low-carb seekers may appreciate cauliflower in lieu of potatoes, aligning the meal with keto guidelines. Alter spices and herbs to maintain flavor diversity that caters to evolving dietary preferences.

Troubleshooting Guide


Achieving the right steak texture requires practice; a thermometer aids in avoiding under or overcooked results. Balance flavors with thoughtful seasoning, leveraging acidity and herbs if needed. Maintain correct cooking temperatures with reliable equipment to avoid burns or raw centers. Substituting core ingredients should consider texture and flavor similarities to preserve dish integrity. Timing errors are mitigated by preparing all aspects in advance for smoother flow.

Recipe Success Stories


Readers worldwide celebrate this dish’s versatility, from winning family dinners to elevated home events. Experiments with marinades bring zestful transformations, while one home cook’s potato-centric twist, using multi-colored varieties, adds visual appeal. Positive feedback emphasizes the straightforward approach paired with gourmet results, highlighted through user-submitted photography capturing the recipe’s beauty and charm. Sharing experiences fuels community creativity and inspiration.

Frequently Asked Questions

– **Can I master this recipe as a beginner?**
Yes, by closely following each step and practicing techniques like searing steaks accurately.

– **What cut of steak is best for this recipe?**
Ribeye or sirloin provide a good balance of flavor and tenderness, making them excellent choices.

– **Are substitutions possible for dietary restrictions?**
Certainly, include modifications such as plant-based substitutes or low-carb swaps to meet various needs.

– **What pairs nicely with this meal?**
Consider sides like a fresh salad or warm bread for a rounded meal, with wine to complement the flavors.

– **How can I achieve a perfect steak crust?**
Ensure your skillet is very hot before adding the steak and avoid moving it too frequently during searing.

– **Can I use different potatoes?**
Absolutely, although adaptability to preparation and cooking methods may vary slightly.

– **How do I store leftovers properly?**
Seal tightly in containers and refrigerate, consuming within a few days to maintain quality.

– **What seasoning blend enhances flavor best?**
A classic combination of salt, pepper, garlic, and fresh herbs does wonders, though experimentation is encouraged.

– **How do I prevent my potatoes from becoming soggy?**
Space them adequately on your baking sheet to allow for even heat distribution and crisping.

– **Is there a way to reduce meal cost?**
Buying steak in bulk or selecting alternative cuts like flank steak can offset costs while retaining deliciousness.

Additional Resources


Explore complementary recipes like garlic butter vegetables and balsamic reductions that enhance your dining experience. Gain insights from technique guides on achieving the perfect sear or mastering roast potato texture. Delve into informative articles about steak and potato varieties, selecting tools and equipment to optimize results. Seasonal articles provide inspiration with adaptable variations tailored for summer barbecues or winter gatherings.

Join the Conversation


We encourage sharing your Steak with Potatoes adventures on social media, engaging in community culinary exchanges. Master photography with tips that elevate food presentation, sharing outcomes and providing feedback on the recipe’s page. Submit your inventive variations, contributing to a diverse array of adaptations. Connect with fellow cooking enthusiasts, enriching your culinary experience and encouraging others to savor each delightful bite.

The Recipe

Steak with Potatoes

Serves: 4

Prep Time: 15 mins

Cook Time: 25 mins

Total Time: 40 mins

Kitchen Equipment Needed

  • Cast-iron skillet
  • Heavy baking sheet
  • Meat thermometer
  • Tongs
  • Sharp knife
  • Cutting board

Ingredients

  • 4 ribeye steaks, about 1-inch thick
  • 2 pounds Yukon Gold potatoes, quartered
  • 4 tablespoons olive oil
  • 4 cloves garlic, minced
  • 2 sprigs fresh rosemary
  • Salt and pepper to taste
  • 2 tablespoons unsalted butter

Directions

  1. Preheat oven to 400°F (200°C). Arrange potatoes on a baking sheet, drizzle with olive oil, and season with salt, pepper, and minced garlic.
  2. Roast potatoes for 25 minutes until golden and crispy, flipping halfway.
  3. Season steaks with salt and pepper; let them rest at room temperature for 15 mins.
  4. Heat the skillet over high heat, add 1 tablespoon olive oil and 1 sprig rosemary. Sear steaks for 3-4 minutes on each side until desired doneness.
  5. Reduce heat to medium, add butter, and baste steaks for 1-2 minutes. Remove from heat, tent with foil, and rest for 5 minutes.
  6. Serve the steaks with roasted potatoes and garnish with remaining rosemary.

Recipe Notes

  • Feel free to substitute Yukon Golds with russets or red potatoes for a different texture.
  • For added flavor, include a splash of balsamic vinegar when basting steaks.
  • Ensure your skillet is hot enough by testing with a drop of water – it should sizzle immediately.

Irresistible French Onion Meatloaf Recipe for a Flavorful Dinner

French Onion Meatloaf: A Classic Comfort Food Reinvented

⚖️
Difficulty
Moderate

⏲️
Prep Time
20 mins

🕒
Cook Time
60 mins

⏱️
Total Time
80 mins

🍽️
Servings
6

A heavenly twist on a classic dish, French Onion Meatloaf is where comfort food meets culinary sophistication. This recipe brings together the rich, caramelized sweetness of French onion with a moist, flavorful meatloaf that promises to elevate your dinner table experiences. From the deep, savory flavors to the intoxicating aroma filling your kitchen, French Onion Meatloaf is a treat for all the senses.

Imagine slicing into a tender loaf, revealing layers of perfectly seasoned beef and gooey, melted cheese topped with an irresistible caramelized onion crust. It’s a meal that warms the heart and delights the palate, offering layers of flavor complexity with each bite. Whether you’re serving up a cozy family dinner or a dinner party for friends, this dish is sure to impress.

French Onion Meatloaf offers the perfect blend of nostalgia and gourmet flair. By elevating a meatloaf into something new and irresistible, you’ll discover a dish that not only nourishes but also brings people together in appreciation of good food and company.

Quick Recipe Highlights

  • Flavor Profile: The French Onion Meatloaf boasts a balance between sweet, caramelized onions and savory, juicy beef, enhanced by a hint of garlic and thyme.
  • Texture: Experience a moist, tender meatloaf with a crisp crust, accentuated by melted cheese for a delightful contrast.
  • Aroma: Expect an enticing mix of caramelized onions and spices, reminiscent of a classic French onion soup.
  • Visual Appeal: This dish showcases a beautifully browned crust, golden onions, and a hint of melted cheese.
  • Skill Level Needed: Requires basic meatloaf skills with attention on caramelizing onions to achieve maximum flavor.
  • Special Equipment: A quality loaf pan and a sharp knife are beneficial for achieving the right consistency and slicing precision.

Recipe Overview

  • Difficulty Level: The moderate difficulty level allows even novice cooks to explore the dish while providing a satisfying challenge for more experienced chefs with its focus on properly caramelizing onions and forming the loaf.
  • Category: A heartwarming main dish perfect for family dinners, casual gatherings, or potlucks.
  • Cuisine: This dish draws heavily from French culinary traditions, marrying a beloved soup flavor with an American classic.
  • Cost: While using budget-friendly beef, the overall cost may vary depending on cheese selection, typically affordable for family servings.
  • Season: Best enjoyed in cooler months where hearty, warming dishes are desired; however, it’s suitable year-round for comfort food lovers.
  • Occasion: Ideal for a cozy night in, holiday meals, or any time you want to wow guests with a special twist on a classic.

Why You’ll Love This Recipe

French Onion Meatloaf is a delightful medley of flavors that’s hard to resist. The sweet, caramelized onions combined with savory meat provide a taste adventure that’s simultaneously new and comforting. Texture is key, and here, you’ll find a perfect balance of juicy meatloaf coupled with crisp onion layers, satisfying every meat lover’s craving. The melted cheese element offers just the right amount of creaminess, enhancing the overall mouthfeel.

Convenience is another significant factor making this recipe a hit. With a prep time of just 20 minutes, it’s straightforward enough to fit into a busy weeknight while still delivering gourmet results. As a versatile dish, it pairs effortlessly with various sides, from mashed potatoes and green beans to a fresh salad. Its robust flavor profile ensures it stands as a main attraction every time.

Nutritionally, the recipe packs protein-rich beef and health-benefiting onions into a delicious package, delivering sustenance and satisfaction. Onions add notable antioxidants and immuno-supportive properties, ensuring you’re indulging without compromising on health. Moreover, ingredients are easily adjustable to accommodate dietary preferences or nutritional goals.

Hosting a dinner party or family gathering? French Onion Meatloaf elevates any occasion, offering a homely feel while making a sophisticated statement. Its comforting vibe is perfect for both intimate and large meal settings, and it pairs seamlessly with a variety of beverages, ensuring guests are impressed.

Finally, French Onion Meatloaf is cost-effective without sacrificing flavor or quality. Ingredients are readily available at any grocery store, and leftovers (if any remain!) are just as delightful the next day, adding meal mileage to your cooking efforts. Perfect for those conscious of their food budgets yet unwilling to compromise on taste, this dish is easy to love.

Historical Background and Cultural Significance

The fusion of the classic meatloaf with the rich flavors of French onion soup is a testament to the adaptability and innovation within the culinary world. Meatloaf, often heralded as a staple in American households, finds its roots in the European tradition of mixing minced meat with bread and spices. Over centuries, it has become a beloved comfort dish, especially prized during economic hardship for its use of simple, available ingredients.

French onion soup, on the other hand, is a legendary aspect of French cuisine, known for its deep, layered flavors created from caramelized onions and broth, typically topped with gooey cheese. Its origins trace back to Roman times, evolving in France as a way to transform humble, everyday ingredients into something extraordinary. The soup became particularly fashionable in French cuisine during the 18th century.

The marriage of these two dishes represents an evolution in global food culture, where traditional recipes are revered, yet reimagined, to create something new and exciting. Regional variations have emerged, and home cooks around the world have found innovative ways to adapt the traditional ingredients to suit local palates, adding personal flair and regional spices.

Bringing French Onion Meatloaf to modern plates not only honors both classic meatloaf and French onion soup but also bridges cultural culinary experiences, inviting home chefs to embrace innovation in their kitchens. This rich history and incredible adaptability underscore why this dish holds such significant cultural importance today.

Ingredient Deep Dive

Caramelized Onions: While caramelized onions provide the signature rich flavor, they also carry significant cultural value, being a fundamental component in diverse cuisines worldwide. Their sweet, savory complexity runs deep in both classic French dishes and various global culinary traditions. Rich in antioxidants, these onions help enhance immune function and reduce inflammation. When selecting onions, look for firm bulbs with a mild scent. Store them in a cool, dark place away from potatoes to prolong freshness. If necessary, substitute shallots for a milder, more delicate flavor profile.

Ground Beef: A cornerstone of many family meals, ground beef’s versatility makes it indispensable in creating hearty, satisfying dishes. A great source of protein and essential nutrients like iron and vitamin B12, it plays a vital role in a well-balanced diet. Choose beef with a good balance of lean meat and fat (around 80-85% lean) for optimum flavor and juiciness. Store raw ground beef in a refrigerator promptly and use within two days of purchase to maintain freshness. Consider using turkey or pork for a lighter alternative or vegetarian options like lentils for unique adaptations.

Cheese: Melting and stretching, cheese is a magical ingredient in this dish, enhancing both flavor and texture while adding a creamy richness. Choose quality Gruyère cheese for its traditional pairing with French onion soup or experiment with cheddar for a sharper taste. Cheese offers essential nutrients including calcium and vitamin A, though moderation is key due to its saturated fat content. Store cheese well-wrapped in the fridge, using wax paper followed by a loose plastic wrap to prevent mold. For those dairy-free, look towards vegan cheese alternatives available in most grocery stores.

Thyme and Garlic: These aromatic powerhouses come together to complement and accentuate flavors in the dish. Thyme’s subtle earthiness pairs beautifully with the savory edge of garlic, providing a fragrant depth often found in French cuisine. Thyme has long been valued for its culinary and medicinal properties, known for anti-inflammatory benefits. Choose fresh thyme where possible, wrapping the stems in a damp towel in the fridge to maintain freshness, while garlic should be firm and dry when chosen for optimal flavor. Substitute dried herbs sparingly if necessary, reducing quantity by about one-third.

Common Mistakes to Avoid

  • Over-mixing the meat can result in a dense loaf. Mix just until ingredients are combined to maintain tenderness.
  • Failing to caramelize onions properly compromises flavor. Take your time, cooking slowly over low heat until deep brown for best results.
  • Using lean ground beef leads to a dry texture. Opt for a balanced fat-content beef, about 80-85%, to ensure juiciness.
  • Skipping resting time before slicing causes crumble. Allow the meatloaf to rest for at least 10 minutes after baking to aid in cohesiveness.
  • Disregarding seasoning balance can lead to bland results. Taste-test the mixture (using a small patty cooked ahead) and adjust spices accordingly before forming the loaf.
  • Pouring all onion topping at once may cause soggy tops. Layer it evenly and moderately to maintain the perfect texture balance.
  • Slicing immediately after cooking can disrupt structural integrity. Be patient, letting the loaf cool slightly to firm up before cutting.
  • Neglecting the use of a loaf pan can lead to uneven cooking. Ensure even shape and heat distribution by opting for a high-quality pan.

Essential Techniques

Caramelizing Onions: This is the cornerstone technique in this recipe that unlocks deep sweet-savory onion flavor. Slice onions evenly to ensure uniform cooking and use a wide pan over medium-low heat, stirring frequently. Patience is key; let them brown slowly over 30 to 40 minutes, adding minimal water to deglaze the pan as needed. Recognizing the deep golden-brown color is the visual cue for perfection.

Forming the Loaf: Proper technique ensures a tender texture. Avoid packing the meat too tightly while forming. Instead, gently shape it until compact enough to hold together. This approach allows for even cooking, avoiding a dense, tough loaf. The loaf pan helps maintain an even shape while supporting effective heat distribution.

Balancing Seasonings: Accurate salt, pepper, and herb balance crucially affect the final taste. Incorporate seasoning thoughtfully, cooking a tiny sample of the mixture before forming the loaf to verify the flavor. Experiment with taste adjustments to suit your personal preferences without overwhelming the inherent flavors of ingredients.

Pro Tips for Perfect French Onion Meatloaf

Enhance flavor by adding a splash of balsamic vinegar to your onions as they caramelize; this will boost the sweetness and deepen the complexity.

To prevent dryness, use breadcrumbs or day-old bread soaked in milk when mixing with the ground beef, adding moisture and tenderness.

Insert a few slivers of garlic directly into the beef mixture before baking for an aromatic boost with each bite.

Consider using parchment paper, lining the loaf pan to make transferring the meatloaf easier after cooking and ensure effortless cleanup.

Prepping onions a day in advance and keeping them refrigerated allows for a relaxed setup and infuses the onions with even more robust flavor.

Testing the mixture’s flavor by cooking and tasting a small sample patty before baking can help you refine the seasonings for spot-on taste.

Variations and Adaptations

Regional variations can offer newly adapted flavors. Italian versions could incorporate sun-dried tomatoes and basil within the mixture, topped with a marinara glaze for a delightful Mediterranean twist.

Seasonal adaptations provide freshness by adjusting side ingredients—pair with arugula or other green salads in spring or roasted veggies in the fall for a more hearty presentation.

Dietary modifications are straightforward with substitutions—a plant-based version can replace beef with lentils or chickpeas and use nutritional yeast for cheesy flavor without dairy.

Flavor variations are plentiful—add a kick by mixing finely chopped jalapeños or smoked paprika into the loaf, adding a fiery twist to the savoriness.

Texture modifications are easily managed—fold in cooked quinoa or barley for grainy depth while experimenting with chopped nuts for added crunch within the mixture.

Creative presentation alternatives include shaping mini loaves for individual servings or using muffin molds for fun, portioned bites.

Serving and Presentation Guide

For impressive presentation, consider serving slices atop soft mashed potatoes, drizzling each portion with a touch of gravy or reduced balsamic glaze for visual and flavor balance.

Garnish with a sprinkle of freshly chopped parsley or thyme and a pinch of coarsely ground black pepper for added color and aroma, enhancing aesthetic appeal.

Classic accompaniments like crusty bread or a side Caesar salad help round out the meal, introducing varied textures to complement the meatloaf.

For a modern twist, arrange slices on a platter aside zucchini noodles or roasted Brussels sprouts that provide refreshing contrast.

Temperature considerations enhance serving experience—aim to serve warm but not cold, allowing the umami depth of flavors to shine through optimally.

Implement portion control suggestions by slicing into even pieces prior to serving for balanced distribution and satisfaction without overindulgence.

Wine and Beverage Pairing

For a wine to match, consider red wines like Pinot Noir or Merlot, offering light tannins and fruit-forward notes that complement the savory meatloaf flavors well.

Prefer non-alcoholic options? Try pairing with a chilled glass of cranberry juice or a spritzy, unsweetened iced tea to cut through richness with a clean finish.

Should you enjoy coffee or tea with meals, rich varieties like a dark roast coffee or an earthy oolong tea can cut through the meat’s flavors beautifully.

Consider pairing beverages served slightly chilled to contrast the warmth of the dish while not overshadowing it with overly cold presentations.

Serve wine in room-temperature glasses, allowing it to aerate slightly for flavor enhancement without excessive chilling.

Storage and Shelf Life

After cooking, wrap leftovers tightly with plastic wrap or aluminum foil and refrigerate promptly to conserve freshness, lasting up to three days.

Keep storage temperatures at or below 40 degrees Fahrenheit to maximize shelf life and prevent spoilage, using an airtight container if possible.

Watch for signs of spoilage, such as off smells or discoloration before consumption. Meatloaf freezing is a great option as it remains stable for up to three months.

For reheating, use the oven at a low temperature, wrapped in foil to maintain moisture or warm individual slices in the microwave as convenient.

When freezing, slice the loaf first and wrap portions individually for easy defrosting, ensuring each wraps in plastic followed by foil or freezer-safe bags.

Make Ahead Strategies

Crafting the meatloaf mixture a day ahead enhances its depth as the flavors meld in the refrigerator, covered well to prevent drying.

Store prepared onions separately to prevent moisture from affecting other ingredients too soon, reducing chances of texture loss.

Quality impact can be evident if ingredients sit too long so use within a day for optimal taste, assembling and baking just before you plan to serve.

Use assembly tips such as shaping the loaf directly into its pan the day you plan to bake, making final preparation seamless and time efficient.

When reheating ready-made meatloaf, consider topping with fresh onion bits and additional cheese for a revitalized appeal in flavor and presentation.

Fresh elements like herbs or delicate toppings should be added last minute to ensure they retain their vibrant color and flavor upon serving.

Scaling Instructions

When halving the recipe, maintain ingredient ratios for consistent flavor and balance; use a smaller loaf pan to retain shape integrity through baking.

Doubling or tripling requires careful calculation of oven capacity and lengthening bake times as necessary, ensuring each loaf retains quality and cooks evenly.

Adjust equipment like using larger mixing bowls or multiple loaf pans to ensure the texture remains consistently distributed among increased volume.

Timings should be lengthened slightly with larger quantities, using a meat thermometer to check internal temperature reaches 160 degrees Fahrenheit for confidence in safe consumption.

Consider careful storage, ensuring any surplus leftover is appropriately wrapped and chilled or frozen to extend edible lifespan.

Nutritional Deep Dive

French Onion Meatloaf scrutinizes macro levels, offering a solid balance of protein, mainly from beef, and moderate fat contributed through cheese and beef choice.

It may lack carbohydrates, opening easy pairings with carb-rich sides like potatoes or grains for complete nutritional dispersion.

The dish provides micronutrients like vitamin B12 from beef and fiber through onions, enhancing dietary scope considerably.

Tailor health benefits by opting for leaner cuts or smaller portions to manage calorie intake while still enjoying this gourmet meal.

Dietary considerations involve natural gluten-free adaptation, contrasting with richer meats possibly unsuited for some eating plans; mindful adjustments might be needed.

Portion analysis can distinguish optimal amounts needed to fulfill nourishment, guided through balancing flavors and nutrient quantity simultaneously.

Dietary Adaptations

A gluten-free variation involves choosing a certified gluten-free breadcrumb substitute and double-checking all spices for cross-contamination assurance.

To create a dairy-free version, swap cheese for soy or nut-based versions, ensuring similar melt and flavor impact without introducing lactose.

For vegan adaptations, begin with a plant-based ground substitute and omit eggs using flax eggs as a binder with preferred spices enhancing compatibility.

Low-carb adaptations might focus on reducing cheese quantity slightly to minimize calorie density while pairing with greens for balanced completion.

Keto followers can relish this dish by opting for cheese high in fats yet low in carbs, retaining the hearty flavors without breaking diet constraints.

Paleo adherence shifts ground meat to grass-fed beef options or suitable game meat incorporating nuts and root vegetables to stay aligned.

Low-FODMAP diet followers may remove onions or use onion powder sparingly to avoid gastrointestinal disturbances, achieving a modified experience inspiring inclusion.

Troubleshooting Guide

Address texture issues like denseness by ensuring light mixing and appropriate fat content in selected beef; this promotes moistness through careful handling.

Flavor balance can be adapted by taste-testing the mixture before shaping—adjust spices or salt levels to prevent overwhelming dominant flavors or blandness.

Temperature issues resolve with an oven thermometer to check accuracy, ensuring each loaf receives equal heat for seamless cooking without over or underdoation.

Equipment challenges are navigable through proper loaf pans; non-stick options guarantee easy release while ensuring evenly dispersed heat throughout the loaf.

Ingredient substitutions rely on experimentation and taste checking; whether swapping meat types or cheese variations, adjust ratios for balanced flavor.

Timing concerns can result from misunderstanding oven capacity. Bake loaves separately if doubling and adjust total oven times accordingly for consistent outcomes.

Recipe Success Stories

Our community of home chefs continuously praises the upgrade this meatloaf brings—a favorite is using smoked cheddar resulting in praises of authentic smoky notes.

Variation successes include adding a balsamic glaze atop loaves, drawing appreciation for sweetening the subtle onion profile without overpowering foundational flavors.

Reader suggestions consistently explore ways to engage creativity; many replicate the traditional elements yet design theme nights for optimal enjoyment.

Photography tips shared by readers showcase experimenting with vibrant fresh herbs atop slices for dynamic pop and contrast, drawing visual emphasis effectively.

Experiences documented express fulfillment in adaptive cooking journeys, such as shifting basic meal perception to original creations articulating family joy.

Frequently Asked Questions

Can I use a different type of meat for this recipe?

Yes, turkey, pork, or a plant-based substitute can replace beef—each offers distinct flavors and textures so adjust seasonings to match respective meat types.

How can I make the meatloaf moist?

Incorporating moisteners like soaked breadcrumbs or milk-dampened bread into your mixture helps retain moisture, adding egg as a binder for stabilized flavor.

Do onions need to be caramelized before using?

Absolutely! Proper caramelization releases onions’ natural sweetness, enhancing taste and delivering depth necessary to recreate authentic French onion flavors.

Is it necessary to use a loaf pan?

While it ensures even shaping and cooking, freehand loaves in baking sheets are viable alternatives; approach needs careful monitoring to maintain form.

What cheese works best for the French Onion Meatloaf?

Traditionally Gruyère shines with its meltability yet consider cheddar or provolone for distinct taste adaptations that complement flavor profiles beautifully.

How long can I refrigerate leftovers?

Refrigerating up to three days maintains freshness—ensure leftovers are tightly wrapped to prevent exposure to air and avoid spoilage.

Can this recipe be frozen for later use?

Certainly! Wrap individual slices securely with plastic wrap before placing into freezer bags; it maintains quality and extends shelf life up to three months.

What sides pair well with French Onion Meatloaf?

Classic sides like mashed potatoes or roasted seasonal vegetables highlight texture contrast or experiment with vibrant salads for refreshing balance.

What cooking techniques improve meatloaf texture?

Gentle mixing, resting before slicing, and carving against grain all contribute to a tender, balanced loaf boasting desirable interior consistency.

Can the recipe be doubled or halved easily?

Yes, maintain proportional ingredient ratios and adjust cooking times to cater to volume; ensure ample space between loaves for smooth outcomes.

Is French Onion Meatloaf gluten-free?

Swap regular breadcrumbs for gluten-free variants while verifying spice labels to ensure no cross-contamination; modifications maintain foundational flavors.

How important is seasoning in this recipe?

Critical—balance seasoning to prevent overpowering subtlety; taste-test mixtures pre-cooking facilitate adjusting ratios that maximize experience diversity.

Additional Resources

Explore related recipes providing similar global fusion adaptability—try our Italian Mushroom Meatloaf or Spanish-Inspired Pork Loaf for further culinary ventures.

Technique guides delve deeper into perfecting key elements such as caramelizing onions or shaping loaves, useful for enhancing cooking proficiency.

Ingredient information helps evaluate choices beneath cultural, economical, or nutritional lenses, fostering informed decisions maximizing benefits from recipe inclusions.

Equipment recommendations emphasize achieving great outcomes matching pan usage and slicing tools, providing diverse suggestions aiding in informed purchases.

Investigate seasonal variations with expansive blogs detailing crispy side pairings and seasonal adaptability exploring fresh local produce extensions enriching meals further.

Join the Conversation

Engage through social media—sharing individual adaptations, ingredient tips, and unique variations encourages dynamic connections around food culture.

Photography tips elevate presentation, experimenting with garnishes or angles adding emphasis—supporting shared community insight enhances collective outcomes.

Submit recipe reviews capturing experiences encountering delicious possibilities, inspiring appreciative feedback on creativity and originality.

Experimentation inspires community contribution enriching the culinary landscape, acknowledging innovative twists develops admired adaptations collectively.

Explore further developments in kitchen techniques journeying through shared adventures celebrated online, cultivating practical improvements amplifying shared progress.

The Recipe

French Onion Meatloaf

Serves: 6

Prep Time: 20 mins

Cook Time: 60 mins

Total Time: 80 mins

Kitchen Equipment Needed

  • Loaf pan
  • Sharp knife
  • Mixing bowls
  • Wide pan for onions
  • Spatula

Ingredients

  • 2 tablespoons olive oil
  • 3 large onions, thinly sliced
  • 2 pounds ground beef (80-85% lean)
  • 1 cup breadcrumbs or day-old bread, crumbled
  • 1 cup shredded Gruyère cheese
  • 1 large egg
  • 2 tablespoons Worcestershire sauce
  • 1 teaspoon thyme leaves
  • 2 cloves garlic, minced
  • Salt and pepper to taste

Directions

  1. Preheat your oven to 350°F (175°C).
  2. Heat olive oil in a wide pan over medium-low heat. Add onions and cook slowly, stirring occasionally, until caramelized, about 30-40 minutes.
  3. In a large mixing bowl, combine ground beef, breadcrumbs, cheese, egg, Worcestershire sauce, thyme, minced garlic, salt, and pepper. Gently mix until just combined.
  4. Transfer the beef mixture into a greased loaf pan, shaping it evenly.
  5. Top the loaf with caramelized onions, spreading them evenly.
  6. Bake in the preheated oven for 60 minutes or until an internal thermometer reads 160°F (71°C).
  7. Let the meatloaf rest for 10 minutes before slicing and serving.

Recipe Notes

  • Feel free to swap Gruyère cheese for cheddar or mozzarella for a different flavor twist.
  • For more herbal flavors, add a dash of finely chopped rosemary or oregano to the meat mixture.
  • If you prefer extra moisture, consider adding a tablespoon of balsamic vinegar to the onions during the caramelization process.

Savory Blackened Steak and Shrimp Alfredo for a Gourmet Dinner

Blackened Steak and Shrimp Alfredo: A Luxurious Meal to Impress

⚖️
Difficulty
Medium

⏲️
Prep Time
20 mins

🕒
Cook Time
30 mins

⏱️
Total Time
50 mins

🍽️
Servings
4

Dive into the delicious world of Blackened Steak and Shrimp Alfredo, a dish that uniquely fuses the robustness of Cajun-spiced steak with the delicate luxury of shrimp Alfredo. This recipe isn’t just about cooking; it’s about creating an experience. Imagine sinking your fork into tender steak covered in a smoky, blackened crust while creamy Alfredo and succulent shrimp enhance every bite. This dish is a symphony of flavors waiting to be part of your culinary repertoire. With its perfect balance of spicy and creamy elements, this Blackened Steak and Shrimp Alfredo will leave every foodie satisfied and impressed.

Quick Recipe Highlights

  • Flavor Profile: The dish combines the bold, spicy notes of blackened seasoning with the rich, creamy texture of Alfredo sauce, creating an unforgettable taste experience.
  • Texture: The steak offers a crispy exterior with a juicy center, while the shrimp adds a firm yet tender bite, complemented by the velvety smoothness of the pasta.
  • Aroma: The robust scent of spices and garlic melds with the delicate aroma of sautéed shrimp, enhancing the dish’s sensory appeal.
  • Visual Appeal: The vibrant colors of perfectly seared steak, pink shrimp, and a golden Alfredo blanket create an enticing presentation on any plate.
  • Skill Level Needed: Intermediate cooking skills are required to manage the blackening technique and timing the multiple components effectively.
  • Special Equipment: Consider using a cast-iron skillet for the ideal searing process and achieving that distinct blackened crust.

Recipe Overview

  • Difficulty Level: Given the need to handle various cooking techniques such as blackening and preparing Alfredo sauce, this recipe is rated medium difficulty. Mastering these techniques will instantly elevate your cooking skills.
  • Category: Perfect as a main course, this elegant dish is ideal for dinner parties or a sumptuous mid-week meal.
  • Cuisine: With roots in Southern and Italian cooking, this dish provides a rich blend of cultural culinary influences.
  • Cost: Ingredients like high-quality steak, shrimp, and cheese can sway the budget; however, thoughtful substitutions can make it affordable.
  • Season: Best enjoyed any time of the year, though its creamy texture makes it especially pleasing during cooler months.
  • Occasion: Ideal for celebratory gatherings or a romantic dinner, this recipe is bound to impress with its rich flavors and premium presentation.

Why You’ll Love This Recipe

The Blackened Steak and Shrimp Alfredo delights with its rich flavors and satisfying texture. The delicate balance between spicy and creamy elements gives your palate an exquisite treat, making every bite a joyous experience. It combines the best elements of Southern American and Italian cuisines, offering a fusion of flavors that are both comforting and exotic.

Preparation might seem daunting, but this recipe is wonderfully convenient once you get the hang of it. Most ingredients are easy to find, and the recipe’s straightforward approach to blackening and sauce-making simplifies the cooking process, particularly for those aiming to impress at the dinner table.

From a nutritional standpoint, this dish is rich in protein and healthy fats, supporting muscle recovery and satiety. With the creamy goodness of the Alfredo and the lean protein from shrimp, it makes for a wholesome indulgence when you’re watching your nutrition.

Perfect for social settings, this recipe exudes sophistication and culinary prowess. Whether it’s for a small dinner party or a heartfelt meal for two, it creates a delightful social dining experience that turns any evening into a culinary journey.

Despite its luxurious nature, this dish is surprisingly cost-effective. It’s a restaurant-quality meal that you can prepare at home for a fraction of the price, making it accessible to those looking for gourmet flavors on a budget.

Historical Background and Cultural Significance

The art of blackening meats hails from the rich culinary history of Louisiana, popularized by Chef Paul Prudhomme in the 1980s. This technique features a smoky and spicy crust, adding a distinctive flair to the basic steak, forever changing the perception of Southern cuisine across the globe.

Culturally, blackening is often associated with Cajun cooking, known for its bold, robust flavors. Over time, it has been embraced by chefs far and wide, utilizing this method to bring out the flavors of various meats, particularly seafood, which thrives under the intense heat required for blackening.

The delightful union of blackened steak with creamy Alfredo sauce speaks to the evolution of fusion cuisine. While Alfredo originates from Italy, this combination exhibits the creative adaptability of world cuisines in modern recipes, bringing two distinct flavors into one harmonious dish.

Variations of this recipe are seen in different regions, adopting local spices or altering the primary ingredients according to what is freshest and most readily available, thus giving each preparation its unique touch while still honoring the fundamental characteristics of the original dish.

Ingredient Deep Dive

For the steak, choose a high-quality cut like ribeye or New York strip, which provides excellent marbling to handle the high heat of blackening. Historically associated with luxury, these cuts are celebrated for their tender juiciness. Marbling contributes to tenderness while maintaining moisture, a crucial element in achieving that coveted crust.

Shrimp are an oceanic delight, adding sweet brininess to the mix. Rich in omega-3 fatty acids, shrimp are a low-calorie protein source that delivers vitamins and minerals essential for bone and brain health. Fresh or frozen shrimp work fine, though fresh varieties provide a more vibrant taste and texture.

Cream and Parmesan cheese are pivotal in creating the Alfredo sauce. Originating from Roman recipes, Parmesan is a hard cheese known for its savory, nutty taste. When selecting Parmesan, opt for authentic Parmigiano-Reggiano to retain the authentic flavor profile of the sauce.

Avoid purchasing pre-grated cheese due to potential additives affecting its melting ability. Store your cheese wrapped in parchment paper or foil in the refrigerator to maintain freshness.

Common Mistakes to Avoid

  • Avoid overcrowding the pan when blackening the steak, as it can lead to steaming rather than searing, depriving your steak of the desired crust.
  • Neglecting to dry the surface of your steak before seasoning can result in a less effective blackening process and a soggy texture.
  • Using oil with a low smoke point will interfere with the blackening process and impart an unpleasant flavor to the dish.
  • Overcooking the shrimp may lead to a rubbery texture, so make sure to monitor them closely.
  • Failing to let the steak rest before slicing will cause it to lose juices, leading to a drier serving.
  • Skipping the step of gradually adding cheese to the Alfredo sauce may result in clumping, impacting the final creamy texture.
  • Forgetting to taste the sauce before serving can lead to an under-seasoned dish.
  • Using pre-cooked shrimp may lead to overcooking them during reheating.
  • Not boiling the pasta in salted water can make it bland, which affects the overall flavor integration.
  • Neglecting to keep pan drippings for flavor elevation might lead to a less rich Alfredo sauce.

Essential Techniques

Blackening involves coating your meat with a spice mixture and searing it at high heat to create a deliciously dark crust. This technique intensifies flavors, adding an intriguing depth to the meat’s profile while enhancing texture.

Achieving a good blackening crust starts with properly drying your steak, then generously seasoning it. Use a high smoke point oil and a preheated cast-iron skillet. Listen for the sizzle as the meat hits the pan; without this sound, you’re not at blackening temperature.

The secret to mastering Alfredo is balancing ingredients while cooking at a medium-low temperature to prevent the cream from scorching or separating. Add Parmesan gradually, stirring constantly to achieve a smooth, velvety finish.

Look for subtle changes in texture and color during each process. Effective blackening is distinguished by a deep brown crust without burning, while a perfect Alfredo should be creamy without lumps, showcasing an even shine across the surface.

Pro Tips for Perfect Blackened Steak and Shrimp Alfredo

For flavor and tenderness, marinate the steak with a touch of lemon juice and olive oil 30 minutes prior to cooking. This infuses subtle tanginess and helps distribute flavor across the meat.

Control the blackening spice’s heat level to suit your palate. Experiment with the ratio of cayenne pepper to achieve just the right spicy kick for your taste.

Immerse the shrimp briefly in cold water to ensure they maintain a fresh and firm texture before cooking, enhancing their succulent nature in the final dish.

Allow your steak to rest for up to 10 minutes after cooking to redistribute moisture and juices for a juicier bite.

Stirring Alfredo sauce with a silicone spatula ensures even distribution of cheese and prevents clumping or forming an undesired skin on top.

For an additional layer of flavor, deglaze the pan with a splash of white wine after cooking steak and shrimp, incorporating pan drippings into the Alfredo base.

Variations and Adaptations

Southern regions might use a blend of local herbs in the blackening mix to add a unique twist, blending Cajun tradition with indigenous flavors.

Substitute cream for a bechamel base during warmer months for a lighter version of the Alfredo, maintaining delicious richness with less density.

For a health-conscious variation, use Greek yogurt instead of cream, which emulates the creamy texture and provides a tangy brightness.

Experiment with seafood, like scallops or crab, alongside or instead of shrimp, creating variations in flavor and texture complexity.

Transform your dish into a baked casserole by mixing cooked pasta with Alfredo sauce, topping with cheese before broiling for a crunchy golden finish.

Swap conventional pasta for spiralized vegetables or gluten-free noodles, giving it a healthy yet satisfying twist that appeals to dietary restrictions.

Serving and Presentation Guide

Use a white plate to make the vibrant colors of your Blackened Steak and Shrimp Alfredo pop, showcasing its visual appeal.

Garnish with fresh herbs like parsley or chives for a burst of color and added freshness. Lemon zest can also be a delightful, fragrant touch.

Traditionally, garlic bread or a crisp green salad complements the rich, creamy dish, adding textural contrast.

For formal occasions, serve in individual shallow bowls to aid in presenting the perfect pasta nest with steak and shrimp arranged artistically on top.

Consider serving at a slightly warm temperature, so the Alfredo sauce maintains its creamy consistency without setting into a gel upon standing.

Pay attention to portion sizes; balance protein and pasta for each individual for an ideal dining experience without overwhelming the palate.

Wine and Beverage Pairing

A rich, oaked Chardonnay complements the creamy Alfredo sauce, its buttery notes mirroring the sauce’s texture while cutting through the blackened spices of the steak.

For red wine lovers, a Pinot Noir offers a lighter acidity that won’t overshadow the delicate shrimp while enhancing the dish’s savory elements.

Sparkling water with a slice of lemon provides a refreshing non-alcoholic alternative, clearing the palate and keeping the flavors lively between bites.

A light-bodied beer with citrus notes would pair well, balancing the creamy, spicy flavor complexity with its effervescent refreshment.

If serving with tea, opt for an iced herbal tea, infused with lemon and mint that cools and refreshes, matching the meal’s vibrant profile seamlessly.

Temperature is key; wines should be served at their optimal cellaring temperatures to maintain integrity without overpowering or muting delicious flavors.

Storage and Shelf Life

Store leftovers in airtight containers in the refrigerator, preventing other flavors from infiltrating the rich aroma of your Blackened Steak and Shrimp Alfredo.

Consume within three days to ensure the best taste and texture, or freeze portions for up to one month for convenience with minimal quality loss.

Sign of spoilage includes an off-smell, discoloration on the meat, or sauce separation, indicating it’s time to discard.

For reheating, gently warm on the stove or microwave in short bursts to prevent the protein from overcooking or sauce from curdling.

When freezing, pack each component separately for the best results, thawing individually before reheating.

Avoid reheating more than once, which affects texture and flavor integrity, ensuring consistency in its delightful presentation.

Make Ahead Strategies

Prepare the blackened seasoning in advance and store in an airtight jar for up to six months, ready for use at any time.

Cook the steak and shrimp just before service for freshness, but you can prepare Alfredo sauce in advance and refrigerate, reheating gently before serving.

Assemble pasta and Alfredo before guests arrive for convenience, with sauteed components ready to elevate the presentation.

Keep prepared components chilled until close to serving to retain freshness without risking bacterial growth.

Incorporate fresh elements like herbs and garnishes upon serving so their vibrant flavors and colors maintain maximum impact in presentation.

Reheat pasta without losing al dente texture by adding a splash of cream before reheating slowly, simmering everything back to its original glory.

Scaling Instructions

Halve ingredients for smaller servings, adjusting seasoning proportionately to maintain flavor balance without overwhelming spice notes.

Doubling requires careful pan management, ensuring components are not crowded, maintaining beautiful searing and blackening results.

Larger recipes may require a second set of cookware available, involving additional timing management to ensure each element meets plating time simultaneously.

Extend cooking times minimally when resizing recipes, avoiding overcooking in higher quantities to match your preferred texture profile.

Consider using larger pots and prep areas, allowing for efficient handling and resting space for each component post-cooking processes.

Separate storage facilitates organization of larger servings post-event, maintaining freshness for leftovers.

Nutritional Deep Dive

This dish offers a robust macro profile featuring protein-rich steak and shrimp, providing essential amino acids for muscle repair and growth.

Shrimp adds a generous dose of omega-3 fatty acids, good fats that contribute to brain and heart health, enhancing its nutritional label.

Calcium-rich Parmesan strengthens bones while delivering savory flavor, with cream introducing fats integral to energy maintenance.

Balance portion control, enjoying nutrients fully without exceeding dietary guidelines, ensuring satisfaction without impacting weight goals.

Alfredo inclusion can be balanced with side greens for added fiber, ensuring a well-rounded meal that meets daily nutritional needs.

Higher sodium content from blackening must be balanced with low-salt salads, matching flavors harmoniously without compromising health objectives.

Dietary Adaptations

Substitute gluten-filled pasta for gluten-free alternatives such as rice pasta, ensuring a celiac-friendly rendition without sacrificing delight.

For dairy-free options, use plant-based milk and omit cheese, integrating nutritional yeast for that distinct umami flavor without lactose.

Provide a vegan alternative by replacing steak with eggplant and shrimp for jackfruit, indulging in plant-based richness with the same spices.

Low-carb versions replace pasta with shirataki noodles, reducing carbohydrate intake while retaining the creamy, flavorful Alfredo and protein components.

Keto adaptation involves high-fat meat and heavy cream focus, maintaining classic high-protein features in a manner fitting ketogenic principles.

Paleo adherents will appreciate a vegetable pasta base, alongside grass-fed beef for a nutrient-rich, naturally sourced meal.

Troubleshooting Guide

Prevent texture issues by ensuring steak rests post-cooking, preserving natural juices and maintaining tenderness for optimal consumption.

Balance flavors harmoniously using checks of spices before execution, observing interplay between sauce creaminess and blackened textures.

Temperature control means avoiding premature surface-searing while managing internal heat, echoing cooking finesse for consistent excellence.

Equipment preparation ensures pots and pans reach optimal heat to evade undercooking; timing these elements influences every process.

Resolve ingredient substitution challenges by understanding foundational tenets; stop at adjustments beyond intrinsic character changes.

Maintain timing fidelity by having all ingredients ready to prevent unwanted delays compromising cooking and plate presentation steps.

Recipe Success Stories

Our community, enamored with this recipe, praises its ease of execution and rich tastes. One fan even swapped shrimp for diver scallops with greater size and richness.

Testimonials highlight customization successes, with creative substitutions shining light on vibrant regional ingredient blends created.

Adaptation stories abound, matching allergens to dietary needs; sauces abound in plant-based elixirs, celebrating culinary innovation.

Reader suggestions commend combining with asparagus or roasted cherry tomatoes, offering texture and health, diversifying options.

Photography tips reveal the beauty captured throughout plating, portrayed in magnificent shares across social media engagement.

Frequently Asked Questions

Can I use pre-cooked shrimp in this recipe?

While possible, starting with raw shrimp is recommended for better flavor and texture. Pre-cooked shrimp can overcook faster, leading to rubberiness.

What cut of steak is best for blackening?

Choose cuts like ribeye or New York strip, which have good marbling that withstands high heat while ensuring a juicy, tender result.

How can I make it less spicy?

Reduce cayenne pepper in the blackening mix. You can also prepare a milder Alfredo base by incorporating more cream to mellow heat.

Is there a substitute for Parmesan cheese?

Nutritional yeast offers a vegan alternative while maintaining an umami-rich flavor ideal for Alfredo sauce. Another option is Pecorino Romano cheese.

Can I prepare components in advance?

Yes, the Alfredo sauce can be made a day prior. Store separately and reheat gently before combining with freshly cooked meat and pasta.

What’s the ideal pasta type for Alfredo sauce?

Fettuccine is classic for Alfredo, its flat, wide shape enveloping sauce perfectly. Yet, spaghetti or linguine also suffice if preferred.

How long should the steak rest after cooking?

Rest steak for 5-10 minutes after cooking to allow juices to redistribute, ensuring tenderness and flavor in each bite.

How do I prevent the sauce from clumping?

Incorporate Parmesan gradually and stir constantly over moderate heat, equilibrating blend without causing cheese to seize.

What should I do if the sauce separates?

If sauce shows signs of separating, quickly whisk in a small splash of cream or milk, revitalizing its creamy consistency.

How can leftovers be reheated without losing quality?

Gently reheat leftovers in a non-stick pan over low heat, stirring periodically to maintain softness. Adding a splash of cream can rejuvenate texture.

Can I use frozen shrimp?

Yes, frozen shrimp work well. Just ensure they’re fully thawed and patted dry before cooking for optimal flavor absorption and texture.

What’s a good wine pairing for this dish?

An oaked Chardonnay or Pinot Noir, complementing creaminess and contrasting spice offers an enriching gustatory affair alongside your dish.

Additional Resources

For further culinary inspiration, explore our selection of complementary recipes featuring iconic Cajun flavors, such as seafood gumbo or jambalaya.

Our technique guides offer step-by-step tutorials on mastering classic blackening and alfredo procedures, equipping your culinary arsenal with skills to elevate everyday dishes.

Ingredient information highlights the benefits of choosing high-quality steak and seafood, enhancing flavor profiling in your creations effectively.

Explore kitchen tool reviews, ensuring you’re equipped with the best cast iron for impeccable blackening results, crucial to our featured dish.

Consider seasonal variations through our guides, maximizing local produce benefits through pairing, creating harmony with chosen donor dishes across multiple meals.

Join the Conversation

Share your culinary masterpieces on social media platforms using our hashtag, showcasing personal renditions of Blackened Steak and Shrimp Alfredo.

Improve presentation through expert photography tips, turning every plate into blog-worthy imagery as a canvas for your cooking talents.

Review recipes on our pages, connecting community members in a shared love of culinary creativity, providing constructive feedback and encouragement.

Engage in collaborative recipe variations, celebrating unique twists based on available ingredients, enhancing still-perfect originals with personal flair.

Your insights inspire us to refine techniques and introduce broader classically inspired meals. Join our food-loving community to share experiences and learn from one another.

The Recipe

Blackened Steak and Shrimp Alfredo

Serves: 4

Prep Time: 20 mins

Cook Time: 30 mins

Total Time: 50 mins

Kitchen Equipment Needed

  • Cast iron skillet
  • Large pot for pasta
  • Saucepan
  • Sharp knife
  • Spoon and spatula

Ingredients

  • 2 ribeye steaks, about 10 oz each
  • 1 lb large shrimp, peeled and deveined
  • 2 tbsp olive oil
  • Blackened seasoning to taste
  • 12 oz fettuccine pasta
  • 1 cup heavy cream
  • 1/2 cup grated Parmesan cheese
  • 3 cloves garlic, minced
  • Salt and pepper to taste
  • Fresh parsley, for garnish
  • Lemon wedges, optional

Directions

  1. Preheat the skillet over medium-high heat. Season steaks with blackened seasoning generously.
  2. In the skillet, heat olive oil until shimmering. Sear steaks for about 4-5 minutes per side, until a dark crust forms. Rest steaks on a plate tented with foil.
  3. Same skillet, add shrimp and sauté until pink, around 2-3 minutes per side. Remove and set aside.
  4. Cook pasta in salted water according to package instructions; drain and set aside.
  5. In a saucepan, simmer cream and minced garlic over low heat, stirring in Parmesan until melted and smooth. Taste and adjust seasoning.
  6. Toss pasta with Alfredo sauce, combine with shrimp.
  7. Slice steaks across the grain, serve over pasta. Garnish with parsley and lemon.

Recipe Notes

  • Substitute Parmesan with Pecorino Romano for a sharper flavor.
  • Control spice level by adjusting blackened seasoning.
  • Do not crowd the skillet to ensure proper blackening.

Irresistible Homemade Eggnog Recipe: Your Ultimate Holiday Delight

The Best Homemade Eggnog Recipe: A Festive Delight

⚖️
Difficulty
Medium

⏲️
Prep Time
15 mins

🕒
Cook Time
15 mins

⏱️
Total Time
30 mins

🍽️
Servings
6-8

Indulge in the rich and creamy delight of the best homemade eggnog recipe, a traditional festive beverage that captures the essence of the holiday season. With its velvety texture and comforting spices, this eggnog promises to be the star of your gatherings. Whether you’re hosting a Christmas party or looking for a special treat, this recipe delivers an unbeatable homemade flavor that will leave your guests asking for more.

Quick Recipe Highlights

  • Flavor Profile: Enjoy a symphony of flavors with the creamy richness of eggs and milk, nuanced by the warmth of cinnamon and nutmeg.
  • Texture: Silky and smooth, this eggnog boasts a luscious mouthfeel that is both comforting and indulgent.
  • Aroma: Inviting scents of holiday spices like cinnamon and nutmeg evoke warm and cozy gatherings.
  • Visual Appeal: A beautiful golden hue enhanced by a dusting of fragrant spices makes each glass a visually delightful treat.
  • Skill Level Needed: With moderate difficulty, this recipe is approachable for those comfortable with basic cooking techniques.
  • Special Equipment: A blender and whisk are essential tools to achieve the perfect consistency.

Recipe Overview

  • Difficulty Level: Classified as medium due to the need for precise temperature control during cooking and whisking eggs to perfection.
  • Category: This recipe falls within the beverage category, specifically a festive holiday drink.
  • Cuisine: Rooted in English culinary tradition, eggnog has become a holiday staple across many Western cuisines.
  • Cost: With easily accessible ingredients, the cost is moderate, ensuring you don’t break the bank while enjoying this festive favorite.
  • Season: Although perfect for winter festivities, this drink can be enjoyed throughout the colder months for its heartwarming qualities.
  • Occasion: Ideal for holiday gatherings, Christmas parties, and New Year’s Eve celebrations.

Why You’ll Love This Recipe


Dive into the luscious taste and texture of this homemade eggnog, where each sip offers a deliciously creamy sensation balanced by the perfect blend of warm spices. Enjoy the convenience of preparing it in just 30 minutes, making it a hassle-free choice for holiday festivities. Beyond its delightful taste, the recipe includes quality ingredients that offer a source of calcium and protein, perfect for keeping indulgence health-conscious. Share the joy by serving it at parties or as a cozy treat by the fireplace, making it a social centerpiece. Plus, with most ingredients being common household staples, this eggnog is both cost-effective and accessible for all levels of home cooks.

Historical Background and Cultural Significance


Eggnog’s origins can be traced back to Medieval Britain, with a lineage that intertwines with posset, a warm milky ale drink. Its transition from a luxury enjoyed by the elite to a popular holiday beverage in America highlights its cultural journey and adaptation. Over time, eggnog has become synonymous with festive celebrations, often featuring in Christmas traditions and toasts to the New Year. As the recipe spread globally, regional variations began to emerge, each adding local flavors and adjustments. For example, Puerto Rican coquito and Mexican rompope demonstrate how eggnog has woven itself into diverse cultural tapestries, each with its unique twist.

Ingredient Deep Dive


Eggs are pivotal in providing the rich base of this eggnog, contributing to its signature creamy texture. Historically considered a symbol of fertility and renewal, eggs are packed with essential nutrients like proteins, choline, and B vitamins. Opt for free-range eggs to ensure the best taste and ethical sourcing, keeping them refrigerated to maintain freshness. If you’re avoiding raw eggs, consider gently cooking them with the milk to a safe temperature.

Dairy milk lends its plush texture and subtle sweetness to the recipe, harmonizing beautifully with the other ingredients. Known for its calcium content, milk is integral for bone health and adds to the recipe’s nutritional profile. Choose whole or reduced-fat milk based on your dietary preferences; remember to store it in a cool environment to avoid spoilage. For those seeking dairy-free alternatives, almond or coconut milk can be suitable substitutes, offering different flavor dimensions.

Common Mistakes to Avoid

  • Avoid overheating the egg mixture to prevent curdling; maintain a gentle heat and constant stirring.
  • Do not skip tempering the eggs, which helps integrate them smoothly without scrambling.
  • Be cautious with spice seasoning; too much can overpower the drink’s delicate balance.
  • Avoid using low-fat milk if a creamy texture is desired, as fat content significantly impacts mouthfeel.
  • Ensure all ingredients are fresh, especially dairy and eggs, to prevent spoilage and off-flavors.
  • Avoid omitting alcohol if longevity is a concern, as it’s a natural preservative that extends shelf life.
  • Refrain from adding hot milk too quickly to eggs, risking a negative reaction.
  • Don’t underestimate the power of a good whisk; under-whisking can leave a flat drink lacking body.

Essential Techniques


Tempering eggs is crucial for smoothly integrating them into the warm milk without cooking them into solid bits. Begin by slowly whisking a small amount of warm liquid into the eggs, gradually adjusting them to temperature increases. This step ensures a cohesive mixture and prevents the eggs from curdling.

Strong whisking is necessary for aerating the eggnog, incorporating air, and softening the flavors. Aim for a consistent, swift motion to achieve a light, frothy texture that enhances each sip. Avoid over-mixing, as the eggnog might become overly thick.

Pro Tips for Perfect The Best Homemade Eggnog Recipe


1. Consider aging your eggnog for a couple of days in the fridge for intensified flavor depth.
2. Use freshly grated nutmeg for an aromatic burst that eclipses pre-ground spice mixes.
3. Chill all components adequately before serving for a refreshing, satisfying sip.
4. Gently fold whipped cream into the mixture prior to serving for an elevated creaminess.
5. Balance sugar to taste after chilling; sweetness can mellow over time in the fridge.
6. Incorporate a dash of vanilla for a harmonious rounding off of flavors, adding warmth and familiarity.

Variations and Adaptations


Regional variations abound, from Puerto Rico’s coquito with coconut and rum to Mexico’s rompope, marked by its unique spice blends. Each version carries cultural flair, offering alternative tastes to traditional norms. Seasonal adaptations can involve infusions of autumnal spices or lighter spring variations. Dietary modifications can be approached with almond milk or plant substitutes for a vegan option, ensuring inclusivity. To explore new flavor profiles, infuse with chocolate or go spicy with chili for a daring twist. For textural interest, try blending in fresh fruit puree or a crisp meringue topping.

Serving and Presentation Guide


Elegant glassware elevates eggnog’s visual appeal—consider using tall glasses or dessert cups for a sophisticated touch. Garnish with a sprinkle of nutmeg or cinnamon sticks for a traditional aura and aromatic warmth. Pair with gingerbread cookies or fruitcake to balance the eggnog’s creaminess with texture contrasts. Modern serving suggestions include offering small flights with varied infusions, echoing cocktail culture’s playful presentation. Keep in mind that serving eggnog slightly chilled enhances its refreshing qualities. Portion control is advised due to its rich nature, typically 5-6 oz servings suffice.

Wine and Beverage Pairing


Pairing eggnog with bold reds or sparkling wines complements the drink’s creaminess, with rich-bodied wines like Cabernet offering a balancing tartness. Non-alcoholic alternatives might include spiced apple cider, echoing warm, festive notes. Coffee pairing, such as an espresso or cappuccino, introduces robust flavors that contrast eggnog’s creaminess. For best results, serve eggnog slightly chilled, ensuring an optimal taste experience. Drinking from a small, chilled glass heightens both aromatic and taste senses, sparking holiday joy.

Storage and Shelf Life


Safely store eggnog in an airtight container in the refrigerator to maintain freshness for up to three days. Consistent refrigeration of below 40°F is essential to inhibit bacterial growth. Avoid metal containers that may react with ingredients, opting instead for glass or plastic. Look out for signs of spoilage, such as separation or off odors, and discard if encountered. For reheating, a gentle method in a double boiler can reintegrate any separation. While freezing is not recommended due to textural changes, if needed, an egg-free version can withstand freezing.

Make Ahead Strategies


Efficiently prepare the eggnog base up to three days ahead, allowing flavors to meld and marry over time. Store it securely in the refrigerator, shaking occasionally. The fresh components, such as cream or any garnishes, can be added prior to serving to maintain freshness. For quality assurance, prepare each stage as close to the intended serving time as possible, preserving intended flavors. When reheating, employ low and slow techniques to avoid texture deterioration. Incorporating fresh elements, such as a new dusting of spices, revives the drink and maintains its serving appeal.

Scaling Instructions


Halving the recipe demands attentiveness to maintaining the ratios, specifically with egg amounts. When doubling or tripling, consider employing a large pot and bowl for whisking to accommodate increased volume. Adjust cooking times to avoid overwhelming the saucepan’s heating capacity and maintain even results. Store larger batches in multiple smaller containers to distribute chilling, avoiding hot pockets inside large volumes. Use this same rule for smaller quantities in reverse, ensuring adherence to proportionate ingredient use and timing considerations.

Nutritional Deep Dive


Eggnog boasts a mix of proteins from eggs and milk, contributing to its caloric density. These proteins offer essential amino acids necessary for muscle repair and function. B vitamins and essential fats within eggnog support energy metabolism and bodily function. Be mindful of its sugar content, balancing indulgence with dietary guidelines. With calcium-rich ingredients, each serving aids in maintaining bone health. Portion control is paramount in incorporating eggnog within balanced meals, keeping track of its relatively high caloric and sugar content.

Dietary Adaptations


Eggnog’s traditional dairy and egg base can be transformed into a composite fitting diverse diets. For gluten-free, ensure all spices and mix-ins are clear of cross-contamination. Dairy-free methodologies advocate almond milk or oat milk, paired with coconut cream. Craft a vegan adaptation by utilizing plant-based creamers and egg substitutes, like aquafaba for frothing. For low-carb or keto, switch to sugar substitutes such as erythritol or stevia, moderating impact on carbohydrate intake. Specific storage and balancing seasonal fruits reflect Paleo dietary requirements.

Troubleshooting Guide


Combat textural thickness by adjusting milk type, opting for a lighter fat version should heaviness persist. Balance flavor with acidity or sweetness alterations when necessary, such as adding a citrus splash or honey variant. Avoid improper temperature storage leading to separation by maintaining consistent chilling post-preparation. Equipment woes such as blender clogging are circumvented by ensuring a well-integrated mix before final blitzing. Delay ingredient introduction until necessary stages to prevent component attachment to mixer sides, ensuring full incorporation.

Recipe Success Stories


Readers have delighted in customizing eggnog to their heart’s delight, integrating spirits such as bourbon for a cheeky adult twist. Many have enjoyed infusing eggnog days prior to special events, enhancing each unique flavor footprint. Testimonials frequently mention adapting the recipe to include various milk alternatives, serving a well-spanned audience with dietary considerations. Readers have successfully adapted non-dairy options, promoting festive joy within allergen concerns, each adjustment met with warm commendation and delight. Nonetheless, creativity reigns through community engagement, encouraging new twists and flavor explorations.

Frequently Asked Questions

Can eggnog be frozen for future use?
While not ideal due to potential texture change, freezing is possible. Remove eggs or dairy to improve results.

How can I create a non-alcoholic version?
Simply omit alcohol, and adjust sweetness and spices for bolder taste without spirits.

Is there a way to thicken eggnog?
Yes, allow chilling to naturally thicken, ensuring correct ingredient ratios for balanced texture.

Can I use a dairy alternative?
Absolutely, options like almond or coconut mimic creaminess while aligning with dietary preferences.

What are the signs of spoilage?
Issues include off smells, curdling, or an unusual hue, all indicators of eggnog gone over its prime.

How should leftover eggnog be reheated?
Employ gentle reheating methods avoiding separation, such as slow saucepan warming.

Why is alcohol included in eggnog?
Beyond flavor, alcohol serves as a preservative, extending the beverage’s refrigerated life.

Can eggnog be served warm?
Yes, gently reheating can offer a comforting warm variant, especially suited for festive gatherings.

Is it safe to consume raw eggs in eggnog?
Traditional recipes use them, but cooking the mixture to 160°F ensures safety without compromising taste.

How do I prevent curdling?
Slow and steady tempering and mixing avoids abrupt temperature shifts that lead to egg coagulation.

What’s a quick way to chill eggnog?
Submerge sealed containers in an ice bath, stirring occasionally for rapid crisping.

What’s the best serving strategy for large parties?
Pre-batch eggnog in pitchers or punch bowls enables self-service, maintaining freshness and simplicity.

Additional Resources


Explore related recipes like the creamy coquito or spiced rompope, diversifying holiday drink options. Delve into technique guides focusing on egg tempering and milk-infusing, pivotal in eggnog mastery. Ingredient spotlights on spices like cinnamon and nutmeg provide educational insights into each component’s contribution. Equipment recommendations showcase the best appliances for frothy and smooth results, promising consistency. Seasonal variations, adapted by climate and tradition, offer fresh perspectives upon foundational eggnog.

Join the Conversation


Join our vibrant community by sharing your eggnog creations across social media, contributing and drawing inspiration from fellow enthusiasts. Engage with a trove of photography tips to capture your eggnog efforts beautifully, whether it’s frosted glass or artistic garnishing. Your feedback enriches the recipe’s evolution—leave reviews and tweaks that might resonate with future readers. Communal sharing of adaptations, from bourbon blitzes to vanilla warmth, sustains an interactive and evolving festive tradition.

The Recipe

The Best Homemade Eggnog

Serves: 6-8

Prep Time: 15 mins

Cook Time: 15 mins

Total Time: 30 mins

Kitchen Equipment Needed

  • Blender
  • Saucepan
  • Whisk
  • Refrigerator storage container
  • Glasses for serving

Ingredients

  • 4 large eggs
  • 3/4 cup granulated sugar
  • 2 cups whole milk
  • 1 cup heavy cream
  • 1/2 cup bourbon (optional)
  • 1 teaspoon vanilla extract
  • 1 teaspoon ground nutmeg
  • 1/2 teaspoon ground cinnamon
  • Pinch of salt

Directions

  1. In a large bowl, whisk the eggs and sugar together until integrated and smooth.
  2. In a saucepan, heat milk, cream, vanilla, nutmeg, and cinnamon till just simmering.
  3. Temper eggs by slowly adding a small amount of hot milk while constantly whisking.
  4. Combine the tempered eggs with the remaining milk mixture in the saucepan.
  5. Gently heat, stirring continuously, until the mixture thickens slightly but does not boil.
  6. Remove from heat, add bourbon if using, and allow to cool slightly.
  7. Refrigerate to chill, ideally overnight, to let flavors blend and settle.
  8. Serve cold, garnished with extra nutmeg or cinnamon as desired.

Recipe Notes

  • For a non-alcoholic version, simply omit the bourbon.
  • Adjust spices according to personal taste preferences.
  • Aged variations may result in a deeper flavor profile, enhancing each note.