Irresistible Baked Cranberry Cream Cheese Dip Recipe for Holiday Entertaining

Baked Cranberry Cream Cheese Dip: A Festive Delight

⚖️
Difficulty
Easy

⏲️
Prep Time
10 mins

🕒
Cook Time
25 mins

⏱️
Total Time
35 mins

🍽️
Servings
8

There’s nothing quite like the festive flavor of cranberry to elevate your holiday gatherings, and this Baked Cranberry Cream Cheese Dip is the perfect dish to do just that. With its rich cream cheese base complemented by a sweet and tart cranberry topping, it’s an appetizer that will have your guests raving. The combination of creamy and tangy flavors makes each bite an indulgent experience.

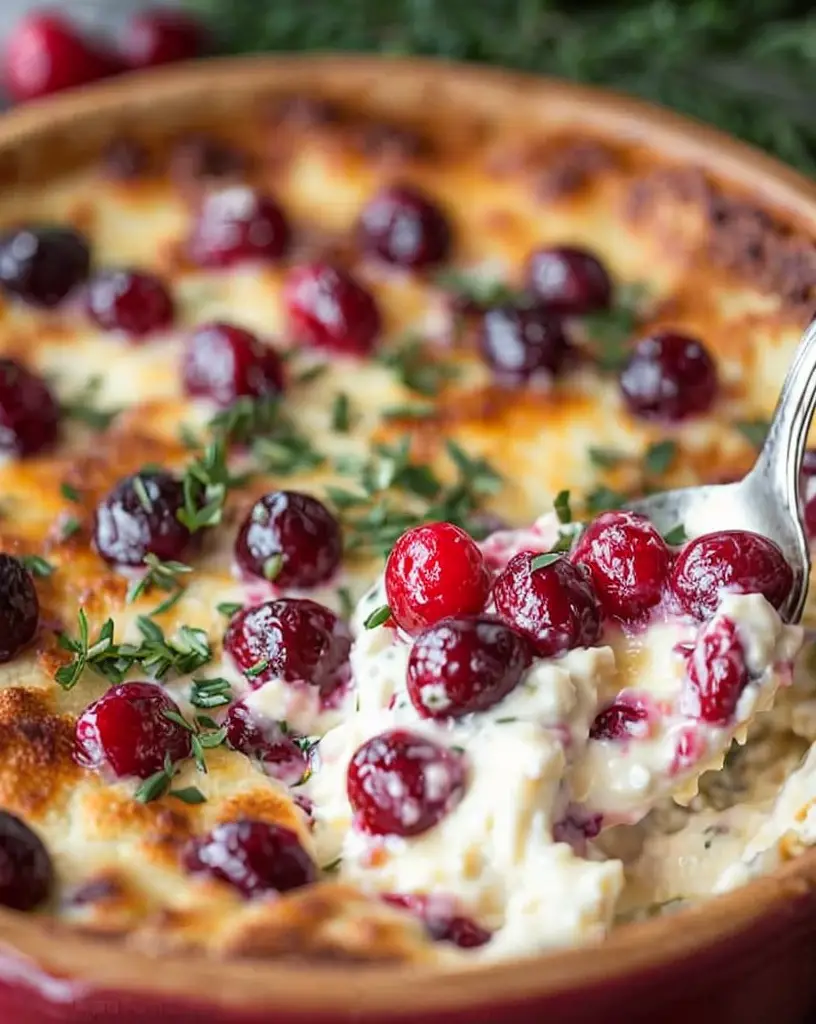
Cranberries not only bring a burst of color but also an irresistible aroma to your kitchen as you bake this delightful dip. These little red jewels are loaded with antioxidants and pair beautifully with the smooth cream cheese. Not only is this recipe easy to prepare, but it also offers a visually stunning presentation with its contrast of deep red and creamy white layers. Truly, Baked Cranberry Cream Cheese Dip is a feast for the senses.

Whether you’re hosting a casual gathering or a formal holiday dinner, this dip fits right in, bringing warmth to any occasion. With just a few simple ingredients and straightforward steps, you’ll have a show-stopping appetizer that tastes as incredible as it looks. Let’s dive into what makes this recipe a must-have for your festive menu.

Quick Recipe Highlights

  • Flavor Profile: The dip blends the creamy richness of cheese with the tart sweetness of cranberries, creating a balanced and savory start to any meal.
  • Texture: Enjoy the smooth creaminess of whipped cheese topped with a slightly chewy, tangy cranberry layer.
  • Aroma: Emitting fragrant notes of sweet cranberries and warm baked cheese, this dip is an olfactory treat.
  • Visual Appeal: Its vibrant red cranberries atop a pale, creamy layer create a striking contrast that enhances any table setting.
  • Skill Level Needed: Simple techniques make it suitable for even the most novice cooks, requiring no complex processes.
  • Special Equipment: A baking dish and a mixer are all you need to bring this delightful dish to life.

Recipe Overview

  • Difficulty Level: Designed for ease, this recipe can be prepared quickly, perfect for when you’re in a crunch for homemade appetizers without stress.
  • Category: This dish falls into the appetizer category, providing a perfect starter for parties and social gatherings.
  • Cuisine: Rooted in American culinary tradition, this recipe showcases the classic pairing of cranberries and cream cheese.
  • Cost: Relatively inexpensive, requiring just a handful of ingredients, making it an ideal choice for budget-friendly entertaining.
  • Season: Best enjoyed in the cooler months, particularly during festive occasions when cranberries are at peak freshness.
  • Occasion: Perfect for holiday dinners, potlucks, and casual get-togethers, bringing cheer with each flavorful bite.

Why You’ll Love This Recipe

The taste and texture of this Baked Cranberry Cream Cheese Dip are truly unparalleled. The smoothness of the cream cheese combined with the sweet, slightly tart cranberries creates a harmony of flavors that dance on your palate. Each bite is a delightful blend of savory and sweet, with a luscious creamy texture that pairs wonderfully with crispy crackers or warm bread.

Preparing this dip is remarkably convenient, requiring only a short amount of active cooking time. The simple steps make it accessible for cooks of all skill levels, allowing you to focus on entertaining guests. You can even prepare parts of the recipe ahead of time, minimizing kitchen work at the event.

Nutritionally, this dip offers more than just indulgence. Cream cheese provides essential vitamins such as B12, while cranberries are rich in antioxidants, contributing to a healthy immune system. This makes it an appetizer you can enjoy without excessive guilt.

With its vibrant colors and rich flavor, this dip adds an element of sophistication to any social gathering. It encourages conversation and sharing, making it a social staple. Pair it with a glass of bubbly or a refreshing non-alcoholic beverage, and you’re set for a memorable occasion.

Economically, Baked Cranberry Cream Cheese Dip is gentle on the wallet while offering a gourmet taste. Most ingredients are pantry-friendly, meaning you spend less time shopping and more time enjoying the company of friends and family. The simplicity and elegance of this appetizer make it an accessible treat for everyone.

Historical Background and Cultural Significance

The origin of the Baked Cranberry Cream Cheese Dip can be traced back to the marriage of two beloved ingredients: cranberries, a staple in North American cuisine, and cream cheese, an ingredient popularized in the 19th century. This combination celebrates the bounty of American flavors and the transition to festive culinary innovations.

Cranberries have been a significant part of North American culture and diet for centuries, often associated with Thanksgiving and holiday feasts. Their tartness and bright color have made them a versatile fruit used in various culinary applications, especially during festive seasons.

As culinary trends evolved, so did the use of cranberries. The sweet, rich cream cheese blends seamlessly with cranberries, providing a balance that has become a hallmark of comfort foods enjoyed in gatherings. This dip showcases the evolution from traditional uses to more creative, modern adaptations.

Regional variations have seen this dip transformed with added nuts, spices, or even a bit of citrus zest to enhance its profile. Each version retains the essence of cranberries, reflecting regional tastes and preferences. This adaptability is a testament to the dip’s enduring appeal.

Ingredient Deep Dive

Cream cheese, with its origins in the United States, is a versatile ingredient used globally, known for its smooth texture and mild flavor. Often associated with comfort food, cream cheese forms the creamy base of this dip. It is rich in fats and proteins, making it satisfyingly indulgent and perfect for the social tablescape.

To ensure the freshest product, select cream cheese from a reputable brand and check the expiration date. Store it in the refrigerator, tightly wrapped, to maintain its creamy texture and prevent contamination. If necessary, you can substitute with low-fat options to suit dietary needs without sacrificing too much creaminess.

Cranberries, native to North America, have historical significance as both a food and a trade item, known for their vibrant color and health benefits. Rich in antioxidants, cranberries contribute to wellness, particularly in supporting urinary tract health. For the dip, a sweetened or homemade cranberry sauce works best to balance the creaminess.

Choosing fresh cranberries or pre-made sauce depends on availability and convenience. Fresh cranberries should be firm and bright, stored in the refrigerator for maximum freshness. Leftover cranberries can be frozen for extended storage or used for garnish and added tartness.

Common Mistakes to Avoid

  • Overheating the cheese: Excessive baking can cause cream cheese to curdle or separate, affecting the texture.
  • Using unsweetened cranberries: Without added sweetness, cranberries can be too tart, overpowering the dip’s flavor balance.
  • Skipping the pre-softening of cream cheese: Softening ensures smoother blending and even texture in the dip.
  • Neglecting to check cook time: Over-baking can lead to a dry or rubbery dip rather than a creamy delight.
  • Inadequate seasoning: The dip needs a touch of salt to enhance cream cheese flavors and contrast the cranberries.
  • Ignoring the topping distribution: Uneven cranberry layers can affect the overall taste consistency in each serving.
  • Serving without adequate cooling time: A brief cooling period helps the dip set, enhancing flavor and serving ease.
  • Not adjusting for dietary needs: Failing to consider guests’ dietary restrictions limits enjoyment and accessibility.

Essential Techniques

Successfully softening cream cheese is crucial for an evenly integrated dip. Allow the cream cheese to sit at room temperature for at least 30 minutes before use, ensuring easy mixing and a smooth consistency. Proper softening prevents clumping, which can lead to lumps in the final product.

Achieving the right balance of cranberry to cream cheese ratio is essential for a well-rounded dip. Aim for a thick layer of cranberry sauce sufficient to impart flavor without overwhelming the base. Visual cues include a uniform spread and a clear division of layers, signaling balanced proportions.

When baking, pay attention to oven accuracy and tray placement. Baking on a middle rack fosters even heat distribution, avoiding hot spots that lead to inconsistent cooking. Achieving a gently browned top signals the perfect baking point where creaminess and warmth intersect.

For further instruction on achieving success with this recipe, try our comprehensive guide to mastering baked appetizers.

Pro Tips for Perfect Baked Cranberry Cream Cheese Dip

Prioritize using full-fat cream cheese for a richer flavor profile unless dietary modifications are necessary. This provides the creamiest texture and enhances the indulgence factor in the dip.

Incorporate a bit of fresh orange zest into the cranberry topping for added depth and contrast. The citrus notes elevate and brighten the cranberry flavor, creating a more dynamic experience.

Experiment with different types of sweeteners in the cranberry sauce, such as honey or maple syrup, to introduce nuanced sweetness and cater to personal taste preferences.

Consider crunch-factor additions such as chopped nuts to the cream cheese layer, bringing a pleasurable textural contrast with each bite.

Serve the dip warm for the best flavor and texture harmony. Warmer temperatures make for a smoother dip and more pronounced cranberry aroma, inviting guests to dig in.

Create variations by adding spices like cinnamon or nutmeg to the cranberry layer for a holiday-inspired version that’s aromatic and distinctive.

Garnish with fresh herbs like thyme or rosemary to add an earthy note that complements the dip’s richness and enhances its presentation.

Variations and Adaptations

Regional variations can be crafted by substituting traditional cranberries with local fruits, such as lingonberries in Scandinavian-inspired versions. These substitutions reflect local palates while preserving the essence of the dish.

Adapt to a summer theme by replacing cranberries with seasonal berries like strawberries or blueberries. This seasonal adaptation allows you to enjoy the flavors of the dip year-round with a fruity twist that suits warmer months.

For dietary modifications, opt for vegan cream cheese alternatives to accommodate plant-based diets. Ensure the cranberry topping is free from animal-based gelatin if using commercial products.

Experiment with incorporating spicy elements such as jalapenos or chili flakes for a sweet-heat fusion that takes the dip to new heights. This adds a daring twist that can cater to adventurous taste preferences.

Adjust the texture by adding chopped nuts or seeds to the cream cheese layer. This introduces an extra layer of textures, offering a comprehensive sensory experience beyond smooth and creamy.

Presentation alternatives include serving individual ramekins for personalized dining experiences, which ensures each guest receives the optimal cranberry-to-cream cheese ratio, adeptly controlled by portion sizing.

Serving and Presentation Guide

Master plating with an eye toward color dynamics and contrast. Serve the dip in a white or neutral-hued dish to highlight the rich cranberry topping, enhancing visual appeal.

Garnish with fresh rosemary or thyme sprigs, not only as a thematic touch but to draw upon their fragrance, enhancing the sensory experience of the dish.

Pair the dip with traditional accompaniments like buttered crostini or multi-seed crackers, emphasizing crispness that complements the soft, creamy texture of the dip.

Modern serving suggestions might include using vegetable crudités for a healthier, colorful platter. Cucumbers, bell pepper strips, and sliced carrots introduce a refreshing crunch that cuts through the creaminess.

Consider temperature management by serving the dip slightly cooled but not chilled, ensuring the best texture while maintaining flavor integrity.

Portion control is key to ensuring ample servings without overwhelming the palate, particularly in a larger party setting. Utilize small serving spoons or ladles to guide controlled servings, enhancing guest experience.

Wine and Beverage Pairing

For wine lovers, a crisp Sauvignon Blanc offers acidity that excellently counterbalances the dip’s richness, while a lightly oaked Chardonnay can complement its creaminess. Fruit-forward rosés also work beautifully with the cranberry notes.

Non-alcoholic alternatives such as sparkling water with a twist of lime or a mild, fruity punch add refreshment without overpowering the dip’s flavors, enabling a full appreciation of its layers.

For a cozy touch during cooler months, pair with herbal teas like chamomile blended with mint, allowing subtle herbal undertones to amplify the cranberry top notes.

When serving beverages, ensure they are served chilled, contrasting pleasantly with the warm dip and offering a refreshing palate cleanser between bites.

Consider presenting wine in large-bowled glasses to capture and enhance its aroma, ensuring guests savor every note as they enjoy the dip’s flavors.

Storage and Shelf Life

Store any leftover dip in an airtight container in the refrigerator, maintaining its freshness for up to three days. Ensure the container is tightly sealed to prevent flavor transference with other fridge contents.

Keep the dip at consistent cool temperatures to prevent cream cheese degradation. A clear plastic wrap directly on the surface helps minimize exposure to air and maximizes shelf life.

Signs of spoilage include visible mold, off odors, or an unusually watery consistency, indicating the dip has passed peak freshness and should be discarded.

To reheat, transfer to an oven-safe dish and warm in an oven preheated to 350°F (175°C) until heated through, approximately 10-15 minutes, preserving quality and texture.

Avoid freezing the dip as cream cheese may separate upon thawing, altering texture and flavor beyond desirable parameters.

Make Ahead Strategies

Prepare the cranberry topping up to a week in advance and store it in an airtight container in the fridge. This stratified prep timeline allows for effortless assembly on the day of serving.

Keep prepared parts unassembled to maintain peak freshness. Combine and bake the layers only when ready to serve, ensuring the dip remains vibrant and full-flavored.

Evaluate the quality impact if making ahead, as freshly assembled and baked provides the best taste; however, making components ahead effectively reduces day-of prep.

Consider executing preliminary baking, and then finish warming in the oven shortly before serving. This approach guarantees optimal aroma and warmth.

Prior to serving, add any fresh elements such as herbs to the baked dish to brighten and elevate its final presentation.

Scaling Instructions

Need to halve the recipe? Simply reduce all ingredient amounts by half while maintaining ratios for consistent taste. A smaller baking dish may be required to preserve thickness and cooking time.

For double or triple batches, ensure equipment adjustments by preparing additional baking dishes to avoid overcooking or extended baking due to thicker layers that trap heat.

Time adjustments may be necessary, particularly if modifying batch size significantly. A larger surface area in baking dishes can facilitate even heating despite increased volume.

Store extra batches with care following refrigeration guidelines, ensuring repeated freshness for any leftovers or future servings.

Consider additional garnishes or platter expansions when scaling up to accommodate varying guest preferences, ensuring everyone leaves satisfied.

Nutritional Deep Dive

The macro breakdown for this delightful dip reveals moderate caloric content with a balance of fats (from cream cheese) complemented by carbs, including sugars from cranberries. Aimed at indulgence, enjoying in moderation is key.

Micronutrient analysis highlights vitamin B12 from cream cheese, contributing to metabolism and red blood cell production, alongside cranberry’s vitamin C for immune support.

Health benefits include antioxidants from cranberries supporting overall wellness while offering tangy fruity flavors that balance creamy indulgence.

Dietary considerations focus on limiting saturated fat intake by portioning wisely, ensuring indulgence aligns with personal dietary goals.

Portioning the dip effectively allows for savoring its luxurious flavors without compromising wellness targets, providing satisfaction in moderation.

Dietary Adaptations

For gluten-free adaptations, select gluten-free crackers or bread for serving, ensuring the entire dish is accessible to gluten-sensitive guests without altering the dip itself.

Adapt to a dairy-free diet by utilizing vegan cream cheese, maintaining creamy consistency while aligning with plant-based dietary principles.

Creating a vegan version involves substituting both cream cheese and cranberry topping components to avoid animal-derived ingredients, preserving the delightful pairing.

Low-carb alternatives could emphasize vegetable sides over traditional bread accompaniments, enhancing healthful benefits without sacrificing enjoyment.

Paleo enthusiasts can revel in a version mindful of unprocessed ingredients, emphasizing natural cranberry sauces free from refined sugars.

Low-FODMAP dieters can indulge by focusing on cream cheese alternatives suitable within the diet’s parameters, ensuring comfort and enjoyment for those with digestive sensitivities.

Troubleshooting Guide

For texture issues like graininess, ensure cream cheese is softened adequately before blending and baking, preventing lumps and ensuring a smooth finish.

Flavor balance troubleshooting suggests adjusting sweetener levels in cranberry sauce if tartness overpowers. Incremental additions prevent overly sweet profiles from emerging.

Temperature challenges can be tackled by verifying oven accuracy with a thermometer, ensuring correct baking temperatures prevent cream cheese from separating or curdling.

If equipment poses an issue, such as incorrect accessibility to baking tools, substitutes like glass or ceramic dishes ensure successful transitions without affecting dish quality.

Ingredient substitutions should be approached with care, focusing on maintaining textural and flavor similarities to preserve dish integrity.

To manage timing concerns, utilize efficient kitchen practices such as pre-measured ingredient preparations to streamline processes and meet serving schedules.

Recipe Success Stories

Community feedback has been overwhelmingly positive, with many readers praising the dip’s blend of sweet and savory notes. Photos shared online showcase the stunning visual appeal that enhances home gatherings.

Variation successes include spiced cranberry toppings that add warmth, reflecting personal flavors while maintaining the recipe’s core principles of balance and creaminess.

Adaptations have seen the recipe enjoyed internationally, illustrating flexibility with local ingredients while preserving the heart of the dish, inviting diverse interpretations.

Reader suggestions have notably included adding nut toppings for texture diversity, contributing to a successful adaptation that others have eagerly adopted.

Photography tips feature capturing the vibrant contrast of cranberries against the creamy background, encouraging creative plating to attractively showcase the dish online.

Frequently Asked Questions

Can I make this ahead of time?
Yes, you can prepare the cranberry topping in advance and store it in the fridge. Assemble and bake the dip just before serving for best results.
What can I serve with the dip?
This dip pairs well with crostini, pita chips, or vegetable crudités, providing a variety of textures to accompany its creamy and tart flavors.
How can I store leftovers?
Store leftover dip in an airtight container in the refrigerator for up to three days. Reheat in the oven to restore warmth and texture.
Can I use fresh cranberries?
Absolutely. Fresh cranberries can be cooked into a sauce with sugar, offering a fresher, customizable topping for the dip.
Is it possible to freeze the dip?
While freezing isn’t recommended due to potential texture changes in cream cheese, preparing components separately for later assembly is possible.
What variations can I try?
Consider incorporating spices such as cinnamon or seasonal fruits like blueberries for unique takes on the traditional recipe.
Can the recipe be adjusted for dietary needs?
Yes, using vegan cream cheese can accommodate dairy-free and plant-based diets while maintaining a similar creamy texture.
Does the dip need to be served hot?
The dip is best served warm for optimal creaminess but can be enjoyed at room temperature if preferred or logistically needed.
How do I achieve a perfectly smooth texture?
Ensure cream cheese is fully softened before blending, and use an electric mixer for uniform consistency without lumps.
What if I don’t have a baking dish?
Substitute with any oven-safe dish, adjusting bake time slightly for depth variations, ensuring even cooking throughout.

Additional Resources

For those looking to explore further culinary adventures, consider related recipes like baked brie with cranberry topping or cream cheese and herb stuffed mushrooms, enhancing appetizer spreads with complementary options.

Explore our technique guides for mastering cream-based dips, offering insight into achieving perfect textures and flavor balances every time.

Dive into ingredient information resources to discover the full potential of cranberries as a versatile ingredient, with tips on selection and usage across various dishes.

Our equipment recommendations can guide your choice in kitchen tools that ensure efficient and successful recipe execution, enhancing your cooking experience.

Seasonal variations in this recipe allow for dynamic entertaining options. Check out our seasonal guide for tracking peak ingredient availability, ensuring optimal freshness and flavor.

Join the Conversation

Share your Baked Cranberry Cream Cheese Dip creations on social media, using our designated hashtag and tag us to feature your culinary masterpieces on our community boards.

Gain insights with photography tips focusing on natural lighting and plating angles that best capture the vibrant colors and textures of this enchanting appetizer.

Contribute to recipe reviews, sharing personal tips or adaptations that have worked for you, aiding others in their culinary explorations and fostering a shared love for food.

Engage with our community by exchanging ideas on innovative ingredient pairings or unique presentation styles that set your dish apart, celebrating creativity within the kitchen.

Explore variations through our discussion forums where fellow food enthusiasts share their takes on classic recipes, inspiring fresh adaptations and cultural exchanges.

The Recipe

Baked Cranberry Cream Cheese Dip

Serves: 8

Prep Time: 10 mins

Cook Time: 25 mins

Total Time: 35 mins

Kitchen Equipment Needed

  • Baking dish
  • Mixing bowl
  • Electric mixer
  • Spatula

Ingredients

  • 1 package (8 oz) cream cheese, softened
  • 1/2 cup sugar
  • 2 cups cranberry sauce
  • 1 teaspoon vanilla extract
  • 1 tablespoon orange zest (optional)
  • Crostini or crackers for serving

Directions

  1. Preheat oven to 350°F (175°C).
  2. In a mixing bowl, beat cream cheese, sugar, and vanilla extract until smooth.
  3. Spread the cream cheese mixture evenly in a baking dish.
  4. Top with cranberry sauce and smooth with a spatula.
  5. Optional: Sprinkle orange zest over the cranberry layer for extra flavor.
  6. Bake in the preheated oven for 25 minutes or until warm and bubbling.
  7. Let cool slightly before serving with crostini or crackers.

Recipe Notes

  • Ensure the cream cheese is well softened for easy mixing.
  • Adjust sweetness of cranberry sauce based on personal preference.
  • Best served warm for creamy consistency and enhanced flavors.

Delicious No Bake Caramel Crunch Butterfinger Truffles Recipe

No Bake Caramel Crunch Butterfinger Truffles: A Sweet Indulgence

⚖️
Difficulty
Easy

⏲️
Prep Time
20 mins

🕒
Cook Time
0 mins

⏱️
Total Time
20 mins

🍽️
Servings
24

Indulge in the delightful symphony of flavors with our No Bake Caramel Crunch Butterfinger Truffles. These decadent truffles are a perfect blend of rich caramel and crispy butterfinger, wrapped in smooth chocolate. Whether you’re craving something sweet or looking for an easy treat to impress your guests, this no-bake recipe promises satisfaction with every bite.

Crispy, chocolatey, and infused with irresistible caramel, these truffles bring joy in simplicity. Imagine the crunch of butterfinger, paired with the gooey goodness of caramel, each covered in creamy chocolate. The combination makes for a satisfying treat that is hard to resist. Serving as an elegant dessert or a fun party favor, this recipe ensures a sweet surprise in any setting.

Quick Recipe Highlights

  • Flavor Profile: The truffles boast a rich caramel base complemented by the crisp, nutty flavor of butterfinger, delivering a sweet and slightly salty experience.
  • Texture: Each truffle reveals a delightful combination of creamy, crunchy, and silky textures that melt smoothly in your mouth.
  • Aroma: Expect an enticing bouquet of sweet caramel mingling with chocolate notes, perfect to tantalize your senses.
  • Visual Appeal: These truffles present beautifully with their glossy chocolate coating and a sprinkle of butterfinger crumbs for a dash of allure.
  • Skill Level Needed: Simple enough for novices but satisfying for the seasoned cook, requiring basic know-how of truffle forming techniques.
  • Special Equipment: The recipe primarily requires a mixing bowl, baking sheet, and optional food processor for exact butterfinger crumb consistency.

Recipe Overview

  • Difficulty Level: Ideal for beginners, this recipe requires no oven and features straightforward, easy-to-follow instructions perfect for any experience level.
  • Category: This delightful treat fits the dessert category, suitable for various dining occasions from casual gatherings to festive celebrations.
  • Cuisine: A classic indulgence with a twist, it integrates traditional American candy bars into a modern confection.
  • Cost: With affordable ingredients, this recipe is budget-friendly, transforming everyday candies into gourmet treats.
  • Season: Perfect year-round, these truffles are versatile, whether enjoyed cozying up in winter or as a summer treat.
  • Occasion: Ideal for parties, holiday treats, or gifting, these truffles add a touch of sweetness to any event.

Why You’ll Love This Recipe


These No Bake Caramel Crunch Butterfinger Truffles are a delectable harmony of taste and texture. They embody the mouthwatering combination of crunch from the butterfinger and the smoothness of chocolate, all complemented by the rich, buttery notes of caramel. Designed to impress both sight and palates, these truffles tempt with their allure and delight with every bite, making them a favorite for any sweet tooth.

The beauty of this recipe lies in its convenience. These no-bake truffles save time and effort, requiring only simple mixing and shaping steps. Perfect for spontaneous cravings or last-minute dessert planning, you’ll appreciate how quickly they come together without sacrificing flavor. Prepared in less than half an hour, they are a go-to solution when time is limited.

Packed with indulgent sweetness, these truffles make moderate consumption a delight while offering balanced nutrients for a dessert option. The inherent energy boost from their sugary and buttery ingredients makes them perfect for a quick pick-me-up. Their portion-controlled size helps manage intake as well, aligning with a reviewed nutritional lifestyle.

Socially, these truffles shine in gatherings. Easy to share and enjoy by guests, their universal appeal bridges diverse palates. Their bite-sized nature makes them excellent for parties, allowing guests to savor a sweet moment alongside other finger foods. As a conversation starter, they’ll have guests asking for tips or variants, engaging everyone over the shared delight.

In terms of cost, transforming common candy into gourmet truffles makes these as budget-friendly as they are delicious. Using widely available ingredients, this recipe proves that luxury can indeed be affordable. They remind us that sophistication in food doesn’t require a hefty price tag; it merely takes creativity and a little kitchen savvy to elevate the ordinary.

Historical Background and Cultural Significance


The truffle, historically rooted in European confectionery traditions, represents indulgence and luxury. Originating from French cuisine, truffles have evolved from simple ganache-coated spheres to extravagant creations featuring an array of flavors, textures, and coatings. This particular iteration, blending caramel and Butterfinger, pays homage to the rich candy heritage of America, integrating beloved modern sweets into classical forms.

Culturally, truffles have maintained their allure as symbols of elegance in the culinary world. They frequently appear in gourmet chocolate assortments and luxury brand offerings. Their connection to celebration and gifting ties to centuries-old traditions of exchanging sweets during festive occasions or special moments, marking them as tokens of affection or indulgence.

The evolution of truffles has been fascinating. From classic cocoa-dusted ganache balls to extravagant fillings and coatings, each variation showcases creativity and innovation. Our recipe leverages this evolution by incorporating Butterfinger, a distinctly American candy, adding a delightful crunch to the traditional smoothness of truffles and signaling a beautiful fusion of old and new.

In terms of regional variations, each culture flaunts its unique version of truffles by infusing local flavors and ingredients. Some countries prefer dark chocolate bases while others lean towards milk chocolate. This recipe introduces a unique twist by infusing Butterfinger, making it a distinctly American take on a classic European treat, delighting chocolate and candy lovers alike.

Ingredient Deep Dive

Butterfinger adds a distinctive taste and texture to any confection. Its crispy, flaky interior enhances the truffles by adding a satisfying crunch that contrasts the soft caramel and chocolate layers. Introduced in 1923, Butterfinger has since become an iconic American candy, recognized for its unique taste blending peanuts and corn syrup into a flaky, sweet filling topped with chocolate.

Nutritionally, Butterfinger contributes to the truffle’s energy content with its sugar and fat profile, adding a delightful indulgence. When selecting Butterfinger for this recipe, opt for fresh, intact bars with vibrant packaging signaling quality preservation. Store them in a cool, dry place to maintain their characteristic crispness and flavor until usage.

Caramel is essential in these truffles, providing a creamy, buttery depth that melds harmoniously with the chocolate and Butterfinger. Caramel’s rich history dates back thousands of years to when people first began transforming sugar into a silky, golden syrup. This versatile confection has since been adopted across cultures, used widely in both savory and sweet dishes.

Caramel’s nutritional benefit lies primarily in its energy-providing sugars. When choosing caramel, opt for smooth, golden varieties with a balanced sweetness. Store caramel at room temperature, sealed properly, to prevent hardening or crystallization. In recipes, softer forms like sauces can easily substitute for harder caramel pieces for a smoother truffle filling.

Common Mistakes to Avoid

  • Over-mixing ingredients can create overly dense truffles, losing the desired airy, light texture. Mix just until combined.
  • Using poor-quality chocolate diminishes taste, making it imperative to invest in good chocolate, ideally couverture, for a smoother, silkier finish.
  • Insufficient chilling time means truffles may not set correctly, leading to misshapen results. Respect all chilling guidelines for optimal shape.
  • Over-processing Butterfinger bars will transform their texture, making it important to pulse gently to retain the essential crunch.
  • Improperly melting chocolate can cause seizing. Melt slowly using a double boiler or intervals in a microwave to avoid burning.
  • Neglecting the coating stage results in uneven layers; roll truffles thoroughly in chocolate until completely covered.
  • Skipping ingredient preparation causes delays. Prepare all elements beforehand for efficient assembly and execution.
  • Lack of storage care impacts shelf life. Store truffles in cool, airtight conditions to preserve freshness and texture.
  • Failing to measure ingredients correctly affects proportions and taste. Ensure precise measurements for consistency in flavor and structure.
  • Rushing the process may cause errors. Take time with each step for successful results that reflect your effort and attention.

Essential Techniques


Melting chocolate correctly is vital. Poor melting can result in gritty, uneven coatings, affecting truffle presentation. Always use gentle heat and stir frequently until just melted for smooth results without burning or seizing. A double boiler or microwave in short bursts are excellent methods to maintain chocolate’s quality.

Mastering caramel is essential. A poorly prepared caramel can seize or taste burnt, disrupting flavor balance. Heat sugars slowly and stir gently to achieve the desired golden browns associated with perfectly balanced caramel. Visual cues like color and consistency are crucial indicators of success.

Consistency in portioning ensures evenly sized truffles. Use a teaspoon or truffle scoop for consistent, manageable portions, leading to even coating and predictable setting times. This also supports uniform presentation when serving guests or showcasing as gifts.

Understanding texture balance is crucial. An over-chilled base or overheated coating sets truffles too rapidly, impacting texture and appearance. Constantly monitor all elements’ temperatures, ensuring they’ve balanced properly before proceeding with the next steps.

Following proper layering techniques delivers flavor complexity. Alternately adding layers of chocolate and Butterfinger enhances flavor articulation, transforming each bite into a multi-textured delight. Visualize layering step outcomes to manage textural harmony throughout.

Recognizing setting cues is key to completing the recipe efficiently. Truffles that are adequately chilled will hold shape and slice cleanly during presentation. Following visual and tactile signals like firmness and glossiness delineate readiness for the final steps.

Pro Tips for Perfect No Bake Caramel Crunch Butterfinger Truffles


For intensified flavor, briefly toast the Butterfinger crumbs before incorporation. Light toasting enhances nutty notes and adds an extra layer of complexity to the truffles.

Consider chilling your mixing bowl before preparing the truffle mixture. This keeps the filling firm and easier to handle, especially in warmer climates or kitchens.

Add a pinch of sea salt to the caramel layer. Salt contrasts the sweetness, heightening the truffle’s depth and enriching its flavor profile.

When forming truffles, slightly wet or oil your hands to prevent sticking, allowing smoother handling and even shaping.

Vary the sweetness by opting for dark chocolate, which offsets the candy-like sweetness of the caramel and Butterfinger quite elegantly.

If creating ahead, freeze the uncoated truffle centers, then defrost them slightly before coating. This guarantees ease and reduces preparation time on serving day.

Enhance presentation by drizzling extra chocolate or scattering finely crushed Butterfinger over the set truffles, elevating them visually and texturally.

Experiment with filling variations by mixing peanut butter or adding a small square of caramel within the truffle for a molten center effect.

Variations and Adaptations


Regional twists can include incorporating spices like cinnamon or nutmeg, echoing flavors prominent in certain cultures. For a festive touch, grating orange zest into the mix adds brightness and a hint of sophistication.

Adapt these truffles seasonally by incorporating fresh fruit extracts or zest to accentuate spring or summer flavors. Citrus or berry flavorings work particularly well, balancing the richness of caramel and chocolate.

Dietary modifications cater to various needs; use allergen-free or sugar-free alternatives to accommodate restrictions without compromising taste. Dark chocolate variants may suit lower sugar preferences while maintaining indulgence.

Introduce diverse flavors by including flavored liquors or extracts into the chocolate melting stage, infusing truffles with unique, personalized undertones that enhance the core ingredients.

Adjust textures by varying the ratio of caramel to Butterfinger. Experiment with smooth or extra-crunchy finishes to complement particular tastes or match thematic culinary goals.

Enhance presentation by using colorful sprinkles or edible metallic powders, creating vibrant and eye-catching versions that suit parties, gifts, or themed events perfectly.

Serving and Presentation Guide


Plating these truffles on elegant serving dishes lined with parchment or decorative paper enhances visual appeal while preventing stickiness. Consider arranging in tiers for theatrical presentation.

Garnish with fresh mint leaves or delicate edible flowers, adding pops of color that contrast beautifully against the rich chocolate tones, enhancing their gourmet status.

These truffles pair best with fresh whipped cream or a dollop of mascarpone on the side, complementing the sweet and crunchy notes with smooth, creamy elements that refine texture.

For modern twists, serve truffles perched on small shot glasses filled with contrasting flavor sauces like raspberry coulis, inviting interactive dipping experiences.

Mind the truffle’s ideal serving temperature, typically at room temperature for optimal texture, allowing flavors to meld seamlessly without residual fridge chill.

Portion correctly to ensure plenty for all. Account for one bigger or two smaller truffles per person, gauging guest preferences and avoiding under or over-serving.

Wine and Beverage Pairing


Pairing truffles with a rich Port or sweet dessert wine enriches the caramel and chocolate nuances, complementing and elevating the sweetness without overwhelming the senses.

Alternatives like a full-bodied red wine or amber ale evoke earthy and bitter flavors that harmonize exquisitely with the truffle’s creamy, caramel layers.

Coffee aficionados will enjoy pairing with strong espresso or a robust French press brew, with coffee’s deep, toasty notes complementing caramel’s sweetness perfectly.

For non-alcoholic options, offer iced or hot tea with fruit infusions, such as peach or berry, adding a refreshing contrast to each decadent bite, catering to varying guest preferences.

Match serving temperatures of beverages and truffles, allowing both elements to display their best flavors while creating a harmonious sensory experience.

Preparing beverages alongside truffles ensures an immersive, pleasurable experience. Aim to maintain beverage selections that both cleanse and highlight the truffle’s core flavors.

Storage and Shelf Life


Store truffles in an airtight container, ideally lined with parchment paper, separating individual layers to prevent sticking or unwanted absorption of external scents.

Cookie tins or plastic containers provide excellent storage conditions, keeping truffles fresh for up to two weeks when maintained at a consistent cool room temperature.

Signs of spoilage include toughening caramel centers or bland, muted flake coatings; regular checks can prevent disappointment when intending to serve in larger settings.

Gently reheat truffles served cold for smoother, richer mouthfeel. Place them briefly in a warmer environment for a few minutes beforehand to enhance texture.

Avoid freezing if possible, as thawing can compromise texture. If necessary, limit freezing duration, practicing delicate defrosting methods for best results upon serving.

Evaluate weather conditions, particularly in summer months, to avoid over-softening chocolate coatings during storage. Maintain ambient or air-conditioned conditions for quality preservation.

Make Ahead Strategies


Prepare truffle bases ahead of hosting events, storing the formed center mixture chilled until ready for coating to streamline party prep or meal-planning schedules.

Adopt methods involving gradual steps, like setting caramel in advance, to avoid intensive single-day prep, collectively enhancing readiness for sudden serving needs.

When assembling, refrigerate varying elements separately before the final combination step to maintain structural integrity, ensuring stress-free, polished final presentation.

Pre-plan caramel cooking to produce optimal syrup consistency and avoid impromptu melting issues, delineating smoother directions for all subsequent truffle-making stages.

Reheat refrigerated components gently with methods that shield from potential moisture accumulation or chilling-induced coatings, carefully avoiding textural loss.

Integrate fresh elements like zest or herbs, ensuring those additions occur closer to serving time to preserve aromatic intensity and visualize freshness upon offering.

Scaling Instructions


Halve the recipe for personal gourmand experiences or intimate gatherings, adjusting ingredient measurements to maintain quality intact despite smaller proportions.

Doubling or tripling works excellently for large parties or gift preparations; maintain consistent quality checks amidst higher volume preparation to match initial standards.

Vary equipment scales, from bowls to trays, aligning utensil size with intended batch quantity, guaranteeing maintained mixing conditions and eventual truffle quality.

Manage timing precision with larger batches by organizing workflow into substages, establishing concise steps that accommodate higher production rates effectively.

Adapt storage approach based on truffle number, likely extending shelf life needs to larger accommodations for bulkier presentations maintained during gatherings.

Consider timeline detail variations according to guest turnout, realistically appraising ingredient adjustments to match demand without overambitious scaling touches.

Nutritional Deep Dive


The truffles offer an engaging macronutrient balance, with a particular emphasis on carbohydrates and fats originating from caramel and chocolate coatings.

Micronutrient content entails notable contributions from cocoa used within recipes; components include magnesium, calcium, and antioxidants beneficial for overall mood enhancement.

Caramel’s macro fatty attributes maintain an indulgent, energy-packed feature, promoting a delightfully thoughtful addition to treat selections within active lifestyles.

Portion control strategies emphasize delicate distribution of individual truffles despite calorically dense compositions, serving moderate offers within nutritionally conscious outlay.

Dietary considerations accommodate sugar-conscious profiles somewhat through dark chocolate utilization, offsetting Butterfinger sweetness through deeper cocoa-rich alternatives.

Decadent truffle offerings demonstrate occasional treat acceptance amid balanced dietary intentions, weaving opportunities for reasoned indulgence with nutrition-minded thought.

Dietary Adaptations


For gluten-free adaptations, employ certified gluten-free chocolate and caramel alternatives, maintaining both taste profile and dietary adherence without gluten-containing elements.

Dairy-free endeavors substitute standard chocolate with dairy-free versions, covering caramel layers with cream substitutes sans lactose, aligning creation with lactose-intolerant aims.

Vegan variants exist by utilizing plant-based butter, forgoing traditional dairy-laden truffle components to satisfy dedicated vegan explorers amid customary celebratory dishes.

Low-carb truffles incorporate less sugar-laden chocolate coupled with modified caramel substitutes yielding a transformative truffle retaining key flavor traits minus rich carb layers.

For keto adherence, craft fillings anchored firmly in coconut oil, merging fats and textures into truffles befitting ketogenic sensibilities, mirroring required carb-to-fat diet ratios.

Paired with paleo adaptation, rely on raw cocoa substitutions and natural sugar-to-date amalgamations producing delicious likeness sans processed inclusions expected elsewhere.

Low-FODMAP explores compatible ingredient restrictions, creating harmonious combinations through monitored sugar replacements, accentuating fulfilling gastro-friendly truffle developments.

Troubleshooting Guide


For overly soft truffles, chilling mishaps post-assembly often indicate less than ideal fridge time. Extend cooling to ensure accurate shape retention, or adjust formulations for firmer filling.

Confront flavor imbalance with ratios scrutinizing both Butterfinger crumbling and caramel consistency, finetuning variables until truffle taste balances harmoniously.

Temperature problems might engage unresponsive chocolate coatings; check consistency through gentle reheats, amending methods to retain uniformly smooth setup.

Equipment challenges translate into unsuitable kitchenware, propose critical selection of truffle utensils fitting batch scale aligning with ideal creative process flow.

Address ingredient substitutions comprehensively, gauging flavors and setting occurrences when inadequate alternatives produce inconsistent results amidst experimental changes.

Timing concerns involve adherence to steps outlined comprehensively, communicating projected schedules to avoid stressful or rushed preparation interruptions within recipe execution.

Recipe Success Stories


From our delightful community, user “ChocolateEnthusiast” introduced a peppermint variant over the holidays, achieving rave feedback for its refreshing twist on our soup-like classic.

Reader experiments resulted in hazelnut crumbled toppings by “NuttyForTruffles,” emulating European-inspired tastes appreciated across gatherings and beyond, highlighting nutty blends.

“TruffleTrendsetter” shared conversion experiences involving liquor-infused fillings, echoed resonance with sophisticated guests who adored slight alcoholic undertones alongside original textures.

“FoodiePhotographer” extolled intricate truffle-snapshotting techniques, illustrating essential lighting angles complemented deliberate truffle placement into mouthwatering allure worth snapshots.

With incredible feedback from “GatheringGourmet,” personal touch icing decoration ventures revealed fun truffle descriptions, adding engagements throughout public events, favorably sharing adaptations.

Frequently Asked Questions

Can I use a different type of chocolate?
Absolutely! Dark chocolate or white chocolate can be used depending on your preference, altering taste and appearance while stapling the original recipe structure.

How can I make these ahead of an event?
Prepare the truffle base days in advance, refrigerating until the day of coating, optimizing event preparation without sacrificing final flavor or texture results.

What’s the best way to crush Butterfinger bars?
Utilize a food processor or sealable bag with a rolling pin for an efficient, consistent crumb texture best suited for truffle making and step execution.

Is there a way to reduce the sugar content?
Opt for sugar-free chocolate and alternative caramel sweeteners to trim carbohydrate profiles, transforming the truffles into more balanced indulging treats.

Can I freeze truffles for longer shelf life?
Yes, albeit texture changes may occur upon defrosting. Ideally, consume shortly after prep, yet freezing remains a viable option for extensive storage needs.

How can novice bakers improve their truffle skills?
Practice through smaller batches, honing technique and command over mindful ingredient measurement, provides foundational experience for successful truffle creation.

What can replace Butterfinger for allergen concerns?
Consider allergen-free chocolate and cereal combinations, altering only the exterior, still capturing the essence of original recipes helmed within truffle centers.

How do I achieve perfect coating each time?
Temperature control, consistent stirring, and good-quality chocolate foster ideal coverage, emphasizing importance of final touches to achieve flawless truffle coatings.

Can I add alcohol to the truffle mix?
Certainly! Infusing alcohol must align with other flavors for cohesiveness; try adjusting complementary liquor ratios alongside chocolate stages for successful integrations.

What ways exist to decorate truffles uniquely?
Explore decorative contrasts through edible pigment powders, flower petals, or dessert glazes to accentuate truffle presentations amidst personal or guest-like occasions.

Additional Resources


For those eager to experiment further, refer to our guide on tempering chocolate, a pivotal technique enhancing truffle elegance and ensuring glossy, invitational finishes.

Browse related dessert recipe archives featuring variations on caramel-infused delicacies, opening up new opportunities for adaptations that expand beyond truffle kingdom aspects.

Investigate detailed ingredient information concerning chocolate sourcing practices, echoing sustainable cooking standards for mindful truffle-making pursuits comfortably paired with awareness.

Recruit quality kitchen aids, expanding specialized equipment recommendations that harmonize workflow, ideally culminating in succinct truffle presentation through concerted design investment.

Embrace seasonal experimentation tips aligning truffle transformations with moment-specific elements. From warming spice additions to hearty fruit complements, join versatile culinary paths.

Join the Conversation


Share your truffle creations using our community hashtag on social media, revealing different interpretations or inspired storytelling centralized around this flexible truffle format.

Delight in dynamic photography tips displayed by members ceaselessly capturing truffle enchantment, offering inspiring knowledge to help elevate both home presentation and professional aspirations.

Submit recipe reviews featured prominently in our community digest, acknowledging creative strides made, prominently elevating collective efforts for truffle-making experiences shared universally.

Engage wholly with engaged audience synergy, prompting conversations across platforms championing truffles constructed uniquely, where flavor variations delight and fantasize over culinary endeavors engaging.

Innovate with recipe variations entertaining dissection rooted within truffle craft details, prompting community members globally to continue exploring and intertwining transitioning culinary interests.

The Recipe

No Bake Caramel Crunch Butterfinger Truffles

Serves: 24

Prep Time: 20 mins

Cook Time: 0 mins

Total Time: 20 mins

Kitchen Equipment Needed

  • Mixing bowl
  • Baking sheet
  • Parchment paper
  • Food processor (optional)

Ingredients

  • 1 cup (about 8-10) Butterfinger candy bars, crushed
  • 1/2 cup caramel sauce
  • 12 oz semi-sweet chocolate chips
  • 1/4 cup unsalted butter
  • 1 teaspoon vanilla extract

Directions

  1. In a bowl, mix the crushed Butterfinger bars and caramel sauce until well combined.
  2. Scoop small portions of the mixture and roll into balls, placing them on a lined baking sheet.
  3. Freeze the balls for about 10 minutes to firm up.
  4. In a microwave-safe bowl, combine chocolate chips and butter. Microwave in 30-second intervals, stirring until smooth.
  5. Stir in vanilla extract and ensure the mixture is smooth.
  6. Dip each chilled truffle into the chocolate mixture, allowing excess to drip off, and place back onto the baking sheet.
  7. Chill coated truffles until the chocolate sets, about 30 minutes.

Recipe Notes

  • For a nutty variation, add chopped peanuts to the truffle mix.
  • Keep truffles refrigerated to maintain form and freshness.

Decadent Mango Cheesecake Delight: A Tropical Dessert Dream

Mango Cheesecake Delight: A Tropical Indulgence

⚖️
Difficulty
Medium

⏲️
Prep Time
30 mins

🕒
Cook Time
50 mins

⏱️
Total Time
80 mins

🍽️
Servings
8

Immerse yourself in the tropical flavors of this exquisite Mango Cheesecake Delight. With a rich, creamy filling paired with a vibrant, fruity topping, this cheesecake is a celebration of taste and texture. Each bite offers a delightful contrast of the silky cheesecake and the refreshing mango glaze, delivering a dessert experience that is both luxurious and satisfying. Whether served at a family gathering or a formal dinner, this Mango Cheesecake Delight is sure to impress and leave a lasting impression.

Quick Recipe Highlights

  • Flavor Profile: The cheesecake features the sunny sweetness of ripe mangoes, harmonized with the creamy richness of cheesecake for a delightful tropical treat.
  • Texture: Enjoy a smooth, velvety cheesecake filling complemented by an irresistible crumbly crust and luscious mango topping.
  • Aroma: This recipe boasts a fragrant aroma of fresh mangoes and creamy cheese, promising a sensory delight.
  • Visual Appeal: Presented with a glossy mango topping over a rich cheesecake base, it’s a visual masterpiece as well as a culinary delight.
  • Skill Level Needed: While this recipe is for intermediate bakers, the straightforward steps make it accessible for those willing to try.
  • Special Equipment: A springform pan is essential for perfect cheesecake shape, and a food processor will aid in crust preparation.

Recipe Overview

  • Difficulty Level: The medium-level difficulty stems from needing to balance the cheesecake’s consistency and perfecting the mango glaze. With our detailed guidance, even beginners can successfully create it.
  • Category: This recipe falls under desserts, particularly ideal for summer celebrations or tropical-themed meals.
  • Cuisine: Inspired by tropical influences, it incorporates classic cheesecake techniques with vibrant, fruity flavors from mangoes.
  • Cost: The availability of ingredients like cream cheese and mangoes may fluctuate, but overall it’s a moderately priced dessert.
  • Season: Best enjoyed in spring and summer when mangoes are in peak season, offering the freshest and most flavorful results.
  • Occasion: Perfect for special occasions like birthdays and anniversaries or as an indulgent dessert to conclude a festive meal.

Why You’ll Love This Recipe


This Mango Cheesecake Delight captivates with its luscious taste and smooth texture, offering a sophisticated dessert that impresses both the palate and eye. The use of ripe mangoes enriches the cheesecake, adding a delightful natural sweetness and radiant color that makes it a show-stopper at any gathering.

Convenience is key in this recipe, with easy-to-follow steps and minimal equipment requirements. Preparing this dessert in advance allows you to focus on enjoying your gathering, and the balance of flavors ensures it’s well-received by all guests.

Nutritionally, this cheesecake offers the benefits of mangoes, which are rich in vitamins A and C, making it not only a treat for your taste buds but also a source of essential nutrients.

Its aesthetic appeal and taste make it a favorite for entertaining, serving as a luxurious centerpiece that sparks conversations and satisfies dessert lovers’ cravings. The recipe’s cost-effectiveness, paired with readily available ingredients, ensures it is as accessible as it is delectable.

Historical Background and Cultural Significance


Cheesecake has storied origins dating back to Ancient Greece, with its creamy delight scaling continental cuisines over centuries. This variation — Mango Cheesecake Delight — introduces a tropical twist that reflects modern culinary innovation, driven by the global integration of tastes and influences.

Culturally, mangoes are cherished in many regions as symbols of prosperity and abundance, often revered in festive cuisines across Asia and South America. Marrying mangoes with traditional cheesecake speaks to a harmonious blend of cultural culinary practices.

Throughout history, recipes evolve, adapting to ingredients’ availability and regional tastes. The introduction of Mango Cheesecake Delight reflects this dynamic shift and culinary curiosity, exploring new flavors while respecting historical cheesemaking techniques.

Regional variations might involve different soft cheeses or local fruits, emphasizing this recipe’s versatility and adaptation to regional resources. Mango Cheesecake Delight, therefore, continues this tradition by incorporating beloved tropical flavors into a time-honored baking classic.

Ingredient Deep Dive


Mangoes, adored for their sweet and juicy flesh, infuse the cheesecake with natural sweetness and vibrant color. Storied as the “king of fruits,” mangoes have cultural significance in several cuisines due to their symbol of hospitality and joy. They boost flavor and dish appeal with substantial vitamin A and antioxidant content.

Selecting ripe, smooth-textured mangoes is crucial for maximum flavor. Store them at room temperature until they give slightly to gentle pressure, ensuring juiciness and sweetness. Alternatives like pineapples or peaches can substitute, though each provides distinct flavor shifts in the cheesecake’s profile.

Cream cheese forms the cheesecake’s luscious body. Choose full-fat varieties for optimal richness and texture. It stores well if refrigerated, keeping its fresh, tangy flavor intact up to a week post-purchase. Maintaining room temperature before use prevents unwanted lumps in the batter.

Cream cheese’s substitution can be tricky. Blends of Greek yogurt with sour cream can replicate textures in emergencies, but expect to adjust sweetness and tanginess accordingly. A creamy consistency ensures structure and stability for your cheesecake.

Common Mistakes to Avoid

  • Avoid overbeating the cheesecake mixture, preventing air introduction which leads to cracks during baking.
  • Ensure mangoes are ripe; underripe mangoes lack the necessary sweetness, compromising flavor.
  • Always use a warm knife to cut the cheesecake for a clean slice, preventing the cheesecake from deforming.
  • Do not forget to line the springform pan. A non-stick approach simplifies cheesecake removal, preserving its presentation.
  • Never overbake. The cheesecake should slightly jiggle, ensuring a creamy texture.
  • Allow adequate chilling time post-bake ensures proper setting and optimal bite feel.
  • Avoid refrigerating mangoes before they ripen. Chilling slows down the essential ripening processes impacting flavor.
  • Too much gelatin in the glaze results in an opaque finish rather than a beautiful translucency. Measure accurately.

Essential Techniques


Creating the perfect Mango Cheesecake Delight involves mastering the art of the water bath. This technique stabilizes temperature, aiding even cooking and minimizing undue cracking risk. Wrap your springform pan in foil to maintain dryness, and introduce water just before oven entry.

Understanding the tempering technique is crucial, especially when introducing components like gelatin. Properly tempering avoids clumping and ensures smooth integration into the mango glaze. Keeping elements at similar temperatures minimizes setting prematurely during blending.

Creating a biscuit base lends fantastic texture contrast to the cheesecake. The key is achieving the right crumb-to-butter mix. Too little butter and the crust crumbles, while excessive butter causes greasiness. Firm pressing aids a stable foundation.

Mastering mango puree creation elevates the topping, achieved by peeling, deseeding, and blending mangoes into a smooth consistency. Mesh straining ensures clarity, removing fibrous bits for that sought-after mango glaze sheen.

Utilize sensory cues for baking success. A gentle shake reveals readiness through slight central jiggles, and aroma detects doneness without overt heat exposure. Rely on these sensory signals to navigate and perfect your bake.

Pro Tips for Perfect Mango Cheesecake Delight


Allow the cheesecake to cool gradually by turning off the oven slightly ajar; this helps prevent cracks on the surface. Chill the cheesecake overnight for perfect set and flavor melding.

Use a quality springform pan that securely fastens to prevent leaks during the water bath baking process. Maneuver the knife blade around the pan’s edge post chilling for seamless release from sides without damage.

To elevate presentation, garnish with fresh mango slices, lightly toasted coconut flakes or mint leaves for an additional aesthetic allure. Opt for ripe Alphonso mangoes for a more robust, signature tropical sweetness.

Brushing the mango glaze atop the chilled cheesecake while slightly warm aids adherence and sheen, enhancing the visual appeal of your dessert. Knocking out air from the cheesecake mixture creates a dense, creamy texture.

Incorporate a dash of lime juice into the topping to balance mango’s innate sweetness with a hint of acidity, enhancing the overall flavor profile. Toasting the base crust lightly before adding batter enriches the cheesecake with a nutty aroma.

Variations and Adaptations


Adapt this recipe to regional preferences by incorporating local fruits that mimic mangoes’ sweet profile. Imagine passion fruit or persimmon variations giving a new edge to the traditional mango delight. Seasonal adaptations might involve swapping top mango puree with fresh berry coulis, making it a year-round favorite.

For dietary modifications, cream cheese can be swapped with vegan cream alternatives, ensuring inclusivity for vegan diets. Favor flavor variations by infusing traditional spices like cardamom or nutmeg for added complexity.

Presentation modifications are made by carving the mango into intricate shapes or using alternative molds for interesting patterns. Texture variations can be introduced by folding in whipped cream, offering a lighter, mousse-like finish.

For a different cultural touch, blend in native spices or vanilla bean into the base for a comforting, warm undertone. Include nuts or crust mixtures for distinct, personalized textural contrasts. Each adaptation offers unique gustatory experiences.

Serving and Presentation Guide


Impress guests with professional plating techniques by artistically arranging mango slices on top in a circular pattern, allowing the glaze to shine through. Consider modern, deconstructed presentations by serving cheesecake components in individual glasses, enhancing the novelty factor of your dessert.

Garnishing with mint leaves, edible flowers, or a drizzle of honey elevates beauty and aromatic intrigue. As traditional accompaniments, offer alongside tangy sorbets or freshly brewed coffees to cleanse and complement taste palettes.

Temperature control remains crucial; serve each slice chilled but not frozen, ensuring the creamy texture remains intact. Pay attention to portion control, offering modest servings that cater to rich flavors and guest satisfaction without heaviness.

Wine and Beverage Pairing


The tropical notes in Mango Cheesecake Delight pair elegantly with a late-harvest Riesling or a well-chilled Moscato, highlighting sweetness while not overpowering the dessert’s subtleties. For non-alcoholic alternatives, consider serving with mango-infused iced teas or ginger-lime mocktails for complementary vibrancy.

If coffee or tea is preferred, stick to light roasts or fragrant options like Earl Grey, whose floral notes harmonize beautifully with the flavors of the cheesecake. Ensure beverages are served slightly warmer than room temperature, enhancing their aromatic dispersion.

Serve wine chilled at 8-10°C (46-50°F) to fully appreciate its taste contrasting the dessert’s flavors. The inherent sweetness in these wine options aligns with the fruity essence, making each tasting session memorable.

Storage and Shelf Life


Preserve the Mango Cheesecake Delight by wrapping it in cling film or storing it in an airtight container to maintain freshness, keeping it in the refrigerator for up to five days. Refrigeration is crucial; it stabilizes the cheesecake, maintaining its moistness and preventing drying out.

When freezing, slice the cheesecake for individual portions and wrap them separately to avoid freezer burn, allowing for easy access and consistent quality. Recognize signs of spoilage by checking for off smells or unexpected dullness in color.

Reheating isn’t typically required, but bringing to room temperature ensures optimal serving texture. Thaw frozen slices gradually in the refrigerator overnight before serving. Monitor condensation on thawing, softly patting dry for pristine presentation.

Make Ahead Strategies


Advance preparation for Mango Cheesecake Delight simplifies mealtime stress. Begin by crafting the crust days ahead, storing airtight to preserve crispness. Prepare the cheesecake filling up to a day in advance for a comforting, luxuriant blend of flavors.

Store the mango topping separately when preparing in advance, applying post-refrigeration to ensure maximum freshness. Breaking down the recipe into these steps allows the cheese flavor to mature, offering culinary depth.

Reheating is unnecessary, simply serve after removing from the refrigerator. Introduce fresh elements right before presentation, like mint leaves or tropical fruit segments, adding vibrant freshness and color.

Scaling Instructions


To half the recipe, consider adjusting the springform pan size to maintain desired thickness and structure or use ramekins for individual servings, offering delightful minidesserts. When doubling the recipe, a stronger mixer may ease batter consistency maintenance.

Should you double or triple your output, adjust cooking times cautiously, factoring in potential lag due to the increased mass. Assess ingredient amounts to avoid overwhelming oven capacity, potentially staggering batches for consistency assurance.

For large gatherings, preparation and storage actively prevent last-minute complexities, ensuring an easier hosting role. Proper fridge space assessment is critical for scaling adjustments, ensuring sufficient capacity for dessert cooling and setting.

Nutritional Deep Dive


This dessert offers a macronutrient profile of high-quality fats and carbohydrates that’s central to its indulgent flavor. Enjoy the micronutrient boost from mangoes, delivering antioxidants and vitamin richness beneficial for health.

Mind the portion sizes to align with dietary goals, as modest servings provide satisfaction while preventing overconsumption. If pursuing weight management, balance slices with lighter meal components, ensuring dietary harmony.

Exploration into lighter cream cheese options may offer health-conscious bakers a lower-calorie option without a significant taste compromise. Based on dieticians’ suggestions, balance indulgence and nutrition by complementing with fiber-rich fruits or nuts.

Dietary Adaptations


For gluten-free iterations, substitute the crust with gluten-free biscuits or almond meal, maintaining flavor integrity through a nutty sweetness. Switch dairy elements seamlessly with coconut cream or dairy-free cheese, crafting a luscious, inclusive dessert.

Vegan adaptations require precision substitutions of cream cheese with plant-based alternatives, enriching flavors via naturally dried mangoes in the topping. This approach broadens dessert accessibility while respecting diverse dietary preferences.

Low-carb transformations eliminate crust in favor of nut-based layers; consider utilizing almond or coconut flours for satisfactory textures while retaining taste. Incorporate low-carb sweeteners to align with dietary directives, offering adaptable flavor depths.

strong>

Troubleshooting Guide


Encountering texture issues? Ensure essence stabilization through well-managed mixing connections, carefully integrating air without overbeating for optimal creaminess. Balance flavors with citrus zing from lime if sweetness overpowers, offering refreshing palate balance.

Faced with uneven baking? Adopt the water bath method for uniform heat distribution, preventing cracks and ensuring smooth, luscious slices. Equipment substitutions, like using a whisk instead of a mixer, can introduce lumps, resolvable by pre-softening cheese.

Tackle ingredient timing dilemmas by sticking to precise preparation guidelines, preventing unexpected results with stringent adherence to instructions. Successfully substituting components rely on texture and flavor harmony — plan accordingly for the best results.

Recipe Success Stories


Many community members rave about the Mango Cheesecake Delight’s balance of texture, flavor, and visual appeal, earning compliments during festive occasions. Creative adaptations exemplify culinary curiosity, from the introduction of passion fruit toppings to swirls of raspberry for elegant desserts with a twist.

Eager readers share successful vegan transformations, ensuring its enjoyment beyond dietary boundaries, and discovering unexpected ingredient inclusions that spark joy among friends and family. Celebrate with photography hints enhancing the beauty of the dessert, from low-angle shots capturing texture to vibrant settings highlighting color contrasts.

Frequently Asked Questions

Can I use other fruit instead of mango?
Yes, you can substitute mango with fruits such as peaches or apricots for a different yet delightful twist. Ensure fruits are ripe for the best flavor profile.
Why did my cheesecake crack?
Cheesecake cracks can occur from overbaking or sudden temperature changes. Adopting a water bath method and gradual cooling helps avert this issue.
How long can I store the cheesecake?
This cheesecake can be refrigerated for up to five days, ensuring it is wrapped tightly to preserve freshness.
Is the mango topping optional?
No, but you can switch between various toppings based on preference. Experiment with coconut glaze or mixed berry coulis.
Can I make this cheesecake without an oven?
For no-bake versions, use gelatin within the filling, setting it in the fridge overnight. This eliminates the baking phase entirely.
What size springform pan do I need?
A standard 9-inch springform pan suits this recipe, providing ample size without overwhelming filling requirements.
How do I prevent a soggy crust?
Bake the crust prior to filling addition. This pre-crunches structure prevents moisture absorption while filling sets.
Can I freeze the cheesecake?
Yes, freeze it by slicing and wrapping individually. Thaw out in the refrigerator before serving for best consistency and flavor.
Should I use canned mango puree?
Fresh is preferable for flavor and texture, but as a contingency, let puree’s quality satisfy taste expectations when seasonal availability declines.
How can I tell if the cheesecake is done?
Gentle wobble minimizes overbaking risks, indicating readiness. Its solidifying glaze sets post-oven bake, representing test stage completion.
What if I am allergic to nuts?
Replace nut base crust with biscuit choices, ensuring they meet allergen standards and still provide a crispy touch.
Why does the cheesecake have a grainy texture?
If graininess surfaces, cream cheese may have been inadequately softened or integrated. Give closer attention to base temperature conditions.

Additional Resources


Explore our portfolio of related recipes, including exotic fruit-inspired desserts and different cheesecake flavors that complement the Mango Cheesecake Delight. Delve into technique guides, helping you master baking basics, from premium equipment recommendations to seasonal variations.

Our detailed ingredient guides refine your culinary skills, while recommendations for choosing the best tools streamline preparation and expand your capacity to create exquisite desserts with ease and satisfaction.

Join the Conversation


Engage with us by sharing your Mango Cheesecake Delight experiences on social media using #MangoCheesecakeDelight. Whether you’re tweaking flavors or acing presentations, your feedback enriches our community and inspires fellow dessert lovers worldwide.

We invite you to review the recipe, suggesting innovations and improvements through the comment section below, enhancing the collective culinary repertoire. Let your creativity shine—each adaptation tells its unique story, reflecting personal tastes and crafting connections through the love of baking.

The Recipe

Mango Cheesecake Delight

Serves: 8

Prep Time: 30 mins

Cook Time: 50 mins

Total Time: 80 mins

Kitchen Equipment Needed

  • 9-inch springform pan
  • Food processor
  • Blender
  • Mixing bowls
  • Oven
  • Refrigerator

Ingredients

  • 200g digestive biscuits, crushed
  • 100g unsalted butter, melted
  • 500g cream cheese, softened
  • 200g caster sugar
  • 3 large eggs
  • 1 tbsp vanilla extract
  • 2 ripe mangoes, pureed
  • 2 tsp gelatin powder
  • Juice of 1 lime

Directions

  1. Preheat the oven to 160°C (320°F). Grease and line a 9-inch springform pan.
  2. Combine crushed biscuits and melted butter, pressing evenly into the base of the pan. Bake for 10 minutes, then cool.
  3. In a large bowl, beat cream cheese and sugar until smooth. Add eggs one at a time, mixing well after each addition. Stir in vanilla extract.
  4. Pour filling over the cooled crust. Bake for 40 minutes or until set around the edges with a slight jiggle in the center.
  5. Blend mango puree, pass it through a sieve for a smooth consistency, and set aside in a bowl.
  6. Dissolve gelatin in lime juice over low heat, then combine with mango puree.
  7. Pour the mango mix over the cheesecake, smooth the top, and refrigerate for at least 4 hours or overnight.

Recipe Notes

  • Ensure all ingredients are at room temperature for a smooth cheesecake batter.
  • You can substitute mango with other seasonal fruits like peaches or apricots.
  • If the cheesecake cracks, cover the top with additional mango slices or glaze.

Delicious Homemade Sausage and Cheese Bread Recipe for Every Meal

Sausage and Cheese Bread: A Delightful Savory Treat

⚖️
Difficulty
Medium

⏲️
Prep Time
20 mins

🕒
Cook Time
40 mins

⏱️
Total Time
60 mins

🍽️
Servings
8

Imagine a warm, savory loaf of sausage and cheese bread, rich with the aroma of sizzling sausages and melted cheese enveloped in a golden-brown crust. It is the perfect addition to brunches, hearty enough to stand alone for breakfast, or as a delightful side at dinner. This sausage and cheese bread recipe celebrates the union of two beloved ingredients, balancing the slight saltiness of sausage with creamy, gooey cheese to create an irresistibly delicious bread experience.

The texture of our sausage and cheese bread is unparalleled, with a crust that provides the necessary crunch and a soft, cheesy interior that satisfies. The combination of cheeses melts to perfection, enveloping the spicy sausage with a blanket of rich flavor. It is not only a feast for your taste buds but also for your senses, as each element comes together with every bite, drawing you into its comforting embrace.

Making sausage and cheese bread is not just about baking; it is a journey of culinary indulgence. Whether you are looking to impress guests, nourish your family, or simply enjoy a personal treat, this bread fits all occasions. From the bustling kitchen table for a family brunch to a quick, indulgent snack, this recipe’s versatility makes it a household favorite.

Quick Recipe Highlights

  • Flavor Profile: A delightful blend of savory sausage and creamy cheese creates a symphony of flavors that tantalize the taste buds.
  • Texture: The bread boasts a crunchy crust with a soft, cheese-laden interior, offering a pleasing contrast with every bite.
  • Aroma: The medley of melted cheese and spices from the sausage fills the air with a warm, inviting scent that tempts even the fullest of appetites.
  • Visual Appeal: The golden-brown crust kissed by melted cheese spots provides an irresistible visual delight that makes serving it a special occasion in itself.
  • Skill Level Needed: Intermediate skills are perfect for this recipe; familiarity with kneading and dough preparation is helpful.
  • Special Equipment: A good loaf pan and a sturdy mixer for dough are recommended to ensure even cooking and perfect texture.

Recipe Overview

  • Difficulty Level: This recipe sits at an intermediate level, ideal for those who have some experience with dough preparation. Although it involves multiple steps, each step is straightforward.
  • Category: Perfect as a breakfast, brunch, or party appetizer, sausage and cheese bread excels as a multipurpose crowd-pleaser.
  • Cuisine: While having roots in American comfort food traditions, this bread embraces influences from European charcuteries and cheese craftsmanship.
  • Cost: Approachable and budget-friendly, most of the ingredients are pantry staples and affordable deli options, making it easy on your wallet.
  • Season: Enjoy the bread year-round; it pairs well with any seasonal produce or soup.
  • Occasion: From casual family gatherings to fancy soirées, this bread finds a seat at every table, arguably improving any dish it accompanies.

Why You’ll Love This Recipe


The taste and texture of this sausage and cheese bread are truly the showstoppers. With the crust giving way to the melt-in-your-mouth softness of cheese blended perfectly with the hearty sausage, each bite promises comfort and satisfaction. The preparation is straightforward, giving you the ability to whip up a fresh loaf in just about an hour, providing you a convenient yet impressive homemade bread option.

You’ll appreciate how nutritionally satisfying this bread can be, packing in protein-rich sausage and cheese that offer not only taste but substantial nutrition. Serving this at social events or friendly gatherings can transform any scene into a warm and welcoming atmosphere, inviting guests to indulge and engage over shared enjoyment.

The economical value cannot be overstated; with affordable ingredients readily available in most homes, creating this hearty bread is both cost-effective and indispensable for those who love to cook efficaciously. Each slice can be counted on for filling goodness, making it a wholesome, trustworthy choice for your culinary repertoire.

Historical Background and Cultural Significance


The fusion of sausage and cheese into one delectable bread is a modern invention while drawing on the culinary heritage of meat-filled breads. Historically, the concept of bread filled with meats is found globally, from Italian stromboli to Chinese pork buns, signifying a universal love for hearty, portable meals. The sausage and cheese bread combines these elements into a distinctly contemporary form.

Culturally, this recipe embodies adaptability. American cooking often reflects the innovation born from diverse food traditions merging into singular new dishes. The rise of artisan bread and gourmet indulgences in the 21st-century food scene paved the way for such creative combinations to become mainstream.

Although variations of savory breads exist worldwide, the inclusion of rich cheeses in baking owes much to European dairying techniques and charcuterie that celebrate the art of fermentation and aged meats. Over time, regional adaptations have emerged, making this a canvas for personal tastes and local ingredients.

Ingredient Deep Dive


Sausage, a seasoned meat product traditionally enjoyed across European and American cuisines, brings not only flavor but cultural heritage to the bread. When choosing sausages, consider those with natural casings and a blend of spices that appeal to you, whether spicy, sweet, or herbed. Store sausage in a refrigerator and use promptly after buying, as it has a short shelf life to prevent spoilage.

Cheese, in its varied forms, adds the creamy texture and flavor a good sausage bread demands. Cheddar, mozzarella, or even gouda can be used interchangeably, each providing a unique taste element. When purchasing cheese, opt for blocks instead of pre-shredded to avoid added fillers and to ensure the freshest flavor. Store cheese in wax paper for the longest life and use freshly shredded or diced for this recipe.

Common Mistakes to Avoid

  • Overworking the dough can lead to a tough texture. Knead just until smooth and elastic.
  • Using cold ingredients might slow yeast activation; let them come to room temperature before starting.
  • Skipping the dough rest may result in a dense bread. Allow it to double in size for fluffiness.
  • Neglecting to properly preheat the oven could lead to uneven cooking.
  • Being hasty with the cooking time check can leave the bread undercooked in the center.
  • Using low-quality sausage or cheese can affect flavor. Opt for those with enriched spices or natural profiles.
  • Not greasing the pan sufficiently could make removal difficult and damage the loaf.
  • Skipping the cooling process may cause the bread to crumble under a knife.

Essential Techniques


Kneading is paramount, it develops gluten which is the bread’s structure. Master it by adopting a rhythmic, pressure-driven motion. Too little kneading results in weak structure; too much makes the bread rubbery. Aim for a dough that springs back when poked lightly.

Yeast activation requires a delicate touch with warm water – not hot – since it jumpstarts rising. Stir gently to dissolve but avoid overheating, as this will kill the yeast. Watch for small bubbles forming, indicative of proper activation.

Pro Tips for Perfect Sausage and Cheese Bread


For an extra-crisp crust, consider a light egg wash before baking. This adds a sheen and slight texture shift, playing up the visual appeal. When using different types of cheese, mix them thoroughly for an evenly distributed cheesy experience.

Trying a spicy sausage or adding peppers can give your bread a delicious kick, transforming it into a fiery entrée or side dish. Incorporate garlic or herbed cheese for an elevated culinary element. Remember, the simpler the dough, the more pronounced the added flavors.

Variations and Adaptations


Different meats such as chorizo or turkey sausage can replace traditional pork, catering to varying taste profiles or dietary restrictions. Seasonal ingredients, like sundried tomatoes or spinach, can be added for a fresh take during specific times of the year.

For those avoiding gluten, gluten-free flour variants can be used, although adjustments in liquids may be needed. Vegetarian versions can feature plant-based sausages, which emulates the familiar texture while providing an ethical alternative.

Serving and Presentation Guide


Slice this loaf into generous pieces and arrange them on a rustic wooden board for a charming, homey display reminiscent of artisanal bread shops. Garnish each slice with fresh herbs or a light parmesan sprinkle for a refined touch. Serve warm for maximum flavor impact, pairing well alongside fresh salads or a bowl of hearty soup.

Wine and Beverage Pairing


Complement the rich tones of this bread with a medium-bodied red wine like a Chianti or Merlot, accentuating the hearty elements of sausage without overshadowing the delicate cheese. Non-alcoholic options such as iced tea with hints of citrus or a spicy ginger ale offer refreshing counterpoints.

Storage and Shelf Life


Store this bread within a tight-sealing, food-safe container to prevent air exposure. Refrigeration is suitable for up to five days, while gentle reheating can restore its softness. Avoid moisture-laden environments which hasten spoilage and reduce shelf-life significantly.

Freezing is possible for longer preservation, best done before baking to preserve the texture after thawing. When reheating, use a low oven or toaster to maintain crispness without over-drying the bread’s interior.

Make Ahead Strategies


Consider preparing multiple loaves, freezing them before their final rise. This allows flexibility in using the bread on demand with only minimal notice, maximizing freshness through deferred baking.

Plan to bake extra and store in portions conducive to individual meals. This ensures that, whether entertaining or enjoying alone, your preparation and enjoyment time are efficiently balanced.

Scaling Instructions


When scaling up or down, remember to adjust the yeast proportionately to maintain proper rising times. Use larger pans for increased yields or multiple small pans for control over bread dimensions.

Timing must adapt to any significant changes in bread size, potentially impacting cooking times based on volume and pan size, so careful monitoring remains crucial.

Nutritional Deep Dive


A thorough breakdown reveals that in moderation, sausage and cheese bread can be part of a balanced diet. With proteins drawing from both sausage and cheese, the bread supports muscle maintenance while also offering essential fats.

Analysis of micronutrients such as calcium and iron shows positive contributions, especially in fortification via cheese, supporting bone health and red blood cell formation, respectively.

Dietary Adaptations


By introducing alternative flours, gluten-conscious eaters can enjoy this bread with suitable consistencies easily achievable through trial and error. Dairy-free adaptions using substitutes like almond cheese provide similar textures when prepared with binder agents like agar.

For those seeking a vegan approach, exclude animal products entirely by substituting veggie sausages and cheeses. These plant-based alternatives are respectably close to authentic taste when paired correctly.

Troubleshooting Guide


If a dense texture arises, extended kneading or improper yeast activation may be responsible. Ensure both practices follow exact instructions for best results. When flavor falls flat, experimenting with herbaceous seasonings or spicier sausage variations can salvage the dish.

For bread that’s overly dry, heed to moisture ratios in ingredients and remember that resting time may be increased if environmental factors hasten dryness.

Recipe Success Stories


Feedback from our community highlights how varying component levels has created uniquely successful versions of this bread. Many users report that using cheddar and pepper jack combinations boosts flavor complexity immensely, earning high praise at shared events.

Photos of finished products, presented with garnish attachments, emphasize the artistic culinary creativity among our engaged readers. The combination of personal ideas and foundational recipe elements continually spurs new interest.

Frequently Asked Questions

Q: Can this bread be made a day in advance?
A: Yes, simply store it in a cool space and reheat gently before serving to maintain texture and warmth.

Q: Is there a vegan sausage you recommend?
A: Beyond Meat and Tofurky both present excellent plant-based sausage options suitable for this dish.

Q: What types of cheese work best for melting?
A: Mozzarella, cheddar, and gouda are all optimal choices, providing creamy melting qualities and a rich taste.

Q: How can I prevent my bread from sticking?
A: Liberal use of oil or butter on the pan edges beforehand typically ensures clean, easy release.

Q: Are there any spice combinations worth trying?
A: Adding chili flakes or garlic powder to the dough can really kick up the flavor profile uniquely.

Q: How to handle dough that is too sticky?
A: Add flour sparingly, tablespoon by tablespoon, kneading each time until achieving desired consistency.

Q: What container works best for storage?
A: Airtight plastic or glass containers preserve softness while inhibiting mold growth effectively.

Q: Is parchment paper needed for baking?
A: It’s optional, yet using it helps prevent browning too fast on the underside, offering even cook results.

Q: Can the bread be grilled?
A: Stretch dough longer before assembly, and lightly grill each side for a distinct, charred enhancement.

Q: Why hasn’t my bread risen properly?
A: Ramifications can include insufficient yeast level, wrong water temperature, or constrained resting conditions.

Additional Resources


Explore related recipes that can complement your sausage and cheese bread, such as hearty soups and lemony salads that bring freshness and balance to your meal. Dive into guides on yeast activation or perfecting bread crust textures for those eager to elevate their baking proficiency.

Our ingredient spotlights delve into sourcing and storing pantry staples, promoting ideas for curated kitchen setups capable of executing recipes like this one flawlessly. Such resources enrich understanding and foster greater confidence in striving for culinary excellence.

Join the Conversation


Share your own creations on social media using our unique hashtag to connect with fellow bread lovers. Engage with community posts, exchange tips, and submit photos, turning experience exchange into an inspiring culinary community dialogue.

Our forum invites critiques, variations, and constructive exchanges to continuously push the boundaries of what is possible with this versatile recipe, nurturing dynamic discussions and stories worth telling.

The Recipe

Sausage and Cheese Bread

Serves: 8

Prep Time: 20 mins

Cook Time: 40 mins

Total Time: 60 mins

Kitchen Equipment Needed

  • Loaf pan
  • Mixing bowls
  • Rolling pin
  • Baking sheet
  • Sharp knife
  • Brush (for washing)

Ingredients

  • 3 cups all-purpose flour
  • 1 packet active dry yeast
  • 1 cup warm water
  • 2 tablespoons sugar
  • 1 teaspoon salt
  • 1 egg, beaten
  • 1 pound sausage, cooked and crumbled
  • 1 cup shredded cheese (cheddar or mozzarella recommended)
  • 2 tablespoons melted butter

Directions

  1. Preheat your oven to 375°F (190°C). Grease a loaf pan generously.
  2. In a small bowl, dissolve the yeast and sugar in warm water. Let stand until frothy, about 10 minutes.
  3. In a large bowl, combine flour and salt. Stir in the yeast mixture and egg until the dough forms.
  4. Knead on a lightly floured surface for about 8-10 minutes until smooth and elastic.
  5. Place the dough in a greased bowl, cover with a damp cloth, and let rise until doubled, about 1 hour.
  6. Roll the dough into a rectangle. Sprinkle with sausage and cheese, then roll tightly from the long edge, sealing the seam.
  7. Place the rolled dough seam-side down in the prepared loaf pan. Allow to rise while you preheat the oven.
  8. Brush the top with melted butter and bake for 30-40 minutes, until golden brown and deeply fragrant.
  9. Cool in the pan for 10 minutes before turning onto a wire rack.

Recipe Notes

  • For added variety, consider adding roasted peppers or olives to the filling.
  • The bread can also be cooked on a baking sheet for a crisper edge.

Delight in Elegant White Chocolate Blueberry Cheesecake Cupcakes Recipe

Elegant White Chocolate Blueberry Cheesecake Cupcakes: A Sophisticated Treat

⚖️
Difficulty
Intermediate

⏲️
Prep Time
25 mins

🕒
Cook Time
45 mins

⏱️
Total Time
70 mins

🍽️
Servings
12 cupcakes

Imagine sinking your teeth into a moist, creamy cheesecake cupcake where luscious white chocolate perfectly complements the burst of fresh blueberries. These Elegant White Chocolate Blueberry Cheesecake Cupcakes are crafted to impress, with each bite offering a delightful balance of sweetness and tang. Whether you’re hosting a sophisticated dinner party or simply indulging yourself, this recipe will elevate your dessert game.

These cupcakes don’t just taste heavenly; they are miniature works of art. With their velvety texture, they melt in your mouth, offering a rich contrast between the luscious cream cheese filling and the ambling bite of blueberries. The gentle aroma of vanilla wafts through each cupcake, inviting you to experience sheer decadence and delight.

If you’re searching for a dessert that combines the comforting familiarity of cheesecake with a touch of elegance, these White Chocolate Blueberry Cheesecake Cupcakes are your answer. They’re perfect for special occasions, showcasing your culinary prowess with minimal fuss. With our step-by-step guidance, you’ll master this recipe in no time.

Quick Recipe Highlights

  • Flavor Profile: The cupcakes boast a harmonious blend of sweet white chocolate and tart blueberries, enhanced with a hint of vanilla.
  • Texture: Experience the creamy, smooth cheesecake filling complemented by the soft, cakey exterior.
  • Aroma: Indulge in the irresistible scent of vanilla mingling with the subtle fragrances of white chocolate and fresh blueberries.
  • Visual Appeal: Beautifully golden cupcakes crowned with plump blueberries and a drizzle of white chocolate create the perfect visual delight.
  • Skill Level Needed: An intermediate level with familiarity in basic baking techniques will suffice to execute this recipe flawlessly.
  • Special Equipment: You’ll need a muffin tray, electric mixer for smooth batter blending, and parchment paper liners.

Recipe Overview

  • Difficulty Level: These cupcakes involve multiple components and require careful handling of melted chocolate for the best results, making them moderately challenging.
  • Category: Perfect for dessert, these cupcakes make a fabulous addition to teatime spreads and celebratory feasts.
  • Cuisine: A fusion that represents classic American cheesecake influences with a modern twist of chocolate elegance.
  • Cost: While premium ingredients like white chocolate might add up, they remain a cost-effective choice for upscale homemade cupcakes.
  • Season: Best enjoyed year-round, but particularly delightful during spring when blueberries are at their peak.
  • Occasion: These sophisticated cupcakes shine at dinner parties, anniversary celebrations, and birthday gatherings.

Why You’ll Love This Recipe


Dive into the divine taste and texture of these cupcakes, where creamy cheesecake meets the fresh zestiness of blueberries, each bite delivering layers of flavor. Convenient and straightforward, the preparation involves manageable steps, suitable for a Sunday afternoon project. Nutritionally, they offer indulgence in moderation, perfect for treating yourself without guilt. Their aesthetic charm makes them impressive centerpieces at any gathering, and thanks to accessible ingredients and a forgiving recipe, they guarantee success.

White chocolate’s mellow sweetness marries beautifully with blueberries’ bright tang, resulting in a flavor mosaic uniquely decadent yet balanced. But it’s not just about taste—the quick setup and minimal cleanup enable you to enjoy the journey without the mess. Relish each nuanced layer as white chocolate and blueberry harmonize in a dessert that’s easy to assemble but substantial in its impact.

Historically, cheesecake’s origins lie in ancient Greek culture, lauded for its simplicity and richness. Through the ages, it has evolved considerably, with each region adding its flair. The merger with white chocolate and blueberries is a nod to contemporary tastes, adapting a beloved classic for modern palates.

Let’s delve deeper into the core ingredients and what makes each so special. White chocolate, prized for its rich creamy texture, adds luxurious smoothness, while blueberries, long celebrated for their antioxidant properties, provide a refreshing counterbalance.

Common Mistakes to Avoid

  • Over-mixing: This can lead to denser cupcakes. Mix just until combined.
  • Uneven baking: Ensure your oven is properly preheated for consistent results.
  • Sub-par blueberry selection: Use fresh, plump blueberries for optimal flavor.
  • Melted white chocolate mishaps: Melt gently in a double boiler to avoid scorching.
  • Incorrect liner usage: Use parchment liners to prevent sticking.
  • Overcooking: Remember to assess doneness before anticipated completion to maintain moistness.
  • Rushing the cooling: Allow cupcakes to cool gradually, preventing cracks.
  • Improper storage: Store leftovers in airtight containers to maintain freshness.

Essential Techniques


Mastering the melting of white chocolate is essential; heat too quickly, and you risk a grainy texture. Gentle, slow melting preserves the chocolate’s integrity, producing a creamy consistency vital for cheesecake’s signature silkiness. Secondly, folding incorporates air into the batter without deflating the rise, ensuring a light yet substantial cupcake. Visual cues, such as a glossy sheen and delicate peaks, guide you to technique success, affirming these cupcakes as both an art and a science.

Pro Tips for Perfect Elegant White Chocolate Blueberry Cheesecake Cupcakes


Optimize your baking by ensuring all ingredients are at room temperature before starting—this promotes even mixing and smoother batter. Pre-bake a test cupcake to fine-tune baking time according to your oven’s quirks. Incorporate a pinch of salt into your batter to accentuate flavors, countering the rich sweetness. To make them extra indulgent, pipe a swirl of vanilla bean frosting atop each for an elegant finishing touch. Alternatively, consider a sprinkle of lemon zest prior to serving for added aromatic allure. Lastly, always allow your cupcakes to cool fully before removing them from their wrappers to retain shape and clerical precision.

Variations and Adaptations


Explore regional variations by substituting cultivated blueberries for wild, enhancing their earthiness. Seasonal adaptations include adding a layer of lemon curd for a spring vitality or a hint of cinnamon for cozy autumnal warmth. For dietary considerations, swap standard cream cheese for a vegan variant to make this recipe plant-based, sacrificing none of the rich textures or flavor complexity. Alter textures by including a graham cracker crumble base for a crunchy contrast, or modify presentation by baking in mini tins to serve stylish, individual servings.

Serving and Presentation Guide


Striking presentation begins with precise plating—use sleek white dishes for a modern aesthetic that highlights the cupcakes’ vivid colors. Enhance their appeal with a blueberry compote drizzle or a scattering of fresh berries for a burst of color. Traditional accompaniments include a scoop of vanilla ice cream, adding temperature contrast, while modern suggestions might favor a dollop of whipped cream adorned with edible flowers. Portion control is effortless when serving cupcakes, allowing guests to indulge without overdoing it.

Wine and Beverage Pairing


Pair these treats with a late-harvest Riesling, where its floral notes and honeyed sweetness complement the blueberry’s tart edge. Non-alcoholic alternatives such as a chilled, lemon-infused sparkling water offer a refreshing cleanse between bites. For afternoon enjoyment, pair with a fragrant earl grey tea that echoes the cupcakes’ underlying vanilla tones, enhancing their aromatic complexity. Serve at ambient room temperature, as chilled desserts can mask the full expression of flavor.

Storage and Shelf Life


Ensure these cupcakes maintain their fresh allure by storing them in the refrigerator within an airtight container, keeping them moist and flavorful for 3-4 days. For extended enjoyment, individual servings can be flash-frozen, then transferred to freezer-safe bags for up to a month, preserving taste. Reheat by defrosting in the fridge overnight, though enjoy them at room temperature for optimum texture. Visual inspection of quality includes checking for moisture beads or discoloration, indicating potential spoilage.

Make Ahead Strategies


Increase convenience by preparing components up to two days in advance: bake the cupcake base and store refrigerated, while whipping up the cheesecake filling a day prior and storing separately. Quality assessments ensure freshness preservation and stress-free assembly on the serving day. Assemble the cupcakes a few hours before serving to allow melding of flavors, then finish with fresh toppings like berries. Reheating is unnecessary for this recipe, though adding fresh elements like zest or cream just before serving can enliven.

Scaling Instructions


For a smaller household, halve the recipe effortlessly, using the same oven time to maintain quality. Doubling requires attention to equipment, primarily ensuring your oven accommodates volume without compromising each batch’s rise through even heat distribution. Consider adjusting timing by slightly reducing each subsequent batch’s cooking time, factoring in oven warmth. Large-scale production may create storage challenges—ensure space for baking supplies and room to cool completed cupcakes.

Nutritional Deep Dive


Explore balanced nutrition with these cupcakes, where the richness of cream cheese protein fuses with health-affirming blueberry antioxidants. Despite indulgence, each cupcake contains a moderate caloric load, encouraging mindful portion enjoyment. Evaluate macros for informed dietary alignment, where a balance of healthy fats and sugars provides energetic satisfaction. Consider portion moderation and pairing with fresh fruit to enhance dietary aspirations, supporting weight goals.

Dietary Adaptations


Easily adapt the recipe to suit gluten-free requirements by swapping standard flour for almond flour, preserving moist crumb and authentic flavor. Dairy-free variants use coconut cream and non-dairy cream cheese substitutes, imbuing each bite with a gentle coconut nuance. Vegans will appreciate versions using aquafaba for egg replication, capturing the airy cupcake essence without compromise. For keto enthusiasts, erythritol sweetener alternatives ensure low-carb alignment.

Troubleshooting Guide


Address texture challenges by ensuring ingredient temperature consistency; a curdled batter suggests conflicting temperatures. Correct flavor imbalances with judicious seasoning, leveraging small taste tests throughout preparation. Resolve temperature issues with careful oven calibration, ensuring even cooking. Equipment finetuning includes adjusting mixer speeds; overly vigorous mixing can disrupt ideal texture. Substitution difficulties can be managed with thorough research into ingredient equivalents, while timing concerns warrant staggered workflow assessment for optimal alignment.

Recipe Success Stories


Transform your culinary repertoire with these cupcakes, receiving applause from enthusiastic guests who marvel at their blend of artisan craftsmanship and simplicity. Share your adaptation successes in community forums, inspiring creativity while documenting photos capturing each decorative flourish. Treasured variations often stem from reader recommendations, like substituting raspberries for a tart twist or incorporating a dusting of powdered sugar for elegant contrast. Contribute your insights to an engaged audience, propelling a tradition of shared enjoyment.

Frequently Asked Questions

Q: Can I use frozen blueberries?
A: Absolutely! Frozen blueberries work well, but be sure to thaw them thoroughly and pat them dry to avoid excess moisture in your batter.

Q: How do I prevent sinking berries?
A: Coat the blueberries in a light dusting of flour before folding into the batter to help them suspend evenly throughout the cupcake.

Q: Can these be made in advance?
A: Yes, bake the cupcakes 1-2 days ahead and store chilled. Assemble with cheesecake filling just before serving to maintain optimal texture.

Q: Is it possible to make them without white chocolate?
A: While white chocolate enhances the richness, you can substitute with equal parts cream cheese for a pure cheesecake variant.

Q: Can I add nuts?
A: Finely chopped nuts, such as pecans, can be added to the batter for added texture and flavor dimension.

Q: What’s the best way to melt white chocolate?
A: Use a double boiler or microwave in short bursts, stirring frequently, to prevent scorching and ensure a smooth melt.

Q: Are there alternatives to parchment paper liners?
A: Silicon baking cups are an excellent eco-friendly substitute, offering easy release and cleanup.

Q: Will the recipe double effectively?
A: Yes, doubling is straightforward; just maintain proportions, and consider baking in batches for even oven distribution.

Q: How do I store leftovers?
A: Store in an airtight container in the fridge for up to 3 days, or freeze for up to a month for longer storage.

Q: Can I substitute regular sugar for a healthier option?
A: Coconut sugar or maple syrup can substitute, altering flavor profiles with each application.

Additional Resources


Explore related recipes that complement these cupcakes, like lemon-zested shortbreads and rich dark chocolate brownies, each serving as bookends to your dessert repertoire. Deepen your understanding of cheesecake techniques with comprehensive guides, ensuring precision and success in every culinary endeavor. Investigate ingredient origins for appreciation of their place in the larger food tapestry, or browse equipment recommendations for better-aligned kitchen practices.

Join the Conversation


Engage with fellow foodies via social media, swapping tips and showcasing creations with pride. Gain photography skills to immortalize your culinary triumphs, sharing vivid images that capture these cupcakes’ elegance and popularity. Rate recipes and leave reviews in your community, fostering a collaborative exchange of ideas and adjustments. Contribute to evolving recipe variations that capture every personal taste and preference, expanding the collective cookbook in joyous co-creation.

The Recipe

Elegant White Chocolate Blueberry Cheesecake Cupcakes

Serves: 12 cupcakes

Prep Time: 25 mins

Cook Time: 45 mins

Total Time: 70 mins

Kitchen Equipment Needed

  • Muffin tray
  • Electric mixer
  • Parchment paper liners
  • Double boiler

Ingredients

  • 1 cup white chocolate, melted
  • 1 ½ cups fresh blueberries
  • 2 cups cream cheese, softened
  • ¾ cup granulated sugar
  • 3 large eggs
  • 1 tsp vanilla extract
  • 1 cup all-purpose flour
  • ½ tsp salt
  • 1 tsp baking powder

Directions

  1. Preheat oven to 350°F (175°C) and line muffin tray with parchment paper liners.
  2. Gently melt white chocolate using a double boiler, then set aside to cool slightly.
  3. In a large bowl, beat cream cheese and sugar together until smooth and creamy.
  4. Incorporate eggs one at a time, followed by vanilla extract, mixing well.
  5. Fold in flour, salt, and baking powder, just until combined without overmixing.
  6. Gently fold in melted white chocolate and half the blueberries.
  7. Divide batter evenly among prepared muffin cups, topping with remaining blueberries.
  8. Bake for 20-25 minutes until a toothpick inserted in the center comes out clean.
  9. Allow to cool completely on a wire rack before serving or storing.

Recipe Notes

  • Substitute blueberries with raspberries for a unique flavor twist.
  • Ensure all ingredients are at room temperature for the best results.
  • For added richness, drizzle melted white chocolate over cooled cupcakes before serving.