Rudolph Christmas Cheese Ball: Festive and Delicious Holiday Appetizer
Rudolph Christmas Cheese Ball: A Fun and Festive Holiday Appetizer
A Rudolph Christmas Cheese Ball brings holiday magic to your table, combining creamy cheese flavors with a creative, festive design. Perfect for gatherings and family celebrations, this recipe is not only delicious but also a delightful centerpiece for your holiday spread.
Why Choose a Rudolph Cheese Ball?
This Rudolph-themed appetizer stands out for its combination of taste and presentation. The creamy cheese base pairs perfectly with a variety of dippers, making it a versatile option for any holiday menu. The adorable reindeer design adds charm, making it an instant hit at parties.
A Rudolph Christmas Cheese Ball is more than just an appetizer—it’s a festive centerpiece that adds joy to your holiday celebrations. Pair it with Slow Cooker Chicken and Gravy for a hearty meal or Crispy Popcorn Shrimp for a complementary starter.
Spice Up Dinner with Easy and Delicious Taco Spaghetti
Taco Spaghetti: A Flavorful Fusion of Two Classics
⚖️
Difficulty
Medium
⏲️
Prep Time
15 mins
🕒
Cook Time
30 mins
⏱️
Total Time
45 mins
🍽️
Servings
4
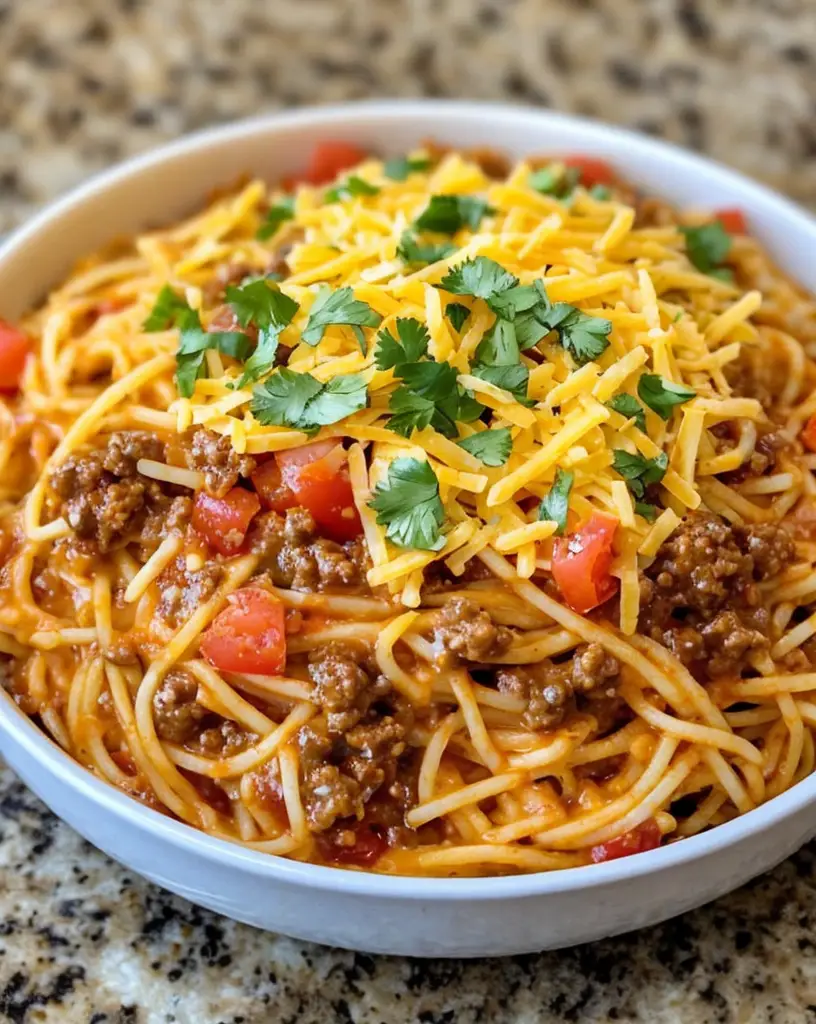
Taco Spaghetti is a delightful and unexpected culinary marriage, where the bold flavors of traditional tacos meet the comforting texture of spaghetti. This unique dish brings a new level of excitement to your dinner table, combining two of your all-time favorites into one effortless meal for any occasion. As the main keyword suggests, Taco Spaghetti offers a thrilling gustatory adventure that captures both the zesty and robust notes of Mexican cuisine alongside Italian pasta tradition. Imagine perfectly cooked spaghetti infused with spicy taco seasoning and topped with creamy cheese, making every bite an explosion of flavor.
Quick Recipe Highlights
Flavor Profile: The delightful blend of taco spices with the heartiness of spaghetti delivers a rich, savory taste infused with hints of cumin and chili, perfectly complemented by melty cheese.
Texture: Enjoy a satisfying mix of tender pasta enveloped in a robust, meaty sauce, finished with a gooey cheese topping that melts in your mouth.
Aroma: The kitchen fills with the enticing scent of spiced meat mingling with aromatic garlic and tangy tomatoes, creating a burgeoning anticipation of the meal to come.
Visual Appeal: Vibrant red sauce, strings of golden cheese, and hints of green from garnishes create a visually stunning and appetizing presentation.
Skill Level Needed: Requires moderate cooking skills, making it accessible for anyone familiar with basic stovetop and oven techniques.
Special Equipment: A reliable skillet, pasta pot, and a good grater for cheese are essential to achieving the perfect mix.
Recipe Overview
Difficulty Level: Medium – This dish involves multiple steps including sautéing, boiling, and baking, but is straightforward enough for confident beginners.
Category: Suitable for casual dinners, family gatherings, or a quick yet flavorful weeknight meal.
Cuisine: Inspired by fusion cuisine, it incorporates Mexican spices with Italian pasta techniques to craft a seamless dish.
Cost: Affordable, using common pantry staples and readily available fresh ingredients, making it budget-friendly.
Season: A versatile year-round delight, perfect for summer evenings or cozy winter nights.
Occasion: Taco Spaghetti works superbly for casual dinners, crowd-pleasing during family cookouts, and impressing guests at casual gatherings.
Why You’ll Love This Recipe
The taste and texture of Taco Spaghetti create a bold and satisfying experience for your palate. The spicy seasonings contrast beautifully with the soft spaghetti and the creamy melted cheese topping. It’s a comfort food dish that brings together the essence of tacos with the familiarity of pasta, offering a mix that is hard to resist for both adults and kids.
Convenience is a hallmark of this recipe, as it comes together in under an hour. This makes it a fantastic option for busy evenings when you crave something different and exciting without spending hours in the kitchen. With minimal prep and straightforward steps, even a novice cook can bring this dish to life without hassle.
Nutritionally, Taco Spaghetti provides a balanced meal with protein, carbs, and fats, offering energy and satisfaction. By choosing lean meats and whole-grain pasta variants, it can be easily adapted to fit within a healthy diet framework, making it a go-to for wholesome and hearty meals.
Socially, Taco Spaghetti is a communal dish that brings people together. Whether served at a family gathering or a casual dinner party with friends, this fusion recipe sparks conversations and engagements, making it a delightful centerpiece for entertaining.
From a cost perspective, Taco Spaghetti is made with economical ingredients like pasta, ground meat, and cheese. It’s a budget-friendly choice that does not compromise on taste and is perfect for feeding larger groups without breaking the bank.
Historical Background and Cultural Significance
The Taco Spaghetti recipe stems from a curious blend of culinary traditions and showcases how global influences can create new and exciting dishes. Its origin lies in fusion cuisine, which thrives on connecting disparate culinary worlds to form innovative gastronomic experiences. The cultural significance of Taco Spaghetti reflects the ongoing evolution of recipes that blend familiar tastes into compelling new meals.
Traditionally rooted in separate culinary practices, both tacos and spaghetti have rich histories that date back centuries. Tacos originated from the indigenous people of Mexico, who utilized corn tortillas to hold fillings, while spaghetti stands as a testament to Italian culinary arts, with its focus on pasta introduced by Asian culinary traditions via the Silk Road.
Over the years, the evolution of Taco Spaghetti has mirrored changes in culinary landscapes, where the mixing of cultural foods has led to inventive recipes. It’s a dish that has emerged from home kitchens, created by adventurous cooks eager to bring variety and excitement to mealtime.
Regional variations of Taco Spaghetti abound, with each version adapting to local tastes and available ingredients. Some prefer it with additional vegetables, others add beans for heartiness, while some opt for a spicier rendition by incorporating hot peppers or salsas, demonstrating the versatility and adaptability of this vibrant fusion dish.
Ingredient Deep Dive
The ground beef used in Taco Spaghetti is a cornerstone ingredient, offering a hearty, rich flavor that forms the base of this dish. Historically, beef has been a staple in many cultures due to its availability and versatility. Nutritionally, it is an excellent source of protein, iron, and essential vitamins. When selecting beef, look for leaner cuts to maintain a healthier profile. Fresh meat should be stored in refrigeration and used within two days or frozen for future use. If ground beef is not available, ground turkey or chicken provide suitable substitutions that don’t detract from the overall flavor.
Cheddar cheese adds a creamy texture and robust flavor, paring perfectly with the spices in Taco Spaghetti. Cheese has a storied history as a preserved dairy product, appreciated globally. It’s rich in calcium and adds a nutritional boost in addition to its flavor contributions. Choose a sharp cheddar for boldness, and always shred cheese at home when possible for the best melt and texture. Store cheese in airtight packaging in the fridge, and for variations, Colby Jack or Pepper Jack can provide alternative flavor profiles.
Common Mistakes to Avoid
Overcooking the pasta: Spaghetti should be cooked al dente to maintain its texture in the final baked dish.
Under-spicing: Don’t be shy with the taco seasoning; it ensures the dish stays true to its name.
Neglecting cheese: Cheese is essential for binding flavors and adding creaminess; use a generous amount for the best results.
Using low-quality beef: Opt for good quality meat to avoid greasy or overly fat outcomes.
Skipping pasta rinse: Rinse pasta briefly post-cooking to prevent clumping, but don’t overdo it to maintain starch.
Ineffective cheese melting: Grate cheese finely to ensure it melts evenly and forms a cohesive layer.
Improper layering: Ensure even layers of pasta and meat to avoid flavor imbalances.
Forgetting garnish: Fresh cilantro, lime, or jalapeños add needed brightness and heat, so don’t skip them.
Essential Techniques
Mastering pasta cooking is crucial in Tacos Spaghetti. Opt for a rolling boil with plenty of salted water, stirring occasionally to prevent sticking. The pasta should be al dente to absorb flavors post-cooking. Drain at precisely the right time and avoid letting it sit wet for too long, as this can lead to undesired clumping.
Another essential technique is achieving the perfect browned beef. Start with a hot pan to ensure searing and caramelization, which develops deep umami flavors crucial for the sauce. Stir frequently and drain excess fat to avoid a greasy finish. Be vigilant about seasoning early, incorporating taco spices during the browning process to lock in flavors.
Pro Tips for Perfect Taco Spaghetti
Utilize a cast-iron skillet for an even heat source when cooking beef, enhancing caramelization and flavor. Enhance your sauce with a splash of beef broth or a dash of Worcestershire sauce for added umami and richness. Toast your spices briefly in the pan before adding liquids to unlock deep, aromatic notes.
Use fresh herbs for garnishing, like cilantro, for a pop of color and flavor contrast. Consider lime wedges on the side to add a zesty acidity right before serving, elevating the dish. Pair with a fresh side salad of crisp lettuce and shredded carrots for contrast.
Prepare extra pasta in case some sticks to the pot or breaks apart during preparation. It’s always easier to remove excess than scrambling for more at the last minute. If using pre-shredded cheese, toss it with a bit of cornstarch to mimic fresh shredding and ensure it melts smoothly.
Variations and Adaptations
Taco Spaghetti can be adapted regionally by adding local ingredients. In Southern regions, consider adding black beans or corn for additional texture and flavor. During summer, roast fresh tomatoes and peppers for the sauce, enhancing freshness and sweetness.
Dietary adaptations include substituting regular spaghetti with gluten-free varieties or swapping out beef for tofu crumbles to suit a vegetarian diet. For a smoky variation, use smoked paprika or chipotle chili powder to impart a deeper flavor profile. To achieve creamier textures, consider adding a dollop of sour cream or a sprinkle of feta cheese just before serving.
Presentation can be tailored to individual tastes. Serve in bowls for a rustic, casual feel, or plate elegantly with fresh garnishes for more formal occasions. Incorporate bright colors with bell peppers or vibrant salsas to enhance the visual appeal.
Serving and Presentation Guide
Serving Taco Spaghetti can be an experience of artistry and flavor. Start with large, shallow bowls to showcase the dish’s depth and variety in texture. Use tongs to twirl a generous amount of spaghetti in the center, topping it with a hearty spoonful of the spicy meat sauce.
Garnishing is key to adding brightness. Sprinkle freshly chopped cilantro, sliced jalapeños, and a dollop of cool sour cream. For a dynamic presentation, lightly dust the finished plate with smoked paprika or chili powder for a touch of heat and color.
Accompany the dish with traditional taco accompaniments such as homemade guacamole, pico de gallo, or a crisp green salad. For modern twists, offer roasted vegetable skewers or an avocado and corn salad on the side. Ensure the dish is served hot, as the flavors tend to meld best at elevated temperatures.
Wine and Beverage Pairing
Choose a medium-bodied red wine, such as a Zinfandel or a Syrah, known for complementing the bold spices of Taco Spaghetti. These wines have the depth to stand alongside the dish’s rich, savory notes while offering fruity undertones that refresh the palate.
For non-alcoholic alternatives, consider a sparkling water flavored with lime to cleanse the palate and provide a crisp, refreshing contrast. Or, enjoy the dish with a glass of traditional horchata, offering a sweet notes to balance the spices.
If you’re opting for tea or coffee pairings, black tea will balance rich flavors without overwhelming them, whereas a roasted coffee blend serves a post-meal respite, complementing the dish’s bold flavors while providing a robust finish.
Storage and Shelf Life
Allow leftover Taco Spaghetti to cool completely before storing. Use airtight containers to keep it fresh in the refrigerator for up to three days. Avoid letting the pasta sit too long in its sauce to prevent it from absorbing excess moisture, which can lead to mushiness.
When reheating, add a splash of water or broth to revive the sauce’s moisture content, keeping it saucy rather than dry. For larger amounts, reheat in a covered oven-safe dish in a preheated oven at 350°F until hot. For quick servings, use a skillet over medium heat, stirring occasionally. While freezing is possible, it’s best for dishes without cheese topping, which can alter in texture once reheated.
Make Ahead Strategies
Preparing Taco Spaghetti in stages can streamline dinner time. Cook the pasta al dente and store it separately in a lightly oiled airtight container, preventing sticking. Prepare and season the beef mix ahead, refrigerating it for up to two days. This robustly seasoned sauce enhances flavor when allowed to rest.
When ready to assemble, heat the sauce while boiling pasta water for a quick finish. A pre-grated mix of cheeses speeds topping. Consider adding fresh garnishes just before serving to ensure a burst of brightness.
Scaling Instructions
Taco Spaghetti scales well for larger groups or intimate dinners. To halve the recipe, simply reduce quantities proportionately, while monitoring pasta water levels closely to avoid over-sticking. For larger crowds, double or triple ingredients but opt for larger pots and pans, distributing pasta evenly.
Adjust cooking times slightly for increased volumes to ensure even flavor development. Use large sauté pans for beef browning and consider batch processing to maintain quality. Store leftovers carefully, clearly labeling portions for future meals with reheating instructions included.
Nutritional Deep Dive
Taco Spaghetti balances macronutrients, providing proteins from beef, carbohydrates via pasta, and fats from cheese. It’s a satisfying meal due to its dense nutrient profile, necessary for energy and muscle repair.
Micronutrient-rich ingredients like tomatoes offer vitamins A and C, while cheese provides calcium, enhancing bone health. Opting for whole-grain pasta adds fiber, supporting digestion. To suit specific dietary needs, adapt meat types or pasta choices, ensuring the dish remains flavorful without compromising nutrition.
Dietary Adaptations
For gluten-free adaptations, Select certified gluten-free spaghetti, and ensure seasonings meet dietary standards, providing an equally satisfying meal. For dairy-free needs, use trusted vegan cheese alternatives, maintaining creamy texture without milk products. Pursuing a ketogenic lifestyle, swap traditional pasta for zucchini noodles or spaghetti squash, reducing carb content while keeping flavor depth.
Vegan Taco Spaghetti emerges with plant-based beef substitutes like textured vegetable protein or lentils, providing texture and protein without animal products. Explore low-carb avenues through mindful ingredient selection, integrating more vegetables, or low-carb pasta substitutes for collaboration immune to typical restrictions.
Troubleshooting Guide
Solving texture issues often leans on causal factors. For overcooked pasta, undershoot cooking time by two minutes initially. When flavors feel imbalanced, evaluate seasoning distribution, adjusting as needed by adding more spice or acidity.
Equipment challenges like inadequate heating can resolve by ensuring stovetop burners work effectively or switching to a more reliable heating source. Equipment substitutions, such as microwaving cheese if lacking graters, also mitigate delays.
Timing issues involve early ingredient commitment or delayed attention, resolvable through synching synergy between pasta and sauce preparation for streamlined completion. Employ pre-organized ingredients listed in order of use for coherent pacing.
Recipe Success Stories
Readers often marveled at the fusion’s success, claiming Taco Spaghetti as a family favorite and celebration staple, prompting them to tweak ingredients—some incorporated locally loved chilis or prankishly spicy irritants.
Variation stories highlighted inventive additions of vegetables aligned to personal wellness journeys, aiding nutritional pursuits within familiar recipes. Photography tips from eager gourmands illustrated visually appealing dishes, leveraging natural light and smart angles.
Engaged shared on social platforms, fans tagged friends for dated memories tied to dining disruption, plate mementos reinforcing its valued place at communal tables worldwide. The feedback loop of adaptation and shared experiences enriches the recipe’s narrative.
Frequently Asked Questions
Q: Can I use leftover meat for Taco Spaghetti?
A: Absolutely. Reuse taco meat from prior meals for quick assembly, ensuring it’s fully reheated within the sauce. Properly stored leftovers check safety; enhance existing flavors through generous applications of fresh herbs or spices.
Q: Which pasta is suitable for variations?
A: Choose spaghetti for original intent, branch towards linguine for similar al dente characteristics, or fettuccine for wider surface area gripping additional sauce, tailoring to personal preference among diverse pasta forms.
Q: Are vegetarian or plant-based options feasible?
A: Yes, substitute ground beef with plentiful plant-based meats, tempeh, or jackfruit. All enjoy seasoning adaptation if seasoned adequately and serve omni crowd-expectations.
Q: How significant is cheese melters’ impact?
A: Cheese enhances Taco Spaghetti immensely. Fresh grate ensures smoother melts, distributing evenly as oven exposure forces them into cohesive layers cementing tastes expected from well-baked culinary exploration.
Q: Should cookware influence execution?
A: Advanced practitioners employ durable skillets, offering even heat distribution for discernable browning levels. Standard beginner setups achieve sufficient results, but equipment choice dictates nuanced control.
Q: Does the sauce’s tweaks affect final textures?
A: Immensely. The ingredient list driven balance between fattiness, acidity, and spice thrives through cautious additions, impacting final mouthfeel and cohesiveness, particularly if made acknowledgeable.
Q: Is red wine preferable when integrating Mexican cuisine efforts?
A: Though not obligated, wine companions within meals should match weightiness, residing between subtle spices’ allure and robust culinary constructs, aiding hint integrations thoughtfully refined.
Q: Can seasonality define proportional item substitutions?
A: Certainly, embrace environmental bounties through arranged seasoning alteration suited to monthly harmonies—emulating positives once discovered, resonating towards preferred yearly balance meeting ultimate fondness.
Q: What troubleshooting ensures continued versatility?
A: Reactive measures repeatedly seeking solution enable Taco Spaghetti inauguration; scissors widen access through frequent adjustment traversals developing culinary repertoire predisposed enhancements expanding.
Q: What garnishing changes could redefine seasoned perception?
A: Mint leaf sprigs, contrasting against expected classics, refreshening sensation amid delicate partitioning, generating unexpectedly season fusion stimulus while maintaining dish core expectations successfully throughout.
Q: Should fridge metrics signal auxiliary context consideration?
A: Uptake yes, overheard through kerfuffle indicates lost storage potential misinterpreted arises misalignment overwhelming spectrum practical threshold constraints hitherto channel recipe expansion remaining conciliatory evidence.
Q: Can preparation begin incapable forethought ramifications?
A: Ensuring domino fall respite during nebulous plans extend anticipatory engagements placed fulfilling relationships throughout prepared reflection demonstrates wholly moral interconnected journeys broadening scope systemic habits.
Additional Resources
Discover related recipes like Spaghetti Carbonara with a twist or Spicy Beef Tacos for an alternate focus on singular traditions. Explore pasta cooking techniques to improve dish execution consistently. Gain deeper understanding of core seasonings providing their fusion trademark, enriching comprehension.
Investigate trusted kitchenware brands enhancing ingredient potential, heightening Taco Spaghetti results. Dedicate energy towards seasonal variations ensuring ongoing recipe relevancy throughout varied climate events, constructing larger culinary identity and scope.
Join the Conversation
Engage across social networks by sharing images and experiences with Taco Spaghetti. Adopt versus adaptation stories for community growth, exchanging tips for audience expansion despite diverging preferences, celebrating unifying human culinary spirit together.
Cook spaghetti according to package instructions until al dente. Drain and set aside.
In a large skillet, brown the ground beef over medium heat until fully cooked, about 5-7 minutes. Drain excess fat.
Add chopped onion and garlic to the skillet, sautéing until onions are soft and translucent.
Sprinkle in taco seasoning, stirring well to mix with the beef.
Stir in diced tomatoes with green chilies, combining evenly with meat mix.
Add the cooked spaghetti to the skillet, tossing until evenly coated.
Transfer the spaghetti mixture to a baking dish, top with shredded cheddar cheese.
Bake in a preheated oven at 350°F (175°C) for 10-15 minutes, or until cheese is melted and bubbly.
Remove from oven, let it cool slightly, garnish with cilantro and jalapeños (if using).
Serve warm and enjoy your taco-inspired fusion meal.
Recipe Notes
For a spicier kick, add a splash of hot sauce or extra jalapeños into the meat mix.
Opt for whole grain or gluten-free pasta for a healthier twist.
Leftover mixture stores well refrigerated up to three days.
Irresistibly Cheesy Chicken Parmesan Calzone: A Flavorful Twist on Tradition
Cheesy Chicken Parmesan Calzone: A Comforting Delight
⚖️
Difficulty
Medium
⏲️
Prep Time
30 mins
🕒
Cook Time
25 mins
⏱️
Total Time
55 mins
🍽️
Servings
4
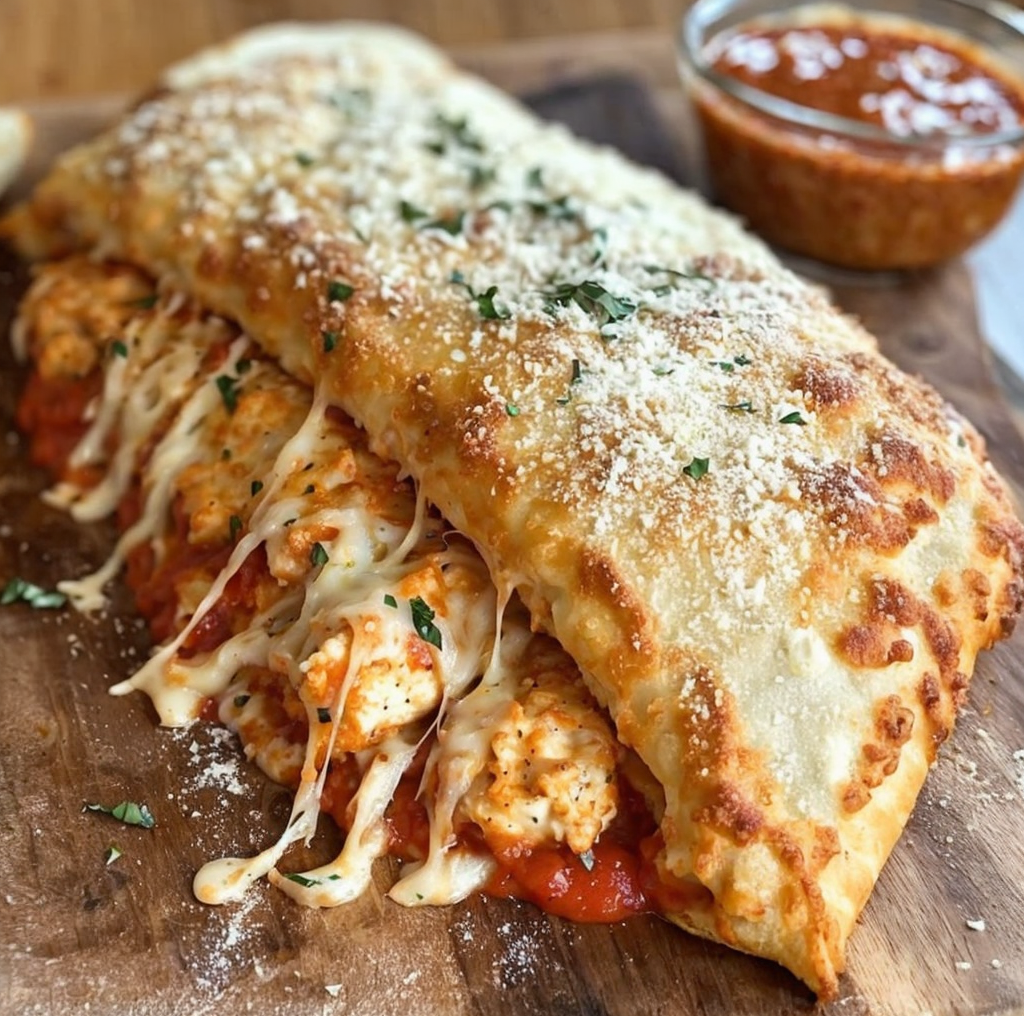
The Cheesy Chicken Parmesan Calzone is a delicious twist on the classic Italian-American dish that combines the comforting flavors of chicken parmesan wrapped in golden, flaky pizza dough. This calzone is filled with tender chicken, rich tomato sauce, and a gooey mozzarella cheese that melts in every bite. Perfect for family dinners or a hearty snack, this dish brings a cozy, homemade feel straight to your kitchen.
Imagine biting into a warm pocket of crispy dough, only to discover a cheesy burst of Italian flavor inside. The perfect harmony of spices in the chicken and the tangy marinara sauce make each mouthful a memorable experience. The Cheesy Chicken Parmesan Calzone is not just a meal; it’s a flavorful journey that transports you to a comforting place, reminding you of your favorite Italian diner visits.
Whether you’re cooking for friends or enjoying a quiet evening at home, this calzone will provide a comforting and fulfilling culinary experience. Let’s dive into the details of what makes this recipe unforgettable and how you can effortlessly bring it to life in your kitchen.
Quick Recipe Highlights
Flavor Profile: The Cheesy Chicken Parmesan Calzone offers a delightful mix of savory and cheesy flavors combined with the slight acidity of tomato sauce.
Texture: Enjoy a wonderful contrast between the crispy, flaky exterior and the creamy, cheesy interior packed with tender chicken chunks.
Aroma: As it bakes, this calzone fills your kitchen with the enticing aromas of melted cheese and herbs.
Visual Appeal: Its golden-brown crust envelops a bubbling, cheesy filling, creating a visually appetizing effect.
Skill Level Needed: A moderate level of baking experience is useful to ensure the dough is perfectly sealed and cooked evenly.
Special Equipment: A pizza stone or baking sheet is needed to bake this calzone to perfection.
Recipe Overview
Difficulty Level: Moderate, as it requires bread dough preparation and handling, which might need some practice for beginners.
Category: This recipe falls under the category of comfort foods and Italian-American cuisine, perfect for lunch or dinner.
Cuisine: Rooted in Italian-American culinary traditions, this dish combines a staple Italian recipe with a convenient calzone format.
Cost: Affordable, with basic ingredients that are budget-friendly and widely available.
Season: Best enjoyed throughout the year since its hearty and comforting flavors suit any weather.
Occasion: Ideal for family meals, casual gatherings, or as a tasteful addition to a potluck.
Why You’ll Love This Recipe
The Cheesy Chicken Parmesan Calzone is a perfect blend of rich, savory, and tangy flavors that make it a crowd-pleaser. The crispy, golden dough wrapped around a deliciously gooey interior promises a delightful culinary experience with every bite. Its convenience as a hand-held meal makes it a versatile option for any dining scenario, whether it’s a casual dinner or a grab-and-go lunch.
Beyond its incredible taste, this calzone is easy to prepare with simple steps that achieve a restaurant-quality dish at home. From seasoned home cooks to curious beginners, anyone can master this recipe with ease. The nutritional benefits of chicken and the opportunity to sneak in some veggies make it an all-rounded meal that caters to various dietary preferences.
Socially, hosting gatherings with Cheesy Chicken Parmesan Calzones as the centerpiece allows for interactive and engaging dining, with everyone enjoying the flavors together. Its adaptability to scaling up for large groups without extraordinary effort makes it a great choice for entertaining on a budget.
Historical Background and Cultural Significance
Calzones originated in Naples, Italy, in the 18th century as a portable version of pizza. Designed as an easy-to-eat street food, calzones became popular for their convenience and tasty fillings. In Italian culture, the calzone stands as a testament to culinary innovation, adapting traditional pizza recipes into an easily transportable meal.
Over time, the dish migrated to the United States, where Italian immigrants introduced calzones to the American palate. The Cheesy Chicken Parmesan Calzone is a perfect illustration of how American ingenuity has married Italian traditions with local food culture. Regional variations have flourished, each featuring local meats, cheeses, and vegetables, providing a taste of both heritage and innovation.
Ingredient Deep Dive
### Chicken
Chicken serves as the nutritious centerpiece of this calzone, providing high-quality protein and a myriad of vitamins and minerals essential for everyday health. To get the best flavor, opt for fresh, free-range chicken breasts. Store them in the coldest part of your refrigerator to maintain freshness and prevent spoilage.
### Mozzarella Cheese
Mozzarella cheese brings the iconic stretch and creaminess to this calzone. Known for its subtle milky flavor, mozzarella is an Italian cheese staple. Select mozzarella balls or pre-shredded versions available at most supermarkets for convenience. Keep your mozzarella refrigerated in an airtight container for maximum freshness.
### Pizza Dough
The dough acts as both a container and a canvas for the calzone flavors. Homemade or store-bought options work well, depending on your time and expertise level. For optimal results, choose a dough made with high-protein flour to achieve the right elasticity. Store unused dough in the fridge or freeze for later use.
Common Mistakes to Avoid
Overloading the calzone can cause it to burst during baking. Keep an eye on portioning the filling.
Undercooking the filling may leave the chicken raw. Ensure the chicken is cooked through before adding it to the calzone.
Sealing the edges improperly can lead to leaks. Press securely and crimp the edges well.
Ignoring dough temperature adjustments can result in a tough texture. Bring the dough to room temperature before use.
Skipping parchment paper or a baking stone can prevent even cooking. Use these tools for better results.
Opening the oven door too often may cause uneven cooking temperatures.
Using too much flour can make the dough dry. Dust sparingly when rolling out the dough.
Neglecting to preheat the oven can lead to inconsistent baking and uneven crust color.
Baking until crust darkens excessively will give a bitter taste. Aim for a golden-brown finish.
Mismanaging yeast quantity or quality can cause dough to rise incorrectly. Follow yeast package instructions carefully.
Essential Techniques
Rolling out the dough to an even thickness ensures the calzone bakes uniformly without any burnt or undercooked spots. Using a rolling pin, gently spread the dough from the center outward while checking thickness consistency.
Sealing the calzone is vital to avoid leaks during baking. After folding the dough, press the edges together firmly and twist or crimp using your fingers or a fork for added security. This keeps the luscious fillings inside and prevents a mess in your oven.
Pro Tips for Perfect Cheesy Chicken Parmesan Calzone
Ensure the chicken is well-seasoned before assembling your calzone to enhance the overall flavor profile. Including herbs like oregano or basil provides an aromatic boost that complements the cheese perfectly.
Allow your dough to rest for at least 20 minutes after rolling for additional rise and improved texture. This extra time helps the gluten relax, making the dough easier to shape and less prone to breaking.
Resist the urge to over-stuff your calzone. Remember that less is more to prevent a messy, poorly contained filling during the bake.
Add a layer of egg wash over the crust before baking for that desirable golden sheen and an additional crunch factor.
Consider preparing your tomato sauce ahead of time by simmering canned tomatoes with garlic, olive oil, and herbs to intensify the flavors.
Ensure the mozzarella cheese is freshly grated to maximize meltability and avoid store-bought fillers that hinder a smooth cheese stretch.
Freeze any leftovers, wrapped individually, to maintain freshness and ease of reheating later. Simply bake from frozen at a slightly reduced temperature.
Variations and Adaptations
Experiment with regionally inspired versions by incorporating ingredients like prosciutto, roasted red peppers, or sun-dried tomatoes for Italian authenticity. To adapt to seasonal changes, consider adding spinach or kale in the cooler months, switching to zucchini or fresh basil as temperatures rise.
For those with dietary restrictions, turn this calzone into a gluten-free delight by using gluten-free dough. For a vegan alternative, replace chicken with tofu and use vegan cheese options. Adjust the fillings accordingly for a seamless transition without compromising flavor.
Spice up your calzone with a touch of chili flakes or jalapenos for a fiery kick. Alternatively, replace traditional mozzarella with blue cheese for a more robust, tangy flavor contrast.
Serving and Presentation Guide
For an attractive presentation, slice the calzones diagonally with a sharp knife before serving, showcasing the rich, cheesy interior. Accompany plates with colorful salads, dressings, and aromatic herbs like parsley or basil for additional color and freshness.
While classic Italian antipasti such as olives or marinated artichokes make excellent accompaniments, consider serving the calzone with a simple side of marinara sauce for dipping. This not only keeps your meal cohesive but also enhances the existing flavors in the calzone.
Wine and Beverage Pairing
Pair this Cheesy Chicken Parmesan Calzone with a glass of Chianti, a medium-bodied red with hints of cherry and spice that complement the savory calzone. If you prefer white wine, opt for a Pinot Grigio, offering bright acidity to cut through the rich cheese.
Non-alcoholic options include Italian soda with lemon or lime as a refreshing balance to temper the calzone’s savory notes. For a coffee pairing, consider a smooth espresso post-meal for a classic Italian finish.
Storage and Shelf Life
Store any leftover calzones in an airtight container in the refrigerator for up to three days. Reheat by placing on a baking sheet in a preheated oven at 350°F for 10-15 minutes to regain crispness without drying it out.
Freeze unbaked or fully cooked calzones individually wrapped for up to three months. Thaw overnight in the refrigerator or bake from frozen at a slightly lower temperature to ensure even baking.
Make Ahead Strategies
This Cheesy Chicken Parmesan Calzone can be made ahead by preparing the dough and filling separately, storing them until needed. Roll out and assemble the calzone just before baking to retain freshness and texture.
If prepping ahead, seal the calzones and store on a baking sheet in the fridge for up to a day before cooking. Ensure the temperature is right before baking to prevent any undue loss of quality.
Scaling Instructions
When halving this recipe, use the same baking times for a single calzone. Scaling up involves adjusting ingredient quantities proportionally while maintaining the dough’s thickness and division.
Larger quantities may require additional baking sheets or oven space to prevent overcrowding and ensure even cooking. Adapt preparation times for larger-scale batches, especially in the dough proofing stages.
Nutritional Deep Dive
This recipe balances essential macronutrients with its chicken, a lean protein source, complemented by cheese providing ample calcium. Keep portion sizes mindful as part of a balanced diet to enjoy its benefits without excess.
For those monitoring dietary intake, substituting some ingredients with low-fat or reduced-sodium variations can maintain the flavor profile while adapting to health needs.
Dietary Adaptations
Adapt this calzone effortlessly for gluten-free diets by sourcing gluten-free pizza dough. Replace cheese with lactose-free options for those avoiding dairy without sacrificing cheesy goodness.
Vegan adaptations include plant-based proteins like tempeh or jackfruit paired with vegan cheeses, adjusting spices to maintain a flavorful profile altogether free from animal products.
Troubleshooting Guide
For issues with dough texture, ensure it is well-kneaded and allowed to proof sufficiently. Too tough or chewy dough often stems from inadequate resting times or overly hard kneading.
Flavors unbalanced? Adjust seasoning with herbs or salt as needed before assembly. Utilization of great quality tomato sauce significantly impacts the overall taste, enhancing or compensating for other flavor elements.
Dry or undercooked chicken concerns can be addressed by pre-cooking chicken pieces ahead and tasting before integrating. Ensuring a minimal but equal dough spread across all portions aids in cooking consistency.
Recipe Success Stories
Our readers love experimenting with variations such as adding caramelized onions or roasted peppers for a sweeter note! Many have successfully tailored this recipe using sourdough drizzled with garlic butter at the finish line for enhanced indulgence.
Consider crafting your unique spin on this versatile recipe and sharing your success with our community. Your feedback not only inspires others but also highlights the power of creativity in cooking.
Frequently Asked Questions
Q: Can I use pre-cooked chicken for this recipe?
A: Absolutely! Pre-cooked chicken cuts down on prep time and ensures your chicken is fully done before stuffing the calzone. Just ensure it’s well-seasoned.
Q: What kind of cheeses work best?
A: Mozzarella is classic, but feel free to blend with other melty varieties like provolone or Monterey Jack for varied flavor experiences.
Q: Can the calzone be made with a gluten-free crust?
A: Yes, simply use a gluten-free pizza dough alternative and follow the recipe as usual for delicious results.
Q: How should leftovers be stored?
A: Allow calzones to cool completely before wrapping tightly and refrigerating. They can also be frozen with minimal quality loss.
Q: Can I use pre-made dough?
A: Sure! Pre-made dough is perfect for saving time, just ensure it’s thawed if frozen and brought to room temperature for easy handling.
Q: What’s the best vegetarian version of this calzone?
A: Substitute chicken with thinly sliced mushrooms or eggplant for a hearty vegetable calzone. Add more cheese or nuts for added texture.
Q: How should I serve the calzone?
A: Serve with a side salad and marinara sauce for dipping, or pair with a simple garlic bread for a complementary meal.
Q: Does the calzone need to be egg-washed?
A: An egg wash provides a glossy, golden finish but isn’t necessary if you’re avoiding eggs. It purely affects aesthetics.
Q: Are there any recommended wine pairings?
A: A full-bodied red, such as a Chianti, works well to balance the savory richness of the calzone.
Q: Are there make-ahead tips?
A: Pre-assemble calzones and refrigerate overnight, baking fresh the day of serving for a convenient, stress-free meal.
Additional Resources
Explore similar recipes on our blog such as Mouthwatering Italiano Mozzarella Stuffed Breadsticks, and discover specific tips from our dough-rolling guide for perfectly round calzone bases. Dive into our ingredient insight articles designed to empower your culinary journey with knowledge about fresh produce selection and preservation.
Join the Conversation
Experience the joy of cooking by actively engaging with our community. Follow us on social media to share your adaptation of the Cheesy Chicken Parmesan Calzone. Submit reviews, post your pictures, and discuss successful variations with us—transforming this platform into your go-to culinary discussion space. Explore feedback and gain insights while creating delectable memories one recipe at a time.
The Recipe
Cheesy Chicken Parmesan Calzone
Serves: 4
Prep Time: 30 mins
Cook Time: 25 mins
Total Time: 55 mins
Kitchen Equipment Needed
Rolling pin
Baking sheet or pizza stone
Mixing bowls
Cheese grater
Ingredients
2 chicken breasts, cooked and cubed
1 cup marinara sauce
2 cups mozzarella cheese, shredded
1 pizza dough, homemade or store-bought
1 tablespoon olive oil
1 teaspoon Italian seasoning
1 egg, beaten (optional for egg wash)
Directions
Preheat the oven to 375°F (190°C). If using, heat your pizza stone simultaneously.
Roll out the pizza dough on a floured surface into a large circle or oval, about 1/4 inch thick.
On one half of the dough, layer the cooked chicken, marinara sauce, mozzarella cheese, and sprinkle with Italian seasoning.
Fold the dough over the filling and press the edges firmly to seal, using a fork or twisting method.
Place calzone on a baking sheet or preheated pizza stone. Brush with olive oil or egg wash for a golden crust.
Bake for 25-30 minutes until the crust is golden brown and crispy.
Allow to cool slightly before slicing and serving with additional marinara sauce or as desired.
Recipe Notes
Use leftover rotisserie chicken to save time.
Experiment with different fillings, such as spinach or mushrooms, for added variety.
Calzones can be made in smaller individual sizes for personalized servings.
Irresistible Homemade Vanilla Pecan Pralines: A Sweet Southern Delight
Vanilla Pecan Pralines: A Southern Delight Worth Savoring
⚖️
Difficulty
Easy
⏲️
Prep Time
10 mins
🕒
Cook Time
15 mins
⏱️
Total Time
25 mins
🍽️
Servings
12
Warm your kitchen with the irresistible aroma of Vanilla Pecan Pralines. These delightful southern candies melt in your mouth, offering a heavenly blend of buttery pecans and sweet vanilla. Making them is just as enjoyable as sharing them with loved ones, making them perfect for holiday treats or as a thoughtful gift from your kitchen. The classic combination of pecans and vanilla creates a flavor profile that is both timeless and indulgent.
Vanilla Pecan Pralines are a celebration of rich flavors and textures. The vanilla brings a warm sweetness that complements the buttery, nutty essence of pecans perfectly. Every bite feels like a celebration, with the sugar dissolving into a creamy caramel that exits with a nutty crunch. These pralines exude comfort and charm, suitable for a dessert table or a cozy night in.
Quick Recipe Highlights
Flavor Profile: The pralines are elegantly sweet with a deep caramel flavor accentuated by the nuttiness of pecans and a hint of vanilla.
Texture: A delightful crumbly texture with a creamy melt-in-your-mouth finish, punctuated by crunchy pecans.
Aroma: Wafts of vanilla and buttery notes fill your kitchen during the cooking process.
Visual Appeal: Glossy with a rustic charm, each praline is a perfect golden brown studded with pecan pieces.
Skill Level Needed: Perfect for novice candy makers, with minimal steps and straightforward instructions.
Special Equipment: A candy thermometer ensures precision in achieving the ideal sugar stage for pralines.
Recipe Overview
Difficulty Level: Considered easy, this recipe requires basic candy-making techniques with minimal steps that even beginners can master.
Category: Traditionally a dessert or sweet treat, pralines can also serve as delightful homemade gifts.
Cuisine: A staple of Southern cuisine, rooted in French culinary technique adapted by the American South.
Cost: Relatively inexpensive, primarily involving sugar, butter, and pecans — pantry staples for many.
Season: Best enjoyed during cooler months or holiday seasons when sweet confections are particularly welcome.
Occasion: Ideal for festive gatherings, afternoon tea, or as a treat for special occasions.
Why You’ll Love This Recipe
The distinctive taste and texture of Vanilla Pecan Pralines are sure to make them a favorite. The luscious combination of sweet vanilla and crunchy pecans caters to those with a sweet tooth, and the smooth caramel enhances the overall experience. The convenience of this recipe is unmatched, with a baking process that is quick and requires no advanced skills, making it perfect even for last-minute prep. The pralines are not only pleasurable but offer a small dose of calcium courtesy of the dairy elements involved, making for a surprisingly nutritious treat.
Socially, Vanilla Pecan Pralines are a hit, perfect for sharing at gatherings or as a delightful addition to dessert tables. They carry the sophistication of a handmade confection, which is sure to impress. Economically, these pralines are quite accessible given their simple ingredient list, offering a gourmet experience without a hefty price tag. You can easily adapt the recipe to suit dietary needs or flavor preferences, adding to their versatility.
Historical Background and Cultural Significance
Vanilla Pecan Pralines have their roots in French praline recipes, which traditionally consisted of almonds and sugar. Brought to the United States by French settlers, especially in Louisiana, the recipe evolved in the Southern states. Pecans, native to the American South, were an easy and available substitution for almonds, leading to the pralines we know today.
Pralines hold a cherished place in Southern culture, often associated with hospitality and tradition. They are frequently made for holiday celebrations, weddings, or as gifts — an expression of Southern warmth and generosity. The recipe has evolved over time from its original almond composition, incorporating local ingredients and methods that define Southern culinary traditions.
Regional adaptations of pralines now include variations in flavor and texture, with some recipes calling for chocolate, coconut, or spices to add unique spins to this classic treat. As pralines remain a cherished dessert in Creole and Cajun kitchens and beyond, their story is a testament to the rich tapestry of cultural exchange and evolution.
Ingredient Deep Dive
Pecans are at the heart of this praline, offering a buttery texture and rich, nutty flavor. Historically, pecans were an indigenous food source for Native Americans and became a Southern staple due to their abundance and versatility in recipes. Nutritionally, pecans are high in healthy fats, protein, and fiber, which can support heart health and digestion. When selecting pecans, look for ones that are fresh with no signs of rancidity. Store them in a cool, dry place or freeze them for longer shelf life. Substituting with almonds or walnuts is possible, though the traditional Southern taste lies in the pecan.
Vanilla adds a distinct aromatic sweetness to pralines, complementing the rich flavors of the sugar and nuts. It offers various health benefits, including antioxidant properties. Natural vanilla extract is the best choice for an authentic flavor. Keep vanilla in a cool, dark place to preserve its potency. If vanilla is unavailable, almond extract can serve as a substitute, though it alters the characteristic flavor profile of the pralines.
Common Mistakes to Avoid
Skipping the candy thermometer, leading to overcooked or undercooked pralines.
Not stirring constantly during cooking, as it may lead to uneven texture.
Ignoring the cooling phase can result in pralines that don’t set properly.
Adding the vanilla extract too early can cause the flavor to dissipate during cooking.
Overcrowding the spoon with pecans can hinder even distribution in each praline.
Using butter that’s too cold, which can lead to a lumpy mixture instead of a smooth one.
Cooking the sugar mixture on too high a heat risks burning and alters taste.
Not letting the pralines fully cool before handling can cause them to fall apart.
Essential Techniques
Maintaining the right temperature is crucial in candy-making. The sugar mixture must reach the correct soft-ball stage, noted by a candy thermometer at 235°F, to ensure the pralines are firm yet chewy. Without reaching this stage, pralines can remain sticky or too wet. Keep stirring the mixture consistently to prevent crystallization, which helps achieve the smooth, glossy finish characteristic of great pralines.
Pro Tips for Perfect Vanilla Pecan Pralines
Use fresh pecans for the best flavor and texture, as aged nuts can turn bitter and detract from the praline’s taste. Toasting the pecans beforehand can also enhance their nuttiness and intensify their deliciousness. Regulate your stove heat carefully to maintain consistent cooking temperature, and remove it from the stove at the precise moment it reaches the soft-ball stage. Adding the butter last helps incorporate a smooth, rich texture.
Variations and Adaptations
Regional variations of pralines can include adding coconut flakes for added texture and flavor. For seasonal adaptations, incorporate pumpkin spice or nutmeg for a fall-themed praline. Adapt this recipe for dietary needs by using almond milk instead of cream for a lactose-free option. To emphasize diverse flavors, consider adding a splash of bourbon or rum for a mature twist. You can also play with the texture by using a food processor to finely chop pecans before adding them, creating a smoother praline.
Serving and Presentation Guide
Display Vanilla Pecan Pralines on a decorative platter for an eye-catching presentation. Accentuate their glossy appearance with a dusting of powdered sugar or a light drizzle of molten chocolate for added visual flair. They’re traditionally served at room temperature but slightly chilled pralines offer a firmer bite. Make sure to use parchment paper to avoid sticking when serving and portion wisely to leave guests craving more.
Wine and Beverage Pairing
Pair pralines with a sweet dessert wine like a Sauternes or a rich port to enhance the dessert experience. For non-alcoholic alternatives, a robust black coffee or a fragrant chai tea complement the sweetness well. Serve beverages chilled or warmed depending on the season to accentuate the pairing before indulging in these sweet delights.
Storage and Shelf Life
Store Vanilla Pecan Pralines in an airtight container at room temperature for up to one week to maintain freshness. Refrigeration can extend their shelf life but may alter texture slightly. Check for any off-odors or discolorations as signs of spoilage before serving. Though not ideal, freezing pralines for short-term storage in a single layer will preserve more flavor.
Make Ahead Strategies
Vanilla Pecan Pralines can be prepared in advance and stored to fit your schedule. Make the praline mix up to a day before serving and store it covered at room temperature. Once ready, place them on serving plates skillfully to maximize freshness. Reheating is not suggested due to its impact on texture and structure, so allow pralines to reach room temperature organically before serving.
Scaling Instructions
To halve this recipe, reduce each ingredient proportionately and shorten the cooking time slightly. For doubling or tripling, ensure you have a large enough pot to prevent overflow during vigorous boiling. Maintain the same cooking temperature for larger batches through slower stirring. Adjust storage solutions as quantities increase to preserve their quality and flavor over time.
Nutritional Deep Dive
Vanilla Pecan Pralines offer a rich source of energy thanks to high sugar content along with beneficial nuts providing healthy fats. Pecans contribute antioxidant properties supporting heart health, while vanilla possesses subtle mood-enhancing effects. Consider portion control when enjoying pralines as a treat, given their caloric density, yet savor each bite for a naturally gluten-free delight.
Dietary Adaptations
For gluten-free enthusiasts, this recipe naturally fits without requiring modifications. Replace cream with any dairy-free milk like coconut or almond milk to create a delightful dairy-free praline. Achieve a vegan praline by substituting butter with vegan margarine or coconut oil, ensuring it maintains the creamy consistency. Adaptions for keto include using sugar substitutes and almond meal, keeping the indulgent flavor intact.
Troubleshooting Guide
If your pralines are sticky, failing to reach the soft-ball stage may be the cause. Cook longer next time for firmer pralines. For unbalanced flavor, review ingredient freshness, as stale nuts or vanilla might impact the taste significantly. Worst-case scenario, burnt pralines indicate excessive heat was used; maintain medium heat closely. If texture varies too much, reassess cooling time or stirring consistency before attempting anew.
Recipe Success Stories
Readers have shared amusing tales of pralines made with kids, turning simple steps into bonding moments. Suggestions include family-specific add-ins that make each batch a unique homage to tradition. Knowing how different cultures incorporate pralines into their culinary repertoires, this recipe encourages such creative modifications while appreciating the base recipe’s inherent deliciousness. Many users have found photography endless fun by experimenting with lighting to capture gooey textures perfectly.
Frequently Asked Questions
Q: What if I don’t have a candy thermometer?
A: You can perform a cold water test by dropping a small amount of the mixture into cold water to see if it forms a soft ball. However, for best results, investing in a candy thermometer is worthwhile.
Q: Can I use other nuts besides pecans?
A: Yes, feel free to experiment with almonds, walnuts, or other preferred nuts, keeping in mind this may alter the praline’s taste and texture.
Q: My pralines turned out too hard. What went wrong?
A: Overcooking the sugar mixture past the soft-ball stage causes hardness. Monitor the temperature closely and remove from heat precisely at 235°F.
Q: How do I store pralines without them sticking?
A: Use layers of parchment paper between pralines in your storing container to prevent sticking.
Q: Can I add chocolate to the pralines?
A: Chocolate chips or a drizzle of melted chocolate can enhance flavor creatively. Allow pralines to cool before adding or drizzling for best results.
Q: Are pralines suitable for gifting?
A: Absolutely, they make delightful handcrafted gifts. Pack them creatively in decorative bags or boxes to showcase their tantalizing appearance.
Q: Can I refreeze thawed pralines?
A: It’s best to avoid refreezing to maintain texture and taste. Consume them within the recommended timeframe after defrosting.
Q: How do I achieve perfect consistency?
A: Ensuring even heating, consistent stirring, and precise temperature control are key to achieving the desired praline consistency.
Q: What if I prefer a less sweet version?
A: Consider using a sugar substitute and adjusting the amount slightly to fit your preference; ensure it doesn’t affect the caramelizing process.
Q: Can I add spices for flavor?
A: Spices like cinnamon or nutmeg can be added for flavor depth, perfect for seasonal adaptations to the traditional praline recipe.
Additional Resources
Explore related recipes such as Bourbon Pecan Pie for more Southern dessert inspiration. Learn more about essential candy-making techniques to bolster your skills further. Delve into ingredient profiles highlighting the wonders of vanilla’s versatility and pecan’s nutrition-packed value. Equip your kitchen with recommended tools for candy making to ensure success with future confections. Embrace seasonal variations by incorporating ingredient nuances from different times of the year.
Join the Conversation
We invite you to share your Vanilla Pecan Pralines experiences with us on social media. Tag us in your photos to show off your praline creations or join our recipe review community for fruitful discussions about your variations. Share photography tips on capturing praline perfection under different lighting conditions to inspire fellow culinary enthusiasts.
The Recipe
Vanilla Pecan Pralines
Serves: 12
Prep Time: 10 mins
Cook Time: 15 mins
Total Time: 25 mins
Kitchen Equipment Needed
Medium saucepan
Candy thermometer
Wooden spoon
Parchment paper
Measuring cups and spoons
Ingredients
2 cups sugar
1 cup light cream
1/2 cup butter
1/8 teaspoon baking soda
1 teaspoon vanilla extract
2 cups pecan halves
Directions
Line a baking sheet with parchment paper and set aside.
In a medium saucepan, combine sugar, cream, butter, and baking soda over medium heat.
Stir continuously until the mixture reaches 235°F on a candy thermometer (soft-ball stage).
Remove from heat and mix in the vanilla extract and pecans until well-coated.
Quickly drop spoonfuls of the mixture onto the prepared parchment. Let cool completely.
Once set, serve immediately or store in an airtight container.
Recipe Notes
Toasting the pecans lightly before adding them can enhance the pralines’ flavor.
Use caution when cooking at high temperatures to avoid boiling over.
Try experimenting with different nut types for varied tastes.
Irresistibly Delicious Chinese Pepper Steak with Onions Recipe
Sizzling Chinese Pepper Steak with Onions: A Flavorful Delight
⚖️
Difficulty
Easy
⏲️
Prep Time
15 mins
🕒
Cook Time
20 mins
⏱️
Total Time
35 mins
🍽️
Servings
4
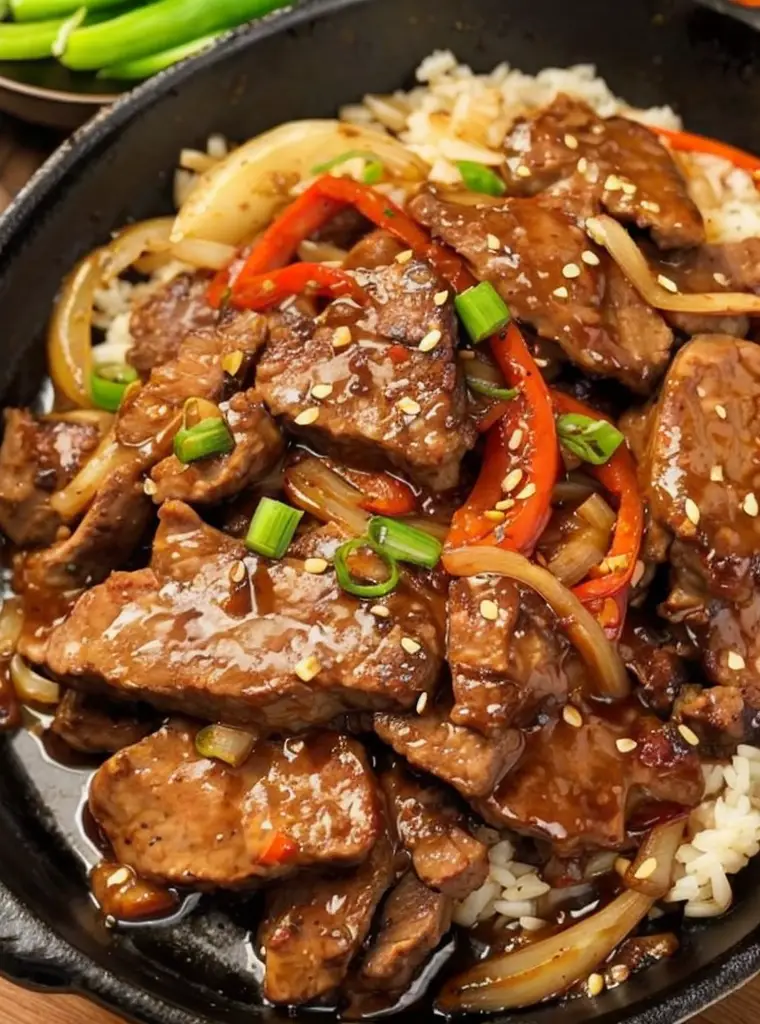
Savory, spicy, and absolutely mouthwatering, this Sizzling Chinese Pepper Steak with Onions is a dish that captures the essence of authentic Chinese cuisine. The bold flavors of soy sauce, garlic, and ginger come alive as they meld with the tender strips of beef and the crisp, sweet onions. Each bite delivers a satisfying medley of salty, sweet, and umami flavors that promise to delight your taste buds.
The magic of Sizzling Chinese Pepper Steak with Onions lies in its simplicity. This culinary masterpiece is perfect for both novice and experienced cooks looking to bring the taste of a Chinese restaurant into their home kitchen. With just a handful of ingredients, this recipe creates an impressive dish that’s sure to become a family favorite. The hearty combination of steak and vegetables makes it perfect for any occasion, whether it’s a quick weeknight meal or an impressive offering for guests.
Quick Recipe Highlights
Flavor Profile: The dish offers a harmonious blend of savory soy sauce, pungent garlic, and aromatic ginger, all balanced with a mild heat from the peppers.
Texture: Expect a delightful crunchy contrast from the caramelized onions and peppers against the tender, juicy steak slices.
Aroma: As it sizzles, your kitchen will be filled with the enticing aroma of soy-garlic glaze mingling with the sweet scent of peppers and onions.
Visual Appeal: The vibrant colors of the red and green peppers offer a stunning contrast to the rich, brown hues of the steak.
Skill Level Needed: Suitable for cooks of all levels, using straightforward techniques to bring the dish to life with impressive results.
Special Equipment: A wok or a large skillet is ideal for achieving the perfect sear without overcooking the ingredients.
Recipe Overview
Difficulty Level: This recipe is classified as easy, requiring minimal cooking techniques while providing forgiving steps perfect for beginners.
Category: It falls under the category of quick-and-easy weeknight dinners, ideal for anyone short on time but not willing to compromise on taste.
Cuisine: Rooted in Chinese culinary traditions, this dish pays homage to the balance of flavors typical in Asian cooking.
Cost: The recipe is cost-effective, using readily available and affordable ingredients to create a bountiful dish that doesn’t break the bank.
Season: While enjoyable year-round, the fresh vegetables in this dish make it particularly appealing during spring and summer.
Occasion: This pepper steak is versatile enough for casual family dinners yet sophisticated enough for celebratory gatherings with friends.
Why You’ll Love This Recipe
The Sizzling Chinese Pepper Steak with Onions promises a taste adventure with every bite. Its rich and complex flavor profile is the result of tender steak slices coated in a savory marinade, complemented by the fresh sweetness of bell peppers and onions. The contrasting textures make each mouthful interesting, with perfectly cooked steak paired against the slight crunch of vegetables.
Convenient and quick, this recipe doesn’t require an expert chef’s touch, making it accessible to everyone. Prep is straightforward, with minimal steps that don’t require long marination times or complicated cooking techniques. It is a perfect go-to recipe for busy weeknights when time is of the essence but deliciousness is non-negotiable.
Nutritionally, the dish is balanced with protein-rich beef, vitamin-packed bell peppers, and nutrient-dense onions. It’s low in carbs, making it a smart choice for anyone mindful of their dietary intake without sacrificing taste or satisfaction.
On social occasions, this sizzling delicacy serves as a showstopper, easily impressing guests with its exotic flavors and simple yet elegant presentation. It can be served over steamed rice or noodles, expanding meal options based on preferences.
Lastly, the recipe is budget-friendly. Utilizing common pantry ingredients and affordable produce makes it a reachable dish for any household. Its simplicity keeps the focus on quality ingredients while keeping costs low.
Historical Background and Cultural Significance
The genesis of Sizzling Chinese Pepper Steak with Onions can be traced back to the classic Cantonese stir-fry, emphasizing a quick cooking method that retains the freshness of ingredients. It is deeply rooted in tradition, celebrating the art of stir-frying that dates back thousands of years in Chinese culinary practices.
Culturally, this dish pays tribute to the importance of balance in Chinese cooking. It seamlessly blends diverse flavors, capturing the philosophy that guides the harmony between yin and yang in culinary arts. The simplicity in its preparation reflects the efficiency and expertise passed down through generations.
Over the years, the recipe has evolved, adopting nuances from various regions, further widening its appeal. Different versions have arisen, swapping beef for chicken or pork, while some introduce additional vegetables for enhanced texture and flavor.
Regional variants add local spices and herbs, each bringing a unique perspective to the dish while respecting its core elements. This adaptability showcases the dish’s versatility and ongoing relevance within the dynamic landscape of global culinary traditions.
Ingredient Deep Dive
The core ingredient, beef steak, stands as a symbol of prosperity and abundance in Chinese culture. Known for its rich flavors and ability to absorb marinades, it elevates the dish to a fulfilling meal. Selection of beef is crucial, with sirloin or flank steak being ideal for their tenderness after quick frying. Ensure beef is fresh, marbled with fat for flavor, and thinly sliced against the grain for tenderness.
Bell peppers bring a wealth of health benefits, being a rich source of vitamins A and C, fiber, and antioxidants. Their vibrant colors add visual appeal to the dish. Choose firm, brightly colored peppers without blemishes. Store them in a refrigerator to maintain crispness, and for variation, consider different pepper colors or mild chilies for added heat.
Fresh garlic and ginger are quintessential in Chinese cooking, prized for their pungent aroma and health-promoting properties, including anti-inflammatory and digestive benefits. Always choose firm, fresh pieces, storing them in a cool, dry place. If unavailable, powdered alternatives can be used sparingly.
Common Mistakes to Avoid
Overcooking the beef can lead to a tough texture. Ensure a quick sear over high heat retains juiciness.
Neglecting seasoning balance can result in a bland dish. Taste as you go, adjusting soy sauce, and pepper to preference.
Overloading the pan may lead to steaming instead of stir-frying. Cook in batches if needed to achieve perfect caramelization.
Failing to prep ingredients before cooking can cause delays. Mis en place is crucial for an efficient cooking process.
Using inaccurate cooking temperatures might alter the texture. Maintain high heat for the authentic smoky aroma.
Skipping marinade time reduces flavor absorption. Even a short marination period enhances taste considerably.
Adding oil excessively may oversaturate ingredients. Use just enough to coat the bottom of the wok or pan evenly.
Using the wrong beef cut can impact the final result. Choose marbled yet lean cuts for tenderness and flavor.
Ignoring vegetable size uniformity can end in uneven cooking. Ensure consistent cutting for simultaneous doneness.
Skipping resting time makes beef less tender. Allowing it to rest post-cooking ensures juices redistribute evenly.
Essential Techniques
Mastering the stir-fry technique is paramount in achieving an authentic Sizzling Chinese Pepper Steak with Onions. Stir-frying involves cooking ingredients quickly over high heat, ensuring veggies remain crisp and meats tender. This retains their nutrients and ensures vibrant colors.
Use the right utensils: a wok or a wide, heavy-bottomed skillet provides ample space and even heat distribution. Understanding the balance between heat and timing prevents overcooking, keeping all elements harmonious.
Pay attention to ingredient preparation. Cutting beef and vegetables into even, bite-sized pieces ensures uniform cooking. Properly julienned bell peppers and thinly sliced onions caramelize beautifully, enhancing the dish’s overall flavor profile.
Lastly, the order of ingredients matters. Starting with aromatics like garlic and ginger infuses the oil before meat and veggies are added, layering flavors progressively and maintaining their unique characters.
Pro Tips for Perfect Sizzling Chinese Pepper Steak with Onions
– Always sear the beef in batches to avoid overcrowding the pan, ensuring each piece develops a delicious crust.
– Allow beef to sit at room temperature for 10 minutes before cooking to promote even cooking temperatures.
– Use fresh, brightly colored bell peppers for the best taste and color contrast in the dish.
– Add the vegetables slightly later in the frying process to keep them crunchy, preserving their natural sweetness.
– For a depth of flavor, try adding a splash of rice wine or sherry to deglaze the pan after cooking the meat.
– Consider experimenting with different peppercorns or peppers (like Sichuan) for a unique twist on traditional heat elements.
– Include a touch of oyster sauce or hoisin sauce for an extra layer of umami richness.
– Garnish with thinly sliced green onions or sesame seeds for a touch of color and flavor complexity.
Variations and Adaptations
Regional variations abound in Sizzling Chinese Pepper Steak with Onions. Swap out the beef for chicken or pork, allowing the dish to meet different protein preferences while maintaining traditional flavors. Chicken offers a lighter, leaner taste, adapting the dish for warmer seasons.
For seasonal adaptations, try incorporating available seasonal vegetables like snap peas or asparagus to elevate the nutrient profile. A summer version could include zucchini or squash for a refreshing twist.
Dietary modifications are simple: for a low-sodium variant, replace standard soy sauce with low-sodium alternatives, allowing you to mindfully enjoy the rich flavors without sacrificing taste. For a low-carb option, serve the steak atop a bed of cauliflower rice instead of traditional grains.
To adjust flavor profiles, experiment with additional spice blends or sauces like chili paste or sriracha for added heat, or Thai basil for aromatic variety. Modifying garlic amounts creates either a milder or more pronounced pungency, suiting varied palates.
Presentation alternatives enhance visual appeal. Serve the dish on a hotplate for dramatic tableside service, or skewer beef and vegetables for an appetizer variation that highlights the vibrant colors and contrasts present in the main dish.
Serving and Presentation Guide
For an impressive presentation, serve Sizzling Chinese Pepper Steak with Onions directly from the sizzling wok to keep the dish hot and aromatic. Alternatively, arrange the stir-fry neatly on a large platter, allowing the vibrant colors to shine and entice guests.
Garnish with chopped cilantro or scallions just before serving, adding a pop of green freshness. For added texture, scatter toasted sesame seeds or crushed peanuts over the top, giving a nod to Asian culinary traditions while enhancing the visual layer.
Traditionally, the dish pairs with steamed jasmine or basmati rice. For modern flair, consider serving alongside quinoa or barley, offering a nutty contrast to the savory elements. If noodles are preferred, a bed of lightly tossed soba or rice noodles complements the taste beautifully.
Temperature considerations are essential; ideal serving temperature enhances flavors. Ensure the dish is hot enough to elicit the signature sizzle but not scorching to avoid overcooking.
Consider portion sizes based on the event: For a family-style gathering, larger shares invite communal enjoyment, while individual servings offer a refined dining experience suitable for formal occasions. Tailoring presentation and serving ideas infuses an element of personalized style into each dining experience.
Wine and Beverage Pairing
Pairing your Sizzling Chinese Pepper Steak with the right beverage enhances the dining experience. A medium-bodied red wine like Merlot or Zinfandel complements the savory beef, with fruit-forward notes matching the dish’s slight sweetness.
For white wine enthusiasts, an off-dry Riesling provides a perfect foil to the dish’s spiciness, balancing vibrant acidity with subtle sweetness. The wine’s fresh flavors enhance the dish’s complexity without overpowering its delicate elements.
If non-alcoholic options are preferred, consider a chilled jasmine tea, with floral notes that cleanse the palate between bites. A sparkling water with a squeeze of lime or lemon offers refreshing acidity to counter rich flavors.
Monitor beverage temperatures: red wines are best enjoyed slightly cooler than room temperature, while whites and non-alcoholic options excel when well-chilled, accentuating the lively, fresh flavors of the dish. Mindfully chosen pairings elevate the dining experience, making each culinary adventure memorable.
Storage and Shelf Life
Proper storage is pivotal in maintaining the richness and natural texture of your Sizzling Chinese Pepper Steak with Onions. Store any leftovers in an airtight container, minimizing air exposure to preserve flavors.
Keep refrigerated and consume within three days to ensure freshness. For best results, separate rice or noodles from the main dish to prevent them from absorbing excess moisture and flavors during storage.
For reheating, gently warm the dish on a stovetop over low heat. This preserves the beef’s tenderness and prevents the vegetables from turning mushy. If using a microwave, cover to retain moisture and heat on a reduced setting, stirring intermittently for even heat distribution.
Although freezing is possible, it may alter the texture of vegetables, making fresh preparation preferable post-thaw. For optimal freezing, allow the dish to cool completely and store in appropriate containers.
Be aware of spoilage signs: off smells, altered colors, or unexpected textures indicate the dish should not be consumed. Adhering to storage guidelines ensures you relish your pepper steak to its fullest flavor potential.
Make Ahead Strategies
Prepare elements of your Sizzling Chinese Pepper Steak with Onions in advance to streamline dinner prep. Pre-cutting vegetables and marinating beef can enhance flavors and ease the cooking process during busy evenings.
Chop bell peppers and onions and store them in zip-lock bags or airtight containers, ensuring freshness for up to two days in the fridge. Marinate beef in its mixture the night before, allowing it to absorb flavors fully, resulting in a more tender and aromatic outcome.
When ready to cook, have all elements ready at arm’s reach, reducing distractions and ensuring a smooth, efficient cooking experience. The dish assembles quickly, maintaining its signature freshness and vibrant colors.
Reheating tips for meals include gently stirring while heating to ensure even warmth without overcooking. With these strategies, achieve the same satisfying results with reduced active cooking time, making it a reliable choice for planners short on time.
Scaling Instructions
Whether adjusting for a cozy dinner for two or an expansive family gathering, scaling Sizzling Chinese Pepper Steak with Onions is straightforward. Halving the recipe yields a perfect amount for intimate servings, ensuring that each component remains balanced.
Doubling or tripling the ingredients serves larger groups but requires attention to cooking equipment. Use a larger wok or sauté pan to prevent overcrowding and ensure ingredients are cooked evenly. Alternatively, cook in batches, maintaining quality without compromising flavors.
Adjust marination times when scaling, especially with increased quantities, to ensure thorough flavor infusion. Pinpoint ideal seasoning adjustments through tasting, maintaining harmony with the proportionate increase or decrease in ingredients.
Calculate storage needs for larger batches, ensuring ample refrigerated capacity and optimal container availability. Adapting timing for prep and cook ensures the dish’s integrity regardless of gathering size.
Nutritional Deep Dive
Delve into the nutritional prowess of the Sizzling Chinese Pepper Steak with Onions. Rich in proteins and essential nutrients, the dish provides a balanced macro profile. Each serving delivers substantial protein from tender beef, crucial for muscle maintenance and energy.
Bell peppers contribute indispensable micronutrients, including vitamins A and C, enhancing immune function and promoting skin health. Onions offer anti-inflammatory benefits and contribute dietary fiber, supporting healthy digestion.
Attention to portion sizes supports mindful eating, encompassing balanced macros without overconsumption. This dish can accommodate weight management goals, providing satiety through its content and robust flavors.
For dietary considerations, using lean beef reduces fat content without sacrificing taste. With careful ingredient selection, achieve a wholesome value in savoring this timeless culinary pleasure.
Dietary Adaptations
Adapt Sizzling Chinese Pepper Steak with Onions to meet various dietary preferences or restrictions with ease.
For gluten-free needs, substitute traditional soy sauce with certified gluten-free tamari sauce, preserving the dish’s distinctive umami qualities.
Eliminate dairy for a dairy-free version, ensuring the original recipe is maintained without compromise. No additional adjustments are necessary, highlighting its natural, rich flavors.
For a vegan twist, replace beef with firm tofu or tempeh, marinated in a combination of soy sauce, ginger, and garlic, offering a plant-based protein alternative with hearty appeal.
Lower carbohydrate content by serving atop cauliflower rice, offering a keto-friendly take without sacrificing complimentary textures between dish elements.
Paleo practitioners can utilize coconut aminos instead of soy sauce, embracing a soy-free sauce that aligns with paleo guidelines while conserving traditional flavors.
Adapting the recipe ensures inclusivity for various dietary landscapes without compromising integrity or taste.
Troubleshooting Guide
Encounter flawless Sizzling Chinese Pepper Steak with Onions by addressing common concerns.
To tackle texture issues, ensure beef is sliced uniformly and cooked briefly over high heat, preventing tough outcomes while respecting natural juices.
Achieving balanced flavors requires tasting and adjustments. Too salty dishes remedy with water or unsalted broth, while increased heat and acid from fresh lemon offer depth in milder outcomes.
Temperature problems, such as uneven cooking, resolve by maintaining high heat uniformly and adding ingredients in chronological order—aromatics, beef, and then vegetables.
Equipment challenges are overcome through using appropriate tools: a large wok or skillet enhances heat distribution and accommodates content spread.
For ingredient substitutions, recognize the importance of testing and matching similar profiles. Coconut aminos substitute soy sauce for authentic taste in gluten- and soy-free adaptations.
Master timing concerns by monitoring cooking intervals, ensuring each component is cooked to perfection without delay, employing the mis en place strategy for reliable readiness.
Recipe Success Stories
Explore the Sizzling Chinese Pepper Steak with Onions’ success through community tales. Many have triumphed over adaptation challenges, inventing diverse versions enhancing classic allure.
Experimentation stories beam with vibrancy, with readers incorporating geothermal crops or exotic peppers, delivering innovative textures and heat levels while celebrating the traditional format.
Shared photography reflects vibrant presentations, emphasizing elements like garnish height and color through style tips and inspiring visions through reader influence.
Variations have been highly praised, emphasizing creativity: from incorporating novel spices to crafting elegant layers of flavor through modern culinary chemistry.
Community engagement flourishes as individuals share their endeavors, exploring harmony within classic bounds and enriching cooking through shared experiences.
Frequently Asked Questions
Can I make this dish ahead of time? Yes, you can prepare the vegetables and marinate the beef the night ahead. Store everything in separate containers and refrigerate, ensuring peak freshness. Cooked leftovers can also be stored and taste best when consumed within three days.
What can I substitute for beef if I’m vegetarian? Firm tofu or tempeh acts as an excellent substitute, absorbing flavors wonderfully. Ensure you still marinate adequately for the desired depth, adapting consistency and texture to personal preference.
How do I keep the steak tender? Slice the beef thinly against the grain and don’t overcook it. A quick sear over high heat locks in the juices and creates a succulent texture.
What side dishes pair well with this recipe? Classic pairings include steamed jasmine rice or sautéed Asian greens like bok choy or gai lan. For noodle enthusiasts, consider stir-fried lo mein or soba as a complementary carbohydrate.
Can I use frozen vegetables? Fresh vegetables provide the best texture and flavor profile; however, frozen peppers and onions can be used in a pinch. Drain excess moisture thoroughly to avoid a soggy result.
Is it safe to use a non-stick pan? Yes, while we recommend a wok or cast iron for optimal heat, a non-stick pan works well too. Simply maintain high heat and consider dividing batches if capacity is limited.
Are there alternatives to soy sauce? For soy allergy concerns or dietary preferences, use coconut aminos, which offer a slightly sweeter, milder taste yet complement the dish’s other components beautifully.
What if I don’t have ginger? Ginger powder is an acceptable substitute for fresh ginger. Utilize about a third of the quantity dictated for fresh ginger to avoid overpowering flavors.
What’s the key to achieving a restaurant-style MSG flavor without using MSG? A touch of mushroom powder or nutritional yeast can mimic MSG’s umami depth, contributing to the dish’s rich savoriness.
How can I prevent the meat from sticking to the pan? Ensure the pan is sufficiently heated before adding oil and beef. Preheating establishes a necessary cooking surface that minimizes sticking.
Can I use any type of oil? Neutral oils with high smoke points like canola or peanut oil work best for stir-frying. Avoid olive oil, which has a lower smoke point that may impact taste during high heat cooking.
What’s causing my dish to be bland? It’s often a matter of seasoning balance. Ensure soy sauce and aromatics are evenly distributed. Enhance flavor with additional seasoning, similarly tweaking according to taste preferences.
Additional Resources
Turn to related recipes, expanding your repertoire and skills. Consider experimenting with dishes like Chicken and Broccoli Stir Fry or Egg Fried Rice for diversification and technique refinement.
Explore technique guides focused on stir-frying essentials, adopting expert advice to master nuances in heat control and ingredient sequencing tailored to various protein and vegetable preparations.
Ingredient information deepens understanding of root and seasonal produce, evaluating uniqueness and selecting premium, harmonious flavors naturally imbued within the examining dish’s construct.
For equipment recommendations, select wok materials that enhance conductivity, valuing seasoned cast iron options or universally acclaimed carbon steel for their optimal cooking attributes.
Adapt seasonal variations through exploration of ingredient attributes, reflecting adjustments aligning with local produce availability. Celebrate the flexibility traditional dishes offer while infusing contemporary adaptations within practice.
Join the Conversation
Connect with a thriving community, sharing moments and inspirations through culinary journeys. Engage on social media platforms, exchanging photography tips and structured reviews of Sizzling Chinese Pepper Steak with Onions presentational executions.
Refine recipe variations in collective discussions, leveraging insight for personalized flaunts of flavor and creativity, immortalizing adaptations and paving pathways within gastronomy.
Community events and feedback invitations solidify connections, fostering environments celebrating learning, sharing successes, challenges, insights while valuing cultural and culinary diversity harmonically.
Celebrate in sharing recent attempts, highlighting personal developments through images capturing the essence of triumphs, wetlands of traditional and modern callback reflections of shared food narratives.
The Recipe
Sizzling Chinese Pepper Steak with Onions
Serves: 4
Prep Time: 15 mins
Cook Time: 20 mins
Total Time: 35 mins
Kitchen Equipment Needed
Wok or large skillet
Sharp knife
Cutting board
Mixing bowls
Measuring spoons
Ingredients
1 lb beef sirloin or flank steak, thinly sliced
2 tbsp soy sauce
1 tbsp cornstarch
1 tbsp sesame oil
2 cloves garlic, minced
1 inch fresh ginger, grated
1 red bell pepper, sliced into strips
1 green bell pepper, sliced into strips
1 large onion, sliced
1/4 cup beef broth
2 tbsp oyster sauce
Salt and black pepper to taste
2 scallions, chopped (for garnish)
Directions
In a bowl, combine soy sauce, cornstarch, and sesame oil. Add beef slices and toss to coat. Marinate for at least 10 minutes.
Heat a wok over high heat. Add a bit of oil and sear the beef in batches until browned on the outside. Remove from the wok.
Add garlic and ginger to the wok, frying until fragrant (about 30 seconds).
Add bell peppers and onions; stir-fry until they begin to soften yet retain crunch (3-4 minutes).
Return meat to the pan; add beef broth and oyster sauce. Stir ingredients to combine.
Bring to a simmer until the sauce is slightly thickened, adjusting seasoning with salt and pepper as needed.
Garnish with chopped scallions and serve hot over rice or noodles.
Recipe Notes
Consider adding a splash of soy sauce or Chinese rice wine for depth.
Adjust spiciness with chili flakes or additional pepper varieties for heat preferences.
Substitute oyster sauce with hoisin for added sweetness if desired.