Savor the Ultimate Surf and Turf with Steak and Shrimp Scampi

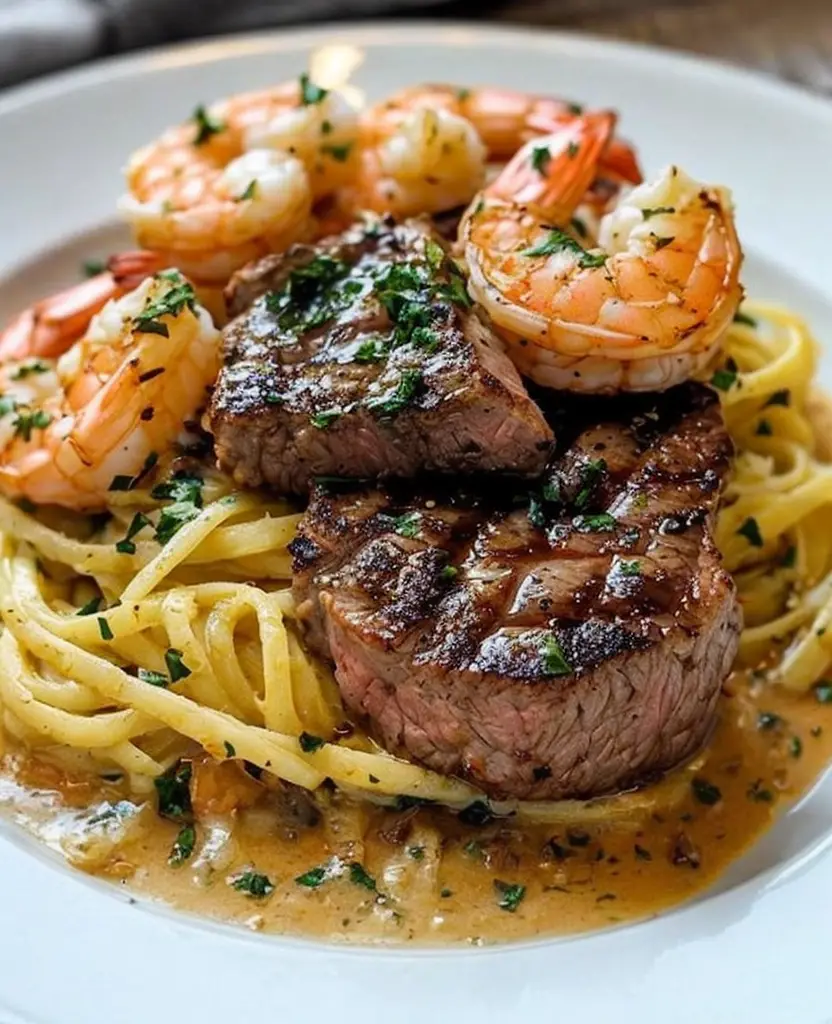
Steak and Shrimp Scampi: A Surf and Turf Delight

⚖️
Difficulty
Intermediate

⏲️
Prep Time
15 mins

🕒
Cook Time
30 mins

⏱️
Total Time
45 mins

🍽️
Servings
4

Steak and Shrimp Scampi is a culinary masterpiece that marries the earthy richness of prime beef with the succulent sweetness of fresh shrimp. This dish combines the best of both land and sea, delivering an experience that’s both luxurious and comforting. Each bite is a journey through deep flavors enhanced by a rich garlic butter sauce that ties the elements together. Whether it’s a special occasion or a desire for an indulgent dinner at home, this dish is sure to please.

The moment the beef hits the hot pan and sizzles alongside the shrimp, an enticing aroma fills the air. The steak develops a crust that’s infused with butter and aromatic herbs, while the shrimp obtain a delicate char, offering layers of complex flavors. As the dish comes together, the harmonious blend of garlic, lemon, and herbs envelops the senses, creating an irresistible aroma that teases the palate.

With its elegant presentation, Steak and Shrimp Scampi is designed to impress. The warm, buttery hues of the dish are complemented by flashes of lemon zest and fresh parsley, creating a dish that’s as appealing visually as it is to taste. A meal fit for a king, this recipe is surprisingly simple in technique yet speaks volumes through its flavor profiles.

Quick Recipe Highlights

  • Flavor Profile: Experience a blend of savory steak and sweet shrimp, united by a rich, buttery garlic sauce.
  • Texture: Delight in a combination of tender steak and juicy shrimp with a silky, smooth sauce.
  • Aroma: Immerse yourself in the delightful scents of lemon, garlic, and herbs wafting from the kitchen.
  • Visual Appeal: A feast for the eyes with its golden-brown crusts and vibrant garnish of parsley.
  • Skill Level Needed: Best suited for intermediate cooks, comfortable with timing and temperature adjustments.
  • Special Equipment: A cast iron skillet and a good set of tongs are recommended for achieving the perfect sear.

Recipe Overview

  • Difficulty Level: This dish requires attention to detail and mastery of timing, particularly in managing different cooking stages for steak and shrimp.
  • Category: Perfect as a main course for dinner, catering to those looking for a balanced surf and turf meal.
  • Cuisine: This dish is grounded in American culinary traditions with Italian influences, particularly in the scampi sauce which uses key ingredients like garlic and lemon.
  • Cost: While it includes premium ingredients like steak and shrimp, careful sourcing can keep the dish accessible without compromising quality.
  • Season: Best enjoyed year-round, though the fresh, summery flavors shine brightly in warmer months.
  • Occasion: Ideal for celebrating special occasions like anniversaries or birthdays, or for elevating a regular weeknight into something extraordinary.

Why You’ll Love This Recipe

The taste of Steak and Shrimp Scampi is a culinary celebration in itself. The juicy cut of steak pairs exquisitely with the subtle sweetness of shrimp, while fragrant garlic butter sauce pulls everything together beautifully. The textures play off each other wonderfully, with the tender steak and plump shrimp contrasting against the rich, velvety sauce. This dish is a delight for the senses—savory, buttery, and slightly tart with hints of herbaceous freshness from parsley.

In terms of convenience, this recipe brings together a gourmet dish with surprisingly simple steps. By focusing on quality ingredients and honing a few key techniques, you can execute this meal in under an hour, making it achievable even on a busy evening. It offers a substantial return on investment in terms of flavor and sophistication while keeping preparation manageable.

Nutritionally, this meal packs in high protein with its steak and shrimp foundation, offering sustaining energy and satiety. It’s naturally low in carbs and adaptable for various dietary preferences without sacrificing its core flavors. If paired with a light salad or steamed vegetables, it provides a balanced plate suitable for a well-rounded, nourishing meal.

For social settings and entertaining, Steak and Shrimp Scampi captures attention as a statement dish. It conveys thoughtfulness and skill, sure to impress guests with its artful fusion of surf and turf. The recipe lends itself to an interactive dining experience where the process and plating can be as much a part of the enjoyment as the food itself.

Cost-effectiveness is another advantage, balancing the use of premium components like steak and shrimp with a strategic approach to shopping and portioning. With a focus on quality over quantity, it’s possible to enjoy a lavish meal without stretching the budget excessively. The simplicity in preparation allows for investing in better ingredients, amplifying the recipe’s luxurious nature.

Historical Background and Cultural Significance

The concept of combining steak with seafood originates from the classic American steakhouse tradition, highlighting the luxury of surf and turf dining. The roots trace back to upscale dining in the mid-20th century when restaurants began offering premium combinations of land and sea delights, symbolizing abundance and culinary opulence.

Culturally, Steak and Shrimp Scampi represent a blend of worlds—American extravagance meets the subtle, flavor-centric Italian way of cooking. It’s a dish that has evolved to cater to a growing appreciation for both steakhouse and Italian culinary techniques, beautifully merging the two into one delectable creation that reflects both traditions.

Traditionally, scampi refers to a method of preparation involving garlic and butter, originating from Italian dishes using scampi crustaceans. The American adaptation has broadened this to include shrimp, aligning with local availability and taste preferences while preserving the original Italian essence.

Regional variations of Steak and Shrimp Scampi may incorporate different herbs, sauces, or marinades, reflecting the diverse culinary landscapes of the U.S. Some prefer a spicy twist with chili flakes, while others might add a touch of white wine for additional complexity. These variations keep the dish dynamic and individually tailored, perfecting it through local tastes and availability.

Ingredient Deep Dive

For the perfect steak, consider cuts like ribeye or filet mignon, known for their tenderness and flavor richness. These cuts boast significant cultural importance in American steakhouses, often heralded for their quality and taste. When choosing steak, prioritize marbling for flavor and select cuts that are vivid in color with a firm texture.

Shrimp, the star of the scampi, brings a touch of the sea’s opulence to this dish. Nutritionally, shrimp is low in calories but high in protein, vitamins, and minerals, making it a valuable component of a balanced diet. Opt for peeled and deveined shrimp to save prep time, ensuring they are firm and fragrant with a slight sea smell, indicating freshness.

Storage of both primary ingredients is crucial. Keep steaks stored in the coldest part of your refrigerator or freeze them if not using within a couple of days. Shrimp, on the other hand, should be used as freshly as possible or kept in the freezer to preserve their natural sweetness until cooking time. Substitutions could include other seafood like scallops or a cut of chicken breast, each offering different but delectable results.

Common Mistakes to Avoid

  • Overcooking the steak can lead to toughness; focus on letting it rest and using a meat thermometer to ensure the perfect doneness.
  • Avoid overcrowding the pan when cooking shrimp to ensure an even, golden sear rather than steaming.
  • Skipping the resting period for steak can cause juices to be lost; ensure the steak rests to retain moisture.
  • Failing to properly heat your skillet can prevent achieving a perfect crust, crucial for flavor development.
  • Insufficient seasoning of both steak and shrimp can result in a bland outcome; use salt and pepper generously.
  • Forgetting to deglaze the pan with lemon juice or white wine can lead to missed flavor complexity from the sauce.
  • Overcooking shrimp makes them rubbery; instead, cook until just opaque for tenderness.
  • Not using enough garlic or fresh herbs may result in a muted scampi sauce that lacks vibrancy.
  • Using unsalted butter could lead to under-seasoned results; if using, adjust seasoning accordingly.
  • Neglecting to pat your steak dry before cooking can hinder crust formation needed for maximum flavor.

Essential Techniques

Searing the steak is essential for flavor depth. To master it, ensure your pan is smoking hot before introducing the meat, which enables a browned, flavorful crust. Common pitfalls include a pan that’s too cold or flipping the steak too frequently, both obstructing appropriate caramelization.

In shrimp preparation, achieving a quick sauté is vital. This technique secures tenderness and keeps the shrimp moist. Look for shrimp turning opaque combined with pink hues as visual cues of readiness. Over-sautéing leads to a rubbery texture, which detracts from the eating experience.

Creating the scampi sauce requires balancing richness with acidity. Start by sautéing garlic until fragrant but not browned, then introduce lemon and butter to achieve a velvety emulsion. Resisting the urge to rush this process ensures the sauce’s depth and elegance.

Pro Tips for Perfect Steak and Shrimp Scampi

Select high-quality ingredients to make the difference in your Steak and Shrimp Scampi; grass-fed beef and fresh shrimp provide the best flavor.

Preheat your pan thoroughly before cooking steak to guarantee a perfect crust; a hot pan is crucial for caramelization.

Be sure to deglaze the pan for scampi sauce after cooking the steak; the brown bits in the pan are packed with flavor.

Temper your steak before cooking, allowing it to come to room temperature; this ensures more even cooking and maximum tenderness.

Add fresh herbs at the last moment to preserve their vibrant flavors and colors in the final dish.

For extra lemony flavor, zest your lemon before juicing and add the zest to the sauce for an aromatic boost.

Rest cooked steak on a warm plate, covered lightly to let it relax and reabsorb its juices, resulting in a juicy bite.

If desired, finish your shrimp in the oven for even cooking after the initial pan sear, ensuring complete and gentle heat distribution.

Variations and Adaptations

Regional variations might lean on local herb blends or add heat with chili peppers. The flexibility of the dish invites experimentation with substitutions like scallops instead of shrimp or incorporating seasonal vegetables like asparagus or squash.

During the winter months, add heartiness with an accompaniment of creamy polenta or parmesan risotto. Warmer months could see a fresh salad alongside, highlighting tomatoes and basil in a refreshing contrast with the scampi.

Dietary modifications are readily achievable by using a plant-based butter substitute and swapping out steak for portobello mushrooms, catering to vegan diners while maintaining flavor depth.

Would you like to tweak the flavors? Incorporate saffron threads in the scampi sauce or infuse steaks with rosemary instead of thyme for subtle enhancements.

For presentation alternatives, try serving with roasted cherry tomatoes, adding a vibrant pop of color and a flavor contrast.

If you prefer a different texture, pound the steak thinner or butterfly shrimp for a broader sear surface, altering texture and appearance beneficially.

Serving and Presentation Guide

Consider using wide, shallow dishes for plating, creating space to showcase the stunning crust of the steak and glossy shrimp while reserving room for garnishes.

Garnishing ideas include freshly chopped parsley, a drizzle of high-quality olive oil, or scattered capers for a burst of brine.

Serve with classic steakhouse sides such as a loaded baked potato or garlic mashed potatoes, adding comfort and familiarity.

Modernize the serving with a side of quinoa salad or lightly dressed arugula, incorporating contemporary tastes.

Take temperature into account by keeping steak warm during resting, as well as heating plates slightly before serving for perfection retention.

Control portion sizes judiciously; aim for 6-8 oz of steak and 4-6 shrimp per serving to satisfy without excess.

Wine and Beverage Pairing

Opt for a full-bodied red wine like Cabernet Sauvignon that complements the steak’s richness while balancing garlic’s pungency in the shrimp.

For non-alcoholic alternatives, a lightly sparkling water infused with lemon serves to cleanse the palate without interfering with flavors.

If desired, offer an iced tea with a splash of mint, providing a refreshing accompaniment in warmer climates.

Temperature is essential; serve red wines slightly cooler than room temperature and white wines chilled yet not icy, ensuring aromatic retention.

Suggest serving with a light cheese platter or bread basket as a precursor, setting the mood for culinary indulgence.

Storage and Shelf Life

Refrigerate leftovers in an airtight container within two hours of cooking to maintain freshness and safety, consuming within 2-3 days.

Store at or below 40°F, monitoring for quality preservation and minimizing the risk of bacterial growth.

Consider portioning leftovers prior to refrigerating for easy reheating, using microwave-safe containers or reheating on the stovetop over low heat to retain texture.

Watch for signs of spoilage like off smells or discoloration, disposing promptly to prioritize health.

Freezing may affect steak texture but consider freezing cooked shrimp- separate from steak, observing a three-month safety window when properly sealed and protected from freezer burn.

Make Ahead Strategies

Plan a prep timeline involving chopping herbs and marinating steak hours ahead, allowing you to focus solely on cooking closer to mealtime.

Store components separately when preparing portions ahead, such as garlic butter sauce, preventing cloves from overpowering other flavors and ensuring freshness.

Quality remains high by pre-searing shrimp hours ahead and gently reheating in sauce, saving valuable serving time but preserving taste and texture vitality.

Assembly tips include arranging garnish last minute, keeping herbs fresh until needed without losing vibrancy during sitting time.

Reheat with care, using gentle heat to avoid overcooking, while winding down as guests arrive, for seamless service transitions.

Engage fresh ingredients as finishing touches for liveliness, incorporating lemon zest or parsley on site to capture aroma and visual appeal.

Scaling Instructions

For halving the recipe, adjust ingredient quantities proportionally, applying the same principles of searing and sauce preparation to ensure retained flavor.

Scaling up involves doubling or tripling ingredient volumes but maintaining a single batch at a time for optimal heat distribution and texture preservation.

Equipment adjustments may include using multiple pans to accommodate increased quantities, thereby preventing overcrowding and heat loss.

Timing modifications might be necessary, particularly for longer resting periods, when serving more significant groups or hosting events.

Consider storage readily when expanding quantities, preparing storage containers for leftover components and preventing wastage.

Nutritional Deep Dive

Macros in Steak and Shrimp Scampi include substantial protein, prevalent in both steak and shrimp, fostering growth and repair.

Micronutrients vary, with shrimp supplying valuable iodine, zinc, and B vitamins, contributing to balanced nutritional intake.

Health benefits can include maintaining energy levels, enhancing muscle preservation due to its abundant protein profile, and benefiting from omega-3 in shrimp.

Dietary considerations encompass accommodating high-protein, low-carb needs while keeping saturated fats higher with steaks in mind.

Portion analysis underscores moderation, harmonizing rich flavors with mindful servings to foster satisfaction without excess.

Weight management tips involve pairing scampi with fiber-dense accompaniments, promoting satiety and nutritional balance.

Dietary Adaptations

For gluten-free adaptation, ensure sauces and sides incorporate gluten-free ingredients, checking labels diligently for possible contaminants in butter or seasonings.

To create a dairy-free version, consider olive oil or margarine substitutes, adapting richness while avoiding allergenic compounds in traditional butter.

For vegan enthusiasts, accommodate with tofu or seitan as steak stand-ins, retaining structure and flavor similarly by marinating with umami-rich spices.

Achieve a low-carb approach by embracing zoodles or shirataki noodles in lieu of pasta, offering meal consistency and appeal.

Keto proponents appreciate fatty focus but should monitor portion sizes, balancing high protein with generous salad accompaniments.

Paleo followers find shrimp scampi naturally aligned with necessities, avoiding grains and legumes while opting for natural oils or fats.

Consider a low-FODMAP approach, monitoring garlic quantities and applying infused oils instead for digestible comfort without sacrificing taste.

Troubleshooting Guide

Address texture issues by ensuring steak is cut across the grain, mitigating toughness and facilitating tenderness.

Correct flavor balance concerns with precise seasoning; salt adequately before cooking, adjusting levels gradually for flavor integrity.

Overcome temperature problems by verifying your meat thermometer for accuracy, ensuring steaks rest for temperature equalization post-cooking.

Confront equipment challenges by ensuring uniform pan base coverage, procuring a heavy-duty skillet promoting effective, even heat for optimal searing.

Navigate ingredient substitutions through strategic like-for-like exchanges such as plant-based margarine integrating dairy-free, without impacting the cooking process significantly.

Refine timing concerns by structuring steps in logical sequence, from mise en place to sequential cooking, enabling smooth workflow from preparation to completion.

Recipe Success Stories

Community feedback often highlights the delight in serving Steak and Shrimp Scampi at gatherings, providing an approachable yet impressive dish strengthened by broad appeal.

Variation successes reflected through personalized element inclusion occasionally transform the scampi sauce, integrating with new spices, boosting recipe versatility.

Adaptation stories reveal culinary exploration ingenuity, particularly among plant-based diets, illustrating effective texture and flavor navigation despite deviations.

Reader suggestions frequently advocate for additional zest or personalized spice mixes, echoing evolving culinary landscapes through tailored enhancements.

Photography tips commonly emphasize capturing the steak’s crust and butter gloss under natural light, showcasing dish coloration effectively for appealing presentation.

Frequently Asked Questions

Can I use frozen shrimp for Shrimp Scampi?
Yes, frozen shrimp can be used, though for best results, ensure they are fully thawed and towel-dried before cooking to avoid excess moisture.

How do I choose the best steak for this recipe?
Focus on tender cuts like ribeye or filet mignon with visible marbling, as these aspects enhance flavor and texture upon cooking.

What’s the secret to a perfectly crusted steak?
Begin with a well-dried steak, seasoning generously, and introduce it to a smoking-hot pan, letting it sear without disturbance until the desired crust forms.

Does the sauce require white wine?
While traditional, wine can be omitted in favor of additional lemon juice or stock, replicating similar depth without alcohol.

What can substitute garlic if I’m allergic?
Consider using garlic-infused oils to impart similar flavor without actual cloves, or substitute with mild shallots finely minced.

How do I avoid rubbery shrimp?
Monitor cooking time closely, removing from heat once they turn opaque, preempting overcooking which leads to undesirable texture.

Can I grill the steak instead of pan-searing?
Absolutely, grilling infuses another flavor dimension, adhering to the same doneness methodology but introducing smoky elements.

Why is resting steak important?
Resting steak allows juices to redistribute throughout the meat, ensuring each bite is juicy and tender as intended.

Additional Resources

Explore related recipes focusing on perfect garlic sauce techniques to amplify scampi mastery, using accessible step-by-step guides to broaden your culinary toolkit.

Broaden ingredient information grasp, from seasonal shrimp varieties enhancing flavor palettes to distinguishing surface marbling benefits in steak quality overviews.

Capitalize on knowledge with equipment recommendations, assessing the best cookware for efficient heat distribution and effective culinary outcomes.

Dive into seasonal variations offering insight into using nature-produced components such as seasonal vegetables, reinforcing fresh availability principles fitting within diverse recipes.

Join the Conversation

Engage with the recipe community online, sharing personal experiences and modifications across social media platforms to inspire fellow food enthusiasts.

Practice photography skills to capture the vibrancy of Steak and Shrimp Scampi, experimenting with lighting and angles to enhance dish presentation and subsequent acclaim.

Collaborate on recipe reviews, unpacking various assumptions about difficulty and taste, discovering shared insights, and evolving traditional perceptions.

Promote community recipe variations indicative of cultural preferences, celebrating unique adaptations making significant marks within broader culinary landscapes.

The Recipe

Steak and Shrimp Scampi

Serves: 4

Prep Time: 15 mins

Cook Time: 30 mins

Total Time: 45 mins

Kitchen Equipment Needed

  • Cast iron skillet
  • Chef’s knife
  • Cutting board
  • Meat thermometer
  • Tongs

Ingredients

  • 4 (6-8 oz) steaks, preferably ribeye or filet mignon
  • 12 large shrimp, peeled and deveined
  • Salt and pepper to taste
  • 4 tbsp butter
  • 2 cloves garlic, minced
  • 1/4 cup fresh lemon juice
  • 2 tbsp chopped parsley
  • 1 tbsp olive oil

Directions

  1. Preheat your cast iron skillet over high heat until it’s smoking hot. Season steaks generously with salt and pepper.
  2. Add olive oil to the pan and place steaks carefully in the skillet. Sear for 3-4 minutes per side for medium-rare, adjusting based on thickness and preference.
  3. Remove steaks from the skillet and allow to rest on a warm plate, covered loosely with foil.
  4. Reduce the heat to medium and add butter to the skillet. Once melted, add garlic and sauté until fragrant, about 1 minute.
  5. Toss shrimp into the skillet, cooking until just opaque, about 2-3 minutes per side. Stir in lemon juice and parsley.
  6. Return steaks to the skillet to warm through briefly. Spoon sauce over them, ensuring shrimp are well coated.
  7. Transfer to plates, garnishing with additional parsley before serving.

Recipe Notes

  • For a thicker sauce, emulsify butter gradually using reserved steak juices.
  • Lemon zest can be added for extra citrus punch.
  • Red pepper flakes offer a spicy kick and can enhance the overall flavor.

Irresistible Stuffed Mushrooms Recipe for a Flavorful Culinary Experience

Best Ever Stuffed Mushrooms: A Flavorful Delight for All Occasions

⚖️
Difficulty
Easy

⏲️
Prep Time
15 mins

🕒
Cook Time
20 mins

⏱️
Total Time
35 mins

🍽️
Servings
4

There’s something undeniably comforting about the earthy goodness of mushrooms infused with a flavorful stuffing. The Best Ever Stuffed Mushrooms recipe combines a medley of herbs, cheeses, and bread crumbs that elevates the humble mushroom cap into an exquisite appetizer. Perfect for gatherings or simply as a treat for yourself, this dish is easy to prepare and even easier to devour. Whether you’re a novice or a seasoned chef, these stuffed mushrooms are a culinary delight that promises satisfaction.

The preparation process is both enjoyable and rewarding. As you chop, mix, and fill, you’ll appreciate how the diverse ingredients come together to create a perfect harmony of tastes and textures. This recipe is straightforward, making it accessible to cooks at all skill levels. It’s a great way to introduce yourself to the joy of creating sophisticated appetizers without the fuss.

Quick Recipe Highlights

  • Flavor Profile: This dish combines the umami-rich taste of mushrooms with savory and aromatic fillings including garlic and herbs.
  • Texture: A delightful crunch of breadcrumbs tops these mushrooms, while the interior is creamy and rich, perfectly complementing the tender mushroom cap.
  • Aroma: Expect your kitchen to fill with the welcoming scents of sautéed garlic and fresh herbs, creating an inviting atmosphere.
  • Visual Appeal: The stuffed mushrooms present a rustic elegance, with golden bread crumbs atop a contrasting mushroom base.
  • Skill Level Needed: This recipe is suitable for beginner cooks as it involves simple techniques like sautéing and baking.
  • Special Equipment: A baking sheet and mixing bowl are the primary tools you’ll need, making this a low-equipment recipe.

Recipe Overview

  • Difficulty Level: The ease of this recipe comes from basic cooking methods such as mixing ingredients and filling caps, suitable for beginners and experts alike.
  • Category: Appetizer, Snack
  • Cuisine: This recipe reflects Italian influences, known for utilizing fresh, rustic ingredients in harmony.
  • Cost: The ingredients are widely available and affordable, making this recipe economically friendly while still delivering gourmet flavor.
  • Season: Ideal for fall and winter when mushrooms are plentiful, but delicious year-round.
  • Occasion: Perfect for holiday parties, potlucks, or any occasion where you need a crowd-pleasing appetizer.

Why You’ll Love This Recipe

The Best Ever Stuffed Mushrooms offer an outstanding burst of flavors with each bite. The creamy filling, combined with the umami of the mushrooms, ensures a rich taste experience. The crunchy top adds a delightful texture contrast, making each bite utterly satisfying. Whether you’re enjoying them as an appetizer or a side dish, their flavors will stand out on any table.

These mushrooms are not only delicious but also impressively easy to make. With straightforward preparation steps, even a novice cook can accomplish a dish that looks and tastes like it came from a professional kitchen. The inclusion of affordable ingredients means that you can enjoy gourmet flavors without breaking the bank, making this an ideal dish for both everyday meals and special occasions.

Historically, stuffed mushrooms have been a beloved party staple, thanks to their versatility and ease of preparation. Originating as a delicious way to utilize mushroom caps in an elevated fashion, this dish has seen countless adaptations across different cultures. While the Italian influence is prevalent due to the herbs and cheeses used, many regions have put their unique twist on this tasty treat, ensuring its status as a classic appetizer.

Ingredient Deep Dive

Mushrooms play a crucial role in this recipe, offering both culinary and nutritional benefits. Known for their rich umami flavor, mushrooms elevate the dish’s palatability. Nutritionally, they are a source of vitamins like B and D. When selecting mushrooms, look for firm, smooth caps without blemishes to ensure freshness.

Cheese is another key ingredient that adds depth and creaminess to the stuffing. Whether using Parmesan or a blend of your choice, cheese offers protein and calcium along with its rich flavor. Storage tips include keeping cheese wrapped in parchment paper or foil to preserve its quality.

Common Mistakes to Avoid

  • Overfilling the mushroom caps can lead to spillage during baking, so keep stuffing within cap edges.
  • Under-seasoning the stuffing can result in a bland dish, so taste test and adjust salt and pepper accordingly.
  • Overcooking mushrooms can make them leathery; stick to the suggested baking time for best results.
  • Using stale breadcrumbs can ruin the texture; fresh ones ensure a crunchy topping.
  • Neglecting to clean mushrooms properly can affect flavor—wipe with a damp cloth instead of soaking.
  • An overpacked baking dish prevents even cooking; ensure ample space between each mushroom.
  • Rushing the baking process can lead to uneven textures; allow time for even heating.
  • Ignoring temperature adjustments for different ovens leads to variance in texture—monitor cooking closely.
  • Under-seasoning leads to bland results; consider adding aromatic herbs for depth.
  • Not letting mushrooms cool properly after cooking may affect the overall eating experience.

Essential Techniques

Sautéing the filling ingredients is an important step in this recipe. This technique helps to release and enhance the flavors of garlic and herbs, ensuring they thoroughly blend into the stuffing mixture. A quick sauté over medium heat until the ingredients are fragrant is key to developing robust flavors without burning them.

Pro Tips for Perfect Stuffed Mushrooms

Ensure mushrooms are thoroughly cleaned before stuffing to avoid grit. Use a damp cloth instead of rinsing under water to prevent sogginess.

Preparing the stuffing ahead of time and refrigerating it allows the flavors to meld beautifully, enhancing the taste.

Room temperature mushrooms ensure even cooking, so allow them to come to room temperature before baking.

For an added crunch, sprinkle extra breadcrumbs on top just before baking.

Incorporate different cheese types for new flavors—try mixing Parmesan with feta or mozzarella.

If you desire a spicier version, consider adding chopped jalapeño peppers to the stuffing mixture.

Variations and Adaptations

Stuffed mushrooms can easily accommodate regional variations. For a Mediterranean twist, incorporate ingredients like olives and sun-dried tomatoes into the stuffing. Seasonal changes can include using fresh spring herbs for a lighter profile or hearty autumn vegetables for depth.

For dietary modifications, replace breadcrumbs with almond meal for a gluten-free version, and use nutritional yeast instead of cheese for a vegan adaptation. Enhance flavors by experimenting with different herbs or spices, such as adding cumin or smoked paprika for an earthy kick.

Serving and Presentation Guide

Stuffed mushrooms are versatile in their presentation. For a classic look, arrange them in neat rows on a serving platter. Garnish with freshly chopped parsley for an elegant touch. For modern aesthetics, place them on rustic wooden boards adorned with rosemary sprigs.

Consider serving these mushrooms at room temperature, which allows the flavors to settle nicely while maintaining texture. Portion control can be managed by choosing mushroom sizes that correlate with serving sizes, making them suitable for both bite-sized snacks and heartier treats.

Wine and Beverage Pairing

The earthy and cheesy richness of stuffed mushrooms pairs excellently with a crisp white wine like Sauvignon Blanc, which cuts through the creaminess with its acidity. For non-alcoholic options, a chilled herbal tea, like chamomile, complements the flavors without overpowering them.

Temperature is crucial in beverage pairing; chilled drinks highlight the warm, savory nature of the mushrooms, enhancing their flavors beautifully. Serve beverages in appropriate glassware to maintain their temperature and aroma.

Storage and Shelf Life

Leftover stuffed mushrooms can be stored in the refrigerator for up to three days. Place them in airtight containers to prevent moisture loss. Before refrigerating, allow them to cool at room temperature to avoid condensation inside the container, which could lead to sogginess.

To reheat, place in a preheated oven at 350°F (175°C) for about 10 minutes or until warm. This ensures they regain their crispiness. For longer storage, consider freezing—but ensure they are completely cooled before doing so to maintain texture.

Make Ahead Strategies

Prep the stuffing the day before and store it in an airtight container in the refrigerator to save time on the day of serving. The mushrooms themselves can be stuffed and stored up to 24 hours in advance, which allows the flavors to intensify.

Reheat the stuffed mushrooms in an oven rather than a microwave to maintain their texture. If needed, refresh the topping with a sprinkle of bread crumbs before reheating to enhance the crispness.

Scaling Instructions

This recipe scales up beautifully. When doubling or tripling, ensure you have adequate baking sheets and oven space to avoid overcrowding, which can affect cooking times. Adjust cooking times slightly, if necessary, while keeping a close eye on texture.

For smaller gatherings, halving the recipe works well. Store any excess unused ingredients like breadcrumbs and cheese separately to maintain their freshness for future use.

Nutritional Deep Dive

Stuffed mushrooms provide a balanced combination of carbohydrates, proteins, and fats. They are low in calories, making them a healthy appetizer option. The mushrooms themselves are rich in antioxidants and vitamins, enhancing the nutritional aspect of this dish.

Incorporating high-quality cheese adds calcium and essential amino acids, while breadcrumbs offer fiber content. For those pursuing a low-calorie diet, using low-fat cheese varieties or reducing bread crumbs is beneficial.

Dietary Adaptations

For gluten-free stuffed mushrooms, replace traditional breadcrumbs with gluten-free alternatives like almond meal or crushed cornflakes. Vegan options can be achieved by substituting cheese with vegan cheese and using vegetable broth in place of any non-vegan ingredients.

Low-carb versions benefit from increased use of cheese or vegetables with fewer bread crumbs. Paleo adaptations include using coconut flour in the stuffing, and keto-friendly recipes can include extra cheese for those following a ketogenic diet.

Troubleshooting Guide

When mushrooms release too much liquid, consider increasing the breadcrumb ratio or prebaking mushrooms to reduce moisture. For under-flavored stuffing, upping the seasoning or incorporating rich spices like smoked paprika can help balance the taste.

Temperature issues often arise when using chilled mushrooms; bring them to room temperature before cooking to ensure even baking. Address ingredient substitutions by carefully choosing replacements that maintain the recipe’s intended flavor profile.

Recipe Success Stories

Readers have shared delightful stories of wow-ed guests when serving these stuffed mushrooms at parties. Many have adapted the stuffing with local cheeses or spices, creating successful regional variations.

Taking photos of the finished dish is highly recommended; consider natural light and garnished platings to enhance the visual appeal of your culinary creation.

Frequently Asked Questions

Can these mushrooms be frozen after cooking?

Yes, once cooled, they can be wrapped in foil and stored in the freezer for up to two weeks. Reheat in the oven to maintain texture.

What are the best cheese substitutes for this recipe?

Try a combination of nutritional yeast and cashew cream for a vegan option, or feta for a tangier flavor.

How can I prevent mushrooms from becoming soggy?

Avoid overfilling them with stuffing, and consider prebaking the caps slightly before adding the stuffing to eliminate excess moisture.

Is this recipe suitable for low-salt diets?

Yes, reduce added salt and choose low-sodium cheeses to create a low-salt version.

Can I use portobello mushrooms instead?

Absolutely, but note that they are larger, requiring more filling, and may need a few extra minutes of cooking time.

What beverage pairs best?

A chilled white wine like Pinot Grigio enhances the flavors, while herbal teas provide a refreshing non-alcoholic pairing.

Can I make these a day ahead?

Yes, prepare and stuff the mushrooms in advance, then bake them on the day of serving for best results.

What variations can enhance the basic recipe?

Including ingredients like crab meat or ground sausage can add depth and protein, creating a more substantial appetizer.

What’s a quick garnish idea?

Fresh parsley or grated cheese sprinkled post-bake highlights the dish’s flavors beautifully.

Is pre-cooking the filling necessary?

Yes, it enhances flavors and ensures a cohesive mixture, preventing a raw taste in the final dish.

How do I ensure even cooking?

Space the mushrooms with room to breathe on the baking sheet for uniform heat distribution and avoiding overcrowding.

Additional Resources

Discover related recipes like Gouda and Spinach Stuffed Mushrooms or experiment with stuffed bell peppers for a vegetable twist. For technique insights, explore guides on perfecting sautéing or the science behind baking crisp toppings.

Equipping your kitchen with versatile baking sheets and a garlic press will streamline the process of making these memorable mushrooms.

Join the Conversation

We love seeing your creative takes on the Best Ever Stuffed Mushrooms! Share your photos on social media with #StuffedMushroomsMagic, or leave a review of the recipe in the comments below. Engage with our community for inspiration or to discover exciting personal variations to try.

The Recipe

Best Ever Stuffed Mushrooms

Serves: 4

Prep Time: 15 mins

Cook Time: 20 mins

Total Time: 35 mins

Kitchen Equipment Needed

  • Baking sheet
  • Mixing bowl
  • Sauté pan
  • Garlic press
  • Knife and cutting board

Ingredients

  • 12 large mushrooms, stems removed
  • 1 tbsp olive oil
  • 1 small onion, finely chopped
  • 3 cloves garlic, minced
  • 1/4 cup bread crumbs
  • 1/4 cup grated Parmesan cheese
  • 1/4 cup chopped fresh parsley
  • Salt and pepper to taste

Directions

  1. Preheat your oven to 375°F (190°C).
  2. Clean the mushrooms with a damp cloth, carefully removing the stems without breaking the caps.
  3. In a sauté pan, heat the olive oil over medium heat. Add the onions and garlic, cooking until the onions are soft and translucent.
  4. Remove the pan from heat and stir in the breadcrumbs, cheese, parsley, salt, and pepper. Mix until combined.
  5. Stuff each mushroom cap with the mixture, pressing lightly to ensure it stays in place.
  6. Arrange the mushrooms on a baking sheet and bake for approximately 20 minutes, until the tops are golden brown.
  7. Serve warm, garnished with extra parsley if desired.

Recipe Notes

  • For added creaminess, incorporate 2 tablespoons of cream cheese into the filling.
  • These mushrooms are versatile—try adding diced bacon or sausage for extra flavor.
  • If you prefer a spicier kick, add a pinch of crushed red pepper flakes to the stuffing mixture.

Irresistible Strawberry Cheesecake Crunch Bites Recipe for Dessert Lovers

Strawberry Cheesecake Crunch Bites: Delightful Mini Treats

⚖️
Difficulty
Easy

⏲️
Prep Time
15 mins

🕒
Cook Time
5 mins

⏱️
Total Time
20 mins

🍽️
Servings
24 bites

Indulge in the mouthwatering world of miniature desserts with our Strawberry Cheesecake Crunch Bites. These delightful, poppable treats blend the creamy richness of cheesecake with the fresh, tangy burst of strawberry, all encased in a satisfying crunch. Perfect for parties or a sweet snack, these bites offer a symphony of flavors and textures that are as easy to make as they are to eat.

Imagine biting into a luscious combination of velvety cheese paired with a fruity punch of strawberry; it’s a taste that leaves a lingering desire for more. These Strawberry Cheesecake Crunch Bites are crafted to lure dessert lovers with their delicate balance, making them an irresistible crowd favorite. Each bite presents a sweet symphony that dances on your palate, inviting joy and satisfaction.

Perfect for picnics and family gatherings, these cheesecake crunch bites are not just delicious but also visually captivating. With their ruby-red strawberry topping and golden crunchy base, they bring color and zest to any dessert spread.

Quick Recipe Highlights

  • Flavor Profile: A delightful blend of sweet and tart fruitiness combined with creamy undertones, balancing perfectly between the vibrant strawberries and smooth cheesecake filling.
  • Texture: Offers a luxurious combination of creamy filling juxtaposed with the crispiness of a crumbly crust.
  • Aroma: Inviting hints of strawberry that mingle with the subtle richness of cream cheese, creating a nose-pleasing experience.
  • Visual Appeal: Bright red strawberry accents atop a creamy white base, encased in a golden crust, creating a stunning tabletop presentation.
  • Skill Level Needed: Simple enough for beginners, requiring basic mixing and layering techniques that are easy to follow.
  • Special Equipment: A mini muffin pan is recommended to shape the bites perfectly, along with a mixer for blending cream cheese and sugar smoothly.

Recipe Overview

  • Difficulty Level: Chosen to be easy, this recipe is accessible to novice bakers and children, allowing everyone to enjoy the creation process.
  • Category: Perfect under desserts, you’ll swoon over these quick bites in parties or as after-dinner treats.
  • Cuisine: A fusion of classic American dessert heritage with contemporary twist of bite-sized indulgence.
  • Cost: Affordable to make, these treats utilize common household ingredients, approximately costing under $10 for two dozen.
  • Season: Best enjoyed when strawberries are in season for the freshest flavor, typically spring and summer.
  • Occasion: Suitable for birthdays, potlucks, and bridal showers, these bites are versatile, adding charm to various gatherings.

Why You’ll Love This Recipe


The Strawberry Cheesecake Crunch Bites are loved not only for their delectable flavor and texture but also for their sheer convenience. Quickly made within 20 minutes, they allow you more time to enjoy with family and friends rather than spending long hours in the kitchen. The creamy and fruity elements ensure a satisfying taste that resonates with both adults and children alike, promising a hit at any kind of gathering.

These thoughtful bites are relatively healthy, using a balance of cream cheese and fresh fruits, providing essential nutrients in a dessert form. Indulge guilt-free, knowing each piece is crafted with wholesome ingredients. Additionally, the compact size makes portion control straightforward, offering a treat without the temptation of over-indulgence.

Turn any event into a celebratory affair when you serve these bite-sized wonders. Their ornate presentation adds a festive air to any table, turning casual gatherings into memorable occasions. The brilliance in design and taste encourages compliments and conversations, making these bites a social delight.

Sourcing ingredients for this recipe is effortless, with strawberries and cream cheese widely available year-round. This makes the Strawberry Cheesecake Crunch Bites an accessible and cost-effective treat, ideal for the spontaneous dessert artist looking to surprise guests without breaking the bank or a sweat.

Historical Background and Cultural Significance


Strawberry cheesecake has roots that trace back to the ancient Greeks, who first coined the term “cheese cake.” Throughout the centuries, its evolution has seen numerous adaptations, including the addition of strawberries, which became a staple in the United States in the 1800s. The mini bite format, however, brings a modern twist to this age-old classic.

Culturally, strawberries signify love and happiness in many traditions, which adds a heartfelt touch to every bite consumed. These tiny cheesecake bites preserve the essence of happiness and love, whether shared among friends or loved ones at family events.

Mini cheesecakes originally gained popularity in the 1950s, reflecting a shift towards convenient party foods as home entertaining became more commonplace. The evolution of these bites has seen them adapted into various flavor combinations and tweaks, keeping in step with culinary trends.

Regional variations have emerged, with some integrating different homemade fruit jams or cheese alternatives based on local preferences. Whether in New York, famed for its renowned cream cheese cheesecakes, or found in Southern homes featuring tangy fruits, these treats have a national love affair.

Ingredient Deep Dive


Fresh strawberries are the heart of these cheesecake bites, celebrated for their bright color and sweet, floral aroma. For centuries, strawberries have symbolized romance and purity, making them a fitting choice for these charming desserts. They bring a light, natural sweetness, packed with vitamin C and powerful antioxidants promoting good health.

Selecting prime strawberries ensures the best flavor, with a deep red color indicating ripeness. Store them in a refrigerated setting to maintain their freshness, but ensure they aren’t left unwashed until just before use to maintain their structural integrity.

Likewise, cream cheese, originally from the vibrant culture of New York dairy artisans, lends a creamy texture and rich body to the cheesecake filling. Packed with calcium and essential fats, it makes a deliciously smooth dessert centerpiece. Choose a reputable brand and allow it to reach room temperature before blending for best results, preventing lumps.

To maintain cream cheese’s freshness, it should remain refrigerated and tightly sealed in its original packaging. If needed, consider mascarpone for a slightly sweeter alternative or Greek yogurt for a lower-calorie substitute.

Common Mistakes to Avoid

  • Overmixing the cream cheese mixture, leading to a runny consistency that doesn’t hold up well once cooled. Mix until just combined.
  • Using unripe strawberries, which lack flavor and sweetness, detracting from the overall taste.
  • Not allowing the bites to set adequately after baking, causing a messy eating experience.
  • Forgetting to grease the muffin pan, resulting in sticky bites that won’t release cleanly.
  • Overbaking can result in a dry texture. Keep an eye on them for a perfect creamy bite.
  • Neglecting to cool bites significantly affects their consistency and flavor development.
  • Skipping crust pressing firmly can lead to crumbly bites that fall apart easily.
  • Underestimating portion sizes might lead to bites that don’t hold together well.

Essential Techniques


Master mixing cream cheese to a smooth, lump-free mixture for supremely creamy cheesecake bites. Begin with softened cheese to allow for gentler mixing, aiding in achieving a silky consistency. Use a low-speed setting to avoid incorporating too much air, which can undermine texture integrity.

Firmly pack the base crumbs with gentle pressure to form a solid crust. A well-packed base prevents leakage and crumbling, allowing each bite to maintain its structure when removed from the pan.

Practice patience with cooling, as abrupt changes in temperature can impair texture and lead to cracks. Ideal cooling should be gradual, facilitating flavor development and cheesecake setting to optimal consistency.

Pro Tips for Perfect Strawberry Cheesecake Crunch Bites


Choose ripe, fragrant strawberries for maximum flavor impact. Their natural sweetness and bright aroma elevate the entire dessert, bringing depth to every bite.

Refrigerate the cream cheese well in advance and allow to soften at room temperature prior to mixing, ensuring a smoothly blended filling without lumps.

For a golden crust, keep an eye on the baking time. Pull the bites as soon as the edges darken slightly to avoid drying out the cheesecake filling.

Incorporate a touch of lemon juice to enhance both the cheesecake flavor and strawberry’s natural sweetness, creating a pleasantly balanced bite.

Variations and Adaptations


Regional variations can incorporate local fruits such as blueberries or raspberries, which can be equally delightful. Swap strawberries for a different berry compote for seasonal freshness or dietary preferences.

For a seasonal twist, integrate winter spices like cinnamon and nutmeg during colder months, offering a warm, comforting bite. Alternatively, add mint for a fresh summer rendition.

Dietary modifications are seamless, using lactose-free cream cheese or non-dairy substitutes for a vegan adaptation. Consider almond or oat crust bases for gluten-free varieties, catering to diverse dietary preferences and needs.

Serving and Presentation Guide


Serve these bites on an elegant tiered tray to add dimension and interest to your dessert presentation. Set them apart with a dusting of powdered sugar or dollop of whipped cream as a finishing touch.

Traditional cheesecake accompaniments such as coffee or vanilla tea make perfect pairings, enhancing subtle flavors while keeping focus on the strawberries.

Wine and Beverage Pairing


Pair with light, sparkling wines like Prosecco to cut through the richness while complementing the strawberry nuances. Alternatively, a rich dessert wine can augment the vanilla notes in the cheesecake.

For non-alcoholic choices, opt for green tea or a mild fruit infusion that will echo the strawberry’s freshness without overwhelming the palate.

Storage and Shelf Life


Store your cheesecake bites in an airtight container in the refrigerator for up to 5 days, sealing in freshness. They can also be frozen for longer storage, but allow them to thaw in the fridge to maintain texture before serving.

Recognize spoilage by watching for discoloration or unpleasant odors, and ensure proper hygiene when handling post-baking.

Make Ahead Strategies


Prepare bites in advance by assembling the components and refrigerating a day before serving. This allows for flavors to meld, providing a richer taste experience.

As a fresh touch, hold off garnishing until serving time, ensuring each bite is presented at its very best.

Scaling Instructions


To scale down for smaller gatherings, simply halve ingredient quantities, maintaining the same proportions for consistent quality. Doubling the recipe requires a larger mixing vessel to adequately incorporate ingredients without spilling.

Keep an eye on cooking times, adjusting slightly based on bite size when altering quantities. Utilize proper pans and have extra ready if needed to bake additional batches.

Nutritional Deep Dive


Each Strawberry Cheesecake Crunch Bite offers a balanced macro profile for a dessert, composing of healthy fats from cream cheese and antioxidant-rich strawberries for a heartening treat.

For dietary-conscious consumers, assess portion sizes carefully, relishing one or two bites for satisfying indulgence without excess calorie intake.

Dietary Adaptations


Adapt these bites for a gluten-free palate by choosing almond flour bases. For dairy-free or vegan alternatives, explore plant-based cream cheese and butter substitutes without compromising flavor.

Keto enthusiasts can utilize low-carb sweeteners and specific almond or coconut flour crusts to enjoy these bites while maintaining dietary goals.

Troubleshooting Guide


Addressing texture concerns: Ensure not to over mix or over bake, which impacts creamy texture. Balance flavor by adjusting sweetness levels to complement strawberry tartness.

Temperature consistency is vital, facilitating smooth cooling and preventing cracks. Invest in quality mini pans to prevent sticking and bypassing unnecessary challenges.

Adjust timing concerns according to specific oven calibration variances, revisiting ingredient proportions if using alternative dietary adaptations.

Recipe Success Stories


Readers rave about the simplicity and elegance of these bites, sharing variations incorporating seasonal fruit jams and adjusting sweetness levels to suit individual palates.

Captured in vibrant photography to celebrate their creation, these Strawberry Cheesecake Crunch Bites shine as culinary accomplishments shared among friends and family.

Frequently Asked Questions

Can I use frozen strawberries?
Fresh strawberries are recommended for optimal flavor and texture. If using frozen, ensure they’re well thawed and drained to avoid excess moisture.

How do I prevent cheesecakes from sticking to the pan?
Thoroughly grease your pan or use parchment liners to facilitate easy removal, ensuring the crust and cheesecake release intact.

What’s the best way to serve them?
Arrange on a serving platter, chilling for a few minutes before, to ensure freshness and visual appeal before your guests arrive.

Can I make these a day in advance?
Absolutely, these bites actually develop better flavor when prepared a day ahead, giving time for the flavors to meld in the refrigerator.

What if I don’t have a mini muffin pan?
A standard muffin tin can be used, although this will yield fewer, larger bites which may require slightly adjusted cooking times.

How do I store leftovers?
Store any leftovers in an airtight container in the fridge. If freezing, wrap each bite in plastic wrap before adding them to a sealed container to avoid freezer burn.

Can these be made vegan?
Yes, use a plant-based cream cheese and substitute the buttery crust with coconut oil or vegan butter to accommodate a vegan diet.

Are there low-sugar options?
Natural sweeteners like honey or maple syrup can be used in moderation, but be aware this may alter the texture slightly.

Will these bites last through a picnic?
With proper storage in insulated carriers, these cheesecake bites fare well for short-term outdoor gatherings.

Do I need any special tools?
Beyond a mini muffin pan, a mixer for cream cheese is all you need for smooth, lump-free cheesecake filling.

Additional Resources


Explore more creamy dessert adventures with our related recipes like Lemon Blueberry Cheesecake Parfaits, and boost your baking confidence with our detailed technique guides.

For equipment recommendations, check our post on essential baking tools that simplify kitchen tasks, ensuring the perfect bake every time.

Join the Conversation


We invite you to share your Strawberry Cheesecake Crunch Bite creations on social media with #CheesecakeBiteDelights. Explore renditions from fellow bakers worldwide, showcasing their unique variations.

Share your experiences and engage in a vibrant community dialog, offering tips, feedback, and inspirational journey others can delight in.

The Recipe

Strawberry Cheesecake Crunch Bites

Serves: 24 bites

Prep Time: 15 mins

Cook Time: 5 mins

Total Time: 20 mins

Kitchen Equipment Needed

  • Mini muffin pan
  • Mixing bowls
  • Electric mixer
  • Spatula
  • Measuring cups and spoons

Ingredients

  • 1 cup graham cracker crumbs
  • 2 tablespoons melted butter
  • 1/4 cup sugar
  • 8 oz cream cheese, softened
  • 1/4 cup powdered sugar
  • 1 teaspoon vanilla extract
  • 2 tablespoons lemon juice
  • 1 cup fresh strawberries, chopped

Directions

  1. Preheat the oven to 350°F (175°C).
  2. Mix graham cracker crumbs, melted butter, and sugar in a bowl until crumbs are well coated.
  3. Press the mixture firmly into the bottom of each mini muffin cup.
  4. Bake for 5 minutes, then let cool completely.
  5. In a large bowl, beat the cream cheese until smooth. Add powdered sugar, vanilla extract, and lemon juice; mix until creamy.
  6. Spoon the cream cheese mixture over cooled crusts, topping each with a piece of strawberry.
  7. Chill in the fridge for at least an hour before serving.

Recipe Notes

  • For a gluten-free version, substitute graham cracker crumbs with crushed almonds or gluten-free biscuits.
  • Adjust sweetness levels by adding or reducing sugar in the cream cheese mixture.

Savory Steak with Potatoes: A Perfect Weeknight Dinner Recipe

Steak with Potatoes: A Savory Delight

⚖️
Difficulty
Intermediate

⏲️
Prep Time
15 mins

🕒
Cook Time
25 mins

⏱️
Total Time
40 mins

🍽️
Servings
4

A perfectly cooked steak with potatoes is the ultimate comfort dish, filling your kitchen with a mouth-watering aroma, and your dining table with a delicious meal everyone will love. Whether you’re planning a cozy family dinner or a romantic date night, this dish is sure to satisfy. The rich, juicy flavors from the tender steak paired with crispy, earthy potatoes offer a balance of taste and texture that’s truly delightful.

Quick Recipe Highlights

  • Flavor Profile: The steak boasts a savory, umami-rich flavor enhanced by a hint of garlic and herbs. Potatoes offer a buttery, slightly sweet contrast that complements the meat perfectly.
  • Texture: Experience the tender, juicy steak paired with crispy-on-the-outside, fluffy-on-the-inside potatoes.
  • Aroma: A captivating blend of sizzling steak, roasted garlic, and fresh herbs fills the air.
  • Visual Appeal: The dish presents a beautiful contrast with the golden-brown crust of the steak and the rustic charm of roasted potatoes.
  • Skill Level Needed: Requires familiarity with pan-searing steak and roasting potatoes for the best texture.
  • Special Equipment: A cast-iron skillet for searing and a baking sheet for roasting.

Recipe Overview

  • Difficulty Level: Intermediate. This recipe requires timing precision and a keen eye for searing steak to perfection without overcooking.
  • Category: This falls under main courses and is ideal for hearty dinners.
  • Cuisine: The dish has its roots in classic western cuisine, influenced heavily by American steakhouse traditions and French cooking techniques.
  • Cost: Moderate. Steak can be a bit pricey depending on the cut chosen, but the payoff in flavor and satisfaction is worth the investment.
  • Season: Best enjoyed year-round, especially during winter for its comforting warmth.
  • Occasion: Perfect for special occasions, family gatherings, and festive dinners.

Why You’ll Love This Recipe


Delving into the taste, the steak with potatoes provides a rich, hearty meal that’s deeply satisfying. The balance of juicy steak and crispy potatoes creates a medley of textures that will make every bite exciting. Beyond the taste, the convenience of this dish is a major selling point. With straightforward preparation steps, even on busy evenings this meal can come together splendidly without a hitch.

Nutritionally speaking, this dish offers a good source of protein from the steak and carbohydrates from the potatoes, making it filling and energizing. This balanced meal can complement most dietary requirements when the right cut of beef is chosen. Socially, steak with potatoes is a crowd-pleaser that works well for gatherings. The dish has the power to bring people together, making your dining experience as memorable as it is delicious.

In terms of cost-effectiveness, selecting more economical cuts of beef can make this dish accessible on a budget without sacrificing quality or taste. Its simplicity in ingredients and preparation ensures that everyone, from novices to experienced cooks, can achieve a great meal without high expenses.

Historical Background and Cultural Significance


Steak and potatoes, a staple in many Western households, has a proud history that dates back centuries. The combination originated from a time when hearty, simple foods were the staple diet around the world. Over the years, it has evolved from a meal of necessity to one of sophistication and indulgence, often celebrated in modern gastronomic circles.

Culturally, steak and potatoes embody the essence of comfort food, serving as a symbol of home-cooked indulgence across generations. This dish’s evolution into fine dining showcases its versatility and enduring appeal. Regional variations abound, with each locale adding its unique twist through herbs, spices, and cooking techniques.

Ingredient Deep Dive


Let’s explore the steak, the star of this dish, celebrated for its rich flavor and juicy texture. Culturally revered and often the centerpiece of a meal, steak provides high-quality protein and essential vitamins. When selecting, look for cuts with good marbling for added flavor. To store, keep it wrapped in the fridge for up to two days or freeze for longer shelf life. Substitute beef with chicken or plant-based “steak” for variations.

Potatoes, the companion to the steak, have been a global staple for centuries. Offering vital nutrients like vitamin C and potassium, they are versatile and easy to work with. Choose firm, blemish-free potatoes and store them in a cool, dark place to prevent spoilage. For those seeking alternatives, consider substituting with sweet potatoes or other root vegetables.

Common Mistakes to Avoid

  • Overcooking the steak, which can result in toughness: Always adjust your heat level and use a meat thermometer to check doneness.
  • Not resting the steak before slicing: Allow the meat to rest to retain juices.
  • Under-seasoning the dish: Ensure you are generous with herbs and spices to elevate flavors.
  • Wrong potato size: Ensure even slicing for uniform cooking.
  • Skipping the preheating of the skillet: A hot pan ensures a well-seared crust.
  • Using the wrong oil: High smoke point oils like vegetable oil are best for searing.
  • Neglecting to toss potatoes: Regular tossing ensures even browning.
  • Cutting the steak immediately after cooking: Avoid slicing until it has rested for a few minutes.

Essential Techniques


Mastering steak with potatoes requires finesse in certain cooking techniques. Starting with steak, searing is crucial for developing a flavorful crust. This involves heating the pan until it’s smoking hot, then carefully placing the steak in it without moving so a rich crust forms. Recognizing visual cues like meat pulling away from the pan will indicate readiness for flipping.

For potatoes, roasting involves balancing high heat to crisp the exterior while keeping the interior fluffy. Tossing the potatoes midway through roasting ensures they cook evenly and develop color; glazing them once out of the oven adds a burst of flavor. Adapting these techniques can transform your cooking, infusing more flavor and texture into the dish.

Pro Tips for Perfect Steak with Potatoes


– Achieve a flawless crust by patting the steak dry with a paper towel before seasoning it generously.
– Preheat your skillet well before adding the steak to ensure a crisp, golden-brown sear.
– Don’t overcrowd the pan when cooking potatoes, as this can lead to steaming rather than roasting.
– Allow your steak to reach room temperature before cooking it for an even cook.
– Always use a meat thermometer to check your steak’s internal temperature to your liking.
– For added flavor, add a sprig of rosemary or thyme to the roast potatoes during the final few minutes of cooking.
– Consider deglazing the steak pan with a splash of wine to create a simple pan sauce.
– Basting the steak with butter during the last minute of cooking adds depth and richness.

Variations and Adaptations


Explore regional takes by using local herbs and spices. For instance, adding a sprinkle of smoked paprika can lend a Spanish flair. For seasonal adaptations, consider including roasted root vegetables in winter or fresh asparagus in spring.

For dietary needs, swap regular potatoes for sweet or purple potatoes to increase fiber intake and add antioxidant benefits. Adjust the dish to suit keto diets by omitting the potatoes entirely and serving with a generous helping of sautéed greens or a crisp salad.

To alter the texture, consider mashing the potatoes for a richer, creamier accompaniment, or air frying them for an extra crispy finish.

Serving and Presentation Guide


Consider plating the steak cut into slices for easy serving, fanned out attractively on the plate. Garnish with a sprinkle of fresh herbs such as parsley or chives for added color. For potatoes, serve them in a rustic heap beside the steak, perhaps in a decorative bowl or platter for larger meals.

For traditional twists, serve with English-style peas or grilled asparagus. More modern service ideas include placing the steak atop a bed of greens, drizzled lightly with balsamic glaze. Ensure your steak is warm but not hot to the touch, serving it at a slightly lower than room temperature for the best flavor profile.

Wine and Beverage Pairing


A robust red wine, such as a cabernet sauvignon or a shiraz, pairs beautifully with the rich flavors of the steak. These wines provide a full-bodied complement that enhances the umami flavors. If preferring a non-alcoholic choice, a well-brewed black tea or grape juice can mirror the depth of red wine.

For white wine enthusiasts, a well-rounded chardonnay could also work, though less traditional. As for coffee lovers, a strong espresso can be an unexpected, delightful end to the meal, cutting through the meal’s richness. Serve drinks slightly chilled for wines and juices, while teas and coffees should be served hot to balance the meal.

Storage and Shelf Life


To store leftovers, place steak and potatoes in separate airtight containers and refrigerate for up to three days. If planning to consume later, freezing is an option. To freeze, wrap the steak tightly in plastic wrap and then aluminum foil for extended freshness, labeling with the date for easy identification.

Reheat gently in a low oven to prevent drying out or microwave on medium until warmed through, taking care to retain the flavors and texture. For frozen portions, allow to thaw in the refrigerator overnight before reheating.

Make Ahead Strategies


Preparing elements of this meal in advance can save time. Potatoes can be peeled, cut, and stored in cold water in the fridge a day before cooking. Season the potatoes and steak before the final cooking step. Marinating the steak overnight can also intensify flavors, adding a layer of depth once cooked.

Ensure quality and freshness by keeping storage and handling optimal, refraining from assembling too early, which may lead to soggy potatoes. Reheating steak at a low temperature and searing briefly at the end maintains perfect juiciness.

Scaling Instructions


When scaling the recipe for larger groups, consider doubling or tripling the amounts. Use larger pans or multiple cooking vessels to allow each surface to properly sear and each potato slice to roast evenly. Adjust cooking times slightly for the steak when increasing quantity to ensure each piece cooks through without overcooking.

Conversely, halving the recipe might suit small gatherings, preserving flavor by scaling down the cook and prep times proportionately. When storing, ensure you package meal portions separately to maintain quality over several servings.

Nutritional Deep Dive


This dish serves as an excellent source of macronutrients, offering ample protein from the steak and carbohydrates from the potatoes. Potassium and vitamin C further enhance the nutritional profile from the potatoes, promoting muscle and cell function.

Incorporating lean cuts of steak ensures lower fat content, making the meal health-conscious without sacrificing taste. Portioning serves better dietary management, while replacing potatoes with vegetables like cauliflower can reduce calorie content, enhancing fiber intake without compromising satisfaction.

Dietary Adaptations


To make this dish gluten-free, ensure all added seasonings and sauces used are certified gluten-free and substitute soy sauce for tamari if marinades are necessary. For a dairy-free version, substitute butter used in basting with a plant-based alternative.

Vegan versions can use portobello mushrooms or tofu steaks for a hearty texture, substituting roasted sweet potato or a medley of roasted root vegetables for the traditional roast potatoes. For ketogenic adaptations, swap the potatoes for greens and use grass-fed butter for basting.

Troubleshooting Guide


If you encounter texture issues, reevaluate the cooking time for balance and doneness, ensuring potatoes and steak align with desired textures. For flavor imbalances, adjust seasoning or consider marinating in advance to deepen flavor penetration.

Temperature inconsistencies can be resolved by ensuring consistent heat distribution throughout cooking, adjusting midway if necessary. Substitute equipment challenges by using versatile cookware suitable for both stovetop and oven transitions, ensuring effective heat management.

Recipe Success Stories


Our readers express delight in the ease and satisfaction this dish brings to the table, often noted as a family favorite and go-to meal for guests. Variations have included garlic-herb infused butter bastings and exotic spice rubs, offering delightful twists.

Adaptations for dietary needs frequently implement colorful vegetable alternatives or different protein sources like chicken for variety. Community feedback often highlights the effective use of available seasonal ingredients to personalize the dish for various special occasions.

Frequently Asked Questions

What is the best cut of steak for this recipe?

Choose a cut like ribeye, New York strip, or filet mignon for the best texture and flavor. These cuts offer marbling that enriches the cooking process, providing a juicy and tender experience.

Can I use waxy potatoes instead of starchy ones?

Yes, waxy potatoes like Yukon or red potatoes hold their shape well when roasted and provide a creamy texture that complements the dish delicately.

How do I ensure my steak is cooked to my preferred doneness?

Using a meat thermometer is crucial. Aim for temperatures of 130°F for medium-rare, 140°F for medium, and 150°F for medium-well. Let it rest after reaching the targeted temperature to finalize cooking.

What’s a good substitute for beef steak?

Portobello mushrooms or thick slices of tofu can be marinated and roasted as a satisfying vegetarian or vegan alternative, maintaining similar flavor profiles when seasoned right.

How can I add more flavors to the potatoes?

Consider tossing them with garlic, rosemary, or thyme during roasting. A squeeze of lemon or drizzle of balsamic glaze afterwards can also enhance their flavor profile distinctly.

Is this dish freezer-friendly?

While potatoes may lose some texture when frozen, the steak can be frozen effectively. Wrap tightly in freezer wrap for up to three months to retain taste and quality.

Can I use a grill instead of a skillet?

Certainly! Grilling the steak imparts a smoky flavor that can uplift the dish. Adjust cooking times to prevent overcooking due to direct heat exposure.

What vegetables pair well with steak and potatoes?

Asparagus, green beans, or sautéed spinach make excellent complements, adding color and additional nutrition to the meal while enhancing the overall plate presentation.

How should leftovers be stored?

Store leftovers in airtight containers, keeping steak and potatoes separately. Refrigerate for up to three days, and reheat gently to maintain texture and flavors.

Is this meal suitable for meal prep?

Yes, pre-cook and package portions for quick weekday meals. Store in microwave-safe containers for easy reheating, ensuring a delicious and convenient dining option each time.

Does marinating the steak make a difference?

Marinating can enhance flavors greatly, especially if opting for lower-fat cuts of beef. Consider a simple blend of olive oil, garlic, and herbs to boost taste.

Additional Resources


Delve further into culinary excellence with related recipes, guiding you through mastering other proteins and their perfect pairings. Grasp fundamental techniques for crisp frying and methods to tenderize meats through in-depth guides. Explore detailed insights into choosing and preparing seasonal product favorites for any dish extension.

Our equipment recommendations can equip your kitchen with the essentials for efficiently managing both simple and advanced recipes, supported by enhanced cooking methods. Seeking seasonal variations will open new culinary horizons, guaranteeing your recipes reflect the freshest produce available.

Join the Conversation


Engage with a community of culinary enthusiasts by sharing your results on social media, accompanied by photography options that highlight your dish’s presentation. Provide reviews and suggestions to contribute to a collective resource of new ideas and flavor combinations.

Experiment with recipe variations that reflect your creativity and share your experiences, ensuring an inclusive and dynamic food preparation environment for enthusiasts all over. Through collaboration, unlock the potential of your culinary contributions, transforming them into delicious art forms meant to charm and satisfy.

The Recipe

Steak with Potatoes

Serves: 4

Prep Time: 15 mins

Cook Time: 25 mins

Total Time: 40 mins

Kitchen Equipment Needed

  • Cast-iron skillet
  • Baking sheet
  • Meat thermometer
  • Knife
  • Cutting board
  • Tongs

Ingredients

  • 4 steaks (ribeye or choice cut)
  • 6 medium potatoes, sliced
  • 2 tablespoons olive oil
  • 2 cloves garlic, minced
  • 1 teaspoon rosemary
  • Salt and pepper, to taste
  • 2 tablespoons butter

Directions

  1. Preheat the oven to 400°F (200°C).
  2. Toss the potatoes with olive oil, salt, pepper, and rosemary on a baking sheet.
  3. Roast the potatoes in the oven for 25 minutes, flipping halfway for even cooking.
  4. Season the steaks generously with salt and pepper on both sides.
  5. Heat the cast-iron skillet over high heat and add the steaks, searing for 3 minutes on each side.
  6. Add the butter and garlic to the pan, basting the steaks as they finish cooking to your desired doneness.
  7. Let the steaks rest on a cutting board for 5 minutes before slicing.
  8. Serve the steaks with roasted potatoes on the side, garnished with fresh herbs.

Recipe Notes

  • Choose your preferred steak cut based on personal taste and desired tenderness.
  • Use a meat thermometer to ensure precise cooking degrees for your steak.
  • For an added burst of flavor, consider marinating the steak overnight.

Irresistible Praline Popcorn Recipe for a Sweet Homemade Snack

Praline Popcorn: A Sweet and Crunchy Gourmet Treat

⚖️
Difficulty
Easy

⏲️
Prep Time
15 mins

🕒
Cook Time
45 mins

⏱️
Total Time
60 mins

🍽️
Servings
12

Step into the world of gourmet snacking with our irresistible Praline Popcorn. This delightful treat combines the crunch of perfectly popped corn with the rich, nutty goodness of pralines, all wrapped up in a buttery caramel coating. Whether you’re looking to satisfy a sweet tooth or entertain guests with a unique treat, Praline Popcorn is the perfect choice. Its tantalizing aroma fills your home, inviting everyone to gather around and indulge.

The magic of Praline Popcorn lies in its contrasting textures and flavors. Each bite delivers a crunchy popcorn base enveloped in a creamy praline coating. The sweetness of the caramel praline paired with the slight saltiness of the popcorn creates an irresistible harmony that beckons for more. Perfect for movie nights, family gatherings, or as a delightful homemade gift, this popcorn recipe is sure to impress.

Quick Recipe Highlights

  • Flavor Profile: A delightful combination of sweet caramel and nutty pralines with a hint of butter and salt, providing a harmonious taste experience.
  • Texture: The contrasting textures of crispy popcorn and crunchy pralines make for a satisfying mouthfeel that’s both light and indulgent.
  • Aroma: The sweet, nutty aroma of praline and caramelized sugar fills the air, making it impossible to resist.
  • Visual Appeal: Golden brown caramel-coated popcorn speckled with toasted pralines creates an inviting and elegant presentation.
  • Skill Level Needed: Easy enough for beginners, requiring only basic kitchen skills and equipment.
  • Special Equipment: You’ll need a large baking sheet and a reliable saucepan for making the caramel sauce.

Recipe Overview

  • Difficulty Level: Praline Popcorn is simple to prepare, making it an excellent choice even for novice cooks. The process primarily involves mixing and baking, with no intricate techniques required.
  • Category: This recipe falls under snacks and desserts, providing a sweet treat that’s perfect at any time.
  • Cuisine: Although pralines are deeply rooted in Southern American cuisine, this popcorn treat brings a touch of global gourmet flair to your table.
  • Cost: Relatively inexpensive, as it uses basic pantry ingredients such as popcorn kernels, sugar, butter, and nuts, making it budget-friendly.
  • Season: Suitable for any season, but especially enjoyable during cooler months when cozying up with a warm snack is most pleasant.
  • Occasion: Perfect for family gatherings, movie nights, holiday parties, or as a thoughtful homemade gift.

Why You’ll Love This Recipe


The flavor and texture appeal of Praline Popcorn is its most compelling feature. The sweet, crunchy coating paired with the airy popcorn creates a symphony of flavors and textures that is truly satisfying. The subtle aroma of toasted nuts enhances the overall taste profile, making each bite a delightful experience.

Convenience is another benefit. The preparation of this praline popcorn is straightforward and quick, requiring no complex culinary skills. Even those new to cooking will find the step-by-step process easy to follow, ensuring a rewarding experience.

From a nutritional standpoint, Praline Popcorn provides a sweet treat with the benefit of fiber from the popcorn and healthy fats from the nuts. While indulgent, it is a much healthier option compared to many store-bought sweets, allowing for a guilt-free enjoyment.

Praline Popcorn is a fantastic addition to any social gathering. Serve it at parties, family get-togethers, or as a unique offering at potlucks. Its universal appeal across ages makes it a crowd-pleaser, sure to spark conversations and laughter.

Finally, it’s cost-effective and accessible. Created from everyday pantry staples, it requires no special equipment or ingredients. It’s an economical way to make a gourmet treat at home, showcasing the balance of budget-conscious and flavor-forward cooking.

Historical Background and Cultural Significance


Praline Popcorn owes its origin to the deep culinary traditions of the Southern United States, where pralines have woven themselves into the cultural tapestry. Originally a French confection, pralines made their journey to the American South, where they evolved to include the rich flavors of local pecans.

The cultural importance of pralines in Southern cuisine is profound. Pralines, originally introduced by French settlers, became a decadent treat cherished for their unique combination of creamy textures and nutty flavors, a hallmark of Southern culinary innovation.

Over time, the evolution of the recipe to include popcorn represents a melding of everyday American snacks with time-honored confections to create something uniquely new. This integration symbolizes the adaptability and creativity inherent in American cooking.

Regional variations of pralines themselves offer an intriguing look at the diversity in Southern cooking. While traditional pralines use pecans, some adaptations incorporate almonds or other nuts, showcasing a flexibility in ingredients that reflects local agricultural specialties.

Ingredient Deep Dive


Popcorn kernels serve as the crunchy base for our Praline Popcorn. Historically, popcorn has been a staple snack in American households known for its versatility and affordability. Nutritionally, popcorn offers a good source of fiber, making it a wholesome choice for snacks.

The secret to selecting popcorn lies in choosing quality kernels that yield fluffy, crisp puffs when cooked. Store popcorn in an airtight container to preserve its freshness and to ensure when popped it reaches the perfect texture necessary for holding the praline coating.

The praline element involves butter, sugar, and nuts, typically pecans. Butter imparts a rich, creamy texture and flavor that’s essential to pralines, while sugar caramelizes to form the sweet, crispy coating. Pecans provide a nutty, earthy undertone that perfectly complements the sweetness.

Selecting the freshest nuts is critical to achieving the best flavor. Pecans should be stored in a cool, dry place to ensure they remain fresh. For a twist, consider substituting pecans with almonds, walnuts, or a mix of your favorite nuts.

Common Mistakes to Avoid

  • Not fully popping the popcorn: Ensure all kernels are popped before adding any seasoning to avoid uneven texture and flavor distribution.
  • Burning the caramel: Keep the heat to medium and stir continuously to avoid burning and ensure a smooth, golden praline coating.
  • Insufficient coating: Make sure the popcorn is evenly coated with praline sauce for a consistent flavor and texture throughout.
  • Rushing the cooling process: Allow enough time for the praline popcorn to cool completely for the coating to harden properly and achieve the optimal crunch.
  • Over-mixing the caramel sauce: Be gentle to maintain a smooth consistency without introducing air bubbles that could affect the texture.
  • Forgetting to stir during baking: Stir the popcorn during the baking phase to ensure an even color and caramelization.
  • Using wet or damp nuts: Moisture can prevent caramelization. Ensure nuts are dry before use to achieve the right texture.
  • Storing improperly: Store in an airtight container to preserve freshness and texture. Avoid exposure to humidity.

Essential Techniques


Mastering the popping of popcorn is crucial. Heat oil in a large pot, add a few kernels until they pop, then add the rest. Cover with a lid, shaking occasionally to ensure all kernels pop evenly. This technique helps avoid burning and assures uniformity.

Caramelization is key to the praline experience. Cook the sugar and butter mixture over medium heat, stirring constantly. Watch carefully as the sugars melt and turn a rich golden color before adding the nuts. Perfecting this step ensures the praline glaze smoothly coats the popcorn.

Pro Tips for Perfect Praline Popcorn


Use high-quality kernels to achieve the fluffiest popcorn, providing a perfect foundation for your praline coating. Freshness matters for both popcorn and nuts.

For a deeper caramel flavor, allow the sugar to reach an amber hue before removing it from the heat. Careful timing and attention will bring out richer flavors.

When coating the popcorn with the praline mix, work quickly. Pour while the caramel is still warm to ensure even distribution before it begins to harden.

Want an extra crunch? Toast the nuts lightly before combining with the popcorn. It adds a layer of flavor depth that complements the sweetness.

For those who prefer a touch of salt with their sweetness, a light sprinkle of sea salt over the coated popcorn before it sets provides a delightful contrast.

If gifting your Praline Popcorn, consider packaging in clear cellophane bags tied with a ribbon. This not only looks professional but helps maintain freshness.

Schedule a movie night or social gathering right after making this to enjoy the popcorn at its freshest and most flavorful.

Variations and Adaptations


Regional variations of praline popcorn might include using cashew nuts in coastal areas or almonds where they are locally available. This small change can significantly tweak the flavor profile while staying true to the original concept.

Seasonal adaptations could involve incorporating spices like cinnamon or nutmeg during the holiday season to give it a festive flavor that’s warm and inviting.

For those needing dietary modifications, a vegan version can be achieved by using plant-based butter alternatives. Ensure all other components used align with dietary needs.

Flavor variations are endless; consider adding a splash of vanilla or a sprinkle of cayenne pepper to introduce new flavor dynamics based on personal preferences or to pair with specific occasions.

To modify texture, experiment with the caramel to sugar ratio until you find your preferred sweetness and crunch. Some opt for a chewier, candy-like coating, while others enjoy the crisp, brittle finish.

For an upscale presentation, serve the praline popcorn in individual paper cones or small decorative bowls. This adds an elegant touch and offers easy serving options at gatherings.

Serving and Presentation Guide


When serving Praline Popcorn, the presentation can enhance the experience. Use rustic, parchment-lined baskets for a charming, casual look suitable for relaxed events.

Add garnishing with a sprinkle of finely chopped nuts or a light dusting of powdered sugar for an elegant touch. This can enhance the visual appeal and texture.

Traditional accompaniments might include a selection of fine chocolates or fruit, offering complementary flavors and enhancing the richness of the snack.

Modern serving suggestions could include pairing with a selection of cheeses for a sophisticated snack platter, enhancing the popcorn’s gourmet appeal.

Consideration of temperature is important; serve at room temperature to ensure the praline coating remains at the ideal texture.

For portion control, serve the popcorn in small individual containers. This ensures convenience and hygiene, particularly in large gatherings.

Wine and Beverage Pairing


Pair Praline Popcorn with a crisp white wine, such as a Sauvignon Blanc, to balance the sweetness and cleanse the palate with each sip. The light, fruity notes of the wine complement the nutty coating.

Non-alcoholic alternatives might include a tart, unsweetened iced tea or a lightly flavored sparkling water. These beverages provide a refreshing contrast to the rich flavors of the praline.

For the coffee and tea enthusiast, a robust black tea or espresso pairs beautifully, enhancing the deep, caramel notes of the praline while providing a perfect backdrop of contrasting flavors.

Consider serving chilled drinks to balance the sweet richness of the popcorn, enhancing the eating experience with a refreshing contrast in temperature.

When serving, ensure beverages are readily available alongside the popcorn, creating a cohesive and enjoyable tasting experience for guests.

Storage and Shelf Life


Store Praline Popcorn in an airtight container to maintain its freshness and crunch. Keeping moisture out is key to preserving the texture and flavor.

Preferably store in a cool, dry pantry away from direct sunlight and humidity. Excess moisture can cause the praline to soften and lose its delightful crunch.

Utilize glass jars or plastic bags with an airtight seal for best results. These containments help keep the popcorn fresh for about a week, although it rarely lasts that long due to its irresistible taste.

Watch for signs of spoilage, such as an off smell or change in texture, and discard any affected popcorn. Freshness is best for optimal flavor.

If reheating is necessary, a light toast in a low-temperature oven can help restore the crispiness if the popcorn turns soft over time. Monitor closely to prevent burning.

For those wanting to prepare ahead, you can freeze praline popcorn. Ensure it is in a vacuum-sealed or airtight container, and consume within two months for best results.

Make Ahead Strategies


Advance preparation of Praline Popcorn can significantly streamline event planning. Begin by popping the corn and preparing all ingredients for the praline trend in advance.

Store the uncoated popcorn in an airtight container until ready to coat with praline, helping maintain freshness until you’re ready for the final steps.

Assess quality impact by sampling a small batch ahead of your main activity to ensure everything tastes optimal and adjusts technique or ingredient quantities if needed.

During assembly, pre-measure all ingredients into portioned containers to expedite the mixing process, ensuring everything flows smoothly.

Consider holding back some of the praline-coated popcorn for a final touch of freshly coated bits right before serving to maintain the best taste.

Fresh additions such as a light drizzle of chocolate or sprinkle of coconut can be added just before serving to enhance both flavor and presentation.

Scaling Instructions


When needing to scale the Praline Popcorn recipe for larger gatherings, the process is simplicity itself. The quantity of popcorn can be doubled or tripled with ease, maintaining the ratios for even coverage.

Halve the ingredients conveniently should you need a smaller batch simply. Divide all quantities equally for consistent results.

Cooking equipment may need adjustments. For doubled or tripled batches, use multiple baking sheets or larger ones to ensure even cooking without overcrowding.

Timing can be modified slightly when scaling. Monitor caramelization closely to avoid overcooking or burning when dealing with larger quantities.

Storage considerations become more critical with larger batches. Ensure you have enough airtight containers to keep your extra portions fresh and accessible for any impromptu snack attacks.

Nutritional Deep Dive


Praline Popcorn, though indulgent, fits within a balanced nutritional framework when consumed in moderation. Its primary components include carbohydrates from popcorn and sugar, with a good dose of healthy fats from nuts.

Macro breakdown indicates a treat primarily composed of carbohydrates, vital for energy, with nut fats complementing with satiating factors, making it a satisfying snack option.

The micronutrient analysis of Praline Popcorn shows elements such as zinc and vitamin E due to nuts, contributing to essential body functional support.

Health benefits can be realized through moderation, enjoying the fiber content of popcorn while balancing the sugar-heavy coating within dietary allowances.

Dietary considerations might include watching portion sizes to maintain a balance of energy intake and gently addressing the carbohydrate-to-fat ratio based on individual dietary goals.

For those mindful of weight management, integrating a serving within a well-rounded eating plan ensures enjoyment without overextending caloric intake.

Dietary Adaptations


For a gluten-free variant, ensure that all your ingredients, particularly spiced additives or flavorings used, are certified gluten-free. Popcorn kernels and the core ingredients generally comply.

Dairy-free adaptations involve substituting butter with non-dairy alternatives such as coconut oil or margarine suitable for your needs, keeping flavors intact while serving dietary requirements.

A vegan alternative swaps butter for vegan-friendly margarine and checks all additional ingredients are animal-product free, respecting lifestyle choices without sacrificing flavor.

Low-carb enthusiasts might explore ingredient substitutions where stevia-sweetened caramel or almond flour-based pralines offer more appropriate alternatives, achieving a close mimic in flavor without breaking the diet.

Keto and Paleo diets could benefit from nut butter based or coconut-derived sweeteners to maintain compliance while preserving the essential sweet-savory notes of the original.

Low-FODMAP versions might involve caution around certain nuts, but pecans, often better tolerated, can continue to serve as your go-to nut choice with mindful amount moderation.

For other specific diet modifications, always carefully check ingredient labels for compliance, considering the slightest variations that could impact dietary integrity.

Troubleshooting Guide


If texture issues arise with a soggy outcome, consider reducing the humidity during preparation and ensure complete cooling before container storage.

For flavor balance challenges, introducing a small test batch allows you to adjust sugar ratios and add seasoning or alternative sweetening agents to refine the direction.

Temperature problems often relate to the caramel process. Use a candy thermometer if available to gain precision during caramelization while stirring consistently.

Equipment challenges might occur if you’re working with insufficient popping capacity or poor heat distribution. Ensure correct pot size for popcorn and uniform pans for baking.

When faced with ingredient substitutions or adjustments, research alternatives with matching binding qualities, ensuring no disruption in praline/sugar coating adherence.

Timing concerns, whether prolonged or too brief, suggests precise attention throughout cooking phases. Utilize kitchen timers for stages to maintain coordination.

Recipe Success Stories


Community feedback indicates enthusiastic reception, with numerous adaptations inspiring others to customize their batches, incorporating spices like cinnamon or cayenne for bold twists.

Variation successes are seen with fruit inclusions like dried cranberries, offering additional texture and flavor layers, proving the recipe’s flexibility and creativity potential.

Adaptation stories reveal how readers have cleverly transformed this into vegan-friendly snacks at gatherings, maintaining tradition while achieving dietary accommodation.

Reader suggestions include packaging methods for gifts, such as decorative tins, creating attractive presentations when sharing Praline Popcorn.

Photography tips advise capturing the glossy, caramel hue on freshly made batches under natural light, emphasizing textural contrasts and enticing visuals.

Frequently Asked Questions

What if my caramel hardens too quickly? If your caramel cools or hardens before coating, gently reheat it on the stove on low until it loosens. Stir continuously to prevent burning.

How do I prevent popcorn from getting soggy? Ensure popcorn and nuts are thoroughly dry before coating, and store in a cool, dry place in airtight containers to maintain crispness.

Can I make this recipe without nuts? Yes, you can omit nuts entirely or replace them with seeds, like pumpkin or sunflower seeds, offering similar flavors and textures.

Is there a way to make this less sweet? Adjust the sugar ratio in the caramel mix or introduce unsweetened cocoa powder to balance flavors, reducing sweetness while adding depth.

Can this be made spicy? Yes, adding a pinch of cayenne pepper or incorporating chili-infused oils into the caramel can create a spicy variant for those who love heat.

How long will it stay fresh? Stored properly in airtight containers, Praline Popcorn can last for up to a week, retaining its flavor and crunch.

What are the ideal storage conditions? Store in a cool, dark place in airtight containers to prevent moisture absorption and keep the caramel’s crisp texture intact.

Is this suitable for freezing? Yes, freeze it in airtight containers for extended storage. Ensure consumption within two months to enjoy full quality.

Could I add chocolate? Absolutely, drizzling with melted chocolate after cooling can elevate the flavor profile, creating an even richer treat.

Whats an alternate topping suggestion? Consider toasted coconut, crushed pretzels, or even a light sprinkle of sea salt for a varied taste and texture enhancement.

Additional Resources


Discover related recipes like chocolate-covered popcorn or spiced nut blends that complement Praline Popcorn, creating beautiful snack assortments.

Technique guides can help master caramel making or demonstrate new popcorn popping methods for consistently perfect results every time.

Ingredient information offers insights on nut choices and sugar variations, allowing you to explore new flavors and educate yourself on nutritional aspects.

Equipment recommendations focus on achieving the best outcomes with reliable popcorn makers and durable baking sheets suited to confectionery demands.

Seasonal variations introduce ways to modify the popcorn recipe with seasonal fruits or festive spices, ensuring you have a themed treat all year round.

Join the Conversation


Engage with our community by sharing your Praline Popcorn creations on social media using our dedicated hashtag. Showcase your creations with photographs and interact with fellow cooking enthusiasts.

Photography tips can guide you on best capturing the glossy sheen and detail of your Praline Popcorn for a visually appealing post. Share your experiences and receive feedback.

Leave reviews to inform others about your successes or adaptations with this recipe, suggesting improvements or inspired innovations.

Participate in community engagement efforts, offering your tips and personal touches that others might incorporate into their own Praline Popcorn attempts.

Explore recipe variations proposed by other community members, creating a space for collective creativity and shared experiences that enrich your cookery endeavors.

The Recipe

Praline Popcorn

Serves: 12

Prep Time: 15 mins

Cook Time: 45 mins

Total Time: 60 mins

Kitchen Equipment Needed

  • Large Pot for Popping Popcorn
  • Large Saute Pan or Saucepan
  • Baking Sheet
  • Wooden Spoon
  • Mixing Bowl
  • Airtight Containers for Storage

Ingredients

  • ½ cup popcorn kernels
  • 1 cup pecan halves
  • 1 cup unsalted butter
  • 2 cups granulated sugar
  • ½ cup light corn syrup
  • ½ teaspoon salt
  • ½ teaspoon baking soda
  • 1 teaspoon vanilla extract

Directions

  1. Preheat your oven to 250°F (120°C) and line a large baking sheet with parchment paper.
  2. Pop the popcorn kernels using your preferred method. Transfer the popped popcorn to a large mixing bowl, discarding any unpopped kernels.
  3. In a large saucepan, combine butter, sugar, corn syrup, and salt. Bring to a boil over medium heat, stirring constantly. Allow mixture to boil for 5 minutes without stirring.
  4. Remove from heat and quickly stir in baking soda and vanilla extract. The mixture will bubble up slightly – this is normal.
  5. Quickly pour the praline caramel mixture over the popcorn and gently stir to coat the popcorn evenly.
  6. Transfer the coated popcorn to the prepared baking sheet, spreading it out evenly. Sprinkle the pecan halves over the top.
  7. Bake in the preheated oven for 45 minutes, stirring every 15 minutes to ensure even coating.
  8. Remove from the oven and cool completely before breaking into pieces. Store in an airtight container for up to one week.

Recipe Notes

  • For a spicier twist, add a pinch of cayenne pepper to the caramel mixture.
  • Mix and match nuts like almonds or walnuts for varied flavor profiles.
  • To make this recipe vegan-friendly, substitute butter with vegan margarine.