Simple and Irresistible Crème Brûlée Cookies Recipe for Quick Desserts
Best Easy Crème Brûlée Cookies Recipe ❤️ Quick Dessert
⚖️
Difficulty
Easy
⏲️
Prep Time
15 mins
🕒
Cook Time
12 mins
⏱️
Total Time
27 mins
🍽️
Servings
16 cookies
Get ready to indulge your sweet tooth with the Best Easy Crème Brûlée Cookies Recipe, a delightful fusion of the classic crème brûlée dessert and delicious cookies. These quick and easy cookies capture the creamy, vanilla essence of traditional crème brûlée, while delivering a satisfying crunch in every bite. Perfect for dessert lovers craving a quick sweet fix, these cookies promise to brighten any gathering.
Imagine biting into a cookie that offers the luxurious taste of crème brûlée with a crispy caramelized top. The smooth blend of vanilla custard-like flavor encased in a delicate cookie will surely make it a household favorite. Whether you’re hosting a dinner party or seeking a simple yet show-stopping treat, this recipe will make a memorable impression.
Turning cherished dessert classics into cookies is like an art form, making your culinary creations both nostalgic and innovative. Crème brûlée cookies not only represent the best of both worlds but allow you to enjoy this beloved French dessert in an entirely new way. Baking these at home will fill your kitchen with an irresistible aroma reminiscent of caramelized sugar and creamy vanilla, creating a sensory delight for both smell and taste.
Quick Recipe Highlights
Flavor Profile: These cookies boast a heavenly blend of creamy vanilla and rich caramel, striking a balance between sweetness and sophistication.
Texture: Crisp on the outside yet tender on the inside, each bite of these cookies mimics the luscious texture of crème brûlée’s custard beneath its caramel shell.
Aroma: Experience the enticing scent of vanilla combined with the comforting aroma of caramelized sugar wafting from your oven.
Visual Appeal: With their golden-brown tops and soft centers, these cookies are as visually appealing as they are delicious.
Skill Level Needed: Perfect for beginners, this recipe is straightforward yet provides an opportunity to practice basic baking techniques.
Special Equipment: A kitchen torch is recommended for achieving the crispy caramel topping, helping replicate the classic crème brûlée texture.
Recipe Overview
Difficulty Level: The choice of “Easy” is due to the recipe’s step-by-step simplicity, making it accessible even to novice bakers who may be trying their hand at creating unique desserts.
Category: These delightful cookies fall under desserts and snacks, providing a versatile option for after-meal treats or midday indulgences.
Cuisine: Inspired by French culinary traditions, these cookies bring an element of elegance and international flair to your baking repertoire.
Cost: With common baking ingredients, this recipe remains budget-friendly, keeping overall costs low while delivering a gourmet experience.
Season: Enjoy these cookies all year round, but they’re particularly perfect for cozy winter evenings when warm, aromatic desserts are most appreciated.
Occasion: Ideal for holiday gatherings, tea parties, or as a comforting snack, these cookies fit any occasion where a touch of sophistication is welcome.
Why You’ll Love This Recipe
The irresistible taste and texture make this recipe a spectacular choice for cookie lovers. Each cookie encapsulates the creamy essence of crème brûlée with a delightful crunch, elevating the traditional cookie experience. Its simplicity in preparation means you can whip these up without much hassle. All the ingredients are conveniently available, making preparation as seamless as possible, especially for those on a tight schedule.
From a nutritional perspective, these cookies offer a satisfying treat without excessive sugar overload. By customizing the sweetness to your preference, they can fit a balanced diet while still offering a delectable indulgence. For entertaining, their gourmet allure makes the perfect addition to any dessert table. Their aesthetic appeal adds sophistication, sure to impress both family and friends.
For cost-conscious bakers, this recipe offers an affordable yet high-quality dessert option, easily fitting within most grocery budgets. Additionally, the commonality of the ingredients allows the recipe to remain accessible. Ultimately, their ease of preparation, combined with luxurious taste, makes crème brûlée cookies a joy to bake and share.
Historical Background and Cultural Significance
Crème brûlée, a timeless dessert with French origins, has captivated dessert enthusiasts for centuries with its simplistic approach to a refined taste. Known as “burnt cream,” this dessert’s roots trace back to the 17th century, gaining prominence in French cuisine.
Its appeal crosses borders, making appearances in various European countries with slight reinterpretations. As the cookie revolution took hold, it was only a matter of time before crème brûlée inspired new creations. This adaptation into cookie form offers a novel way to celebrate the flavors, providing portability and casual enjoyment not typically associated with the dessert.
Regional adaptations showcase how this classic has evolved over time, highlighting the creativity it inspires among bakers worldwide. In different variations, you may see hints of orange zest or touches of fruits, each bringing new dimensions to the cherished original flavor combination.
Ingredient Deep Dive
Vanilla Extract: As one of the main flavor components, vanilla extract brings out the classic custardy flavor typical of crème brûlée. Known for its aromatic and comforting essence, it sets the tone for the entire cookie. When selecting vanilla, pure extract is preferred for its depth over the synthesized variant.
Sugar: Essential for both the cookie’s structure and flavor, it also forms the signature caramelized topping. White granulated sugar provides finesse in flavor without overwhelming other elements. To retain its quality, store sugar in a cool, dry place, minding that no moisture enters the container, which could lead to clumping.
Common Mistakes to Avoid
Overbaking: Keep a close eye on bake time to ensure cookies remain soft inside, rather than dry.
Skipping the Torch: Without a blowtorch, you won’t achieve the desired caramel crunch on top.
Using Imitation Vanilla: For optimal taste, opt for pure vanilla extract.
Imbalanced Ingredients: Maintain proportion between sugar and other components to avoid overly sweet cookies.
Uneven Caramelization: Distribute sugar evenly before torching to prevent burnt spots.
Improper Storage: Store in an airtight container to retain texture and avoid staleness.
Substituting Ingredients: Some swaps may alter essential texture or flavor.
Skimping on Cooling: Allow cookies to cool properly before adding caramel topping.
Essential Techniques
Caramelization: Properly apply sugar and caramelize it to achieve that classic crème brûlée crust, taking care to distribute heat evenly.
Pro Tips for Perfect Crème Brûlée Cookies
Use a high-quality, fine sugar for the caramelization process to achieve uniform heating. Keep the dough consistent in texture to preserve the soft bite and balanced flavor. Test different vanilla products to find one that best suits your taste preferences for these cookies.
Variations and Adaptations
Regional variations encourage play with flavors such as incorporating a splash of citrus zest or infusing the dough with spices, each adding a new spin while celebrating the classic crème brûlée notes.
Serving and Presentation Guide
For sophisticated presentation, serve on a decorative plate with a dash of powdered sugar or alongside fresh berries. Consider temperature – these cookies are best enjoyed slightly warm, rekindling their aroma and texture.
Wine and Beverage Pairing
Pair crème brûlée cookies with a well-chilled dessert wine, like a Sauternes, or for non-alcoholic options, consider a vanilla chai tea to complement the cookie’s flavors.
Storage and Shelf Life
Store cookies at room temperature in an airtight container to maintain freshness; they should ideally be enjoyed within 3-5 days for peak texture and taste.
Make Ahead Strategies
Prepare dough in advance and freeze until ready to use. Bake directly from frozen with minor time adjustments to ensure fresh cookies every time.
Scaling Instructions
Doubling the recipe requires careful adjustment of leavening agents and attention to mixing times to ensure even consistency and desired results.
Nutritional Deep Dive
The balance of macronutrients allows these cookies to fit comfortably into indulgent occasions, while offering opportunities for moderation during enjoyment based on personal dietary needs.
Dietary Adaptations
To accommodate gluten-free diets, consider using a high-quality gluten-free baking blend. Dairy-free adaptations require substitutions for butter and cream, impacting texture subtly while maintaining flavor integrity.
Troubleshooting Guide
If cookies spread too much, check your butter proportions or chill the dough longer. Adjust room temperature to eliminate varying bake times impacting batches.
Recipe Success Stories
Home bakers have successfully incorporated personal touches, from topping with chocolate drizzle to including almond slivers, each proposing a unique version while maintaining the core spirit of the recipe.
Frequently Asked Questions
How do I achieve the perfect caramel topping without a torch? Use an oven broiler on low, monitoring closely to prevent burning. Can this recipe be halved? Yes, just adjust ingredient measurements and cooking times accordingly. What alternatives work for pure vanilla extract? Consider using vanilla beans or paste for equally rich flavor. How do I keep cookies from becoming too hard? Monitor baking times closely and avoid over-mixing the dough. Can these cookies be frozen? Yes, freeze either before baking or after cooling, remembering to defrost gently. How can I prevent cookies from spreading too much? Ensure dough is chilled thoroughly before baking and that your oven temperature is accurate. Why is my caramel topping uneven? Distribute sugar evenly and apply consistent torch heat. What can I pair with these cookies? They work wonderfully with creamy cheeses or fruit jams for complementing flavors. Are there low-carb options for this recipe? Explore alternative flours and sweeteners to reduce carb content while maintaining taste. Any suggestions for adding decorative elements? Garnish with edible flowers or candy pieces to enhance visual appeal. How can I reduce sweetness? Adjust sugar levels slightly to fit personal preferences while ensuring texture remains intact.
Additional Resources
Explore related recipes like classic crème brûlée or experiment with other cookie variations that capture the essence of complex desserts in delicious, simple forms.
Join the Conversation
Engage with us through social media by sharing your own crème brûlée cookie creations and adaptations. Discover the community’s rich array of tips, feedback, and exciting variations, adding a global flavor palette to this beloved cookie.
The Recipe
Best Easy Crème Brûlée Cookies
Serves: 16 cookies
Prep Time: 15 mins
Cook Time: 12 mins
Total Time: 27 mins
Kitchen Equipment Needed
Mixing bowls
Hand or stand mixer
Baking sheet
Parchment paper
Cooling rack
Blowtorch (for caramel topping)
Ingredients
1 cup all-purpose flour
1/2 cup unsalted butter, softened
1/2 cup granulated sugar (plus more for topping)
1 egg yolk
1 tsp pure vanilla extract
1/4 tsp baking powder
Pinch of salt
Directions
Preheat your oven to 350°F (175°C) and prepare a baking sheet with parchment paper.
In a mixing bowl, cream together the butter and sugar until fluffy.
Add the egg yolk and vanilla, mixing thoroughly.
Sift in the flour, baking powder, and salt, and mix until just combined.
Divide dough into small balls, place them on the prepared sheet, and flatten slightly.
Bake for 10-12 minutes until edges are golden.
Remove from oven, allow to cool on a rack before sprinkling with sugar and torching until caramelized.
Recipe Notes
Adjust sugar topping according to taste preference.
Ensure even mixing for consistent textures.
Store in a cool, dry place to maintain freshness.
Irresistible Cinnamon Roll French Toast Bites Perfect for Brunch
Cinnamon Roll French Toast Bites: A Delectable Breakfast Delight
⚖️
Difficulty
Easy
⏲️
Prep Time
10 mins
🕒
Cook Time
15 mins
⏱️
Total Time
25 mins
🍽️
Servings
4
Indulge your taste buds with the delightful flavors of Cinnamon Roll French Toast Bites. Imagine the comforting taste of cinnamon rolls merged with the satisfying crispness of French toast. This heavenly breakfast treat transforms ordinary mornings into something special. Each bite offers a symphony of warm cinnamon, creamy glaze, and golden, toasted perfection.
The balance of sweet and spicy notes makes these bites irresistible. Not only do they fill your kitchen with an intoxicating aroma, but they also provide a visually appealing feast. The enticing swirls of cinnamon dance on a canvas of crispy, golden bread. Enjoy these bites with a side of fresh fruit or a dollop of whipped cream to elevate your breakfast experience.
Our Cinnamon Roll French Toast Bites are designed with simplicity in mind, requiring just a few ingredients and minimal time. It’s a dish that brings joy with every scrumptious bite. Whether you’re preparing breakfast for a special occasion or treating yourself on a regular morning, this recipe delivers in flavor, convenience, and visual appeal.
Quick Recipe Highlights
Flavor Profile: Sweet, warm notes of cinnamon combined with the rich taste of eggy French toast. Perfectly balanced with buttery undertones.
Texture: A crispy exterior gives way to a soft, tender interior, creating a delightful mouthfeel.
Aroma: Inviting scents of cinnamon and butter fill the air, reminiscent of home-baked treats.
Visual Appeal: Swirls of cinnamon and a golden-brown finish make for a stunning presentation.
Skill Level Needed: Easy enough for beginners yet satisfying to seasoned cooks wanting a quick fix.
Special Equipment: No special equipment required, just a skillet or griddle and mixing tools.
Why You’ll Love This Recipe
The Cinnamon Roll French Toast Bites boast an incredible taste that satisfies even the pickiest eaters, combining the comforting flavors of cinnamon and buttery richness. With a crisp exterior and a soft interior, each bite delivers taste and texture harmony. These bites bring warmth and happiness every morning, making them a go-to breakfast luxury.
Preparation is a breeze, taking only a few minutes of your time. The process is straightforward and caters to both quick weekday breakfasts and lazy weekend brunches. Plus, the simple ingredient list makes it an accessible recipe for all culinary skill levels. These bites are even perfect for getting kids involved in the kitchen!
Nutritionally, the recipe provides a balanced start to your day, offering protein from eggs and carbs for energy. Enjoy with fruits for a well-rounded meal or indulge guilt-free. The bites are not only delicious and quick but can also be accommodated into various dietary needs with minor tweaks.
Serving these at family gatherings or brunch parties instantly elevates your hosting game. They encourage communal enjoyment, sparking conversations and connections over shared deliciousness. With customizable toppings, everyone gets to personalize their dish to their preference, adding more fun to your table.
Finally, Cinnamon Roll French Toast Bites are a cost-effective breakfast option. They utilize pantry staples, minimizing the need for elaborate ingredients. Whether you’re feeding a crowd or having a solo breakfast feast, the economic advantage of this recipe truly shines.
Preheat your skillet or griddle over medium heat and lightly grease with butter.
In a mixing bowl, whisk together eggs, milk, and vanilla extract until well combined.
Open the cinnamon rolls and cut each roll into four pieces.
Dip the cinnamon roll pieces into the egg mixture, ensuring they are well-coated.
Place the coated pieces on the skillet, cooking in batches if necessary. Cook each side for 2-3 minutes until golden brown.
Remove from heat and serve with your choice of toppings.
Recipe Notes
You can easily double this recipe to accommodate more guests.
For a richer flavor, substitute cream for milk.
Add a pinch of nutmeg for a warm, spiced undertone.
Create a Delicious Holiday Antipasto Cream Cheese Log Recipe
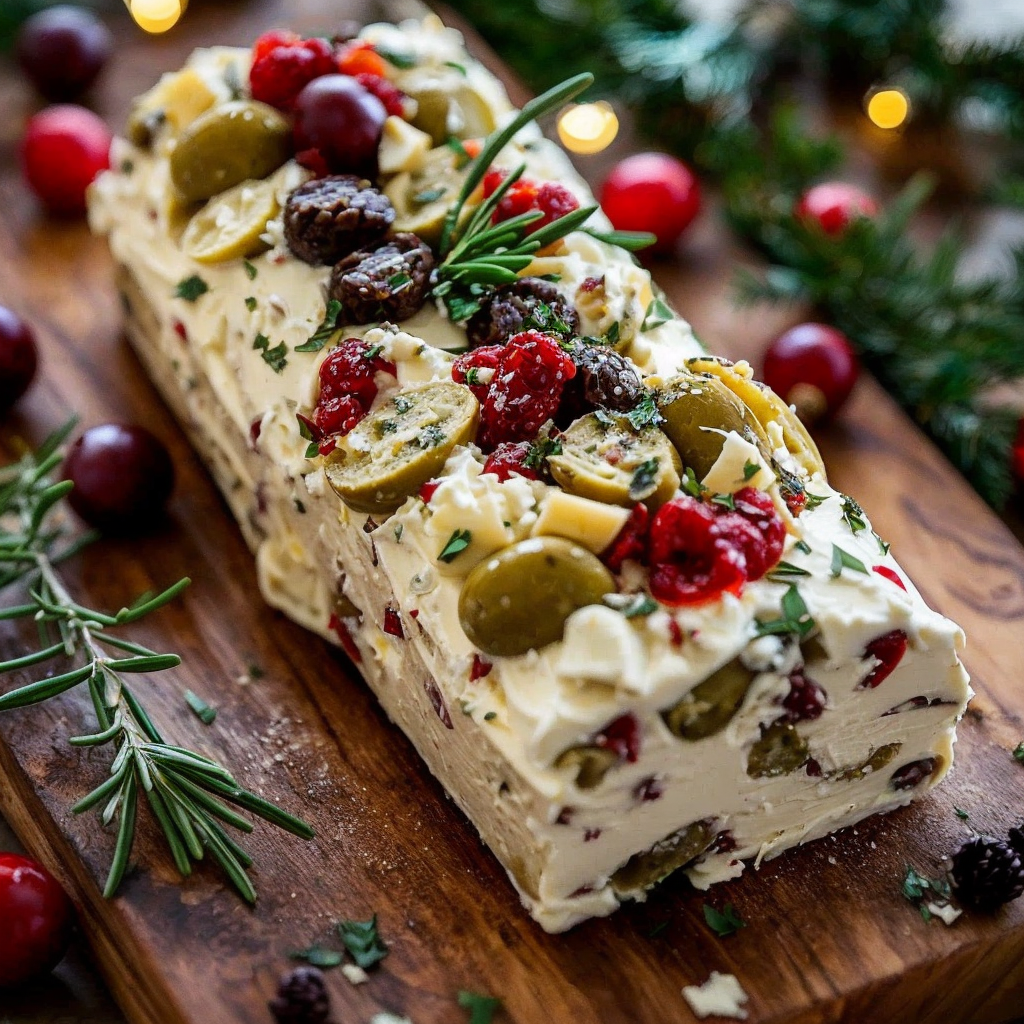
Festive Holiday Antipasto Cream Cheese Log: A Delightful Appetizer
⚖️
Difficulty
Easy
⏲️
Prep Time
20 mins
🕒
Cook Time
0 mins
⏱️
Total Time
20 mins
🍽️
Servings
10
The Festive Holiday Antipasto Cream Cheese Log is the ultimate crowd-pleaser for your holiday gatherings. This easy-to-make appetizer combines creamy cheese with bold flavors, offering a perfect balance of savory, sweet, and tangy notes. Whether you’re hosting a Christmas party or a New Year’s Eve celebration, this antipasto log is guaranteed to impress your guests with its delightful medley of tastes and festive presentation.
This recipe is designed for those who want to enjoy a gourmet appetizer without spending hours in the kitchen. With minimal prep time and no cooking required, the antipasto cream cheese log is both convenient and impressive. The flavors intensify when all ingredients have time to meld together, making it perfect to prepare ahead of your event.
Quick Recipe Highlights
Flavor Profile: This dish is a celebration of Mediterranean flavors with a balanced blend of creamy, salty, tangy, and sweet notes, sure to please every palate.
Texture: The smooth and creamy texture of the cream cheese is contrasted by the crisp bite of bell peppers and olives, creating an enticing mouthfeel.
Aroma: The aromatic herbs and marinated elements deliver a delightful fragrance that fills the room with appetizing scents.
Visual Appeal: Vibrant colors from the antipasto ingredients create a visually stunning centerpiece, perfect for any festive table setting.
Skill Level Needed: With straightforward steps, this recipe is accessible to beginners, allowing even novice cooks to achieve culinary excellence.
Special Equipment: A few kitchen tools, such as a mixing bowl, plastic wrap, and a serving platter, are essential for perfect preparation.
Recipe Overview
Difficulty Level: This recipe is rated easy. With simple mixing and shaping techniques, anyone can create an elegant appetizer.
Category: This dish falls under appetizers, ideally suited for kick-starting any meal or serving as party finger food.
Cuisine: Embodying Italian influences, this recipe draws from traditional antipasto inspirations, celebrated across the world.
Cost: With accessible ingredients like cream cheese and jarred antipasti, this dish is budget-friendly without compromising on quality.
Season: Best enjoyed during the holiday season, the vibrant presentation and flavors are particularly well-suited to winter festivities.
Occasion: Perfect for Christmas, New Year’s Eve, or any celebratory event where you want to delight guests with a special appetizer.
Why You’ll Love This Recipe
The Festive Holiday Antipasto Cream Cheese Log is a culinary delight that captivates taste buds with its intricate layers of flavor and texture. The combination of smooth cream cheese provides a creamy base, offset by the sharpness of olives and the tang of marinated vegetables, creating a multifaceted taste experience. Each bite offers something new, ensuring it remains a talking point throughout the evening.
One of the standout benefits is its simplicity and convenience. Preparation involves minimal steps, making it an ideal choice for those short on time or seeking stress-free party planning. With no cooking involved, this appetizer allows you to focus on other elements of your event while the flavors come together beautifully.
Nutritionally, this dish includes ingredients like olives and capsicum, contributing to heart-healthy fats and an array of vitamins. It offers a wholesome option without avoiding indulgence. Its balanced composition allows for moderate consumption within a well-rounded diet.
Offering not just a delicious appetizer but also a conversation starter, this antipasto log becomes a centerpiece in more ways than one. Its bold flavors encourage guests to mingle, discuss, and enjoy, enhancing the social aspect of any gathering.
Cost-effectiveness is another appealing aspect. This dish proves that you don’t need expensive ingredients to make an impact. Common pantry items and affordable antipasto elements come together to produce a lavish-feeling appetizer that doesn’t break the bank.
Historical Background and Cultural Significance
Antipasto, a traditional Italian course, predates modern cuisine as a ceremonial opening to lavish banquets. This historical root aims to stimulate the appetite before the main dish. Originally, antipasto platters featured cured meats, cheeses, marinated vegetables, and olives, setting a celebratory tone that we’ve adapted into the antipasto cream cheese log.
Culturally, antipastos hold significant importance during holidays, particularly in Italian and Italian-American households, where they serve as a precursor to more substantial courses. This tradition has been embraced worldwide, with different regions adding their unique spins based on local ingredients and preferences.
The recipe has evolved over time, incorporating diverse cultural influences. Initially dominated by meat, variations like the antipasto cream cheese log focus on vegetarian-friendly ingredients, broadening their appeal to modern dietary preferences without sacrificing bold flavors and traditional quality.
Regionally, versions might include variations in cheese type or additional elements like artichokes or pepperoncini, showcasing how antipasto adapts to locational changes while staying true to its origins. Whether served in Italy or around the world, the humble antipasto has grown into an adaptable art form reflecting its rich culinary history.
Ingredient Deep Dive
Cream cheese, central to our antipasto log, was invented accidentally in 1872, but its use as a base for composing complex flavors marks its cultural popularity. Known for its rich, tangy taste, cream cheese adds a creamy texture that perfectly complements robust antipasto elements like olives and marinated vegetables, creating a harmonious balance that is both traditional and modern.
Nutritionally, cream cheese offers essential minerals such as calcium and vitamin A, though moderation is key due to its rich nature. Selection tips include choosing full-fat varieties for creaminess, while storage requires refrigeration and careful sealing to prevent drying or contamination.
Olives offer a delightful piquancy that lifts the entire dish with their briny depth. Rich in monounsaturated fats, they promote heart health, providing a flavorful way to enhance wellbeing. When selecting olives, prefer those packed in brine for extended freshness. They are best stored in their own liquid within resealable containers for convenience.
Should olives not be your preference, capers can offer a similar briny tang, maintaining the antipasto’s vibrant integrity. The textures and flavors both shine when handled and stored correctly, ensuring they enrich the antipasto cream cheese log with each layer.
Common Mistakes to Avoid
Overmixing the cream cheese can lead to a runny texture. It’s important to mix until just combined to maintain the log’s firmness.
Not chilling long enough will make the log difficult to shape and serve. Ensure adequate refrigeration time for best results.
Using low-fat cream cheese can alter the texture of the log. Full-fat cream cheese provides the best consistency and flavor.
Skipping the draining of antipasto ingredients may add excess moisture, affecting texture. Always drain well before using.
Ignoring ingredient size for antipasto mix. Ensure all items are finely chopped for even distribution and flavor.
Failing to cover the log tightly when chilling could lead to drying out. Always wrap securely to maintain moisture.
Serving immediately out of the fridge may compromise flavor. Allow some time at room temperature for better taste integration.
Using expired or stale ingredients affects flavor quality. Fresh, high-quality ingredients are crucial for taste excellence.
Essential Techniques
Proper mixing is crucial for achieving a smooth cream cheese base. Ensure all components are at room temperature before mixing to prevent lumps. This simple action helps in creating a homogenous texture essential for a cohesive log.
Chilling is equally vital. Allowing enough refrigeration time ensures the log retains its shape while serving. The cooling process firms up the ingredients, enhancing both the visual appeal and the overall eating experience.
Presentation also plays a key role. Shaping the log evenly into a cylindrical form helps with even slicing for an elegant serving. A consistent form also aids the distribution of flavors with each piece, which is appealing to taste and sight.
Understanding mixing ratios between cream cheese and antipasto elements will help avoid overpowering flavors. Balancing ingredients ensures a harmonious taste that stays true to the intended profile of the recipe.
Pro Tips for Perfect Festive Holiday Antipasto Cream Cheese Log
Ensure your cream cheese is thoroughly softened before mixing; this makes the blending of ingredients much smoother, resulting in a creamier texture.
Select a good variety of pickled and marinated antipasto components to add layers of flavor that excite the palate, providing a more authentic Italian feel to the dish.
Let the cheese log sit at room temperature for about 10-15 minutes before serving. This will heighten the flavors, making it more palatable and enjoyable for guests.
Adding fresh herbs, such as basil or parsley, can enhance the presentation and infuse a burst of fresh flavor, complementing the other elements perfectly.
Use a sharp, warmed knife to slice the cheese log for effortless cutting and clean presentation, ensuring each guest gets an enticing, uniform slice.
If possible, prepare the log a day in advance to allow flavors to meld thoroughly, improving the depth and cohesiveness of the dish.
When wrapping the log for chilling, ensure a tight seal with plastic wrap to maintain firmness and keep flavors intact, preventing any unwanted flavors from the fridge.
Pairing the antipasto log with crunchy crackers or fresh bread provides a delightful contrast in texture, elevating the eating experience with each bite.
Variations and Adaptations
For regional variations, try experimenting with different olives, such as kalamata or green olives, to alter the flavor profile to your liking. Each type offers a distinct taste and texture that can personalize the traditional antipasto cream cheese log.
Embrace seasonal adaptations by incorporating fresh, seasonal herbs and veggies. For example, add diced sun-dried tomatoes in summer or roasted red peppers in winter for a festive touch.
To accommodate dietary preferences, consider using a plant-based cream cheese for a vegan option, ensuring all antipasto elements are vegan-friendly as well.
Enhance the flavors with spicy antipasto ingredients for a bold, zesty twist. Hot peppers or spicy olives can add a delightful kick to the standard recipe.
For a change in texture, incorporate finely chopped nuts like walnuts or almonds for added crunch. This not only provides a textural contrast but also adds nutty flavors that complement the creamy base.
Presentation alternatives include shaping the antipasto log into a festive wreath or individual balls for eye-catching holiday party servings. Customize the layout to suit the occasion.
Serving and Presentation Guide
For an elegant presentation, serve the cream cheese log on a beautiful wooden board or platter with an assortment of crackers, breadsticks, and sliced vegetables. This will create a bountiful display that is as pleasing to the eyes as it is to taste.
Garnishing with fresh herbs or colorful vegetable ribbons adds vibrancy and indicates the fresh flavors within the dish. It also complements the antipasto’s colors, creating an enticing appetizer.
Traditional accompaniments, like sliced salami or prosciutto, can be provided alongside for a more indulgent feast, adding layers of richness and flavor complexity.
Modern serving suggestions include offering the log alongside hummus or roasted red pepper dips for a Mediterranean-inspired board, satisfying various tastes.
Consider the temperature, allowing the antipasto cream cheese log to come slightly to room temperature before serving. This enhances the flavors and makes it easier to spread.
For portion control, slice the log before serving to guide guests and prevent overconsumption, ensuring everyone enjoys a taste without a rush for more.
Wine and Beverage Pairing
Pair this festive antipasto cream cheese log with a light, crisp white wine like a Sauvignon Blanc, which complements its savory and creamy notes while balancing the tanginess from olives.
Non-alcoholic alternatives such as a sparkling water with a splash of lemon or lime bring freshness to the antipasto and enhance the palate cleansing between bites.
For those preferring coffee, a light-bodied brew or a black tea pairs beautifully, cutting through the creamy flavors with gentle aromatic notes and completing the culinary experience.
Temperature considerations for beverages, especially wines, are crucial. Serve whites chilled to highlight fruity notes, enhancing their refreshing quality with the richness of the antipasto.
Consider garnishing wine glasses or mocktails with citrus slices to mirror the antipasto flavors, bringing a unified experience for the taste and sight while entertaining.
Storage and Shelf Life
Store any leftovers of the antipasto cream cheese log tightly wrapped in plastic wrap within an airtight container. Doing so will maintain freshness and prevent other refrigeration odors from transferring.
The recipe keeps well in the refrigerator for up to three days. Ensure proper chilling to preserve its texture and savor the immaculate flavors when served again.
Recommended storage temperature is under 40°F (4°C) to reduce spoilage risk. Monitor storage and maintain refrigeration to ensure food safety and quality.
Check for signs of spoilage like discoloration or off odors before consuming stored antipasto to ensure it’s safe to eat and its flavors remain intact.
When reheating, avoid microwaves. Instead, bring chilled portions to room temperature gently to preserve texture and balance without melting the cheese base.
Make Ahead Strategies
Plan your prep timeline by preparing the antipasto elements and cream cheese mix the day before. Assemble the log and refrigerate overnight for optimal flavor melding.
Store components separately if necessary, keeping meats and cheese components separate until assembly to maintain texture and flavor integrity.
Assess the quality impact of being a make-ahead dish, noting that ingredient flavors blend better with time, typically resulting in a richer taste profile.
Assembly tips include using plastic wrap or wax paper to shape the log evenly, considering presentation from all angles to showcase the mixture’s rich content.
For reheating or warming chilled logs, let them stand at room temperature briefly, enhancing the taste and ensuring a spreadable consistency for easier serving.
Add fresh garnishes like herbs or additional antipasto elements just before serving, maintaining fresh vibrancy without premature wilting during storage.
Scaling Instructions
To halve the recipe, reduce the cream cheese and antipasto ingredients by half, ensuring an even distribution of elements in smaller quantities while retaining the flavors.
Doubling or tripling the antipasto cream cheese log is easy—scale the ingredients while considering appropriate mixing equipment like larger bowls or food processors.
For equipment adjustments, use larger serving trays or platters to accommodate increased log sizes while ensuring the mixture retains its shape and attractiveness.
Timing modifications involve extra chilling time for larger logs, allowing flavors to meld and textures to firm, ensuring preservation during serving.
Storage considerations include separating individual logs within airtight containers, maintaining quality and offering easy access for serving larger parties.
Nutritional Deep Dive
The antipasto cream cheese log offers a balanced macro breakdown, featuring fats from cream cheese and olives with modest protein contributions from cheese components.
Micronutrients such as calcium and vitamin A from dairy and antioxidants from olives enhance nutritional value, providing essential health benefits with indulgent enjoyment.
This dish allows for portion awareness due to concentrated, flavorful bites requiring smaller servings. Maintain portions for balanced indulgence within dietary preferences.
For weight management, consider serving alongside fresh vegetables or lighter bites to create a filling experience with reduced caloric intake from richer components.
Dietary Adaptations
For a gluten-free version, serve with gluten-free crackers or vegetable sticks as dippers, ensuring all accompaniments meet dietary restrictions.
Dairy-free adaptations involve using plant-based cheeses and ensuring other antipasto elements are free from dairy derivatives, maintaining flavor without compromise.
A vegan approach includes plant-based cheese and ensuring the antipasto elements like marinated vegetables and olives adhere to vegan standards and preferences.
Low-carb versions focus on serving the log with vegetables rather than bread or crackers, complementing the dish’s creamy flavor with crisp freshness.
Paleo-friendly adaptations explore non-dairy cheese alternatives, ensuring all antipasto ingredients align with a paleo diet’s guidelines and principles.
Low-FODMAP adjustments include selecting onions and garlic-free antipasto components and ensuring other elements align with low-FODMAP criteria for a safe and enjoyable experience.
Troubleshooting Guide
Should the texture turn out too soft, ensure adequate chilling time and the use of full-fat cream cheese to provide proper firmness.
Balancing flavor is critical; should the log be overly salty, incorporate unsalted ingredients or adjust antipasto quantities for a harmonious blend.
Temperature problems often arise from improper chilling. Ensure consistent refrigeration and allow time for the log to firm adequately between steps.
Equipment challenges might include difficulty with shaping; use plastic wrap or parchment to assist even shaping, preventing sticking and ensuring uniformity.
If ingredient substitutions impact the log, match substitutions closely in texture and flavor profile for consistency without altering the final outcome.
Timing concerns involve extended refrigeration if the log lacks firmness; proper storage and timing maintain its visual appeal and spreadability.
Recipe Success Stories
This Festive Holiday Antipasto Cream Cheese Log has become a favorite in many homes, bringing together stories of successful holiday parties and full complements each season.
Readers have experimented with seasonal variations, infused herbs, and swapped antipasto elements to personal delight, proving the recipe’s flexibility.
Adaptation stories highlight the ease of converting components for vegan or gluten-free preferences while retaining familiar flavors and culinary appeal.
Community feedback praises the ease and simplicity of preparation, emphasizing the log’s ability to stand out as a favorite without monopolizing kitchen time.
Photography tips include featuring vibrant antipasto colors with camera-lit backdrops, showcasing the log’s beauty and culinary vibrancy in each shared image.
Frequently Asked Questions
Can I make this log ahead of time?
Absolutely. Preparing the log a day in advance allows the flavors to meld perfectly, offering a richer taste come serving time.
What if I don’t like olives?
You can substitute olives with capers or sun-dried tomatoes for a different yet equally compelling briny flavor and maintain the recipe’s balance.
How do I store leftovers?
Wrap tightly in plastic and store in an airtight container in the refrigerator for up to three days to maintain freshness and prevent contamination.
Can I freeze the antipasto log?
Freezing is not recommended as it may alter the texture upon thawing. Best results come from refrigeration and consuming within its shelf life.
What can I use instead of cream cheese?
Soft cheeses like mascarpone or vegan cheese alternatives can replace cream cheese, focusing on similar textures for success in taste and presentation.
Is this suitable for a large gathering?
Certainly. The recipe can be scaled up to cater to a larger audience, retaining its elegance and flavors even in bigger portions.
How can I make it spicier?
Incorporate a mix of spicy antipasto ingredients such as hot pepper slices or sprinkle red pepper flakes into the cheese mixture for a bolder kick.
What’s the best cracker to serve with this?
Choose a sturdy, lightly salted cracker that complements the log’s flavors without overpowering them, providing ideal texture for combining with spreads.
What wine pairs best with this dish?
A chilled bottle of Sauvignon Blanc or a light Pinot Grigio offers a refreshing complement to the rich, savory notes of the antipasto cream cheese log.
Can I customize the antipasto mix?
Yes, personalization is encouraged, allowing you to select antipasto elements reflecting preferences while still providing delightful taste harmony.
Additional Resources
For related recipes, check out our collection of appetizer ideas like Tapenade Crostini and Marinated Cheese Platters for diverse and exciting party offerings.
Delve into technique guides detailing cream cheese handling and antipasto preparation, ensuring you’re fully equipped to master the recipe essentials.
Ingredient information extensively explores antipasto elements like meats, olives, and cheese, providing understanding and insight into flavor combinations.
Consider equipment recommendations in our resource center, guiding you on best tools, storages, and serving options for antipasto favorites.
Explore seasonal variations, adapting our antipasto logs and appetizers with the freshest, most evocative ingredients available each season for menus that inspire.
Join the Conversation
Share your culinary creations on social media using our dedicated hashtags, inspiring others within our community and celebrating personal recipe triumphs.
Discover photography tips that emphasize your antipasto’s vibrant colors, ensuring every shot is Instagram-ready with proper lighting and creative compositions.
Leave recipe reviews sharing experiences and insights, encouraging others to embark on their antipasto journeys with the support of shared knowledge.
Engage with the community, exchanging variations and tips to foster knowledge-sharing among fellow antipasto aficionados and aspiring cooks.
Explore recipe variations while receiving feedback from our enthusiastic community, enhancing your creative exploration and sustaining culinary passion.
The Recipe
Festive Holiday Antipasto Cream Cheese Log
Serves: 10
Prep Time: 20 mins
Cook Time: 0 mins
Total Time: 20 mins
Kitchen Equipment Needed
Mixing Bowl
Paddle Mixer or Fork
Plastic Wrap
Serving Platter
Ingredients
2 (8-ounce) packages cream cheese, softened
1 cup assorted chopped antipasto (such as olives, bell peppers, and artichokes)
1 tablespoon Italian herbs
1/4 teaspoon crushed red pepper flakes (optional for extra heat)
Fresh basil for garnish
Crackers or slices of bread for serving
Directions
In a large mixing bowl, blend softened cream cheese using a paddle mixer or fork, ensuring it’s smooth and lump-free.
Gently fold in the chopped antipasto, Italian herbs, and red pepper flakes (if using) until evenly distributed within the cream cheese.
Transfer the mixture onto plastic wrap, forming a cylindrical log shape. Wrap tightly and chill in the refrigerator for at least 1 hour or until firm.
Unwrap the log and place it onto a serving platter. Garnish with fresh basil leaves for a vibrant presentation.
Serve with crackers or bread, allowing guests to slice and enjoy the antipasto cream cheese log.
Recipe Notes
For a dairy-free version, substitute cream cheese with a plant-based alternative.
Add or adjust antipasto components based on personal taste preferences or availability.
Let the log warm slightly at room temperature before serving to enhance flavors.
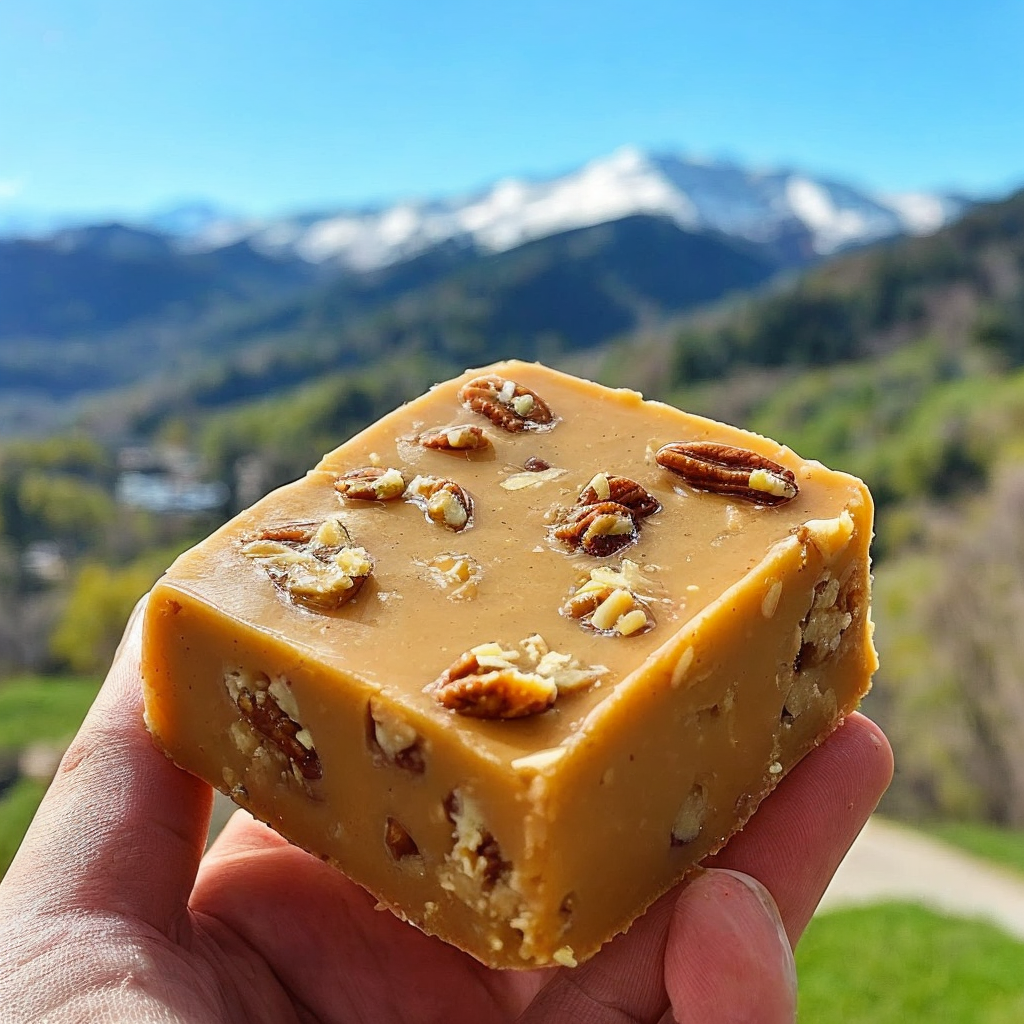
Irresistible Butter Pecan Fudge Recipe for a Sweet Delight
Butter Pecan Fudge: Creamy Delight for Your Sweet Tooth
⚖️
Difficulty
Medium
⏲️
Prep Time
15 mins
🕒
Cook Time
20 mins
⏱️
Total Time
35 mins
🍽️
Servings
24 pieces
Indulge in the buttery goodness with our homemade Butter Pecan Fudge, a perfect treat for those who crave a sweet and nutty delight. This rich, creamy fudge is a wonderful blend of caramel notes and crunchy pecans, delivering a taste that’s both nostalgic and timeless. Whether you’re an experienced cook or a beginner in candy making, this recipe will guide you through creating a delectable treat that’s hard to resist.
In the realm of fudge recipes, Butter Pecan Fudge stands out with its luscious combination of butter and pecans. Imagine biting into a soft, melt-in-your-mouth piece, with the toasted pecans adding a delightful crunch. This recipe not only satisfies your sweet tooth but also offers a unique texture profile that will leave you wanting more. Perfect for holiday gifting or a special dessert, this fudge is a delightful addition to your recipe collection.
Quick Recipe Highlights
Flavor Profile: A perfect balance of sweet caramel and nutty pecans with a buttery undertone.
Texture: Smooth and creamy with added crunch from toasted pecans.
Aroma: Rich buttery scent with light toasted nut notes.
Visual Appeal: Creamy light brown fudge speckled with golden pecan pieces.
Special Equipment: Candy thermometer for precision, heavy saucepan for even cooking.
Recipe Overview
Difficulty Level: This medium difficulty recipe requires attention to detail when melting and blending ingredients to prevent burning.
Category: Ideal for desserts or sweet snacks, perfect for sharing.
Cuisine: Influences from Southern American cuisine, known for its love of pecans and rich flavors.
Cost: Moderate, as ingredients are commonly available, but quality nuts can be more expensive.
Season: Best enjoyed in cooler months when fudge is traditionally made, allowing for better texture and longevity.
Occasion: Perfect for festive celebrations, parties, or as a homemade gift.
Why You’ll Love This Recipe
Butter Pecan Fudge offers a delightful texture, combining the creaminess of fudge with the crunch of pecans. This makes each bite a unique experience, with a satisfying melt followed by a nutty crisp. Its rich buttery flavor makes it a standout dessert that’s sure to impress family and friends.
Preparation is surprisingly straightforward, with the main challenge being careful temperature monitoring. This simplicity means you can create a gourmet treat without spending hours in the kitchen, making it a convenient option for busy schedules.
Nutritionally, pecans offer healthy fats and other beneficial nutrients, adding a slightly healthful twist to this indulgent treat. While it’s a dessert, knowing it’s not just empty calories can be comforting when you enjoy a piece or two.
The recipe’s appeal in social settings is unmatched. Homemade Butter Pecan Fudge is always a conversation starter at gatherings, reflecting the effort and love put into creating it. Its elegant simplicity makes it a perfect option for enhancing any dessert table.
From a cost perspective, this recipe is accessible. Most of the ingredients are pantry staples, meaning you won’t have to break the bank to create a luxurious dessert that could rival store-bought confections.
Historical Background and Cultural Significance
Butter Pecan flavoring has an interesting history rooted in Southern American cuisine. Pecans themselves are native to North America, often used by indigenous peoples long before European settlers arrived. The incorporation of butter and sugar came later, as these ingredients became more widely available and popular in sweet treats.
Culturally, butter pecan is a beloved flavor, often found in ice creams and candies throughout the United States. It’s a staple in Southern kitchens, symbolizing comfort and tradition, often associated with family gatherings and festive occasions.
The evolution of this recipe reflects broader trends in American candy-making over the 20th century, as homemade sweets became a way to express care and skill in a pre-packaged world. Fudge, in particular, became a homemade treat of choice due to its relative simplicity and ability to infuse various flavors.
Regional variations exist, but the central elements of high-quality butter, sugar, and pecans remain the same. In some areas, additional flavorings like bourbon or vanilla are added, showcasing the adaptability of this classic treat to local tastes and ingredients.
Ingredient Deep Dive
Butter plays a pivotal role in this recipe, providing not only the creamy texture but also a rich flavor base. It has been a cornerstone of baking and confectionery for centuries, beloved for its versatility and flavor-enhancing qualities. Ensure you select high-quality unsalted butter to allow precise control over the saltiness of the final product.
Pecans are the signature nut of this dish, lending a unique sweetness and crunch. Nutritionally, pecans are rich in healthy fats, fiber, and antioxidants, making them a beneficial addition to any diet. When selecting pecans, look for fresh, plump kernels. Store them in a cool, dry place to maintain freshness, or freeze for longer shelf life.
Substituting other nuts could offer interesting variations, although nothing quite matches the distinct flavor of pecans. Walnuts might work in a pinch, but they tend to be slightly more bitter, so consider toasting them lightly to enhance their sweetness.
Common Mistakes to Avoid
Overcooking the sugar mixture can lead to a hard, brittle fudge that lacks creaminess. Use a candy thermometer to avoid this pitfall.
Skipping the toasting of pecans can result in a lack of depth in flavor, so don’t overlook this simple step.
Using salted butter might lead to an overly salty fudge, masking the sweet, buttery notes.
Not allowing the fudge to cool properly can cause it to be too soft or sticky. Patience is key.
Failing to stir consistently can create grainy fudge. Ensure a smooth texture by stirring as directed.
Incorrect measuring of ingredients can alter the fudge’s texture and flavor. Precision is important here.
Using low-quality ingredients can result in a less flavorful final product.
Attempting to speed up the cooling process in the freezer might cause crystallization issues.
Essential Techniques
Mastering the sugar melting process is crucial. This involves carefully heating sugar until it dissolves completely, reaching the soft-ball stage for the perfect fudge consistency. Visual cues such as a smooth, molten appearance without grainy particles are signs of success.
Toasting pecans might seem minor, but it elevates the flavor profile significantly. Properly toasted pecans should be golden brown and aromatic, indicating that their natural oils have been brought out, enhancing both taste and texture.
Pro Tips for Perfect Butter Pecan Fudge
Ensure your butter is at room temperature before beginning to facilitate smooth mixing. This little step helps achieve a consistent texture.
Use a heavy-bottom saucepan to ensure even heat distribution and prevent scorching, which can impart a bitter taste to the fudge.
Always use a candy thermometer to hit the precise temperature marks required for fudge. Eyeballing it might lead to variability in texture and hardness.
Add vanilla extract at the very end of the cooking process; heat can diminish its flavor if added too early.
Consider adding a pinch of salt to balance out the flavors and enhance the natural sweetness of the pecans.
For easier cutting, lightly oil your knife and wipe it frequently to prevent sticking.
Variations and Adaptations
Regional variations might include adding bourbon for a Kentucky twist, incorporating raisins for a more Northeast feel, or including a dash of chili for a southwestern kick.
For seasonal adaptations, consider incorporating crushed candy canes around the holiday season, or drizzling with caramel for a richer variation in fall.
Dietary modifications can involve using dairy-free butter and sweetened condensed coconut milk to create a vegan-friendly version.
Flavor variations can include incorporating vanilla or caramel extracts, or substituting half of the butter with browned butter for a nutty depth.
For a twist in texture, try incorporating white chocolate chips or toffee bits, adding unexpected bites of additional sweetness and crunch.
Presentation alternatives include shaping the fudge in molds for fancy shapes or dusting with a touch of powdered sugar for an elegant look.
Serving and Presentation Guide
When plating, consider individually wrapping pieces in decorative wax paper or placing them in small paper cups for a festive look. This not only makes them more appealing but also aids in portion control.
Garnishing can involve sprinkling extra toasted pecan pieces on top or even drizzling melted chocolate for added flair.
Traditional accompaniments might include serving alongside coffee or tea to cut through the fudge’s sweetness, especially after a meal.
Modern serving suggestions could include pairing with fresh berries or a dollop of whipped cream to balance the richness.
Serve fudge at room temperature to best enjoy its creamy texture, but slightly chilled if you prefer a firmer bite.
For portion control, cut the fudge into smaller pieces, allowing guests to indulge without overdoing it.
Wine and Beverage Pairing
Pairing Butter Pecan Fudge with wine can elevate the dessert experience. Opt for a sweet dessert wine like a Moscato or a rich port to complement the flavors.
For non-alcoholic alternatives, consider offering a spiced chai tea or a creamy latte, which naturally aligns with the warm, comforting notes of the fudge.
If serving coffee, opt for a medium to dark roast to provide a rich, robust counterpoint to the sweetness.
Ensure any beverage is served at the appropriate temperature: wines and non-alcoholic drinks slightly chilled, coffees piping hot.
Serving suggestions include small half-glasses of wine or espresso-sized cups of coffee to avoid overpowering the palate.
Storage and Shelf Life
Store your Butter Pecan Fudge in an airtight container to maintain its freshness. At room temperature, it can last up to two weeks, making it ideal for holiday preparation.
Refrigerating will extend its shelf life to about a month. Before serving, let it sit out to reach room temperature for the best texture.
Use plastic wrap or parchment paper between layers to prevent pieces from sticking together and becoming misshapen.
Signs of spoilage include a stale smell or dry, crumbly texture. If in doubt, discard any questionable pieces.
Reheating is generally unnecessary, but should you choose to serve it slightly warm, a quick 5-second burst in the microwave for a few pieces can bring back the creaminess.
Fudge can be frozen for up to three months. Thaw in the fridge to prevent condensation from affecting the texture.
Make Ahead Strategies
Prepare Butter Pecan Fudge a few days in advance to allow the flavors to meld together. Store in an airtight container to preserve freshness.
Between steps, allow the cooked mixture to cool slightly before adding any extract or nuts, as this ensures better flavor integration.
While the taste improves over time, be cautious of drying out, especially if the air exposure is prolonged between storage phases.
Assemble any garnishments or cuts just before serving for the freshest look and taste.
Reheat individual pieces only if necessary, as excessive reheating can change the texture.
Add fresh garnishes like a sprinkle of sea salt or a drop of caramel on serving day for added appeal.
Scaling Instructions
Halving the recipe is straightforward; just ensure that the reduced quantities are measured precisely to maintain the fudge’s consistency.
For doubling or tripling, use larger pans and extend cooking times slightly, but keep a watchful eye on the sugar mixture to prevent burning.
Equipment like candy thermometers and large heavy-bottom pans are crucial for larger batches to manage the heat distribution effectively.
Timing modifications mainly revolve around the cooling time, which will increase slightly with larger batches.
When scaling, consider additional storage solutions, like larger airtight containers or layering with parchment to prevent sticking.
Nutritional Deep Dive
Butter Pecan Fudge offers a fascinating macro breakdown. While it’s high in sugars and fats, the presence of pecans introduces healthy monounsaturated fats.
Micronutrient-wise, pecans are a good source of vitamins and minerals, including Vitamin E and magnesium, lending minor health benefits to this indulgent treat.
Portion sizes are critical to enjoying fudge without significant dietary impact, with moderation key due to its caloric density.
While not necessarily a health food, the combination of protein and fiber from nuts can help manage hunger when eaten in small amounts.
For those concerned about sugar, cutting smaller pieces can help control intake without sacrificing the experience.
Dietary Adaptations
For a gluten-free version, ensure all ingredients are free from cross-contamination, as fudge itself does not contain gluten but might if exposed to it during preparation.
Dairy-free adaptations are easily achieved by replacing butter with vegan margarine and using dairy-free sweetened condensed milk for a similar result.
A vegan approach requires finding suitable non-dairy sweeteners that mimic the creaminess of regular condensed milk and butter flavors.
Low-carb enthusiasts might replace sugar with sugar substitutes designed for baking, although texture could slightly vary.
Keto dieters can focus on quality fats from pecans and seek keto-friendly sweeteners while adjusting quantities to personal dietary limits.
Those following a Paleo diet can adapt by using natural sugar alternatives and coconut oil as a butter replacement.
Troubleshooting Guide
Texture issues like graininess usually mean the sugar wasn’t melted properly. Re-melt and continuously stir until fully dissolved.
For flavor balance, if the fudge is too sweet, a pinch of salt might help counteract the sugar. If it lacks depth, try adding more vanilla or a splash of bourbon.
Temperature concerns often stem from not using a thermometer. For accurate results, carefully follow the cooking temperatures specified.
If equipment challenges arise, ensure your saucepan provides even heat. If necessary, double-insulate the pan by placing it inside a larger one.
For ingredient substitutions, maintain the ratios as close as possible to avoid unwanted consistency changes.
Timing concerns often occur during cooling; always allow the fudge to set at room temperature for the correct firmness.
Recipe Success Stories
Many have found great success with variations like adding a hint of sea salt, bringing out the rich undertones and balancing the sweetness.
Reader feedback often praises the recipe’s accessibility and adaptability, with creative twists providing fresh takes on a classic treat.
Community adaptations commonly include layering with chocolate or incorporating espresso for a coffee-infused variation.
Photography tips from users suggest cutting fudge with sharp, heated knives for clean edges and stacking them creatively for a dynamic presentation.
Enthusiastic reports reveal achieving store-quality fudge at home, with many appreciating the opportunity to share such a personalized gift with loved ones.
Frequently Asked Questions
Can I use other nuts besides pecans? Yes, walnuts or almonds can work, though textures and flavors will differ slightly. Toast them first for optimum flavor.
What if my fudge doesn’t set properly? If your fudge doesn’t set, it might not have reached the correct temperature. Re-cook to the soft-ball stage to achieve a firmer texture.
Is a candy thermometer necessary? While not strictly mandatory, it’s highly recommended for precision. Without it, achieving the right consistency can be challenging.
How can I make my fudge less sweet? Consider reducing sugar slightly or using a mix of rich cacao nibs or dark chocolate for a more bitter balance.
Can I freeze Butter Pecan Fudge? Absolutely, wrap it tightly in foil and place it in a freezer-safe container. Thaw in the fridge or at room temperature when ready to enjoy.
How long does homemade fudge last? Stored properly, it can last two weeks at room temperature, four weeks in the fridge, and several months if frozen.
What’s the best way to cut fudge? For clean cuts, use a hot, sharp knife, wiping it clean between cuts to prevent sticking and ensure smooth edges.
Can I make this fudge without nuts? Yes, you can omit pecans for a plain butter fudge, swapping in chocolate chips or other candies for texture if desired.
Is this recipe suitable for diabetics? Given its sugar content, diabetics should exercise caution. Opting for low-sugar sweeteners might offer a more suitable alternative.
What do I do if my fudge is too hard? Re-melt it gently with a splash of cream, re-cook to the correct temperature, and re-pour to reset properly.
Why is my fudge grainy? Graininess comes from undissolved sugar. Stir thoroughly during cooking and let it dissolve completely before removing from heat.
What can I add to enhance the flavor? Consider vanilla extract, sea salt, or a splash of bourbon or rum for deeper flavors. Toasted coconut can also provide a delightful twist.
Additional Resources
Explore related recipes like chocolate pecan bark or explore caramel variations for more candy-making adventures. Each offers unique challenges and rewards, expanding your expertise.
Technique guides on candy-making basics are invaluable. Understanding each step deeply allows room for creativity and successful adaptations.
Information on different nuts and their applications in desserts can open doors to new flavor combinations and textures.
For equipment recommendations, seek insights on the best brands for candy thermometers and pans to ensure precision and quality in candy crafting.
Seasonal variations might mean exploring citrus during summer months or hearty spices in winter, allowing your fudge to naturally align with seasonal flavor profiles.
Join the Conversation
Share your Butter Pecan Fudge creations on social media using specific hashtags to connect with fellow bakers. Seeing others’ interpretations can inspire further innovation.
Offer photography tips like using natural lighting and texture-rich backgrounds to showcase the brilliance of home-made fudge.
Encourage readers to share reviews and tweak the recipe to their liking, creating a vibrant community around shared culinary experiences.
Community engagement thrives on variation sharing, whether it’s swapping ingredients or providing beautiful plating ideas.
By fostering an open exchange of ideas and experiences, we can enrich our baking journeys, making recipes like Butter Pecan Fudge enduring kitchen staples.
The Recipe
Butter Pecan Fudge
Serves: 24 pieces
Prep Time: 15 mins
Cook Time: 20 mins
Total Time: 35 mins
Kitchen Equipment Needed
Candy thermometer
Heavy saucepan
Wooden spoon
Baking dish
Parchment paper
Knife
Ingredients
2 cups granulated sugar
1/2 cup unsalted butter, cubed
1/2 cup evaporated milk
2 cups toasted pecan halves
1 tsp vanilla extract
Directions
Line a baking dish with parchment paper for easy release.
In a heavy saucepan, combine sugar, butter, and milk over medium heat.
Stir constantly until the mixture reaches the soft-ball stage using a candy thermometer.
Remove from heat, and stir in vanilla and toasted pecans.
Quickly pour mixture into the prepared dish, spreading evenly.
Allow to cool at room temperature until set, about 2 hours.
Once set, remove fudge from the dish and cut into squares.
Recipe Notes
Ensure sugar is fully dissolved before reaching the soft-ball stage to prevent graininess.
For added flavor, consider stirring in a tablespoon of rum or bourbon with the vanilla.
Store fudge in an airtight container to maintain freshness and prevent drying out.
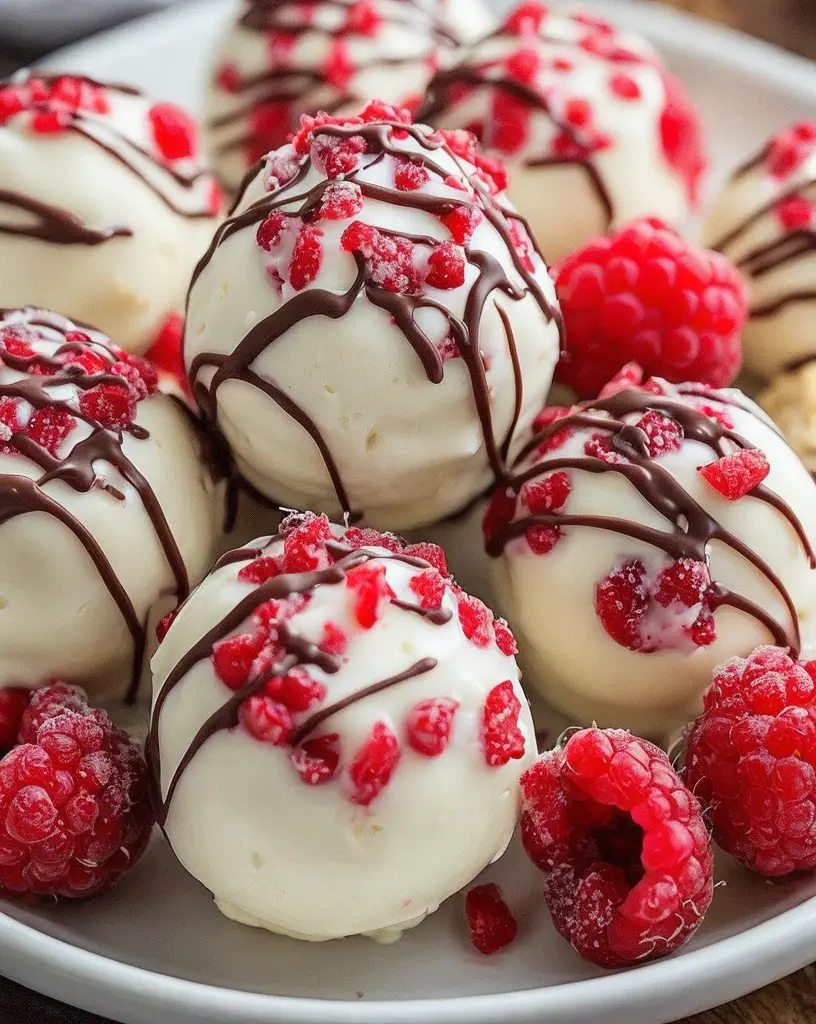
Irresistible White Chocolate Raspberry Cheesecake Balls for Dessert Lovers
White Chocolate Raspberry Cheesecake Balls: Irresistible Dessert Delight
⚖️
Difficulty
Easy
⏲️
Prep Time
20 mins
🕒
Cook Time
5 mins
⏱️
Total Time
25 mins
🍽️
Servings
12
Imagine indulging in the blissful combination of creamy white chocolate and tart raspberries, all wrapped in a luscious cheesecake ball. These decadent White Chocolate Raspberry Cheesecake Balls are a dessert dream with a velvety texture that melts in your mouth, leaving behind a medley of flavors that dance on your taste buds. Whether you’re a fan of quick desserts or cherishing an evening of baking treats, this recipe stands as a beacon of delightful indulgence.
Beneath the surface of their gorgeous exterior, these cheesecake bites conceal a core of sweetness and tang, perfectly balanced to satisfy your dessert cravings. Encased in a delicate white chocolate shell that adds a satisfying snap, these balls offer an enchanting visual and gustatory presentation. Their vibrant colors and rich flavors make them ideal for special occasions, gatherings, or a quiet night at home.
Quick Recipe Highlights
Flavor Profile: The sweet, creamy white chocolate perfectly complements the tart raspberry, creating a delightful balance.
Texture: These cheesecake balls boast a smooth, creamy interior encased in a crisp white chocolate shell.
Aroma: You’ll be greeted with the sweet scents of white chocolate and subtle hints of fresh raspberries.
Visual Appeal: The contrast of white chocolate and deep red raspberry create a visually stunning treat.
Skill Level Needed: Simplistic enough for beginners, yet impressive enough for seasoned bakers.
Special Equipment: A hand mixer or blender is helpful for achieving a smooth cheesecake filling.
Recipe Overview
Difficulty Level: Categorized as easy, this recipe requires basic mixing and rolling skills, ideal for newcomers to culinary delights.
Category: A versatile dessert, perfect for snack time cravings or after-dinner delights.
Cuisine: Rooted in modern dessert trends while appreciating classic flavor pairings.
Cost: Economical, using accessible ingredients available in most grocery stores, keeping dessert costs low.
Season: Best enjoyed in the spring and summer when raspberries are at peak freshness for enhanced flavor.
Occasion: Suitable for parties, holidays, or a simple treat, these balls add a sweet touch to any event.
Why You’ll Love This Recipe
These White Chocolate Raspberry Cheesecake Balls captivate with their exquisite taste and texture. Each bite offers a delightful contrast between smooth, tangy cheesecake filling and a crunchy, sweet chocolate coating. This recipe provides an excellent opportunity for creative dessert making that doesn’t sacrifice convenience or time. With just a few simple steps, anyone can achieve dessert perfection.
Beyond their delightful taste, these treats are conveniently easy to make, requiring minimal equipment and simple ingredients. They promise maximum flavor with minimal effort, making them an ideal choice for spontaneous dessert creations. For those mindful of nutritional benefits, raspberries provide a source of fiber, vitamins, and antioxidants, contributing to a guilt-free indulgence.
Social occasions benefit significantly from these irresistible cheesecake balls. Their elegant appearance and rich flavors make them a party favorite, ensuring admiration and compliments from family and friends. The recipe’s cost-effectiveness ensures accessibility, offering a gourmet feel without the associated price tag.
Historical Background and Cultural Significance
White chocolate and raspberry have long been cherished as a classic combination in the dessert world. The pairing evokes a sense of sophistication, with raspberry’s history tracing back to ancient cultivation in Europe. It holds cultural importance as a symbol of purity and invisibility in folklore, often used in culinary traditions to add a dash of vibrancy and tartness to sweet dishes.
The evolution of the cheesecake ball itself is a modern twist on traditional cheesecake, transforming it into a more portable, bite-sized form that aligns with today’s culinary trends focusing on practical, stylish treats. The melding of these ingredients reflects a fusion of old and new, marrying historical flavors with innovative presentation methods.
Ingredient Deep Dive
White chocolate’s origins trace back to the 1930s, introduced by Nestlé. An adaptation of milk chocolate, it lacks cocoa solids and offers a sweet, creamy experience, providing a smooth, melt-in-your-mouth delight. Selecting high-quality white chocolate ensures a creamy texture without graininess for these cheesecake balls. Store it in a cool, dry place to prevent melting or blooming.
Raspberries, native to Europe, offer rich cultural and nutritional benefits, thriving in regions with cool summers. Known for their high fiber, vitamin C, and antioxidant content, they contribute tanginess and natural sweetness to the cheesecake filling. Choose firm, fragrant raspberries and store them in the refrigerator to maintain freshness before use.
Common Mistakes to Avoid
Overmixing the cheesecake filling can lead to a runny texture; mix just until smooth and combined.
Not chilling the balls enough before coating in chocolate can result in a mess; ensure they are firm before dipping.
Using low-quality white chocolate can affect both taste and texture; opt for high-quality brands for the best results.
Failing to dry raspberries properly can add excess moisture to the filling; gently pat them dry before use.
Overheating white chocolate can cause it to seize; melt gently over low heat or use a double boiler.
Not allowing chocolate coating to set can cause smearing; place coated balls in the fridge to firm up.
Using overly ripe raspberries can lead to a mushy filling; select firm, fresh fruit.
Skipping the lining of the baking tray can result in sticky balls; always use parchment paper.
Essential Techniques
Achieving the perfect chai latte requires mastering the steaming of milk to a velvety consistency. The key is to heat the milk to just the right temperature—around 150°F—to enhance sweetness while creating a luscious foam. Avoid overheating, which can scorch the milk and affect taste. When steaming, position the steam wand just below the milk’s surface for optimal texture and microfoam, crucial for the creamy chai latte experience.
Creating white chocolate raspberry cheesecake balls involves key techniques. Properly melting the white chocolate is crucial; gently heat it over a double boiler or microwave in short intervals, stirring frequently to avoid burning. Correctly freezing the cheesecake balls before dipping ensures the chocolate adheres smoothly. This step prevents mess and guarantees a hard, even coating, essential for the perfect texture balance.
Pro Tips for Perfect White Chocolate Raspberry Cheesecake Balls
Ensure berries are thoroughly dried to prevent unwanted moisture in the filling, affecting both taste and texture. While melting chocolate, add a small amount of coconut oil to achieve a smoother, shinier coating once set. Use a toothpick or fork for easy dipping, allowing excess chocolate to drip off before placing them on parchment to minimize pooling.
Variations and Adaptations
Experiment with regional variations by substituting the raspberries for other berries such as strawberries or blueberries, which offer a slightly different tart-sweet experience. For seasonal adaptations, incorporate cinnamon or nutmeg during fall to add warmth. Adapting for dietary needs, such as using dairy-free cream cheese and coconut cream, can create a vegan-friendly version without sacrificing richness.
Serving and Presentation Guide
For an elegant display, arrange the cheesecake balls on a tiered cake stand lined with parchment paper, garnished with fresh mint leaves or a light dusting of powdered sugar. Modern serving suggestions include alternating colors on skewers for a unique dessert kebab. Pay attention to portion control by placing individual balls in mini cupcake liners for bite-sized perfection.
Wine and Beverage Pairing
Enhance your dessert experience by pairing these cheesecake balls with a glass of sparkling rosé, which complements the tart raspberry and creamy white chocolate. For a non-alcoholic alternative, try a light berry-infused iced tea, adding herbal notes to the sweet treat. Hot beverages like a classic Earl Grey tea can also pair beautifully with this dessert, offering a warming complement to the treat’s flavors.
Storage and Shelf Life
To store these treats, place them in an airtight container and refrigerate for up to 5 days. Ensure they are kept in a single layer to prevent sticking. Freezing is also an option; lay them on a baking tray until fully frozen, then transfer to zip-lock bags. Allow the cheesecake balls to thaw in the fridge before serving to maintain their creamy texture.
Make Ahead Strategies
This recipe is perfect for make-ahead preparation. Roll and pre-chill the cheesecake balls a day before, storing them in airtight containers before dipping in chocolate. This method ensures freshness and allows chocolate to adhere seamlessly when you’re ready to serve. Add a fresh garnish just before presenting them for optimal visual and flavor appeal.
Scaling Instructions
For larger gatherings, double or triple the recipe by ensuring additional preparation and storage space. Adjust the amount of chocolate and raspberries proportionally to maintain quality. If scaling down, reduce ingredient quantities while maintaining the same ratios to ensure consistency in texture and flavor.
Nutritional Deep Dive
These cheesecake balls offer a balance of macronutrients, with cream cheese providing a source of fat and protein, complemented by the antioxidants and fiber found in raspberries. Consider portion control to manage caloric intake, particularly for those mindful of dietary goals. Analyze ingredient labels for specific nutritional details, sharing any allergen information with guests.
Dietary Adaptations
Catering to dietary needs, these balls can be made gluten-free by using gluten-free graham cracker crumbs. For a vegan adaption, replace the cream cheese with vegan cream cheese alternatives and use dairy-free white chocolate to maintain a similar texture and flavor profile. Incorporating such changes ensures inclusivity without compromising on taste.
Troubleshooting Guide
For issues with texture, ensure cream cheese is softened properly for smooth mixing. If flavor balance is off, consider adding a touch more vanilla or a hint of lemon zest. Equipment challenges, such as overmixing with a powerful mixer, can be resolved by mixing just until combined. Address ingredient substitutions by choosing high-quality alternatives that closely mimic original components.
Recipe Success Stories
Many have shared their success with these cheesecake balls, often experimenting with additional ingredients like crushed pistachios for a nutty crunch or swapping raspberries for blackberries for an intriguing twist. Community feedback consistently highlights the balance of sweet and tart as a significant crowd-pleaser, and readers often note the ease and enjoyment of the preparation process.
Frequently Asked Questions
Q: Can these cheesecake balls be frozen? A: Yes, they can be frozen. Place them on a tray until fully frozen, then store in a zip-lock bag. Thaw in the refrigerator before serving.
Q: What if I can’t find fresh raspberries? A: Frozen raspberries can be used; simply thaw and pat them dry before incorporating into the recipe.
Q: Can I use milk chocolate instead of white chocolate? A: Absolutely, using milk chocolate will give a richer taste, though it may slightly overshadow the raspberry notes.
Q: How do I prevent the balls from sticking together? A: Ensure chocolate coating is completely set and store in single layers separated by parchment paper.
Q: How long do they last at room temperature? A: They should be refrigerated if not consumed within 2 hours, as cream cheese requires cooler temperatures to prevent spoilage.
Q: Can I make this dairy-free? A: Yes, use a dairy-free cream cheese substitute and coconut cream for the filling, along with a dairy-free white chocolate.
Additional Resources
Explore related recipes like our raspberry cheesecake bars or white chocolate mousse for variations in presentation and texture. Delve into technique guides on perfecting white chocolate melting and cheesecake filling consistency for a professional touch. Discover a variety of ingredient information and equipment recommendations to ease your culinary journey.
Join the Conversation
We’d love to see your culinary creations! Share your White Chocolate Raspberry Cheesecake Balls photos and experiences on social media using #RaspberryCheesecakeDelight. Leave a review or join our community discussions for further recipe variations and adaptations. Your feedback enhances our recipe with personal touches and new ideas.
The Recipe
White Chocolate Raspberry Cheesecake Balls
Serves: 12
Prep Time: 20 mins
Cook Time: 5 mins
Total Time: 25 mins
Kitchen Equipment Needed
Mixing bowls
Hand mixer or stand mixer
Baking sheet
Parchment paper
Microwave-safe bowl
Spatula
Ingredients
1 cup white chocolate chips
1/2 cup crushed graham crackers
8 oz cream cheese, softened
1/4 cup powdered sugar
1 tsp vanilla extract
1 cup fresh raspberries, mashed
Directions
Line a baking sheet with parchment paper and set aside.
In a mixing bowl, beat the softened cream cheese until smooth. Add powdered sugar and vanilla extract, mixing well.
Fold in the crushed graham crackers and mashed raspberries, ensuring they are evenly combined.
Roll mixture into 1-inch balls and place them on the prepared baking sheet. Freeze for 15 minutes.
Melt the white chocolate chips in a microwave-safe bowl, heating in 30-second intervals and stirring until smooth.
Dip the chilled cheesecake balls in melted white chocolate, ensuring they are fully coated.
Place the coated balls back on the baking sheet and refrigerate until the chocolate is set.
Serve chilled and enjoy!
Recipe Notes
Consider adding a teaspoon of lemon zest for an extra tangy flavor twist.
Substitute raspberries with blueberries or strawberries for variations in taste and color.