Irresistible Banana Cake with Luscious Cream Cheese Frosting Recipe

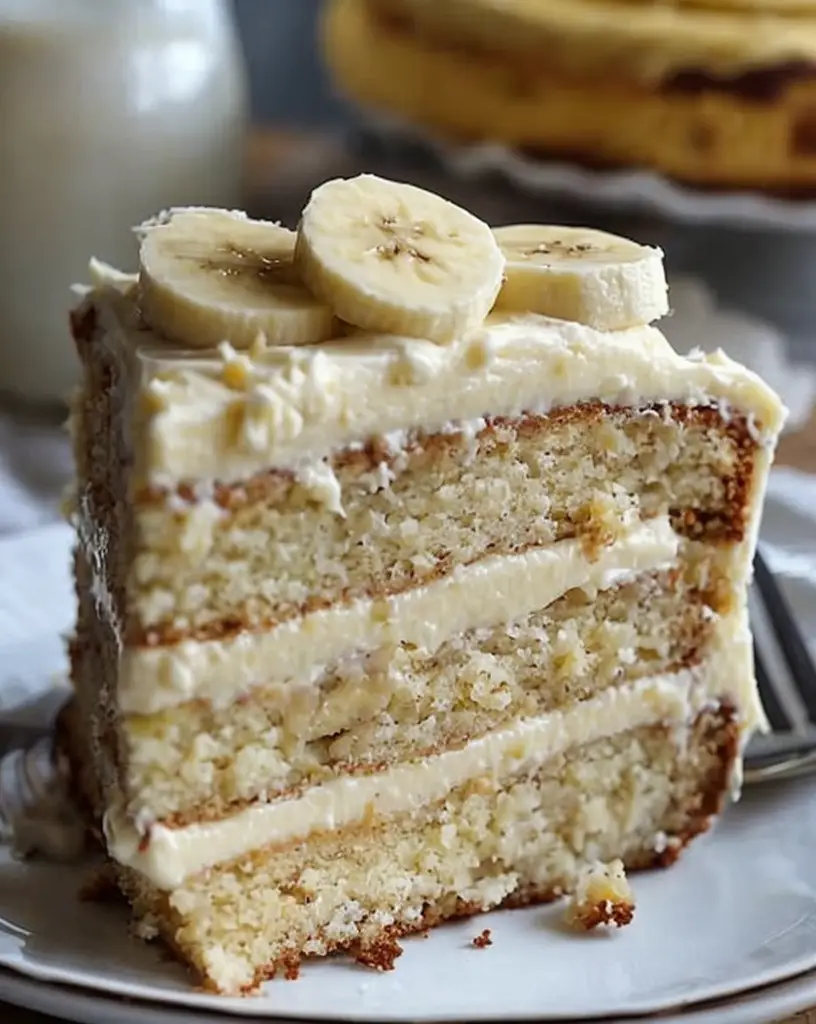
Heavenly Banana Cake with Cream Cheese Frosting: A Must-Try Delight

⚖️
Difficulty
Moderate

⏲️
Prep Time
20 mins

🕒
Cook Time
40 mins

⏱️
Total Time
60 mins

🍽️
Servings
8

Ready to indulge in a wildly popular Heavenly Banana Cake with Cream Cheese Frosting? This delightful cake brings together the irresistible flavors of ripe bananas with the silky smoothness of cream cheese frosting. With its moist texture and sweet, fruity aroma, this dessert is the perfect centerpiece for any occasion, and it’s bound to win the hearts of your family and friends.

The creamy frosting coupled with the rich banana foundation creates a taste sensation that is both nostalgic and delightful. Whether served as a treat at tea time or the grand finale at a dinner party, this banana cake is guaranteed to impress. Plus, it’s a fantastic way to use up those overripe bananas languishing in your fruit bowl.

Quick Recipe Highlights

  • Flavor Profile: A perfect blend of sweet bananas and creamy frosting creates an irresistible taste delight.
  • Texture: The cake boasts a moist and tender crumb while the cream cheese frosting adds a creamy, luxurious finish.
  • Aroma: The enticing smell of ripe bananas and vanilla fills your kitchen, creating a warm, inviting atmosphere.
  • Visual Appeal: With its golden hue and contrasting white frosting, this cake is as beautiful as it is delicious.
  • Skill Level Needed: Suitable for moderate skill levels thanks to simple steps and a clear process.
  • Special Equipment: Requires basic kitchen tools, including a mixing bowl, a whisk, and a baking pan.

Recipe Overview

  • Difficulty Level: This Heavenly Banana Cake requires moderate skill level, perfect for home bakers who love experimenting with flavors yet are short on time.
  • Category: This cake is a dessert category favorite, often enjoyed as a sumptuous end to a meal or a standout feature at celebrations.
  • Cuisine: Drawing inspiration from American baking traditions, this cake showcases the beloved combination of bananas and cream cheese.
  • Cost: Most ingredients are pantry staples, making the cake affordable and accessible for regular baking.
  • Season: Perfect in any season, bananas are readily available year-round, making this dish a perennial favorite.
  • Occasion: Best for birthdays, family gatherings, or simply as a mid-week treat to delight your loved ones.

Why You’ll Love This Recipe


The Heavenly Banana Cake with Cream Cheese Frosting offers a divine taste and texture that you’ll crave again and again. Its moist banana base is soft and tender, enriched with the subtle nuttiness of vanilla and sharpness of cream cheese frosting. This combination brings a sense of comfort and nostalgia, while still feeling fresh and modern.

Convenient to prepare, this recipe is ideal for busy bakers who want impressive results without spending hours in the kitchen. Quickly mix the banana cake batter with just a few simple steps, and the cream cheese frosting comes together effortlessly, ready to spread on the cooled cake.

Healthwise, bananas are a rich source of vitamins and minerals like potassium, and this cake offers a sweet treat with a nutritional boost. Cream cheese adds a touch of calcium, and when paired with whole grains and nuts as optional additions, it brings a balanced complement to a healthy diet.

Socially, nothing delights a crowd like homemade cake. Serve this banana cake at your next gathering to surprise and please guests of all ages. Easy to slice and share, it’s the perfect centerpiece for coffee mornings, office celebrations, or family dinner.

Cost-wise, Heavenly Banana Cake is made affordable thanks to its simple, everyday ingredients. Bananas, flour, sugar, and cream cheese are accessible to most home bakers, and with many pantry items already on hand, it’s budget-friendly without sacrificing quality.

Historical Background and Cultural Significance


Banana cake has an intriguing history, evolving as a creative solution to using overripe bananas during periods when waste was discouraged. Its roots lie in the resourcefulness of home bakers during the early 20th century, creating delicious, moist cakes from simple ingredients.

In many cultures, the banana is cherished for its nutritional value and versatility in recipes. This cake showcases how different culinary traditions explore banana use, resulting in different takes like the Caribbean dark rum-infused variation or the spiced cinnamon versions found in Southeast Asia.

Over time, the recipe has seen multiple adaptations, including layer cakes with frosting and shredded nuts. This evolution underlines its importance as a flexible treat shaped by regional and personal preferences, each version a testament to culinary creativity.

Today, the cake sits comfortably within global cuisine, embraced by countries worldwide who have made it their own. With regional variants in flavor and texture, banana cake remains a beloved staple that connects people through shared love for sweet, comforting desserts.

Ingredient Deep Dive


Bananas are the star ingredient, providing natural sweetness, moisture, and flavor depth. Known for their potassium content, bananas are also a good source of vitamin C, fiber, and other essential nutrients. Select ripe bananas with brown spots for optimal sweetness and moisture.

Cream cheese frosting brings its tangy, smooth texture to the cake, balancing the sweet with a hint of tart. Rich in taste, it’s perfect for those seeking indulgence. Store cream cheese in the fridge and bring it to room temperature for easier mixing.

Flour forms the structure of our cake. Opt for all-purpose flour unless seeking a gluten-free alternative. When storing flour, keep it in a cool, dry place sealed to maintain freshness. Use whole wheat flour as a hearty alternative if desired.

Eggs offer a binding role while contributing to the cake’s light texture. For a vegan version, replace eggs with mashed berries or flaxseed water mix. Fresh eggs are best, so check their expiration date and store them in the refrigerator.

Baking powder and soda are essential leavening agents, creating a tender crumb. Make sure they’re fresh, as old agents can lead to dense, flat cakes. Store in a dry place and replace the box every six months.

Common Mistakes to Avoid

  • Using underripe bananas: They lack sweetness and moisture. Wait until bananas are brown and spotty.
  • Overmixing the batter: This leads to a dense cake. Mix until just combined.
  • Incorrect oven temperature: Always preheat your oven, and use an oven thermometer for accuracy.
  • Skipping room temperature ingredients: Cold items can lead to an uneven batter. Let everything sit at room temperature first.
  • Ignoring pan size recommendations: Using a different pan size affects bake time and cake texture.
  • Forgetting to sift dry ingredients: Sifting prevents lumps and ensures even mixing.
  • Not cooling cake before frosting: Warm cake melts the frosting, leading to a mess.
  • Improper storage: Ensure leftovers are covered to prevent drying out.

Essential Techniques


Ripe bananas play a crucial role in achieving the optimal taste and texture; use a fork or potato masher for quick mashing until smooth. The smoothness of the banana mash dictates how even the cake texture will be, so ensure there are no chunks.

Creaming butter and sugar is essential for texture. Beat until light and fluffy to incorporate enough air into the batter. This leads to a tender cake by trapping air that expands during baking, providing rise and lightness.

Utilize the right baking pan preparation techniques. Line with parchment and grease lightly for easy cake removal. Proper prep ensures the cake doesn’t stick, helps with even baking, and maintains the integrity of the cake structure.

Measuring ingredients accurately is vital, especially with baking powder and soda. Too much yields a bitter taste, while too little results in a dense cake. Use the back of a knife to level measuring cups and spoons for precision.

A key technique in frosting is achieving the right consistency. Beat cream cheese and butter until smooth, then gradually add sugar to avoid lumps. A smooth frosting ensures a buttery mouthfeel, perfect for spreading or piping.

Pro Tips for Perfect Heavenly Banana Cake with Cream Cheese Frosting


Make sure to use overripe bananas; they add extra moisture and natural sweetness to the cake. Check the ripeness by looking for a deep yellow color with several brown spots.

When making cream cheese frosting, beat butter and cream cheese until creamy before adding sugar. This way, you’ll avoid lumps and get smoother results faster.

Add a pinch of salt to your frosting to balance out the sweetness and enhance the banana flavor. A small amount can shift frosting from overly sweet to a taste profile that complements your cake fully.

Experiment with additions like walnuts or chocolate chips to the batter. This adds texture and an extra layer of flavor, taking your cake to a whole new level.

Ensure your baking pans are greased and lined. Using parchment paper helps with easy removal, maintaining the cake’s structure and minimizing breakage.

Do not overmix the batter. Mix till ingredients combine to maintain a tender crumb and ensure optimal texture.

Variations and Adaptations


Try regional variations by adding spices like cinnamon or nutmeg for warmth, inspired by traditional Caribbean flavors. This warm note complements the sweetness of bananas.

Seasonal adaptations can include adding fruits like blueberries or raspberries during summer months, offering a burst of freshness alongside banana’s mild earthiness.

For dietary modifications, use almond or oat flour for a gluten-free option, or swap out regular sugar with coconut sugar for a healthier, lower glycemic alternative.

Explore flavor variations by incorporating dark chocolate chunks or a drizzle of caramel sauce for a decadent twist that turns your cake into a gourmet treat.

Changing texture is as simple as adding crushed nuts or seeds into the batter, creating a delightful crunch that contrasts with the cake’s moist crumb.

Presentation alternatives include layering the cake with frosting for a classic tiered effect, or piping decorative frosting patterns to add a visual flourish to your dessert.

Serving and Presentation Guide


Use a large, flat platter for serving, decorated with fresh bananas or edible flowers for a rustic charm. A clean slice ensures the cake’s moist layers are visible.

For garnishing, top with extra cream cheese frosting rosettes or dust with a light sprinkle of cinnamon powder. This ties together flavor notes and elevates presentation.

Traditional accompaniments are lightly whipped cream or a scoop of vanilla ice cream, providing contrast and refreshing the palate between bites.

Modern serving suggestions include a drizzle of caramel sauce or a sprinkle of sea salt flakes, adding complexity and creating a more nuanced profile.

Temperature considerations are key; serve it slightly chilled or at room temperature, ensuring the cream cheese frosting remains firm yet smooth.

For portion control tips, cut cake slices about an inch wide to perfectly fit small dessert plates, ensuring each guest has a taste without overindulgence.

Wine and Beverage Pairing


Pair with a light, fruity dessert wine like Moscato, which complements the sweetness of the banana and enhances the cream cheese’s tangy richness.

For non-alcoholic alternatives, opt for sparkling water mixed with a hint of lemon to cleanse the palate or a ginger-infused iced tea for a spicy kick.

In terms of coffee or tea, try pairing the cake with an American latte or a classic Earl Grey. These combinations accentuate the cake’s rich flavors while contrasting its sweetness.

Consider temperature thoughtfully; beverages should be mildly warm or chilled to match the cake’s ambient serving temperature.

Avoid overpowering drinks like robust-red wines or intensely bitter coffees which may overshadow the subtleties of the cake.

Storage and Shelf Life


Store leftover cake in an airtight container in the refrigerator to maintain freshness and prevent the cream cheese frosting from spoiling.

For refrigeration, ensure the cake is well covered with wax paper or container lid to limit exposure to moisture or odors. This can last up to five days when stored properly.

Signs of spoilage include a noticeable change in color, texture, or any unpleasant odor. Discard immediately if any of these signs are present.

Reheating instructions suggest letting cake slices rest at room temperature briefly before serving to avoid a cold, firm texture.

For freezing, individually wrap slices in plastic wrap or aluminum foil, then store in airtight containers. This will keep for up to three months.

Make Ahead Strategies


To save time, prepare the cake a day in advance, letting it cool completely before wrapping and refrigerating overnight. This also enhances its flavor as it sits.

Separate components like cake and frosting can be prepared ahead, then stored separately. Assemble the cake with frosting on the day of serving for optimal freshness.

During interim storage, wrap the cooled cake in plastic wrap to prevent drying out, while keeping frosting in an airtight container.

Reheating guidelines include gently warming the cake at room temperature or opting for extra fresh elements like berries for serving.

Scaling Instructions


To halve the recipe, simply reduce all ingredients by half, ensuring measurements are accurate for balanced flavor and texture.

For doubling or tripling, scale ingredients accordingly while maintaining ratios. Adjust baking time slightly, checking with a toothpick to ensure even cooking.

Equipment adjustments like using larger baking pans or multiples necessitate stable oven temperature for consistent results.

Timing modifications are crucial when scaling; larger cakes generally require longer bake times and more thorough checking for doneness.

For sensitive ingredients like leavening agents, maintain proper proportions to ensure no change in cake texture, regardless of size.

Nutritional Deep Dive


Examine the macro-nutrient breakdown: carbohydrates from bananas provide energy, while cream cheese and eggs supply fats and protein for nutrition balance.

Micronutrient analysis highlights potassium and vitamin B6 from bananas, alongside traces of calcium from the frosting, supporting overall health.

Emphasizing health benefits, the cake’s ingredients contribute to dietary fiber, energy supply, and natural sweetness without excess processed sugars.

Consider each portion analysis favorably; reasonable size servings ensure indulgence in a balanced, mindful manner, supporting weight management goals.

Adapt the cake to personal health needs by adjusting sugar levels or incorporating nuts and seeds for added nutrition.

Dietary Adaptations


For gluten-free: Substitute flour for a gluten-free blend or almond flour, ensuring similar moisture properties.

Dairy-free versions can swap cream cheese for coconut cream cheese or cashew frosting alternatives, maintaining richness without lactose.

Vegan adaptations include replacing eggs with flaxseed meal mixed with water or apple sauce, providing the necessary binding quality.

Low-carb seekers can opt for almond or coconut flour and sweeten using stevia or monk fruit sweeteners. These sustain indulgence while managing carbohydrate intake.

Explore keto versions with coconut flour and erythritol for sweetness, allowing for a low-carb, high-fat cake suitable for keto diets.

The paleo approach shifts to natural sweeteners like honey and almond flour, paired with coconut milk frosting providing creamy indulgence.

Low-FODMAP adjustments avoid certain sugars, favoring alternatives like maple syrup and gluten-free flour for a gut-friendly option.

Troubleshooting Guide


Solve texture issues like a dry cake by ensuring precise measurement of wet ingredients and using ripe bananas for added moisture.

For flavor balance, a touch of vanilla extract or lemon zest can elevate the cake’s profile, adding brightness and depth.

Address temperature problems by using an oven thermometer for accuracy, ensuring the cake bakes through without overcooking or burning.

Overcome equipment challenges with parchment paper lining and adjusting to smaller pans if larger ones are unavailable, controlling the bake consistency.

Ingredient substitutions should be carefully ratio calculated. When replacing eggs, ensure sufficient moisture and binding through other foods like applesauce.

Timing concerns are addressed by checking for doneness using a toothpick. If it emerges clean, the cake is ready; otherwise adjust baking time incrementally.

Recipe Success Stories


Community feedback is glowing, with enthusiastic bakers sharing their adaptations like adding chopped walnuts or raving about the cake’s moist texture.

The adaptation stories are numerous, with readers adding personal touches like a dash of rum for holiday bakes or enjoying it in gluten-free form with almond flour.

Reader suggestions include using alternative frostings for variety, like peanut butter or an espresso spread atop certain versions for a unique twist.

Photography tips center on capturing the cake in beautiful natural lighting, highlighting the frosting’s creamy texture alongside a slice displaying the plush interior.

Many have had success substituting ingredients like coconut sugar for lower glycemic impact while maintaining the cake’s signature taste, perfectly demonstrating the recipe’s versatility.

Frequently Asked Questions

Can the banana cake be made gluten-free?
Yes, substitute all-purpose flour with a gluten-free blend or use almond flour while adjusting other ingredients to maintain the right texture.

What’s the best way to store leftover cake?
Store leftovers in an airtight container in the refrigerator for up to five days. This helps maintain moisture and keeps the frosting fresh.

Can I prepare this cake in advance?
Absolutely, prepare the cake ahead and refrigerate. Assemble with frosting before serving for best texture and flavor.

What can I substitute for cream cheese?
Use a dairy-free alternative like vegan cream cheese or coconut cream for a similar texture with different dietary needs.

Is this cake suitable for vegans?
With substitutions like flaxseed egg replacements and dairy-free cream cheese, this recipe can be adapted to suit vegan diets.

How do I ensure the cake is moist?
Use properly ripened bananas for maximum moisture and avoid overmixing the batter to maintain a tender crumb.

What’s the ideal ripeness for bananas?
Look for bananas with brown spots and a slightly blackening peel as these offer perfect sweetness and moisture.

Can this cake be frozen?
Yes, wrap individual slices in plastic and store them in an airtight container in the freezer for up to three months.

What can I add for extra flavor?
Spices like cinnamon or vanilla can enhance flavors, while chocolate chips or nuts add additional texture and taste.

Why did my cake turn out dense?
A dense cake often results from overmixing, insufficient leavening, or stale ingredients. Check freshness and mix until just combined.

Additional Resources


Explore related recipes like banana bread, muffins, or a traditional carrot cake with cream cheese frosting for varied takes on beloved flavors.

Discover technique guides on proper banana mashing and frosting consistency to elevate your baking skills for this and other recipes.

Ingredient information highlights the use of alternative flours and sweeteners, providing healthier options without compromising taste.

Equipment recommendations such as the best baking pans or mixers facilitate smooth preparation and enhance baking success.

Seasonal variations expand your repertoire with festive options like a spiced holiday banana cake or a tropical version featuring coconut.

Join the Conversation


Share your own Heavenly Banana Cake with Cream Cheese Frosting experiences on social media, showcasing your baking prowess and personal twists.

Photography tips include featuring your cake in natural daylight or using a pretty backdrop to highlight its visual appeal for social sharing.

Leave recipe reviews to provide feedback, share your adaptations, or suggest alternative methods to help other bakers succeed.

Engage with the community, exchanging ideas and tips that might inspire new creations or improvements to your baking skills.

Explore recipe variations recommended by fellow bakers or suggest your own, contributing to the vibrant discussion around this beloved cake.

The Recipe

Heavenly Banana Cake with Cream Cheese Frosting

Serves: 8

Prep Time: 20 mins

Cook Time: 40 mins

Total Time: 60 mins

Kitchen Equipment Needed

  • Mixing bowls
  • Whisk
  • Spatula
  • Baking pan
  • Measuring cups and spoons
  • Oven

Ingredients

  • 1 1/2 cups all-purpose flour
  • 1 teaspoon baking soda
  • 1/4 teaspoon salt
  • 1/2 cup unsalted butter, softened
  • 1 cup granulated sugar
  • 2 large eggs
  • 3 ripe bananas, mashed
  • 1 teaspoon vanilla extract
  • 1/2 cup sour cream
  • 1/2 cup cream cheese, softened
  • 2 cups powdered sugar
  • 1 teaspoon vanilla extract (for frosting)

Directions

  1. Preheat your oven to 350°F (175°C). Grease and flour the baking pan.
  2. In a bowl, mix flour, baking soda, and salt; set aside.
  3. Cream together the butter and sugar until light and fluffy. Add eggs one at a time, beating well with each addition.
  4. Mix in the mashed bananas and vanilla extract.
  5. Gently stir flour mixture into banana mixture alternating with sour cream until just blended.
  6. Pour into the prepared pan and bake for 40 minutes or until a toothpick comes out clean.
  7. While the cake cools, prepare the frosting by beating together cream cheese and powdered sugar until smooth.
  8. Add vanilla extract and continue to beat until fully combined.
  9. Once cake is cooled, spread cream cheese frosting evenly on top.

Recipe Notes

  • For added crunch, stir in a half-cup of chopped walnuts or pecans into the batter.
  • As a flavor twist, add a teaspoon of cinnamon to the dry ingredients.
  • The cake can be made as a layer cake by doubling the recipe and dividing batter into two pans.

Flavorful Chicken with Garlic Parmesan Rice Recipe for Dinner

Chicken with Garlic Parmesan Rice: A Delightful Fusion of Flavors

⚖️
Difficulty
Medium

⏲️
Prep Time
15 mins

🕒
Cook Time
30 mins

⏱️
Total Time
45 mins

🍽️
Servings
4

The Chicken with Garlic Parmesan Rice is a comforting dish that brings together the savory taste of chicken with the aromatic blend of garlic and rich Parmesan cheese. This dish offers a symphony of flavors that will elevate your dining experience to gourmet levels right in your own kitchen. Ideal for family gatherings or a cozy dinner, it combines juicy chicken breasts with creamy, cheesy rice that is suffused with the flavor of garlic.

This savory dish is not just about taste; it’s about creating unforgettable moments around the dinner table. Imagine the tantalizing aroma of garlic wafting through your home as the rice simmers to perfection, enhanced by the nutty flavor of Parmesan cheese. With its beautiful presentation and tantalizing scents, this dish promises to be a favorite, evoking smiles and satisfied sighs with every bite.

Quick Recipe Highlights

  • Flavor Profile: Savory chicken marries well with garlic-infused, creamy Parmesan rice, creating a harmonious balance.
  • Texture: Tender chicken paired with creamy, perfectly cooked rice adds a delightful texture contrast.
  • Aroma: The scent of simmering garlic and melted Parmesan cheese will enchant your senses.
  • Visual Appeal: The golden brown chicken against the creamy rice creates a visually inviting plate.
  • Skill Level Needed: Basic sautéing and rice-cooking skills are required.
  • Special Equipment: A good-quality skillet and a saucepan with a lid will ensure cooking success.

Recipe Overview

  • Difficulty Level: With simple ingredients and classic techniques, this recipe is accessible to most home cooks while offering room for finesse in execution.
  • Category: This is a versatile main course that fits into both casual and formal meal categories.
  • Cuisine: While influenced by Italian-American traditions, this dish has a universal appeal across culinary borders.
  • Cost: Estimated cost is modest due to common, pantry-friendly ingredients like rice and Parmesan.
  • Season: Great year-round, with special warmth in cooler months due to its hearty nature.
  • Occasion: Perfect for any occasion from weeknight dinners to family celebrations.

Why You’ll Love This Recipe


The Chicken with Garlic Parmesan Rice is a textural and flavorful triumph that promises not only to satisfy your palate but also to warm your soul. The succulent chicken, when paired with the creamy, aromatic rice, ensures a meal that’s both indulgent and comforting. Its fuller mouthfeel is complemented by the robustness of the garlic and Parmesan, delivering a taste explosion with every bite.

In today’s fast-paced world, convenience is paramount, and this dish delivers. With minimal prep and cook time, you can indulge in the flavors of a gourmet meal right at home without the stress. It requires no complex techniques, making it perfect for both novice cooks and busy professionals looking to whip up a quick yet impressive dinner.

This dish offers nutritional benefits, as it combines protein-rich chicken with the beneficial aspects of garlic and Parmesan. Garlic is known for its immune-boosting properties, while Parmesan adds not just flavor but essential nutrients like calcium. It’s a comforting meal that doesn’t compromise on your health goals.

For social gatherings or family dinners, this dish stands out as a crowd-pleaser. Its elegant presentation makes it a centerpiece on any table, encouraging hearty conversation and shared enjoyment. Whether it’s a casual weeknight or special occasion, it’s bound to impress.

The affordability and accessibility of the ingredients ensure that this delightful dish can become a regular part of your meal rotation without breaking the bank. Chicken and rice are staple items, while garlic and Parmesan just elevate the everyday into exceptional.

Historical Background and Cultural Significance


Chicken with rice is a pairing that has traversed the globe, with each culture adding its own twist. In this fusion, the Italian inspiration shines through with the use of Parmesan and garlic, showcasing the famed Italian technique of creating flavor depth with minimal yet quality ingredients.

Garlic has been a beloved ingredient in cuisines worldwide, hailed for its pungency and health benefits. Parmesan cheese, rooted in Italian legacy, brings a taste of Italy to this otherwise global dish, adding a depth of flavor recognized and loved universally.

Over the decades, this recipe has evolved from a simplistic chicken and rice pairing into a beloved culinary favorite, celebrated for its versatility. By adding garlic and Parmesan, a modern twist is blended with traditional fundamentals, creating a dish that pays homage to its roots while being perfectly suited for today’s kitchens.

Regional variations abound, with additions of unique spices or local toppings turning this dish into an adaptable canvas, reflecting the diversity of culinary traditions while maintaining the integrity of its core flavors.

Ingredient Deep Dive


Chicken is a globally revered protein known for its versatility and health benefits. Rich in essential nutrients and low in fat, it adapts well to various culinary techniques, including sautéing for this recipe. Its subtle taste allows for infusion of flavors, making it the perfect base for garlic and Parmesan.

Garlic is lauded not only for its intense flavor but also for its myriad health benefits, including boosting the immune system. When incorporated into this dish, it offers a pungent flavor that enhances the savory profile of both the chicken and rice.

Parmesan cheese, a king in the cheese world, is valued for its nutty flavor and granular texture. Rich in calcium and protein, it melts into the rice, providing a creamy consistency and an umami-enhanced flavor profile. Always select a block of Parmesan to grate freshly whenever possible to maximize flavor and shelf life.

Rice, with its mild flavor and firm texture, serves as an essential companion to the flavorful chicken. Opt for long-grain varieties for this recipe, known for absorbing flavors well without turning mushy. Store rice in an airtight container in a cool, dry place to maintain its quality and nutritional value.

Common Mistakes to Avoid

  • Using cold rice can lead to uneven cooking, so make sure your rice is at room temperature before starting.
  • Overcooking the chicken can result in dry meat; cook just until the internal temperature reaches 165°F.
  • Adding cheese while the rice is too hot may cause it to separate. Allow rice to cool slightly before mixing in the Parmesan.
  • Under-seasoning is a common mistake; season each ingredient as you go for maximum flavor.
  • Not allowing the garlic to bloom can result in a bitter taste. Sauté it gently to release its sweet aroma.
  • Rushing the simmering step prevents flavors from fully merging, so don’t skimp on this crucial time for best taste results.
  • Using inferior quality Parmesan can drastically affect the flavor; always opt for real Parmigiano-Reggiano.
  • Stirring rice excessively can cause it to become gummy; stir sparingly to maintain separate, fluffy grains.

Essential Techniques


Mastering the sauté method is crucial, as it locks in the juices of the chicken while developing a seared crust for maximum flavor. Keep your skillet hot to achieve that perfect golden-brown hue without drying out the meat. The gentle sauté of garlic is vital to unlock its aromatic oils, adding depth to the dish without imparting any bitterness from overcooking.

Simmering the rice is key to achieving a creamy, cohesive texture rich in flavor. Observe for even absorption of flavors and liquids, ensuring a satisfyingly luscious outcome. Pay attention to the visual cues of the rice turning creamy as it releases its starches into the seasoned liquid.

Pro Tips for Perfect Chicken with Garlic Parmesan Rice


Achieve perfectly cooked, rich rice by toasting it slightly before adding liquid. This step brings out a nutty flavor that harmonizes with the Parmesan. Dicing the chicken into uniform pieces ensures even cooking and a consistent, tender texture throughout the dish. For an extra layer of flavor, consider marinating the chicken in a garlic and herb mixture for at least 30 minutes before cooking.

Use freshly grated Parmesan, as pre-grated variants are often coated with anti-clumping agents that affect meltability and flavor. When seasoning, focus on each layer—use herbs like thyme or basil along with salt and pepper—enhancing the depth of the final dish.

Balancing the flavors is critical in creating a harmonious dish. Taste as you go, adjusting the seasoning to your preference, ensuring that the garlic and Parmesan shine without overpowering. If the dish is too salty, a splash of cream or unsalted butter can cut through the excess saltiness, providing a smoother, richer flavor.

Variations and Adaptations


Regional variations could include the use of local herbs and spices, such as rosemary instead of thyme, or substitutions like adding sun-dried tomatoes for an added tang. Keep a seasonal twist in mind; integrate vegetables like asparagus or mushrooms during their peak season for a fresh dimension of flavor.

For a lighter version, substitute brown rice for white rice to increase fiber content, or use low-fat cheese to reduce caloric intake. Vegan adaptations can be explored by substituting chicken with a sturdy vegetable like eggplant or tofu and using a vegan Parmesan alternative.

To accommodate gluten-free diets, ensure that the chicken stock and cheese are certified gluten-free. Meanwhile, for those who want a bit more robust flavor, consider adding crispy pancetta or sautéed leeks to enrich the dish’s complexity.

Serving and Presentation Guide


When serving, plate the chicken atop the garlic Parmesan rice to create an elegant tower. For garnishing, freshly chopped parsley adds a pop of color and fresh aroma. To stay traditional, accompany the dish with a light side salad or steamed green beans, which enhance the overall dining experience without overshadowing the star elements.

A modern plating suggestion includes serving individual portions of rice in ramekins, overturned onto plates for a restaurant-style presentation. Temperature is essential; serve hot for the best taste and textural contrast between creamy rice and crisp chicken.

Mindful portion control ensures the dish remains balanced in nutritional content while being satisfying. Utilize ladles for rice and specified portion sizes for chicken to maintain consistency across servings.

Wine and Beverage Pairing


Pair this dish with a dry white wine like a Sauvignon Blanc or a light Chardonnay to complement the creamy Parmesan and garlic elements. For non-alcoholic options, consider serving with a chilled, aromatic herbal iced tea that mirrors the dish’s flavorful subtleties.

If you prefer warm beverages, a light green tea can cleanse the palate, refreshing it between bites. Temperature regulations suggest chilling wines appropriately or maintaining tea at warm temperatures to optimize the dining experience.

Serve drinks in appropriate glassware, such as a slender wine glass for whites to concentrate bouquets or a large mug for tea to maintain its warmth. Always present drinks alongside the dish to allow cohesiveness within the meal’s sensory journey.

Storage and Shelf Life


Store leftovers in airtight containers to preserve flavors and moisture in both the chicken and rice. Aim to refrigerate promptly, maintaining a storage temperature below 40°F to minimize bacterial growth and ensure safety.

Containers should ideally be glass or high-grade plastic with secure lids to prevent drying out. Always check for signs of spoilage, like off smells or discoloration, before reheating.

Reheat gently on the stovetop or microwave, adding a splash of broth or water to restore moisture. For freezer storage, defrost overnight in the refrigerator before reheating to maintain optimal texture and taste without compromising integrity.

Make Ahead Strategies


For make-ahead convenience, consider cooking the chicken and starch separately. Store components in separate containers to maintain texture integrity. Refrigerate rice and chicken for up to three days before combining and reheating, ensuring freshness.

Storing components allows you to enhance flavors with fresh garlic and garnish upon reheating. Quality assessments before serving ensure you revive the freshness and vibrancy of flavors.

When reheating, opt for stovetop methods to infuse moisture back into the dish, ensuring a home-cooked quality meal every time. Garnish with fresh Parmesan and herbs just before serving to revive that just-cooked visual appeal.

Scaling Instructions


Easily halve the recipe by reducing each ingredient proportionately, particularly useful for smaller households or intimate meals. Scaling up requires multiple pans or larger cookware to distribute heat evenly and ensure consistent cooking.

Double-check seasoning when scaling for larger portions, as larger volumes may require a slight increase to maintain flavor balance. Adjust cooking times and temperatures slightly, monitoring closely to ensure evenly cooked chicken and rice.

Storage space and equipment should be considered when multiplying this recipe. Ensure sufficient fridge or freezer capacity and utilize adjustable oven racks or multiple burners to facilitate swift cooking for large batches.

Nutritional Deep Dive


The Chicken with Garlic Parmesan Rice is informed by a macro balance that supports maintenance of lean muscle, attributed to its protein-rich chicken. Parmesan adds calcium and a trace amount of vitamin A, while garlic offers antioxidant benefits.

Recognizing micronutrient densities assists in meal planning; consider side dishes rich in fiber or vitamin C to round out the nutrient profile. A single portion provides satiety without excess calories, supporting weight management goals while satisfying flavor cravings.

For those monitoring dietary intakes, the dish can be part of a caloric-controlled plan. Recognizing the fat and protein content helps accommodate dietary needs without excluding satisfaction and joy derived from delicious meals.

Dietary Adaptations


The recipe’s gluten-free potential is optimized by ensuring broth and cheese selections avoid gluten-containing thickeners. Lactose intolerant individuals may consider lactose-free cheeses or experiment with alternative non-dairy cheeses.

For a vegan version, replace chicken with tempeh or plant-based chicken substitutes and ensure complete dairy alternatives for the cheese. Those following a low-carb or keto lifestyle can consider cauliflower rice as a substitute for traditional rice, fitting better within carb constraints.

To make this dish paleo-friendly, starch alternatives and coconut cream could replace traditional grains and dairy while retaining creamy consistency and flavor richness. This adaptability across dietary needs embodies a contemporary culinary inclusivity, emphasizing taste over dietary limitation.

Troubleshooting Guide


Stuck with mushy rice? Ensure the correct water-to-rice ratio and avoid over-stirring, aiding texture retention. Over-salted dish? Soften the taste with a splash of additional broth or fresh cream.

Does the chicken come out dry? Prioritize accurate cooking temperatures, removing from heat upon reaching 165°F to maintain juiciness. Encounter flavor imbalances? Introduce acidity like lemon or vinegar to harmonize overpowering flavors and enhance the overall palate.

Equipment challenges such as uneven heating might be remedied by rotating pans or ensuring heat sources are appropriately aligned with cooking vessels. Dial down heat when simmering to allow the gradual melding of flavors without burning.

Recipe Success Stories


Passionate cooks worldwide have shared versions of this recipe, from doubling garlic for adventurous flavor lovers to incorporating caramelized onions for sweetness. Community feedback overwhelmingly appreciates its adaptability.

Reader suggestions include spicing up the dish with red pepper flakes for a bit of heat or blanched vegetables for added color and nutrition. Dive into the vibrant online community of cooks sharing their visual interpretations and twists on this iconic blend.

Photography tips from successful chefs encourage attention to plating colors and clear contrast between golden chicken breast and creamy rice. Winning culinary clicks hinge on bright natural lighting and garnished details.

Frequently Asked Questions

Q: Can I use a different type of cheese?
A: Yes, feel free to experiment with cheeses like mozzarella for a milder flavor or sharp cheddar for a richer one.

Q: Is it possible to prepare this dish in advance?
A: Absolutely! Prepare components separately and store. Assemble fresh when ready to serve for maximization of flavor.

Q: What are some good substitutes for garlic?
A: Fresh shallots or onion powder can mimic the essence if garlic isn’t suitable for your palate.

Q: How can I lower the sodium content?
A: Use low-sodium chicken stock and cheese alternatives, and consider seasoning with herbs instead of salt.

Q: What wine would best complement this dish?
A: A crisp Sauvignon Blanc elevates the garlic and cheese flavors without overpowering the dish.

Q: Is Parmesan necessary, or can I use another cheese?
A: While Parmesan enhances the savoriness, you can opt for Asiago or Romano as sturdy substitutes.

Q: How can I veganize this dish?
A: Switch the chicken for tofu or chickpeas and use nutritional yeast in place of Parmesan for a flavorful vegan option.

Q: Are there low-carb options for the rice?
A: Yes, riced cauliflower is a delicious low-carb alternative that works well in this dish.

Q: What herbs pair well with this recipe?
A: Herbs like thyme, basil, or parsley can enhance this dish, complementing the garlic and Parmesan.

Q: Can leftovers be frozen?
A: Yes, but ensure proper packaging to prevent dryness and maintain flavor upon reheating.

Additional Resources


Dive deeper with similar Italian pasta dishes that offer complementary flavor profiles and recipe blogs exploring Parmesan’s versatility. Technique guides enrich understanding of rice preparation, and ingredient breakdowns offer insight into garlic’s health benefits.

Discover equipment recommendations for mastering sauté techniques, ensuring optimal results for this chicken recipe. Explore seasonal adaptations through culinary blogs focusing on winter and summer ingredient substitutions, maintaining this dish’s allure year-round.

Join the Conversation


Join fellow food enthusiasts on social platforms to share your culinary creations and insights into this beloved chicken dish. Discover photography techniques that showcase your recipe’s best light and engage in discussions on recipe adaptations.

Create a community by encouraging reviews, and share variations, enhancing this recipe’s experiential journey for home cooks worldwide. Emphasize family traditions tied to this dish, weaving your narrative into this flavor-intense piece of culinary art.

The Recipe

Chicken with Garlic Parmesan Rice

Serves: 4

Prep Time: 15 mins

Cook Time: 30 mins

Total Time: 45 mins

Kitchen Equipment Needed

  • Skillet
  • Saucepan with lid
  • Wooden spoon
  • Grater
  • Measuring cups and spoons

Ingredients

  • 4 boneless, skinless chicken breasts
  • 2 cups of chicken broth
  • 1 cup of uncooked long-grain rice
  • 1/2 cup grated Parmesan cheese
  • 4 cloves of garlic, minced
  • 1 tablespoon olive oil
  • Salt and pepper to taste

Directions

  1. Heat olive oil in a skillet over medium heat. Season chicken breasts with salt and pepper and add to the skillet.
  2. Sauté chicken until golden brown and cooked through, approximately 6-7 minutes per side. Remove from skillet and set aside.
  3. In the same skillet, add minced garlic and sauté briefly until fragrant, about 30 seconds.
  4. Add rice, stirring to coat in garlic oil, and cook for 1-2 minutes until slightly toasted.
  5. Pour in chicken broth and bring to a simmer. Cover and reduce heat to low, cooking until rice is tender and liquid has been absorbed, about 18-20 minutes.
  6. Stir in Parmesan cheese and remove from heat. Adjust seasoning if necessary.
  7. Slice chicken into strips and serve over the garlic Parmesan rice. Garnish with additional Parmesan and parsley if desired.

Recipe Notes

  • For creamier rice, add a splash of cream or more Parmesan cheese before serving.
  • Adjust sodium by using low-sodium broth or substituting water for some broth.
  • Feel free to add herbs or vegetables such as spinach or mushrooms for added nutrition and flavor.

Crispy and Delicious Baked Chicken Chimichangas for a Healthier Twist

Baked Chicken Chimichangas: A Delicious Twist on a Classic Favorite

⚖️
Difficulty
Medium

⏲️
Prep Time
20 mins

🕒
Cook Time
25 mins

⏱️
Total Time
45 mins

🍽️
Servings
4

Are you craving a Mexican delight that’s both hearty and healthy? Baked Chicken Chimichangas are the perfect solution. Unlike their deep-fried cousins, these chimichangas offer the same delightful crispiness without the extra calories, making them a fantastic choice for a satisfying dinner. This recipe combines tender chicken with a medley of spices, creating an irresistible filling wrapped in a golden, baked tortilla.

The enticing aroma of warm spices such as cumin and paprika fills the kitchen as these chimichangas bake to perfection. Each bite offers a harmonious balance of flavors, from the savory chicken to the creamy cheese, all nestled inside a perfectly baked tortilla shell. This delightful dish transforms any mealtime into a festive celebration with its burst of colors and rich tastes.

Baking these chimichangas instead of frying saves on time without sacrificing flavor. This method not only makes the dish healthier but also simpler. So the next time you’re short on time but still want to impress your family or friends, turn to this baked version of chicken chimichangas.

Quick Recipe Highlights

  • Flavor Profile: A savory blend of cumin, garlic, and paprika envelops the moist chicken and cheese, offering a burst of authentic Mexican flavors in every bite.
  • Texture: Experience a perfect crunch from the baked tortillas, contrasting beautifully with the juicy, tender chicken inside.
  • Aroma: Soothing notes of spices intermingle with the aroma of freshly baked tortillas, enticing guests from the moment they enter your home.
  • Visual Appeal: A set of vibrant golden-brown chimichangas with a tantalizing oozing of cheese, garnished with fresh cilantro and lime wedges.
  • Skill Level Needed: Ideal for home cooks with basic kitchen skills, this recipe requires simple techniques to achieve optimal results.
  • Special Equipment: A baking sheet and parchment paper are essential to ensure even baking and prevent sticking.

Recipe Overview

  • Difficulty Level: This recipe requires a moderate skill level due to the need to precisely season the chicken and appropriately wrap the chimichangas to ensure even baking.
  • Category: Perfect for a family dinner or casual dinner party, these baked chimichangas are filling and satisfying.
  • Cuisine: Drawing from traditional Mexican cuisine, this dish highlights flavors and techniques that celebrate Mexican culinary heritage.
  • Cost: Affordable, as it uses readily available ingredients, this dish fits well within a mid-range budget without compromising on flavor.
  • Season: Suitable year-round, especially in the fall and winter when oven-baked meals are particularly comforting and inviting.
  • Occasion: Ideal for weeknight dinners, casual get-togethers, and even appetizers for larger gatherings when cut into smaller portions.

Why You’ll Love This Recipe


With its irresistible taste and satisfying texture, baked chicken chimichangas quickly become a family favorite. The recipe combines the savory flavor of seasoned chicken with the satisfying crunch of a baked tortilla. The tantalizing contrast between the crispy exterior and the gooey cheesy center keeps you coming back for more.

Not only is this dish delicious, but it’s also highly convenient and straightforward to prepare. With minimal prep and clean-up involved, you can have a delightful meal ready in under an hour. The use of common pantry staples further enhances the ease of creation, while the baking method promotes a healthier option compared to frying.

Nutritionally, the baked chicken chimichangas provide a good balance of protein, carbohydrates, and essential nutrients. Using lean chicken ensures lower fat content, while the addition of cheese supplies calcium and a touch of indulgence. The baked approach further minimizes calorie intake, making this meal a guilt-free indulgent choice.

For social gatherings, these chimichangas offer not only great taste but also ease of serving. Thanks to their structured form, they are easy to handle and enjoy without utensils, making them perfect for social settings and buffets. Guests will be impressed by the rich and vibrant flavors, which encourage lively conversation and enjoyment.

Finally, the cost-effectiveness and accessibility of the ingredients make this dish an excellent choice for budget-conscious cooks. With versatile components, this recipe is adaptable to what’s already in your kitchen, avoiding the need for special trips to the grocery store. This aspect contributes to its appeal as an everyday, yet special meal choice.

Historical Background and Cultural Significance


Chimichangas carry a rich origin story, steeped in Mexican culinary traditions. While its exact inception is contested, many believe chimichangas originated in northern Mexico, evolving from the traditional burrito. The dish has been deeply rooted in the cross-border culinary exchanges between Mexico and the southwestern United States.

Culturally, chimichangas are a quintessential component of Mexican-American cuisine, symbolizing the blend of traditions and flavors that have characterized the border regions. Over time, they have become a staple in Tex-Mex restaurants and home kitchens alike, celebrated for their robust flavors and comforting texture.

The recipe has evolved from its original fried preparation to include variations such as our baked chicken chimichangas. This evolution reflects contemporary concerns over health and nutrition while maintaining the core qualities that make chimichangas so beloved. As part of the trend towards reducing caloric intake without sacrificing flavor, this baked version offers a modern twist on a time-honored favorite.

Regional variations abound, with each area imparting its unique twist to the traditional chimichanga recipe. While beef remains a popular filling, chicken provides a lighter yet equally flavorful alternative, ideal for those seeking variety in their culinary experience. The baked rendition, in particular, has gained popularity for its ease of preparation and healthy profile.

Ingredient Deep Dive


Chicken, the star of this dish, carries its own cultural and nutritional significance. As a widely consumed protein across the globe, chicken features prominently in many traditional and contemporary dishes. In Mexican cuisine, it’s revered for its versatility and ability to carry the rich flavors of spices and sauces.

Nutritionally, chicken is a lean protein choice, offering a high amount of protein with minimal fat content. It’s an excellent source of B-vitamins and essential minerals, contributing to its appeal as a staple ingredient in health-conscious diets. When selecting chicken, opt for free-range or organic varieties when possible to enhance flavor and environmental sustainability.

Cheese is another vital component, adding creaminess and depth to the chimichangas. Traditionally, a softer cheese like Monterey Jack or cheddar works well, melting smoothly into the filling. Cheese contributes not only flavor but also nutritional value, providing calcium and protein.

For optimal storage, keep cheese in its original packaging or a sealed container in the refrigerator to maintain freshness. If substituting, consider using a low-fat version or alternative plant-based cheese for a healthier or vegan adaptation.

Common Mistakes to Avoid

  • Overfilling tortillas: This can cause splitting or bursting during baking. Use moderation to ensure a tidy wrap.
  • Skipping the tortilla warming step: A warm tortilla is more pliable, preventing cracks and encouraging an even bake.
  • Underseasoning the chicken: Season generously to enhance flavor and ensure the filling isn’t bland.
  • Improper wrapping technique: Wrapped too loosely, the filling may spill out. Wrap tightly without tearing the tortilla.
  • Using high-fat cheese: Opt for a balanced cheese to prevent overly greasy chimichangas.
  • Skipping parchment paper for baking: This can lead to sticking and uneven baking. Use parchment for best results.
  • Ignoring recommended oven temperature: The right temperature is crucial for achieving the desired crispiness.
  • Baking too close together: Spaces the chimichangas slightly apart on the sheet for even airflow and browning.
  • Not letting them rest: Allow after-baking rest for the chimichangas ensures the filling sets and is easier to slice.
  • Skipping garnish: Fresh garnishes like cilantro or lime add visual appeal and a burst of freshness.

Essential Techniques


Mastering the wrap is crucial to achieving perfect baked chimichangas. The technique involves evenly spreading the filling, folding the sides inward, and rolling tightly towards the open end. Ensuring the filling is snug and the tortilla properly sealed will help maintain the chimichanga’s shape and prevent leakage during baking.

Baking at the right temperature seals in the flavors and creates a beautifully crisp exterior while keeping the inside tender. Pay attention to the color and texture changes, aiming for a golden hue as an indicator of doneness. Avoid opening the oven frequently to preserve consistent baking conditions.

Seasoning the chicken adequately involves layering spices, allowing the flavors to meld, and providing depth to the chimichanga. This enhances the filling and contributes to the dish’s overall taste profile, making each bite flavorful and satisfying. Balance is crucial, ensuring no single spice overwhelms others.

Pro Tips for Perfect Baked Chicken Chimichangas


Line your baking sheet with parchment paper to avoid sticking and ensure even heat distribution. This will assist in achieving perfectly baked tortillas with minimal fuss.

Experiment with different fillings by incorporating other Mexican staples, such as beans or sautéed vegetables, to add variety and nutritional value to your dish.

For extra crispiness, brush the tortillas with a hint of oil before baking. This simple step enhances their texture, resulting in a lovely golden finish.

If you prefer a spicier kick, include a dash of hot sauce or jalapeños in the filling mixture, complementing the savory chicken and cheese.

Monitor baking time closely, as ovens may vary. Look for cues such as a light golden color and firm tortillas to indicate readiness, ensuring a satisfying crunch upon serving.

Consider preparing additional fillings in advance to enjoy quick and easy homemade meals. Pre-prepped fillings allow you to assemble and bake chimichangas at a moment’s notice for fresh, convenient dining.

Variations and Adaptations


Regional variations offer exciting twists on classic chimichangas. In the Southwest, additional beans or corn provides an extra layer of flavor and texture, enhancing the dish’s complexity. Meanwhile, cilantro and lime deliver the bright, zesty notes characteristic of coastal Mexican cuisine.

For seasonal adaptations, add roasted fall vegetables like sweet potatoes or squash for a heartier meal. These elements complement the warming spices of the filling, making them particularly appealing in autumn.

Dietary modifications, such as using whole wheat tortillas or low-fat cheese, create healthier variations without compromising taste. For those following a plant-based diet, substitute chicken with tofu or jackfruit and include plant-based cheese options.

The flavor palette can be adjusted to suit personal preferences, such as incorporating chipotle for a smoky undertone or adding fresh herbs for a refreshing twist. These variations maintain the dish’s integrity while offering new dimensions of taste.

Texture modifications, such as experimenting with crunchier alternatives like almond flour tortillas, provide an unexpected change of pace. Additionally, finely diced vegetables in the filling introduce diversity in mouthfeel.

Presentation alternatives can bring visual appeal, whether serving chimichangas whole or slicing them into smaller portions for appetizers. Pair with colorful side salads or salsas to enhance the dining experience.

Serving and Presentation Guide


Plating the chimichangas with vibrant garnishes elevates your presentation. Consider topping with fresh, chopped cilantro or a squeeze of lime juice for bursts of color and added freshness, complementing the golden chimichangas.

Garnishing ideas include creamy avocado slices, a dollop of sour cream, or a spoonful of zesty salsa to enhance the visual and taste appeal of your dish. These additions create a delicious harmony and invite guests to indulge.

Traditional accompaniments like Mexican rice or refried beans further enrich the meal, offering a harmonious balance and completing the traditional dining experience. Choose pairings that enhance the flavors and textures of the chimichangas while maintaining authenticity.

For modern serving suggestions, present chimichangas with a mixed greens salad topped with a light vinaigrette. The refreshing crunch adds contrast, balancing the richness of the baked tortilla.

Temperature considerations are essential for optimal taste and texture satisfaction. Serve the chimichangas hot from the oven, allowing flavors to meld and cheese to ooze gently, amplifying the enjoyment of each bite.

Portion control tips include serving one chimichanga per person as a main course or slicing them into smaller pieces for casual gatherings. This provides flexibility and accommodates varied appetites.

Wine and Beverage Pairing


Pairing chimichangas with a crisp, chilled white wine like Sauvignon Blanc can accentuate the bright flavors of the dish without overshadowing the savory notes of the chicken and cheese. A slightly acidic wine complements the richness, offering a delightful harmony.

Non-alcoholic alternatives such as sparkling water infused with lime or lemon echo the zesty flavors of the chimichangas while providing a refreshing palate cleanser. These choices help maintain the festive atmosphere without diminishing the experience.

Coffee or tea pairings, specifically a strong iced coffee or a lightly sweetened hibiscus tea, offer a contrast to the savory elements of the dish. These beverages balance the meal without overwhelming the taste buds, creating a cohesive dining experience.

Temperature considerations suggest chilled beverages to accompany the meal, providing a refreshing contrast to the warm chimichangas. Alcoholic or non-alcoholic, ensure selections are served at an ideal temperature to enhance enjoyment.

Serving suggestions include presentation in elegant glassware for a sophisticated touch or colorful pitchers for a more relaxed setting. Both options encourage sharing and conversation, drawing guests into a welcoming and engaging meal.

Storage and Shelf Life


Proper storage of baked chimichangas ensures their freshness and quality over time. Once cooled, store them in an airtight container in the refrigerator for up to three days, preserving flavors and preventing spoilage.

Temperature requirements for storage should be adhered to strictly. Keep chimichangas at a consistent cool temperature to maintain freshness and minimize the risk of spoilage or contamination.

Container recommendations include sealable plastic bags or airtight containers, which protect against freezer burn and maintain the chimichangas’ texture when stored. Ensure the storage medium is secure and airtight for the best results.

Signs of spoilage include an off-putting smell, change in texture, or visible mold. Discard any chimichangas exhibiting these traits to avoid health risks, emphasizing the importance of proper storage.

Reheating instructions are straightforward. For best results, reheat chimichangas in the oven to retain crispness, maintaining their enjoyable texture. Alternatively, use a microwave for quick reheating, though this may result in a softer tortilla.

Freezing guidelines allow for long-term storage up to three months. Wrap each chimichanga individually in plastic wrap and aluminum foil to prevent freezer burn, ensuring they are ready when you crave them later.

Make Ahead Strategies


For busy days, consider pre-cooking the chicken and assembling the filling ahead of time. Store the prepared filling in a sealed container, ready to use when you assemble the chimichangas.

The prep timeline allows you to spread preparation over several days. Cut down the workload by preparing components in advance, reducing stress and maximizing convenience on the day of serving.

Storage between steps plays a vital role in maintaining the quality of your components. Keep prepped ingredients refrigerated until assembly to ensure freshness and flavor integrity.

A quality impact assessment suggests the recipe remains flavorful even when made ahead. By preempting steps, you not only shorten the preparation time but retain the dish’s intended taste.

Assembly tips focus on streamlining the wrapping process. Arrange all components within reach to foster efficiency, allowing for seamless construction of the chimichangas.

Reheating guidelines ensure you enjoy hot, crispy chimichangas even if made in advance. The oven or toaster oven restores the desired crunch, faithful to the original dish.

Fresh element additions at the time of serving include garnishes like fresh cilantro or lime, which elevate the dish’s flavor and presentation with minimal effort.

Scaling Instructions


Halving the recipe is straightforward and accommodates smaller gatherings or intimate meals. Simply adjust the quantities of each ingredient, maintaining the same ratio for consistent flavor.

Doubling or tripling the recipe is ideal for larger parties. Assess oven capacity and consider baking in batches if necessary to ensure each chimichanga bakes evenly and retains its quality.

Equipment adjustments are essential when scaling. Use multiple baking sheets to accommodate increased quantities, ensuring adequate space between chimichangas for even cooking.

Timing modifications may be necessary based on oven capacity and increased batch size. Monitor cooking times and modify slightly if needed, checking for ideal doneness.

Storage considerations for bulk preparation allow for frozen storage of extras, ensuring delicious homemade meals are always within reach. Maintain quality and prevent freezer burn through proper wrapping methods.

Nutritional Deep Dive


A macro breakdown reveals that baked chicken chimichangas provide a balanced mix of proteins, carbohydrates, and fats, making them a comprehensive meal choice. Lean chicken offers the primary protein source, contributing to muscle maintenance and repair.

Micronutrient analysis highlights the presence of essential vitamins and minerals. Chicken supplies B vitamins and iron, while cheese adds calcium, supporting bone health and overall well-being.

Health benefits are numerous, offering an appetizing way to meet nutritional needs. Lean proteins and wholesome fats maintain energy levels and satiety, appealing to those seeking health-conscious meals.

Dietary considerations accommodate diverse preferences. Whole grain tortillas and low-fat cheese options tailor the chimichangas to specific lifestyles, highlighting their versatility and adaptability to various diets.

Portion analysis suggests serving one chimichanga as part of a balanced meal. This ensures a satisfying dining experience while maintaining dietary goals and contributing to healthy eating habits.

Weight management tips encourage pairing the chimichangas with colorful vegetable sides or salads, balancing meal composition and enhancing satiety while enjoying a flavorful treat.

Dietary Adaptations


To create gluten-free baked chicken chimichangas, substitute traditional tortillas with certified gluten-free varieties. Be sure to verify all other ingredients for hidden gluten sources to maintain adherence to the dietary requirement.

For a dairy-free rendition, replace the traditional cheese with a plant-based alternative. Consider nutritional yeast or cashew cheese as suitable substitutes, offering the creamy texture without dairy content.

To craft a vegan version, swap chicken for marinated tofu or jackfruit and use plant-based cheese alternatives. This maintains the dish’s flavors and textures while adhering to vegan principles.

Low-carb enthusiasts can replace tortillas with cabbage or coconut wraps for a lighter, carb-conscious twist. These alternatives offer structural integrity while contributing minimal carbohydrates.

Following a keto diet is simplified by adjusting cheese to a high-fat, low-carb variety and ensuring the tortilla aligns with ketogenic criteria. This emphasis on healthy fats complements the lifestyle.

A Paleo adaptation suggests using almond flour tortillas and eliminating cheese in favor of nuts or seeds for texture. This maintains the essence of the dish within Paleo guidelines.

Low-FODMAP considerations focus on ingredient selection. Use lactose-free cheese and appropriate low-FODMAP tortillas to meet dietary needs, ensuring a comfortable and enjoyable dining experience.

Troubleshooting Guide


Texture issues often arise from uneven baking. Use parchment paper to prevent sticking and ensure even heat distribution across the baking sheet.

Flavor balance can be disrupted if seasoning is inadequate. Taste-test seasonings before filling the tortillas to ensure robust and satisfying flavors in the chimichangas.

Temperature problems stem from incorrect oven settings. Adjust accordingly and monitor visual indicators such as color and crispness to guide baking time.

Equipment challenges may occur with overcrowding on the baking sheet. Use additional sheets or bake in smaller batches for optimal results and consistent quality.

Ingredient substitutions require careful consideration to avoid unexpected results. Choose alternatives with similar textures and flavors to maintain the integrity of the finished chimichangas.

Timing concerns are best addressed through close attention to baking cues. Avoid relying solely on time recommendations, using sensory and visual assessments for precise outcomes.

Recipe Success Stories


Community feedback highlights the wide acclaim baked chicken chimichangas have garnered. Home cooks appreciate the simplicity and flavor, sharing adaptations and successes across various platforms.

Variation successes include unexpected yet delightful additions such as avocado or bell peppers, showcasing the dish’s versatility and capacity for personalization.

Adaptation stories often emphasize dietary modifications, from gluten-free to vegan versions. Creative cooks share their experiences, celebrating successful renditions that retain the chimichangas’ essence.

Reader suggestions frequently involve innovative serving ideas or garnishing tips, broadening the dish’s appeal and application. These insights nurture community engagement and inspiration.

Photography tips shared within the community emphasize presentation techniques, enhancing social media sharing and showcasing the vibrant colors and textures of the chimichangas.

Frequently Asked Questions

Can I prepare the filling in advance? Yes, the filling can be made ahead of time and stored in an airtight container in the refrigerator for up to two days, facilitating quick assembly and baking.

How do I ensure the chimichangas stay crispy? Ensure even baking by placing parchment on the baking sheet, and avoid overcrowding. A light brush of oil on the tortillas before baking enhances crispiness.

What are the best cheese substitutes for a dairy-free version? Plant-based cheeses such as nutritional yeast, almond cheese, or cashew cheese work well, providing similar creaminess and taste without dairy.

Can I use leftover chicken for this recipe? Absolutely! Repurpose leftover chicken by shredding and seasoning it to achieve the desired flavors, reducing preparation time and minimizing food waste.

How do I reheat frozen chimichangas? For best results, thaw in the refrigerator overnight, then reheat in the oven for ten minutes at 350°F, preserving texture and flavor.

Are there low-carb tortilla alternatives? Yes, low-carb wraps such as coconut or almond flour tortillas offer a suitable substitute, meeting dietary preferences without sacrificing quality.

Is this recipe suitable for meal prep? Baked chicken chimichangas lend themselves well to meal prep. Store prepared chimichangas in the refrigerator or freezer, ready to bake or reheat.

Can I grill instead of baking? Grilling provides a unique flavor but requires diligent attention to avoid burning. Monitor grill temperature and cook chimichangas until sufficiently crispy, flipping as needed.

What can I pair with chimichangas for a full meal? Consider serving with Mexican rice, refried beans, or a crisp salad for a balanced and satisfying meal experience.

What types of beverages complement chimichangas? Bold and crisp white wines, sparkling water with citrus, or iced coffee variants complement the flavorful notes of the chimichangas beautifully.

Additional Resources


For more exciting Mexican-inspired recipes, consider exploring enchiladas, tacos, or tamales, each offering unique flavors and techniques to broaden your culinary skills and appreciation.

Technique guides focused on mastering spice blends and seasoning perfectly can elevate your chimichanga experience through intentional flavor enhancement and balance, contributing to a memorable meal.

Ingredient information highlights the diversity of tortilla options and cheese varieties, encouraging experimentation and adaptation based on dietary preferences and taste discoveries.

Equipment recommendations ensure a seamless cooking process, suggesting reliable brands for baking sheets, utensils, and containers that contribute to consistent and satisfying results.

Sneak in seasonal variations by researching which fresh produce pairs best with the dish throughout the year. This guides ingredient choices, allows for nutritional optimization, and keeps dining experiences fresh.

Join the Conversation


Engage with fellow food enthusiasts online by sharing your baked chicken chimichanga creations across social media platforms. Use hashtags and tags to participate in lively discussions and exchanges.

Photography tips from the community enhance the visual appeal of shared culinary creations, inspiring others to attempt the recipe and explore adaptations or pairings.

Recipe reviews provide invaluable insights into personalized adaptations or attempts, fostering a sense of connection and shared experience among home cooks and food lovers.

Community engagement thrives on diverse recipe variations shared by creative cooks, motivating collective experimentation and appreciation for the versatility of baked chimichangas.

Feel inspired? Share your twist on the classic baked chicken chimichanga recipe and become a part of a dynamic community that values both tradition and innovation in culinary exploration.

The Recipe

Baked Chicken Chimichangas

Serves: 4

Prep Time: 20 mins

Cook Time: 25 mins

Total Time: 45 mins

Kitchen Equipment Needed

  • Baking Sheet
  • Parchment Paper
  • Mixing Bowls
  • Skillet
  • Oven

Ingredients

  • 2 cups cooked chicken, shredded
  • 1 teaspoon cumin
  • 1 teaspoon garlic powder
  • 1 teaspoon paprika
  • 1/2 teaspoon salt
  • 1/2 cup shredded cheese
  • 4 large flour tortillas
  • 1 tablespoon vegetable oil

Directions

  1. Preheat oven to 400°F (200°C). Line a baking sheet with parchment paper.
  2. In a mixing bowl, combine shredded chicken, cumin, garlic powder, paprika, and salt.
  3. Lay a tortilla flat and place an even amount of chicken mixture on top. Sprinkle with cheese.
  4. Fold in sides of the tortilla and roll up tightly to enclose the filling.
  5. Place seam-side down on the prepared baking sheet. Repeat with remaining tortillas.
  6. Brush chimichangas lightly with vegetable oil.
  7. Bake for 25 minutes or until tortillas are golden and crispy.
  8. Let cool slightly before serving with your preferred garnishes.

Recipe Notes

  • Experiment with different cheeses or add a dash of hot sauce to the filling for a spicier version.
  • Freezes well for future meals; simply reheat in the oven to restore crispness.

Delicious Salmon Shrimp with Cheesy Broccoli and Corn Recipe

Salmon, Shrimp, Cheesy Broccoli with Corn: A Delectable Seafood Delight

⚖️
Difficulty
Moderate

⏲️
Prep Time
15 mins

🕒
Cook Time
30 mins

⏱️
Total Time
45 mins

🍽️
Servings
4

Dive into a feast of oceanic flavors with this Salmon, Shrimp, Cheesy Broccoli with Corn recipe. Perfectly seared salmon, succulent shrimp, and vibrant broccoli florets come together under a blanket of melted cheese for a dish that’s both comforting and elegant. Whether you’re a seafood enthusiast or a casual home cook looking to impress, this recipe combines the best of the sea with comforting, cheesy goodness that is bound to be a hit at your dinner table.

Our Salmon, Shrimp, Cheesy Broccoli with Corn not only satisfies seafood cravings but also packs a punch of nutritional benefits. High in omega-3 fatty acids, vitamins, and minerals, this dish is as healthy as it is delicious. The addition of corn offers a touch of sweetness and color, rounding out a meal that’s perfect for any occasion. Ideal for a family dinner or a small gathering with friends, this dish brings comfort and sophistication to your table.

Quick Recipe Highlights

  • Flavor Profile: A harmonious blend of savory salmon, sweet shrimp, rich cheese, and earthy broccoli.
  • Texture: Expect a delightful contrast of creamy cheese, tender shrimp, and slightly crunchy broccoli.
  • Aroma: Enjoy the mouthwatering aroma of seafood mingling with the comforting scent of melted cheese.
  • Visual Appeal: Vivid greens, pinks, and yellows make this dish as visually enticing as it is tasty.
  • Skill Level Needed: Intermediate cooking skills for perfect seafood texture and cheesy consistency.
  • Special Equipment: A skillet and casserole dish are essential for optimal texture and flavor.

Recipe Overview

  • Difficulty Level: Moderate skills required to balance seafood cooking times and achieve ideal cheese melting.
  • Category: Main course, perfect for lunch or dinner.
  • Cuisine: Influenced by global seafood traditions with a modern cheesy twist.
  • Cost: Moderate, with most ingredients being fresh seafood and vegetables.
  • Season: Best enjoyed year-round due to its balanced flavors and health benefits.
  • Occasion: Ideal for family dinners, cozy weekends, or festive occasions.

Why You’ll Love This Recipe


The distinct flavors and textures of salmon, shrimp, and broccoli combine seamlessly in this dish. Cheesy broccoli adds a playful twist to the classic seafood entrée, making it a family favorite. Despite its gourmet appeal, this recipe is surprisingly straightforward and requires minimal preparation time. The combination of salmon and shrimp not only provides high-quality protein but also essential omega-3 fatty acids promoting heart health and cognitive function.

Perfect for social gatherings, this Salmon, Shrimp, Cheesy Broccoli with Corn recipe will have your guests raving about the flavors long after the last bite. From quick weeknight dinners to elaborate holiday feasts, the versatility and appeal of this dish make it suitable for numerous occasions. With accessible ingredients predominantly available all year round, this recipe is as easy on the wallet as it is on your schedule, keeping it a go-to option for diverse settings and needs.

Historical Background and Cultural Significance


Seafood has played a significant role in global cuisines for centuries, becoming a staple in both coastal and inland culinary traditions. Salmon, in particular, holds cultural importance in various regions, from the Nordic countries to North America, symbolizing abundance and prosperity. Meanwhile, shrimp offers a universal appeal and adaptability to countless flavor profiles and cooking methods.

The cheesy broccoli combination in this recipe brings an American flair, intertwining traditional seafood with comfort food innovation. Over time, dishes like these have evolved, merging classic recipes with modern interpretations encouraging new ways to appreciate time-honored ingredients. Regional variations reflect a fusion of indigenous techniques and contemporary preferences, celebrating the diversity and richness of seafood dishes worldwide.

Ingredient Deep Dive


Salmon’s deep roots in culinary history underscore its adaptability and nutritional benefits, making it a mainstay in nutritious and delicious meals. It is an excellent source of high-quality protein, vitamins B12 and D, and essential amino acids, while its rich omega-3 fatty acids promote a healthy heart and brain function. To select salmon, look for firm, vibrant-colored fillets with a clean scent, storing them in an airtight container in the coldest part of the fridge for up to two days to preserve freshness.

Shrimp brings versatility and a succulent texture, enhancing meals with its mild, sweet flavor profile loaded with calcium, iodine, and protein. Selecting fresh shrimp with a firm texture and a slight oceanic smell ensures quality. Store raw shrimp on ice or in the coldest part of your fridge, using within 48 hours for maximum freshness. Should substitutions be necessary, scallops or firm white fish could provide comparable flavors and textures, offering equally delightful results.

Common Mistakes to Avoid

  • Overcooking seafood, which can lead to a rubbery texture; monitor cook times carefully.
  • Undersalting the cheese sauce, which could make the entire dish taste bland.
  • Failing to pre-cook broccoli sufficiently may result in an uneven texture.
  • Neglecting to thaw frozen shrimp properly, which could affect taste and safety.
  • Using old or less-than-fresh seafood; always prioritize quality ingredients.
  • Overcrowding the skillet when searing salmon; this impedes even cooking.
  • Forgetting to drain corn, which could add unnecessary liquid to the dish.
  • Choosing the wrong cheese; stick to those that melt well, like cheddar or Monterey Jack.

Essential Techniques


Achieving the ideal salmon sear is paramount for texture and flavor. Begin by ensuring the skillet is hot before adding your fish, creating a crisp outer layer encasing a moist interior. Mastery lies in timing; avoid moving the salmon until a golden crust forms, signaling readiness for a flip. Melted cheese perfection requires combining cheese with minimal liquid steps, ensuring gradual heating to prevent separation. Shredded cheese maintains a smooth consistency, embracing each broccoli floret in a lush, uniform sauce.

Pro Tips for Perfect Salmon, Shrimp, Cheesy Broccoli with Corn


Allow salmon to rest at room temperature for 10 minutes before cooking for even thermal distribution. Season both seafood and vegetables generously for balance throughout each bite. Consider adding a dash of lemon zest for a pop of acidity that cuts through the cheese richness. To ensure broccoli maintains its vibrant color, blanch before incorporating it into the cheese sauce. Utilize foil during baking for even heat distribution, sealing moisture and flavor. Lastly, let cooked seafood rest momentarily, permitting juices to redistribute, yielding better texture and taste.

Variations and Adaptations


Regional adaptations capture diverse tastes, like adding smoked paprika for a smoky allure reflective of southern culinary traditions. Seasonal variations might substitute corn with asparagus in spring or bell peppers in autumn, celebrating nature’s bounty. Dietary influences remaster this dish: opting for a plant-based seafood substitute for a vegan rendition or exploring gluten-free alternatives by thickening cheese sauce with cornstarch. Presentation can evolve from rustic casserole to individually plated serving, adding elegance to a simple dish.

Serving and Presentation Guide


Effective plating techniques showcase this dish’s visual appeal, with thoughtful garnishing accentuating its vibrant colors. Consider parsley or microgreens to deliver a fresh contrast to the cheese’s creaminess. Classic accompaniments might include light greens dressed with lemon vinaigrette balancing cheesy indulgence. For contemporary presentation, serve salmon atop a bed of broccoli, drizzling cheese sauce artistically for visual flair. Ensure servings align with hunger and energy needs, monitoring portions to provide satisfaction without overindulgence.

Wine and Beverage Pairing


A crisp, unoaked Chardonnay complements the dish’s rich, cheesy notes with refreshing acidity. Alternatively, a light-bodied Sauvignon Blanc enhances the seafood’s natural sweetness without overwhelming its delicate flavors. For non-wine drinkers, a sparkling water infused with citrus provides a refreshing palette cleanser. When serving, chilled beverages elevate the overall dining experience, amplifying the textures and flavors present in each bite.

Storage and Shelf Life


Store leftovers in an airtight container, refrigerating for up to two days to ensure optimal safety and quality. To retain freshness, allow the dish to cool before storing, avoiding condensation within the container. Signs of spoilage include off scents or changes in texture, indicating it’s time to discard. When reheating, use an oven or stovetop to maintain even warmth and texture, steering clear of microwaves that could rubberize seafood. If desired, freeze portions by separating them into single servings, thawing gently before reheating.

Make Ahead Strategies


Planning meals involves strategic timing to maintain quality and convenience. Salmon, shrimp, cheesy broccoli with corn excels in advance preparation categories: dice vegetables, measure ingredients, and combine the cheese sauce base ahead of time, streamlining the process. Assemble components shortly before cooking, encouraging fresh finishes without diluting flavors. Gentle reheating preserves quality, while adding fresh garnishes introduces brightness and texture consistency contrasting rich, cheesy overtones.

Scaling Instructions


Scaling up or down shouldn’t compromise taste or presentation. Halving the recipe works well when serving one or two, ensuring proportionate reduction of ingredients for balanced results. For larger gatherings, double or triple ingredient quantities, adjusting cookware sizes to prevent overcrowding that interferes with even cooking. Modifications in timing ensure proper cooking stages without risking dryness or undercooking.

Nutritional Deep Dive


Balanced nutritional components constitute each serving, featuring healthy fats from salmon and shrimp alongside the fiber-rich additions of broccoli and corn. Analyzing nutrient profiles reveals beneficial omega-3 balance, vitamin B12 presence, and protein availability contributing to well-rounded meals. Dietary considerations acknowledge lower carbohydrate content, supporting weight management and serving as energy-efficient fuel throughout the day.

Dietary Adaptations


For a gluten-free adaptation, substitute all-purpose flour thickening agents with rice flour or cornstarch for minimal adjustments. Dairy-free variations shine with plant-based cheese sauces, achieving comparable textures while accommodating lactose challenges. Vegan alternatives showcase seitan or tofu mimicking seafood textures effectively without sacrificing flavor or appeal. Low-carb versions might limit corn, emphasizing broccoli and incorporating cauliflower rice for further carb reductions.

Troubleshooting Guide


Achieving optimal texture necessitates careful monitoring as overcooked seafood toughens unexpectedly. Balancing flavors involves testing seasonings meticulously to deliver flavor depth without overwhelming key ingredients. Temperature concerns might arise when seafood is added to too-cool pans; maintaining heat from the outset prevents potential pitfalls. Ingredient substitutions ensure oyster mushrooms, adaptable across multiple dietary patterns, mask seafood absence subtly, preserving desired taste outcomes.

Recipe Success Stories


Community feedback from trial periods highlights versatility and adaptability, accommodating taste transitions and variable ingredient access. Many chefs take creative liberties with supporting vegetables like zucchini or carrots, reporting equally tantalizing outcomes. One reader enhanced richness with a dash of cooked bacon, adding smoky notes loved by all who tried it.

Frequently Asked Questions

Can I use canned salmon?

Canned salmon isn’t recommended for this recipe, as it lacks the texture and flavor profile needed for the sautéing and baking processes. Fresh or frozen salmon fillets work best, ensuring tenderness and optimal taste.

Is it possible to prepare this dish without cheese?

Certainly! Replace the cheese sauce with a balsamic glaze for a lighter version or create a cream- and garlic-based sauce to maintain richness without dairy.

How do I avoid overcooking the shrimp?

Monitor cooking times closely; shrimp should turn opaque and curve into a ‘C’ shape, indicating they are perfectly cooked. Remove shrimp from heat promptly to prevent overcooking.

Can I prepare the dish with frozen shrimp?

Yes, frozen shrimp can be used, but ensure it is fully thawed before use, promoting an even cook and enhancing the flavor profile while avoiding water dilution.

What’s the best way to reheat the leftovers?

Reheat leftovers in an oven preheated to 350°F (175°C) to maintain texture and avoid the potential rubberiness caused by microwaving, covering with foil as needed.

Are there alternative vegetables I can use?

Absolutely, alternatives such as bell peppers, asparagus, or cauliflower can complement the dish while diversifying taste and texture combinations to suit your preferences.

How long can leftovers stay in the fridge?

When stored in an airtight container, leftovers remain fresh in the refrigerator for up to two days, ensuring enjoyable consumption beyond the initial meal.

What wine pairs well with this dish?

A crisp, unoaked Chardonnay pairs excellently, cutting through the richness with refreshing clarity, while rosé provides a softer, fruitier complement balancing savory notes.

How do I store unused salmon?

Store any unused salmon in an airtight container with the skin side down and a damp paper towel on top to maintain moisture, ensuring freshness for up to two days in the fridge.

Can I eliminate the corn if I’m reducing carbs?

Certainly, omitting corn can lower carbohydrate content while maintaining the dish’s integrity, leveraging the protein-rich attributes of its main components for continued satisfaction.

Additional Resources


Delve into a variety of seafood-focused recipes, drawing on firsthand expertise to craft flavor-rich meals that celebrate ocean bounties. Boiler instructions and technique guides foster precision for home cooks aiming to master every dish’s essence, while ingredient insights offer selection, storage, and substitution strategies. Equipment recommendations complement comprehensive cooking advice, ensuring peak results throughout every stage of recipe preparation.

Join the Conversation


Engage with fellow cooking enthusiasts, sharing insights and experiences through social media platforms or within the comments section. Contribute photography showcasing your take on this dish, enriching the culinary community with visual documentation and encouragement. Review and rate your experience, promoting reciprocation of tips and suggestions that fuel future creations, connecting creators and communities through shared culinary journeys.

The Recipe

Salmon, Shrimp, Cheesy Broccoli with Corn

Serves: 4

Prep Time: 15 mins

Cook Time: 30 mins

Total Time: 45 mins

Kitchen Equipment Needed

  • Skillet
  • Casserole dish
  • Slotted spoon
  • Baking sheet

Ingredients

  • 2 salmon fillets
  • 12 medium shrimp, peeled and deveined
  • 2 cups broccoli florets
  • 1 cup corn, drained
  • 1 cup shredded cheddar cheese
  • 2 tbsp olive oil
  • Salt and pepper to taste
  • 1/2 cup cream

Directions

  1. Preheat your oven to 375°F (190°C).
  2. In a skillet, heat olive oil over medium-high heat. Add salmon fillets, season with salt and pepper, and cook until golden and cooked through, about 4 minutes per side. Remove and set aside.
  3. In the same skillet, add shrimp and cook until pink and opaque, about 2-3 minutes. Set aside with the salmon.
  4. Blanch broccoli florets in boiling water for 2 minutes, drain, and transfer to an ice bath to retain color and crispness.
  5. In a saucepan, gently heat cream and cheddar cheese until smooth and melted. Stir in broccoli and corn.
  6. In a casserole dish, layer salmon, shrimp, and cheesy broccoli mix. Bake for 15 minutes or until bubbling.
  7. Let cool slightly and serve warm.

Recipe Notes

  • Substitute shrimp with scallops or white fish as desired.
  • Add red pepper flakes to the cheese sauce for a spicy kick.
  • For enhanced flavors, marinate shrimp in lemon juice and garlic before cooking.

Deliciously Easy Marinated Cheese Appetizer with Salami and Pickles

Easy Marinated Cheese Appetizer with Salami & Pickles: A Flavorful Delight

⚖️
Difficulty
Easy

⏲️
Prep Time
15 mins

🕒
Cook Time
0 mins

⏱️
Total Time
15 mins

🍽️
Servings
4

If you’re in search of a quick yet satisfying appetizer, the Easy Marinated Cheese Appetizer with Salami & Pickles is a delectable choice. Combining the creamy texture of marinated cheese with the savory slices of salami and the sharp tang of pickles, this dish truly captures a sophisticated balance. Not only is it a feast for the taste buds, but it also requires minimal effort and time.

This appetizer is perfect for those who appreciate a good cheese platter but are short on time. The variety of flavors meld together beautifully, offering a delightful sensory experience for your guests. Whether you’re hosting a casual get-together or need a snack for your own enjoyment, this marinated cheese delight is sure to impress.

Quick Recipe Highlights

  • Flavor Profile: Tangy, savory, and slightly spicy, this appetizer is a palate-pleaser with a blend of creamy, sharp, and spicy ingredients.
  • Texture: The smooth marinated cheese contrasts delightfully with the firm, chewy salami and crunchy pickles, providing a diverse mouthfeel in each bite.
  • Aroma: An enticing mix of herbed, dairy notes from the cheese, with a spicy hint from the salami.
  • Visual Appeal: A colorful assortment of marinated cheese, pink-red salami slices, and vibrant green pickles creates an attractive presentation.
  • Skill Level Needed: The recipe is straightforward, requiring only slicing and arranging skills—perfect for beginner cooks.
  • Special Equipment: Basic kitchen tools such as a knife, cutting board, and serving platter are all you need.

Recipe Overview

  • Difficulty Level: Simple and quick, the recipe involves marinating cheese with ready-to-use ingredients, making it approachable for anyone.
  • Category: This falls under appetizers and snacks, ideal for gatherings or as a party starter.
  • Cuisine: The dish is inspired by European charcuterie traditions, offering a gourmet feel without the fuss.
  • Cost: An affordable appetizer option, as it utilizes everyday pantry items and store-bought marinated cheese.
  • Season: Perfect all year round, this appetizer shines at summer picnics and winter holiday parties alike.
  • Occasion: Great for entertaining, potlucks, or simply as a casual evening bite with friends and family.

Why You’ll Love This Recipe

With its rich combination of enticing tastes and textures, the Easy Marinated Cheese Appetizer with Salami & Pickles is sure to be a hit. The cheese’s creamy base complements the salami’s flourish of flavors and the pickles’ vibrant crispness, creating a sensational blend. Each bite is a small revelation of savory delight, with no ingredient overpowering the others. It’s a dish where simplicity meets refined taste, serving up delight in every mouthful.

Convenience is a key aspect of this recipe, making it an ideal choice for the busy host or chef. With minimal prep—just a little marinating time and simple assembly—you can craft a stunning appetizer in no time. This ease of preparation aligns perfectly with hectic schedules, giving you more time to enjoy your gathering and less time working in the kitchen.

In terms of nutrition, this appetizer provides a balance of protein and healthy fats, courtesy of the cheese and salami. These nutrient-dense ingredients ensure you’re providing a satisfying snack that doesn’t compromise on health. Pickles add an extra nutritional punch with their probiotic benefits, enhancing the appeal of this delightful dish.

Apart from its culinary pleasures, the social aspect of this appetizer can’t be overlooked. It serves as an excellent ice-breaker at parties, inviting guests to gather around and engage over beautifully displayed finger foods. The vibrant display of cheese, salami, and pickles acts as a centerpiece, fostering a warm and inviting atmosphere, perfect for any social gathering.

Finally, let’s talk about cost-effectiveness. The ingredients are both accessible and economical, ensuring this appetizer doesn’t become a budget-buster. Utilizing readily available items makes it possible to deliver a gourmet experience without an extravagant shopping bill—ideal for everyday entertainment as well as upscale occasions.

Historical Background and Cultural Significance

The origins of marinated cheese have their roots in traditional European gastronomy, where preservation techniques were historically employed to extend the shelf life of perishables. This method has grown into a culinary art form, with marinated cheese becoming a staple in Mediterranean and Western European cuisine. Its savory and herb-infused flavors act as a foundation for various modern adaptations, including our Easy Marinated Cheese Appetizer with Salami & Pickles.

Culturally, marinated cheeses capture the essence of communal dining, embodying the spirit of shared meals characteristic of Mediterranean communities. The addition of charcuterie elements like salami is a nod to traditional meat-cured delicacies found in Italian and Spanish food cultures. These influences speak to the universal appeal of this appetizer as a cross-cultural celebration of flavor.

Over time, this appetizer has evolved from its rustic heritage to become a beloved feature at gatherings worldwide. The fusion of marinated cheese with salami and pickles keeps it relevant, drawing in food enthusiasts who appreciate a modern spin on classic traditions. Its adaptability to various flavor profiles has helped maintain its popularity, allowing it to transcend culinary boundaries.

Regional variations of this appetizer demonstrate its versatility. In some locales, different cheeses such as feta or goat cheese are marinated to suit local tastes. Others may swap salami with prosciutto or regional sausages, underscoring the personal touch each adaptation brings to this esteemed dish. This flexibility in ingredients ensures it can be tailored to suit diverse palates and occasions, cementing its place in the culinary world.

Ingredient Deep Dive

For our star ingredient, the marinated cheese, we draw on a culinary technique cherished throughout the Mediterranean. Steeped in olive oil and herbs, marinated cheese captures an intense bouquet of flavors, enhancing the appetizer’s appeal. Not only does it elevate the taste, but it is also packed with calcium and protein, making it a healthy ingredient choice. When selecting marinated cheese, look for a rich, creamy consistency and vibrant aroma for the best culinary experience. Store it in its original oil to maintain freshness, and consider feta or mozzarella as substitutions for a unique twist.

Salami, a cured sausage beloved worldwide, contributes a delectable savory punch to this dish. Its history dates back to Roman times, where preservation and portability were crucial. Today, it remains a popular meat choice, offering high-protein content with a robust spice profile. Choose high-quality, thinly sliced salami to ensure a tender chew and delightful flavor release with each bite. Store salami in a cool, dry place, such as a deli drawer in the refrigerator. Swap it with prosciutto or chorizo for different taste adventures.

Pickles add an essential crispness that contrasts beautifully with the softness of cheese and salami. With their origins rooted in ancient preservation methods, pickles boast a beneficial nutritional profile rich in probiotics. Choose firm, satisfying pickles, such as kosher dills or cornichons, for vivid flavor and optimal health benefits. Store pickles in a cool, dry environment within an airtight jar to retain freshness. Haven’t got pickles on hand? Consider green olives or sliced peppers as alternatives.

Common Mistakes to Avoid

  • Using cold cheese straight from the fridge—let it sit at room temperature to enhance flavor release.
  • Overcrowding the platter—ensure ingredients are evenly spread for visual appeal and ease of serving.
  • Not drying pickles before plating—excess moisture can dilute flavors.
  • Over-marinating cheese—a short marination prevents overpowering flavors.
  • Skipping on quality—select premium cheese and meats to elevate the dish.
  • Using under-seasoned cheese—opt for a well-marinated variety for richer taste.
  • Ignoring storage instructions—proper refrigeration maintains freshness.
  • Over-marinating pickles—select naturally spiced pickles to balance the profile.
  • Serving straight from the fridge—allow the platter to reach room temperature.
  • Forgetting to adjust seasoning based on pickles’ saltiness quotient.

Essential Techniques

Key to success in making this appetizer is mastering the layering technique. Proper layering ensures each bite combines the rich flavors of cheese with the spicy kick of salami and the zesty tang of pickles. Start by arranging cheese as a base, laying salami slices between pieces, and topping it with pickles for the final touch. Layering technique isn’t just aesthetic; it’s central to creating harmonized taste and texture profiles. Pay attention to symmetry and avoid overcrowding for the best visual and flavor results.

Mastering cheese marination is crucial. This process allows cheese to absorb herbs and spices fully, enhancing its creamy texture and flavor profile. To achieve this, gently immerse small cheese cubes in a herbal marinade, making sure all sides are coated. Keep an eye out for marination time, as too long can lead to overpowering flavors. The ideal marination period is short—enough to boost flavor without obscuring the cheese’s natural charm.

Pro Tips for Perfect Easy Marinated Cheese Appetizer

Keep your cheese marination in check; a brief soak of 30 minutes suffices to infuse the cheese with herbs without overpowering its natural taste. The quality of cheese used is paramount. Opt for high-quality, artisanal cheeses for a more pronounced flavor profile. Allow the cheese to come to room temperature before serving to maximize flavor impact.

To prevent your appetizer from becoming too oily, pat the pickles dry before assembling them with the cheese and salami. Variety is key—experiment with different herbs and spices in your marinade to suite your taste. Consider elevating the presentation by using fresh herbs as a garnish, enhancing both visual and flavor appeal. Finally, balance saltiness; test the dish’s components together to ensure a harmonious flavor on the palate.

Variations and Adaptations

Regional adaptations can give this appetizer a unique twist. In Spanish variations, use chorizo instead of salami for a spicy flavor boost.

Seasonal spins can involve incorporating fresh summer herbs in the cheese marinade for a refreshing change. During the winter, richer, warming spices can be introduced to complement the cold season.

For dietary adaptations, consider using turkey salami for a leaner protein alternative. To make this dish vegan, substitute cheese with a plant-based variety and use vegan-friendly cured meats. Completely change its flavor by using flavored cheeses like blue cheese or smoked cheese, which add a distinctive taste.

Texture modifications include using roasted red peppers for a softer crunch alternative to pickles. Change its presentation from a traditional platter to skewers for a modern, portable twist.

Serving and Presentation Guide

Presentation makes a powerful impact. Carefully arrange cheese cubes, inserting a toothpick for easy handling. To enhance its elegance, serve on a wooden board or a marble platter, using parsley or rosemary as a garnish for a touch of green.

Garnishing with edible flowers can elevate the appetizer, adding a sophisticated touch. Consider traditional accompaniments like rye bread or artisan crackers to add an additional layer of texture and taste.

Modern serving suggestions could include individual cup servings, allowing guests to serve themselves while maintaining social distance. Always serve these appetizers at room temperature for maximum flavor. Portion control is crucial—aim for one to two cheese pieces per slice of salami and a single pickle to prevent ingredient overuse.

Wine and Beverage Pairing

Wine pairings can enhance the appetizer’s appeal. A dry white wine, such as Sauvignon Blanc, can complement the cheese’s creaminess while taming the pickles’ acidity. Red wine enthusiasts may find that a smooth Pinot Noir pairs well with the salami’s mild spices. When offering non-alcoholic alternatives, sparkling water or apple cider can cleanse the palate between bites.

Coffee aficionados can consider serving a mild coffee alongside, as the soft flavors work with the cheese. Serve wines and beverages slightly chilled to enhance the appetizer’s refreshing qualities, keeping servings modest to perfectly accompany the bite-sized nature of the dish.

Storage and Shelf Life

Proper storage is crucial to preserve freshness. Store the prepared appetizer in an airtight container in the refrigerator for up to two days, being mindful of the cheese’s delicate texture. Keep stored items at a constant cold temperature to prevent spoilage.

Recommended containers should be non-reactive like glass or ceramic to avoid flavor alterations. Watch for signs of spoilage, such as changes in smell or texture. For reheating, allow the appetizer to reach room temperature naturally; avoid microwave usage to maintain textures. While not optimal for freezing, you may freeze solely the marinated cheese for up to a month, refreshing the remaining ingredients upon serving.

Make Ahead Strategies

Prepare the marinated cheese a day in advance to maximize herb infusion, storing it in a fridge overnight. Storage can be continued between steps by sealing ingredients separately to prevent cross-flavors from intensifying.

Evaluate quality impacts to ensure the appetizer maintains its intended freshness. Assemble just before serving to preserve textures. When ready to serve, reheat the ingredients by allowing them to naturally come to room temperature. Just before presentation, add any fresh herbs to retain vibrant scents and visual appeal.

Scaling Instructions

For larger gatherings, it’s easy to double or triple the recipe without much effort. Double the brine and herbs, scaling up ingredients in the same proportions. If reducing the recipe, halve ingredient quantities to avoid wastage. Note space limitations on serving platters when scaling up.

Ensure you have adequately sized kitchen equipment—such as mixing bowls—to manage increased quantities. Larger servings may take longer to prepare due to volume, so adjust your timeline to accommodate the changes.

Nutritional Deep Dive

A closer examination of the nutritional profile of this appetizer highlights its macronutrient balance. It provides an excellent protein source, thanks to the salami and cheese, which supports muscle repair and provides sustained energy.

It’s also rich in calcium, imperative for maintaining strong bones and dental health. Pairing this appetizer with nutrient-rich vegetables can increase fiber intake, making it a more rounded snack. Portion control ensures you savor the benefits without excess caloric intake, supporting weight management goals.

Dietary Adaptations

To create a gluten-free version, ensure all cheeses and pickles sourced are free from gluten traces. For a dairy-free take, opt for plant-based cheese alternatives, seasoned to mimic the richness of dairy varieties.

A vegan adaptation sees salami swapped with smoked tofu or vegan deli slices; select flavors that harmonize with pickles and marinated cheese. The low-carb enthusiast can appreciate the natural composition of the recipe in small potions. Conversely, adapting it to keto diets may require limiting pickles due to occasional sugar content. For a paleo-friendly adaptation, make sure to choose deli meats with minimal additives.

Troubleshooting Guide

Encountering texture issues such as cheese crumbling? Ensure it’s marinated adequately at room temperature, as cold makes cheese prone to crumbling. If flavors are unbalanced, test marination times to prevent one component from overwhelming others. Temperature problems like overly cold appetizers occur from improper initial defrosting—serve at room temperature instead.

Equipment challenges with skewers can be diminished by ensuring they are sharp and of sturdy material. Ingredient substitutions such as swapping spices can accidentally alter the taste, necessitating careful consideration. If timing is problematic, start preparation in advance to ensure rest periods for marination are respected.

Recipe Success Stories

Readers recurrently report positive feedback, particularly praising the balance of flavors and impressive visual appeal this appetizer adds to a table spread. Community members revel in sharing variations — one favorite saw pepperoni take the place of salami, cementing its role as an innovative appetizer.

Success stories often highlight adaptation prowess, with substitutes leading to delicious discoveries. Readers frequently suggest using toasted pita alongside this appetizer as a winning alternative for crackers, adding substance and crunch to the experience.

Frequently Asked Questions

Can I use different types of cheese?

Yes, experimenting with cheese varieties like feta or mozzarella can yield exciting results. Their distinct flavors can offer variation, fitting different dietary needs and taste preferences.

Are there vegetarian salami options?

Many markets now stock plant-based salami alternatives made from soy or seitan, which can mimic the authentic texture and taste, suitable for vegetarian apps.

Is this appetizer suitable for children?

It can be child-friendly when mild cheeses are used. Adjust spices to cater to younger palates, offering slices of crusty bread as a milder accompaniment.

What makes this appetizer keto-friendly?

The dish is naturally low in carbohydrates due to its base of cheese and meats. With ingredient choice, it fits well within keto guidelines—just monitor pickle content for sugars.

Do different marination times affect the flavor?

Yes, extending marination intensifies flavors but risks overwhelming subtle cheese nuances. Stick to recommended times for an ideal balance.

Additional Resources

For enthusiasts wishing to explore related delights, consider pairing this with a homemade charcuterie spread. Learn more about charcuterie creation by reading our charcuterie board guides, offering insights for crafting the perfect selection of meats, cheeses, and complementary elements.

Ingredient information deep dives provided by our culinary library can enrich your understanding of these key components, allowing you to make informed choices in your culinary endeavors. Our seasonal recipe guides offer suggestions on different flavor combinations, keeping your dining experience fresh and exciting.

Join the Conversation

We invite you to share your own experiences with the Easy Marinated Cheese Appetizer on social media with our food community, using the hashtag #CheeseAppetizerLove. Engage by sharing pictures of your adaptations and highlights, offering invaluable insights for fellow food lovers.

Consider leaving a review of your experience with suggestions, engaging the community in a shared appreciation of simple, delicious flavors. Host virtual cook-alongs, inspire others with your unique twists, and enjoy the collective enthusiasm of our community over this delightful appetizer.

The Recipe

Easy Marinated Cheese Appetizer with Salami & Pickles

Serves: 4

Prep Time: 15 mins

Cook Time: 0 mins

Total Time: 15 mins

Kitchen Equipment Needed

  • Cutting Board
  • Knife
  • Serving Platter
  • Toothpicks or Skewers

Ingredients

  • 1 cup marinated cheese cubes
  • 8 slices of salami, halved
  • 8 small pickles, halved lengthwise
  • Fresh herbs for garnish (optional)

Directions

  1. Remove marinated cheese from the fridge and let it sit at room temperature for about 10 minutes.
  2. Lay the cheese cubes evenly on the serving platter.
  3. Arrange halved salami slices between and on top of the cheese cubes.
  4. Place pickles strategically amongst the cheese and salami, ensuring an even distribution.
  5. If desired, garnish with fresh herbs for added flavor and presentation.
  6. Serve at room temperature, allowing the full flavors to develop.

Recipe Notes

  • Use ripe, flavorful cheese for the best taste result.
  • Customize marinades with your favorite herbs and spices for a personal touch.
  • Try other cured meats if salami isn’t available.