Hearty Slow Cooker Tomato Tortellini Soup with Ground Beef Recipe

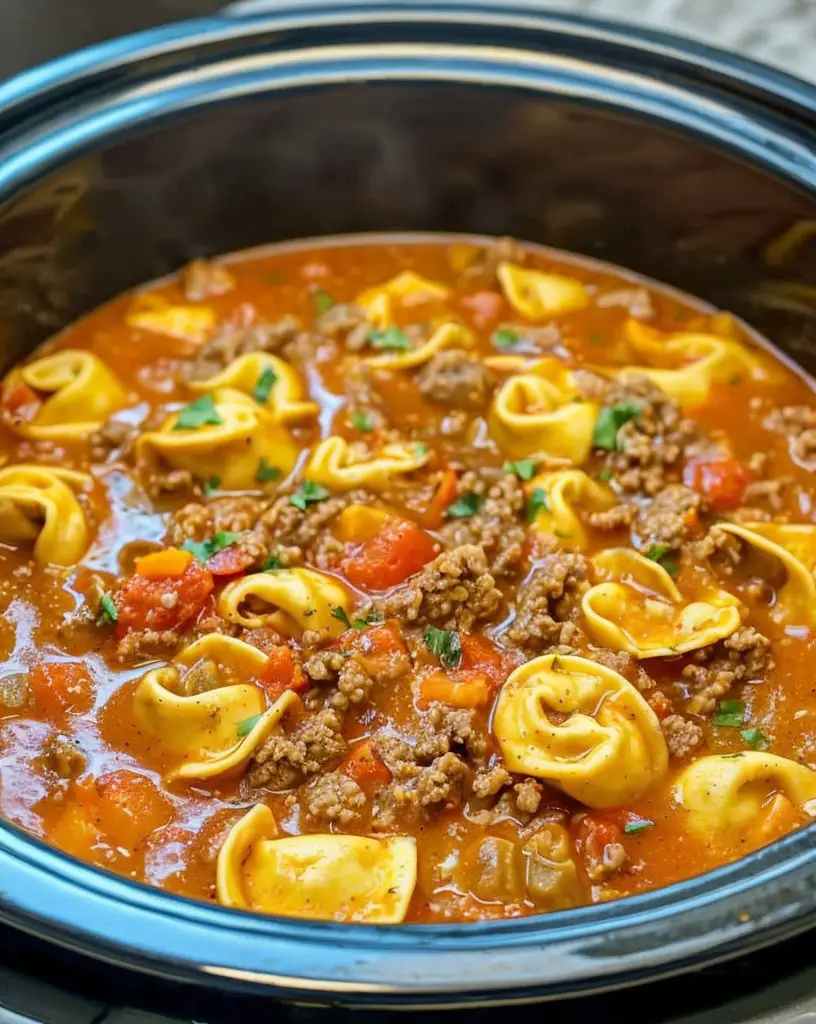
Slow Cooker Tomato Tortellini Soup with Ground Beef: Comfort in a Bowl

⚖️
Difficulty
Easy

⏲️
Prep Time
15 mins

🕒
Cook Time
240 mins

⏱️
Total Time
255 mins

🍽️
Servings
6

Imagine coming home after a long day and being greeted by the rich aroma of Slow Cooker Tomato Tortellini Soup. This comforting meal combines the hearty taste of ground beef with the subtle sweetness of tomatoes, creating an irresistible symphony of flavors. The addition of cheese-filled tortellini adds a delightful creamy texture, making each bite a perfect balance of savory and smooth.

If there’s one word to describe Slow Cooker Tomato Tortellini Soup with Ground Beef, it’s “satisfying.” This dish not only fills the kitchen with a cozy, inviting aroma but also ensures that every bowl delivers a burst of flavor and warmth. The convenience of using a slow cooker allows the flavors to meld together, making preparation a breeze without compromising on taste.

For those who appreciate a blend of textures, the tender ground beef offers a fantastic counterpoint to the soft, chewy tortellini, creating a delightful mouthfeel. Whether it’s a chilly evening or a casual family gathering, this soup is sure to impress with its heartiness and depth of flavor.

Quick Recipe Highlights

  • Flavor Profile: The savory beef paired with tangy tomatoes and cheesy tortellini creates a robust flavor profile.
  • Texture: Tender beef with soft tortellini provides a satisfying mouthfeel.
  • Aroma: Rich aromas of tomato and herbs fill the kitchen as the soup simmers.
  • Visual Appeal: A vibrant red broth with specks of green herbs and golden tortellini makes this dish visually inviting.
  • Skill Level Needed: Simple enough for beginners with just basic browning and slow-cooking skills required.
  • Special Equipment: A slow cooker is necessary to achieve the right consistency and blend of flavors.

Recipe Overview

  • Difficulty Level: The recipe is straightforward, involving minimal chopping and browning, perfect for novice cooks.
  • Category: A comforting main dish that’s perfect for cold nights and casual dinner parties.
  • Cuisine: Inspired by Italian-American cuisine, merging classic flavors in a comforting soup.
  • Cost: Budget-friendly ingredients make it an economical choice without sacrificing taste.
  • Season: Best enjoyed in fall and winter when warm, hearty soups are most appreciated.
  • Occasion: Ideal for family dinners, potlucks, or any time you want a no-fuss meal that satisfies.

Why You’ll Love This Recipe


The Slow Cooker Tomato Tortellini Soup with Ground Beef captivates with its hearty yet creamy taste, offering a delightful balance between robust and smooth flavors. The chewy texture of tortellini combined with richly seasoned beef creates a heavenly taste experience that’s hard to resist. Each spoonful is a comforting reminder of home-cooked meals at their finest.

Embrace the convenience of this recipe which allows you to set it and forget it. As the soup simmers, flavors meld beautifully, transforming a handful of everyday ingredients into a restaurant-worthy dish. Serve this to guests, and you’re bound to earn praises for providing such a flavorful feast with minimal effort.

Nutritionally, this soup is a great source of protein from the beef and cheese, while the tomatoes contribute essential vitamins like C and A. The balance of carbohydrates, fats, and proteins makes it a wholesome meal option.

Beyond its taste and nutritional benefits, this dish is a crowd-pleaser, perfect for social gatherings or quiet family nights alike. Its comforting essence brings people together over shared meals, sparking joy and conversation around the dining table.

In terms of cost, all ingredients are commonly found in most pantries or easily accessible at local supermarkets. The simple list ensures that you’re not breaking the bank, while still delivering a decadent bowl of goodness for everyone to enjoy.

Historical Background and Cultural Significance


Inspired by classic Italian tomato and pasta soups, Slow Cooker Tomato Tortellini Soup with Ground Beef is a modern twist on traditional flavors that take root in Italy’s rich culinary history. Tortellini, renowned for its delectable cheese filling, originates from Italy’s Emilia-Romagna region, where pasta making is an art form passed down through generations.

Soup has been a staple dish across many cultures for centuries, reflecting the adaptability of ingredients that represent the heart of traditional cooking methods. This particular recipe embodies a blend of Italian culinary artistry with the seamless integration of modern appliances like slow cookers, which infuse convenience into traditional cooking techniques.

As culinary tastes continue to evolve, this dish exemplifies the innovation within comfort food, adapting well-loved ingredients into a format that suits today’s fast-paced lifestyle. Regional variations may introduce different meats or vegetable broths, but the underlying principle remains fidelity to robust flavors and nourishing outcomes.

Variations of this soup are celebrated in different parts of the world, each adding unique touches that reflect local ingredients and preferences. By adjusting herbs or swapping in local cheeses, regional interpretations showcase the dish’s adaptability and global appeal.

Ingredient Deep Dive


The use of tomatoes in this soup deserves particular attention, given their integral role in achieving the dish’s vibrant base. Tomatoes, originally from South America, have become a cornerstone ingredient in many cuisines due to their versatility and nutritional benefits. They are packed with vitamin C, potassium, and antioxidants such as lycopene, known for their heart-health benefits.

Selecting the best tomatoes involves choosing those with rich color and firm flesh, indicating ripeness and quality. Storage in a cool, dry place helps maintain their flavor and freshness. Canned varieties provide a convenient alternative with prolonged shelf life while maintaining similar nutritional content. If fresh tomatoes are unavailable, canned crushed tomatoes work perfectly, offering consistency in texture.

Ground beef is another vital component, providing a rich and savory flavor. Lean ground beef is preferable for those looking to reduce fat content, while maintaining protein and iron intake. Opt for fresh, bright red beef with a consistent texture and minimal fat marbling. For storage, keep beef refrigerated and use within a day or two of purchase, or freeze for extended preservation.

Ground beef provides substantial protein and essential minerals, including iron and zinc, making it an energizing addition to any meal. If looking for a leaner option or different flavor palette, ground turkey or chicken can be perfect substitutes, compatible with the soup’s robust nature.

Common Mistakes to Avoid

  • Overbrowning the ground beef before adding it to the slow cooker can result in a dry texture; aim for a light golden brown sear.
  • Adding frozen tortellini directly to the slow cooker may increase cooking time; it’s best to defrost them before use.
  • Skipping the initial browning step for the beef can compromise the depth of flavor in the final dish.
  • Not seasoning the soup adequately could lead to blandness; ensure spices and salt are balanced to taste.
  • Leaving the soup cooking for too long might dissolve the tortellini, resulting in them becoming mushy, impacting texture.
  • Using low-quality canned tomatoes can affect the overall taste; opt for high-quality brands for the best flavor.
  • Ignoring the cheese in the tortellini assuming it’s an optional addition; it’s essential for the creamy texture.
  • Failing to taste and adjust seasoning before serving may lead to an imbalanced flavor profile.
  • Forgetting to monitor the water level could result in a drier soup than desired – add broth if needed to maintain consistency.
  • Not considering dietary preferences or adjustments could make the dish unsuitable for some guests; consider providing alternatives.

Essential Techniques


Browning ground beef is crucial, as it enhances the meat’s flavor through the Maillard reaction, producing deliciously rich and complex flavors. Mastering this technique involves heating the pan before adding beef and cooking it quickly in small batches to ensure it doesn’t steam.

Understanding the function of a slow cooker is key to perfecting this soup, allowing low and slow cooking that tenderizes meats and melds ingredients’ flavors. A common pitfall is lifting the lid too often, which releases heat and can extend cooking time. Let the slow cooker do its job for best results.

Taste as you go to maintain flavor balance, since this soup relies on a mix of fresh and canned ingredients that vary in saltiness and acidity. Adjusting seasonings as needed based on preference ensures the final dish is flavorful and satisfying.

Visual cues of perfectly cooked tortellini include a soft, slightly puffed appearance and a tender bite. Overcooked tortellini may become too mushy, losing their chewiness and diminishing the desired texture.

Pro Tips for Perfect Slow Cooker Tomato Tortellini Soup


Consider adding a splash of white wine when sautéing the beef for an extra layer of flavor, enhancing acidity and depth in the soup.

Fresh herbs like basil or parsley added towards the end of cooking impart a vibrant freshness to the soup that dried herbs can’t quite replicate.

For a creamier soup, stir in a few spoonfuls of ricotta or a splash of cream cheese just before serving to enrich the broth’s texture.

Experimenting with different tortellini fillings like spinach or mushroom can layer in additional flavors and complement the core ingredients.

Balancing a teaspoon of sugar with the tomatoes’ acidity can smoothen out sharpness, resulting in a more rounded flavor profile.

Garnish with freshly grated Parmesan cheese and a drizzle of olive oil for enhanced richness and a visually appealing finish.

Variations and Adaptations


Regional variations can include using local sausages or specialty meats in place of ground beef, delivering unique flavor infusions via local herbs or spices.

A seasonal adaptation might involve adding seasonal vegetables like squash or zucchini in autumn months or even fresh corn kernels in the summer for sweetness.

Dietary modifications such as using gluten-free pasta or opting for dairy-free cheese alternatives can make this recipe inclusive for different dietary needs, without sacrificing taste.

Explore bold flavor variations by incorporating roasted red peppers or smoked paprika for added spice and warmth, complementing the beef nicely.

Texture modifications might come from adding crunchy croutons as a garnish or stirring in some beans for extra substance, shifting the texture’s focus.

Presentation alternatives can involve serving this soup in a bread bowl, adding an element of novelty and enhancing its rustic, comforting appeal.

Serving and Presentation Guide


Effective plating techniques include using wide, shallow bowls to showcase the soup’s vibrant color and toppings like herbs or cheese, adding visual interest.

Garnish ideas could involve fresh herbs, a dollop of pesto, or a sprinkle of cracked black pepper, providing both a flavor boost and aesthetic appeal.

Traditional accompaniments such as warm crusty bread or classic garlic breadsticks are ideal sides, providing a textural foil to the soup’s softness.

Modern serving suggestions might include offering the soup in small cups for an appetizer or pairing with a light salad for a balanced meal set.

Temperature considerations involve ensuring the soup is served piping hot to maintain the intensity of flavors and the comfort factor that comes with warm soups.

Portion control tips ensure everyone gets their fill, suggesting about 1 to 1.5 cups per serving, depending on whether it’s a starter or main course.

Wine and Beverage Pairing


Pair this soup with a medium-bodied red wine like Chianti or a young Cabernet Sauvignon, which complements the tomato-based broth and beef richness.

For non-alcoholic alternatives, consider a sparkling mineral water with a slice of lemon that refreshes the palate between bites.

Should you prefer coffee or tea, a mild black tea can offer a smooth accompaniment, while a light roast coffee works surprisingly well with the tortellini’s cheesy notes.

Temperature considerations for wine emphasize serving reds slightly chilled or at room temperature, and non-alcoholic beverages can be delightfully cool with subtle carbonation.

Serving suggestions promote offering beverages in appropriate glassware to enhance the dining experience, whether a classic wine glass or a chilled tumbler.

Storage and Shelf Life


Proper storage methods to maintain freshness involve storing the soup in an airtight container, preserving its flavor and texture longer.

Maintain an ideal temperature by refrigerating promptly after cooling, best consumed within 3-4 days to ensure optimal taste and quality.

Consider using glass or BPA-free plastic containers for storing leftovers to avoid flavor absorption or chemical leaching.

Signs of spoilage like off-odors or discoloration are clear indicators the soup is past its prime; if in doubt, discard to maintain food safety.

When reheating, gently bring to a simmer on the stovetop or use a microwave in increments, ensuring even heating without overcooking the tortellini.

Freezing guidelines encourage portioning the soup before freezing, allowing quicker thawing and portion control; consume within 1-3 months for best quality.

Make Ahead Strategies


Plan a prep timeline by browning the beef and chopping vegetables a day ahead, storing them in separate containers for quick assembly.

Between steps, store prepped ingredients in the refrigerator to maintain freshness and eliminate any moisture build-up, ready for slow cooking.

Assess quality impact by noting that flavors meld better overnight, resulting in more balanced and deeper taste upon reheating.

Assembly tips for this make-ahead wonder suggest layering ingredients directly into the slow cooker, minimizing cleanup and prep time.

Reheating guidelines prioritize gentle warming to preserve the tortellini’s structure and maintain the beef’s tenderness.

Enhance freshness with additions like fresh herbs or a squeeze of lemon juice during reheating to revive and elevate flavors.

Scaling Instructions


Halving the recipe for fewer servings involves simply dividing ingredients, maintaining balance in ratios and ensuring appropriate slow cooker size.

Doubling or tripling implies more efficient ingredient use without compromising ratios but requires a larger cooker or multiple appliances.

Equipment adjustments may involve larger or additional slow cookers for scaled recipes, maintaining uniform heat distribution for successful outcomes.

Timing modifications, especially at larger scales, might mean extending cooking times by 1-2 hours, checking for doneness and flavor integration.

Store any larger quantities adequately, dividing portions into freezer-safe containers for later use, preventing waste and extending meal availability.

Nutritional Deep Dive


This soup offers an advantageous macro breakdown with balanced portions of protein (from beef), carbohydrates (tortellini), and fats (cheese), supporting sustained energy release.

Micronutrient analysis reveals benefits like vitamins C and A from tomatoes, along with iron and zinc from beef, covering essential dietary needs.

Recognize health benefits beyond basic nutrition, such as lycopene for heart health from tomatoes and complete amino acids from beef.

Consider dietary constraints, advising that with appropriate modification, this dish can accommodate most, including gluten-free and dairy-sensitive eaters.

Portion analysis demonstrates that a balanced serving provides concentrated macro and micronutrient intake, aiding overall dietary goals.

Weight management tips for conscious eaters include moderating pasta portions or employing low-carb substitutes for tortellini to align with dietary plans.

Dietary Adaptations


For a gluten-free version, use gluten-free tortellini or replace it entirely with rice pasta, maintaining core soup characteristics.

Dairy-free adaptations may necessitate substituting regular tortellini for those with dairy-free cheese, or testing pasta alternatives like chickpea flour types.

A vegan-friendly take could involve removing beef and tortellini, introducing chickpeas and spiralized vegetables like zucchini for texture and nutrition.

Low-carb adjustments replace tortellini with spiralized vegetable noodles, maintaining similar texture elements matched with beef protein sources.

Keto adaptations also thrive with similarly reduced-carbohydrate pasta options, supplemented by additional healthy fats such as avocado garnish to complement protein.

Paleo variations might substitute beef with another lean protein source and replace tortellini with suitable vegetables or greens for a unique spin on tradition.

Low-FODMAP recipes can reduce onion and garlic while retaining slow-cooked flavors, introducing alternatives like garlic-infused oil to uphold taste profiles.

Consider other diet-specific tweaks according to need, ensuring wide accessibility based on taste and nutritional adherence.

Troubleshooting Guide


Texture issues often arise from overcooking; avoid mushy pasta by cooking tortellini closer to serving time for optimal texture.

Flavor balance sometimes requires sharper hits of acid; adding lemon juice or red wine vinegar late offers a reliable fix for weak flavors.

Temperature problems linked to unexpected slow cooker variances mean monitoring allows reclaiming regularity and ensuring safe cooking.

Equipment challenges vary but are solvable with alternative setups; even a sturdy stovetop-compatible casserole doubles as functional cookware.

Ingredient substitutions can advance successful outcomes, such as using common ingredient swaps that maintain both flavor and dietary adherence.

Timing concerns, particularly with diffused heat distribution, mean strategic stirring helps recalibrate consistency for steady heat management.

Recipe Success Stories


The Slow Cooker Tomato Tortellini Soup with Ground Beef has garnered praise within our community, with many highlighting its comforting, rich flavors.

Creative variations inspire readers to share their unique ingredient swaps or adaptations that accommodate personal preferences or dietary needs.

Many adapt this versatile recipe; ideas include adding roasted vegetables or swapping in unique pasta shapes for dietary or visual variety.

Community feedback consistently underscores simplicity’s appeal, valuable even to beginners mastering new kitchen skills.

Photography encouragement comes alongside shared stories, illustrating unique soup finishes that echo rich flavors through compelling visual stories.

Reader suggestions frequently build exciting new content, encouraging continuous improvements or experiments in taste, flavor and texture pursuits.

Frequently Asked Questions

Can I freeze leftover soup? Yes, this soup freezes well. Use freezer-safe containers and reheat slowly for best flavor retention.

What spices pair best aside from listed ingredients? Enhancements like red pepper flakes or fresh basil provide depth and complexity.

Is it possible to make this soup vegetarian? Omitting beef and including hearty mushrooms or plant proteins like beans adds nourishment.

Can I use canned tomatoes instead of fresh? Absolutely, canned options reliably match depth of fresh tomatoes and maintain consistent flavor.

What’s the easiest method to thicken the soup? Incorporating a roux or mashed beans can deliver an appreciated thickness without altering taste.

Are there specific tortellini alternatives? Yes, you can substitute tortellini with ravioli or similar stuffed pasta variations.

How can I reduce salt content naturally? Use low-sodium broth and fresh tomatoes, seasoning with herbs and lemon for enhanced taste.

Will the soup taste watery with substitutions? Enhancing flavor with stock or vegetable reductions offsets any perceived watering down from subs.

How is different cookware suited for broths? Conventional pots ensure circulation within broths and proper slow cooker care means consistent cook.

What garnishes add uniqueness? A sprinkle of pine nuts or drizzle of white truffle oil offers unique garnishes lending tantalizing aromatic touches.

Additional Resources


Explore related recipes that further develop your kitchen repertoire, pairing this soup with homemade focaccia or bruschetta.

Access technique guides for honing kitchen skills related to soup crafting, offering insights into balancing flavors and layering ingredients.

Discover essential ingredient information ensuring quality selections and storage recommendations advancing culinary expertise.

Benefit from equipment recommendations providing quality assurance across varied kitchen tools facilitating exceptional home cooking.

Embrace seasonal variations that cater to produce availability influencing distinctive taste variations across seasons.

Join the Conversation


Join our engaging social media community, sharing your soup presentation photos and receiving friendly critique and tips.

Submit personal reviews on this recipe, discussing taste, preparation, and modifications executed catering to household tastes.

Participate in photography tips discussions, mastering visual storytelling to accompany your culinary creations.

Encourage active community engagement, celebrating variations, adaptations, and resulting successes with like-minded enthusiasts.

Discuss inspiring recipe interpretations, showcasing imaginative spins unique to each person and sparking creativity in home kitchens.

The Recipe

Slow Cooker Tomato Tortellini Soup with Ground Beef

Serves: 6

Prep Time: 15 mins

Cook Time: 240 mins

Total Time: 255 mins

Kitchen Equipment Needed

  • Slow cooker
  • Large skillet
  • Wooden spoon
  • Chef’s knife
  • Cutting board

Ingredients

  • 1 lb ground beef
  • 1 yellow onion, chopped
  • 2 cloves garlic, minced
  • 1 can (28 oz) crushed tomatoes
  • 4 cups beef broth
  • 1 tsp Italian seasoning
  • Salt and pepper to taste
  • 2 cups cheese tortellini
  • Fresh basil, for garnish
  • Parmesan cheese, for topping

Directions

  1. In a large skillet, brown the ground beef over medium heat, breaking it apart with a wooden spoon.
  2. Add the chopped onions and garlic, and cook until the onion is translucent.
  3. Transfer the beef mixture to the slow cooker.
  4. Pour in the crushed tomatoes and beef broth. Stir in the Italian seasoning, salt, and pepper.
  5. Set the slow cooker to low and cook for 4 hours.
  6. Add the tortellini to the slow cooker and cook for an additional 30 minutes on low.
  7. Serve hot with fresh basil and Parmesan cheese sprinkled on top.

Recipe Notes

  • Feel free to substitute beef with ground turkey for a lighter version.
  • For additional flavor, add a splash of red wine while cooking the beef.
  • Store leftovers in the refrigerator for up to 4 days or freeze for up to 3 months.

Irresistible Dill Pickle Chex Mix Recipe for Snack Lovers

Dill Pickle Chex Mix Recipe: A Tangy Snack Delight

⚖️
Difficulty
Easy

⏲️
Prep Time
10 mins

🕒
Cook Time
30 mins

⏱️
Total Time
40 mins

🍽️
Servings
8-10

Imagine diving into a bowl of Dill Pickle Chex Mix, where each bite promises a burst of tangy delight. Perfect for pickle enthusiasts, this snack combines the best of crispy Chex cereal and the unmistakable zest of dill pickles. Whether you’re planning a family game night or a casual picnic, this recipe serves as an ideal treat with its savory, crave-worthy flavor.

With minimal prep and cook time, the Dill Pickle Chex Mix is designed for both experienced cooks and budding chefs. Its combination of cereals and unique seasoning offers a twist on traditional snack mixes, ensuring you’ll impress friends and family with this flavorful creation. Add to that the joy of homemade snack mixes, prepared with love, and you’ve got a winner.

This mix offers an explosion of flavors and textures that will transport your taste buds straight to pickle yesteryear while keeping your snacking experience modern and convenient. The versatility of this recipe makes it a must-try for all occasions, whether lounging at home or hosting a friendly gathering.

Quick Recipe Highlights

  • Flavor Profile: A delightful combination of salty, tangy, and slightly spicy flavors, making every crunch satisfying.
  • Texture: Super crunchy with varied textures from different cereals and nuts, offering a playful mouthfeel.
  • Aroma: Inviting dill aroma with undertones of spices, making each bite alluring before it even hits the tongue.
  • Visual Appeal: Golden brown mix flecked with green dill bits, beautifully varied with unique shapes of included cereal.
  • Skill Level Needed: Simple and accessible steps ensure even a novice can achieve a delicious result on the first try.
  • Special Equipment: Basic baking and mixing tools, such as a large bowl and baking sheet, are needed.

Recipe Overview

  • Difficulty Level: This recipe is rated as easy, as the steps involve mixing ingredients and baking, with little technical skill required.
  • Category: Snack mixes, appetizers, and crowd-pleasers, perfect for parties or casual munching.
  • Cuisine: Inspired by American culinary traditions with a modern twist on popular snack themes.
  • Cost: An affordable mix using common pantry items, making it a cost-effective option for group events.
  • Season: This versatile mix is great year-round but particularly shines during summer for picnics and barbecues.
  • Occasion: Ideal for informal gatherings, family movie nights, or as a unique potluck contribution.

Why You’ll Love This Recipe


The Dill Pickle Chex Mix is a standout due to its irresistible taste and textural variety. The crispy cereals combined with the tangy, dill-infused seasoning create a harmony that dances on the palate. Perfectly baked, these flavors enhance the crunch, making every bite a flavor-packed adventure.

For those who cherish convenience, this recipe involves a straightforward preparation process. With its simple steps and short bake time, it’s a hassle-free snack perfect for any occasion. The mix can be stored for days without losing its delightful crunch, making it a prep-and-forget option for continuous enjoyment.

Nutrition-wise, the inclusion of nuts provides a source of healthy fats and protein, balancing out the indulgent nature of snack mixes. This tangy treat not only satisfies cravings but also offers a nutritional edge without compromising on taste.

Beyond its culinary prowess, the Dill Pickle Chex Mix invites social sharing. Friends and family will flock to this novel snack, its unique flavor profile sparking conversations and delight. Whether it’s for a party or a picnic, this mix is a guaranteed crowd-pleaser.

Affordability and accessibility further contribute to the mix’s appeal. Ingredients are widely available, ensuring that even those with the most modest grocery budgets can partake in this tangy delight.

Historical Background and Cultural Significance


Snack mixes find their roots in early American culinary history, evolving from simple cereal bowls to complex flavor profiles like our Dill Pickle Chex Mix. This recipe pays homage to the tradition of twisty, savory snacks crafted for sharing during social gatherings.

Culturally, Chex Mix variations hold a special place in American holiday traditions, symbolizing comfort and nostalgia for gatherings that bring people together. The dill pickle twist modernizes this legacy, linking present snacking habits with a cherished past.

Over the years, Dill Pickle flavor has gained recognition, particularly in North America, where its tangy burst has been integrated into various culinary applications, elevating traditional recipes with a zesty flair.

Regions across the United States popularized various takes on snack mixes. Each geography added a distinct, localized flavoring, slowly paving the way for contemporary takes like the Dill Pickle Chex Mix, now an emerging classic.

Ingredient Deep Dive


Chex cereal forms the base of this mix, a beloved ingredient in American cuisine that originated in the mid-20th century. Its versatile, light-crunch profile lends itself beautifully to seasoning adaptations, making it a favorite among innovative snack recipes.

Dill, the herb behind the signature flavor, has a rich culinary history, deeply rooted in Middle Eastern and European traditions. Known for its fresh, grassy taste, dill not only enhances this recipe but also brings a host of nutritional benefits, including antioxidants and anti-inflammatory properties.

Common components such as nuts add to the versatility of the mix, providing a satisfying crunch and enhancing satiety. When selecting nuts, ensuring freshness is key to maintaining the best flavor profile. Opt for raw or lightly roasted varieties to allow the dill seasoning to shine.

Storage-wise, preparing the mix ahead of time will highlight the prolonged flavor retention in an airtight container, ensuring freshness for days. In case some ingredients aren’t available, reasonable substitutions like swapping peanuts for almonds are feasible.

Common Mistakes to Avoid

  • Overbaking: Watch the baking time closely to prevent a burnt aftertaste; slightly golden is the desired finish.
  • Uneven Coating: Mix the seasoning well to ensure each piece is evenly coated for a consistent taste throughout.
  • Skimping on Seasoning: The dill flavor should be vibrant, so don’t hesitate to use the recommended quantities for the full tangy experience.
  • Using Stale Ingredients: Freshness is key, particularly for cereal and nuts; check your pantry before starting the recipe.
  • Inappropriate Storage: Use airtight containers post-baking to maintain crunchiness and flavor retention.
  • Ignoring Mixing Tools: Employ wide mixing bowls for even coating of all elements with seasoning.
  • Heat Mismanagement: Consistent oven temperature is crucial to achieving balanced cooking without over-drying.
  • Skipping Resting Time: Allow a short cooling period for flavors to settle, enhancing the overall taste profile.
  • Overcomplicating: Stick to the recipe for an optimal balance of flavors and textures initially.
  • Ingredient Swaps: While substitutions are possible, ensure compatibility with dill and the seasoning mix to maintain harmony.

Essential Techniques


Mastering mix seasoning requires evenly distributing your seasoning blend over every bite-size piece. Consistently tossing the cereal after adding the flavor mix will ensure a uniform coating, enhancing the taste experience.

Baking requires precision, beginning with preheating the oven to the recommended temperature. This foundational step ensures the mix crisp evenly, granting the desired golden brown hue.

Crucial to achieving a balanced crunch is monitoring both temperature and time. A golden sheen is your cue, signaling an ideal combination of having baked long enough to develop flavor without the risk of burning.

Post-bake cooling on a wire rack or open-air container is an advanced technique, providing consistent texture while preventing the mix from steaming and losing its crispness.

Pro Tips for Perfect Dill Pickle Chex Mix

Quality pickles are the unsung heroes of this dish. Opt for full-flavor, brined pickles known for their consistent tang when choosing your seasoning ingredients.

For an even better flavor infusion, consider allowing your seasoning to sit and meld its flavors for a few minutes before adding to the Chex. This melding will elevate the tangy notes throughout the mix.

Incorporating a hint of cayenne pepper can bring a subtle heat, contrasting the sweetness of Chex cereal harmoniously.

Proper returning of mixture while baking will ensure complete flavor immersion on every piece of cereal.

Choose your nuts wisely. Roasting nuts lightly before adding them into the mix allows their natural oils to accentuate the dill-coated flavor profile, lending a richer taste.

Experiment with garlic powder or onion powder sparingly for an added layer of depth.

Variations and Adaptations

Regionally, add herbs like thyme or basil native to your location for a nuanced layer of local flavors. Such adaptations can reflect regional garden availability.

As the seasons change, consider adapting with seasonally available seeds like sunflower or pumpkin seeds for added crunch and taste just right for harvest time.

For dietary needs, gluten-free Chex cereal and suitable nut alternatives provide an accessible option without sacrificing the treasured dill flavor.

Adventurous palates might enjoy adding extra spice-infused ingredients to manifest a bold tasting experience.

If you prefer a lighter option, opt for a reduced-oil approach by moderating butter quantities, refreshing the dill mix with water for solvent-free binding.

For alternative presentations, create personal snack-size bags or a sophisticated party bowl with garnished dill sprigs for an eye-catching display.

Serving and Presentation Guide

Plating your Dill Pickle Chex Mix can be as simple or elegant as you choose. Consider using clear glass bowls to showcase the mix’s colors, accentuated with fresh dill sprigs for visual freshness.

Garnishing with sprinkle of fresh herbs such as dill will highlight its core flavor and appeal visually, enhancing your table presentation.

Traditionally, Chex Mix has been served in large bowls for communal gatherings, encouraging sharing and social enjoyment, perfect for family-style events.

For a modern twist, offer individual servings in decorative paper cups, complementing picnics or parties while offering ease of access.

Consideration of the mix’s temperature is key in presentation. Serve it freshly cooled to maintain crunch and maximize flavor profile impact as guests dig in.

Maintain consistent portion sizes with this intuitive snack using small scoops or ladles so that each serving perfectly encapsulates the mix’s flavorscape.

Wine and Beverage Pairing

Dill Pickle Chex Mix, with its vibrant, tangy notes, pairs beautifully with crisp, light white wines, such as a Sauvignon Blanc or a Pinot Grigio, enhancing its sharp flavors.

For non-alcoholic alternatives, consider serving with fizzy lemon lime soda, which complements the dill pickle tones with its refreshing notes.

Incorporating a cold brew herbal tea, like a mint blend, can offer a smooth, balanced backdrop to the dill-forward bite.

Temperature matters in beverage pairings; aim to chill wines and non-alcoholic drinks slightly cooler than standard serving temperatures to offset the snack’s savory character.

For best results, serve beverages in elegant stemware to elevate the presentation and invite your guests into the tasting experience more fully.

Storage and Shelf Life

To maintain optimal crunchiness and freshness, store your Dill Pickle Chex Mix in an airtight container at room temperature, where it will last up to one week.

Temperature stability is key. Avoid placing the container in humid or excessively warm areas, as this can impact the texture and flavor negatively.

Consider a glass or stainless steel container for long-term storage, minimizing any potential plastic taste leeching into the mix.

Signs that the mix may be losing its pinnacle quality involve a damp or stale texture, indicating the need for a fresh batch.

To revive slightly stale mix, a quick five-minute bake at a low setting can restore the crispiness without much effort.

Freezing the mix is not generally recommended, as it may alter the texture, but it can be done in tightly sealed bags for up to a month.

Make Ahead Strategies


Preparing Dill Pickle Chex Mix in advance is straightforward. Begin by measuring and mixing the dry ingredients up to a day before.

Between steps, store pre-measured ingredients in airtight containers to maintain freshness before fully assembling the mix.

Pre-baking the mix may slightly impact the freshness, but with proper storage, it will retain its crunch and flavor for a short period.

Assembled, unbaked mix can be stored and then baked just before serving to maintain that fresh-bake appeal and aroma.

Upon reheating, ensure an even spread on your baking surface to maintain uniform flavor and texture distribution.

After reheating, refreshing the mix with a sprinkle of fresh dill or seasoning before serving can reinforce its vibrant taste.

Scaling Instructions


For smaller gatherings, halving the Dill Pickle Chex Mix recipe is straightforward by simply dividing ingredient amounts while maintaining the same equipment.

Doubling or tripling the recipe for large events may require additional baking sheets and mixing bowls to keep preparation times consistent.

Account for equipment adjustments, such as larger ovens or enhanced storage containers, when scaling up significantly to avoid uneven baking.

Timing modifications in baking may be necessary, observing for signs of golden brown uniformity as a cue rather than setting specific time increments.

When preparing larger quantities, ensure portions are mixed thoroughly to avoid inconsistent seasoning distribution throughout the batch.

Packaging in appropriate containers for scaled-up quantities ensures the mix remains fresh and enjoyable over extended periods.

Nutritional Deep Dive


The Dill Pickle Chex Mix provides a balanced nutritional profile, with carbohydrates from the cereal and protein from added nuts.

Micronutrient benefits, such as vitamin A from dill and essential minerals from nuts, contribute to an overall healthy snacking option.

The mix allows a controlled portion of energy from healthy fats in nuts while keeping other less nutritious snack options at bay.

When broken down, each portion presents a satisfying snack that can deter overindulgence by focusing on quality over quantity.

In dietary considerations, opt for wholegrain cereal variants for increased fiber content, enhancing digestive benefits.

For active individuals, this mix offers substantial snack satisfaction without derailing weight management goals due to its modest, nutrient-rich ingredients.

Dietary Adaptations


For gluten-free adjustments, select verified gluten-free Chex cereal varieties and ensure all seasoning ingredients are celiac-safe.

To achieve a dairy-free mix, substitute butter with a high-quality vegan butter alternative that maintains the mix’s rich flavor.

For vegan adaptation, confirm all ingredients, especially Worcestershire sauce, are vegan-certified or use known vegan alternatives.

Low-carb versions require substituting cereal with low-carb crunch options, available in specialty health food stores, while retaining the core dill pickle seasoning.

In a keto-friendly adaptation, focus on high-fat nuts and seeds, reducing cereal portions significantly in favor of dietary fat intake.

Paleo versions can focus on grain-free alternatives, using vegetables such as kale chips or coconut crisps with dill-enhanced nuts.

For low-FODMAP needs, modify ingredient selections in line with IBS-friendly guidelines, such as reducing garlic powder and using appropriate cereal options.

Troubleshooting Guide


If the mix turns soggy, consider reheating to evaporate any absorbed moisture, ensuring an open-air cool down to maintain crispness.

Dill overload can be rectified by mixing in additional base ingredients, balancing the flavor intensity to desired preference.

Temperature issues, such as uneven baking, may be solved with consistent check-ins and gently rotating baking trays for even drying.

Encounters with lacking crunch are often resolved through extended baking at a slightly decreased heat to balance cooking without burning.

Substitute confusion may require reevaluating ingredient compatibility, particularly with seasoning bases to retain the authentic flavor profile.

Timing concerns such as an overextended bake can be mitigated with preliminary recipe walkthroughs, establishing baking cues and signs.

Recipe Success Stories


Recently, home cooks have expressed delight in the Dill Pickle Chex Mix, celebrating its innovative flavor that refreshes traditional snack expectations.

Reader stories frequently share successful adaptations, discovering unique flavors by adding various seeds or choosing different nut varieties for added personalization.

Adaptations in photography showcase the mix’s versatility, where seasoned culinary influencers present their distinctive interpretations visibly, enhancing the visual appeal across diverse platforms.

Shared community engagements reveal consistent praise about the mix’s compete nutritional balance as a veteran snack favorite with new-age health consciousness.

Photography tips frequently accompany reader stories, noting the importance of natural light and ingredient dispersal for social media-ready captures.

Frequently Asked Questions

What variations can I try with this recipe?

Try adding different herbs or spices, light spice elements such as cayenne pepper, or include festive ingredients for seasonal twists.

How long does the Dill Pickle Chex Mix stay fresh?

When stored properly in an airtight container, your Chex Mix will remain fresh for up to a week.

Can I make this recipe gluten-free?

Certainly, use gluten-free Chex cereals and double-check all seasonings to accommodate a gluten-free diet seamlessly.

Is this recipe suitable for vegan diets?

Yes, with careful selection of vegan-friendly ingredients or using suitable substitutes, the snack can accommodate a vegan lifestyle.

Will this recipe store well if made in advance?

The mix’s shelf stability supports advance preparation for serving at your convenience and remains delicious and crisp for days.

What can I use instead of dill?

Consider using herbs like parsley or chives for a similar fresh taste that complements the mix’s textures.

How do I fix an overly tangy mix?

Incorporate additional Chex cereal for balance, gently baking again to refresh flavor harmony if necessary.

Why is my mix soggy?

Ensure proper air distribution during cooling processes to prevent moisture retention, reheating with a brief return to the oven for remediation.

What’s the best way to introduce the dill flavor?

Consistently toss the seasoning mix prior to adding it to the Chex, ensuring even dill distribution before baking.

How can I enhance the visual appeal of my Chex Mix?

Add colorful dried fruits or seeds, such as cranberries or pumpkin seeds, along with the mix for visual variation without altering flavor core elements.

Additional Resources


Enhance the recipe with aligned dishes such as dill-centric dips or savory spreads, extending your snack table variety.

Delve into other snack creation guides to advance your culinary expertise, applying professional techniques to perfect consistency and seasoning blends.

Ingredient insights, focusing on Chex variations or herbs like dill, will expand your flavor palette for future creative applications.

Keep up-to-date with innovative seasonings and kitchen gadgetry that continually enhance snacking experiences to modern, desirable levels.

Embrace seasonal shifts in ingredient availability, leveraging local freshness in respective applications for peak taste enhancement.

Join the Conversation


Harness the community’s collective creativity by sharing your own adaptations of the Dill Pickle Chex Mix on social media platforms.

Contribute feedback and reviews; each perspective enhances our collective culinary appreciation of this wonderfully tangy, engaging snack.

Join discussions on innovative camera techniques that highlight food aesthetics, rendering your homemade snack creations worthy of showcase.

Join forums dedicated to recipe exchanges, where enthusiasts and seasoned cooks alike can share their takes and inspire new interpretations.

Seize opportunities to connect with other food lovers globally, discovering variations beyond traditional borders for an ever-evolving flavorful journey.

The Recipe

Dill Pickle Chex Mix

Serves: 8-10

Prep Time: 10 mins

Cook Time: 30 mins

Total Time: 40 mins

Kitchen Equipment Needed

  • Large mixing bowl
  • Baking sheet
  • Measuring spoons
  • Oven
  • Air-tight container for storage

Ingredients

  • 4 cups of Chex cereal (Rice or Corn)
  • 2 cups of pretzel sticks
  • 1 cup of peanuts or mixed nuts
  • 1/4 cup of butter, melted
  • 2 tablespoons of dill pickle juice
  • 1 tablespoon of dried dill weed
  • 1 teaspoon of garlic powder
  • 1 teaspoon of onion powder
  • Salt and pepper to taste

Directions

  1. Preheat your oven to 300°F (150°C) to prepare for a gentle, even bake.
  2. In a large mixing bowl, combine Chex cereal, pretzel sticks, and nuts.
  3. In another small bowl, mix melted butter, dill pickle juice, dried dill, garlic powder, onion powder, salt, and pepper until well-blended.
  4. Pour the seasoning mixture over the cereal mix, thoroughly coating all pieces by tossing gently.
  5. Spread the mixture evenly onto a baking sheet.
  6. Bake in the preheated oven for 30 minutes, stirring every 10 minutes to ensure even cooking.
  7. Remove from the oven and allow to cool before serving or storing in an airtight container.

Recipe Notes

  • For a spicier version, add 1/4 teaspoon of cayenne pepper to the seasoning mix.
  • For best results, ensure nuts are fresh to maintain optimal flavor and texture.
  • The recipe is flexible; feel free to add or remove ingredients based on personal preference or dietary needs.

Delicious Homemade Hamburger Steaks with Savory Onion Gravy Recipe

Hamburger Steaks with Onion Gravy: A Comfort Classic

⚖️
Difficulty
Easy

⏲️
Prep Time
15 mins

🕒
Cook Time
30 mins

⏱️
Total Time
45 mins

🍽️
Servings
4

Indulge in the savory goodness of Hamburger Steaks with Onion Gravy, the ultimate comfort food for any night of the week. This dish brings together perfectly seasoned beef patties simmered in a luscious, rich onion gravy. The tender hamburger steaks are cooked just right, providing a delightful texture that pairs beautifully with the velvety smooth sauce. You’ll love the classic flavors and warmth that this meal brings to your dinner table.

Quick Recipe Highlights

  • Flavor Profile: Juicy beef patties are smothered in a robust onion gravy, delivering a savory and slightly sweet taste.
  • Texture: The hamburger steaks are juicy and tender, while the gravy adds a silky mouthfeel.
  • Aroma: The dish fills your kitchen with enticing notes of sautéed onions and thyme.
  • Visual Appeal: Golden-brown steaks draped in a glossy, amber-hued gravy make a visually comforting presentation.
  • Skill Level Needed: Basic cooking skills required; anyone can master this comforting dish.
  • Special Equipment: A cast-iron skillet is recommended for even cooking and flavor enhancement.

Recipe Overview

  • Difficulty Level: Easy; it involves straightforward cooking techniques perfect for beginners.
  • Category: Main course; perfect for dinner with family or friends.
  • Cuisine: Rooted in American comfort food traditions, with influences of classic French techniques for the gravy.
  • Cost: Budget-friendly; utilizes common, affordable ingredients such as ground beef and onions.
  • Season: Ideal for fall and winter, providing warmth and heartiness during cooler months.
  • Occasion: Suitable for weeknight dinners or as a homely dish to impress guests.

Why You’ll Love This Recipe

The taste of Hamburger Steaks with Onion Gravy is a flavor explosion, combining the umami of beef with the sweet, caramelized flavor of onions. The contrasting textures of tender steaks and smooth gravy make every bite a pleasure. This recipe is convenient and quick, taking less than an hour from start to finish, making it perfect for busy weeknights. Nutritionally, it’s a good source of protein and iron, essential for a balanced diet. This dish is wonderfully versatile in terms of serving, making it a great choice for family meals and entertaining.

Hamburger Steaks with Onion Gravy is a cost-effective recipe that relies on simple, inexpensive ingredients, making it accessible for those on a budget. Its ease of preparation means you’ll spend more time enjoying with loved ones rather than stuck in the kitchen. Served alongside creamy mashed potatoes or a crusty slice of bread to sop up the gravy, it provides a comforting and rustic dining experience that guests will remember.

Historical Background and Cultural Significance

This recipe traces its roots back to the early 20th century, when American diners sought hearty meals that were both affordable and delicious. The hamburger steak is said to have emigrated from Germany in the form of frikadeller and evolved into its current form in the States. As for the onion gravy, it borrows French culinary techniques, indicating a fascinating blend of traditions. Over the years, this dish has become a staple in American households, symbolizing hearty, uncomplicated home cooking.

The cultural importance of this dish is profound in the U.S., being a nostalgic reminder of family meals and comfort. It’s a prime example of traditional cooking that embodies simplicity while delivering satisfying flavors. Various regional adaptations have introduced elements like mushrooms or garlic to enrich the gravy, demonstrating its versatile appeal.

Ingredient Deep Dive

Ground beef is the star of the hamburger steaks, providing richness and depth thanks to its inherent fat content. Historically, beef has been a staple protein in American diets, valued for its versatility. When selecting ground beef, opt for a medium fat content for juiciness. Store it refrigerated and consume within a couple of days, or freeze for longer storage. For substitutes, ground turkey offers a lower-fat alternative.

Onions are indispensable in this recipe, offering their sweet, caramelized notes to the gravy. Known for their widespread use across cuisines, onions add a subtle depth to dishes. Choose firm, dry bulbs for the best quality and store them in a cool, dry place. If unavailable, shallots can serve as a flavorful substitute.

Common Mistakes to Avoid

  • Avoid using lean ground beef, as it can result in dry steaks. Choose a fat content of at least 15%.
  • Don’t rush the onion caramelization process; allow onions to cook slowly for optimal flavor.
  • Ensure your skillet is hot before adding the steaks to achieve a good sear and lock in juices.
  • Overcrowding the pan with steaks can lead to steaming rather than searing.
  • Do not overmix the meat mixture; doing so can make the steaks tough.
  • Avoid skipping the resting period for cooked steaks, as it redistributes juices evenly.
  • Under-salting can be corrected, but over-salting cannot; taste as you season.
  • Using stale or low-quality beef results in a lackluster flavor experience.

Essential Techniques

Mastering the art of onion caramelization is crucial. Properly caramelized onions should be deeply browned and sweet, forming the foundation of flavor for the gravy. Cook them slowly over low heat to draw out natural sugars and develop the best aroma. Avoid a high flame, which could burn or over-crisp the onions rapidly.

Searing the steaks is another vital technique. A seared exterior enhances flavor and texture. To achieve this, heat your skillet until very hot before adding the steaks, test with a sprinkle of water to hear it sizzle. Common pitfalls include flipping the steaks too early—let a crust form first—and overcrowding.

Pro Tips for Perfect Hamburger Steaks with Onion Gravy

For ultra-tender steaks, consider adding a tablespoon of breadcrumbs to the beef mixture. Allowing the uncooked patties to chill for 30 minutes firms them up, maintaining shape while cooking. Utilize a generous herb selection in both the meat and gravy for added depth.

Use beef broth instead of water in the gravy for enhanced flavor. A splash of Worcestershire sauce can add a complex umami note to the gravy. Make sure to rest the steaks for a few minutes post-cooking for even juicier results.

Variations and Adaptations

Explore regional variations by adding sautéed mushrooms to the onion gravy, providing earthy tones typical of Midwest American cuisine. For a seasonal twist, incorporate grated carrots or parsnips into the gravy during colder months. A gluten-free adaptation can be made by using rice flour for thickening the gravy instead of all-purpose flour.

Experiment with different herbs in the meat mixture such as dill or tarragon to alter flavor profiles. Texture modifications can be achieved by adding a touch of cream to the gravy for a silkier finish. Present the dish over polenta or rice for a modern, beautiful serving approach.

Serving and Presentation Guide

Consider serving Hamburger Steaks with Onion Gravy on a rustic wooden board to enhance its homely appeal. Garnish with fresh chopped parsley or thyme for a pop of color and inviting aroma. Traditionally accompanied by mashed potatoes, some choose steamed green beans or buttered carrots as modern side options.

Maintain ideal serving temperatures to preserve the dish’s flavors—lukewarm is not ideal. Balance portion control by serving a single steak per person, supplemented by plentiful sides for a comforting balance.

Wine and Beverage Pairing

Rich red wines like Cabernet Sauvignon can complement the hearty flavors of the steak and gravy. For non-alcoholic options, a chilled glass of sparkling apple cider pairs well, offering a crisp contrast. Tea enthusiasts may enjoy a bold black tea which accents the dish’s savory elements.

Temperature is key; serve beverage pairings slightly cooled, so they complement rather than overpower the meal flavor profile.

Storage and Shelf Life

Store leftover Hamburger Steaks with Onion Gravy in an airtight container in the refrigerator, maintaining quality for up to three days. Always ensure the dish is fully cooled before sealing to prevent moisture buildup. Signs of spoilage include an off smell or grey hue to the gravy.

For reheating, gently warm on the stove over medium-low heat, adding a splash of water or broth to rejuvenate the gravy’s consistency. If freezing, wrap airtight and consume within three months for best results, thawing overnight before reheating.

Make Ahead Strategies

Prepare hamburger patties a day ahead to save time, storing refrigerated until ready. Assemble components of the gravy without the liquid, and cook when convenient. Once cooked, the entire dish reheats well without compromising quality. If reassembly is necessary, reserve fresh herbs for final addition to retain their aromatic punch.

Reheating is most successful using stovetop methods to prevent over-zapping of beef in the microwave. A sprinkle of chopped fresh thyme or parsley can freshen the reheated dish.

Scaling Instructions

For halved recipes, reduce ingredient measures accordingly; do not reduce cooking times, as this ensures proper texture development. Doubling the recipe requires ample skillet space, or cook in batches to maintain quality. Adjust seasoning progressively to suit larger yields.

Properly storing extra portions necessitates high-quality storage containers to maintain freshness. Consider utilizing a vacuum sealer for ideal preservation. When scaling, remain mindful of equipment capacities and preparation space limitations.

Nutritional Deep Dive

Hamburger Steaks with Onion Gravy offer a significant protein boost, with reasonable fat content for sustaining energy levels. The onions contribute key vitamins like vitamin C and antioxidants. For health-conscious diners, moderate portion sizes and supplementary steamed vegetables can uplift the dish’s nutritional profile.

A beneficial macro breakdown shows adequate carbs, derived mainly from the gravy and potential carbohydrate accompaniments. Weight management is supported by mindful consumption, considering portion sizes in relation to daily caloric needs.

Dietary Adaptations

For a gluten-free version, gluten-free breadcrumbs and rice flour are viable substitutions. Dairy-free adaptations exclude any butter used in the gravy; substitute plant-based alternatives. Vegans can replicate savory flavors with plant-based ground meats and non-dairy gravy enhancers.

Low-carb seekers should pair the steak with sides like cauliflower mash instead of traditional potatoes. Each adaptation ensures the essence of the dish remains intact, respecting various dietary preferences and health needs.

Troubleshooting Guide

For texture issues, if steaks turn out dry, assure you are not overcooking and check for sufficient fat content in the beef. If flavor lacks depth, assess the seasoning, particularly of the gravy; sometimes a pinch more salt or Worcestershire sauce can balance flavors effectively.

Equipment like pans should be non-stick or well-seasoned cast iron to prevent sticking, and ensure even heating. Timing disputes often arise if multitasking; set timers or practice mise en place to streamline your cooking process. Ingredient substitutions, handled adeptly, should align with preferences while respecting traditional flavors.

Recipe Success Stories

A community favorite, readers frequently rave about the recipe’s ease and flavorful results. Variations submitted include chicken-based versions and pepper-infused gravies, maintaining the dish’s versatility. Reader tips often highlight using fresh-cut herbs from backyard gardens, adding a personal touch to each preparation.

Photography enthusiasts capture the dish on vintage-style dinnerware, enhancing its nostalgic appeal. Engaging social media shares frequently feature different plating techniques, encouraging vibrant community engagement around this classic recipe.

Frequently Asked Questions

Q: Can I make the hamburger steaks ahead of time?
Absolutely, you can prepare the beef patties in advance and refrigerate them for up to a day. This helps the flavors meld and simplifies preparation on the cooking day.

Q: Are there vegetarian alternatives to this recipe?
Yes, you can substitute the beef patties with vegetarian-friendly options like portobello mushrooms or store-bought plant-based patties. Adjust seasonings in the onion gravy to align with these alternatives.

Q: How do I thicken the onion gravy if it’s too runny?
For a thicker consistency, mix a small amount of cornstarch or flour with cold water to create a slurry, then gradually whisk it into the simmering gravy.

Q: What can I pair with the steaks apart from mashed potatoes?
Popular alternatives include sautéed greens, such as spinach or kale, a crisp salad for contrast, or a warm grain side like quinoa or rice pilaf.

Q: Can I cook these on a grill instead of a skillet?
While traditionally cooked in a skillet for the perfect crust and flavor integration with gravy, grilling is possible. Ensure the patties are firm enough to hold together without crumbling.

Q: What herbs pair best with this dish?
Thyme and rosemary work excellently with beef, enhancing the savory profile, while parsley is perfect for garnishing, adding freshness and color to the plate.

Q: Is there a low-sodium version available?
To lower sodium, opt for low-sodium beef broth and reduce added salt. Limiting Worcestershire and soy sauce usage can also preserve flavor while minimizing sodium intake.

Q: Can I substitute caramelized onions with onion powder?
While onion powder lacks the depth and sweetness of caramelized onions, you can use it sparingly to flavor the patty mixture but not for the gravy itself.

Q: How do I prevent the patties from falling apart?
Ensure the ground beef mix has cohesion. Adding breadcrumbs and chilling the patties before cooking greatly aids in maintaining their structural integrity.

Q: How can I make this dish spicy?
For added heat, incorporate chopped chili peppers or a pinch of cayenne into the beef mix. Spicing up the gravy with a splash of hot sauce is also an option.

Additional Resources

Explore related recipes such as Salisbury Steak or Beef stroganoff for similar flavor profiles with unique twists. Discover detailed guides on cooking techniques like pan-searing and caramelization for perfect execution every time. Ingredient insights on quality beef selection and onion varietals can further enhance cooking proficiency.

Equipment suggestions include high-quality cast-iron skillets for unmatched heat retention and distribution. Seasonal variations align this dish with culinary updates, enhancing year-round enjoyment.

Join the Conversation

Engage with us on social media by sharing your Hamburger Steaks with Onion Gravy photos and tips. Discover photography ideas that highlight the dish’s comforting nature. Submit your recipe reviews and connect with fellow readers who’ve tried exciting variations. We encourage community interaction, fostering a space for sharing techniques and serving suggestions.

The Recipe

Hamburger Steaks with Onion Gravy

Serves: 4

Prep Time: 15 mins

Cook Time: 30 mins

Total Time: 45 mins

Kitchen Equipment Needed

  • Cast-iron skillet
  • Mixing bowls
  • Wooden spoon
  • Tongs

Ingredients

  • 1 lb ground beef (80% lean)
  • 1 onion, thinly sliced
  • 3 tablespoons all-purpose flour
  • 1 cup beef broth
  • 1 tablespoon Worcestershire sauce
  • Salt and pepper, to taste
  • 2 tablespoons olive oil
  • Fresh thyme, for garnish

Directions

  1. In a bowl, mix ground beef with salt, pepper, and a tablespoon of Worcestershire sauce. Form into 4 patties.
  2. Heat olive oil in a cast-iron skillet over medium heat. Add the patties and cook until browned, about 4 minutes per side. Remove from skillet and set aside.
  3. Add sliced onions to the same skillet, cooking until caramelized.
  4. Stir in flour, cooking for an additional minute to form a paste.
  5. Slowly add beef broth, stirring to make a smooth, thick gravy. Season with salt and pepper.
  6. Return the patties to the skillet, spooning gravy over the top. Simmer for 10 minutes. Garnish with fresh thyme before serving.

Recipe Notes

  • Ensure patties reach an internal temperature of 160°F for safety.
  • Consider adding a splash of cream to the gravy for an extra-rich finish.
  • Leftover gravy makes an excellent addition to mashed potatoes or rice.

Delightful Crispy Parmesan Artichoke Hearts for a Flavorful Snack

Crispy Parmesan Artichoke Hearts: A Savory Delight You’ll Love

⚖️
Difficulty
Easy

⏲️
Prep Time
15 mins

🕒
Cook Time
20 mins

⏱️
Total Time
35 mins

🍽️
Servings
4

Welcome to a delightful journey through flavors with this Crispy Parmesan Artichoke Hearts recipe. This dish combines the nutty richness of Parmesan with the tender heart of the artichoke, creating a perfect appetizer or side dish that will captivate any palate. Perfectly seasoned and delightfully crispy, these artichoke hearts are a testament to simple ingredients yielding extraordinary results.

Whether you are hosting a dinner party or just want to enjoy a snack that is both wholesome and flavor-packed, this recipe is your answer. The crisp outside contrasts wonderfully with the soft, savory inside, creating a harmony of textures that’s hard to resist. Buttery, with a hint of garlic and herbs, these artichoke hearts are a versatile dish you’ll find yourself making repeatedly.

Diving into the world of artichoke hearts is not only about their flavor but also about discovering their nutritional benefits. Rich in fiber, vitamins, and antioxidants, they are an excellent choice for a health-conscious foodie. With the Parmesan adding calcium and protein, this dish offers more than just a satisfying taste—it’s also a boon for your well-being.

Quick Recipe Highlights

  • Flavor Profile: The beautifully crispy Parmesan crust provides a nutty, savory punch, while the artichoke delivers a mild, earthy taste, perfectly balanced with hints of garlic and herbs.
  • Texture: Experience the satisfying crunch of the outer layer, juxtaposed against the soft, tender artichoke center, a genuine textural masterpiece.
  • Aroma: Let the inviting scent of baked Parmesan and herbs mingle with the subtle fragrance of artichoke, creating an aromatic symphony.
  • Visual Appeal: Golden brown and inviting, with specks of green herbs, this dish is as visually appealing as it is delicious, perfect for elevating any table setting.
  • Skill Level Needed: Simple and straightforward, this recipe requires basic kitchen skills, making it accessible for cooks of all levels.
  • Special Equipment: No complex gadgets needed—just a baking sheet, oven, and basic prepping tools, ensuring ease of preparation.

Recipe Overview

  • Difficulty Level: This recipe lands on the easier side, requiring minimal techniques and basic kitchen tools, making it an excellent choice for novice cooks or anyone short on time.
  • Category: Appetizer or side dish, this recipe shines in versatile roles, perfect for starting a meal or complementing a main course.
  • Cuisine: Rooted in European culinary traditions, this dish combines classic Italian ingredients with a creative twist, bringing the art of simplicity to the fore.
  • Cost: Economical and accessible, the main ingredients are cost-effective, making this a budget-friendly yet gourmet option for any occasion.
  • Season: Ideal year-round, but particularly satisfying in spring when artichokes are at their peak freshness.
  • Occasion: Great for casual gatherings, special dinners, or holiday feasts, these artichoke hearts are a versatile addition to any menu.

Why You’ll Love This Recipe

The taste and texture make this dish an unforgettable experience. The crispy Parmesan crust enveloping the tender, earthy artichoke creates a magnificent culinary combination that satisfies both crunchy and creamy cravings. It’s a delightful snack or starter that feels indulgent yet light enough to leave room for the main course.

This recipe is a breeze to prepare, requiring minimal ingredients and effort. The straightforward prep work means you can easily whip up a batch even on a busy weeknight or as a last-minute appetizer for guests, proving that fantastic food doesn’t have to take hours in the kitchen.

Nutritionally, the combination of artichokes and Parmesan offers a feast of fiber, antioxidants, and essential nutrients. Artichokes are known for their health-boosting qualities, with benefits ranging from improved digestion to heart health, while Parmesan adds a dose of calcium and protein to your meal.

Socially, this dish is a guaranteed crowd-pleaser. The unique blend of flavors and textures is sure to start conversations and bring people together over shared appreciation for great food. Ideal for parties and gatherings, it’s a dish that encourages communal enjoyment and engagement.

From a cost perspective, this is a highly affordable yet elegant recipe. The ingredients are easily available and budget-friendly, allowing you to create a luxurious dish without breaking the bank, making it a fantastic option for frequent enjoyment.

Historical Background and Cultural Significance

The origins of artichokes trace back to the Mediterranean region, where they have been cultivated for centuries. Known for their health properties and unique taste, artichokes have long been a staple in Italian and French cuisines. This recipe is a homage to these culinary traditions, bringing a beloved ingredient into modern kitchens with a simple, flavorful twist.

Culturally, artichokes have been a symbol of good taste and class across many European societies. The addition of Parmesan cheese, hailing from Parma in Italy, further deepens the cultural ties, as this cheese is a respected hallmark of Italian cuisine, celebrated for its nutty and savory qualities.

As food trends evolved, so did the preparation methods of artichokes. This crispy variant is an evolution from traditional steaming or boiling, offering a contemporary approach that highlights different textures and flavors, catering to modern palates that appreciate contrast and crunch.

Regionally, variations of this recipe exist, incorporating local herbs or cheeses, making each rendition unique to its locale. This adaptability showcases the recipe’s versatility and the universal appeal of combining crispy and creamy elements, ensuring its continued popularity across generations.

Ingredient Deep Dive

Artichokes are more than just a tasty ingredient; they’re steeped in history and symbolism. Known for their health benefits, they have been a staple in Mediterranean diets for centuries. Packed with fiber, vitamin C, and antioxidants, they are celebrated for aiding digestion and promoting heart health. Selecting petite, firm artichokes ensures the best flavor and texture for this recipe.

The star of this dish’s crispy coating, Parmesan cheese, brings its own rich legacy. Originating from the Parma region in Italy, this cheese is renowned for its nutty flavor and granular texture. It is an excellent source of calcium and protein, complementing the artichoke’s nutrients. For best results, choose fresh Parmesan and store it in a cool, dry place to maintain its integrity and flavor.

Substituting Pecorino Romano for Parmesan introduces a sharper taste, while using panko breadcrumbs can add extra crunch to the coating. These options ensure flexibility in flavor and texture profiles, allowing for customization based on dietary preferences or availability of ingredients.

Common Mistakes to Avoid

  • Skipping the pat dry step for artichokes can result in a soggy coating. Ensure they are thoroughly dried for maximum crispiness.
  • Overcrowding the baking sheet is a common mistake that leads to uneven cooking. Leave plenty of space between each piece for optimal results.
  • Undercooking the artichokes may leave them tough; follow the recommended temperature and time for best results.
  • Using pre-grated Parmesan cheese can affect the flavor and texture negatively. Opt for freshly grated for a superior taste.
  • Not preheating the oven might lead to uneven cooking, so ensure it’s fully preheated before baking.
  • Ignoring seasoning can lead to a bland dish. This recipe thrives on the balance of spices and cheese, so season generously.
  • If substituting ingredients, ensure compatibility with flavors to maintain the dish’s balance and appeal.
  • Avoid reheating in the microwave as this impacts the texture; opt for an oven or air fryer to maintain crispiness.

Essential Techniques

The pat dry technique for artichokes is crucial to ensure that the coating adheres properly and crisps up in the oven. Use paper towels to gently but thoroughly dry the artichokes after draining, which helps prevent the dreaded soggy crust.

Properly preheating the oven is essential for achieving the perfect golden brown crisp. A well-heated oven ensures even cooking, making sure the Parmesan crisps up nicely around the artichoke hearts.

Mastery of seasoning balance is key in this dish. The right amount of garlic powder, salt, and pepper enhances the natural flavors without overpowering the subtle artichoke taste.

Understanding visual cues for doneness, such as a golden brown color and audible sizzling, can guide you to know when the artichokes are perfectly cooked, creating a satisfying crunch with each bite.

Pro Tips for Perfect Crispy Parmesan Artichoke Hearts

Enhance the flavor by adding a pinch of red pepper flakes to the coating mix for a bit of heat that complements the cheesy crust beautifully.

Experiment with different cheese blends, such as adding grated Asiago for a punchier flavor alongside the Parmesan.

To maintain the crisp texture, serve immediately after baking. If you’re preparing in advance, reheat briefly in the oven to restore perfect crispiness.

For a richer flavor, lightly drizzle truffle oil over the artichokes after baking, adding an earthy, luxurious note to the dish.

To ensure even coating, use your hands to press the Parmesan mixture into each artichoke heart firmly, ensuring it sticks well before baking.

Consider pairing with a lemon aioli dip for an additional flavor layer, enhancing the savory aspects of the dish with tangy, creamy goodness.

Variations and Adaptations

Create a Mediterranean-inspired version by incorporating dried oregano and basil into the breadcrumb mixture, bringing a herby aroma that complements the Parmesan beautifully.

Adapt the recipe for winter by adding a touch of rosemary and thyme for an earthy, hearty take that pairs well with cozy, colder days.

For a vegan alternative, use nutritional yeast instead of Parmesan and flaxseed meal or aquafaba as a binder, ensuring the same crispy texture and robust flavor without dairy.

Add a pop of flavor without changing the core recipe by sprinkling lemon zest into the Parmesan mix, providing a fresh citrus note that enhances each bite beautifully.

Play with presentation by stacking artichoke hearts on skewers for a fun, party-friendly dish that offers visual appeal without compromising taste or texture.

Serving and Presentation Guide

For an elegant serving presentation, arrange the crispy artichokes in a circular pattern on a white plate, garnished with fresh parsley for a pop of color against the golden brown crust.

Consider garnishing with lemon wedges or fresh basil leaves, adding an aromatic and visual flourish that invites diners to indulge.

Pair with a light salad using mixed greens, cherry tomatoes, and a simple vinaigrette to balance the richness of the artichokes with refreshing flavors.

Traditionally served hot to maintain crispness, they can also be enjoyed at room temperature, making them versatile for buffet-style or casual settings.

For portion control, consider serving in small ramekins or on individual appetizer plates, allowing each guest to savor their own share without overindulging.

Wine and Beverage Pairing

Pairing this dish with a crisp white wine such as Sauvignon Blanc or a light-bodied Chardonnay will highlight the nutty Parmesan and delicate artichoke flavor, enhancing the overall experience.

Non-alcoholic options like sparkling water with a slice of lemon or apple cider provide refreshing contrasts, maintaining the palate’s brightness with each bite.

For a comforting alternative, serve with a light green tea or herbal tea blend that complements the dish’s savory elements without overwhelming the taste profile.

Consider the temperature of beverages to ensure they refresh the palate; chilled wines or cool teas are ideal alongside warm, crispy artichokes.

Serve the beverages in appropriate glasses, enhancing the dining ambiance and allowing diners to experience the pairing fully.

Storage and Shelf Life

To store these crispy treats, place them in an airtight container lined with paper towels to absorb excess moisture, extending their shelf life in the refrigerator for up to three days.

Keep at a stable temperature to ensure they remain fresh and avoid placing near odorous foods that might impact flavor absorption.

For preservation, consider freezing the artichokes before baking. When you’re ready to serve, thaw them in the refrigerator and bake to enjoy the same crispness.

Watch for signs of spoilage, such as off-odors or growing mold, indicating they are no longer safe to eat.

When reheating, use an oven set to around 350°F for best results, restoring that delightful crispiness without making them chewy.

Make Ahead Strategies

Prepare the artichoke hearts up to a day in advance by cleaning and seasoning them, storing them in the refrigerator until you’re ready to coat and bake.

Prepare the Parmesan mixture ahead of time and store in an airtight container, allowing you to save time during meal prep and ensuring consistent flavors.

Consider baking a test batch a day before serving to perfect timing and flavor adjustments, improving confidence and satisfaction with the final dish.

Reheat in the oven briefly on serving day to melt the cheese and restore crispness, offering an easy make-ahead solution that doesn’t compromise quality.

Freshen up with a sprinkle of fresh herbs or a drizzle of olive oil before serving, ensuring vibrant flavors and textures for your guests.

Scaling Instructions

For a smaller yield, halve the recipe using precise measurements for seasoning and cheese, ensuring the flavors remain well-balanced and the coating is sufficiently crispy.

To cater to a larger group, double or triple the ingredient quantities while maintaining cooking techniques and adjusting oven time based on increased batches.

For larger batches, consider using multiple baking sheets and rotating them in the oven to ensure even baking and consistency across all artichoke pieces.

Store any unused ingredients appropriately to extend their usability for future recipes, ensuring nothing goes to waste and maximizing your budget.

With large batches, consider serving in stages to maintain optimal temperature and freshness, allowing each serving to be enjoyed piping hot.

Nutritional Deep Dive

Each serving of Crispy Parmesan Artichoke Hearts offers a balanced macro breakdown, with carbohydrates from breading, protein from cheese, and healthy fats, creating a nutrient-dense dish that satisfies hunger.

Artichokes provide an excellent source of fiber, aiding in digestion and promoting satiety, with low calorie content supporting weight-management goals.

Parmesan cheese offers high levels of calcium and protein, contributing to bone health and muscle maintenance, while its rich flavor adds significant taste without requiring large quantities.

The dish holds antioxidant properties, thanks to the artichokes, which are linked to a range of health benefits, from reducing inflammation to supporting liver function.

For conscious portion control, enjoy as part of a balanced meal rather than a standalone snack, ensuring nutritional needs are met without excess intake.

Dietary Adaptations

For a gluten-free version, replace breadcrumbs with gluten-free panko or almond flour, maintaining texture and flavor while accommodating dietary restrictions.

To create a dairy-free alternative, employ nutritional yeast in place of Parmesan and use dairy-free butter or olive oil to support the coating process.

Vegans can replace Parmesan with a mix of ground nuts and nutritional yeast for a similar nutty flavor, ensuring an inclusive approach without sacrificing taste.

For a low-carb/keto option, consider using crushed pork rinds or a nut-based crumb topping, maximizing the recipe’s appeal across various dietary landscapes.

Paleo followers can enjoy this dish with slight modifications, such as using arrowroot flour and coconut oil, ensuring adherence to dietary guidelines without losing flavor.

Troubleshooting Guide

  • If the coating isn’t sticking, ensure artichokes are thoroughly dried and you’ve firmly pressed the Parmesan mixture onto them before baking.
  • For flavor imbalances, adjust with additional seasonings like lemon zest or fresh herbs to enhance the taste without overpowering the artichoke’s natural flavor.
  • To address temperature issues, preheat your oven completely before introducing the artichokes to ensure they cook evenly to the desired crispness.
  • If you’re facing equipment challenges, remember, alternate methods like air frying can also yield crispy results, offering flexibility in cooking styles.
  • Ingredient substitutions such as alternative crumbs require adjustments in seasoning balance to maintain flavor intensity and crispiness.
  • Pay attention to timing concerns by using a timer and checking visual cues, like toastiness, to prevent under or overcooking the artichokes.

Recipe Success Stories

Our community of readers can’t get enough of these delectable, Crispy Parmesan Artichoke Hearts! Janet from Texas shared her variation of using gluten-free breadcrumbs, bringing a smile to her gluten-sensitive guests’ faces as they enjoyed each crispy bite.

Adapting for a keto diet, Mark from Ohio substituted almond flour for breadcrumbs, finding it added a delightful nuttiness that paired beautifully with the artichokes, providing a luxurious snack experience.

Frances in California recommended serving these artichoke hearts at her last holiday gathering, where they were a hit amongst both adults and kids, making for memorable culinary conversation starters.

Readers have experimented with various photography tips, capturing the artichokes’ beautiful golden crust and sharing their images across social media platforms, sparking inspiration for fellow home cooks.

Suggestions pour in for creative uses of leftover artichokes, from creating artichoke quiche to adding them to salads, showcasing the versatility and community enthusiasm for making the most of this recipe.

Frequently Asked Questions

How do I ensure the artichoke hearts remain crispy?
To maintain crispness, serve the artichokes immediately after baking. If reheating, use an oven or air fryer instead of a microwave to avoid sogginess.

Can I prepare these artichoke hearts in advance?
Yes, you can prepare them up to a day in advance by seasoning and storing them; coat and bake right before serving for best results.

Are there substitute options for Parmesan cheese?
Pecorino Romano offers a sharper, similar taste, while nutritional yeast is a great alternative for vegan diets.

How should I store leftovers?
Store in an airtight container lined with paper towels to absorb moisture, keeping them fresh in the refrigerator for 2-3 days.

Is there an alternative cooking method?
Yes, an air fryer can provide similar crispiness with less oil, cooking them at 375°F for about 15 minutes.

What wine pairs best with this dish?
A crisp Sauvignon Blanc or a light-bodied Chardonnay complements the nutty, savory flavors of the Parmesan.

Can I use canned artichokes?
While fresh artichokes offer the best texture, canned artichokes can be used if thoroughly dried to ensure the coating adheres properly.

How do I prevent the crumbs from falling off?
Ensure artichokes are properly dried and press the coating firmly onto them; refrigerating before baking helps adherence.

Are these artichokes freezer-friendly?
You’re better off freezing them before baking. Thaw in the fridge and bake when ready to enjoy optimum texture.

What can I serve with these artichokes?
A lemon aioli or a light yogurt-based dip complements their flavors, adding a refreshing contrast to this savory dish.

Additional Resources

Explore related recipes like our Roasted Garlic Aioli, perfect for dipping these artichokes as well as our other crisp vegetable sides that provide similar satisfaction and balance.

Utilize our technique guides to master crispy coatings and seamless baking methods, ensuring consistent results across various recipes.

Discover ingredient information that delves into the benefits and selection tips for artichokes, helping you make informed choices at the market.

Consider our equipment recommendations for baking essentials, enhancing efficiency and ease in the kitchen without unnecessary clutter.

Adapt recipes with seasonal variations for creativity and freshness whatever the time of year, ensuring robust flavors remain in focus.

Join the Conversation

Share your Crispy Parmesan Artichoke Hearts creations on social media, using our dedicated hashtag to join a community of enthusiastic cooks sharing their takes on this delightful dish.

Engage by reviewing the recipe and offering your unique insights, fostering a space where fellow readers can learn, adapt, and share experiences.

Participate by submitting your photography tips for capturing the dish’s golden crunchy allure, providing inspiration and encouragement for all food lovers.

Join in our community discussions around the myriad variations of this recipe and other artichoke-based dishes, contributing to a growing repository of culinary creativity.

Connect with other readers to share your adaptations and come up with new ideas to further enhance this timeless recipe, embracing the art of communal cooking and sharing.

The Recipe

Crispy Parmesan Artichoke Hearts

Serves: 4

Prep Time: 15 mins

Cook Time: 20 mins

Total Time: 35 mins

Kitchen Equipment Needed

  • Baking sheet
  • Parchment paper
  • Mixing bowls
  • Grater
  • Oven

Ingredients

  • 1 can (14 oz) artichoke hearts, drained and patted dry
  • 1 cup freshly grated Parmesan cheese
  • 1 cup panko breadcrumbs
  • 1 teaspoon garlic powder
  • Salt and pepper to taste
  • 2 tablespoons olive oil
  • 1 tablespoon chopped fresh parsley, for garnish

Directions

  1. Preheat your oven to 400°F (200°C) and line a baking sheet with parchment paper.
  2. In a bowl, combine the Parmesan, breadcrumbs, garlic powder, salt, and pepper.
  3. Dip each artichoke heart in olive oil, then roll in the Parmesan mixture until evenly coated.
  4. Place the coated artichokes on the prepared baking sheet, ensuring they are not touching.
  5. Bake for 20 minutes or until the coating is golden brown and crispy.
  6. Remove from the oven, transfer to a serving platter, and garnish with chopped parsley.

Recipe Notes

  • For extra flavor, add a pinch of red pepper flakes to the Parmesan mixture.
  • Store leftovers in an airtight container in the fridge for up to 3 days.
  • Reheat in the oven to restore crispiness; avoid microwaving as it may soften the coating.

Delicious Greek Chicken Meatballs with Refreshing Homemade Tzatziki Recipe

Greek Chicken Meatballs with Homemade Tzatziki: A Journey to the Mediterranean

⚖️
Difficulty
Moderate

⏲️
Prep Time
20 mins

🕒
Cook Time
30 mins

⏱️
Total Time
50 mins

🍽️
Servings
4

The lovely balance of tender Greek Chicken Meatballs with Homemade Tzatziki promises a delightful culinary experience. With a harmonious blend of fresh herbs, garlic, and zesty lemon, these meatballs encapsulate the vibrant tastes of the Mediterranean region. Paired with a creamy and refreshing homemade tzatziki, this dish is perfect for those seeking an authentic taste of Greece with flavors that excite your palate. Easy to prepare, these juicy meatballs not only pack a punch of flavor but are also visually appealing, making them an ideal choice for family dinners and get-togethers.

Experience the allure of Greek cuisine with these comforting chicken meatballs. The nutritious and filling quality of this meal caters to a variety of diets, ensuring everyone at the table leaves satisfied. Drawing from traditional Greek culinary methods, this recipe is packed with fresh ingredients that enhance each element’s natural taste. These meatballs are perfect served in a pita or alongside roasted vegetables, topped with a dollop of tzatziki sauce that adds a refreshing zing, ensuring a meal packed with textures and a stunning array of flavors.

Quick Recipe Highlights

  • Flavor Profile: A medley of lemon, garlic, and fresh herbs infuses these meatballs with bold and exciting flavors, complemented perfectly by the coolness of tzatziki.
  • Texture: These meatballs are wonderfully moist and tender, while the tzatziki adds a creamy touch with a subtle crunch from cucumbers.
  • Aroma: A delightful aroma of garlic mixed with fresh herbs wafts from the meatballs, creating a warm and inviting scent that draws you in.
  • Visual Appeal: The golden-brown meatballs contrast beautifully with the bright white tzatziki, enhanced by vibrant green herbs and flecks of cucumber.
  • Skill Level Needed: Fairly simple to execute, requiring basic cooking and knife skills with an eye for seasoning balance.
  • Special Equipment: A food processor and a skillet will be your best options to seamlessly mix and cook these delightful meatballs.

Recipe Overview

  • Difficulty Level: This recipe is moderate in difficulty, with straightforward techniques like mixing and sautéing requiring attentive seasoning and timing.
  • Category: Perfectly suits main meals, ideal for lunch or dinner; serves as a light but satisfying option for family or small gatherings.
  • Cuisine: Deeply rooted in Greek culinary traditions, the recipe incorporates Mediterranean influences known for their fresh, vibrant, and wholesome elements.
  • Cost: An affordable dish using budget-friendly ingredients such as ground chicken, garlic, yogurt, and cucumbers, making it accessible without compromising on quality.
  • Season: Best enjoyed during warm months when cucumbers and herbs are fresh and provide a summery taste, though suitable year-round.
  • Occasion: Whether for a casual weeknight meal or a special weekend cook-up, these meatballs cater to any dining demand with panache.

Why You’ll Love This Recipe


Delight in the seamless blend of taste and texture with Greek Chicken Meatballs, where each bite encases a mix of garlic flavor coupled with the tanginess of lemon and herbs. The addition of tzatziki brings a creamy texture, perfectly balancing the richness of the meatballs. As a healthy option, ground chicken provides a lean protein alternative, making it appealing for health-conscious eaters. The dish is well-rounded and nutrient-packed, offering a fulfilling meal that fits into a balanced diet effortlessly.

Convenience plays a large role in why these chicken meatballs remain a favorite. Simple preparation and minimal ingredients mean you can create a gourmet-style entrée in under an hour, with no need for advanced skills or fancy techniques. Packed with protein, these meatballs are not only delicious but also provide essential nutrients for energy and muscle maintenance. Adding tzatziki complements the meatballs with beneficial probiotics from yogurt, aiding in digestion and gut health, offering a nutritional boost.

Hosting a gathering? This recipe shines as a crowd-pleaser. The appeal of Greek flavors makes these meatballs an entertaining staple without the stress of elaborate cooking. Harmonic flavors, vibrant colors, and fresh ingredients speak to the tastes of many, ensuring guests are impressed. Economically, Greek Chicken Meatballs with Homemade Tzatziki are budget-friendly, utilizing items easily sourced from local markets. This allows foodies to enjoy authentic Mediterranean flavors at home without a hefty price tag, adding value to everyday meals.

Historical Background and Cultural Significance


Tracing back centuries, Greek cuisine has always celebrated its natural resources, with recipes evolving while cherishing staple ingredients like meats, herbs, and yogurt. Chicken, often seen as a healthier meat option, grew in popularity for its versatility and ease of cooking. Throughout Greek history, tzatziki has remained a staple, cherished for its cooling properties, especially essential in the Mediterranean climate where refreshment from heat is vital. The evolution of this dish represents a harmony between tradition and modern taste preferences.

In Greek culture, food is synonymous with connection, community, and celebration, making meals central to cultural identity. This recipe embodies the essence of Greek hospitality, ingrained in practices of sharing and enjoyment. Over time, regional variations emerged, each adding its spin based on local produce, altering the spices, or changing the zing of tzatziki to fit evolving palates. Whether visiting the streets of Athens or a quaint village, the flavors of these meatballs call familiar memories of Greece’s coastlines and bustling markets.

Ingredient Deep Dive


Ground chicken is the heart of these meatballs, offering a lean source of protein that is tender and readily absorbs flavors. Historically, chicken became widely used in Greek cooking due to its versatile nature and was often used in leaner versions of traditional recipes. Nutritionally, it provides essential amino acids and vital nutrients for muscle repair and energy. Selection tips suggest choosing freshly ground, light-colored meat with minimal liquid. Store ground chicken in the coldest part of the fridge for up to two days or freeze for longer shelf life. If unavailable, turkey can serve as a suitable substitute.

Fresh herbs like parsley, dill, and mint are crucial in achieving authentic Greek taste in these meatballs. Historically, herbs were prized for both their culinary and medicinal properties, with Greeks using them abundantly. They offer an array of health benefits, including promoting digestion and providing antioxidants. When selecting, look for vibrant, aromatic leaves free from wilting. To extend shelf life, store them wrapped in a damp paper towel inside a plastic bag. Although fresh herbs are preferred, dried herbs can be substituted in smaller quantities.

Common Mistakes to Avoid

  • Avoid over-mixing the meatball mixture, as it can lead to dense, dry meatballs.
  • Not seasoning enough: Ensure you taste-test and balance flavors with salt and lemon juice.
  • Skipping resting time: Allow the mixture to sit to absorb flavors and bind properly before cooking.
  • Incorrect cooking temperature: Use medium heat to avoid burning while ensuring even cooking.
  • Ignoring ratios: Stick to the ingredient measurements to maintain texture and flavor.
  • Improper meat selection: Opt for leaner cuts of ground chicken to maintain the intended taste and health benefits.
  • Cooking overcrowding: Do not pack the pan, as it can extend cooking time and result in uneven browning.
  • Over-chilled tzatziki: Serve tzatziki at room temperature for optimal consistency and flavor release.

Essential Techniques


Mixing ingredients is fundamental to this recipe, ensuring flavors harmonize without overworking the meat. Achieving evenly combined ingredients will guarantee that each meatball tastes balanced. To avoid overmixing, gently incorporate the herbs, spices, and meat until just combined. Proper mixing relies on recognizing visual cues, such as when the mixture becomes cohesive without visible clumping of separate ingredients.

Sautéing the meatballs is crucial to lock in juices and achieve a flavorful outer crust. Heat control is important here, using medium heat to balance cooking without burning. Watching for golden-brown exteriors while checking for internal doneness (no pink center) ensures success. Pitfalls include overheating causing burning, which can be visualized by the presence of excessive smoke or a deep-brown, instead of golden, appearance.

Pro Tips for Perfect Greek Chicken Meatballs


Use fresh, high-quality herbs for the best flavor; dried can work but lack freshness. If substituting, use a third of the quantity.

Rest the meatball mixture before rolling and cooking, allowing flavors to meld and enhancing overall texture.

Incorporate a breadcrumb and milk mixture, acting as a binder, ensuring moist meatballs without dense results.

For tzatziki, use Greek yogurt for its creamy, thick consistency; straining cucumber prevents a watery sauce.

Cook meatballs in batches to ensure even cooking, not overcrowding the pan.

Store leftovers properly to maintain flavor and freshness; cool completely before placing in airtight containers.

To jazz up presentation, garnish with a sprinkle of chopped mint or a dash of paprika, adding vibrant colors.

Variations and Adaptations


For a regional variation, consider the use of spices like cumin for a Middle Eastern twist, adding depth and warmth to the meatballs.

Embrace seasonal adaptations by substituting or enhancing herbs with what’s fresh at that time, such as adding a touch of rosemary in autumn.

For dietary modifications, use quinoa flakes instead of bread crumbs for a gluten-free alternative, ensuring the dish remains cohesive and flavorsome.

Customize flavors by introducing fillings like feta cheese for added richness or sun-dried tomatoes for a burst of umami.

Achieve a comforting, smoother texture by cooking slowly in a tomato-based sauce,giving an Italian-inspired aroma and plush mouthfeel.

Change up presentation by assembling open sandwiches with pita bread, along with lettuce and vibrant cherry tomatoes for a rustic, wholesome approach.

Serving and Presentation Guide


Kick up presentation with intentional plating techniques; stack meatballs on a bed of tzatziki to highlight contrasting colors.

Consider garnishing with fresh dill, lemon wedges, or split tomato pieces, each adding an aesthetic touch and visual interest to the plate.

Traditionally served with pita or flatbread, you can also opt for roasted vegetables or couscous to accompany your meal.

Modernize by incorporating microgreens or edible flowers – this could elevate the dish to a gourmet status while keeping it simple.

Overall temperature consideration requires serving meatballs hot but tzatziki slightly chilled for an optimal, experiential contrast.

For portion control, aim for equal-sized meatballs, ensuring even cooking and balanced servings, with recommended servings evenly distributed for guests.

Wine and Beverage Pairing


Pair Greek Chicken Meatballs with a crisp white wine such as Sauvignon Blanc; its acidity mingles well with the zest of lemon and counterbalances the creaminess of tzatziki.

Non-alcoholic alternatives could include a lightly sweetened iced herbal tea or citrus-infused water, providing a refreshing bite.

Serve hot beverages like a chamomile tea which mirrors the herbaceous ness of the dish, promoting warmth without overpowering subtler flavors.

Temperature suggestions advise around room temperature for wine pairings to fully appreciate the texture and aroma of both the wine and dish.

Suggest progressing from beverage to meal in a relaxed manner; eat a few bites before sipping to enhance flavor release.

Storage and Shelf Life


Store leftover meatballs in airtight containers to prevent drying out and maintain freshness over time.

Refrigerate at appropriate temperatures, ideally just above freezing, to prolong shelf life without altering taste integrity.

When reheating, opt for indirect heat such as an oven to avoid losing moisture content, maintaining their juicy quality.

Containers are best sealed plastic or glass, offering protection against air exposure that potentially accelerates spoilage.

Recognizing spoilage signs includes any off smells or discoloration away from normal degrees; discard if suspicious.

Freezing guidelines stress cooling meatballs first before individually wrapping for easy thawing, then reheating gently in oven or stovetop to avoid toughness.

Make Ahead Strategies


Embrace flexibility with Greek Chicken Meatballs by preparing components ahead, such as shaping meatballs for freezing.

An ideal prep timeline spaces initial mixing and cooking across several days for leisurely weeklong preparation.

Store in layers, separated by parchment in airtight containers, to ensure uniform preservation without clustering.

Consider reheating considerations for both flavor and texture, selecting appropriate warming techniques to avoid drying out meatballs.

Consider fresh element additions at serving time, like herbs, to provide a vibrant experience even after pre-preparation storage.

Quality impact assessment shows minimal flavor loss if adequately stored and reheated, demonstrating their dependability as a make-ahead meal option.

Scaling Instructions


For halving this recipe, maintain ratios closely while reducing quantities, ensuring maintained flavor integrity and proper ingredient proportion.

Doubling or tripling demands larger batch management, attentive blending to ensure even distribution without excessive handling.

Adjust equipment, using wider or deeper pans for cooking increased quantities in alignment with adjusted ratios for uniform results.

Modify timings minimally for larger batches, maintaining essential cooking durations to secure consistent results without altering flavor profiles.

Effective storage considerations include labeling adjusted portions for example measuring and distribution, to maintain quality over time and use.

Nutritional Deep Dive


Macro breakdown highlights proteins from chicken plus beneficial fats from yogurt, harmonizing nutritional needs with culinarian satisfaction.

Micronutrient analysis appreciates parsley and dill’s vitamin content, providing antioxidants and digestive aid without overshadowing core flavors.

Health benefits draw from balanced ingredients rooted in Mediterranean diets, promoting cardiovascular health while remaining flavorful.

Considerations for dietary concerns emphasize natural, lesser-processed elements, avoiding artificial additives for an honest meal preparation approach.

Delve into portion analysis offers guidance to maintain caloric boundaries without sacrifice to food quality or personal satisfaction during mealtimes.

Weight management tips suggest pairing with controlled side dishes like leafy salad for a balanced, fulfilling meal aligning with wellness goals.

Dietary Adaptations


Choose gluten-free options, sensorily indistinguishable from traditional ones, to fulfill needs of gluten-sensitive individuals or dietary preferences.

Adapting to dairy allergy use alternatives like lactose-free yogurt for tzatziki, retaining creamy textures without triggering sensitivities.

Propose vegan alternatives with plant-based protein sources and coconut yogurt, preserving core flavors without animal-based counterparts.

Low-carb and keto enthusiasts can substitute breadcrumb for almond meal, ensuring adherence to specific dietary protocols without loss of coherence.

Paleo-approved versions include replacing some herbs or incorporating additional vegetables for nutritionally dense meals appearing unchanged.

Low-FODMAP adjustments make discordant ingredients minor alterations, respecting individual digestion requirements peacefully alongside traditional dining.

Troubleshooting Guide


Combat issues like too-dry meatball texture by ensuring adequate measurements of binding agents keeping everything cohesive.

Maintain flavor balance: under-adjusted herbs or spices sacrifice authenticity; reflect before finalizing to refine taste identity accurately.

Temperature problems in cooking arise from either under- or overcooking; timing and technique correction along with meat thermometer use mitigates errors.

Inconvenience from equipment challenges inspires creativity adapt standard methods without compromising authenticity to keep effort rewarding.

Substitute wisely by observing appropriate alterations that suit overall theme while achieving necessary variation without deviating drastically from core intention.

Beware of timing concerns – give yourself ample preparation time, gauged success reflects foresight appreciation realistically ensuring stress-free cooking.

Recipe Success Stories


Find community feedback brimming with stories recounting personal touches adding uniqueness to classic crafting through adaptable recipes.

Reader variations uncover enticing surprises in each re-imagined experience, from carrying forward new eateries across global locations investing cultural developments.

Adaptation success chronicles encourage constant engagement among audience, fostering enthusiasm alongside culinary curiosity inspiring broader scope approaches.

Photography tips serve to embolden storytelling by artwork beyond written word, capturing essence through careful visual narrative complementing original charm.

Recount harmony of reader suggestions resonates throughout virtual kitchen forums, joining endless resourcefulness built upon shared passion flavors spaces.

Frequently Asked Questions

Can I make these meatballs gluten-free?
Absolutely! Use gluten-free breadcrumbs or almond meal as a substitute, maintaining consistency without gluten inclusion.

How do I achieve the best texture in meatballs?
Key lies in gentle mixing and proper ingredient balance, ensuring cohesion while avoiding overworking to preserve juiciness.

What can I use instead of cucumber in tzatziki?
Try grated zucchini or peeled, seeded tomatoes for an alternative texture while keeping the refreshing bite tzatziki is known for.

Is this recipe keto-friendly?
Modify the recipe by substituting almond meal for breadcrumbs and using full-fat yogurt, aligning with keto diet principles.

How do I store leftovers?
Place in airtight containers in the refrigerator for up to three days or freeze for extended storage, reheating gently to regain flavor and texture.

Can I substitute yogurt in tzatziki for a vegan option?
Coconut or almond-based yogurts are great vegan alternatives, retaining the crucial creamy texture without dairy inclusion.

How many meatballs should I serve per person?
Typically, four to five meatballs per person ensures balanced servings aligning portion control and satisfaction for guests.

What can replace lemon zest?
Lime zest offers an alternative zesting choice, imbuing different citrus notes compatible across various Mediterranean flavors.

Can I add cheese to these meatballs?
Feta cheese works harmoniously, adding a creamy-tangy depth producing an enticing soft center encased in golden exterior.

How does the cooking time vary with different meat types?
Different meats vary in cooking time; monitor internal temperature, wary of proteins requiring diverse preparation timelines for best outcomes.

Are these meatballs spicy?
While not inherently spicy, optional chili flake introduction can adjust depending on personal taste preference, enriching multiplicitous flavor layers.

Can I use a different type of oil for cooking?
Explore varieties like avocado or coconut oil, both promising healthy alternatives capturing nuances expected from traditional Mediterranean dishes.

Additional Resources


Discover related recipes boasting Mediterranean delights, spanning salads to desserts each honoring heritage flavor tenets.

Technique guides accommodate burgeoning chefs exploring advanced methodologies, sparking curiosity while honing contemporary kitchen practices incrementally.

Gain thorough ingredient insight to compel invention through adaptive experimentation, reviving authentic inspirations into novel culinary expressions.

Equipment recommendations ease initial reluctance among novices, enhancing tool accessibility contemporaneously raising aspiration within professionally cultivated spheres.

Seasonal variations focus attention forward natural cycles maximizing freshness existence through traditional balance and modern adaptation.

Join the Conversation


Engage with others passionate about Greek cuisine on social media platforms, sharing your own rendition and inspiration from this recipe.

Encourage community involvement through feedback collection, driving growth alongside knowledge exchange and sustained connections.

Embark on photographic exploration by capturing essence within frames, archiving memories alongside creativity through imaginative stylization.

Submit recipe reviews or variations, uplifting collective wisdom through collaborative commentary benefiting culinary union globally.

Embrace networking wonder where diverse experiences intermittently collide, fostering open discourse broadening horizons through cuisine appreciation universally.

The Recipe

Greek Chicken Meatballs with Homemade Tzatziki

Serves: 4

Prep Time: 20 mins

Cook Time: 30 mins

Total Time: 50 mins

Kitchen Equipment Needed

  • Food processor
  • Skillet
  • Baking tray
  • Mixing bowls
  • Grater

Ingredients

  • 500g ground chicken
  • 1/2 cup breadcrumbs
  • 1 egg, beaten
  • 2 tbsp fresh parsley, chopped
  • 2 tbsp fresh dill, chopped
  • 2 cloves garlic, minced
  • Zest of 1 lemon
  • Salt and pepper to taste
  • 2 tbsp olive oil
  • 1 cup Greek yogurt
  • 1 cucumber, grated
  • 1 tbsp lemon juice
  • 1 tbsp olive oil for tzatziki

Directions

  1. Combine ground chicken, breadcrumbs, egg, parsley, dill, garlic, lemon zest, salt, and pepper in a bowl. Mix gently.
  2. Shape into 16 meatballs and rest for 10 minutes.
  3. Heat olive oil in skillet over medium heat. Sauté meatballs in batches until golden brown and cooked through, about 10 minutes.
  4. For tzatziki, mix Greek yogurt, grated cucumber, lemon juice, olive oil, salt, and pepper.
  5. Serve meatballs warm with tzatziki as a dip or dressing.

Recipe Notes

  • If meatballs are too wet, add extra breadcrumbs until desired consistency is reached.
  • For added flavor, incorporate a pinch of chili flakes into meatball mix.