Deliciously Refreshing Best Grape Salad Recipe for Every Occasion

Best Grape Salad: A Refreshing and Delicious Delight

⚖️
Difficulty
Easy

⏲️
Prep Time
10 mins

🕒
Cook Time
0 mins

⏱️
Total Time
10 mins

🍽️
Servings
6

The Best Grape Salad is a wonderfully refreshing dish that combines the crisp sweetness of grapes with creamy, tangy dressing and a delightful crunch of toasted pecans. This culinary masterpiece is not only quick and easy to prepare but also boasts a vibrant visual appeal that’s sure to impress guests at any gathering. Whether you’re serving it as a side dish or a light dessert, this grape salad is a versatile must-have in your recipe collection.

This grape salad recipe is perfect for any occasion, whether it’s a family picnic, a holiday feast, or a midweek dinner treat. The combination of juicy grapes, creamy dressing, and a hint of tang make it an irresistible addition to any meal. With just a handful of ingredients, you can whip up this delectable salad in no time, allowing you to spend less time in the kitchen and more time enjoying the company of loved ones. Elevate your dish with vibrant red or green grapes to create a symphony of colors that will catch everyone’s eye.

Quick Recipe Highlights

  • Flavor Profile: The Best Grape Salad offers a perfect balance of sweetness from the grapes and a tangy creaminess from the dressing.
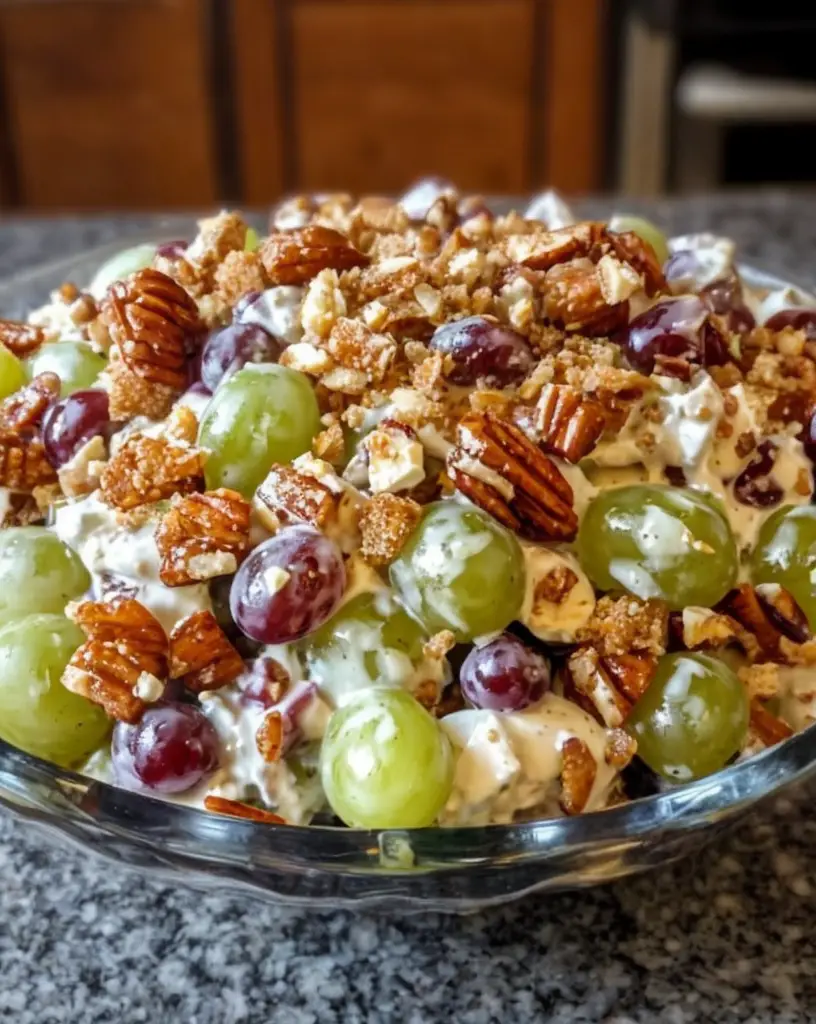
  • Texture: This salad delights with juicy, plump grapes enveloped in a smooth, creamy sauce, topped with the satisfying crunch of pecans.
  • Aroma: Experience a refreshing scent of ripe grapes mixed with the rich aroma of toasted pecans and a hint of vanilla.
  • Visual Appeal: Featuring the vibrant hues of red and green grapes alongside the creamy dressing, this salad is a feast for the eyes.
  • Skill Level Needed: Minimal culinary skills are required, making it an excellent choice for beginners and experienced cooks alike.
  • Special Equipment: No specialized equipment is needed, just a mixing bowl and a spoon to combine ingredients effortlessly.

Recipe Overview

  • Difficulty Level: The simplicity of this recipe makes it perfect for chefs of all levels, requiring only basic mixing skills.
  • Category: This delightful dish fits seamlessly into categories such as salads, side dishes, or even desserts thanks to its sweet and creamy elements.
  • Cuisine: This could be enjoyed in any cuisine as a sweet side dish, hinting at influences from classic American home cooking with its use of cream cheese.
  • Cost: Affordable yet luscious, this recipe makes use of common and readily available ingredients.
  • Season: Perfect in every season, but particularly refreshing in spring and summer as a cool, juicy treat.
  • Occasion: Ideal for brunches, potlucks, family gatherings, or as a sweet conclusion to an outdoor barbecue.

Why You’ll Love This Recipe


The Best Grape Salad is adored for its unique blend of texture and taste. With a creamy dressing that perfectly complements the natural sweetness of the grapes, every bite offers a harmonious blend of flavors and a delightful crunch from toasted pecans. The convenience of preparing this salad, requiring only 10 minutes, ensures you have a quick-to-make crowd-pleaser on hand, perfect for those last-minute gatherings or a casual family dinner.

Unlock the nutritional benefits of this salad, with grapes serving as a source of essential vitamins, minerals, and antioxidants. The simple cream cheese-based dressing adds a rich calcium source while pecans offer healthy fats and proteins, transforming the dish into a balanced side that caters to both taste and well-being. Impress guests at social events with this salad’s stunning presentation, offering a visually appealing centerpiece for your dining table.

Not only is this dish cost-effective due to its minimal ingredient list, but it also provides accessibility through its use of pantry staples. Enjoy the flexibility of this recipe by adapting it to suit various dietary needs, ensuring everyone has the opportunity to relish this delightful dish without compromising flavor or satisfaction.

Historical Background and Cultural Significance


The allure of the grape stretches back thousands of years, where it featured prominently in the diets and traditions of ancient cultures. Known for their use in cooking, winemaking, and even religious rites, grapes have always been valued for their versatility and flavor. Over the centuries, the fruit’s popularity spread, and it began to appear in an array of sweet dishes, exemplified in refreshing recipes like grape salad.

Delighting countless families with its tangy-sweet character, grape salad showcases how traditional ingredients can be combined in innovative ways. This dish captures the essence of fusion by pairing the classic flavors of cream cheese and nuts with fresh fruit, creating a taste that bridges different cultures and palates. Enjoyed from homes to high-end restaurants, grape salad remains a beloved choice due to its refreshing simplicity and nutritional value.

Define personal variations by experimenting with regional ingredients while maintaining the core elements that define this dish. Explore substituting different nuts, incorporating various grape types, and adjusting the sweetness of the dressing, reflecting the adaptability that accounts for grape salad’s enduring charm.

Ingredient Deep Dive


The star of this recipe is, of course, the grape, a fruit celebrated for its historical significance and delicate sweetness. Originally hailing from regions in the Mediterranean and Central Europe, grapes have thrived across diverse climates, making them a versatile and accessible ingredient worldwide. Rich in vitamin K and C, as well as antioxidants, grapes not only imbue the salad with flavor but also provide numerous health benefits. When selecting grapes, opt for those that are firm, plump, and deeply colored for optimal freshness. To extend their shelf life, store grapes in their original packaging in the coldest part of your fridge.

Pecans provide a crucial textural contrast, lending a subtle buttery taste and crunch to the salad. Native to North America, pecans were a staple food for indigenous people, eventually spreading worldwide. Packed with fiber, vitamins, and healthy fats, pecans bring both flavor and nutrition to the table. Choose pecans that are clean and firm; store them in an airtight container in a cool, dry place to preserve their quality. Substitute other nuts like walnuts or almonds to achieve varied flavors or accommodate dietary restrictions.

Common Mistakes to Avoid

  • Using overly ripe grapes can make the salad mushy. Always use firm and plump grapes for the best texture.
  • Overdressing the salad can overpower the delicate grape flavor. Start with less dressing and add more to taste as needed.
  • Not mixing the dressing thoroughly can result in uneven flavor distribution. Ensure all components are well-combined for a cohesive taste.
  • Forgetting to chill the salad before serving can reduce its refreshing quality. Refrigerate for at least an hour, allowing flavors to meld.
  • Using pre-shelled pecans without toasting results in lost flavor depth. Toast pecans briefly for additional richness.
  • Skipping the washing of grapes can result in a loss of freshness or unwanted residues. Clean grapes thoroughly before use.
  • Not cutting grapes in half can lead to inconsistent texture and bite-size. Halve grapes for an evenly balanced salad experience.
  • Adding the pecans too early can cause them to lose crunch. Stir them in just before serving to maintain their texture.

Essential Techniques


Mastering the dressing is crucial for the Best Grape Salad. Mixing cream cheese until smooth ensures a creamy texture that evenly coats the grapes. Add sugar gradually, tasting as you go, to achieve just the right amount of sweetness without overpowering the natural flavors of the grapes. The toasting of pecans is a vital step not to overlook. A brief toast brings out the nutty flavor, enriching the salad’s overall taste profile. Always give pecans time to cool before mixing them into the salad to preserve the crunch.

Pro Tips for Perfect Best Grape Salad


To create a vibrant visual impact, combine both red and green grapes, adding a pop of color to your dish. Achieve an ultra-creamy dressing by softening cream cheese to room temperature before mixing. Personalize sweetness levels by adjusting the amount of sugar or incorporating honey for a natural alternative. Enhance the crunch by topping the salad with additional pecans or introducing other nuts like almonds. Keep the salad fresh for longer by storing it in an airtight container in the refrigerator. For a gourmet touch, consider topping with a sprinkle of cinnamon or nutmeg before serving.

Variations and Adaptations


Adjust this recipe for regional tastes by incorporating specialty nuts, such as macadamias in tropical locales. Enjoy a seasonal touch by adding fresh, in-season berries such as blueberries or strawberries for a summery twist. Tailor the salad to accommodate dietary needs, such as utilizing dairy-free cheese options for lactose intolerance or replacing sugar with a low-calorie sweetener. Enhance the flavor profile by experimenting with different vinegars or citrus zest, offering an exciting twist to the base recipe.

Serving and Presentation Guide


Serve this salad in a clear, shallow dish to showcase its vivid colors while maintaining an elegant presentation. Garnish with a few whole grapes and a sprinkle of toasted nuts for decorative appeal. Pair the grape salad with a light main dish, such as grilled chicken or fish, to complement its refreshing qualities. Ensure ideal temperature by chilling the salad until it’s time to serve, so it maintains its crisp, invigorating vibe.

Wine and Beverage Pairing


Find the perfect complement with a light, crisp white wine like Sauvignon Blanc or Pinot Grigio, known for their fruity undertones that harmonize beautifully with the salad’s sweet and tangy elements. For those who prefer non-alcoholic options, a sparkling water with hints of citrus or a light lemonade are excellent choices, enhancing the salad’s refreshing quality.

Storage and Shelf Life


Store this salad in an airtight container in the refrigerator for optimal freshness. To ensure peak taste and texture, consume within two days of preparation. Observe for signs of spoilage, such as mushy texture or off-odor, especially when stored longer than two days. Pecans may soften over time; consider reserving some for topping immediately before serving.

Make Ahead Strategies


You can prepare this salad in advance, but add the toasted pecans just before serving to maintain their crunch. Assemble most of the components, excluding nuts, and store them in the refrigerator until ready to enjoy. Before serving, thoroughly mix the salad to ensure even distribution of dressing and topping.

Scaling Instructions


This recipe is versatile for any serving size. Double or triple the grape salad by preparing batch after batch rather than mixing a large quantity at once for maximum ingredient integration. Equipment typically remains consistent, but larger mixing bowls may be needed. Adjust chilling time in proportion to the salad volume to ensure everything is properly chilled.

Nutritional Deep Dive


The Best Grape Salad is both a flavorful and nutritious dish. Grapes bring an abundance of antioxidants, known for supporting cardiovascular health, whereas cream cheese contributes a decadent amount of calcium. Pecans supply healthy fats and fiber, promoting digestive wellness. Analyzing the salad’s macronutrient profile reveals a balance ideal for everyday enjoyment, provided that serving sizes are moderated to fit personal dietary goals.

Dietary Adaptations


For gluten-free adaptations, this recipe naturally fits most gluten-free diets without adjustments. To accommodate vegan preferences, substitute cream cheese with a plant-based version while maintaining an almond or cashew-based creaminess. With careful ingredient management, this salad can also serve as a delectable side for keto or low-carb plans.

Troubleshooting Guide


Address common texture concerns by ensuring grapes are fresh and firm before preparation. Tackle flavor imbalance by incrementally adjusting sugar to taste preference and monitoring vanilla extract levels to avoid overconsumption. Monitor temperature issues; quickly chill salad after assembly for peak freshness.

Recipe Success Stories


Readers have added personal touches like shredded coconut or dried cranberries for an added flavor dimension, demonstrating the adaptability of this dish. As community members prepare this salad, they share stunning photography showcasing improved plating and artistic presentation, proving you don’t have to be a professional chef to create gourmet-looking meals.

Frequently Asked Questions

Can I use other types of grapes? Yes, experimenting with different grape varieties can introduce new flavor profiles, so feel free to choose your favorites.

How do I prevent my pecans from getting soggy? Add pecans just before serving to ensure they retain their crunch.

Is it possible to freeze this salad? Freezing is not recommended, as it would alter the texture of the grapes.

Can I substitute the cream cheese with another base? Yogurt or a dairy-free alternative can be used for a lighter consistency.

How do I store leftovers? Keep refrigerated in an airtight container, ideally consumed within two days for best freshness.

Are there alternative sweeteners I can use? Honey or maple syrup serve as tasty and natural alternatives to sugar.

What’s a suitable serving size? A standard serving is about one cup, with the option to adjust based on your meal context.

Additional Resources


Explore other delightful salad recipes in the same flavor family, such as ambrosia or fruit salad, for more fruity indulgences. Delve into ingredient guides detailing grape types and nutritional values for informed decision-making on selection. Discover up-to-date kitchen equipment reviews and find the best tools to streamline your preparation experience.

Join the Conversation


Share your own Best Grape Salad creations on social media, showcasing your unique take on this delicious dish. Invite friends and family to contribute their thoughts through comments or reviews, fostering a greater sense of culinary community. Document your journey with this recipe, noting any variations and adaptations and forming a collective narrative of creativity and exploration.

The Recipe

Best Grape Salad

Serves: 6

Prep Time: 10 mins

Cook Time: 0 mins

Total Time: 10 mins

Kitchen Equipment Needed

  • Mixing bowl
  • Spoon
  • Knife
  • Cutting board

Ingredients

  • 2 cups of red grapes, halved
  • 2 cups of green grapes, halved
  • 8 oz cream cheese, softened
  • 1/2 cup sugar
  • 1 cup toasted pecans, chopped
  • 1 tsp vanilla extract

Directions

  1. In a mixing bowl, combine cream cheese and sugar until smooth and creamy.
  2. Add the vanilla extract and mix until fully incorporated.
  3. Gently fold in the halved grapes, ensuring they’re evenly coated.
  4. Stir in chopped pecans just before serving.
  5. Chill in the refrigerator for at least an hour before serving for optimal flavor melding.

Recipe Notes

  • For added flavor, try incorporating a sprinkle of cinnamon or nutmeg.
  • Substitute pecans with walnuts or almonds if desired.
  • Adjust the amount of sugar based on sweetness preference.

Ultimate Crispy Two-Cheese Potato Gratin Recipe for Cheese Lovers

Crispy Two-Cheese Potato Gratin: A Perfect Cheesy Delight

⚖️
Difficulty
Easy

⏲️
Prep Time
20 mins

🕒
Cook Time
45 mins

⏱️
Total Time
65 mins

🍽️
Servings
6

When it comes to comfort food, nothing beats a warm, cheesy dish straight from the oven. This Crispy Two-Cheese Potato Gratin is a delightful masterpiece that brings together creamy and crispy elements in one sumptuous bite. Imagine the rich aroma of cheddar and Gruyère cheese bubbling to perfection, enveloping thinly sliced potatoes. The golden crust on top adds that extra layer of indulgence, making it a must-try dish for any gathering.

If you’re looking to impress your guests or simply craving something decadent, this potato gratin is your answer. The combination of two types of cheese creates a nuanced flavor profile, offering both sharpness and creaminess. The silky texture of the potatoes perfectly complements the crispy cheese topping, while the subtle infusion of garlic and herbs delivers a savory kick. This dish not only captivates the palate but also delights the senses with its enticing aroma and beautifully layered appearance.

Quick Recipe Highlights

  • Flavor Profile: A harmonious blend of sharp cheddar and nutty Gruyère enhances the natural earthiness of potatoes, while subtle garlic notes add depth.
  • Texture: Creamy and tender potato layers contrasted with a crispy, golden cheese crust offer a delightful mouthfeel.
  • Aroma: Rich, cheesy aromas wafting from the oven, combined with hints of garlic and herbs, create an inviting and mouthwatering experience.
  • Visual Appeal: Vibrant layers of golden cheese atop perfectly sliced potatoes bring an elegant touch to any table setting.
  • Skill Level Needed: Simple slicing and layering techniques make this recipe accessible to cooks at all skill levels.
  • Special Equipment: A mandoline slicer ensures uniform potato slices, while a baking dish provides even cooking.

Recipe Overview

  • Difficulty Level: This recipe is straightforward, relying on simple techniques like slicing and layering. Beginners will find it as approachable as it is satisfying.
  • Category: Perfect as a side dish, this potato gratin complements any main course with its creamy richness.
  • Cuisine: Rooted in French culinary tradition, this dish incorporates classic gratin techniques with a comforting twist.
  • Cost: Affordable with staple ingredients, making it budget-friendly without compromising on taste or elegance.
  • Season: Best enjoyed year-round but especially inviting during cool autumn and winter months when hearty dishes are in demand.
  • Occasion: Ideal for festive gatherings, holiday dinners, or any special occasion needing a crowd-pleasing side.

Why You’ll Love This Recipe

One of the most compelling aspects of this Crispy Two-Cheese Potato Gratin is its irresistible combination of flavors and textures. The melding of sharp cheddar and creamy Gruyère against the backdrop of tender potatoes creates a taste that is both comforting and sophisticated. Each bite offers a melty, cheesy sensation, highlighting the dish’s savory and nutty qualities. Furthermore, the satisfaction of breaking through the crunchy topping enhances the overall eating experience, leaving every cheese lover enchanted.

Convenience is another key factor in why this recipe shines. With minimal prep and straightforward cooking steps, it allows both novice and seasoned cooks to achieve a gourmet result without stress. The use of a mandoline slicer makes slicing potatoes quick and consistent, ensuring even cooking. Additionally, the gratin can be assembled in advance, making it an excellent choice for busy hosts or weeknight dinners when time is limited but quality and taste are a priority.

Nutritionally, potatoes provide an excellent source of vitamins and minerals, notably vitamin C and potassium. Cheese adds not only divine flavor but also offers protein and calcium, making this dish a delicious way to include some essential nutrients in your meal. While indulgent, the balanced ingredients ensure you can enjoy each serving knowing there’s nutritional value tucked into every cheesy layer.

For social situations, this potato gratin proves to be a unifying dish that pleases a variety of palates. Whether it’s a holiday feast or a casual family gathering, its robust flavors and enticing presentation invite compliments and second helpings. It serves as a reliable side that pairs well with most proteins—from roast chicken to hearty steaks—making it versatile for any dining scenario.

Cost-effectiveness is also noteworthy. By leveraging everyday ingredients like potatoes and cheddar cheese, this recipe offers sophistication without breaking the bank. Even the addition of Gruyère for its distinctive nuance doesn’t significantly impact the budget, making it an accessible luxury. The ingredients are easily found in most grocery stores, providing an uncomplicated yet gourmet dish available to everyone.

Historical Background and Cultural Significance

The origins of the potato gratin trace back to French culinary traditions, where “gratin” means crust or skin, commonly achieved through baking dishes with breadcrumbs, cheese, or both. This method has been celebrated in France for centuries and was initially utilized to transform humble ingredients into rich, sustaining meals, marking it as both an economical and delightful cooking technique.

In France, regional variations of gratin abound. Often associated with the Dauphiné region, gratin dauphinois is closely related to this dish but traditionally does not include cheese, relying more on cream and garlic for its luscious sauce. The addition of cheese to the gratin unites these French traditions with the beloved culinary practice of using cheese to enhance and elevate simple ingredients, leading to a richer version embraced by cheese lovers.

Over time, this dish has transcended borders, with each culture adding its individual twist. In the United States and beyond, the incorporation of various cheeses and additional ingredients such as bacon or onions have become popular adaptations. Despite these changes, the core of gratin—thinly sliced potatoes baked with cream or milk—remains a testament to its classical roots.

Today, the potato gratin stands as a versatile dish that continues to evolve, influenced by local customs and palates. Its enduring appeal is a testament to its balance of simplicity and indulgence, offering a dish that remains both familiar and dynamic, shaped by history yet infinitely adaptable to modern tastes and preferences.

Ingredient Deep Dive

**Potatoes:**

As the foundation of this gratin, potatoes bring a wealth of cultural and culinary significance. Historically a staple in many diets worldwide, potatoes are praised for their versatility and availability. Rich in vitamins C and B6, potassium, and fiber, they are both nutritious and filling, providing the bulk of this delectable dish. When selecting, look for firm, smooth potatoes free from sprouting or green spots to ensure good quality and taste. Store them in a cool, dry place away from sunlight to prolong their freshness and flavor. If necessary, substitute with sweet potatoes for a different yet delicious twist.

**Cheddar Cheese:**

Cheddar’s sharp and tangy profile makes it a natural fit for gratins, contributing both richness and depth. Originating in England and celebrated globally, cheddar is a remarkably versatile cheese. With considerable calcium and protein, it provides both flavor and nutritional benefits. Freshly grated cheese yields the best melt, creating that signature gooey layer. Choose a mature variety for more intense flavor, and store it in the refrigerator, tightly wrapped, to maintain freshness. For an alternative, try aged gouda for an equally satisfying result.

Common Mistakes to Avoid

  • Overlapping potato slices can lead to uneven cooking. Ensure slices are thin and evenly distributed.
  • Skipping pre-grating can result in clumpy cheese layers. Grate fresh for smoother integration.
  • Not using enough seasoning can make the dish bland. Taste and adjust salt and herbs to preference.
  • Piling too much cheese can overwhelm the dish. Balance cheese to potatoes for optimal texture.
  • Baking at too low a temperature may lead to undercooked potatoes. Follow the suggested temperature for best results.
  • Setting oven racks improperly can affect browning. Position racks in the center for even heat distribution.
  • Insufficient greasing of baking dish can cause sticking. Coat with butter or cooking spray beforehand.
  • Overbaking can cause dried edges. Check for doneness around suggested cooking time to prevent this.
  • Cutting immediately after baking can cause it to fall apart. Let it rest to firm up before serving.
  • Skipping testing for doneness can leave potatoes undercooked. Insert a fork to ensure they are tender.

Essential Techniques

**Slicing Potatoes:**

Slicing potatoes thinly is pivotal to achieving the gratin’s tender layers and requires careful technique. A mandoline slicer is invaluable here, providing uniform slices that cook evenly. Ensure safety by using a hand guard to protect fingers, and aim for consistent thickness for perfect stacking. This precision not only aids cooking but also enhances the dish’s visual appeal.

**Layering:**

Layering is both an art and essential to distributing flavors evenly throughout the gratin. To master this, alternate layers of potatoes evenly with cheese and seasoning. This creates balance and allows flavors to meld seamlessly. Avoid overly thick layers to facilitate even cooking, and consider seasoning lightly with each layer to build depth without overpowering.

Pro Tips for Perfect Crispy Two-Cheese Potato Gratin

1. **Use Waxy Potatoes**: For the best texture, opt for waxy potatoes like Yukon Gold. They hold their shape better in the oven, ensuring a firm, sliceable dish.

2. **Cheese Combination**: Don’t shy away from experimenting with cheese combinations. Adding a bit of Parmesan to the cheese mix can intensify flavor and enhance browning.

3. **Infusion Technique**: Infuse cream with herbs like rosemary or thyme before layering to enrich the flavor subtly without overwhelming the dish.

4. **Uniform Slices**: Aim for potato slices no thicker than 1/8 inch. Uniformity ensures even cooking and a harmonious blend of textures.

5. **Prevent Browning with Foil**: Cover the gratin with foil initially during baking to prevent over-browning. Remove in the last 15 minutes to achieve that golden, crispy top.

6. **Rest before Serving**: Allowing the gratin to rest for a few minutes before serving lets it set, aiding in neat portions and enhancing its rich flavors.

Variations and Adaptations

**Regional Variations:**

In different regions, potato gratin is customized using local ingredients. In Italy, additional herbs like parsley or oregano might be included, while Swiss variations often incorporate Emmental cheese, adding a sweeter, more nutty layer.

**Seasonal Adaptations:**

Adapting this gratin to the season can heighten its appeal. In spring, try incorporating fresh garlic or ramps for a verdant twist. Winter offers the opportunity to enrich with root vegetables like parsnips or carrots for a hearty and colorful take.

**Dietary Modifications:**

For a vegan option, swap out dairy cheese with a nut-based cheese and use almond or soy milk. Gluten-free breadcrumbs can ensure crispness without gluten.

**Flavor Variations:**

Complement or replace Gruyère with blue cheese or brie for an intense flavor profile. Adding caramelized onions or leeks can introduce a sweet, earthy balance.

**Texture Modifications:**

For a fluffier texture, incorporate a beaten egg into the milk mixture before baking. This adds an airy element that lightens the dish’s classic heaviness.

**Presentation Alternatives:**

Individual gratin servings, baked in ramekins, can offer an elegant, personal dining experience. This is particularly appealing for dinner parties or intimate gatherings.

Serving and Presentation Guide

Plating techniques for a stellar presentation begin with using a sharp knife to cut even squares of gratin, ensuring clean edges. For added sophistication, garnish with freshly chopped chives or parsley to brighten the dish visually and flavor-wise.

Traditional accompaniments include a side of roasted vegetables or a fresh, crisp salad, both of which balance the richness of the gratin with light, refreshing notes. For modern flair, consider serving with a vinegary slaw or pickled radishes to add a complementary tang.

Temperature considerations are crucial for maintaining the gratin’s appeal. Serve warm to ensure the cheeses are melted and gooey, which intensifies the dish’s comfort factor. When it comes to portion control, consider the richness; a small serving often suffices, allowing the gratin to shine without overwhelming other dish components at the meal.

Wine and Beverage Pairing

Pairing wine with this gratin can elevate the dining experience. A medium-bodied white wine such as Chardonnay complements the creamy cheese while cutting through the richness, highlighting the dish’s complexity. For red wine enthusiasts, a light Pinot Noir offers an ideal balance, with its fruity notes highlighting the potato’s earthiness.

If you prefer non-alcoholic options, consider a robust oolong tea. Its rich brew mirrors the gratin’s depth, adding layers to the meal without overpowering the flavors. Or choose a refreshing sparkling water with a lemon slice to cleanse and refresh the palate between bites.

For those who enjoy coffee or tea with their meal, a smooth black coffee or lightly infused herbal tea, such as chamomile or sage, pairs well, enhancing the gratin’s natural herbal notes without introducing bitterness.

Seasonal beverages also have their charm. In colder months, a savory hot cider can complement perfectly, while light lemon or basil-infused water can be ideal in warmer seasons, providing refreshment alongside the gratin.

Storage and Shelf Life

For optimal storage, allow the gratin to cool to room temperature before transferring to an airtight container. This prevents condensation, which can make the dish soggy. Refrigerate for up to three days; the flavors often meld and deepen over this period, enhancing each subsequent serving.

When reheating, do so gently in an oven preheated to 350°F (175°C) for 15-20 minutes, which revives the crisp top and heats through without drying out the potatoes. A microwave works for convenience, though it may soften the crisp layers.

If freezing, do so before baking. Assemble the dish, cover it tightly with foil, and store it in a freezer-safe container for up to one month. Thaw overnight in the refrigerator before baking as instructed. Signs of spoilage include an off smell, discoloration, or excessive liquid in the dish.

Make Ahead Strategies

Planning to assemble the gratin ahead? Perfect! Prepare the dish up to the baking step, cover, and store in the refrigerator for up to 24 hours. This allows you to enjoy your time with guests while the gratin bakes to perfection just before serving.

Between preparation and baking, ensure potatoes are fully submerged in the cream mixture to avoid oxidation and discoloration. If necessary, overlay with parchment directly on the potatoes before covering to maintain color and texture.

To retain peak freshness, reheat without compromising quality by using an oven rather than a microwave. This ensures the top retains its hallmark crispiness, and infusing freshly grated cheese on top before reheating can refresh its look and taste alike.

Scaling Instructions

To easily halve the recipe, reduce all ingredients proportionally; this includes minimizing the baking dish size to avoid a thin, overcooked layer. Great for intimate dinners or smaller households, and keeps proportions consistent.

Doubling or tripling the recipe requires paying close attention to oven space and cooking times. Large batches may need longer cooking to achieve consistent results, particularly for the golden crust. Utilize multiple smaller dishes if necessary to maintain oven circulation.

Equipment adjustments often correlate with scaling: ensure you have sufficiently large mixing bowls and baking dishes, and a food processor can assist with larger quantities of cheese. Consider storage carefully when increasing recipe size, ensuring sufficient refrigerator or freezer space.

Nutritional Deep Dive

With a macro breakdown rooted in its main ingredients, each serving provides considerable carbohydrates primarily from potatoes, supplemented by protein and fats from the cheese. Potassium and vitamin C are notable micronutrients from the potatoes, while calcium and vitamin D are prominent in the cheese, beneficial for overall health.

Health benefits extend to its comforting and satisfying nature, curbing cravings with nutrient-dense qualities rather than empty calories. For those focused on weight management, portion control is advisable given its caloric density afforded by the cheeses.

In terms of dietary considerations, monitor portions if on specialized diets like low-fat or keto, as this dish leans heavily on dairy fats. Balancing with a portion of lean protein or high-fiber vegetables can create a more well-rounded meal.

Dietary Adaptations

**Gluten-free:**

Naturally gluten-free without breadcrumbs, this gratin is suitable for celiac-friendly dining. Use gluten-free flour for thickening cream if needed.

**Dairy-free:**

For a dairy-free variant, replace milk and cheese with almond milk or oat milk and use a vegan cheese blend that melts well, such as those made from cashews.

**Vegan:**

In addition to dairy substitutes, use nutritional yeast for umami flavor and additional cheeselike complexity. Coconut cream can substitute heavy cream to maintain creaminess.

**Low-carb:**

Creating a low-carb version involves replacing potatoes with thinly sliced zucchini or cauliflower for a similar texture with a fraction of the carbs.

**Keto:**

A keto adaptation keeps carbs in check while increasing fats. Replace potatoes with cauliflower or turnip, ensuring high-fat dairy cheese consistency.

**Paleo:**

Ensure compliance by substituting regular cheese with Paleo-friendly nut-based cheeses, and swap potatoes with sweet potatoes or squash for a delightful alternative.

**Low-FODMAP:**

Reduce ingredients such as onions and garlic powder which are high in FODMAPs, replacing them with garlic-infused oil to maintain flavors without digestive discomfort.

Troubleshooting Guide

**Texture Issues:**

If the gratin is too dry, check oven temperature and duration. Slow, even cooking prevents moisture loss. Adding more cheese on top can restore moistness without altering internal layers.

**Flavor Balance:**

For blandness, ensure each layer is seasoned. Tasting cheese before use helps to anticipate necessary salt adjustments, maintaining the desired punchy flavor.

**Temperature Problems:**

An under-set center often results from opening the oven mid-bake. Keep the door closed, utilizing internal thermometers or visual checks when nearing completion.

**Equipment Challenges:**

Utilizing proper equipment ensures more reliable results. If lacking a mandoline, carefully slice by hand to mimic uniformity. An oven thermometer can assist in verifying heat.

**Ingredient Substitutions:**

Adjust ratios if substitutions change moisture levels. For example, flavorful additions like ham necessitate additional cream to maintain balance without dryness.

**Timing Concerns:**

Sticking strictly to timeframe works best for small batches. Larger portions might need longer cooking times, particularly in crowded ovens—adjust and test as necessary.

Recipe Success Stories

**Community Feedback:**

Readers report great success with Gruyère and Parmesan blends, elevating the dish’s nuance while maintaining its beloved cheesiness and ensuring crowd-pleasing results.

**Variation Successes:**

Creative takes encompassing seasonal vegetables such as asparagus prove to be delightful incorporations, offering a symphony of textures that both balance and enhance flavors.

**Adaptation Stories:**

Those adapting for dietary needs discover plant-based approaches, like coconut milk and nutritional yeast, provide a satisfying pale yellow hue and flavor akin to the original.

**Reader Suggestions:**

Enhancements such as truffle oil drizzled subtly on top capture the senses, adding earthy undertones that complement its core components beautifully.

**Photography Tips:**

Success stories often feature golden crisps evocative of snow, a visual feast that works particularly well under natural light, capturing each tempting detail.

Frequently Asked Questions

Can I prepare the potato gratin in advance?
Absolutely! Assemble the gratin, cover and refrigerate for up to 24 hours before cooking. This can help meld flavors and save time on cooking day.

What type of potatoes are best for gratin?
Yukon Gold potatoes are a great choice due to their waxy nature, which helps them hold their shape during baking, offering a smooth, butter-like texture.

How do I make the gratin crispier?
Make sure to use a higher oven temperature during the last few minutes or broil briefly, keeping a close watch to avoid burning.

What cheese substitutes can I use?
Feel free to use other melty cheeses like mozzarella or Emmental for a different flavor profile and texture experience.

How long will leftover gratin keep?
Stored properly in the fridge, gratin can last 3-4 days. Reheat in the oven to restore the top’s crispness.

Can I freeze the gratin?
Freezing is possible pre-bake. Wrap tightly and freeze, then thaw before baking as usual, ensuring even cooking.

Are there low-calorie cheese options?
Opt for low-fat cheese varieties or mix with aspects like nutritional yeast to match flavors while controlling calories.

How do I prevent the dish from being greasy?
Balance cheese with potatoes and cream to avoid excess greasiness. Using high-quality, firm cheese helps manage oils expelled during baking.

What if I don’t have a mandoline?
Careful hand slicing is an option if a mandoline slicer is unavailable, or use a kitchen knife but aim for uniformity in thickness.

How do I adjust for uneven oven temperatures?
Frequently rotate the dish halfway through cooking, or employ oven thermometers for precise internal temperature tracking.

Additional Resources

For those eager to expand their culinary prowess, explore related recipes such as scalloped potatoes or au gratin variations featuring different vegetables for inspired results. Technique guides on mastering mandoline skills or cheese integration provide further insight into achieving perfection.

Ingredient information access, particularly concerning which potato variants work best under different circumstances, is invaluable. Equipment recommendations ensure your kitchen stays ready to tackle any potato gratin challenge with finesse.

Seasonal variations offer creative pathways through timely ingredient focuses; earthy mushrooms or fresh spring greens alter the gratin landscape exquisitely.

Join the Conversation

We’ll love to hear your thoughts on this Crispy Two-Cheese Potato Gratin recipe! Share your own adaptations and photos with us across social media platforms and exchange culinary tips and tricks with fellow gratin enthusiasts in our community. We host regular feature posts spotlighting reader-submitted variations, showcasing the talents and creativity within our cooking community.

Savor the Perfect Ribeye Steak with Caramelized Onions and French Fries

Ribeye Steak with Caramelized Onions and French Fries: A Gourmet Delight

⚖️
Difficulty
Medium

⏲️
Prep Time
20 mins

🕒
Cook Time
30 mins

⏱️
Total Time
50 mins

🍽️
Servings
2

Prepare to indulge in the mouthwatering flavors of our Ribeye Steak with Caramelized Onions and French Fries. This classic recipe merges the rich, savory goodness of a perfectly seared ribeye steak, topped with sweet and luscious caramelized onions, and served alongside crispy, golden French fries. Perfect for a cozy dinner or a special occasion, this dish promises an unforgettable taste experience.

The hearty ribeye steak, known for its marbled texture and robust flavor, is complemented by the delicate sweetness of caramelized onions, creating a harmony of taste profiles. The sides of traditional French fries add a delightful crunch, providing a satisfying contrast in every bite. Whether you’re a steak enthusiast or a culinary explorer, this combination will tickle your taste buds.

Quick Recipe Highlights

  • Flavor Profile: A rich and robust combination of savory steak and sweet, soft onions.
  • Texture: Juicy and tender ribeye with a caramelized coating and crispy fries.
  • Aroma: Enticing beefy aroma with sweet, deep notes from the onions.
  • Visual Appeal: A visually striking meal with beautifully seared steak, golden onions, and crispy fries.
  • Skill Level Needed: Requires basic searing skills and knowledge of onion caramelization.
  • Special Equipment: A heavy skillet or grill pan is essential for the perfect sear.

Recipe Overview

  • Difficulty Level: Intermediate – Involves timing precision and temperature management for a perfectly cooked steak and caramelization of onions.
  • Category: Elegant main course ideal for dinner.
  • Cuisine: Rooted in classic American steakhouse traditions with a touch of French culinary influence from the onion preparation.
  • Cost: Moderately priced, with ribeye being a premium cut balanced by inexpensive onions and potatoes.
  • Season: Best enjoyed in cooler weather for its hearty warmth, though it’s delicious year-round.
  • Occasion: Perfect for dinner dates, family gatherings, or special celebrations.

Why You’ll Love This Recipe


Savor the indulgence of tender ribeye steak exquisitely paired with sweet caramelized onions, offering an irresistible combination that keeps you coming back for more. The steak’s rich, beefy flavor creates a delectable contrast to the mellow sweetness of the onions, while the fries complement the dish with just the right amount of crispy satisfaction.

Time-saving and straightforward, this ribeye steak recipe allows you to create a restaurant-quality meal in the comfort of your home without requiring hours of preparation. The caramelized onions can be made ahead, saving you precious time on busy evenings or festive occasions when you’re hosting.

Not only is this meal a feast for your senses, but it also provides an ample protein boost, aiding in muscle repair and growth. You’ll gain essential nutrients such as iron and vitamin B12 from the steak, beneficial for overall health.

Impress your guests with a dish that’s both elegant and satisfying. Perfect for social gatherings, this ribeye steak and caramelized onions delight brings a touch of sophistication to any occasion. Share this recipe with fellow cooking enthusiasts and watch as it becomes a new dinner party favorite.

With simple, accessible ingredients, this dish is both cost-effective and easy to source, ensuring that you never have to travel far for a gourmet experience. Adjust the recipe to suit any budget by choosing different cuts of beef or experimenting with alternative onion varieties.

Historical Background and Cultural Significance


Ribeye steak has long been a prized cut, known for its rich marbling and exceptional flavor. Its roots trace back to ancient beef consumption, evolving over centuries into a centerpiece of modern steakhouse dining.

The accompanying caramelized onions lend a nod to traditional French cuisine, where the technique of slowly cooking onions to release their natural sugars is a celebrated culinary art. This fusion of American and French elements creates a dish that’s both comforting and sophisticated.

Over time, the preparation of ribeye steak has evolved, incorporating innovative seasoning and cooking methods. This particular recipe embracing caramelized onions showcases a harmonious balance of flavor, a testament to culinary evolution.

In various regions, this dish enjoys unique spins and adaptations, from different seasoning blends to alternative side accompaniments. Its enduring popularity speaks to its universal appeal and adaptability in diverse cultural settings.

Ingredient Deep Dive


The ribeye steak, renowned for its superb marbling, holds significant cultural value as a symbol of luxury and indulgence. Its history spans across global cuisines, often featured in grand feasts and celebrations. Selecting a well-marbled ribeye is essential for achieving that tender, juicy bite everyone craves.

Nutritionally, ribeye offers a rich source of protein, vital for muscle health, and impressive amounts of essential vitamins and minerals like iron and zinc. Store your ribeye steak in a refrigerator and bring it to room temperature before cooking to ensure even grilling.

Caramelized onions, esteemed in French cuisine, provide sweetness and depth, transforming a humble ingredient into a gourmet delight. They hold nutritional benefits with low calorie counts, delivering fiber and vitamin C for health benefits.

After purchase, store onions in a cool, dry place to prolong their shelf life. Consider white or yellow onions for a sweeter caramelization, or substitute red onions for a milder flavor profile.

Common Mistakes to Avoid

  • Overcooking the steak can result in a tough texture; always follow recommended timing and temperature.
  • Rushing the caramelization process leads to underdeveloped flavors. Patience is key to achieving the desired sweetness.
  • Not letting the steak rest after cooking causes juice loss; always rest the steak for optimal juiciness.
  • Skipping the meat thermometer can result in incorrect doneness, so use one to ensure accuracy.
  • Using a non-preheated pan affects searing quality; ensure the pan is hot before adding the steak.
  • Failing to season both sides of the steak leads to an imbalance in flavor distribution.
  • Caramelizing onions on high heat can burn them; use medium-low heat instead for even cooking.
  • Crowding the pan with onions can result in steaming rather than caramelizing.
  • Using too much oil can make the onions greasy instead of evenly coated and golden.
  • Neglecting to slice onions uniformly results in uneven cooking; strive for consistent slices.

Essential Techniques


Achieving the perfect caramelized onion is an art. Start by slicing onions uniformly to ensure consistent cooking. Add them to a preheated pan and let them cook slowly over low to medium heat. The secret is allowing the natural sugars to emerge without high heat, creating a rich, golden-brown hue.

In searing a ribeye, it’s vital to preheat your skillet to ensure the steak achieves a delectable crust. Avoid moving the steak too much during searing; this ensures even caramelization while retaining the ribeye’s juicy interior. A perfect sear creates both flavor and texture contrasts.

Pro Tips for Perfect Ribeye Steak with Caramelized Onions and French Fries


Use a cast-iron skillet for impeccable heat retention and excellent searing results on your steak. Rest the steak after cooking to allow juices to redistribute, enhancing tenderness.

Before slicing onions, consider chilling them slightly in the fridge to reduce tear-inducing vapors. Slice uniformly for consistent caramelization which amplifies their sweet, complex flavor.

Cook your French fries either in an air fryer for a healthier alternative or double-fry them in batches for extra crispiness. Season with salt immediately after cooking for optimal flavor absorption.

Dry your ribeye steak with paper towels before seasoning to promote a crisp, offering an irresistible outer crust.

Experiment with adding a splash of balsamic vinegar during the last stages of onion caramelization for a tangy twist that elevates sweetness.

Use fresh herbs like rosemary or thyme on the steak for additional aroma, infusing it with a delightful, herbaceous undertone.

Variations and Adaptations


In exploring regional variations, consider using locally available meat cuts like sirloin or tenderloin for economic adaptability. Seasonal root vegetables like parsnips or sweet potatoes serve as alternative side options, delivering a delightful twist to the traditional French fry accompaniment.

For those observing dietary restrictions, explore substitutions such as air-fried zucchini wedges or a cauliflower mash, providing low-carb, gluten-free alternatives that align with keto or paleo diets.

Ensure culinary diversity by introducing bold spice rubs or marinades that correspond with cultural inclinations—smoky chipotle for a twist of Tex-Mex flair or a mix of sesame and soy for an Asian inspiration.

Elevate the dish’s texture by adding a crispy, herbed breadcrumb topping to the caramelized onions, offering both visual appeal and sensory diversity.

Presentation possibilities abound, whether opting for rustic, shareable planks of steak strips or artfully plated individual servings, garnished with fresh parsley for a pop of color.

Serving and Presentation Guide


Thoughtful plating can transform your ribeye steak into a culinary masterpiece. Consider a minimalist approach with sliced steak fanned over a smattering of caramelized onions, flanked by elegantly stacked French fries. Sprinkle chopped fresh herbs for a burst of color and aroma.

Elevate your garnishing strategy by experimenting with different sauces, such as a creamy garlic aioli or chimichurri, drizzling artfully for aesthetic appeal and flavor enhancement.

A buffet-style presentation on a large wooden board, with slices of ribeye beautifully fanned and encompassed by bowls of onions and crispy fries, encourages convivial sharing.

Taking temperature into account, serve this dish promptly to maintain the desired warmth, maintaining the steak’s ideal medium-rare experience that brings out its full flavor.

Guide each serving with the perfect amount of French fries, advocating for a balanced portion that complements without dominating the plate, ensuring each bite seamlessly melds together.

Wine and Beverage Pairing


When pairing wine with your ribeye steak, look no further than a bold, structured red wine, such as a Cabernet Sauvignon or Malbec, which complements the beef’s richness while mirroring the deep, mellow notes of the caramelized onions.

For those seeking non-alcoholic options, consider a rich, tannic iced tea or a pomegranate spritzer, providing contrasting acidity that invigorates the palate with each bite.

Should coffee or tea be part of your dining ambiance, a robust dark roast or a smoked tea infusion creates a seamless aromatic experience that echoes the dish’s depth.

Ensure your beverage selection is served at optimal temperatures—wine tastes best slightly below room temperature, while iced options refresh when chilled.

Play with presentation by serving drinks in elegant glassware. The transparency allows for visual interaction with the vibrant dish and enhances the meal experience.

Storage and Shelf Life


For optimal freshness and safety, store leftover ribeye steak and caramelized onions in airtight containers. Keep these containers in the refrigerator, where they will remain good for up to three days.

Freezing the steak uncooked is an option if vacuum-sealed, allowing it to maintain its quality for up to six months. Always ensure to thaw it gradually in the fridge before cooking.

Pay attention to any signs of spoilage, such as off-odors or discolorations, and discard any component that seems suspect to ensure food safety.

When reheating, opt to gently warm the steak in an oven at low heat covered loosely with foil, protecting it from drying and toughening.

In tackling French fries, recapture their crispiness by a brief reheat in an air fryer or oven, avoiding microwaving, which might render them soggy.

Make Ahead Strategies


Maximize efficiency by caramelizing onions a day ahead, storing them in a refrigerator-ready container, and simply reheating to serve.

Construct a prep-friendly timeline where meat can be seasoned ahead and refrigerated, allowing flavors to fully infuse before searing to amplify its taste.

By preparing the fries in advance, you can focus on other meal components. Parboil potatoes ahead and refrigerate, finishing them off in the fryer or oven just before serving.

Assessing quality impact, know that certain elements such as fries may diminish in crispiness if pre-cooked completely, so aim for partial preparations for the best results.

Anticipate presentation enhancements by freshly adding garnishing herbs, sauces, or crispy onion toppings—elements that benefit from last-minute attention to retain freshness.

Scaling Instructions


Adapting this recipe to varying crowd sizes is straightforward. When halving, maintain balance in proportions, ensuring flavor intensity remains consistent by carefully scaling down spices and condiments.

Doubling or tripling for larger gatherings requires equipping a larger skillet or grill surface to accommodate added portions without overcrowding, preserving ideal searing quality.

Keep in mind timing modifications, as larger quantities necessitate adjustments both for cooking and resting phases to secure the same tender, juicy result.

Store surplus steak correctly, optimizing potential use for subsequent meals as added elements in sandwiches, salads, or sides, ensuring no portion goes to waste.

Nutritional Deep Dive


With a macronutrient-rich profile, ribeye steak offers substantial protein aiding muscle development and repair. Its generous heme iron boosts energy through improved oxygen transport in cells.

Explore micronutrients such as zinc for immunity strength and vitamin B12 critical for nervous system health, ensuring each serving supports a balanced diet.

A well-rounded portion strategy can accommodate weight management goals by pairing the meal with leafy greens, balancing caloric intake while still indulging in its flavors.

Dietary fiber present in onions facilitates digestion, complementing the ribeye’s nutrient density, and creating a harmonious nutritional experience.

Awareness of these elements ensures the dish not only satisfies the palate but also contributes valuable dietary benefits to health-conscious dining practices.

Dietary Adaptations


For a gluten-free adaptation, ensure all seasonings used are certified gluten-free, typically being free from contaminants present in some spice blends.

Achieve a dairy-free experience by avoiding cream-based side sauces, which you might pair instinctively, favoring oil-based or vegetable reductions instead for those averse or intolerant to dairy.

Vegan diners may opt for plant-based substitutes such as portobello mushrooms, which replicate the ribeye’s savory nature, accompanied by vegetable-based sides maintaining the essence while diverging from animal products.

Catering to low-carb needs involves replacing traditional fries with baked or air-fried vegetable sticks such as zucchini or asparagus, aligning with keto or paleo preferences.

Adapt to the low-FODMAP diet by replacing onions with green onions, still imparting flavor while minimizing digestive concerns, illustrating customizable accessibility for all diets.

Troubleshooting Guide


Don’t let texture issues ruin your steak; always rest your ribeye, allowing fibers to reabsorb juices. Through this, you maintain desired tenderness, crucial for enjoying the dish to its fullest.

For balanced flavor, consider using a meat thermometer. If you find disparities, optimizing internal temperature to an exact reading ensures that the steak isn’t over or underdone.

Achieve seamless temperature control by choosing the right pan; heavier alternatives retain heat better, ensuring even cooking—essential when avoiding center misfires.

If your kitchen lacks necessary equipment, look for inventive solutions using available tools. For instance, a heavy pot lid can serve as a steak press in some cases, assisting equally effective searing.

When ingredient substitutions seem necessary, remain vigilant to how such adjustments impact flavor profiles or textures, seeking guidance on best alignments if uncertainty arises.

Maintain precision through recipe timing, factoring minute variances in oven or stove efficiency; methodically checking progress averts over or under-cooking, which can be common.

Recipe Success Stories


Feedback from our community continuously validates this recipe’s acclaim, celebrating its convenience and mouthwatering outcome. Suggested variations frequently include an addition of roasted garlic or honey-glazed elements, imbuing dishes with extra layers of taste.

Reader suggestions offer inspiration, occasionally resulting in successful family adaptations like adding bold chimichurri or blue cheese crumbles enriching depths of flavor.

Photography enthusiasts love highlighting the dish’s presentation, sharing tips to capture ribeye’s marbling, vibrant onion hues, and contrasting golden fries under natural light for optimal appeal.

Community engagement is crucial as shared interpretations circulate, fostering a collective atmosphere where individuals experiment and contribute firsthand adaptations of the recipe.

Readied with reader photos, the dish effortlessly showcases appetite-inducing imagery in solidifying its reputation, encouraging continued savoring across various culinary circles.

Frequently Asked Questions

How can I ensure my steak is perfectly cooked without a meat thermometer?

Without a meat thermometer, evaluate the doneness by using the touch method; gently press the steak center and compare the resistance to different parts of your palm, indicative of cooked stages – soft equating to rare, firmer reflecting well-done.

Are there alternative meats for ribeye in this recipe?

Substituting ribeye with sirloin or tenderloin offers leaner or less costly alternatives, both possessing unique attributes while preserving core flavor essence despite minor texture changes.

What type of oil should I use for caramelizing onions?

Opt for mild-flavored oils like canola or vegetable oil, ensuring onions caramelize without overwhelming with taste deviations, enhancing the natural sweet progression of pan-searing.

Can I use pre-packaged onion caramelization kits?

While feasible, preparing fresh onions often reveals deeper flavors and greater texture contrast, typically more satisfying whether from local produce or sourcing adaptable varieties.

How long can caramelized onions last in the fridge?

Properly stored in airtight containers, caramelized onions maintain their flavor and quality for up to five days, ensuring readiness for use in upcoming meals.

What are suggestions for non-alcoholic pairings?

Consider iced chamomile tea for an herbaceous complement or a pomegranate spritzer, providing depth through tart contrast accompanied by natural effervescence.

Can I grill the steak instead of pan-frying?

Grilling is an approved alternative, offering smoky notes; following optimal temperature guidelines ensures characteristic ribeye marks and flavor perfection.

What are some garnishing ideas for presentation enhancement?

Use fresh herbs like rosemary or thyme and finishing with a touch of sea salt or freshly cracked pepper complements visual refinement while amplifying finished dish aroma.

Are there lower-cost substitutions for French fries?

Consider oven-baked sweet potato wedges, delivering a similar crunch with enhanced sweetness, offering both cost efficiency and comparable tastiness.

How do I prevent steak from sticking to the pan?

Preheat the skillet properly, lubricating with a thin layer of oil prevents sticking; additionally allowing the steak to sear undisturbed secures the foundational crust’s integrity.

Additional Resources


Explore related recipes that shape your culinary presence by drawing inspiration from classic steakhouse menu creations or rich, homey comfort dishes with a personal touch.

Glimpse into our technique guides, offering insight into mastering perfection in steak searing or the artistry of onion caramelization, critical for any culinary journey.

Investigate essential ingredient information to make informed shopping decisions, ensuring your choices foster the freshest possible dish quality each preparation.

Dive into equipment recommendations, echoing the need for the right gear to enhance every cooking venture, maximizing safety and effectiveness.

Challenge seasonal variations as a means of exploration, embracing how classic dishes can seamlessly adapt to ever-changing palate demands driven by diversity.

Join the Conversation


Engage with a global community of culinary enthusiasts who celebrate tweaking and tasting, creating lively dialogue furthering connection through shared meal experiences.

Leverage social media platforms to showcase creations, exchanging tips with like-minded individuals excited to explore novel presentations and diverse personal spins.

Every recipe review submitted helps foster a platform thriving on honesty and growth, yielding spaces rich in diverse voices amplifying delicious progress.

Involved photography aficionados contribute high-value imagery, refining skills and perfecting compositions highlighting the signature beauty of each crafted dish—a sight to behold.

Embrace collaborative learning spaces where community-driven recipe variations showcase achievable results, invigorating creativity inspiring further experimentation among participants.

The Recipe

Ribeye Steak with Caramelized Onions and French Fries

Serves: 2

Prep Time: 20 mins

Cook Time: 30 mins

Total Time: 50 mins

Kitchen Equipment Needed

  • Cast-iron skillet or grill pan
  • Sharp knife
  • Cutting board
  • Non-stick pan for onions
  • Baking sheet or fryer

Ingredients

  • 2 ribeye steaks, about 1 inch thick
  • 2 large onions, thinly sliced
  • 2 tablespoons olive oil, divided
  • Salt and pepper, to taste
  • 4 large potatoes for fries, thinly sliced
  • Vegetable oil for frying
  • Fresh herbs for garnish (optional)

Directions

  1. Heat 1 tablespoon of olive oil in a non-stick pan over medium heat. Add onions and cook, stirring occasionally, for about 20–25 minutes until they are golden and caramelized. Remove from heat and set aside.
  2. Preheat oven to 400°F (200°C) for fries. Spread potato slices onto a baking sheet, drizzle with remaining olive oil, and season with salt. Bake for 25-30 minutes until golden and crisp, turning them halfway through cooking.
  3. Meanwhile, heat a cast-iron skillet or grill pan over high heat for steak preparation. Season steaks generously with salt and pepper.
  4. Place steaks in the pan, cook for 3-4 minutes on each side for medium-rare, longer if preferred. Remove and let rest for 5 minutes to redistribute juices.
  5. Plate the steak, topping with caramelized onions and serve with freshly baked fries. Garnish as desired.

Recipe Notes

  • You can substitute regular potatoes with sweet potatoes if desired.
  • Caramelized onions can be made ahead and reheated gently before serving.
  • Adjust searing time based on steak thickness and preferred doneness.

Delicious Maraschino Cherry Chocolate Chip Cookies Recipe for Sweet Lovers

Maraschino Cherry Chocolate Chip Cookies: A Sweet Delight

⚖️
Difficulty
Easy

⏲️
Prep Time
15 mins

🕒
Cook Time
12 mins

⏱️
Total Time
27 mins

🍽️
Servings
24 cookies

Indulge in the delightful marriage of tangy maraschino cherries and decadent chocolate chips with our Maraschino Cherry Chocolate Chip Cookies. These cookies blend the rich flavors of chocolate with the sweet surprise of cherries, creating a sensational treat for the taste buds. Perfect for any occasion, this easy-to-follow recipe guarantees a batch of cookies that will disappear as quickly as they’re baked.

Quick Recipe Highlights

  • Flavor Profile: The cookies are a perfect blend of dark chocolate richness paired with juicy and sweet maraschino cherries.
  • Texture: Expect a soft and chewy interior with a slight crunch around the edges.
  • Aroma: Experience the inviting aroma of baked chocolate mingling with subtle cherry notes.
  • Visual Appeal: These cookies boast a beautiful contrast of dark chocolate chunks against vibrant red cherry pieces.
  • Skill Level Needed: Ideal for beginners, this recipe requires basic cookie skills and avoids complex techniques.
  • Special Equipment: Use a standard hand or stand mixer for combining ingredients effortlessly.

Recipe Overview

  • Difficulty Level: Easy – A straightforward recipe perfect for novice bakers looking to impress without stress.
  • Category: Dessert – These cookies are an excellent choice for ending a meal on a sweet note.
  • Cuisine: American – These cookies reflect the classic American combination of cherries and chocolate.
  • Cost: Moderate – With easily accessible ingredients, this recipe is budget-friendly yet indulgent.
  • Season: Year-round – Enjoy these cookies at any time, especially during holiday occasions.
  • Occasion: Perfect for holiday gatherings, family picnics, or a cozy night in.

Why You’ll Love This Recipe


These cookies tantalize your taste buds with their harmonious flavor balance of sweet maraschino cherries and rich chocolate chips. The convenience of this recipe makes it a family favorite, requiring only a short prep and cook time for delicious results. Nutritionally, these cookies are a satisfying treat when enjoyed in moderation. These cookies bring social value to gatherings, making memorable moments among friends and family. Cost-effectiveness and accessibility of ingredients make this recipe a staple for spontaneous baking sessions.

Historical Background and Cultural Significance


The fusion of cherries and chocolate dates back centuries, capturing the essence of festive American baking traditions. Originally, maraschino cherries were a luxuriously preserved fruit, often used in desserts by the upper class. Over time, recipes such as these cookies have evolved, adapting to modern tastes while maintaining their original charm. In different regions, variations may include additional ingredients like walnuts or white chocolate.

Ingredient Deep Dive


Maraschino cherries offer a burst of sweetness; originally a delicacy, they’ve become a dessert staple. Rich in vitamin C and antioxidants, they add visual appeal and flavor depth. Store in airtight containers after draining excess syrup. Use them in recipes sparingly due to their syrupy nature. High-quality chocolate chips provide the best texture and melt. Opt for semi-sweet variety; their balanced flavor complements the cherries.

Common Mistakes to Avoid

  • Using warm butter – It can lead to overly flat cookies. Ensure butter is softened, not melted.
  • Overmixing dough – This can create tough cookies. Mix just until ingredients are combined.
  • Not chilling the dough – Briefly refrigerating helps enhance flavor and manage spread.
  • Skipping the parchment paper – Ensures even baking and easier cleanup.
  • Overbaking – The cookies will continue cooking on the tray; remove them when edges firm up.
  • Using old baking soda – This will affect rising and texture. Check expiration dates regularly.
  • Improper cherry preparation – Drain well to avoid adding excess moisture.
  • Ignoring portion sizes – Use a scoop for uniformity, affecting cooking time and texture.
  • Chocolate chip selection – Use quality chips to ensure a smooth melting texture.
  • Incorrect oven temperature – Always preheat the oven for consistent baking results.

Essential Techniques


Master the room temperature butter technique to ensure your cookies are fluffy. Proper dough chilling enhances flavor and texture while controlling spread. Use measuring techniques to achieve the right balance of ingredients. Recognize visual cues like golden brown edges to determine doneness.

Pro Tips for Perfect Maraschino Cherry Chocolate Chip Cookies


Use a cookie scoop for uniformity and consistent bake. Allow your dough to chill for at least 30 minutes to develop flavors. Line your baking sheets with parchment paper to prevent sticking and ensure even baking. For added flair, gently press a few chocolate chips on top before baking. Ensure cherries are well-drained to avoid excess moisture in your dough. Experiment with different chocolate varieties for unique flavor profiles.

Variations and Adaptations


Explore regional variations by adding different nuts for texture. Seasonal adaptations could include adding zest of citrus for a refreshing summer twist. Dietary modifications allow for gluten-free alternatives using almond flour. Flavor variations include adding a teaspoon of almond extract. Texture modifications can be achieved with different chocolate chunk sizes. Presentation alternatives may involve drizzling melted chocolate on the cooled cookies.

Serving and Presentation Guide


Use a decorative platter lined with parchment for rustic appeal. Garnish with fresh cherry halves for added color. Traditional accompaniments involve a glass of cold milk. Modern suggestions include a scoop of vanilla ice cream. Ensure cookies are cooled to prevent melting garnishes. Think about portion control by serving small batches at a time to maintain freshness.

Wine and Beverage Pairing


Pair with a medium-bodied red wine to complement the chocolate. Non-alcoholic options include pairing with a tart cherry juice or a rich hot chocolate. For those who love coffee, a medium-roast coffee balances sweetness. Consider temperature, as chilled beverages can refresh the palate. Serve drinks in clear glasses to enhance visual appeal.

Storage and Shelf Life


Store cookies at room temperature in airtight containers for up to a week. Avoid humidity to maintain freshness. Use glass or metal containers for best results. Beware of stale odors indicating spoilage. Reheat gently to revive texture, either in an oven or microwave. For long-term storage, freeze dough portions, baking as needed.

Make Ahead Strategies


Prepare your ingredients ahead of time, storing them appropriately. Chill dough in advance, allowing you to bake fresh batches on demand. Discuss how refrigeration impacts flavor depth over time. Store-baked cookies can become softer but can be crisped in an oven. Reheat before serving, maintaining their fresh-baked quality. Add fresh cherries for garnish just before serving for optimal flavor.

Scaling Instructions


Halve the recipe by reducing ingredient measurements proportionally, while maintaining ratios. To double or triple, use larger mixing equipment to accommodate the increased volume. Adjust baking times slightly with added dough; larger batches may require more cooking time per tray. Mind how storage needs change with larger quantities to ensure freshness.

Nutritional Deep Dive


Each cookie offers a balance of carbohydrates for energy and fats for satisfaction. Includes micronutrients like iron and magnesium from chocolate. Also consider dietary sugar balance in moderation. Detail portion sizes for those managing weight goals. Explain health benefits of key ingredients like the antioxidant properties of cherries.

Dietary Adaptations


For gluten-free, substitute flour with a blend of almond and coconut flour. Dairy-free may involve using plant-based butter alternatives. Vegan options exclude eggs, utilizing flaxseed meal in water. Low-carb approaches use sugar-free chocolate and almond flour for fewer carbs. Customize for keto by adjusting sweeteners. Detailifications cater to various diets, highlighting the adaptability of these cookies.

Troubleshooting Guide


Address common texture issues, like overly flat cookies, with proper dough chilling. Balance flavor with spices if desired or add a pinch of salt for contrast. Solve temperature problems by calibrating ovens regularly. Equipment challenges involve using appropriately sized mixers or bowls. For substitutions, provide plant-based or allergy-friendly alternatives. Timing concerns resolve with timer checks to avoid overbaking.

Recipe Success Stories


Join our community where readers rave about the success of these cookies at events. Share adaptation techniques for dietary restrictions without losing charm. Engage with reader suggestions for variations that maintain tradition with a twist. Photography tips help present cookies beautifully on your social media platforms. Encourage readers to share their experiences and favorite additions.

Frequently Asked Questions

What can I use instead of maraschino cherries? Try dried cherries or cranberries for a more tart alternative.
How do I store leftover dough? Wrap in plastic and refrigerate for up to 72 hours or freeze for later use.
Can I reduce sugar content? Yes, but the texture may alter; consider using a sugar substitute.
Why did my cookies spread too much? Ensure butter wasn’t too warm and dough was chilled.
How can I make these gluten-free? Substitute all-purpose flour with a gluten-free blend.
Are there vegan replacements for these cookies? Use flax eggs and vegan chocolate chips.
Can I add nuts to the recipe? Absolutely, chopped walnuts or pecans work beautifully.
What if my cookies are undercooked in the middle? Allow to cool on the sheet; they continue cooking off-heat.
How long can I store these cookies? Store in an airtight container for a week at room temperature.
Can I use different chocolate types? Mix milk, white, or dark chocolate chips for varied flavors.
Should I flatten the dough before baking? Slightly flatten for even baking, but avoid making them too thin.
How essential is chilling the dough? It’s crucial for reducing spread and developing flavor.

Additional Resources


Explore related cookie recipes to diversify your baking skills. Delve into technique guides for perfect cookie consistency. Ingredient information helps wary shoppers pick quality items. Seek equipment recommendations for committed bakers seeking efficiency. Learn about seasonal variations for holiday or special event baking.

Join the Conversation


Join us on social media, sharing your cookie creations and ideas. Snap photos using our photography tips for the perfect shot. Leave reviews to help fellow bakers. Engage in our community space for recipe variations and sharing success stories. Enjoy feedback and tips from other baking enthusiasts, forming friendships over shared culinary passions.

The Recipe

Maraschino Cherry Chocolate Chip Cookies

Serves: 24 cookies

Prep Time: 15 mins

Cook Time: 12 mins

Total Time: 27 mins

Kitchen Equipment Needed

  • Stand or hand mixer
  • Baking sheet
  • Parchment paper
  • Mixing bowls
  • Cookie scoop

Ingredients

  • 1 cup unsalted butter, softened
  • 1 cup brown sugar
  • 1/2 cup white sugar
  • 2 large eggs
  • 1 tsp vanilla extract
  • 2 1/2 cups all-purpose flour
  • 1 tsp baking soda
  • 1/2 tsp salt
  • 1 cup maraschino cherries, drained and chopped
  • 1 1/2 cups chocolate chips

Directions

  1. Preheat your oven to 350°F (175°C) and line baking sheets with parchment paper.
  2. Cream butter, brown sugar, and white sugar together until smooth.
  3. Add eggs, one at a time, beating well after each addition. Mix in vanilla.
  4. In a separate bowl, whisk together flour, baking soda, and salt. Gradually add to creamed mixture, mixing well.
  5. Fold in chopped maraschino cherries and chocolate chips until well distributed.
  6. Drop rounded tablespoons of dough onto the prepared baking sheet.
  7. Bake for 10-12 minutes or until edges are lightly browned.
  8. Allow cookies to cool on baking sheets for a few minutes before transferring to wire racks.

Recipe Notes

  • For a twist, add chopped nuts like walnuts or pecans.
  • Store baked cookies in an airtight container for up to a week.
  • For best results, refrigerate dough for at least 30 minutes before baking.

Irresistible Christmas Gumdrop Nougat Candy Recipe for Festive Fun

Easy Christmas Gumdrop Nougat Candy Recipe for a Festive Treat

⚖️
Difficulty
Easy

⏲️
Prep Time
15 mins

🕒
Cook Time
5 mins

⏱️
Total Time
20 mins

🍽️
Servings
24 pieces

The holiday season is the perfect time to indulge in sweet confections, and this Easy Christmas Gumdrop Nougat Candy Recipe is bound to be a festive favorite. With its delightful blend of flavors and a chewy texture, this nougat is a showstopper at any holiday gathering. The recipe is an effortless way to create a nostalgic treat that will transport you back to cherished Christmas memories. Colorful gumdrops bring a vivid burst of color and sweetness that complements the delicate vanilla-flavored nougat.

This simple-to-make candy has a rich history wrapped in the comforting scents of sugar and vanilla, reminiscent of yuletide cheer. As the holiday spirit fills the air, prepare this candy to share with family and friends, sparking joy with every bite. The soft and satisfying chew makes it a candy that will be adored by children and adults alike, promising happiness wrapped in delicious sweets.

Quick Recipe Highlights

  • Flavor Profile: The candy boasts a delicate vanilla flavor combined with the fruity sweetness of gumdrops, resulting in a delightful contrast.
  • Texture: Soft, chewy nougat with a gentle pull in each bite, enhanced by the jelly-like crunch of chopped gumdrops.
  • Aroma: The irresistible aroma of vanilla fills your kitchen as the nougat sets, evoking a sense of warmth and festivity.
  • Visual Appeal: Vivid colored gumdrops speckling the white nougat make for a visually appealing and festive treat.
  • Skill Level Needed: Beginner-friendly, this recipe requires minimal cooking expertise and guarantees impressive results.
  • Special Equipment: Using a candy thermometer ensures the nougat reaches the desired consistency, while a sturdy wooden spoon simplifies mixing.

Recipe Overview

  • Difficulty Level: This recipe is easy to prepare, perfect for beginner candy makers looking to create a charming holiday treat with minimal effort.
  • Category: Ideal for dessert and sweet treats, this candy is a wonderful addition to your holiday dessert spread.
  • Cuisine: Rooted in classic confections, the gumdrop nougat fuses traditional candy-making techniques with a modern holiday twist.
  • Cost: With readily available and inexpensive ingredients, this nougat is budget-friendly while making a generous batch.
  • Season: Best enjoyed during the holiday season, this recipe captures the essence of Christmas with its cheerful colors and flavors.
  • Occasion: Perfect for holiday celebrations, gifts, or as a sweet treat to share during festive gatherings.

Why You’ll Love This Recipe


This Easy Christmas Gumdrop Nougat Candy Recipe offers an exquisite balance of taste and texture. The combination of soft vanilla-flavored nougat and chewy gumdrops creates a sensational mouthfeel that will light up your taste buds. Every bite promises a harmony of sweetness that’s not overly cloying but rather satisfying in a festive way.

Convenience is one of the standout features of this recipe. With simple, easy-to-source ingredients and straightforward instructions, you can whip up this delightful candy in no time. The minimal cooking time and steps mean you’ll have more moments to enjoy the holiday spirit, making it perfect for busy schedules.

Not only is this candy delicious, but it also comes with nutritional perks. Gumdrops add a bit of fruit goodness, and by controlling the ingredients, you can avoid preservatives commonly found in store-bought counterparts. This homemade version allows you peace of mind with each indulgent bite.

In terms of social value, presenting a beautifully crafted batch of gumdrop candy at a party will surely impress your guests. From Christmas dinners to casual gatherings, this candy is a conversation-starter that draws attention and admiration. It serves as an ideal hostess gift and is a sweet token of appreciation during the holidays.

Finally, this candy’s cost-effectiveness and accessibility make it a must-have on your holiday list. Making it at home is more economical than purchasing store-bought versions, while allowing customization of flavors and textures to cater to personal preferences.

Historical Background and Cultural Significance


Nougat spans centuries, with its roots lying deep in Mediterranean and Middle Eastern regions. Historically, nougat was a luxurious confection adored by royalty, and its delicate texture was considered a culinary marvel. As candy-making techniques advanced, nougat recipes included various nuts and were often reserved for special occasions and celebrations.

Nougat’s journey across cultures is marked by adaptation and regional influences. In certain parts of Europe, the use of aromatic honey and almonds is a nougat staple, while other regions embraced fruits and spices to create distinct variations. The Easy Christmas Gumdrop Nougat is a modern adaptation, weaving traditional nougat comfort with playful, colorful holiday elements.

Through time, nougat evolved in part due to migration and trade, becoming a cherished delicacy globally. In the context of Christmas, it has transitioned from being a lavish luxury to a commonplace symbol of holiday joy, embodying the sweet essence of sharing during the most wonderful time of the year.

Regional variations highlight cultural diversity, reflecting community traditions and personal touches. In contemporary kitchens, nougat becomes a vehicle for culinary creativity, balancing its luxurious past with a modern, inclusive approach that celebrates worldwide flavors and influences.

Ingredient Deep Dive


Sugar forms the backbone of this recipe, bestowing the essential sweetness that transforms simple ingredients into a delectable treat. Historically, sugar’s journey across continents marks it as a treasured spice, once accessible only to the wealthy. Today, granulated sugar offers balance and consistency, key to achieving the perfect nougat texture.

Corn syrup plays its part as a stabilizer, preventing crystallization and ensuring smoothness. This ingredient maintains the chewy allure synonymous with nougat and mixes effortlessly, acting as a binding agent. For culinary enthusiasts looking to experiment, substituting with golden syrup could infuse subtle caramel notes while preserving texture.

Egg whites are whipped to provide structure and volume. The protein network they form traps air, setting the stage for a fluffy yet firm nougat consistency. This historical technique showcases the versatile power of egg whites in confectionery, while vegan substitutions such as aquafaba offer dietary flexibility without compromising texture.

Gumdrops bring color and festive cheer into this nougat, with their bright jewel tones and fruity essence. Historically used as decorative candies, they elevate the visual and sensory appeal of the recipe. When selecting gumdrops, choose a mix of flavors for a delightful combination, and store them in an airtight container to retain moisture and freshness.

Strong vanilla essence adds depth and sophistication, a beloved aroma that evokes nostalgia and comfort. This fragrant spice has deep roots in culinary history, celebrated for its ability to enhance sweetness and harmonize diverse flavors. Opt for pure vanilla extract for the best flavor representation, and consider using vanilla beans for a luxurious touch.

Common Mistakes to Avoid

  • Overcooking the sugar mixture can lead to a hard texture. Use a candy thermometer to ensure the correct temperature.
  • Rushing the process and not allowing the nougat to set can result in sticky candy. Patience is essential.
  • Failing to use a non-stick or lined pan can cause the nougat to adhere, making removal difficult.
  • Skipping the stirring step when incorporating gumdrops may lead to uneven distribution, affecting texture.
  • Choosing low-quality vanilla can impact the overall flavor profile. Use high-quality extract for the best results.
  • Not cutting gumdrops small enough can lead to separation within the nougat. Aim for uniform, bite-sized pieces.
  • Using ingredients at differing temperatures may affect the mix. Bring them to room temperature for consistency.
  • Ignoring humidity levels, which can affect candy texture. Make candy on a dry day for optimal results.

Essential Techniques


Properly whipping the egg whites is crucial for nougat’s signature fluffy texture. This process incorporates air, creating volume and stability. Use clean equipment to avoid contaminating whites with fat, which inhibits aeration. Achieve stiff peaks for ideal consistency, and avoid over-mixing to prevent collapse.

Cooking the sugar mixture requires precision and attention. Maintaining the correct temperature ensures the nougat sets well. Utilize a candy thermometer for accuracy, and be patient as it achieves the soft-ball stage. Keep stirring to avoid burning and crystallization.

Blending gumdrops seamlessly into the nougat mixture requires careful folding without deflating the airy mixture. Distribute gumdrops evenly for consistent flavor with every bite, and minimize agitation to preserve texture. Use a sturdy utensil, like a silicone spatula or wooden spoon, for gentle incorporation.

Pro Tips for Perfect Easy Christmas Gumdrop Nougat Candy


For a richer flavor, browning the butter lightly before adding ingredients can introduce a nutty undertone to the nougat. This small step elevates the candy’s complexity without complicating the process.

Experiment with different gumdrop flavors for a tailored taste experience. Consider thematic colors for specific holidays or occasions, and try unique flavors like citrus or spice for a twist.

Stir in chopped nuts for added texture variation. Almonds, pistachios, or pecans provide complementary crunch, enriching the sensory experience and offering visual appeal through contrasting colors.

Optimal nougat cutting requires swift action with a sharp, non-serrated knife. Dip the knife in hot water before slicing through the chilled nougat, ensuring even, clean cuts for an immaculate presentation.

If occurring in a humid climate, adding a teaspoon of cornstarch to the candy when setting can help maintain nougat texture and prevent sweating, ensuring longer shelf life and freshness.

Ensure the candy sets properly by chilling in a fridge. This solidifies the nougat faster, enabling easier handling and reducing stickiness during serving or packing for gifts.

Store in parchment paper to avoid excess moisture and maintain freshness. Organize in layers for stability, minimizing contact to preserve the nougat’s glossy finish.

Variations and Adaptations


Regional variations include Mediterranean-inspired nougat with honey and almonds, offering a homage to traditional techniques while complementing modern gumdrop colors.

Seasonal adaptations create a dynamic treat year-round. Consider incorporating dried cranberries or candied orange peel during autumn or pairing peppermint-flavored gumdrops for winter festivities.

Dietary modifications allow this nougat to cater to gluten-free or vegetarian diets. Utilize natural gumdrops and plant-based marshmallows for a universally inclusive piece of candy.

Flavor variations can introduce surprise elements. Incorporate citrus zest or cinnamon powder for an aromatic uplift or explore essences like almond or rose for exotic notes.

Texture modifications involve adding crisped rice cereal for extra crunch. The interplay between nougat and crispy bits imparts a playful dimension to the traditional chew.

Presentation alternatives include setting candy in silicone molds for festive shapes. Decorate with edible glitter or drizzle with chocolate for a decorative flair that delights guests visually.

Serving and Presentation Guide


Ensure thoughtful presentation by slicing nougat into neat, identical pieces. Display on festive platters lined with parchment for an inviting yet functional touch, preventing sticking.

Garnishing with a light dusting of powdered sugar adds a picturesque winter feel, enhancing visual appeal, and nodding to snow-covered holiday dreams.

Traditional accompaniments serve nougat beside an assortment of holiday cookies or nuts, creating an inclusive dessert spread that caters to diverse palates.

Modern serving suggestions embrace creativity. Tiered stands turn nougat into a decorative feature that doubles as an edible centerpiece, capturing attention and admiration.

Serving temperature is key; room temperature retains the characteristic chew. Avoid drafts or humidity that may affect structure and use storage solutions to lock in freshness.

Portion control tips balance indulgence. Providing smaller pieces ensures guests enjoy without overindulgence, allowing them to savor this sweet holiday treat responsibly.

Wine and Beverage Pairing


Wine pairings with this nougat suggest reaching for a lightly sweet Moscato or a bubbly Prosecco. These wines balance nougat’s sweetness, complementing fruit flavors harmoniously.

For a non-alcoholic alternative, apple cider or elderflower cordial offers refreshing options that counter nougat’s richness, attuning to audience preferences seamlessly.

Consider coffee or tea pairings to highlight nougat’s delicate flavors. A hot cup of Earl Grey underscores vanilla notes, while robust espresso provides a delightful contrast.

Temperature considerations emphasize serving beverages at contrasting warmth to the room-temp candy. Cold drinks refresh, while heated options emphasize winter coziness.

Offering sharing-sized beverage suggestions encourages communal enjoyment. Large pitchers and decanters invite guests to serve freely, fostering a sense of hospitality and festivity.

Storage and Shelf Life


Effective storage methods include airtight containers to preserve freshness and protect against moisture, preventing unwanted stickiness or drying out over time.

Room temperature works for up to two weeks, as long as the nougat is properly wrapped. For extended preservation, consider refrigeration, maintaining texture and flavor integrity.

Choose containers that minimize air exposure. Sturdy glass jars with rubber seals provide a nostalgic presentation and robust protection against environmental factors.

Signs of spoilage include excessive moisture accumulation, stickiness, or any off odors. Regular checks ensure the candy remains in optimal condition throughout its shelf life.

Gentle reheating, if necessary, revives softness without compromising integrity. A short session in a low-temperature oven, wrapped, ensures smoothness returns.

Freezing offers long-term storage but requires care. Wrap nougat tightly in plastic and foil to protect texture, and defrost gradually when ready to enjoy, minimizing abrupt temperature changes.

Make Ahead Strategies


Develop a prep timeline by organizing ingredient measurements and ensuring equipment is ready in advance. Swift movement through the stages supports the process.

Storing between steps involves sealing ingredients to maintain consistency and quality, particularly when extending preparation over several days to free up time.

Assess quality impact on essential ingredients, ensuring substitutions retain characteristic flavors and textures. Testing versions allows for quick recovery from potential hurdles.

Assembly tips streamline steps, aligning prep areas for smooth transitions. Ensure a clear workspace and coordinated flow to handle stages with ease.

Reheating guidelines underscore gentle processes to maintain integrity. Avoid excessive heating, sticking to minimal warmth for optimal results.

Incorporating fresh elements aids in presentation and taste variation. Consider adding freshly chopped gumdrops or a last-minute vanilla infusion for heightened allure.

Scaling Instructions


Halving the recipe offers control over output, using precise measurement to maintain balance. Adjust tool size accordingly to ensure even mixing and setting in smaller batches.

Doubling or tripling requires careful heating attention, primarily for the sugar mixture. Utilize larger pots to accommodate volume while maintaining consistent boiling and heat distribution.

Equipment adjustments facilitate larger quantities, with wider pans providing uniform height and ease of access, ensuring quality across multiple setup batches.

Timing modifications consider extended sugar cooking periods due to increased volume, along with adjusted cooling times to allow substantial setting.

Storage considerations expand as output increases. Prep adequate containers and organize space efficiently, considering tight seals to preserve freshness across larger candy volumes.

Nutritional Deep Dive


Macro breakdown focuses primarily on carbohydrate content due to sugar presence, accompanied by protein from egg whites, offering minimal fat presence.

Micronutrient analysis highlights periodic vitamin inclusion from gumdrop accompaniment, while providing indulgent energy perfect for festive activities.

Health benefits are limited within nougat’s energy delivery, particularly for those engaged in active pursuits and seeking short-term vim during bustling holiday schedules.

Dietary considerations cater to specific needs by modifying ingredients, reducing sugar intake, and exploring alternative binders for allergen-sensitive adaptations.

Portion analysis is crucial to manage intake, focusing on bite-sized enjoyment that enhances overall sensory involvement without overindulgence.

Weight management tips integrate nougat into a balanced meal plan, offering smaller serves as an occasional treat within a varied diet to maintain healthier lifestyle alignment.

Dietary Adaptations


For gluten-free adaptation, ensure gumdrops and any additives lack wheat-based derivatives, moving to pure sources that support dietary needs.

Dairy-free adjustments typically align with the original recipe; however, review any artificial colors in gumdrops for traces potentially affecting restrictions.

Consider vegan alternatives via aquafaba in place of egg whites, matching structure while supporting plant-based approaches without sacrificing integrity.

Low-carb adaptations may prove challenging but can involve keto-friendly syrups in place of corn syrup, seeking low glycemic indices for specific needs.

Paleo adaptations necessitate honey consideration over sugar, defining flavor uniqueness, and adhering to unprocessed ingredient adherence in gumdrops.

Low-FODMAP adjustments center around focusing on specific sweetener choices, ensuring compliance with digestive sensitivities for personal peace of mind.

Troubleshooting Guide


Texture issues might include soft nougat lacking structure. Adjust sugar temps to soft-ball stages for correction, obtaining ideal consistency and form.

Flavor balance may waver with insufficient vanilla essence or poor-quality ingredients, requiring strategic enhancements or premium alternatives.

Temperature problems should employ a reliable thermometer for sugar stages, correcting under or overcooked elements critical for rightful setup.

Equipment challenges can be minimized by ensuring appropriate instrumentation, like a durable candy thermometer and proper molds ensuring desired results.

Ingredient substitutions like aquafaba require testing to maintain results, offering insights into incorporating variations effectively within familiar recipes.

Timing concerns can create hurdles, particularly when multitasking, necessitating vigilant attention to staged preparation ensuring synchronicity across processes.

Recipe Success Stories


Our community celebrated this recipe by sharing dynamic gumdrop color arrangements, revealing creative flair within traditional presentation.

Variation successes included peppermint-laced nougat, delighting holiday gatherings, while pecans and spices weave a new seasonal appeal.

Adaptation stories embrace dietary changes such as gluten and dairy-free pivots, securing perfect holiday satisfaction for multiple dietary needs.

Reader suggestions included chocolate drizzles bringing visual excitement while aligning additional flavor balancing dimensions for enhanced enjoyment.

Photography tips involved capturing nougat against vibrant backdrops, focusing on gumdrop interplay, producing visually engaging imagery to inspire creativity.

Frequently Asked Questions

What is the ideal temperature for cooking nougat?

Reaching around 240°F (115°C) allows the sugar mixture to hit the soft-ball stage, forming perfect nougat texture.

How do I prevent gumdrops from sticking together in nougat?

Cut gumdrops into smaller pieces, dusting lightly with cornstarch to reduce stickiness and ensure distribution.

Can I add nuts to this recipe?

Yes, integrating chopped nuts provides additional texture, pairing well within glossy nougat layers without disrupting sweetness.

How long does it take for nougat to set?

Around 2-4 hours at room temperature, or quicker when refrigerated for those seeking sooner indulgence.

What can I use instead of corn syrup?

Gold or glucose syrup serves as possible substitutions, maintaining structure but potentially mutating ingredient flavors.

How can I reduce stickiness when handling nougat?

Use a hot knife for slicing, and parchment paper between layers during storage to minimize undesired adhesion.

How should I store leftover nougat candy?

Seal nougat in airtight containers, using parchment layers to ensure freshness and preserving structure up to two weeks.

Can I freeze the nougat for longer storage?

Wrap tightly in plastic and foil for freezing, adhering to slow defrosting when ready for extended enjoyment.

What drink pairs well with nougat candy?

Consider lightly sweet wines like Moscato or seasonal ciders for balance, while coffee pairs provide robust companions.

Can I make this nougat vegan-friendly?

Yes, swap egg whites using aquafaba, preserving structural integrity while meeting dietary inclusiveness.

What is the history of nougat?

Nugat finds roots in Mediterranean tradition, evolving globally through myriad cultural interpretations, reflecting culinary heritage.

Can I make gumdrop nougat in advance for events?

Absolutely, prep and store ahead, ensuring structural preservation enables readiness for vibrant presentations at gatherings.

Additional Resources


Explore related recipes, from classic sugar confections to innovative adaptations that take traditional nougat flavor into new territory—perfect for adventurous cooks.

Technique guides, accessible through candy-making blogs or educational channels, provide deeper insights into transforming sweets into artful expressions.

Ingredient information delves into sugar’s history and uses, offering alternatives for those curious and those seeking modifications to standard recipes.

Equipment recommendations focus on essential tools like reliable candy thermometers or non-stick surfaces, securing results that match expectations.

Seasonal variations propose additional flavor developments, welcoming readers keen on skillfully adapting and innovating familiar comforts within evolving culinary landscapes.

Join the Conversation


Share your nougat creations online, snapping vibrant images showcasing personal twists and colors of tradition for inspiration across digital communities.

Photography tips explore lighting and angles, capturing nougat’s allure in compelling visuals that invite others to savor both sight and taste experiences.

Encourage recipe reviews, inviting feedback and connection from chefs globally, celebrating diverse takes on a beloved seasonal confection.

Engage communities with challenges, suggesting thematic adaptations or inviting collaborative creativity where followers propose sweet variations.

Explore recipe variations collectively, whether through exchanging ideas or tackling dietary needs, fostering bonds around shared passion for crafting edible joy.

The Recipe

Easy Christmas Gumdrop Nougat Candy

Serves: 24 pieces

Prep Time: 15 mins

Cook Time: 5 mins

Total Time: 20 mins

Kitchen Equipment Needed

  • Saucepan
  • Candy thermometer
  • Mixing bowl
  • Wooden spoon or silicone spatula
  • Sharp knife
  • Baking pan lined with parchment

Ingredients

  • 2 cups granulated sugar
  • 1 cup light corn syrup
  • 1/4 teaspoon salt
  • 2 egg whites
  • 2 teaspoons vanilla extract
  • 1 cup chopped gumdrops

Directions

  1. Prepare a baking pan by lining it with parchment paper.
  2. In a saucepan, combine sugar, corn syrup, and salt. Stir over medium heat until sugar dissolves.
  3. Attach a candy thermometer and cook without stirring until mixture reaches 240°F (soft-ball stage).
  4. Meanwhile, beat egg whites until soft peaks form.
  5. Gradually pour hot syrup into egg whites, beating constantly until mixture thickens.
  6. Blend in vanilla extract.
  7. Gently fold in chopped gumdrops until distributed evenly.
  8. Pour nougat into prepared pan, smoothing the top with a spatula.
  9. Allow nougat to set at room temperature for 2 hours.
  10. Cut nougat into squares with a sharp knife, serve and enjoy.

Recipe Notes

  • Ensure gumdrops are dusted with cornstarch to prevent sticking during mixing.
  • Nuts can be added for an additional texture dimension.
  • Nougat keeps well in an airtight container for up to two weeks.