Irresistible Mini Pineapple Upside-Down Cheesecakes for Delightful Treats

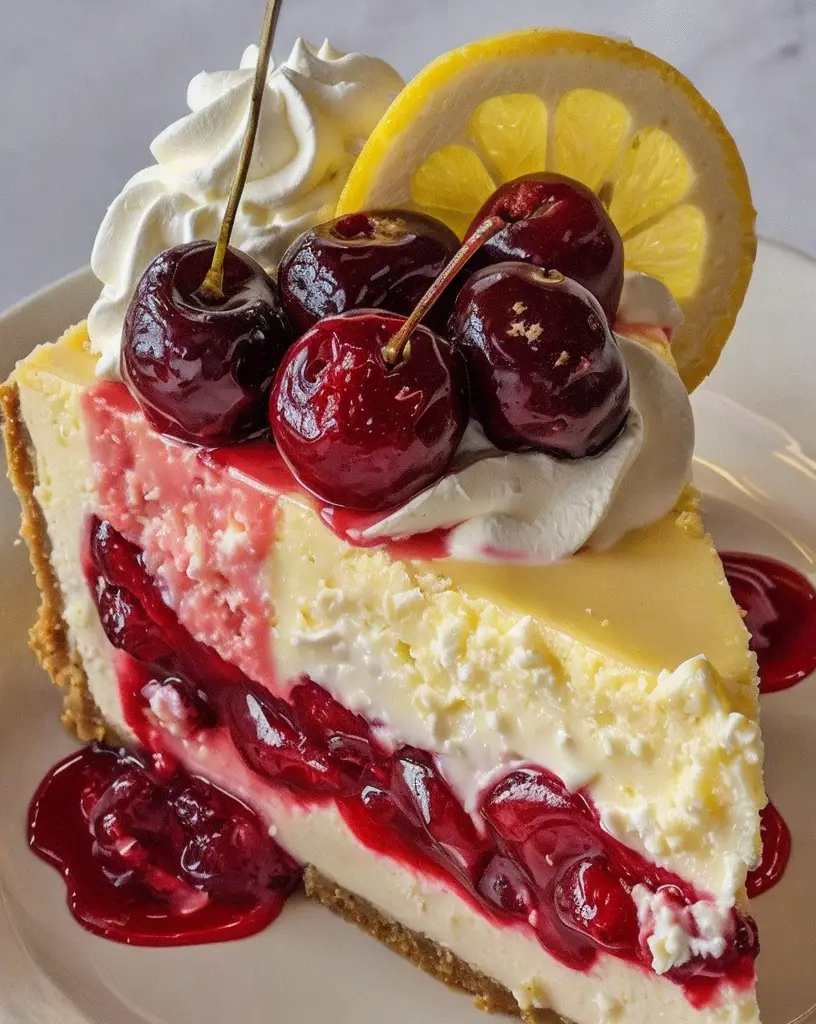
Mini Pineapple Upside-Down Cheesecakes: A Bite-Sized Delight

⚖️
Difficulty
Easy

⏲️
Prep Time
15 mins

🕒
Cook Time
25 mins

⏱️
Total Time
40 mins

🍽️
Servings
12

Satisfy your sweet tooth with these delectable Mini Pineapple Upside-Down Cheesecakes. Combining the rich creaminess of cheesecake with the tropical allure of pineapple, this dessert will transport your taste buds to a sunny paradise. Whether you’re a dessert aficionado or just starting to explore baking, this recipe guarantees success with its charming presentation and delightful flavors.

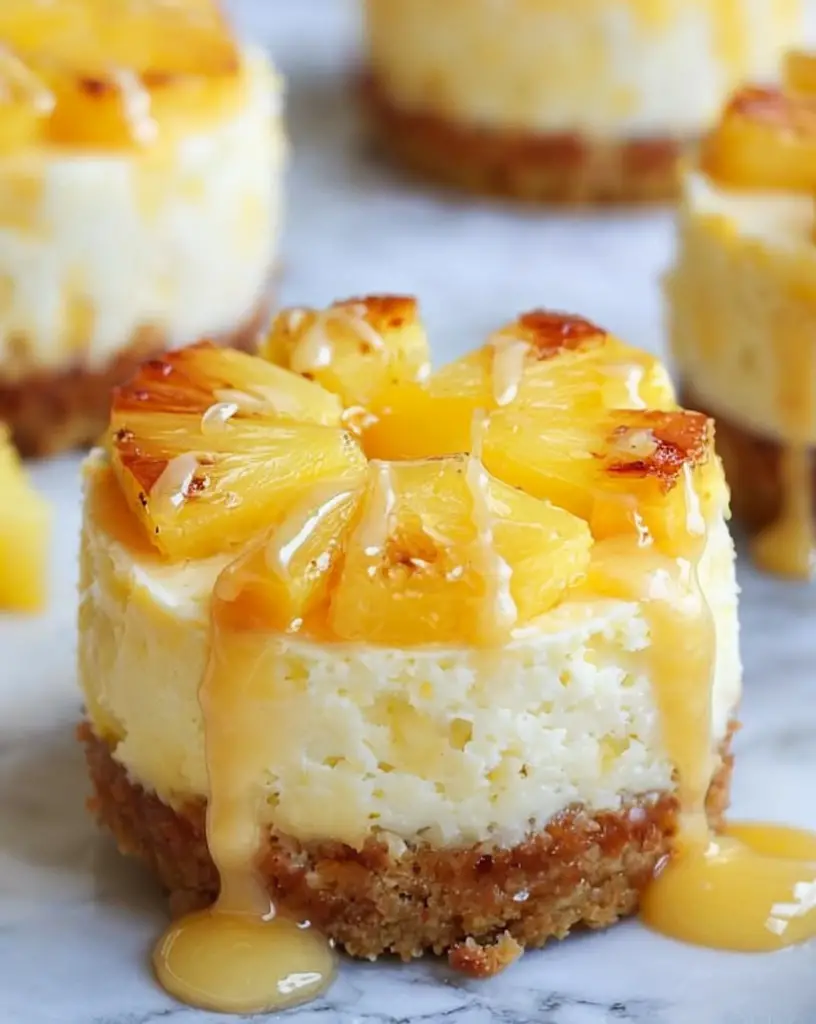
In every bite, you’ll experience a marvelous fusion of caramelized pineapples on a buttery graham cracker base, topped with a velvety cheesecake layer. The juiciness of the pineapple enhances the richness of the cheesecake, offering an irresistible treat perfect for any occasion.

Quick Recipe Highlights

  • Flavor Profile: The sweet pineapple mingles with the creamy cheesecake for a perfect balance of tart and sweet.
  • Texture: A delightful mix of juicy, creamy, and crumbly textures creates a harmonious mouthfeel.
  • Aroma: The alluring scent of freshly baked cheesecake and caramelized sugar will fill your kitchen.
  • Visual Appeal: These mini delights feature a beautiful golden hue with a glossy, upside-down topping.
  • Skill Level Needed: Simple techniques suitable for beginners with stunning results.
  • Special Equipment: A standard muffin tin for perfect portion sizes.

Recipe Overview

  • Difficulty Level: With straightforward steps and basic ingredients, this easy recipe is beginner-friendly.
  • Category: Perfect as a dessert or a sweet treat for parties and gatherings.
  • Cuisine: While rooted in American dessert traditions, it carries influences from the classic pineapple upside-down cake.
  • Cost: An affordable dessert, using common pantry staples and fresh pineapple.
  • Season: Best enjoyed in the summer when pineapples are at their peak sweet-tart balance.
  • Occasion: Ideal for casual get-togethers or as a stunning end to a dinner party.

Why You’ll Love This Recipe


Indulging in Mini Pineapple Upside-Down Cheesecakes brings a perfect blend of taste and texture to your palate. The contrasting elements — smooth cheesecake and juicy pineapple — create a sensory experience that’s both refreshing and decadent.

This recipe’s convenience shines through in its simplicity. The short preparation time and minimal kitchen equipment mean you can whip up these cheesecakes without fuss, making them ideal for unexpected guests or busy schedules.

Nutritionally, this dessert offers a balance of indulgence and natural sweetness. By utilizing fresh pineapple, you add a dose of vitamin C to your dessert enjoyment. Swapping heavier ingredients in traditional cheesecakes for lighter options can reduce caloric intake while maintaining flavor.

Socially, these mini cheesecakes are conversational pieces that add charm to social gatherings. Their individual servings make them perfect for sharing, and the elegant presentation will impress your guests.

Finally, this recipe’s cost-effectiveness means you can create an upscale dessert at a fraction of the cost of purchasing pre-made options. Ingredients are accessible from most grocery stores, ensuring easy procurement and preparation.

Historical Background and Cultural Significance


The origin of the pineapple upside-down cake dates back to the early 1900s when canned pineapple became widely available. This led to a variety of creative uses, including the now iconic dessert. Over time, as cheesecake rose in popularity, inventive bakers began combining these beloved desserts.

Culturally, the pineapple upside-down cake represented the height of home baking sophistication in America, often appearing at potlucks and community gatherings. Its vibrant presentation and lush flavors made it a perennial favorite.

This recipe has evolved significantly, with the cheesecake variation offering a refined take on the original concept. The fusion of creamy cheesecake with tropical pineapple enhances the traditional dessert, bringing it to a more modern audience.

Regional variations can be found globally, with each emphasizing local tastes. In tropical regions, fresh pineapple is a staple, while temperate areas might adapt using seasonal fruits or syrup-soaked canned versions.

Ingredient Deep Dive


Pineapple serves as the star, celebrated for its juicy, tart sweetness. Historically significant in tropical regions, pineapples symbolize hospitality and luxury. Rich in vitamin C and antioxidants, they enhance both the flavor and nutrition of this dessert. Select ripe, vibrant fruit, and store them at room temperature until they reach peak ripeness.

Cheese in cheesecakes owes its cultural origins to Ancient Greece, where it was a revered food for the Olympics participants. Modern adaptations use cream cheese for its rich texture and tang. When selecting, choose full-fat varieties for optimal texture, and store it in the refrigerator, maintaining a cold chain to prevent spoilage.

To substitute graham crackers, you can use digestive biscuits or Oreo crumbs. Store perishables like cheese in airtight containers, and substitute pineapples with apples or peaches for variations.

Common Mistakes to Avoid

  • Overmixing the cheesecake batter can lead to a dense texture. Mix just until combined to maintain creaminess.
  • Neglecting to preheat the oven can result in uneven baking. Ensure your oven reaches the correct temperature before starting.
  • Using cold cream cheese will lead to a lumpy batter. Allow cheese to soften at room temperature.
  • Failing to grease the tin adequately may cause sticking. Use non-stick spray or butter to ensure release.
  • Skipping cooling time might cause the cheesecake to crumple. Let them cool gradually to set perfectly.
  • Undercooking or overcooking can affect the taste. Use a toothpick to check doneness accurately.
  • Overfilling baking cups can cause overflow. Fill each cup just to the rim for even portions.
  • Improper ingredient measurements can disrupt texture balance. Accurately measure each item to ensure consistency.

Essential Techniques


Achieving the perfect cheesecake batter is crucial for a smooth texture. Mixing at a low speed prevents air bubbles that cause cracking. Mastering this technique involves gentle folding and watching for a homogenous mixture with no lumps.

Caramelizing pineapple right involves cooking it until golden brown without burning. The sugars in pineapple will gradually caramelize, creating a deeper flavor. Watch for deepening color and a fragrant aroma as cues for readiness.

Creating a perfect crust involves pressing the graham cracker mixture firmly. Use a flat-bottomed glass for even pressure to ensure a compact base that holds its shape. Avoid leaving the base too loose, which can crumble upon serving.

Pro Tips for Perfect Mini Pineapple Upside-Down Cheesecakes


Before beginning, make sure all ingredients are at room temperature for a seamless mixing process. This will result in a smoother batter and flawless consistency.

For a more vibrant flavor, consider adding a dash of vanilla extract to the cheesecake mixture. This complements the sweetness of the pineapple beautifully.

If fresh pineapple isn’t available, drained canned pineapples can be a handy substitute, maintaining flavor without compromising texture.

Enhance the visual appeal by finely chopping maraschino cherries and incorporating them into the top layer. This creates an attractive, colorful garnish.

Ensure your instant-read thermometer is nearby to check the internal temperature. Cheesecakes should read 150°F for ideal doneness.

To add a delightful acidic contrast, garnish with a dollop of whipped cream, offering a textural balance and visual contrast.

Variations and Adaptations


Regional variations can incorporate tropical fruit blends such as mango or papaya, offering a different aromatic complexity.

For a seasonal touch, exchange pineapple with fresh pears or apples during autumn festivity baking to align with available produce.

To cater to specific dietary needs, the recipe can be adapted by using gluten-free graham crackers without sacrificing texture.

Embrace unexpected flavor experiments like adding a pinch of cinnamon or nutmeg to introduce a warm, spicy note.

For a more substantive texture modification, mix in crushed nuts like pecans or walnuts into the crust for added crunch.

Presentation-wise, these desserts shine individually plated, atop doilies or dessert plates, drizzled with extra caramel sauce for an upscale appearance.

Serving and Presentation Guide


Master the art of effortless plating by using mini dessert stands to highlight each cheesecake. This elevates the presentation and adds a touch of sophistication to your table settings.

For garnishing, a few sprigs of mint will add a splash of color and fragrant aroma that complements the pineapple infusion.

Serve with traditional accompaniments such as tropical fruit salads or light sorbets between each cheesecake for a balanced taste palette.

Experiment with modern serving styles by featuring the mini cheesecakes alongside cacao nibs or edible flowers for contemporary appeal.

When serving, maintain them slightly chilled for optimal taste, as warmth might affect the structure.

Remember to account for portion control to avoid indulgence; one or two per person offer a satisfying and delightful dessert experience.

Wine and Beverage Pairing


Pair these mini pineapple delights with a chilled glass of Moscato, which will complement the sweetness without overpowering the dessert’s nuances.

Non-alcoholic alternatives include sparkling water with lemon slices for a crisp, refreshing contrast to the dessert’s richness.

Coffee aficionados can savor an espresso alongside, its intensity complementing the cheesecake’s luscious, smooth texture.

Ensure beverage temperatures are spot-on; chilled Moscato at around 45°F maintains its refreshing nature, pairing seamlessly with each bite.

Serve these cheesecakes with a hint of tropical flair by offering coconut milk iced coffee as an innovative beverage choice that mirrors the dessert’s flavors.

Storage and Shelf Life


Proper storage involves refrigerating the cheesecakes in an airtight container to maintain freshness and prevent moisture loss.

Keep them chilled between 35-40°F in the refrigerator; this keeps the cheesecake intact and flavors blended harmoniously.

Use glass or plastic containers with secure lids to maintain optimal conditions, avoiding unwanted flavors or odors from the fridge.

Signs of spoilage may include discoloration or off odors, indicating it’s time to discard the old batch.

Reheating is unnecessary for these miniature treats; serve them straight from the fridge to appreciate their silky texture.

Freeze any extras by wrapping individually in plastic and storing in a freezer-safe bag, extending their life up to two months.

Make Ahead Strategies


Strategize your prep timeline by layering components the day before serving, allowing the flavors to meld wonderfully.

Store the baked base separately, topping with fresh cheesecake mix before chilling, maintaining maximum freshness.

Assess and balance quality impacts, refining cooking times or temperature settings if making in advance.

Prioritize careful assembly by ensuring pineapple slices are symmetrically placed for consistent baking and visual uniformity.

Though reheating isn’t required, adding fresh whipped topping or fruit garnishes right before serving enhances presentation.

Infuse freshness by sprinkling fresh citrus zest or thinly sliced pineapples before guest arrivals, adding vibrancy to the cheesecakes.

Scaling Instructions


When halving the recipe, reduce ingredient quantities proportionally, mindful of the impact on flavor concentration and baking times.

To double, utilize larger muffin tins or multiple pans to accommodate increased batter volume, making scaling more effective.

Equipment adjustments, such as larger mixers or additional tins, enhance efficiency without physical strain from mishandling volume.

Monitor timing modifications carefully, as larger batches may require additional cook and cool periods to ensure consistent outcomes.

Scaling for storage necessitates containers that support bulk prep, focusing on air-tightness to uphold freshness and prevent moisture loss.

Nutritional Deep Dive


Dive into the macro breakdown to reveal a balanced ratio of fats, carbohydrates, and proteins in this delectable dessert.

Micronutrients, such as the vitamin C found in pineapples, contribute to immune support and antioxidant benefits.

Highlight the health benefits associated with cheesecake’s fundamental ingredient, cream cheese, including calcium and protein content.

For dietary considerations, focus on portion analysis to maintain a balance between enjoying sweet treats and nurturing well-being.

Weight management tips include savoring in moderation and choosing smaller quantities or substitute ingredients like low-fat cheese.

Promote conscious guidance around indulgence, focusing on smaller servings that deliver the same flavorful punch without excess calories.

Dietary Adaptations


For those seeking gluten-free options, utilize certified GF graham crackers or almond meal for a redefined crust element.

Dairy-free enthusiasts can select lactose-free cream cheese or coconut-based substitutes without losing the characteristic creamy quality.

Those following vegan diets will appreciate plant-based soft cheese options combined with egg replacements for binding.

For low-carb adaptations, swap traditional sweetened elements with sugar alternatives, reducing overall carbohydrate intake.

Keto adjustments involve embracing almond flour for crusts and unrefined sweetener blends to comply with diet restrictions.

Paleo followers can substitute dairy and sweetened components with coconut-based or cinnamon-dusted nut variations for compatibility.

Low-FODMAP dieters will find successes in ingredient adjustments, sparingly utilizing sweetener alternatives and compliant lactose-free dairy.

Troubleshooting Guide


Address texture issues by monitoring batter consistency, ensuring ingredients are well-integrated yet not over-mixed, which can alter density.

Balance flavors by adjusting sugar content relative to cheesecakes’ tang, experimenting with less sugar or natural alternatives.

Maintain temperature stability during baking to prevent over or under-browning, crucial for uniform results.

Overcome equipment challenges by improvising tools, like using green beans reload on constraint pans and resource limitations.

Experiment with ingredients like lactose-free or almond-based cheese should dairy shortages or substitutions arise.

Tackle timing concerns through strategic prep layouts, arranging ingredient organization ahead of the baking process.

Recipe Success Stories


Readers have shared incredible adaptations, showcasing variations incorporating delightful berry toppings for colorful enhancements.

Community feedback has consistently rated high, noting the efficiency and presentation appeal, even in professional catering settings.

Countless variation successes remind us of the versatility and adaptability of this dessert to suit personal preferences.

Photographic tips submitted by enthusiasts recommend various angles capturing the visual essence of pineapple-topped cheesecakes.

Reader suggestions highlight innovative approaches to garnishing, incorporating everything from herbs to chocolate shards.

Frequently Asked Questions

Can I use other fruits instead of pineapple?

Yes, you can experiment with fruits like peaches or mangoes, depending on the season and personal preference.

How long do these cheesecakes last in the fridge?

Properly stored in an airtight container, they will remain fresh for up to five days.

What is the best cheese for these cheesecakes?

Full-fat cream cheese is ideal for achieving the desired creamy consistency and flavor profile.

Can I freeze these mini cheesecakes?

Absolutely, they freeze well. Wrap each in plastic wrap and store in a freezer bag for up to two months.

What can I use for a dairy-free version?

Substitute cream cheese with a vegan or lactose-free alternative to cater to dairy-free diets.

Are these cheesecakes suitable for a keto diet?

With low-carb adaptations like almond flour for crusts, they can fit within a keto framework.

What adjustments are necessary for high altitude?

You may need to decrease the baking time slightly and monitor closely to avoid overcooking.

How do I prevent the cheesecake from cracking?

Mix ingredients gently and avoid overbaking to maintain a crack-free, smooth surface.

What is the best way to serve these cheesecakes?

Serve them chilled, garnished with fresh fruit or whipped cream for added flair.

Should I grease the muffin tin?

Yes, using a non-stick cooking spray ensures easy release and clean presentation.

Additional Resources


Explore related recipes that embrace tropical flavors, complementing the Mini Pineapple Upside-Down Cheesecakes.

Technique guides available on our site cover the nuances of cheesecake baking, aiding in mastering your own creations.

Ingredient information provides insights into alternative options for varying dietary needs and personal preferences.

Our curated recommendations highlight equipment innovations, enhancing efficiency and effectiveness in your kitchen endeavors.

Seasonal variations emphasize the versatility of this cheesecake, aligning flavor profiles with available produce year-round.

Join the Conversation


Engage with fellow bakers on social media by sharing your culinary achievements, capturing the essence of these mini delights.

Share photography tips by experimenting with lighting and backgrounds to bring out the vibrant colors and textures of your creation.

Submit recipe reviews to offer insight and inspire others, contributing your unique adaptations and success strategies.

Become part of our community, joining discussions about variations that reflect local flavors or uncover innovative dietary adaptations.

Explore limitless possibilities in recipe variations, each inspired by personal interpretations and welcoming our readers’ creativity.

The Recipe

Mini Pineapple Upside-Down Cheesecakes

Serves: 12

Prep Time: 15 mins

Cook Time: 25 mins

Total Time: 40 mins

Kitchen Equipment Needed

  • Muffin tin
  • Mixing bowls
  • Spatula
  • Hand mixer
  • Baking sheet

Ingredients

  • 1 1/2 cups graham cracker crumbs
  • 1/4 cup melted butter
  • 1/4 cup brown sugar
  • 1 can (20 oz) pineapple slices, drained and patted dry
  • 12 maraschino cherries
  • 2 (8 oz) packages cream cheese, softened
  • 1/2 cup sugar
  • 1 tsp vanilla extract
  • 2 large eggs

Directions

  1. Preheat the oven to 325°F (165°C) and grease a 12-cup muffin tin generously.
  2. In a bowl, combine the graham cracker crumbs and melted butter. Press evenly into the bottom of each muffin cup.
  3. Arrange a pineapple slice at the bottom of each cup, placing a cherry in the center of each slice.
  4. In another bowl, beat the cream cheese until smooth. Gradually add sugar and vanilla, mixing well.
  5. Add eggs one at a time, beating on low speed just until incorporated.
  6. Spoon the cheesecake mixture evenly over the pineapple layers in the muffin cups.
  7. Bake for 23-25 minutes or until the centers are set. Cool completely before removing from the tin.
  8. Refrigerate for at least two hours before serving for best results.

Recipe Notes

  • Ensure cream cheese is at room temperature for a smooth batter.
  • Chill before serving to help the flavors meld.
  • Experiment with additional toppings like whipped cream or nuts.

Savor the Perfect Ribeye Steak with These Expert Grilling Tips

Perfect Ribeye Steak: A Delight for the Senses

⚖️
Difficulty
Medium

⏲️
Prep Time
10 mins

🕒
Cook Time
15 mins

⏱️
Total Time
25 mins

🍽️
Servings
2

Indulge in the exquisite taste of a perfectly cooked ribeye steak, where each bite unveils a symphony of flavors in your mouth. The ribeye, renowned for its marbling and tenderness, offers a juicy, flavorful experience perfect for any steak lover. Savory and rich, this steak delivers a sensory journey that’s as enjoyable to look at as it is to taste. With minimal ingredients and an emphasis on technique, you’ll be able to craft a restaurant-quality dish in the comfort of your own home.

The magic of ribeye steak lies in its marbling, which ensures a tender and juicy bite every time. Whether seared to perfection on a skillet or grilled over an open flame, the ribeye’s decadent taste and buttery texture make it a standout choice for any special occasion. Enhance its natural flavors with a simple seasoning of salt, pepper, and a hint of garlic or butter, and let the meat speak for itself with its robust and hearty profile.

Transform any evening into a culinary celebration as the heady aroma of a cooking ribeye fills the kitchen. This dish not only tantalizes the taste buds but also captivates with its sizzling soundtrack and mouthwatering scent, promising a memorable dining experience.

Quick Recipe Highlights

  • Flavor Profile: Rich and umami-filled, with buttery and savory notes that captivate the palate with each bite.
  • Texture: Expertly tender, with a beautiful balance between the juicy meat and a delightfully crispy sear.
  • Aroma: Invigorating blend of beefy goodness with a touch of smoky char and subtle hints of garlic and butter.
  • Visual Appeal: Gorgeous caramelized crust with bursts of marbling that promise deliciousness in every slice.
  • Skill Level Needed: Intermediate, ideal for those familiar with basic cooking techniques seeking to refine searing skills.
  • Special Equipment: A cast-iron skillet or grill enhances flavor with its even heat distribution and superior searing capabilities.

Recipe Overview

  • Difficulty Level: Moderate due to the focus on perfect timing and heat control to achieve the desired sear and doneness.
  • Category: Main course; ideally suited for dinner.
  • Cuisine: Rooted in American tradition, showcasing hearty, rustic flavors with an emphasis on quality beef.
  • Cost: Moderate, primarily due to the quality of the beef cut, balanced by simple, accessible additional ingredients.
  • Season: Best in cooler months when comfort foods reign supreme, although equally delightful year-round for steak enthusiasts.
  • Occasion: Perfect for special gatherings, romantic dinners, or a luxurious treat for yourself.

Why You’ll Love This Recipe


The ribeye steak’s taste is unparalleled due to its marbled fat, which melts during cooking, imparting a juicy, beefy flavor. The contrast between the seared crust and tender interior enhances the eating experience. Conveniently, this recipe requires minimal effort but yields maximum satisfaction. Seasoning is straightforward, complementing the meat without overshadowing its natural flavor.

With its high protein content and moderate fat levels, this steak offers nutritional benefits while keeping you satiated. The relatively quick cooking time makes it an excellent choice for an impressive, hassle-free meal when entertaining. Its luxurious taste paired with a simple salad or mashed potatoes creates a full meal without complexity.

Ribeye offers both cost-effectiveness and accessibility: while the cut is premium, the straightforward recipe doesn’t demand extravagant ingredients. Easy to find in most grocery stores, ribeye strikes a balance between indulgence and approachability, making it a staple in both casual and formal menus.

Historical Background and Cultural Significance


Ribeye steak, a prime cut from the beef rib section, is celebrated for its marbling and flavor. Originating from the traditional butchery practices, ribeye has become synonymous with luxury and indulgence in American cuisine. Over the years, its preparation has evolved from simple grilling to various culinary techniques ensuring tenderness.

This cut holds cultural importance as a centerpiece in many family get-togethers, backyard barbecues, and upscale dinners. Each region has its take, with some opting for dry rubs while others love a classic marinade. The ribeye is integral to regional cuisines across the globe, with each culture adding its unique footprint to this classic dish.

Ingredient Deep Dive


The ribeye steak, prized for its marbled composition, ensures both flavor and tenderness. This cut is often associated with celebrations and indulgence due to its robust taste. Nutritionally, it is a powerhouse of protein and essential nutrients. When selecting ribeye, look for rich marbling and a bright, fresh color to ensure quality.

Store your ribeye in the coldest part of your refrigerator or freeze for longer shelf life. If substitutions are needed, similar fatty cuts like sirloin can suffice. However, nothing truly replaces the juicy, tender experience of a genuine ribeye steak.

Common Mistakes to Avoid

  • Avoid over-seasoning the steak. Let the meat’s natural flavors shine.
  • Don’t skip resting the steak post-cooking; this step redistributes juices.
  • Ensure the skillet or grill is hot to achieve a proper sear and crust.
  • Use a meat thermometer for accurate doneness rather than guessing.
  • Allow your steak to reach room temperature before cooking to ensure even cooking.

Essential Techniques


Mastering the art of searing is crucial for ribeye. A hot skillet ensures a perfect crust and locks in juices, creating a rich, savory exterior. Understanding internal temperatures with a digital thermometer allows precise doneness, ensuring the meat is neither undercooked nor overdone.

Letting the steak rest before cutting allows muscle fibers to relax and juices to redistribute, creating a more succulent bite. Focus on these techniques for a consistently perfect ribeye experience.

Pro Tips for Perfect Ribeye Steak


– Allow your steak to reach room temperature before cooking for uniform results.
– Use clarified butter for high-heat cooking without burning.
– Avoid flipping the steak multiple times; one good sear on each side is ideal.
– Allow the juices to redistribute by letting the steak rest before slicing.
– Enhance flavor by finishing the steak with garlic butter or herb-infused oil.

Variations and Adaptations


Regional variations emerge from different seasoning approaches. In Texas, a smoky, spicy rub may be preferred, whereas in France, a wine-based sauce might accompany ribeye. Seasonal adaptations include using fresh herbs in summer or hearty root vegetables in winter. For dietary needs, leaner cuts can replace ribeye, but with slight flavor compromise.

Serving and Presentation Guide


Plating is key to enhancing ribeye’s appeal. Slice the steak diagonally while ensuring even portions. Add a pat of herb butter on top for an elegant touch, alongside vibrant vegetables or a simple salad. Traditional accompaniments include baked potatoes, but modern trends suggest pairing with grilled asparagus or sautéed mushrooms.

Wine and Beverage Pairing


A robust red wine, such as a Cabernet Sauvignon, complements ribeye’s richness. For non-alcoholic options, consider a sparkling water infused with lemon or ginger. During cooler months, a hot tea with subtle spice notes could elevate the dish’s comfort factor.

Storage and Shelf Life


Store cooked ribeye in an airtight container in the fridge for up to 3 days. Reheat gently to avoid overcooking, using low oven heat or a covered skillet. For extended storage, freeze the steak for up to three months, ensuring it’s tightly wrapped to prevent freezer burn.

Make Ahead Strategies


Marinate the steak a day ahead to enhance flavor. Let it reach room temperature before cooking for best results. Store delicate side ingredients separately to maintain their integrity, adding them fresh when assembling the final dish.

Scaling Instructions


Adjust the ribeye portions depending on your guest count. Halve the recipe for intimate settings, or increase it for larger groups by using a grill or larger skillet. Time adjustments might be necessary when cooking multiple steaks concurrently to ensure even cooking.

Nutritional Deep Dive


Ribeye steak boasts a high protein content, along with essential vitamins such as B12 and iron. The fat provides flavor and satiety, important for balanced meals. To maintain a healthy diet, consider pairing the steak with fiber-rich sides to aid digestion and provide a balanced macro breakdown.

Dietary Adaptations


For a gluten-free meal, ensure all seasonings and sides meet dietary requirements. Lean cuts like sirloin can replace ribeye for lower-fat, cholesterol-friendly options. Vegetarian versions could involve using portobello mushrooms as a steak alternative, offering a similar experience with different flavor profiles.

Troubleshooting Guide


For texture issues like toughness, adjust resting time or slice thinner. For flavor imbalance, ensure even seasoning distribution. Temperature problems may arise with equipment calibration; always preheat thoroughly for best results, and calibrate thermometers regularly.

Recipe Success Stories


Many home cooks cherish the ribeye steak for its simplicity and ability to impress. Readers often share variations including marinated versions or adaptations with unique spice mixes. Photography tips suggest natural lighting and featuring cross-section shots to display its succulent center.

Frequently Asked Questions

What is the best way to season ribeye steak?

Simple seasoning with salt and pepper is usually sufficient. To enhance flavor, one may add garlic powder or fresh herbs like rosemary or thyme after cooking.

How do you know when a ribeye steak is done?

Using a meat thermometer is most accurate; for medium-rare, aim for an internal temperature of 135°F (57°C), letting it rest to reach 145°F (63°C). Visual checks can also work, but calibration is key.

Additional Resources


Explore related recipes like pan-seared filet mignon or grilled New York strip steak for additional culinary inspiration. Access technique guides on perfect searing methods and internal temperature tips. Utilize equipment recommendations for professional results, enhancing your kitchen endeavors.

Join the Conversation


Join our foodie community to discuss ribeye variations, share your culinary triumphs, and discover what others are creating in their kitchens. Follow us on social media for the latest recipes, photography tips, and steak inspiration. Engage with fellow enthusiasts to expand your cooking horizons and share your ribeye success stories.

The Recipe

Perfect Ribeye Steak

Serves: 2

Prep Time: 10 mins

Cook Time: 15 mins

Total Time: 25 mins

Kitchen Equipment Needed

  • Cast-iron skillet or grill
  • Meat thermometer
  • Kitchen tongs
  • Cutting board
  • Chef’s knife

Ingredients

  • 2 ribeye steaks, about 1-inch thick
  • Salt and pepper to taste
  • 1 tablespoon olive oil
  • 2 cloves garlic, minced
  • 2 tablespoons butter
  • Fresh rosemary or thyme (optional)

Directions

  1. Remove the ribeye steaks from the refrigerator and allow them to come to room temperature.
  2. Preheat a cast-iron skillet over high heat and add olive oil.
  3. Season the steaks generously with salt and pepper on both sides.
  4. Place the steaks in the hot skillet and sear for 3-4 minutes per side, achieving a golden-brown crust.
  5. Add butter and minced garlic to the pan, basting the steaks as they finish cooking.
  6. For desired doneness, use a meat thermometer to check the internal temperature.
  7. Remove the steaks and let them rest on a cutting board for 5-10 minutes.
  8. Slice and serve with fresh herbs, if using.

Recipe Notes

  • For extra flavor, marinate the steaks beforehand with herbs and olive oil.
  • Adjust seasonings to your preference, including spicy rubs or smoky seasonings.

Indulge Your Sweet Tooth with This Peanut Butter Cup Cake Roll

Peanut Butter Cup Cake Roll: A Delectable Delight

⚖️
Difficulty
Moderate

⏲️
Prep Time
30 mins

🕒
Cook Time
15 mins

⏱️
Total Time
45 mins

🍽️
Servings
8

If you’re a fan of peanut butter and chocolate, then this Peanut Butter Cup Cake Roll is destined to become your new favorite dessert. This cake roll combines the rich, velvety texture of a chocolate sponge cake with a creamy peanut butter filling. Each slice is a symphony of flavors and textures, delivering a perfect balance of sweet and savory. Whether you’re preparing it for a birthday celebration or a casual get-together, this cake is as easy to make as it is delicious.

The art of the cake roll may seem daunting, but with our detailed instructions, you’ll be a pro in no time. Imagine cutting through a spiraled slice, unveiling the luscious layers of peanut butter cream enveloped by a moist and airy cake. Not only is this Peanut Butter Cup Cake Roll a feast for the palate, but it also pleases the eyes with its elegant presentation, making it an ideal choice for impressing your guests.

Quick Recipe Highlights

  • Flavor Profile: The combination of bold chocolate and creamy peanut butter provides a delightful and comforting taste experience.
  • Texture: Each bite is marked by the fluffiness of the sponge cake contrasted with the smoothness of the peanut butter filling.
  • Aroma: The cake exudes a warming scent of cocoa mixed with the nutty fragrance of peanut butter, irresistible to anyone nearby.
  • Visual Appeal: A beautiful spiral of golden brown and chocolate hues, perfect for an Instagram-worthy dessert table.
  • Skill Level Needed: Suitable for bakers with intermediate skills but accessible for ambitious beginners following step-by-step guidance.
  • Special Equipment: A jelly roll pan and parchment paper are essential for achieving the perfect roll without cracks.

Recipe Overview

  • Difficulty Level: Mastering the art of rolling the cake does take a bit of practice, but patience and care will yield fantastic results.
  • Category: Fits perfectly within the realm of celebratory desserts and casual indulgence.
  • Cuisine: This recipe pulls from classic American dessert traditions, known for its love of rich, comforting flavors.
  • Cost: A moderate cost recipe as it utilizes pantry staples with the main splurge being peanut butter cups.
  • Season: Best enjoyed year-round, this cake roll shines as a comforting winter dessert or a summer barbecue finale.
  • Occasion: Whether it’s a birthday party, holiday gathering, or simply a weekend treat, this recipe adds joy to any occasion.

Why You’ll Love This Recipe


The exquisite taste of this Peanut Butter Cup Cake Roll is sure to capture your heart. The contrast between decadent chocolate and savory peanut butter is a flavor combination celebrated for its timeless allure. Every mouthful delivers a rich and creamy experience that creates an unforgettable taste sensation—it’s everything a peanut butter lover dreams of.

Convenience is a hallmark of this recipe. Despite its elegant presentation, the preparation is surprisingly straightforward. With our easy-to-follow steps, you can create a professional-looking dessert in the comfort of your own kitchen. Plus, the ingredients are simple and readily available at any local grocery store.

This delightful dessert is not only indulgent but also offers comforting satisfaction. The nutritional benefits of peanuts include a good source of protein and healthy fats, making this dessert a more fulfilling choice. Of course, moderation is key, but enjoying a slice of this cake can be part of a balanced lifestyle.

Sharing the Peanut Butter Cup Cake Roll at gatherings can bring a smile to the faces of family and friends. Its stunning presentation makes it a table centerpiece, and it’s an ideal conversation starter. This cake is bound to be the highlight of any party, winning over both chocolate aficionados and casual sweet-tooths alike.

Cost-effectiveness and accessibility make this recipe a must-try for any dessert enthusiast. While the flavors are complex, the method and ingredients aren’t burdensome on your wallet. Even with a modest budget, you can create a dessert that tastes and looks like it came from a high-end bakery.

Historical Background and Cultural Significance


The concept of the cake roll, or Swiss roll, originated in Central Europe, making its way to America in the 19th century. The fusion of this technique with classic American flavors like peanut butter and chocolate is a testament to culinary innovation and cultural blending.

Peanut butter has been a staple in American kitchens since the early 20th century, symbolizing comfort and simplicity. Its integration into desserts like this cake roll highlights its versatility and enduring appeal in America’s culinary landscape.

Over the decades, the peanut butter cup cake roll has evolved to include various riffs and adjustments, yet it never strays far from its roots. However, regional twists and personal touches continue to keep this classic exciting and relevant to modern palates.

In different parts of the United States, this recipe has seen unique adaptations, often based on locally-sourced ingredients and personal preferences. Each variation adds an exciting spin to the original, making every cake roll a personal and satisfying creation.

Ingredient Deep Dive


Peanut butter, the star ingredient, is not just a taste sensation but a nutritional powerhouse. Its rich history dates back to ancient civilizations where peanuts were cultivated for their nutrient-rich seeds. Today, it’s a beloved staple in American households, prized for its energy-boosting properties.

Nutritionally, peanut butter is a source of protein and healthy fats, making it a satisfying addition to any dessert. Selecting a smooth, natural peanut butter provides the best consistency for the cake roll’s filling, as it offers creaminess without added sugar or preservatives.

Storage is key to maintaining the freshness and quality of peanut butter. It should be kept in a cool, dry place and always sealed tightly. If separation occurs, simply stirring will restore its creamy texture. If substituting, almond or cashew butter can provide a different but equally delicious flavor profile.

Chocolate, the other protagonist of this recipe, has been cherished since ancient Mesoamerican cultures, celebrated for its luxurious taste and mood-lifting properties. It’s no wonder this ingredient is a universal symbol of indulgence and comfort.

When choosing chocolate for the cake roll, opt for high-quality cocoa powder and semi-sweet chocolate to balance the sweetness of the peanut butter. Both should be stored in a cool, dry place, away from direct sunlight. If needed, you can swap semi-sweet for dark chocolate to enhance the cake’s depth of flavor.

Common Mistakes to Avoid

  • Overbaking the cake can lead to cracks when rolling. Ensure to check for doneness with a toothpick while still keeping it slightly moist.
  • Rolling the cake while too hot or too cold can break it. Wait until it is warm to the touch before carefully rolling with parchment paper.
  • Skipping the parchment paper can result in a cake that sticks and breaks. Always line your pan for easy removal and rolling.
  • Using crunchy peanut butter can disrupt the creamy texure. Stick to smooth peanut butter for a consistent, velvety filling.
  • Filling the roll too late may result in a dry texture. Spread the filling when the cake is at optimal temperature for perfect moisture absorption.
  • Inaccurately measuring flour leads to a dense cake. Fluff up flour before scooping to ensure accurate measurements.
  • Substituting ingredients without knowledge may global balance. If alternatives are necessary, evaluate their impact on both texture and flavor.
  • Ignoring cooling before serving can ruin presentation. Let your cake roll chill thoroughly for clean and neat slicing.

Essential Techniques


Mastering the roll is crucial for success. This technique allows you to create that signature spiral, a hallmark of cake rolls. Be prepared to practice with patience to get it just right. Roll the warm cake gently with parchment paper; this initial roll prevents cracking and builds muscle memory for the final presentation.

Proper spreading technique ensures even distribution of the peanut butter filling. This is important to achieve uniform texture and balanced flavor density throughout the cake. Use an offset spatula for a smooth, seamless layer that won’t mound or break.

When baking the sponge cake, timing and temperature are key. Avoid overbaking by monitoring closely. The cake should spring back when lightly touched and not pull from the sides of the pan excessively. These visual cues guide you to the perfect bake.

Ensuring even cooling before spreading the filling prevents unwanted melting and clumping. The right temperature provides a supportive base for the filling, maintaining its structure. Skipping this step can result in a runny or inconsistent texture.

Pro Tips for Perfect Peanut Butter Cup Cake Roll


For a non-stick baking process, line your jelly roll pan with parchment paper, ensuring overhangs for easier removal. This can prevent frustration with sticking and ripping.

Experiment with chocolate types for variation. Try a richer dark chocolate for a bolder flavor that stands out against the creamy peanut butter.

Avoid refrigerating too long before serving to maintain moistness. A quick refrigeration should suffice to set the filling without drying the sponge.

For an elegant touch, sift a light dusting of cocoa powder over the finished roll before presentation. This adds a touch of sophistication and aroma.

Allow the cake roll to rest before slicing, as this helps the flavors meld and the texture settle, minimizing messiness and ensuring clean, tight rolls.

Firmly wrap leftovers in plastic wrap to preserve moistness. This is important for retaining freshness over a couple of days without losing texture integrity.

Variations and Adaptations


Regional variations include adding a jam-inspired layer for a delightful twist on the classic flavor. Raspberry or strawberry blends well with the peanut butter for a unique taste experience.

To adapt for different seasons, incorporate ingredients that reflect the time of year. In winter, a dash of cinnamon adds warmth, while a hint of citrus zest brightens summer presentations.

Dietary modifications are accessible with various nut butters, gluten-free flour blends, and dairy-free creams, tailoring the dessert to various preferences and dietary needs.

Flavor variations can be achieved through adding a touch of vanilla extract or a splash of espresso powder to enhance chocolate depth without clashing with dominant flavors.

To alter texture, include crushed peanuts within the filling for a bit of crunch. This not only adds contrast but also complements the smoothness of the rest.

For a unique presentation, consider slicing the prepared roll into smaller rounds and arranging them in a layered pattern to emphasize the spiral effect, serving as perfect individual treats.

Serving and Presentation Guide


To perfect your plating, aim for slices that are clean and uniform. Utilize a warm serrated knife to cut slices without dragging, maintaining a pristine appearance.

Garnish ideas include sprinkling chopped peanut butter cups or drizzling a glossy chocolate sauce across the top, which both enhances flavor and visual intrigue.

Traditional accompaniments such as a cup of strong coffee or a scoop of vanilla bean ice cream can enhance the richness and provide a wonderful balance to the dish.

Modern serving suggestions might involve using individualized plated desserts, perfect for a formal dinner setting, where presentation takes center stage.

Consider the cake’s temperature for optimal enjoyment. Allowing it to reach room temperature before serving maximizes moisture and flavor release.

Portion control is important to fully appreciate the dessert’s richness without overwhelming the palate. Aim for modest slices to let each bite shine.

Wine and Beverage Pairing


A rich Port wine complements the chocolate and peanut butter, offering a luxurious mouthfeel that deepens the dessert experience with each sip.

For non-alcoholic choices, a spiced chai tea can augment the flavors, infusing an undertone of aromatic spices that parallels the complexity of the cake roll.

Coffee, with its naturally robust flavor, pairs seamlessly with this dessert—just be sure to choose a blend with nutty, chocolatey notes to match the cake’s profiles.

Consider serving your wine or beverage slightly chilled to contrast with the dessert’s richness, enhancing the full flavor spectrum during the tasting experience.

Presentation can be elevated by using crystal stemware for wine or sophisticated mugs for coffee, adding an element of class to the dessert course.

Storage and Shelf Life


Secure your cake roll by wrapping it in plastic wrap or placing it in an airtight container to keep it fresh for up to three days at a cool room temperature.

Avoid exposing the cake to temperature fluctuations as this could affect both texture and taste. A constant, cool environment is ideal for storage.

Choose containers that don’t compress the cake, preserving its shape and integrity. Specialty cake storage containers or flat-bottomed ones are recommended.

Watch for signs of spoilage, such as changes in texture, unusual moisture, or off-putting smells. These indicate that the cake is past its prime for consumption.

Reheating should be gentle, if needed. Only a slight warming, avoiding drastic temperature changes, maintains its freshness and structural composition.

For longer storage, consider slicing and individually wrapping pieces for freezing. This method promotes easier thawing for future individual servings.

Make Ahead Strategies


Start with preparing the sponge batter in advance, storing it covered in the refrigerator for a day to streamline final assembly.

To maintain freshness between steps, store rolled sponge in parchment within the fridge, preventing unnecessary drying before the final roll with filling.

Assess the impact of storage on quality by opting for fresh ingredients in each separate element, assembling when all components are ready to guarantee fullness in flavor.

Master proper filling assembly by spreading evenly yet quickly to avoid hardening or thickening of the filling as it sits.

Reheat based on need by gently warming in a low-temperature oven rather than a microwave, which may cause uneven heating and texture degradation.

Integrate fresh garnishes or dusting of confectioner’s sugar just before serving to reignite visual appeal without impacting flavor or texture negatively.

Scaling Instructions


To halve the recipe, adjust ingredient measurements accordingly and use a smaller baking pan to maintain the sponge’s thickness proportional with adjusted quantities.

Doubling or tripling involves careful scaling of all components, especially the filling, to ensure maintained flavor throughout the increased amount of sponge.

Equipment like larger baking pans may be required to accommodate more batter, along with expanded workspace for rolling and assembly without crowding efforts.

Timing modifications should include prolonged baking or cooling times proportionate to the increased ingredient volumes to ensure each component is cooked optimally.

Consider larger or additional storage solutions if creating more for future consumption, maintaining freshness if not served immediately.

Nutritional Deep Dive


Macro breakdown reveals balanced levels of carbohydrates and proteins with moderate fat content, offering a rewarding treat within mindful consumption.

Micronutrients included are particularly noted in the filling’s peanut butter, providing vitamin E and magnesium, thereby contributing to its nutritional appeal.

Health benefits may be observed in the satiating qualities derived from the protein and fiber content, encouraging reduced follow-up snacking.

For those observing dietary guidelines, portion sizes and ingredient sources are noted, such as opting postively where possible for organic or low-sugar variations.

Understanding the recipe’s structure assists in making calculated choices regarding indulgence versus nutritional impact, empowering more educated dessert decisions.

Maintain weight management through enjoying this dessert within a balanced meal plan, acknowledging the potential richness of ingredients and conscious serving size.

Dietary Adaptations


For a gluten-free transformation, use gluten-free baking flour blends that offer similar texture without sacrificing cake structure or mouthfeel.

Switch a dairy-free component such as coconut cream in the filling for instances where lactose poses dietary concerns, retaining similar consistency and richness.

Explore vegan alternatives through egg replacements and non-dairy spreads, adjusting processes slightly to assure consistency without animal products.

Adapt low-carb goals by minimizing sugar content and opting for natural sweeteners along with almond flour substitution for lower glycemic impact.

Keto adjustments can follow similar practices to low-carb, choosing quality fats and minimizing carbohydrate-rich elements where possible.

Paleo-inspired variants may utilize almond flour bases, natural sweeteners, and premium nut spreads, ensuring respect for the dietary framework priorities.

Strong focus on low-FODMAP versions encourages cautious ingredient scrutiny while still permitting pleasurable dessert experiences through strategic alterations.

For other specific dietary concerns, consider less common ingredient inclusions or omissions with a mindful approach to maintain enjoyment without limiting core appeal.

Troubleshooting Guide


Understand texture issues by evaluating baking time and moisture levels; a balance ensures the cake either stays moist or dries out inadvertently.

Flavor balance can be fine-tuned by adjusting filling ingredients, leaning on personal sweetness or richness preferences within the familiar recipe framework.

Temperature problems addressed prompt timely assembly and correct baking location considerations to avoid cooking inconsistencies.

Overcome equipment challenges by fortifying the importance of non-stick supplies and properly-sized pans, offering equal distribution and fewer baking mishaps.

Ingredient substitutions recognized remove complexity, ensuring alternatives focus on maintaining the original flavor, texture, or compound effect without altering intention.

Timing concerns highlight the role of proper cooling intervals, underscoring their impact on the final roll success in both structural and filling applications.

Recipe Success Stories


Community feedback frequently applauds the winning combination of flavors, crediting easy adaptability for regional taste twists established within personal kitchens.

Variation successes stem from shared reader evaluations, showcasing unique uses like incorporating seasonal fruit syrups or personalized pastry cream tweaks influenced by cultural instincts.

Adaptation stories thrive as more inventive substitutions appear, encouraging others to explore boundaries with filling alterations or crust developments tailored to favored palates.

Reader suggestions frequently lead to enhancement opportunities and improvisation within the recipe itself, elevating universal recognition for flexibility accommodating diverse groups.

Photographic tips situate naturally amongst success stories, presenting insight into capturing each detail that rolls beautifully and deliciously in visual keepsakes shared widely online.

Frequently Asked Questions

1. Can I make this peanut butter cup cake roll gluten-free?
Yes, substitute the all-purpose flour with a gluten-free blend to maintain the same texture while keeping it gluten-free.

2. What’s the best way to prevent the cake from cracking when I roll it?
Rolling the cake in parchment paper while warm ensures flexibility and aids in maintaining a smooth roll without cracking.

3. How early can I prepare this cake before an event?
The cake can be made up to three days in advance when wrapped properly, preserving freshness for the occasion.

4. Can I use crunchy peanut butter instead of smooth?
While possible, smooth peanut butter is recommended to keep the filling texture creamy for best results.

5. How should leftover cake be stored?
Wrap it tightly in plastic wrap or store in an airtight container to retain moisture and texture at room temperature or refrigerated.

6. Is it possible to use white chocolate instead?
Yes, white chocolate offers a sweeter, vanilla-forward variant that shifts the flavor profile while retaining pairing compatibility with peanut butter.

7. How thick should I roll the cake?
Aim for thin width, rolling tightly to ensure multiple thickness spirals capture evenly distributed fillings within each cross-sectional slice.

8. What other filling can I use besides peanut butter?
Cream cheese frosting or fruit spreads offer creative alternatives adequately pairing with the original chocolate sponge concept.

9. Should I use salted or unsalted butter?
Unsalted butter is ideal for those controlling salt levels, with optional salt additions considered to taste within recipe components.

10. Can I freeze slices for later use?
Absolutely! Freeze individual slices with parchment separators for easy, single-serve thawing while maintaining quality control over time.

Additional Resources


Examine related recipes such as chocolate logs or roulades, gaining insight into mastering rolling techniques for dessert versatility.

Access technique guides focusing on mastering essential tasks like cake rolling and chocolate ganache for professional-grade finishes.

Explore ingredient information sessions for core recipe components like premium cocoa or alternative nut megabutter innovation, connecting culinary theory with practice.

Discover equipment recommendations simplifying kitchen experiences via small investments that garner significant outcome improvement.

Uncover seasonal variations or adaptations within the larger dessert spectrum, illustrating fusion inspirations drawn from globally diverse traditions.

Join the Conversation


Share your creations on social media using hashtags or tagging pages for collective appreciation and peer interaction, sparking fresh idea exchanges.

Gain valuable photography tips to highlight the dessert’s visual allure and engage viewers with techniques designed to capture and draw culinary admirers.

Engage in recipe reviews to add depth and insight, offering practical considerations or confirming excellence in the recipe’s execution.

Delve into community engagement, seeking exchanges that complement your cake project’s enhancements or share pleasure within kitchen creativity portfolios.

Experience recipe variations highlighted by exploring uncovered dialogues around budding trends or long-standing acclaim, bridging culinary community connections in delightful support.

The Recipe

Peanut Butter Cup Cake Roll

Serves: 8

Prep Time: 30 mins

Cook Time: 15 mins

Total Time: 45 mins

Kitchen Equipment Needed

  • Jelly roll pan
  • Parchment paper
  • Offset spatula
  • Mixing bowls
  • Electric mixer
  • Serrated knife

Ingredients

  • 3/4 cup all-purpose flour
  • 1/4 cup cocoa powder
  • 1 tsp baking soda
  • 1/4 tsp salt
  • 4 large eggs
  • 1 cup granulated sugar
  • 1/2 cup smooth peanut butter
  • 1/2 cup whipping cream
  • 1 cup chopped mini peanut butter cups

Directions

  1. Preheat the oven to 350°F (175°C). Line a jelly roll pan with parchment paper.
  2. In a bowl, sift together flour, cocoa powder, baking soda, and salt. Set aside.
  3. In another bowl, beat eggs and sugar together with an electric mixer until thick and pale.
  4. Gradually fold in dry ingredients until just combined.
  5. Spread the batter evenly into the prepared pan and bake for 12-15 minutes.
  6. Upon immediate removal, transfer onto a clean, lightly sugared cloth and gently roll the cake. Allow cooling.
  7. To make the filling, whip peanut butter and cream until fluffy. Incorporate chopped peanut butter cups.
  8. Unroll the cooled cake, spread with filling, and reroll. Wrap in parchment and refrigerate for at least an hour.

Recipe Notes

  • Ensure even cooling before spreading the filling to avoid runniness.
  • Maintain tight rolling for defined, visually distinct spiral effects.
  • For a more intense flavor, incorporate a dash of espresso powder into the cake batter.

Zesty Spicy Mango Steak and Shrimp Alfredo Recipe Delight

Spicy Mango Steak and Shrimp Alfredo: A Fusion of Rich Flavors

⚖️
Difficulty
Medium

⏲️
Prep Time
25 mins

🕒
Cook Time
30 mins

⏱️
Total Time
55 mins

🍽️
Servings
4

Indulge in the vibrant taste of Spicy Mango Steak and Shrimp Alfredo, a perfect blend of savory and sweet with a hint of heat. This dish marries perfectly tender steak, succulent shrimp, and a creamy Alfredo sauce infused with the tropical sweetness of mango. The result is a culinary experience that tantalizes your taste buds with its rich flavors and unique fusion of influences. Perfect for those who love the creamy smoothness of Pasta Alfredo but crave a little extra flair.

Each element of this Spicy Mango Steak and Shrimp Alfredo is carefully balanced for maximum pleasure. As the steak sizzles and the shrimp turns pink, the aroma is simply irresistible. The creaminess of the Alfredo sauce, combined with the unexpected zing from the mango and spices, ensures a dish that is both comforting and exciting. Ideal for special occasions or just a delightful family dinner.

If you’re looking to impress with a dish that stands out for its flavor and creativity, this Spicy Mango Steak and Shrimp Alfredo checks all the boxes. Rich in taste, contrasting textures, and vibrant colors make this dish a feast for the senses. Easy enough for a midweek meal yet impressive enough for a dinner party, it encapsulates the joy of cooking with bold ingredients that tell a story of culinary innovation.

Quick Recipe Highlights

  • Flavor Profile: This dish skillfully blends the sweetness of mango with spicy undertones, enveloped in a creamy and rich Alfredo sauce.
  • Texture: The perfect combination of silky pasta, juicy steak, and tender shrimp creates a diverse yet harmonious mouthfeel.
  • Aroma: Experience the tantalizing fragrance of grilled steak and shrimp, mixed with garlicky Alfredo and tropical mango.
  • Visual Appeal: A vibrant ensemble of golden shrimp, pink steak, and creamy pasta highlighted by specks of fresh herbs.
  • Skill Level Needed: Suitable for home cooks with moderate experience, the recipe involves stovetop and pan-searing techniques.
  • Special Equipment: A cast-iron skillet or grill pan and a large pasta pot ensure an even cooked, flavorful dish.

Recipe Overview

  • Difficulty Level: While this recipe includes multiple steps, its simplicity lies in its straightforward techniques and richly rewarding flavors.
  • Category: This dish falls under hearty main courses, perfect for family meals or elegant dinner parties.
  • Cuisine: An inventive fusion drawing inspiration from Italian and Caribbean flavors, creating a unique culinary experience.
  • Cost: Moderate cost given quality steak and shrimp, though well worth the investment for the entire dining experience.
  • Season: Best enjoyed during summer months when mangoes are in season, providing the freshest and most vibrant flavor.
  • Occasion: Ideal for special dinners, celebrating occasions, or whenever you need a gourmet treat to elevate your meal.

Why You’ll Love This Recipe

The taste and texture of the Spicy Mango Steak and Shrimp Alfredo offer a delightful twist on the traditional Alfredo experience. The interplay of creamy sauce with juicy meat and the unexpected spice provides an exciting zing that keeps each bite compelling. It’s a fresh approach to a comforting classic that doesn’t shy from bold tastes and exciting textures.

Convenience is another key appeal of this recipe. While impressive on the plate, it doesn’t demand extensive time commitments or complex techniques. With a few key steps, you can create an amazing dish that will leave everyone asking for seconds. It’s a meal that brings restaurant-style elegance to your home kitchen easily.

When it comes to nutrition, this dish offers a balanced source of proteins and essential vitamins. Herbs and spices not only boost the flavor but enrich the meal’s health profile. Incorporating mango adds not only a delicious sweetness but also a powerful dose of antioxidants and dietary fiber.

As a centerpiece for entertaining, Spicy Mango Steak and Shrimp Alfredo shine thanks to its visual and flavorful impact. It’s an ideal choice for creating joyous, shared dining experiences that foster conversation and delight. Sharing this meal together is a celebration of the art of good cooking and enjoyable food.

Economically, this meal offers an affordable luxury. Although it uses premium ingredients like steak and shrimp, the cost per serving is manageable. Utilize peak-season mangoes and make your own Alfredo sauce to further reduce expenses while maximizing freshness, which means more delicious experiences for fewer dollars.

Historical Background and Cultural Significance

The story of Alfredo sauce dates back to early 20th-century Italy, where it was devised as a simple but luxurious dish—a buttery Parmesan fusion that quickly became a favorite. Introduced to the American palate through restaurateurs, the dish found fertile ground as a popularized variant, welcoming new influences lovingly adapted to suit regional tastes.

Culturally, Alfredo sauce represents a bridge between the traditional richness of Italian cuisine and its modern adaptations. The addition of shrimp and steak adds surf-and-turf elegance, while mango infusion harkens to Caribbean culinary tradition distinguished by its playful use of fruits and spices, resulting in a thoughtful culinary journey.

Over time, adaptations of Alfredo sauce have emerged globally, each making use of local ingredients and tastes. The inclusion of mango and spices in this recipe is a celebration of cultural fusion, offering a testament to the recipe’s capability of adapting and delighting across culinary boundaries.

Regional variations are prevalent across the globe—the base of butter, Parmesan, and cream adapting into countless evolutions. From white wine infusions to the addition of varied spices, the story of Alfredo is one of joyful creativity, celebrated by food enthusiasts who dare to blend the classic with the contemporary.

Ingredient Deep Dive

Mango brings an essential element to this Alfredo variant, both in flavor and cultural resonance. Used globally as a symbol of tropical flavor, mango pairs beautifully with seafood and spice, offering a fibrous texture and sweet contrast to spicy elements, while complementing creamy sauces with its refreshing note.

In nutritional terms, mangos are packed with vitamins A and C, providing an antioxidant boost and dietary fiber. Select ripe yet firm mangoes for optimum texture and sweetness. Store them at room temperature until ripened, then refrigerate for longevity. In a pinch, substitute fresh mango with ripe peaches or nectarines.

Shrimp serves as the surf in this dish, its tender juiciness offering a counterbalance to the rich sauce. Light yet filling, shrimp is a versatile ingredient with a global culinary history. It symbolizes tradition in many coastal cuisines—its adaptability allowing it to shine in spicy and creamy contexts alike.

Nutritionally, shrimp is low in calories and rich in protein, adding a lean element to the dish. When selecting shrimp, look for firm, moist shells and avoid any fishy odors. Store them refrigerated and use promptly. If needed, prawns offer a dependable substitute—though with a slightly sweeter and firmer bite.

Common Mistakes to Avoid

  • Overcooking the steak or shrimp is a common mishap. Timing is key to retain tenderness, so always adhere to recipe guidance for optimal results.
  • Under-seasoning the pasta dish can make the flavor profile less comprehensive. Be sure to taste and adjust with salt, pepper, and spices as needed.
  • Incorporating mango that is too ripe can result in excess sweetness or mushy texture. Select ones that are slightly firm to achieve the best balance.
  • Using pre-grated Parmesan brings less savory impact and may cause clumping in the sauce. Opt for fresh grating for the best texture and flavor.
  • Attempting to prepare all ingredients at once may lead to chaos in the kitchen. Set up a structured mise en place to keep the process smooth.
  • Overcrowding the pan when cooking steak or shrimp impedes caramelization. Cook in batches to ensure proper browning and flavor development.
  • Forgetting to rest the steak after cooking results in loss of juices and flavor in the final dish. Allow it to sit before slicing for juicy tenderness.
  • Ignoring the need to gradually add cheese can lead to a broken sauce. Introduce cheese slowly while stirring to maintain the smooth emulsification.
  • Alterations to the sauce base without due consideration may result in an imbalanced flavor. Stick to proportions for cream, cheese, and spices.
  • Neglecting the aromatic elements, such as garlic and herbs, loses the nuanced layers of aroma that contribute vitally to the dish’s appeal.

Essential Techniques

Cooking steak properly is fundamental for this dish. Achieving a perfect sear involves using high heat and minimal handling, allowing a crust to form while keeping the interior juicy. Rest the steak post-cooking to redistribute juices, ensuring rich flavor with every bite.

For shrimp, timing and observation are your best friends. Pink tint and opaque flesh indicate doneness; overcooked shrimp becomes tough—a common pitfall. Combine the shrimp with spices during cooking to allow flavor absorption, enhancing the overall profile.

Creating the Alfredo sauce calls for careful temperature moderation. Constant stirring over gentle heat prevents the sauce from separating, while gradually adding cheese maintains a smooth, silky consistency. Attention to visual cues avoids common pitfalls like clumping or breaking.

Pro Tips for Perfect Spicy Mango Steak and Shrimp Alfredo

For an enhanced experience, marinate the steak in mango puree and spices—this adds another layer of flavor infusion and tenderization. Even a short marinade time can make a notable difference in taste.

Achieve textural variety by using a pasta shape that holds sauce well. Fettuccine or linguine works beautifully, but penne may yield delightful pockets of flavor with each bite. Toss in the still-hot pasta for better absorption and flavor integration.

To heighten mango notes, finish with a fresh mango garnish before serving, offering a fresh bite against the creamy backdrop. A sprinkle of chili flakes further accentuates the spiciness for those who enjoy extra heat.

Create vegetable pairings that complement the dish. Lightly steamed broccoli or a fresh arugula salad invites a satisfying contrast, while a squeeze of lemon heightens bright notes and balances richness.

Adding a dash of white wine to the Alfredo sauce elevates complexity and depth. Its acidity complements the creamy texture, emphasizing subtle cheese nuances and enrobing the pasta luxuriously.

When plating, use contrasting colors to enhance visual allure—think fresh cilantro leaves or a sprinkling of paprika for artistic detail. This simple final tweak transforms the dish into a true feast for the eyes.

Variations and Adaptations

Regional variations can include incorporating local spices or herbs that align with the regional palate. Asian influences could introduce soy sauce or ginger notes for an astonishingly different yet delicious outcome.

For seasonal adaptations, consider using fresh stone fruits like peaches when mangoes are out of season, preserving the sweet undertone amidst pasta’s richness. Peaches retain sweetness while offering a unique textural twist.

Dietary modifications welcome vegetables as protein substitutes. Grilled tofu or portobello mushrooms offer substantial alternatives for vegetarians or those looking to reduce meat intake without compromising satisfaction.

Consider flavor variations by introducing smoked paprika or cayenne pepper for layers of smoky intensity. Conversely, tone down the spiciness with hints of nutmeg or lemon zest for a fresh spin.

Texture modifications can be achieved by incorporating crushed nuts such as almonds or cashews, offering a crunchy contrast to creamy pasta and smooth mango. A garnish of crispy shallots lifts each bite with delightful subtlety.

Presentation alternatives range from serving the Alfredo over a bed of wild rice or cauliflower rice for a grain-free version that highlights unique cross-textural experiences, maintaining vibrancy and intrigue.

Serving and Presentation Guide

For plating, twirl pasta into a neat nest and top with delicately arranged steak slices and shrimp. The elegance of the presentation heightens the anticipation—an artful setup amplifies dining pleasure.

Garnishing with sliced fresh mango and chopped herbs creates a colorful backdrop, hinting at the flavor profile awaiting the diner. The finishing flourish brings together a dish that tastes and looks expertly coordinated.

Traditional accompaniments include warm crusty bread to scoop up the luscious Alfredo sauce and balance the mango’s sweetness. Alternatively, serve alongside a simple leafy salad dressed with vinegar for balance.

For a modern serving suggestion, consider utilizing mango salsa as a topper, introducing familiar flavors under an unexpected guise, maintaining tradition while embracing creativity.

Temperature considerations ensure optimal enjoyment; serve piping hot or warm to fully experience the creamy texture and nuanced taste. Avoid reheating in the microwave to preserve textural integrity.

Portion control tips include serving pasta on smaller plates, which naturally encourages adequate portion awareness without missing indulgence. The dish’s richness means satisfaction often triumphs over volume consumption.

Wine and Beverage Pairing

For wine pairings, a chilled Chardonnay offers a complementary creaminess and a touch of fruitiness, harmonizing beautifully with the sweetness and spice of the dish. A light red such as Pinot Noir can also delight, offering subtle earthiness.

Non-alcoholic alternatives introduce tart citrus juices like grapefruit or an infused mocktail incorporating lime and sugar, echoing the dish’s vibrant notes without overshadowing its complexity.

When considering coffee or tea pairings, a light herbal tea provides a refreshing finish—a mint or ginger brew neutralizes the palate, promoting a complete and satisfying taste experience without overstimulation.

Temperature considerations recommend serving wine chilled to subtly tame the heat and offer a soothing contrast to the dish’s warmth. Refresh beverages throughout the meal for continual palette cleansing.

For serving suggestions, stemware or elegant tumblers heighten the sophistication of the meal, creating an atmospheric balance encouraging lingering conversation and delighted appreciation among diners.

Storage and Shelf Life

Proper storage of leftovers requires airtight containers, preserving freshness and preventing odor absorption. Quick refrigeration after cooling maintains flavors and textures, prolonging the recipe’s shelf life considerably.

Adhere to temperature requirements—a steady, cold environment is essential, typically below 40°F. Consume fully within 2–3 days to enjoy the vibrant ingredients at their best. Freezing isn’t ideal due to potential texture changes.

Container recommendations include glass or high-quality BPA-free plastic options that maintain a suitable environment for the Alfredo elements. Ensure tight seals avoid encouraging spoilage or drying out.

Signs of spoilage include off odors, separation of sauce components, or shriveling of mango and shrimp textures. Refrain from consuming if any such signs persist.

Reheating instructions prioritize gentle, gradual warming. Preferred methods include stovetop over low-medium heat with occasional stirring, or baking until heated through—generally avoiding microwaves to preserve original texture.

Freezing guidelines recommend freezing only the sauce components minus pasta for longer shelf life and reduced textural impacts. Thaw gently and prepare pasta fresh, integrating once fully warmed.

Make Ahead Strategies

Plan an effective prep timeline by slicing steak and preparing shrimp, as well as keeping the Alfredo sauce ready a day before use. The captured flavors improve overnight, enriching the pasta further.

Storage between steps should prioritize chilling each prepared element separately, ensuring continued freshness before final assembly. This approach maximizes time use without loss of quality or flavor.

Assess the potential impact of quality throughout steps; gradual advancement may even enhance the dish’s harmonious flavors, particularly in marination or sauce integration.

Assembly tips encourage adding pasta to sauce moments before serving to ensure proper absorption, with mango segments added upon serving for textural integrity and burst of freshness.

Reheating guidelines offer tips for gently reheating the steak and sauce elements separately to maintain moisture and performance, avoiding mushy results or hardened textures.

Fresh element additions before serving can reinvigorate flavors, incorporating fresh herbs, spices, or garnishes like lemon zest that freshen the final presentation and overall experience vivaciously.

Scaling Instructions

When halving the recipe, adjust ingredients proportionally, paying particular attention to spices that can overpower due to reduced volume. Check seasoning throughout preparation for balance.

Doubling or tripling is straightforward; however, ensure proper equipment such as larger pans or pots maintain heat distribution and control. Adjustments in cooking time may be necessary to accommodate increased volumes.

Equipment adjustments include using a larger skillet or additional burners, preserving the efficiency of sequential cooking strategy. Avoid overcrowding and maintain gentle handling of ingredients.

Timing modifications should account for larger batches often requiring extended or adjusted cooking durations—favoring gradual sauce building and attentive ingredient integration.

Storage considerations for larger batches advocate portioning that aligns with manageable, single-use volumes. This approach allows for easier, more even reheating and more effective preservation of flavors and texture.

Nutritional Deep Dive

A thorough macro breakdown reveals a balanced dish offering strong sources of protein from steak and shrimp, healthy fats from the Alfredo sauce, and a starchy component from the pasta sustaining energy levels.

Micronutrient analysis reveals key vitamins from mango, rich in vitamin A and C, and the leafy herbs used in the dish. Mangos and shrimp provide potassium, rounding out essential nutrients.

The dish’s health benefits lie in its rich protein content, paired with a moderate carb source and essential fats. Its construction offers a well-rounded nutritional profile for a satisfying meal.

Dietary considerations suggest ensuring moderate portions due to creamy sauce richness, lending itself to enhanced enjoyment while maintaining calorie awareness. Complementary sides balance meal components.

Portion analysis aligns with calculated moderation aspects, suggesting one-quarter of the total made dish per serving for a balanced plate approach, enhancing nutritional harmony without overindulgence.

Weight management tips advocate savoring each bite for total satisfaction while appreciating portion control to encourage balanced intake and promote healthier dining habits as part of a broader meal plan perspective.

Dietary Adaptations

Gluten-free options use corn or rice-based pasta, achieving similar textural results without gluten exposure while maintaining the integrity of sauce and inclusions.

The dish adapts to a dairy-free diet using vegan-friendly cream alternatives and dairy-free Parmesan substitutes. These complement the textures without sacrificing indulgent appeal.

Vegan considerations invite vegetable protein like tofu or tempeh to substitute meat components, retaining the primary flavor characteristics while aligning with plant-based preferences.

Low-carb alternatives could involve swapping pasta for zucchini noodles or spiralized vegetables, lowering carb intake and providing a great complement to the naturally sweet and savory elements offered.

Keto considerations emphasize high-fat content using cream or butter while staying mindful of serving sizes and carb elements, achieving compliance with guidelines harmoniously.

Paleo adaptations incorporate lean protein with additional vegetable companions, allowing enjoyment within outlined dietary structures, while nut-based creams replace traditional sauce elements.

Low-FODMAP variations reduce garlic or onion content, with infused oils or other herbs and spices as effective replacements enhancing flavor without dietary distress.

For other specific diets, adjust particular elements while maintaining the foundational components and flavors—innovate with mindful substitutions aligning with preferences or requirements.

Troubleshooting Guide

Texture issues such as overly thick sauce suggest adding additional liquid such as reserved pasta water or a dash of cream to improve fluidity and provide a smooth creaminess.

Flavor balance problems could result from incorrect seasoning levels—emphasize gradual incorporation of spices, adjusting for taste throughout preparation to ensure a balanced profile.

Temperature problems arise when incorrectly heating components, affecting textures or causing scorching. Favor consistent heat levels and thorough monitoring to safeguard quality throughout.

Equipment challenges from inappropriate tools influence cooking times or outcomes. Ensure suitable selections supporting task expectations, facilitating a controlled preparation environment.

Ingredients substitutions require careful consideration, ensuring that changes harmonize rather than conflict with the dish’s intended balance and complexity of flavor.

Timing concerns could impact texture and doneness. Plan efficiently to complement the cooperative nature of cooking steps, ensuring aligned cooking times and peak doneness consistency.

Recipe Success Stories

Community feedback heralds the Spicy Mango Steak and Shrimp Alfredo as a triumph of taste—users celebrate its simplicity and impactful flavor, generating interest and acclaim from peers.

Variation successes highlight wholesome inclusions like fresh vegetables and alternative pastas, contributing to a customized experience while preserving the core delight of the dish.

Adaptation stories detailing various dietary integration reveal the dish’s versatility, opening avenues for diverse consumption experiences—a tale of adaptability catering to individual preferences seamlessly.

Reader suggestions inspire creativity, prompting unique takes infusing personal twists into the classic preparation, creating interesting dialogues within the community fostering mutual appreciation.

Photography tips enrich engagement, promoting a sharing environment that highlights artistic angles, elegant lighting, and presentation invitations that capture the delightful essence of the dish.

Frequently Asked Questions

Can I make this dish ahead of time?
Yes, you can prepare the sauce and marinate the steak a day ahead. Store each component in separate airtight containers to maintain freshness and flavor.

What type of pasta should I use?
Fettuccine or linguine works best as they hold the sauce well. However, penne or rigatoni can also be used for added texture and sauce retention.

How do I store leftovers?
Store leftovers in an airtight container in the refrigerator. Consume within 2–3 days to ensure maximum freshness. Avoid freezing for best texture results.

Can I adjust the spiciness?
Absolutely. Simply reduce or increase the quantity of chili flakes or other spices to align with your taste preference, creating the heat level you enjoy most.

What’s an alternative to fresh mango?
Ripe peaches or nectarines offer a similar sweet profile that complements the dish’s flavors effectively, providing a great standby in mango’s absence.

Can this be made dairy-free?
Yes, use plant-based cream and cheese alternatives for a dairy-free version that maintains the creamy Alfredo texture and delightful taste.

How do I prevent the sauce from breaking?
Gradually add grated cheese while continuously stirring over low heat to achieve a smooth sauce. Excessive heat can cause separation, so slow and steady adjustments are key.

What wine pairs well with this dish?
A chilled Chardonnay complements the creamy texture well, while a light, bright red such as a Pinot Noir offers subtle, elegant earthiness.

Can I omit the steak?
Omit the steak and double the shrimp quantity for an equally delicious variation. Alternatively, incorporate a vegetarian protein like portobello mushrooms.

Is there a specific type of mango to use?
Alphonso or Ataulfo mangoes are preferable for their sweetness and creamy texture, but any ripe mango that isn’t too ripe will work just as well.

How can I make this low-carb?
Substitute traditional pasta with zoodles or spiralized squash, without compromising flavor for a reduced carb intake while enjoying the essentials.

What is the best way to reheat the pasta?
Reheat gently over a stovetop on low, stirring regularly or in an oven to avoid overheating that can affect the texture adversely with unwanted changes.

Additional Resources

Explore related recipes to deepen your culinary repertoire with options that showcase creative pasta dishes or mango-infused delights. Each provides unique pairing opportunities for more satisfying meal plans.

Technique guides enrich your cooking skills, covering vital methods like searing, sauce consistency, and innovative pairings that pave the way for successful culinary endeavors.

Ingredient information broadens knowledge on the utilized delicacies, highlighting nutritional breakdowns, benefits, and culinary uses that ignite passion for creative discovery with repeatedly joyful results.

Equipment recommendations enhance your kitchen environment with selections that support the ideal execution of classics while offering tools for inventive spins on beloved favorites.

Seasonal variations feature expert input and insight on how to best approach evolving tastes throughout the year, encouraging menu adaptations that stimulate year-round enthusiasm for food.

Join the Conversation

Share your own experiences preparing Spicy Mango Steak and Shrimp Alfredo, engaging with a community that’s passionate about culinary discovery. Every shared recipe reveals new perspectives and kitchen stories.

Capture your creations through photography, detailing the journey with tips from lighting techniques to plating design, creating a visual narrative that speaks to aesthetics and taste equally.

Review your preparation process, noting favorite flavor highlights or methodology preferences. Each review fosters mutual understanding and offers inspiration to fellow enthusiasts echoing similar passions.

Respond to reader suggestions by contributing creative twists or alternative ingredient insights, encouraging exploration and ingenuity that extends far beyond single interpretations of the dish.

Engage through social media, extending sharing opportunities across platforms to deepen culinary connections, excite audiences, and bond over a genuine appreciation for the diverse world of food preparation and enjoyment.

The Recipe

Spicy Mango Steak and Shrimp Alfredo

Serves: 4

Prep Time: 25 mins

Cook Time: 30 mins

Total Time: 55 mins

Kitchen Equipment Needed

  • Cast-iron skillet or grill pan
  • Large pasta pot
  • Sharp knife
  • Cutting board
  • Tongs
  • Medium saucepan

Ingredients

  • 1 lb sirloin steak, seasoned with salt and pepper
  • 12 oz shrimp, peeled and deveined
  • 8 oz fettuccine
  • 1 ripe mango, diced
  • 1 cup heavy cream
  • 1/2 cup Parmesan cheese, grated
  • 2 cloves garlic, minced
  • 1 tsp red pepper flakes
  • Salt and pepper to taste
  • 2 tbsp olive oil
  • Fresh cilantro, chopped for garnish

Directions

  1. Bring a large pot of salted water to boil and cook fettuccine according to package instructions. Drain and set aside.
  2. Heat olive oil in a cast-iron skillet over medium-high heat. Sear the seasoned steak for 4–5 minutes on each side until desired doneness. Let rest before slicing.
  3. In the same skillet, add shrimp and cook until pink and opaque. Remove from heat.
  4. In a medium saucepan, heat cream over low heat. Stir in grated Parmesan and minced garlic, whisking until cheese melts and sauce is smooth.
  5. Combine fettuccine and sauce, stirring to coat pasta evenly with Alfredo sauce. Add diced mango, cooked shrimp, and sliced steak.
  6. Top with red pepper flakes and chopped cilantro. Serve immediately, enjoying the fusion of spicy, sweet, and creamy flavors.

Recipe Notes

  • Substitute mango with peach if desired.
  • Adjust chili levels for a milder version.
  • Use gluten-free pasta for a gluten-free dish.

Irresistible Cherry Lemon Cheesecake Recipe: A Zesty Dessert Delight

Cherry Lemon Cheesecake: A Decadent Delight

⚖️
Difficulty
Moderate

⏲️
Prep Time
30 mins

🕒
Cook Time
60 mins

⏱️
Total Time
90 mins

🍽️
Servings
12

Indulge in the smooth, creamy luxury of this Cherry Lemon Cheesecake, an exquisite dessert that blends the vibrant zest of lemon with the rich succulence of cherries. Perfect for any occasion, this cheesecake is a refreshing twist that will leave your taste buds tingling. Whether it’s a family gathering or a romantic dinner, the Cherry Lemon Cheesecake shines with its unique flavor profile, making it a must-try for dessert enthusiasts. The harmonious blend of sweet cherries and tart lemon creates an unforgettable culinary experience.

Quick Recipe Highlights

  • Flavor Profile: The cheesecake beautifully balances the tartness of lemon with the sweetness of cherries, offering a vibrant yet creamy taste.
  • Texture: A flawlessly smooth filling over a crunchy biscuit crust, with juicy cherries adding a delightful contrast.
  • Aroma: Fresh citrus notes mingle with sweet hints of cherries, creating a fragrant dessert bouquet.
  • Visual Appeal: The cheesecake’s golden crust and creamy top, adorned with glossy cherries, create an eye-catching centerpiece.
  • Skill Level Needed: Requires moderate skill in baking and working with gelatin for the perfect set texture.
  • Special Equipment: A springform pan and electric mixer ensure optimal results.

Recipe Overview

  • Difficulty Level: Moderate due to the multi-step preparation and precision required for baking and setting a cheesecake.
  • Category: A rich dessert perfect for dinner parties or special occasions.
  • Cuisine: A modern twist on classic American cheesecake with hints of Mediterranean citrus influence.
  • Cost: Moderate, considering fresh fruit and quality dairy products are essential.
  • Season: Best enjoyed in late spring and summer when cherries are at their peak.
  • Occasion: Ideal for birthdays, holidays, or any event where you want to impress guests with a luxurious dessert.

Why You’ll Love This Recipe


Experience the vibrant taste and texture of our Cherry Lemon Cheesecake, which offers a seamless blend of tangy lemon and sweet cherries. The cheesecake’s lush creaminess is complemented by a crunchy biscuit crust, creating a delicious harmony with every bite. It’s a sophisticated yet easy-to-prepare dessert that turns any occasion into a special event with its delectable balance of flavors.

The Cherry Lemon Cheesecake is not only delicious but also convenient to make. With a simple yet impressive presentation, it impresses without the need for complicated steps. The ingredients are readily available, and the recipe provides the opportunity to refresh your dessert repertoire with minimal effort.

Alongside its irresistible taste, the cheesecake delivers a range of nutritional benefits. The cherries are rich in antioxidants, while the creamy lemon offers vitamin C. This recipe ensures indulgence with healthier elements, making it a guilt-free dessert choice.

Socially, the cheesecake is a conversation starter. Its unique blend of cherry and lemon flavors sets it apart, allowing it to shine at gatherings and celebrations. Your guests will appreciate the unique flavor profile while you create lasting memories.

Economically, the Cherry Lemon Cheesecake is cost-effective. With numerous servings and common ingredients, it proves an affordable luxury. Instead of purchasing an expensive dessert from a bakery, crafting your own masterpiece saves money while delivering gourmet quality.

Historical Background and Cultural Significance


Cheesecakes have been an indulgent treat for centuries, with roots tracing back to ancient Greece. The introduction of cream cheese in America revolutionized the dish, adding the richness we associate with it today. This Cherry Lemon Cheesecake is a modern interpretation, integrating the historical reverence for cheesecake with a fresh twist.

In many cultures, cheesecake is more than a dessert; it’s a symbol of celebration and luxury. Our version, with its refreshing citrus and cherry notes, respects the dessert’s cultural significance while offering a contemporary take that honors tradition.

Over time, cheesecake recipes have evolved to reflect available ingredients and culinary trends. The Cherry Lemon Cheesecake highlights modern palates’ preference for bold, natural flavors, showcasing the adaptability and enduring appeal of this classic confection.

Different regions have put their spin on the cheesecake, influencing the creation of our recipe. The tangy lemon and cherry toppings showcase European and American influences, bringing together a dessert beloved worldwide.

Ingredient Deep Dive


Cream cheese is the heart of any good cheesecake, offering a rich, creamy texture. Its development in the late 19th century revolutionized desserts, providing the silky base we enjoy today in cheesecakes across cultures. It’s essential to choose full-fat cream cheese for the best consistency, ensuring a luxurious mouthfeel.

Lemons, integral to the cheesecake’s refreshing taste, bring both a bright flavor and a boost of vitamin C. When selecting, look for lemons with firm skin and a vibrant yellow hue, indicating juiciness. Proper storage keeps them fresh; refrigerated in a crisper drawer or a paper bag.

Cherries infuse the cheesecake with natural sweetness and antioxidants. Fresh cherries are ideal, so choose vibrant, plump fruit for the best flavor. If fresh ones aren’t available, frozen cherries can be a reliable substitute, retaining most of their juicy essence during baking.

Common Mistakes to Avoid

  • Overmixing the batter can incorporate too much air, leading to cracks on the surface as it bakes. Mix just until combined for a smooth top.
  • Skipping the water bath when baking often results in uneven cooking, affecting texture. The steam creates a gentle, even heat, crucial for perfect results.
  • Using low-fat cream cheese compromises the cheesecake’s creamy texture, as fat is essential to achieving the desired consistency.
  • Not allowing enough chilling time will leave the cheesecake unset and difficult to slice, undermining presentation and texture.
  • Baking at too high a temperature can cause unsightly browning and cracks. Always follow recommended temperature guidelines carefully.
  • Incorrect crust-to-filling ratio may result in a soggy base. Ensure your crust is balanced in thickness with the creamy filling for optimal texture.
  • Using all lemon zest and no juice can make the flavor too bitter. A blend of juice and zest provides a balanced citrus note.
  • Rushing the cooling process might lead to structural issues. Gradual cooling in the oven, then at room temperature, helps achieve a set, stable cheesecake.

Essential Techniques


Gradually incorporating eggs into the cream cheese mixture ensures a silky texture. This technique prevents the batter from breaking, which can lead to a grainy filling. It’s essential to add eggs one at a time on low speed, fully blending each before adding the next.

Baking with a water bath regulates temperature and stops cracks from forming. Wrapping the springform pan with foil keeps water out and ensures the cheesecake cooks evenly. Always monitor the water level, adding more if necessary during baking.

Chilling time is crucial for setting the cheesecake. It should rest for at least four hours or overnight for the best results. Proper setting ensures easy slicing and a perfect plate presentation, a testament to the baker’s skill.

Pro Tips for Perfect Cherry Lemon Cheesecake


Allowing all ingredients to reach room temperature before use helps them blend smoothly, reducing the risk of a lumpy batter. Start by setting out your cream cheese, eggs, and even lemons to reach optimal mixing conditions.

For an extra creamy filling, prevent overbaking by removing the cheesecake when the center jiggles slightly. Residual heat will continue cooking, ensuring perfect doneness without cracks.

Ensure your biscuit crust is well-packed. Using a flat-bottomed glass or smooth bottle helps achieve an even, compact layer that provides a sturdy base and great texture contrast to the creamy filling.

The key to a stunning glaze is to simmer cherry juice with some cornstarch until thickened, then cool slightly before pouring over the set cheesecake. This prevents the topping from becoming runny and enhances the glossy, professional finish.

Introducing a hint of vanilla into the cream cheese batter can elevate flavors, complementing the lemon and emphasizing the natural sweetness of the cherries.

Variations and Adaptations


Experiment by substituting raspberries or blackberries for cherries, adjusting sugar to balance tartness. The lemon base’s flexibility pairs well with various seasonal fruits, letting you enjoy the cheesecake year-round.

For a winter twist, add a hint of ginger or cinnamon to the crust mix. These warm spices complement the lemon’s brightness, creating a cozy aroma perfect for holiday gatherings.

Make it vegan by swapping cream cheese with a plant-based alternative and using a cashew or almond milk base. Ensure gelatin substitutes like agar are correctly incorporated for a smooth, set filling.

Add white chocolate shavings atop the cheesecake for a decadent touch. This variation enhances sweetness and adds a glamorous, festive garnish perfect for celebrations.

Alter the classic presentation by turning it into mini cheesecakes using muffin trays. The individual servings are perfect for parties and ensure equal portion control.

Serving and Presentation Guide


For picture-perfect presentation, serve each slice with a glossy cherry on top and a fresh mint leaf for contrast. The vibrant colors of the cheesecake are complemented by the natural hues of the garnish.

Slices are best served chilled with a warm dessert fork for easy cutting through the dense, creamy layer. A chilled dessert plate accentuates the refreshing quality of the cheesecake.

Pair with a dollop of lightly whipped cream dusted with lemon zest. The extra creaminess complements the cheesecake’s tartness, adding depth and balance to each serving.

Modernize the presentation by serving on elegant slate boards for a rustic touch. Edge plates with thin lemon and cherry slices for extra flair in plating.

Wine and Beverage Pairing


A chilled glass of Moscato or a light Riesling complements the cheesecake’s sweetness, while the hints of floral notes match the cherry sweetness.

Non-drinkers or juice lovers can enjoy the cheesecake with a blend of cherry or cranberry juice with a splash of soda, offering a refreshing non-alcoholic alternative.

Lemon verbena or chamomile tea provides a gentle herbal backdrop, enhancing the dessert’s delicate lemon flavor without overpowering it.

Serve beverages slightly colder than room temperature to counterbalance the cheesecake’s creamy richness, creating an overall harmonized dessert experience.

Storage and Shelf Life


Refrigerate the cheesecake covered with plastic wrap to prevent moisture loss and flavor absorption from other foods. A properly stored cheesecake can last up to five days in the fridge.

If freezing is desired, wrap the cheesecake tightly in aluminum foil or plastic wrap, then a freezer bag to prevent freezer burn. For the best quality, consume within two months.

Inspect for signs of spoilage, such as off smells, before consuming. Proper handling ensures it remains a delicious treat for days to come.

For reheating, let frozen slices thaw in the fridge overnight. Avoid room temperature defrosting for food safety and maintaining texture.

Make Ahead Strategies


Plan your prep by completing the crust and filling stages the day before serving. Store them separately if you prefer added toppings to be as fresh as possible.

Before garnishing with cherries, ensure the cheesecake has set entirely overnight for a seamless top layer. This prep timeline boosts flavor, ensuring a well-infused, balanced taste by the time it’s served.

Consider preparing extra batches of the crust in advance and freezing them to streamline future cheesecake endeavors, minimizing prep and mess.

Scaling Instructions


To halve the recipe, divide all ingredients by two, maintaining accuracy for flavors and textures, crucial for achieving the same delicious results.

Doubling the recipe requires ensuring ample oven and refrigerator space to accommodate larger equipment or multiple pans.

Changes in ingredients may alter cooking times slightly, so keep an eye on visual cues of doneness like the cheesecake’s jiggle and cooling process, crucial for scaling success.

Heavy-duty mixers and larger bowls are recommended when scaling up to prevent overcrowding and ensure even blending.

Nutritional Deep Dive


The Cherry Lemon Cheesecake is a balanced indulgence, offering calories from cream cheese and sugar. Each slice delivers a dose of calcium and quick energy carbohydrates.

Cherries add fiber and antioxidants, while lemons offer vitamin C, contributing to overall health benefits. The crust’s use of whole-grain crackers can further increase fiber if chosen wisely.

With sensible portioning, this dessert fits within varied dietary goals. Mindful consumption supports weight management while indulging in occasional treats.

Control sugar and fat by choosing moderation or ingredient swaps for reduced calorie content without losing essential flavors.

Dietary Adaptations


Gluten-free enthusiasts can replace the traditional crust with almond flour or gluten-free biscuits, ensuring an all-inclusive dessert option.

For a dairy-free approach, use plant-based creams and dairy replacements for cream cheese, offering a cheesecake that meets these dietary needs.

To convert to a vegan dessert, employ nuts and soy-based alternatives for a creamy result, adapting solid ingredients like eggs with arrowroot powder as a binding agent.

Softened tight carbohydrate intakes using almond flour crusts and alternate sweeteners like stevia for lower carb versions.

Troubleshooting Guide


If the texture is too grainy, ensure cream cheese is at room temperature and blended until smooth but not overmixed. Correct technique results in the desired luscious quality.

A flavor imbalance can often mean too much lemon or not enough sugar. Taste-test filling before baking, adjusting according to preference for the perfect harmony.

Oven hot spots may require repositioning the cheesecake during baking to avoid over-browning and surface cracking, ensuring an even cook and desirable visual results.

Avoid excessive ingredient substitutions without checking compatibility; some swaps affect binding, requiring adjustments to methods or measurements for successful adaptation.

If timing is an issue, adjust preparation stages to suit your schedule without sacrificing cooling and setting stages, crucial to achieving the signature cheesecake texture.

Recipe Success Stories


Community feedback praises the Cherry Lemon Cheesecake for its striking flavor combination and versatile serving suggestions, often featured in personal and professional celebratory events.

Readers enjoy adapting this recipe with local fruits, sharing stunning creations that showcase seasonal bounty, adding to the recipe’s versatility.

Variation successes include inclusion of herbs like mint or basil in garnishing, introducing aromatic contrasts that broaden the flavor profile while maintaining classic cheesecake essence.

Photography tips from contributors include using fresh fruit arrangements for contrast and brightness, capturing the dessert’s appeal in even casual snapshots.

Frequently Asked Questions

Can I substitute the cherries with another fruit? Yes, most berries and stone fruits work beautifully, just balance sugar levels to maintain the recipe’s sweet-tart flavor profile.

How do I prevent my cheesecake from cracking? Use a water bath, don’t overmix the batter, and avoid opening the oven door during baking to maintain temperature consistency.

Is it possible to freeze the cheesecake? Absolutely, wrap it well and consume it within two months for the best taste and texture.

What if I don’t have a springform pan? Use a deep cake pan lined with parchment for easier removal. Be careful when transferring out of the dish.

Can this recipe be made sugar-free? Substitute sugar with non-caloric sweeteners like erythritol, adjusting to taste as these sweeteners have varying sweetness levels.

What’s the secret to a perfect cherry topping? Simmer cherries in juice with a bit of sugar and cornstarch until thickened smoothly, then cool slightly for a glossy finish.

Is there a no-bake version of this cheesecake? Modify the filling with increased gelatin and no-bake crust adjustments, then chill until set for a simpler preparation.

How can I make it look professional? Top with a mirror glazing technique or fruit arrangements to elevate presentation; chill thoroughly for the cleanest cuts.

Can I use lemon essence instead of fresh lemon? While essence can work in a pinch, the fresh zest and juice are vital for authentic citrus flavor and aroma.

What’s the best way to incorporate gelatin? Bloom in a cool liquid first, then dissolve fully in warmth; mix seamlessly with the filling for a smooth, set cheesecake.

How long should I chill the cake before serving? Aim for a minimum of four hours, overnight if possible, to ensure proper setting and flavor melding.

Why is my crust soggy? A thick, undercooked crust can lead to this; ensure an even bake and cooling before adding the filling to maintain texture integrity.

Additional Resources


For more dessert inspiration, explore our series of indulgent cheesecake variations focusing on flavor exploration and technique mastering. Check out our detailed guide on gelatin handling, preventing common pitfalls for a perfectly set dessert every time.

Delve into our seasonal fruit guides for tips on selecting and incorporating different berries into your sweet creations, ensuring fresh, vibrant taste throughout the year. Discover equipment must-haves for the serious dessert enthusiast, from simple molds to essential handling tools.

Join the conversation by sharing your own Cherry Lemon Cheesecake experience in our community. We welcome photos and stories of your baking adventure. Use our hashtag to connect with fellow bakers, exchanging tips and reviewing your favorite variations. Your take on this recipe may inspire the next home baker!

The Recipe

Cherry Lemon Cheesecake

Serves: 12

Prep Time: 30 mins

Cook Time: 60 mins

Total Time: 90 mins

Kitchen Equipment Needed

  • Springform pan
  • Electric mixer
  • Mixing bowls
  • Measuring cups and spoons
  • Spatula
  • Oven

Ingredients

  • 1 1/2 cups graham cracker crumbs
  • 1/4 cup melted butter
  • 3 packages (8 oz each) cream cheese, softened
  • 1 cup granulated sugar
  • 3 tablespoons all-purpose flour
  • 1 teaspoon vanilla extract
  • 1/4 cup lemon juice
  • Zest of 1 lemon
  • 3 large eggs
  • 1 cup fresh or frozen cherries
  • 1 tablespoon cornstarch

Directions

  1. Preheat your oven to 325°F (163°C).
  2. In a bowl, mix graham cracker crumbs with melted butter. Press onto the bottom of a springform pan to form the crust.
  3. In a large mixing bowl, beat cream cheese until smooth. Gradually add in sugar, flour, and vanilla extract.
  4. Mix in lemon juice and zest, followed by one egg at a time, ensuring each is fully integrated before adding the next.
  5. Pour mixture over the crust in the springform pan and smooth the top.
  6. Bake for 55-60 minutes or until center is set but still wobbles slightly. Cool in the oven with door ajar.
  7. In a saucepan, combine cherries and cornstarch. Cook over medium heat until thickened, then cool.
  8. Once cheesecake is cooled, pour cherry topping evenly over the surface.
  9. Chill in the fridge for at least 4 hours or overnight before serving.

Recipe Notes

  • For a nutty touch, mix 1/4 cup crushed nuts with the crust.
  • Adjust sugar to taste depending on the sweetness of your fruit.
  • If fresh cherries aren’t available, pitted tart cherries in juice can be used.