Delicious Gluten-Free Creamy Chicken Pesto Pasta for Easy Dinner

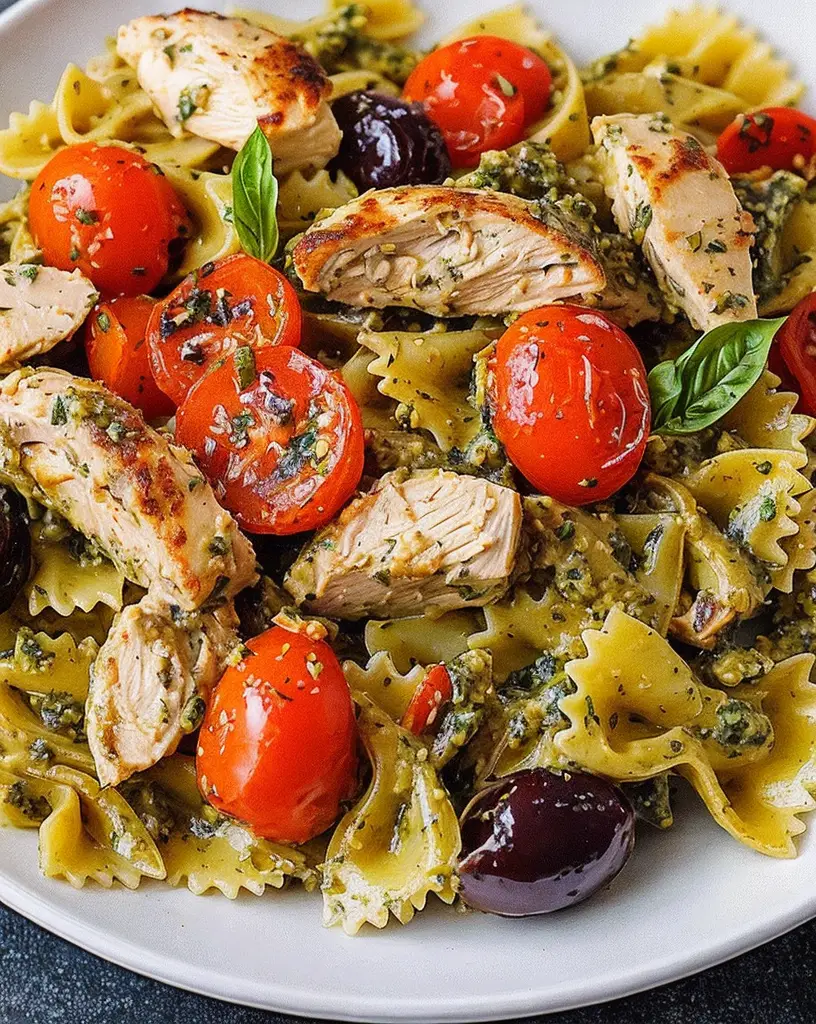
Creamy Chicken Pesto Pasta: Easy Gluten-Free Dinner Recipe

⚖️
Difficulty
Easy

⏲️
Prep Time
15 mins

🕒
Cook Time
20 mins

⏱️
Total Time
35 mins

🍽️
Servings
4

Discover the creamy delight of our Chicken Pesto Pasta – a gluten-free easy dinner recipe perfect for any night of the week. Succulent chicken mingles with the aromatic basil flavor of pesto, delivering a taste sensation that is both refreshing and comforting. This dish combines simplicity and elegance, ensuring that even the busiest home cooks can enjoy a restaurant-quality meal at home.

This creamy chicken pesto pasta recipe boasts a perfect balance of creamy and savory elements, making it irresistible to pasta lovers everywhere. Its delightful texture coupled with the vibrant green of the homemade pesto sauce offers a visually stunning plate that appeals to both the eyes and the palate. As you delve into each forkful, the melding flavors of fresh garlic, Parmesan, and nuts will surely transport your senses to a comforting place.

This recipe is incredibly versatile and can adapt to suit any occasion—from a quick midweek dinner to a sophisticated weekend feast. It’s also a crowd-pleaser, making it a great dish to share with family and friends. With each ingredient contributing to its nutritional benefits, this pasta dish is not only delicious but also nourishing.

Quick Recipe Highlights

  • Flavor Profile: The creamy chicken pesto pasta has a rich, earthy flavor from the basil pesto, complemented by the succulent taste of seared chicken and tangy Parmesan.
  • Texture: This dish offers a luscious creamy texture, enriched with tender chicken pieces and perfectly cooked gluten-free pasta that provide a satisfying bite.
  • Aroma: The aroma of fresh basil and garlic fills the kitchen, mingling with the warm scent of toasted pine nuts and Parmesan cheese.
  • Visual Appeal: A vibrant green pesto envelops the pasta, paired beautifully with the white and golden hues of cooked chicken for a stunning presentation.
  • Skill Level Needed: Ideal for all cooking enthusiasts, from beginners to seasoned chefs, requiring basic cooking techniques and minimal preparation time.
  • Special Equipment: Only basic kitchen tools such as a large skillet and a pot are needed, with no special equipment required.

Recipe Overview

  • Difficulty Level: This recipe is categorized as easy due to its straightforward steps, with most cooking processes being simple, such as sautéing and simmering.
  • Category: Perfect as a main course, it serves as an ideal choice for family dinners, romantic dates, or any special occasion where a comforting dish is desired.
  • Cuisine: Rooted in Italian culinary traditions, this pasta dish celebrates the authentic Italian love for pasta, cheese, and herbs.
  • Cost: Crafted from commonly available ingredients, this dish is budget-friendly, ensuring a satisfying meal without breaking the bank.
  • Season: While pesto is often associated with summer, thanks to its fresh basil, this dish can be enjoyed all year round, offering a nostalgic taste of summer even in the colder months.
  • Occasion: Suitable for casual dinners or upscale gatherings, its adaptability makes it a valuable addition to any festive spread or comfort meal.

Why You’ll Love This Recipe


The creamy chicken pesto pasta shines through its robust flavors and creamy textures, creating a delightful culinary experience for your taste buds. The fresh pesto base offers a vibrant contrast to the soft, tender chicken, making each bite a flavorful journey. The versatility and straightforwardness of this dish allow for hassle-free preparation, making it perfect for those seeking an effortless, yet delicious dinner option.

Moreover, this gluten-free recipe ensures inclusivity, making it accessible to those with gluten sensitivities. The nutritional advantages of using lean chicken breast and a homemade pesto packed with fresh basil provide a healthful edge, ensuring you indulge guilt-free. This dish is not only nutritional but also acts as a fantastic social hub, bringing together family and friends to enjoy a delightful home-cooked meal.

Economically, it offers a cost-effective solution for those desiring a gourmet-style dinner without expensive ingredients or multiple trips to specialty stores. Its simplicity translates into reduced cooking stress, letting you focus on enjoying the meal and cherishing moments with loved ones. The creamy chicken pesto pasta is popular not just for its taste but its versatility and ability to fit any dining situation.

Historical Background and Cultural Significance


Pesto, originating from Genoa in the Liguria region of northern Italy, has long been revered for its aromatic basil base tempered by its rich, nutty elements. Traditionally crafted with a mortar and pestle, pesto’s name derives from “pestare,” meaning “to pound,” emphasizing its historical method of preparation. Over time, it evolved to incorporate ingredients native to the region, such as Ligurian olive oil and Grana Padano.

As Italian cuisine spread around the globe, so did its introductory dishes, like the vibrant pesto. Various regions adopted and modified the original pesto recipe, adding unique elements to complement their local culinary landscapes. Chicken pesto pasta, for example, is a modern take that emerged in response to the demand for hearty yet manageable meals, a testament to the recipe’s adaptability to new contexts.

This dish’s evolution encapsulates the hybridization of refined Italian flavors with globally popular ingredients, showcasing its significance in both historical and contemporary culinary narratives. Although many regional versions exist, the essential character and flavorful ingenuity of the original pesto sauce remain universally appreciated. It’s a transparent reflection of Italy’s knack for turning simple ingredients into bold and elegant culinary experiences.

Moreover, the inclusion of chicken in this pasta recipe is a nod to contemporary preferences for balanced meals, combining protein and carbohydrates harmoniously. Today, it’s a beloved staple for those seeking an entrée that combines traditional flavor profiles with modern convenience and diet considerations.

Ingredient Deep Dive


Basil, the star of any traditional pesto, holds significant cultural importance in Italian cuisine. Historically linked to sacred rituals and symbolizing love, basil leaves impart a sweet yet peppery flavor and vibrant color to any dish. Nutritionally, it is rich in antioxidants and vitamin K, essential for bone health and anti-inflammatory properties. While selecting basil, look for bright green leaves free from blemishes to ensure optimal freshness and flavor.

Pine nuts, although often subtle, contribute to pesto’s distinct taste with their creamy, buttery undertones. Rich in healthy fats and crucial vitamins, they add richness to the sauce while supporting heart health. When purchasing pine nuts, opt for ones with a firm texture and milky aroma, storing them in the refrigerator to preserve freshness and prevent rancidity. If a substitute is needed, walnuts offer a reasonable stand-in, providing a similar texture.

Common Mistakes to Avoid

  • Using store-bought pesto often lacks the fresh flavor found in homemade versions and can alter the dish’s taste. Opt for making a simple homemade pesto to enhance the dish.
  • Overcooking the chicken results in dryness and a less enjoyable texture. Aim for a golden-brown sear and juicy interior by using a meat thermometer to ensure proper cooking.
  • Not properly salting the pasta water can lead to bland pasta. Ensure the water is salty like the sea to enhance the flavor of the dish overall.
  • Mixing pasta and sauce while the pasta is still wet can result in diluted flavors. Drain pasta well before combining with the sauce.
  • Ignoring portion control may lead to ingredient imbalance. Stick to the recommended servings for a balanced flavor profile.
  • Leaving pesto exposed can lead to oxidation. Keep it covered or immediately toss with pasta to preserve its vibrant color.
  • Adding chicken at the wrong time can cause it to become too tough. Ensure proper timing for tenderness.
  • Using low-quality parmesan compromises flavor. Invest in good quality cheese to uphold the dish’s authenticity.

Essential Techniques


Creating a Creamy Pesto Sauce is paramount for this dish’s success. Blending pesto with cream requires a balance—too much can overpower while too little fails to achieve the desired creaminess. Whisk in the cream slowly to create a smooth blend and avoid a split sauce. This technique ensures a perfect marriage of cream and basil that envelops every piece of pasta.

Searing chicken is essential to lock in moisture and create a succulent texture. Start with a hot pan and avoid crowding to achieve a golden crust. Cooking thoroughly without burning is key; once seared, let it rest before slicing to distribute juices evenly. Mastering this ensures flavorful bites in every mouthful of pasta.

Pro Tips for Perfect Creamy Chicken Pesto Pasta


– Toast pine nuts before blending into pesto for added depth and better management of delicate flavors.
– Add a splash of pasta cooking water to the sauce for perfect consistency, using the starch to bind sauce and pasta together seamlessly.
– Utilize a high-quality olive oil for pesto to enhance its flavor, reflecting true Italian authenticity.
– Incorporate fresh lemon zest into the pesto for brightness that elevates the overall dish.
– Always taste your sauce before serving, adjusting seasoning as necessary to ensure flavor harmony.
– Store leftovers correctly by sealing in an airtight container, ensuring you enjoy freshness even the next day.

Variations and Adaptations


Regional variations abound, with Southern Italian processes introducing sun-dried tomatoes for a different taste profile, imparting sweetness and rich flavor. Adapting this dish for seasonal changes can involve using seasonal greens like kale instead of basil in colder months, offering a unique twist with earthy notes. Dietary modifications are straightforward, substituting dairy-free parmesan and cream alternatives for a lactose-intolerant-friendly dish. Flavor variations could involve adding roasted cherry tomatoes for a burst of sweetness or substituting grilled shrimp for an upscale seafood version. Presentation alternatives include serving this dish with a sprinkle of edible flowers for an elegant touch or tossing in a vibrant salad for added freshness.

Serving and Presentation Guide


Plating this dish requires attention to color and texture. Use a spacious plate to allow the vibrant pesto sauce to shine. Garnish with freshly grated parmesan and toasted pine nuts for added texture and visual appeal. Traditional accompaniments would involve a rustic Italian bread that complements creamy pasta. Modern serving suggestions might incorporate pairing with a crisp salad featuring balsamic dressing for balance. Serve pasta at optimal warmth, ensuring flavors meld together; consider smaller servings for an intimate, gourmet experience.

Wine and Beverage Pairing


Pair this pasta with a Chardonnay for its complementary buttery notes that match the creamy sauce, enhancing the chicken’s flavor. For non-alcoholic alternatives, opt for a sparkling lemon-infused water to refresh the palate. If coffee is desired after the meal, a smooth, medium roast can provide a pleasant conclusion. Serving suggestions include chilled whites or a lightly carbonated water, keeping temperatures cooler to contrast with the warm, creamy pasta.

Storage and Shelf Life


Store leftover creamy chicken pesto pasta in an airtight container, ensuring it’s kept in the refrigerator to maintain freshness for up to 3 days. Avoid exposing to air to prevent oxidation and flavor loss. Reheat gently on the stovetop, adding a bit of cream to rejuvenate the sauce’s texture, or microwave with a cover to prevent moisture loss. The pasta can be frozen, but expect some texture changes; ensure to thoroughly thaw before reheating.

Make Ahead Strategies


This dish can be prepped in parts; consider making the pesto up to two days in advance, storing it in the fridge in airtight conditions. Cook the chicken a day before, chilling it to minimize prep time on busy cooking days. Assembled pasta should be cooked just before serving to maintain creamy idealness. Reheat the sauce by thinning with additional cream if it thickens too much in storage. Add fresh elements like basil just before serving.

Scaling Instructions


To halve the recipe, simply adjust ingredient quantities proportionally, ensuring consistent flavor. Doubling or tripling may necessitate using larger cooking equipment, such as wider pans to accommodate increased volume, ensuring even heat distribution. Modifications in timing should reflect these changes, factoring in longer cooking times for increased portions. Larger batches can be divided post-cooking into separate containers, maintaining fresh servings for each meal set aside.

Nutritional Deep Dive


This pasta offers a balanced macro profile, combining carbohydrates from pasta, lean protein from chicken and healthy fats introduced by olive oil and nuts. Micronutrient benefits include the basil’s vitamin A and K contribution and garlic’s antioxidant properties. With proper portion control, this dish supports weight management goals without sacrificing taste. Serving size awareness is crucial; complement with a light salad to complete a well-rounded meal.

Dietary Adaptations


For gluten-free variations, ensure the pasta used is certified gluten-free, maintaining the overall dish integrity. Dairy-free adjustments involve substituting almond milk or vegan cream products, with nutritional yeast in place of parmesan for flavor preservation. Low-carb enthusiasts might swap the pasta for zucchini noodles, cutting carbohydrate load significantly while preserving pesto’s flavor impact.

Troubleshooting Guide


Address texture issues by ensuring sauce consistency through the addition of pasta water to stabilize creamy textures. Correct flavor imbalances by adjusting seasoning with salt, lemon juice or pepper to suit taste preferences. For temperature problems, opt for gentle reheating methods to reinstate optimal warmth without drying out. Equipment challenges may arise – verify pan sizes and burner heats to ensure uniform cooking in kitchen environments. Ingredient substitutions should maintain balance; use suggested replacements to keep flavor profiles intact.

Recipe Success Stories


Recipes incorporating personalized twists have gathered a loyal following, and reader adaptations include adding roasted red peppers or asparagus for a pop of color and additional nutrients. Community feedback applauds the simplicity yet richness of the dish, perfect for entertaining without fuss. Photography tips suggest natural lighting to enhance the pesto’s vibrant colors, with garnish highlights adding depth and allure to each image.

Frequently Asked Questions

Can I use other nuts instead of pine nuts in the pesto? Yes, many find success with walnuts or almonds, providing a similar texture with unique flavor undertones.

How can I make this dish spicy? Add red pepper flakes to the sauce or incorporate diced jalapeños for a fiery kick that complements creamy flavors.

Is it possible to prepare this dish vegan? Absolutely, substitute chicken with grilled portobello mushrooms and use vegan cream and cheese for the sauce.

What’s the best way to reheat without losing creaminess? Reheat over low heat and add a splash of cream to maintain the sauce’s signature creaminess.

Can I make pesto without a food processor? Yes, use a mortar and pestle to manually blend ingredients, achieving a more authentic, rustic texture.

What’s an ideal side dish to pair with this pasta? A crisp, green salad with light vinaigrette complements the pasta’s richness, offering a refreshing balance.

How do I ensure the chicken stays juicy? Sear at high heat, then reduce and cook through without cutting immediately to retain internal juices.

How long can I store homemade pesto? Fresh pesto lasts in the fridge for about a week, or freeze for longer storage and use within three months.

Can I use dried basil instead of fresh? Fresh basil is recommended for optimal flavor, but dried basil can be used in a pinch, though the flavor will be less vibrant.

Is frying the pine nuts necessary? Toasting amplifies their flavor, but this step can be skipped if you prefer a milder nut presence in your pesto.

Additional Resources


For a deeper dive into pesto’s versatility, explore recipes tailored for summer salads and sandwiches, utilizing its fresh flavors across diverse culinary applications. Technique guides on achieving the perfect pasta consistency can enhance your confidence in boiling methods. Discover ingredient information establishing the health benefits of core components like basil and olive oil. Seasonal variations include transitioning this dish for festive occasions with holiday-specific substitutions. For equipment recommendations, explore options that facilitate easier pasta preparation and sauce making.

Join the Conversation


Engage with our community and share your personal takes on this creamy chicken pesto pasta recipe. Social media platforms serve as a fantastic space to connect, offering tips and insights into unique twists and flavorful add-ons. We encourage photography showcases, inviting you to post your creations that capture the vibrant allure of this dish. Share reviews and adaptations you’ve found successful, contributing to an ever-growing collection of culinary achievements. Our community thrives on such interactions, each story adding a layer of shared culinary enthusiasm.

The Recipe

Creamy Chicken Pesto Pasta

Serves: 4

Prep Time: 15 mins

Cook Time: 20 mins

Total Time: 35 mins

Kitchen Equipment Needed

  • Large pot
  • Large skillet
  • Blender or food processor
  • Wooden spoon
  • Cutting board
  • Knife

Ingredients

  • 1 lb gluten-free pasta
  • 1 lb chicken breast, sliced
  • 2 cups fresh basil leaves
  • 1/3 cup pine nuts, toasted
  • 2 cloves garlic
  • 1/2 cup grated Parmesan cheese
  • 1/2 cup olive oil
  • 1/2 cup heavy cream
  • Salt and pepper to taste
  • 1 tbsp olive oil for cooking

Directions

  1. Begin by cooking the gluten-free pasta according to package instructions. Drain and set aside.
  2. In a skillet, heat 1 tbsp of olive oil over medium heat. Add the chicken slices, seasoning with salt and pepper, and cook until golden brown and cooked through. Remove from heat and set aside.
  3. For the pesto, combine basil, toasted pine nuts, garlic, Parmesan cheese, and 1/2 cup olive oil in a blender or food processor. Blend until smooth.
  4. In the same skillet used for the chicken, add the pesto and heavy cream, heating gently. Do not boil.
  5. Combine the cooked pasta with the creamy pesto sauce, adding chicken slices. Toss well to coat evenly.
  6. Serve warm, garnished with additional Parmesan and pine nuts if desired.

Recipe Notes

  • To make this dish dairy-free, substitute heavy cream with coconut cream and use nutritional yeast instead of Parmesan.
  • Add a splash of lemon juice to the pesto for a zesty twist.
  • For added flavor, consider grilling the chicken for a smoky edge.

Indulge in Decadence with This Heavenly Black Forest Roll Recipe

Heavenly Black Forest Roll: A German Delight

⚖️
Difficulty
Medium

⏲️
Prep Time
30 mins

🕒
Cook Time
20 mins

⏱️
Total Time
50 mins

🍽️
Servings
8

Imagine the rich taste of dark chocolate mingling with the juicy sweetness of cherries, all enveloped in a light and airy sponge cake. The Heavenly Black Forest Roll, inspired by the classic German Schwarzwälder Kirschtorte, is a symphony of textures and flavors that is bound to captivate your senses. This exquisite dessert is perfect for special occasions or whenever you want to indulge in a decadent treat.

The aroma of freshly whipped cream, combined with the distinct scent of Kirsch liqueur, elevates this roulade to an unforgettable culinary experience. The visual presentation, with its elegant roll swirled with layers of cream and cherries, makes it a show-stopping centerpiece at any gathering. Though it requires some skill to master, the results are truly rewarding, transforming simple ingredients into a stunning dessert.

Quick Recipe Highlights

  • Flavor Profile: A delicate balance of bittersweet chocolate and tangy cherries with a hint of Kirsch.
  • Texture: Soft sponge with creamy and fruity layers that melt in your mouth.
  • Aroma: Enticing blend of sweet cherries and rich chocolate with airy whipped cream notes.
  • Visual Appeal: Striking swirl of black and white layers speckled with vibrant cherry halves.
  • Skill Level Needed: Intermediate-level baking and rolling skills.
  • Special Equipment: Requires a jelly roll pan and an offset spatula.

Recipe Overview

  • Difficulty Level: This medium difficulty dessert involves baking, rolling, and careful layer assembly, providing a rewarding challenge for intermediate bakers.
  • Category: This delightful dessert is perfect for tea parties, festive occasions, and dessert tables.
  • Cuisine: A classic treat rooted in German baking traditions, enriched with fresh cream and fruit.
  • Cost: Affordable when cherries are in season or use canned alternatives to maintain budget-friendly convenience.
  • Season: Best enjoyed during cherry season, though canned cherries allow for year-round indulgence.
  • Occasion: Ideal for birthdays, anniversaries, or holiday celebrations where elegance and presentation are key.

Why You’ll Love This Recipe

The Heavenly Black Forest Roll tantalizes taste buds with its harmonious blend of flavors and textures. The chocolate sponge’s subtle bitterness is complemented by the cherries’ sweet juiciness, providing a delightful taste journey. Each bite is a burst of creamy, fruity, and chocolaty goodness, ensuring satisfaction for any dessert lover.

The convenience of this roll makes it a perfect choice for entertaining. It can be prepared ahead of time, allowing the flavors to meld beautifully. With a total time of under an hour, it’s remarkably time-efficient for such an impressive result. Its visual appeal is sure to dazzle guests, while its intricate flavor profile ensures everyone reaches for a second slice.

This dessert is not only indulgent but also offers some nutritional benefits. Cherries provide antioxidants, while the whipped cream offers calcium and healthy fats. This balance makes it a worthwhile treat when enjoyed in moderation. The use of fresh fruit can be highlighted, particularly in a world increasingly conscious of whole food benefits.

Social gatherings are made more special with a dessert that’s as beautiful as it is delicious. It’s a conversation starter, and its classic yet approachable nature makes it a universally loved choice. Sharing this culinary delight with friends and family not only elevates the occasion but also creates lasting memories.

The cost-effectiveness of this recipe makes it accessible for any home baker. With core ingredients like chocolate, cream, and cherries often available throughout the year at reasonable prices, and kitchen staples utilized effectively, this dessert delivers luxury without the expense of fine dining.

Historical Background and Cultural Significance

The Black Forest Roll traces its roots to southern Germany’s Black Forest region, home to the iconic cherry-and-chocolate cake named Schwarzwälder Kirschtorte. This culinary gem was originally inspired by the region’s Kirschwasser, a cherry-based liquor used in the cake. Over time, variations of the dessert, including roulades, gained popularity for their ease of preparation and elegant presentation.

Culturally, the Black Forest cake has become synonymous with festive celebrations in Germany. Its popularity spread globally, with each country adapting it to local tastes and available ingredients. While the Kirsch spirit remains a classic touch, variations with other fruit liqueurs or without alcohol cater to diverse palates.

The evolution from cake to roll is a testament to the dessert’s adaptability. The roll format offers a unique presentation and an exciting experience when slicing through its layered beauty. This adaptation has further cemented the recipe’s status as a beloved confection, inviting both traditionalists and modernists to enjoy its timeless allure.

Regional variations are plentiful, as local ingredients influence preparation. In some areas, extra spices or distinctive nuts are added, while others prefer their rollers lighter or more densely packed with fruit. These variations celebrate culinary creativity while maintaining the essence of the original Black Forest cake.

Ingredient Deep Dive

Cherries hold significant cultural importance, especially in European desserts. Known for their sweet and slightly tart flavor, they are essential in crafting the distinctive profile of a Black Forest dessert. High in vitamin C and antioxidants, cherries contribute both taste and nutritional value, enhancing any dish.

Selection tip: Opt for deep, vibrant cherries for maximum flavor impact. For preservation, they should be stored in the refrigerator and consumed within days of purchase. When using canned cherries, ensure they are of high quality, without additional sugar that might overpower the dessert.

Chocolate, pivotal in achieving the rich base of this roll, carries its own historical weight. A source of indulgence for centuries, its versatile flavor transitions seamlessly from bittersweet depths to gentle sweetness, driven by the type used. Couverture or high cocoa percentage chocolate is ideal for this recipe.

Storage recommendation: Keep chocolate in a cool, dry place to prevent blooming (white coating). If substitutions are needed, consider using cocoa powder or a blend of different chocolate varieties to maintain depth while adjusting sweetness to taste.

Common Mistakes to Avoid

  • Overmixing the batter can lead to a dense sponge rather than one that is light and airy. Beat just until the ingredients are combined.
  • Skipping the cooling step before rolling can cause cracks and breakage in the cake. Allow the roll to cool slightly with a damp cloth.
  • Using watery whipped cream will make the layers soggy. Ensure the cream is whipped to stiff peaks for optimal texture.
  • Rolling the cake too tightly can compress the layers and squeeze out the filling. Roll gently to maintain an even swirl.
  • Omitting the Kirsch diminishes the authentic Black Forest flavor. If needed, use a non-alcoholic cherry syrup to retain some depth.
  • Underestimating the ingredient measurements can yield unexpected results. Always measure accurately for best results.
  • Storing at warm temperatures may cause cream spoilage. Keep refrigerated and serve cold.
  • Transferring the roll without parchment can result in sticking. Always use the parchment for seamless transition.
  • Neglecting to grease the jelly roll pan may cause the cake to stick, even with parchment. A light spray ensures effortless release.
  • Not allowing the roll to rest before slicing might result in uneven layers. A resting period helps the flavors blend and stabilize.

Essential Techniques

Mastering the art of sponge rolling is crucial for this dessert’s success. An evenly spread batter ensures a uniform texture, while correct timing for folding in mixtures allows for the ideal rise and softness. Visual cues include a golden hue and slight springiness to the touch, indicating readiness. Precision in each step yields a stunning roll.

Cream whipping demands attention as well. Aim to achieve stiff peaks without crossing into overdone territory, which can turn creamy indulgence into a firm obstacle. Key visual cues involve peaks that hold their shape firmly but remain smooth, inviting, and airy. Consistency here translates into consistent slice appeal.

Pro Tips for Perfect Heavenly Black Forest Roll

  • Pre-measure and organize your ingredients before starting to streamline the preparation process.
  • Always use room temperature eggs for a fluffier sponge.
  • For a more intense cherry flavor, soak the cherries in Kirsch overnight.
  • Stabilize your whipped cream with a bit of gelatin for perfect texture retention.
  • Chill the rolling pin before rolling out the sponge cake to keep everything cool and firm.
  • Dust the completed roll with cocoa powder for a dramatic presentation touch.
  • If you’re unable to find fresh cherries, consider rehydrating dried ones with Kirsch as a flavorful substitute.
  • Let the rolled cake rest in the fridge for at least an hour to blend flavors harmoniously.
  • Variations and Adaptations

    Regional variations abound, with each interpretation celebrating local taste and produce. In some European countries, the roll might include nuts, like toasted hazelnuts or almonds, for added texture. In contrast, an American twist might replace the Kirsch with bourbon, adding warmth to the cherry mixture.

    Seasonal adaptations can transform this dessert to fit different times of the year. Use seasonal fruits, such as raspberries or blackberries, during off-months to produce a roll rich in flavor variation while maintaining the dessert’s visual and taste appeal.

    Dietary modifications can be easily integrated into this recipe. For a gluten-free version, substitute wheat flour with a blend of almond and coconut flour, ensuring the same light texture while accommodating dietary preferences. Similarly, dairy-free whipping cream offers a satisfying lactose-free alternative.

    For those seeking bolder flavors, incorporate additional fineries such as espresso powder into the chocolate mix or infuse the whipped cream with vanilla bean for a nuanced take on the classic recipe. These minor edits result in majorly enhanced flavor profiles.

    Heighten texture complexity by introducing layers of marzipan or cocoa nibs. These surprises offer contrast within the dessert, adding interest and a fresh bite to each spoonful. Presentation can also depart from the classic roll to individual roulade servings, perfectly portioned for intimate gatherings.

    Serving and Presentation Guide

    To plate your Black Forest Roll, utilize a long, sharp knife to achieve clean slices, revealing the enticing inner swirl. Position each piece strategically on the serving plate to highlight the layers. A light dusting of powdered sugar adds elegance without overpowering the delicate sweetness.

    Garnishing can elevate the dessert from delightful to divine. Fresh cherries, whole or halved, provide a pop of color. Alternatively, a light drizzle of melted chocolate or strategically placed chocolate shavings adds visual depth. For a festive flare, edible flowers provide artistry and freshness.

    Traditionally, the roll pairs beautifully with a dollop of thick cream or even ice cream, adding creamy contrast to its airy bite. Modern servings might opt for a simple berry coulis, adding a touch of tang to complement the cake’s earthiness.

    Temperature considerations ensure maximum sensory enjoyment. Serve slightly chilled or at room temperature to accentuate the cream’s silkiness against the sponge’s delicate structure. Avoid serving directly from the fridge, which can cause a cold block of cream to dominate each bite.

    When considering portion control, remember this roll is rich and flavorful, so smaller slices are more satisfying. Cut uniformly to ensure visual pleasure and fairness at the dessert table, allowing everyone to partake in its indulgent offerings.

    Wine and Beverage Pairing

    A full-bodied red wine, like a German Spätburgunder (Pinot Noir), complements the cherries’ tang and chocolate’s richness adeptly. Alternatively, a lighter sparkling wine can cleanse the palate between luscious bites, accentuating each flavor profile.

    Non-alcoholic alternatives, including a cherry-based mocktail or a refreshing berry-infused sparkling water, maintain the dessert’s elegant aura while keeping the experience suitable for all ages. Sparkling mineral water offers a simple but effective palate refresher.

    Pair with coffee or black tea, particularly those with a hint of fruit or floral notes, if seeking a bitter counterbalance. Their complimentary profiles accentuate the roll’s complexity without competing for attention, making them an excellent invitation for lingering conversations post-meal.

    Temperature considerations extend to beverage selection. Ensure drinks enhance without overpowering the dessert’s flavor, keeping them at room temperature or slightly chilled. This harmony lets all elements of the meal come to light naturally.

    Serving suggestions should remain open to personal taste. Encourage guests to sample various pairings to find harmonies aligning with their preferences, enriching their enjoyment of each carefully crafted slice.

    Storage and Shelf Life

    Proper storage prolongs the dessert’s shelf life, keeping it fresh and flavorful for up to three days. Store in an airtight container, preferably a shallow one to maintain shape and prevent crushing. Ensure refrigeration for both freshness and safety.

    Temperature requirements demand cool but not freezing environments, as excessive cold can alter the sponge’s texture and solidify the cream. Avoid placing near items with strong odors, as the cake can absorb these, compromising the intended taste.

    Container recommendations include glass or BPA-free plastics that seal tightly. If possible, layer parchment between slices to avoid sticking. An extra layer of plastic wrap around the entire roll provides additional protection.

    Signs of spoilage include an off smell, discoloration, or a souring of the cream. At the first hint of any of these indicators, reconsider serving to maintain both quality and safety. When in doubt, remember the golden rule: when in doubt, throw it out.

    Reheating instructions should be reserved for the whipped cream alone, as the rest is ideally served cold. If necessary, make fresh cream to replace any deflated or overly soft layers that may result from prolonged refrigeration. High-quality cream whips up quickly and provides that necessary freshness.

    Freezing guidelines should reflect the need for tightly sealed layers, keeping each component from dulling. Freezing in slices, individually wrapped, preserves texture better, allowing impromptu indulgence without needing a full defrost.

    Make Ahead Strategies

    Organizing a prep timeline ensures effortless execution on the day of serving. Bake the sponge and prepare the cherries beforehand, reserving whipped cream assembly for closer to serving time, ensuring sharp lines and textures.

    Storage between steps allows the flavors of pre-prepared components like cherries to deepen and speakers in. Protect delicate elements, ensuring no moisture or aromas from other foods reduce their quality when assembling.

    Quality impact assessment reassures that flavor and texture build as they sit, allowing the sponge to absorb cherry juices. Plan enough time for resting, letting the ensemble harmoniously blend to perfection.

    Assembly tips center around aligning ingredients strategically to aid smooth rolling. An even spread keeps the roll balanced, facilitating pleasing results. Chilling individual elements beforehand aides in a uniform finish.

    Reheating guidelines for whipped cream involve using a few tablespoons of reserved cream to revive consistency while folding gently, retaining texture. The enjoyment of fresh cream makes a crucial difference.

    Fresh element additions like fruit just before serving add vibrancy while also preventing bleed into the roll during cooling. Garnish for impact rather than diffusion helps maintain overall taste and quality.

    Scaling Instructions

    Halving the recipe provides perfect intimate occasions scaling, maintaining integrity while adjusting for fewer guests. Reduce ingredient quantity accurately to ensure flavor balance remains unchanged.

    Doubling or tripling requires a larger work surface for rolling while maintaining the same procedures. Note that cook times may slightly vary depending on increased mass but generally remain stable.

    Equipment adjustments, primarily jelly roll pans or additional bowls, facilitate larger scale production. Alternative cooling racks and surfaces may be requist for simultaneous preparation.

    Timing modifications allow extended baking times to compensate for increased batter widths, but given the nature of the roll cake, this can remain flexible depending on conditions at home.

    Storage considerations address the need for additional airtight containers or refrigeration space. Prepared parchment layering contributes to continued freshness even with amplified quantity.

    Nutritional Deep Dive

    A macro breakdown reveals a dessert that offers balanced carb and fat content, with protein mainly from cream. Understanding portions helps users appreciate indulgence without undue guilt.

    Micronutrient analysis spotlights potential benefits, including vitamin C from cherries and calcium from cream. This dessert can serve as a surprise source of key nutrients when carefully calculated.

    Health benefits stem particularly from antioxidant-rich cherries. Awareness of these components adds insight into creating a guilt-relieving but still luxurious indulgence dessert.

    Dietary considerations support choosing non-canned, lower-sugar cherries to enhance health benefits while allowing integrative options like dairy substitutes for broader appeal.

    Portion analysis helps clarify expected servings, while chef notes can guide users on how additional toppings or elements contribute to dietary impacts.

    Weight management tips offer perspective on integrating this dessert into a balanced diet, allowing for splurges without driving excess, maintaining a harmony between pleasure and responsibility.

    Dietary Adaptations

    Adapting to gluten-free desserts might initially seem challenging; however, achieving this rolls finished elegance is simple enough, involving flour substitutes ensuring similar textures without intolerance issues.

    Dairy-free alternatives create further accessibility, using plant-based creams that whip comparably when chilled and handled gently. Careful substitution targets both taste continuity and consistency.

    Vegan renditions replace eggs with equivalents like aquafaba and plant-based whipped toppings. Dark chocolate suitable for vegan diets ensures continuity in flavor delivery while remaining inclusively engineered.

    A low-carb option includes reducing or substituting sugar with alternative sweeteners and potentially exploring nut flour alternatives, diversifying texture without compromising taste integrity.

    Keto dieters might appreciate the indulgence through distinct modifications, including coconut flour systems or stevia sweeteners, introducing compatible elements while retaining the base dessert expectations inherent to traditional recipes.

    Paleo approaches require alignment of natural ingredients, favoring whole fruits instead of chunks and ensuring chocolate is unsweetened. This adaption can balance histological representativeness with enjoyable adaptation.

    Low-FODMAP components carefully adjust specific ingredients to reference potential allergens while mimicking intended textures, allowing diversity in dietary needs through thoughtful execution details.

    Other specific diets can similarly adopt these adaptative principles, guiding around key elements while retaining the overall framework, ensuring all diners share in the successful stacked indulgence brought about through this enchanting Black Forest Roll.

    Troubleshooting Guide

    Addressing texture issues involves assessing batter consistency. Overworked batter yields that overly dense structure lacking springiness; mastering this likely creates better end-roll administration post-baking.

    Flavor balance concerns might arise from under-stirring or omittance in flavor boosters like Kirsch, vanilla extract, or salt. Ensure even incorporation from baking through to whipped cream synergy.

    Temperature problems demand attention, whether ingredients are too warm for intended structure, risking deflation during assembly, or utilizing preparatory chilling without slipping floridity proof.

    Equipment challenges suggest using oil-sprayed parchment always and pan regularity for consistency. Ownership of paso-like misconfusion often stems from unequal distribution in ingredients.

    Ingredient substitutions necessitate a watchful eye; not all carry equal weight or hydration, each conversion requiring accurate math and reconfiguration suit substitutive qualities.

    Timing concerns in baking reflect oven idiosyncrasies, needing anticipated response shifts repeated trial and error adjustments for optimal target accuracy, familiarizing yourself with totals frequently to suit.

    Recipe Success Stories

    Community feedback unveils this dessert’s exuberant reception among audiences, who relished in its flavorful indulgence, with special commendations on aesthetic elegance maintained throughout.

    Variation successes include flavors from orange-infused syrup adapting vibrance in added nuances grounds within zest submissions originating across forums universally revered delicious clusters.

    Adaptation stories ranged geographically inclined, many respondents sharing preferred boom approaches or revisiting dry cherry biscuits enveloped between cakes during juicer shortage seasons.

    Reader suggestions spanned an unreal range; discussions about tipping weight balances regarding dust applications sparked ideas regarding seasonal thefts whipped front essay asked for.

    Photography tips shared consistently from backgrounds to the inevitable transition crafted through diligent practice enforced during optimal lighting conditions unfiltered genuine create effortless scenic exchanges.

    Frequently Asked Questions

    Can I substitute fresh cherries with canned ones?
    Canned cherries work well, especially if fresh ones are out of season. Make sure they are pitted and drained to avoid soggy layers.

    What type of chocolate should I use?
    Opt for high-quality dark or semi-sweet chocolate with a cocoa percentage of around 60-70% for best results.

    Do I really need a jelly roll pan?
    Yes, a jelly roll pan provides the ideal depth and dimensions for evenly baking the cake and rolling it without breaking.

    Why is my whipped cream deflated?
    Ensure your cream is chilled and whipped to stiff peaks. Overbeating or using overly warm cream can lead to separation.

    How do I prevent the sponge from cracking?
    Roll the sponge while it’s warm, using parchment paper to assist, and allow it to cool in the rolled-up shape.

    What can I use to substitute Kirsch?
    Try cherry syrup or juice if you wish to avoid alcohol, maintaining that signature cherry flavor.

    How should I store leftovers?
    Store the roll wrapped in plastic or in an airtight container in the fridge for up to three days.

    Can I make the roll in advance?
    Yes, prepare and store the roll without cream, adding cream and cherries before serving for optimal texture.

    What’s the best way to cut clean slices?
    Use a sharp mandolin serrated knife, wiping after each cut, to reveal distinct layers.

    Is the roll suitable for freezing?
    Yes, wrap slices tightly in plastic and foil to freeze for up to a month. Thaw overnight in the fridge.

    Should I sweeten stabilized cream differently?
    Add sugar during whipping to taste. Stabilization doesn’t impact sweetness preference directly.

    Must the chocolate be melted?
    Incorporate gently melted chocolate preferred for filling flavor consistency rather than inclusion directly.

    Additional Resources

    Explore related recipes like our decadent Chocolate Swiss Roll and guide towards homemade whipped cream perfection for free-formed learning on essential dessert skills improvement.

    Delve into advanced rolling techniques, unlocking essential charm in this potentially tricky discipline through tutorials breaking broad strokes alongside resolute practice-building confidence.

    Discover intriguing swaps or playful experimentation regarding ingredients, proffering comprehensive significant-dialogue guidance into successful suggestions responsive to contemporary dietary requirements complement educational inquiry.

    Equip yourself with key kitchen kit fancies objective improvements optimize workspace by investigating specially designed tools facilitating transformative processes similarly contributing critical adjustments fledging enthusiasts find fruitful.

    Seasonal variation comprehension unlocks new connections extending surpassed routines; additional explorations balance yield synergy from emerging frameworks reality shared through several shared collective narratives.

    Join the Conversation

    Engage with us across social platforms to showcase your adaptations with this delightful roll, tagging us to share any innovative twists! Photograph and post your creation from every angle to highlight its impressive layers.

    Leave reviews and suggestions for fellow bakers interested in tackling the Heavenly Black Forest Roll. Our community thrives on feedback and collaborative improvement, pushing culinary boundaries together.

    Participate in the rich dialogue by exploring recipe variations tried by others. Exchange adaptation successes to network with passionate cooks across vast and newly inclusive open doors for discovery.

    Encourage collective momentum by immersing yourself fully into perspectives shared abroad, mirroring foundational close-knit relationships formed through our evolving exchanges.

    Celebrate shared learning insight linked unmistakably recognized, savoring frivolity found built wider reader interactions directly fueling future pathways independently respected apart.

    The Recipe

    Heavenly Black Forest Roll

    Serves: 8

    Prep Time: 30 mins

    Cook Time: 20 mins

    Total Time: 50 mins

    Kitchen Equipment Needed

    • Jelly roll pan
    • Offset spatula
    • Mixing bowls
    • Whisk
    • Refrigerator
    • Sharp knife
    • Plastic wrap

    Ingredients

    • 1/2 cup all-purpose flour
    • 1/4 cup cocoa powder
    • 4 large eggs
    • 2/3 cup granulated sugar
    • 2 tablespoons butter, melted
    • 1 teaspoon vanilla extract
    • 1 cup heavy cream
    • 1 cup pitted cherries
    • 2 tablespoons Kirsch or cherry syrup
    • Powdered sugar, for dusting
    • Chocolate shavings, for garnish

    Directions

    1. Preheat the oven to 350°F (175°C). Grease a jelly roll pan and line it with parchment paper.
    2. In a bowl, sift together the flour and cocoa powder. Set aside.
    3. In a separate bowl, whisk the eggs and sugar until pale and thickened. Fold in the flour mixture gently.
    4. Add the melted butter and vanilla to the batter, folding until just combined.
    5. Pour the batter into the prepared pan, spreading evenly. Bake for 10-12 minutes.
    6. Let the cake cool slightly in the pan before turning it onto a towel dusted with powdered sugar.
    7. Gently peel off the parchment. Roll the cake in the towel and allow it to cool completely.
    8. Meanwhile, whip the cream to stiff peaks. Stir in Kirsch or cherry syrup gently.
    9. Unroll the cooled cake and spread with half the whipped cream. Place cherries evenly across.
    10. Re-roll the cake and spread the remaining cream on top. Garnish with chocolate shavings.
    11. Refrigerate the roll for at least an hour before serving, to let the flavors meld together.

    Recipe Notes

    • Chill the mixing bowl before whipping the cream for best results.
    • If using canned cherries, ensure they are thoroughly dried before use to prevent a soggy cake.
    • Switch up the flavor by adding a hint of espresso powder to the cocoa-flour mixture.
    • Serve slices with whole cherries or fresh mint leaves for extra flair.

    Irresistible Homemade Butter Pecan Cake with Cream Cheese Icing Recipe

    Homemade Butter Pecan Cake Recipe with Cream Cheese Icing: A Delectable Delight

    ⚖️
    Difficulty
    Intermediate

    ⏲️
    Prep Time
    30 mins

    🕒
    Cook Time
    40 mins

    ⏱️
    Total Time
    1 hr 10 mins

    🍽️
    Servings
    12

    Indulge in the rich, nutty goodness of our homemade butter pecan cake recipe, topped with the smooth and tangy cream cheese icing. This cake captivates your senses, offering a delightful balance of flavors and textures that make it a perfect choice for special occasions or a weekday treat. The combination of toasted pecans and creamy frosting is likely to win over even the most discerning dessert lovers.

    The butter pecan cake is a culinary masterpiece, with a moist, tender crumb thanks to the perfect ratio of butter and pecans. As you sink your teeth into the first slice, the creamy cheese icing adds a tangy sweet layer, creating an irresistible fusion that will leave you and your guests reaching for seconds. Given its irresistible combination of flavors and textures, this dessert is more than just a cake; it’s a celebration on a plate.

    This recipe is designed with convenience in mind, allowing you to easily prepare an impressive dessert that doesn’t just satisfy but delights with every bite. Perfect for all seasons, this butter pecan cake recipe is sure to become a staple in your repertoire, cherished by family and friends alike.

    Quick Recipe Highlights

    • Flavor Profile: The cake offers a rich, buttery flavor, enhanced by the nuttiness of toasted pecans balanced exquisitely with the creamy sweetness of the cream cheese icing.
    • Texture: Expect a moist, tender crumb with a complimentary creamy icing, offering a satisfying textural contrast.
    • Aroma: As it bakes, the cake emanates a warm, inviting aroma of butter and nuts, filling your kitchen with an enticing fragrance.
    • Visual Appeal: This cake is a feast for the eyes with its golden-brown finish and cream cheese topping, embellished with chopped pecans.
    • Skill Level Needed: Intermediate baking skills are required, including familiarity with basic cake-baking techniques.
    • Special Equipment: Use a stand mixer for ease and precision, and two 9-inch cake pans for the desired layered effect.

    Recipe Overview

    • Difficulty Level: Rated intermediate due to techniques like creaming butter and folding in dry ingredients, requiring some baking experience.
    • Category: Best categorized as a dessert or a special-occasion cake, suitable for both casual and formal gatherings.
    • Cuisine: Incorporates classic American dessert elements, with southern influences evident in the butter pecan flavors.
    • Cost: Moderate total cost due to ingredients like pecans and cream cheese, but well worth the investment for the flavor payoff.
    • Season: Perfect year-round, but the nutty profile is especially fitting for fall and winter seasons.
    • Occasion: Ideal for birthdays, holidays, and any gathering where you aim to impress with your baking skills.

    Why You’ll Love This Recipe


    Immerse yourself in the irresistible taste and texture of this butter pecan cake. The rich blend of butter and pecans provides a deep, satisfying taste that pairs beautifully with the cream cheese icing’s acidity, creating a perfectly balanced dessert. The cake’s tender crumb offers a delightful mouthfeel, while the icing adds a layer of creaminess that enhances every bite.

    This recipe offers significant convenience in preparation. The steps are straightforward and achievable within a short time, allowing you to deliver a stunning dessert with minimal fuss. Whether for a spontaneous gathering or planned event, the cake’s appeal remains undiminished.

    Nutritionally, the cake offers a good balance of macro and micronutrients, particularly when prepared with fresh, quality ingredients. The pecans are a source of healthy fats, while the cream cheese provides protein, making it a more balanced indulgence.

    The cake shines in social settings, making it a perfect centerpiece for gatherings. Its universal appeal ensures it will be enjoyed by a wide range of palates, and its visual attractiveness makes it a conversation starter.

    Cost-wise, while some ingredients are premium, their quality ensures the recipe’s outcome is a step above, providing an excellent return on investment. Its rich flavors and luxurious textures provide a decadent experience without excess expense.

    Historical Background and Cultural Significance


    Originating in the Southern United States, the butter pecan cake is deeply rooted in the culinary traditions of the region. Known for its use of local nuts and dairy, this cake reflects a heritage of rich, flavorful ingredients that signify southern comfort food traditions.

    Culturally, the cake is synonymous with celebrations and gatherings, where food plays an integral role in community and familial bonding. Its warming flavors make it a staple in holiday feasts, offering a sense of nostalgia and homeliness.

    Over time, the butter pecan cake has evolved, with variations emerging across different regions. However, its essential components — butter, pecans, and a creamy topping — remain constants, preserving the essence of its traditional roots.

    The pecan itself, as a fruit native to North America, particularly the southern states, imbues the cake with a regional authenticity. The incorporation of cream cheese icing, a modern twist, demonstrates the recipe’s adaptability while maintaining its cultural integrity.

    Ingredient Deep Dive

    Butter is crucial in this cake for its role in developing flavor and providing moisture. Its use can be traced back through culinary history as a staple in both sweet and savory dishes, offering richness and depth to baked goods. It’s vital to use unsalted butter for control over the final taste.

    Pecans add a distinctive nutty flavor to the cake and are symbolic of Southern cuisine, often associated with hospitality and warmth. They are rich in healthy fats and antioxidants, making them a nutritional powerhouse. Select fresh, whole pecans for the best flavor and store them in a cool, dry place to prevent rancidity. Toasting the pecans before using enhances their flavor and adds a delightful texture.

    Cream cheese, the star of the icing, provides a tangy counterpoint to the sweet cake. Known for its versatility in both savory and sweet applications, it offers smoothness and body to the icing. It’s best to use full-fat cream cheese for optimal texture and flavor impact.

    All-purpose flour forms the cake’s structure. Opt for unbleached flour for a purer taste, stored in a cool, dry place to maintain freshness. Ensure accurate measurements to avoid texture issues, and consider substituting a small amount with cake flour for a finer crumb.

    Eggs are key for binding the batter, offering structure while retaining moisture. They should be at room temperature for best results, and if unavailable, can be substituted with appropriate egg replacement products for those with dietary restrictions.

    Brown sugar adds moisture and a hint of molasses to the cake, complementing the butter’s richness. It’s a critical ingredient for achieving the cake’s depth of flavor. Store brown sugar in an airtight container to prevent hardening, and occasionally mix with a splash of water to maintain its texture.

    Common Mistakes to Avoid

    • Overmixing the batter: This can lead to a dense cake. Mix until just combined to maintain a light, airy texture.
    • Incorrect butter temperature: Ensure the butter is room temperature. Cold butter won’t cream properly, affecting the cake’s consistency.
    • Skimping on pecans: The flavor of pecans is central to the cake’s profile. Use enough to taste their distinctive nuttiness.
    • Improper layer leveling: Uneven layers can cause imbalance. Level each cake layer before icing for stability.
    • Rushing the cooling process: Allow cakes to cool completely before icing to avoid melting and sliding.
    • Not toasting the pecans: Raw pecans lack intensity. Toast them lightly to enhance the cake’s overall flavor.
    • Incorrect oven temperature: Use an oven thermometer to ensure the correct baking temperature, preventing under or overbaked cakes.
    • Heavy icing application: Too much icing can overwhelm the cake’s delicate balance. Apply evenly and tastefully.
    • Overbeating the icing: Overwhipping can create grainy icing. Beat until smooth and creamy.
    • Skipping ingredient sifting: Sift dry ingredients to avoid lumps and ensure uniform mixing.

    Essential Techniques

    Creaming butter and sugar is critical for incorporating air into the cake, ensuring a fluffy and tender crumb. Ensure your butter is softened, and beat until light and pale for best results.

    Folding in dry ingredients is crucial to avoid overworking the batter. Gently incorporate using a spatula, turning the bowl as you fold to preserve the batter’s airiness.

    Properly toasting pecans enhances their natural flavors. Spread pecans on a baking sheet and toast at a low temperature until fragrant, ensuring even toasting without burning.

    Leveling cake layers ensures stability when assembling. Use a serrated knife to trim the tops, maintaining a flat surface for uniform icing.

    Creating smooth cream cheese icing requires attention to butter and cream cheese softness, incorporating confectioner’s sugar gradually to prevent lumps.

    Pro Tips for Perfect Homemade Butter Pecan Cake

    Use a high-quality vanilla extract for the most flavorful results, enhancing the cake’s subtle flavors with an aromatic depth.

    Chill the cake layers before assembling. This makes handling easier and minimizes crumb mess during icing.

    For enhanced pecan flavor, infuse your butter with toasted pecans ahead of preparation, straining before use to capture a deep nutty essence.

    To preserve freshness, wrap cooled cake layers individually before assembly, ensuring maximum moisture retention.

    Add a hint of sea salt to the cream cheese icing for a sophisticated balance that elevates the cake’s sweetness.

    Experiment with other nut varieties such as walnuts or almonds to give this classic butter pecan cake your unique twist.

    Variations and Adaptations

    Consider regional variations by incorporating local flavors like maple syrup or bourbon for added complexity.

    Adapt for seasons by mixing in seasonal fruits like apple slices or figs into the batter for a refreshing change.

    For dietary considerations, explore gluten-free flour blends, adjusting leavening agents as needed for similar results.

    Play with flavor variations by introducing spices such as cinnamon or nutmeg, adding warmth and depth to your cake.

    Experiment with texture modifications by using whipped cream or mascarpone in place of cream cheese for a lighter icing.

    Enhance presentation by topping the cake with caramel drizzle or chocolate shavings, providing an aesthetic and flavorful touch.

    Serving and Presentation Guide

    Plating techniques such as creating individual slices with a dollop of extra icing on the side add sophistication to your presentation.

    Garnish ideas including toasted pecan halves or fresh mint leaves elevate the cake’s visual and taste appeal.

    Traditional accompaniments like a scoop of vanilla ice cream can further enhance the dessert experience.

    Modern serving suggestions involve deconstructing the cake into elegant miniatures for individual enjoyment.

    Temperature considerations include serving slightly chilled for a refreshing mouthfeel, especially in warm climates.

    Portion control tips suggest serving moderate slices, encouraging savoring the rich flavors rather than overindulging.

    Wine and Beverage Pairing

    Choose a dessert wine like a spiced Zinfandel, accentuating the butter pecan’s natural flavors.

    For non-alcoholic alternatives, consider a robust flavored coffee or spiced chai, offering a balance to the cake’s richness.

    Explore pairings with herbal teas, particularly vanilla or cinnamon blends, complementing the cake’s flavor notes.

    Ensure beverages are served at an ideal temperature – wine nicely chilled, coffee hot, to enhance the sensory experience.

    Offer serving suggestions such as using distinctive glassware or mugs to enrich the visual appeal when presenting your beverages.

    Storage and Shelf Life

    Store leftover cake in an airtight container at room temperature for up to three days, retaining its moist texture.

    Refrigerating helps extend shelf life, though be mindful that chilling may slightly alter the texture.

    Use a cake dome for best presentation, preventing drying while keeping the cake visible and appealing.

    Signs of spoilage include any off-flavor or texture change, particularly on the cake’s surface or icing.

    For freezing, wrap slices individually, protecting their structure and allowing easy defrosting when needed.

    Reheating instructions include allowing cake slices to reach room temperature naturally, avoiding microwaving which might alter texture.

    Make Ahead Strategies

    Prepare cake layers a day in advance, storing in the refrigerator to streamline final assembly on serving day.

    Store between steps using parchment paper or plastic wrap, maintaining moisture during extended storage periods.

    Assess quality impact if refrigerating or freezing; keep avoid extended periods which may impact overall quality.

    Follow assembly tips like using chilled icing for firmer structure and ease during final decoration efforts.

    For reheating, bring cake to room temperature, ensuring flavors are lively and the icing stable.

    Enhance fresh elements just before serving, such as adding garnishing for maximal visual and flavor appeal.

    Scaling Instructions

    Halving the recipe involves reducing each ingredient proportionately, with careful attention to the eggs, considering beat and division.

    Double or triple scaling needs appropriate equipment like multiple cake pans and space considerations for extra batter.

    Timing modifications for baking should be monitored closely to avoid overcrowding or imbalanced temperature control.

    Storage considerations surge as larger cakes require more space, considering airtight containers for freshness.

    Nutritional Deep Dive

    Explore the cake’s macro breakdown, with fats predominantly from butter and pecans, complemented by protein in dairy components.

    Identify micronutrient analysis, where pecans contribute to healthy mineral and vitamin content, enriching the cake’s nutritional profile.

    Discuss health benefits by recognizing the wholesome ingredients providing energy, alongside essential fatty acids.

    Consider dietary aspects including calorie content, offering advice on serving sizes maintaining dietary management goals.

    Highlight portion control with suggested serving sizes aligning with nutritional goals, promoting mindful enjoyment.

    For weight management tips, understand balance and moderation, particularly when including such indulgent desserts.

    Dietary Adaptations

    For gluten-free adaptation, select the appropriate blend of quality gluten-free flours, ensuring leavening is adequately adjusted.

    Consider dairy-free options by using plant-based butter and cream cheese alternatives, retaining texture and moistness.

    Vegan modifications include egg substitutions like aquafaba or apple sauce, ensuring cohesiveness within your batter.

    Adapt for low-carb by exploring almond flour and xylitol, maintaining the cake’s essential flavor and appeal.

    Utilize keto-friendly approaches through precise ingredient selection, ensuring carbohydrate content remains satisfactory.

    For paleo adherence, focus on naturally derived alternatives, maintaining integrity through refined-free sugars and oils.

    Troubleshooting Guide

    Address texture issues by ensuring precise ingredient measurement, coordinating baking time precisely to maintain moisture.

    Solve flavor balance problems by adjusting pecan to vanilla sweetness, using salt or spices effectively for rich yet balanced taste.

    Explore temperature pitfalls like incorrect butter melting points, ensuring the perfect blend for creaming without separation.

    Discuss equipment challenges, such as uneven oven heat distribution, exploring alternatives like rotating pans for evenness.

    Understand ingredient substitution impacts, ensuring alternative options provide consistency alongside ethical or allergen considerations.

    Timing concerns are best managed by preparing mise en place, coordinating steps efficiently for timely, balanced results.

    Recipe Success Stories

    Celebrate community feedback showcasing variations, flavor enhancements, and seasonal adaptations that extend recipe appeal.

    Share reader suggestions like ingredient swaps or narrative shares, allowing immersive engagement with the recipe’s cultural essence.

    Include photography tips to capture the cake’s beauty and highlight its appeal, aiding in visual presentation and online sharing.

    Frequently Asked Questions

    Does this cake freeze well?

    Yes, the cake freezes excellently when wrapped tightly in a double layer of plastic wrap to preserve moisture.

    Can I use a different nut variety?

    Yes, walnuts or hazelnuts can be used, though pecans are traditional for authentic flavor.

    What if my cream cheese icing is too runny?

    Chill it briefly and add more confectioner’s sugar to thicken without impacting flavor subtleties.

    How do I avoid overmixing the batter?

    Mix until just combined, observing visual clues like uniform texture and minimal flour streaks.

    What’s the best way to toast pecans?

    Use a preheated oven, spreading pecans evenly on a sheet, monitoring for even golden brown coloring.

    Why does my cake sink in the middle?

    This usually indicates undercooking or incorrect oven temperature. Ensure the cake is baked through using a toothpick test.

    How can I substitute for eggs?

    Egg substitutes like yogurt, applesauce, or commercial egg replacers can be used, with proportional adjustments.

    What should I do if my cake is too dry?

    Ensure accurate flour measurement or incorporate syrup between layers to boost moisture.

    Can I make this cake gluten-free?

    Yes, using a suitable gluten-free all-purpose blend ensures similar tender texture and flavor.

    Is there a dairy-free cream cheese alternative?

    Opt for nut-based alternatives or commercially available dairy-free cream cheese for a consistent, creamy texture.

    How can I ensure even frosting layers?

    Use an offset spatula and rotate the cake as you apply frosting, ensuring a smooth and even finish.

    Additional Resources

    Explore related recipes like pecan pie or other layered cakes that share component synergy.

    Delve into technique guides emphasizing cake leveling, icing application, and decoration for a perfect finish.

    Engage with ingredient information, uncovering alternatives and substitutions that customize the cake to dietary or personal preferences.

    Consider equipment recommendations for baking consistency, like sturdy stand mixers or levelers ensuring results perfection.

    Interpret seasonal variations, integrating fresh-produced themes or holiday motifs reflecting personal styling preferences.

    Join the Conversation

    Join culinary discussions on social media platforms by sharing your butter pecan cake creations, tagging enthusiasts for broader engagement.

    Experiment with photography tips, capturing cake colors and textures, fostering more interest in its preparation.

    Exchange recipe reviews amongst peers to refine techniques and approach, cultivating a sachet of culinary rewarding variations.

    Embrace community engagement forums, amplifying ideas, and exploring collective creation initiatives or culinary twists.

    Encourage creative recipe adaptations, sharing inventive iterations or family secret inclusions within your culinary circle.

    The Recipe

    Homemade Butter Pecan Cake

    Serves: 12

    Prep Time: 30 mins

    Cook Time: 40 mins

    Total Time: 1 hr 10 mins

    Kitchen Equipment Needed

    • Stand mixer or hand mixer
    • 9-inch cake pans (2)
    • Rubber spatula
    • Offset spatula
    • Cooling rack
    • Parchment paper

    Ingredients

    • 1 cup unsalted butter, softened
    • 1 cup chopped pecans, toasted
    • 1 1/2 cups granulated sugar
    • 4 large eggs
    • 1 tablespoon pure vanilla extract
    • 2 cups all-purpose flour
    • 1 tablespoon baking powder
    • 1/2 teaspoon salt
    • 1 cup buttermilk
    • 8 oz cream cheese, softened
    • 1/4 cup unsalted butter, softened
    • 4 cups confectioner’s sugar
    • 1 teaspoon vanilla extract

    Directions

    1. Preheat the oven to 350°F (175°C). Grease and flour two 9-inch round cake pans and line the bottoms with parchment paper.
    2. In a medium skillet, toast pecans over medium heat until fragrant. Set aside to cool.
    3. Cream the butter and sugar in a stand mixer until light and fluffy. Add eggs, one at a time, blending well after each addition. Stir in vanilla extract.
    4. In a separate bowl, whisk together flour, baking powder, and salt. Alternate adding flour mixture and buttermilk to the creamed mixture, beginning and ending with the flour.
    5. Fold in toasted pecans. Divide batter evenly between pans and smooth the tops with a spatula.
    6. Bake cakes for 30-35 minutes or until a toothpick inserted in the center comes out clean. Cool in pans for 10 minutes, then turn onto wire racks to cool completely.
    7. For the icing, blend softened cream cheese and butter until smooth. Gradually add confectioner’s sugar, mixing until creamy. Stir in vanilla extract.
    8. Frost the completely cooled cake layers as desired, sprinkling some pecans on top if desired.

    Recipe Notes

    • Ensure thorough cooling before icing to avoid melting and slipping.
    • For a nut-free option, omit pecans and add extra vanilla.

    Indulge in Homemade Bliss with Grandma’s Chocolate Comfort Cookies

    My Grandma’s Chocolate Comfort Cookies: A Taste of Nostalgia

    ⚖️
    Difficulty
    Easy

    ⏲️
    Prep Time
    15 mins

    🕒
    Cook Time
    10 mins

    ⏱️
    Total Time
    25 mins

    🍽️
    Servings
    24 cookies

    My Grandma’s Chocolate Comfort Cookies are more than just a delightful dessert; they are a cherished family tradition. With each bite, you will find a heavenly blend of rich chocolate and melt-in-your-mouth texture that is sure to transport you back to cozy afternoons spent baking in grandma’s kitchen. There’s nothing quite like the smell of freshly baked cookies wafting through the home, enveloping you in a comforting hug of sweetness and love.

    These cookies boast a perfect balance of flavor and texture, making them a favorite treat for all ages. The delightful crunch on the outside gives way to a soft, gooey center that pairs wonderfully with a glass of cold milk. Ideal for any occasion, My Grandma’s Chocolate Comfort Cookies are a testament to the timeless appeal of homemade goodies.

    Whether you are looking to indulge your own sweet tooth or share a memorable moment with loved ones, this recipe will not disappoint. Each cookie is a little piece of nostalgia that whispers childhood memories and the warmth of family gatherings. It’s time to rediscover the joy of baking with this irresistible recipe.

    Quick Recipe Highlights

    • Flavor Profile: My Grandma’s Chocolate Comfort Cookies combine rich cocoa flavors with a subtle hint of vanilla, offering sweetness with an indulgent depth.
    • Texture: These cookies have a delightful crunch on the outside while remaining soft and chewy in the center, creating a perfect balance of textures.
    • Aroma: The enticing aroma of chocolate and freshly baked cookies fills the kitchen, promising comfort and warmth with every batch.
    • Visual Appeal: Golden brown edges with a slightly cracked top, these cookies have a homemade look that is as inviting as it is appetizing.
    • Skill Level Needed: This easy recipe requires basic baking skills, making it perfect for novice bakers or those short on time.
    • Special Equipment: A standard baking sheet and an oven are all that is required to bring these cookies to life, ensuring quick and fuss-free preparation.

    Recipe Overview

    • Difficulty Level: This recipe is easy to follow, making it ideal for both novice bakers and seasoned cooks looking to whip up a quick batch of cookies.
    • Category: My Grandma’s Chocolate Comfort Cookies fall under the categories of dessert and snack, perfect for any time of day.
    • Cuisine: This classic cookie recipe is a staple of American baking traditions, showcasing simple yet beloved flavors.
    • Cost: With a low-cost ingredient list, these cookies are budget-friendly and accessible, making them perfect for any baking occasion.
    • Season: While these cookies can be enjoyed year-round, they are particularly comforting during the cooler months, when the warmth of an oven is most welcome.
    • Occasion: Ideal for family gatherings, cozy nights in, or as a delightful gift, these cookies make any occasion special with their timeless charm.

    Why You’ll Love This Recipe

    Taste and texture are the standout features of My Grandma’s Chocolate Comfort Cookies. The perfect blend of crunchy exteriors and chewy centers make them a delightful treat for the senses. The rich cocoa flavor pairs effortlessly with a hint of vanilla, bringing a well-rounded sweetness that’s sure to please any chocolate lover.

    Beyond their irresistible taste, these cookies are incredibly convenient to prepare. Requiring just 15 minutes of prep time and another 10 in the oven, they are as easy as they are delicious. This makes them a go-to recipe for those days when you want a quick homemade treat without the fuss.

    The nutritional advantages of these cookies, although subtle, include moderation. With each cookie serving as a delightful treat, they can fit into a balanced diet that includes occasional indulgences. Plus, the use of high-quality cocoa offers a small boost of antioxidants, making them a slightly less guilty pleasure.

    In terms of social appeal, these cookies are a crowd-pleaser at any gathering, be it a relaxed afternoon tea or a holiday party. Their ability to evoke nostalgia and create new memories makes them a wonderful addition to any social or family gathering.

    Cost-effectiveness is one of the best parts of this recipe. The ingredients are straightforward and likely already available in your pantry. This affordability makes them accessible to everyone, ensuring that anyone can enjoy the simple pleasure of baking and sharing homemade cookies.

    Historical Background and Cultural Significance

    This recipe is grounded in family heritage, passed down through generations. The origin story is filled with tales of kitchen adventures and family gatherings, where baking these cookies was a cherished tradition. Such recipes are more than just instructions; they are a way to preserve and celebrate family history.

    Culturally, cookies like these have become a symbol of American comfort food. They represent more than just ingredients mixed together—they embody memories, family connections, and the shared moments around a kitchen table. Their cultural importance lies in their ability to bring people together, one cookie at a time.

    Over the years, this recipe has evolved, adapting to modern kitchen conveniences while retaining its classic appeal. The essence of the original has remained intact, ensuring that each batch retains the love and care of the original creation while being adaptable for new tastes and preferences.

    While the core recipe remains unchanged, regional variations have popped up, reflecting local tastes and ingredient availability. Whether it’s adding nuts or using different types of chocolate, these variations only enhance their universal appeal, allowing families everywhere to enjoy a taste of nostalgia with their own unique twist.

    Ingredient Deep Dive

    Flour is a staple ingredient in baking, providing structure to the cookies. It’s fascinating how this simple component, a global pantry staple, has shaped numerous culinary traditions. Opt for all-purpose flour for this recipe, or substitute with whole grain for a nutritious twist, storing in a cool, dry place to maintain its quality.

    Cocoa powder is the star of the chocolate cookies, packing a delicious punch of flavor. Historically a luxury item, cocoa has come a long way in becoming an accessible ingredient. For the richest taste, choose unsweetened cocoa powder, storing it in an airtight container to maintain its flavor profile.

    Butter adds richness and flavor while contributing to the cookies’ tender crumb. Select high-quality butter for the best taste, with unsalted giving you control over the cookie’s salt content. Store butter in the refrigerator to keep it fresh and ready for any baking adventure.

    Sugar plays a dual role, sweetening and caramelizing to create that exquisite golden-brown color. Granulated sugar offers consistency, while brown sugar adds a deeper, molasses-like flavor, perfect for achieving that chewy texture. Storing sugar in a dry container keeps it free-flowing and clump-free.

    Eggs are a crucial ingredient, acting as a binding agent while adding moisture and richness. Their nutritional benefits include essential proteins and fats, making them indispensable. Ensure your eggs are fresh for the best results, storing them in the fridge until baking time.

    Common Mistakes to Avoid

    • Avoid overmixing the dough, which can lead to tough cookies. Mix just until the ingredients are combined.
    • Using cold butter can lead to uneven texture. Ensure your butter is at room temperature before beginning.
    • Measuring flour incorrectly can affect the cookie’s structure. Always spoon and level the flour for accurate measurement.
    • Skipping the preheat can result in uneven baking. Make sure your oven is fully preheated before baking.
    • Using old baking powder can lead to flat cookies. Always check expiration dates before baking.
    • Overbaking will make them dry. They should appear slightly underdone when removed from the oven, as they’ll continue cooking on the pan.
    • Not rotating the pan halfway can result in unevenly baked cookies. Rotate for even heat distribution.
    • Using dark or nonstick pans can cause over-browning. Light-colored baking sheets work best for even results.
    • Opening the oven frequently can affect baking time. Keep the oven door closed as much as possible.
    • Ignoring proper storage can lead to stale cookies. Store in an airtight container for maximum freshness.

    Essential Techniques

    Mastering the creaming technique is crucial, as it adds air to the butter and sugar, contributing to the texture. Ensure both ingredients are at room temperature and beat them until light and fluffy, preventing dense cookies. Look for a pale, well-blended mixture as your visual cue.

    The folding technique is essential for incorporating flour without deflating the dough. Use a spatula to gently fold the flour into the wet mixture, preventing overmixing and ensuring a tender texture. Fold until just combined to retain lightness in the final cookies.

    Knowing when the cookies are done is critical. They should appear slightly underbaked in the center when removed from the oven, as residual heat will finish the process. Look for set edges and a soft center for perfectly baked cookies.

    Cooling the cookies is not just a waiting game—it’s essential for setting the structure and achieving the desired texture. Allow them to cool on the baking sheet for a few minutes before transferring to a rack, preventing excessive breakage or sogginess.

    Pro Tips for Perfect Chocolate Comfort Cookies

    Chill the dough for at least 30 minutes before baking. This helps control spread and enhances the flavor, leading to beautifully shaped cookies.

    Experiment with flavor by adding a pinch of espresso powder. It intensifies the chocolate flavor without being overpowering, adding depth to your cookies.

    Keep cookies fresh longer by storing them with a slice of bread in the container. The bread will absorb moisture, preventing the cookies from becoming stale too quickly.

    For varied textures, mix in different types of chocolate chips such as dark or white chocolate. This adds a delightful surprise in each bite.

    Use parchment paper or a silicone baking mat to line your baking sheets. This not only prevents sticking but also promotes even baking and easy cleanup.

    Allow cookies to cool on the sheet for a few minutes before transferring them to a wire rack. This helps set their structure, minimizing breakage and enhancing texture.

    Variations and Adaptations

    Regional variations can include adding nuts or spices, like cinnamon or nutmeg, for a holiday twist. Adapting this way makes the cookies feel festive and slightly different without straying too far from the original.

    For seasonal adaptations, consider using dried fruits like cranberries during the winter holidays or adding orange zest for a light, summery twist. Changing up ingredients keeps the recipe fresh throughout the year.

    Dietary modifications are possible by replacing butter with a plant-based spread for vegan cookies or using gluten-free flour blends. These adjustments make the recipe accessible to those with dietary restrictions.

    Flavor variations can be explored by adding different extracts such as almond or peppermint. It personalizes the recipe for different tastes or special occasions, allowing for creativity in baking.

    Texture modifications are achievable by adjusting sugar types, like using light versus dark brown sugar, which impacts chewiness. Experimenting this way tailors the cookies to your preferred texture.

    Presentation alternatives include drizzling melted chocolate over cooled cookies or topping with a sprinkle of sea salt. Such small touches elevate the cookies’ appearance and add a gourmet flair.

    Serving and Presentation Guide

    For plating techniques, consider arranging the cookies in concentric circles or stacking them in uneven piles for a rustic look. This creates a visually appealing display for serving.

    Garnishing ideas include dusting with powdered sugar for added sweetness or sprinkling with cocoa powder for a rich, chocolatey aroma, enhancing both taste and appearance.

    Traditional accompaniments might be a glass of cold milk or hot cocoa, ideal for balancing the rich flavors with a refreshing drink, creating a cozy and satisfying pairing.

    Modern serving suggestions could involve pairing these cookies with a scoop of vanilla ice cream or a dollop of whipped cream, enhancing their indulgence for a dessert experience.

    Temperature considerations play a role in flavor perception; serve cookies warm for a soft, melting center or at room temperature for a chewy texture.

    Portion control tips include serving smaller cookies on a shared platter for parties or individually wrapping them for takeaway favors, offering flexibility in presentation.

    Wine and Beverage Pairing

    For a wine pairing, consider a sweet dessert wine like an elegantly rich port or a fruity Zinfandel, which complements the chocolate notes without overpowering them, enhancing the overall tasting experience.

    Non-alcoholic alternatives include serving with chai tea, which offers a spicy contrast to the sweetness, or a rich hot chocolate for a decadent chocolate-on-chocolate experience.

    For coffee lovers, pairing with a robust espresso or a creamy cappuccino can highlight the cocoa flavors while offering a contrasting bitterness to balance the sweetness.

    Serve beverages at an appropriately warm temperature, ensuring they enhance rather than overwhelm the cookies’ flavors, providing a warm, comforting experience.

    For creative serving suggestions, consider using a cookie as a garnish for a hot drink, dipping partially in chocolate, or serving alongside a custom drink creation for unique presentation.

    Storage and Shelf Life

    For storage methods, consider airtight containers to preserve freshness, ensuring the cookies remain soft and delicious. This also prevents flavor absorption from other foods.

    Optimal temperature requirements include room temperature for immediate consumption or refrigerated if keeping for an extended period, allowing flexibility in storage.

    Container recommendations include glass jars or plastic storage boxes, ideally with a moisture-absorbing material like a kitchen towel to keep them at peak quality.

    Be aware of signs of spoilage, such as abnormal taste, texture changes, or unpleasant odors; this helps ensure the cookies are enjoyed at their best.

    Reheating instructions involve a brief microwave or oven warm-up to restore softness. Avoid overheating as this can alter texture, diminishing the cookies’ delightful chewiness.

    Freezing guidelines suggest pre-freezing individual cookies on a tray before placing them in a bag or container to prevent sticking, allowing for easy access as needed.

    Make Ahead Strategies

    A prep timeline could involve mixing the dough in advance, allowing flavors to develop overnight in the refrigerator. This also aids in time management for busy schedules.

    For storage between steps, keep the dough wrapped in plastic or in sealed containers, reducing air exposure to maintain its quality until baking.

    Assess the quality impact between fresh and stored dough, noting that chilled dough often enhances the final flavor and consistency, offering insights for planning.

    Assembly tips include portioning dough into cookie-sized scoops before chilling, simplifying the baking process, and ensuring consistent cookie sizes for even cooking.

    Reheating guidelines should focus on a gentle process, like warming a few at a time to avoid burning, helping maintain the originally desired texture and flavor.

    Fresh element additions can involve adding toppings such as chocolate drizzle post-baking or when serving, introducing new flavors without altering the core recipe.

    Scaling Instructions

    To halve the recipe, simply adjust ingredient quantities while maintaining proportionate ratios to preserve taste and quality, enabling smaller batches for less crowd.

    Doubling or tripling requires careful measurement, especially of leavening agents, to prevent imbalance. Consider using larger bowls and additional pans for even distribution.

    Equipment adjustments may include using multiple baking sheets and larger mixing equipment, optimizing the workflow for efficient and straightforward scaling.

    Timing modifications need attention; adjust oven time slightly when baking larger or smaller batches to prevent under or overcooking based on quantity changes.

    Storage considerations reflect larger batches, perhaps using bulk containers or multiple storage strategies, ensuring freshness and ease of access to enhanced quantities.

    Nutritional Deep Dive

    The macro breakdown emphasizes carbohydrates from flour and sugars, with fats coming primarily from butter, painting a picture of energy sources within your cookies.

    Micronutrient analysis might focus on trace vitamins and minerals from ingredients like cocoa, offering a small but appreciated source of antioxidants.

    From a health perspective, these cookies should be enjoyed as a treat within a balanced diet, aligning with energy intake and dessert preferences.

    Dietary considerations highlight the potential for allergen inclusion, suggesting substituting ingredients as needed for those requiring specific dietary adherence.

    Portion analysis reveals each cookie as a manageable, satisfying treat, aligning within dessert portioning guidelines for maintaining balanced intake throughout a meal.

    Weight management tips involve moderation and mindful enjoyment, recognizing these cookies as part of occasional indulgence that supports a positive relationship with food.

    Dietary Adaptations

    For gluten-free adaptations, replace all-purpose flour with a reliable gluten-free blend, checking for cross-contamination, allowing those with gluten sensitivity to indulge safely.

    Making My Grandma’s Chocolate Comfort Cookies dairy-free involves swapping butter with plant-based alternatives like margarine or coconut oil, pledging inclusivity for all diets.

    Vegan modifications require egg replacements such as flaxseed or commercial egg substitutes, aligning with cruelty-free and plant-based diet ethics to retain beloved flavors.

    Low-carb plans might explore using almond flour and sugar substitutes, like erythritol or stevia, to maintain flavor sans carbohydrates, fitting into personal dietary goals.

    Keto alternatives need attention, using low-carb ingredient swaps and balanced macros to fit within ketogenic guidelines, while still invoking pleasure from traditional flavors.

    Paleo solutions include focusing on natural sweeteners, and whole food ingredients, embodying a diet closer to ancestral eating patterns for enthusiastic adopters.

    Low-FODMAP directions center around selecting suitable ingredients that conform to digestive limitations, providing baked options for those managing gut health effectively.

    Troubleshooting Guide

    Handling texture issues could involve adjusting the ratio of wet to dry ingredients, allowing fine-tuning towards achieving desired crisps or sponginess in cookies.

    Flavor balance concerns might be alleviated by experimenting with salt or sugar quantities, revisiting flavors to strike the seamless taste experience aimed for.

    Tackling temperature problems advises monitoring oven settings meticulously or recalibrating for accurate measurements, improving consistency in baking outcomes.

    Equipment challenges can encourage investment in quality tools or improvising with available resources, promoting seamless execution throughout the kitchen.

    Ingredient substitutions frequently arise; focusing on maintaining proportional equivalents aids smooth transitions without compromising the essence of the recipe.

    Timing concerns recommend clock precision and kitchen attentiveness, refining the knack of baking times and feasibly rounding the heat spectrum for satisfaction.

    Recipe Success Stories

    Community feedback has lauded My Grandma’s Chocolate Comfort Cookies for their simplicity and nostalgic appeal. Readers have shared heartwarming reviews of family bonding moments, creating memories just as cherished as the cookies themselves.

    Variation successes have been noteworthy—readers have modified the recipe with unique mix-ins like crushed peppermint or dehydrated fruit, adding personal flair to the timeless classic.

    Adaptation stories abound with individuals sharing how dietary changes have allowed everyone at the table to enjoy these cookies, demonstrating the versatility and broad appeal of this recipe.

    Reader suggestions include using high-quality dark chocolate for an intense flavor or experimenting with zest for a touch of citrusy freshness, offering invaluable insights into culinary exploration.

    Photography tips have been shared by the community, highlighting the visual appeal of these cookies when arranged on rustic platters or accompanied by fresh flowers, enhancing presentation.

    Frequently Asked Questions

    Can I prepare the dough ahead of time?
    Yes, the dough can be made a day in advance. Store it in the refrigerator and allow it to reach room temperature before baking for the best results.

    What is the best way to store leftover cookies?
    Store leftover cookies in an airtight container at room temperature. To keep them extra fresh, add a slice of bread to the container.

    Can I freeze these cookies?
    Absolutely! Freeze cookies in a single layer before moving them to a freezer bag. Thaw at room temperature when ready to eat.

    What is a good substitution for butter?
    You can use margarine or coconut oil as a substitute for butter. Ensure equivalents for moisture and flavor balance.

    Can I make these gluten-free?
    Yes, simply use a gluten-free flour blend instead of all-purpose flour. It’s a straightforward adjustment to accommodate gluten-free diets.

    Do I have to chill the dough?
    Chilling isn’t mandatory but highly recommended to reduce spread and enhance flavors. Thirty minutes is sufficient to see noticeable benefits.

    Why are my cookies too flat?
    This might happen if your butter is too warm. Ensure chilled or firm butter for greater control over spreading when baking.

    Is it okay to add nuts?
    Yes, adding nuts can provide crunchy texture and additional flavor. Consider walnuts or pecans as compatible options.

    How do I know when they are done baking?
    Look for cookies with set edges and slightly soft centers. They should still appear slightly underbaked when removed from the oven for a moist center.

    Can I double the recipe?
    Absolutely! Maintain ingredient ratios to ensure quality results, and prepare additional baking sheets for efficiency.

    Additional Resources

    For more amazing recipes, explore our chocolate desserts section, which includes brownies, cakes, and more indulgent delights. Each recipe offers a unique take on the chocolate lover’s dream.

    Technique guides are available for mastering baking basics, such as creaming methods and proper ingredient measurements—perfect companions for budding bakers.

    Dive into ingredient information concerning chocolate varieties and sourcing, helping you choose the best quality for rich, flavorful results in all baking endeavors.

    Equipment recommendations extend to the best baking sheets and mixing tools, promoting seamless kitchen experiences for beginners and seasoned chefs alike.

    Seasonal variations guide readers through adapting their baking practices to match the time of year, embracing local ingredients and cultural festivities through flavors.

    Join the Conversation

    We invite you to share your own experiences with My Grandma’s Chocolate Comfort Cookies. Engage with us on social media by using #ChocolateComfortCookies, and let us see your creations.

    Photography tips are available for achieving aesthetically appealing shots, complete with lighting, plating, and ambiance ideas to transform a simple cookie photo into an evocative visual story.

    Recipe reviews are welcomed and appreciated. Your feedback helps us refine our recipes and brings the communal spirit of shared cooking to life on our platform.

    Community engagement is key to our philosophy. Join our baking circle to exchange ideas, adapt recipes, and spread joy through the experience of creating and sharing homemade goodness.

    Experiment with your own variations and post your creative takes and suggestions, enriching the community with authentic, personalized touches that showcase their ingenuity.

    The Recipe

    My Grandma’s Chocolate Comfort Cookies

    Serves: 24 cookies

    Prep Time: 15 mins

    Cook Time: 10 mins

    Total Time: 25 mins

    Kitchen Equipment Needed

    • Baking sheet
    • Mixing bowl
    • Measuring cups and spoons
    • Spatula
    • Electric mixer (optional)
    • Wire cooling rack

    Ingredients

    • 1 cup unsalted butter, room temperature
    • 1 cup granulated sugar
    • 1 cup packed brown sugar
    • 2 large eggs
    • 2 teaspoons vanilla extract
    • 3 cups all-purpose flour
    • 1 teaspoon baking soda
    • 1/2 teaspoon baking powder
    • 1/2 teaspoon salt
    • 2 cups semisweet chocolate chips

    Directions

    1. Preheat your oven to 350°F (175°C) and line a baking sheet with parchment paper.
    2. In a mixing bowl, cream together butter and sugars until light and fluffy.
    3. Beat in eggs one at a time, then stir in the vanilla extract.
    4. In another bowl, combine flour, baking soda, baking powder, and salt. Gradually stir into the creamed mixture.
    5. Fold in the chocolate chips, ensuring they are evenly distributed.
    6. Drop rounded tablespoons of dough onto the prepared baking sheet, spacing them apart to allow for spreading.
    7. Bake in the preheated oven for 8-10 minutes or until the edges are golden, and the center is set.
    8. Remove from oven and let cool on the baking sheet for 5 minutes before transferring to a wire rack to cool completely.

    Recipe Notes

    • For extra flavor, consider adding 1 teaspoon of instant espresso powder to the dry ingredients.
    • You can swap chocolate chips with chunks for a more rustic cookie experience.
    • If you prefer softer cookies, slightly reduce baking time by a minute or two.

    Irresistible Philly Steak Cheese Fries Recipe for Ultimate Comfort Food

    Philly Steak Cheese Fries: A Decadent Delight

    ⚖️
    Difficulty
    Easy

    ⏲️
    Prep Time
    15 mins

    🕒
    Cook Time
    25 mins

    ⏱️
    Total Time
    40 mins

    🍽️
    Servings
    4

    Philly Steak Cheese Fries combine the rich, savory taste of the classic cheesesteak with the satisfying crunch of golden fries. This indulgent dish is perfect for a hearty meal or as a crowd-pleasing appetizer. The flavorful combination of tender beef, melted cheese, and crispy fries creates a delightful harmony of textures and tastes that will leave you craving more. Whether you’re a fan of traditional Philadelphia cuisine or you’re looking for a new way to enjoy steak and cheese, these fries are sure to become a favorite.

    Enjoy the enticing aroma of caramelized onions and sizzling beef as they fill your kitchen. The visual appeal of this dish is undeniable, with its vibrant layers of golden fries, creamy cheese sauce, and tender steak slices topped with fresh herbs. The skill level is quite approachable, making it an ideal recipe for both beginner and intermediate cooks who are looking to expand their culinary repertoire.

    Quick Recipe Highlights

    • Flavor Profile: Savor the succulent taste of juicy beef paired with the creamy richness of melted cheese, all atop crispy, golden fries.
    • Texture: Experience the perfect balance of velvety cheese sauce with the crunchy exterior of well-cooked fries and tender steak slices.
    • Aroma: Delight in the mouthwatering fragrance of sautéed onions and grilled beef, a true olfactory treat.
    • Visual Appeal: A feast for the eyes, this dish boasts layers of vibrant ingredients and vibrant colors, topped with herbs for added flair.
    • Skill Level Needed: Easy enough for beginners while challenging enough for novice chefs to improve their cooking skills.
    • Special Equipment: A skillet, baking sheet, and a cheese grater are the essentials for crafting this delectable fry dish.

    Recipe Overview

    • Difficulty Level: The dish is straightforward, with most of the effort focused on prepping the ingredients and managing cooking times to achieve the perfect texture.
    • Category: This dish can be served as a main course or as a shareable appetizer, making it highly versatile for any meal plan.
    • Cuisine: Rooted in American traditions, particularly the influence of Philadelphia’s classic cheesesteak, this recipe brings a modern twist to a beloved classic.
    • Cost: Depending on the quality of ingredients, you can expect this dish to remain budget-friendly, with steak being the most expensive component.
    • Season: Perfect all year round, but especially delightful during the colder months when hearty meals are appreciated.
    • Occasion: Ideal for game days, casual gatherings, or even as an indulgent dinner option.

    Why You’ll Love This Recipe

    The taste and texture of Philly Steak Cheese Fries will undoubtedly win you over from the first bite. The tender beef pairs beautifully with the creamy cheese sauce, while the crisp fries add a glorious crunch that completes each mouthful. The savory satisfaction of this dish satisfies those deep cravings for comfort food but with an elevated flair.

    Convenience is king with this recipe. The preparation is broken into simple steps that ensure you’ll have no trouble achieving perfection every time. Its easy-to-follow method makes it accessible for weeknights yet impressive enough for entertaining guests at home.

    Nutritionally, this dish provides a balanced amount of proteins and carbohydrates, especially when prepared with high-quality steak and fresh potatoes. You can further enhance its nutritional profile by incorporating whole-grain or sweet potato fries.

    In a social setting, this dish never fails to impress. Its visually stunning presentation makes it a great talking point and helps elevate any dining experience. It’s an ideal choice for serving family-style at parties or as an indulgent appetizer, sure to leave your guests raving.

    Cost-effectiveness and accessibility make this recipe stand out. With standard ingredients that can be found easily in most supermarkets, you won’t break the bank creating this dish. By selecting seasonal or on-sale produce and cheese, you can extend your budget even further while crafting a memorable meal.

    Historical Background and Cultural Significance


    Philly Cheesesteak’s storied origins lie in Philadelphia, Pennsylvania, where the combination of thinly-sliced beef and cheese nestled in a split roll became an emblematic dish. Incorporating these iconic flavors into Fries seems like a natural progression reflecting fondness for this American classic.

    Culturally, cheesesteaks carry significant weight as a representation of both Philadelphia’s culinary identity and America’s diversity in food. The addition of fries is a nod to both countries’ love for comfort food, bringing together staple components in one indulgent dish.

    The evolution of the dish into Philly Steak Cheese Fries taps into society’s penchant for fusion cuisine, reflecting how traditional meals can inspire new creations. It showcases innovation while maintaining a deep respect for the classics by taking familiar flavors and giving them fresh appeal.

    Regional variations might include additions such as peppers or mushrooms, common accompaniments to cheesesteak. Each version adds its own flair while staying true to the spirit of melding cheese and beef.

    Ingredient Deep Dive


    The key ingredient—beef—is central both culturally and nutritionally to Philly Steak Cheese Fries. High-quality ribeye or sirloin provides authentic flavor and tenderness. Look for marbling in the beef as a sign of flavor intensity. Keep the steak refrigerated until use to maintain its structure, and slice just before cooking for optimum freshness.

    Potatoes, whether they’re classic russets or sweet potatoes, provide the foundation for this dish. Selecting starchy potatoes helps achieve the desired crispiness when deep-fried or oven-baked. To store them, keep in a cool, dark place to avoid sprouting. Experimenting with sweet potatoes can create a new twist by offering a touch of natural sweetness.

    Cheese contributes another layer of delectable flavor—the go-to options being provolone or melted cheddar, both bringing contrasting creamy juiciness when melted over other ingredients. Opt for freshly grated cheese to improve melting quality. If provolone is unavailable, mozzarella serves as an excellent alternative for delicate reserves and pulls.

    Caramelized onions enhance both taste and depth with their inherent sweetness. Choose onions that feel firm without any soft spots, store them in a ventilated area away from potatoes to prolong shelf life, and transform them by slow-cooking—even slightly burnt edges can intensify flavor.

    Common Mistakes to Avoid

    • Avoid using pre-shredded cheese as it generally contains anti-caking agents that can affect smooth melting.
    • Improper frying or baking technique leads to limp fries; ensure even heat distribution and avoid overcrowding the pan.
    • Overcooking the steak results in toughness; aim for medium-rare for tender beef.
    • Skipping the caramelization step for onions can reduce flavor depth and sweetness.
    • Using under-seasoned components can result in a bland dish; balance seasoning throughout the layers.
    • Rushing the cooking process can lessen both flavor and visual appeal.
    • Choosing low-fat cheese alternatives might weaken flavor consistency and texture.
    • Neglecting to rest cooked steak causes loss of juices when slicing.
    • Omit temperature check on baking temp for fries to maintain crispness.

    Essential Techniques


    Caramelizing onions is essential for releasing their sugars, leading to a sweet, rich taste. Slowly cook sliced onions with a little olive oil over medium-low heat until they turn a deep golden brown. Avoid turning the heat up too high to prevent burning.

    Perfectly frying potatoes ensures both crisp exterior and fluffy interior. To achieve this, choose starchy potatoes like russet, soak in cold water to reduce excess starch, and ensure they are completely dry before cooking. Fry in small batches for even browning, or alternatively, bake at high temps for healthier crisp fries.

    Pro Tips for Perfect Philly Steak Cheese Fries

    For extra flavor, marinate steak in Worcestershire sauce, garlic, and pepper before cooking. This step will tenderize the beef while infusing it with flavor complexity.

    Fry or bake potato strips twice for maximum crispiness, blanching first and then applying a finishing fry or bake at a higher temperature.

    Using a cast-iron skillet for cooking steak helps achieve a nice sear due to even distribution of heat—creating a classic finish to your beef.

    Preserve cheese sauce smoothness by consistently stirring as it melts to prevent curdling, utilizing low heat and constant motion.

    Top fries with fresh herbs and grated parmesan for additional layers of flavor complexity and presentation enhancement.

    Slicing steak against the grain ensures tenderness and makes each piece absorb flavors more efficiently while enjoying enhanced eating experience.

    Variations and Adaptations


    For regional variations, consider adding bell peppers or mushrooms to bring extra depth to your Philly Steak Cheese Fries. They not only add color and flavor but also contribute to nutritional benefits.

    Seasonal adaptations might incorporate modified toppings like adding roasted squash in fall for a cozy twist on this classic.

    To adapt for dietary preferences, switch to lactose-free cheese to make it dairy-friendly while keeping the creamy texture. If you prefer to reduce carbs and calories, use baked sweet potato fries as a base.

    Want to test flavor profiles? Amplify the savoriness by utilizing aged cheeses or spicy alternatives like jalapeño cheddar for adventurous tastebuds.

    Alter textures by swapping classic fries with waffle or curly fries, offering varied crispiness and fun visual elements!

    For creative serving ideas, present this dish in individual skillets or ramekins with personalized layers and customization from guests’ toppings.

    Serving and Presentation Guide


    For an impressive presentation, serve on a large platter or in a cast iron skillet with small sprigs of rosemary for color contrast.

    Garnish with chopped parsley, a sprinkle of paprika, or a dash of sesame seeds as edible decor.

    Serve with complementary dipping sauces like aioli or tangy yogurt to elevate the taste and encourage interactive dining.

    Consider serving with cold beers or carbonated drinks that refresh between bites, cooling palates while creating harmony.

    Maintain essential temperature contrasts with warm beef and cheese atop chilled plates, and balance portion sizes to complement other menu components.

    Wine and Beverage Pairing


    Pair Philly Steak Cheese Fries with a robust red wine like Cabernet Sauvignon, which matches the depth of steak flavors and accents cheese undertones, offering an elegant touch.

    For non-alcoholic options, consider iced tea or sparkling waters with citrus enhancements, balancing rich dish elements.

    In cooler months, hot apple cider adds a comforting element alongside this heartwarming meal.

    Beverage options like pale lagers or amber ales present smooth notes that harmonize effortlessly with grilled beef tones.

    Enjoy these pairing options while keeping drinks appropriately chilled or warmed, elevating your overall dining experience.

    Storage and Shelf Life


    Store leftovers in airtight containers placed in the fridge, ensuring separation between fries to prevent sogginess.

    Maintain proper food safety by consuming within 2-3 days, checking for signs like soggy fries or unappealing aromas indicating spoilage.

    Reheat leftovers in an oven or air fryer to restore crispness on fries and ensure full reheating without losing texture quality.

    Follow freezing guidelines by wrapping cooked steak separately from fries to extend shelf life beyond immediate consumption, preventing unwanted moisture absorption.

    Make Ahead Strategies


    Prep steak and ingredient components up to 24 hours ahead, storing components separately in airtight containers to maintain freshness.

    Optimize cooking times by staging cleanup between batches, allowing time to begin fresh component assembly while previous elements rest or cool.

    Reheat steak gently for meals made ahead, prioritizing preservation of its juices while ensuring it stays flavorful.

    Infuse fries or onion components with extra spices before reheating to refresh flavors and enhance taste.

    For styling and presentation consistency, aim for assembling right before serving, which should maintain crispness and balanced texture.

    Scaling Instructions


    To halve servings, adjust ingredient measurements proportionately while maintaining seasoning levels, ensuring the original flavor balance remains intact.

    Doubling involves readiness for larger equipment like sheet pans to accommodate increased volume, adjusting oven time and placements accordingly to guarantee thorough cooking for fries.

    Monitor frying or baking temperatures closely if scaling substantially—more potato volume means fluctuating temperature while ensuring even outcomes.

    Store surplus servings in large, separated containers to prevent improper textures combining, reheating separately for balanced execution later.

    Nutritional Deep Dive


    The primary macronutrients—proteins, carbs, and fats—are well-represented within Philly Steak Cheese Fries through its hearty marble steak, cheese, and potato accompaniments, providing an excellent fuel source post-workout or midday meal.

    Micronutrients like iron and B vitamins from beef support cellular function and energy regulation ensuring this dish has substantial nutritional value despite its indulgent feel.

    Balance remaining dietary intakes before and after consumption given the slightly higher fat content, maintaining a well-rounded nutritional profile.

    Perfect for sharing, portion control principles allow for harmonious consumption within planned balance without strenuous constraints.

    Dietary Adaptations


    Choose gluten-free fries and a gluten-free cheese sauce for a celiac-friendly version without compromising flavors.

    Use alternative cheeses like almond or soy-based alternatives for a plant-based experience while consulting sources on substitute substitutions for melting behavior.

    Going low-carb might involve baked zucchini fries for an equally delicious crunch that aligns with dietary expectations.

    Should keto principles guide your selections, exclude potatoes and increase meat content proportionally, paired with additions like mushrooms for nutritional fiber.

    Paleo adaptations can lead to grain-free fry alternatives alongside grass-fed steak choices maintaining ethical adherence to holistic nutrition practices.

    Troubleshooting Guide


    If fries turn soggy, ensure you maintain rigorous drying techniques and avoid overcrowding when baking to achieve best results.

    For overly salty results, counterbalance this with a squeeze of lemon juice or low-sodium stocks to enhance other dish elements.

    Temperature concerns might arise if cheese behaves unpredictably; consistent stirring serves as a solution for smooth sauce textures.

    If dry steak becomes problematic, explore marination beforehand and add fats like butter or oils during cooking to enhance tenderness.

    Consult reliable sources about effective culinary changes that make substitution transitions seamless for abstract needs, using varying options for maximum flavor preservation despite modifications.

    Recipe Success Stories

    Community feedback echoes high praise for Philly Steak Cheese Fries, showcasing reader success stories adapting toppings and cheeses to match personal tastes while maintaining core attributes.

    Images often feature delightful perfection through vibrant online communities sharing adaptations alongside recipe tweaks inspiring experiments.

    Photographers regularly note flair shown in garnishment presentation celebrating individual creativity alongside distinctive serving styles.

    Reader suggestions for additions like jalapeño slices or avocados have been incorporated successfully, adding fresh layers of flavor contrasts.

    Joining Philly Steak Cheese Fries online community groups brings opportunities for collaborative attempts advancing delicious culinary experiences.

    Frequently Asked Questions

    Q: Can I use frozen fries?

    A: Absolutely! Frozen fries streamline cooking times without overriding flavors—opt for brands with high-quality textures and taste benefits providing consistent results.

    Q: How do I prevent cheese clumping?

    A: Grate cheese finely; use a low, consistent heat to control smooth melting, and preserve delicate flavors and even distributions avoiding anti-caking additives found in pre-shredded options.

    Q: Do I need to use a specific type of potato?

    A: Starchier potatoes like russets develop perfect structuring ideal for both frying and baking purposes, assuring ultimate characteristic balance—though sweet potatoes also serve.

    Q: Can I replace steak with chicken?

    A: Absolutely! Thinly sliced chicken breast works well within Philly Steak Cheese Fries, adjusting seasonings slightly for variance and ensuring even cooking on all aspects.

    Q: What’s the best way to store leftovers?

    A: Store individual components separately in sealed containers to maintain texture and quality, adhering closely to food safety recommendations for secure consumption later.

    Q: If my sauce looks too thin, how do I thicken it?

    A: Introduce cornstarch slurry slowly while stirring, gauging results without overpowering dominant cheese flavor balances, making minimal adjustments gradually.

    Q: What’s a simple way to reduce the dish’s sodium content?

    A: Opt for low-sodium versions of cheese or beef, paired alongside rock salt fries and using strategic seasoning moderation for desired reduction.

    Q: How can I make it spicier?

    A: Increase heat flavorings through additions like cayenne pepper and smoked paprika while embedding chili-laced cheeses—create layers accentuating key dish dimensions efficiently.

    Q: Do I have to caramelize the onions?

    A: While it’s not mandatory, caramelized onions greatly impact flavor complexity—achieving beneficial depth and substance enhances the dish exponentially, inviting reprising through encouraged participation.

    Q: Can leftovers be reheated without losing quality?

    A: To maintain balance and structure, separate ingredients when storing and reheat in methods restoring authentic crispy attributes from prior servings, preserving integrity.

    Additional Resources

    For those delving deeper into making Philly Steak Cheese Fries a staple, staying updated on quality ingredient sourcing guides enhances procurement choices considerably.

    Explore further recipes featuring out-of-the-ordinary iterations within this delightful dish tweaking nuance variations that follow culinary passion alongside traditional aspects.

    Eager to improve technique comprehension? Check online video resources focusing on fundamental cooking methods incorporating supportive references achieving core objectives.

    Join the Conversation

    Connect with enthusiasts online through sharing Philly Steak Cheese Fries content, engaging social media exchanges bringing amazing ideas to life and saluting creativity globally fashioned from habitual tendencies.

    Additionally, reviewing alternative post iterations leads broader discussions inspiring reinterpretations through expanding familiar reaches and opening possibility portals alongside signature encouragement iterations, energizing rich experiences.

    Artistic photography tips include lighting and color decoding—capturing dishes beautifully boasts elements that truly spark joy celebrating moments, inviting gourmet endeavors inspiring shared enjoyment immersion!

    From formal recipe reviews to online snapshots showcasing differing elements added into recipes such as Philly Steak Cheese Fries adaptations, rich exchanges embracing multi-dimensional role experiments positively thrive.

    Explore Philadelphia’s vibrancy within international influences from travelogues inspired by authentic cheesesteak recollections transcending consequential horizons.