Cozy Italian Pastina Soup Recipe for a Perfect Comfort Meal
Italian Pastina Soup: The Ultimate Comfort Food
⚖️
Difficulty
Easy
⏲️
Prep Time
10 mins
🕒
Cook Time
20 mins
⏱️
Total Time
30 mins
🍽️
Servings
4
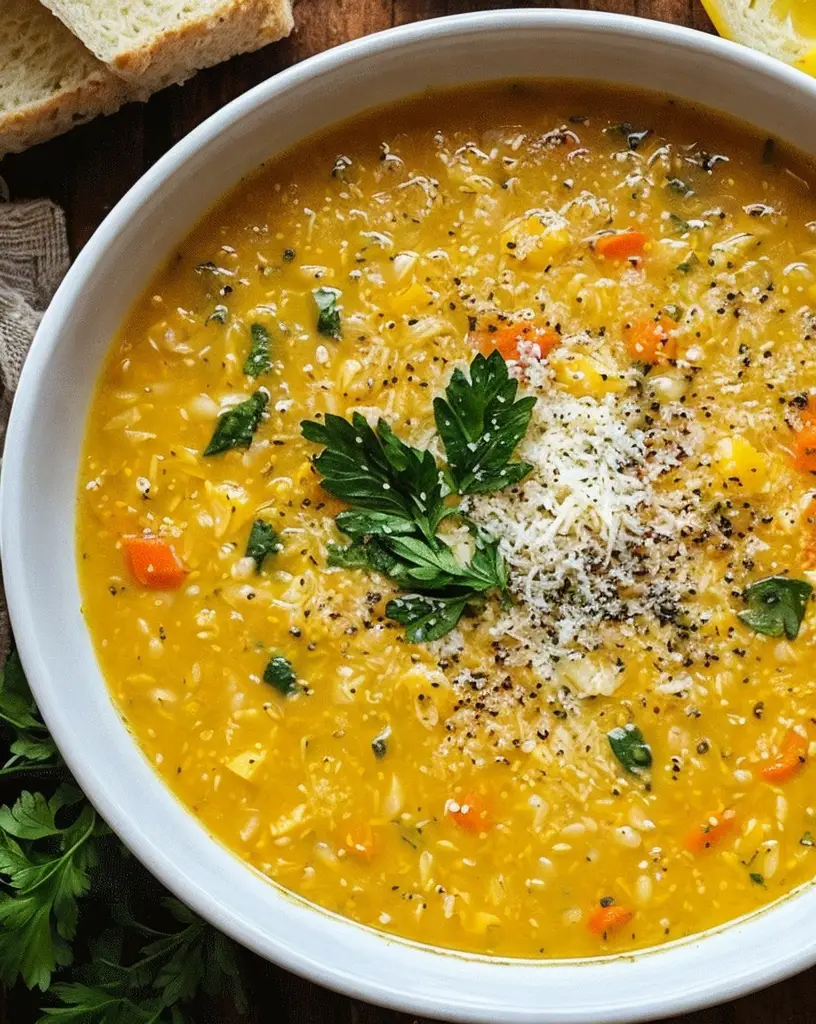
Italian Pastina Soup is the culinary embodiment of comfort. Whenever the cold weather rolls in or you’re under the weather, this soup acts like a warm, nurturing embrace. With tender pastina pasta nestled in a light, savory broth, it’s a dish that invites second helpings and warms the soul just as much as the body. A traditional Italian comfort staple, this soup melds simple ingredients in perfect harmony, producing complex flavors that dance in your mouth.
Quick Recipe Highlights
Flavor Profile: The soup presents a subtle yet delightful combination of seasoned broth with a gentle hint of cheese.
Texture: The pastina absorbs the flavors beautifully, giving each spoonful a unique, melt-in-the-mouth experience.
Aroma: The inviting scent of aromatic broth mingles with just a touch of nutty parmesan.
Visual Appeal: The adorable star-shaped pasta makes this dish irresistible both to the eyes and the palate.
Skill Level Needed: Perfect for beginners, this recipe requires minimal techniques and guarantees success.
Special Equipment: A basic soup pot and a ladle are all you need to bring this recipe to life.
Recipe Overview
Difficulty Level: This recipe is considered easy, making it accessible for even the most inexperienced home cook. It involves simple steps of boiling and seasoning that anyone can master.
Category: Italian Pastina Soup fits seamlessly into categories like comfort food, easy dinners, and traditional soups.
Cuisine: Rooted in Italian traditions, this dish highlights the beauty of simplicity typical of Italian home cooking.
Cost: This soup is incredibly affordable, with key ingredients being economical and easily accessible.
Season: Best enjoyed during cooler months, though its comforting notes are perfect for any dreary day.
Occasion: It’s a wonderful choice for casual family meals or as a light dish during gatherings.
Why You’ll Love This Recipe
Taste and texture go hand in hand in this Italian Pastina Soup. The broth offers a savory base, bridging delicate flavors through tender pastina pasta. The texture is velvety, comforting without being overwhelmingly rich.
Convenience becomes evident as you prepare this dish; from pantry to table, the timeline is pleasingly brief. The ingredients demand minimal prep, ensuring a quick transition from raw to ready.
Nutritionally, this soup offers balanced nourishment. The pasta delivers energy, while the broth hydrates and satisfies without unnecessary calories, making it a health-conscious choice.
Beyond taste, its social value is notable. It serves as a heartwarming anchor at dinner parties, gently nurturing conversation and camaraderie around the dinner table.
Lastly, its cost-effectiveness stands out. A few quality ingredients transform into something extraordinary without straining your budget, proving delicious meals need not be expensive.
Historical Background and Cultural Significance
Originating from Italian cuisine, pastina dishes have long been a staple in Italian homes, served as a core comfort food. In Italy, it is often one of the first solid foods introduced to children.
The cultural importance lies in its simplicity and tradition, symbolizing nourishment and family loving care. Grandmothers have passed down these recipes through generations, embedding family stories into each bowl.
Over time, the recipe has evolved. While originally perhaps more minimal, today’s versions incorporate richer broths and various personal touches, reflecting changing tastes while maintaining its essence.
Regional variations exist, from adding tiny meatballs in some parts to enhancing flavors with fresh herbs elsewhere, showcasing Italy’s diverse culinary heritage.
Ingredient Deep Dive
Pastina, a tiny pasta shape like stars, holds cultural importance within Italian families, often a child’s introduction to solid foods. It’s nutritious, offering a good balance of carbohydrates essential for energy.
Broth forms the soup’s base, preferably homemade, showcasing classic Italian flavors. It’s nutrient-rich and provides deeper flavors after simmering, improving both the taste and nutrition of your soup.
Parmesan cheese adds umami and richness. Select freshly grated parmesan for the best results. Storage involves keeping it in the fridge, tightly wrapped. For substitutions, consider Asiago for a similar nutty flavor.
Egg whisked into the broth delivers extra protein and creates a lovely silky finish. Freshness is key, so always choose quality eggs and store them in a cool place. To replace, silken tofu offers a similar texture in vegan adaptations.
Common Mistakes to Avoid
Overcooking the pastina can lead to mushy soup. Monitor your pasta carefully to keep the texture just right.
Skipping the broth seasoning makes the soup bland. Always taste and adjust your broth with salt and herbs.
Adding cheese too early results in a grainy soup. Parmesan should be added just before serving.
Boiling after adding egg can cause curdling. Ensure the heat is low when incorporating eggs.
Using low-quality parmesan sacrifices flavor. Always opt for the best cheese you can find.
Neglecting to remove pasta foam could dull flavors. Skim any foam that forms while cooking.
Forgetting to taste as you cook may cause imbalanced flavors. Stir and taste frequently.
Miscalculating water-to-pasta ratio can yield a dry soup. Stick to the recommended measurements for best results.
Essential Techniques
Boiling the pastina is crucial since this simple action defines the soup’s texture. Master it by waiting till your water is at a rolling boil and giving constant stirs.
Whisking the egg into the broth enriches the soup. Practice a soft continuous whisking motion to achieve a silky, smooth result, avoiding direct heat after adding it into the mix.
Cheese incorporation into warm, not boiling, soup ensures a smooth texture throughout. Learning to sprinkle and fold gently prevents any clumping and enhances the umami profile beautifully.
Parmesan should be integrated right before serving, ensuring its fragrant and nutty flavor is prominent. Let the soup cool slightly to allow flavors to settle well, then garnish before plating.
Pro Tips for Perfect Italian Pastina Soup
Use fresh, high-quality parmesan cheese for a richer, more authentic flavor profile. It’s worth the investment to elevate your soup.
Adding a pinch of nutmeg can enhance the aromatic qualities of the broth subtly, giving it a gourmet touch.
If desired, a few drops of fresh lemon juice can brighten the soup delicately, balancing the richness of the cheese and broth.
For a creamier consistency, consider substituting a portion of the broth with cream or milk just before serving.
If using store-bought broth, select a low-sodium version and adjust the salinity yourself. This prevents overly salty outcomes and gives more control over your dish’s flavor.
When reheating leftovers, do so gently to avoid overcooking the pasta, especially over direct heat. A quick microwave zap, or steaming is ideal.
Variations and Adaptations
Join the conversation by participating in our vibrant community. Share your Italian Pastina Soup photos on social media, engage with others by sharing your unique twists, and contribute to developing new recipe versions. Blog comments are encouraged as a space for sharing feedback and additional ideas. Let’s build a community of food lovers united by this comforting dish!
Elevate Your Dining Experience with The Ultimate Surf and Turf Dinner
The Ultimate Surf and Turf Dinner: A Perfect Culinary Delight
⚖️
Difficulty
Medium
⏲️
Prep Time
30 mins
🕒
Cook Time
40 mins
⏱️
Total Time
70 mins
🍽️
Servings
4
Indulge in a heavenly feast with The Ultimate Surf and Turf Dinner, where land meets sea in a culinary symphony that promises to satiate your taste buds. Perfect for special occasions or an exquisite weekend treat, this dish combines the richness of tender steak with the delicate flavor of lobster. It’s a dazzling dance of textures and tastes that makes every bite a memorable experience. From the crackling sear of the beef to the buttery tenderness of the lobster, this Surf and Turf recipe is all about the joy of eating.
Quick Recipe Highlights
Flavor Profile: The contrast between the hearty, savory steak and the sweet, succulent lobster creates a balanced and luxurious flavor.
Texture: Enjoy the firm, juicy texture of perfectly cooked steak alongside the tender flakes of fresh lobster meat.
Aroma: The fragrant blend of garlic, butter, and steak drippings creates an intoxicating aroma that prepares your senses for the deliciousness to come.
Visual Appeal: A spectacular plate with glistening lobster tails and perfectly seared steak garnished with fresh herbs.
Skill Level Needed: Moderate cooking skills are required due to the searing and grilling techniques involved, ensuring both the steak and lobster are cooked to perfection.
Special Equipment: You’ll need a skillet or grill pan for the steak and an oven-safe dish for the lobster tails.
Recipe Overview
Difficulty Level: This meal is rated medium due to the need for precise timing and temperatures to achieve perfect results.
Category: Main Course, featuring both seafood and red meat.
Cuisine: A blend of American and New England culinary traditions, showcasing a luxurious dining experience.
Cost: While a splurge-worthy dish, sourcing good quality steak and lobster can be done at a reasonable price at local markets.
Season: Best enjoyed in the summer and fall when lobsters are abundant, though it can be made year-round.
Occasion: Ideal for anniversaries, romantic dinners, or celebratory meals with friends and family.
Why You’ll Love This Recipe
The Ultimate Surf and Turf Dinner offers a phenomenal blend of taste and texture. The juicy steak provides a robust flavor, while the lobster tail adds a sweet, marine taste. Together they balance each other perfectly, creating a taste experience that is both indulgent and satisfying.
This dish’s convenience lies in its straightforward preparation, making it attainable even for those new to cooking such opulent meals. The detailed cooking instructions will guide you to culinary success with ease.
For those conscious about their nutrition, this meal provides a great balance of proteins, essential fatty acids from the lobster, and iron from the steak, making it not just scrumptious but nutritious.
Socially, presenting such a dish can elevate any dining experience, making your gathering or date night truly special. It’s a guaranteed showstopper that will impress even the most discerning foodie.
Despite its luxurious feel, this meal doesn’t break the bank. Surf and Turf can be quite affordable when planned with carefully sourced ingredients, making high-end dining experiences achievable at home.
Historical Background and Cultural Significance
The concept of combining seafood with steak has been a staple in American cuisine since the mid-20th century. Originating in fine dining establishments, it was designed to offer diners the best of both worlds.
Culturally, Surf and Turf showcases the abundant bounty of both land and sea, reflecting the prosperity of the regions it hails from. It has become a symbol of culinary elegance and gourmet sophistication.
While classic in nature, the Surf and Turf dish has evolved over time, with variations in techniques and components to suit different palates and dietary requirements.
Regional variations exist, such as the use of different shellfish or cuts of beef, allowing each version to reflect local tastes and ingredient availability, adding to its widespread popularity.
Ingredient Deep Dive
Steak is deeply embedded in culinary traditions worldwide. It is synonymous with luxury for many, providing robust iron content and protein, vital for energy and muscle development.
When selecting steak, seek cuts like ribeye or filet mignon, rich in marbling and tenderness for optimal flavor. Store properly wrapped in the refrigerator, and ensure it’s brought to room temperature before cooking. Substitute with other cuts like sirloin if necessary.
Lobster offers an unmatched sweetness and delicate texture. Rich in omega-3 fatty acids and essential minerals, it supports heart health and boosts the immune system.
Select whole live lobsters or fresh tails, ensuring they are firm and vibrant in color. Store lobsters in a cool environment and cook shortly after purchasing. For alternatives, shrimp or crab can substitute lobster.
Common Mistakes to Avoid
Overcooking steak ruins its tenderness. Monitor internal temperatures closely.
Undercooked lobster can be tough and chewy. Ensure it’s opaque and white in color.
Not resting the steak after cooking can cause juices to run, resulting in dry meat.
Using too much seasoning can overpower the inherent flavors of the steak and lobster.
Failing to preheat your pan properly will not allow the steak to sear correctly.
Overcrowding the pan with steak reduces the searing effect, leading to steaming instead.
Disregarding the quality of butter and aromatics affects the overall richness of the dish.
Timing is key. Ensure both components are timed to be ready concurrently for optimal serving.
Essential Techniques
Searing your steak correctly ensures that you lock in juices while creating a delicious crust. It’s crucial to use a hot pan and resist turning too frequently. Visual cues include a golden-brown crust and easy release from the pan when turned.
Grilling lobster tails may seem daunting, but melting butter over a low flame helps avoid drying out. Shell-side down cooking allows for even heat distribution. Moreover, it becomes cedar-like when cooked to perfection with buttery juices within.
Pro Tips for Perfect The Ultimate Surf and Turf Dinner
Incorporating fresh herbs like rosemary or thyme into your butter baste adds layers of aromatic richness to the steak.
Brushed garlic lemon butter over the lobster tail before grilling can elevate flavors while keeping the meat juicy.
Let your steak rest for at least five minutes after cooking. This resting period allows the fibers to reabsorb internal juices, improving tenderness.
Use a thermometer to accurately gauge internal temperatures for both steak and lobster, ensuring precision and preventing overcooking.
A light drizzle of fresh lemon juice over your lobster just before serving can brighten the dish and balance flavors.
Choose a complimentary side, such as roasted vegetables or mashed potatoes, to accentuate the steak and lobster while providing color contrast.
Variations and Adaptations
Regional variations often swap lobster for local shellfish varieties like prawns in the southern states, maintaining the dish’s luxurious feel while staying local.
For a seasonal twist, consider autumn accompaniments like pumpkin puree or a spiced cranberry glaze to contrast the main components with seasonal flavors.
Dietary modifications can include substituting butter with ghee for lactose-free or using a grilled portobello mushroom cap instead of steak for a veggie alternative.
To change the flavor, try marinating the steak in a balsamic glaze, introducing a sweet-tart complement to the robust beef.
If a firmer texture is desired, switch grilling for roasting with your choice of aromatic herbs and spices, developing deeper flavors.
Presentation can be modernized by serving sliced steak with artfully placed lobster on a wooden board, incorporating a rustic visual element.
Serving and Presentation Guide
When plating your Surf and Turf dinner, allow the shine of the lobster shell to stand out by placing it prominently beside the steak, enhancing the visual impact.
A sprig of fresh herbs or a lemon wedge brings out vibrant colors, creating an edible garnish while adding flavor contrast and brightness.
Traditional accompaniments such as drawn butter or a creamy hollandaise sauce can be served on the side to enhance tactile richness.
If modern presentation is desired, consider artisanal slate or wooden boards for serving, emphasizing a natural aesthetic.
Maintain temperature by serving immediately, ensuring the steak is at the right warmth and the lobster remains succulent.
For best portion control, slice the steak and serve it in pre-cut portions, which aids in even distribution and gives a neat presentation.
Wine and Beverage Pairing
Wine aficionados will appreciate full-bodied red wine like Cabernet Sauvignon or Merlot, complementing the richness of the steak, balancing flavors harmoniously.
For non-alcoholic alternatives, try spiced apple cider or a cranberry spritzer, offering a fruity counterbalance to the umami elements of the dish.
A strong black coffee or green tea pairs well post-dinner, cleansing the palate and offering contrasting warmth to the abundant flavors of the meal.
Temperature matters; serve white wines well-chilled for lobster and red wines slightly below room temperature.
Pour the wine just before serving to allow for proper oxygenation, helping to enhance aromatic notes and bouquet.
Storage and Shelf Life
Store leftovers in airtight containers in the refrigerator to maintain freshness and prevent aromas from mixing with other food items.
The steak and lobster dish should typically be consumed within 48 hours of preparation to ensure optimal texture and flavor.
Use glass or ceramic containers to minimize leaching odors and flavors, preserving integrity of the dish until reheating.
Signs of spoilage in cooked lobster include a fishy odor or discoloration of the meat, while steak may develop a slimy texture.
To reheat, place in an oven set at low temperature covered to retain moisture, ensuring the meat remains tender without overcooking.
If freezing leftovers, wrap portions individually in plastic wrap and aluminum foil to prevent freezer burn and keep at peak quality for up to three months.
Make Ahead Strategies
Prepare components like compound butter or seasoning mixtures well in advance, storing them in the refrigerator until ready to use.
Keep proteins stored separately post-prep and right before cooking, allowing space for easy organization and minimizing preparation stress.
Assess flavor quality if left too long between preparation stages. Marinades and rubs applied too early may alter textures through over-tenderization.
Tips for assembly include organizing all ingredients beforehand, simplifying the cooking environment for seamless progression through each step.
Reheat gently with indirect heat. Quick reheats can cause uneven temperatures and moisture loss, particularly in lobster and steak.
Fresh herbs should be added just before serving, preserving aromatic freshness and enhancing presentation vibrancy.
Scaling Instructions
When halving the recipe, adjust seasonings proportionately, remembering that critical reactions like Maillard do not scale linearly.
Doubling or tripling requires attention to equipment capacity; ensure pans and grills can accommodate without overcrowding, as this inhibits browning.
Cooking time modifications necessitate attention to frying pan or grill heats; larger quantities retain heat longer and may slow down cooking processes.
Consider container size flexibility and batch processing for storage considerations, ensuring portions fit available space without compromising freshness.
When scaling, watch for seasoning intensity. Larger meats need not be overly saturated, as surface area and volume differ in seasoning absorption.
Nutritional Deep Dive
The macro breakdown of this Surf and Turf dinner showcases balanced proteins, with steak and lobster offering essential amino acids necessary for tissue repair and muscle growth.
Mineral-dense lobster tail provides calcium, necessary for bone health, while the steak offers iron and B vitamins, supporting metabolic function.
Dietary considerations should include portion sizes to benefit from nutrient profiles without overindulgence. Consuming in moderation maintains balance with diverse food intake.
Each portion averages approximately 500-600 calories, allowing for nutrient-dense meals alongside sensible dietary plans, fitting into numerous diets without excessive calorie intake.
Weight management tips include pairing with vegetables high in fiber, providing satiety without excessive calorie contribution.
Troubleshooting Guide
If the texture of your steak is tough or chewy, consider adjusting cooking times or resting it longer post-cooking to redistribute juices effectively.
For flavor balance, ensure your seasoning complements the natural taste of meat and seafood; avoid overpowering with one-dimensional seasoning.
Temperature problems can be resolved by using a thermometer for precise internal readings at regular intervals during cooking.
Equipment challenges like inadequate pan size can be mitigated by batch processing or upscale tools ensuring even heat distribution.
Ingredient substitutions may require flavor matching. If you use prawns instead of lobster, account for the inherent sweetness variance.
Timing concerns are resolved by preparing ingredients in advance, keeping cooking progression smooth and eliminating unexpected delays.
Recipe Success Stories
An enthusiastic home chef shared their success with a surf-and-turf variation, adding their signature lemon herb butter twist, earning rave reviews from family and friends.
One reader swapped steak for a vegetarian mushroom-walnut patty and praised the balance of earthiness against the sweet richness of lobster.
Adaptations garnered positive feedback, incorporating Cajun seasoning for a southern flare; this adaptation created a bold and spicy flavor loved by readers.
Numerous suggestions came through from the community about elevating presentation; incorporating edible flowers and microgreens offers an elegant touch for special appearances.
An amateur photographer shared stunning captures of their plated version, recommending natural lighting and rustic tableware for Instagram-ready images.
Frequently Asked Questions
Q: Can I make the dish without a grill?
A: Yes. Instead of grilling, sear the steak in a hot skillet and bake the lobster in a preheated oven to achieve similar tastes and textures.
Q: What is the best way to ensure my steak is juicy?
A: Allowing the steak to rest after cooking is crucial, as it helps the fibers reabsorb juices, maintaining its succulence.
Q: Can I use frozen lobster tails?
A: Absolutely. Thaw them properly in the refrigerator overnight to maintain texture, then proceed as you would with fresh.
Q: How do I know when the lobster is done?
A: Cooked lobster meat is white and opaque, with a firm texture. An internal temperature of 140°F (60°C) confirms perfect doneness.
Q: Are there alternatives to cooking with butter?
A: Ghee or olive oil are suitable alternatives for those avoiding butter while still preserving flavor and richness.
Q: What side dishes complement this meal?
A: Consider roasted vegetables or a refreshing green salad with a tangy vinaigrette. They add a color and textural contrast without crowding flavors.
Q: What if my steak is too salty?
A: Serve with an unsalted side dish to counteract the seasoning or lightly drizzle with lemon to balance flavors.
Q: How can I store leftovers effectively?
A: Use airtight containers and refrigerate promptly. Consume within 48 hours for optimal flavor and safety.
Q: Is there a vegetarian version of Surf and Turf?
A: Yes, substituting steak for grilled portobello mushrooms or a robust veggie patty can provide an equally satisfying experience.
Q: Can I prepare some components ahead of time?
A: Certainly. Marinating the steak and prepping the lobster will streamline the cooking process on serving day.
Additional Resources
Explore our related recipes: Sizzling Shrimp Skewers, Grilled Mushroom Caps, and Herb-Butter Mashed Potatoes to enhance your meal with harmonious sides.
For mastering steak cooking techniques, review our in-depth grilling and searing guides, offering tips for achieving steakhouse-quality results at home.
Discover essential equipment that enhances your cooking experience. Our curated selection highlights tools that amplify flavors.
Dive into ingredient guides emphasizing sustainable sourcing. Understand the impacts of locally sourced meat and seafood.
Stay attuned to seasonal adaptations, reflecting the best each time of year has to offer in flavors, textures, and availability.
Join the Conversation
Share your creations on social media, tagging us for potential features and culinary camaraderie. Your visual stories showcase your unique twists on a classic dish.
Photography tips are available for improving your food captures. Experiment with natural light and plating techniques to make your surf and turf visually appealing.
Leave a recipe review on our site to connect with fellow food lovers, sharing insights and contributing to enhancements in culinary communities.
Community engagement thrives on feedback. Suggest variations, adaptations, and ingredients to enrich our diverse recipe repository.
Venture beyond recipe confines by adding your regional touches to ingredients and seasonings, creating a personalized dining experience that resonates.
The Recipe
The Ultimate Surf and Turf Dinner
Serves: 4
Prep Time: 30 mins
Cook Time: 40 mins
Total Time: 70 mins
Kitchen Equipment Needed
Skillet or Grill Pan
Oven-safe Dish
Thermometer
Cooking Tongs
Baking Sheet
Brush for Butter Basting
Ingredients
4 ribeye steaks (approximately 8 oz each)
4 lobster tails
1/2 cup unsalted butter, melted
2 tablespoons olive oil
3 cloves garlic, minced
Salt and pepper to taste
Fresh lemon wedges for serving
Fresh herbs for garnishing (optional)
Directions
Preheat your skillet over medium-high heat.
Season the steaks generously with salt and pepper. Add olive oil to the skillet.
Sear steaks for 4-5 minutes per side, or until desired doneness is reached. Use a meat thermometer to ensure accuracy.
Let the steaks rest on a cutting board covered with foil to retain warmth.
Preheat oven to 400°F (200°C). Arrange lobster tails in an oven-safe dish.
Mix butter with minced garlic and brush over lobster tails. Season with salt and pepper.
Bake lobster tails in the preheated oven for 10-12 minutes or until cooked through and opaque.
Arrange steaks and lobster on a platter, garnishing with fresh herbs and lemon wedges before serving.
Recipe Notes
For a garlic butter steak, add cloves of crushed garlic to the steak pan for the final minute of cooking.
Adapt sides based on your preferences. Consider garlic mashed potatoes or a simple asparagus salad.
If using frozen lobster tails, ensure they are fully thawed in the fridge for at least 8 hours before cooking.
Indulge in Irresistible Pecan Cream Pie: A Delicious Dessert Delight
Pecan Cream Pie: The Unforgettable Dessert Delight
⚖️
Difficulty
Medium
⏲️
Prep Time
30 mins
🕒
Cook Time
45 mins
⏱️
Total Time
75 mins
🍽️
Servings
8-10
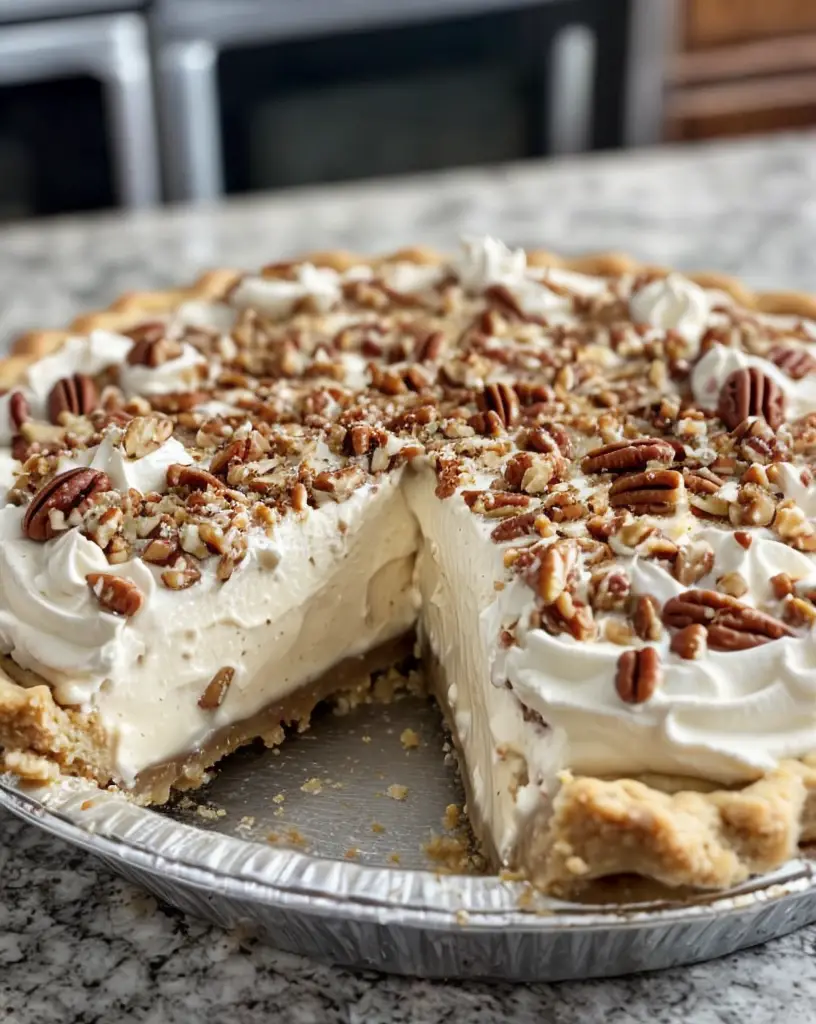
The Pecan Cream Pie is the perfect blend of creamy richness and nutty pecan flavor that will make your taste buds sing. Ideal for family gatherings or festive occasions, this delightful dessert is as beautiful to behold as it is delicious to eat. With its buttery crust and velvety filling, it’s bound to become a favorite in your kitchen and a showstopper at any dinner table.
Imagine slicing into a pie where every forkful provides a luscious contrast between the smooth, creamy filling and the crunchy, toasted pecans. This dessert not only caters to your sweet tooth but also promises an unforgettable taste experience that will transport you to the heart of Southern comfort food.
There’s something magical about the aroma of Pecan Cream Pie baking in the oven. The fragrant notes of toasted pecans and a hint of vanilla fill the air, promising warmth and nostalgia. Whether it’s a post-dinner treat or the star of your holiday table, this pie is sure to please.
Quick Recipe Highlights
Flavor Profile: A harmonious blend of nutty pecans and a rich, creamy filling with subtle hints of vanilla.
Texture: Perfectly balanced with a smooth filling contrasted by crunchy pecan pieces.
Aroma: Heavenly fragrance of toasted pecans intertwined with the sweet scent of vanilla and caramelized sugar.
Visual Appeal: A stunning presentation with a golden-brown crust and a richly colored pecan topping.
Skill Level Needed: Requires intermediate baking skills, suitable for those who are comfortable working with pie dough.
Special Equipment: Requires a 9-inch pie dish and an electric mixer for best results.
Recipe Overview
Difficulty Level: The pie involves making a creamy filling and handling pie dough, making it of medium difficulty. It’s perfect for bakers looking to challenge themselves just a bit.
Category: This is a dessert recipe, ideal for serving after the main course.
Cuisine: It belongs to Southern American cuisine, famous for its rich flavors and comforting desserts.
Cost: Approximate cost is moderate, considering the ingredients like pecans and cream.
Season: Best enjoyed during fall and winter, but its sweetness makes it a year-round favorite.
Occasion: Perfect for Thanksgiving, Christmas, birthdays, or any hearty family gathering.
Why You’ll Love This Recipe
This Pecan Cream Pie is a celebration of flavors and textures that will thrill your taste buds. The combination of smooth, luscious cream filling and crunchy pecans provides a delightful contrast, making each bite a memorable experience. The hint of vanilla enhances its flavor, adding depth and complexity that will make dessert lovers rejoice.
Preparation is simple yet rewarding. The recipe involves making a straightforward pie crust and a rich filling, both of which are easy to follow even for those not overly confident in the kitchen. By breaking down the process into manageable steps, it promises an impressive dessert with minimal hassle.
Despite its decadent taste, Pecan Cream Pie offers surprising nutritional benefits. Pecans are packed with antioxidants and healthy fats, while the cream provides essential vitamins and minerals. It’s a dessert that you can enjoy with the knowledge that it’s not only delicious but also nourishing in moderation.
Perfect for entertaining, Pecan Cream Pie is a crowd-pleaser that can be prepared ahead of time. Its sophisticated look and irresistible taste make it a talking point at gatherings. It’s a pie that’s meant to be shared, bringing smiles and delighted sighs to the faces of those lucky enough to enjoy it.
Cost-effective and made from easily accessible ingredients, this pie offers luxury without a hefty price tag. Make use of pantry staples like sugar, eggs, and dairy, combined with pecans, for an indulgent treat without breaking the bank.
Historical Background and Cultural Significance
The origins of the Pecan Cream Pie can be traced back to the South, where pecans are abundant and often used in cooking and baking. This pie has evolved from traditional pecan pie recipes, incorporating cream to provide a unique twist on a beloved classic.
Throughout history, Pecan Cream Pie has held a place as a comforting dessert passed down through generations. Its cultural significance is steeped in Southern traditions, where it’s often served during holidays and celebrations to bring families together.
The evolution of this pie reflects the adaptability of home cooks and bakers, who have added their spin on the classic to enhance its flavor and presentation. This has resulted in various versions, each offering a slightly different take while retaining its essential pecan goodness.
Regional variations of the Pecan Cream Pie abound, each offering a local twist that showcases the region’s unique flavors. Yet, no matter where you go, the core elements—smooth cream filling and crunchy pecans—remain constants that connect people to this delightful dessert.
Ingredient Deep Dive
Pecans are the star of this pie, providing a distinct nutty flavor and satisfying crunch. Rich in healthy fats and antioxidants, pecans are a powerhouse ingredient that adds both texture and nutritional benefits. When selecting pecans, look for plump, unblemished nuts, and store them in an airtight container in a cool place to maintain freshness.
Cream is another key ingredient, lending the pie its luxurious, velvety texture. Using high-quality heavy cream is essential for achieving the best results. It should be stored in the refrigerator and used within its expiry date. For substitutions, consider coconut cream for a non-dairy alternative.
Common Mistakes to Avoid
Overbaking can result in a dry and cracked filling. Keep an eye on the pie and remove it from the oven when the filling is just set.
Using low-fat substitutes may compromise the creaminess of the filling.
Skipping the toasting of pecans can result in a lackluster final flavor.
Not chilling the pie dough adequately can lead to a crust that shrinks in the oven.
Overmixing the filling can incorporate too much air, leading to undesired texture.
Adding eggs too quickly may cause them to scramble. Incorporate slowly into other ingredients.
Inadequate chilling before serving can result in a filling that doesn’t hold its shape.
Using stale pecans can overpower the pie with an unpleasant, rancid taste.
Essential Techniques
Making the perfect pie crust is a technique that requires practice. Chilling the ingredients—including the flour and butter—helps create a flakier crust. A light hand in mixing prevents the butter from over-softening, which is crucial for success.
Properly incorporating the cream filling ensures a smooth, consistent texture. This requires careful mixing to avoid over-aeration and gentle folding to combine the components uniformly. Visual cues like a glossy, homogenous filling indicate readiness for baking.
Pro Tips for Perfect Pecan Cream Pie
For extra depth of flavor, try adding a splash of bourbon or rum to the filling. This small addition can enhance the richness of the cream and pecans.
Use a pie shield or aluminum foil to protect the edges of the crust from over-browning during baking. This ensures the crust remains golden and beautifully crisp.
To enhance the nuttiness of the pie, lightly toast the pecans beforehand. This will draw out the oils and intensify their natural flavor.
Let the pie cool completely before serving to allow the filling to set properly. Patience here will prevent a runny slice on the dessert plate.
Consider pairing the pie with a dollop of whipped cream or a scoop of vanilla ice cream to accentuate its creamy filling.
If you notice any air bubbles in the filling as it sets, gently tap the pie dish on the counter to release them. This ensures a consistent texture throughout.
Variations and Adaptations
Southern pecans are traditional, but other regions might prefer adding chocolate chips or a drizzle of caramel for extra sweetness and richness.
Adapting to the seasons, you can incorporate spices like cinnamon, nutmeg, or cloves during fall, adding warmth and complexity to the pie.
For a gluten-free adaptation, use a gluten-free flour blend for the crust. Various flour blends on the market can replicate the traditional pastry texture.
Experiment with different nuts or seeds as toppings or additions to introduce varied textures. Walnuts, macadamias, or even sunflower seeds offer interesting alternatives.
Add a twist on texture by playing with the crust. A graham cracker crust can offer a different mouthfeel and additional sweet flavor.
For a unique presentation, bake it as mini tartlets for individual servings. This adaptation works well for parties or buffets, allowing for portion control and easier serving.
Serving and Presentation Guide
Plating your Pecan Cream Pie with a touch of flair can elevate its appeal. Serve on a classic ceramic pie dish, then slice carefully and use a cake server for neat presentation.
Adding a sprinkle of powdered sugar can enhance its visual charm, offering a snowy contrast to the golden-brown pie.
Garnishing with whole or halved pecans arranged in artistic patterns on top adds sophistication and visual interest.
If you’re serving the pie with accompaniments, consider a side of fresh whipped cream or crème fraîche to balance the sweetness with tangy creaminess.
The pie is ideally served at room temperature, but you can warm slices slightly if desired. This enhances the aroma and creates a comforting dessert experience.
Portion control is made simple with pre-scored slices, ensuring even and symmetrical serving sizes that avoid waste while satisfying guests.
Wine and Beverage Pairing
The caramel and nutty flavors of Pecan Cream Pie pair beautifully with dessert wines like a late-harvest Riesling or a rich Port. Their sweetness complements the pie without overpowering it.
For non-alcoholic options, consider serving it alongside a glass of iced sweet tea, which echoes Southern charm with its refreshing contrast.
Coffee is a classic partner, particularly a rich, dark roast that features chocolate notes. It cuts through the pie’s richness and provides a perfect after-meal balance.
If offering tea, a cinnamon spice blend adds warmth and enhances the nutty, sweet flavors of the pie. The spiced notes complement the pie’s complexity.
Ensure beverages are served at their ideal temperatures—for wine, slightly chilled, and coffee piping hot—to enhance the Pecan Cream Pie tasting experience.
Storage and Shelf Life
Store the Pecan Cream Pie covered in the refrigerator to maintain its freshness. Use plastic wrap or an airtight container to prevent drying out and protect flavors.
Ideally, serve the pie within three days for optimal taste and texture. After this period, the filling may begin to weep, and the crust can soften.
If freezing, wrap the pie tightly in foil, then place it in a freezer-safe bag or container to avoid freezer burn. Doing so can extend its shelf life for up to two months.
Watch for signs of spoilage like off-smells, a sour taste, or mold. These indicate the pie is no longer fit for consumption.
To reheat slices, place them on a baking sheet in a preheated oven at 350°F for 5-10 minutes, or microwave in short bursts until just warm.
For an emergency thaw, allow the pie to sit at room temperature for several hours or overnight, then pop it into the oven to restore its firmness and warmth.
Make Ahead Strategies
The crust can be made up to a day in advance, saving time during final assembly. Chilling it in the fridge will help maintain its flakiness.
Store finished components separately to maintain their integrity; refrigerate the cream filling and cover with plastic wrap to prevent forming a skin.
Assemble the pie a few hours before serving to allow the flavors to meld. Avoid overfilling the crust to prevent overflow during baking.
When reheating, do so gently, allowing flavors to retain their depth without drying out the filling or crust.
Introduce fresh elements, like decorative pecan halves, just before presenting the pie to keep them crisp and visually appealing.
Arrange your preparation timeline by prioritizing longer tasks earlier (such as chilling the dough) to ensure a smooth pie-making process.
Scaling Instructions
Halve the recipe for smaller gatherings, adjusting ingredient measurements precisely to maintain balance in flavors and textures.
For a larger group, doubling the recipe involves using two pie trays or a larger one, extending cooking time moderately to ensure thorough baking.
Consider using a stand mixer for larger batches to ensure thorough mixing without overworking the dough or filling.
Change the baking time as necessary when adjusting the pie size. Monitor key visual and sensory signs of doneness like crust color and filling firmness.
Keep storage space in mind with increased quantities, as more pies may require additional refrigeration or freezer space.
Nutritional Deep Dive
The macro profile of Pecan Cream Pie includes healthy fats from pecans, offering satiety and richness. Pecans also contribute protein and dietary fiber.
In terms of micronutrients, you’ll find vital vitamins and minerals such as vitamin E and magnesium in pecans, beneficial for heart health and metabolism.
This dessert can contribute to a balanced diet when consumed in moderation, providing energy and satisfaction.
Dietary considerations include lactose, as traditional recipes use dairy cream, but alternatives are available for those with sensitivities.
Portion control is key, with a single slice (about one-eighth of the pie) offering sufficient calorie intake to balance with other meals.
Nutritional benefits extend to essential fats and antioxidants, supporting overall health when enjoyed as part of an active lifestyle.
Dietary Adaptations
For a gluten-free version, substitute the crust with gluten-free flour blends, ensuring the use of xantham gum for elasticity.
To make it dairy-free, replace cream with coconut cream or almond cream, maintaining richness and flavor without lactose.
Vegan adaptations require using egg replacements like flaxseeds or chia seeds and plant-based milk alternatives for smooth filling consistency.
For low-carb needs, adjust sugar to a suitable substitute like erythritol and select nut flour for the crust to minimize carbohydrates.
Keto enthusiasts can swap the crust with a mixture of almond flour and butter, maintaining taste while adhering to dietary restrictions.
Low-FODMAP followers should monitor cream choices, picking lactose-free options to ensure digestive comfort.
Lastly, offer other specific diets a pie without common allergens by opting for basic ingredient modifications respecting dietary guidelines.
Troubleshooting Guide
Issues of texture, such as a runny or too-firm filling, can often be addressed by proper cooling times and ingredient measurements.
Balancing flavors might require incremental additions of vanilla or salt following taste assessments, improving depth without overpowering taste.
Temperature-related concerns often derive from incorrect oven calibration—use an oven thermometer to ensure precision during baking.
For equipment troubles, such as dough stickiness, chilling tools beforehand can assist in mitigating difficulty.
Ingredient substitutions need close monitoring to prevent altering the dish’s core qualities; trials of small test batches help achieve ideal consistency.
Timing worries, such as setting time, demand patience; leaving overnight in the fridge can often remedy less-than-perfect set fillings.
Recipe Success Stories
Reader stories often recount how Pecan Cream Pie brought joy to celebrations, inspiring variations enriched with beloved family traditions.
Many adaptations include caramel drizzles or chocolate swirls, reflecting personal tastes and creative instincts that enhance the pie’s allure.
Suggestions from the community have led to tips for easier crust baking and alternative nut options, showcasing global inspirations.
Feedback shares the pie’s photographic appeal, advising garnishes and sweet-topped finishes that capture its beauty in images.
Encouragement from others fosters culinary adventures, with shared experiences leading to delightful Pecan Cream Pie transformations.
Frequently Asked Questions
How do I know when the pie is fully baked? Monitor for a golden-brown crust and a mostly set, slightly jiggly center—a sign of a perfect bake.
Can I use store-bought crust? Yes, though homemade crust is recommended for best flavor and texture. Store-bought options save time and still offer good results.
What is the best method to toast pecans? Spread them on a baking sheet and toast in a 350°F oven for about 5-7 minutes, watching closely to prevent burning.
How do I prevent the pie from being too runny? Ensure proper cooking times and ingredient measurements—some added cornstarch can also assist in thickening.
What substitutes work for a non-dairy cream option? Coconut cream or almond milk cream are great alternatives that maintain similar textures.
Can the pie be frozen after baking? Yes, ensure it cools completely before wrapping properly, storing it safely for up to two months.
How can I ensure my filling is smooth? Mixing gradually and avoiding excessive air incorporation keep the filling from becoming grainy.
What can I pair this pie with for a complete dessert? A fellow Southerner recommends iced tea for a delightful pairing, blending sweetness with refreshment.
How to avoid a soggy crust? Bake the crust thoroughly before adding filling, and ensure dry ingredient bases to prevent moisture absorption.
Where do pecans get their flavor richness? The natural oils within pecans broaden their taste profile, especially intensified through slight toasting.
Additional Resources
Explore related dessert recipes such as traditional pecan pies or cream tarts interested in expanding the nutty and creamy culinary journey.
Technique guides outline essential baking processes like perfect pie crusts, helping novice bakers gain confidence for a seamless experience.
Ingredient information offers deep dives into pecans, showcasing their nutritional benefits and magical conversion from raw to toasted wonders.
Equipment recommendations, include essential pie-baking utensils that ease the complexity of preparation, such as dough mixing bowls or pie weights.
Seasonal variations suggest ingredient modifications reflective of fall spices, guiding the infusion of autumnal warmth into classic creations.
Join the Conversation
Engage via social media, sharing your Pecan Cream Pie’s glowing visuals and unique adaptations with our vibrant community who appreciates your culinary creativity.
Spotlight your baking prowess through detailed photography tips for showcasing the pie’s rich textures and evocative colors.
Contribute personal reviews and connect with fellow readers, comparing notes and experiences to collectively improve upon our beloved recipe.
Community engagement grows flavorful conversations, featuring points of shared inspiration that lead to transformative pie-baking stories.
Personalize your pie with theme-based variations, from seasonal ingredients to region-specific takes—each contribution enriches our culinary tapestry.
The Recipe
Pecan Cream Pie
Serves: 8-10
Prep Time: 30 mins
Cook Time: 45 mins
Total Time: 75 mins
Kitchen Equipment Needed
9-inch pie dish
Electric mixer
Mixing bowls
Baking sheet
Wire whisk
Parchment paper
Rolling pin
Ingredients
1 unbaked 9-inch pie crust
1 cup pecan halves
1 cup heavy cream
3/4 cup packed brown sugar
1/4 cup cornstarch
1/4 teaspoon salt
3 large egg yolks
2 tablespoons butter
1 teaspoon vanilla extract
Directions
Preheat the oven to 350°F (175°C).
Roll out the pie crust and place it in the pie dish. Trim and crimp the edges.
Line the crust with parchment paper and fill with pie weights. Bake for 10-15 minutes to set the crust. Remove weights and cool.
Spread pecans on the baking sheet and toast in the oven for 5-7 minutes until fragrant. Let cool.
In a medium saucepan, combine cream, brown sugar, cornstarch, and salt over medium heat. Stir constantly until the mixture thickens.
In a separate bowl, lightly beat egg yolks. Gradually whisk in a small amount of the hot cream mixture to temper then return the entire mixture to the saucepan.
Cook on low heat, stirring until thickened to a custard-like consistency. Remove from heat and stir in butter and vanilla.
Pour the filling into the prepared crust, smoothing the surface, and top with toasted pecans.
Chill for at least 4 hours or until firm before serving.
Recipe Notes
Substitute half-and-half for heavy cream for a lighter version.
Add a touch of cinnamon to the crust for added warmth.
Irresistible Salted Caramel Pecan Muffins Perfect for Fall Baking
Salted Caramel Pecan Muffins: A Sweet and Savory Delight
⚖️
Difficulty
Medium
⏲️
Prep Time
20 mins
🕒
Cook Time
25 mins
⏱️
Total Time
45 mins
🍽️
Servings
12
Get ready to indulge in the heavenly taste of Salted Caramel Pecan Muffins. Imagine a warm, fluffy muffin infused with the rich, buttery flavor of caramel and the delightful crunch of toasted pecans. These muffins strike the perfect balance between sweet and savory, making them a favorite for any occasion. Whether you’re serving them as a breakfast treat or as a decadent dessert, these muffins are sure to leave everyone wanting more.
The beauty of Salted Caramel Pecan Muffins lies in their simplicity yet profound flavor profile. The combination of caramel’s velvety sweetness with a touch of sea salt creates a mouth-watering sensation that’s hard to resist. The pecans add an earthy note, enhancing the overall depth of flavor. Each bite delivers a delightful contrast of textures – fluffy, moist muffin enriched with crunchy pecans. This harmonious blend will delight your taste buds and make your kitchen smell like a bakery.
Quick Recipe Highlights
Flavor Profile: These muffins combine sweet caramel with a hint of salt and a nutty pecan finish, creating a complex and satisfying taste experience.
Texture: The muffins are soft and tender, complemented by the crunchy texture of the pecans, offering a pleasing mouthfeel.
Aroma: Experience the enticing aroma of freshly baked caramel and roasted pecans filling your kitchen.
Visual Appeal: Caramel drizzles and pecan pieces offer a rustic yet inviting look, making each muffin a visual treat.
Skill Level Needed: Moderate baking skills are required to caramelize sugar and evenly bake the muffins without overcooking.
Special Equipment: Use a muffin tin, an electric mixer, and a caramel saucepan to achieve the best results.
Recipe Overview
Difficulty Level: This recipe is moderately difficult, involving caramel creation and precise baking times to ensure perfect muffins.
Category: Ideal for breakfast or brunch menus, but equally delightful as a sweet snack or dessert.
Cuisine: Inspired by Southern baking traditions, these muffins incorporate classic American flavors.
Cost: The primary ingredients are affordable, though pecans can be slightly pricier depending on seasonality.
Season: While enjoyable year-round, these muffins are particularly comforting in the fall due to their warm, nutty flavors.
Occasion: Perfect for holiday gatherings, family breakfasts, or treat-yourself weekends.
Why You’ll Love This Recipe
The Salted Caramel Pecan Muffins are a treat for the senses. The combination of sweet caramel with nutty pecans and a hint of salt delivers a depth of flavor that is both comforting and exciting. The muffins’ texture is a delightful contrast between moist cake and crunchy nuts, making each bite a unique experience.
Besides their tempting taste, these muffins are convenient to prepare. The recipe won’t keep you in the kitchen for too long, and it’s simple enough for those who don’t bake often. With just a few common ingredients and a couple of special touches, you’ll create a bakery-worthy treat in your own home.
From a nutritional standpoint, pecans provide healthy fats and essential minerals, while the homemade caramel allows you to control sugar content, making these muffins a relatively moderate indulgence. Enjoy them with a coffee for a satisfying breakfast or an afternoon pick-me-up.
Socially, serving these muffins automatically makes any occasion feel special. Whether it’s a holiday brunch with family or a picnic with friends, they are a versatile treat that fits any setting. They are also great for gifting, wrapped up beautifully for a homemade present.
Despite their luxurious taste, these muffins are an affordable treat. Most of the ingredients may already be in your pantry, and the recipe yields a dozen muffins, offering excellent value for a gourmet snack.
Historical Background and Cultural Significance
The Salted Caramel Pecan Muffins draw inspiration from Southern culinary traditions, where pecans and caramel feature prominently in many beloved dishes. Pecans, native to North America, have been a staple in Southern desserts for centuries, often showcased in pies and pralines.
Culturally, these muffins bring together the comforting elements of home baking with the sophistication of caramel’s gourmet appeal. Originating as a way to use local ingredients, the recipe has evolved to incorporate modern techniques and variations, showcasing the versatility of classic flavors in contemporary baking.
The combination of caramel and sea salt has taken the culinary world by storm in recent years, building on traditional flavors to create a sensation of rich sweetness meeting crispy saltiness. This has led to an evolution in how these ingredients are used, transitioning from fine dining restaurants to everyday home baking.
Regional variations of this recipe might include additions like cinnamon for warmth or chocolate chips for an extra touch of indulgence. Each baker can personalize the muffins to suit their taste or reflect their regional preferences, making the recipe a canvas for creativity.
Ingredient Deep Dive
Flour: Adding to the structure of the muffins, all-purpose flour is a staple in baking due to its balanced protein content, contributing to both texture and height. Store in an airtight container to maintain freshness.
Pecans: Pecans bring not only a nutty flavor but also health benefits, such as heart-healthy fats and antioxidants. Look for plump, uniformly colored pecans for the best taste and store them in a cool, dry place to prevent them from turning rancid.
Caramel: Homemade caramel provides a richness that ties the flavors together. To achieve perfect caramel, heat sugar gently and stir continuously to prevent burning. Adjust sweetness by altering the sugar content according to preference.
Common Mistakes to Avoid
Overcooking the caramel can lead to a bitter taste. Watch the caramel closely and remove from heat as soon as it turns amber.
Using cold ingredients directly from the refrigerator may prevent the batter from developing the correct texture. Bring all ingredients to room temperature.
Overmixing the batter can result in tough muffins. Mix just until the dry ingredients are incorporated.
Neglecting to toast the pecans beforehand can minimize their flavor. Lightly roast them to enhance their natural oils and taste.
Filling the muffin tins too high risks overflow and uneven baking. Fill each cup about two-thirds full for best results.
Skipping the cooling step will affect the caramel’s setting, resulting in a runny top. Allow muffins to cool fully before serving.
Forgetting to line or grease the muffin tin can lead to sticking. Use paper liners or generously grease each cup.
Using aluminum pans may cause uneven heating. Opt for silicone or high-quality metal pans for consistent results.
Ignoring precise measurements may lead to an imbalance in flavors. Use measuring cups and spoons for accuracy.
Not checking oven calibration can result in over-baking. Use an oven thermometer for an accurate temperature reading.
Essential Techniques
Caramelizing sugar is the cornerstone of this recipe, essential for achieving that distinct sweet and slightly bitter flavor profile. To master this technique, use a heavy-bottomed pan to distribute heat evenly and stir continuously. Visual cues like color change from white to amber indicate readiness. Avoid stirring too quickly, which can incorporate unwanted air bubbles and result in crystallization.
Pro Tips for Perfect Salted Caramel Pecan Muffins
Use high-quality sea salt for the salted caramel to enhance the overall flavor without overpowering the sweetness. Opt for finely ground salt for an even distribution.
Roast your pecans before incorporating them into the batter to bring out their full nutty flavor. Layer them on a baking sheet and toast for a few minutes until fragrant.
If you like a little extra richness, add a touch of vanilla extract to the batter alongside the eggs. This deepens the muffins’ flavor profile even further.
To create an upscale presentation, drizzle additional caramel sauce over the muffins before serving. This gives them an irresistible glossy finish.
For an even bake, ensure all ingredients are at room temperature, promoting even heat distribution in the oven.
Experiment with adding a pinch of cinnamon or nutmeg to the batter for a warm, spiced variation that’s perfect for colder months.
Variations and Adaptations
To add a regional twist, vary the nuts based on local preferences or availability. Walnuts or almonds can be substituted for pecans for a different nutty note.
Incorporate dried fruits such as cranberries or raisins during fall for seasonally inspired sweetness. This adds a chewy texture alongside the crunch of pecans.
For a dietary adjustment, replace all-purpose flour with a gluten-free baking mix, adjusting liquid ratios as necessary to maintain the batter’s consistency.
Increase the sweetness or adjust the overall sugar content to fit personal preference, keeping in mind that altering the caramel might require practice for perfect consistency.
In terms of presentation, serve these muffins on a wooden platter for a rustic look or individually wrapped as gifts during the holiday season. A sprinkle of powdered sugar can also add an appealing touch.
Serving and Presentation Guide
Plate these muffins on a tiered stand for a sophisticated brunch presentation. This visual appeal works perfectly when serving at parties or gatherings, encouraging guests to indulge.
For garnishing, a light dusting of powdered sugar or a drizzle of additional caramel sauce can elevate the aesthetic, making them even more inviting.
Pair these muffins with coffee or a rich caramel latte for a harmonious blending of flavors, enhancing the caramel notes in both muffin and beverage.
Consider serving these muffins with fresh fruit for a balanced breakfast option, adding a touch of brightness alongside the rich, decadent muffin.
For controlled portions at events, pre-slice muffins into halves or quarters, allowing guests to sample alongside other treats without overindulging.
Wine and Beverage Pairing
A sweet, slightly chilled Moscato complements the saltiness and sweetness of the caramel, providing a refreshing contrast to the rich flavors of the muffins.
If you prefer non-alcoholic options, choose a creamy chai latte to mirror the spices and deepen the caramel’s richness with aromatic nuances from the tea.
For coffee lovers, a cappuccino or an espresso pairs beautifully with the muffins’ sweetness, offering a classic and comforting experience alongside your morning muffin.
Frequent enjoyment of these muffins with green tea brings out their sophisticated notes, introducing a subtle herbal layer to their flavor profile.
Servers should consider room temperature as a key factor—chilling wine or opting for warm beverages based on the season enhances the dining experience.
Storage and Shelf Life
To maintain the muffins’ freshness, store them in an airtight container at room temperature for up to three days. Keeping them sealed prevents moisture loss and staleness.
For longer storage, freeze muffins individually wrapped for up to three months. Thaw at room temperature for a quick and delicious treat whenever you crave one.
Monitor for signs of spoilage, such as mold or an off-smell, especially in humid climates where baked goods may spoil faster.
Reheat muffins in the oven at a low temperature for a fresh-baked feel, or enjoy them at room temperature for a quick snack.
Avoid refrigeration if possible, as it may dry out the muffins. Storing at room temperature or freezing preserves the texture best.
Make Ahead Strategies
Prepare the muffin batter a day in advance, storing it in the refrigerator overnight. This enhances the flavors as they meld before baking, offering intense taste.
Complete all caramel preparation the day before, ensuring it’s stored in a refrigerator-safe container to retain its texture and flavor until needed.
While advance preparation may slightly alter texture, enjoying them fresh ensures the optimal taste and feel. Consider adding fresh pecans or a caramel drizzle right before serving.
If reheating, gently warm muffins in an oven or toaster oven to bring back their delightful fresh-baked taste. This little step makes all the difference for meal presentations.
Emphasize fresh components like extra pecans or a final pinch of sea salt to reintroduce bright notes and delightful contrast with advanced preparation.
Scaling Instructions
When halving the recipe, maintain accurate and proportional ingredient division to uphold proper flavor balance. Use a smaller muffin tin to scale down output accordingly.
For doubling or tripling, increase ingredients proportionately but measure carefully to prevent overwhelming batter with excess mix. Opt for batch baking to ensure even baking and consistent texture.
Adjust mixing equipment if necessary, using a larger bowl or stand mixer for increased ingredients. This supports efficient mixing without compromising consistency.
Timing may vary, so always check for doneness with a toothpick inserted into the muffins, ensuring consistent results without undercooking or overbaking.
Consider additional storage solutions for larger batches, possibly using dedicated muffin carriers for transport if sharing treats with others.
Nutritional Deep Dive
These muffins offer a blend of macronutrients, including carbohydrates for energy, healthy fats from pecans, and slight protein content from eggs and nuts.
Pecans add significant micronutrients like magnesium and vitamin E, supporting overall health and providing antioxidant benefits contrasted with the sugars in caramel.
While indulgent, moderation is vital—enjoying these muffins as a part of a balanced diet minimizes any dietary concerns regarding sugar or fat intake.
Consideration for portion size helps manage weight, allowing enjoyment without affecting dietary goals. Incorporating mindful eating strategies complements this balanced approach.
Portion control advice includes savoring each bite to fully appreciate the taste and texture, helping prevent overindulgence and maintaining dietary commitments.
Dietary Adaptations
Gluten-Free: Substitute all-purpose flour with gluten-free baking flour, ensuring other ingredients are gluten-safe to maintain compliance with dietary needs.
Dairy-Free: Swap butter with plant-based alternatives and ensure caramel ingredients are free from dairy substances for a delicious, inclusive version of the muffins.
Vegan: Use flax eggs and non-dairy margarine for a compassionate twist on this recipe. Ensure caramel is vegan or make it using coconut cream for a luscious finish.
Low-Carb: Seek specialized low-carbohydrate flour and sugar alternatives to align with dietary restrictions, maintaining flavor without carbohydrates as a focus.
Keto: Focus on reducing sugar intake and increasing pecan content. Consider coconut flour for a keto-oriented adaptation that retains key nutritional qualities.
Paleo: Embrace natural sweetening options with honey or maple syrup, ensuring the balance of flavors while fitting within paleolithic dietary preferences.
Low-FODMAP: Minimize high-FODMAP ingredients, focusing on pecan portion control and suitable low-FODMAP alternatives to maintain gut health without sacrifice.
Troubleshooting Guide
Texture Issues: If muffins turn out dense, check if overmixing the batter or using cold ingredients occurred. Switch to room-temperature elements and gentle mixing.
Flavor Balance: Lessen sugar or salt based on taste feedback, adjusting quantities to perfect the balance of sweet and savory notes for varied preferences.
Temperature Problems: Constant temperature monitoring prevents baking discrepancies. Equip yourself with an oven thermometer for precision cooking.
Equipment Challenges: Mismatched baking equipment affects results. Consider investing in uniform muffin tins and reliable baking sheets for consistency across batches.
Ingredient Substitutions: Mix dry and wet ingredients separately to match replacement flour textures for seamless adaptation when alternative ingredients are used.
Timing Concerns: Finish baking by checking muffin doneness with proper timing, gaining insight into recipe modifications if timing differs based on home equipment.
Recipe Success Stories
Community Feedback: Many home bakers report satisfying results when adding personal touches, like extra caramel drizzle or a pecan praline topping, creating unique muffins.
Variation Successes: A successful adaptation involves adding apples for a fruity accent which complements the caramel, popular during autumn gatherings and holidays.
Adaptation Stories: Various bakers transformed the muffins into a cake form, employing same-ingredient ratios in a cake pan, offering impressive serving alternatives.
Reader Suggestions: Readers rave about incorporating chopped dark chocolate for further depth or golden raisins for sweet surprise bites within each muffin.
Photography Tips: Capturing muffin textures can highlight their appeal. Consider close-up shots with natural lighting and a contrasting backdrop for picturesque, inviting photos.
Frequently Asked Questions
Q1: Can I make these muffins without nuts?
A1: Yes, simply omit the pecans or replace them with a different ingredient, such as chocolate chips or dried fruits, for an alternative texture and flavor.
Q2: What’s the best way to store leftover muffins?
A2: Store muffins in an airtight container at room temperature for up to three days. For longer storage, freezing in an airtight container is recommended.
Q3: How can I ensure my caramel doesn’t burn?
A3: Monitor the caramel closely, using medium heat and constant stirring. When the sugar reaches amber color, promptly remove from heat to avoid burning.
Q4: Is it possible to make a sugar-free version?
A4: Experiment with sugar alternatives like stevia or erythritol in place of regular sugar. Be mindful of substitution ratios to maintain the expected sweetness.
Q5: Can these muffins be made in advance for a party?
A5: Yes, prepare them the night before, ensuring they’re stored in an airtight container. Refresh by lightly warming them before serving at your event.
Q6: Do I need to use fresh pecans?
A6: While fresh pecans offer optimum flavor, you can use packaged pecans as long as they are stored properly and maintain their nutty taste.
Q7: Can I use maple syrup instead of caramel?
A7: While maple syrup has a different flavor profile, it can be used as a substitute, providing a distinct sweetness. Adjust the quantity to avoid overly wet batter.
Q8: How do I prevent muffins from sticking to the pan?
A8: Use paper muffin liners or grease the muffin tin thoroughly before adding the batter. Silicone baking cups offer a non-stick alternative to traditional tins.
Q9: Why are my muffins sinking in the middle?
A9: This may be due to underbaking or overmixing. Ensure proper baking time and handle the batter gently to maintain structure.
Q10: Can these muffins be transformed into a loaf?
A10: Absolutely, extend baking time as needed and cover with foil midway through to prevent the top from over-browning while the center bakes.
Additional Resources
For those looking to explore complementing recipes, consider trying a pecan-infused bread or caramel sauce. These additions can enrich your baking repertoire and provide delectable pairings.
Technique guides are invaluable for further mastering caramelization or exploring creative baking techniques that enhance your muffin-making skills.
Ingredient information provides insights into substitutions and enhancements while elevating the familiar experience. Investigating pecans’ nutritional value can inspire dietary adjustments.
Explore equipment recommendations to tailor your kitchen setup, supporting consistent, professional results with each batch of muffins you bake.
Take advantage of seasonal variations, using fresh produce available in your area to adapt recipes while maintaining the integrity and expected taste of your baked goods.
Join the Conversation
Engage with fellow baking enthusiasts and share your experiences on social media platforms, using hashtags to connect with like-minded muffin lovers.
Consider photography tips for capturing your freshly baked muffins, enhancing their presentation through creative techniques and natural lighting.
Writing recipe reviews offers vital feedback to others in the community, assisting newcomers in expectations and variations they might try for themselves.
Community engagement fosters a collective creativity, encouraging recipe variations from shared experiences. Discover new ideas and inspiration with each interaction.
Welcome suggestions for adaptations, whether through comments or forums, enabling continual learning and innovation in the shared love of baking.
The Recipe
Salted Caramel Pecan Muffins
Serves: 12
Prep Time: 20 mins
Cook Time: 25 mins
Total Time: 45 mins
Kitchen Equipment Needed
Muffin tin
Electric mixer
Caramel saucepan
Baking sheet
Cooling rack
Ingredients
1 cup all-purpose flour
1/2 cup granulated sugar
1/2 cup unsalted butter, softened
2 large eggs
1/2 cup milk
1 tsp vanilla extract
1/2 tsp baking powder
1/4 tsp baking soda
1/4 tsp salt
1 cup pecans, toasted and chopped
1/2 cup homemade caramel sauce, plus extra for drizzling
Directions
Preheat your oven to 350°F (175°C) and line a muffin tin with paper liners.
Using an electric mixer, beat butter and sugar until light and fluffy. Add eggs, one at a time, mixing well after each addition.
Mix in vanilla extract. In a separate bowl, whisk flour, baking powder, baking soda, and salt.
Gradually add dry ingredients to the wet mixture, alternating with milk, starting and ending with dry ingredients. Fold in pecans and caramel sauce.
Divide batter evenly among muffin cups, filling about two-thirds full. Drizzle tops with additional caramel sauce if desired.
Bake for approximately 20-25 minutes or until a toothpick inserted into the center of a muffin comes out clean.
Allow muffins to cool in the pan for 5 minutes before transferring to a cooling rack.
Recipe Notes
Ensure eggs and butter are at room temperature for smooth blending.
For a deeper flavor, consider using dark caramel sauce.
Experiment with different types of nuts for variation.
Muffins are best served the day they are baked but can be stored for later enjoyment.
Delicious Mini Zucchini and Beef Burgers for a Healthy Twist
Mini Zucchini and Beef Burgers: A Delicious and Nutritious Delight
⚖️
Difficulty
Easy
⏲️
Prep Time
15 mins
🕒
Cook Time
20 mins
⏱️
Total Time
35 mins
🍽️
Servings
4
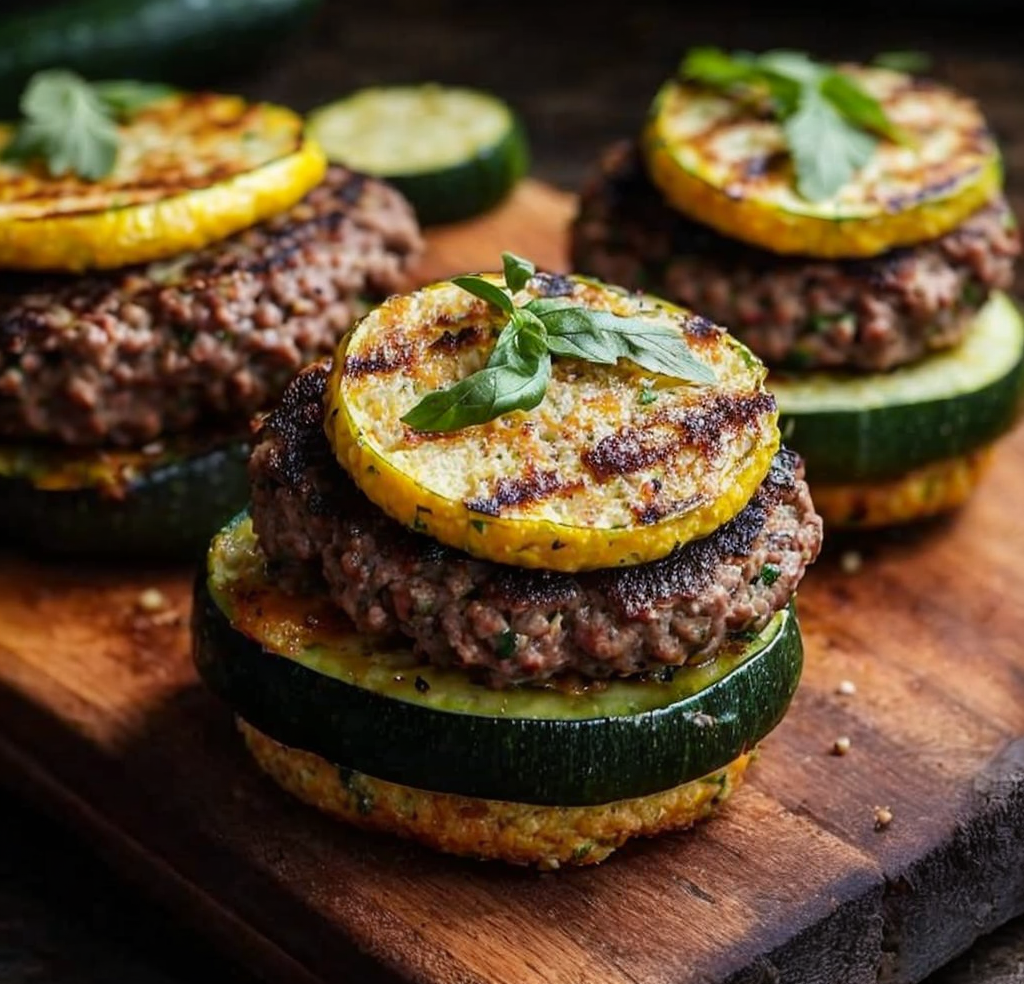
Indulge in the delightful flavors of our Mini Zucchini and Beef Burgers, a delicious and nutritious twist on the classic burger that promises to tantalize your taste buds. Packed with the goodness of fresh zucchini and lean beef, these mini burgers are perfect for a quick and satisfying meal. The combination of zucchini and beef creates a juicy and flavorful patty that will leave you craving for more.
Whether you’re hosting a BBQ or looking for a weeknight dinner solution, these Mini Zucchini and Beef Burgers are sure to be a hit. The subtle flavors of zucchini blend perfectly with the richness of beef, making for a harmonious taste sensation. Not only are these burgers delicious, but they also offer a great way to incorporate more vegetables into your diet without compromising on taste.
Quick Recipe Highlights
Flavor Profile: These burgers offer a savory profile, with the subtle sweetness of zucchini complementing the rich, umami flavors of beef, enhanced with a touch of garlic and spices.
Texture: Enjoy a juicy and tender patty with a crisp exterior, thanks to the perfect blend of beef and finely grated zucchini.
Aroma: The inviting aroma of grilled beef and fresh zucchini fills the air, with hints of garlic in every bite.
Visual Appeal: The vibrant green flecks of zucchini throughout the burger add a pop of color, making it visually appealing on the plate.
Skill Level Needed: This recipe is ideal for cooks of all skill levels. Minimal technique is required beyond mixing and shaping patties, making it accessible for beginners.
Special Equipment: You’ll need a griddle or non-stick skillet for the best results, along with a box grater for the zucchini.
Recipe Overview
Difficulty Level: This recipe is rated as easy, primarily involving basic mixing and grilling techniques that are straightforward and simple for any home cook.
Category: This versatile dish is perfect for both casual weeknight dinners and enjoyable weekend BBQs.
Cuisine: Drawing inspiration from American and Mediterranean cuisines, these burgers have an international flair thanks to the use of zucchini.
Cost: With budget-friendly ingredients like ground beef and zucchini, this recipe is wallet-friendly without compromising on quality.
Season: While zucchini is a summer vegetable, these burgers can be enjoyed year-round, making them perfect for any season.
Occasion: Ideal for family gatherings, friendly get-togethers, or just a comforting meal at home.
Why You’ll Love This Recipe
The distinct blend of beef and zucchini delivers a succulent and delightful burger experience. The juicy tenderness and slightly crispy edges make every bite a joy, while the natural flavors harmonize beautifully, ensuring a tasty and satisfying meal.
One of the greatest advantages of these Mini Zucchini and Beef Burgers is their ease of preparation. With only a few simple steps and readily available ingredients, you can whip up a delicious meal in no time, perfect for busy evenings.
Aside from being delicious, these burgers are nutritious and lower in fat compared to traditional beef burgers. Zucchini adds valuable vitamins and minerals, boosting the nutrition profile without any compromise on flavor.
These mini burgers are perfect for entertaining, providing a quick and easy dish that will please a crowd. Their appealing size makes them perfect for sliders or appetizers, offering a touch of variety to your menu.
With affordable ingredients, this recipe is a cost-effective way to enjoy a gourmet meal at home. Zucchini and beef are staple ingredients that won’t break the bank, and the simplicity of the recipe means you’re getting great value and enjoyment without a hefty price tag.
Historical Background and Cultural Significance
The origin of mini burgers can be traced back to the American culinary tradition, where smaller portions of classic dishes became popular in the late 20th century. These Mini Zucchini and Beef Burgers are a modern twist, infusing a traditional dish with a healthy edge.
In many cultures, combining vegetables with meat has been a way to stretch ingredients and add flavor. The addition of zucchini in this recipe is inspired by Mediterranean cooking, where vegetables are often used innovatively in meat dishes.
Over time, the recipe has evolved, with home cooks and chefs adding their unique touches to make these mini burgers even more versatile and flavorful. This adaptability has allowed the dish to remain relevant and loved globally.
Today, regional variations of these mini burgers exist, from incorporating different spices to altering the protein used. This cultural exchange and adaptation demonstrate the universal appeal and flexibility of the recipe.
Ingredient Deep Dive
Zucchini, a staple in many households, offers a mild taste and high moisture content, making it an ideal ingredient for various dishes. Originating in Central America, zucchini is praised in many cuisines for its versatility and nutritional value.
Rich in vitamins A, C, and K, zucchini supports overall health while being low in calories and carbs. It’s a fantastic option for those looking to boost their vegetable intake while enjoying a tasty meal.
To select the best zucchini, look for firm, medium-sized specimens with smooth, bright skin. Store them in the refrigerator and aim to use them within a week for optimum freshness.
If zucchini isn’t available, feel free to substitute with grated carrot or squash. Each offers a unique flavor and texture, allowing you flexibility when creating your burgers.
Ground beef brings umami richness, perfectly balancing the delicate taste of zucchini. Opt for lean ground beef to create a healthier burger without losing flavor and juiciness.
When selecting ground beef, choose options with a moderate fat content (around 15-20%) to ensure a juicy burger. Store beef in the coldest part of your refrigerator and use it within a couple of days for the best quality.
For vegetarians, you can substitute the ground beef with lentils or black beans for a similar texture and protein content while maintaining the robust flavors through seasonings.
Common Mistakes to Avoid
Avoid over-mixing the burger mixture to prevent a tough texture. Gently combine ingredients just until mixed.
Take care not to overcook the burgers, as they should remain juicy. Aim for medium doneness for the best flavor.
Make sure to season both the beef and zucchini adequately to enhance the natural flavors.
Grate the zucchini finely to ensure it incorporates seamlessly into the beef mixture.
Don’t skip squeezing excess moisture from the zucchini, or the burgers may be too wet and fall apart.
Rest the burgers after cooking to allow juices to redistribute, ensuring a juicy bite.
Use a griddle or non-stick pan to prevent sticking and ensure even cooking.
Ensure your grill or pan is hot before placing the patties on it to achieve a nice sear.
Essential Techniques
Grating zucchini is an essential technique for this recipe, ensuring the vegetable integrates well with the meat. Use a fine grater to achieve soft strands that meld with the beef for harmonious flavors.
Proper patty formation is crucial for even cooking and prevents falling apart. Use your hands to lightly shape the patties, ensuring they’re not too thick, for quick and uniform grilling.
Master the art of grilling by preheating your grill or pan. This ensures a consistent temperature, delivering an even cook and a delicious, caramelized crust on the burgers.
Pay attention to visual cues such as browning and patty firmness to determine doneness. This avoids overcooking, ensuring the burgers remain juicy and flavorful.
Pro Tips for Perfect Mini Zucchini and Beef Burgers
For added moisture and flavor, consider mixing some finely diced onions into the patty mixture. This enhances the overall taste and results in a juicier burger.
Resting the patties before cooking allows flavors to meld together, rendering a richer taste that will impress your taste buds.
Experiment with different cheese toppings for variety. A slice of cheddar or gouda melt makes for an indulgent topping, complementing the flavors beautifully.
Try incorporating various herbs and spices into your mixture, such as basil or oregano, to add depth and character to your burgers.
Cooking these mini burgers on a charcoal grill adds a smoky flavor that elevates the overall taste, making them perfect for outdoor gatherings.
Consider using slider buns or mini brioche for a gourmet touch. These smaller buns fit the patties perfectly and provide an upscale twist on a classic dish.
Variations and Adaptations
Across the Mediterranean, variations of mini sliders often include spices like cumin and coriander, adding a bold flavor profile. Try incorporating these spices for a regional twist.
In spring and summer, add fresh herbs like mint and parsley for a refreshing take on these burgers. Seasonal freshness can elevate the dish, making it perfect for warm weather.
For a gluten-free version, use gluten-free breadcrumbs or omit them altogether, ensuring a delicious burger for all dietary needs.
Experiment with flavor by topping the burgers with pickled onions or drizzling with a garlic aioli, adding layers of taste that make every bite an adventure.
For a delightful crunch, add some chopped walnuts or pecans for a texture contrast that complements the juicy patty.
Present these mini burgers as part of an elegant platter with microgreens and edible flowers, offering a modern and visually appealing approach.
Serving and Presentation Guide
Stack your mini burgers on wooden skewers for a fun presentation and to keep them secure, especially if serving at a party or gathering.
Garnish with bright greens like arugula for a pop of color and a slight peppery taste, enhancing both the look and flavor profile of your dish.
Include classic accompaniments such as a light coleslaw or potato salad to complement the flavors of the burgers without overwhelming them.
Consider serving mini burger sliders on a wooden board for a rustic aesthetic, making the presentation as inviting as the food itself.
Serve at a slightly warmer temperature than room temperature for optimal taste, but avoid serving too hot, which could mask the intricate flavors.
Control portions by considering two mini burgers per person, ensuring that both the presentation and the meal are balanced and satisfying.
Wine and Beverage Pairing
Pair these mini burgers with a light red wine such as a Pinot Noir, which beautifully complements the beef while not overpowering the delicate zucchini flavor.
For non-alcoholic options, a spritzer made with cucumber and mint offers a refreshing palate cleanser which matches the dish’s fresh components.
For those who enjoy tea, a mild green tea can provide an earthy complement to the savory elements, maintaining the meal’s overall balance.
Serve all beverages slightly chilled to enhance their refreshing properties, particularly if you pair these with the summer-leaning qualities of the dish.
Consider a variety of drink options when hosting, allowing guests to choose a pairing that best suits their palate and enhances their dining experience.
Storage and Shelf Life
Store leftover patties in an airtight container in the fridge for up to three days. This helps maintain freshness and quality while enjoying leftover delights.
Ensure the burgers are fully cooled before refrigerating to reduce condensation from breaking down texture and flavor.
Consider storing pre-cooked patties with parchment paper between each one to avoid sticking, maintaining their shape and integrity.
Signs of spoilage include an off smell or change in texture. Always prioritize freshness and quality, especially when storing leftovers.
Reheat leftover burgers on a stovetop or in a conventional oven for the best flavor and texture. Avoid microwaving, which can over-chew the texture.
If you plan to freeze patties, pre-portion them and wrap in plastic wrap, then in foil, to ensure they remain delicious for up to three months.
Make Ahead Strategies
Prepare the beef and zucchini mixture a day in advance and store it in the refrigerator. This allows flavors to develop, improving the overall taste once cooked.
Divide storage between steps by forming and cooking the patties ahead of time. This ensures maximum convenience without losing freshness at serving time.
Assess the quality impact of refrigerating versus freezing, opting for refrigeration when possible for the best texture and flavor.
When reheating, consider adding freshly cut herbs or a slice of cheese to add vibrancy and enhance freshness for every meal.
Incorporate fresh elements like new toppings or garnishes during assembly, ensuring each burger feels thoughtfully made even if prepped in advance.
Scaling Instructions
Halve the recipe by reducing all ingredients proportionally, maintaining balance and taste while catering to a smaller crowd.
For larger gatherings, double or triple ingredients for this flexible recipe, noting adjusted cooking times for larger batches to ensure even cooking.
Modify equipment choices for scaled recipes, perhaps opting for larger grills or multiple pans to accommodate increased patty volumes.
Timing will need slight adjustment when scaling the recipe, allowing thorough cooking while ensuring each burger remains juicy and succulent.
Ensure storage considerations for larger batches to maintain quality over quantity, using airtight containers and thoughtful preparation and storage techniques.
Nutritional Deep Dive
With a balance of protein and vegetables, these burgers are an excellent choice for a nutritious meal, combining essential macronutrients and fiber.
Loaded with vitamins from zucchini and protein from beef, this recipe offers a balanced, nutrient-rich meal perfect for all lifestyles.
With careful ingredients like lean beef and added vegetables, this dish supports dietary needs while maintaining flavor and appeal.
Understanding portion sizes is crucial for weight management, with one serving balancing protein, carbs, and fats appropriately.
Capitalize on the flavor-packed nature of the dish as a delicious way to meet nutritional goals without sacrificing satisfaction and enjoyment.
Dietary Adaptations
Adjust the recipe for gluten-free diets by using gluten-free breadcrumbs, ensuring inclusivity without altering flavor or texture.
For a dairy-free adaptation, simply use a dairy-free cheese alternative or omit cheese toppings to accommodate dietary preferences.
Transform this recipe into a vegan option by swapping beef for a plant-based protein such as lentils or chickpeas, still achieving a satisfying bite.
To cater to low-carb diets, omit the buns and serve the patties on large lettuce leaves, maintaining the burger experience without excess carbs.
Adapting this recipe for a keto lifestyle is simple with the omission of buns, focusing on patty quality and additional healthy fats for a delicious main course.
Troubleshooting Guide
If your burger texture is off, ensure grated zucchini is well-squeezed to remove excess liquid, crucial for maintaining patty integrity.
For issues with flavor balance, adjust seasoning slightly by incrementally adding salt and pepper while mixing the patty for a refined taste.
If temperature consistency is problematic, use a meat thermometer to ensure the interior of the burger reaches the appropriate temperature.
Address equipment challenges with carefully chosen pans and tools, emphasizing non-stick or grill options to ensure even cooking and an easy process.
Ingredient substitutions can lead to varied results; ensure compatible replacements, such as appropriate vegetable protein for beef.
Use controlled timing for consistent results, ensuring burgers rest after cooking, locking in moisture and achieving optimal taste and texture.
Recipe Success Stories
Our community has raved about these Mini Zucchini and Beef Burgers, constantly sharing how they became a staple in their home cook repertoire.
Read about creative twists on the recipe, with variations like herb-infused patties and global adaptation attempts enhancing the enjoyment for all.
Adaptation stories reveal how simple substitutions, like vegan adaptations, allow more people to enjoy the burger’s exquisite flavors.
Discover compelling reader suggestions showcasing unique tips and strategies for elevating the dish further, enjoying every bite anew.
Explore photography tips from talented individuals highlighting how they visually capture the dish’s color and enticing appeal through their lenses.
Frequently Asked Questions
Can I make these burgers in advance?
Yes, you can prepare the patties ahead of time, cooking them later. Store in an airtight container in the refrigerator to maintain freshness.
What can I use instead of zucchini?
You can substitute zucchini with grated carrots or even finely chopped spinach for a different but equally delicious experience.
Can I freeze these burgers?
Absolutely! Freeze uncooked or cooked patties by wrapping them in plastic wrap, then foil, for freshness that lasts up to three months.
How do I prevent the burgers from falling apart?
Ensure extra moisture is squeezed from the zucchini, ensuring a firm mix. Also, form compact patties to maintain shape during cooking.
What spices complement this recipe?
Experiment with garlic powder, smoked paprika, or a sprinkle of red pepper flakes to add depth and an extra burst of flavor.
Can I use turkey instead of beef?
Yes, ground turkey can provide a lean and flavorful alternative, maintaining the deliciousness while offering a slightly lighter bite.
What is the best way to cook these burgers?
While grilling offers a smoky flavor, a non-stick skillet or griddle provides consistent heat distribution for perfectly cooked burgers.
Any advice for a vegan version?
Use lentils or chickpeas instead of beef, adding spices to heighten flavor, ensuring a delightful, plant-based adaptation for everyone to enjoy.
Are these burgers healthy?
With lean beef and nutrient-rich zucchini, these burgers support balanced nutrient intake, making them a delicious and healthy option.
How can I enhance the flavor further?
Try adding toppings like pickles, aioli, or a slice of your favorite cheese to introduce new dimensions and elevate the taste profile.
Additional Resources
Explore related recipes such as traditional beef stew or zucchini fritters, complementing the Mini Zucchini and Beef Burgers for a diverse meal plan.
Learn technique guides through helpful tutorials, showcasing useful kitchen tips like grating, mixing, and grilling for confident cooking results.
Find more ingredient information about zucchini and beef, uncovering the full potential of these versatile components in various recipes.
Equipment recommendations highlight essential tools for the best cooking experience, ensuring optimal results every time you prepare the recipe.
Seasonal variations teach how to adapt recipes for all-year enjoyment while enjoying the freshest produce available each season.
Join the Conversation
Share your experiences by posting your Mini Zucchini and Beef Burgers on social media, engaging with a community that celebrates culinary creativity.
Join the discussion on photography, exchanging tips and ideas for capturing the dish’s various angles and making the images pop with life.
Leave a recipe review to share feedback and suggestions, strengthening the recipe’s credibility and enhancing development through shared stories.
Participate and engage with a network of fellow food enthusiasts, joining conversations that explore variations, ideas, and everyday culinary successes.
Enter our world of mini burger variations, unveiling adaptations and alternatives that take you on a flavorful global journey within your kitchen.
The Recipe
Mini Zucchini and Beef Burgers
Serves: 4
Prep Time: 15 mins
Cook Time: 20 mins
Total Time: 35 mins
Kitchen Equipment Needed
Griddle or non-stick skillet
Box grater
Mixing bowl
Spatula
Ingredients
1 pound lean ground beef
1 medium zucchini, finely grated
2 garlic cloves, minced
1/2 teaspoon salt
1/4 teaspoon black pepper
1 tablespoon olive oil
Slider buns or mini brioche, to serve
Directions
In a large mixing bowl, combine ground beef, grated zucchini, minced garlic, salt, and pepper. Mix until just combined.
Form small patties from the mixture, approximately the size of the slider buns.
Heat olive oil in a griddle or non-stick skillet over medium-high heat.
Cook patties for 3-4 minutes on each side, or until browned and cooked through.
Serve on slider buns or mini brioche with your choice of toppings.
Recipe Notes
For added flavor, consider topping with cheese slices or fresh herbs.
If the mixture is too moist, adjust with breadcrumbs to improve consistency.
Experiment with spices to add variety and additional depth to the patties.