Root Beer Float Pie: The Ultimate No-Bake Dessert Recipe
Root Beer Float Pie: Nostalgic Dessert with a Modern Twist
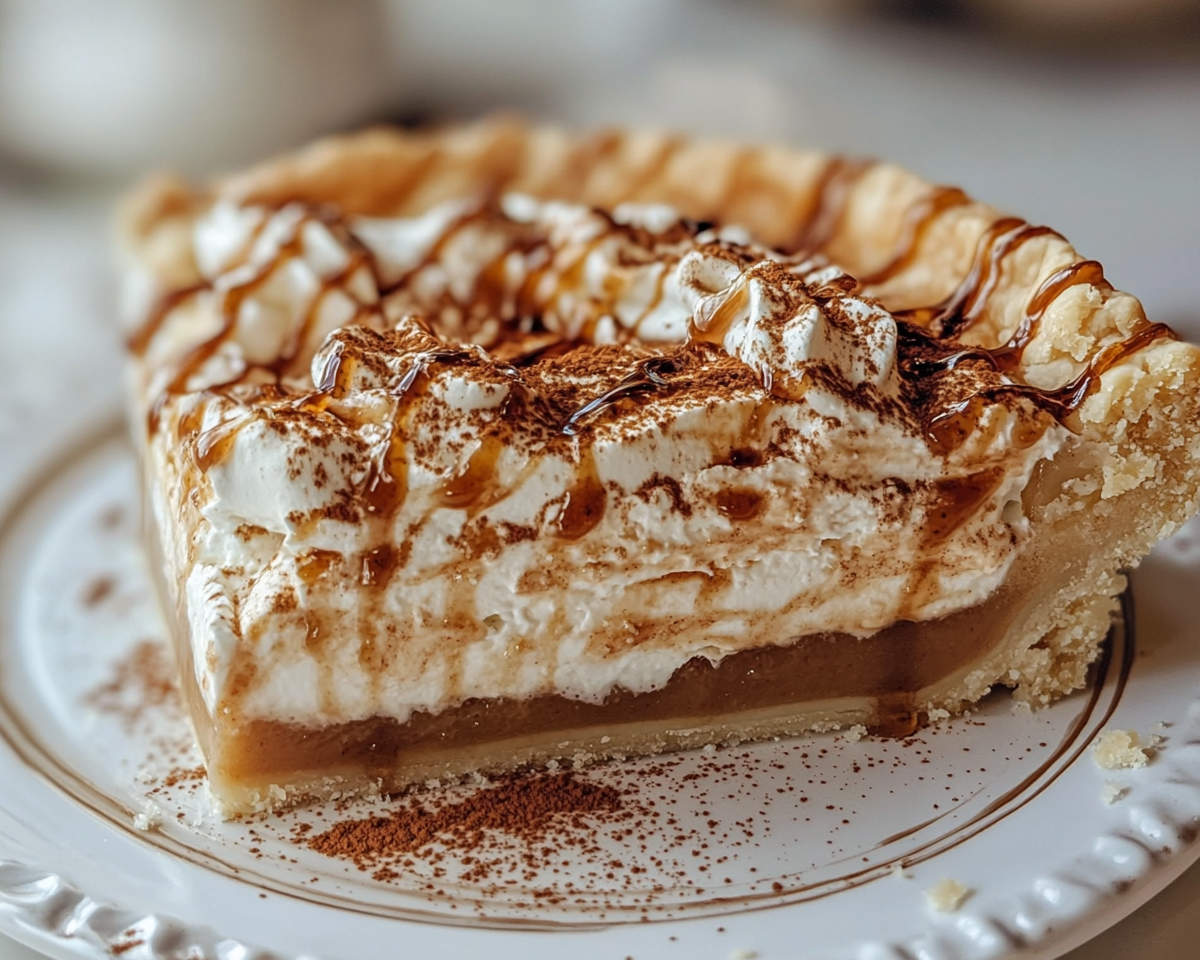
Root Beer Float Pie is the perfect dessert for those looking to combine a taste of nostalgia with a creamy, delightful treat. This no-bake dessert is not only visually appealing but also easy to prepare, making it an ideal choice for family gatherings, summer parties, or just a sweet craving.
The Origins of Root Beer Float Pie
The concept of root beer desserts dates back to the golden age of soda fountains. Root beer, with its distinctive and complex flavor profile, has long been a favorite in American culture. The creation of Root Beer Float Pie combines the creamy richness of a classic root beer float with the convenience of a pie. For more on classic desserts, check out Vintage Dessert Recipes.
Why Root Beer Float Pie Stands Out
This dessert is loved for its:
Ease of Preparation: A no-bake dessert that requires minimal effort and equipment.
Rich Flavors: Combining the iconic taste of root beer with creamy whipped topping.
Versatility: Customizable with various crusts, toppings, and flavor enhancements.
To explore more creative no-bake desserts, visit our collection of Easy No-Bake Recipes.
Ingredients for a Perfect Root Beer Float Pie
Here’s what you need to create this delightful dessert:
Crust:
2 cups graham cracker crumbs or chocolate cookie crumbs
1/3 cup melted butter
2 tbsp granulated sugar
Filling:
1 cup root beer concentrate
1 cup heavy cream
1 packet unflavored gelatin
1/2 cup sugar
2 cups whipped topping
Optional Toppings:
Maraschino cherries
Chocolate shavings
Whipped cream
Step-by-Step Preparation
Make the Crust:
Combine the graham cracker crumbs, melted butter, and sugar.
Press the mixture evenly into a pie pan.
Chill for 30 minutes to set.
Prepare the Filling:
Heat the root beer concentrate and sugar until dissolved.
Dissolve gelatin in warm water, then mix into the root beer base.
Fold in whipped topping until smooth.
Assemble the Pie:
Pour the filling into the crust.
Refrigerate for at least 4 hours or overnight.
Add Toppings:
Garnish with whipped cream, cherries, or any preferred topping.
Refrigeration: Store the pie in an airtight container for up to 5 days.
Freezing: Freeze for up to 2 months; thaw in the refrigerator before serving.
FAQs About Root Beer Float Pie
Q: Can I use actual root beer instead of concentrate?
A: It’s best to use root beer concentrate for a stronger flavor without affecting the filling’s consistency.
Q: Is gelatin necessary?
A: Yes, gelatin helps set the pie. For a vegetarian option, use agar-agar.
Q: What toppings work best for this pie?
A: Whipped cream, cherries, chocolate syrup, or even crushed root beer candies add a delightful touch.
Internal Linking Opportunities
For enhanced navigation and SEO, include these internal links:
Root Beer Float Pie is a celebration of classic flavors reimagined in a creamy, delightful dessert. Its simplicity and versatility make it a must-try for dessert lovers of all ages. Whether for a casual family dinner or a festive occasion, this pie guarantees smiles all around.
Savor Rich Crockpot French Onion Short Rib Soup Recipe
Crockpot French Onion Short Rib Soup: The Ultimate Comfort Dish
⚖️
Difficulty
Medium
⏲️
Prep Time
20 mins
🕒
Cook Time
420 mins
⏱️
Total Time
440 mins
🍽️
Servings
6
Transform your dining experience with our Crockpot French Onion Short Rib Soup, a delectable fusion of savory short ribs and rich, caramelized onions. This recipe is slow-cooked to perfection, creating a deep and luxurious taste that’s both comforting and elegant. Imagine the warmth of French onion soup combined with tender beef that melts in your mouth. It’s a symphony of flavors that will have your family and friends coming back for more.
Our Crockpot French Onion Short Rib Soup is not just a dinner; it’s an experience. The slow-cooked process enhances the natural sweetness of the onions and allows the beef to absorb all the savory nuances of the broth. The result is a hearty soup with a depth of flavor unmatched by quick fixes. Perfect for chilly evenings or when you need some culinary comfort, this dish is as soothing as it is satisfying.
The magic of our Crockpot French Onion Short Rib Soup lies in its ingredients and the time they spend fusing together in a slow cooker. As the soup simmers, it fills your home with a delightful aroma that promises the rich taste to come. With every bite, you’ll savor the harmonious blend of caramelized onions, tender beef, and subtle herbs, creating a dish that’s as fulfilling to make as it is to eat.
Quick Recipe Highlights
Flavor Profile: The soup boasts a rich, savory base with sweet undertones from the caramelized onions and a beefy depth from the short ribs.
Texture: Tender short rib meat falls apart in the mouth, complemented by soft, golden onions swimming in the velvety broth.
Aroma: Inviting aromas of sweet onions and savory beef waft through the air, making it impossible to resist.
Visual Appeal: A stunning dish of deep browns and golden hues, topped with a sprinkle of fresh herbs adding a touch of vibrancy.
Skill Level Needed: Moderate cooking skills required to properly caramelize onions and manage slow-cooking techniques.
Special Equipment: A dependable crockpot is essential to gently cook the ingredients to perfection over several hours.
Recipe Overview
Difficulty Level: The recipe demands patience more than expertise, with proper sautéing and layering techniques necessary for optimal results.
Category: This dish is perfect as both a hearty main course and a warming soup, ideal for lunch or dinner.
Cuisine: Deeply rooted in the classic tradition of French cooking, influenced by heartland comfort foods.
Cost: Economical, with the key expenses being high-quality beef and fresh produce, making it affordable for family meals.
Season: Best enjoyed in fall or winter when warm, comforting dishes are most appreciated.
Occasion: Ideal for family gatherings, cozy dinners, and special occasions where you want to impress without fuss.
Why You’ll Love This Recipe
Indulge in the delightful taste and texture of our Crockpot French Onion Short Rib Soup. The slow-cooked process ensures tender beef and perfectly caramelized onions, creating a mouthwatering flavor that’s simply irresistible. This soup is the ultimate comfort food, ideal for those chilly nights when you crave something rich and warming.
Convenience is key with this recipe. Let your crockpot do the hard work as the soup simmers away, allowing you to go about your day. By the time you’re ready for dinner, a comforting homemade meal awaits with minimal ongoing supervision required during cooking.
Beyond taste, this soup also offers nutritional benefits. Short ribs provide a good source of protein, while onions add fiber and essential vitamins. It’s a balanced dish that can contribute positively to your well-being while also indulging your taste buds.
There’s always something magical about serving up something special to those you love. This soup is a great conversation starter and entertaining piece, with its aromatic, inviting scent filling the room and setting the mood for good times and shared moments.
Cost-effectiveness and accessibility are highlights of this recipe. Using basic ingredients that can be easily found year-round, you can treat yourself and your loved ones to a restaurant-worthy meal without breaking the bank. Perfect for budget-conscious cooks seeking great-tasting dishes.
Historical Background and Cultural Significance
The origins of French onion soup date back centuries, initially as a humble peasant dish made with onions—a staple in many kitchens—and stale bread. The evolution of this classic into gourmet status is a testament to the transformative power of simple ingredients and cooking techniques.
French onion soup holds a cherished place not only in French cuisine but globally, celebrated for its rich, harmonious flavors. Its development over the years has seen variations that adapt to regional tastes while staying true to its roots—balancing savory broth with the sweetness of caramelized onions.
Over the years, ingredients have evolved along with cooking preferences and availability, leading to numerous versions and adaptations of the soup. From broths that boggle the senses to cheeses that adorn its crust, each iteration celebrates local nuances while honoring the dish’s heritage.
Regional variations abound, with distinct iterations featuring diverse cheeses, bread toppings, and even additional proteins or spices. Each variation brings something unique, yet all share a common love for this heartwarming dish that transcends borders and centuries.
Ingredient Deep Dive
Short ribs serve as the star component, imparting a rich flavor and hearty texture. Traditionally, beef short ribs are favored for their marbling and flavor profile, making them an ideal choice for slow-cooking applications. In terms of selection, look for ribs with a good balance of meat and fat.
Onions, particularly sweet yellow ones, are crucial in achieving the deep flavor that defines this dish. Caramelization brings out the onions’ natural sugars, providing a sweet balance to the robust beef broth. Fresh, firm onions are best for optimal flavor and texture.
Caramelizing onions is a process that requires patience. The key is to cut them uniformly, use a moderate heat setting, and stir consistently to prevent burning. The resulting golden-brown onions provide the foundational sweetness and depth for which the soup is renowned.
Beef broth serves as the base, enhancing the earthy notes of the soup. Quality matters here, so selecting a broth with no added sodium allows you to control the saltiness of the final dish. Alternatively, homemade broth tends to impart an unmatched depth of flavor.
Herbs such as thyme and bay leaves bring aromatic undertones and layers of subtle complexity to the dish. Their inclusion elevates the soup beyond mere comfort food to a gourmet dining experience, with herbs providing a fresh counterpoint to the richness of the broth.
Common Mistakes to Avoid
Rushing the caramelization process can lead to burnt onions instead of sweet, golden perfection. Patience is key to achieving the desired flavor.
Overcrowding your crockpot can result in uneven cooking. Ensure there’s ample room for the ingredients to mingle and cook uniformly.
Choosing the wrong cut of beef can alter the texture and flavor. Prioritize short ribs with a good balance of fat for the best result.
Underseasoning in the beginning can lead to a bland soup, so taste and adjust seasoning with each layer.
Not allowing the soup to simmer long enough might hinder flavor development, so be patient for full taste potential.
Skipping the searing process robs the ribs of a deep, caramelized outer layer, impacting the overall depth of the soup’s flavor.
Settling for low-quality broth compromises the base flavor. Always seek high-quality or homemade broth for the richest experience.
Overlooking excess fat removal will make the soup oily. Skim regularly for a balanced dish.
Forgetting to deglaze the pan after searing means lost flavors. Always use a splash of vinegar or wine to capture and incorporate those flavors into the broth.
Disregarding the importance of finishing garnishes limits visual appeal. Fresh herbs or a well-chosen cheese can elevate the final presentation.
Essential Techniques
The art of caramelizing onions is crucial for this recipe. It involves slow-cooking onions on low heat, allowing them to brown and release their sugars while developing a deep, rich flavor—key to the soup’s signature taste.
Searing the short ribs is another fundamental technique, providing the meat with an initial browning that locks in juices and imparts a pronounced, savory flavor. This step enriches the broth, maximizing the dish’s taste.
Layered seasoning ensures each component infuses the soup with flavor. Start with the beef and continue seasoning every layer of ingredients added to the crockpot. This incremental approach builds depth without overwhelming the senses.
Time plays a crucial role in the transformation of both ingredients and flavors in this dish. Allow ample time for the crockpot to work its magic, gently melding each element together for a robust, cohesive flavor profile.
The finishing touch comes in the form of garnishes. Whether cheese, herbs or simply some toasted bread, the choice of topping adds texture, flavor, and visual appeal to the final presentation, inviting you to indulge.
Pro Tips for Perfect Crockpot French Onion Short Rib Soup
Invest in high-quality beef short ribs for the best results, as they form the foundation of this dish, imparting rich flavor and meaty texture. Pat them dry before searing for a perfect crust.
Don’t rush the caramelization process of the onions. Stir frequently and be patient, as this will lay the flavor foundation for your entire dish. The better the caramelization, the richer and more developed the taste will be.
Deglaze the pan after searing the short ribs to capture all the flavorful fond left behind. This simple step enhances the overall taste and prevents those precious flavors from being wasted.
Use homemade beef broth if possible. Its depth of flavor is unparalleled and can make a world of difference in a slow-cooked dish. If using store-bought, choose a low-sodium option to control seasoning levels.
Add bay leaves and thyme to the crockpot for an aromatic infusion that’s subtle yet impactful. These herbs complement the rich flavors, bringing hints of freshness and refinement to the robust soup.
For a richer flavor, consider adding a splash of red wine into the crockpot. The acidity helps balance the flavors and adds another layer of complexity to this already delectable dish.
Maintain a consistent check on the pot’s liquid levels, especially if left unattended for long periods. Add more broth or water as needed to prevent drying out and ensure that everything cooks evenly.
Before serving, remove excess fat that may have surfaced during the slow cooking process with a spoon for a cleaner, more balanced flavor in each bite.
Variations and Adaptations
Regional variations can introduce local cheeses or breads for the topping, offering new flavor profiles while honoring the soul of the dish. Different cultural influences can bring exciting twists to this classic comfort food.
Seasonal adaptations might include the addition of root vegetables like carrots or parsnips during winter months, enriching the soup with a heartier flavor and complementing the short ribs beautifully.
Dietary modifications are also possible, such as substituting the short ribs with tofu for a vegetarian version. Adjust the seasoning to enhance the tofu’s flavor and ensure a satisfying, meat-free meal.
Experiment with flavor variations by incorporating different herbs or spices. A touch of rosemary or a hint of garlic can add an interesting dimension to the traditional flavors.
Texture modifications can be achieved with the addition of legumes or grains like barley, adding a wholesome and fulfilling element that makes the dish even more robust.
For a modern presentation, serve the soup in bowls with crusty, artisan bread on the side, allowing guests to dip and savor the deep flavors in a contemporary, engaging manner.
Serving and Presentation Guide
Plating techniques can elevate the visual appeal of the soup. Use rustic bowls for a farmhouse touch or simple white porcelain for a more refined presentation that highlights the colors of the dish.
Garnishing ideas include freshly chopped parsley, crumbled toast, or shredded gourmet cheese, each adding a fresh pop of color and extra layer of flavor.
Traditional accompaniments like a chunk of baguette or a simple salad create a lovely balance with the hearty soup, adding contrast and completing the meal.
Modern serving suggestions could involve smaller portions served as an appetizer, ideally followed by a lighter main course for balance.
Consider serving the soup with a generous scoop of mashed potatoes for a truly hearty meal that warms the heart and satisfies the appetite.
Portion control tips help maximize enjoyment, suggesting serving sizes to accommodate a range of diners without overwhelming the palate or stomach.
Wine and Beverage Pairing
Robust red wines such as a Cabernet Sauvignon or Merlot complement the richness of the soup, with their bold flavors harmonizing beautifully with the short ribs and caramelized onions.
For those seeking non-alcoholic options, rich apple cider or a ginger-infused herbal tea can be delightful, pairing well with the complex flavors and providing a refreshing contrast.
Temperatures are key—red wines should be slightly cooler than room temperature, allowing their flavors to marry perfectly with the warmth of the soup.
Serving suggestions include decanting the wines ahead of time to enhance their aromas and taste, ensuring that each sip is as enjoyable as each bite of the soup.
Strong, dark coffee or rich black teas pair well post-dinner, providing a satisfying end to the meal and complementing its hearty notes.
Storage and Shelf Life
To preserve the freshness of leftovers, allow the soup to cool before storing it in airtight containers. Ensure it’s kept in the refrigerator if consumed within a few days.
Temperature requirements are crucial; ideally stored at below 40°F (4°C) to prevent the growth of bacteria and maintain the quality of the dish.
Select containers that are BPA-free and have a good seal to avoid contamination and to preserve flavors, extending the shelf life.
Identify spoilage by any sour smells or changes in color, which may indicate the soup has surpassed its viable shelf life and should not be consumed.
If reheating, do so gently over low heat to maintain the integrity of the ingredients and flavors, ensuring the soup’s deliciousness remains intact.
Freezing guidelines suggest portioning the soup and sealing in freezer-safe bags or containers for up to three months. Thaw slowly in the refrigerator overnight before reheating.
Make Ahead Strategies
Create a prep timeline that fits your schedule by chopping onions or other vegetables the night before making the process more seamless and efficient when it’s time to cook.
Store steps separately where possible to preserve freshness, like keeping the chopped onions refrigerated in a covered container until ready for use.
Quality might slightly be impacted when not executed fresh; however, the slow cooking method helps to meld flavors and maintain delicious results, even if prepped hours earlier.
Assembly tips include having its ingredients ready for the crockpot ahead of time to streamline the cooking process and ensure a more straightforward experience.
When reheating, opt for stovetop over microwave whenever possible to evenly distribute heat, bringing out the best flavors of the soup at each serving.
Introduce fresh garnishes just before serving to restore vibrancy and introduce crisp textures and flavors that might have mellowed during cooking.
Scaling Instructions
If halving the recipe, simply divide each ingredient by two, maintaining cook times for consistency as cutting the ingredient amount won’t necessarily reduce the time needed for flavors to fully develop.
For doubling or tripling, ensure the crockpot is large enough to accommodate the increased volume. Overcrowding could affect the cooking process and compromise results.
Some equipment adjustments may be necessary, like using extra-large pots or multiple slow cookers to handle extra servings without risking mishaps or overflow.
Timing modifications should be cautious. Larger quantities naturally need more time to come to temperature. Monitor closely, especially near the end of the cook time.
Consider additional cooling and storage requirements to safely prepare and store larger batches without food safety concerns.
Nutritional Deep Dive
The soup’s macro breakdown consists mainly of proteins from short ribs, followed by fats from rendered meat and, finally, carbohydrates from onions and any potential bread offerings.
Micronutrient analysis highlights key benefits from consuming onions regularly, which can include heart health and dietary fiber—all contributing positively to overall wellness.
Health benefits of this soup are bolstered by its strong nutritional profile, proving that hearty, comforting meals can be both delicious and nutritious.
Dietary considerations should account for content from beef, optional cheese, and bread. If any food allergies or restrictions exist, alternate ingredients can be thoughtfully included.
Portion control remains important, even with something as flavorful as this soulful soup. Aim to balance it with fresh produce or other side elements for a comprehensive dietary offering.
For weight management tips, consider leaner beef options or controlled portions to strike a balance between indulgence and health, making this tempting soup part of a successful dietary routine.
Dietary Adaptations
To make this Crockpot French Onion Short Rib Soup gluten-free, opt for gluten-free bread alternatives if including toast or thickening with flour to ensure the recipe meets specific dietary guidelines.
For a dairy-free version, skip topping the soup with cheese, substituting with a sprinkle of nutritional yeast for a similar savory touch without impacting underscoresheet restrictions.
For a vegan adaptation, exchange short ribs for protein-rich tofu or tempeh, adjusting seasonings to make up for the diminished umami tones provided by earthy beef.
A low-carb version can reduce onions and opt for alternate thickening agents or using low-glycemic vegetables to support subscribed limitations.
A keto-friendly adaptation will carefully measure carbs and fats, selecting ingredients like ghee instead of butter and more meat to compensate for lost calories otherwise.
To meet the paleo criteria, ensure all ingredients align, avoiding grains and selecting grass-fed meat for holistic compatibility.
Low-FODMAP modifications potentially involve considering onion substitutes or serving alternatives more aligned with this digestive-conscious diet may offer relief for some discomforts too.
Additional specific dietary alterations can include accommodating allergies—always ensure replacements match nutrient needs to avoid any detriments.
Troubleshooting Guide
In the event of texture issues like overly soft ingredients, adjust cooking time and test periodically to prevent vegetables and meat from becoming too mushy.
Balance flavors by tasting broth in stages, as over-seasoning is correctable by diluting with water, while under-seasoning may only require additional herbs or condiment accents.
If temperature discrepancies arise, verify crockpot settings and use an external thermometer regularly—not only for cravings but balance safety, too, during meal use.
Equipment challenges might crop up, demanding immediate solutions such as manual stirring or readjustments to the heat/counter timers as needed for process peace.
Ingredient substitutions could lead to unplanned changes or issues when replacements aren’t 1:1—get creative or course-correct with new proportions or spices to boost and balance further.
Timely concerns often lead to panic, making preparation key to ensuring seamless meal readiness. Balance leisure and process all once underway for efficiency over stress.
Recipe Success Stories
Our community has shared numerous success stories risen from the love of perfecting this dish, with some tweaking flavors or playing with new ingredients to bring uniqueness to the table.
From introducing unexpected twists—like fragrant rosemary or wine substitutions—many have embraced adaptability without sacrificing the essence of the traditional recipe.
Community feedback has shared glowing accounts of happy gatherings and memories formed over bowls of this hearty soup, adding warmth to occasions and homes alike.
Adapting recipes furthermore proves paramount, especially within constraints. Culinary experimentation has led to cherished stories, reaching new audiences every time.
Conversations around the soup often circle photography, with beautifully captured dishes now adorning social media feeds’ inspiring other food lovers to capture and celebrate their culinary masterpieces.
Frequently Asked Questions
Q: Can I use a different cut of beef?
A: Yes, cuts like chuck roast or beef shank may be used as alternatives. They provide similar results but may require slight adjustments in cooking time and seasoning.
Q: Is it necessary to caramelize the onions?
A: Caramelizing onions is crucial as it deepens the flavor and balances the savory beef broth. Skipping this step may result in a less flavorful dish.
Q: Can I make this soup in advance?
A: Absolutely! This soup benefits from resting as flavors continue to meld. Reheat gently to rediscover its rich nature when ready to serve.
Q: Can I freeze leftovers?
A: Yes, freezing is a great way to preserve this soup. Portion and store it in freezer-safe containers for up to three months, reheating gently when needed.
Q: Are there low-sodium alternatives for the broth?
A: Opt for low-sodium or homemade broths for better control over salt levels. When commercial options are preferable, make sure to dilute if flavors prove overpowering.
Q: What can I substitute for the beef broth?
A: Try vegetable or mushroom broth as suitable alternatives. They offer rich, umami profiles perfect for enhancing the soup, keeping any vegetarians in mind.
Q: Can I add vegetables to the recipe?
A: Certainly! Root vegetables like carrots or parsnips add texture and sweetness, enriching the soup without overshadowing its key flavors.
Q: What cheeses work best for topping?
A: Gruyère or Swiss are classical choices, melding beautifully when toasted. However, experiment with flavors to find harmonious adaptions suitable for your palate.
Q: How long can leftovers be stored?
A: Left in proper refrigeration, it’s possible to safely keep leftovers for about 3 to 4 days. Plan accordingly to savor every bit of this delectable soup.
Q: Can wine be incorporated into the recipe?
A: Yes! A splash of dry red wine elevates flavors, adding complexity and depth. Ensure it’s thoroughly blended to prevent overpowering the delicate soup balance.
Additional Resources
Dive deeper into related recipes that extend the soup’s influence by exploring other timeless classics, ensuring culinary experiences remain diverse and engaging.
Technique guides offer insights into perfecting foundational skills that enhance each dish, making replicating great meals easier and consistently memorable.
Ingredient information is valuable and fosters understanding of flavor profiles and compatibility, helping you become adept at creating stand-out flavor variations.
Equipment recommendations list essential kitchen tools that elevate cooking mastery and support experimentation, allowing culinary creativity to bloom safely and effectively.
Seasonal variations impart knowledge on how to adapt recipes year-round, encouraging continued enthusiasm for dishes while accommodating fresh, in-season produce.
Join the Conversation
Engage on social media by sharing your experience with this recipe, whether how joyous aromas have captivated senses or how adept garnishes transformed appearance and intrigue.
Photography tips guide readers through presenting dishes gorgeously, drawing inspiration from seasoned photographers to document and showcase delectable artistry through images.
In-depth recipe reviews provide additional perspectives in written or spoken form, granting insight into firsthand experiences, ideas for personalization, and sincere enjoyment shared.
Community engagement is encouraged by submitting variation suggestions and adaptation stories, allowing for dynamic recipes that hold collective input and ingenuity as inherent assets.
Endless exploration fosters inspiration, broadening horizons for new culinary pursuits that hold a cherished connection through engagement, exploration, and vibrant collaboration throughout.
The Recipe
Crockpot French Onion Short Rib Soup
Serves: 6
Prep Time: 20 mins
Cook Time: 420 mins
Total Time: 440 mins
Kitchen Equipment Needed
Crockpot or slow cooker
Large skillet
Knife
Cutting board
Tongs
Wooden spoon
Measuring spoons
Ingredients
2 pounds beef short ribs
4 large yellow onions, thinly sliced
4 cups beef broth
2 tablespoons olive oil
2 teaspoons salt
1 teaspoon black pepper
3 cloves garlic, minced
2 bay leaves
1 teaspoon thyme
Optional: 1/2 cup red wine
Optional: Fresh parsley for garnish
Optional: Gruyère cheese for topping
Optional: Bread for serving
Directions
Season the short ribs with salt and pepper, then sear in a large skillet over medium-high heat until browned on all sides. Transfer to the crockpot.
In the same skillet, add olive oil and onions. Sauté over medium heat until onions caramelize and turn golden brown.
Add minced garlic to the onions and cook for an additional minute.
Deglaze the skillet with red wine, if using, scraping up any browned bits from the pan for extra flavor.
Transfer the caramelized onions into the crockpot with the short ribs. Add beef broth, bay leaves, and thyme.
Cover and cook on low for 6-8 hours, until the beef is tender and shreds easily.
Before serving, remove bay leaves and skim any excess fat from the surface.
Optionally, garnish with fresh parsley and serve with crusty bread and Gruyère cheese for a delectable finish.
Recipe Notes
For a richer sauce, increase the amount of beef broth or add a spoon of beef bouillon paste.
Adjust seasoning to taste, considering additional herbs or spices to suit personal preference.
For extra crunch, top servings with croutons directly before enjoying.
Feel free to substitute your preferred cheese if Gruyère is unavailable or undesirable.
Irresistible Easy Cheesy Thumbprint Appetizers for Your Next Party
Easy Cheesy Thumbprint Appetizers: Perfect Party Bites
⚖️
Difficulty
Easy
⏲️
Prep Time
15 mins
🕒
Cook Time
25 mins
⏱️
Total Time
40 mins
🍽️
Servings
12
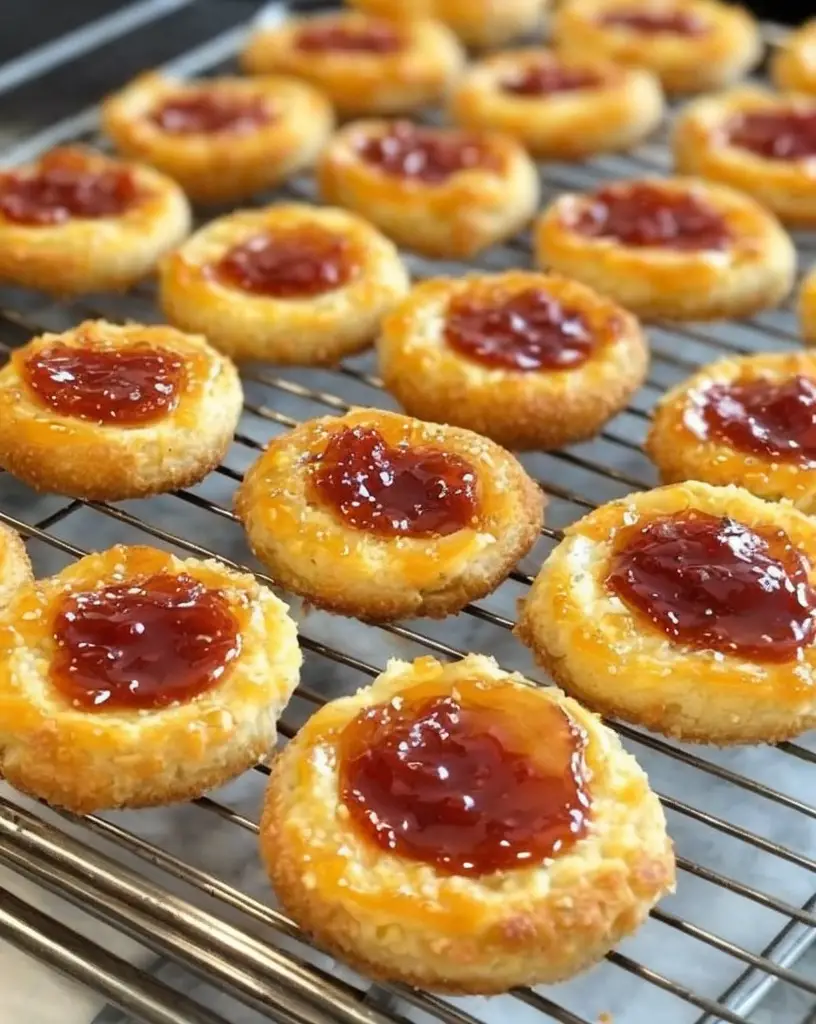
Indulge your guests with flavorful and enticing Easy Cheesy Thumbprint Appetizers that combine creamy cheese with a delightful crunch. Perfect for festive gatherings, this recipe brings warmth and joy to every bite. Taste the melted cheese infused with aromatic herbs and spices, creating a symphony of flavors that dance on your palate. These appetizers are not only delicious but also visually stunning, making them a perfect centerpiece for any party table.
The Easy Cheesy Thumbprint Appetizers recipe is a delightful experience, offering a rich combination of crispy exterior and gooey, savory filling. The buttery texture complements the hint of spice, ensuring each bite is more satisfying than the last. With a captivating aroma that fills the room, these appetizers will surely attract both hungry eyes and eager noses.
Quick Recipe Highlights
Flavor Profile: A harmonious blend of tangy cheese and savory herbs, topped with a hint of spice to elevate the overall taste.
Texture: The contrasting textures of a crisp outer layer and a creamy center create a delightful mouthfeel.
Aroma: The combination of melted cheese and fresh herbs produces an irresistible, savory fragrance.
Visual Appeal: These golden bites are not only delicious but also eye-catching, perfect for enhancing the look of your food spread.
Skill Level Needed: Designed for cooks who appreciate easy yet satisfying recipes, requiring basic kitchen skills.
Special Equipment: All you need is a baking sheet and a mixing bowl to bring these cheesy wonders to life.
Recipe Overview
Difficulty Level: This recipe is perfect for beginners, as the steps are straightforward and the ingredients are easy to handle.
Category: Ideal as an appetizer or snack, these bites fit well into any casual or festive occasion.
Cuisine: Although rooted in Western cuisine, the cheese and herb combination allows room for creative, global adaptations.
Cost: With accessible ingredients, this dish is budget-friendly, yet tastes gourmet.
Season: Best enjoyed year-round, but they truly shine during holiday gatherings due to their comforting attributes.
Occasion: Suitable for parties, game nights, or whenever you crave an easy-to-prepare treat.
Why You’ll Love This Recipe
Experience a world of flavor and texture with the Easy Cheesy Thumbprint Appetizers. They are savory, with a crumbly base and creamy cheese filling that soothes and satisfies. The balance of flavors makes this appetizer ideal for those who appreciate depth in taste without an overpowering intensity. Their small, manageable size ensures they’re perfect for munching while mingling.
Convenience is at the heart of this recipe. With minimal preparation and quick cooking time, it’s a lifesaver for anyone looking to impress without spending hours in the kitchen. Plus, most of the ingredients are pantry staples, making this recipe a go-to for spontaneous gatherings or unexpected guests.
These appetizers aren’t just easy to make; they’re also nutritionally rich, thanks to ingredients like cheese providing calcium and other nutrients. This is a snack that can fit into many dietary preferences when handled thoughtfully.
When it comes to social events, Easy Cheesy Thumbprint Appetizers provide both a conversation starter and a satisfying treat. People love to gather around food that’s prepared with love, and these appetizers are sure to enhance the mood of any gathering, making them memorable.
Cost-effectiveness is a notable advantage. Despite their gourmet taste, the appetizers require simple, inexpensive ingredients, allowing you to maintain a party budget without sacrificing quality. They’re proof that great taste doesn’t have to come with a hefty price tag.
Historical Background and Cultural Significance
The concept of thumbprint cookies finds its roots in Swedish traditions, initially known as “Hulkor” or “thumbprints.” This concept evolved over time, with sweet versions becoming popular globally. The savory adaptation of the thumbprint idea taps into this rich history, combining culinary techniques from different cultures.
In many Western culinary traditions, cheese has always been a central ingredient. The Easy Cheesy Thumbprint Appetizers capitalize on this, reflecting the universal love for cheese while blending it with contemporary flavors and techniques. This evolution showcases the influence of global tastes on traditional recipes.
As appetizers claim their rightful place at the heart of gatherings, these thumbprint bites have found their niche. They represent the fusion of convenience and exquisite taste that modern cuisine demands. The recipe’s evolution continues as more people customize it with local flavors, highlighting its adaptability.
Regional variations abound, with different herbs and spices being used for diverse culinary interpretations. This recipe encourages culinary creativity, inviting cooks to contribute to its growing history by incorporating local ingredients and flavors.
Ingredient Deep Dive
Cheese is the central ingredient in this recipe. It not only enhances flavor but also provides a creamy texture that contrasts beautifully with crispy, baked dough. Cheese’s cultural significance spans continents, with its presence in meals symbolizing prosperity and comfort. Nutritionally, it’s packed with calcium, vitamins, and protein, making it a beneficial addition to any dish.
Selecting the right cheese can make or break this recipe. Opt for a semi-hard cheese that melts well but retains some form and texture. Storage is crucial – keep cheese wrapped in parchment or wax paper and refrigerate to maintain its freshness. For an extra twist, try blending cheeses or even substituting with special alternatives for dietary needs or preferences.
Herbs are equally important in providing aroma and enhancing flavor. Fresh herbs tend to deliver superior taste, but dried herbs can be used when fresh is unavailable. The choice of herbs reflects personal taste and culinary tradition, with parsley and chives being popular options for their bright, peppery notes.
When storing herbs, a wet paper towel in a sealed bag within the fridge helps maintain their freshness. In terms of substitutions, dried can substitute fresh, but remember to adjust quantities accordingly as dried herbs are more potent.
Common Mistakes to Avoid
Avoid using too much cheese, as it can cause the appetizers to lose shape and become too oily during baking.
Don’t overbake, as these appetizers can quickly turn from perfectly golden to burnt due to the cheese’s fat content.
Refrain from using pre-grated cheese, which often contains additives that can affect melting.
Ensure even spacing on the baking sheet to allow for proper air circulation and even baking.
Resist the temptation to overcrowd the thumbprint with too much filling, which can cause it to spill over.
Use baking paper or a silicone mat to prevent sticking and ensure easy removal from the baking sheet.
Monitor the oven temperature, ensuring it is consistent, as fluctuations can affect how evenly these appetizers bake.
Avoid under-seasoning; cheese benefits from a balanced hint of salt to accentuate its flavors.
Essential Techniques
Creating the perfect indentation for the thumbprint is crucial to the appetizer’s success. This step requires gently pressing into the dough’s center to form a well that will securely hold the cheese mixture. Proper indenting ensures that the filling stays in place throughout baking, enhancing both appearance and taste.
Mastering the baking time is essential. Pay close attention to visual cues like color change from pale to light golden to avoid overbaking. Timing is everything, as the cheese should melt but not burn, maintaining its creamy consistency. Practice patience, and avoid opening the oven door unnecessarily, as this can disrupt the baking process.
Pro Tips for Perfect Easy Cheesy Thumbprint Appetizers
Rotate the baking sheet halfway through for even baking and consistent color development. Experiment with cheese blends for unique flavor profiles, combining aged cheese with softer types for depth. Use a piping bag for precise filling to avoid overloading each thumbprint.
Chill the dough slightly before creating indentations to enhance handling and prevent sticking. Add a sprinkle of freshly cracked pepper or additional herbs atop the cheese filling before baking for added flavor. Consider using parchment paper to ensure easy handling and perfect release after baking.
Variations and Adaptations
Regional variations might involve incorporating specific spices or herbs native to your area. These appetizers are adaptable to different seasons, with spring versions featuring light herbs and autumn variants including warm spices. For dietary needs, consider gluten-free or keto-friendly doughs, opening more doors for those with specific preferences.
Flavor variations abound with this recipe due to the allowance for different cheeses, herb mixtures, and spices. Each different combination can lead you down a deliciously new path. Additionally, texture changes, such as incorporating different types of nuts for added crunch, are a creative option. Presentation, too, can vary—think creatively about shapes, colors, and plating techniques that catch the eye.
Serving and Presentation Guide
For plating, consider a contrasting background like a dark slate plate to make the golden thumbprints pop. Garnishing options include a light sprinkle of chopped herbs or a small slice of sweet pepper for a dash of color. While traditional accompaniments may suggest wine, consider pairing these appetizers with a refreshing herbal iced tea for a modern take.
Temperature matters; serve these appetizers slightly warm to allow the cheese to retain its delicious, melty consistency. Be mindful of portion control, suggesting four to six pieces per guest to ensure no one is left wanting and that everyone has a chance to savor them.
Wine and Beverage Pairing
Pair these appetizers with a crisp, chilled Chardonnay or a bold, fruity red wine for a delightful taste balance. For non-alcoholic alternatives, a sparkling cucumber mocktail provides a refreshing contrast to the rich, cheesy bites, complementing the flavors without overpowering them.
For wine pairings, serve them well-chilled or at room temperature, depending on the variety, to enhance both the sip and bite experience. Consider offering a choice between red and white to accommodate diverse tastes and preferences.
Storage and Shelf Life
Store leftovers in an airtight container in the refrigerator to maintain their crispness. To reheat, use an oven or toaster oven set to a low temperature to preserve the cheese’s texture while avoiding sogginess. Signs of spoilage include off odors or changes in cheese color and texture.
These appetizers can also be frozen, allowing for storage in advance or saving leftovers for later. Place them in a single layer on a baking sheet before transferring to a storage container to prevent sticking. Thaw in the refrigerator before reheating for optimal texture and taste.
Make Ahead Strategies
Prepare the dough and the filling separately, allowing for easy assembly when needed. Storing these components in the refrigerator can retain freshness and make the final assembly step quicker. Once filled, pop them into the oven for freshly baked flavor without the rush of last-minute preparation.
Consider assembling the thumbprints just before guests arrive, baking them off when needed for ultimate freshness. The flavors are more intense when the appetizers are served fresh and hot. Keep chilled fillings refrigerated right up until baking time to ensure a safe and tasty appetizer.
Scaling Instructions
For a smaller gathering, halve the recipe. Pay attention to ingredient measurements and baking times to avoid under- or over-baking. Doubling or tripling is perfect for larger parties—ensure you have sufficient kitchen space and baking sheets to accommodate batches without crowding the oven.
Adjust oven times slightly when handling much larger batches, as ovens can require more time to reach the optimal bake when filled. Remember to rotate trays for even baking throughout the party, ensuring a steady stream of perfectly baked appetizers for your guests.
Nutritional Deep Dive
Cheese contributes significantly to the macro breakdown, adding proteins and fats, with options to reduce fat by choosing lighter cheeses. Vitamins like calcium and Vitamin A are present, counterbalanced by the carbs from the dough. For health benefits, remember the importance of cheese’s protein and the herbs’ antioxidants.
Consider portion sizes to manage dietary intake and manage any restrictions accordingly. While the dish can fit into moderate calorie budgets, adjustments can be considered for particular dietary needs by opting for low-fat cheeses or alternative dough bases.
Dietary Adaptations
For gluten-free alterations, substitute the dough with your favorite gluten-free alternative, ensuring no sacrifice in texture. Dairy-free options involve using plant-based cheeses, finding a balance that still offers a creamy center. The vegan avenue includes both the aforementioned dough and cheese adjustments, alongside egg substitutes if needed.
Low-carb enthusiasts can adjust traditional dough recipes with almond flour or equivalent low-carb options to retain similarly satisfying bites. Paleo and keto presents the opportunity to utilize natural, whole-food-based cheeses and nut flours while keeping the essence of the dish intact.
Troubleshooting Guide
For a dry texture, ensure you’re using high-quality cheese and maintain moisture balance with the dough. Over-creaming cheese or herbs can dilute the flavor; don’t overpower the thumbprints with excessive seasoning. Proper temperature management is crucial—use an oven thermometer for accuracy.
If ingredients substitute but flavor or consistency is compromised, balance flavors with a dash of lemon or vinegar to maintain brightness. Timing concerns—like misaligned bake durations, can be countered by arranging smaller batches. Test a few ahead of others for refinement.
Recipe Success Stories
Feedback has highlighted how this recipe thrives, championing reader adjustments to cheese types, from spicy Pepper Jack to smoky Gouda. The growing community loves sharing photos on social platforms, showcasing their unique variations. Recent suggestions involved introducing ingredients like sundried tomatoes for an elevated twist.
Photography tips from the community recommend capturing the gooey cheese pull for maximum tantalization. Engaging interaction and reader successes continue to evolve the recipe’s impact far beyond its original creation.
Frequently Asked Questions
Can I make these appetizers ahead of time?
Yes, you can prepare both the dough and the filling in advance. Store them in the fridge separately and assemble just before baking for optimal freshness.
What types of cheese work best?
Choose semi-hard cheeses like cheddar or gouda for melting qualities, or experiment with different flavors to match your personal taste.
Are there vegetarian versions?
The dish is naturally vegetarian. All cheeses can be replaced with vegetarian alternatives that mimic the melting qualities of the original to fit dietary needs.
What if I don’t have fresh herbs?
Dried herbs work well, just use about one-third the quantity to avoid overpowering the flavors due to their concentrated nature.
Is there a way to add more crunch?
Consider adding crispy bacon bits or small nuts within the filling for a crunchy texture that complements the creamy cheese.
How can I prevent soggy bottoms?
Ensure your baking sheet isn’t overcrowded, allowing heat to circulate properly for a uniformly crispy bake on all sides.
What’s the secret to perfect consistency?
Maintaining a proper balance of dough to cheese is key; ensure fillings don’t overflow by pressing a precise thumbprint well.
What do I pair these with at parties?
Pair them with a selection of wines, a vibrant salad, or light soup to complement their rich flavors without clashing.
Can I freeze these appetizers?
Yes, freeze them in a single layer before transferring to a storage container, then defrost completely before reheating to maintain texture.
Do different cheeses affect bake time?
Some cheeses melt faster, so monitor the first batch closely, making time adjustments based on your ingredient choice.
Additional Resources
Explore other cheese appetizers such as Gouda and Green Onion Puffs or Mozzarella Stuffed Red Peppers. Uncover a realm of other thumbprint variations, from sweet noblesse to savory renditions like Olive and Sundried Tomato prints. Technique guides can assist with understanding the perfect indentation, and equipment tips offer the best bake-ware selections for optimizing the recipe’s success.
Join the Conversation
Share your personal takes, substitutions, and successes on social media with #CheesyThumbprintAppetizers. Engage with other readers’ innovations, from successful variations that form unique spins to tips on improvising with local ingredients. Support the continual growth of this recipe with feedback and creative twists, contributing to a communal cookbook of beloved party creations. Join in the social media fun, and snap your perfect appetizer photos for all to enjoy!
The Recipe
Easy Cheesy Thumbprint Appetizers
Serves: 12
Prep Time: 15 mins
Cook Time: 25 mins
Total Time: 40 mins
Kitchen Equipment Needed
Baking sheet
Mixing bowl
Measuring cups
Silicone mat or baking paper
Ingredients
1 cup all-purpose flour
½ cup unsalted butter, softened
1 cup shredded cheddar cheese
1 tablespoon fresh parsley, chopped
½ teaspoon salt
¼ teaspoon paprika
1 egg yolk
Directions
Preheat the oven to 350°F (175°C). Line a baking sheet with silicone mat or baking paper.
In a mixing bowl, cream together butter and egg yolk until smooth. Gradually add flour, paprika, and salt, mixing until a dough forms.
Fold in the cheddar cheese and parsley until evenly distributed.
Scoop tablespoon-sized amounts of dough onto the prepared baking sheet, spacing them evenly apart.
Use your thumb or a spoon to press an indentation into each piece of dough.
Bake for 20-25 minutes or until golden brown. Allow to cool slightly on the baking sheet.
Recipe Notes
You can experiment with different herbs or spices to personalize your flavor profile.
Serve warm for optimal taste and texture.
Store leftovers in an airtight container in the refrigerator.
Indulge in Luxurious Creamy Garlic Butter Lobster Tails Recipe
Creamy Garlic Butter Lobster Tails: A Luxurious Delight
⚖️
Difficulty
Medium
⏲️
Prep Time
15 mins
🕒
Cook Time
20 mins
⏱️
Total Time
35 mins
🍽️
Servings
2
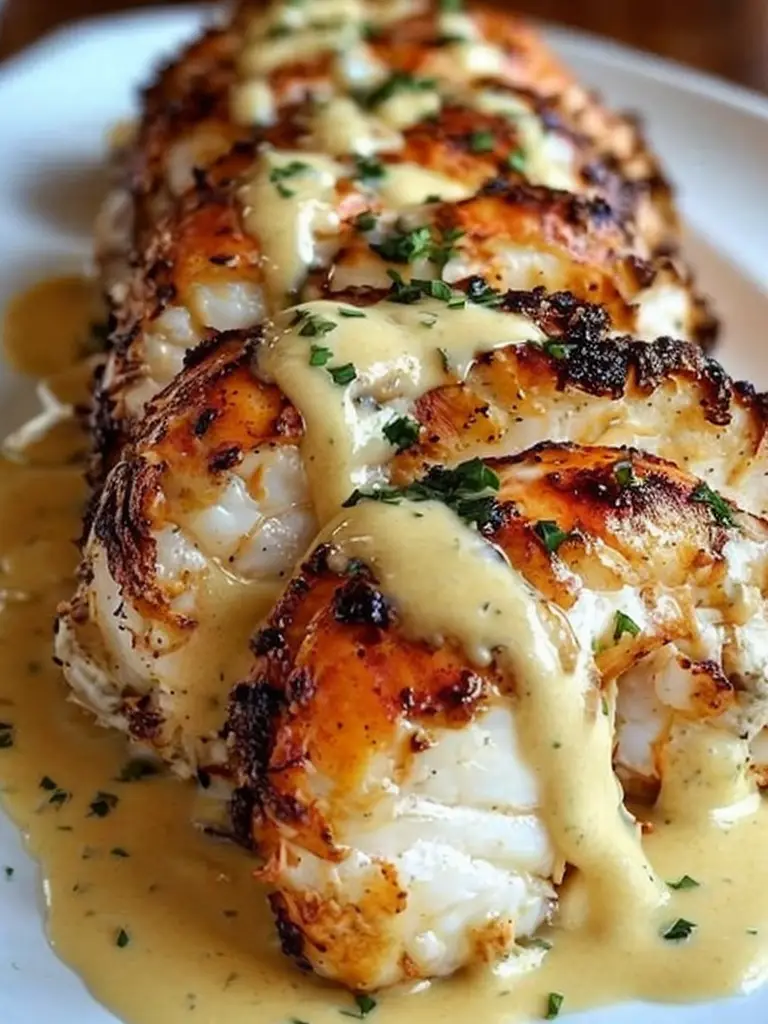
Indulge in the decadent flavors of Creamy Garlic Butter Lobster Tails, an exquisite dish that brings the luxury of a high-end seafood restaurant to your table. This recipe transforms tender lobster tails with a luscious blend of garlic, butter, and cream, capturing the essence of a luxurious coastal cuisine. Perfect for special occasions or an indulgent weeknight treat, these lobster tails promise to delight your taste buds with every buttery, savory bite.
With a perfect balance of creamy richness and subtle garlic notes, this dish is not only flavorful but also visually stunning, making it an ideal centerpiece for gourmet dinners. Embrace the warm aroma of melting butter and sautéed garlic as it fills your kitchen, inviting anticipation for what’s to come. This dish combines classic flavors in a way that feels both familiar and exciting, providing a culinary experience that is both comforting and luxurious.
Quick Recipe Highlights
Flavor Profile: Savory and rich, with buttery and garlicky notes harmonizing with the delicate sweetness of lobster.
Texture: Tender lobster meat with a creamy sauce, offering a melt-in-your-mouth experience.
Aroma: A fragrant blend of garlic and butter, creating an irresistible scent.
Visual Appeal: Vibrant lobster tails nestled in a creamy sauce, garnished with fresh herbs.
Skill Level Needed: Moderate, requiring basic sautéing and baking techniques.
Special Equipment: A heavy skillet and an oven-safe dish are essential.
Recipe Overview
Difficulty Level: Medium; the recipe involves careful timing and temperature control to achieve the perfect creamy sauce consistency without overcooking the lobster.
Category: Ideal for dinner or a special main course that promises to impress.
Cuisine: Inspired by classic French techniques enriched with modern flavors.
Cost: On the higher end due to the main ingredient, but considered affordable luxury for two.
Season: Best enjoyed in late spring and summer when lobsters are at their peak.
Occasion: Perfect for romantic dinners, celebrations, or festive gatherings.
Why You’ll Love This Recipe
The Creamy Garlic Butter Lobster Tails recipe is cherished for its outstanding taste and texture, making it a favorite for those who want to enjoy a restaurant-quality meal at home. The tender lobster, enveloped in a rich, buttery sauce, offers a delightful contrast in each bite. Despite its gourmet nature, the recipe is relatively easy to follow, requiring only a few simple steps to achieve perfection. Nutritionally, the dish provides a high-quality source of protein and healthy fats, offering a satiating meal option without being overly heavy.
Socially, this dish elevates any dining occasion, perfect for creating memorable experiences with loved ones. It doubles as an impressive entrée for dinner parties, garnering praise for both its taste and visual appeal. Economically, while lobster may initially seem like a splurge, this homemade recipe remains more cost-effective than ordering it at a restaurant, allowing you to indulge without breaking the bank.
Historical Background and Cultural Significance
Lobster has long been associated with the coastal regions where it is abundant, originally a staple for local fishermen before gaining popularity among the elite. The transition of lobster from a humble shellfish to a gourmet delicacy is a testament to its versatile nature and rich flavor profile. Over time, lobster dishes have evolved, embracing new culinary techniques and ingredients that highlight its luxurious taste.
Today, lobster tails are celebrated in various culinary traditions, from French-style preparations to New England classics, each offering unique takes on this iconic seafood. The Creamy Garlic Butter Lobster Tails recipe draws inspiration from these cultural influences, blending traditional and modern flavors to create a dish that pays homage to its rich heritage while appealing to contemporary palates.
Ingredient Deep Dive
Lobster Tails: Considered a luxurious seafood choice, lobster tails offer a firm, succulent texture and a sweet, mild flavor that pairs well with rich ingredients. When selecting lobster tails, opt for those that are frozen or fresh with a vibrant color. Store them in the refrigerator until ready to use, or freeze for longer shelf-life. If lobster is not available, large prawns or crayfish may be substituted.
Garlic: This ingredient brings an essential aromatic and slightly pungent flavor to the dish. Fresh garlic is recommended, as it provides a more robust taste compared to pre-minced or powdered forms. To store, keep garlic in a cool, dry place to maintain freshness for longer periods. For those who prefer a milder garlic flavor, shallots can be used as an alternative.
Common Mistakes to Avoid
Overcooking Lobster: This results in a tough, rubbery texture. Monitor the lobster closely and adhere to recommended cooking times.
Using Low-Quality Butter: Choose high-quality butter for the best taste and smooth texture.
Under-seasoning: Ensure the dish is properly seasoned throughout to enhance the flavors.
Not Patting Lobster Dry: Moisture on the lobster can dilute the sauce, so ensure the lobster is well-dried before cooking.
Rushing the Sauce: Allow time for garlic to gently sauté in butter to avoid a bitter taste.
Skipping the Broil: A brief broil adds a golden finish to the dish and should not be overlooked.
Ignoring Temperature: Ensure consistent heat while sautéing and baking to avoid burning the ingredients.
Improperly Minced Garlic: Garlic should be evenly minced to prevent burning and ensure even flavor distribution.
Neglecting Rest Time: Allow the dish to rest post-cooking for flavors to meld.
Wrong Pan Size: Ensure the pan fits all ingredients comfortably to allow proper cooking.
Essential Techniques
Perfecting the sauce: The key to mastering this dish lies in creating a rich, creamy sauce without separation. Start by gently melting butter and sautéing garlic until fragrant, then gradually incorporate cream, stirring continuously to maintain the emulsion. Keep an eye on the heat to ensure the sauce remains smooth and luscious.
Broiling for finish: Broiling the lobster tails briefly enhances their color and texture, providing a visually appealing finish. Watch closely to prevent burning, and remove just as the tops turn golden brown. This technique adds depth to the overall presentation and flavor.
Pro Tips for Perfect Creamy Garlic Butter Lobster Tails
– Always start with dry lobster tails to ensure they cook evenly and the sauce adheres properly.
– Use freshly minced garlic for maximum flavor intensity and aroma.
– Allow enough time for the garlic to lightly brown for depth of flavor without becoming bitter.
– Stir the sauce gently and continuously to prevent it from curdling or separating.
– Season the dish in layers, starting with a well-seasoned white wine reduction.
– Garnish with fresh herbs like parsley or chives for added color and aroma.
Variations and Adaptations
Explore regional adaptations by incorporating local spices and herbs. For a Mediterranean twist, add sun-dried tomatoes and basil. If you’re seeking a seasonal flair, experiment with citrus zest during summer months to brighten the dish. Dietary needs can be accommodated by using lactose-free cream or coconut cream for a dairy-free option, while maintaining the essence of the recipe.
Serving and Presentation Guide
For a polished presentation, serve the lobster tails on warmed plates, surrounded by the creamy garlic butter sauce. Garnish with fresh herbs or microgreens for a touch of color and elegance. Consider plating with a side of roasted vegetables or a light salad to complement the rich flavors. Serve immediately for the best taste and visual appeal.
Wine and Beverage Pairing
Pair these Creamy Garlic Butter Lobster Tails with a chilled glass of Chardonnay or Sauvignon Blanc, which will complement the buttery richness with crisp acidity. If you prefer non-alcoholic options, a zesty lemonade or lime spritz provides a refreshing balance. Ensure all beverages are served cold to enhance the dining experience.
Storage and Shelf Life
Store leftovers in an airtight container in the refrigerator for up to two days. Reheat gently over a low flame to prevent overcooking the lobster or separating the sauce. Freezing is not recommended, as the texture of the lobster and sauce may be compromised. Check for any changes in aroma or appearance before consuming.
Make Ahead Strategies
Prepare the elements separately ahead of time for streamlined cooking. You can sauté the garlic butter mixture and store it refrigerated until ready to use. Pre-cut the lobster tails, ensuring timely cooking when guests arrive. This approach maintains the quality while reducing on-the-spot preparation.
Scaling Instructions
The recipe is easily halved for an intimate setting or doubled for a larger gathering. Adjust cooking times slightly when increasing the quantity to ensure even heat distribution. Ensure you have a suitably sized pan to accommodate the extra servings, and maintain consistent quality by adjusting seasonings proportionally.
Nutritional Deep Dive
Lobsters are a high-protein, low-calorie seafood option rich in essential nutrients like omega-3 fatty acids, which support heart health. Paired with the moderate use of cream and butter, the dish offers a balanced yet indulgent meal. It supports muscle repair and offers a savory satisfaction without extreme calorie burden.
Dietary Adaptations
To adapt the recipe for gluten-free diets, ensure all ingredients, including butter and cream, are certified gluten-free. For a dairy-free version, substitute coconut cream and a plant-based butter alternative, keeping the luxurious texture intact without compromising on taste.
Troubleshooting Guide
If you find the sauce separating, it may be due to high heat; lower the temperature and whisk gently to recombine. Bland flavors can be adjusted with a pinch of salt or a splash of lemon juice upon serving. Should the lobster tails appear undercooked, finish under the broiler for a few additional minutes.
Recipe Success Stories
Readers have shared their successes with variations incorporating truffle oil for added decadence or utilizing the dish as a lavish surf-and-turf companion. Many praise it as a go-to for impressing dinner guests, lauding its ease of execution and restaurant-quality finish.
Frequently Asked Questions
Can I use frozen lobster tails? Yes, ensure they are fully thawed before cooking to achieve even texture and flavor.
What can I serve with the lobster? Steamed asparagus, buttered corn or a light salad make excellent sides.
Is there a substitute for cream? Coconut cream or a nut-based cream can substitute for a dairy-free version.
How do I know when the lobster is done? Lobster should be opaque and firm to the touch, you can test with a fork.
Can I prepare this dish in advance? Parts can be made ahead, but it’s best assembled when ready to serve.
Does the recipe freeze well? Freezing is not recommended due to changes in texture upon reheating.
What wine pairs best? A crisp white like Chardonnay complements the rich sauce nicely.
Can I omit the garlic? Garlic can be reduced or substituted with shallots for a milder flavor.
Will it work with other seafood? Yes, shrimp or crab can be alternatives, adjusted for cook time.
How important is broiling? Broiling adds color and texture, enhancing the final presentation.
Additional Resources
Enhance your culinary skills with related recipes that use similar techniques, such as Creamy Shrimp Pasta or Garlic Butter Scallops. Explore detailed guides on sauce-making and learn how to select and prepare seafood efficiently. Elevate your dining with expert wine pairing tips available in our companion articles.
Join the Conversation
Share your experience with this recipe on social media using #GarlicButterLobster, and don’t forget to tag us for a chance to be featured. We encourage you to leave comments and reviews, share variations or adaptations that worked for you, and inspire fellow readers with your culinary creations.
The Recipe
Creamy Garlic Butter Lobster Tails
Serves: 2
Prep Time: 15 mins
Cook Time: 20 mins
Total Time: 35 mins
Kitchen Equipment Needed
Heavy skillet
Oven-safe dish
Garlic press (optional)
Broiler
Ingredients
2 lobster tails
4 tablespoons unsalted butter
3 garlic cloves, minced
1/2 cup heavy cream
Salt and pepper to taste
Chopped fresh parsley, for garnish
Directions
Preheat your oven to broil on high.
In a heavy skillet, melt the butter over medium heat. Add the minced garlic and sauté until fragrant, about 1 minute.
Stir in the heavy cream, and bring the mixture to a simmer. Season with salt and pepper to taste.
Place the lobster tails in an oven-safe dish and pour the creamy garlic butter sauce over them.
Broil for about 10-12 minutes, or until the lobster meat is opaque and cooked through.
Garnish with fresh parsley and serve hot.
Recipe Notes
For a richer flavor, add a splash of white wine to the sauce.
This recipe can be doubled for larger gatherings.
Serve with crusty bread to soak up the delicious sauce.
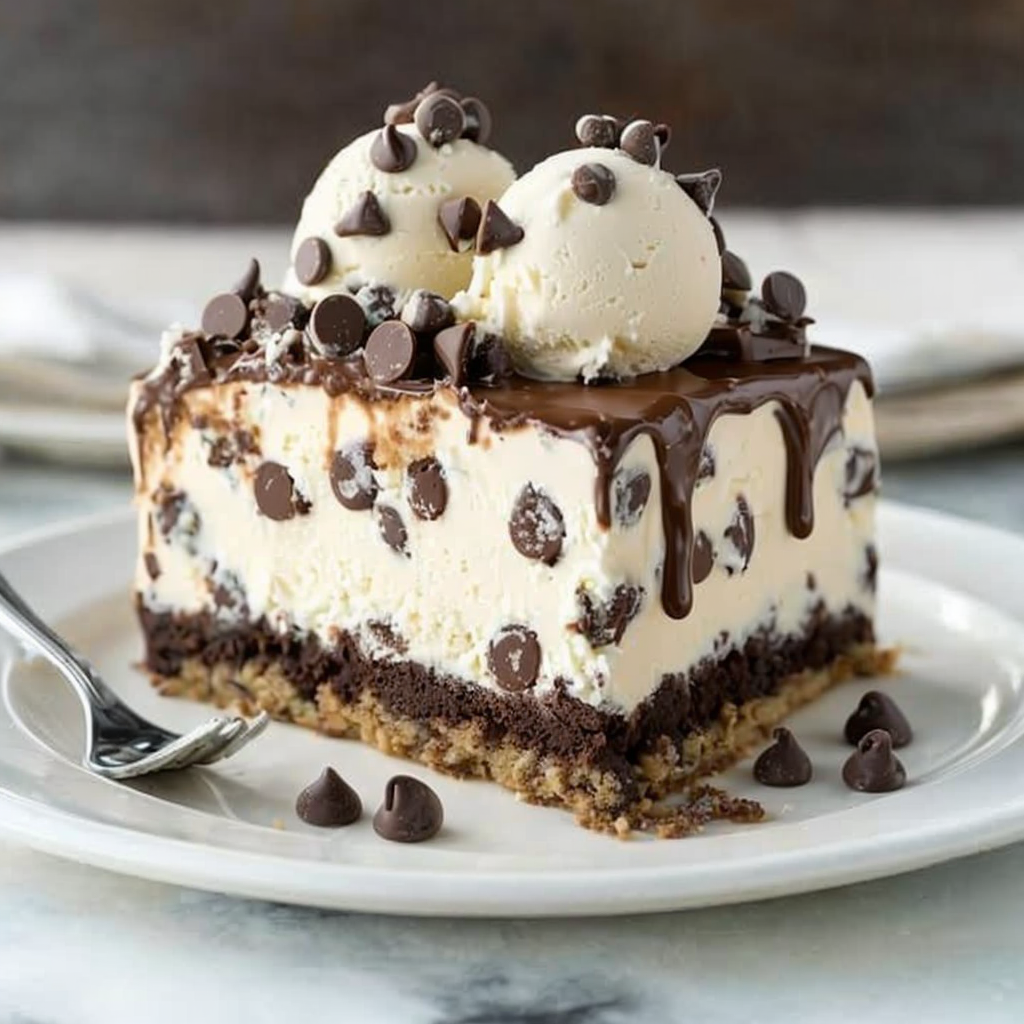
Indulge in Delicious Chocolate Chip Cookie Dough Ice Cream Cake
Chocolate Chip Cookie Dough Ice Cream Cake is the perfect treat for any dessert lover. Combining the rich, delectable taste of chocolate chip cookie dough with the refreshing coolness of ice cream, this cake is both satisfying and indulgent. The contrasting textures of creamy ice cream and crunchy cookie bits, alongside smooth chocolate ganache, offer a delightful sensory experience. Whether you’re celebrating a birthday, hosting a summer barbecue, or simply enjoying an afternoon delight, this ice cream cake will thrill your taste buds.
Quick Recipe Highlights
Flavor Profile: Captures the classic taste of chocolate chip cookies in every bite, enhanced by the creamy goodness of vanilla ice cream. Slight hints of vanilla and butter enrich the flavor experience.
Texture: A delightful mix of smooth ice cream with chunks of chewy cookie dough and crunchy chocolate chips, topped with a thick layer of chocolate ganache.
Aroma: The sweet scent of vanilla and chocolate greet your senses with each slice, creating an irresistible allure.
Visual Appeal: Layers of rich color contrast beautifully—the golden hue of cookie dough set against a creamy white layer of ice cream and dark chocolate topping.
Skill Level Needed: Requires basic assembly skills, but patience for freezing times is essential.
Special Equipment: Springform pan, mixer, and offset spatula for smooth layering.
Recipe Overview
Difficulty Level: Intermediate. While the steps are straightforward, precision in layering and patience during freezing stages are key.
Category: Dessert. This sweet indulgence fits perfectly as a post-meal treat or celebration centerpiece.
Cuisine: A fusion of American classics—ice cream cake and chocolate chip cookie dough.
Cost: Moderate. Ingredients are readily available but buying quality ice cream and chocolate adds comfort to the dessert.
Season: Best enjoyed in warm weather months, especially spring and summer when cool, refreshing desserts are in demand.
Occasion: Perfect for birthdays, family gatherings, or any festive occasion where you want to impress with a homemade dessert.
Why You’ll Love This Recipe
If you’re wondering why this Chocolate Chip Cookie Dough Ice Cream Cake deserves a place on your dessert table, consider the rich culinary experience it offers. The taste is a heavenly combination of two beloved treats: the buttery crunch of chocolate chip cookies and the smooth richness of ice cream. The texture varies with each bite, offering a satisfying crunch, a chewy contrast from the cookie dough, and the creaminess of ice cream.
Preparation is a breeze thanks to a straightforward assembly process. While it requires patience with freezing times, the actual hands-on work is minimal, making it a convenient choice for those who love homemade desserts without a time-consuming ordeal. Nutritional advantages may not be its primary selling point, given its indulgent nature, but knowing that all ingredients are handpicked ensures no hidden preservatives.
This dessert is a social icebreaker—perfect for parties, it sparks conversation and evokes nostalgia for simpler, fun times. Sharing a slice means sharing a memory. Moreover, it’s a cost-effective choice when considering the serving size—providing ample portions without an extravagant budget. The ingredients are accessible, ensuring anyone with basic grocery access can recreate this masterpiece.
Historical Background and Cultural Significance
The origin of ice cream cake can be traced back to the Victorian era, when “Bombes” were fashionable—moulded mixtures of ice cream and fruit. Over the years, these transformed into the layered aesthetic we know today. The combination with cookie dough is a modern twist, paying homage to classic American desserts while delivering a novel culinary experience.
Chocolate chip cookies, invented in the 1930s by Ruth Wakefield, have become a cornerstone of American dessert culture. The inclusion of cookie dough in desserts is more recent, emerging from a trend of adding indulgent, raw components to elevate simple sweets. Regional variations sometimes incorporate other cookie types or even brownie bases to diversify the texture.
Evolution in the ice cream industry, introducing numerous flavors and textures, has allowed for such creative cakes to develop. Modern interpretations readily incorporate cultural preferences, pushing the boundaries of the traditional cake.
Ingredient Deep Dive
The star of this dessert—the chocolate chip cookie dough—is as rich in history as it is in flavor. Embedded in American culture, it offers a comforting, nostalgic flavor profile loved by all ages. Nutritionally, whole ingredients like butter and eggs offer richness, though indulgence should be mindful.
Vanilla ice cream provides the creamy base and complements the cookie’s sweetness with its subtle flavor. Opt for high-quality brands or homemade for the best results. Storage is key—keep your ice cream at a stable, cold temperature to maintain consistency and avoid ice crystals.
Dark chocolate for the ganache should be rich yet balanced in bitterness. A good quality chocolate enhances the entire cake’s taste profile without overpowering it. Look for even color and a lack of bloom on the chocolate surface when purchasing.
Common Mistakes to Avoid
Rushing the freezing process. Allow sufficient time for the ice cream to set for defined layers.
Using low-quality chocolate, which can affect the entire flavor balance.
Overmixing cookie dough, leading to tough cookies instead of the desired chewy texture.
Skipping the use of parchment paper in the pan. This ensures a smooth release of the cake.
Underestimating the need for a well-set ganache to avoid a runny mess.
Freezing ice cream too hard, making it difficult to spread. Allow it to soften slightly before use.
Using a dull knife to cut the cake leads to squishing rather than slicing cleanly.
Neglecting to properly clean tools in-between to prevent flavor contamination.
Failing to level the cake during assembly, causing an unsteady final product.
Essential Techniques
The art of layering an impeccable dessert like this lies in precision. Start by softening ice cream to outfit layers without melting—this ensures smooth spreadability and neat edges. Master the ganache by using a double boiler for even melting, resulting in a glossy, pourable consistency.
Freezing the cake with intervals allows each layer to set, preventing mishaps in structure when cutting. Each layer should freeze solid before the next is introduced, preserving the distinctness of each component. Opt for a sharp, warm knife for even slicing and to prevent the layers from merging due to pressure.
Pro Tips for Perfect Chocolate Chip Cookie Dough Ice Cream Cake
To achieve the ultimate texture, mix your cookie dough just long enough to combine ingredients. Overmixing can result in texture changes. For the ganache, allow it to cool before pouring over the ice cream to prevent melting or breaking the surface.
Line your pan with parchment paper to facilitate smooth removal and to maintain the cake’s shape. When smoothing ice cream layers, dip your spatula in hot water to prevent sticking.
If time allows, let the cake thaw slightly before serving to enhance its flavor profile and soften the texture for the perfect bite. Avoid using pre-packed cookie dough; homemade dough offers the best taste and authenticity.
Variations and Adaptations
Regional variations can be achieved using local cookie types, such as shortbread in Scottish-inspired versions. For seasonal adaptations, consider incorporating fruit compotes or syrups for freshness.
For those with dietary restrictions, consider using gluten-free oat flour for the cookie dough or dairy-free ice creams available in the market. Vegan alternatives can be made using coconut milk-based ice creams and eggless cookie dough recipes to cater to plant-based diets.
Likewise, switch up flavors with different ice cream bases like strawberry or mint for contrast, or add nuts and fudge for added texture. Adding edible flowers or colorful sprinkles can transform it visually, making it perfect for themed gatherings.
Serving and Presentation Guide
An ideal serving approach involves slicing the cake using a warm knife for seamless pieces. Layer each slice on a chilled dessert plate to maintain its structure. Consider garnishing with fresh mint or a drizzle of chocolate syrup.
Classical accompaniments such as a dollop of whipped cream enhance the richness and offer a modern twist. Ensure portions are balanced; aim for approximately an inch-thick slice per serving to ensure even distribution of each element.
Wine and Beverage Pairing
Pairing this dessert with a late-harvest Riesling or a rich port wine enhances its sweetness while balancing with a hint of acidity. For non-alcoholic options, consider a cold-brewed chai tea with its spices to contrast the sweetness.
Coffee complements the richness, so an espresso or latte works well, providing a new dimension to the dessert without dominating its flavors. It’s best served slightly colder than room temperature to allow the flavors to unfold greatest impact.
Storage and Shelf Life
Preserve the freshness of your chocolate chip cookie dough ice cream cake by storing it in a tightly sealed container in the freezer. Ensure it’s wrapped to minimize exposure to air, which can cause freezer burn.
Store at a stable, cold temperature to maintain the cake’s integrity. Signs of spoilage include a crunchy, icy texture or a muted taste profile. For optimal enjoyment, allow a brief period of thawing before serving.
Make Ahead Strategies
Advance preparation involves creating cookie dough and ice cream layers ahead, storing them separately in airtight containers. Assemble the cake when ready, ensuring each layer is well-frozen for optimal results.
Strategically freeze between layers for ease and precision, resulting in an even, visually appealing dessert. Incorporate fresh elements like whipped cream only before serving to maintain their vibrancy.
Scaling Instructions
To halve the recipe, adjust ingredients proportionately, keeping scaling in mind for cooking times and equipment size. For larger gatherings, doubling is convenient if space and tools allow.
Equipment adjustments, such as larger pans, as well as timing extensions for freezing should be considered with increased quantities. Larger batches may require deeper freezes to maintain structure during transportation or when set out over time.
Nutritional Deep Dive
This indulgent dessert is high in carbohydrates and fats, with nutrients depending heavily on ingredient quality. Using high-fat ice cream provides more richness, alongside added benefits from real dairy over alternatives.
Portion control is crucial due to calorie density, making it perfect as an occasional treat rather than a staple. Adjust flavors and textures for a macro-focused diet by incorporating nuts or seeds for added protein.
Dietary Adaptations
To adapt for gluten-free diets, substitute oat or almond flour into the cookie dough recipe. Use dairy-free ice cream variants for lactose intolerance, or create vegan modifications with plant-based alternatives like coconut milk.
Lower carbohydrate versions might include using sugar-free sweeteners and keto-friendly flours such as almond or coconut. For a paleo adaptation, all-natural ingredients such as coconut flour and honey provide a wholesome alternative.
Troubleshooting Guide
Encountered textural issues? Ensure all cookie dough elements are properly chilled, preventing melting or bleeding colors in layers. Flavor balance is achievable with a careful mix of quality chocolate and premium vanilla.
Freezing technique challenges can be mitigated by using modern chilling solutions with even temperatures, such as blast chillers. Ingredient substitutions should maintain quality and a similar texture, ensuring recipe balance remains ideal.
Timing concerns often stem from impatience during freezing phases. Follow each step diligently to maintain recipe integrity and achieve the desired final result.
Recipe Success Stories
Feedback from our community emphasizes the delight of combining childhood favorites into one dessert. Successful reader adaptations include adding caramel swirls or altering the flavors with espresso powder for a mocha twist.
Unique presentations shared feature themes and decorations ranging from festive to formal, showcasing the cake’s versatility. Culinary photographers offer tips to highlight beautiful layers—reflection pieces on the ganache, complimentary tableware, and lighting setups accentuating the creaminess.
Frequently Asked Questions
Can I use store-bought cookie dough?
Yes, store-bought dough can be a time-saving alternative, but homemade dough allows for better control over ingredients and taste nuances.
Is there a way to make this cake without a springform pan?
You can use an aluminum baking pan lined with parchment paper for similar results, though achieving the same level of neatness may be more challenging.
Can this cake be made in advance and frozen for longer periods?
Absolutely. Properly wrapped, this cake can last in the freezer for several weeks, although the freshest flavors are achieved when consumed within the first few days.
How do I prevent the ice cream from melting during assembly?
Assembling in stages within a chilled environment and working quickly with softened, but not melted, ice cream can mitigate melting risks.
Additional Resources
Explore more with related recipes that push the texture boundaries, inspiration through culinary technique guides, or delve deeper into flavor science for personalized dessert creation. Discover high-quality equipment that enhances your culinary journey or advice on seasonal product selection for year-round perfection.
Join the Conversation
Engage with our warm community through social media channels, sharing your photographic renditions of this dessert. Participate in discussions, offering feedback or personal tweaks while staying informed about flavor trends and executing thematic dinner parties revolving around this crowd favorite.
The Recipe
Chocolate Chip Cookie Dough Ice Cream Cake
Serves: 10
Prep Time: 20 mins
Cook Time: 0 mins
Total Time: 240 mins
Kitchen Equipment Needed
Springform pan
Mixer
Offset spatula
Parchment paper
Ingredients
1 cup all-purpose flour
½ teaspoon baking soda
½ teaspoon salt
½ cup unsalted butter, softened
½ cup packed brown sugar
¼ cup granulated sugar
1 teaspoon vanilla extract
1 cup chocolate chips
2 quarts vanilla ice cream
1 cup heavy cream
1 cup dark chocolate chips for ganache
Directions
Prepare the cookie dough: Mix butter, sugars, and vanilla in a bowl. Add flour, baking soda, and salt, mixing until combined. Stir in chocolate chips.
Press dough into the lined springform pan, creating an even base. Freeze for 30 minutes.
Spread softened vanilla ice cream over the dough evenly; freeze until solid.
For the ganache: Heat cream until simmering. Pour over chocolate chips and whisk until smooth. Cool slightly before spreading evenly over the frozen ice cream layer.
Freeze cake for at least 3 hours or overnight. Serve with optional toppings as desired.
Recipe Notes
Substitute semi-sweet chocolate for dark ganache for a lighter taste.
Add nuts to the cookie dough for additional texture.
Ensure ice cream is slightly softened for smooth spreading.