Luscious Herb-Infused Grilled Lobster: Elevate Your Seafood Experience

Tremendous Herb-Infused Grilled Lobster with Garlic Essence: A Culinary Delight

⚖️
Difficulty
Medium

⏲️
Prep Time
20 mins

🕒
Cook Time
15 mins

⏱️
Total Time
35 mins

🍽️
Servings
4

Savor the ultimate luxury with our Tremendous Herb-Infused Grilled Lobster with Garlic Essence. Perfectly blending the robust flavors of fresh herbs and the aromatic allure of garlic, this recipe presents an exceptional culinary experience. The succulent lobster, grilled to perfection, exudes a mouthwatering aroma that promises to tantalize your taste buds from the first bite. Ideal for special gatherings or for turning a regular dinner into a memorable feast, this dish combines elegance and simplicity in every bite.

Quick Recipe Highlights

  • Flavor Profile: Rich, savory flavors with herbaceous notes complemented by a subtle garlic undertone that enhances without overpowering the lobster’s natural sweetness.
  • Texture: The lobster is tender yet firm, maintaining a slight chewiness that speaks to the freshness and perfect grilling technique, paired with the smoothness of the infused flavors.
  • Aroma: A delightful blend of herby freshness and roasted garlic that weaves a heavenly scent, creating an inviting ambience in your kitchen.
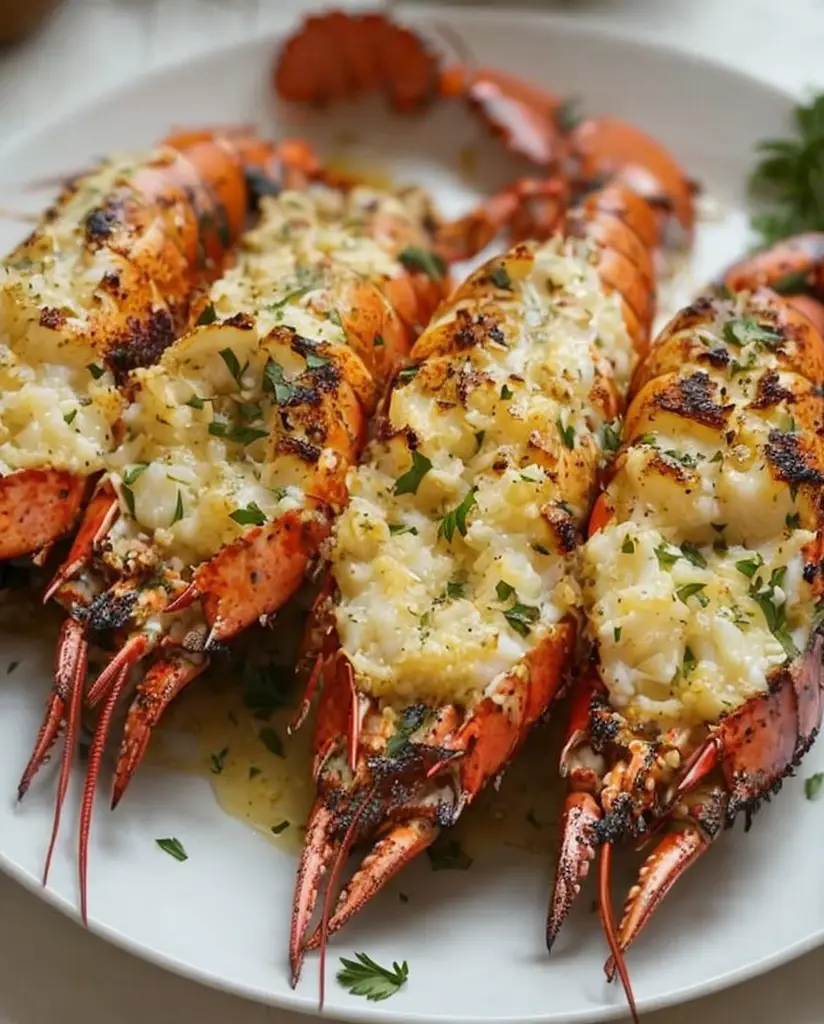
  • Visual Appeal: A visually stunning presentation with vibrant colors of the grilled lobster garnished with green herbs, perfect for impressing guests.
  • Skill Level Needed: While some grilling experience is beneficial, the dish is accessible to dedicated home cooks willing to follow detailed instructions.
  • Special Equipment: A quality grill, kitchen shears, and a basting brush are essential for creating this masterpiece with precision and ease.

Recipe Overview

  • Difficulty Level: This dish strikes a balance between simple and challenging, providing an achievable gourmet experience with some grilling skill and patience.
  • Category: Mainly a seafood main course, this dish fits well within the fine dining and special occasion food categories.
  • Cuisine: Reflecting coastal culinary traditions, it draws heavily from Mediterranean influences with its use of fresh herbs and simple preparation.
  • Cost: The main expense is the lobster, making this an investment for special dinners, yet each ingredient contributes significantly to the end flavor profile.
  • Season: Best enjoyed in summer when grilling outdoors is a delight, but can be made year-round with indoor grilling options.
  • Occasion: Ideal for celebrations, romantic dinners, or impressing guests at an elegant dinner party where seafood is center stage.

Why You’ll Love This Recipe


The Tremendous Herb-Infused Grilled Lobster with Garlic Essence offers a gastronomic journey filled with taste and texture. Its rich, aromatic profile lures you into a symphony of flavors only lobster can deliver. The fresh herbs intertwine seamlessly with garlic, elevating the lobster into an extraordinary dish that is both sophisticated and delightful. You’ll relish not only the taste but also the irresistible aroma that fills your kitchen.

Convenience and preparation benefits abound with this recipe. Though it requires some initial prep, assembling the herb marinade and managing the grill enhance your cooking precision and timing, resulting in a beautifully cooked dish that showcases your culinary skills. The step-by-step directions ensure reliable results, keeping the process stress-free.

Nutritionally, lobster is a protein powerhouse, providing essential nutrients like Omega-3 fatty acids and selenium with minimal fat. Together with the herbs and garlic, this dish contributes to a balanced diet, rich in antioxidants and anti-inflammatory properties. Enjoy a satisfying meal that supports your health without compromising on taste.

Social and entertaining value is at the forefront of this grill setup, easily becoming the centerpiece of any gathering. Sharing this dish with family or friends over a well-set table fosters memorable experiences, guaranteed to provoke oohs and aahs from your guests with every spectacular mouthful they take.

Despite lobster’s general association with luxury, this recipe proves cost-effective and attainable. By focusing on quality over quantity in ingredients, you ensure each bite is impactful and rewarding. Accessible cooking methods and available ingredients make this an approachable task for many aspiring home cooks.

Historical Background and Cultural Significance


The lobster’s rich history adds depth to this recipe’s allure. Originating from ancient cuisines, lobster has been revered for its delicacy across centuries. Once a staple peasant food, it transformed into a luxury ingredient, adored for its unique flavors and versatile cooking profiles seen today. Lobster’s evolution highlights changes in food cultures, transitioning from coastal abundance to contemporary gastronomy prized by chefs worldwide.

This recipe, deeply rooted in Mediterranean culinary traditions, illustrates the cultural importance of simplicity and quality. The Mediterranean people have long valued the harmony of natural flavors, letting star ingredients like fresh seafood shine. Just as those traditions prioritize fresh herbs and minimal interference, our recipe reflects this focus on genuine savor.

Through time, variations of grilled lobster have emerged across regions, each adapting to local tastes and ingredient availability. Whether accompanied by garlic scapes in New England or butter drizzled in France, global interpretations demonstrate the vast adaptability and beloved status of lobster in international cuisine.

Significant regional variations have consistently maintained the lobster’s elevated stature. Southeastern U.S. styles may feature heavier spice rubs or buttery sauces, whereas West Coast chefs opt for lighter, citrus-infused approaches. Our herb-infused version pays homage to classic techniques while incorporating current global trends of garlic essence and herbaceous integrity.

Ingredient Deep Dive


Lobster is the jewel of this dish, celebrated for its sweet, delicate flesh and status as an oceanic treasure. Historically, lobster was caught and consumed by coastal communities, a humble sustenance later transformed into a luxury owing to culinary advancements and refined palates. Today’s gourmet scenes embrace lobster’s full potential, incorporating it into modern dining with reverence.

Nutritionally, lobster is lauded for being low-fat yet protein-rich, making it ideal for health-conscious consumers. Additionally, it is abundant in vitamins and minerals such as copper, zinc, and B12, supporting metabolic and cognitive functions. Its contribution to dietary excellence is unparalleled among seafood, underscoring why it’s a popular, nutrient-dense choice.

For the verdant blend of herbs, select a fresh and vibrant mix to enhance flavor and presentation. Basil, parsley, and rosemary are our top choices, boasting ancient culinary significance due to their health benefits, flavor complexity, and aromatic strengths. Ensure herbs are crisp and bright green, indicative of freshness, as this greatly impacts the dish’s essence. Store them by loosely wrapping in damp paper towels within the refrigerator to maintain vitality.

Garlic, the subtle hero of the recipe, brings layers of nuanced flavor and depth. Known for its potent health properties, it fortifies heart health and boosts the immune system. Select firm, plump garlic bulbs free from sprouting or withering. Skillfully stored in a cool, dry space, garlic imparts its full potential in infusing dishes with distinguished profiles.

Common Mistakes to Avoid

  • Overcooking the lobster can lead to a tough and rubbery texture. Monitor closely and remove from heat promptly once fully cooked.
  • Under-seasoning the dish diminishes the complex flavor profile. Ensure consistent herb application and allow marination time for full flavor penetration.
  • Selecting lobsters that are not fresh compromises texture and taste. Purchase from reputable sources and verify freshness before use.
  • Failing to maintain consistent grill heat results in uneven cooking. Preheat grill adequately and use a thermometer for steady grill temperatures.
  • Using dried herbs instead of fresh ones can alter flavor dynamics significantly. Stick to fresh for superior infusion and aromatic benefits.
  • Skipping the resting period causes flavor imbalance. Letting the cooked lobster rest allows the juices to redistribute, enhancing taste experience.
  • Improper basting technique can lead to uneven herb application. Use a brush, applying uniform coats of the herb mixture during grilling.
  • Neglecting presentation affects appreciation and appetite appeal. Ensure attractive garnishing and alignment for impressive visual impact.
  • Ignoring shell-cleaning results in residual sand or hard particles. Thoroughly clean the lobster shells before preparation to avoid unwanted textures.
  • Lacking patience impacts dish quality. Take time with each step, from preparation through execution, for optimal results.

Essential Techniques


Grilling lobster to perfection is central to this dish’s success. Proper heat management and timing ensure that the lobster remains juicy and flavorful. Begin with high heat to sear, sealing in the juices, followed by moderate grilling to cook the lobster through without overdoing it. Embrace the art of basting with an herb-infused brush for each flip to maximize flavor absorption.

One key technique is deftly applying the herb mixture. Using fresh herbs enhances both aromatics and taste, but uneven application can result in flavor gaps. This demands uniform distribution, achieved through skillful basting at intervals, infusing the crustacean with tantalizing essence while maintaining the natural lobster flavor.

Achieving perfect caramelization signals flavors blending appropriate textures. Watch for lobster’s beautiful color transition from raw translucence to a deep, vibrant red hue, indicating readiness. Grilled marks should be prominent yet not charred, highlighting expert grillsmanship balancing smokiness and lobster delicacy.

Signs of Doneness are vital in avoiding overcooked or undercooked lobster. Visual cues include opaque meat and firm but not rubbery texture, combined with a shell turning a bright red hue indicative of thorough cooking. A taste test confirms doneness, revealing succulent, nuanced layers of flavors integral to the finished dish.

Pro Tips for Perfect Tremendous Herb-Infused Grilled Lobster


Ensure the lobster is at room temperature before starting the grilling process for even cooking. This also prevents the meat from seizing up when exposed to heat, maintaining a tender bite.

Using quality, fresh herbs is critical for achieving the best flavor. Fresh, aromatic herbs deliver a beautiful illusion of complexity to your sauce, enhancing the natural beauty of the lobster’s flesh.

Monitor your grill’s heat levels closely. Fluctuating temperatures can lead to undesirable overcooking or uneven heat distribution, impacting the dish’s overall success.

Resting the cooked lobster allows juices to be evenly reabsorbed. This step is critical for flavor development and contributes to a savory mouthful with every bite.

Do not rush the marination process. Allow ample time for the herbs and garlic to infuse into the lobster, ensuring the best possible depth of flavor.

Keep safety paramount when grilling seafood. Use appropriate grilling gloves and tools when handling high-temperature components to prevent accidents.

Experiment with complementary dips to enhance your grilled lobster’s taste. A lemon butter sauce or herb-citrus aioli adds an extra layer of flavor complexity.

Allow for varying grilling times based on lobster size to ensure each piece reaches succulent perfection without overexposure to heat.

Variations and Adaptations


In regions with traditional smoky barbecues, this recipe adapts wonderfully by incorporating wood chips for an added smoky flavor that pairs beautifully with the herb condiments.

Spring or fall adds an inventive twist by incorporating seasonal herbs like frisée or fennel, enhancing inter-seasonal cuisine adaptability.

For a gluten-free option that retains robust flavors, replace traditional side breads with grain-based alternatives or fresh greens.

Alter flavors by adjusting the herb blend, experimenting with additions like tarragon or cilantro for creative spins on the herb profile.

The texture can be modified by experimenting with different grilling techniques, such as indirect cooking for a more subtle char and softer flesh.

For a dazzling presentation at gatherings, plate these lobsters atop a brightly colored platter, garnished artistically with lemon halves and sprigs of fresh herbs, captivating both the eye and the palate.

Serving and Presentation Guide


Optimal plating combines aesthetic appeal with functional elegance, ensuring both pleasing visuals and maneuverability. Remove lobster meat from shells before serving, allowing guests easy access to every flavorful mouthful it offers.

Vibrant garnishes like fresh parsley and lemon wedges add zing, enhancing lobster’s natural pinkish-red hue and creating an inviting, colorful display that encourages sampling.

Pair the dish it with traditional accompaniments like classic French fries or a Mediterranean-inspired couscous salad, which introduces refreshing contrast to the meal.

For modern chic styles, arrange lobster tails over bedded greens, invoking freshness and balance aligning with seasonal dining trends.

Maintain its ideal serving temperature by pre-warming plates, conveying added luxury and maintaining warmth for a delightful dining experience right through to last bite.

For precise portion control, use pre-cut lobster portions, allowing uniform servings, reducing waste, and ensuring satisfaction from each diner, irrespective of appetite size.

Wine and Beverage Pairing


Lobster’s exquisite flavor is highlighted with a glass of crisp, white Burgundy wine, introducing notes of citrus and light oak, enhancing the dish’s inherent delicacy.

Non-alcoholic options can equally captivate guests through a fresh, herbal iced tea with mint and lemon. Its refreshing nature aligns perfectly with lobster’s aromatic qualities.

Lobster and roasted garlic pair intriguingly with fragrant, lightly brewed teas, like a jasmine tea recently steeped, introducing floral hints to the experience.

Serve beverages chilled but not too cold—whether wine or an iced alternative—to effectively balance delicate nuances of both lobster dish and drink selections.

Assemble wine or tea flights to offer guests variety, creating explorative opportunities and potential rave pairings each showcasing lobster’s versatility anew.

Storage and Shelf Life


Careful storage ensures preservation of lobster’s unique taste. Wrap leftovers tightly with cling film or store in airtight containers, refrigerating promptly after cooling.

Maintain fridge temperatures below 40°F to preserve freshness and avoid spoilage. Lobster can be stored for up to two days at optimal quality.

Utilize sealed, non-reactive containers to keep both strong odors and moisture away, ensuring pristine taste and texture upon reheating.

Check for spoilage signs, such as off smells or changed color. Properly stored lobster maintains its original scent and appearance, indicating safety and flavor retention.

For reheating, gently warm lobster meat on low heat to prevent overcooking. Steaming or microwave options on a moderate setting retain moisture and flavor.

Freezing requires thorough cleaning and vacuum sealing. For best results, use within three months, defrosting slowly in the refrigerator for optimal outcomes.

Make Ahead Strategies


Prepare herbs and marinade mix in advance, storing separately to ensure peak freshness when amalgamated with fresh-caught lobster.

Grill, then store grilled lobster only briefly, covering with foil to preserve heat while arranging accompanying sides, maintaining dish cohesiveness.

Clear assembly instruction plans allow smooth transition between prep stages without detracting from overall meal synergy or resulting flavor quality.

Reheating guidelines around low temperatures retain moistness, protecting dish from dryness or textural compromise, assuring enjoyable dining every serving.

Fresh elements added late complement key dishes. Such adjustments enhance dynamics, keeping tastes vibrant, enhanced by final garnish or decor.

Strategize labor-intensive tasks, like shell cleaning or herb chopping, beforehand, ensuring focused efforts when finalizing lobster, a fuss-free finishing parade.

Scaling Instructions


Halve the recipe for intimate dinners where portions need reduction. Adjust ingredient ratios carefully, ensuring marination and basting meets taste expectations.

Doubling provides ample lobster for larger crowds, necessitating increased marinade quantity and grill space, guaranteeing consistent flavor presence holiday events.

Transition equipment, using larger grills or additional stations when scaling upward to prevent crowding, maintaining air circulation, even cooking harmony.

Adaptation timings become crucial, adjusting initial cooking rounds, moving from grill-to-table rapidly to ensure precise cooking and serving accuracy.

Store extra ingredients, using airtight methods while sequencing preparation of main elements according to event timelines affording uninterrupted culinary flow.

Nutritional Deep Dive


Lobster exhibits a remarkable macronutrient balance – rich in proteins yet low in harmful fats, aiding muscle growth and offering substantial nourishment.

Micronutrients abound, with lobster contributing essential minerals like selenium and phosphorus, both supporting immune health and bone development.

Beyond its omega-3 bounty, lobster meat helps combat inflammation, lowering cardiovascular risks, enhancing clarity of mind, and boosting longevity benefits.

Dietary considerations facilitate easy inclusion for health-conscious individuals or those monitoring fat or caloric intake due to its lean nature.

Precise portion analysis ensures effective consumption, meeting energy needs without excess intake, in line with energy balance and weight maintenance principles.

Dietary Adaptations


For gluten-free iterations, eliminate gluten-containing sides, focusing on naturally gluten-free complements like rice or quinoa salads with simple dressing.

Make it dairy-free by substituting butter with olive oil or ghee during the basting stage, retaining rich flavor nuances inherent to the original recipe.

Vegan adaptation requires significant ingredient substitution, swapping lobster with plant-based alternatives like protein-packed tofu marinated similarly.

Low-carb diets benefit naturally from lobster, accentuating low carbohydrate profiles with side salads instead of starchy accompaniments enhancing overall health.

Keto enthusiasts should highlight lobster’s favorable lipid profile, incorporating fats from sources like avocado at garnishes for adherence to dietary themes.

Strict Paleo adherents align with this dish through whole, unprocessed foods, featuring only natural interim additions fitting non-industrialized eating lifestyles.

Accommodate low-FODMAP needs by ensuring none of the added ingredients trigger digestive discomfort, delivering delectable satisfaction across gut-friendly nutrition.

Troubleshooting Guide


Struggling with texture issues? Check roast profiles. Overcooked lobster can firm drastically, whereas undercooked delights remain supple for satisfying mouthfuls.

Correct flavor imbalances by altering herb combinations or incorporating additional spices, ensuring appealing, balanced, all-around experiences.

Temperature problems solved through immediate grilling machine calibration, accurate thermometer readings, establishing baseline ranges for success sustained.

Confront equipment challenges by adjusting volumes or grilling regions to suit personal setups, maintaining distribution, and achieving favorable conditions.

Ingredients sensitive to change can utilize substitutes, examining like-flavors or potential impact adjustments, preserving lobster’s intrinsic attractiveness.

Timing concerns address, mapping peak delays, allocating needed preparations, wielding chef clock maximally, guiding improved outcomes without hurdles.

Recipe Success Stories


Foodies rave, astonished by creating such restaurant-quality lobster at home. Their feedback cites unforgettable textures and harmonious flavor blending perfection.

Variations on this classic continue extending through communities, highlighting customization opportunities based on available local ingredients or desired biases.

Adaptation highlights emerge as families adjust beloved recipes while maintaining core components revered, offering delicious, versatile remakes household favorites.

Engagement flourishes through reader cues, contributing tips, enhancing both results and satisfaction. Tips include varying lead times or unexpected ingredient turns.

Photography enhances invites showcasing photogenic brilliance, capturing moments in history via imagery depicting fulfilled guests savoring creations.

Frequently Asked Questions

Q: Can I use frozen lobster for this recipe?
A: Fresh lobster is preferred for best texture and flavor. If using frozen, ensure it is completely thawed and drained well to prevent excess water during grilling.

Q: How can I prevent my lobster from sticking to the grill?
A: Preheat your grill thoroughly and oil the grates before placing the lobster on them. This ensures a nice char and prevents sticking.

Q: Is it necessary to marinate the lobster beforehand?
A: While not absolutely compulsory, marinating significantly enhances the flavor. Allow at least 30 minutes for the herbs and garlic to permeate the lobster.

Q: Can I prepare this recipe without a grill?
A: Yes, an oven broiler or stovetop grill pan serves as excellent alternatives, although you’ll need to adjust cook times to match these methods.

Q: What herbs work best in this recipe?
A: Fresh basil, parsley, and rosemary are recommended for their aromatic properties and flavor profiles. Customize based on available herbs like thyme or dill.

Q: How do I know when my lobster is properly cooked?
A: Look for bright red shell color and opaque meat. A slight firmness with juicy texture indicates perfect readiness.

Q: Can leftover lobster be used in other dishes?
A: Absolutely. Incorporate into salads, pasta dishes, or even seafood chowders to enjoy continued indulgence in various forms.

Q: What’s the best way to handle tough lobster shells?
A: Use quality kitchen shears for cutting through shells post-cooking. Also, a cracker and pick set lets diners handle remaining hard areas independently.

Q: Could I add a dipping sauce?
A: Definitely consider a simple lemon butter dipping sauce to complement the flavors or even a light aioli for an added zing.

Q: Do you recommend any specific sides?
A: Roasted vegetables, fresh salads, or crusty bread align splendidly with this dish, forming a complete, balanced meal presentation.

Q: How do I ensure an attractive plating?
A: Use vibrant platters and garnish liberally with fresh herbs and lemon to create eye-catching visuals that appeal as much to the eye as to taste.

Additional Resources


For those exploring more seafood recipes, check out our lemon herb butter shrimp or our quick and easy seared scallops, both consistent crowd-pleasers.

Dive deeply into grilling expertise with guides on proper tools, setup organization, and key safety fundamentals for safe practices and delicious outcomes.

Gain ingredient insights for herb substitutions by exploring key property profiles matching your preferred palates for nuanced culinary variations across cuisine.

Select premium equipment explicitly reviewed for reliability across culinary needs— from grills and shears to accurate thermometers ensuring ideal cooking finishes.

Seasonal variations include our collection of fall-inspired seafood favorites, capitalizing on readily available produce and tastes harmonizing with cooler months.

Join the Conversation


Excited about trying this recipe? Join in on social media, and share your own grilling triumphs or photographic captures of this delectable seafood masterpiece.

Express feedback through our comment section with personalized tips and technique enhancement ideas to bolster hands-on learning outcomes.

Share thoughtful, comprehensive reviews to inspire others, highlighting key elements that refine your experience as indicative of valued community insight.

Contribute to community enthusiasm with fresh interpretations of herb-infused grilled lobster, fostering innovative culinary development ideas among readers.

Embrace photography tips to improve sharing visuals, converting culinary charm into inviting visuals which invite likes, shares, and interactions collectively.

The Recipe

Tremendous Herb-Infused Grilled Lobster with Garlic Essence

Serves: 4

Prep Time: 20 mins

Cook Time: 15 mins

Total Time: 35 mins

Kitchen Equipment Needed

  • Grill
  • Kitchen Shears
  • Basting Brush
  • Thermometer
  • Parchment Paper

Ingredients

  • 4 lobster tails
  • 1/4 cup extra-virgin olive oil
  • 2 tbsp fresh basil, chopped
  • 2 tbsp fresh parsley, chopped
  • 1 tbsp fresh rosemary, chopped
  • 3 cloves garlic, minced
  • 1 lemon, cut into wedges
  • Salt and pepper to taste

Directions

  1. Preheat the grill to medium-high heat.
  2. Prepare the lobster by using kitchen shears to cut through the top shell lengthwise down the center of the back to the tail.
  3. Combine olive oil, basil, parsley, rosemary, garlic, salt, and pepper in a bowl and blend well.
  4. Baste the herb mixture over each lobster tail generously, ensuring the entire flesh is covered.
  5. Place the lobsters shell side down on the grill and cook for 12-15 minutes, basting occasionally until shells are bright red and meat is opaque.
  6. Remove from the grill and let the lobster rest for 5 minutes. Serve warm, garnished with lemon wedges.

Recipe Notes

  • For extra flavor, marinate for up to 1 hour in the refrigerator before grilling.
  • Adjust herb combinations as per personal preference for unique twists on flavor.
  • If using smaller or larger lobster tails, adjust grilling time accordingly.

Delicious Mini Tater Tot Cheeseburgers Recipe for Snack Lovers

Mini Tater Tot Cheeseburgers: Bite-Sized Delights For All Occasions

⚖️
Difficulty
Easy

⏲️
Prep Time
15 mins

🕒
Cook Time
20 mins

⏱️
Total Time
35 mins

🍽️
Servings
4

If you’re searching for a fun and tasty appetizer, look no further than these Mini Tater Tot Cheeseburgers. These bite-sized burgers combine the comfort of cheeseburgers with the crispy goodness of tater tots—a match made in culinary heaven. The perfect treat for game day, parties, or even a weekend snack, these mini delights are easy to make and joyful to eat. You’ll love the savory beef, melty cheese, and crispy tater tots, coming together in each bite. Indulge in the rich flavors that will make these Mini Tater Tot Cheeseburgers a hit at your next gathering!

Quick Recipe Highlights

  • Flavor Profile: Salty, with a delightful balance between savory beef and gooey cheese, highlighted by the crispy and golden tater tots.
  • Texture: Expect a wonderful contrast between the crispy tater tot exterior and the juicy, tender beef interior, with the cheese melting perfectly in between.
  • Aroma: The enticing scent of grilling beef and melting cheddar cheese is complemented by the nostalgic aroma of freshly baked tater tots.
  • Visual Appeal: These mini burgers present a festive appearance on a platter, with golden tater tots wrapping the melty cheddar cheese and juicy burger patties.
  • Skill Level Needed: Simple enough for beginner cooks, requiring basic skills of browning beef and assembling mini sandwiches.
  • Special Equipment: A mini muffin tin aids in shaping these perfectly sized burger bites and ensuring even baking.

Recipe Overview

  • Difficulty Level: This recipe is designed with ease in mind, perfect for cooks of all skill levels. With simple cooking techniques like browning ground beef and baking frozen tater tots, it’s an accessible recipe for any occasion.
  • Category: These Mini Tater Tot Cheeseburgers fall under appetizers and snacks, making them the star of game-day gatherings or casual parties.
  • Cuisine: This recipe is a playful twist on American cuisine, combining classic cheeseburger ingredients with the beloved tater tot.
  • Cost: The ingredients are budget-friendly, making use of staples like ground beef, cheese, and frozen tater tots, costing approximately $10 for a batch of mini burgers.
  • Season: Ideal for any season, these mini cheeseburgers are especially popular during backyard barbecue season or fall football gatherings.
  • Occasion: Perfect for any party, these bite-sized delights are also fantastic for casual entertaining with friends or quick family snacking.

Why You’ll Love This Recipe


These Mini Tater Tot Cheeseburgers offer a burst of flavor and texture that enchants with every bite. The juicy beef, lightened by melted cheese, is delightfully encased in crispy tater tots, making for an exceptionally satisfying mouthful. The convenience of this recipe cannot be overstated—quick prep and minimal cooking time make them a go-to choice for effortless entertaining. Nutritionally, they offer a balanced indulgence with protein-packed beef and cheesy richness to satisfy your cravings.

Socially, this recipe works wonders; the fun presentation captures attention at parties and brings people together over shared enjoyment. Easy on the wallet, the ingredients are readily accessible and affordable, ensuring everyone can partake. Their smaller size means they’re perfect for portion control, making you a hit at events without any guilt. Indeed, these Mini Tater Tot Cheeseburgers bring culinary joy with remarkable versatility.

Historical Background and Cultural Significance


The origin story of cheeseburgers dates back to the 1920s in the United States, when chefs began adding cheese to hamburgers to enhance flavor. The evolution of the tater tot is equally fascinating, originating in the 1950s as a clever way to utilize potato scraps. The cultural importance of these two American classics underscores their amalgamation in this creative recipe, combining the innovative spirit of early American fast food with the satisfying crunch of the beloved tater tot.

Over the decades, mini tater tot cheeseburgers have become a popular fixture in social gatherings and sports events. They offer the nostalgic taste of American comfort food while appealing to modern dining trends favoring small, shareable bites. Regional variations across the U.S. may include adding different spices or toppings, but the core concept—savory bite-sized fun—remains constant.

Ingredient Deep Dive


Ground beef, the starring ingredient, holds deep cultural significance as a staple in American comfort food. It offers a high protein content, essential for muscle growth and cell repair. Choose quality ground beef, such as 80/20 mix, for the best juiciness-to-fat ratio when browning. Store it in the fridge or freezer, and substitute it with ground turkey for a leaner option if desired.

Cheddar cheese adds creamy richness and flavor. High in calcium, it supports bone health. Selecting sharp cheddar can enhance flavor because it melts well and offers a tangy kick. Store it refrigerated, and shop for it in block form for grating yourself. Alternative cheeses like Monterey Jack or Gouda can be used to personalize your flavor profile further.

Common Mistakes to Avoid

  • Overbrowning the beef: Avoid using high heat, which can dry out the meat. Cook on medium to retain juiciness.
  • Not pre-cooking tater tots: Ensure they’re hot and crispy before assembly to keep them from becoming soggy.
  • Using cold cheese: Let cheese sit at room temperature for even melting during baking.
  • Skipping seasoning: Add salt and pepper to enhance beef flavors before browning.
  • Incorrect muffin tin size: Use a mini muffin tin for proper burger shape and size.
  • Rushing assembly: Ensure uniform layering for balanced bites, allowing cheese to keep toppings together.
  • Skipping greasing: Grease the muffin tin well to avoid any sticking issues.
  • Serving delayed: Serve promptly after baking for the best texture and taste experience.

Essential Techniques


Mastering the art of browning beef is crucial for these Mini Tater Tot Cheeseburgers. Proper browning creates a rich, complex flavor by caramelizing the meat’s natural sugars. Start with a hot pan and avoid overcrowding; too much meat lowers heat and steams instead of browning. Keep an eye on the meat, stirring occasionally, and remove excess fat to avoid greasy results. Achieving a rich, dark crust on the beef is the goal, signifying successful Maillard reaction, enhancing depth and aroma.

Pro Tips for Perfect Mini Tater Tot Cheeseburgers


Elevate your Mini Tater Tot Cheeseburgers with these pro tips. For added flavor, mix finely chopped onion and garlic with the ground beef before browning. Using a mustard glaze—for example, brushing dijon mustard atop each burger before baking—enhances taste and adds a tangy top note. Consider adding seasonings like Worcestershire sauce or smoked paprika for a smoky depth. Present these mini burgers with a light sprinkle of toasted sesame seeds over the tater tops for visual and textual appeal. Personalize with a zigzag of spicy mayo or a pickle slice for that authentic burger taste.

Variations and Adaptations


Experiment with regional tastes by incorporating bacon bits inside the beef for a smoky richness reminiscent of Southern barbecue. Adapting these cheeseburgers for a season-specific theme could include adding fresh, sliced jalapeños for a summer spice punch. Dietary modifications, like using turkey meat or plant-based patties, cater to diverse preferences. Enhance flavors by introducing gourmet cheese varieties such as blue cheese or Swiss. For a twist in texture, try a potato crisp base instead of tater tots. Creative plating could include serving with sriracha ketchup for a modern edge.

Serving and Presentation Guide


Present these Mini Tater Tot Cheeseburgers on a rustic wooden board or a sleek, modern platter for visual appeal. Consider garnishing with fresh herbs like parsley or thinly sliced radishes to add a splash of color and freshness. Traditional accompaniments like ketchup and mustard suit well, but adding aioli or barbecue sauce provides a modern twist. Serve at room temperature or slightly warm, ensuring the cheese remains melty and enticing. Portion control tips include allocating 2-3 burgers per person, ensuring delightful satisfaction without overindulgence.

Wine and Beverage Pairing


Opt for a light, fruity red wine like a Pinot Noir to complement the rich, savory flavors of the Mini Tater Tot Cheeseburgers. This wine option balances tartness and acidity without overpowering the dish. For non-alcoholic alternatives, consider a crisp iced tea or sparkling water with a lemon twist to refresh the palate. If serving with coffee, go for a mild roast with nutty undertones to harmonize flavors. Beverage temperature should remain chilled to contrast the warm cheeseburgers effectively, enhancing the overall tasting journey.

Storage and Shelf Life


Store leftover Mini Tater Tot Cheeseburgers in an airtight container in the refrigerator for up to three days. For optimal freshness, keep them away from aromatic foods to prevent flavor absorption. To reheat, bake in a preheated oven at 375°F for 10-12 minutes until hot, avoiding the microwave, which can make tots soggy. If freezing, individually wrap each mini cheeseburger for up to a month, thawing in the fridge before reheating for best results. Watch for signs of spoilage, like off-smells or changes in appearance.

Make Ahead Strategies


Efficiently plan by prepping components ahead. Shape and brown beef patties a day in advance, cooling and refrigerating until needed. Cook tater tots ahead but reserve final assembly and baking for serving day to retain crispness. Assess that assembly steps and component storage don’t impact quality, maintaining flavor balance. When reheating, ensure elements are added fresh, like any post-bake condiments. This strategy saves time without sacrificing the delightful taste and texture love with Mini Tater Tot Cheeseburgers.

Scaling Instructions


Easily scale this recipe to suit different crowd sizes by adjusting ingredient quantities. To halve the recipe, maintain proportions and adjust cooking timing slightly to ensure ideal texture and flavor. Doubling or tripling involves larger pans or multiple muffin tins for even cooking, ensuring all components maintain quality. Timing modifications usually include monitoring cook times closely, pulling from the oven when golden and warm throughout. Store extra ingredients carefully to prevent spoilage, extending longevity for further use.

Nutritional Deep Dive


Assessing the nutritional profile, Mini Tater Tot Cheeseburgers offer a balanced macro-nutrient content, with protein-rich beef supporting muscle repair and cheddar cheese complementing with fat for energy. The tots contribute additional carbohydrates, maintaining a fulfilling meal. Micro-nutritionally, expect a boost of iron and calcium from combined beef and cheese, enhancing vitality. Dieters should consider moderating portion size or selecting lower-fat cheese options to adhere to dietary needs. Overall, mindful consumption within a balanced diet framework easily accommodates these tasty mini burgers.

Dietary Adaptations


Adjust the recipe for gluten-free diets by verifying all ingredients are certified gluten-free, especially the tater tots. Swap regular buns with cauliflower or cabbage leaves for a low-carb approach, aligning with keto-friendly meals. For a dairy-free version, replace cheddar with dairy-free cheese alternatives and opt for dairy-free condiments. To accommodate vegans, substitute the beef with plant-based protein mixes and cheese with vegan cheese. Adhering to dietary preferences is simple with ingredient replacements, making Mini Tater Tot Cheeseburgers universally enjoyed.

Troubleshooting Guide


Ensure optimal flavor balance by seasoning the beef properly before browning, mindful to prevent under- or over-flavoring. If texture becomes an issue, adjust cook times to achieve a tender, juicy interior. When confronting temperature problems, verify oven thermostats for accuracy, or consider an oven thermometer. Overcome equipment challenges by using alternatives like silicone molds instead of mini muffin tins. Ingredient substitutions, such as ground turkey for beef, may require adjustments to maintain desired taste profiles. Timing concerns can be resolved by thoroughly understanding each step’s duration and orchestrating accordingly.

Recipe Success Stories


Many readers have expressed enthusiasm for these Mini Tater Tot Cheeseburgers in online forums and recipe reviews. Adaptations include reader success stories of adding spices like cumin or smoked chipotle powder for personalized tastes. Photography tips from the community suggest highlighting bright garnishes, like green onions or cherry tomatoes, for an appealing visual presentation. Others have shared how rotating the tater tots during baking achieves an even crisp, delighting guests. Each story contributes to the shared joy and growing versatility of this beloved recipe.

Frequently Asked Questions

Can I use different types of cheese?

Yes, you can use any cheese that melts well, like Monterey Jack or mozzarella, to tweak flavor profiles.

How can I make them vegetarian?

Substitute the ground beef with plant-based meat alternatives for a delicious vegetarian twist.

Is it possible to prepare these in advance?

Yes, you can precook the components, and store them separately. Assemble and bake right before serving.

Are there low sodium alternatives?

Choose low-sodium cheese and season the beef conservatively to align with low-sodium dietary guidelines.

What if I don’t have a muffin tin?

Use a baking sheet and shape the burgers by hand, adjusting cooking time to protect integrity and size.

Can I freeze leftovers?

Yes, wrap each mini cheeseburger tightly and freeze for up to a month. Thaw in the fridge before reheating.

How can I make tater tots extra crispy?

Bake the tater tots separately until crispy before assembling, enhancing overall texture.

What side dishes pair well?

Consider fresh salads, roasted vegetables, or simple fries as complementary side dishes offering contrast.

Can I adjust this for smaller servings?

Yes, easily scale the recipe down to serve smaller groups by halving ingredients and adjusting cook times slightly.

What dip pairs best with these burgers?

Sriracha mayo, honey mustard, or barbecue sauce provide delightful dipping options enhancing the burger taste.

Additional Resources


Explore related recipes like traditional sliders or stuffed potato skins for further snacking inspiration. Technique guides focusing on achieving perfectly cooked ground beef expand skills, ensuring future recipe success. Ingredient information articles explore different cheese varieties’ flavor profiles, helping select alternatives. Equipment recommendations include mini muffin tins or burger presses, optimized for universal kitchen use. Seasonal variations suggest incorporating fresh seasonal produce into the recipe or complementing sides to keep meals dynamic and flavorful all year round.

Join the Conversation


We’d love to see your versions of these Mini Tater Tot Cheeseburgers! Share your creative adaptations on social media using #TaterTotCheeseburgers. Enhance the presentation with photography tips, focusing on lighting and garnish to make the dish a feast for the eyes. Leave your recipe reviews in the comments section, helping the community learn from your experiences. Participate in discussions for variations, seasoning tweaks, or innovative integrations making unforgettable impressions at gatherings. Embrace the recipe’s versatility while engaging with a vibrant cooking community celebrating these delightful bites.

The Recipe

Mini Tater Tot Cheeseburgers

Serves: 4

Prep Time: 15 mins

Cook Time: 20 mins

Total Time: 35 mins

Kitchen Equipment Needed

  • Mini muffin tin
  • Frying pan
  • Oven
  • Mixing bowl
  • Spatula

Ingredients

  • 1 lb ground beef
  • 1 cup shredded cheddar cheese
  • 1 package frozen tater tots
  • Salt and pepper to taste
  • Ketchup and mustard (optional, for serving)

Directions

  1. Preheat the oven to 400°F (200°C).
  2. Brown the ground beef in a frying pan over medium heat, seasoning with salt and pepper.
  3. Cook the tater tots separately until they’re golden and crispy.
  4. In a mini muffin tin, place a layer of shredded cheddar cheese.
  5. Fill each muffin cup with a spoonful of the browned beef, pressing down gently.
  6. Top each with a cooked tater tot.
  7. Bake in the preheated oven for 8-10 minutes, or until cheese is melted and bubbly.
  8. Serve immediately with ketchup and mustard, if desired.

Recipe Notes

  • For extra flavor, add spices like smoked paprika or garlic powder to the beef.
  • Try different cheeses such as Monterey Jack for variation.
  • To store leftovers, keep in an airtight container in the refrigerator for up to three days.

Savory Longhorn Steakhouse Parmesan Chicken Recipe You Must Try

Longhorn Steakhouse Parmesan Chicken: A Culinary Delight

⚖️
Difficulty
Moderate

⏲️
Prep Time
20 mins

🕒
Cook Time
25 mins

⏱️
Total Time
45 mins

🍽️
Servings
4

Craving a dish that’s perfect for a family dinner or a gathering with friends? Look no further than the Longhorn Steakhouse Parmesan Chicken. This recipe combines the juicy tenderness of chicken breast with a savory parmesan crust that’s sure to impress. The melted cheese and rich flavors create an irresistible aroma that fills your kitchen, making this dish not only a treat for the taste buds but also a feast for the senses.

Whether you’re seeking the comfort of a homemade meal or the satisfaction of mastering a restaurant-worthy dish, this Parmesan Chicken delivers in every aspect. The flavors meld perfectly with each bite, offering a balanced taste that’s both rich and delightful. The result? A dish that’s as comforting as it is indulgent.

Quick Recipe Highlights

  • Flavor Profile: Savory and robust with rich parmesan and aromatic herbs blending with the succulent chicken.
  • Texture: Perfectly crunchy on the outside with a tender, juicy inside, thanks to the perfect frying technique.
  • Aroma: Aromas of melting cheese, fresh herbs, and crisp breadcrumbs journey through your kitchen.
  • Visual Appeal: A golden-brown crust paired with a vibrant combination of melted cheese and fresh parsley.
  • Skill Level Needed: Moderate skill level; familiarity with frying chicken and creating a crust is beneficial.
  • Special Equipment: While a basic frying pan and oven are standard, a meat mallet might be useful for an even thickness.

Recipe Overview

  • Difficulty Level: This recipe is deemed moderate due to the frying step requiring attention and control for optimal crust.
  • Category: Perfect as a main dish that pairs well with simple sides, bringing sophistication to any meal occasion.
  • Cuisine: Inspired by the heartwarming flavors of Italian-American cuisine, mixing hearty cheeses and tender meats.
  • Cost: Relatively cost-effective with primary expenses in cheese and quality chicken; overall, a worthy home investment.
  • Season: This dish is perfect for cooler months when hearty meals become comforting and satisfying.
  • Occasion: Ideal for family dinners and celebrations where a little extra effort is appreciated in creating warmth and joy.

Why You’ll Love This Recipe


The taste of Longhorn Steakhouse Parmesan Chicken is a symphony of flavors, delightful to the palate. The rich and robust parmesan perfectly complements the succulent chicken, enhancing its natural juiciness. This dish offers a satisfying crunch with every bite, creating a textural experience that’s both delightful and fulfilling. Coupled with its delicious taste, this chicken is also convenient to prepare. It requires typical ingredients and straightforward methods, making it suitable for any home cook seeking to impress.

Nutritionally speaking, this dish offers a welcome balance. Protein-rich chicken is complemented by calcium-packed parmesan, contributing to a meal that’s both flavorful and nourishing. Its robust flavors and hearty composition make it perfect as a satisfying main course. Socially, this dish serves as a perfect centerpiece for gatherings. Its impressive presentation and comforting flavors invite conversation and joy around the dining table, nourishing not only the body but also growing shared memories.

From a cost perspective, this chicken is surprisingly economical. Utilizing ingredients that are likely already in your kitchen, it avoids the need for complex or costly elements, making it accessible to wide audiences. Overall, this dish isn’t just a meal; it’s an experience of flavors, emotions, and culinary traditions brought together in one perfect plate.

Historical Background and Cultural Significance


Parmesan Chicken has rich culinary roots tracing back to the fusion of Italian and American cuisines, brought together through waves of migration and adaptation. This dish evolved as an interpretation of traditional Italian recipes, adapted to suit American tastes and ingredient availability. While its core essence remains tied to Italy’s culinary ethos, it has since evolved into a celebrated American favorite, especially in steakhouses.

Culturally, recipes like Parmesan Chicken serve as reminders of culinary adaptability and the intermingling of traditions. It reflects how cuisine evolves, morphing with each new culture it encounters, bringing along its original flavors and adding new ones. The dish has gained significant popularity across the United States, presented in various forms by restaurants and cherished in home kitchens.

As it has spread, it continues to evolve, each cook adding a personal touch, whether it be an extra spice or an innovative cooking method. Regional variations of Parmesan Chicken now exist, with each area bringing its own cultural twist to this classic dish.

Ingredient Deep Dive


The star of this dish, chicken breasts, are an essential protein component in various cuisines, including Italian and American. This choice cut of meat is loved for its tenderness and ability to absorb flavors, making it an ideal base for the Parmesan crust. Traditionally, chicken holds cultural significance in Italian cuisine as a symbol of abundance and family meals. Nutrient-wise, chicken is rich in protein and a good source of essential vitamins and minerals.

Parmesan cheese, a staple in Italian cooking, brings a savory depth and rich texture to this dish. Its production and culture are well ingrained in Italian tradition, renowned for its protected designation of origin (PDO) status in Europe. Apart from its delightful taste, parmesan provides a good dose of calcium and protein, adding nutritional value to the meal.

Common Mistakes to Avoid

  • Overcooking the chicken can lead to dryness; always monitor cooking time and temperature for juicy meat.
  • Skipping the breading step will compromise the crust’s texture, taking away the desired crunch.
  • Using low-quality cheese could diminish the flavors; opt for authentic parmesan to retain richness.
  • Cooking at too high a heat can lead to burnt crusts; maintain medium heat for even cooking.
  • Forgetting to pat dry chicken leads to a soggy crust; moisture prevents proper browning.
  • Neglecting proper seasoning results in a bland dish; ensure each component is well-seasoned.
  • Using the wrong oil for frying can alter flavors; use a neutral oil with a high smoke point.
  • Underestimating prep time can rush steps; prepare ingredients in advance for a smoother process.

Essential Techniques


Bread-crusting the chicken is vital. Proper technique ensures the crust adheres well, offering that desirable crunch. Begin by dredging the chicken in flour to create a dry surface, allowing the egg mixture to stick. Follow with breadcrumbs mixed with grated parmesan for flavor depth. The importance of maintaining an even crumb layer cannot be understated; it equally distributes flavor, texture, and appearance.

When frying, maintain consistent medium heat. This ensures that the crust crisps up without burning and that the chicken cooks through evenly. Visually, the aim is to achieve a golden brown crust, signaling the right balance between texture and doneness. Mastering these techniques leads to a delectable Parmesan Chicken.

Pro Tips for Perfect Longhorn Steakhouse Parmesan Chicken


For the perfect crunch, ensure your breadcrumbs are finely milled and evenly coating the chicken. Freshly grated Parmesan cheese is preferred for its moisture and flavor retention compared to pre-packaged options. If possible, let the chicken rest for a few minutes before serving, allowing flavors to meld and juices to redistribute, enhancing every bite.

Keep your kitchen tools at the ready; it helps in organizing the cooking process better. The use of a meat mallet can ensure even thickness in chicken breast, promoting uniform cooking. If you’re short on time, prepare and freeze the breaded chicken in advance, then simply defrost and cook when needed.

A meat thermometer can save your day. Ensure your chicken reaches an internal temperature of 165°F (75°C) for safe consumption while retaining tenderness. Experiment with adding a pinch of herbs to your breadcrumb mixture for nuanced flavors.

Variations and Adaptations


Regional interpretations may include herbs like basil or sage infused in the breadcrumb mixture, echoing Italian culinary notes. For a seasonal touch, summer offers fresh tomato relish toppings while winter invites warm, melted provolone cheese. Dietary modifications can accommodate various needs; gluten-free panko works well for those avoiding wheat, and leaner cuts can be utilized for a lower-fat version.

For a flavor twist, smoked paprika can lift the crust’s profile, adding a hint of richness. Additionally, consider adapting textures by supplementing panko for traditional breadcrumbs, offering a lighter, airier crust.

Presentation alternatives include individual servings topped with fresh microgreens and drizzles of balsamic reduction, offering a contemporary touch to a classic dish.

Serving and Presentation Guide

A vibrant garnish of fresh basil or parsley lays beautifully atop the golden crusted chicken, adding a touch of freshness. For plating, consider resting the chicken atop a bed of arugula for a contrast in color and a peppery bite. Traditional accompaniments like roasted vegetables or creamy mashed potatoes enhance the dish’s appeal.

Modern serving suggestions might include pairing with light, zesty salads, bringing balance to the hearty flavors. Attention to temperature is crucial; the chicken is best enjoyed hot and fresh from the kitchen. For portion control, slice chicken into medallions, artfully displaying each slice.

Wine and Beverage Pairing


A crisp white wine like Sauvignon Blanc or a light red like Pinot Noir pairs nicely with the savory flavors of Parmesan Chicken, both complementing and cutting through the richness. For non-alcoholic alternatives, consider an iced lemon tea or spritzed sparkling water with a hint of lime.

Beverage temperatures should be cool, refreshing the palate and enhancing the dish’s enjoyment. Suggestions for serving include using tall glasses with clear ice for an elevated presentation, adding elegance to your dining experience.

Storage and Shelf Life


Store leftovers in an airtight container to maintain moisture levels; refrigeration will keep it fresh for up to three days. Ideally, reheat using an oven to retain the crust’s crispness rather than a microwave, which can make it soggy. Avoid freezing cooked Parmesan Chicken due to texture alteration.

Containers should be lined with paper towels to absorb excess moisture, maintaining crust texture. Signs of spoilage include off smells, slimy texture, and discolored appearance. Always prioritize fresh ingredients to prolong shelf life post-cooking.

Make Ahead Strategies


Prepare elements such as the breadcrumb mix and slather separately; they can be stored for a week in containers. While assembling the dish, pre-breading and freezing individual pieces provide a head start for quick meals ahead.

When reheating, add fresh elements like herbs to bring life back to flavors dulled during refrigeration. Maintain quality by avoiding extended freezer storage which leads to freezer burn or taste dilution. Separate moist ingredients during make-ahead to maintain textural integrity.

Scaling Instructions


For half recipes, reduce cooking times slightly, monitoring closely for doneness to avoid overcooking. Doubling involves maintaining an organized station and working in batches to retain the quality of frying. Larger scales will require additional tools like larger pans to prevent crowding the oil, ensuring even cooking.

Timing adjustments may be necessary, as increased volume affects cooking dynamics and requires attention to ensure consistency across all servings. Ensure equal seasoning distribution to maintain flavors when scaling the recipe.

Nutritional Deep Dive


Macronutrient-wise, Parmesan Chicken is a protein-dense dish with moderate fat content from frying, well-suited for active lifestyles. Companioned by cheeses, it offers a source of necessary calcium.

Portion considerations could involve calorie adjustments, with options for leaner chicken portions or reduced cheese for weight management. Exploring the micronutrient contribution, Parmesan offers essential minerals such as zinc and phosphorus, contributing to overall nutritional benefits.

Dietary awareness supports portion control strategies, balancing out protein intake with recommended sides like vegetables for diversified nutrient access.

Dietary Adaptations


For gluten-free versions, utilize alternative breadcrumbs composed of ground nuts or gluten-free flour, accommodating gluten-sensitive diets. Dairy-free adaptations include plant-based cheese options or nutritional yeast for that desired umami effect.

Vegan transformations rely on seitan or tofu as protein alternatives, seasoned thoroughly for maximum flavor. Carb-conscious individuals adapt by using almond meal as a crust base, lowering carbohydrate levels while maintaining taste.

Keto-approved recipes focus on high-fiber coatings and healthy fats through oils and nuts, giving texture while minimizing carb impact, suitable across multiple dietary restrictions.

Troubleshooting Guide


Texture challenges, such as soggy crusts, stem from trapped moisture during cooking; proper drying and temperature maintenance solve this. Balanced flavors require seasoning experimentation; tasting as you go ensures harmonious blends.

Temperature issues may arise if heating equipment is unsuitable; invest in quality thermometers and pans. Substituting key ingredients like breadcrumbs should be done carefully, ensuring similar texture and flavor profiles are maintained. Timing can be adjusted through close monitoring, especially for chicken deferment affecting cooking efficiency.

Recipe Success Stories


Cooking enthusiasts rave about the adaptive flavor profiles achievable through herbs and spice infusions, lending personalization to each recipe attempt. Successes involve marinating meat overnight for intensified flavors, extending beyond standard execution.

Modified ingredient stories unfold—readers share innovative approaches within community groups, cultivating shared culinary advances. Photography captures the dish’s essence, often spotlighting vibrant ready-to-eat meals paired with complements, showcasing presentation brilliance.

Frequently Asked Questions

How long can Parmesan Chicken be stored post-cooking?
Answer: Properly stored in airtight containers, your Parmesan Chicken remains safe for consumption within three days when refrigerated. Always monitor for signs of spoilage, ensuring safe reheating practices.

Can I substitute Parmesan for a different cheese?
Answer: Parmigiano Reggiano is optimal for its flavor; however, Asiago or Romano offer an excellent replacement with similar profiles. The key is maintaining a high smelting point appropriate for crust creation.

What’s the best size for chicken portions?
Answer: Aim for uniform thickness to ensure consistent cooking; using a mallet assists in achieving this while promoting even crust adherence and preventing overcooked portions.

What oil is best for frying?
Answer: Opt for neutral oils like canola or vegetable oil with a high smoke point to achieve an ideal fry without imparting additional flavors that could alter the intended taste profile.

Can leftovers be frozen?
Answer: While freezing cooked Parmesan Chicken is possible, note the potential for altered texture—notably in the crust; prioritize refrigeration for short-term storage where possible.

Why does my crust not adhere?
Answer: Likely causes include insufficient drying of the chicken’s surface or uneven breading. Pat chicken dry, utilize flour adhesion, and press breadcrumbs firmly for best results.

How to achieve even frying?
Answer: Maintain oil height adequate for shallow frying and avoid overcrowding pans. Fry in small batches while monitoring heat levels to ensure constant cooking temperatures.

How do I enhance flavor further?
Answer: Layering flavors with marinades, fresh herbs, and balancing seasoning during preparation amplifies depth; remember to taste-test frequently for personalized perfection.

Any non-alcoholic pairings?
Answer: Complement each meal with sparkling mineral water with lemon slices or herbal teas infused with mint to provide a refreshing palate-cleansing experience.

Is pre-breading essential?
Answer: Pre-breading aids in thorough crust formation, essential for textural success. Skipping this can lead to uneven adhesion; incorporate this step for maximum quality.

Steps for vibrant presentation?
Answer: Use colorful garnishments, precision slicing, and contrasting plate selections to visually enhance the dish, capturing attention while pleasing delightful diverse palates.

Additional Resources


Explore further with related recipes harnessing parmesan’s culinary diversity; try recipes like Chicken Piccata or Eggplant Parmesan, where cheese is central. Guides to mastering frying techniques, ingredient optimization, and suitable equipment will equip you, elevating cooking skills.

Incorporating seasonal twists enhances this recipe’s adaptability year-round, supported through detailed seasonal ingredient analyses.

Join the Conversation


Engage with our community through social media sharing, showcasing your recipe attempts with visually enticing photographs. Constructive reviewing helps others, inspiring innovative improvements to collective meals. Share your unique variations and adaptations, contributing to a growing recipe resource. Embrace culinary connections, creating a sense of virtual togetherness one joyful dish at a time.

The Recipe

Longhorn Steakhouse Parmesan Chicken

Serves: 4

Prep Time: 20 mins

Cook Time: 25 mins

Total Time: 45 mins

Kitchen Equipment Needed

  • Meat mallet
  • Frying pan
  • Oven
  • Baking sheet
  • Mixing bowls

Ingredients

  • 4 boneless, skinless chicken breasts
  • 1 cup all-purpose flour
  • 2 eggs, beaten
  • 1 cup breadcrumbs
  • 1 cup grated Parmesan cheese
  • Salt and pepper to taste
  • 1 tsp Italian herbs
  • Cooking oil for frying

Directions

  1. Preheat the oven to 350°F (175°C).
  2. Slightly flatten chicken breasts using a meat mallet for uniform thickness.
  3. Set up a breading station: one bowl with flour, one with beaten eggs, and a mixture of breadcrumbs and parmesan cheese in a third.
  4. Season each chicken breast with salt, pepper, and Italian herbs.
  5. Dredge each piece in flour, dip in egg, and coat with breadcrumb mixture.
  6. Heat oil in a frying pan over medium heat. Fry chicken until golden brown on each side, about 3-4 minutes per side.
  7. Transfer fried chicken to a baking sheet and bake in the preheated oven for an additional 10-15 minutes until cooked through.
  8. Let rest for 5 minutes before serving, allowing juices to redistribute.

Recipe Notes

  • Substitute panko for breadcrumbs for an airier texture.
  • Pair with fresh arugula salad or roasted vegetables for a complete meal.
  • Add red chili flakes to the breadcrumb mix for a spicy kick.

Garlic Steak & Potato Foil Packets: A Simple, Flavorful One-Pan Meal

steak and potato foil packets, foil packet recipes, garlic steak dinner, steak foil wraps, grilled steak packets, one-pan steak meal

Garlic Steak & Potato Foil Packets: A Flavor-Packed Meal for Any Occasion

Garlic Steak & Potato Foil Packets are a perfect meal option for those seeking a combination of flavor, convenience, and versatility. These foil packets bring together tender steak, perfectly cooked potatoes, and aromatic garlic into one delightful package. Whether you’re grilling outdoors or baking indoors, this recipe delivers restaurant-quality results with minimal cleanup.

Learn about foil cooking safety to ensure the best experience while making foil packet meals.


Why Garlic Steak & Potato Foil Packets Are So Popular

A Brief History of Foil Packet Meals

Foil packet cooking has roots in outdoor traditions, from camping to BBQs. It has since become a household favorite due to its simplicity and ability to lock in flavors. The combination of garlic, steak, and potatoes takes this method to gourmet levels.

The Perfect Blend of Ingredients

  • Steak: Ribeye or sirloin offers tenderness and rich flavor.
  • Potatoes: Yukon Gold or baby potatoes ensure a creamy texture.
  • Garlic: Fresh cloves amplify the dish’s aroma and taste.

These packets are also a great opportunity to get creative with add-ons like vegetables, cheese, or herbs.

Explore the health benefits of garlic and how it enhances both flavor and nutrition.


How to Make Garlic Steak & Potato Foil Packets

Tools You’ll Need

  • Heavy-duty aluminum foil
  • Tongs for easy handling
  • Optional: Grill mats or oven trays

Ingredients (Serves 4)

  • 1 pound steak (cubed)
  • 1 pound potatoes (sliced into even sizes)
  • 2 tablespoons garlic (minced)
  • 3 tablespoons butter
  • Herbs: Rosemary, thyme, parsley
  • Salt and pepper to taste

Step-by-Step Guide

1. Prep the Ingredients

  • Cube the steak into bite-sized pieces.
  • Slice the potatoes into thin, even rounds to ensure they cook uniformly.
  • Mince the garlic finely for even distribution.

2. Season and Marinate

  • Combine the steak, potatoes, garlic, butter, and herbs in a large bowl.
  • Add a generous amount of salt and pepper.
  • Optional: Marinate the mixture for 30 minutes for enhanced flavor.

3. Assemble the Foil Packets

  • Cut large pieces of foil, enough to wrap the ingredients securely.
  • Layer potatoes at the bottom and place steak on top.
  • Seal the edges tightly to prevent steam from escaping.

4. Cooking Options

  • Grill: Cook over medium heat for 20-25 minutes.
  • Oven: Bake at 375°F for 25-30 minutes.
  • Air Fryer: Place packets in the basket and cook at 370°F for 20 minutes.

Tips for Perfect Foil Packets

  • Even Cutting: Ensure potatoes and steak are cut to similar sizes for even cooking.
  • Pre-Cooking Potatoes: For faster results, parboil potatoes for 5 minutes before assembly.
  • Double Wrapping: Prevent leaks by using two layers of foil.

Looking for more meal inspiration? Try One-Pan Pork Chops and Potatoes.


Health Benefits of Garlic Steak & Potato Foil Packets

This meal is not only delicious but also offers nutritional value:

  • Protein-Rich: Steak provides essential amino acids.
  • Energy-Packed: Potatoes are a great source of carbohydrates.
  • Antioxidant Boost: Garlic supports heart health and boosts immunity.

Variations to Try

Keto-Friendly Version

  • Replace potatoes with cauliflower florets.
  • Use olive oil instead of butter for a lower-calorie option.

Vegetarian Option

  • Swap steak with portobello mushrooms and add more vegetables like zucchini and bell peppers.

Cheesy Delight

  • Sprinkle shredded cheddar or Parmesan on top before sealing the foil.

Troubleshooting Common Issues

  • Undercooked Potatoes: Pre-cook or cut smaller pieces.
  • Burnt Steak: Lower the grill heat or reduce cooking time.
  • Soggy Packets: Avoid adding too much liquid during seasoning.

Serving Suggestions

Pair your Garlic Steak & Potato Foil Packets with:

  • A crisp green salad for balance.
  • Garlic bread for added indulgence.
  • Beverages like red wine or iced tea.

Try pairing this dish with recipes like Creamy Garlic Parmesan Chicken for a garlic-themed dinner night.


FAQs About Garlic Steak & Potato Foil Packets

How Long Should You Cook Steak Foil Packets?

Cooking time varies by method:

  • Grill: 20-25 minutes.
  • Oven: 25-30 minutes.
  • Air Fryer: 20 minutes.

Can You Make Them Ahead of Time?

Yes! Assemble the packets and store them in the refrigerator for up to 24 hours before cooking.

What’s the Best Steak for This Recipe?

Cuts like ribeye, sirloin, or flank steak work best due to their balance of flavor and tenderness.


Internal Linking Opportunities


Conclusion

Garlic Steak & Potato Foil Packets are the perfect blend of simplicity, flavor, and versatility. Whether you’re grilling for a summer BBQ or baking for a cozy dinner, these packets deliver a delightful experience with minimal effort. Don’t hesitate to experiment with flavors and make it your own.

Guide to Choosing the Best Steak Cuts for more steak selection tips.

Irresistible Slow Cooker Beef Brisket with Homemade BBQ Sauce

Slow Cooker Beef Brisket with BBQ Sauce: A Flavorful Delight

⚖️
Difficulty
Easy

⏲️
Prep Time
15 mins

🕒
Cook Time
480 mins

⏱️
Total Time
495 mins

🍽️
Servings
8

Indulge in the rich and savory flavors of Slow Cooker Beef Brisket with BBQ Sauce, a truly comforting dish for any occasion. This recipe captures the essence of tenderness, where the beef brisket is slow-cooked to perfection, absorbing the smoky, tangy essence of homemade BBQ sauce. The brisket, bathed in a robust sauce, not only delights the palate but also fills your home with an inviting aroma.

This dish celebrates the heartfelt connection of good food and great company. Imagine the brisket, moist and juicy, effortlessly flaking onto your fork. The BBQ sauce enhances the savory notes while introducing a satisfying hint of sweetness. Whether it’s a family gathering or an intimate dinner, the perfect combination of flavors and textures in this beef brisket promises to leave a lasting impression.

Quick Recipe Highlights

  • Flavor Profile: A harmonious blend of smoky, tangy, and sweet notes that bring out the rich flavor of the beef.
  • Texture: The beef is incredibly tender and juicy, with each bite practically melting in your mouth.
  • Aroma: The aroma is a delightful mix of cooked beef and the distinct smoky scent of BBQ sauce, filling the air with warmth.
  • Visual Appeal: The dish boasts a beautiful caramelized glaze from the BBQ sauce, with a rustic, hearty presentation.
  • Skill Level Needed: Perfect for beginners, the recipe involves straightforward preparation and slow cooking.
  • Special Equipment: A slow cooker is essential to achieve the tender, slow-cooked texture desired in this recipe.

Recipe Overview

  • Difficulty Level: Easy – This dish relies on the slow cooker to tenderize the brisket and infuse it with flavor, requiring minimal hands-on effort.
  • Category: Ideal as a main course for lunch or dinner, especially suitable for casual gatherings and family meals.
  • Cuisine: Rooted in American barbecue traditions, particularly renowned in Southern US cuisine for its hearty and comforting nature.
  • Cost: Relatively affordable, as brisket is a more budget-friendly cut of beef, while the BBQ sauce uses common pantry ingredients.
  • Season: Perfect for autumn and winter, although it can be enjoyed year-round, especially for cookouts and backyard barbecues.
  • Occasion: Suitable for casual get-togethers, Sunday dinners, or any event where comforting and satisfying food is desired.

Why You’ll Love This Recipe


The combination of taste and texture in this Slow Cooker Beef Brisket with BBQ Sauce is nothing short of a culinary masterpiece. The tender, melt-in-your-mouth brisket paired with the luscious sauce creates a perfect harmony of flavors. It’s a delightful dish that rewards patience with a satisfying sensory experience, from the rich aroma to the delectable taste.

Convenience is at the heart of this recipe. With a prep time of just 15 minutes, you can set it up in the morning and come home to a delicious, ready-to-eat meal. The slow cooker does all the heavy lifting, making it an effortless way to achieve a restaurant-quality dish in the comfort of your home.

Nutritionally, this recipe balances protein-rich beef with a sauce that’s flavorful yet not overly indulgent. It’s a comforting option without the heavy additives typical of pre-made sauces, allowing for a more wholesome meal that’s substantial without any compromise on taste.

The social aspect of this dish cannot be understated. It’s a communal affair perfect for family gatherings and social events. Sharing this dish creates a connection among diners, providing not only a wholesome meal but also a shared experience around a table filled with warmth and laughter.

Lastly, the recipe is highly cost-effective. Using a cut like brisket allows for a substantial meal without breaking the bank. The ingredients are readily accessible and affordable, meaning that even a novice cook can recreate this impressive meal without needing exotic or costly elements.

Historical Background and Cultural Significance


The beef brisket has a storied history in culinary traditions, particularly in the United States, where it holds a place of honor at barbecues and festive occasions. Originating as a cut that requires long, slow cooking methods, brisket was embraced for its rich flavor when cooked correctly. Today, it stands as a staple in Southern barbecue culture.

Culturally, the beef brisket transcends regional boundaries, celebrated not just in Southern barbecue but also in Jewish cuisine, especially as the centerpiece of holiday meals. It speaks to the universality of comfort food and its ability to bring people together through shared taste experiences.

Over time, the recipe for brisket has evolved, with variations and adaptations reflecting regional tastes and available ingredients. From simple salt and pepper rubs to complex spice and sauce blends, brisket has become a canvas for flavor exploration, illustrating the creativity of cooks across different cultures.

While the method of slow-cooking is universal, the addition of BBQ sauce represents a distinctly American take on brisket. It highlights the spirit of American cuisine—bold, flavorful, and rooted in tradition with a flair for experimentation. This integration showcases the dynamic nature of food and its capacity to adopt and innovate within different cultural contexts.

Ingredient Deep Dive


The star of this recipe, beef brisket, is integral to its success. Traditionally a working cut from the forequarter, brisket is known for its robust flavor and potential for tenderness when cooked slowly. Historically, it has been favored in ethnic and regional cuisines for its ability to absorb flavors while maintaining a satisfying beefiness.

Nutritionally, brisket is rich in protein and essential vitamins such as B12 and zinc. To select the perfect brisket, look for one with even marbling and a consistent thickness. Proper storage involves wrapping it tightly and keeping it refrigerated before cooking, ensuring freshness and preventing contamination.

The BBQ sauce in this recipe serves as more than just a condiment—it is a flavor-enhancer with roots in Southern barbecue traditions. The sauce offers a balanced combination of smoky, sweet, and tangy elements, achieving depth and richness in every bite. Key to its depth are ingredients like smoked paprika and apple cider vinegar, each contributing unique aromatic qualities.

Selecting a quality barbecue sauce starts with recognizing specific flavors you enjoy, such as spiciness level and sweetness. For those aiming to store it, a cool, dark pantry is optimal, ensuring the sauce maintains its integrity and taste over time.

Common Mistakes to Avoid

  • Not trimming the excess fat from the brisket can result in a greasy texture rather than a tender finish.
  • Overcrowding the slow cooker inhibits proper heat distribution, leading to uneven cooking.
  • Skipping the searing process means losing out on the depth of flavor from caramelization.
  • Using the wrong setting on your slow cooker can alter cooking times and moistness.
  • Adjusting the recipe with too much sauce can mask the brisket’s natural flavor.
  • Not allowing the brisket to rest after cooking can cause juices to spill out, losing moisture.
  • Using an improper knife to slice the brisket can tear the meat, affecting presentation.
  • Cutting the brisket against the grain is key; not doing so results in tougher slices.

Essential Techniques


One crucial technique is to sear the brisket before slow-cooking. This step builds flavor by forming a crust from the Maillard reaction, sealing in juices and maximizing tenderness. Mastering this involves using high heat and a proper cut of meat.

Timing is important. While the slow cooker is designed to be forgiving, precise cooking ensures the ideal tenderness. Checking doneness with a fork—when it slides easily, the brisket is ready.

Proper slicing post-cooking is essential. Identify the grain of the brisket and make perpendicular cuts. This ensures the tender texture you’re aiming for, as slicing into the grain makes the meat more toothsome and satisfying.

Pro Tips for Perfect Slow Cooker Beef Brisket


Allow the brisket to rest prior to slicing. This rest period allows internal juices to redistribute, keeping the meat moist and delicious.

For a balanced sauce flavor, taste as you go, adjusting sweetness and tang level based on your palate and desired dish outcome.

Introduce a smokey depth by adding a drop of liquid smoke into the BBQ sauce, enhancing the barbecue feel without a smoker.

Consider making the dish a day ahead—flavors tend to deepen over time, and reheated portions often taste better.

For a hearty meal, serve over a bed of mashed potatoes or cheesy grits to complement the rich, savory brisket.

Slice only what’s about to be served. Leaving the remaining brisket whole ensures moisture preservation and longer lasting leftovers.

Variations and Adaptations


Regional variations can introduce diverse flavor profiles. For example, add a Midwest touch with a mustard-based sauce, replacing or complementing the traditional tomato base.

For a seasonal twist, consider incorporating fresh summer herbs in the sauce or a fall-inspired spice mix using cinnamon and nutmeg for warmth.

Those on specialty diets can adapt the recipe easily. For keto, adjust the sugar levels in the BBQ sauce or explore sugar substitutes without altering the flavorful results.

Introduce an Asian flair with soy sauce and ginger as part of the sauce base, imparting a uniquely umami taste to the dish.

Creating a soft texture extends beyond the slow cooker. Use a meat tenderizer before cooking, or consider marinating overnight for phenomenal softness.

Presentation matters. Served sliced thinly over a wooden board, garnished with fresh herbs or roasted veggies, gives the meal a rustic elegance perfect for any occasion.

Serving and Presentation Guide


Exceptional plating elevates the presentation to match the exceptional taste. Consider arranging slices of brisket overlapping slightly, forming a visually appealing layout.

Garnishing with a sprinkle of chopped parsley or scallions adds a fresh splash of color, creating contrast against the rich sauce.

Traditional accompaniments like corn on the cob, creamy coleslaw, or pickles provide texture and balance, complementing the brisket’s depth.

For more modern serving suggestions, serve brisket sliders with a brioche bun, or offer brisket tacos for a refreshing twist.

Temperature is a key consideration—serve warm or hot for the best mouthfeel, as cooling diminishes flavor intensity and enjoyment.

Maintain portion control by slicing brisket according to serving sizes, ensuring everyone experiences a balanced portion of meat and sauce without overindulgence.

Wine and Beverage Pairing


Slow Cooker Beef Brisket pairs beautifully with full-bodied red wines such as Zinfandel or Syrah. These wines complement the richness of the brisket without overpowering the flavors.

For non-alcoholic alternatives, offer cold brewed iced tea or a tangy, carbonated lemonade to balance and refresh the palate amidst the meal.

If coffee or tea is a preferred accompaniment, choose robust, earthy varieties that harmonize with the beef’s depth.

Temperature considerations are crucial, with drinks kept chilled to contrast the warmth of the brisket, providing a sensory refresh.

For serving suggestions, present wine in large-bowled glasses to capture the aromatic compounds, enhancing both taste and enjoyment throughout the meal.

Storage and Shelf Life


Proper storage involves placing cooled brisket slices in airtight containers, extending freshness for up to four days in the refrigerator.

Temperature is paramount—avoid leaving cooked brisket out for extended periods, keeping it below 40°F when storing.

Opt for glass or high-quality plastic containers to limit exposure to air and moisture, which can degrade the texture and flavor.

Signs of spoilage include off smells, discoloration, or slimy residue—at any indication, avoid consumption.

Reheat slices gently over low heat on the stovetop or in the microwave, adding a splash of sauce or broth to maintain moisture.

Freezing guidelines advocate for freezing beef brisket in sealed, vacuum-packed bags for up to three months, with thawing recommended in refrigeration before use.

Make Ahead Strategies


The Slow Cooker Beef Brisket can be prepared a day or two in advance, benefiting from the melding of flavors over time.

Divide the cooling and storage processes to ensure quality, storing sauce separately to avoid soaking the meat, which can alter texture.

Assess the quality impact—brisket tastes better over time, but freshness is key. Refrigerated storage should precede freezing for optimal taste.

Consider key assembly tips—stand at the ready with all needed garnishes and accompaniments once the brisket is reheated.

Reheat either in the slow cooker on low or gently in an oven, covered, to maintain moisture and suppress any tendency to dry out.

Incorporate fresh herbs or citrus zest post-storage, intensifying flavors and enlivening the dish, making it appear newly prepared.

Scaling Instructions


Scaling recipes requires substituting appropriately, ensuring proportions remain consistent. For instance, doubling the saucing components but retaining any rub blends ensures balanced flavors and ample coverage.

Modifications for timing may be necessary in cases of large-scale doubling, considering the increased mass, influencing slow cooker temperatures slightly and centralizing supporting heat distribution.

Equipment adjustments include expanding slow cooker capacity or dividing quantities in separate appliances, preventing overcrowding and ensuring thorough, even cooking.

Consideration about storage exists when scaling—plan for dividing leftovers ahead of time, ensuring prompt chilling free of spoilage risks.

Nutritional Deep Dive


The Slow Cooker Beef Brisket provides a satisfying macronutrient profile, heavily reliant on quality protein. Each portion fits into a wholesome meal with ample amino acids supporting muscle maintenance and development.

Micronutrients include iron and vitamin B12, essential in oxygen transport and cellular energy levels, especially benefiting those with active lifestyles or who require higher nutrition needs.

Health benefits align with adhering to lean cuts without excess fats, while using controlled sauce quantities preserves beneficial keto or paleo diet intentions.

Dietary considerations adhere to portion control, where excess sodium or sugar in sauces requires adjustments for health-conscious eaters observing intake limits.

This recipe, when managed with moderation, supports portion analysis and maintains dietary goals, refining nutrient balances and offering flavorful enjoyment within constraints.

Weight management is possible with mindfulness, ensuring portions do not surpass caloric recommendations and instead slot into larger, holistic, balanced meal plans.

Dietary Adaptations


To make the dish gluten-free, ensure all BBQ sauce ingredients and trickle-down provisions remain certified gluten-free and free from any cross-contact substances.

For dairy-free variance, modifications are not extensive, focusing on no hidden inclusions within saucing or after-prep, enhancing its natural suitability.

Vegans may significantly adapt the recipe, substituting seitan or an equivalent protein substitute with equal weight distribution, avoiding animal-based broths.

Low-carb lifestyles find the recipe adaptable, removing sugar-based sauce components favoring sweeteners or natural extract inclusions, enhancing keto credibility.

Incorporations of whole30 or paleo options arise, ensuring clean, minimally-processed sauce ingredients align with a reflection of nutritional importance.

Low-FODMAP adjustments consider omitting onions or garlic in the sauce, instead embracing alternative spice blends for flavor compensation.

Troubleshooting Guide


Texture issues arise from improper slicing methods; resolve this by identifying meat grain and adjusting knife angles accordingly through precise cuts.

Imbalances in flavor can follow oversized sauces—dilution with water, broth, or dilution adjustments help mediate these taste projections.

Temperature control can falter—monitor slow cooker steps diligently, ensuring set points mirror recommended guidelines preventing uncooked centers.

Equipment challenges stem from slow cooker incompatibility, remedying with appropriately matched purchasing around capacity-dependent suggestions, and fitting components.

Ingredient substitutions should follow suitability checks—ensuring new inclusions not only mimic original textures but reproduce equivalent taste complexities.

Timing concerns resonate closely with rest allowances post-cooking; allocate reasonable resting periods for redistributive moisture and temperature control.

Recipe Success Stories


This recipe remains a standout favorite among readers seeking hearty, flavorful dinners requiring minimal preparatory stress. It has inspired countless adaptations across varied culinary levels, from novice cooks embracing meal prep inclusions to seasoned chefs refining signature sauce additions.

Creative variations involve selections of spices—adjusting flavor intensities to reflect personalized preferences, yielding new brisket renditions celebrated as photogenic achievements.

Adaptation stories posted by readers light up social media, demonstrating the adaptability of this slow cooker recipe across diverse dietary needs and festive contexts.

Proactive engagement through user suggestions sparked meaningful culinary conversations, reflecting community insights centered on improvements or successes in dish performances.

Photography forms the backdrop of shared triumphs—strategically illuminated closeups capturing glossy sauce applications and flawless slicing receive universal accolades.

Frequently Asked Questions

What is the ideal cut of brisket for this recipe?
For Slow Cooker Beef Brisket, choose a “flat cut,” which ensures even cooking and tenderness without excess fat or muscle complexities.

How do I prevent the brisket from drying out?
Brisket dryness can be mitigated with adequate saucing and keeping the slow cooker lid closed throughout cooking to lock in moisture.

What kind of wood flavor suits the best if I decide to smoke it?
If adding smoke, flavors like hickory or oak balance the brisket’s beef notes without overpowering the intrinsic sauce smokes.

Can I make this recipe using a pressure cooker?
Yes, but adjust timing significantly—pressure cooking can rapidly tenderize brisket, requiring timing conversion down to approximately 1 hour.

Is it possible to cook brisket on high rather than low?
While feasible, slow-cooking on low optimizes tenderness and flavor absorption. High settings may reduce cook time but risk texture inconsistency.

What’s a good side dish for this beef brisket?
Complement this beef brisket with creamy mashed potatoes, roasted vegetables, or spicy grilled corn for diverse taste and texture alignment.

How important is it to remove brisket fat before serving?
Post-cooking fat removal is recommended—significantly affecting both presentation and being key in achieving desired dining texture dynamics.

What portion control guidelines should I follow?
When serving brisket, allocate around 6 ounces per person, ensuring nutrient density doesn’t compromise overall meal nutritional goals.

What are the best containers for freezing brisket?
Vacuum-sealed pouches are superior—they preserve both taste and texture integrity through optimal moisture locking and space conservation.

How do I know when the brisket is cooked correctly?
Cooked brisket appears fork-tender, pulling apart effortlessly, and showcases a luscious, deep brown glisten from sauce application.

Additional Resources


Explore related recipes where BBQ brisket introduces a strong foundation for smoked meat inspirations or enhances international crossover dishes bridging barbecue flavors with Mexican or Asian influences.

Technique guides delve further into slow-cooker efficiencies and explore diverse saucing attributes and smoke infusions achievable at home.

Ingredient information compiles data on premium beef selections detailing nutritional rolls and optimal marinade or sauce pairings for pivotal taste outcomes.

Equipment recommendations include high-quality slicing knives essential for clean, precise cutting or mini-choppers for efficient, quick sauce prep processes.

Seasonal variations offer guides exploring different herbs or rubs across growing seasons, tweaking brisket profiles through subtle pleas from native, organic selections.

Join the Conversation


We encourage sharing your spin on this Slow Cooker Beef Brisket in our vibrant social media community where enthusiasts unite in showcasing their successes or unique tweaks.

Photography tips are readily accessible across food photography forums, navigating from dish composition to strategic lighting, sharing aesthetic triumphs abound.

Recipe reviews invigorate blog discussions, rewarding us insightfully with tweaks explored when replicating the brisket, informing potential improvements.

Community engagement offers immersion into vibrant exchanges—garnered through comments or culinary events—embracing culture exchange surrounding dishes we love.

Variations on this beef brisket are celebrated as narratives of emerging creativity—documenting factors like new sauces lighting up taste adaptations we’re all keen to try.

The Recipe

Slow Cooker Beef Brisket with BBQ Sauce

Serves: 8

Prep Time: 15 mins

Cook Time: 480 mins

Total Time: 495 mins

Kitchen Equipment Needed

  • Slow cooker
  • Large skillet
  • Knife and cutting board
  • Basting brush
  • Measuring cups and spoons
  • Mixing bowl

Ingredients

  • 3 lbs beef brisket
  • Salt and pepper, to taste
  • 2 tablespoons olive oil
  • 3 cups BBQ sauce
  • 1 cup beef broth
  • 2 cloves garlic, minced
  • 1 tablespoon smoked paprika

Directions

  1. Season brisket generously with salt and pepper.
  2. In a skillet, heat olive oil over medium-high heat. Sear brisket on all sides until brown and crispy.
  3. Place seared brisket into slow cooker.
  4. In a bowl, combine BBQ sauce, beef broth, minced garlic, and smoked paprika.
  5. Pour the sauce mixture over brisket.
  6. Cover and cook on low for 8 hours, until meat is tender.
  7. Once cooked, let brisket rest for 10 minutes before slicing against the grain.
  8. Serve with extra sauce drizzled over the top.

Recipe Notes

  • For extra flavor, marinate the brisket in BBQ sauce overnight.
  • Consider adding a bay leaf or thyme sprigs to the cooker for additional aroma complexity.
  • Adjust the BBQ sauce based on desired sweetness or spice level.