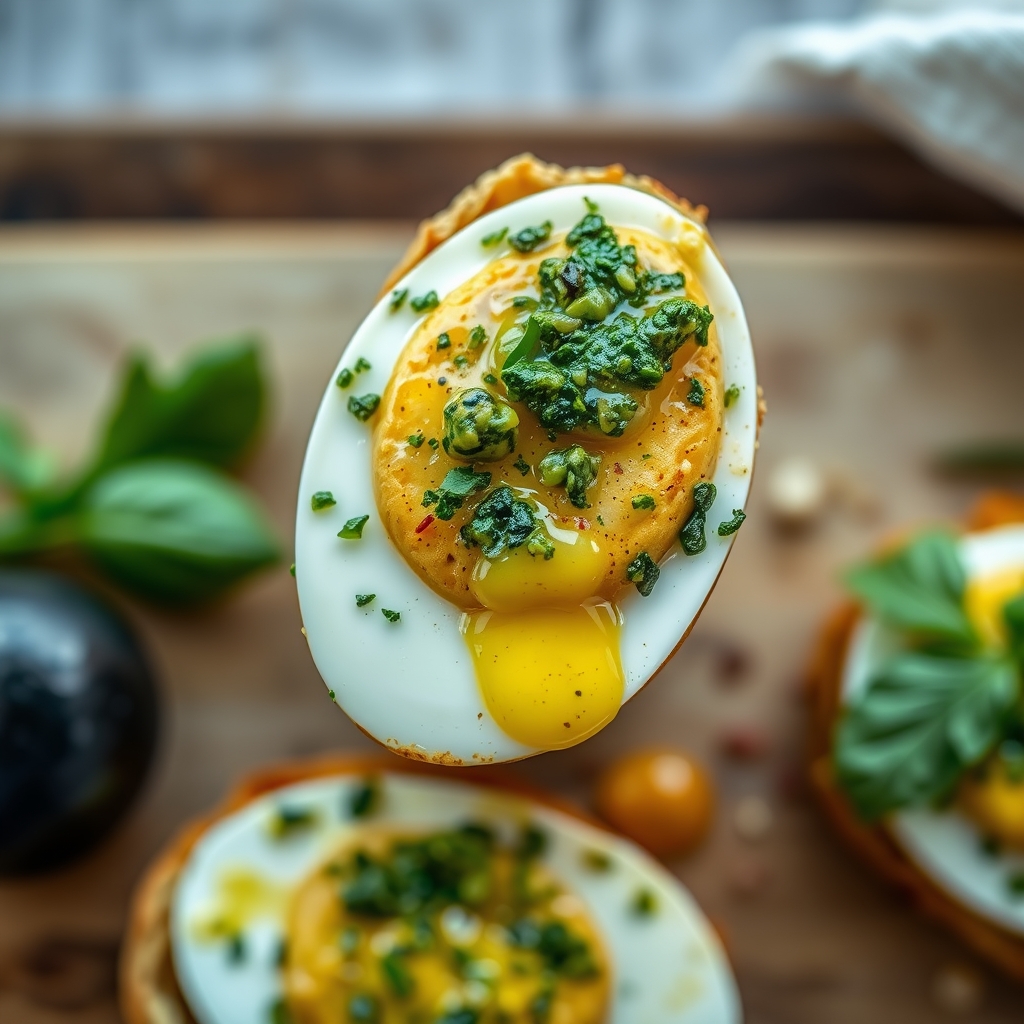
Pesto Eggs

Pesto Eggs

If you’re looking for a breakfast dish that’s packed with flavor, easy to make, and guaranteed to impress, pesto eggs are the answer. This simple yet decadent recipe combines the rich, herby goodness of pesto with perfectly cooked eggs for a meal that feels gourmet but comes together in minutes. Whether you’re a seasoned home cook or just starting out in the kitchen, this dish is a must-try.

Why You’ll Love This Recipe

Pesto eggs have taken the internet by storm, and for good reason. Here’s why you’ll adore this recipe:

  • Bursting with flavor: The combination of fragrant basil pesto and creamy eggs creates a taste sensation that’s hard to beat.
  • Quick and easy: With just a handful of ingredients and minimal prep time, this dish is perfect for busy mornings.
  • Versatile: Serve it on toast, with roasted vegetables, or alongside a fresh salad—it works for any meal.
  • Nutrient-packed: Eggs provide high-quality protein, while pesto adds healthy fats from olive oil and nuts.
  • Impressive presentation: The vibrant green pesto makes this dish look as good as it tastes, perfect for brunch guests.

Ingredients Breakdown

Let’s take a closer look at the key ingredients that make pesto eggs so delicious:

  • Eggs: The star of the dish. Opt for free-range or organic eggs for the best flavor and texture.
  • Basil pesto: Use store-bought for convenience or homemade for an extra fresh taste. The pesto infuses the eggs with garlic, basil, and nutty richness.
  • Olive oil: A drizzle helps cook the eggs smoothly and enhances the pesto’s flavor.
  • Salt and pepper: Essential for seasoning and balancing the dish.
  • Optional garnishes: Fresh basil, grated Parmesan, or red pepper flakes can add extra layers of flavor.

How to Make Pesto Eggs

Follow these simple steps for perfect pesto eggs every time:

  1. Heat the pan: Place a non-stick skillet over medium heat and add a small drizzle of olive oil.
  2. Add the pesto: Spoon 1–2 tablespoons of pesto into the pan, spreading it evenly.
  3. Crack the eggs: Gently crack the eggs into the pan, ensuring they stay separate.
  4. Cook to preference: For sunny-side-up eggs, cover the pan with a lid and cook for 3–4 minutes until the whites are set but the yolks remain runny. For firmer yolks, cook a minute longer.
  5. Season and serve: Sprinkle with salt and pepper, then transfer to a plate. Garnish with fresh basil or Parmesan if desired.

Pro Tips for the Best Results

  • Use a non-stick pan to prevent the eggs from sticking and ensure easy flipping if you prefer over-easy eggs.
  • If making homemade pesto, toast the nuts first for a deeper, richer flavor.
  • For extra creaminess, add a splash of heavy cream to the pesto before cooking the eggs.
  • If the pesto starts to brown, lower the heat slightly to prevent burning.
  • Let the eggs rest for a minute after cooking—this helps the flavors meld beautifully.

Variations and Substitutions

Pesto eggs are incredibly adaptable. Here are some tasty twists to try:

  • Different pestos: Swap basil pesto for sun-dried tomato pesto, cilantro pesto, or even kale pesto.
  • Vegan option: Use tofu scramble instead of eggs and dairy-free pesto.
  • Spicy kick: Stir in a pinch of red pepper flakes or drizzle with hot honey.
  • Cheesy upgrade: Sprinkle feta, goat cheese, or mozzarella on top before serving.
  • Extra greens: Toss in baby spinach or arugula for added freshness.

What to Serve With It

Pesto eggs pair beautifully with a variety of sides:

  • Toasted sourdough or crusty bread for soaking up the runny yolks.
  • Avocado slices for extra creaminess and healthy fats.
  • Roasted cherry tomatoes for a sweet, tangy contrast.
  • Crispy bacon or prosciutto for a savory, salty bite.
  • Fresh fruit salad to balance the richness of the dish.

How to Store and Reheat

While pesto eggs are best enjoyed fresh, here’s how to handle leftovers:

  • Refrigeration: Store in an airtight container for up to 2 days.
  • Reheating: Gently warm in a skillet over low heat to avoid overcooking the yolks. Microwaving can make the eggs rubbery.
  • Freezing: Not recommended, as eggs lose their texture when frozen and reheated.

Frequently Asked Questions (FAQs)

Can I use jarred pesto for this recipe?
Absolutely! Store-bought pesto works perfectly fine, though homemade will give a fresher taste.

What if I don’t like runny yolks?
Simply cook the eggs longer until the yolks are set, or flip them for over-medium or over-hard eggs.

Can I make this dish ahead of time?
It’s best served fresh, but you can prep the pesto in advance to save time.

Is this recipe gluten-free?
Yes, as long as you serve it with gluten-free bread or other gluten-free sides.

Can I add other vegetables?
Definitely! Sautéed mushrooms, roasted bell peppers, or caramelized onions would all be delicious additions.

Final Thoughts

Pesto eggs are a game-changer for breakfast, brunch, or even a quick dinner. The combination of rich, herby pesto and perfectly cooked eggs is nothing short of magical. Whether you stick to the classic version or experiment with fun variations, this dish is sure to become a staple in your kitchen. Give it a try—you might just discover your new favorite way to enjoy eggs!

Print
clock clock iconcutlery cutlery iconflag flag iconfolder folder iconinstagram instagram iconpinterest pinterest iconfacebook facebook iconprint print iconsquares squares iconheart heart iconheart solid heart solid icon

Pesto Eggs

  • Author: Chef Jamie

Description

A delicious and easy breakfast dish featuring perfectly cooked eggs with a rich, herby pesto twist. Ready in minutes and packed with flavor!


Ingredients

Scale

For the Crust:

  • For the eggs:
  • 2 large eggs
  • 1 tbsp olive oil
  • Salt to taste
  • Pepper to taste
  • For the pesto:
  • 1/4 cup fresh basil leaves
  • 1 tbsp pine nuts
  • 1 clove garlic
  • 2 tbsp grated Parmesan cheese
  • 2 tbsp olive oil
  • Salt to taste
  • For garnish:
  • Fresh basil leaves
  • Extra Parmesan cheese

Instructions

1. Prepare the Crust:

  1. 1. Prepare the pesto: In a food processor, combine basil, pine nuts, garlic, Parmesan, and olive oil. Blend until smooth. Season with salt to taste.
  2. 2. Heat olive oil in a non-stick skillet over medium heat.
  3. 3. Crack the eggs into the skillet and cook to your preferred doneness (sunny-side up or over-easy).
  4. 4. Spoon a generous amount of pesto over the eggs while they cook.
  5. 5. Season with salt and pepper.
  6. 6. Transfer to a plate, garnish with fresh basil and extra Parmesan.
  7. 7. Serve immediately with toast or crusty bread.

Notes

For a nut-free version, substitute pine nuts with sunflower seeds. Store leftover pesto in an airtight container in the fridge for up to 3 days.

Croissant French Toast Casserole

Croissant French Toast Casserole

Imagine waking up to the irresistible aroma of buttery croissants, soaked in a rich custard, baked to golden perfection, and dusted with powdered sugar. This Croissant French Toast Casserole is the ultimate breakfast indulgence, combining the flaky goodness of croissants with the comforting warmth of French toast—all in one effortless dish. Whether you’re hosting a brunch or treating your family to a lazy weekend breakfast, this recipe is guaranteed to impress. Let’s dive into why this dish is a must-try and how you can make it perfectly every time.

Why You’ll Love This Recipe

There are countless reasons to adore this Croissant French Toast Casserole, but here are just a few that make it stand out:

  • Effortless Elegance: This dish looks and tastes gourmet, yet it’s incredibly simple to prepare. The buttery croissants do most of the work, creating layers of texture and flavor without any fuss.
  • Perfect for Crowds: Unlike traditional French toast, which requires standing over the stove, this casserole bakes all at once, making it ideal for feeding a group without last-minute stress.
  • Make-Ahead Friendly: Assemble it the night before, pop it in the fridge, and bake it in the morning. It’s the ultimate no-fuss breakfast solution.
  • Versatile and Customizable: Add your favorite toppings, from fresh berries to caramelized nuts, or swap ingredients to suit dietary preferences.
  • Leftovers Taste Amazing: If you’re lucky enough to have any left, this casserole reheats beautifully, tasting just as delicious the next day.

Ingredients Breakdown

Every ingredient in this Croissant French Toast Casserole plays a crucial role in creating its decadent texture and flavor. Here’s what you’ll need and why each one matters:

  • Croissants: The star of the dish! Their buttery, flaky layers absorb the custard while maintaining a slight crispness when baked.
  • Eggs: The backbone of the custard, providing structure and richness.
  • Whole Milk and Heavy Cream: A combination that ensures a luxuriously creamy texture. For a lighter version, you can use half-and-half.
  • Vanilla Extract: Adds warmth and depth to the custard.
  • Cinnamon and Nutmeg: These spices infuse the dish with classic French toast flavor.
  • Brown Sugar: Caramelizes slightly during baking, adding a subtle molasses note.
  • Salt: Balances the sweetness and enhances all the flavors.
  • Powdered Sugar and Maple Syrup: For serving, because every bite deserves a little extra sweetness.

How to Make Croissant French Toast Casserole

Follow these simple steps to create a show-stopping breakfast casserole that will have everyone asking for seconds:

  1. Prep the Croissants: Tear day-old croissants into large chunks and arrange them in a greased baking dish. Slightly stale croissants work best, as they absorb the custard without becoming mushy.
  2. Make the Custard: In a large bowl, whisk together eggs, milk, heavy cream, vanilla, brown sugar, cinnamon, nutmeg, and salt until smooth and well combined.
  3. Soak the Croissants: Pour the custard evenly over the croissants, pressing them down gently to ensure they soak up the liquid. Let the mixture sit for at least 15 minutes (or cover and refrigerate overnight).
  4. Bake to Perfection: Preheat your oven to 350°F and bake the casserole for 30–35 minutes, or until the top is golden brown and the center is set but still slightly soft.
  5. Serve Warm: Dust with powdered sugar and drizzle with maple syrup right before serving. For extra indulgence, add a dollop of whipped cream or fresh berries.

Pro Tips for the Best Results

Want to take your Croissant French Toast Casserole to the next level? Try these expert tricks:

  • Use Day-Old Croissants: Fresh croissants can turn too soft when soaked. Slightly stale ones hold their texture better.
  • Let It Rest Before Baking: Allowing the croissants to soak for at least 15 minutes ensures even absorption and a custardy interior.
  • Don’t Overbake: The casserole should be set but still slightly jiggly in the center when you pull it out—it will continue to firm up as it cools.
  • Add a Crunchy Topping: Sprinkle a mix of brown sugar and chopped pecans over the top before baking for a delightful contrast in texture.
  • Warm Your Syrup: Heating maple syrup before drizzling enhances its flavor and makes it blend seamlessly with the dish.

Variations and Substitutions

This recipe is wonderfully adaptable. Here are some ways to make it your own:

  • Chocolate Lovers: Toss in chocolate chips or drizzle melted chocolate over the baked casserole.
  • Fruit-Forward: Layer sliced strawberries, blueberries, or caramelized apples between the croissant pieces before adding the custard.
  • Dairy-Free: Swap the milk and cream for coconut milk or almond milk, and use dairy-free croissants.
  • Savory Twist: Skip the sugar and vanilla, and add shredded cheese, herbs, and cooked bacon for a savory breakfast bake.
  • Gluten-Free: Use gluten-free croissants or brioche to accommodate dietary needs.

What to Serve With It

While this casserole is delicious on its own, pairing it with the right sides can turn it into a full feast:

  • Fresh Fruit Salad: A bright, juicy mix of berries, citrus, and melon balances the richness.
  • Crispy Bacon or Sausage: The salty-sweet contrast is always a winner.
  • Whipped Cream or Yogurt: Adds a creamy, tangy element.
  • Hot Coffee or Chai Tea: A warm beverage complements the cozy flavors.
  • Mimosas or Sparkling Juice: For a celebratory brunch touch.

How to Store and Reheat

Leftovers? No problem! Here’s how to keep your casserole tasting fresh:

  • Refrigeration: Store covered in the fridge for up to 3 days.
  • Freezing: Wrap tightly and freeze for up to 2 months. Thaw overnight in the fridge before reheating.
  • Reheating: Warm individual portions in the microwave for 30–60 seconds, or reheat the whole dish in a 300°F oven for 10–15 minutes until heated through.

Frequently Asked Questions (FAQs)

Here are answers to some common questions about making Croissant French Toast Casserole:

  • Can I use other bread instead of croissants? Yes, brioche or challah work well, but croissants add unmatched buttery flakiness.
  • Can I make this without eggs? For an egg-free version, try a flaxseed or chia seed egg substitute, though the texture may be slightly different.
  • How do I prevent a soggy casserole? Avoid over-soaking the croissants, and make sure your baking dish isn’t overcrowded.
  • Can I double the recipe? Absolutely! Use a larger baking dish and extend the baking time by 5–10 minutes if needed.
  • What’s the best way to cut the croissants? Tearing them by hand creates nooks and crannies that hold the custard better than neat slices.

Final Thoughts

There’s something magical about a dish that feels indulgent yet comes together with minimal effort. This Croissant French Toast Casserole is exactly that—a breakfast masterpiece that’s as perfect for holiday mornings as it is for lazy Sundays. Whether you stick to the classic recipe or experiment with your own twists, one thing’s for sure: every bite will be a little slice of heaven. So go ahead, preheat that oven, and get ready to savor the best French toast casserole you’ve ever tasted.

Print
clock clock iconcutlery cutlery iconflag flag iconfolder folder iconinstagram instagram iconpinterest pinterest iconfacebook facebook iconprint print iconsquares squares iconheart heart iconheart solid heart solid icon

Croissant French Toast Casserole

  • Author: Bakery Delights

Description

A decadent breakfast casserole made with buttery croissants, soaked in a rich custard, and baked to golden perfection. Perfect for brunch gatherings or special occasions.


Ingredients

Scale

For the Crust:

  • For the casserole:
  • 6 large croissants (day-old preferred)
  • 4 large eggs
  • 1 cup whole milk
  • 1/2 cup heavy cream
  • 1/4 cup granulated sugar
  • 1 teaspoon vanilla extract
  • 1/2 teaspoon ground cinnamon
  • 1/4 teaspoon salt
  • For the topping:
  • 2 tablespoons unsalted butter (melted)
  • 2 tablespoons brown sugar
  • 1/4 teaspoon ground cinnamon
  • Optional garnish:
  • Powdered sugar
  • Maple syrup
  • Fresh berries

Instructions

1. Prepare the Crust:

  1. 1. Preheat oven to 350°F (175°C). Grease a 9×13-inch baking dish.
  2. 2. Tear croissants into 1-2 inch pieces and arrange evenly in the prepared dish.
  3. 3. In a large bowl, whisk together eggs, milk, cream, sugar, vanilla, cinnamon, and salt until fully combined.
  4. 4. Pour custard mixture evenly over croissant pieces. Press down lightly to ensure all pieces are soaked.
  5. 5. Let sit for 15 minutes (or refrigerate overnight for make-ahead option).
  6. 6. For topping: Mix melted butter, brown sugar, and cinnamon in a small bowl. Drizzle over casserole.
  7. 7. Bake for 35-40 minutes until golden brown and custard is set (center should not jiggle).
  8. 8. Let cool 5 minutes before serving. Dust with powdered sugar and serve with maple syrup and berries if desired.

Notes

For best results, use slightly stale croissants as they absorb custard better. Can be assembled the night before and baked in the morning. Leftovers reheat well in microwave (30 sec) or oven (10 min at 300°F).

Smash Burger Tacos

Smash Burger Tacos

If you’ve ever found yourself torn between the juicy satisfaction of a smash burger and the handheld convenience of a taco, this recipe is your dream come true. Smash Burger Tacos combine the best of both worlds—crispy, caramelized beef tucked into a warm tortilla with all the classic burger fixings. It’s a fun, flavorful mashup that’s perfect for weeknight dinners, game day gatherings, or anytime you crave something indulgent yet easy to make. Let’s dive into why this recipe is a must-try and how to make it unforgettable.

Why You’ll Love This Recipe

First, let’s talk about what makes Smash Burger Tacos so irresistible. Here are just a few reasons you’ll want to add this dish to your regular rotation:

  • Bold, Savory Flavors: The smash burger technique ensures a crispy, golden-brown crust on the beef, while the inside stays juicy and packed with umami goodness.
  • Customizable Toppings: Like any great taco, you can load these up with your favorite burger toppings—think melty cheese, pickles, onions, and special sauce.
  • Quick and Easy: Unlike traditional burgers that require shaping patties, smash burgers cook in minutes, making this a speedy meal for busy nights.
  • Fun Presentation: Serving burgers in taco form is a playful twist that’s sure to impress family and friends.
  • Perfect for Sharing: These are ideal for casual get-togethers where guests can assemble their own tacos with their preferred toppings.

Ingredients Breakdown

Every great recipe starts with quality ingredients. Here’s what you’ll need to make Smash Burger Tacos shine:

  • Ground Beef (80/20 blend): The higher fat content ensures juicy, flavorful beef that crisps up beautifully when smashed.
  • Corn or Flour Tortillas: Choose small street taco-sized tortillas for easy handling or larger ones for a heartier meal.
  • American Cheese: Its meltability is unmatched, but cheddar or pepper jack work too.
  • Burger Seasoning: A simple mix of salt, pepper, garlic powder, and onion powder enhances the beef.
  • Toppings: Classic options include shredded lettuce, diced tomatoes, pickles, red onions, and a creamy sauce like Thousand Island or mayo-ketchup blend.

How to Make Smash Burger Tacos

Now, let’s walk through the steps to create these crave-worthy tacos:

  1. Prep the Beef: Divide 1 pound of ground beef into 8 equal portions (about 2 oz each) and loosely shape them into balls. Don’t overwork the meat.
  2. Heat the Skillet: Place a cast-iron skillet or griddle over medium-high heat. Let it get screaming hot—this ensures a good sear.
  3. Smash the Beef: Place a beef ball onto the hot skillet, then immediately press it down firmly with a spatula or a burger press. Hold for 10 seconds to create a thin patty. Repeat with remaining beef.
  4. Season and Cook: Sprinkle each patty generously with burger seasoning. Cook for about 2 minutes until the edges crisp up, then flip.
  5. Add Cheese: Immediately place a slice of cheese on each patty and let it melt while the other side cooks (about 1 more minute).
  6. Warm Tortillas: Lightly char the tortillas in a dry skillet or over an open flame for 10 seconds per side.
  7. Assemble: Place a cheesy smash patty in each tortilla and top with your favorite burger fixings. Serve immediately.

Pro Tips for the Best Results

Want to take your Smash Burger Tacos to the next level? Try these expert tricks:

  • Use a Burger Press: If you make smash burgers often, invest in a sturdy press for even, thin patties.
  • Don’t Crowd the Pan: Cook in batches to avoid steaming the beef instead of searing it.
  • Toast the Tortillas: A quick char adds texture and prevents sogginess.
  • Make a Signature Sauce: Mix mayo, ketchup, mustard, and relish for a homemade burger sauce.
  • Rest the Beef: Let the ground beef sit at room temp for 15 minutes before cooking for even doneness.

Variations and Substitutions

This recipe is endlessly adaptable. Here are some delicious twists to try:

  • Turkey or Chicken: Swap beef for ground turkey or chicken for a leaner option.
  • Vegetarian: Use plant-based ground meat or grilled portobello mushrooms.
  • Spicy Kick: Add jalapeños, hot sauce, or pepper jack cheese.
  • Breakfast Version: Top with a fried egg and bacon for a morning twist.
  • Global Flavors: Try toppings like kimchi, sriracha mayo, or tzatziki for fusion flair.

What to Serve With It

Round out your meal with these perfect pairings:

  • Classic Fries: Crispy shoestring or steak fries are a natural match.
  • Onion Rings: For extra crunch and sweetness.
  • Coleslaw: A vinegar-based slaw cuts through the richness.
  • Pickle Spears: Serve on the side for a tangy bite.
  • Milkshakes or Craft Beer: A frosty drink balances the savory flavors.

How to Store and Reheat

While these tacos are best fresh, here’s how to handle leftovers:

  • Refrigeration: Store cooked patties and toppings separately in airtight containers for up to 3 days.
  • Freezing: Freeze cooked patties (without toppings) for up to 1 month. Thaw overnight in the fridge.
  • Reheating: Warm patties in a skillet over medium heat to revive crispiness. Avoid microwaving, which can make them rubbery.

Frequently Asked Questions (FAQs)

Can I make these gluten-free?
Absolutely. Use corn tortillas or gluten-free flour tortillas, and ensure all toppings and sauces are gluten-free.

What’s the best way to smash the burgers without a press?
A sturdy metal spatula works well. For extra pressure, place a second spatula on top or use the bottom of a heavy skillet.

Can I prep these ahead for a party?
Yes. Cook the patties and keep them warm in a 200°F oven while you prepare toppings. Assemble tacos just before serving.

Why is my beef sticking to the pan?
Your skillet may not be hot enough, or you’re not pressing firmly enough. A well-seasoned cast-iron skillet works best.

Can I use pre-made burger patties?
You can, but the magic of smash burgers comes from pressing fresh beef onto a hot surface for maximum crispiness.

Final Thoughts

Smash Burger Tacos are more than just a meal—they’re an experience. Whether you’re cooking for one or hosting a crowd, this recipe delivers satisfaction in every bite. The beauty lies in its simplicity and versatility, allowing you to get creative with flavors while enjoying the comforting familiarity of a burger in taco form. Next time you’re craving something indulgent yet easy, give this mashup a try. I promise, once you taste that crispy beef tucked into a warm tortilla, you’ll wonder why you didn’t think of it sooner. Happy cooking!

Print
clock clock iconcutlery cutlery iconflag flag iconfolder folder iconinstagram instagram iconpinterest pinterest iconfacebook facebook iconprint print iconsquares squares iconheart heart iconheart solid heart solid icon

Smash Burger Tacos

  • Author: Chef Alex

Description

A fun fusion of classic smash burgers and crispy taco shells, loaded with melty cheese, fresh toppings, and a special sauce. Perfect for game day or a quick weeknight dinner!


Ingredients

Scale

For the Crust:

  • For the burgers:
  • 1 lb ground beef (80/20 blend)
  • 1 tsp salt
  • 1 tsp black pepper
  • 1 tsp garlic powder
  • 1 tsp onion powder
  • For the tacos:
  • 8 small flour tortillas (street taco size)
  • 1 cup shredded cheddar cheese
  • 1 cup shredded lettuce
  • 1/2 cup diced tomatoes
  • 1/4 cup diced red onion
  • For the sauce:
  • 1/2 cup mayonnaise
  • 2 tbsp ketchup
  • 1 tbsp yellow mustard
  • 1 tsp pickle relish
  • 1/2 tsp smoked paprika

Instructions

1. Prepare the Crust:

  1. 1. Make the sauce by whisking together all sauce ingredients in a small bowl. Refrigerate until ready to use.
  2. 2. Heat a large cast-iron skillet or griddle over medium-high heat.
  3. 3. Divide ground beef into 8 equal portions (about 2 oz each) and roll into loose balls.
  4. 4. Place a tortilla in the hot skillet, then immediately place a beef ball in the center.
  5. 5. Using a stiff spatula, press down firmly to smash the beef into a thin patty that covers most of the tortilla.
  6. 6. Cook for 2-3 minutes until edges of tortilla are crispy and beef is browned.
  7. 7. Flip the entire taco/patty assembly and immediately top the beef with cheese.
  8. 8. Cook for another 1-2 minutes until cheese melts and tortilla is crispy.
  9. 9. Remove from heat and repeat with remaining tortillas and beef.
  10. 10. Assemble tacos by topping each with lettuce, tomatoes, red onion, and a drizzle of the special sauce.

Notes

For extra crispy shells, brush tortillas lightly with oil before cooking. Can substitute ground turkey for a lighter version. Double stacking two taco shells per burger adds great texture!

Birria Grilled Cheese

Birria Grilled Cheese

If you love the rich, spicy flavors of traditional birria and the comforting gooeyness of a grilled cheese sandwich, this Birria Grilled Cheese recipe is about to become your new obsession. Imagine tender, slow-cooked birria meat paired with melted cheese, sandwiched between buttery, crispy bread and dipped in a savory consommé. This fusion dish takes two beloved classics and combines them into one unforgettable meal. Whether you’re serving it for a cozy dinner or impressing guests at a gathering, this recipe delivers bold flavors and irresistible textures in every bite.

Why You’ll Love This Recipe

There are countless reasons to fall in love with this Birria Grilled Cheese, but here are just a few that make it stand out:

  • Flavor explosion: The combination of tender, spiced birria meat and melted cheese creates a depth of flavor that’s hard to resist. The consommé adds an extra layer of richness, making each bite more satisfying than the last.
  • Comfort food redefined: This dish takes the simplicity of a grilled cheese sandwich and elevates it with the complexity of birria, resulting in a meal that’s both nostalgic and exciting.
  • Perfect for sharing: Whether you’re hosting a game night or a casual family dinner, this recipe is a crowd-pleaser. Serve it with extra consommé for dipping, and watch it disappear.
  • Versatile and customizable: You can adjust the spice level, swap cheeses, or even make it with leftover birria for a quick and delicious meal.
  • Great for leftovers: If you’ve made a big batch of birria, this is a fantastic way to repurpose it into something new and exciting.

Ingredients Breakdown

To make the best Birria Grilled Cheese, you’ll need a mix of key ingredients that each play an important role in building flavor and texture. Here’s what you’ll need:

  • Birria meat: Traditionally made with beef (like chuck roast or short ribs), this slow-cooked meat is tender and infused with a blend of dried chilies, spices, and aromatics. You can also use goat or lamb for a more authentic touch.
  • Cheese: Oaxaca cheese is ideal for its meltability, but Monterey Jack or a mix of mozzarella and cheddar also work well. The cheese should be gooey and stretchy when melted.
  • Bread: A sturdy bread like sourdough or bolillo rolls holds up well to the filling and gets perfectly crispy when grilled.
  • Butter: Used for grilling the sandwich, butter adds richness and helps achieve that golden-brown crust.
  • Consommé: The flavorful broth from cooking the birria is essential for dipping, adding moisture and an extra burst of flavor.
  • Optional toppings: Sliced onions, cilantro, or a squeeze of lime can add freshness and balance to the richness of the sandwich.

How to Make Birria Grilled Cheese

Follow these steps to create the ultimate Birria Grilled Cheese at home:

  1. Prepare the birria meat: If you don’t already have leftover birria, start by slow-cooking your meat with dried chilies, garlic, onions, and spices until it’s fall-apart tender. Shred the meat and reserve the consommé.
  2. Assemble the sandwich: Take two slices of bread and layer a generous amount of shredded birria meat on one slice. Top with plenty of cheese, then place the second slice of bread on top.
  3. Butter the bread: Spread softened butter on the outer sides of the sandwich to ensure even browning.
  4. Grill to perfection: Heat a skillet or griddle over medium heat. Place the sandwich in the pan and cook until the bread is golden and crispy, and the cheese is melted, about 3-4 minutes per side. Press down lightly with a spatula for even cooking.
  5. Serve with consommé: Slice the sandwich in half and serve immediately with a small bowl of warm consommé for dipping.

Pro Tips for the Best Results

To take your Birria Grilled Cheese to the next level, keep these expert tips in mind:

  • Use day-old bread: Slightly stale bread holds up better to the filling and gets crispier when grilled.
  • Don’t skimp on the cheese: The cheese acts as a glue, so be generous to prevent the sandwich from falling apart.
  • Keep the heat medium: Cooking too quickly can burn the bread before the cheese melts. A steady medium heat ensures even cooking.
  • Double-dip for extra flavor: Lightly dip the assembled sandwich in warm consommé before grilling for an extra layer of flavor (similar to a torta ahogada).
  • Add a crispy edge: For extra crunch, sprinkle a little shredded cheese directly onto the skillet—it will melt and crisp up, creating a delicious cheesy crust on the bread.

Variations and Substitutions

This recipe is highly adaptable to different tastes and dietary needs. Here are some ways to mix it up:

  • Vegetarian option: Swap the meat for mushrooms or jackfruit cooked in birria spices for a plant-based version.
  • Spice level: Adjust the heat by using fewer chilies or adding a touch of honey to balance the spice.
  • Cheese alternatives: Try pepper jack for extra heat or a smoked gouda for a deeper flavor.
  • Gluten-free: Use gluten-free bread or even corn tortillas for a quesadilla-style twist.
  • Breakfast version: Add a fried egg inside the sandwich for a hearty morning meal.

What to Serve With It

While this sandwich is delicious on its own, pairing it with the right sides can turn it into a full feast. Consider serving it with:

  • Mexican street corn (elote): The creamy, tangy flavors complement the richness of the sandwich.
  • Avocado salad: A simple mix of avocado, tomatoes, and lime adds freshness.
  • Pickled onions or jalapeños: These add a bright, acidic contrast.
  • A cold horchata or Mexican soda: The sweetness balances the spiciness of the birria.
  • Extra consommé for dipping: Because you can never have too much.

How to Store and Reheat

If you have leftovers (which is rare!), here’s how to keep them fresh:

  • Refrigeration: Store assembled but uncooked sandwiches in an airtight container for up to 2 days. The cooked sandwich is best eaten immediately but can be refrigerated for 1 day.
  • Freezing: Freeze the shredded birria meat separately for up to 3 months. Thaw overnight before using.
  • Reheating: To revive a cooked sandwich, warm it in a skillet over low heat to crisp the bread again. Avoid microwaving, as it can make the bread soggy.

Frequently Asked Questions (FAQs)

Can I use store-bought birria? Yes! Many Mexican markets sell pre-cooked birria meat and consommé, which can save time.

What if I don’t have Oaxaca cheese? Monterey Jack, mozzarella, or a mild cheddar blend work well as substitutes.

Can I make this in a panini press? Absolutely! A panini press will give you even grill marks and a perfectly melted interior.

How do I prevent the sandwich from being too greasy? Blot the birria meat with a paper towel before assembling to remove excess fat.

Is there a way to make this less messy to eat? Serve it with a fork and knife, or wrap half the sandwich in parchment paper for easier handling.

Final Thoughts

Birria Grilled Cheese is more than just a sandwich—it’s a celebration of bold flavors and comforting textures. Whether you’re making it for a weeknight treat or a weekend gathering, this dish is sure to impress. The best part? It’s endlessly adaptable, so you can tweak it to suit your tastes. Once you try it, you’ll understand why this fusion of Mexican tradition and American comfort food has taken the culinary world by storm. So grab your ingredients, fire up the skillet, and get ready to experience grilled cheese like never before.

Print
clock clock iconcutlery cutlery iconflag flag iconfolder folder iconinstagram instagram iconpinterest pinterest iconfacebook facebook iconprint print iconsquares squares iconheart heart iconheart solid heart solid icon

Birria Grilled Cheese

  • Author: Chef Maria Sanchez

Description

A decadent fusion of Mexican birria and classic grilled cheese, featuring tender shredded beef, melted cheese, and a rich consommé for dipping. Perfect for a comforting meal with bold flavors.


Ingredients

Scale

For the Crust:

  • For the birria beef:
  • 2 lbs beef chuck roast
  • 4 dried guajillo chilies
  • 2 dried ancho chilies
  • 1 onion, quartered
  • 4 cloves garlic
  • 1 tsp cumin
  • 1 tsp dried oregano
  • 1 tsp smoked paprika
  • 1 cinnamon stick
  • 3 cups beef broth
  • 2 tbsp apple cider vinegar
  • Salt to taste
  • For the grilled cheese:
  • 8 slices sourdough bread
  • 2 cups shredded Oaxaca cheese
  • 1 cup shredded Monterey Jack cheese
  • 4 tbsp unsalted butter
  • For serving:
  • 1 cup reserved birria consommé
  • 1/4 cup chopped cilantro
  • 1 lime, cut into wedges

Instructions

1. Prepare the Crust:

  1. 1. Prepare the birria beef: Remove stems and seeds from dried chilies. Toast in a dry skillet for 30 seconds per side.
  2. 2. Blend chilies with onion, garlic, cumin, oregano, paprika, and beef broth until smooth. Strain through a fine mesh sieve.
  3. 3. Place beef in a slow cooker, pour chili mixture over it, add cinnamon stick and vinegar. Cook on low for 8 hours.
  4. 4. Shred the beef, reserving 1 cup of the cooking liquid (consommé) for dipping.
  5. 5. Make grilled cheese: Butter one side of each bread slice. On unbuttered sides, layer cheeses and birria beef.
  6. 6. Cook sandwiches in a skillet over medium heat for 3-4 minutes per side until golden and cheese melts.
  7. 7. Serve immediately with warm consommé, cilantro, and lime wedges.

Notes

For extra flavor, dip assembled sandwiches in consommé before grilling (like a birria quesadilla). Can substitute with goat cheese for a tangy twist. Leftover birria beef freezes well for up to 3 months.

Pink Sauce Pasta

Pink Sauce Pasta

There’s something undeniably magical about a creamy, velvety pasta sauce that strikes the perfect balance between rich and tangy. Pink sauce pasta, with its blush-hued elegance, is one of those dishes that feels indulgent yet approachable—a crowd-pleaser that’s as perfect for weeknight dinners as it is for impressing guests. This recipe blends the best of both worlds: the comforting creaminess of alfredo and the bright acidity of marinara, creating a sauce that’s luxuriously smooth and packed with flavor. Whether you’re a pasta enthusiast or just looking for a new favorite dish, this pink sauce pasta is about to become a staple in your kitchen.

Why You’ll Love This Recipe

If you’re still on the fence about trying this pink sauce pasta, let me give you a few reasons why it’s worth every bite.

  • Perfectly balanced flavors – The combination of creamy and tangy creates a harmonious taste that’s neither too heavy nor too sharp.
  • Quick and easy to make – Unlike some gourmet pasta dishes, this one comes together in under 30 minutes, making it ideal for busy weeknights.
  • Versatile and customizable – You can add proteins like chicken or shrimp, toss in extra veggies, or adjust the spice level to suit your preferences.
  • Impressive presentation – The delicate pink hue makes this dish visually stunning, perfect for date nights or dinner parties.
  • Kid-friendly yet sophisticated – Even picky eaters love the creamy texture, while adults appreciate the depth of flavor.

Ingredients Breakdown

Every great dish starts with quality ingredients, and pink sauce pasta is no exception. Here’s what you’ll need and why each component matters.

  • Pasta – Penne, rigatoni, or fettuccine work best because their shapes hold the sauce well. Opt for high-quality durum wheat pasta for the best texture.
  • Olive oil and butter – A combination of both ensures a rich base for sautéing garlic and building the sauce.
  • Garlic – Freshly minced garlic adds aromatic depth that powdered garlic just can’t match.
  • Tomato sauce or marinara – This provides the tangy, slightly sweet foundation of the pink sauce. Use a high-quality jarred sauce or homemade for the best results.
  • Heavy cream – The key to that luscious, velvety texture. Half-and-half can work in a pinch, but heavy cream delivers the best richness.
  • Parmesan cheese – Freshly grated Parmesan melts beautifully into the sauce, adding umami and a slight nuttiness.
  • Italian seasoning – A blend of dried herbs like basil, oregano, and thyme enhances the sauce’s complexity.
  • Red pepper flakes (optional) – Just a pinch adds a subtle heat that balances the creaminess.
  • Salt and black pepper – Essential for seasoning every layer of the dish.

How to Make Pink Sauce Pasta

Now that we’ve covered the ingredients, let’s dive into the step-by-step process of making this irresistible pink sauce pasta.

  1. Cook the pasta – Bring a large pot of salted water to a boil and cook the pasta until al dente, according to package instructions. Reserve about a cup of pasta water before draining.
  2. Sauté the garlic – In a large skillet, heat olive oil and butter over medium heat. Add minced garlic and sauté until fragrant, about 30 seconds—be careful not to burn it.
  3. Add the tomato sauce – Pour in the tomato sauce and stir well, letting it simmer for 2-3 minutes to meld the flavors.
  4. Incorporate the cream – Reduce the heat to low and slowly pour in the heavy cream, stirring constantly to create a smooth, unified sauce.
  5. Season and thicken – Add Italian seasoning, red pepper flakes (if using), salt, and black pepper. Let the sauce simmer gently for 5 minutes to thicken slightly.
  6. Add Parmesan – Stir in freshly grated Parmesan until fully melted and the sauce is glossy.
  7. Combine with pasta – Toss the cooked pasta into the sauce, adding a splash of reserved pasta water if needed to loosen the consistency.
  8. Garnish and serve – Finish with a sprinkle of extra Parmesan and fresh basil or parsley for a pop of color.

Pro Tips for the Best Results

Want to take your pink sauce pasta from good to unforgettable? Here are some insider secrets.

  • Use freshly grated Parmesan – Pre-shredded cheese contains anti-caking agents that can make the sauce grainy.
  • Don’t rush the simmer – Letting the sauce cook gently allows the flavors to deepen and the texture to thicken properly.
  • Reserve pasta water – The starchy liquid helps bind the sauce to the pasta, creating a silky finish.
  • Adjust creaminess to taste – If you prefer a lighter sauce, substitute half the cream with whole milk, but keep in mind it won’t be as rich.
  • Add a splash of white wine – Deglazing the pan with a bit of wine before adding the tomato sauce adds a subtle complexity.

Variations and Substitutions

This recipe is wonderfully adaptable. Here are some ways to make it your own.

  • Protein additions – Grilled chicken, shrimp, or even crispy pancetta make excellent additions for a heartier meal.
  • Vegetable boost – Stir in sautéed mushrooms, spinach, or roasted red peppers for extra nutrition and texture.
  • Spice it up – Add extra red pepper flakes or a dash of hot sauce for those who love heat.
  • Dairy-free version – Substitute heavy cream with coconut milk and use nutritional yeast instead of Parmesan for a vegan-friendly alternative.
  • Gluten-free option – Use your favorite gluten-free pasta—just be sure to cook it al dente to prevent mushiness.

What to Serve With It

Pink sauce pasta is a star on its own, but pairing it with the right sides can elevate your meal.

  • Garlic bread or focaccia – Perfect for soaking up every last bit of sauce.
  • Simple green salad – A crisp arugula or Caesar salad adds freshness to balance the richness.
  • Roasted vegetables – Asparagus, zucchini, or Brussels sprouts complement the creamy pasta beautifully.
  • White wine – A chilled Pinot Grigio or Sauvignon Blanc pairs wonderfully with the dish’s creamy-tangy profile.

How to Store and Reheat

Leftovers? No problem. Here’s how to keep your pink sauce pasta tasting great.

  • Refrigeration – Store in an airtight container for up to 3 days. The sauce may thicken—just add a splash of milk or water when reheating.
  • Freezing – Freeze in a sealed container for up to 2 months. Thaw overnight in the fridge before reheating gently on the stove.
  • Reheating – Warm on the stovetop over low heat, stirring occasionally. Avoid microwaving, as it can make the sauce separate.

Frequently Asked Questions (FAQs)

Let’s tackle some common questions about pink sauce pasta.

Can I use milk instead of heavy cream?

You can, but the sauce won’t be as rich or thick. If using milk, consider adding a tablespoon of flour to help thicken it.

Why is my sauce too thin?

If your sauce hasn’t thickened enough, let it simmer a bit longer. You can also stir in a small amount of cornstarch slurry (1 tsp cornstarch mixed with 1 tbsp water).

Can I make this ahead of time?

Yes, but the sauce may thicken upon cooling. Reheat gently with a splash of milk or pasta water to restore the creamy texture.

What’s the best pasta shape for pink sauce?

Short, sturdy shapes like penne or rigatoni hold the sauce well, but fettuccine or linguine also work great for a more elegant presentation.

Is pink sauce the same as vodka sauce?

They’re similar but not identical. Vodka sauce includes vodka and sometimes onions, while pink sauce is a simpler blend of tomato and cream.

Final Thoughts

Pink sauce pasta is one of those dishes that feels like a warm hug—comforting, satisfying, and just a little bit fancy. Whether you’re cooking for yourself, your family, or a special someone, this recipe delivers on flavor, ease, and visual appeal. Don’t be afraid to experiment with add-ins or tweak the seasoning to make it your signature dish. After all, the best recipes are the ones that bring joy to your kitchen and your table. So grab your favorite pasta, pour yourself a glass of wine, and savor every creamy, dreamy bite.

Print
clock clock iconcutlery cutlery iconflag flag iconfolder folder iconinstagram instagram iconpinterest pinterest iconfacebook facebook iconprint print iconsquares squares iconheart heart iconheart solid heart solid icon

Pink Sauce Pasta

  • Author: Chef Maria

Description

A creamy and tangy pink sauce pasta that combines the richness of tomato sauce with the smoothness of cream for a perfect balance of flavors. This dish is quick to make and perfect for weeknight dinners.


Ingredients

Scale

For the Crust:

  • For the pasta:
  • 8 oz penne pasta
  • 4 cups water
  • 1 tsp salt
  • For the sauce:
  • 1 tbsp olive oil
  • 2 cloves garlic, minced
  • 1 small onion, finely chopped
  • 1 cup tomato sauce
  • 1/2 cup heavy cream
  • 1/4 cup grated parmesan cheese
  • 1 tsp dried basil
  • 1/2 tsp red chili flakes (optional)
  • Salt and pepper to taste
  • For garnish:
  • Fresh basil leaves
  • Extra parmesan cheese

Instructions

1. Prepare the Crust:

  1. 1. Cook the pasta: Bring 4 cups of water to a boil in a large pot. Add salt and penne pasta. Cook according to package instructions until al dente. Drain and set aside.
  2. 2. Prepare the sauce: Heat olive oil in a large pan over medium heat. Add minced garlic and chopped onion. Sauté until onions are translucent.
  3. 3. Add tomato sauce to the pan and stir well. Let it simmer for 2-3 minutes.
  4. 4. Reduce heat to low and pour in the heavy cream, stirring continuously to combine with the tomato sauce.
  5. 5. Add grated parmesan cheese, dried basil, red chili flakes (if using), salt, and pepper. Stir until the cheese melts and the sauce thickens slightly.
  6. 6. Combine pasta and sauce: Add the cooked pasta to the sauce and toss until evenly coated.
  7. 7. Garnish with fresh basil leaves and extra parmesan cheese before serving.

Notes

For a lighter version, you can substitute heavy cream with half-and-half or milk. Adjust the red chili flakes according to your spice preference. Store leftovers in an airtight container in the refrigerator for up to 2 days.