Irresistible Homemade Pimento Cheese: Elevate Your Snack Game

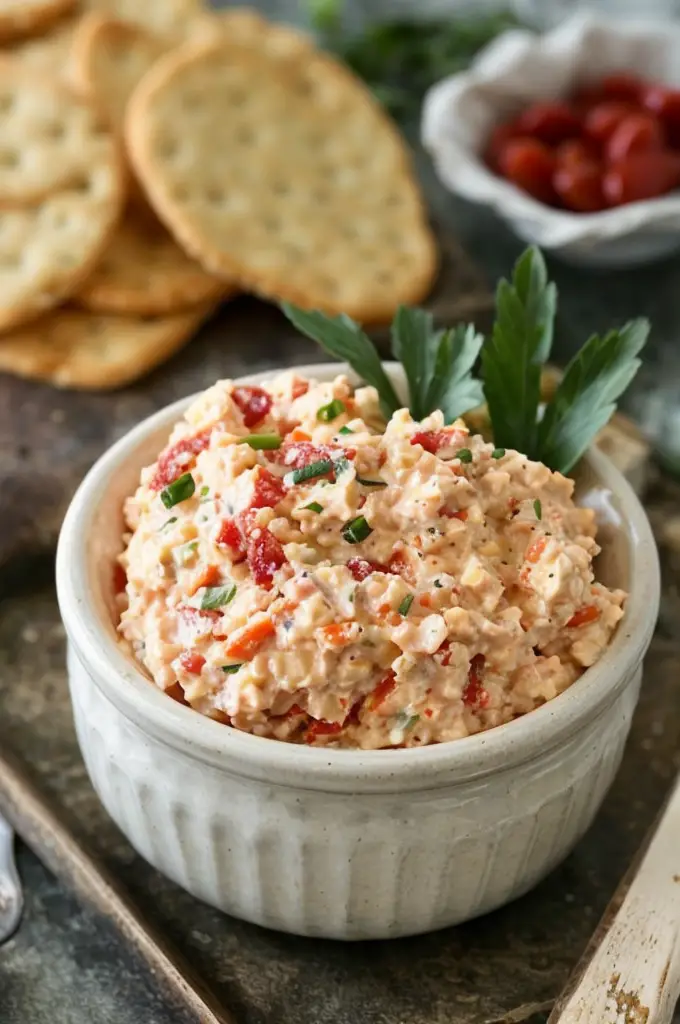
The Best Homemade Pimento Cheese: A Southern Delight for Every Occasion

⚖️
Difficulty
Easy

⏲️
Prep Time
10 mins

🕒
Cook Time
0 mins

⏱️
Total Time
10 mins

🍽️
Servings
4

Welcome to an irresistible journey into the world of Southern cuisine with the Best Homemade Pimento Cheese. This spread, with its creamy and tangy profile, captures the essence of traditional Southern flavors in just one bite. The smooth cheese becomes mesmerizingly richer with the addition of pimentos, while a hint of mayonnaise binds these flavors with unbeatable creaminess. It’s a simple yet exquisite recipe that serves as a perfect appetizer or a charming addition to your lunch sandwich.

Pimento cheese is more than just a recipe; it’s a skilled blend of modest ingredients creating something extraordinary. Whether it’s served with crackers, vegetables, or sandwiched between slices of freshly baked bread, the experience is nothing short of delightful. The vibrant colors of this spread invite you to indulge, while its heartwarming flavors keep you coming back for more. Perfect for picnics, parties, or even a regular day when you want to elevate your meals effortlessly.

Quick Recipe Highlights

  • Flavor Profile: A harmonious balance of creamy cheese and sweet-tangy pimentos, with a delicate peppery undertone.
  • Texture: Smooth and creamy with occasional chunks of pimento providing a pleasant contrast.
  • Aroma: Inviting aroma of sharp cheddar mingling with the subtle scent of mayonnaise and pimentos.
  • Visual Appeal: A visually striking spread with its vibrant orange hue accentuated by red pimento flecks.
  • Skill Level Needed: Ideal for beginners; requires basic mixing skills and no specialized techniques.
  • Special Equipment: A mixing bowl and spoon or a food processor for faster preparation.

Recipe Overview

  • Difficulty Level: This recipe is rated easy due to its simple ingredient list and straightforward preparation method.
  • Category: This delightful spread fits perfectly as an appetizer, snack, or a sandwich filling.
  • Cuisine: A Southern classic, pimento cheese is deeply rooted in American culinary tradition.
  • Cost: Generally inexpensive to prepare, making it an accessible treat for all budgets.
  • Season: Enjoyed year-round, though particularly popular in summer for outdoor picnics and gatherings.
  • Occasion: It suits any occasion, from casual get-togethers to festive gatherings like barbecues or potlucks.

Why You’ll Love This Recipe

The irresistible taste and creamy texture of homemade pimento cheese make it a favorite across households in the South and beyond. With a balance of sharp and tangy cheddar mixed with sweet pimentos, it creates a flavor sensation that’s hard to resist. The creamy base is perfectly crafted to complement the crunchiness of fresh veggies or the warmth of crispy toast, elevating the taste sensation with every bite.

Convenience is king when it comes to this pimento cheese recipe. With just a few minutes of preparation and no cooking required, it’s a must-have recipe for busy hosts or those craving a quick, tasty treat. Simply mix, spread, and serve—your guests will think you spent all day on this dish!

Not only is pimento cheese a culinary delight, but it’s also packed with nutritional benefits. Cheese provides a good source of calcium and protein, while pimentos add a splash of vitamins. When made at home, you can control the ingredients, ensuring a healthier version than many store-bought options.

Perfect for entertaining, this pimento cheese spread encourages socializing as guests gather around to enjoy it. It pairs beautifully with a cheese board, elevating any snack platter. Its versatility means it works on various occasions, from casual lunches to elegant dinners.

Budget-friendly and requiring minimal ingredients, this pimento cheese is a cost-effective choice for every meal. Whether you’re feeding a family or meal-prepping for the week, the recipe is easy to stretch or modify, ensuring everyone gets their fill of this southern classic.

Historical Background and Cultural Significance

The origin of pimento cheese is as rich and intriguing as its taste. Thought to have originated in the early 20th century, it quickly gained popularity as a quintessentially Southern dish. Initially, it served as an affordable staple during economic hard times due to its simple and accessible ingredients.

Culturally, pimento cheese holds a special place in Southern heritage. Often referred to as the ‘caviar of the South,’ it’s a symbol of hospitality and home-style comfort. It has graced countless gatherings, from holiday parties to church luncheons, deepening its appeal as a beloved communal dish.

Over the years, the recipe has evolved, seeing various adaptations that reflect evolving tastes and the availability of ingredients. While each family may have its cherished version, the fundamental elements of cheese and pimento remain constant, highlighting its enduring appeal.

Regional variations add layers to its story, showcasing subtle differences between state lines. Whether it’s extra spicy in one region or mayo-heavy in another, these changes reflect the personal and cultural nuances that keep pimento cheese a dynamic staple in American kitchens.

Ingredient Deep Dive

Cheddar Cheese: Cheddar cheese is the star of pimento cheese, renowned for its rich, sharp flavor that defines the spread. As a staple in many culinary traditions, its history dates back to England, with deep ties to American cuisine through Southern cooking. Nutritiously, cheddar provides calcium and protein, crucial for bone health and body functions. When selecting, opt for fresh, well-aged cheddar for depth in flavor. Store it wrapped in parchment or wax paper in the fridge to maintain freshness. If needed, substitute with Colby for a milder taste.

Pimentos: These sweet red peppers enhance the spread’s flavor profile by adding a subtle sweetness and vibrant color. Originally cultivated in Spain, pimentos bring an international twist to this classic Southern dish. They’re low in calories and contain significant vitamin content, contributing to the spread’s nutritional value. Choose jarred pimentos for convenience; store opened jars in the fridge. When not available, roasted red peppers make an acceptable substitute, offering a similar taste and texture.

Mayonnaise: Integral for its creamy consistency, mayonnaise binds the cheese and pimento into a silky spread. Originating from French cuisine, mayonnaise plays a versatile role in American dishes as a binding and flavor-enhancing agent. While high in calories, it provides healthy fats and aids in the absorption of vitamins. Opt for traditional or light varieties depending on dietary needs. Store in a cool place after opening; Greek yogurt can be a lighter alternative for health-conscious adaptations.

Common Mistakes to Avoid

  • Using pre-shredded cheese: Processed cheese often lacks the rich, creamy texture necessary for authentic pimento cheese.
  • Overmixing: This can lead to a paste-like consistency, losing the spread’s trademark texture.
  • Ignoring seasoning: A properly seasoned spread elevates the flavor; be mindful of salt and pepper additions.
  • Skipping pimento draining: Ensure pimentos are well-drained to prevent a watery spread.
  • Using flavorless mayonnaise: Always choose quality mayonnaise for a rich flavor binding.
  • Not allowing to sit: Letting the spread rest brings flavors together beautifully for a fuller taste.
  • Refrigerating improperly: Store in airtight containers to maintain optimum freshness and flavor.
  • Skipping taste testing: Always check the balance of flavors before serving to guests.
  • Using low-quality cheese: The recipe heavily depends on cheese’s flavor; invest in good quality cheddar.
  • Forgetting about texture: Aim for a balance between creamy and a slight chunky feel, especially with pimentos.

Essential Techniques

The magic of the best pimento cheese recipe lies in its utterly simple yet essential techniques. Using freshly grated cheddar enhances flavor and texture, crucial for achieving the perfect consistency that can’t be matched by pre-shredded varieties. Ensure the cheese is at room temperature before mixing, allowing smoother amalgamation and creamier results.

Balance is the next key technique; it’s about achieving the harmonious interplay between creamy mayonnaise and the hearty texture of cheddar. Mix gently to maintain this balance, while ensuring that pimentos remain intact to introduce bursts of sweet, tangy flavor. Remember—this spread isn’t about finesse; it’s about showcasing rich, hearty flavors in each mouthful.

Pro Tips for Perfect Pimento Cheese

  • Let it sit: Allow the pimento cheese to sit in the fridge for at least an hour to let the flavors meld beautifully.
  • Choose a robust cheddar: The sharper the cheese, the more complex the flavor profile.
  • Fresh is best: Use fresh peppers when possible, roasting them for an enhanced smoky note.
  • Add a twist: Incorporate a dash of hot sauce for an exciting spicy kick.
  • Texture balance: Don’t overblend; leave bits of cheese and pimento to preserve texture.
  • Experiment with spices: A hint of paprika or garlic powder can elevate the flavor complexity.
  • Pair wisely: Serve with textured, hearty breads or add crisp crackers for crunch contrast.
  • Pepper it: A sprinkle of freshly ground black pepper can accentuate the spread’s flavor.

Variations and Adaptations

The beauty of the best homemade pimento cheese lies in its versatility. Regional variations showcase how this spread morphs to match local tastes. Southern versions might opt for a creamier base through additional mayonnaise, while Texas-style infuses a hint of spice. Don’t hesitate to explore seasonal twists by adding finely chopped spring onions in spring or crispy bacon in winter for a smokier edge.

Dietary adaptations are a breeze with pimento cheese. For a vegan version, swap cheese for nutritionally rich cashew cheese and opt for vegan mayonnaise. Season with nutritional yeast to replicate the cheesy flavor, providing a spread that’s both plant-based and deliciously fulfilling.

Serving and Presentation Guide

An eye-catching display elevates the best pimento cheese from traditional to gourmet. Plate using small ramekins for individual servings lined with vibrant, fresh herb sprigs which enhance not just aesthetics but also aroma. Present alongside a palette of colorful veggie sticks, freshly baked bread, and a choice of savory biscuits or crackers for diverse textural experiences.

For a modern touch, try forming the spread into small bullet-shaped bites sprinkled with chives, turning a humble spread into delicate hors d’oeuvres. Pay attention to the temperature—it should be served chilled but not overly cold, ensuring the flavors remain bold and vivid.

Wine and Beverage Pairing

Pair the best homemade pimento cheese with wine choices that complement its bold flavors yet balance its creaminess. A crisp, chilled Sauvignon Blanc works beautifully to enhance its sharp cheddar notes, while a young Pinot Noir, served at the right temperature, provides an exceptional counterpoint to the sweet pimentos.

For non-alcoholic options, try fruity sparkling beverages like a berry soda or a homemade lemonade with mint. These choices add a refreshing contrast to the richness of the cheese, ensuring a palate-cleansing sip between bites.

Storage and Shelf Life

Proper storage can prolong the deliciousness of your pimento cheese. Keep it in an airtight glass container to prevent absorption of fridge odors. For optimal freshness and flavor, consume within a week. Monitor for spoilage signs like changes in color and scent, a key indication it’s past its prime.

To reintroduce, allow it to reach room temperature before spreading on warmed toast or using in recipes. While freezing isn’t recommended as texture alters, small portions freeze well in airtight freezer bags, making for convenient defrosting.

Make Ahead Strategies

Planning in advance maximizes preparation convenience for pimento cheese. Grate cheese and chop pimentos a day ahead, storing them separately. Combine all ingredients hours before serving, allowing flavors to meld without pressure.

A well-prepped spread enhances quality. Refrigerate in an airtight container for the best results and don’t skimp on fresh elements like herbs or seasoning right before serving, lifting the entire dish with just a sprinkle.

Scaling Instructions

Whether you’re hosting a large gathering or preparing a cozy meal for two, scaling this pimento cheese recipe is straightforward. Halve the recipe for smaller servings using a smaller bowl, or double the ingredients for larger batches requiring a food processor to evenly combine the mixture without sacrificing texture.

Timing remains the same since there’s no actual cooking involved. When scaling up, ensure your storage solutions are adjusted to keep the spread fresh and vibrant for your event. Accompany with ample pairing options to cater to a larger crowd.

Nutritional Deep Dive

The nutritional appeal of pimento cheese lies in its balanced combination of proteins and fats. The cheese itself provides ample protein and calcium, crucial for muscle and bone health, while pimentos contribute a vitamin A boost.

This spread offers a concentrated source of fats, beneficial in moderation. Tracking portion sizes ensures mindful consumption, aiding in weight maintenance and offering rich flavors without overindulgence. Adjust ingredients for specific dietary preferences, ensuring you’re aligning with personal health goals while maintaining taste integrity.

Dietary Adaptations

The best pimento cheese recipe can easily accommodate dietary needs without sacrificing its charming flavors. For a gluten-free option, ensure all ingredients and pairings meet the criteria, with gluten-free bread being an excellent serving choice.

Opt for dairy-free alternatives for lactose-intolerant individuals by utilizing lactose-free cheese options or plant-based cheeses, offering a seamless shift without loss of flavor. Keto-friendly adaptations are also effortless—use full-fat ingredients and replace conventional mayonnaise with avocado oil-based varieties.

Troubleshooting Guide

Addressing texture issues begins with cheese selection; avoid pre-shredded products that result in gritty spreads. Use vibrant, well-drained pimentos to prevent overly watery textures. If the flavor feels off-balance, a touch more seasoning, like salt or a sprinkle of cayenne, can offer depth.

Monitor room temperature to prevent ingredient separation or oiliness. Try different equipment if mixing proves difficult, ensuring a smooth blend in desirable proportions. Timing changes can relax prep pressures, with an extended period for chilling allowing flavors to meld effectively.

Recipe Success Stories

Across countless kitchens, success stories of homemade pimento cheese signal its universal charm. Many followers share images of customized versions; some added jalapeños for spice, while others layered extra cheese for depth. Variations bring creativity to the forefront, inspiring others.

Enthusiastic readers have commended its adaptability with other southern classics, such as deviled eggs or as a burger topping, pushing the boundaries of its traditional role. Community engagement breathes life into the recipe, inviting all to share experiences and capitalize on shared insights.

Frequently Asked Questions

Can pimento cheese be made ahead?
Pimento cheese improves when made ahead, allowing flavors to meld and mature. Store in an airtight container and chill for up to a week for optimal taste.

What’s the best cheese for this recipe?
A sharp cheddar is ideal due to its flavor and melting qualities, though Colby can be used for a milder profile.

Are there vegan alternatives?
Yes, use vegan cheese and mayonnaise. Nutritional yeast can mimic cheddar’s depth, providing a plant-based positive balance.

How can I add spice to the spread?
Add ingredients like minced jalapeños or a dash of cayenne pepper for a heat element. Hot sauce is another fine choice.

Can this be frozen?
While recommended for instant use, portions can freeze well. Defrosting alters texture slightly but retains flavor for future use.

What crackers pair well?
Choose sturdy crackers like wheat or water varieties, allowing the cheese’s spread and flavors to be fully appreciated.

Does it need to be served cold?
Pimento cheese is best served chilled, maintaining flavors and texture but should never be icy cold as it dampens taste profiles.

How do I prevent it from being watery?
Drain pimentos thoroughly and avoid excess mayonnaise. Proper mixing is key to achieving a consistent texture.

What’s the best way to store leftovers?
Use airtight containers in the refrigerator, preserving flavors for up to a week while monitoring signs of spoilage.

Is it suitable for children?
Most kids love pimento cheese for its smooth texture and mild flavors, offering a kid-friendly snack option that’s nutritious.

Additional Resources

Dive deeper into Southern cuisine with related dishes that hark to the hospitality and tradition the South is famous for. Explore cornbread variations, learn about distinct Southern barbecue styles, or craft homemade buiscuits to complement pimento cheese perfectly.

Technique guides focus on achieving ideal texture, perfecting cheese mixes, or even canning methods for those keen on preserving spreads. Delve into ingredient breakdowns, examining the role cheese plays in culinary desirability, or uncover seasonal gourmet adaptations to expand your repertoire with each new season.

Join the Conversation

Engage with our vibrant foodie community by sharing your pimento cheese experiences on social media platforms. Capture your spread creations, and tag us to connect with other culinary enthusiasts. We’re curious to see your presentation styles and any creative twists you’ve added.

Dive into discussions over reviews and adaptations, and sign up for our newsletter for ongoing recipe inspirations. Your stories inspire us to keep versatility and flavor at the forefront of our culinary adventures. Engage and explore the innovative world of food creation today!

The Recipe

The Best Homemade Pimento Cheese

Serves: 4

Prep Time: 10 mins

Cook Time: 0 mins

Total Time: 10 mins

Kitchen Equipment Needed

  • Mixing bowl
  • Grater
  • Spoon or spatula
  • Food processor (optional)

Ingredients

  • 2 cups sharp cheddar cheese, freshly grated
  • 1/2 cup mayonnaise
  • 1/4 cup pimentos, drained and chopped
  • 1/4 teaspoon garlic powder
  • 1/4 teaspoon onion powder
  • Salt and pepper to taste

Directions

  1. In a mixing bowl, combine the grated cheese and mayonnaise.
  2. Add the drained and chopped pimentos.
  3. Season with garlic powder, onion powder, salt, and pepper.
  4. Mix until thoroughly combined and smooth.
  5. Chill in the fridge for at least 30 minutes before serving to enhance flavors.
  6. Serve chilled with crackers, vegetables, or as a sandwich spread.

Recipe Notes

  • Adjust seasoning according to taste preferences.
  • Store in the refrigerator in an airtight container for up to one week.
  • For a spicy twist, add minced jalapeños or a dash of hot sauce.

Indulge in These Irresistible Gooey Salted Caramel Cream Cheese Cupcakes

Gooey Salted Caramel Cream Cheese Cupcakes: A Sweet Indulgence

⚖️
Difficulty
Medium

⏲️
Prep Time
20 mins

🕒
Cook Time
25 mins

⏱️
Total Time
45 mins

🍽️
Servings
12

Dive into the ultimate dessert experience with our Gooey Salted Caramel Cream Cheese Cupcakes, a perfect blend of sweet and savory flavors that will tantalize your taste buds. These cupcakes offer a rich caramel flavor balanced by a hint of salt, paired with the creamy tang of cream cheese to create a cupcake that’s more than just sweet – it’s a complex palate pleaser. Whether you’re a lifelong caramel aficionado or newly venturing into the world of intricate desserts, this recipe will not disappoint.

Crafted for those with a flair for baking and a passion for innovative flavor pairings, these cupcakes boast both simplicity and sophistication. Imagine sinking your teeth into a moist, fluffy cake topped with gooey salted caramel and a luxurious, smooth cream cheese frosting. Each bite promises layers of flavor and texture – it’s culinary artistry at its best! Celebrate your next occasion, big or small, with these captivating cupcakes that steal the show every time.

Quick Recipe Highlights

  • Flavor Profile: Expect a delightful fusion of rich caramel sweetness with just the right sprinkle of sea salt, enhanced by the tangy creaminess of the cream cheese frosting.
  • Texture: The cupcakes are moist and tender, complemented by the smooth, creamy texture of the frosting and the gooey caramel layer.
  • Aroma: Your kitchen will fill with the warm, inviting scent of caramel and vanilla, mingling perfectly with the classic aroma of freshly baked cupcakes.
  • Visual Appeal: These cupcakes are picture-perfect with a golden caramel drizzle over a pristine white frosting, drawing eyes even before the first bite is taken.
  • Skill Level Needed: While accessible to intermediate bakers, the recipe provides clear instructions and tips to guide novices to sweet success.
  • Special Equipment: All you need is a stand mixer, an icing spatula, and a piping bag to achieve bakery-quality results at home.

Recipe Overview

  • Difficulty Level: Moderate, owing to the caramel creation, which demands attention and precision. The rest is straightforward, making it ideal for bakers looking to expand their skills.
  • Category: These cupcakes fall under the dessert category, making them a sweet finale for any meal or celebration.
  • Cuisine: Inspired by American baking traditions, these cupcakes introduce a touch of modern culinary flair with their gourmet twist.
  • Cost: With standard pantry ingredients supplemented by cream cheese and caramel, these cupcakes are affordable for most budgets.
  • Season: Perfect year-round, but particularly delightful in the fall and winter months when caramel flavors are at their peak popularity.
  • Occasion: From holiday gatherings and birthday parties to casual get-togethers, these cupcakes fit seamlessly into any dessert table lineup.

Why You’ll Love This Recipe

Gooey Salted Caramel Cream Cheese Cupcakes offer a taste experience that’s simply irresistible. Each component harmonizes beautifully — the cupcake’s moist crumb, the indulgent cream cheese frosting, and the luscious caramel drizzle all play their parts in this delicious symphony of flavors. The use of sea salt elevates the caramel’s sweetness, ensuring that each bite is exciting and well-balanced.

Preparing these cupcakes is a rewarding endeavor, thanks to their manageable steps that lead to a stunning end result. With straightforward instructions, you’ll confidently navigate the creation of homemade caramel, which might seem daunting at first but quickly turns into a fun culinary adventure. Efficiency is key, and this recipe ensures that you’re maximizing your time without compromising quality.

Nutritionally, these cupcakes strike an indulgent yet slightly restrained tone as they balance rich flavors with manageable serving sizes. They fit perfectly into a well-rounded dessert repertoire without being overtly heavy or unnecessarily calorific. Additionally, they can easily be adapted for various dietary needs with the right substitutions, allowing for guilt-free enjoyment.

On a social level, serving these cupcakes at a gathering is sure to spark conversation and liven up the mood. Their elegant appearance and sophisticated taste profile make them a crowd-pleaser that will elevate any function. Sharing such a delightful treat also enhances relationships, as you spread joy through the universal love of good food.

Finally, the recipe’s cost-effectiveness cannot be understated. It calls for mostly basic ingredients, ensuring that you don’t break the bank while still impressing your guests. Plus, the accessibility of these components means you’re likely to have most on hand, simplifying the preparation process even further.

Historical Background and Cultural Significance

The concept of cupcakes, or small cakes baked in cups, has origins that trace back to the 19th century, gaining popularity as a quick and convenient dessert. During this time, the ease of measuring ingredients by the cup was novel, simplifying what was traditionally an elaborate baking process. Since then, cupcakes have become an essential part of global pastry-making traditions, reflecting both historical roots and modern innovation.

Caramel, on the other hand, boasts a rich history as a confection dating back to the 17th century. Initially enjoyed as a simple sugar and cream concoction, caramel has evolved to become the complex flavor staple we know today. The addition of salt, popularized in recent years, elevates caramel’s multidimensional appeal by enhancing its innate sweetness and depth, paving the way for countless culinary creations.

These Gooey Salted Caramel Cream Cheese Cupcakes embody a blend of these historical elements—bringing the classic charm of cupcakes into harmony with the complex allure of salted caramel. As a cultural symbol, they represent the merging of American baking traditions with modern gourmet innovation, showcasing simple elements transformed into extraordinary indulgences.

Regionally, the influence of cupcakes spans globally. From American diner displays to the most sophisticated European patisseries, the versatile cupcake continues to captivate hearts. Meanwhile, caramel has found its place within varied cuisines, appearing as sauces, candies, and even savory accents. The marriage of these elements in our cupcakes is a testament to the culinary world’s ability to adapt and inspire through time.

Ingredient Deep Dive

The star of our cupcakes, the caramel, hails from a storied past of sugar alchemy. Initially crafted with only sugar and water, it has evolved into a mixture that incorporates cream and butter for added richness. Selecting high-quality sugar and fresh cream is crucial for the best results. Store-bought caramel alternatives do exist, yet nothing beats the freshness and flavor complexity of making it yourself.

Cream cheese plays a dual role in our recipe—providing balance and contrast to the caramel’s sweetness while introducing its own tangy charm. When selecting cream cheese, opt for full-fat versions, as they yield the best texture and flavor for baking. It’s important to let the cream cheese sit at room temperature before use, ensuring a smooth and consistent frosting that’s delightful in every bite.

Each ingredient in these cupcakes adds to their overall success. For instance, premium vanilla extract rounds out flavors beautifully, while a quality sea salt garnishing strikes the perfect savory note. Butter, flour, and eggs—each staple ingredients—are essential to create a tender cake crumb structure. Ensuring fresh, quality ingredients across the board is the secret to achieving a bakery masterpiece at home.

Common mistakes, from under-measuring dry ingredients to overbeating the batter, can be avoided with careful attention to detail. Mastering caramel requires patience and a watchful eye for visual cues, such as the amber color that signals readiness. Keep an eye on frosting consistency; too thick won’t spread, too thin won’t hold shape. Perfection lies in practice and precision.

Common Mistakes to Avoid

  • Avoid overcooking your caramel, as it can quickly move from richly flavored to burnt. Watch for a deep amber hue as a visual cue to remove it from heat.
  • Ensure that all ingredients are at room temperature before starting, particularly for the batter and frosting, to achieve the best texture and even mixing.
  • Be mindful of overmixing your batter to avoid dense cupcakes; mix just until the ingredients are combined and smooth.
  • Don’t skip the cooling process for your caramel before topping the cupcakes; applying hot caramel can melt the frosting beneath.
  • Under-measuring your salt can dull the flavor profile; measure carefully for a balance that enhances rather than overwhelms the caramel.
  • Use a piping bag for even frosting distribution; it helps achieve a professional look while establishing consistent texture.
  • Don’t rush the cooling of cupcakes before frosting; a warm cupcake can cause frosting to slide and lose its definition.
  • Keep portions under control when adding caramel; overloading can lead to an unmanageable, messy eating experience.

Essential Techniques

Mastering the art of perfect caramel creation is crucial for this recipe. The key is closely monitoring the sugar as it melts and darkens, avoiding stirring too much, which can cause crystallization. A successful caramel becomes a beautiful, deep amber hue with a rich, complex flavor that’s neither too bitter nor overly sweet.

Cream cheese frosting demands a careful approach. Begin by beating the cream cheese to a creamy texture before adding the sugar and vanilla. This ensures a smooth result without lumps. Aim for a spreadable consistency that holds its shape, adjusting the sugar or cream levels as necessary to achieve this.

Piping with precision is essential for a visually appealing cupcake. Using a proper piping bag and tip combination makes the task straightforward; the goal is a neat, even swirl on top of each cupcake. Practice on parchment paper if you’re unfamiliar with piping, and soon you’ll achieve a presentation worthy of any bakery.

Pro Tips for Perfect Gooey Salted Caramel Cream Cheese Cupcakes

Keep a close eye on your caramel’s color and smell to gauge readiness; it should be a deep amber and give off a toasted sugar aroma. Remove it from heat immediately to avoid burning.

To maintain cream cheese texture, avoid overmixing once your frosting components are fully integrated; this prevents a loose, runny consistency.

Embrace the balance of salt in caramel by using a kosher or sea salt that complements rather than overwhelms, highlighting and enriching the caramel flavor.

A small offset spatula offers greater control when spreading frosting or caramel on the cupcakes, allowing for clean and professional edges.

Before serving, place finished cupcakes in the fridge for 10 minutes, allowing flavors to meld and textures to firm slightly for the perfect bite.

Practice controlled piping to achieve distinct, even patterns. Always pipe straight onto the cupcake, applying even pressure to the pastry bag for professional results.

Variations and Adaptations

Regional variations of these cupcakes could involve substituting the caramel with local flavors such as honey or maple syrup, providing a unique take that embraces local ingredients. Alternatively, try a seasonal adaptation by incorporating spices like cinnamon or nutmeg into the batter for fall-inspired warmth.

Dietary modifications can make these cupcakes accessible to more people. Swap traditional flour for a gluten-free blend, or use dairy-free cream cheese and margarine for a lactose-free version. With slight adjustments, you’ll have a dessert suitable for a range of diets.

For those preferring a less sweet option, reduce sugar content slightly in both the cupcake and frosting while enhancing the saltiness of the caramel contrast. This subtle change creates a delicious, balanced dessert without sacrificing the overall integrity of the original recipe.

Serving and Presentation Guide

Achieving the perfect cupcake presentation can elevate your dessert to new heights. Consider a tiered serving stand for a visual display that highlights the cupcakes’ beauty at an event. For an added touch of elegance, a simple caramel drizzle over the frosting is both aesthetically pleasing and indicates the flavor profile.

Garnishing these cupcakes with a light sprinkle of sea salt or finely chopped nuts adds texture and accentuates the caramel’s complexity. Traditional accompaniments like coffee or espresso pair wonderfully, enhancing the caramel’s richness, while offsetting it gently with the cream cheese’s tang.

Presentation doesn’t end with the surface; nestle each cupcake in decorative liners to appeal to both the eye and the palette. Pay attention to portioning to avoid overindulgence, as the richness packs a punch that a small size can satisfy adequately.

Wine and Beverage Pairing

Pairing wine with these decadent cupcakes requires selecting those that complement rather than clash with the rich caramel and cream cheese notes. A dessert wine such as Sauternes or a sweet Riesling carries fruit and honey undertones that harmonize beautifully with the cupcakes’ flavor profile.

For non-alcoholic options, consider brewed herbal teas like chamomile or rooibos, which provide a warm, soothing backdrop that highlights the dessert’s complex flavors. A classic pairing includes coffee or espresso, providing a lovely bitterness that cuts through the dessert’s sweetness for balance.

When serving beverages, pay attention to temperature; warm drinks contrast nicely with the cool, creamy cupcake while chilled wines enhance the dessert’s luxurious experience. Consider offering tasting notes alongside beverages for an enriched culinary experience that highlights different pairing angles.

Storage and Shelf Life

Proper storage is essential to preserving the freshness and integrity of these cupcakes. After baking, allow them to cool completely before making any storage decisions. Keep them in an airtight container in the refrigerator for maximum freshness, as cream cheese frosting can soften or spoil at room temperature.

For those planning to make these cupcakes in advance, it’s crucial to separate the frosting process until just before serving. This ensures the freshest experience possible and prevents any potential spoilage from cream cheese left too long at room temperature.

Keep an eye out for drying or crystallizing caramel atop stored cupcakes. These are signs of degradation, indicating it’s time to enjoy them. Avoid freezing frosted cupcakes, as cream cheese generally does not thaw well, resulting in altered texture and potential flavor loss.

Make Ahead Strategies

A strategic make-ahead timeline for these cupcakes engages several key points to maximize convenience and quality. You can bake the cupcakes a day in advance, storing them securely in an airtight container to prevent drying out. Simply assemble the frosting and caramel before serving.

To maintain freshness and quality during storage, ensure each part is separated into its respective container—cupcakes, frosting, and caramel—and refrigerate until needed. Bring the parts together in an assembly line fashion when ready to serve, ensuring that flavors and textures are at their peak performance.

Reheating should focus solely on bringing the cupcakes to room temperature from the fridge. Avoid microwaving, which could alter the texture of the delicate cake. Fresh elements like the final caramel drizzle should be added just before serving to preserve the ultimate combination of flavors.

Scaling Instructions

To scale this recipe, precise adjustments to ingredient measurements are necessary to maintain balance and flavor consistency. Halving the recipe is straightforward; reduce each ingredient by half, paying close attention to ensure accurate division, particularly of ingredients that aren’t easily split, like eggs.

Doubling or tripling the recipe entails care to maintain consistent mixing and baking times. Larger batches may require adjustments in oven layout or pan quantities, so consider setting a timer for rotating pans if necessary to ensure even baking across all cupcakes.

Keep storage considerations in mind when scaling up, as additional ingredients or larger quantities require room in your refrigerator or pantry. Plan ahead to ensure enough space for cooling and presentation, especially for events where quantity meets quality demands.

Nutritional Deep Dive

Gooey Salted Caramel Cream Cheese Cupcakes boast a unique macro composition that balances pleasure with moderation. These indulgences feature a carb-centric profile suited for occasional enjoyment. However, specific dietary needs can be addressed with ingredient swaps that retain this balance.

Micronutrients are less prominent, given the dessert nature of these cupcakes, focusing more on flavor than nutrition. Still, each ingredient selected contributes to a complex, enjoyable experience with mindful portion control enhancing the benefits of indulgence.

Health benefits derive primarily from conscious consumption within an overall balanced diet. Incorporate one or two cupcakes in moderation rather than consuming as a primary dietary staple to enjoy the richness without overwhelming your nutritional goals.

Dietary Adaptations

For fans of gluten-free living, swapping all-purpose flour with a high-quality gluten-free baking blend ensures these cupcakes remain accessible. Incorporate xanthan gum for added texture control to mimic traditional results seamlessly.

Embracing a dairy-free approach is possible by opting for dairy-free cream cheese alternatives and vegan butter options, allowing even lactose-intolerant or dairy-free individuals a taste of these delicious cupcakes.

Vegan adaptations can further cater to animal-free diets by replacing eggs with substitutes such as flaxseed or applesauce, alongside non-dairy replacements for butter and cream cheese, accommodating any preference.

Low-carb diets can embrace a slightly modified version by substituting almond or coconut flour for a lower-carbohydrate profile while adjusting for other ingredients accordingly to maintain intended flavors.

Troubleshooting Guide

When issues arise regarding cupcake texture, such as dryness or density, assess mixing duration and ingredient ratios. Properly balancing wet and dry components is critical for achieving the desired moist crumb.

Flavor imbalance often signals either under or over-application of salt or sugar. Adjust seasoning gradually, ensuring caramel and frosting have harmonized tones before execution as finishing steps.

Temperature problems often stem from oven calibration. Double-check the internal thermometer accuracy to prevent uneven baking, leading to raw centers or overly baked exteriors.

If equipment issues occur, such as frosting dispersal challenges, review tip attachments or mixer settings. Ensuring proper fittings and speeds minimizes frustrations with consistency and control.

Ingredient substitutions might lead to unexpected variances. Ensure comparability before making substantial adjustments, factoring in equal measurements of alternative ingredients to maintain intended taste profiles.

Timing concerns often stem from inaccuracy during preparation stages such as caramel or frosting creation. Keep a close eye on the clock or utilize assists like timers for optimal sequencing during production.

Recipe Success Stories

Readers have shared a myriad of success stories, utilizing creative adaptations and sharing joyous occasions celebrated with these cupcakes. Enthusiastic feedback underscores their versatility, with home bakers relaying tales of initial caution towards caramel turning boldly into triumph upon mastery.

Feedback points to regional variations, as users incorporate local ingredients for personalized takes, obtaining both unexpected and delightful results. Variants include regional nuts for garnishing and other modifications championed through social media platforms by the community.

Suggestions abound, combining photography tips that showcase the cupcakes alongside tales of baking with family, creating intergenerational connections through shared kitchen experiences. Readers contributed ideas and tips for customized toppings and unique flavor pairings for seasonal variations.

Frequently Asked Questions

1. Can I use store-bought caramel? Yes, store-bought caramel can be a convenient substitute. However, fresh homemade caramel enhances the taste considerably and provides greater flavor depth.

2. Is it possible to make the frosting with reduced sugar? Absolutely. You can reduce sugar for less sweetness. Add small amounts incrementally to maintain texture and flavor balance.

3. What alternatives exist for dairy ingredients? Opt for non-dairy cream cheese and vegan butter. These swaps deliver a comparable texture and taste while accommodating dietary restrictions.

4. How should I store the finished cupcakes? Ensure they are refrigerated, covered securely in an airtight container to preserve freshness and maintain the frosting’s integrity.

5. Can I use natural sugar substitutes? Stevia and monk fruit can replace sugar, ensuring sweetness with fewer calories. Note that taste and texture may vary slightly.

6. How far in advance can I prepare cupcakes? Baking up to a day ahead is advisable, while frosting and caramel are best added shortly before serving to preserve texture and flavor quality.

7. Can I make these gluten-free? Substitute with gluten-free flour blends, using similar measurements for remarkable results while accommodating gluten sensitivities.

8. Do I need a stand mixer? While convenient, a hand mixer suffices if used cautiously to avoid overbeating, maintaining desired batter and frosting texture.

9. What’s the ideal oven temperature? Bake at 350°F (175°C) for optimal results, ensuring your oven maintains consistent heat distribution across cupcake pans.

10. How long are they good for once frosted? Fully assembled cupcakes remain fresh for up to 3 days when refrigerated. Consume at room temperature for enhanced flavor and texture.

Additional Resources

Explore related recipes for expanding your baking repertoire, including other beloved cupcake varieties and techniques that perfect your culinary expertise. Consider experimenting with caramel-centric dishes and desserts to broaden your appreciation of its delightfully versatile characteristics.

Technique guides for mastering the foundational elements of cake baking and caramel-making offer further insights. Discover ingredient spotlights that delve into lesser-known details surrounding key flavor components and their culinary histories, enriching your understanding of their roles.

Additionally, recommendations for essential kitchen equipment will aid in achieving consistent, high-quality results with each bake. Introduce yourself to seasonal adaptations that highlight the cupcake’s potential across varied climates and occasions, making them a year-round favorite.

Join the Conversation

Social media provides the perfect venue to share photos of your creations, swap tips, and engage with a broader community of baking enthusiasts. Share your unique takes on the Gooey Salted Caramel Cream Cheese Cupcakes hashtag and revel in a shared appreciation for culinary innovation.

Experimenting with photography captures the visual essence of your baked works—employ natural lighting, creative angles, and tasteful compositions for engaging, shareable content appreciated by bakers worldwide. Provide your own recipe reviews and inspire constructive exchange through dedicated forums and blog comments.

Engage with fellow enthusiasts, sharing recipe variations and adaptations that inspire and expand our collective baking horizons for the love of flavor. Whether for personal fulfillment or broader culinary discourse, joining this cohesive community proves an endlessly enriching endeavor.

The Recipe

Gooey Salted Caramel Cream Cheese Cupcakes

Serves: 12

Prep Time: 20 mins

Cook Time: 25 mins

Total Time: 45 mins

Kitchen Equipment Needed

  • Mixer (stand or handheld)
  • Muffin tin and liners
  • Mixing bowls
  • Piping bag and decorative tip
  • Offset spatula
  • Saucepan
  • Wire rack

Ingredients

  • 1 cup granulated sugar
  • 6 tablespoons unsalted butter, cubed
  • 1/2 cup heavy cream
  • 1/2 teaspoon sea salt
  • 1 1/4 cups all-purpose flour
  • 1/2 teaspoon baking soda
  • 1/4 teaspoon baking powder
  • 1/4 teaspoon salt
  • 4 ounces cream cheese, softened
  • 1/4 cup unsalted butter, softened
  • 1/2 cup granulated sugar
  • 1 large egg
  • 1 teaspoon vanilla extract
  • 1/2 cup milk
  • 3/4 cup powdered sugar
  • 1/2 teaspoon vanilla extract for frosting

Directions

  1. Preheat oven to 350°F (175°C) and line a muffin tin with liners.
  2. In a saucepan, melt sugar over medium heat until amber, stirring occasionally.
  3. Carefully whisk in butter until melted, followed by heavy cream, and cook until smooth. Stir in sea salt.
  4. In a bowl, whisk flour, baking soda, baking powder, and salt together.
  5. In another mixing bowl, beat cream cheese and butter until creamy. Add sugar, egg, and vanilla; mix until smooth.
  6. Slowly incorporate dry ingredients alternately with milk into cream cheese mixture, mixing on low speed until combined.
  7. Divide batter among muffin cups, filling 2/3 full, and bake for 20-25 minutes. Cool completely on a wire rack.
  8. For the frosting, beat together softened cream cheese and butter in a bowl until smooth. Gradually add powdered sugar and vanilla; beat until fluffy.
  9. Spread or pipe frosting on cooled cupcakes. Drizzle with caramel sauce.

Recipe Notes

  • Caramel can be made up to a week in advance and stored in the fridge.
  • Room temperature ingredients ensure better mixing and texture.
  • Adjust frosting sweetness to taste by modifying powdered sugar levels.
  • A sprinkle of sea salt on top before serving enhances the flavor.

Irresistible Homemade Raspberry Crumble Cookies: A Sweet and Simple Treat

Homemade Raspberry Crumble Cookies: A Delicious Twist on Tradition

⚖️
Difficulty
Medium

⏲️
Prep Time
20 mins

🕒
Cook Time
15 mins

⏱️
Total Time
35 mins

🍽️
Servings
12 cookies

Imagine biting into a homemade raspberry crumble cookie, fresh out of the oven. Each bite is a delightful balance of buttery goodness and the sweet-tart punch of raspberry, creating a harmony of flavors that dances on your palate. These Raspberry Crumble Cookies are a tribute to the traditional crumble but reimagined as delightful handheld treats perfect for any occasion. With an inviting aroma that fills your kitchen, these cookies promise not only taste but the warmth and joy of homemade baking. Whether you are an experienced baker or new to the kitchen, these cookies are sure to be a hit, providing both satisfaction and a bit of nostalgia in every bite.

Let’s delve into what makes these Raspberry Crumble Cookies uniquely irresistible. Combining the sweetness of crumble with the tanginess of raspberries offers a refreshing twist. The crisp exterior and soft center create a textural symphony that is both comforting and exciting. Perfect for summer picnics or holiday gatherings, the visual appeal of these cookies is enhanced by their beautiful ruby-red raspberry centers. Here’s what you need to know to make these delightful cookies come to life in your kitchen.

Quick Recipe Highlights

  • Flavor Profile: The perfect balance of buttery crumble and tangy raspberry, providing a sweet-tart taste with a hint of vanilla.
  • Texture: A delightful combination of a crispy exterior with a soft, chewy center makes each bite satisfying.
  • Aroma: An enticing scent of baked goodness mixed with fruity notes that will fill your kitchen.
  • Visual Appeal: Golden cookies with vibrant red centers catch the eye, making them a beautiful addition to any dessert table.
  • Skill Level Needed: Moderate baking skills are required, including basic dough preparation and jam placement techniques.
  • Special Equipment: A cookie scoop, parchment paper, and baking sheets ensure uniformity and ease.

Recipe Overview

  • Difficulty Level: Intermediate, requiring knowledge of baking dynamics and precision in measuring ingredients.
  • Category: Desserts, perfect for afternoon tea snacks, holiday treats, or as an indulgent dessert option.
  • Cuisine: A delightful fusion of traditional American baking with a modern fruity twist.
  • Cost: Affordable ingredients that offer gourmet results, suitable for budget-friendly baking.
  • Season: Best enjoyed in spring and summer when raspberries are in season, though equally delightful year-round using preserved raspberries.
  • Occasion: Perfect for picnics, holiday gatherings, or as a sweet surprise for loved ones.

Why You’ll Love This Recipe


From the first bite, these Raspberry Crumble Cookies captivate with their harmonious blend of taste and texture, enticing your senses and elevating them beyond ordinary cookies. The ease of preparation doesn’t compromise depth, providing both convenience and gourmet flavor. Nutritionally, the inclusion of fresh raspberries adds a healthy twist, rich in vitamins and antioxidants, balancing indulgence with nourishment. As a versatile option, they shine in both casual and formal settings, making them perfect for entertaining guests or as a self-indulgent treat with your favorite cup of tea. The cookies’ affordability and easy accessibility of ingredients highlight them as an excellent option for bakers looking to achieve mouth-watering results without a hefty price tag.

Historical Background and Cultural Significance


These cookies are inspired by the traditional raspberry pie, a staple dessert with roots in early American baking, symbolizing comfort and homeliness. Integrating the crumble concept pioneered by European bakers in the 1500s, the evolution into a cookie form marks a cultural shift towards convenient and portable treats. Raspberry-filled cookies have seen regional variations across Europe and America, each adapting flavors to local tastes and ingredients. Today, Raspberry Crumble Cookies are cherished in various forms around the world, celebrating cultural exchange and the timeless love of baking.

Ingredient Deep Dive

Main Ingredient: Raspberries

Raspberries contribute vibrant color and taste to these cookies, celebrated historically as a luxury fruit in ancient Greece and Rome. Their high vitamin C content offers a health boost, while their natural acidity balances the sweetness of the crumble. When selecting, look for plump, brightly colored berries. Fresh raspberries can be refrigerated for up to three days or frozen for longer storage. If unavailable, raspberry preserves serve as an excellent substitution, ensuring the cookies’ signature flavor remains intact.

Common Mistakes to Avoid

  • Overmixing the dough can lead to tough, dense cookies. Mix until just combined.
  • Ignoring the quality of raspberries can result in bland flavors; always use fresh or high-quality preserves.
  • Skipping the chilling step causes cookies to spread excessively during baking.
  • Underbaking leaves cookies doughy; ensure edges are golden for a perfect bake.
  • Neglecting parchment paper or liners can cause sticking and break cookies.
  • Using hot baking sheets from previous batches affects texture; allow cooling in between uses.
  • Incorrect measurements due to inaccurate tools result in flavor imbalance; use precise tools.
  • Omitting a wire rack for cooling causes soggy bottoms; proper airflow is necessary.

Essential Techniques

Creaming Butter and Sugar

This technique is vital for achieving the perfect crumbly texture. Properly creamed butter and sugar create air pockets, helping cookies rise. Mastery involves using room-temperature butter and beating until pale and fluffy, typically around three minutes. Avoid over-creaming, which can lead to a greasy cookie.

Pro Tips for Perfect Raspberry Crumble Cookies


– Measure ingredients accurately using a scale for precise results.
– Chill dough thoroughly for at least 30 minutes to prevent spreading.
– Rotate baking sheets halfway for even browning and consistent results.
– Use quality raspberry preserves for intense fruit flavor in each bite.
– Press the cookies slightly before baking to define their shape.
– Allow cookies to set on the baking sheet for a few minutes post-bake to prevent breakage.

Variations and Adaptations


Regional variations can include adding a hint of lemon zest for a refreshing citrus note. Seasonal adaptations might swap raspberries for strawberries in the summer or cranberries in the fall. Dietary modifications can adjust the recipe to be gluten-free or vegan by utilizing almond flour and dairy-free butter. For a chocolate lover’s twist, incorporate white chocolate chips for an indulgent flavor layer. To play with textures, consider adding chopped nuts to the crumble for crunch, and explore different presentations by using cookie cutters for unique shapes.

Serving and Presentation Guide


Artfully plate the cookies on a tiered stand for a classic tea party feel. Add a dusting of powdered sugar to enhance visual appeal and suggest the cookies be paired with a dollop of vanilla ice cream for added indulgence. Consider serving them slightly warm, releasing aromas and softening the raspberry filling. For portion control, serve two cookies per person alongside a sprig of mint for added freshness and pop of color.

Wine and Beverage Pairing


Pair these cookies with a light sparkling wine like Prosecco, which complements the fruity notes without overpowering them. For non-alcoholic options, consider a raspberry iced tea or lemonade, echoing the cookie flavors. A strong black coffee or rich dark tea also pairs beautifully, balancing the sweetness with its bitterness. Serve beverages slightly chilled to enhance the cookie’s refreshing qualities, and consider using clear glassware to highlight the drink’s colors beside the cookies.

Storage and Shelf Life


Store cookies in an airtight container at room temperature, keeping them fresh for up to three days. For extended shelf life, you can refrigerate them, albeit some softness may be lost. Use zip-lock bags or airtight plastic containers to prevent moisture exposure. Look for signs like excessive softening or mold as indications of spoilage. For longer preservation, freeze them in single layers, placing parchment between cookies to avoid sticking, and thaw at room temperature before consuming to maintain freshness.

Make Ahead Strategies


Prepare the dough a day in advance and chill to save time on baking day. Divide and pre-scoop cookies onto parchment-lined trays, placing them in the refrigerator overnight. This method allows for swift baking even under time constraints. Assembled cookies freeze well, ensuring quality flavor retention once thawed. Avoid pre-baking as it may dry them out; fresh elements like a new fold of raspberry can be added before serving for a just-made appearance.

Scaling Instructions


When halving the recipe, ensure precise half-measurements to maintain texture. To double or triple, consider using a commercial-grade mixer to accommodate larger volumes without compromising ingredient incorporation. Adjust baking times as needed; larger batches may require longer, consistent oven use. Space considerations should be made for multiple trays, utilizing separate racks or alternating sheets to prevent congestion and ensure even baking.

Nutritional Deep Dive


A single serving boasts balanced macronutrients, offering a healthy dose of sugars, fats, and protein. Key micronutrients from the raspberries and other ingredients include vitamins C and E, contributing to skin health and immunity. The natural fats present provide a satiating effect, and moderate consumption aligns with most dietary guidelines. Portion awareness can help manage caloric intake while still enjoying these delightful cookies as a part of a balanced diet.

Dietary Adaptations


For a gluten-free option, substitute regular flour with an almond or a gluten-free all-purpose blend, adjusting liquid levels if needed to achieve the proper dough consistency. To make a vegan version, replace butter with coconut oil and use a flaxseed egg substitute, maintaining the cookie’s integrity and taste. A low-carb adaptation can incorporate almond flour and erythritol, appealing to keto enthusiasts while maintaining flavor integrity.

Troubleshooting Guide


If cookies turn out too soft, check oven temperature accuracy and allow for longer cooling time. For flavor issues, ensure quality ingredients and correct measurements. Temperature control throughout dough handling minimizes spread; avoid overheating. If equipment like mixers fails to incorporate fully, use manual stirring methods for completion. Ingredient swaps should be done with consideration of moisture and binding properties, accounting for compatibility. Timing discrepancies can be adjusted by knowing your oven’s specific traits and visually checking cookies regularly.

Recipe Success Stories


Readers have shared joy in creating personalized variations of these Raspberry Crumble Cookies, some adding white chocolate chips, others experimenting with different fruit jams. One baker mentioned their triumph in using homemade raspberry preserves, elevating flavor authenticity. Photography contributions showcased beautifully crafted cookies dressed in powdered sugar, sparking inspiration for decoration finesse. Suggestions for storing and gifting, like wrapping individually in parchment, were warmly received, enhancing cookie experiences across the community.

Frequently Asked Questions

Do I need to chill the cookie dough?

Yes, chilling is essential. It prevents excessive spreading and ensures that cookies have the correct texture. The dough can be chilled for at least 30 minutes or up to overnight.

Can I substitute the raspberries with another fruit?

Absolutely! You can use strawberries, blueberries, or even cranberries. Adjust sweetness and texture by modifying the amount of sugar and cooking time if necessary.

What if I don’t have a cookie scoop?

No worries! Use a tablespoon to measure dough, ensuring each dough ball is uniform for consistent baking.

How can I keep my cookies from becoming too soft?

Proper storage is crucial. Keep cookies in an airtight container once completely cooled, and avoid humid environments to ensure a longer shelf life.

What’s the best way to melt butter for cookie recipes?

Let your butter soften naturally at room temperature. Avoid microwaving as it can cause uneven melting and impact final texture.

Can I freeze these cookies once baked?

Yes, you can freeze them for up to three months. Layer with parchment to prevent sticking, thaw at room temperature before serving.

Is there a non-dairy alternative to butter for vegan cookies?

Coconut oil or vegan butter spreads work well, maintaining the rich taste typical of butter cookies.

Why use parchment paper in baking?

Parchment paper prevents sticking, aids in even baking, and makes for easier cleanup, essential for achieving desirable cookie consistency.

How do I achieve a consistent cookie size?

Using a cookie scoop ensures that dough balls are uniform in size, promoting even baking and appearance.

Why are my cookies spreading too much?

This could result from insufficient chilling time. Ensure your dough is cold before baking, and verify that baking sheets are not overheated from previous batches.

Additional Resources


Explore similar cookie recipes featuring different fruits such as blueberries or peaches, perfect for when raspberries are unavailable. Delve into technique guides for mastering baking essentials like butter creaming and dough handling, elevating your cookie-making expertise. For detailed ingredient information, check out our selection guides on the freshest seasonal fruits. If upgrading kitchen tools, browse our recommendations for mixers and baking sheets, designed to enhance every baking experience.

Join the Conversation


We invite you to share your Raspberry Crumble Cookie creations with us on social media using #RaspberryCrumbleCookies. Discover unique twists by exploring our community’s adaptations, and engage through feedback and reviews to contribute your experience. Participate in our baking groups to find new inspiration and tips, providing and receiving support in the delightful journey of making these cookies a part of your culinary repertoire.

The Recipe

Homemade Raspberry Crumble Cookies

Serves: 12 cookies

Prep Time: 20 mins

Cook Time: 15 mins

Total Time: 35 mins

Kitchen Equipment Needed

  • Large mixing bowl
  • Electric mixer
  • Cookie scoops
  • Baking sheets
  • Parchment paper

Ingredients

  • 1 cup unsalted butter, softened
  • 1 cup granulated sugar
  • 2 teaspoons vanilla extract
  • 2 ½ cups all-purpose flour
  • ½ teaspoon salt
  • ½ cup raspberry preserves

Directions

  1. Preheat oven to 350°F (175°C) and line two baking sheets with parchment paper.
  2. In a large bowl, cream together the butter and sugar until light and fluffy. Add in vanilla extract and mix well.
  3. Gradually mix in flour and salt until a crumbly dough forms.
  4. Using a cookie scoop, drop dough onto prepared baking sheets, spacing evenly.
  5. Press a thumbprint into each cookie to create an indentation.
  6. Fill each indentation with a small spoonful of raspberry preserves.
  7. Bake for 12-15 minutes or until edges are golden. Allow to cool on a wire rack.

Recipe Notes

  • Chill the dough before baking to prevent excessive spreading.
  • Experiment with different fruit preserves for unique variations.
  • Store in an airtight container for up to 3 days at room temperature.

Savor the Ultimate Louisiana Crawfish and Fried Chicken Sandwich Recipe

Louisiana Crawfish and Fried Chicken Sandwich: A Southern Delight

⚖️
Difficulty
Moderate

⏲️
Prep Time
30 mins

🕒
Cook Time
20 mins

⏱️
Total Time
50 mins

🍽️
Servings
4

Craving something hearty, flavorful, and slightly indulgent? Our Louisiana Crawfish and Fried Chicken Sandwich is the perfect choice. This sandwich combines the succulent and spicy flavors of traditional Louisiana crawfish with the crispy, juicy goodness of Southern fried chicken. Each bite offers a harmonious blend of textures and flavors that are bound to transport you straight to the heart of Cajun country.

The Louisiana Crawfish and Fried Chicken Sandwich is not only a feast for the palate but also a visual delight. Imagine the bright red hues of crawfish peeking out alongside golden-brown fried chicken, all held together by a plush bun. This sandwich promises not only a mouthwatering taste experience but also an aroma that will have your senses dancing. Whether you’re a seafood enthusiast or a fried chicken aficionado, this dish promises satisfaction.

Cooking this Louisiana Crawfish and Fried Chicken Sandwich might seem a tad intricate, yet with our guided instructions, it’s a fulfilling culinary endeavor. The sandwich’s preparation process is achievable with basic cooking techniques, making it accessible for home cooks eager to explore Southern flavors. Make this sandwich for lunch, dinner, or even a special occasion, and watch your loved ones revel in this Southern masterpiece.

Quick Recipe Highlights

  • Flavor Profile: This exquisite sandwich features the spicy, savory essence of crawfish combined with the rich, juicy flavor of fried chicken, complemented by subtle Cajun spices.
  • Texture: Experience the satisfying crunch of the fried chicken juxtaposed with the tender, flaky texture of crawfish.
  • Aroma: Indulge in an inviting blend of spices, with hints of pepper, garlic, and Cajun aromas wafting through the air.
  • Visual Appeal: Enjoy a beautifully presented sandwich showcasing vibrant red crawfish and golden-crusted fried chicken sandwiched in a soft, fresh bun.
  • Skill Level Needed: While some basic frying techniques are required, the recipe is manageable for intermediate home cooks.
  • Special Equipment: A deep fryer or a heavy-bottomed pot for frying, alongside a thermometer to ensure precise oil temperature.

Recipe Overview

  • Difficulty Level: This recipe is moderately challenging due to the frying process, which demands careful temperature control and timing to achieve perfectly cooked chicken and crawfish.
  • Category: Perfect for hearty lunch or dinner, this sandwich falls into the category of main meals, providing a fulfilling eating experience.
  • Cuisine: This sandwich highlights Southern culinary traditions, especially those stemming from Louisiana’s rich and diverse food culture.
  • Cost: Cost-effective yet premium, the sandwich balances affordable ingredients with a luxurious experience, thanks to the crawfish and quality chicken.
  • Season: Best enjoyed during spring and summer when crawfish are in season, providing the freshest and most flavorful ingredients.
  • Occasion: Ideal for gatherings, casual dinners, or even as a standout dish at a Southern-themed party.

Why You’ll Love This Recipe


The Louisiana Crawfish and Fried Chicken Sandwich is perfect for those seeking a blend of Southern charm and bold flavors. The savoriness of the crawfish, combined with the delightful crunch of fried chicken, results in an unforgettable taste sensation. The sandwich strikes a balance between spice and flavor, appealing both to those who appreciate nuanced seasoning and those seeking a kick.

The preparation process, while slightly detailed, is a labor of love that pays off with each delectable bite. The convenience of having a complete meal sandwiched between two halves of a bun cannot be overstated, offering a portable feast perfect for on-the-go gourmets. Each component can be prepared ahead, streamlining your cooking process for a seamless meal.

Despite its indulgent nature, this sandwich incorporates crawfish, a lean protein rich in essential vitamins and minerals. Coupled with the energy-packed ingredients of the sandwich, it makes for a remarkably balanced meal. Pair this sandwich with a fresh salad or a side of veggies for a nutritionally complete dining experience.

From casual gatherings to intimate dinners, this dish serves as an excellent culinary centerpiece, enchanting guests with its bold flavor and visual appeal. Its versatile nature means it can adapt to a variety of settings and moods, whether you’re entertaining company or enjoying a weekend cookout.

This sandwich is surprisingly accessible. The majority of the ingredients are household staples, easily adaptable to suit budgets and availability. While crawfish and chicken standout as the stars, pantry staples like spices and flour help bring the sandwich together economically.

Historical Background and Cultural Significance


The Louisiana Crawfish and Fried Chicken Sandwich is deeply rooted in the culinary traditions of the Southern United States. Louisiana, known for its vibrant Creole and Cajun cuisines, shines in this dish, bringing together fresh, local seafood and hearty fried elements, both hallmarks of Southern cooking. This sandwich captures the essence of a culture that marries land and sea-based ingredients harmoniously.

Crawfish, often referred to as the “seafood of the South,” is a cultural staple, celebrated in festivals such as the Crawfish Boil, and enjoyed in numerous dishes across Louisiana. Historically, crawfish has been vital to the state’s economy and food heritage, providing both sustenance and a sense of community bonding over crawfish-centered gatherings.

As Southern cuisine evolved, the marriage of fried chicken and seafood became more prominent in dishes like po’boys and this sandwich. Rooted in tradition, yet open to innovation, the sandwich captures the spirit of Louisiana’s food landscape—rich in flavor, culture, and history. The union of fried chicken and crawfish is more than culinary fusion; it’s a testament to Louisiana’s adaptable and diverse food traditions.

Regional variations are quite prevalent in Southern cuisine, with each area adding its unique twist. While the core of the sandwich remains constant—fried chicken and crawfish—variations might include different seasoning blends or accompaniments that reflect local preferences or seasonal influences.

Ingredient Deep Dive


Crawfish, a celebrated ingredient of Louisiana cuisine, finds its home in this sandwich, bringing an authentic oceanic touch. Historically, crawfish consumption began as a necessity among settlers, later transforming into a regional delicacy. Rich in protein and low in calories, this crustacean supports heart health and boosts energy. When selecting crawfish, fresh, lively specimens ensure taste integrity. Store in a cool, damp place, and cook within a day of purchase. Substituting shrimp maintains the flavor profile if crawfish is unavailable.

The sandwich’s soul lies in the fried chicken, a staple in Southern cooking with roots tracing back to African American culinary traditions. Chicken provides essential nutrients like lean protein and vitamins B6 and B12, promoting muscle health and energy. Opt for chicken thighs for juicier, more flavorful bites, or adjust to breasts for a leaner option. Store uncooked chicken in the coldest part of your refrigerator and use fresh within two days, or freeze for later use.

A softly toasted bun binds the components, serving as a canvas for the explosion of flavors within. Select buns with a slight sweetness for balance or go traditional with a French roll for a firmer bite. Keep buns fresh in a breadbox or freeze for prolonging freshness. For substitution, consider gluten-free options if dietary restrictions necessitate.

Common Mistakes to Avoid

  • Overcooking crawfish can result in a rubbery texture. Ensure a quick, precise cooking time for tender meat.
  • Underseasoning is common; crawfish and chicken need assertive Cajun spices to reach full flavor potential.
  • Frying chicken at the wrong temperature often leads to greasy results. Use a thermometer to maintain 350°F for optimal crunch.
  • Forgettting to pat dry the crawfish before cooking can lead to sogginess.
  • Skipping marinading reduces flavor depth in the chicken; allow at least 30 minutes for seasoning to penetrate.
  • Using too much oil can overwhelm the sandwich’s flavor balance.
  • Mismatched buns can overpower the delicate ingredients. Choose neutral-flavored, light-textured breads.
  • Improper storage after assembly can result in soggy bread. Keep the components separate until serving.
  • Forgetting to season the flour in the dredging process can result in bland chicken.
  • Inadequate oil resting causes greasy sandwiches. Let the fried ingredients rest on a rack.

Essential Techniques


Mastering the frying technique is crucial for this recipe. Proper oil temperature ensures crispy, golden-brown chicken. If the oil is too hot, the exterior cooks too fast, leaving the inside undercooked. Conversely, low temperatures lead to sogginess. Use a thermometer to maintain a consistent 350°F, and avoid overcrowding the frying vessel, as this can cause temperature fluctuations affecting texture.

Timing the crawfish cooking process ensures tender, succulent meat. Crawfish cook quickly—overcooking renders them tough and chewy. Boil in seasoned water briefly, just until the shells turn vibrant red. Immediately rinse with cold water to stop the cooking process, preserving flavor and texture.

Marinating is key for infusing flavor into the chicken. A rest of at least 30 minutes allows spices to penetrate, enhancing every bite. Longer marinades deepen the flavor but keep overnight marination to a minimum to prevent texture changes from acidic components.

Toasting buns might seem minor but adds a critical layer of texture. A slight toast provides a barrier against moist ingredients, ensuring the bun maintains its structure. For perfect toasting, a hot pan or grill with no oil will crisp the bread without adding greasiness.

Pro Tips for Perfect Louisiana Crawfish and Fried Chicken Sandwich

Leverage a double dredging method for extra crispy chicken. Dredge, allow to rest, and dredge again. This ensures a robust crust, ideal for complementing the tender crawfish.

Test the oil temperature with a drop of batter. If it sizzles immediately, the oil is ready. This ensures constant frying quality and predictability without relying solely on a thermometer.

Infuse the oil with spices before frying to subtly enhance flavors without over-seasoning the chicken itself, adding depth to every bite.

Enhance the sandwich by adding pickled jalapeños for an extra kick. Their acidity cuts through the sandwich’s richness, creating a balanced taste experience.

Let the cooked chicken rest on a wire rack instead of paper towels. This prevents steaming, ensuring the crust remains crispy till serving.

Butter the buns lightly before toasting for an extra layer of flavor. It also helps to crispen the surface of softer buns, adding textural contrast.

Variations and Adaptations

Adapt the sandwich for different regional tastes by altering the spice mix. A touch of smoked paprika or chipotle powder adds a Southwest flair. Alternatively, a dash of Old Bay seasoning gives a nod to the Eastern Seaboard.

For seasonal variations, include fresh summer tomatoes or switch to arugula for a peppery note in winter. Seasonal vegetables can provide fresh crispness, enhancing the sandwich’s appeal and nutritional value.

Modify the recipe for dietary preferences by substituting gluten-free buns and flour, or baking the chicken instead of frying for a healthier twist. Ensure alternative bread types withstand hearty fillings without falling apart.

Experiment with unique flavors by infusing the accompanying mayonnaise with sriracha or chipotle for an added flavor punch, appealing to those with a love for spicy sandwiches.

To transform the texture, opt for a softer brioche bun to highlight the contrast with the fried elements, or choose a ciabatta for a firmer bite more suited to robust sauces and fillings.

For creative presentation, serve the sandwich open-faced, layering ingredients visually appealingly on one half, allowing an intricate look into its delicious components.

Serving and Presentation Guide

Crafting an inviting visual presentation begins with structure. Stack the sandwich cleanly, with crawfish and chicken centered for an enticing cross-section when sliced. Consider slicing diagonally to reveal the gourmet layerings within the sandwich.

Garnish the plate with fresh herbs like parsley or scallion, bursting with color and inviting aroma. Alternatively, incorporate pickled vegetables like onions or cucumbers for a dash of color and tang.

Complement this Southern favorite with traditional sides like a creamy coleslaw or sweet potato fries, enhancing the comfort-food feel while adding balance and variety to the meal.

For a modern serving approach, present the sandwich deconstructed, allowing diners to appreciate each ingredient’s quality, assembled just before eating. This also enables individuals to tailor portions and flavor augmentation personally.

Serving temperatures significantly impact enjoyment. Ensure the sandwich is assembled just before serving, allowing for optimal hot-and-cold contrast between the ingredients. Warm elements should remain hot, while vegetables provide a cool, refreshing balance.

Portion control is crucial. Given the indulgence of ingredients, serving half portions alongside substantial side dishes can cater to various appetites and occasions without overwhelming.

Wine and Beverage Pairing


A chilled glass of crisp white wine, like Sauvignon Blanc, pairs perfectly with the sandwich, complementing the crawfish’s delicate flavors while cutting through the rich fried chicken. Its citrus notes balance the meal’s spice elements harmoniously.

Consider non-alcoholic alternatives like a sparkling lemonade or iced sweet tea—classics that elevate the Southern culinary experience with refreshing sweetness, countering spice with cool relief.

For beer enthusiasts, a light lager or ale enhances the sandwich without overpowering its intricate flavor profile. These provide a smooth, clean finish, reinforcing the dish’s bold and spicy characteristics.

If coffee or tea is your preference, select unsweetened green tea; its mild bitterness contrasts rich oily textures, but its temperature must remain cool to avoid exacerbating spice levels.

Serving a grapefruit or blood orange spritzer adds a vibrant, effervescent touch. These drink choices uplift the dining experience with a sense of flair, ensuring balance and excitement in every sip.

Storage and Shelf Life


Efficient storage extends the sandwich’s life without compromising quality. Store components separately to maintain individual texture and flavor integrity, especially vital for fried items to remain crispy.

Refrigerate the chicken and crawfish in airtight containers to prevent moisture loss and flavor absorption from other foods, keeping them fresh for up to two days.

Signs of spoilage include soggy, discolored components or an off scent. The fresh aroma should prevail, indicating no need for disposal.

Gently reheat chicken in a low oven to regain crispiness. Avoid microwaving, which softens the crust unavoidably, detracting from traditional enjoyment.

Freezing is viable for individual ingredients, but assembly just before serving lends itself best to a superior sandwich experience. Wrap each segment tightly before freezing to minimize freezer burn.

Safe defrosting practices insist on refrigerator time, allowing the chicken and crawfish to return to temperature steadily. Ensure complete reheating for safety and textural quality.

Make Ahead Strategies


Prepare ingredients in advance to streamline mealtime assembly, saving time while preserving flavor. Marinate chicken overnight to enhance its depth, allowing a melding of ingredients.

After cooking, while separated, components may be stored up to two days. Wait to toast buns and heat fillings just before serving for optimal freshness and vibrancy.

Should you opt to prepare far in advance, consider vacuum sealing where possible. It prolongs freshness, particularly beneficial for crawfish, retaining their distinctive aroma and taste effectively.

To reheat, focus on individual parts, minimizing texture loss by utilizing oven, stove-top, or air-fryer techniques—avoid microwave methods for maintaining peak sandwich excellence.

Introduce fresh elements, like lettuce or tomato, post-reheating, preserving their brightness and crunch. Adding them after reassembly ensures the sandwich feels made-to-order.

Assemble sandwiches just before serving, placing emphasis on retaining their homemade appeal. Even pre-prepared fillings showcase freshness when built carefully by hand.

Scaling Instructions


Adjusting the recipe to accommodate additional mouths involves slight change adaptations, ensuring scalability without excess complication. Halve ingredients by simple division, yet allocate proportionate attention to cooking time adjustments.

Double or triple the mix, considering fryer oil volume and capacity revisions to maintain consistent frying quality across increased servings.

Equipment may need resizing, such as larger mixing bowls or frying vessels, to hold the added volume effectively. Adequate preparation space is vital, ensuring comfortable workflow.

Note extended timing requirements; increased volume necessitates phased cooking, avoiding overcrowding in any singular process. Management of preparation pace is key.

Storage considerations are also essential. As the volume rises, so does storage need expansion. Have ample containers available to separate items or refrigerate accordingly.

Nutritional Deep Dive


This sandwich provides a rounded nutritional profile, blending crawfish and chicken proteins efficiently. Crawfish is a low-fat source of selenium and B vitamins, supporting metabolism and cellular functions.

Chicken completes this profile with a hearty boost of lean protein, alongside the provision of zinc and iron, essential for maintaining immune and blood health.

The sandwich houses a balanced distribution of macronutrients, with carbohydrates from the bun complementing the protein content, ensuring sustained energy release throughout digestion.

Within micronutrients are supportive effects, notably vitamins A, B, and C, vital for immune support, reducing inflammation, and maintaining skin health.

Portion analysis proves beneficial for balanced delivery—value lies in selection variety for sides and extended nutrition. Complementing with fiber-rich accompaniments uplifts meal wholesomeness.

Mindful consumption keeps dietary peace enjoyable; it’s treat-soaked comfort devoid of guilt when placed amid broader healthy diets.

Dietary Adaptations


Choose gluten-free flours and buns to accommodate sensitivities without sacrificing flavor. Many rice-based mixes retain crisp and tender qualities essential for the perfect sandwich.

For dairy-free needs, substitute milk in marinades for plant-based alternatives. Nut or soy milk remains a popular choice for mimicking traditional marinating liquids in a dairy-free manner.

Vegan adaptation introduces alternative proteins such as tofu or tempeh, treated with similar Cajun spices. Crispy coating methods can replicate the chicken’s texture, ensuring a delectable meal.

Aim for low-carb versions through careful bun selection or lettuce wraps, reducing bread reliance while maintaining richness with the protein focus.

This sandwich fits keto-friendly molds due to protein content; reduce carbohydrate load with consideration to seasoning sugars and bun swaps.

Transition to Paleo eats by eliminating processed bread, opting instead for creative alternatives like sweet potato slices or other grain-free options.

For low FODMAP guidance, monitor ingredient choices alertly, recognizing affects rendering potential intolerance despite protein focus adjusted.

Troubleshooting Guide


Managing texture issues stems from correct oil temperature during frying. Successful crispiness results from 350°F, verified with reliable thermometers to assure consistency.

Ensure flavor balance with all-seasoned components equally. Bland elements risk whole sandwich appeal; apply spices liberally while observing palate variations.

Navigate temperature problems with thermometer validation or preliminary oil testing. Ideal frying achieves golden crust while retaining internal juiciness.

Tackle equipment challenges by pre-sourcing suitable fryers or pots. Adequate sizing guarantees efficiency, allowing correct batch preparation without ingredient compromise.

Ingredient substitution requires understanding of comparable flavor and texture replacements. Swap shrimp for crawfish in equivalent diets or choose labeled GF flour for similar outcomes.

Timing concerns require clock awareness; phased cooking processes alleviate stress from narrow finishing windows, maintaining personal rhythm within recipe adaptation.

Recipe Success Stories


Community engagement has favored this recipe, reflecting Southern comfort merges spotlight vibrancy, raving about the dynamic combination of crawfish’s delicateness with traditionally robust fried chicken.

Experimenters shared variations successfully swapping standard to gluten-free setups, reaffirming adaptability without quality diminution—a testament to creative culinary exploration’s potential.

Reader suggestions mirrored presentation experiments, suggesting open-faced or deconstructed forms highlighted underlying beauty in often hidden elements.

Photographers chimed in with appreciative captures, recommending natural light angles illuminating texture hues, achieving menu-ready plates brimming with palatable enticement.

Adaptation stories continued, inviting kitchen adaptations incorporating personal regional influence. Users confidently created with Eastern or Southwestern twists, broadening recipe scope seamlessly.

Diverse range paints possibilities vibrant; fixed recipe norms melt under reimagining breadth, inventive interpretation blooming within shared culinary enjoyment.

Frequently Asked Questions

1. Can I use pre-cooked crawfish? Pre-cooked crawfish work if you can’t access fresh—reheat gently with seasoning to retain flavor and texture.

2. Is it possible to bake the chicken instead? Bake at 400°F until golden and cooked through. Opt for oil spritz to enhance crust without frying.

3. What’s the best bread substitute for gluten-free diets? Consider gluten-free buns with a firm texture to hold fillings. Reviews suggest Udi’s or Schär as reliable brands.

4. How do I prevent grease overload? Ensure ingredients are patted dry before cooking. Rest fried items on wire racks to maintain crispening during cooling.

5. Can I meal-prep this sandwich? While initial prep is suited earlier in the day, the final assembly should be close to serving time for optimal results.

6. How can I reduce overall spice for milder palates? Adjust Cajun seasoning levels, choosing less intense spices or reducing cayenne pepper content.

7. Is an air fryer a suitable alternative? Yes, air fryers are popular substitutes providing similar crisp textures without deep frying’s subtle flavor nuances.

8. How do you adapt this recipe for keto diets? Select low-carb bread substitutes or use lettuce wraps, retaining protein-centric ingredients at the core of the meal.

9. What’s a good vegetarian alternative? Marinated and fried tofu versions balance flavor while capturing outer crispy features of original concepts.

10. Can I freeze the assembled sandwich? It’s best to freeze components separately to maintain texture integrity, recombining post-thaw upon anticipated consumption.

11. How do I avoid sogginess in leftovers? Store fillings independently, keeping buns dry until reheating, preventing sogginess from condensing in moisture.

12. What’s the most common mistake to avoid? Ensure proper seasoning through every ingredient layer—flavorful balance throughout is key to successful recreation.

Additional Resources


Explore related recipes tapping into Southern culinary landscapes, such as Po’boys or jambalaya, inspiring iterations of traditional flavors into new and exciting forms.

Technique guides discuss the art of frying, seasoning mastery, and spice-blend knowledge, elevating all dishes touched by these critical cooking skills.

Ingredient exploration fathoms crawfish intricacies, deepening understanding in its nutritional profile and culinary versatility, drawing connections between history and modern use.

Equipment considerations highlight suitable kitchen tools for achieving perfect frying environments, including digital thermometers’ trustworthiness or fryer size dynamics.

Uncover seasonal recipe turns, using vegetables in peak availability’s fullness, underscoring potential adaptations reshaping year-long enjoyment of favored dishes.

Join the Conversation


Share your sandwich preparation on social media using #LouisianaCrawfishChickenSandwich to connect with fellow creators, fostering a dynamic community of culinary enthusiasts.

Capture captivating photos with natural light, accentuating vivid colors and textures, enhancing visual storytelling while contributing to collective inspiration.

Delight in recipe reviews—taste experiences and tweaking triumphs tell tales of shared success, energizing others with creative culinary pursuits online.

Engage with evolving ideas and recipe variations emerging spontaneously, inviting freshness to context and execution while catering to wider enjoyment dimensions;

Your involvement breathes life into templates; responses rekindle recipe narratives, harmonizing unity within a broader culinary landscape.

The Recipe

Louisiana Crawfish and Fried Chicken Sandwich

Serves: 4

Prep Time: 30 mins

Cook Time: 20 mins

Total Time: 50 mins

Kitchen Equipment Needed

  • Frying pan or deep fryer
  • Tongs
  • Wire rack
  • Mixing bowls
  • Kettle or pan for boiling crawfish

Ingredients

  • 4 boneless chicken thighs
  • 1 lb crawfish tails
  • 4 sandwich buns
  • Cajun seasoning
  • 2 cups all-purpose flour (or gluten-free substitute)
  • 1 cup buttermilk (or dairy-free alternate)
  • Vegetable oil (for frying)
  • Salt and black pepper to taste
  • Optional toppings: lettuce, tomato, pickles

Directions

  1. Season chicken thighs with salt, pepper, and Cajun seasoning. Marinate in buttermilk for at least 30 minutes.
  2. Boil crawfish in salted water with a dash of lemon juice; drain and cool.
  3. Heat oil in frying pan to 350°F. Coat chicken in seasoned flour, dredge again for extra crispness.
  4. Fry chicken until golden brown and cooked through, around 5-7 minutes per side. Rest on wire rack.
  5. Slice and lightly toast sandwich buns.
  6. Assemble sandwich: layer fried chicken, crawfish, and optional toppings on toasted buns. Serve hot.

Recipe Notes

  • Adapt side ingredients based on availability and preference, ensuring the main components’ freshness.
  • Use a sweet or spicy sauce for added flavor if desired.

Irresistible Blueberry Scones Recipe for Perfect Breakfast Bliss

Blueberry Scones: A Delightful Breakfast Staple

⚖️
Difficulty
Medium

⏲️
Prep Time
20 mins

🕒
Cook Time
25 mins

⏱️
Total Time
45 mins

🍽️
Servings
8

Start your day with a batch of freshly baked blueberry scones, a perfect mix of buttery richness and fruity sweetness. These homemade scones are a delightful breakfast treat, offering a burst of blueberry flavor in every bite. Whether you’re enjoying them with a cup of tea or as a standalone snack, their comforting flavors and enticing aroma make them a crowd favorite.

Blueberry scones are not just about taste but also a delightful baking experience. The process of making scones is therapeutic, as you mix simple ingredients to create something extraordinary. Imagine the joy of pulling warm scones from the oven, their golden crust enveloping a soft, fluffy interior speckled with juicy blueberries.

Quick Recipe Highlights

  • Flavor Profile: The scones offer a delightful combination of sweet and tangy blueberries with a buttery base that’s mildly sweet, perfect for any time of day.
  • Texture: Expect a crumbly yet soft texture on the inside, complemented by a slightly crisp exterior for that perfect bite.
  • Aroma: As the scones bake, they fill your kitchen with the comforting scent of baked dough and fruity notes from the blueberries.
  • Visual Appeal: Their golden-brown exterior is punctuated by vibrant blue dots of blueberries, making them visually irresistible.
  • Skill Level Needed: This recipe requires basic baking skills, perfect for those looking to improve their pastry-making prowess.
  • Special Equipment: A pastry cutter or a food processor is ideal for blending the dough efficiently without overworking it.

Recipe Overview

  • Difficulty Level: Medium – The recipe involves combining dry and wet ingredients and requires attention to dough consistency for optimal results.
  • Category: Breakfast, Brunch, Snack – These scones fit comfortably into any meal category, making them versatile in every way.
  • Cuisine: Inspired by British scones, they carry a touch of American flair with the addition of fresh blueberries.
  • Cost: Relatively low-cost ingredients make this recipe affordable, with most items already in a typical pantry.
  • Season: Best enjoyed in spring and summer when blueberries are at their peak freshness, but frozen ones work just as well year-round.
  • Occasion: Ideal for a leisurely weekend breakfast, a brunch gathering, or even as a delightful afternoon tea companion.

Why You’ll Love This Recipe

Blueberry scones stand out for their exquisite balance of taste and texture. Biting into one offers a rush of flavors – the tart sweetness from the blueberries juxtaposed with the creamy richness of the buttery dough. Texturally, they strike a balance between flaky and tender, with each bite melting in the mouth effortlessly.

Convenience is another reason to love these scones. The ingredients are common, and the preparation requires minimal specialized equipment, making it accessible for all home bakers. In under an hour, you can have scones ready from scratch, showcasing your baking skills with pride.

Health-conscious individuals will appreciate the relatively balanced nutrition profile of these scones. They’re a source of fiber, thanks to the blueberries, and offer a moderate indulgence calorie-wise – a perfect treat without the guilt.

When it comes to social events and entertaining, these scones shine as an impressive offering. Whether you’re hosting a brunch or attending a potluck, blueberry scones add a touch of homemade charm and sophistication to the table.

Lastly, the cost-effectiveness and accessibility of this recipe ensure it can be executed frequently without breaking the bank. With blueberries as the most exotic ingredient, these scones are both budget-friendly and easy to prepare with items you likely already have.

Historical Background and Cultural Significance

Originating from the British Isles, scones have long been a staple of British tea culture. Traditionally served with clotted cream and jam, scones have evolved considerably over the centuries, adapting to various regional palates and available ingredients.

In the early days, scones were made with oats and baked over an open flame. With the invention of baking powder, they transitioned into the risen, fluffy versions we enjoy today. Throughout history, scones have symbolized hospitality and comfort, often marking celebrations and social gatherings.

The introduction of fruits like blueberries became more widespread as global trade and agricultural practices evolved. This integration has expanded the variety of scones available globally, making blueberry scones a beloved variation in places with abundant berry harvests.

Regional variations of scones abound, from the savory cheese-laden scones of Scotland to the sweetened, fruit-filled ones popular in North America. Each variation reflects local tastes and ingredient accessibility, ensuring that scones remain a versatile delicacy anywhere.

Ingredient Deep Dive

Blueberries, the star ingredient in this recipe, carry significant cultural and nutritional importance. Historically, they have been revered for their medicinal properties among indigenous cultures in North America. Rich in antioxidants and vitamins, blueberries contribute to cardiovascular health and reduced inflammation.

Selecting fresh, plump blueberries is key. Look for berries with a deep blue hue and no signs of shriveling. If fresh blueberries are unavailable, frozen options provide comparable flavor and nutritional benefits. For storage, refrigerate fresh blueberries in a breathable container to extend their life or freeze them for longer storage.

The right flour is crucial in scone-making. All-purpose flour provides the structure needed, balancing tenderness and rise. For a lighter texture, consider substituting part of the flour with cake flour, which has a lower protein content.

Common Mistakes to Avoid

  • Overmixing the dough can lead to tough scones due to excess gluten formation. Mix just until the ingredients come together.
  • Using warm butter reduces the scones’ flakiness. Ensure the butter is cold for best results.
  • Not chilling the dough can result in flatter scones. A brief rest in the fridge helps maintain their shape during baking.
  • Overbaking leads to dry scones. Keep a close eye during the last few minutes of baking for a perfect texture.
  • Opening the oven too frequently can affect baking time and texture. Resist the urge to peek.
  • Skipping the glaze reduces flavor depth. Consider a simple sugar glaze to enhance sweetness and texture.
  • Using old or low-quality baking powder can impair rise. Check expiration dates regularly for optimal leavening.
  • Failing to declump the dry ingredients may lead to uneven distribution. Sift them together to ensure consistency.
  • Ignoring dough temperature when adding liquids can affect texture. Ensure room temperature liquids for even mixing.
  • Rolling the dough too thinly affects height. Keep it at least one inch thick for fluffy scones.

Essential Techniques

Perfect scones demand mastery of the dough technique, balancing tenderness with rise. Key to this is maintaining cold butter throughout the process, helping create those desirable flaky layers. Use a pastry cutter to integrate the butter with the flour mixture efficiently.

Achieving the right dough consistency is crucial. It should be slightly sticky but workable. Avoid overworking the dough, as this will result in a dense final product. Gently bring the dough together for best results.

Pro Tips for Perfect Blueberry Scones


– Ensuring the correct oven temperature is crucial for the right rise and texture. Use an oven thermometer to confirm accuracy.
– Integrate butter by pulsing in a food processor, maintaining its coldness and achieving even distribution quickly.
– Freeze scones before baking if desired. This helps maintain shape and allows flexibility with bake timing.
– Brush tops with cream or milk for a golden, appealing crust without overly sweetening.
– Experiment with zest, like lemon or orange, for an added aromatic dimension complementing the blueberries.
– Store leftovers wrapped in foil to preserve their moisture, reheating gently in a low oven when needed.

Variations and Adaptations

Blueberry scones can vary by region with the inclusion of local flavors like lavender or citrus zests. For seasonal twists, consider adding cranberries in fall or peaches in summer. Each addition brings a unique twist aligning with seasonal ingredients.

For dietary adaptations, swap regular flour with gluten-free alternatives or butter with dairy-free options, ensuring the scones remain inclusive for all dietary needs. Enhance flavor profiles by incorporating almond or vanilla extracts, providing new depths to the scone’s aroma.

Exploring different flours like whole wheat adds a nutty flavor and changes the texture profile, appealing to diverse palates. Present with a casual glaze or keep rustic for a homely touch, aligning with the occasion.

Serving and Presentation Guide

When it comes to serving, let creativity shine with various plating techniques. Consider pairing with clotted cream and jam for a traditional British experience or modernize with mascarpone and honey. Garnish with mint leaves or a dust of powdered sugar for aesthetic appeal.

Pairings like lemon curd or whipped butter offer additional taste dimensions, allowing guests to customize their scone experience. Present on rustic serving platters, elevating the scones’ appeal through visual charm.

Wine and Beverage Pairing

Consider pairing blueberry scones with a light, fruity white wine like Moscato for a harmonious blend of flavors. Non-alcoholic options such as a chilled iced tea or lemonade complement their sweetness without overpowering.

Coffee and tea work splendidly, balancing the scones’ richness with complementary warm notes. Decaf or light-roast options enhance flavors without masking the scones’ natural taste, suitable for any time of day.

Storage and Shelf Life

Store blueberry scones in an airtight container at room temperature to retain moisture. For prolonged freshness, consider freezing individually wrapped scones, reheating gently when ready to consume. Monitor for signs of spoilage, like unusual odors or hard surfaces.

Make Ahead Strategies

Prepare the dough ahead, storing it in the refrigerator until baking. This strategy maintains freshness while allowing flexibility for timing. Reheat in a moderate oven after baking to retain fluffiness, ensuring fresh-tasting scones at every serving.

Scaling Instructions

Adjust the recipe as needed, with halving being an excellent option for smaller gatherings or doubled for larger events. Ensure proportionate mixing of ingredients and consider longer baking times if significantly increased in volume.

Nutritional Deep Dive

Blueberry scones provide a balanced macro profile, with carbohydrates predominantly from the flour and inherent fruit sugars. Micronutrients from blueberries, such as vitamin C and antioxidants, enhance the scones’ health appeal.

Dietary Adaptations

For gluten-free adaptations, substitute gluten-free all-purpose flour mixes, balancing with xanthan gum if necessary. Dairy-free versions can replace butter with plant-based alternatives without sacrificing texture.

Troubleshooting Guide

Address issues like dryness by ensuring proper butter incorporation and avoid excessive flour usage. Flavor balance can be adjusted with spices or extracts, while temperature challenges require consistent checking and possible oven recalibration.

Recipe Success Stories

Blueberry scones have become household favorites, with readers experimenting by adding different fruits or even nuts, receiving rave reviews at various community events. Connecting through shared experiences makes this recipe a staple for many homes.

Frequently Asked Questions

How do I keep scones fresh longer?
Store them in an airtight container at room temperature or freeze for future use. Avoid refrigeration as it can dry them out.

Why did my scones turn out flat?
Ensure your baking powder is fresh and your butter remains cold throughout the process, crucial factors for proper rise.

Can I use frozen blueberries?
Yes, frozen blueberries work well. Do not thaw them and gently fold them into the dough to prevent excess moisture.

What if I don’t have a pastry cutter?
A food processor or just your hands can work, ensuring not to melt the butter while working it into the flour.

Can I make vegan blueberry scones?
Substitute butter with vegan margarine and replace dairy with plant-based milk for vegan adaptations.

Why are my scones too crumbly?
It’s likely due to too much flour or not enough liquid. Measure carefully and adjust as needed for desired consistency.

How to add more flavor?
Incorporate citrus zests or vanilla extract to enhance taste, complementing the blueberries superbly.

What cream pairs well with scones?
Clotted cream is traditional, but mascarpone or whipped cream also make excellent complements for added richness.

How do I reheat scones?
Use a moderate oven rather than a microwave to retain their original texture, ensuring even heating.

What makes scones different from biscuits?
Scones tend to be richer and often sweet, with more butter and less rise agent compared to American biscuits.

Additional Resources

Explore various related scone recipes, like lemon-poppy seed or cranberry-orange, to expand your baking repertoire and impress guests with diverse flavors. Access guides on butter techniques or flour types to deepen understanding and refine skills further.

Join the Conversation

Share your blueberry scone creations on social media, using hashtags to connect with fellow bakers. Discover varied photo techniques to capture their beauty, from close-ups focusing on texture to lifestyle setups enhancing tabletop aesthetics.

The Recipe

Blueberry Scones

Serves: 8

Prep Time: 20 mins

Cook Time: 25 mins

Total Time: 45 mins

Kitchen Equipment Needed

  • Mixing Bowl
  • Pastry Cutter or Food Processor
  • Baking Sheet
  • Parchment Paper
  • Oven

Ingredients

  • 2 cups all-purpose flour
  • 1/3 cup sugar
  • 1 tbsp baking powder
  • 1/2 tsp salt
  • 1/2 cup unsalted butter, cold and diced
  • 2/3 cup buttermilk
  • 1 cup fresh blueberries
  • 1 tsp vanilla extract
  • Additional sugar for sprinkling

Directions

  1. Preheat the oven to 400°F (200°C) and line a baking sheet with parchment paper.
  2. In a large mixing bowl, whisk together flour, sugar, baking powder, and salt.
  3. Add the diced cold butter into the flour mixture, using a pastry cutter or your fingers to blend until the mixture resembles coarse crumbs.
  4. Mix in blueberries, ensuring even distribution.
  5. In a separate bowl, combine buttermilk and vanilla extract. Gradually add to the dry ingredients, stirring until just combined.
  6. Turn the dough onto a floured surface and gently shape it into a circle about 1 inch thick.
  7. Cut into 8 wedges and transfer to the prepared baking sheet.
  8. Sprinkle additional sugar over the top of the scones for added sweetness.
  9. Bake for 20-25 minutes, or until golden brown and firm to the touch.
  10. Allow to cool slightly before serving warm.

Recipe Notes

  • Feel free to substitute buttermilk with milk if needed, adding a splash of lemon juice to mimic the tanginess.
  • Frozen blueberries can be used but add them directly from the freezer.
  • For a zesty twist, add the zest of one lemon to the flour mixture.