Irresistible Blue Cheese Walnut Thyme Pull Apart Puff Pastry Delight

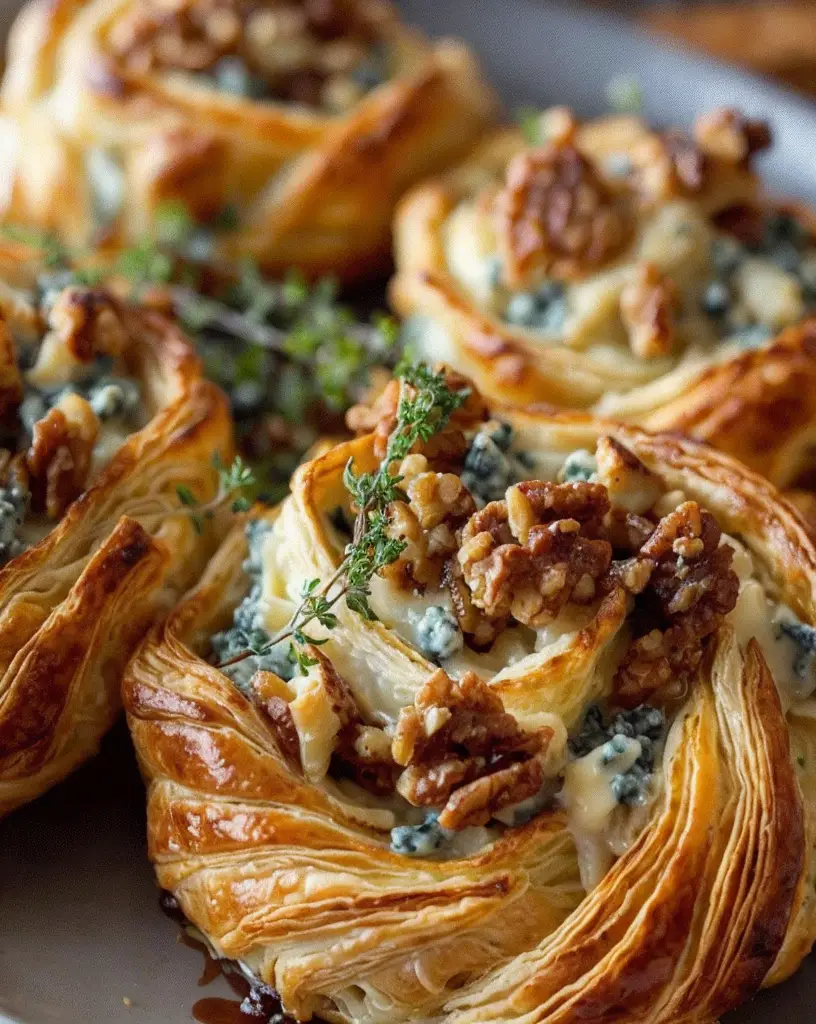
Blue Cheese, Walnut, and Thyme Pull Apart Puff Pastry Twirl: A Flavorful Delight

⚖️
Difficulty
Easy

⏲️
Prep Time
15 mins

🕒
Cook Time
25 mins

⏱️
Total Time
40 mins

🍽️
Servings
8

Imagine the perfect afternoon filled with the savory aroma of freshly baked pastry wafting through your kitchen. The Blue Cheese, Walnut and Thyme Pull Apart Puff Pastry Twirl is an indulgent treat ideal for any gathering or a cozy evening at home. This delectable pastry brings together rich blue cheese, the crunch of walnuts, and earthy thyme, creating a symphony of flavors with every bite. Its simplicity yet elegant presentation makes it an irresistible addition to your recipe collection.

This recipe is a brilliant amalgamation of textures and tastes. The buttery layers of puff pastry envelop a filling that combines creamy blue cheese with crunchy walnuts, imparting an irresistible bite. The thyme adds an aromatic, herbal note that perfectly balances the robust cheese, making this pull apart pastry not only delicious but also intricately flavorful.

Quick Recipe Highlights

  • Flavor Profile: Celebrate a delightful savory experience with sharp blue cheese, earthy thyme, and nutty walnuts.
  • Texture: Enjoy a harmonious blend of creamy, crunchy, and flaky textures that melt in your mouth.
  • Aroma: Allow the herbaceous scent of thyme and toasted walnuts to enchant your senses.
  • Visual Appeal: Relish the golden-brown pastry spiraling around a rich cheese filling, making it a visual centerpiece.
  • Skill Level Needed: Basic pastry handling and spreading skills are all you need to impress your guests.
  • Special Equipment: A rolling pin and pastry brush will be your trusty tools for this easy-to-create masterpiece.

Recipe Overview

  • Difficulty Level: This recipe is straightforward, making it accessible even for beginners. The key is to manage the puff pastry gently and ensure it is packed with all the savory ingredients.
  • Category: Perfect as an appetizer or snack, it fits well into brunch settings or as a party appetizer.
  • Cuisine: This dish finds its roots in European cuisine, with a focus on combining premium cheese and rustic flavors.
  • Cost: Expect to spend a modest amount, as high-quality puff pastry and blue cheese can elevate this recipe substantially.
  • Season: Ideal for the holiday season, but its delightful flavors make it a year-round favorite.
  • Occasion: Perfect for gatherings, parties, or an exquisite addition to weekend brunch.

Why You’ll Love This Recipe


This Blue Cheese, Walnut, and Thyme Pull Apart Puff Pastry Twirl offers a taste and texture that is simply captivating. Each bite is a delightful contrast of creamy blue cheese, crunchy walnuts, and flaky puff pastry, harmoniously flavored with aromatic thyme. It’s a recipe that is as much a joy to eat as it is to prepare.

Convenience and ease of preparation make this recipe a favorite among both novice and seasoned cooks. The use of ready-made puff pastry streamlines the process, allowing you to focus on creating a luscious filling and assembling a stunning presentation in no time.

Indulging in this pastry twirl doesn’t only satisfy your taste buds but also provides some nutritional benefits. Rich in calcium from the cheese and healthy fats from the walnuts, this treat is a wholesome addition to your meal repertoire, perfect for occasional enjoyment.

Beyond its nutritional perks, this recipe excels as a social centerpiece. Whether at a cozy family breakfast or a lively evening party, its inviting aroma and gorgeous presentation invite guests to gather and share joyful moments over delicious food.

Finally, this recipe stands out for its cost-effectiveness and accessibility. With a few high-quality ingredients, you can create a gourmet experience that rivals restaurant-style dishes without breaking the bank. The intrinsic richness and multifaceted flavors ensure that every penny is well spent.

Historical Background and Cultural Significance


The origin of this recipe draws inspiration from the rich culinary traditions of Europe, where cheese and nuts have been integral components of festive and ceremonial dishes for centuries. Across various regions, combining creamy blue cheese with nuts is a testament to the enduring appeal of contrasting textures and savory profiles.

Blue cheese, with its storied past stretching back to the Roman era, has long been cherished for its robust flavor and complexity. Traditionally crafted in caves, it symbolizes artisanal expertise and a deep connection to heritage, elements which are celebrated through this pastry recipe.

Over time, the recipe has evolved, embracing modern culinary innovations like pre-made puff pastry while retaining its classic core ingredients. The fusion of old-world cheese-making with the versatility of contemporary baking creates an exciting and timeless culinary experience.

Regional variations are popular, with some swaps in ingredients reflecting local tastes and seasonal availability. Whether introducing fresh herbs or experimenting with different nut varieties, the adaptability of this recipe makes it a beloved staple in many households.

Ingredient Deep Dive


Blue cheese is the hero of this dish, offering a sharp, tangy flavor profile that sets the stage for a memorable culinary experience. Renowned for its origins in various European countries, blue cheese boasts a variety of styles, each with unique notes influenced by specific climates and production methods.

Beyond its storied cultural heritage, blue cheese is rich in calcium and protein. To select the best variety, look for a cheese that is slightly soft but firm to the touch, and store it wrapped in parchment paper in the fridge to maintain freshness.

Walnuts bring both nutritional benefits and texture dynamism to this recipe. Historically revered for their richness in omega-3 fatty acids and antioxidants, walnuts add a delightful crunch that complements the creaminess of blue cheese beautifully.

For best results, choose raw, unsalted walnuts and store them in an airtight container in a cool, dark place to prevent rancidity. If needed, other nuts like pecans or almonds may substitute walnuts, maintaining the recipe’s textural harmony.

Common Mistakes to Avoid

  • Overfilling the pastry can lead to it splitting during baking. Ensure an evenly distributed and moderate filling amount.
  • Failing to seal edges properly may allow filling to escape during baking, so press gently to secure seams.
  • Underbaking can result in a soggy pastry; ensure adequate cooking time to achieve a golden-brown finish.
  • Cooling the pastry too quickly might affect its texture, so allow it to cool on a wire rack.
  • Using puff pastry that isn’t fully thawed can lead to uneven rolling and baking.
  • Skipping the egg wash results in a dull appearance; a quick brush enhances color and shine.
  • Too much thyme can overpower the dish; balance is key to capturing its aromatic notes without overwhelming flavors.
  • Handling the pastry too much can cause it to lose its flakiness when baked.

Essential Techniques


Achieving the perfect puff pastry texture is crucial. When rolling out the dough, ensure its thickness is consistent to promote even cooking. Avoid stretching the pastry, as this can cause it to shrink during baking and affect texture.

Mastering the art of spreading is essential for an evenly distributed filling. Use a small offset spatula to achieve a smooth layer that covers the entire pastry surface without spilling over the edges.

Paying attention to baking visual cues is vital. A golden-brown hue with slight blistering indicates the perfect puff pastry doneness. Overbaking can result in a dry pastry, while underbaking leads to a soggy bottom.

Rolling the pastry into a tight spiral is an art. It’s key to maintaining shape and keeping the filling intact. Practice patience, and if needed, refrigerate for 10 minutes to make handling easier.

Pro Tips for Perfect Blue Cheese Twirl


Maintain cold ingredients when working with puff pastry to ensure it remains flaky. Warmth causes the butter layers within the pastry to melt, leading to a denser texture.

After assembling, chill the pastry for 20-30 minutes before baking. This helps maintain shape and enhances the flakiness when baked.

Experiment with different crumble sizes for the cheese. Larger pieces provide a more robust flavor bite, while finer pieces distribute flavor more evenly.

For added depth, try toasting the walnuts slightly before integrating them into the filling. This amplifies their flavor and adds a warm, nutty aroma to the dish.

Using fresh thyme sprigs instead of dried ones elevates the aromatic quality of this pastry, enhancing its genuine herbal notes without overpowering the cheese’s tang.

Serving the twirl slightly warm ensures the cheese maintains its creamy texture without becoming overly runny or firm, offering the best taste and texture experience.

Variations and Adaptations


Regional variations can include swapping blue cheese with other crumbly cheeses such as feta or goat cheese, allowing the recipe to cater to various palates while preserving its core essence.

Seasonal adaptations invite the inclusion of other herbs in place of thyme during different times of the year. Fresh basil or rosemary can bring a new dimension to the dish during summer and winter, respectively.

Dietary modifications are attainable with gluten-free puff pastry alternatives, offering the same texture and taste experience for those with gluten sensitivities.

For a flavor twist, consider adding dried cranberries to the filling during festive seasons, bringing a sweet contrast against the savory profile of the blue cheese and walnuts.

Texture modifications come through adjusting the nut varieties. Substituting with pecans or hazelnuts can provide a more buttery, sweet nuance to the pastry twirl.

Presentation alternatives may involve serving as smaller, individual pinwheels, each offering a bite-sized burst of flavor perfect for cocktail-style events.

Serving and Presentation Guide


When it comes to plating techniques, consider arranging the pastry in a spiral pattern on a rustic wooden board or on a sophisticated serving platter for a striking centerpiece.

Garnishing ideas could include a sprinkle of fresh thyme leaves or thin curls of cheese on top to accentuate the dish’s rustic charm and enhance visual appeal.

Traditional accompaniments such as a small bowl of honey or fig preserves complement the sharpness of the cheese with a sweet counterpoint, bringing balance to the tasting experience.

For modern serving suggestions, consider pairing with a delicate green salad, lightly dressed, to add a fresh, crisp contrast to the creamy, rich pastry.

Temperature considerations suggest serving the twirl slightly warmed, allowing the cheese to ooze slightly and maintain its melt-in-the-mouth quality.

Portion control tips involve slicing the pastry into six sections, making it easy to handle and ensuring each guest enjoys a satisfying but not overwhelming portion.

Wine and Beverage Pairing


A chilled glass of Pinot Grigio or Chardonnay offers an acidic complement to the creamy, tangy richness of the blue cheese. These whites balance the dish’s bold flavors without overpowering them.

For non-alcoholic alternatives, consider a refreshing iced tea or an apple cider. Their slight sweetness gently elevates the pastry’s savory notes, providing a refreshing cleanse to the palate.

If pairing with coffee or tea is preferred, opt for a rich, full-bodied coffee or a robust black tea that shares the pastry’s intrinsic complexity and can match its flavor intensity.

It’s essential to serve these beverages slightly chilled; the crispness cuts through the cheese’s richness while the carbonation can cleanse and refresh.

For serving suggestions, choose clear glasses to showcase the beverage’s hues and serve with a side of fresh fruits or nuts to mirror the pastry’s complementary tastes and textures.

Storage and Shelf Life


To maintain freshness, store the puff pastry twirl in an airtight container at room temperature for up to two days. For slightly longer storage, keep it in the fridge, ensuring it is well-sealed to prevent drying.

Temperature requirements for stored pastry should be consistent to maintain texture; too much heat can cause the pastry to become soggy, while too much cold can turn it brittle.

When considering container recommendations, opt for a shallow glass or metal storage container to prevent squishing and retain layer integrity in the pastry.

Signs of spoilage include mold growth visible on the cheese or a stale, off-putting smell. The pastry should also feel consistently firm, rather than excessively soft or hard.

Reheating instructions involve warming the pastry in the oven on low heat (300°F/150°C) until slightly warm to the touch. Avoid using the microwave to prevent the puff pastry from becoming soggy.

Freezing guidelines suggest that if you need to freeze, do so before baking. Assemble the pastry as instructed, then tightly wrap and freeze. Bake from frozen, adding a few extra minutes to the cook time.

Make Ahead Strategies


When planning to make this recipe ahead, consider constructing the pastry up to a day before and storing it chilled in the fridge until baking time. This allows flavors to infuse and makes for easy oven transfer.

Store components between steps in sealed containers. Pre-prepped ingredients won’t lose their freshness, even when assembled later.

Quality impact is minimal when making ahead, as the pastry aims to capture all flavors tightly without risking quality loss over time in refrigeration.

Assembly tips include using cold ingredients straight from storage to ensure the pastry remains firm and pliable for shaping and filling.

For best reheating, allow the pastry to return to room temperature before the second oven chill. This prevents uneven warming and restores the flaky texture.

Adding fresh elements like a dusting of cheese or herbs post-baking ensures vibrant flavor contrast and visual appeal, negating any muted potential from storage.

Scaling Instructions


Scaling this recipe to half is straightforward, reducing each ingredient proportionally and following the same assembly techniques but with a smaller pastry sheet.

Doubling or tripling the recipe demands increased ingredient availability, such as extra cheese or additional puff pastry sheets, but doesn’t complicate cooking techniques or methodologies.

Equipment adjustments such as larger baking trays or oven space consideration may arise when increasing batch size but require no specialized kitchen tools.

Timing modifications include extending the baking phase slightly if increasing batch size, as larger quantities necessitate thorough cooking to achieve optimal texture.

When increasing servings, consider ample storage space and airtight containers to retain quality.

Nutritional Deep Dive


This recipe offers a balanced macro breakdown with wholesome fats from cheese and nuts, moderate protein content, and low carbohydrates when conforming to specified ingredient quantities.

Micronutrient analysis showcases calcium and Vitamin K from the cheese and heart-healthy omega-3 fatty acids sourced from walnuts.

Health benefits are apparent, with healthy fats contributing to satiety and energy retention, while the controlled portion of complex carbohydrates offers sustained metabolic energy.

Dietary considerations involve awareness of sodium levels due to cheese content, emphasizing portions and balance concerning overall daily intake.

Portion analysis serves to bring richness and flavor concentration into one small serving, avoiding excessive caloric intake but still offering indulgent satisfaction.

Weight management tips involve limiting the pastry to smaller portions and pairing with water-rich, low-calorie foods such as leafy greens and vegetables for a well-rounded meal.

Dietary Adaptations


For a gluten-free version, utilize gluten-free puff pastry available in specialty stores or make your version from alternative flour blends.

A dairy-free modification involves substituting blue cheese with dairy-free cheese varieties like cashew blue cheese spread, maintaining texture and flavor while ensuring dietary considerations are met.

For vegan adaptation, combine gluten-free and dairy-free ingredients, relying on vegan cheese alternatives and coconut oil-based puff pastry.

A low-carb adaptation reduces any remaining puff pastry carbs, potentially substituting with keto-friendly pastry alternatives available in specialty stores.

Those following a keto lifestyle may enjoy the reduced carb version, focusing on cheese, nuts, and broader inclusion of low-carb ingredients in complementary dishes.

Paleo adaptation allows for potential nut cheese substitutions and a focus on almond flour-based pastry versions, reducing processed elements.

For a low-FODMAP approach, maintain low-FODMAP cheese choices and a reduced onion/garlic approach, facilitating easy digestion for sensitive stomachs.

Troubleshooting Guide


Encountering texture issues such as sogginess may indicate underbaking or excessive filling, necessitating refined proportions and thoroughly baking until golden brown.

If flavor balance doesn’t impress, adjust cheese types or increase herb quantities; yet adhere to a refined palette of complementary tastes without overwhelming the delicate pairing essence.

Temperature problems often relate to preheating accuracy or inadequate cooling times post-baking; monitoring both ensures texture and taste meet expectations.

Equipment challenges arise if using subpar pastry tools; committing to a sharp knife and appropriate rolling pins ensures precision and professional presentation.

Ingredient substitutions invite varied adaptations; consider flavor profiles and textural advancements, embracing experimentation while ensuring core recipe integrity.

Timing concerns primarily involve overextending pan heating or inadvertently adjusting cooking times beyond instructed; watch for visual cues to ensure baking remains on track.

Recipe Success Stories


Many community members have shared their success with this Blue Cheese, Walnut, and Thyme Pull Apart Puff Pastry Twirl. Numerous readers have embellished the flavors with additional locally sourced cheeses, enhancing regional pride and producing unique twists to common adaptations.

Variation successes often involve including figs or berries, introducing sweetness that balances the savory elements while offering additional vibrant color upon serving.

Adaptation stories invoke creative inspiration, demonstrating commitment to diverse dietary requirements without sacrificing the classic essence of the pull-apart pastry.

Reader suggestions embrace creative pairings, such as adding a spoon of honey or a sprinkle of chili flakes before baking, adding intriguing, personal touches to traditional methods.

Photography tips guide aspirant food bloggers, allowing them to spotlight the twirl’s stunning layers. Close-up shots emphasize its enticing complexity, while wider angles capture the twirl’s charming rustic texture.

Frequently Asked Questions

Can I use other types of cheese in this recipe?
Absolutely! While blue cheese is renowned for its tangy flavor, feel free to experiment with alternatives like feta or gouda to suit your preference.

What if I don’t have walnuts on hand?
You can substitute walnuts with other nuts such as pecans or almonds, maintaining the recipe’s crunch and nutty element.

How do I prevent the pastry from getting soggy?
Ensure you bake the pastry sufficiently to achieve a golden-brown crust, and avoid overfilling to reduce excess moisture.

Is it necessary to use fresh thyme?
While fresh thyme imparts a stronger aroma, dried thyme may be used sparingly if fresh is unavailable.

Can this recipe be frozen before baking?
Yes, it can be prepared and frozen, then baked from frozen, providing convenience for quick homemade delights.

What’s the best way to reheat leftovers?
Reheat in an oven at a moderate temperature to ensure the pastry remains flaky and warm within, avoiding microwave sogginess.

How do I present this recipe beautifully?
Arrange on a serving board, garnish with fresh herbs, and serve with accompaniments like fig jam to enhance its gourmet appearance.

Can I use pre-made puff pastry?
Certainly! Pre-made puff pastry simplifies preparation, offering consistent flakiness and saving significant time and effort.

Is it okay to prepare ahead of time?
Yes, assemble the pastry and chill until baking time for maximum flavor infusion and ease of serving.

Can I adjust for dietary needs?
Certainly! Opt for gluten-free or dairy-free alternatives as needed, ensuring compliance without compromising flavor.

How do I ensure even filling distribution?
Use a spatula to spread the filling evenly, preventing concentrated pockets that may disrupt texture upon baking.

Can I add fruit flavors to this recipe?
Incorporate fruits like figs or dried cranberries sparingly for a touch of sweetness complementing the tangy cheese and earthy nuts.

Additional Resources


Explore related recipes that incorporate similar ingredients, like blue cheese and walnut salad, which can complement the twirl and expand on flavor profiles distinct to these ingredients.

Technique guides are available for pastry handling, offering a keen insight on mastering dough management and achieving professional-level textures with each bake.

Ingredient information, spotlighting cheese varieties and walnut benefits, provides deeper understanding of attributes and culinary synergy present in this dish.

Equipment recommendations include owning a humble rolling pin and precise pastry brush, essentials that ensure perfect pastry execution without specialized gear.

Seasonal variations suggest adapting the recipe throughout the year, incorporating spring herbs and summer fruits to fit different occasions and taste journeys.

Join the Conversation


Join us on social media, where you can share your successes, adaptations, and photographs of this Blue Cheese, Walnut and Thyme Pull Apart Puff Pastry Twirl. Tag us to be featured and inspire others with your culinary creativity.

Photography tips for capturing your pastry include utilizing natural light and playing with perspective, focusing on its flaky layers and filling vibrance to entice your followers.

Recipe reviews help our community by offering valuable feedback, paving the way for upcoming variations and ensuring the recipe meets dietary and flavor satisfaction goals.

Engage in community discussion about creative ingredients, and showcase novel variations, like introducing spices or developing themed adaptations for unique culinary experiences.

Explore new recipe variations through collective insight, experimenting toward mutual culinary discovery and delight. Let’s create a universal tapestry of flavors, one pull apart pastry twirl at a time!

The Recipe

Blue Cheese, Walnut and Thyme Pull Apart Puff Pastry Twirl

Serves: 8

Prep Time: 15 mins

Cook Time: 25 mins

Total Time: 40 mins

Kitchen Equipment Needed

  • Rolling pin
  • Pastry brush
  • Baking tray
  • Paring knife
  • Offset spatula

Ingredients

  • 1 sheet puff pastry, thawed
  • 100g blue cheese, crumbled
  • 50g walnuts, coarsely chopped
  • Fresh thyme leaves
  • 1 egg, beaten
  • Salt and black pepper to taste

Directions

  1. Preheat your oven to 200°C (400°F) and line a baking tray with parchment paper.
  2. Roll out the thawed puff pastry sheet on a floured surface to ensure even thickness.
  3. Evenly spread the blue cheese over the pastry, leaving a small border on all sides.
  4. Sprinkle chopped walnuts and fresh thyme leaves over the cheese layer.
  5. Season the filling lightly with salt and fresh black pepper.
  6. Brush the border of the pastry with beaten egg and roll it into a log, sealing the edge tightly.
  7. With a sharp knife, cut the roll into 8 equal pieces and arrange them on the prepared baking tray.
  8. Brush the tops of each roll with remaining egg wash for a decorative gloss.
  9. Bake in the preheated oven for 25 minutes or until golden brown and crispy.
  10. Remove from the oven and allow the pastries to rest for a few minutes before serving.

Recipe Notes

  • For added sweetness, incorporate dried cranberries into the filling.
  • If blue cheese is unavailable, try goat cheese or feta for a different flavor profile.
  • Serve warm for the best texture and taste.

Irresistibly Easy Jello Meringue Cookies Recipe for Sweet Delight

Easy Jello Meringue Cookies: A Sweet and Simple Treat

⚖️
Difficulty
Easy

⏲️
Prep Time
15 mins

🕒
Cook Time
90 mins

⏱️
Total Time
105 mins

🍽️
Servings
24 cookies

Imagine biting into a light, airy cloud of sweetness with a delightful touch of fruity flavor. That’s what you get with these Easy Jello Meringue Cookies. Perfectly crisp on the outside but soft and chewy inside, these cookies promise a burst of joy for your taste buds. These meringue treats are a simple yet captivating confection, just right for those moments you crave a little bit of magic.

These cookies shine with their playful colors and vibrant flavors, making them not just a tasty treat but also a feast for the eyes. The hint of Jello adds a unique twist to classic meringue, infusing it with subtle notes of fruitiness that will make your cookie experience truly memorable. Whether you’re baking for a party or a casual get-together, these whimsical cookies are sure to be a hit.

Quick Recipe Highlights

  • Flavor Profile: These cookies offer a delightful blend of sweetness and subtle fruitiness, thanks to the Jello mix, making each bite a perfectly balanced experience.
  • Texture: Expect a crisp exterior that gives way to a soft, airy interior, creating a melt-in-the-mouth sensation that’s hard to resist.
  • Aroma: A gentle, sweet aroma with fruity hints that beckons anyone nearby to have a taste.
  • Visual Appeal: Vibrant, colorful cookies that catch the eye, making them an excellent choice for kid-friendly parties or festive gatherings.
  • Skill Level Needed: Suitable for beginners, these cookies are easy to make with clear, straightforward steps requiring no advanced baking skills.
  • Special Equipment: A stand or hand mixer is essential for achieving the perfect meringue consistency, while a piping bag helps shape the cookies.

Recipe Overview

  • Difficulty Level: Rated easy, this recipe is designed for bakers of all levels. The technique involves simple steps, mostly requiring patience as the meringues bake slowly to perfection.
  • Category: These tasty treats fall under the category of desserts and are an excellent addition to cookie platters or sweet snack selections.
  • Cuisine: Rooted in classic European techniques, these cookies embody the versatile and creative spirit of contemporary home baking.
  • Cost: With minimal ingredients, these cookies are budget-friendly, relying on pantry staples with just a few speciality items.
  • Season: Perfect for any season, but they bring a splash of color and flavor to spring and summer gatherings.
  • Occasion: Ideal for parties, picnics, or satisfying a sudden sweet tooth craving at home.

Why You’ll Love This Recipe

One of the greatest charms of Easy Jello Meringue Cookies lies in their taste and texture. The contrast between the crisp outer layer and the tender, chewy center makes each bite a celebration of textures. The fruity undertones from the Jello add a delightful twist to traditional meringues, elevating them to new flavor heights.

The preparation process is simple and convenient, making these cookies an excellent choice for quick baking projects. With a straightforward ingredient list and basic techniques, even novice bakers can achieve professional-looking and tasting meringue cookies without much fuss.

These cookies aren’t just delicious; they’re also light and airy, making them a guilt-free treat. Each cookie is low in calories and contains simple ingredients, making them a sweet treat you can enjoy without derailing your diet.

Socially, these cookies are showstoppers. Their vivid colors and fun shapes make them a talking point at events, ensuring they’re the first to disappear from the dessert table. Serve them at a child’s birthday party, or bring them to a potluck and watch them become an instant hit.

From a cost perspective, making these cookies is incredibly affordable. The recipe uses common pantry items, requiring only a small investment in a packet of Jello to bring excitement to a batch of classic meringues. This makes them not only fun and tasty but also an economical choice for dessert.

Historical Background and Cultural Significance

Meringue cookies have a storied past, tracing back to the intricate European dessert traditions of the 17th century. Believed to originate from the Swiss town of Meiringen, these cookies have been a favorite in European patisserie for centuries and have evolved significantly over time.

The cultural significance of meringue spans many countries, each putting its own spin on this airy confection. This recipe adapts the traditional technique with the unique addition of Jello, showcasing the evolving nature of desserts and how they cross cultural borders.

As these cookies spread across the globe, they evolved with local ingredients and flavors. The introduction of Jello, a quintessential American invention, is a perfect example of how regional ingredients can blend with traditional techniques to produce delightful new versions of timeless treats.

Today’s variations of meringue reflect the diverse culinary influences from around the world. From the simple versions found in European bakeries to the colorful and flavored adaptations in America, these cookies continue to charm food lovers with their versatile appeal.

Ingredient Deep Dive

Egg whites are the star of this recipe, offering the foundational fluff and stability. Historically, eggs have symbolized new beginnings and were extensively used in ancient cooking practices. They provide the necessary structure and lift to meringues when beaten to perfection.

In terms of nutrition, egg whites are low in calories and high in protein, making them a heart-healthy choice. When selecting eggs, opt for fresh ones for more stable whites. Store them in the fridge to maintain freshness and ensure proper separation of the whites from the yolks.

Sugar plays a pivotal role in meringues, not only sweetening but also helping stabilize the whipped egg whites. Fine granulated sugar is ideal as it dissolves more easily, ensuring a smooth meringue mixture.

For best results, measure sugar accurately. Store it in a dry, cool place to prevent clumping. If you prefer, consider using a fine caster sugar for even smoother results, or try a lower-sugar version with alternatives, keeping in mind adjustments in ratios and cooking times.

Common Mistakes to Avoid

  • Not using a clean bowl: Ensure your mixing bowl is clean and dry, free from any grease, to avoid deflating the egg whites.
  • Overbeating egg whites: Beat until stiff peaks form. Overbeating can break down the egg structure, resulting in flat cookies.
  • Using old eggs: Fresh eggs whip better. Avoid using old or room-temperature eggs for optimal results.
  • Incorrect sugar incorporation: Add sugar gradually, ensuring it’s fully dissolved before proceeding to avoid a gritty texture.
  • Baking at high temperature: Low and slow is key to perfect meringues, ensuring they dry out rather than bake through.
  • Opening the oven too soon: Resist the temptation to open the oven during baking to prevent cracks from sudden temperature changes.
  • Poor storage conditions: Store baked cookies in an airtight container to prevent them from absorbing moisture and becoming sticky.
  • Skipping preheating: Preheat the oven thoroughly to ensure even cooking and proper cookie texture.

Essential Techniques

For flawless meringues, mastering the technique of beating egg whites is crucial. Begin with clean, dry equipment and always ensure no traces of yolk mix with whites. Begin at a medium speed, gradually increasing to high to achieve stiff peaks.

Piping the meringue mixture gives the cookies their defined, uniform shape. Use a strong piping bag and a star tip for best results. Practice even pressure while squeezing to create consistent-sized cookies, and remember, patience is key.

The meringues must be baked at a low temperature. This gradual process allows the cookies to dry out and set without browning. Monitor the baking process, and if a slight color develops, reduce the temperature slightly.

Visual cues are essential for meringues. Look for meringues that are firm and crisp to the touch with no tacky or wet spots. If unsure, allow them to sit in the oven with the door ajar to finish drying out after baking.

Pro Tips for Perfect Easy Jello Meringue Cookies

Add a pinch of cream of tartar while beating the egg whites. This helps stabilize them, ensuring you achieve the perfect fluffy texture without fear of deflating.

Ensure your sugar is finely granulated to dissolve easily and fully integrate into the egg whites. Consider processing granulated sugar in a food processor if necessary for a finer texture.

When it’s rainy or humid, consider delaying your baking project. Humidity can affect the way meringues dry, leading to chewy instead of crisp cookies.

Allow baked meringues to cool completely in the oven with the door slightly ajar. This gradual cooling helps prevent cracks that can form when there is a drastic temperature change.

Opt for a fresh Jello mix to ensure maximum flavor payoff. Experiment with different flavors of Jello to customize the taste according to your preference or event theme.

Keep your workspace cool. Excessive heat can cause meringue mixture to lose volume and stability, compromising your final cookie texture.

Use parchment paper rather than grease on your baking sheet. This ensures easy removal of cookies without extra fat affecting your batter.

Store meringues in a low-humidity environment. Airtight containers with a silica gel packet can help maintain the desired crispy texture longer.

Variations and Adaptations

Incorporate regional flavors by adding a hint of citrus zest to the meringue mixture or topping with a sprinkle of coconut flakes for a tropical twist.

Switch up the seasonal flavors by trying different Jello mixes, such as lime for a spring batch or cherry for a festive winter angle.

Dietary modifications can easily be implemented by using sugar substitutes, ensuring your treats remain light and delightful for those watching their sugar intake.

Alter the flavor profile with extracts instead of Jello. A taste of vanilla, almond, or even a hint of peppermint can enhance overall flavor and create endless possibilities for these versatile treats.

Enhance texture by folding in finely chopped nuts or dried fruit. This can provide a new dimension that contrasts beautifully with the soft meringue.

For a modern presentation, consider sandwiching two cookies together with a layer of fruit preserve or chocolate ganache for an indulgent bite.

Serving and Presentation Guide

These cookies stand out best on a beautiful platter or a tiered dessert stand, creating an eye-catching centerpiece at any gathering. For added elegance, consider arranging them by color or size.

Garnish with a light dusting of powdered sugar or a drizzle of melted chocolate to enhance their visual appeal. For a pop of freshness, top with a sliver of fresh fruit that corresponds to the Jello flavor.

Traditionally, these cookies can be served with a side of tea or coffee. The lightness and subtle flavor of these cookies pair perfectly with both, offering a refreshing and balanced conclusion to a meal.

To keep the presentation modern, consider serving alongside fresh berries or a dollop of whipped cream. These additions enhance both flavor and visual appeal, making them even more irresistible.

Consider room temperature for best serving condition, ensuring that the cookies maintain their texture and flavor. If serving outside, opt for shaded areas to avoid melting or becoming sticky.

When planning portions, estimate 2-3 meringue cookies per guest. They are light and airy, meaning guests may easily indulge in multiple servings without feeling overindulged.

Wine and Beverage Pairing

For wine pairings, a Moscato or a sweet Riesling can beautifully complement the fruity notes in these cookies. Their gentle sweetness and subtle effervescence highlight the meringue’s light texture.

For non-alcoholic options, consider serving these cookies with a sparkling water infused with citrus or berry flavors. The effervescence and delicate flavors enhance the cookie’s natural sweetness.

These cookies also pair excellently with tea, such as a light Earl Grey or chamomile tea, which balance their sweetness without overpowering the delicate flavors.

Maintain an appropriate temperature for serving beverages, keeping sparkling wines and non-alcoholic drinks chilled and offering tea slightly warmer to ensure a balanced flavor experience.

Serve chilled wine in slender glasses to preserve its chill and avoid warming from hands. For tea, ceramic cups maintain the temperature while enhancing the aromatic experience.

Storage and Shelf Life

To store these cookies, use a clean, dry airtight container to protect them from moisture. This preserves their desirable crisp texture over an extended period.

Avoid storing in the fridge as the humidity can contribute to sogginess. Keep them in a cool, dry area instead, ensuring they’re shielded from direct sunlight or excessive heat.

Consider using silica gel packets inside the storage container to help absorb any ambient moisture, keeping your cookies at their best for up to a week.

Signs of spoilage include loss of crispness, a sticky surface, or any off smells that indicate your cookies are past their prime.

If you need to reheat them to regain some crispness, pop them in a preheated oven at low temperature for a few minutes. Monitor closely to avoid browning or burning.

Freezing is not recommended as it can impact the cookies’ texture. If you must, wrap them tightly and consume shortly after thawing to prevent deterioration.

Make Ahead Strategies

These cookies can be prepared a day in advance, allowing you to focus on other preparations. Simply store according to recommendations to maintain freshness.

Consider separating your tasks. Prepare and bake the meringues in advance, then decorate or assemble them closer to your event if needed.

While not typically required, if planning to add toppings like chocolate or fruit, applying them before serving ensures they’re fresh and vibrant.

Reheating is generally unnecessary if storage conditions are optimal, but for a refresher, a low-temperature oven can restore crunchiness.

If adding fresh elements such as zest or garnishing shortly before serving, it enhances the overall freshness and appeal, ensuring each cookie is at its most delicious.

Scaling Instructions

When halving the recipe, use a small mixer to maintain adequate air incorporation. Adjust baking trays to smaller sizes if needed to fit your reduced batch.

Doubling the recipe requires additional baking sheets and potential staggered baking times. Ensure adequate time is accounted for extended baking sessions.

Adjust oven racks to allow for uniform heat distribution if baking multiple trays at once, and rotate them for even cooking.

Timing modifications may be necessary based on batch size. Larger volumes may slightly increase mixing times to achieve desired peaks.

Storage becomes more crucial with larger batches. Ensure ample airtight containers are available to store extras properly and maintain quality over time.

Nutritional Deep Dive

These meringue cookies boast a lean macro profile, focusing primarily on proteins and low calories, making them suitable for balanced indulgence.

Rich in protein from eggs and low in fats, these treats offer a guilt-free experience. Incorporate them into a varied diet while keeping overall sugar intake in mind for best results.

While low in micronutrients, these cookies offer a delightful treat that fits within the context of a balanced diet when consumed wisely.

Their simple ingredient list ensures a manageable dietary consideration, making them suitable for most, with moderation in serving sizes as a general guideline.

Portion analysis reveals that enjoying these cookies in moderation, typically 2-3 at a time, aligns well with dietary goals while offering a satisfying sweet fix.

For those focusing on weight management, these cookies provide a light option. Pair them with fruit or yogurt for a more balanced snack experience, providing satisfaction without excess calories.

Dietary Adaptations

For gluten-free adaptations, these cookies naturally fit the bill as they contain no gluten-based ingredients, making them a welcome choice for those with sensitivities.

Achieving a dairy-free version requires no modification, as the base recipe contains dairy-free ingredients, offering a naturally adaptable option.

To cater to vegan diets, consider using aquafaba instead of egg whites, maintaining a similar texture while accommodating plant-based preferences.

Low-carb needs can be met by substituting sugar with a preferred sugar alternative, like erythritol or stevia, while adjusting sweetness to taste.

While not inherently a keto-friendly treat, sugar substitutes and careful portion control can align these cookies more closely with ketogenic dietary principles.

Those following a paleo diet may find these meringues difficult due to sugar. Explore natural sweeteners that fit within paleo guidelines as potential alternatives.

For low-FODMAP diets, these treats are generally suitable with careful ingredient choices. Verify compatible Jello flavoring options to maintain compliance.

Troubleshooting Guide

Texture issues often arise from over or under-beating egg whites. Aim for stiff peaks without going beyond, ensuring expected consistency.

Flavor imbalances can occur with improper Jello amount or sugar incorporation. Adjust to taste and ensure ingredients fully dissolve for optimal integration.

Temperature problems, such as an over-browned crust, are typically linked to high oven settings. Lower your bake temperature for a longer, gentler cook.

Handling equipment challenges means ensuring clean, dry tools are used, as grease can inhibit egg white aeration. Regular equipment checks can prevent unexpected issues.

Substitute ingredients carefully, noting that altering sugar affects longevity and flavor. Explore natural options meticulously to maintain the final product’s excellence.

Timing concerns, such as spreading or collapse during baking, can be avoided by considering environmental factors and precise oven timings.

Recipe Success Stories

Our baking community has embraced these Easy Jello Meringue Cookies with enthusiasm. Many readers rave about using them as a colorful, sweet party favorite.

Incorporating variations, from different Jello flavors to additional zest, community feedback shows innovation and creativity with each batch prepared.

Adaptation stories showcase creativity, with some readers pairing them with unique dipping sauces or using them as creative toppings for desserts.

Reader suggestions frequently highlight the recipe’s flexibility, noting how basic elements lend themselves to endless culinary creativity.

Photography tips submitted by readers frequently emphasize lighting and colorful backgrounds to best capture the vibrant nature of the cookies.

Frequently Asked Questions

Can I use any flavor of Jello? Yes, you can choose any flavor to match your personal taste preferences or event themes.

What if I don’t have a piping bag? You can use a zip-top plastic bag with a corner snipped off to pipe the meringues onto your baking sheet.

How to store leftover meringue cookies? Store them in an airtight container in a cool, dry place to maintain crispness, ideally with a small silica packet inside.

Can I freeze the cookies? It’s not recommended, as freezing can impact texture, but if necessary, ensure they’re tightly wrapped and consume soon after thawing.

Is it possible to make them vegan? Yes, substitute aquafaba for egg whites to create a vegan-friendly version of these meringue cookies.

My cookies became sticky, what happened? This often results from high humidity or improper storage. Use airtight conditions and consider desiccant packs to help prevent stickiness.

Can I reduce the sugar in this recipe? You can try reducing it slightly or using substitutes, keeping in mind it may affect flavor and texture.

Do I have to use cream of tartar? It’s helpful for stabilizing the egg whites, but you can make meringues without it, being extra cautious during whipping.

What does “stiff peaks” mean? It refers to egg whites beaten until they hold a firm, pointed shape without drooping when the whisk is lifted.

Can I use liquid egg whites? Fresh egg whites are recommended for optimal texture and volume, but liquid pasteurized whites may work with extra focus on whipping.

Why did my meringues crack? Cracks may result from rapid temperature changes. Allow gradual cooling by leaving the oven door slightly ajar after baking.

How do I know when the meringues are done? Look for a dry, firm exterior that’s not tacky. If uncertain, continue at low heat for a few more minutes.

Additional Resources

Dive deeper into meringue techniques with expert guidebooks, which cover various meringue-based recipes beyond cookies, like pies and pastries.

Explore related recipes such as meringue-topped cupcakes or pavlovas that build on the skills acquired with Easy Jello Meringue Cookies.

Gain insights into diverse flavor pairings and ingredient interactions from reliable food science resources to enhance your baking knowledge.

Consider investing in a high-quality stand mixer and baking tools that can streamline your baking process, ensuring perfect results with each attempt.

Explore seasonal variations, adapting these cookie techniques to complement seasonal fruit and flavor trends for year-round creativity.

Join the Conversation

Join our community on social media to share your own Easy Jello Meringue Cookie creations and exchange ideas with fellow home bakers.

Learn photography tips to capture your baking masterpieces, focusing on light, composition, and vibrant colors to enhance your presentation skills.

Encourage other bakers by sharing reviews and tips in the comments, helping fellow baking enthusiasts master their own meringue adventures.

Broaden your recipe repertoire by trying and adapting suggestions from our engaged community, enriching your culinary explorations.

Exchange stories and variations with fellow bakers, experiencing a shared love for baking and the versatility of Easy Jello Meringue Cookies.

The Recipe

Easy Jello Meringue Cookies

Serves: 24 cookies

Prep Time: 15 mins

Cook Time: 90 mins

Total Time: 105 mins

Kitchen Equipment Needed

  • Stand or hand mixer
  • Large mixing bowl
  • Spatula
  • Piping bag with star tip
  • Baking sheet
  • Parchment paper

Ingredients

  • 4 egg whites
  • 1 cup granulated sugar
  • 1 package (3 oz) Jello mix, any flavor
  • 1/2 tsp cream of tartar
  • Pinch of salt

Directions

  1. Preheat your oven to 200°F (93°C). Line two baking sheets with parchment paper.
  2. In a clean, dry bowl, beat the egg whites with a pinch of salt until they start to form soft peaks.
  3. Gradually add sugar, one tablespoon at a time, beating well after each addition until the mixture is glossy with stiff peaks.
  4. Fold in the cream of tartar and Jello mix gently until well incorporated, being careful not to deflate the meringue.
  5. Transfer the mixture to a piping bag fitted with a star tip. Pipe small mounds onto the prepared baking sheets.
  6. Bake for 90 minutes, until the cookies are crisp and easily peel off the parchment.
  7. Turn off the oven, crack the oven door, and let cookies cool completely inside the oven to prevent cracking.

Recipe Notes

  • For added flavor, sprinkle some lemon zest over piped cookies before baking.
  • Ensure egg whites are at room temperature before starting to ensure maximum volume when beating.
  • Different Jello flavors can be used for varied taste profiles; be adventurous with combinations.

Savor Crispy Homemade Mozzarella Cheese Sticks with Easy Recipe

Irresistible Mozzarella Cheese Sticks: A Cheesy Delight for Every Occasion

⚖️
Difficulty
Easy

⏲️
Prep Time
15 mins

🕒
Cook Time
10 mins

⏱️
Total Time
25 mins

🍽️
Servings
4

Imagine biting into a warm, crunchy, and gooey Mozzarella Cheese Stick, with texture so tempting it makes you reach for another one almost instantly. These Irresistible Mozzarella Cheese Sticks are the epitome of cheesy comfort food, bringing a playful burst of flavor with every bite. With this recipe, you can transform ordinary mozzarella into a remarkable appetizer, snack, or party treat in just a few simple steps.

Whether you’re planning a family gathering, a game night, or simply indulging in some me-time, these Mozzarella Cheese Sticks offer a tantalizing combination of textures and aromas. The crispy exterior gives way to a soft, molten cheese center, making it a sensory delight. The aroma of fried mozzarella fills your kitchen, enticing everyone and elevating the anticipation of this mouth-watering dish.

Most importantly, this recipe for Mozzarella Cheese Sticks requires minimal ingredients and effort, making it perfect for both beginners and experienced home cooks looking for a quick, satisfying fix. Let this cheesy delight be your go-to snack for any occasion—simple, effortless, and unforgettable.

Quick Recipe Highlights

  • Flavor Profile: Mozzarella Cheese Sticks offer a mild, creamy flavor complemented by a subtle crunch from the breaded coating. The slight hint of seasoning enhances the cheese’s natural taste without overwhelming it.
  • Texture: Experience the perfect combination of crunchy, crispy coating and soft, melt-in-your-mouth mozzarella cheese, making each bite sensational.
  • Aroma: A captivating aroma of melted cheese and freshly fried breadcrumbs fills the air, tantalizing your senses and making your mouth water.
  • Visual Appeal: These golden brown cheese sticks, often accompanied by a vibrant marinara sauce, create an appetizing visual contrast that’s hard to resist.
  • Skill Level Needed: Easy—perfect for novice cooks looking to impress with minimal effort and maximum taste.
  • Special Equipment: Requires basic kitchen tools such as a pan for frying and a rack or tray for cooling the cooked cheese sticks.

Recipe Overview

  • Difficulty Level: This recipe is classified as easy because it involves straightforward steps such as breading and frying. The main challenge lies in maintaining the right oil temperature to achieve a perfect golden crust without overcooking the cheese.
  • Category: Mozzarella Cheese Sticks belong to the appetizer and snack category, ideal for parties, gatherings, or as a comforting treat.
  • Cuisine: These cheese sticks are a favorite in American cuisine, often found in diners, pubs, and eateries, showcasing a playful twist on traditional Italian mozzarella.
  • Cost: An affordable dish, the main expense comes from the cheese. Breadcrumbs, eggs, and flour are economical and often pantry staples.
  • Season: While these cheese sticks can be enjoyed year-round, they shine during sports seasons, holidays, and casual get-togethers when rich, comforting snacks are in demand.
  • Occasion: Perfect for casual snack sessions, game nights, and family gatherings. Their playful form and flavor make them a hit with both adults and children.

Why You’ll Love This Recipe

The taste and texture of these Mozzarella Cheese Sticks are truly unrivaled. Each stick boasts a perfectly crisp crust surrounding gooey, stretchy mozzarella cheese, making every bite an indulgent escape. The contrast between the crunchy coating and the smooth interior creates a delightful sensory experience.

These Cheese Sticks offer convenience and ease of preparation, making them an ideal choice for spontaneous snacking or when unexpected guests arrive. With just a handful of ingredients and straightforward steps, you can create a restaurant-quality appetizer in your kitchen in no time.

Mozzarella Cheese Sticks are not only delicious but also provide protein and calcium, making them a relatively nutritious snack option. When paired with a healthy dip or sauce, they can fit into a balanced diet without any guilt.

One of the greatest joys of this recipe is its ability to spark social interactions. Whether you’re hosting a party or simply enjoying them with your family, these cheese sticks bring people together, evoking shared smiles and memories.

Cost-effectiveness and accessibility are key reasons why this recipe is a winner. The ingredients are readily available at most grocery stores, and the affordability of mozzarella cheese makes it a budget-friendly choice without skimping on flavor.

Historical Background and Cultural Significance

Mozzarella Cheese Sticks have a fascinating origin story rooted in Italian cuisine, where mozzarella cheese has been a staple for centuries. The idea of breading and frying mozzarella transformed this cheese from a mere ingredient to the main attraction in a delightful appetizer.

Culturally, Mozzarella Cheese Sticks have grown beyond their Italian roots to become a beloved snack across the globe. They are often synonymous with comfort food in American eateries and associated with warmth, sharing, and indulgence.

Over the years, mozzarella sticks have evolved in their presentation and recipes, with variations that include different breading and seasoning techniques. This adaptability is a testament to their versatility and enduring popularity.

Regional variations of Mozzarella Cheese Sticks can be found worldwide. While the base concept remains the same, certain regions may incorporate local herbs, spices, or sauces to give their cheese sticks a unique flair, demonstrating culinary creativity and adaptability.

Ingredient Deep Dive

Mozzarella Cheese is the star of these delectable sticks. Originally hailing from Italy, mozzarella is a highly esteemed cheese renowned for its creamy texture and mild flavor. This cheese’s history dates back to ancient Roman times, where it was crafted from buffalo milk.

From a nutritional standpoint, mozzarella is an excellent source of protein and calcium, crucial for bone health. Its lower fat content compared to other cheeses makes it a relatively healthier option for indulgent recipes.

When selecting mozzarella cheese, opt for whole-milk varieties to ensure creaminess and meltability. Pre-shredded cheese should be avoided here, as it may not yield the desired gooey texture due to anti-caking agents.

For storage, mozzarella should be kept refrigerated in its original packaging until ready to use. Once opened, wrap it in cheese paper or parchment to maintain freshness and prevent drying.

Substitutions for mozzarella are numerous; however, low-moisture mozzarella is the best alternative to achieve the classic texture. For dietary restrictions, consider using dairy-free mozzarella varieties that melt well.

Breadcrumbs form the crunchy exterior of the cheese sticks. Originating from dried bread, they are a staple in breading recipes. This makes them a key player in achieving the crispy texture desired in cheese sticks.

Beyond texture, breadcrumbs offer a blank slate for additional herbs and spices, allowing customization of flavor. Nutritionally, they provide a carbohydrate-rich coating that balances the protein-heavy cheese.

Fresh breadcrumbs yield the best results, as they retain moisture better than pre-packaged options. Toast stale bread and pulse it in a food processor to create homemade breadcrumbs that elevate your dish.

Store homemade breadcrumbs in an airtight container at room temperature, ensuring they remain crispy and free from moisture. They can also be frozen for longer storage, ready for use at a moment’s notice.

Breadcrumbs can be substituted with panko for extra crunch, or gluten-free breadcrumbs for dietary needs. Adjust the seasoning to complement your desired flavor profile and enhance the dish.

Common Mistakes to Avoid

  • Skipping the Freezing Step: Failing to freeze the breaded mozzarella can lead to cheese leakage during frying. Ensure they’re frozen solid before cooking.
  • Overheating the Oil: Frying at too high a temperature can result in a burnt exterior and undercooked interior. Maintain a medium heat for even cooking.
  • Using Pre-shredded Mozzarella: Here, pre-shredded options don’t melt nicely. Whole-milk mozzarella sticks are a better choice for superior texture.
  • Neglecting Moisture Control: Pat dry your cheese sticks to remove excess moisture before breading; this helps the coating adhere better.
  • Inadequate Bread Crumb Coverage: Ensure each mozzarella stick is thoroughly coated in breadcrumbs to avoid cheese seepage during frying.
  • Using Stale Oil: Fresh oil is key for a clean-tasting and crispy result. Replace oil if it’s been previously used for other fried foods.
  • Rushing the Breading Process: Double coat the cheese efficiently, allowing time for the layers to adhere properly for extra crispiness.
  • Overcrowding the Pan: Fry a few sticks at a time to maintain oil temperature and ensure even cooking and crispness.

Essential Techniques

Mastering the breading technique is crucial for perfect Mozzarella Cheese Sticks. This involves a three-step process of flour, egg wash, and breadcrumbs to ensure a well-adhered and crispy coating.

Frying is another vital technique that greatly influences the outcome. Maintaining the oil at a consistent medium temperature prevents burning and ensures a golden brown exterior.

Monitoring oil temperature requires practice. Visual cues such as gentle bubbling around the cheese stick and an even browning indicate success.

Freezing the breaded mozzarella before frying helps maintain shape and prevents the cheese from oozing out, critical for achieving the iconic look and texture.

Pro Tips for Perfect Mozzarella Cheese Sticks

For ultimate crispness, consider using panko breadcrumbs in combination with regular breadcrumbs. This mixture yields an extra crunchy coating that elevates the cheese stick experience.

Season your breadcrumbs with garlic powder, Italian herbs, or paprika for an enhanced flavor that complements the mild cheese and pleases your palate.

Freeze your cheese sticks on a baking sheet before frying. This step is essential to maintaining their shape and ensures minimal cheese loss during cooking.

Serve your Mozzarella Cheese Sticks immediately after frying for the best taste and texture. Allowing them to cool can result in loss of crunch and molten interior.

Pair your cheese sticks with marinara or arrabbiata sauce for an authentic Italian touch that enhances the taste profile.

For a healthier twist, bake the cheese sticks in an oven preheated to 400°F (200°C), turning them halfway until golden brown, to reduce oil intake while maintaining a crispy exterior.

Experiment with fillings by wrapping a slice of pepperoni or sundried tomato around the mozzarella before breading for a unique twist on the classic recipe.

Variations and Adaptations

Regional variations offer diverse takes on Mozzarella Cheese Sticks. Explore adding spices like cayenne for a Southern-inspired kick or herbs like fresh basil and oregano for an Italian flair.

Incorporate seasonal adaptations to your Mozzarella Cheese Sticks by including seasonal herbs within the breading or serving alongside fresh garden salsa for a summer twist.

For those with dietary restrictions, consider gluten-free breading options or plant-based mozzarella alternatives to cater to a wider spectrum of dietary needs.

Experiment with flavor variations by integrating parmesan into the breadcrumb mix for added savory depth, or using smoked mozzarella for a unique, rich taste.

Change up the texture by creating stuffed mozzarella sticks with ingredients such as jalapeños or bell peppers, adding an extra layer of flavor and a delightful crunch.

For an elegant presentation, stack the Mozzarella Cheese Sticks high and garnish with finely chopped parsley or a sprinkle of parmesan cheese for a polished finish.

Serving and Presentation Guide

To enhance visual appeal, arrange Mozzarella Cheese Sticks on a serving board with decorative garnishes such as fresh basil leaves or lightly roasted tomato slices.

Consider garnishing ideas like a drizzle of balsamic reduction to add both elegance and a hint of sweetness that pairs well with the savory cheese.

Traditional accompaniments such as marinara sauce served in a bowl alongside the Mozzarella Cheese Sticks provides a classic Italian touch that complements the dish.

For a modern twist, serve with an avocado dip or spicy aioli to introduce exciting new flavors that inspire diners to explore different taste combinations.

Temperature plays a significant role; serve them hot for the best texture and taste, ensuring the cheese is gooey and the coating remains crisp.

Pay attention to portion control, offering 3-4 sticks per person alongside a balanced salad or other sides, creating a well-rounded meal experience.

Wine and Beverage Pairing

Pair Mozzarella Cheese Sticks with a crisp Sauvignon Blanc or Pinot Grigio wine that complements the mild cheese flavor while balancing the richness of the fried crust.

For those seeking non-alcoholic alternatives, consider offering a sparkling water with a hint of citrus or a chilled iced tea to cleanse the palate and refresh between bites.

If coffee or tea is preferred, a subtle green tea or lightly brewed black tea provides a nice contrast to the Mozzarella Cheese Sticks’ richness.

Maintain wine and beverage temperatures; serving wines slightly chilled and non-alcoholic drinks cool enhances the overall tasting experience.

Encourage creative serving suggestions, such as offering drinks in decorated glasses with garnishes like fresh citrus slices or mint sprigs for added appeal.

Storage and Shelf Life

Mozzarella Cheese Sticks should be stored in an airtight container in the refrigerator to maintain their quality and prevent moisture loss, ideally consumed within two days for best taste.

Temperature requirements are crucial; keep them refrigerated at around 40°F (4°C) to prevent spoilage and maintain their freshness.

Consider using glass or BPA-free plastic containers for storage, ensuring a tight seal to contain aromas and moisture effectively.

Watch out for signs of spoilage such as off smells, visible mold, or changes in texture, and discard immediately to ensure food safety.

Reheat leftover cheese sticks in an oven preheated to 350°F (175°C) for a few minutes to regain crispiness and heat them evenly while maintaining the cheese’s gooey texture.

Mozzarella Cheese Sticks are suitable for freezing. Arrange them on a baking sheet in a single layer, freeze until solid, then transfer to a sealable bag. Reheat from frozen as needed.

Make Ahead Strategies

Prepare cheese sticks ahead by breading and arranging them on a tray, freezing them, and storing them in freezer bags for easy access and cooking when needed.

Between steps, particularly after breading, refrigerate the cheese sticks to allow the coating to firm up and adhere, ensuring consistent quality.

Assess quality impact for make-ahead strategies; refrigeration and freezing maintain integrity, making minimal impact on texture and taste when cooked fresh.

Assembly tips include organizing an efficient station with ingredients and equipment within reach to streamline the preparation process for quicker results.

Reheating guidelines include using an oven for previously cooked sticks, maintaining crispness, and ensuring even heating without sogginess.

Add fresh elements like freshly chopped parsley or grated parmesan cheese to garnish and enhance flavor when serving reheated cheese sticks.

Scaling Instructions

To halve the recipe, reduce the number of mozzarella sticks and adjust the breading ingredients accordingly, keeping the technique and cooking time consistent.

For doubling or tripling, ensure you have enough oil and a large pan to fry in batches without crowding to maintain the oil temperature and consistency.

Equipment adjustments may include using larger bowls for breading ingredients and multiple baking sheets for freezing in advance, enabling efficient upscaled production.

Timing modifications involve allocating additional time for frying and preparation when handling a larger quantity, ensuring quality remains intact and process streamlined.

During scaling, consider storage implications, particularly for leftovers, and ensure proper refrigerated or frozen storage facilities are available based on quantity.

Nutritional Deep Dive

These Mozzarella Cheese Sticks offer a balance of macronutrients, with substantial protein content from the cheese and carbohydrates from the breading.

Micronutrient analysis indicates levels of calcium and vitamin B, which are beneficial for bone health and metabolism, respectively.

The recipe’s health benefits include protein-mediated satiety and fulfilling the body’s calcium needs, playing a role in a balanced diet when consumed in moderation.

Dietary considerations include monitoring portion sizes and pairing the cheese sticks with fresh vegetables or a salad to enhance nutritional diversity.

Portion analysis reveals that typical serving sizes provide ample protein and contribute to daily nutrient intake, encouraging mindful consumption.

For weight management, consume these cheese sticks in moderation, balancing with other nutrient-rich foods and maintaining an active lifestyle to optimize health.

Dietary Adaptations

For gluten-free options, use gluten-free breadcrumbs, ensuring the whole recipe is suitable for those with gluten intolerance or Celiac disease.

Substitute dairy-free mozzarella for a cheese-like texture and flavor in dairy-free adaptations, ideal for vegans or lactose-intolerant individuals.

A vegan modification utilizes dairy-free cheese alternatives and egg replacements such as flaxseeds or aquafaba for binding in the breading process.

A low-carb version might involve using almond flour or crushed pork rinds for breading, reducing carbohydrate content and offering a keto-friendly option.

For paleo adaptations, employ almond meal as a breading substitution and adhere to dairy-free cheese, maintaining flavor and texture while aligning with paleo guidelines.

A low-FODMAP diet can accommodate these cheese sticks through careful selection of lactose-free mozzarella and gluten-free breading to meet dietary restrictions.

Troubleshooting Guide

To resolve texture issues, ensure the cheese sticks are adequately frozen before frying, preventing leakage and maintaining structural crispness.

Flavor balance can be achieved by seasoning the breadcrumbs adequately and using complementary dipping sauces to enhance the natural cheese flavor.

Temperature problems are resolved by frying in small batches and maintaining consistent oil heat using a thermometer for accuracy.

Manage equipment challenges by organizing your kitchen space efficiently, using a spacious pan and necessary tools to ease the frying process.

Ingredient substitutions, such as swapping regular mozzarella for smoked or spicy versions, can enhance flavor and accommodate personal preferences.

Timing concerns are mitigated by planning prep and cooking times ahead, allocating sufficient pauses to allow proper breading adherence before proceeding.

Recipe Success Stories

Community feedback on Mozzarella Cheese Sticks has been overwhelmingly positive, with many praising the simple recipe steps and delightful outcome, sharing tips on social media.

Variation successes include the addition of ingredients like jalapeños or ham in the breading process, creating unique versions that pique interest.

Adaptation stories often emphasize dietary successes, with readers sharing their gluten-free or vegan journeys based on this versatile recipe, encouraging others to explore it.

Reader suggestions frequently highlight the use of alternative dipping sauces, inspired by international cuisines, broadening the taste experience.

Photography tips suggest capturing images of the cheese pull or crisp coating, showcasing the dish’s appeal and encouraging others to try the recipe.

Frequently Asked Questions

Can I use different types of cheese for the sticks? Yes, while mozzarella is traditional, other melting cheeses like provolone or cheddar can be used for variation.

How do I prevent the cheese from oozing? Freezing the breaded sticks ensures that cheese stays in place while frying and maintains crispness.

Is it possible to bake these cheese sticks? Absolutely! Bake them in a preheated 400°F oven, turning until golden brown, for a healthier alternative.

What is the best oil for frying? Neutral oils with high smoke points, such as canola or vegetable oil, are ideal for frying cheese sticks.

Can I prepare these in advance? Yes, bread and freeze beforehand. Simply fry or bake directly from the freezer when ready to serve.

Can gluten-free ingredients be used? Certainly, use gluten-free breadcrumbs and flour to adapt the recipe for those with gluten sensitivities.

What dips complement these cheese sticks? Classic marinara, pesto, or a spicy aioli are popular choices that enhance the dish’s flavor profile.

Do variations affect cooking times? Ingredient additions like fillings may slightly alter timing, requiring careful monitoring to avoid burning.

How long can leftovers be stored? Store in the refrigerator for up to two days, or freeze for longer-term storage and reheat as needed.

Any tips to avoid a soggy texture? Cool the fried cheese sticks on a rack, avoiding direct contact with surfaces that trap steam, to maintain crispness.

What’s the best way to serve them? Serve immediately after cooking for optimal texture, alongside a complementary sauce and garnish for visual appeal.

Can I make these vegan? Yes, use dairy-free mozzarella and egg replacer in the breading to create a delicious, cruelty-free version.

Additional Resources

Related recipes such as homemade marinara sauce or other fried appetizers can complement your cheese sticks, elevating your menu for guests.

Explore technique guides focusing on frying skills or how to achieve perfect breading coverage, which are crucial for these cheese sticks’ success.

Dive into ingredient information, including the history and uses of mozzarella cheese, offering insight into its culinary versatility and applications.

Equipment recommendations highlight essential kitchen tools and gadgets, ensuring you have the right tools to prepare these Mozzarella Cheese Sticks effortlessly.

Investigate seasonal variations to adapt this recipe according to seasonal produce availability, keeping it fresh and aligned with varying tastes and ingredients throughout the year.

Join the Conversation

Engage with fellow food lovers on social media, sharing your Mozzarella Cheese Sticks creations and discovering unique twists and additions shared by others.

Photography tips inspire you to capture stunning images of your cheese sticks, showcasing the alluring cheese pull or golden crispy exterior to perfection.

Encourage readers to leave recipe reviews and share their experiences with their variations, fostering a rich community of Mozzarella Cheese Stick enthusiasts.

Community engagement through cooking challenges or collaborations prompts collective creativity, inspiring new takes on a classic recipe worldwide.

Explore and exchange recipe variations and adaptations, showcasing the versatility and global appeal of Mozzarella Cheese Sticks in diverse culinary contexts.

The Recipe

Irresistible Mozzarella Cheese Sticks

Serves: 4

Prep Time: 15 mins

Cook Time: 10 mins

Total Time: 25 mins

Kitchen Equipment Needed

  • Frying pan or deep fryer
  • Mixing bowls
  • Whisk
  • Wire rack
  • Baking sheet

Ingredients

  • 8 mozzarella cheese sticks
  • 1 cup all-purpose flour
  • 2 large eggs, beaten
  • 1 cup breadcrumbs
  • 1 cup panko breadcrumbs
  • 1 tsp garlic powder
  • 1 tsp Italian seasoning
  • Salt and pepper, to taste
  • Oil for frying
  • Marinara sauce, for dipping

Directions

  1. Set up a breading station with three bowls: one with flour, one with beaten eggs, and one with breadcrumbs mixed with panko, garlic powder, and Italian seasoning.
  2. Coat each mozzarella stick with flour, then dip into the egg mixture, and finally roll in the breadcrumb mixture thoroughly. Repeat the egg and breadcrumb steps for a thicker coating.
  3. Place the breaded mozzarella sticks on a baking sheet and freeze for at least 1 hour.
  4. Heat oil in a pan to 375°F (190°C). Fry a few sticks at a time to avoid overcrowding. Cook for about 2-3 minutes per side until golden brown.
  5. Transfer the fried cheese sticks to a wire rack to drain excess oil and retain crispness.
  6. Serve immediately with marinara sauce for dipping.

Recipe Notes

  • Ensure mozzarella is fully submerged during frying for even cooking.
  • If doubling the recipe, fry in batches to maintain oil temperature.
  • Experiment with additional seasonings in the breadcrumb mix for personalized flavor.

Indulge in a Sweet Escape with This Orange Dreamsicle Cake

Orange Dreamsicle Cake: A Nostalgic Delight

⚖️
Difficulty
Medium

⏲️
Prep Time
20 mins

🕒
Cook Time
45 mins

⏱️
Total Time
65 mins

🍽️
Servings
12

Indulge in the nostalgic flavors of the Orange Dreamsicle Cake, a delightful dessert that captures the essence of summer. This cake is a vibrant celebration of citrusy orange and creamy vanilla, reminiscent of the classic frozen treat. The first bite will transport you back to lazy, sun-soaked days and leave you craving more. Whether you’re serving it at a family gathering or just indulging in a sweet moment for yourself, this cake is sure to impress with its dreamy combination of flavors and textures.

Quick Recipe Highlights

  • Flavor Profile: A perfect harmony of zesty orange and smooth vanilla, creating a sweet and tangy balance that delights the palate.
  • Texture: Light and fluffy cake layers are complemented by a creamy, dreamy frosting, ensuring a delightful mouthfeel in every bite.
  • Aroma: Freshly grated orange zest and vanilla essence fill the air with an irresistible fragrance, making this cake truly inviting.
  • Visual Appeal: A burst of vibrant orange hues contrasted with creamy white frosting gives this cake a visually stunning presentation.
  • Skill Level Needed: Suitable for bakers with moderate skills, requiring some careful mixing and layering techniques.
  • Special Equipment: You’ll need a stand mixer or hand mixer, cake pans, and a zester to perfect this creation.

Recipe Overview

  • Difficulty Level: This medium-difficulty recipe requires attention to detail during ingredient preparation and cake layering to achieve perfection.
  • Category: Fits perfectly into the category of desserts and cakes, ideal for any occasion where a sweet treat is needed.
  • Cuisine: A modern take on a classic American dessert, inspired by the beloved ice cream bar, the Dreamsicle.
  • Cost: The ingredients are budget-friendly, mostly available at any local grocery store, resulting in an affordable creation.
  • Season: Best enjoyed in spring and summer, when fresh oranges are in season, though it can bring sunshine to any time of year.
  • Occasion: Perfect for birthday parties, summer picnics, or as a special treat for Sunday gatherings with family and friends.

Why You’ll Love This Recipe


The Orange Dreamsicle Cake is a culinary marvel that combines taste, texture, and visual appeal in a single bite. Each slice offers the delightful tang of orange seamlessly mixed with creamy vanilla frosting, making it a hit among both kids and adults. Its light and fluffy texture, juxtaposed with rich frosting, provides a delightful contrast that keeps dessert lovers coming back for more.

Despite its sophisticated flavors, this cake is surprisingly easy to prepare, with common kitchen equipment and readily available ingredients. The recipe strikes a balance between simplicity and elegance, making it accessible even to those who don’t bake often. Enjoy a hassle-free baking experience that offers maximum flavor with minimal stress, ideal for both novice bakers and seasoned chefs.

Nutritionally, the cake provides a dose of vitamin C from the orange elements, offering some beneficial aspects amidst the indulgence. While desserts are meant to be a treat rather than a primary nutritional source, it’s always nice to know there are positives within the sweet enjoyment.

Entertaining becomes delightful with this recipe that can serve as a conversation starter. Whether sharing the story of its nostalgic roots or simply letting its flavors speak for themselves, the cake is sure to be the centerpiece at any gathering, inviting smiles and memories to be made with every serving.

Lastly, the Orange Dreamsicle Cake is a cost-effective choice for a homemade dessert. Using basic pantry staples with just a couple of specialty items like fresh oranges and vanilla extract, the cake manages to be both luxurious and frugal, perfectly balancing indulgence with practicality.

Historical Background and Cultural Significance


The Orange Dreamsicle Cake draws inspiration from the iconic Dreamsicle, a beloved summer treat originally introduced in the early 20th century. Evolving from the classic combination of ice cream and orange-flavored coating, this cake transforms those flavors into a delightful dessert experience. It’s a testament to the evolution of classic American desserts, adapting beloved flavors into new, innovative forms.

Culturally, the Dreamsicle has been a symbol of carefree summer days and has maintained a presence in American dessert culture for generations. This cake pays homage to those memories, capturing the nostalgic essence of a cherished treat and bringing it to life in an elegant form suitable for contemporary tables.

Over the decades, the Dreamsicle flavor profiles have made their way into various desserts, including popsicles, cakes, and even beverages. This cake is just one example of the creative adaptations that continue to celebrate these flavors. By transforming it into a baked good, the Dreamsicle becomes accessible year-round, allowing its luscious flavors to be enjoyed regardless of season.

Regional variations of the cake may include different frosting techniques or additional ingredients like whipped cream layers or additional zest to vary the flavor intensity, but the heart of the recipe remains consistent: the delightful blend of orange and cream.

Ingredient Deep Dive


Oranges are the star ingredient, bringing both flavor and nutritional merit to the Orange Dreamsicle Cake. Rich in vitamin C, oranges contribute to immune health while adding a vibrant, zesty kick to the dessert. Selecting fresh, juicy oranges yields the best flavor intensity; consider navel or Valencia oranges for the sweetest, most aromatic zest and juice.

Vanilla plays a crucial supporting role, weaving through the layers to tie together the flavors with creamy richness. For the best results, use pure vanilla extract to enhance its depth and complementary sweetness, adding to the cake’s overall sensory experience.

Butter provides the base for both the cake and frosting, setting the stage for texture and flavor. Use unsalted butter to control the salt content, allowing the cake’s sweet nuances to shine through.

Common Mistakes to Avoid

  • Overmixing the batter can lead to a dense cake. Mix just until ingredients are combined.
  • Not zesting enough orange can result in a less vibrant flavor. Ensure you zest thoroughly, avoiding the bitter white pith.
  • Skipping the cake cooling step may cause frosting to melt. Allow cakes to fully cool before applying frosting.
  • Substituting margarine for butter might alter texture and flavor drastically, as margarine contains more water.
  • Using low-quality vanilla extract can diminish the rich creaminess, so opt for pure vanilla for best results.
  • Crowning the cake without a crumb coat can result in uneven frosting, leading to a less polished look.
  • Not properly leveling cake layers before stacking might cause tilting or uneven layers.
  • Slicing the cake too soon after assembly can result in fragile, uneven slices.
  • Ignoring proper measuring techniques for flour can result in a dry texture, so fluff and spoon flour into the measuring cup.
  • Rushing through assembly can lead to structural issues; patience is key for neat layering and frosting application.

Essential Techniques


Creaming butter and sugar properly is critical to achieving the perfect cake texture. This process incorporates air into the mixture, contributing to the cake’s lightness. Be sure to cream for at least 3-5 minutes until the mixture is fluffy and pale.

Using a crumb coat is a professional technique to secure loose crumbs before applying a final layer of frosting. This ensures a smooth, flawless finish, important for presentation as well as structure.

Zesting an orange correctly can make or break the cake’s citrus flavor. Use a microplane or fine grater, ensuring only to grate the vibrant orange skin, avoiding the bitter white pith underneath for a sweet and aromatic addition.

Pro Tips for Perfect Orange Dreamsicle Cake


Always use room temperature ingredients when baking to ensure even mixing and consistent texture throughout the batter. Cold ingredients could cause the batter to clank and lead to undesirable lumps.

Add a splash of fresh orange juice to the frosting to enhance the cake’s flavor, ensuring the juice is freshly squeezed for the best taste.

For a decorative finish, consider topping your cake with candied orange slices or zest curls, offering both visual appeal and a burst of flavor.

When grating orange zest, hold the orange steady and move it in consistent strokes across the grater to achieve uniform strands of zest without reaching the pith.

Ensure you rotate the cake pans halfway through baking to achieve an even rise, as oven hotspots can cause uneven cooking.

Chill the cake an hour before slicing to achieve cleaner slices, allowing it to sit for a few minutes before serving to come to the perfect serving temperature.

Variations and Adaptations


Regional variations might involve using local citrus fruits such as mandarins or blood oranges, offering a twist on the classic Dreamsicle flavor.

For winter adaptations, consider using a darker frosting paired with a slightly spiced orange syrup to evoke a cozy, festive feeling.

Dietary modifications can easily be made by substituting a dairy-free margarine for butter and using almond milk in the cake batter to accommodate lactose intolerant or vegan individuals.

Enhance or modify the flavor by incorporating a teaspoon of cardamom into the batter for a warm, spicy twist that complements the orange notes.

To adjust the cake’s texture, you could experiment with incorporating a layer of whipped cream between the cake layers for an additional creamy element.

Presentation alternatives include creating a naked cake look, showcasing the cake layers and frosting interwoven with zest or sugar decorations.

Serving and Presentation Guide


Plating your Orange Dreamsicle Cake with artistic flair creates a show-stopping presentation. Layer each slice with visible streaks of orange zest and consider a smear of rich vanilla cream on the plate for a gourmet touch.

Garnishing ideas include delicate curls of zest placed atop the frosting or small segments of fresh orange arranged artfully for both flavor and decoration.

Traditional accompaniments might include a scoop of vanilla ice cream, echoing the original Dreamsicle theme, creating harmony between flavors and temperatures.

Alternatively, modern serving suggestions like pairing small slices of cake with espresso or cappuccino can offer a delightful end to any dinner party.

Temperature control is essential; serving at room temperature allows the flavors to fully bloom without suppression from cold refrigeration or the heaviness of excessive warmth.

Portion control tips include serving smaller slices alongside a secondary dessert option, providing a balanced dessert course for guests.

Wine and Beverage Pairing


Pairing wines with the Orange Dreamsicle Cake requires a light touch. Choose a sweet Riesling or Moscato to mirror the cake’s sweetness and citrus notes, without overpowering the delicate balance of flavors.

Non-alcoholic alternatives such as a sparkling orangeade or citrus-infused water can enhance the cake’s tanginess while providing a refreshing contrast.

Coffee or tea pairings offer an enjoyable complement; a light roast coffee or citrusy herbal tea can balance the richness of the cake, aiding in digestion and heightening pleasure.

Considerations of beverage serving temperatures ensure an overall harmonious dining experience. Chilled or lightly warmed beverages work best with the dessert’s creamy elements.

Offer personal serving suggestions like a small mint leaf or citrus slice garnishing the rim of the glass to add a professional finishing touch to the presentation.

Storage and Shelf Life


Proper storage methods are crucial to maintaining the cake’s freshness. Keep the cake in an airtight container to prevent it from drying out or absorbing fridge scents.

Ideal temperature requirements are either room temperature for immediate consumption or refrigerated conditions if storing for several days, though moisture levels should be monitored.

Using opaque storage containers helps to protect the cake from light exposure, which might detract from its overall appeal.

Signs of spoilage appear as unusual discoloration, dry spots, or off smells, indicating it may no longer be fresh for consumption.

Reheating instructions involve allowing the cake to return to room temperature if enjoyed shortly after refrigerating, but avoid reheating in a microwave to preserve original textures.

Freezing guidelines suggest wrapping slices individually to allow for single servings with minimal defrost time, preserving both flavor and texture over several weeks.

Make Ahead Strategies


Planning a prep timeline ensures efficient cake preparation and allows for time to focus on assembly. Prepare the cake layers a day ahead, storing them in airtight conditions to lock in moisture.

Between-step storage keeps the cake elements in pristine condition. Wrap tightly in plastic wrap or store in sealed bags for stability throughout the process.

Quality impact assessment considers that certain cakes benefit from resting as flavors intensify when allowed to meld overnight.

Assembly tips include making the frosting fresh and chilling it slightly for easier, smooth frosting application, ensuring structural integrity and aesthetic appeal.

Reheating guidelines are minimal since the cake is best enjoyed fresh, but room-temperature serves also maintain its charm after brief refrigerator storage.

For a fresh twist, add freshly whipped cream or fruit garnishes just before serving to elevate the cake’s freshness.

Scaling Instructions


Halving the recipe effectively maintains proportions but requires careful adjustments to baking times and consideration for smaller equipment variations.

Doubling or tripling the recipe scales well, provided large enough kitchen equipment is available, with additional attention to even distribution of batter in pans.

Equipment adjustments should be considered, such as using larger mixing bowls and additional baking pans for scaled quantities, ensuring uniform baking and result accuracy.

Timing modifications come into play when scaling, involving closer observation of baking times due to potential variations in ingredient volume and pan size.

Storage considerations help maintain quality for large batches, with heightened focus on ensuring airtight containment to extend freshness across larger quantities.

Nutritional Deep Dive


A macro breakdown of the Orange Dreamsicle Cake reveals a moderate carbohydrate and sugar concentration balanced by protein from dairy ingredients, key to indulgent desserts.

Micronutrient analysis highlights benefits from ingredients such as vitamin C from fresh oranges and calcium present in milk or cream elements.

Conscious health benefits in a dessert context suggest incorporating a moderate serving guideline, allowing enjoyment without significant dietary impacts.

Dietary considerations emphasize options for reducing sugar or calories as needed, adapting ingredient substitutions where health-conscious alternatives are appropriate.

Portion analysis assists in maintaining awareness of treat-to-nutrition ratios, aligning consumption with personal dietary goals or allowances.

Weight management tips recognize moderation as primary, encouraging savoring each slice and enjoying the flavors without overindulgence.

Dietary Adaptations


Explore gluten-free alternatives through use of gluten-free flour blends, adapting the recipe for celiac conditions or gluten intolerances without flavor compromise.

Dairy-free adaptations can be delicious; substitute plant-based butter and almond milk to maintain structural consistency without dairy reliance.

Vegan solutions follow suit with egg substitute options such as flaxseed meal or aquafaba, preserving moisture and crumb quality.

A low-carb version may employ almond flour and sugar substitutes like erythritol, catering to keto or low-carb preferences while maintaining cake essence.

Paleo adaptations focus on natural sweetness of maple syrup or honey, with coconut milk providing a creamy element to suitable frosting alternatives.

Low-FODMAP directions target sensitive dietary requirements, selecting compliant ingredients for a well-tolerated dessert choice.

Troubleshooting Guide


Managing texture issues begins with ensuring accurate ingredient measurement and batter mixing, avoiding omissions such as sifting dry ingredients.

Flavor balance requires an attentive approach, like increasing citrus elements if flavors fall flat, or adjusting vanilla measurements for perceived intensity.

Temperature problems generally arise from uneven oven distribution; rotating pans midway helps balance inconsistencies.

Equipment challenges like a malfunctioning mixer can be countered with manual mixing, using handheld whisks or spatulas to replicate the blending process.

Ingredient substitutions must consider equivalents in moisture, fat content, and structure; precise research supports successful adaptation practices with minimal quality loss.

Timing concerns, such as cake overbaking, find resolution in regular oven checks, utilizing a thermometer to monitor core temperatures effectively.

Recipe Success Stories


Community feedback is overwhelmingly positive, with readers frequently praising the vibrant flavors and nostalgic elements of the Orange Dreamsicle Cake.

Variation successes often involve local ingredient incorporations, such as incorporating seasonal fruits like strawberries for added zest and color bursts.

Adaptation stories resonate well, showcasing global perspectives on the classic Dreamsicle through creative presentation or regional interpretation.

Reader suggestions have informed richer frosting experiences and introduced decorative ideas that enhance both cake aesthetics and flavor.

Photography tips emphasize capturing the cake’s vibrant hues and tiered structure, lending to professional-like imagery through home setups.

Frequently Asked Questions

Can I make this Orange Dreamsicle Cake ahead of time?
Yes, you can prepare the cake layers a day in advance. Once baked, wrap them well and store them in airtight containers. Assemble with fresh frosting before serving.

What’s the best way to ensure my cake has a light texture?
Careful measurements and avoiding overmixing are crucial. Be sure to alternate adding dry and wet ingredients to prevent deflation of the batter.

Can I use juice from store-bought oranges in this recipe?
While fresh orange juice enhances flavor, store-bought could work if unsweetened. Opt for fresh oranges, particularly for zest, to achieve the best outcome.

Is it possible to freeze the cake for future enjoyment?
Yes, slice the cake and wrap each piece in plastic wrap, then place them in a sealable freezer bag. Defrost in the refrigerator before enjoying.

What variations work well with the Dreamsicle flavor profile?
Adding a spice like cardamom or incorporating a layer of raspberry preserves can offer exciting nuances to the traditional Dreamsicle flavors.

How do I prevent the cake from sticking to the pan?
Grease the pans thoroughly and line with parchment paper. Ensure complete coverage to maintain whole cake layers when removing from pans.

Can I substitute the eggs to make this cake vegan?
Yes, consider using flaxseed or aquafaba as egg substitutes. These alternatives frequently deliver similar binding properties necessary for the cake.

Is there a specific wine that pairs well with this cake?
A sweet Riesling or Moscato complements the citrus notes excellently, offering a refreshing contrast while maintaining the dessert’s flavor profile.

Will almond flour work for a gluten-free adaptation of the recipe?
Yes, almond flour can substitute, though texture adjustments may be needed. Consider pairing with a stabilizer like xanthan gum for structure.

How do I achieve an even frosting layer?
Start with a crumb coat to lock in stray crumbs. Let it set, then apply a thicker layer on top, smoothing with a spatula or offset knife for precision.

Additional Resources


Consider reviewing related recipes like Lemon Drizzle Cake for those interested in further citrus explorations or Vanilla Buttercream for frosting mastery.

Technique guides offer valuable insights into essential baking skills, such as achieving perfect whipped frostings or nuanced cake layering for cohesive cakes.

Ingredient information documents delve deeper into citrus varieties, explaining flavor interactions and nutritional aspects critical to pertinent recipes like this.

Equipment recommendations showcase reliable baking tools, endorsing durable products that cater to consistent performance when tackling baking tasks.

Seasonal variations offer insight into how adapting dishes with seasonal ingredients can heighten flavors and relevance to time-sensitive dining experiences.

Join the Conversation


Engage with us on social media, showcasing your Orange Dreamsicle Cake craftsmanship with your own flair. Share your photos, tips, and experiences for community enjoyment.

Photography tips aim to guide aspiring food photographers in capturing the cake’s impressive color range and appealing texture, creating vibrant imagery.

Contribute honest recipe reviews, providing insights into personal adaptations and illustrating how you enjoy this nostalgic delight in your homes.

Community engagement provides a platform for connecting with fellow bakers, exchanging decorating techniques, flavor pairing advice, and adaptation strategies to build camaraderie.

Discover endless recipe variations encouraged by shared feedback, informing ongoing culinary creativity and promoting inclusive, welcoming dessert spaces.

The Recipe

Orange Dreamsicle Cake

Serves: 12

Prep Time: 20 mins

Cook Time: 45 mins

Total Time: 65 mins

Kitchen Equipment Needed

  • Stand mixer or hand mixer
  • Two 9-inch cake pans
  • Zester
  • Rubber spatula
  • Wire rack for cooling

Ingredients

  • 2 ½ cups all-purpose flour
  • 1 tablespoon baking powder
  • ½ teaspoon salt
  • ¾ cup unsalted butter, room temperature
  • 1 ⅔ cups granulated sugar
  • 2 tablespoons orange zest
  • 3 large eggs
  • 1 teaspoon vanilla extract
  • 1 cup whole milk
  • For the frosting: 1 cup unsalted butter, room temperature
  • 4 cups powdered sugar, sifted
  • ¼ cup freshly squeezed orange juice
  • 1 teaspoon vanilla extract

Directions

  1. Preheat your oven to 350°F (175°C) and grease two 9-inch cake pans.
  2. In a bowl, whisk together flour, baking powder, and salt. Set aside.
  3. Cream butter and granulated sugar in a stand mixer until light and fluffy, about 3-5 minutes.
  4. Add orange zest, eggs, and vanilla to the creamed mix and blend until combined.
  5. Gradually add the dry ingredients alternating with milk, beginning and ending with the flour mixture. Mix just until combined.
  6. Divide the batter evenly between the prepared cake pans and bake for 25-30 minutes or until a toothpick inserted in the center comes out clean.
  7. Cool the cakes in the pans for 10 minutes, then invert onto a wire rack to cool completely.
  8. To make the frosting: Beat butter until creamy, then gradually add powdered sugar, orange juice, and vanilla, beating until smooth and fluffy.
  9. Once cakes have cooled, layer and frost them with the prepared orange frosting.
  10. Refrigerate until set, then slice and serve.

Recipe Notes

  • To prevent sticking, line the bottom of cake pans with parchment paper.
  • Adjust orange juice levels in the frosting to achieve desired consistency.
  • Store in the refrigerator for up to three days; allow to reach room temperature before serving.

Irresistible Cheeseburger Pretzel Balls: A Savory Snack Delight

Cheeseburger Pretzel Balls: Bite-Sized Comfort

⚖️
Difficulty
Medium

⏲️
Prep Time
30 mins

🕒
Cook Time
20 mins

⏱️
Total Time
50 mins

🍽️
Servings
12

Indulge your taste buds with mouthwatering Cheeseburger Pretzel Balls. These delightful bites are a perfect fusion of juicy cheeseburgers and the comforting warmth of homemade pretzels. With a soft pretzel exterior encasing flavorful beef and melted cheese, they offer a mini-package of comfort food bliss. Imagine the aroma of freshly baked dough mingling with savory beef and cheese—pure culinary magic!

Cheeseburger Pretzel Balls combine the nostalgic flavors of a classic cheeseburger with the fun, chewy texture of pretzel dough. They’re an ideal party snack, easy to grab, and guaranteed to please kids and adults alike. As you bite into the golden-brown exterior, the softness of the pretzel gives way to a rich, savory filling, delivering a delightful taste and texture experience in every mouthful.

Quick Recipe Highlights

  • Flavor Profile: These bites capture the essence of a classic cheeseburger with savory beef, melty cheese, and a hint of tangy pickle nestled in a soft, freshly-baked pretzel.
  • Texture: Experience the satisfying contrast between the soft, chewy pretzel dough and the juicy, savory filling inside.
  • Aroma: Expect a tantalizing blend of fresh-baked bread, melted cheese, and seasoned beef with every batch.
  • Visual Appeal: The golden-brown hue of perfectly baked pretzels presents an inviting and appetizing dish that’s sure to impress at any gathering.
  • Skill Level Needed: Moderate baking skills are required, particularly for handling yeast dough and shaping each ball evenly.
  • Special Equipment: A kitchen scale, rolling pin, and baking sheet are essential, along with parchment paper for easy cleanup.

Recipe Overview

  • Difficulty Level: This recipe requires some familiarity with dough-making, especially for shaping the balls and ensuring even distribution of the filling.
  • Category: Cheeseburger Pretzel Balls fall under the categories of appetizer, snack, and comfort food, perfect for casual gatherings.
  • Cuisine: Drawing influences from American cuisine, this recipe embodies a fusion of classic cheeseburgers and soft pretzels.
  • Cost: Reasonably priced, these treats rely on accessible ingredients like ground beef, cheese, and pantry staples for pretzel dough.
  • Season: While ideal year-round, their warm and hearty nature makes them especially enjoyable during fall and winter months.
  • Occasion: Perfectly suited for game days, family gatherings, and casual parties, with their bite-sized portability.

Why You’ll Love This Recipe

Cheeseburger Pretzel Balls captivate with their mouthwatering taste and irresistible texture, creating a delightful bite every time. The softness of the pretzel blends harmoniously with the delicious surprise of a cheeseburger-inspired filling, making them a joy to savor.

Convenience is key with this recipe—relatively easy to prepare, these tasty bites offer an impressive snack option for parties or family gatherings. With straightforward steps, they fit perfectly into busy schedules without sacrificing flavor or presentation.

These Pretzel Balls offer nutritional benefits, too. By using lean ground beef and fresh ingredients, you ensure a balanced snack. Customize fillings, such as adding grains or vegetables, for added nutrient profiles.

Perfect for social events, these bite-sized snacks encourage mingling and sharing. Their unique blend of flavors sparks conversation, allowing guests to enjoy classic tastes in a playful package.

One of the advantages of Cheeseburger Pretzel Balls is their cost-effectiveness. With simple ingredients, you create a dish that feels gourmet without overextending your budget, making entertaining more accessible for all.

Historical Background and Cultural Significance

Cheeseburgers have iconic American roots, evolving from simple ground beef patties to beloved staples nationwide. This innovation soon inspired creative reinterpretations, leading to delicious variations like Cheeseburger Pretzel Balls.

Culturally, cheeseburgers represent comfort food, embodying the fast-paced American lifestyle. Their adaptability made them popular, as nuanced recipes like this bring nostalgic familiarity with novel twists, increasing their appeal.

This recipe evolved as chefs sought to combine favorite foods, leading to unexpected pairings like pretzels with burgers. The outcome is delightful, wrapping classic flavors in a thought-provoking ensemble of textures.

Regional variations abound, with areas imparting unique flavors, like spicy sauces or gourmet cheeses, personalizing Pretzel Balls into distinctively local delicacies that pay homage to the cheeseburger’s enduring legacy.

Ingredient Deep Dive

Ground beef serves as the quintessential base for this recipe, symbolizing American culinary tradition. Its versatility ensures a hearty filling, and using lean options promotes healthier choices without compromising on taste.

Nutrition-wise, beef provides essential nutrients, including protein and iron. Choose fresh, high-quality cuts for optimal results, and properly store refrigerated leftovers to prevent spoilage, retaining flavor and safety.

Cheese, particularly cheddar, adds a creamy richness to these bites, enhancing flavor profiles. Opt for sharp varieties for extra tang or experiment with blends of Swiss or mozzarella for personalized cheesiness.

Cheese’s nutritional content includes calcium and vitamin D, contributing to bone health. Buy in blocks for freshness, shred as needed, and refrigerate in airtight conditions for prolonged quality. Considerify vegan cheese substitutes for dietary needs.

Common Mistakes to Avoid

  • Over-kneading the dough: Avoid tough pretzels by kneading until just combined.
  • Skipping dough rest: Allow adequate resting for a perfect rise and texture.
  • Underfilling: Ensure enough filling for a balanced bite, but not too much to avoid bursting.
  • Incorrect water temperature: Use tepid water for yeast activation, not too hot or cold.
  • Overbaking: Rely on appearance—golden brown is perfect. Avoid drying out the interior.
  • Ignoring seasonings: Add salt and pepper to enhance the ground beef’s natural flavors.
  • Inadequate sealing: Pinch dough edges thoroughly, ensuring no filling escapes.
  • Lack of oven preheating: Preheat oven fully, ensuring even cooking and puffing.
  • Skipping egg wash: Apply egg wash to develop the quintessential pretzel sheen.
  • Limited boiling time: Boil pretzels thoroughly for the right chewy texture.

Essential Techniques

Master the art of dough kneading to achieve the ideal pretzel texture, as it balances elasticity and resistance—key for the delicious chew of Cheeseburger Pretzel Balls. Adequate kneading primes dough for structure and support.

Knowing when and how to properly fill each ball prevents spills and ensures balanced bites. Gather the dough around the delicious core, pinching edges closed and guarding against ooze during baking.

Understanding yeast activation is pivotal—too hot or cold can impede rise. Optimal yeast activity occurs in tepid conditions, so exercise precision in preparation for airy, tender pretzels.

Applying a boiling step activates the dough’s skin, sealing surface starch and developing iconic chewy exteriors. Strict adherence ensures textural success, safeguarding against over expansion.

Pay attention to shaping, forming uniform balls for even baking. Practiced shaping ensures well-distributed filling and consistent presentation across batches.

Pro Tips for Perfect Cheeseburger Pretzel Balls

Enhance the beef mix with Worcestershire sauce for an umami boost. It enriches without overpowering, elevating depth while maintaining the cheeseburger’s essence.

Alternate toppings and integrate jalapeños or caramelized onions, personalizing taste profiles. This simple step enriches and diversifies the basic recipe seamlessly.

Ensure cheese is fully enclosed, preventing oozing during baking, which can impede presentation and increase kitchen cleanup.

Monitor baking closely, trusting appearance over time adherence. Adjust positioning on outliers to nourish imperfect browning into its golden promise.

Use a finely ground salt bath during pretzel boiling for enhanced flavors and texture.

Scale the recipe for larger gatherings, adjusting ingredients straightforwardly via direct multiplication of values while maintaining key conditions.

Variations and Adaptations

Regional variations, like Southwest twists with pepper jack cheese and jalapeños, introduce bold, spicy flavors, crafting an innovative twist on the well-loved classic.

Adapt for seasons by incorporating seasonal produce within fillings or toppings, tailoring comfort to the abundant flavors of fall with roasted vegetables or greens.

Catering to dietary needs, utilize gluten-free flour blends for celiac-safe alternatives, accommodating with replacement ingredients without sacrificing beloved characteristics.

Experiment with flavors, opting for tangy lemon zest or dashes of cayenne pepper in fillings. Balance the cheeseburger aesthetic with surprise notes underscoring each bite.

Adjust textures, designing crumblier interiors via minced mushrooms and breadcrumbs for variety, appealing to alternative palates seeking softer textures.

For presentation twists, bake balls within muffin cups for a novel serving aesthetic. Include a dipping sauce station with flavored aiolis or ketchups to enhance the sensory experience.

Serving and Presentation Guide

When plating, stack balls creatively in a pyramid or tower shape. Consider a sprinkle of chopped parsley or chives for color contrast, adding a beauty edge.

Garnishing with sesame seeds or poppy seeds atop yields visual intrigue, suggesting cheeseburger bun qualities enhanced further by the pretzel style.

Common accompaniments like ketchup, mustard, or pickles afford diner control, giving traditionally loved staples the modern rendition it deserves.

Contemporary presentation ideas focus on individual plating, allocating serving sizes with small bites arranged in meticulous fashion on trendy platters.

Adjust temperature during plating, ensuring melting cheese accommodates mouthfeel without losing pretzel form integrity.

Maintain portion control by assigning per-guest limits, reinforcing awareness through creative setups and labels, ensuring voracious yet modest consumption.

Wine and Beverage Pairing

Pair a robust, oaked Chardonnay with Pretzel Balls, complementing savory beef notes and accentuating rich, comforting flavors via crisp acidity.

Non-alcoholic options include ginger beer, with its sweet-spicy flavor offset mellow cheddar and robust pretzel, maintaining a refreshing balance.

Coffee pairings aren’t typical, yet a mild roast could underscore cheesy richness, merging savory experience with delightful aromatics.

Serving temperature considerations prioritize moderate cool to lukewarm, balancing cheesy fillings and warm pretzel exteriors, ensuring optimal texture.

Innovative serving suggestions might involve customizing drink stations, providing bases with mixable syrups and garnishments, encouraging guests to tailor experiences.

Storage and Shelf Life

Store leftover Pretzel Balls in an airtight container in the refrigerator. Prioritize separating them with wax paper layers to maintain freshness and prevent sticking.

Refrigeration retains flavor, requiring gentler reheating to protect texture from excessive heat via microwave or low oven settings.

Container selection favors glass or non-reactive shelves, preserving integrity across storage periods while avoiding material leaching.

Recognize spoilage as softness deteriorates and off-odors emerge, urging cautious consumption and removal.

For extended storage, freezing is an option. Pre-freeze flat before transferring to bags, extracting incrementally and reheating upon thawing for consistent quality.

Make Ahead Strategies

Prepare Pretzel Balls up till shaping a day ahead, refrigerating until ready. Enable filling adjustments and seasoning enhancements closer to baking.

Between steps, store filled balls appropriately, leveraging enclosures that minimize airflow, as uncovered dough risks drying out through exposure.

Consider a pre-boil freeze if a timed event looms, ensuring prepared balls undergo a swift defrost period before the finale bake.

Quality impacts include potential texture changes, necessitating careful reheating technique applications for resurgence of originally promised chewiness and mouthfeel.

Delay final assembly until service convenience is paramount, increasing timetable flexibility and presenting freshest possible offerings.

To finish, consider adding fresh garnishments at serving time for visual and textural enhancements, offering guests updated tastes.

Scaling Instructions

Halve the recipe for smaller gatherings, dividing each ingredient exactly, promoting proportional quality despite quantity variances.

Doubling the batch enhances output without doubling complexity, leveraging same-time preparations with confidence knowing core ratios maintain predictability.

Adjust equipment—consider larger bowls for dough, and multiply baking sheets to prevent overcrowded baking areas preserving energy during simultaneous rise and bake.

Timing shifts demand awareness of extended groupings, juggling necessary times via staggered setups for effective kitchen flow—multiple ovens assist when possible.

Storage accommodates excess, directing freeze opportunities or alternative processes catering to the variety in contexts while prioritizing culinary integrity post-scale.

Nutritional Deep Dive

Per serving, a serving of Cheeseburger Pretzel Balls delivers a balanced macronutrient profile, highlighting high protein contents as key contributions—crucial for satiety minus excessive fats typical of traditional burgers.

Micronutrient highlights encompass contributions from added vegetables without overshadowing the symbiotic relations built upon each core participant providing value alongside tactile enjoyment.

Embrace adjustments aligning with dietary considerations, encouraging substitutions like reduced-fat cheese when focused on broader outreach targeting diverse audiences.

Comprehend portions maintaining wellness targets seamlessly intertwining flavor and calories for satisfaction without extensive overconsumption.

Weight management assesses simple offering proportions via bite-size constraints, regulating indulgence, inviting return snacking.

Dietary Adaptations

For gluten-free adaptations, opt for flour replacements such as chickpea or rice alternatives, experimenting with consistent dough cushion to vitalize the textural signature.

Non-dairy cheese selections expand lactose-intolerant audiences, emphasizing fermented, meltable products aligning within constraints of the original concept.

Vegans embrace protein-pletful meat alternatives and innovative cheeses to reinterpret plant-based paradigms without breaking tradition’s promises—a draw for diverse palates while embodying preservation.

Situated low carb while nourishing keto targeting depends on innovative resourceful ingredient swaps—flour-based goods find mirrors in nut flours or increasing ground meat balance further adaptations.

Embroil fittingly through paleo filters, withdrawing starchy linchpins, increasing nutrient-dense permutations within structural limitations preserving playfulness.

Interact comfortably under low-FODMAP parameters, cushioning digestive friendly adjustments appeasing oft-frustrated digestive experiences—consider effective showcasing.

Troubleshooting Guide

Manage chewy textures by adjusting bake time and ingredient ratios, avoiding over-drying or lackluster formation.

Address flavor balance by seasoning attentively and encouraging exploration—taste as you go.

Solve temperature problems judging attempted solutions reproducibility— evaluate dough rest, address oven calibration needs.

Tackle equipment challenges by procuring required gadgets timely; acknowledge creative rethink around improvised efficiency means.

Exercise ingredient substitution vigilantly, safeguarding intentions while maintaining ingenuity— matching flavors competently within new frameworks promotes individualistic approaches.

Allocate timing concerns humbly, leveraging tested multipliers for baking efficiency poised skillfully for structured results duplicating expected feats.

Recipe Success Stories

Community feedback highlights versatility, emphasizing participant flavors personalization—members exchange alt-favorite filling stories exceptional in twists and creativity within core traditions.

Enthused adaptation testimonials shine light, showcasing organic results spanning varied attempts modifying frameworks for numerous diets.

Readers passionately engage, contributing to shared culinary evolution and showcasing photographic pursuits woven tightly over digital canvases—inspired words transmute enthusiasm into exposure, exploring humble pleasures together.

Photo enthusiasts leverage snap-shot moments, enriching recipes novelty depiction journey, emulating successful crossings between culinary and visual imaginary spaces.

Frequently Asked Questions

  • Can I make the dough ahead of time? Yes, you can prepare and refrigerate the dough a day ahead. Allow it to rest at room temperature before shaping.
  • What’s the best cheese choice? Cheddar offers a classic taste, but feel free to experiment with Swiss or pepper jack for alternative flavors.
  • Can I use turkey instead of beef? Absolutely, ground turkey or chicken make excellent substitutes, adding distinctiveness to the classic profile.
  • How do I avoid filling leaks? Ensure edges are tightly sealed by pinching the dough around the filling to prevent leaks during baking.
  • Can I freeze unbaked Pretzel Balls? Yes, you can freeze them. Just defrost before baking to allow even cooking.
  • Can I serve them with a dip? Certainly! Sauces like mustard, BBQ, or spicy mayo complement these pretzel bites well.
  • Can whole wheat flour be used? Using whole wheat alters flavor slightly but remains a healthy, viable option.
  • How long do leftovers last? Store in an airtight container in the fridge; consume within 3 days for best freshness.
  • Is an egg wash necessary? Egg wash enhances color and shine, adding traditional pretzel presentation and visual appeal.
  • Can I add other ingredients to the filling? Certainly, feel free to add ingredients like caramelized onions or diced peppers for elevated flavors.
  • Do they remain soft after baking? Store properly-sealed to maintain softness, reheating carefully via microwave or oven if needed.
  • What’s the perfect oven temperature? Preheat and maintain your oven at 400°F (200°C) for ideal baking conditions.

Additional Resources

Explore related recipes for additional inspiration, such as traditional pretzels or mini sliders, building versatility by expanding culinary adventures.

Dive deeply into technique guides online allowing structured learning approaches presented seamlessly as ongoing projects, enhancing aspirational skills.

Indulge in ingredient overviews, enhancing appreciation through background discovery and thoughtful selection, featuring impact-rich randomness enriching culinary voyages.

Browse desired gadgets enriching presentation, initiating converging discussions affirming accomplishments—balance portrayals oscillating between experimental focus and polished completion.

Seasonal variations thrive by elucidating organic relationships, gently navigating aromatic terrain—ethereal reflections act as launchpads toward awe-inspiring capturing moments.

Join the Conversation

Engage with fellow food lovers through social media platforms, share your variations using the hashtag #CheeseburgerPretzelBalls for a chance to be featured.

Offer photography tips and recipe reviews, enhancing community interaction and cultivating an online space dedicated to culinary exploration.

Embrace community engagement thoughtfully, reciprocating genuine connections, seeking feedback, and showcasing shared passion concurrently.

Explore inventive recipe variations, personalized artistry, and new horizons—cross-pollinating cultural genres yields predictable stylistic bouquets rewarding affectionate depth.

The Recipe

Cheeseburger Pretzel Balls

Serves: 12

Prep Time: 30 mins

Cook Time: 20 mins

Total Time: 50 mins

Kitchen Equipment Needed

  • Kitchen Scale
  • Rolling Pin
  • Baking Sheet
  • Parchment Paper
  • Mixing Bowls

Ingredients

  • 2 cups all-purpose flour
  • 1 packet active dry yeast
  • 1 tbsp sugar
  • 1 tsp salt
  • 3/4 cup warm water
  • 1 lb ground beef
  • 1 cup shredded cheddar cheese
  • 2 tbsp Worcestershire sauce
  • 1 egg beaten (for egg wash)
  • Coarse salt (for topping)

Directions

  1. In a large bowl, dissolve yeast and sugar in warm water. Let sit until frothy, about 5 minutes.
  2. Add flour and salt; mix until a dough forms. Knead until smooth.
  3. In a separate pan, brown ground beef. Stir in Worcestershire sauce and cheddar cheese.
  4. Divide dough into equal portions. Flatten each and add a spoonful of beef mixture.
  5. Pinch dough to seal and shape into balls.
  6. Preheat oven to 400°F (200°C). Line baking sheet with parchment paper.
  7. Brush balls with egg wash. Top with coarse salt.
  8. Bake for 20 minutes until golden brown. Let cool slightly, then serve.

Recipe Notes

  • For added flavor, toss ground beef with diced onions during browning.
  • Substitute cheddar with mozzarella for a milder taste.
  • For spice, add chopped jalapeño to the filling.