Savory Steak and Ale Pie Recipe for Comfort Food Lovers

Steak and Ale Pie: A Comforting Classic for Cozy Evenings

⚖️
Difficulty
Intermediate

⏲️
Prep Time
30 mins

🕒
Cook Time
90 mins

⏱️
Total Time
120 mins

🍽️
Servings
6

Imagine the rich aroma wafting through your kitchen as you bake a traditional Steak and Ale Pie. This delightful dish is a savory masterpiece that combines tender, juicy steak with the robust flavor of ale, all encased in a flaky pastry. Whether it’s a special family gathering or a cozy dinner, this pie is sure to warm hearts and stomachs alike.

The allure of Steak and Ale Pie lies not only in its succulent taste but also in its historical roots. With each bite, you’re experiencing a piece of culinary heritage that dates back centuries. As you explore the layers of flavor in this hearty dish, let the blend of seasoned beef and ale transport you to a comforting world of comfort food perfection.

Quick Recipe Highlights

  • Flavor Profile: The combination of tender beef and robust ale creates a deep, savory flavor accentuated by herb and subtle onion undertones.
  • Texture: Expect a perfect contrast between the crispy, golden crust and the rich, juicy filling.
  • Aroma: This pie fills your home with the mouthwatering scents of slow-cooked beef and earthy, malty ale.
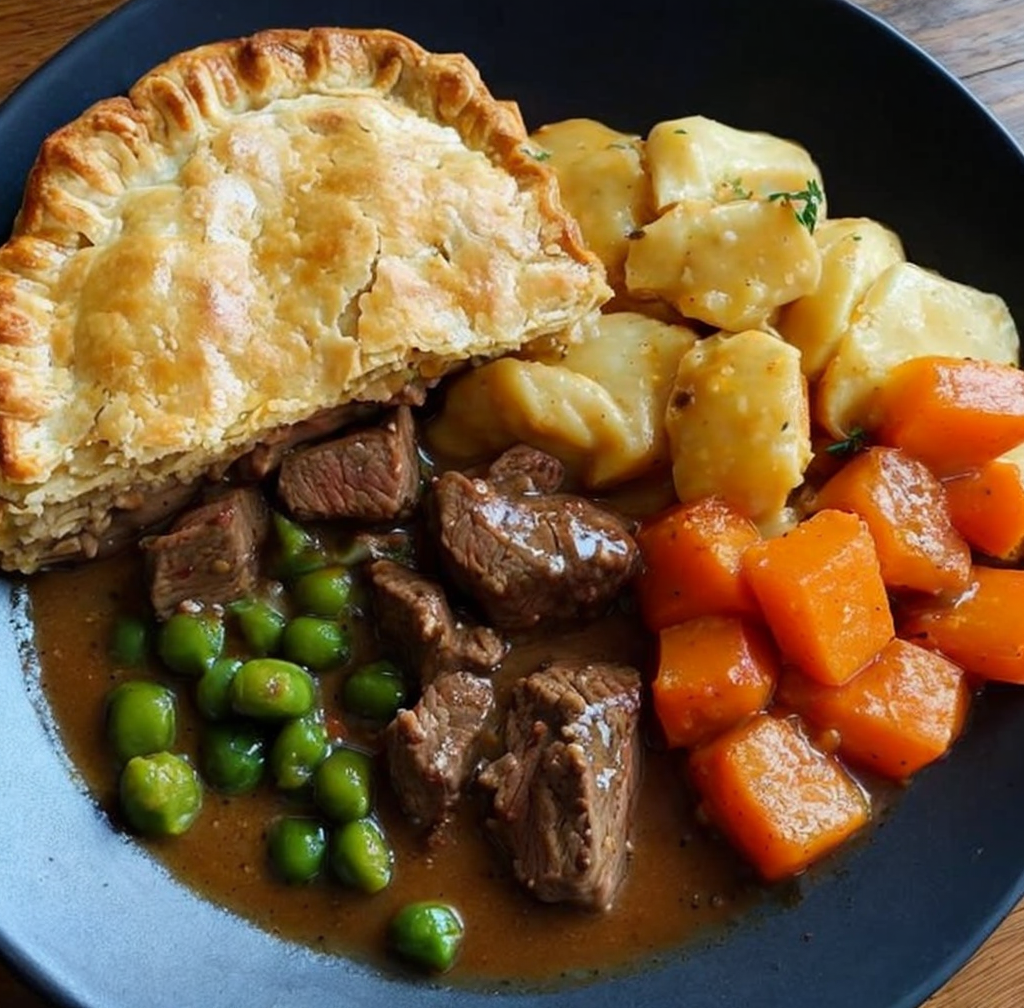
  • Visual Appeal: A beautifully browned crust with mouthwatering juices peeking through makes this pie an inviting sight on the dinner table.
  • Skill Level Needed: Intermediate cooking skills are desirable to manage crust preparation and control of the filling consistency.
  • Special Equipment: You’ll need a reliable oven, a deep pie dish, and rolling pin for perfect crust preparation.

Recipe Overview

  • Difficulty Level: Intermediate. The recipe involves baking a pastry crust, which may require some experience to get just right. Additionally, achieving the perfect balance of flavors in the filling requires careful seasoning.
  • Category: This meal can be categorized as a main course casserole, perfect for hearty meals.
  • Cuisine: This pie is a beloved part of British cuisine, with influences from traditional pub food and home-cooked comfort meals.
  • Cost: Moderate cost due to the quality of beef and ale involved, but serves enough to be economical for a family meal.
  • Season: Best enjoyed in the cooler months of fall and winter when hearty, warming meals are most appreciated.
  • Occasion: Steak and Ale Pie is ideal for Sunday dinners, holiday gatherings, or any occasions where guests are looking for comfort and indulgence.

Why You’ll Love This Recipe


The taste of Steak and Ale Pie is second to none, with its rich and indulgent filling that seamlessly pairs the hearty flavor of steak with the slight bitterness of ale. This perfect marriage of ingredients creates an unforgettable taste experience that will keep you coming back for more. The textures between the flaky crust and the tender filling create a delightful contrast that enriches every mouthful.

Preparation is straightforward and can be part of a calming kitchen routine. Once the filling is stewing on the stove, your hands are free to roll and shape the pastry, making it a pleasant, manageable task even for those new to pie-making. With this pie, convenience does not sacrifice quality.

Nutritionally, Steak and Ale Pie provides a good source of protein from the beef, accompanied by the benefits of nutrient-rich vegetables such as onion and mushrooms. Enjoy as part of a balanced meal alongside a side of vegetables or salad to round out its nutritional profile.

Socially, this pie serves as a warming centerpiece to a communal dining experience, perfect for family meals or gatherings with friends. It invites conversation and sharing in a relaxed, comfortable setting.

Finally, the ingredients are accessible and economical, especially when preparing for a larger group. With commonly found ingredients, this pie offers excellent value while promising a gourmet dining experience.

Historical Background and Cultural Significance


Steak and Ale Pie has its roots in traditional British cuisine and dates back to the Roman era, where various savory pastry dishes were part and parcel of banquets. Over the centuries, the pie has stood the test of time, becoming a symbol of comfort and hearty fare across the UK.

Culturally, this pie holds a cherished place within British culinary traditions, often associated with home-cooked warmth and hospitality. Its presence in pubs and inns further ingrained it into British cultural heritage, often served alongside other beloved staples such as fish and chips.

The recipe has evolved over time, with changes largely reflecting the availability of ingredients and local preferences. While traditional recipes call for beef suet in the crust and an ale that imparts a rich, malty flavor, modern variations feature lighter beers and the incorporation of additional vegetables.

Around the UK, regional differences are notable. In some areas, stout or porter replaces ale for a darker color and more intense flavor, while others add regional herbs or spices to bring local character to the dish.

Ingredient Deep Dive


The beef used in Steak and Ale Pie stands at the heart of its flavor profile. Dating back to early British herds, beef was a prize ingredient for meal preparation. Today, selecting the right cut, such as chuck or brisket, ensures a tender bite. Its nutritional benefits include high protein content and essential vitamins, such as iron and B12. Fresh beef should be a vibrant red color and have a clean, fresh scent—opt for well-marbled pieces for the most flavor. Store covered in the refrigerator and use within a few days to maintain freshness.

Ale, the other key ingredient, provides the backbone of deep, robust flavor. Historically, ales have varied greatly in strength and sweetness across regions, allowing for customization based on personal preferences. For this pie, a medium-bodied ale with moderate bitterness is ideal. Store ale in a cool, dark place, ensuring it remains sealed until ready to pour into your recipe.

Common Mistakes to Avoid

  • Using low-quality beef, resulting in a lack of tenderness and flavor—opt for marbled cuts.
  • Thickening the sauce too early, which can lead to a dry filling—allow it to reduce naturally.
  • Overworking the pastry dough, resulting in a tough crust—handle it gently and as briefly as possible.
  • Neglecting to chill the pastry, which can turn it greasy—give it ample time in the refrigerator.
  • Skipping the sear on beef—it’s crucial for developing flavor in the pie filling.
  • Skipping the egg wash on the pastry top—this step ensures a golden-brown crust.
  • Using the wrong ale; overly bitter ale can overbalance the pie’s flavors—choose a well-rounded ale instead.
  • Serving immediately after baking, which leads to a runny filling—reserve time for resting after baking.

Essential Techniques


Mastering the pastry crust is fundamental to perfecting Steak and Ale Pie. Use cold ingredients and snap the butter into the flour until it resembles coarse breadcrumbs. Resting the dough is essential to relax gluten formation and prevent shrinkage in baking. Avoid overmixing to maintain a tender crumb structure.

Searing the beef helps in developing the deep, savory flavors intrinsic to the filling. Ensure the beef is dry before adding to the pan and do not overcrowd, which can steam the meat rather than sear. Look for a crusty brown layer as an indicator of proper technique.

Pro Tips for Perfect Steak and Ale Pie


A dash of Worcestershire sauce adds depth of flavor to the filling, complementing the beef and ale.

For the crust, brush with an egg wash at least 15 minutes before baking to encourage a glossy, golden finish.

Adding mushrooms imparts an earthy quality that complements both beef and ale.

If using a darker ale, consider balancing flavors with a pinch of sugar to counter bitterness.

Ensure your oven is preheated to ensure proper pastry puff and browning.

Rest the pie for 15 minutes before serving, allowing the filling to set and develop flavor.

Include a bay leaf during stewing for subtle, aromatic undertones.

Variations and Adaptations


Traditional recipes embrace stout for a darker, richer filling, especially in Northern regions of the UK.

Seasonal adaptations can include adding root vegetables like carrots and parsnips during winter months.

For a gluten-free twist, consider almond flour pastry for crust and cornstarch for thickening.

Vegetarian adaptations include substituting portobello mushrooms for beef and dark vegetable broth in place of ale.

To vary flavor, try using a smoked or spicy ale, adding complexity and warmth to the pie.

Change the crust by using puff pastry for a lighter, flaky cap or experiment with alternative grains.

Serving and Presentation Guide


For traditional presentation, serve directly from the baking dish to capture rustic charm.

Add a dusting of freshly chopped parsley for a vibrant pop of color against the golden crust.

Serve with classic accompaniments like creamy mashed potatoes or steamed green vegetables for a complete meal.

Consider an elegant touch with individual ramekins for personal pies—great for formal dinner parties.

Ensure to serve hot, where steam-rise showcases aromatic appeal and ensures the crust remains flaky.

Portion with a sharp, serrated knife for clean cuts that maintain the integrity of the delicate pastry.

Wine and Beverage Pairing


For wine pairing, a robust red like a Shiraz or Malbec complements the hearty beef flavors harmoniously.

Non-alcoholic options like ginger beer enhance the pie’s aromatic spice undertones without overpowering its flavors.

For more traditional pairings, a pint of ale or stout served chilled harmonizes seamlessly with the dish’s core ingredients.

Consider lighter options such as a chilled cider for contrast, providing a refreshing palate cleanse.

Temperature plays a key role—ensure any beverage pairing enhances and doesn’t overshadow the pie’s warmth.

Serve in proper glassware; for ale and stout, a tulip glass enhancing aroma and flavor adds a nice touch.

Storage and Shelf Life


Refrigerate leftovers in an airtight container, where they should keep for up to three days.

Ensure the pie cools to room temperature before covering and refrigerating to maintain its crust integrity.

For freezing, wrap individual portions tightly in cling film and aluminum foil to prevent freezer burn—consume within two months.

Look for sauce separation or off smells as spoilage indicators, signaling it’s past its prime.

Reheat gently in a preheated oven at 180°C (350°F) to restore the crust’s flakiness and filling warmth.

Avoid microwave reheating, which can make the crust soggy—opt for the stovetop or oven instead.

Make Ahead Strategies


Prepare the beef filling a day ahead and store refrigerated, allowing flavors to meld overnight.

Pastry can be made in advance and stored wrapped in the fridge for up to two days; bring to room temperature before rolling.

Store each pie component separately to prevent premature moisture absorption in the crust.

To assemble on day of, roll the pastry while the oven preheats—it’s a seamless coordination enhancing timeliness.

For freshness, add any last-minute herbs or sprinkles of salt post-baking to keep flavors vibrant.

Follow stepwise reheating for best quality—heat filling before assembling to ensure consistent temperature.

Scaling Instructions


To halve the recipe, adjust seasoning carefully and consider using individual ramekins for proportionate serving.

Doubling the recipe requires attention to oven size; ensure adequate space for proper airflow and cooking.

Adjust equipment as necessary—large mixing bowls or baking trays facilitate doubling efforts.

Cooking time modifications may be required; longer for deeper dishes, shortened for thinner, more spread-out versions.

Anticipate additional storage space for leftovers or preparing to freeze excess portions.

Consider half-prep with full baking maintaining quality for future reheats or dinners.

Nutritional Deep Dive


Balanced macros involve the protein-rich beef, complemented by fats from pastry, and energy from carbohydrates.

Include micronutrients like iron and zinc from beef, critical for bodily function and immunity enhancement.

Consume within dietary guidelines to enjoy flavor while maintaining a health-focused approach.

Portion control helps regulate intake; enjoy alongside vegetables to balance caloric consumption.

Weight management integrates mindful pairing of lighter side dishes and compensating for richer main components.

Ensuring plenty of vegetables alongside enhances fiber intake without compromising pie enjoyment.

Dietary Adaptations


For gluten-free dining, sub conventional crust with gluten-free flour blends and adjust as needed.

Dairy-free versions can use margarine or coconut oil in pastry evoking different but delicious flavors.

Vegan pie ensures hearty enjoyment by swapping beef with lentils and using plant-based broken ale.

Low-carb adjustments include a crustless version or almond flour cover to support dietary preferences.

Keto adaptations follow similar routes with focus on protein fill and minimal carb impact through smart substitutions.

Paleo-friendly adaptations consider removal of ale, opting for bone broth, and ensuring grain-free pie assembly.

Switch conventional ingredients for low-FODMAP-friendly versions, supporting gut health and tolerance.

Troubleshooting Guide


Overly wet filling can be reduced by increasing heat and allowing excess moisture to evaporate.

Flavor balance issues, such as too bitter, can be rectified with sweetness like sugar or honey to mellow flavors.

Ensure crust texture meets expectations by monitoring butter and water ratios in preparation—too much leads to toughness.

Equipment like old ovens causing uneven temperature should be remedied with oven thermometers for accuracy.

Ingredient swaps like gluten-free flour may alter dough handling; trial small quantities for error minimization.

Timing concerns involve adjusting for altitude or humidity that extends or shortens cooking naturally.

For gaps between filling and crust, press down gently after baking to encourage cohesiveness without disturbing pie integrity.

Recipe Success Stories


Community feedback includes rave reviews of homey warmth, with excellent pairing suggestions enhancing family gatherings.

Creative twists witnessed range from mushroom lovers infusing earthy flair to added spices enhancing aromatic notes.

Readers have successfully adapted recipes for slow-cooker versions, maintaining tenderness and efficiency.

Suggestions for healthier preparations often involve sides, from salads lifting profiles to low-carb accompaniments aiding balance.

Photography tips highlight gaining visual appeal through parsley sprinkles or contrasting plating, more inviting and enticing.

Frequently Asked Questions

Can I freeze Steak and Ale Pie?
Yes, you can freeze the pie either baked or unbaked for up to two months. Ensure wrapping is airtight to prevent freezer burn and label clearly for convenience.

What’s the best type of ale to use?
Opt for a medium-bodied ale that isn’t overly bitter. Malty ales are preferred as they enhance the richness without overpowering other ingredients.

Can I make the crust from store-bought dough?
Store-bought dough is an efficient option, though personal preference can dictate using homemade for original flavors and tailored flakiness.

How do I prevent the crust from getting soggy?
Use blind-baking techniques for part-time baking without filling to set and dry initial crust before complete assembly contributes to texture integrity.

Can I make this pie vegetarian?
Substituting beef with hearty vegetables or plant-based proteins such as mushrooms and lentils will adapt the pie beautifully for vegetarians.

How do I reheat the Steak and Ale Pie?
For best results, reheat in a preheated oven at 180°C (350°F) to ensure the crust regains its flakiness and the filling is warmed thoroughly.

Can I make it spicier?
Incorporate spices like cayenne or chili powder carefully to add heat while maintaining balance with other flavors, adjusting to taste preferences.

What sides pair well with this pie?
Mashed potatoes, green beans, or salad offer contrast and balance to the richness, enhancing overall meal satisfaction.

Is egg wash necessary for the crust?
While not essential, an egg wash ensures that golden color and adds a restaurant-quality finish to the baked product.

Can I serve this pie cold?
While serving cold maintains flavors, warm serving is preferred to fully appreciate textures and contrasts inherent to the dish.

Additional Resources


Explore more comforting pies like chicken pot pie and vegetable pies for variety in your dinner routine.

Technique guides on baking can provide helpful insights for perfecting pastry skill—check for online tutorials or step-by-step videos.

Ingredient guides offer substitution tips and flavor pairings, supporting variety and dietary needs easily accessible online.

Equipment like pie weights improve blind-baking effectiveness, ensuring crust stability and uniform cooking across the dish.

Seasonal twists can be found through blog recommendations or culinary websites, promoting creativity and adaptation throughout the year.

Join the Conversation


Share your photos and experiences on social media platforms, using hashtags for greater connection and engagement with fellow cooks.

Photography tips can elevate presentation, focus shots on chosen pie sections or highlight textural contrast for visual appeal.

Review submissions welcome on personal blogs or cooking platforms, adding community feedback and curated tips to recipe pages.

Community engagement strengthens shared kitchen experiences, consider participating in virtual cooking classes or forums.

Try different recipe variations and share outcomes, sparking creativity and diverse interpretation in favorite classics.

The Recipe

Steak and Ale Pie

Serves: 6

Prep Time: 30 mins

Cook Time: 90 mins

Total Time: 120 mins

Kitchen Equipment Needed

  • Oven
  • Deep pie dish
  • Rolling pin
  • Saucepan
  • Pastry brush

Ingredients

  • 500g beef chuck, diced
  • 1 tbsp olive oil
  • 1 onion, finely chopped
  • 2 cloves garlic, minced
  • 2 tbsp flour
  • 300ml beef stock
  • 200ml ale
  • Salt and pepper to taste
  • 250g mushrooms, sliced
  • Fresh thyme, a few sprigs
  • Pastry for topping (store-bought or homemade)
  • 1 egg, beaten (for wash)

Directions

  1. Preheat oven to 200°C (400°F).
  2. Brown beef in olive oil over medium heat in a saucepan. Remove and set aside.
  3. Sauté onion and garlic until soft, then add mushrooms and cook until browned.
  4. Stir in flour and cook for one minute.
  5. Return beef to the pan, pouring in the ale and stock. Add salt, pepper, and thyme.
  6. Cover and simmer for 1 hour 15 minutes or until beef is tender and sauce is thickened.
  7. Transfer filling to a pie dish and top with pastry, sealing edges.
  8. Brush pastry with beaten egg and make a small cut for venting.
  9. Bake for 25-30 minutes or until crust is golden.
  10. Let rest before serving.

Recipe Notes

  • If sauce is too thin, remove cover in the final simmering minutes to thicken.
  • Change up herbs such as rosemary for different flavor profiles.
  • Ensure pie’s center does not remain undercooked by monitoring baking time.

Irresistible Homemade Chocolate Ice Cream Recipe for Ultimate Dessert Bliss

The Best Homemade Chocolate Ice Cream Recipe: A Creamy Delight for Every Occasion

⚖️
Difficulty
Medium

⏲️
Prep Time
20 mins

🕒
Cook Time
30 mins

⏱️
Total Time
50 mins

🍽️
Servings
8

Rich, creamy, and full of intense chocolate flavor, The Best Homemade Chocolate Ice Cream is a dessert that promises to indulge your senses. Perfectly chilled and smooth, this ice cream captures the essence of luxury in every scoop. Whether you’re celebrating a special occasion or simply craving a delightful treat, this recipe is your gateway to elevate your dessert game. Imagine relishing each mouthful, the creamy texture melting into a pool of chocolatey bliss, leaving you yearning for more.

This distinctive recipe stands out because of its balance of flavors, achieved by using high-quality cocoa and premium chocolate. With a delicate mix of sweet and bitter, it leaves an exquisite aftertaste that lingers long after you’ve finished. You’ll find this homemade chocolate ice cream to be a comforting classic that transcends seasons, making it ideal for any time of the year.

Quick Recipe Highlights

  • Flavor Profile: A divine blend of rich, dark chocolate with just the right amount of sweetness to create a balanced, indulgent flavor.
  • Texture: Creamy and silky with a luxurious mouthfeel that melts smoothly on your tongue.
  • Aroma: Enticing notes of cocoa and vanilla that fill your kitchen with a welcoming warmth.
  • Visual Appeal: A deep, dark chocolate hue that promises richness in every scoop, adorned with tiny chocolate chunks for added allure.
  • Skill Level Needed: Requires a moderate level of skill, making it accessible for home cooks comfortable with custard-based techniques.
  • Special Equipment: Ice cream maker, thermometer, and a heavy saucepan.

Recipe Overview

  • Difficulty Level: The recipe is moderately challenging, given the need to temper eggs with hot cream to create a custard without scrambling them. Mastering the right temperature is key, but the steps are straightforward with practice.
  • Category: Dessert. This homemade chocolate ice cream falls under the classic dessert category, serving as a fantastic end to any meal.
  • Cuisine: While ice cream is enjoyed worldwide, this recipe is quintessentially Western, drawing on traditional French techniques for creating custard-based ice creams.
  • Cost: Moderate, with the main expenses being high-quality chocolate and cocoa powder. However, the cost per serving is economical given the gourmet result.
  • Season: Suitable for all seasons. In summer, it provides a refreshing escape, while in winter, it offers a comforting, rich dessert.
  • Occasion: Perfect for dinner parties, family gatherings, or as a personal weekend treat. Its universal appeal makes it a crowd-pleaser.

Why You’ll Love This Recipe


When it comes to taste and texture, this chocolate ice cream is unparalleled. The luxurious creaminess of the base combined with the rich, intense chocolate flavor creates an experience that is both satisfying and memorable. The recipe uses both cocoa powder and chocolate chunks, ensuring that each bite is a harmonious blend of smooth texture and unexpected bursts of crunchy chocolate pieces.

Convenience is another highlight of this recipe. Although it requires an ice cream maker, the preparation steps are simple and can be managed easily in a home kitchen. You can prepare the custard ahead of time and churn it in the ice cream maker just before serving, allowing for a hassle-free dessert option. The ingredients listed are common pantry staples, with the exception of premium chocolate, making this an accessible recipe that doesn’t require a special trip to gourmet stores.

Nutritionally speaking, while ice cream is typically indulgent, you can control the quality and quantity of ingredients in this homemade version. The use of natural ingredients like fresh cream and cocoa ensures a more wholesome dessert without artificial additives or preservatives.

This recipe is also social and entertaining. It’s perfect for serving at parties, where guests can engage in the process of preparing and churning the ice cream together. The excitement of watching homemade ice cream come together is unmatched and often a conversation starter.

Cost-effectiveness is a compelling reason to try this recipe. Unlike expensive store-bought gourmet options, you can produce a high-quality ice cream at a fraction of the cost while achieving a superior taste. Investing in a few quality ingredients results in a batch of ice cream that can serve multiple guests, providing great value for money.

Historical Background and Cultural Significance


The origins of chocolate ice cream can be traced back to the late 17th century when chocolate began being used in sweet drinks. The transformation of this drink into a frozen treat was a natural evolution following the invention of ice cream itself. Chocolate ice cream was among the earliest flavors to be made and has held a prestigious place in dessert culture ever since.

Its cultural importance is significant in western cuisine, where it symbolizes indulgence and celebration. Chocolate, as a base ingredient, is often associated with luxury, pleasure, and decadence, making the ice cream version a popular choice for special occasions.

Over time, the recipe for chocolate ice cream has evolved to incorporate different types of chocolate and methods of preparation. From French-style chocolate custard bases to simpler Philadelphia-style recipes that omit eggs, the variations are endless, allowing for culinary creativity.

Regional variations also exist, with Italian gelatos offering their own take using less cream for a denser product. Meanwhile, American versions may prioritize a lighter, airier texture. This adaptability has only increased chocolate ice cream’s ubiquity and beloved status worldwide.

Ingredient Deep Dive


The main ingredient, chocolate, has a rich cultural history dating back to the ancient Mesoamerican cultures, which revered cacao as a sacred plant. Nutritionally, chocolate, especially dark varieties used in this recipe, is rich in antioxidants and minerals like iron and magnesium. When selecting chocolate for your ice cream, opt for high-quality brands with a cocoa content of at least 60% for a robust flavor, and store your chocolate in a cool, dry place to prevent immediate melting.

Cocoa powder also features in this recipe, known for its deep flavor and rich color. It’s an excellent source of dietary fiber and minerals such as zinc and selenium. Selecting unsweetened cocoa powder ensures that you control the sweetness of your ice cream. To maintain freshness, store your cocoa powder in an airtight container in a cool and dry pantry. For those looking for alternatives, carob powder or instant espresso powder can alter the flavor profile interestingly.

Common Mistakes to Avoid

  • Skipping the chilling step after making the custard, which can result in icy texture in your ice cream.
  • Uneven temperatures when tempering the eggs, leading to scrambled eggs in your custard base.
  • Using low-fat milk or cream that results in an unsatisfactorily thin consistency.
  • Not agitating the mixture enough during churning, which can yield ice cream with large ice crystals.
  • Forgetting to strain the custard to remove any cooked egg bits for the smoothest texture.
  • Adding chocolate chunks that are too large, making it difficult to scoop the ice cream.
  • Churning the ice cream while it’s too hot, preventing it from solidifying properly.
  • Not pre-freezing the ice cream maker bowl, leading to improper churning.
  • Using low-quality chocolate which will affect overall flavor.
  • Freezing for too long before serving, resulting in an overly hard consistency.

Essential Techniques


Tempering eggs is crucial in this recipe to prevent scrambling. Slowly add the hot cream to the eggs while whisking vigorously, and this gradual process ensures the eggs thicken without cooking. Another key technique is carefully churning the ice cream mixture in an ice cream maker. Churning incorporates air, preventing the formation of ice crystals and resulting in creamy ice cream. It’s crucial to avoid over-churning as it might lead to a grainy texture. Lastly, mastering the art of cooling the custard before churning is imperative. This step enhances flavor fusion and improves the ice cream’s consistency.

Pro Tips for Perfect Chocolate Ice Cream


It’s essential to select the best quality chocolate for the richest flavor. Always chill your mixture thoroughly before churning to ensure a smooth and creamy texture. To enhance the chocolate taste, consider adding a touch of sea salt or espresso powder. To avoid ice crystals, ensure your container is airtight when storing in the freezer. Allow your ice cream to temper on the counter for a few minutes before scooping for the best texture. Experiment with adding a dash of liquor like rum or whisky as it can enrich the flavor profile. Finally, taste the custard mixture before chilling; adjust the sweetness or chocolate levels at this stage.

Variations and Adaptations


Explore regional variations by incorporating spices like cinnamon for a Mexican twist. For seasonal adaptations, consider mixing in fresh raspberries during summer to add a fruity tang. Dietary modifications can be achieved by using coconut milk instead of cream for a dairy-free version. If you desire more depth in flavor, opt to substitute some cocoa with dark melted chocolate. To alter the texture, add various nuts or seeds for crunch. For presentation, roll scoops in finely chopped mint leaves or edible flowers to enhance aroma and visual appeal.

Serving and Presentation Guide


For plating, use pre-chilled bowls or cups to keep your ice cream cold for longer. A sprinkle of chopped mint or a drizzle of chocolate sauce can serve as fantastic garnishes. Traditional accompaniments include a side of cookies or fresh berries. For a modern touch, serve in waffle bowls for enhanced texture. Ensure that you serve the ice cream at the optimal temperature; allow it to sit for a couple of minutes after taking it out of the freezer to achieve a creamy softness. Lastly, portion control can be easily managed by using a measuring scoop for uniform size servings.

Wine and Beverage Pairing


Dark chocolate ice cream pairs beautifully with a range of beverages. A robust red wine like a Port or a Zinfandel complements its richness. Non-alcoholic alternatives such as a classic iced mocha can highlight the chocolate notes. Consider a velvety espresso or a strong black tea for a caffeine-infused pairing. Pay attention to serving beverages at the right temperature; a warm drink can be comforting in cooler months while a chilled option feels refreshing in the summer. Serve beverages in small amounts beside the ice cream to encourage slow sipping to enjoy both elements fully.

Storage and Shelf Life


To maintain peak freshness, store your chocolate ice cream in an airtight container. A robust freezer container helps keep it at the right temperature and prevents freezer burn. If any icy patches form, scrape them away and seal the container tightly. Check the consistency and flavor if left for more than a month, as homemade ice cream is best consumed within a month for optimal taste. Reheating is unnecessary, simply allow it to sit at room temperature for a few minutes. If intending to freeze batches long-term, label containers with the preparation date.

Make Ahead Strategies


This recipe is perfect for advance preparation. Begin by making the custard base up to two days in advance. Chill it well to infuse flavors over time. For optimal assembly, churn on the day of serving to preserve its freshness. If lacking time, batch making and storing isn’t a problem when you factor in proper freezing techniques to secure it long-term. Adding fresh garnishes, like cocoa nibs or fruit, right before serving elevates both decoration and taste. Always have garnishes prepped and ready to enhance efficiency when serving to a group.

Scaling Instructions


To adjust the recipe for smaller or larger gatherings, remember that ice cream ingredients can be halved or tripled with ease. Ensure kitchen tools like saucepans and bowls are adequate to handle increased volumes when scaling up. With timing, doubling the recipe may require additional churning time, while batch-freezing helps manage space. With storage, utilizing multiple smaller containers allows for consistent serving without unnecessary thawing of excess portions. Scaling down equally demands precision in measurements, so halving ingredients must retain their proportionate balance to avoid overly strong or weak flavors.

Nutritional Deep Dive


Each serving of this chocolate ice cream primarily comprises of fats, carbohydrates, and proteins, rounded to optimize creamy texture and flavor depth. It offers a good source of calcium and energizing carbohydrates, predominantly derived from natural sugars present in both milk and chocolate. On the vitamin front, the presence of antioxidants courtesy of cocoa is beneficial. Those watching caloric consumption should manage portion sizes, as typical servings can be dense due to the rich ingredients. For weight management, integrating this indulgence responsibly with ample physical activity is advisable.

Dietary Adaptations


For gluten-free adaptations, ensure all additional flavorings and any mix-ins like cookie bits are gluten-free certified. A dairy-free version can be concocted using coconut milk or almond milk as substitutes, with an additional starch thickener to achieve custard-like consistency. For a vegan alternative, use soy or oat milk and replace eggs with cornstarch or agar-agar powders. Low-carb or keto conversions can involve sugar replacements like erythritol or stevia while opting for dark chocolates minimal in sugars. For a Low-FODMAP version, choose lactose-free dairy options and no sugar alcohols.

Troubleshooting Guide


If your ice cream turns out grainy, ensure proper temperature is maintained during custard cooking and the mixture is smooth before churning. For flavor imbalance repair, adjust sweetness or salt post-churn as needed. Too firm ice cream suggests over-freezing; temper by leaving it out before serving. Equipment issues arise often with ice cream makers; make sure the bowl is adequately chilled before use. Ingredient substitutions can alter textures; always test small amounts first. If timing disruptions occur, resetting and managing stages with strategic advance preparation helps keep disruptions minimal and quality high.

Recipe Success Stories


Community members have shared their successes, with one reader noting that mixing in crushed peppermint during the holiday season adds a refreshing twist. Others have found delight in experimenting with a splash of bourbon for added warmth. Enthusiasts often praise how easy beginner chefs can dive into chocolate ice cream making through this recipe, despite its custard base challenge. Reader suggestions include enhancing it with chocolate chips for fun textural dynamics, or using flavored instant coffee to tailor undertones further. Capturing perfected scoops in photography showcases its ample richness.

Frequently Asked Questions

1. Can I make this chocolate ice cream without an ice cream maker? Absolutely! You can pour the custard into a shallow container and freeze, stirring every 30 minutes until firm.

2. What can I do if I don’t have a thermometer for checking the custard’s temperature? You can perform the spoon test by coating the back of a spoon with custard. If it leaves a clean line when finger swiped, it’s ready.

3. Can I use a different type of sugar for this recipe? Yes, feel free to replace granulated sugar with coconut or cane sugar, ensuring equal conversions for sweetness level.

4. What should I do if my chocolate seizes while melting? Gradually add a teaspoon of warmed heavy cream and stir continuously to restore texture.

5. How do I prevent a sharp ice cream taste from excess cocoa? Make sure to accurately measure cocoa, adding more sweetness or a dash of salt if cocoa dominates the taste.

6. How can I prevent freezer burn? Store in airtight containers leaving minimal air space and cover the surface with wax paper before sealing.

7. Can I mix other flavors into this base? Certainly, consider swirling with caramel, peanut butter, or fold in roasted nuts for versatile taste experimentation.

8. What’s the best way to serve this dessert at a party? Pre-scoop servings into individual cups and refreeze. Plating becomes seamless and quick for large groups.

9. How can I tell if my ice cream has spoiled? Off or sour odors, noticeable ice crystals, or significant discoloration signal spoilage, prompting proper disposal.

10. Can I adapt this recipe for different chocolate flavors? Yes, switching to white or milk chocolate creates unique variations, as taste balance adjusts accordingly.

11. Is it possible to use non-dairy milk? Non-dairy alternatives are acceptable, yet require stabilizers to match regular custard texture.

12. How can I keep my ice cream smooth without an ice cream maker? Constant stirring while freezing ensures optimal texture, albeit with added labor.

Additional Resources


Explore related recipes like vanilla bean ice cream for more homemade churning adventures. Technique guides delve into custard preparation for silky ice creams, while ingredient articles provide insight into selecting premium cocoa and chocolate. Equipment recommendations like high-performance thermometers ensure successful outcomes. Considering chocolate’s versatility, seasonal variations on dessert pairings enhance understanding of intricate flavor profiles linking desserts with savory menus.

Join the Conversation


Engage with us by sharing your favorite chocolate ice cream photos on social media with #ChocolateIndulgence. Photography tips include capturing during golden hour for vibrant color and texture. Leave recipe reviews and suggestions to help refine and innovate together as a community. Have your own chocolate twists? Share your recipe variations with fellow enthusiasts dedicated to uncovering culinary flexibility. This dynamic interaction fosters camaraderie among dessert aficionados, encouraging creativity.

The Recipe

The Best Homemade Chocolate Ice Cream

Serves: 8

Prep Time: 20 mins

Cook Time: 30 mins

Total Time: 50 mins

Kitchen Equipment Needed

  • Heavy saucepan
  • Whisk
  • Ice cream maker
  • Thermometer
  • Mixing bowls
  • Fine-mesh strainer

Ingredients

  • 2 cups heavy cream
  • 1 cup whole milk
  • 3/4 cup granulated sugar
  • 1/2 cup unsweetened cocoa powder
  • 2 ounces bittersweet chocolate, chopped
  • 4 large egg yolks
  • 1 teaspoon pure vanilla extract
  • Pinch of salt

Directions

  1. In a medium saucepan, combine heavy cream, milk, sugar, and cocoa powder. Heat on medium until just before boiling.
  2. In a separate bowl, whisk the egg yolks until smooth.
  3. Slowly pour the hot cream mixture into the yolks, whisking constantly to prevent curdling.
  4. Return the mixture to the saucepan and cook over low heat, stirring constantly, until it thickens enough to coat the back of a spoon.
  5. Pass the custard through a fine-mesh strainer into a clean bowl.
  6. Stir in chopped chocolate until melted, then add vanilla and salt.
  7. Cover and refrigerate until very cold, at least 2-4 hours or overnight.
  8. Churn mixture in an ice cream maker according to manufacturer’s instructions.
  9. Transfer to a container and freeze until firm, about 2 hours.

Recipe Notes

  • For a smoother texture, ensure thorough chilling before churning.
  • Add a splash of your favorite liqueur during the final step for depth in flavor.

Deliciously Refreshing Creamy Avocado Pasta Salad Perfect for Summer

Creamy Avocado Pasta Salad Recipe: A Deliciously Fresh Twist for Your Table

⚖️
Difficulty
Easy

⏲️
Prep Time
15 mins

🕒
Cook Time
10 mins

⏱️
Total Time
25 mins

🍽️
Servings
4

Imagine a dish that combines the velvety richness of avocado with the tangy zest of lime, all enveloped in a comforting pasta salad. Our Creamy Avocado Pasta Salad Recipe is the perfect summer dish, marrying vibrant flavors with contrasting textures to delight your senses. You’ll be drawn to its creamy consistency and the freshness of your favorite vegetables in each bite.

This avocado pasta salad is more than just a meal; it’s a fresh escape from the ordinary. The robust aroma of basil and garlic will fill your kitchen, inviting you and your guests to savor each mouthful. Whether served as a main course or a delectable side, this pasta salad is bound to be a recipe you revisit time and again.

Quick Recipe Highlights

  • Flavor Profile: This recipe bursts with a creamy, zesty flavor with hints of garlic and lemon that keep it bright and fresh.
  • Texture: The smooth, buttery texture of avocado perfectly coats the al dente pasta, with fresh veggies adding a satisfying crunch.
  • Aroma: Enjoy the aromatic blend of fresh basil, garlic, and a hint of lime as you prepare this dish.
  • Visual Appeal: The vibrant green avocado and bright vegetables create a visually stunning dish that’s as beautiful as it is tasty.
  • Skill Level Needed: Perfect for beginners, this dish requires basic chopping and pasta cooking skills.
  • Special Equipment: A blender or food processor is ideal for achieving the perfect creamy consistency.

Recipe Overview

  • Difficulty Level: Easy – This dish requires minimal effort, making it perfect for a quick and tasty meal.
  • Category: Ideal as a refreshing appetizer, scrumptious side dish, or a delightful vegetarian main course.
  • Cuisine: This pasta salad draws inspiration from Mediterranean flavors, bringing together avocado and herbaceous notes commonly found in the region’s cuisine.
  • Cost: Affordable – Utilizing readily available ingredients, this dish keeps costs low while maximizing flavor.
  • Season: Best enjoyed during the warmer months when fresh produce is at its peak.
  • Occasion: Excellent for picnics, barbecues, or a simple yet elegant dinner with friends.

Why You’ll Love This Recipe


This Creamy Avocado Pasta Salad Recipe is a delightful combination of rich flavors and contrasting textures that keeps everyone coming back for more. The creamy avocado serves as a luscious base, complemented by fresh herbs and a hint of zesty lime. The robust, fresh flavors are enticing and refreshing, making it a favorite choice, especially during warm weather.

Enjoy the convenience of a dish that comes together quickly with minimal prep. It’s an ideal meal for those busy weekdays when you need something fast, flavorful, and filling. The recipe makes excellent use of pantry staples while providing room for seasonal tweaks with different fresh produce.

Nutritionally, this dish excels as a powerhouse of healthy fats thanks to the avocado, while maintaining balanced calories. It’s a wholly vegetarian option that remains satisfying, providing essential nutrients through its plant-based ingredients.

Entertain with ease by serving this salad at various gatherings. Its irresistible flavor and vibrant appearance make it a crowd-pleaser, while it stands as a versatile dish adored by guests of all dietary preferences. Interactive table settings where guests can customize with their preferred toppings also amplify its social appeal.

Cost-effective and accessible, the Creamy Avocado Pasta Salad Recipe calls for common, affordable ingredients typically found at your local grocery store. Its simplicity doesn’t overshadow its gourmet-worthy flavors, making it a perfect complement for elevating any meal setting.

Historical Background and Cultural Significance


Avocado has a deep-rooted history, tracing back to ancient Central and South American civilizations. The Aztecs and Mayans were among the first to cultivate this fruit, recognizing not only its rich taste but its nutritional value long before modern science. Today, avocado is a staple in many cuisines across the globe, with each culture adapting it to its indigenous cooking styles.

This Creamy Avocado Pasta Salad Recipe embodies a cultural fusion, bringing together elements of Mediterranean flavors with central avocado-based fare. The inclusion of pasta speaks to Italian influences, merging with the avocado’s Latin American origins for a recipe that celebrates global culinary traditions.

Over the years, pasta salad recipes have evolved in response to regional ingredient availability and cultural taste preferences. The avocado’s versatility exemplifies how it seamlessly aligns with diverse recipes, making it not just a standalone fruit but a dynamic ingredient that elevates dishes like this pasta salad.

Different cultures adore avocado for its creamy texture and mild flavor, resulting in numerous authentic regional variations of similar creamy salads. From pairing with seafood in coastal areas to embracing it in vegan diets, this ingredient’s evolutionary path showcases a world of innovative culinary adaptation that transcends cultural barriers.

Ingredient Deep Dive


Avocado is a superfood celebrated for its rich, creamy texture and myriad of health benefits. Originating from southern Mexico, it has played a role in diets for thousands of years. Today, avocados are beloved for their versatility and the creamy layer they add to dishes such as this pasta salad.

Avocados pack a punch with health benefits, containing heart-healthy monounsaturated fats, vitamins E and C, potassium, and fiber. Their creamy consistency makes for an excellent salad dressing base, replacing heavier dairy options. When choosing avocados, seek ones that yield to gentle pressure, indicating ripeness. They should be stored in a cool, dark place or refrigerated once ripe to slow spoilage. For a twist, substitute avocado with ripe mashed mango for a sweet variation or use an avocado oil-based dressing for a more intense flavor.

Pasta forms the comforting base of this salad, soaking up the creamy avocado dressing beautifully. Rich in carbohydrates, it provides the main energy source for the dish, complementing the density avocado brings. Opt for whole grain or legume-based pasta for an added fiber boost. Keep pasta stored in a dry place, away from sunlight to maintain its quality. Fully cook it to al dente, avoiding an overcooked texture that might compromise the dish’s final presentation.

Common Mistakes to Avoid

  • Overripe Avocados: Avoid using overripe avocados as they can lend a bitter taste instead of the intended creamy flavor.
  • Excessive Blending: Blending for too long can cause the avocado to heat and discolor in a less appetizing manner.
  • Undercooked Pasta: Ensuring pasta is cooked to al dente prevents it from absorbing too much dressing and losing its shape.
  • Skipping Lime: Not including lime can result in a lack of bright acidity needed to balance the dish flavors.
  • Improper Storage: Store salad covered tightly to prevent avocado oxidation, maintaining its vibrant green color.
  • Underseasoning: Do not forget to adequately season with salt and pepper, enhancing the dish’s overall impact.
  • Inadequate Cooling: Allowing pasta to cool ensures the dressing better coats each piece without sliding off.
  • Ignoring Garnishes: Fresh herbs or toasted seeds add vital texture and aromatic complexity.

Essential Techniques


Mastering the art of making a creamy dressing without dairy is essential for this recipe’s success. Avocado naturally provides a richness that, when blended with citrus and herbs, creates a luscious, velvety texture without needing added fats. To master it, blend ingredients just until smooth, avoiding excessive oxidation caused by over-blending.

Achieving the perfect pasta texture is important for this and similar dishes. Cook the pasta to al dente—a slight firmness in the center—so that it holds well once combined with the dressing. Visual cues for success include pasta retaining its shape and a bit of “toothiness” when bitten.

Avoiding common pitfalls like under-seasoning is key. Taste continually and adjust seasoning to ensure flavors are balanced. A taste test after combining selected ingredients helps prevent overwhelming any unique ingredient while seasoning compensates for a less ripe avocado.

Pro Tips for Perfect Creamy Avocado Pasta Salad


Choose ripe avocados with a gentle press to ensure they are soft enough for a creamy dressing but not overly ripe, which can taste bitter. Always have a lemon or lime handy to prevent avocado browning, naturally preserving its vibrant color.

To avoid a watery salad, adequately dry vegetables and cooled pasta before mixing everything together. Excess moisture can dilute the avocado dressing, losing its creamy consistency.

Introduce an element of surprise through garnishes such as toasted nuts or seeds—like pumpkin or sesame. These toppings add a delightful crunch and play well against the smooth texture.

Consider adding protein for a heartier dish. A cup of cooked chickpeas or grilled chicken can easily be incorporated without much hassle, enhancing the nutrient profile.

Enhance the flavor profile with a slight drizzle of high-quality olive oil just before serving, elevating the nutty avocado into a well-rounded dish. Olive oil’s complementary flavor enhances each familiar ingredient.

For a more intense herb-infused dressing, consider letting herbs blend with avocados for a few minutes before using them. The resting period allows flavors to meld effectively, giving time for aromatic infusion.

Variations and Adaptations


Regional variations can add a new dimension to this dish. Consider adding shredded cheese and fresh jalapeño for a Southwestern twist, providing a spicy kick that lends itself well to a different cultural palate.

Seasonal adaptations involve bringing in produce that highlights current seasonal bounties. Try adding roasted butternut squash cubes during the fall or slicing juicy heirloom tomatoes for a burst of summer color and taste.

For dietary modifications, consider using gluten-free pasta or spiralized zucchini noodles to keep it Keto-friendly without sacrificing the savory flavors that compose the dish’s foundation.

Flavor variations can include the addition of different spices or ingredients like roasted red pepper flakes for heat, grilled corn for sweetness, or even sun-dried tomatoes for a rich umami experience.

Texture modifications might involve substituting crunchy veggies, like cucumber or radishes, providing an additional crispness without detracting from the creamy base and smooth mouthfeel.

Presentation alternatives involve serving the salad in elegant glass bowls to showcase its rich colors or artfully arranged on a large serving platter lined with leafy greens to enhance the salad’s visual appeal.

Serving and Presentation Guide


Emphasize the vibrant visual appeal of this dish by serving it in an oversized bowl, drizzled with a bit of avocado oil for a glistened finish, and topped with fresh herbs. For gatherings, plate single servings in small ramekins for a professional touch.

Garnishing can significantly enhance presentation. A sprinkle of freshly cracked pepper, delicate microgreens, or bright, edible flowers heightens attractiveness. Add a zest of lime for a pop of color and a hint of smokiness.

Pairing this salad with focaccia bread or crispy bruschetta embraces traditional Italian accompaniments, adding a rustic touch. In cooler weather, option to serve with hearty sourdough to provide warmth and contrast.

For a modern serving suggestion, fill hollowed avocados with pasta salad—a nod to its star ingredient—merging decor and functionality. This creates a stunning presentation piece suitable for sit-down dinners or buffets.

Maintain proper serving temperature by refrigerating the salad for a couple of hours before serving, allowing flavors to meld. However, let it stand at room temperature for a few minutes before presenting to ensure optimal taste.

For portion control, consider using a cup scooper for evenly distributed servings, ensuring guests receive equal amounts of each ingredient without dominating one aspect over another.

Wine and Beverage Pairing


For wine enthusiasts, a chilled Sauvignon Blanc with its crisp acidity and subtle grassy notes pairs wonderfully with the creamy avocado, cutting through the richness and complementing the herbaceous dressing.

As a non-alcoholic alternative, a fresh mint-infused lemonade provides a burst of flavor and complements the salad’s vibrant taste. The citrus element echoes the lime in the dressing for a harmonious pairing.

For those leaning toward hot beverages, iced green tea works well, balancing the creamy savory notes without overpowering the dish’s delicate flavors. A touch of lemon in the tea can echo the dish’s zing.

Consider beer connoisseurs with a light pilsner—its effervescence and subtle flavors don’t compete but instead refresh the palate, allowing for varied enjoyment alongside this rich salad.

Blended smoothies featuring cucumber, mint, and a hint of ginger present a vibrant, non-traditional pairing suited for brunch dining where this salad can stand as a main course.

To highlight temperature considerations, chill wines beforehand while serving teas slightly warm. Such temperature contrasts with a cool salad provide an interactive dining sensory experience, elevating meal pleasure.

Storage and Shelf Life


Store leftovers in an airtight container to prolong freshness, minimizing exposure to air to prevent avocado browning and maintaining salad integrity. Refrigerate immediately after partaking to keep cool.

The salad should ideally be consumed within two days for maximum freshness, flavor, and texture. Enjoyed too late, you risk a deeper, less appealing color and a prominent taste change.

Utilize jars or glass containers in place of plastic to enhance quality by reducing absorbed odors, shielding the salad from wilting, and remaining odor-free.

Monitor signs of spoilage, such as a sharp, fermented smell or slimy texture. Although naturally browning is expected over time, spoilage will render a distinct acidic smell.

If reheating is desired for the added protein variation, slightly warm only specific portions in a low-temperature oven, carefully avoiding direct microwaving as avocado’s fat content may separate.

Avoid freezing as the textures and flavors may suffer considerably once thawed, impacting the creamy consistency, bright taste, and overall vibrant visual appeal of this dish.

Make Ahead Strategies


Prepare ingredients separately in advance by cooking and chilling the pasta, storing the diced vegetables covered, and mixing the avocado dressing at the last moment to prevent oxidation.

Store between steps separately, reserving pasta and dressing in individual containers ensuring each retains its integrity. The salsa-like vegetables in another, for additional freshness.

Quality impacts are positive through prepped stages, allowing flavors more development time and delivery of a more unified finished dish. Conversely, continually chilling dressing helps preserve the creamy blend.

Assembly is optimal up to an hour before serving to retain freshness. When ready, coat pasta with dressing, gently tossing to accommodate any final touch herbs, ensuring an evenly dressed salad.

Reheat the protein shell before adding, if necessary. Doing so revitalizes dish elements without sacrificing culinary appeal, enhancing the multi-textured mouthful experience.

Upon serving, opt to add fresh elements such as herbs, chilled slices of avocado, or scallions to heighten visual and fragrant appeal, keeping main components entirely vibrant.

Scaling Instructions


To halve the recipe, measure ingredients precisely and adjust ratios accordingly. Avocado portions should remain consistent to maintain the dish’s creamy essence, balancing other elements.

Doubling or tripling involves considering available storage, specifically for fresh produce. Additionally, having a large enough food processor or blending time for creamy dressing is essential.

Equipment adjustments include utilizing larger bowls for mixing and blending to accommodate the increased quantity and ensuring enough refrigerator space for éclat cooling.

Time modifications primarily affect the cooking stage, with pasta requiring adjusted boil water amounts and cooking time assessment based on increased quantity proportions.

Storage considerations focus on maintaining freshness when scaled, suggesting container-based refrigeration prevents spoilage, protecting each aspect separately for easier assembly.

Accommodating preparation in steps rather than one sitting allows better quality control. As the scale increases, this approach prevents rough ingredient combinations, sustaining high-quality outcomes.

Nutritional Deep Dive


The Creamy Avocado Pasta Salad offers a well-balanced macro breakdown of healthy fats from avocados, resulting in supportive cell functionality and energy maintenance through carbs.

Its micronutrient analysis includes potassium, vitamins E, and C, valuable for maintaining stable blood pressure, enhanced skin health, and antioxidant presence supporting cellular well-being.

Health benefits highlight avocado’s high fiber content, increasing satiety and steadying glucose levels while assisting digestive processes due to fiber content that bulks stool consistency.

Dietary considerations accommodate vegan, vegetarian, and the dash of plant-based consumption developments, presenting an appealing option within modern inclusive dining preferences.

Portions consist of nutrient-dense ingredients, ensuring proper meal satisfaction without excess calorie intake. Varied serving compositions introduce mix-and-match flavor impact opportunities.

Weight management tips that accompany this salad lean towards mindful consumption paired with physical activity, astute portion control, and diverse nutrient density across serving experiences.

Dietary Adaptations


To create a gluten-free version, substitute regular pasta with gluten-free alternatives, such as quinoa or rice pasta, while maintaining similar dressing techniques for consistent textures.

Transform this recipe into a dairy-free delight by excluding any cheese accompaniments or grated parmesan, focusing solely on the inherent creaminess of avocado and additional natural inclusions.

Craft a vegan variation, enriching the salad with extra plant protein inclusions like lentils or edamame, keeping its authentic culinary concept intact.

For low-carb, employ zucchini noodles or spaghetti squash in place of traditional pasta. Keep dressing components unchanged, allowing for flavorful immersion without high carb content.

Keto preparations are similar; emphasize low-carb noodles, maintaining the avocado richness alongside selected fats like olive oil, fostering dietary receptiveness.

Paleo adaptation requires avocado oil-based dressing and spiralized root vegetables, directly integrating non-dairy, non-grain alignments with distinct salad compositions.

Consider low-FODMAP approaches featuring spinach in place of high-FODMAP onions and garlic-infused oil rather than raw cloves, addressing specific dietary needs while maintaining flavor.

Troubleshooting Guide


Address any texture issues by checking pasta cooking timing. Overcooking can lead to soggy texture folds, compromising the structure needed for biting satisfaction.

Correct flavor imbalance issues—such as overpowering garlic or too much lime—by gradually adding neutral tastes like avocado stretches or swapping full use with half implementations.

Fix temperature-related problems by avoiding draining heated ingredients directly over avocado elements. Rapid exposure results in poor response from fat textures, leading to oily separation.

Equipment challenges arise, like limited blending scope. Opt for small batches to retain smooth, stable results, preferable in manually adjustable settings on blending tools used.

Ingredient substitutions tackle common shortages; if out of lime juice, use lemon as an alternative, maintaining acidity. Persist within substitution guidelines without sacrificing the final dish’s taste.

Timing concerns require steady observation of cooling phases to ensure thorough infusion avoidance from under-settled dressings. Prompt chilling balances dish elements effectively.

Recipe Success Stories


Within our community, recipe success invigorates creativity by allowing each participant to weave personal touches or ingredient substitutions, sharing diverse perspectives across tables globally.

Reader adaptations speak to quick-thinking execution achieved through available ingredients, showcasing culinary ingenuity and encouraging exploration beyond comfort zones with bold confidence.

Photographs highlight glorious, individualized presentation styles, providing artistry and abundant ideas inspiring collective feedback loops of shared successes and celebration.

Beyond adaptation, provision of professional tips and insights amplify personal engagement, encouraging interaction and reader collaboration, broadening both immediate connection and universal outreach.

Collective creativity celebrates professionals and hobbyists alike, establishing cordial community environments where experimentation isn’t merely encouraged; it’s revered through shared experiences.

Frequently Asked Questions

Can this recipe be made ahead of time?

Yes, the ingredients can be stored separately and assembled just before serving to maintain balance and freshness.

Can I freeze this pasta salad?

It’s not recommended to freeze due to potential texture changes in the avocado, impacting the salad’s taste and appearance.

What’s the shelf life of this salad?

The salad is best eaten within two days when stored properly in sealed, refrigerated containers.

Can I use a different type of pasta?

Absolutely, feel free to use any pasta type, including gluten-free or whole-grain options, to fit your personal preferences.

How can I prevent avocados from browning?

A splash of lime or lemon juice helps to slow oxidation, keeping the vibrant green color longer in the dish.

What can I serve with avocado pasta salad?

This versatile dish pairs well with various proteins like grilled chicken or tofu, and complements side dishes such as bruschetta or a leafy green salad.

Is there a substitute for fresh herbs?

In a pinch, dried herbs can suffice, though fresh offers the best flavor. Reduce quantities according to intensity levels of dried forms.

What proteins pair well with this recipe?

Chickpeas, grilled chicken, or tofu blend well within the salad’s existing flavor palette and supply additional nutrients.

What vegan options work well?

Incorporating plant proteins like lentils or using non-dairy pasta alternatives are popular and satisfying vegan approaches.

How can I incorporate more seasonal produce?

Adjust by introducing seasonal fruits and vegetables that meld with the dish’s existing taste profile, enhancing nutritional density and variety.

Additional Resources


Enhance culinary knowledge through related recipes like Mediterranean couscous and fresh tomato basil salad, allowing for cultural immersion through diverse taste explorations.

Deepen understanding with technique guides such as “Mastering Avocado Ripe-Timing” or “Hearty Herb Infusion Basics,” spreading elemental cooking prowess across various dimensions.

Ingredient information offers insight into avocado origins, practical uses and health benefits, ensuring broader culinary applicabilities and informed ingredient choices.

Equip your kitchen with recommended essentials by exploring latest blender and noodle-making innovations, enhancing kitchen dynamics and facilitating recipe scaling efficiently.

Seasonal variations highlight monthly produce selections, offering guidance on sourcing the freshest inspirations to align recipes with environmental opportunities broadly expected.

Join the Conversation


We invite you to share your personal adaptations across social media platforms using specific hashtags, reaching an integrated community striving for culinary creativity.

Develop photography tips through exploration of light contrast, integral composition, and interior environments, enhancing preparation enjoyment alongside aesthetic documentation.

Compose thoughtful reviews detailing experiences and impressions of the Creamy Avocado Pasta Salad, fostering authentic narrative connections among reader audiences.

Engage in interactive community discussions exploring varying culinary adjustments, inspiring diverse taste journeys with respect and appreciation for shared cultural nuances.

Discover further recipe variations offering layered complexity, enlarged opportunities for exploration, and intensified individuality tailored within larger communal receptivity layers.

The Recipe

Creamy Avocado Pasta Salad

Serves: 4

Prep Time: 15 mins

Cook Time: 10 mins

Total Time: 25 mins

Kitchen Equipment Needed

  • Pasta pot
  • Colander
  • Blender or food processor
  • Mixing bowl
  • Knife and cutting board

Ingredients

  • 8 ounces of pasta (fusilli or penne)
  • 2 ripe avocados
  • 1/4 cup fresh lime juice
  • 1/2 cup fresh basil leaves
  • 1 clove garlic
  • 1 cup cherry tomatoes, halved
  • 1 cucumber, diced
  • Salt and pepper to taste
  • Optional: grated parmesan for garnish

Directions

  1. Bring a large pot of salted water to a boil. Add pasta and cook according to package instructions until al dente. Drain and rinse under cold water.
  2. Meanwhile, in a blender or food processor, combine avocados, lime juice, basil, and garlic. Blend until smooth and creamy.
  3. In a large mixing bowl, combine cooked pasta, cherry tomatoes, and cucumber. Add the avocado dressing and toss until well coated.
  4. Season with salt and pepper to taste. If desired, garnish with grated parmesan just before serving.

Recipe Notes

  • For added protein, consider adding grilled chicken or chickpeas.
  • If storing, keep the dressing separate and combine just before serving.
  • Feel free to adjust seasoning or add herbs like cilantro for a flavor twist.

Irresistible Cheesy Garlic Bread Shrimp Grilled Cheese Recipe Delight

Cheesy Garlic Bread Shrimp Grilled Cheese: A Savory Delight for Gourmets Everywhere

⚖️
Difficulty
Intermediate

⏲️
Prep Time
15 mins

🕒
Cook Time
20 mins

⏱️
Total Time
35 mins

🍽️
Servings
4

Indulge in the irresistible fusion of flavors with our Cheesy Garlic Bread Shrimp Grilled Cheese. A sumptuous harmony of savory shrimp nestled within layers of melting cheese and crispy garlic-infused bread. This delightful creation isn’t just a sandwich; it’s an experience that brings the vibrant taste of the sea to a comforting classic. Imagine the oozy cheddar and mozzarella blanketing a succulent shrimp filling, all encased in golden, buttery bread. Whether you’re a seafood enthusiast or a grilled cheese aficionado, this recipe offers a delightful twist on traditional comfort food that satisfies every taste bud.

Quick Recipe Highlights

  • Flavor Profile: Enjoy an exquisite blend of cheesy richness and the savory depth of garlic-infused shrimp. A perfect balance of saltiness and umami with a hint of lemon zest for freshness.
  • Texture: Sink your teeth into a combination of crispy bread, gooey melted cheese, and tender shrimp that provide a delightful contrast in every bite.
  • Aroma: The aromatic garlic and melty cheese aromas bring back childhood comforts, infused with a modern twist from the fresh shrimp.
  • Visual Appeal: A beautiful golden crust complements the creamy, bubbling cheese for an appetizing presentation, sure to impress any gourmet.
  • Skill Level Needed: This recipe requires intermediate skills, such as mastering a perfectly golden grilled sandwich while balancing the cooking of shrimp.
  • Special Equipment: You’ll need a skillet, preferably cast iron, and a reliable spatula to handle the flipping with grace and precision.

Recipe Overview

  • Difficulty Level: While the preparation involves several steps, managing shrimp cooking and cheese melting requires attentive timing but nothing too complex for seasonal cooks.
  • Category: This dish is ideal for lunch or a savory snack, lying comfortably within the realm of comfort food with a gourmet twist.
  • Cuisine: The recipe draws from Italian-American influences, combining classic garlic bread with All-American grilled cheese and seafood bliss.
  • Cost: Relatively affordable, with shrimp being the most significant cost, yet the investment offers a great value for gourmet quality at home.
  • Season: Best enjoyed year-round, but shrimp quality can influence flavors, making spring and early fall optimal for fresh seafood.
  • Occasion: Perfect for casual gatherings, family dinners, or when you’re looking to impress guests with minimal fuss and maximum flavor.

Why You’ll Love This Recipe


Our Cheesy Garlic Bread Shrimp Grilled Cheese is a flavorful delight that’s sure to captivate your senses with its unique take on beloved classics. It brings the best of both worlds together, delivering the comforting satisfaction of a grilled cheese sandwich with the sophisticated twist of garlicky shrimp. The combination of flavors is further elevated by the texture contrast between crispy bread and tender, cheese-encompassed shrimp, making every bite a sensory delight. Not only is it a feast for the taste buds, but also a joy to prepare.

Convenience takes center stage with this easy-to-make dish. A straightforward recipe that requires basic ingredients commonly available in most kitchens simplifies the preparation process while offering flexibility in serving sizes. Ready in under 40 minutes, it’s an ideal choice for impromptu meals that don’t sacrifice on gourmet taste.

On the nutritional front, including shrimp adds a lean source of protein and essential nutrients to the mix, making this dish a more balanced option than many traditional hand-held snacks. The possibility to adjust cheese types and quantities allows for customization according to dietary preferences or requirements.

Social and entertaining values are inherent in the charm of this dish. Impress your guests with a new take on comfort food, turning simple lunches into memorable culinary experiences. Whether it’s a casual weekday or a special dinner party, the crowd-pleasing qualities of this dish cater to a wide range of taste preferences.

From a cost-effective perspective, the recipe makes gourmet accessible, especially when planned with sales or bulk purchase strategies. Making use of ingredients like cheese and bread that have easy availability and long shelf-life ensures this recipe fits within most household budgets without compromising taste or quality.

Historical Background and Cultural Significance


The origins of the grilled cheese sandwich can be traced back to the early 20th century when the invention of sliced bread revolutionized home cooking, bringing about a convenient and affordable way to create quick meals. Adding shrimp and garlic further establishes a connection between traditional comfort foods and America’s diverse culinary influences, highlighting regional seafood and Italian-American ingredients.

Culturally, grilled cheese is an iconic American sandwich that’s beloved across all age groups. Infusing it with garlic and shrimp incorporates flavors from other traditions while maintaining its cultural significance as a renowned crowd-pleaser. This particular recipe pays homage to Italian cuisine with its homage to garlic bread, showcasing the melding of cross-cultural tastes and the adaptability of American culinary preferences.

The evolution from simple sandwiches to gourmet creations reflects a broader trend in culinary arts, where blending cooking techniques and ingredients from various global cuisines illustrates progression in gastronomy. As American cuisine continuously evolves to incorporate international elements, dishes like this become more prevalent, representing contemporary fusion dining experiences.

Regionally, variations of this recipe might feature local seafood, distinctive cheeses, or unique breads. From Maine lobster rolls with cheese to California’s artisanal bread offerings, this dish can be effortlessly adapted to reflect local cultures and tastes, creating diverse iterations across different culinary landscapes.

Ingredient Deep Dive


Shrimp, the star protein of this dish, brings its own rich history and cultural significance. Highly regarded in Mediterranean and Asian cuisines, shrimp offers versatility and culinary flexibility. Known for their sweet, seafood flavor, shrimp pick up the garlic and butter beautifully in this recipe, elevating the cheese’s savory notes.

Nutritionally, shrimp are low in calories yet rich in protein, offering valuable omega-3 fatty acids and antioxidants that support heart and brain health. When sourcing shrimp, fresh or sustainably-farmed options are ideal for ethical and environmental reasons. Ensure they are firm to the touch with a briny smell to confirm freshness.

Storage of shrimp should be done in the refrigerator and consumed within two days of purchase for optimal taste. If needing to store longer, freezing is recommended. You can opt for cooked or uncooked shrimp based on preparation preference or time constraints, with uncooked shrimp offering the most authentic flavor.

In many cases, substitutions such as chicken or tofu can be made to cater to dietary restrictions or preferences without losing the overall dish’s flavor profile. Finding the right balance in substitutes allows for inclusivity while maintaining taste integrity.

Common Mistakes to Avoid

  • Overcooking Shrimp: Cook shrimp until pink and opaque; overcooking leads to rubbery textures.
  • Burning the Bread: Maintain a moderate heat and patience to achieve golden brown crust without burning.
  • Overstuffing: Avoid overloading the sandwich as it prevents even cooking and affects structural integrity.
  • Using Wet Ingredients: Pat shrimp dry to prevent additional moisture affecting bread crispness.
  • Uneven Cheese Melting: Distribute cheese evenly for consistent melting, enhancing sandwich texture.
  • Skipping Rest Time: Allow the sandwich to rest a few minutes before cutting to secure ingredients.
  • Inadequate Seasoning: Properly season shrimp and ingredients to enhance flavor depth.
  • Neglecting to Control Heat: Frequent adjustments to heat ensure even cooking, preventing burnt spots.
  • Forgoing Ingredient Quality: Use fresh, quality ingredients for optimal taste and texture.
  • Ignoring Cheese Variations: Don’t be afraid to explore different cheeses for custom flavor profiles.

Essential Techniques


Perfecting the art of a grilled cheese takes practice, particularly when incorporating additional ingredients like shrimp. Balancing the cook time for shrimp and achieving the desired bread crispness can be tricky. Preheating the pan is crucial to forming a perfect crust quickly. Recognizing the importance of butter temperature is also vital; clarified butter or a mixture can prevent scorching.

A useful technique is allowing the cheese to reach room temperature before cooking, helping it melt evenly and quickly. Cover the pan while cooking to use trapped steam for additional melting power without drying the sandwich. Additionally, using a spatula to gently press the bread ensures consistent contact with the pan surface for an even crust.

For shrimp, be attentive to color change as the reliable indicator of cooking progress. Leaving shrimp until just done before removing from heat prevents overcooking and retention of juices. Mastering shrimp cooking ensures tender, succulent pieces that complement the melted cheese.

Pro Tips for Perfect Cheesy Garlic Bread Shrimp Grilled Cheese


1. Prep Work: Prepare all ingredients before starting; busy assembly time leaves no room for multitasking.
2. Cheese Selection: Blend cheeses like cheddar and mozzarella for flavor and melting quality.
3. Pan Temperature: Preheat the pan gently; a hot pan delivers an instantaneous crust formation.
4. Seasoning: Don’t skimp on seasoning, incorporating garlic and herbs will awaken natural flavors.
5. Heat Distribution: Utilize medium-low heat to prevent outsides from burning while cheese melts.
6. Shrimp: Consider using pre-cooked shrimp for a quick and foolproof experience if pressed for time.
7. Resting Time: Allow resting post-cooking; heat stabilizes ingredients for cleaner slicing.
8. Experimentation: Customize with pesto, sun-dried tomatoes, or other ingredients for personal flair.

Variations and Adaptations


Cheesy Garlic Bread Shrimp Grilled Cheese has potential for several variations, adapting classic seafood gatherings to diverse culinary landscapes. Regional variations might include crab or lobster, seasoned locally with regional spices, enhancing this foundational recipe to suit coastal cuisines.

For a seasonal adaptation, consider adding fresh herbs or summer vegetables to the concoction. Zucchini, tomatoes, or grilled peppers introduce a garden-fresh character, perfect for warm months. Similarly, the richness of roasted squash or pumpkin can lend an autumnal depth to the dish.

Dietary modifications can readily convert this dish to suit various needs. For those avoiding dairy, a range of plant-based cheese offers similar textures with diverse flavor impacts. Gluten-free bread usage is a straightforward solution for those with gluten sensitivities.

For a flavor variation, incorporate additional spice layers like cayenne or chipotle powder for warmth. Alternatively, introducing different aromatics such as fresh basil or oregano results in distinct Mediterranean notes, providing a new dimension to the original profile.

Texture modifications can be achieved through bread choices, opting for thicker, rustic breads ensures hearty crunch, while sourdough contributes a tanginess that pairs well with seafood.

In terms of presentation, consider open-faced alternatives, showcasing melted cheese and shrimp toppings for visual appeal. Garnishing with fresh herbs and a sprinkling of paprika or grated Parmesan creates a dish worthy of its gourmet description.

Serving and Presentation Guide


When it comes to serving, focus on plating attention to detail. Create a contrast with a dark-colored plate to highlight the golden bread and oozing cheese. Slice diagonally for visual interest, revealing the flavorful filling, and serve with a side salad for balance.

Garnishing can enhance the appearance and flavor. Consider using chopped chives, dill, or parsley for a fresh, green touch, or sprinkle a little grated Parmesan for extra indulgence. A squeeze of lemon just before serving can add brightness.

Traditionally, these sandwiches could be accompanied by a classic tomato soup, providing a well-rounded meal with hot, savory notes complementing the buttery cheese bread. For modern serving suggestions, consider pairing them with roasted vegetables or crispy potato wedges.

Maintain the sandwiches at optimal temperature by serving them promptly. Ensure ingredients are evenly distributed to avoid cold spots. Portion control involves adjusting slices depending on whether these are appetizers or main courses, offering two to four portions each.

Wine and Beverage Pairing


Pairing beverages with our Cheesy Garlic Bread Shrimp Grilled Cheese requires considering its rich creamy nature. A crisp white wine, like Pinot Grigio or Sauvignon Blanc, complements the seafood and garlic without overpowering.

Non-alcoholic alternatives can include a rosemary-infused lemonade for freshness or a sparkling water with a slice of lemon to cleanse the palate between bites. Offer sparkling apple cider for those seeking a non-alcoholic bubbly treat.

In terms of coffee or tea, if preferring these, herbal teas, especially ones with citrus or mint, can provide the right contrast without overshadowing the main feature of the meal.

Temperature considerations revolve around keeping the beverages cool and refreshing to act as a perfect counterbalance to the warm, rich flavors of the sandwich. Serve wines and ciders slightly chilled, matching the cozy warmth of the cheese.

Presentation of beverages can reflect the casual yet chic style of the main dish. Use simple glassware for wines and large mugs for tea or coffee, creating an inviting homely ambiance.

Storage and Shelf Life


Once the Cheesy Garlic Bread Shrimp Grilled Cheese is prepared, it is best enjoyed fresh. However, considerations for storage can extend shelf life. Wrap sandwiches in aluminum foil and store in airtight containers in the refrigerator for up to 2 days.

Consider keeping individual components separate if making beyond immediate consumption, helping maintain ingredient integrity. For instance, cook shrimp and prepare bread separately, assembling right before consumption to preserve texture distinction.

Look for signs of spoilage such as a mushy texture or unpleasant odor, especially from the shrimp. Consume cooked sandwiches quickly to avoid deterioration in quality. When reheating, use an oven or toaster oven at a low temperature to rewarm without making the bread soggy.

If you wish to freeze, assemble sandwiches and cover them in plastic wrap before freezing for up to a month. Defrost in the refrigerator before reheating using the methods mentioned above, to maintain a crisp exterior and melty interior.

Make Ahead Strategies


Advance preparation is possible; start by gathering and chopping ingredients like garlic and cheese, which can be stored in sealed containers until needed. Pre-cooking the shrimp ahead of time can save significant minutes when you’re ready to assemble and cook your sandwich.

Consider marinating shrimp in garlic and seasoning for enhanced flavors, storing them in the refrigerator overnight. As far as bread, pre-butter slices and keep in protective wrapping to streamline the assembly process.

Quality might slightly vary if cooked ahead of time; aim to assemble just before cooking for optimal taste. Assembly tips include ensuring an even cheese distribution and tightly enclosing the shrimp to avoid mess during the grill phase.

Reheating can be done in a pan or oven; cover slightly if using an oven to prevent over-drying. Enhance freshness with additional cheese or a spritz of lemon post-reheating to reinvigorate flavors.

Maintain a fresh element by garnishing with freshly chopped herbs at the serving stage, allowing for a burst of flavor and color contrast.

Scaling Instructions


To scale this recipe, it’s essential to modify quantities proportionally. For halving, simply halve all ingredient measures but retain cooking times; this preparation adjustment will not require significant shifts in instructions or ingredient handling, allowing easier management for smaller portions.

Doubling requires strategic planning. Ensure you have ample cooking surface and preparation space to accommodate larger quantities simultaneously. Timing modifications are minimal; slightly increased cooking times may be needed due to pan or oven capacity adjustments.

Equipment adjustments can involve using larger skillets or pans; consider baking in the oven using a baking sheet if stove space becomes constrained. Distribute sandwiches evenly to ensure consistent cooking.

Storage considerations will involve planning with additional space for storing prepped ingredients and cooked batches. Proper containment and layering in storage containers keep ingredients crisp and fresh for subsequent use.

Nutritional Deep Dive


The Cheesy Garlic Bread Shrimp Grilled Cheese offers a thoughtful blend of macros, combining carbs from the bread, protein from shrimp, and fat from cheese, providing an efficient energy source. This balance helps sustain hunger from meal times.

Micronutrient analysis reveals shrimp as a rich source of Vitamin B12 and selenium, among other nutrients. Incorporating varied cheeses introduces calcium, Vitamin D, and essential fatty acids supporting bone health and brain function.

Health benefits can be derived from the inclusion of seafood; omega-3 fatty acids promote heart health. Garlic’s potential anti-inflammatory properties further add to the dish’s appeal as a nutritious comfort food choice.

Dietary considerations can be adjusted by opting for healthier bread variants, reduced-fat cheese, or plant-based cheese alternatives, customizing for specific dietary needs while maintaining the dish’s essence.

Portion analysis ensures logical consumption; consumed per sandwich with accompanying vegetables or a side provides a balanced meal. Weight management is aided by conscious choices or modifications favoring reduced cheese or light butter spreads.

Dietary Adaptations


For those requiring gluten-free adaptations, select a gluten-free bread option that holds up well against grilling. Options like rice flour-based or multi-grain gluten-free alternatives offer both texture and nutritional diversity.

Dairy-free variations achieve comparable results by substituting traditional cheese with dairy-free or vegan cheeses that melt well. These cheeses are often coconut oil or almond-based, allowing similar textures seen in traditional offerings.

Going vegan implies additional adaptations; replace dairy cheese with vegan cheese and shrimp with plant-based protein like tempeh or crispy tofu for a filling alternative, ensuring flavor is maintained through seasoning.

For low-carb or keto preferences, swap bread for low-carb alternatives or utilize portobello mushrooms as the “bread” providing a unique earthy taste. Adjust cheese accordingly to include higher-fat, lower-carb cheeses.

A paleo-friendly version excludes grains entirely, relying on almond flour-based bread to maintain compliant grains, with similar cheese adaptions bridging the gap needed for a thoroughly satisfying meal.

Low-FODMAP considerations mean swapping garlic for garlic-infused oil, allowing the aromatic benefit without gastrointestinal triggers, while customizing cheese selection to suit personal tolerance levels creates an equally delicious sandwich.

Troubleshooting Guide


When texture concerns arise, consider bread choice and cooking times. For overly soggy bread, moderate cheese quantities and maintain dry shrimp. Visually monitor bread during cooking to ensure crisp results without burning.

Flavor balance can shift with wrong cheese choices; experiment with different flavors until desired balance is met. Opt for cheeses that provide the desired level of creaminess and saltiness, adjusting other ingredients accordingly.

Temperature inconsistencies lead to sub-optimal cooking; preheat skillets before placing sandwiches, maintaining a medium, steady temperature to ensure even cooking throughout without burnt edges.

Equipment challenges may arise with inadequate pan size; for multiple portions, consider batch preparation or utilize oven grill settings to maintain quality across servings. Use appropriate spatulas without risk of sandwich dismantling.

Ingredient substitutions, like swapping prawns for shrimp or tofu for cheese, require adapting cooking times and methodology. Observe during transition to optimize outcome and taste retention.

Timing concerns should observe pre-prep strategies to streamline assembly, enhancing efficiency without compromising sandwich quality standards, especially important for larger gatherings or quick preparation needs.

Recipe Success Stories


In our community, this recipe has sparked creativity and rave reviews. From home chefs to culinary enthusiasts, feedback centers on the harmonious blend of flavors and the satisfying texture profile.

Notable successes include adaptations where readers utilized local seafood for additional flare, such as crab or lobster fillings, resulting in regionally inspired variations that maintain authenticity and innovation.

Adapting reader stories where additions like pesto or roasted peppers elevated taste encourage exploration, creating the opportunity for personal tailoring. Photography tips shared by users emphasize showcasing vibrant color contrasts of the finished dish.

A particularly popular photography tip involves capturing the moment of slicing, revealing melting cheese and shrimp, effectively highlighting the sensory appeal that defines this sandwich.

Readers enjoyed the option to present open-face or stacked sliders for entertaining, aligning portion sizes and creativity with occasion demands, showcasing the recipe’s versatility in style and delivery.

Frequently Asked Questions

Can I use frozen shrimp for this recipe?

Yes, frozen shrimp can be used; thaw completely and pat dry to remove excess moisture before cooking. This ensures the shrimp cooks evenly and retains a nice texture.

What cheese works best for melting?

Mozzarella and cheddar are wonderful melting cheeses that provide both flavor and texture. Feel free to mix these with a touch of parmesan for added richness.

How do I prevent the bread from becoming soggy?

Ensure shrimp is properly dried and avoid excess sauce; use fresh, slightly stale, or thicker cuts of bread for best results. Toasting bread lightly before assembly helps too.

Is there a way to reduce calories in this recipe?

You can minimize butter usage, opt for reduced-fat cheese, and select a lighter bread. Turkey or chicken can replace shrimp for a lower-calorie protein.

Can this recipe be made vegan?

Absolutely, replace cheese with vegan alternatives and use marinated tofu or seasoned jackfruit instead of shrimp. Taste and nutrient adjustments are easy to achieve.

What’s the best bread to use?

Rustic bread like sourdough or multigrain works well with its stronger structure, ensuring that it stays crisp and holds up to the filling’s weight.

What alternative cooking methods can I use?

An oven or toaster oven can effectively cook these sandwiches using a baking sheet. Lightly oil the sheet for optimal results at medium-high heat.

Is it possible to make it ahead for a party?

Prepare ingredients in advance but compile and grill prior to serving. Keep warm at low temperatures in the oven if necessary without diminishing texture.

Can gluten-free bread be used?

Yes, gluten-free bread is a good substitution. Opt for higher-quality brands to ensure it withstands grilling without becoming crumbly or too dense.

Is additional seasoning needed?

Consider taste preferences; basic salt, pepper, and nutritional yeast Seasoning enhance flavor depth without overpowering the shrimp’s natural taste.

Can you use other seafood?

Crab, lobster, or scallops can substitute shrimp. Adjust cooking times to accommodate these variations while maintaining the sandwich’s balance of flavors.

What’s the key to achieving crispy bread?

Employ medium heat with even pressure from a spatula, take care not to overload ingredients, and use butter or oil to enhance crust qualities.

Additional Resources


For those eager to explore beyond this recipe, consider diving into related cheese-focused recipes for inspiration or experimenting with garlic shrimp pasta for a complementary meal alternative.

Comprehensive technique guides provide assistance on perfecting cheese melting or achieving diverse bread crispness finishes, supported by ingredient information illustrating optimal shrimp selection virtues.

Look into equipment recommendations, ensuring all necessary kitchen tools are available to achieve satisfactory results consistently. Learn more about seasonal variations, focusing around seafood and grilled cheese trends.

Insightful blogs and community forums offer varied perspectives, allowing exploration and sharing within cooking networks, enhancing future endeavors through collaborative exchanges of ideas and experiences.

Join the Conversation


Share and connect with a vibrant culinary community eager to discuss adaptations and enhancements of the Cheesy Garlic Bread Shrimp Grilled Cheese. Engage through social media platforms by sharing photos, tips, and personal takes with hashtags capturing the creativity behind home culinary art.

Photography tips can elevate the visual storytelling of finished dishes, allowing the beauty and appeal to shine through in captured moments of enjoyment and sharing. Encourage recipe reviews, fostering an environment valuing feedback and suggestions for improvement.

Engage with community engagement opportunities by participating in discussions, offering support, and embracing amateur cooks striving for similar outcomes. Encourage creativity, as variations of this recipe open pathways for distinct culinary expressions, enriching both individual portfolios and collective knowledge bases.

Irresistible Southern Pecan Pralines Recipe for Sweet Lovers Everywhere

Perfect Southern Pecan Pralines: A Sweet Delight for Every Occasion

⚖️
Difficulty
Easy

⏲️
Prep Time
10 mins

🕒
Cook Time
15 mins

⏱️
Total Time
25 mins

🍽️
Servings
24 pralines

The Perfect Southern Pecan Pralines are a decadent treat that brings the sweet flavors of the Southern United States right to your kitchen. These pralines are rich in flavor, carrying notes of caramel and buttery goodness, beautifully complemented by the nutty crunch of pecans. Whether you’re nostalgic for a childhood treat or seeking a new dessert recipe to impress guests, these pralines offer a heavenly experience with every bite.

Rich in tradition, Southern Pecan Pralines are crafted with simple yet flavorful ingredients, such as fresh cream, butter, and sugar, combined into a silky, chewy candy that is hard to resist. Their aroma wafts through the kitchen, making it hard to wait until they cool. Each batch delivers a delightful blend of textures, perfectly capturing the essence of Southern hospitality.

A staple for festive occasions or simple family gatherings, these pecan pralines are a must-try. With their rich history and delectable flavor profile, they connect modern times with culinary traditions. In this post, we’ll delve into what makes these pralines so special, explore their cultural significance, and share tips for launching your candy-making journey.

Quick Recipe Highlights

  • Flavor Profile: A luscious blend of caramelized sugar, creamy butter, and the nutty taste of pecans, providing a warm and indulgent flavor.
  • Texture: Smooth and creamy with a slight chew from the caramelized candy, balanced by the crunchy texture of the whole pecans.
  • Aroma: Rich and buttery with hints of vanilla and toasted pecans, these pralines fill the room with a comforting sweet scent.
  • Visual Appeal: Golden brown with a glossy finish and studded with pecans, these pralines are as enticing on the eyes as they are on the taste buds.
  • Skill Level Needed: Easy enough for beginners, with straightforward steps and simple ingredients.
  • Special Equipment: A heavy-bottomed saucepan and a candy thermometer are essential tools for ensuring perfect consistency every time.

Recipe Overview

  • Difficulty Level: The simplicity of this recipe lies in the stir and pour method. This makes it an excellent choice for beginners and seasoned cooks alike.
  • Category: Sweet treats or confections, perfect for desserts and candy jars.
  • Cuisine: Deeply rooted in the Southern culinary tradition, capturing the essence of classic American sweets.
  • Cost: The ingredients aren’t expensive, making it a cost-effective way to create a luxury treat at home.
  • Season: Ideal for any season, but they are a festive favorite for holidays and gatherings.
  • Occasion: These pralines are perfect for holidays, gifting, or an anytime indulgence.

Why You’ll Love This Recipe


The taste and texture of Southern Pecan Pralines are simply captivating. The combination of melted butter and caramelized sugar yields a divine sweetness, with pecans adding a rich, nutty layer that enriches every bite. The melt-in-your-mouth consistency of these pralines makes it hard to stop at just one.

In terms of convenience, the praline recipe requires minimal ingredients and can be whipped up quickly. With a short prep and cooking time, these sweet delights are an easy addition to any dessert table or gift basket. The simplicity of the process belies the impressiveness of the result.

Southern Pecan Pralines offer a few nutritional perks as well. While they are certainly a treat, pecans bring a load of healthy fats and a slight dietary fiber boost, making these candies a relatively better indulgence compared to other sweet options.

Aside from the taste, Southern Pecan Pralines are a fantastic choice for social gatherings and events. Their appealing texture and rich aromas often spark conversations and can be a hit when shared during festivities and family meals. The nostalgia they evoke makes them universally adored, bridging generational gaps with flavor.

Economically, pralines are a winning choice. The main components like sugar, butter, and pecans are affordable and easy to find, while the impressive result they deliver feels like a high-end treat. You’ll delight guests without breaking the bank, whether for a party favor or a simple homemade gift.

Historical Background and Cultural Significance


The origin of Pecan Pralines can be traced back to the French colony of Louisiana in the 18th century, where settlers combined Old World recipes with local ingredients. The word “praline” itself comes from the French cook, Marshal du Plessis-Praslin. The adaptation of this sweet treat in the Southern states led to the inclusion of pecans, a native nut, which has become synonymous with this confection.

Culturally, Southern Pecan Pralines serve as a symbol of the warm hospitality and rich culinary traditions of the South. Often associated with sumptuous Southern feasts, they are a mainstay in celebrations and come as a testament to the region’s bountiful culinary creativity.

Over time, pralines have evolved from being a luxury candy for the elite to an everyday treat, accessible and beloved by many. The introduction of pecans into the recipe not only localizes it within Southern culture but adds a flavor that is now inseparable from the praline identity.

Regional variations of pralines include different nuts or additional flavorings. Some areas incorporate chocolate or rum to create unique versions while maintaining the core identity of pralines. Whether in New Orleans or Georgia, these candies possess a universal appeal.

Ingredient Deep Dive


Pecans: Pecans are a beloved ingredient in Southern cuisine, celebrated both for their rich history and nutritional benefits. Originating from Native American tribes, pecans were integral to their diet and trading. They are high in monounsaturated fats, which are heart-friendly, and contain antioxidants that help promote overall health. To select the best pecans, look for ones that have a uniform size and a rich golden-brown color. Ensure they are stored in a cool, dry place to maintain freshness, or refrigerate them to prolong shelf life. If necessary, pecans can be substituted with walnuts or almonds, offering a different nuanced taste.

Butter: Butter is a staple ingredient in both cooking and baking, known for imparting richness and flavor. Originating from the dairying traditions of ancient pastoral communities, it’s incredibly versatile. Butter is an excellent source of Vitamin A and other fat-soluble vitamins. When selecting butter, opt for unsalted options to adjust seasoning as needed, and ensure it’s stored in a sealed container in the refrigerator. For a healthier alternative, coconut oil or vegan butter can be substituted without sacrificing much flavor.

Common Mistakes to Avoid

  • Not using a candy thermometer: Achieving the right temperature is crucial. Without precise measurement, you risk the pralines being either too soft or too hard.
  • Overcooking the mixture: This can lead to the pralines becoming grainy. Remove from heat as soon as the correct temperature is reached.
  • Incorrect stirring technique: Stirring too fast after adding pecans can cause unwanted crystallization. Maintain a gentle pace.
  • Skipping the cool-down phase: Letting pralines cool undisturbed ensures a perfect set and texture.
  • Using old pecans: Stale nuts can significantly compromise flavor and texture, so ensure freshness.
  • Inadequate saucepan size: The mixture needs room to expand as it heats. Choose a pan big enough to avoid overflow.
  • Inconsistent ingredient temperature: Allow ingredients to come to room temperature for even cooking.
  • Not preparing the work surface: Pralines need a non-stick or parchment-lined surface for setting.

Essential Techniques


Achieving the perfect consistency is crucial when making pecan pralines. The key lies in cooking the mixture to the right temperature. A candy thermometer becomes indispensable in this process to ensure the mixture reaches the perfect 240°F (soft-ball stage), which guarantees the candy sets properly. Stirring is another essential technique; gentle and even stirring prevents the formation of sugar crystals, ensuring that the pralines remain smooth and creamy when set.

Pro Tips for Perfect Southern Pecan Pralines


Ensure all ingredients are measured and prepped before starting to maintain pace, especially since praline-making is a fast process. Use a heavy-bottomed saucepan for even heat distribution and to prevent the sugar from burning. Adding a teaspoon of lemon juice can prevent crystallization and help maintain a smooth, creamy praline texture. When cooling, ensure that pralines have enough space to lay flat and set properly.

For a sophisticated twist, consider adding a pinch of sea salt or a splash of bourbon to enhance the praline’s flavor profile. If you’re looking for a creamier praline, consider reducing the sugar content slightly while incorporating a little more cream to balance flavor and consistency.

Variations and Adaptations


Southern Pecan Pralines are open to endless variations. Incorporate regional flavors by adding cayenne pepper for a spiced praline or dipping half of a praline in chocolate for a rich, dessert-style candy. For a seasonal touch, add pumpkin spice in the fall, or zest of citrus fruits in the summer.

Dietary adaptations can be achieved with relative ease; use a dairy-free butter and plant-based cream for a vegan-friendly praline, or substitute the sugar with a low-glycemic alternative for a diabetic-friendly version. For a unique twist, fold in dried cranberries or raisins to add a chewy texture variation and a different flavor profile.

Serving and Presentation Guide


The visual appeal of pecan pralines is as delightful as their taste. When serving, consider arranging pralines on a decorative platter with parchment paper separating layers if stacking. To elevate their presentation, drizzle white chocolate over each praline or sprinkle them with finely chopped pecans. Traditional accompaniments might include a warm cup of coffee or tea, while more modern presentations could incorporate assorted seasonal fruits or a selection of cheeses for a contrast in flavors and texture.

Wine and Beverage Pairing


Consider pairing Southern Pecan Pralines with a rich dessert wine such as a Sauternes or a high-quality port, which complement the sweet, nutty flavors beautifully. If you prefer non-alcoholic options, chai tea or a creamy hot chocolate can enhance the pralines’ flavors without overpowering them. Ensure both the wine and non-alcoholic pairings are served at their appropriate temperatures: chilled for the wine and steaming for hot beverages, to fully enjoy the flavor profiles.

Storage and Shelf Life


Store your pecan pralines in an airtight container at room temperature, away from direct sunlight to prevent melting or discoloration. When properly stored, pralines can last for up to a week without significant loss of flavor or texture. To extend their shelf life, you can refrigerate them, although allowing them to return to room temperature before serving is ideal to restore their intended consistency. Avoid freezing pralines as the process can cause undesirable texture changes upon thawing.

Make Ahead Strategies


For optimal convenience, prepare pralines a day in advance of a planned event. The set candies benefit from a full cooling period, enhancing their texture and flavor profile. Keep the pralines separated with parchment paper in an airtight container to prevent sticking or merging. Rewarming isn’t necessary as pralines are best enjoyed at room temperature, but if desired, a brief stay in a warm area can soften them slightly.

Scaling Instructions


Scaling the recipe is straightforward. When doubling or tripling, make sure to use a larger saucepan to prevent overflow. Adjust cooking time slightly as larger batches take longer to reach the required temperature. It’s also prudent to make larger batches in succession rather than all at once to maintain quality and consistency. Store the extra pralines properly sealed to avoid humidity exposure or loss of flavor.

Nutritional Deep Dive


Pecan pralines primarily consist of sugar and fats, with a small protein contribution from the pecans. While they’re an indulgent treat, pecans themselves are known to contain vital nutrients including copper, manganese, vitamin E, and healthy fats that benefit cardiovascular health. With moderation, pralines can be enjoyed as part of a balanced diet. Consider serving smaller portions to manage sugar intake while still indulging in their deliciousness.

Dietary Adaptations


The pecan praline recipe can accommodate various dietary needs without sacrificing much flavor or quality. A gluten-free version is inherently a given, as the traditional recipe contains no wheat products. For a dairy-free or vegan alternative, substitute coconut cream and vegan butter to maintain a lush, creamy texture. To create a lower-carb option, utilize a sugar alternative like erythritol or monk fruit sweetener, keeping in mind textural differences upon setting.

Troubleshooting Guide


If your pralines turn out grainy, ensure that the sugar has been completely dissolved before reaching high temperatures and avoid stirring too vigorously after adding pecans. Sticky praline issues often arise from undercooking or excess humidity during setting; try reheating to the correct temperature and setting again on a cool day. If the mixture doesn’t set, check the accuracy of your thermometer and ensure it reads accurately at other crucial cooking stages.

Recipe Success Stories


Readers have shared commendable success with homemade Southern Pecan Pralines, with feedback highlighting the memorable simplicity and rewarding flavors. Some enthusiasts have taken it further, adding cinnamon or zest for a personal touch, with remarkable results well-received at gatherings. Others suggest deviations such as pressing pralines into small silicone molds for a uniform finish or sandwiching between chocolate-dipped biscuits, creatively expanding their use beyond the candy dish.

Frequently Asked Questions

What is the key to achieving the right praline texture?
The key lies in reaching the exact temperature of 240°F and allowing sufficient cooling time on a non-stick surface for proper setting.

Can I use a different nut if I’m allergic to pecans?
Absolutely! Potential alternatives include walnuts or almonds, though these will alter the traditional flavor profile slightly.

How long will these pralines stay fresh?
Stored in an airtight container, pralines remain fresh for up to a week. Refrigeration can extend this period slightly.

What happens if my pralines don’t harden?
Try reheating the mixture to the correct temperature; improper cooling or under-heating often results in soft pralines.

Is it possible to make these without a candy thermometer?
While possible, it’s challenging to achieve the perfect texture without accurately gauging the temperature, crucial for praline success.

Can you freeze pralines for longer storage?
Freezing is not recommended, as it affects the texture adversely, leading to potential stickiness or crystallization upon thawing.

Are there healthier sugar alternatives for pralines?
Erythritol or monk fruit sweetener can be used, though they may influence setting properties and the final texture.

What should I do if my mixture starts to crystallize?
Adding a few drops of lemon juice can help prevent crystallization by disrupting sugar structure formation.

Can pralines be shipped or gifted?
Yes, they make excellent gifts. When packaged securely in wax paper or cellophane bags, they travel well.

Are pralines suitable for a low-carb diet?
Traditional pralines are high in sugar; however, using alternative sweeteners can mitigate carb load.

Additional Resources


Explore related recipes such as caramel fudge or pecan butter cookies to further enhance your culinary repertoire. Delve into our technique guide for mastering candy-making at home, with tips on achieving perfect texture every time. For an extensive understanding of the key ingredients, read our in-depth article on selecting and storing nuts and natural sweeteners.

Join the Conversation


Share your praline creations and connect with a community of fellow enthusiasts! Engage with us on social media by posting your variations and decoration ideas using the hashtag #PecanPralinePerfect. We encourage recipe reviews and feedback to help refine flavors and techniques. Discover tips from top food photographers to showcase your sweet success with sleek dessert images.

The Recipe

Perfect Southern Pecan Pralines

Serves: 24 pralines

Prep Time: 10 mins

Cook Time: 15 mins

Total Time: 25 mins

Kitchen Equipment Needed

  • Heavy-bottomed saucepan
  • Candy thermometer
  • Wooden spoon
  • Baking sheet lined with parchment

Ingredients

  • 1 cup granulated sugar
  • 1 cup packed light brown sugar
  • 1/2 cup evaporated milk
  • 1/2 cup unsalted butter
  • 2 cups pecan halves
  • 1 tsp vanilla extract

Directions

  1. In a heavy-bottomed saucepan over medium heat, combine granulated sugar, brown sugar, evaporated milk, and butter.
  2. Stir constantly with a wooden spoon until the mixture reaches a rolling boil.
  3. Attach the candy thermometer to the pan and continue to boil without stirring until the mixture reaches 240°F.
  4. Remove from heat and stir in pecans and vanilla extract. Continue stirring until the mixture thickens and becomes creamy.
  5. Drop heaping spoonfuls of the mixture onto the prepared baking sheet. Allow pralines to cool and set completely.

Recipe Notes

  • For added flavor, consider adding a pinch of sea salt or a splash of bourbon when stirring in pecans.