Decadent Maple Salted Caramel Banana Bread Recipe for Sweet Lovers

Maple Salted Caramel Banana Bread: A Decadent Twist on Classic Comfort

⚖️
Difficulty
Moderate

⏲️
Prep Time
15 mins

🕒
Cook Time
60 mins

⏱️
Total Time
75 mins

🍽️
Servings
8

Get ready to indulge in a slice of heaven with our Maple Salted Caramel Banana Bread. This delightful twist on the classic banana bread combines the rich flavors of maple syrup and salted caramel, creating a perfect balance of sweetness and savory. Imagine the comforting aroma filling your kitchen as this bread bakes to golden perfection. If you are a fan of banana bread, this elevated version will surely become a favorite in your recipe collection.

Using ripe bananas enhances the natural sweetness, while the salted caramel swirls add a luscious texture. The maple syrup not only adds depth to the flavor profile but also provides a caramel-like sweetness that perfectly complements the bananas. With each bite, you’ll experience the soft, moist crumb intermingled with bursts of gooey caramel—a true treat for the senses. Whether served warm with a dollop of butter or enjoyed on its own, this banana bread is guaranteed to impress your family and friends.

Quick Recipe Highlights

  • Flavor Profile: The marriage of maple syrup and salted caramel introduces a sweet-savory finish, enhancing the traditional banana bread.
  • Texture: This banana bread is moist and tender with pockets of gooey salted caramel, offering a delightful contrast to the soft crumb.
  • Aroma: While baking, it emits a cozy aroma of caramelized sugar and ripe bananas, ideal for a warming atmosphere.
  • Visual Appeal: Its golden crust punctuated with streaks of caramel creates a rustic yet elegant presentation.
  • Skill Level Needed: The recipe requires intermediate baking skills to master the swirling technique for the caramel.
  • Special Equipment: A quality loaf pan and mixing bowls are essential for ensuring even, consistent baking.

Recipe Overview

  • Difficulty Level: Despite being slightly more complex than basic banana bread, the steps are straightforward, making it manageable for most home bakers.
  • Category: This dish fits perfectly into dessert or breakfast categories, enjoyed at any time of day.
  • Cuisine: The recipe takes inspiration from American comfort baking while incorporating modern culinary trends with the addition of salted caramel.
  • Cost: Moderate; common ingredients such as bananas and flour keep costs low, while quality maple syrup may slightly increase expenses.
  • Season: Best in the fall when caramel flavors align with cooler weather cravings, but delightful year-round.
  • Occasion: Perfect for brunches, holiday gatherings, or as an afternoon treat with tea or coffee.

Why You’ll Love This Recipe

Our Maple Salted Caramel Banana Bread is a delightful harmony of taste and texture. Sweet, ripe bananas meld with the rich, buttery flavors of maple syrup and salted caramel. This fusion creates a moist crumb with pockets of gooey, sweet-savory caramel that melts in your mouth. Each bite is an experience of textures, from the soft bread base to the unique burst of sticky caramel. It’s a decadent twist, adding an exciting dimension to classic banana bread, making it hard to resist.

Convenience is key in this recipe. Using simple, easily available ingredients, the recipe ensures you can whip this up without much hassle. Bananas, a pantry staple, prove versatile, turning slightly overripe fruits into this indulgent loaf. The preparation and cooking require minimal fuss, aligning perfectly with busy lifestyles while still delivering an impressive dish. It’s a straightforward process, allowing bakers of all skill levels to achieve bakery-quality results at home with ease.

Nutritionally, this bread integrates the benefits of bananas, rich in potassium and vitamins, by transforming them into a comforting baked good. The use of pure maple syrup instead of processed sugars offers a natural sweetness, and by choosing whole-grain flour, you add an element of fiber to the treat. Each slice is a testament that indulgence doesn’t have to forego nutritional consciousness. This bread satisfies cravings while offering nutritional positives that can align with an overall balanced diet.

This banana bread is not just about personal enjoyment; it’s an excellent social treat. Share it with family and friends during gatherings, afternoon teas, or potlucks, where it’s bound to be a conversation starter. The enticing aroma that fills your kitchen when baking is an inviting lure for guests. Serving it warm, perhaps with a scoop of ice cream beside, elevates any social occasion into an exceptional experience, making memorable impressions.

Cost-effectiveness is another highlighted advantage. Using fundamental ingredients such as bananas and pantry staples keeps the overall expense low. When you choose to invest in high-quality maple syrup and caramel, you elevate the dish without substantially increasing costs. It’s a budget-friendly way to enjoy a gourmet-tasting dessert, allowing you to impress loved ones with minimal financial strain, ensuring delicious bakes fit into any culinary budget.

Historical Background and Cultural Significance

The history of banana bread intertwines deeply with the economic challenges of the Great Depression in the United States. Housewives, faced with the necessity to minimize waste, ingeniously started using overripe bananas in their baking recipes. This bread soon became a staple, cherished for its sweet flavor and practical use of otherwise discarded fruit. Combining pantry staples, it offered a sense of comfort and home, becoming synonymous with warmth and economic resourcefulness.

Banana bread has evolved significantly from its humble origins. With its cultural significance in modern baking, countless adaptations have surfaced over the years, including our sophisticated version of maple salted caramel. Blending classic and contemporary flavors, this recipe showcases the possibilities in transforming traditional breads into gourmet creations. Adding caramel and maple modernizes the traditional flavor profile, reflecting current culinary trends that focus on indulgent and complex taste combinations.

The introduction of salted caramel in baking rose to prominence in the early 2000s, quickly becoming a popular element in desserts across the globe. This trend adds a modern twist to banana bread by introducing a balance between sweet and salty flavors. By combining it with maple syrup, a staple of North American cuisine, the recipe embraces both nostalgia and innovation. The salted caramel elevates the classic flavors, bringing a nuanced taste to this beloved bakery item.

Regional variations of banana bread flourish worldwide, showcasing local culinary traditions. In the tropics, it often includes coconut or tropical nuts, while other adaptations might feature chocolate chips or spices like cinnamon. Each variation speaks to regional palates and available ingredients. The maple salted caramel version draws influence from Canadian and French baking, where sweet-savory profiles are admired, resulting in a blend of classic North American flavor with a European touch.

Ingredient Deep Dive

Bananas are quintessential in banana bread, revered for their natural sweetness and ability to provide moisture. Culturally, bananas are significant in tropical regions where they have been cultivated for centuries, symbolizing fertility and prosperity in various cultures. Rich in potassium and vitamin B6, bananas not only contribute flavor but also nutritional benefits, supporting heart health and energy levels. For baking, select bananas that are heavily speckled or brown—a sign of ripeness and inherent sweetness. Store them in a cool, dry place, and if overly ripe, freeze for future use. For substitutions, applesauce can be used to replace mashed bananas.

Maple syrup is a treasured sweetener, deeply rooted in North American tradition, particularly in Canada, where its production is an annual spring ritual. Its distinct, robust flavor enriches recipes, providing a caramelized sweetness. Nutritionally, it’s a source of zinc and antioxidants. When selecting, opt for pure maple syrup rather than the artificial kind, to ensure quality flavor. Store unopened syrup in a cool pantry, and once opened, refrigerate to preserve freshness. If necessary, honey can be substituted, although it will alter the flavor profile slightly.

Salted caramel, a contemporary flavor sensation, balances sweet and savory, enhancing the depth of desserts. It adds a luxurious touch to recipes. Nutritionally, caramel is calorie-dense, contributing primarily sugar, but it’s the flavor that often takes precedence in indulgence. For homemade versions, slowly heat sugar until caramelized, adding a touch of salt at the end for balance. Store in airtight containers at room temperature or in the fridge for longer periods. While making salted caramel could be replaced with a dulce de leche, it might not offer the same level of savory contrast.

Common Mistakes to Avoid

  • Overmixing the batter: This can result in dense, tough banana bread. Mix just until ingredients are incorporated to maintain softness.
  • Using unripe bananas: Unripe bananas lack the sweetness and moisture of ripe ones. Always ensure bananas are overripe for optimal flavor and texture.
  • Neglecting to check oven temperature: Adjust the oven to the correct temperature to avoid over or under-baking, resulting in uneven texture.
  • Ignoring caramel swirl distribution: Make sure caramel is evenly swirled to avoid clumps and ensure consistent flavor throughout.
  • Rushing the cooling process: Allow the loaf to cool completely on a wire rack, preventing it from becoming soggy or crumbly.
  • Substituting key ingredients unwisely: Changes in main ingredients like bananas or caramel can affect the final outcome in texture and taste.
  • Using low-quality maple syrup: Opt for pure maple syrup to ensure depth of flavor and avoid artificial aftertastes.
  • Baking liner placement: Ensure parchment paper or non-stick spray is used to prevent sticking and uneven edges.
  • Incorrect salted caramel preparation: Ensure caramel is perfectly cooked to prevent granulation or burning. Follow the process patiently.
  • Misjudging cook time: Keep a close eye on bake time—the bread should be set but not dry.

Essential Techniques

Perfectly ripe bananas are essential for a rich, sweet result. Look for bananas that are heavily speckled or showing brown spots as an indicator of peak ripeness. This ensures they’re sweet and soft enough for easy mashing and integration into the batter. When mashing, aim for a smooth consistency to evenly distribute moisture and flavor throughout your banana bread, avoiding a lumpy texture in the finished product.

The swirling technique for incorporating salted caramel into the banana bread is key. Use a knife or skewer to create gentle swirls in the batter, ensuring each slice has even distribution of caramel. Be cautious not to over-mix, as you may lose the desired marbling effect. Swirls should be visible and evenly dispersed, creating pockets of gooey caramel in every bite.

Handling and preparing the dough correctly involves not overmixing once the dry ingredients are added. Overmixing can lead to gluten development, resulting in tough or chewy bread. Stir just until the dry ingredients are incorporated for a tender crumb. The batter should remain lumpy and thick, providing a moist and light final loaf.

Baking time and temperature management are critical to achieving the perfect loaf. Preheat the oven properly to maintain consistent temperature and avoid uneven cooking. Use a toothpick to check doneness—inserted into the center, it should come out mostly clean, with just a few moist crumbs clinging. Overbaking will dry out the bread, so precise timing is essential.

Curing the salted caramel is a crucial technique to master. Achieving the right balance of sugar caramelization and salt is essential. Heat sugar gradually to prevent burning, then add salt and allow the caramel to cool slightly before using. It should be smooth and pourable. This process can be tricky but results in a rich, luxurious texture and flavor when executed correctly.

Pro Tips for Perfect Maple Salted Caramel Banana Bread

Allow your banana bread to cool completely before slicing. This cooling period lets the flavors meld together, enhancing the caramel and banana notes for a richer taste. Cooling also helps the bread set, preventing it from crumbling when you slice it. Use a serrated knife for clean cuts and an aesthetically pleasing presentation.

Enhance the flavor profile by toasting walnuts or pecans. Incorporating nuts adds a delightful crunch and complements the sweetness of the bananas and caramel. Toasting nuts before folding them into the batter deepens their flavor and brings aromatic complexity to the loaf.

Opt for dark or amber grade maple syrup for a deeper, more robust flavor. Lighter syrups may not provide enough contrast against the rich banana and caramel tastes. The deeper tones of dark or amber maple syrup create a dynamic taste, enriching every slice with a warm, indulgent sweetness.

If you prefer using homemade salted caramel, make sure to use a high-quality butter and sea salt to create a balanced flavor. Homemade caramel allows you to control the saltiness and texture, leading to a more personal touch in your banana bread. The sea salt enhances flavor without overpowering the sweetness.

It’s advisable to use parchment paper in the loaf pan, allowing the bread to come out easily after baking. Line the pan with parchment, leaving extra paper around the edges for easy lifting. This ensures the loaf maintains its shape and prevents sticking or uneven browning.

Experiment with flavored add-ins like cinnamon or nutmeg to complement the maple and caramel. Just a hint of warming spices can elevate the bread, providing a more aromatic and layered taste experience. Start with small quantities and build up to your desired flavor potency.

Variations and Adaptations

The classic maple salted caramel banana bread can have regional adaptations like adding spices such as nutmeg or cloves, reminiscent of cozy autumn bakes. These spices add depth and warmth, creating a festive twist that’s perfect for holiday gatherings. Additionally, considering local nuts or fruit additions can add distinct flavors aligned with various regional tastes.

Seasonal adaptations make this recipe versatile throughout the year. Incorporate cranberries or apples during autumn months to add a tart contrast and seasonal freshness. In spring and summer, consider adding blueberries or strawberries for bursts of juicy sweetness, complementing the banana’s soft texture and adding vibrancy to your bake.

Dietary modifications for gluten-free or vegan versions are possible. For gluten-free, swap regular flour with almond or coconut flour, adjusting quantities due to different absorption rates. For a vegan take, replace eggs with flaxseed meals or plant-based yogurt. Experimenting and adjusting to maintain texture and flavor is crucial in these adaptations.

Explore flavor variations by infusing the mix with different extracts, such as vanilla or almond, further accentuating the sweet, maple tones. Add chocolate chips or chunks to the batter for a luxurious touch. This addition introduces a richer, indulgent layer, transforming the bread into a decadent dessert option.

Texture modifications such as incorporating shredded coconut give an interesting twist, combining tropical flavors with the classic banana and caramel. The coconut provides a subtle chewiness and sweet aroma, enhancing the overall mouthfeel while maintaining harmony with the primary ingredients.

For presentation alternatives, consider baking the banana bread in muffin tins for individual servings. This approach is perfect for on-the-go snacks or parties, providing a convenient serving size. Garnish muffins or bread slices with a drizzle of extra caramel and a sprinkle of sea salt for a professional finish.

Serving and Presentation Guide

For stunning presentation, consider serving the banana bread on a rustic wooden board or a marble platter to highlight its golden crust against natural textures. Slice evenly to showcase the caramel swirls and moist crumb, enticing onlookers with its visual appeal.

Garnishing ideas include a light dusting of powdered sugar or a drizzle of extra caramel sauce to enhance visual allure and add a hint of sweetness. A sprig of mint atop each slice introduces a fresh splash of color, perfect for gatherings or dessert tables.

Traditional accompaniments like a dollop of whipped cream or a scoop of vanilla ice cream elevate your slice to a full-fledged dessert experience. Pairing with light, floral teas or robust espressos complements the bread’s richness.

For modern serving suggestions, try pairing it with salted butter and rosemary for a savory contrast. The combination of salted butter’s creaminess and rosemary’s aromatic hint provides an innovative flavor experience that surprises and delights.

Serve the banana bread at room temperature for optimum flavor and consistent texture, allowing the caramel and maple notes to fully express themselves. Avoid serving too cold or too hot, which may mask the intended flavor balance.

Consider portion control tips such as slicing slightly smaller pieces for gatherings, allowing guests to sample while still enjoying other offerings. For intimate settings, thicker slices enhance indulgence, letting guests savor the nuanced flavors and textures.

Wine and Beverage Pairing

Pairing the maple salted caramel banana bread with a buttery Chardonnay brings out the bread’s rich, buttery notes. The wine’s full-bodied texture complements the caramel ribbons, creating a harmonious sip and bite experience. The fruity undertones of Chardonnay mimic the banana’s sweetness, achieving a delicate balance.

For non-alcoholic alternatives, select a spiced chai tea that complements the bread’s warm and sweet notes. The spices in chai enhance the depth of the maple and caramel flavors, providing a warming, aromatic beverage pairing that suits either breakfast or dessert settings.

If coffee is a preference, a dark roast with chocolate or nutty notes complements the banana’s natural sweetness and the caramel’s richness. Opt for espresso or fresh-brewed coffee to capture the depth and complexity of the bread, offering a taste synergy with each sip.

When serving beverages with the banana bread, maintain temperature considerations relevant to the selection. Cold drinks enhance refreshment during warm months, while hot drinks offer comfort alongside a cozy slice, perfect for winter indulgence.

Serving suggestions might include preparing a beverage “station” where guests can self-serve slices alongside their drink preference. This flexibility encourages a relaxed environment where personalization is key, letting guests enjoy their pairing of choice.

Storage and Shelf Life

Store the maple salted caramel banana bread under a cake dome or in an airtight container to maintain moisture and flavor. At room temperature, it lasts up to three days, while refrigeration extends its shelf life to about a week. Ensure cool containment to preserve its softness and prevent flavor loss.

For longer storage, freezing is effective. Wrap individual slices in plastic wrap, followed by an aluminum foil layer. Seal them in a zip-top bag, ensuring as much air as possible is removed before sealing. The bread can be stored in the freezer for up to three months.

Watch for signs of spoilage like dryness, mold, or off-odor, especially when stored at room temperature. Proper storage conditions greatly affect the bread’s longevity, ensuring continued freshness and enjoyment. Transition through storage methods (room-to-fridge-to-freezer) according to anticipated use.

To reheat, use an oven set at 350°F. Place slices in foil and warm them for around 10 minutes, achieving fresh-baked warmth without excess dryness. Alternatively, use a toaster oven, ensuring even reheating. Avoid microwaves to preserve texture.

Consider refrigerator storage’s impact, which can result in slight dryness due to temperature fluctuations. The bread retains its best texture when stored airtight, minimizing air exposure. Adding a slice of bread or apple in the container can help retain moisture.

Make Ahead Strategies

When planning to make maple salted caramel banana bread ahead, identify key prep strategies, such as mashing bananas and pre-mixing dry ingredients in advance. These small steps save time and streamline the assembly process on baking day.

Between mixing and baking, the batter can be stored in the fridge for up to 12 hours. This approach is convenient for morning preparations, allowing a quick shift from fridge to oven. Let it sit for a few minutes at room temperature before baking to stabilize.

To assess the impact of prolonged storage, bake half a recipe’s worth to test results. Observing taste and texture after being stored can help optimize future preparations and storage techniques. Adjust rules as necessary to achieve the best pre-baked conditions.

When assembling the final caramel swirl, create it directly before baking to ensure vibrant, even distribution. Preparing the caramel swirl ahead may result in absorption into the batter, reducing visual and taste impact. Add just before it heads to the oven.

For reheating, reintroduce just-baked texture and aroma by wrapping the loaf in aluminum foil, gently warming in a low oven. Baking a fresh caramel glaze for a drizzle can revitalize any loaf that’s been made ahead, adding extra depth and moisture.

Include fresh elements like toasted nuts or extra banana slices just before serving. These additions offer a touch of creativity and freshness, engaging all who partake in the delightful banana bread experience.

Scaling Instructions

When scaling the recipe, precise ingredient doubling or halving is essential to maintain intended texture and flavor. This means proportionally increasing or decreasing ingredients to retain the loaf’s moisture and density. Pay attention particularly to baking powder or baking soda adjustments.

Consider equipment adjustments if doubling or tripling, such as using larger loaf pans or multiple smaller ones. Ensure oven space accommodates the increase, allowing consistent baking across all pans. Consider baking in batches for efficiency and even quality.

Time modifications may be necessary, especially with thicker loaves. Trial runs can provide insight on extra bake time, usually requiring an additional 10-15 minutes when recipes are doubled. Use toothpick tests to ensure successful doneness without overbaking.

When halving, smaller pan sizes can impact baking times, often reducing by around 15 minutes for typical recipes. Maintain a watchful eye on color and firmness as indicators before removing from the oven.

Stay wary of flavor concentration. When scaling, certain flavors like salted caramel may overpower or underwhelm. Adjust caramel intensity as needed—sensitive ingredients should be increased or decreased conservatively to ensure balance.

Consider scaling up storage and preservation strategies to match increased quantities. Extra baked goods can be shared or pre-packaged for longer-term freezing. Adapt storage needs according to the space and purpose, ensuring continued quality and freshness.

Nutritional Deep Dive

The nutritional profile of maple salted caramel banana bread balances indulgence with some wholesome aspects. Important macros include carbohydrates mainly from flour and bananas, moderate proteins, and fats, often varying with additional nuts or buttery caramel.

Micronutrient analysis reveals bananas supply vitamin C and B6, contributing potassium, which benefits heart health. Additional maple syrup offers manganese, a trace mineral aiding metabolism and bone health. This balances the otherwise sugar-laden nutritional footprint.

Health benefits germinate from bananas’ fiber content, aiding digestion, while also delivering energy quickly through its natural sugars. Pairing this with moderate elements, like nuts, provides slivers of healthy fats, supporting longer satiety.

Understanding dietary considerations, this sweet bread is higher on the calorie spectrum due to sugars, warranting mindful consumption within balanced diets. Portioning becomes vital, with three-fourths to one-inch slices as standard-serving suggestions.

For managing portion control, recommended serving sizes on nutritional labels offer insights. Staying within portion guidelines can satisfy cravings and dietary needs while pursuing healthier-choice implications through ingredient subtractions or adjustments.

Providing weight management tips, balance this sweet bread with fiber-rich companion foods or beverages. It pairs well with yogurt or seasonally available fruits, enhancing both taste and nutrition while keeping indulgence balanced with health-centric aims.

Dietary Adaptations

For gluten-free needs, substitute conventional flour with a gluten-free replacement, like almond flour, keeping the texture light and rich. These replacements often require slight measurement changes and potentially added binders like xanthan gum for cohesion.

Dairy-free adaptations for the banana bread are approachable, often needing simple swaps. Use plant-based butter alternatives or coconut oil in the caramel to achieve similar textures, while dairy-free yogurt or milk alternatives can substitute wet ingredients.

To achieve a vegan adaptation, swap eggs for flaxseed or chia seed mixtures—typically one tablespoon seeds mixed with three tablespoons water per egg. Utilize non-dairy milk for batter consistency and try coconut or cane sugar to replace pure maple syrup.

Low-carb modifications might involve using almond flour or coconut flour, often requiring a higher egg ratio for moisture balance. Replacing regular sugar with erythritol or stevia keeps carb content minimized while retaining sweetness.

A keto adaptation would follow similar steps to low-carb, with added focus on high-fat, moderate protein ratios. Ensuring inclusion of coconut oil or butter maintains fat requirements while substituting sugar aligns with keto macros.

For those following paleo diets, utilizing coconut flour or nut flours appeals alongside raw honey or maple syrup for sweetening. This approach upholds paleo’s focus on unprocessed, natural foods, easily enhancing the rich sweetness of the banana bread.

Low-FODMAP consideration for health-focused consumers incorporates unripe bananas, limiting fructose concentration. Adjusting maple syrup and caramel quantities or selecting possible commercial alternatives labeled low-FODMAP can maintain dietary compliance.

Troubleshooting Guide

Address texture issues by ensuring ingredients are measured accurately and that batter isn’t overmixed. An overly dry or dense loaf may arise from too much flour or excessive stirring, trapping air and developing gluten, both detrimental to texture.

To balance flavor, start by carefully measuring ingredients like salt and maple syrup to avoid overpowering the loaf. If bread tastes too flat or salty, next baking session adds ingredients moderately, building flavor profiles deliberately taste-test when in doubt.

Temperature problems impacting cooking are solvable by preheating the oven sufficiently prior to baking. Investing in an oven thermometer offers insurance against misread temperatures, preventing under- or overcooked loaves.

Use appropriate pans for the best equipment challenges. Go for high-quality, non-stick loaf pans paired with parchment to counteract sticking and ensure even cooking cycles—preventative measures every baker should consider.

Ingredient substitutions vary in success—replace key components with tried-and-true alternatives tested through smaller batches to determine proportionate changes. This testing ensures correct absorption and viscosity are aligned with original recipe demands.

Consult timing concerns with observed experiences; focus on consistent total bake cycle through observation, comparing with your original benchmarks. Use visual cues synonymous with the main recipe to understand if adaptations prolong or shorten baking sessions effectively.

Recipe Success Stories

Community feedback has been overwhelmingly positive, with readers praising the delectable combination of maple and salted caramel enveloped in banana bread. Many have expressed delight at how accessible and easy the recipe is while achieving results akin to professional bakery standards.

Innovative variation successes abound, from experimenting with different nuts or incorporating seasonal fruits like raspberries. Readers have shared stories of implementing their unique variations, lending inspiration for others to innovate and explore personalized adjustments without losing structural integrity.

Adaptation stories are common—whether dietary restrictions or ingredient inadequacies warranted creative changes. Successful modifications include gluten-free and vegan iterations that retained the bread’s rich texture and flavor profile, tailored perfectly to individual dietary needs.

Reader suggestions have enhanced the recipe further, sharing unparalleled secrets for the best results. Peeking into these stories has revealed consistent tips on ingredient enhancement, tool selections, baking parameters, or presentation that guarantees ongoing success.

Photography tips emerged coincidentally with tasting summaries. Enraptured by the banana bread’s appearance, readers have captured perfect shots, allowing them to share the recipe’s attraction far beyond just flavor but into visual allure.

Frequently Asked Questions

How can I ensure my bananas are ripe enough?

Look for bananas with a speckled peel pattern, indicating full ripeness. If bananas are not ripe yet, they can be hastened by placing them in a brown paper bag for a day or two.

Why is my banana bread too dense?

Overmixing the batter often leads to a denser loaf. Mix only until the flour is incorporated, keeping the bread light and fluffy. Additionally, ensure baking soda is fresh for proper rise.

Can I use a sugar-free substitute?

Yes, you can replace sugar with healthier alternatives like erythritol or stevia in both the bread and caramel, though it may affect the overall flavor and texture slightly. Adjust to taste preferences.

What should I do if I don’t have maple syrup?

Honey or agave nectar can substitute for maple syrup, though they will introduce different flavor notes. Test in smaller quantities to taste adjust and verify complementary balances.

Can this recipe be turned into muffins?

Absolutely! Just reduce the baking time by about half, checking frequently with a toothpick for doneness. This adaptation creates convenient, personal-sized servings perfect for take-along treats.

How do I store leftover salted caramel?

Store leftover caramel in an airtight container refrigerated for up to two weeks. To reused, gently reheat in a double boiler or microwave before pairing with another dish.

What if I don’t like nuts?

Nuts are optional and can be omitted or replaced with chocolate chips or grated coconut for additional texture without compromising the overall balance. Consider personal tastes and dietary needs.

Why did my caramel swirl sink?

If the caramel swirl sinks, it could indicate overly thin batter or overly dense caramel. Adjust by making sure batter is thick and incorporating caramel gently to help distribute evenly.

How do I get the caramel swirl to look good?

Swirl the caramel using a knife in a figure-eight motion just before baking to achieve an attractive pattern. Ensure it isn’t over-mixed to prevent completely blending into the batter.

Is this bread suitable for freezing?

Yes, it freezes well. Slice and wrap individual portions in plastic wrap and foil or use a freezer-safe bag. Thaw overnight in the fridge and reheat in the oven for optimal freshness.

Why do parts of my bread feel raw?

Uneven heat distribution or incorrect bake time can cause raw spots. Ensure the oven is preheated and use the appropriate pan size to achieve even cooking throughout the loaf.

How can I prevent my bread from sticking to the pan?

Line the loaf pan with parchment paper, leaving edges to lift the bread out easily. Alternatively, use a high-grade non-stick loaf pan or add a light coating of non-stick spray.

Additional Resources

Explore related recipes that complement the flavors of the Maple Salted Caramel Banana Bread, such as traditional banana muffins or a chocolate chip banana loaf, offering variant tastes within the same comfort food family. These provide alternatives for different flavor moods.

Technique guides are available for perfect caramel making, essential for achieving recipes like this. Investigating further into caramel’s science assures consistent and lush textures, never crystallized or burnt, promising delicate and silky outcomes.

Ingredient information resources related to sourcing the best bananas, maple syrup selections, or flour types ensure bakers can make knowledgeable decisions that influence the nuance and success of their banana bread endeavors. Nutritional insights guaranteed extra guidance.

Equipment recommendations discuss optimal pans, mixers, or measuring tools directly suited for baking needs, enhancing process joy and achieving more successful baking. Trusted brands or surprising tips might streamline processes, yielding better results without hassle.

Investigating seasonal variations inform buyers on suitable fruit, nut, or spice additions, allowing adaptability within the banana bread whenever necessity or preference dictates. Seasonal alignment turns homespun baking into experiential, festive opportunities fitting popular cycles.

Join the Conversation

Engage with the community through social media sharing and let others enjoy your Maple Salted Caramel Banana Bread experiences by posting photos and sharing tips with hashtags catered toward baking groups. Encourage others to try their hand at this culinary adventure.

Offer photography tips to those exploring food blogging aspirations—understanding lighting, composition, or color harmony turns even amateur captures into appealing presentations. This encourages not just aesthetically pleasing shots, but also better engagement online.

Use recipe reviews as platforms for improvement advice and feedback, collectively honing the recipe. Reviews can enlighten readers or maintain conversation about choices made, substitute successes, or alternative methods discovered firsthand enhancing communal baking.

Engage with community sharing by offering discussions of recipe best practices, differences encountered, and personal stories that enrich the narrative of successful banana bread adaptation, forming bonds through the joy of shared cooking journeys.

Explore and develop reader-driven variations that could get featured based on exceptional adaptation stories. Sharing these success tales empowers and inspires not just the original creator but a broader community keen on culinary creativity.

The Recipe

Maple Salted Caramel Banana Bread

Serves: 8

Prep Time: 15 mins

Cook Time: 60 mins

Total Time: 75 mins

Kitchen Equipment Needed

  • Loaf pan
  • Mixing bowls
  • Electric mixer
  • Measuring cups and spoons
  • Skewer or knife for swirling caramel

Ingredients

  • 1 ½ cups all-purpose flour
  • 1 teaspoon baking soda
  • ¼ teaspoon salt
  • ¾ cup maple syrup
  • ⅓ cup salted butter, melted
  • 1 teaspoon vanilla extract
  • 2 large eggs
  • 2 cups mashed ripe bananas (about 4 bananas)
  • ½ cup salted caramel sauce, plus extra for drizzling

Directions

  1. Preheat your oven to 350°F (175°C) and line a loaf pan with parchment paper or lightly grease it.
  2. In a bowl, mix the flour, baking soda, and salt. Set aside.
  3. In another large mixing bowl, beat together the maple syrup and butter until smooth. Add vanilla and eggs, mixing well.
  4. Stir in the mashed bananas to the wet mixture until combined.
  5. Gradually add the dry ingredients to the wet ingredients, mixing until just incorporated to avoid overmixing.
  6. Pour half of the batter into the prepared loaf pan and drizzle half of the caramel sauce over it. Use a skewer or knife to gently swirl the caramel.
  7. Add the remaining batter and repeat the caramel drizzle, swirling it into the top layer.
  8. Bake for 60 minutes, or until a skewer inserted into the center comes out mostly clean.
  9. Let the bread cool in the pan for 10 minutes before transferring it to a wire rack to cool completely.
  10. Drizzle with additional caramel sauce before serving if desired.

Recipe Notes

  • For added texture, consider folding in ½ cup of chopped walnuts or pecans.
  • If you prefer less caramel, reduce the quantity to ¼ cup within the batter and keep extra for serving.
  • Adapt the sweetness level by adjusting maple syrup according to your preference.

Irresistible Mexican Street Corn Dip: Elevate Your Appetizer Game

Mexican Street Corn Dip: A Fiesta in Every Bite

⚖️
Difficulty
Easy

⏲️
Prep Time
15 mins

🕒
Cook Time
10 mins

⏱️
Total Time
25 mins

🍽️
Servings
6

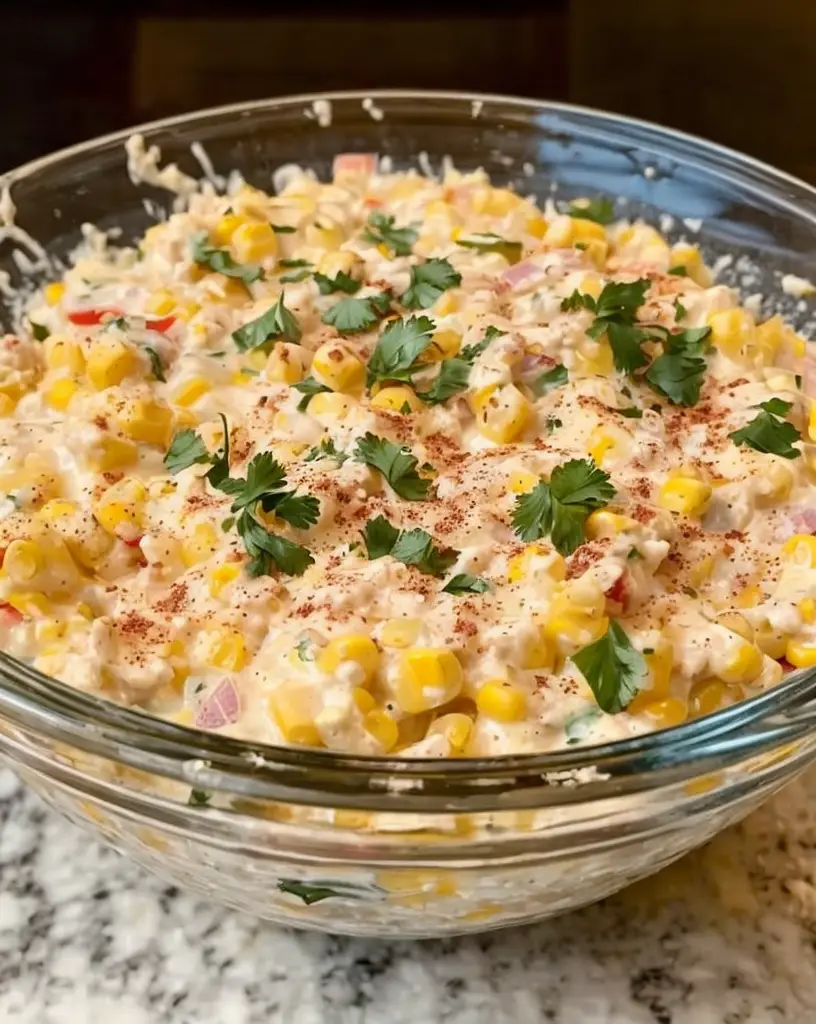
Discover the irresistible flavors of Mexican street corn in a creamy, crave-worthy dip that’s perfect for any occasion. This Mexican Street Corn Dip packs the vibrant, bold taste of traditional elote into a delightful dish that will entice your taste buds. Whether you’re hosting a party or enjoying a cozy night at home, this dip offers the perfect combination of flavors and textures, guaranteed to wow your guests and family alike.

Picture golden corn kernels enveloped in a luscious, spicy, and slightly tangy sauce, accented by the sharpness of Cotija cheese and the refreshing pop of fresh lime juice. This dip captures all the essence of classic street food while adding a level of convenience that means you can enjoy it anytime, anywhere. Easy to make and packed with rich, authentic flavors, Mexican Street Corn Dip is destined to become a staple in your culinary repertoire.

Quick Recipe Highlights

  • Flavor Profile: A savory blend of charred corn, rich mayonnaise, spicy chili powder, zesty lime, and tangy Cotija cheese for a classic Mexican taste.
  • Texture: Creamy and luscious base contrasted by the crunchy bite of fresh corn kernels and the crumbly elegance of cheese.
  • Aroma: A smokey, spiced scent reminiscent of authentic Mexican cuisine, with a fresh citrus undertone.
  • Visual Appeal: Vibrant yellows and whites punctuated by colorful flecks of red chili and green cilantro, making a striking presentation.
  • Skill Level Needed: Ideal for beginners; requires basic skills like mixing and simple cooking techniques.
  • Special Equipment: A skillet for charring the corn and a mixing bowl are all you need.

Recipe Overview

  • Difficulty Level: Designed with ease in mind, this dip involves basic cooking, mixing, and seasoning techniques perfect for cooks of all levels.
  • Category: Ideal as an appetizer or side dish, it complements a variety of meals or can be enjoyed solo as a snack.
  • Cuisine: Rooted in Mexican tradition, this dip captures the soul of street food culture, known for bold and dynamic flavors.
  • Cost: Affordable and wallet-friendly, mainly consisting of common pantry ingredients like corn, cheese, and spices.
  • Season: Best enjoyed in summer when corn is freshest, but adaptable for year-round delight using frozen kernels.
  • Occasion: Excellent for casual backyard barbecues, festive gatherings, or as a game-day munchie.

Why You’ll Love This Recipe

Mexican Street Corn Dip is the epitome of savory satisfaction. Every bite delivers a symphony of unique textures and flavors that will please any palate. The sweet corn paired with the creamy tang of mayonnaise and the spicy kick of chili powder makes for a taste experience that is both indulgent and balanced.

Convenience is another standout feature of this dip. As a one-bowl recipe, preparation and cleanup are minimal, making it an excellent choice for busy cooks or last-minute snack needs. Despite its simplicity, the finished product looks and tastes like something much more sophisticated.

Nutritionally, this dip is a wholesome choice. Corn provides fiber and essential nutrients while the cheese adds calcium and protein. With a reasonable calorie count per serving, it’s a guilt-free indulgence you can feel good about serving to friends and family.

Its social and entertaining value is undeniable. The bold, approachable flavors make it a universal crowd-pleaser. This dish lights up parties and potlucks, often sparking conversations and leaving guests asking for the recipe.

Finally, Mexican Street Corn Dip is a budget-friendly option that doesn’t sacrifice on taste. Using readily available ingredients from your local grocery store means you can enjoy gourmet flavors without breaking the bank, making it accessible for any aspiring home cook.

Historical Background and Cultural Significance

Mexican Street Corn, known as elote, traces its origins back to the bustling street markets of Mexico. A staple in Mexican culinary tradition, elote has been enjoyed by locals and tourists alike, symbolizing the vibrancy and creativity of street vendors.

Elote holds cultural importance as a bridge between ancient and modern Mexican cuisine, blending indigenous practices with European influences over time. This integration has produced a cherished street food favorite that continues to be loved and adapted across borders.

The evolution of elote has seen this humble corn dish reimagined globally. From grilled versions common in backyards to this creamy dip adaptation, its essence remains a testament to the adaptability and genius of Mexican gastronomy.

Regional variations abound, with each area putting forth its unique spin on the beloved treat. From Mexico City’s bustling streets to Oaxaca’s culinary festivals, each bite of elote contains a story of the region’s landscape, heritage, and people.

Ingredient Deep Dive

Corn is the cornerstone of this Mexican Street Corn Dip. Cultivated for thousands of years, corn is a symbol of sustenance and prosperity in Mexican culture. The carbohydrate-rich kernels are a powerhouse of essential nutrients, including fiber and antioxidants vital for good health.

Selecting the right corn is vital. Fresh corn is preferred when in season for optimal sweetness and juiciness. For convenience, quality frozen corn is a worthy substitute, ensuring year-round access to this delightful dip.

Mayonnaise serves as the creamy base, harmonizing disparate flavors into a cohesive and satisfying dish. This staple condiment offers a touch of richness that complements the corn’s natural sweetness, while also serving as the vehicle for the myriad of spices and flavors.

Opting for quality mayonnaise enhances the dip’s overall flavor profile. Store it in a cool, dry place to maintain its freshness and creamy consistency, ensuring your dip is as tasty as possible.

Common Mistakes to Avoid

  • Overcooking the Corn: Aim for a light char to enhance flavor, as overcooking can lead to a tough or rubbery texture.
  • Using Cold Ingredients: Let ingredients reach room temperature for better integration and consistency.
  • Underseasoning: Make sure to adjust spices according to personal preference, and always taste before serving.
  • Ignoring Citrus: Subtle lime juice is vital to balance the flavors, so don’t omit it.
  • Using Bland Cheese: Cotija cheese offers the necessary sharpness; substitute wisely with similar cheeses if unavailable.
  • Neglecting Texture: Ensure a mix of cream and crunch, without letting corn turn mushy.
  • Improper Storage: Use airtight containers and refrigerate promptly to preserve freshness.
  • Not Considering Allergies: Be wary of ingredients like cheese and mayonnaise for dietary restrictions.
  • Skipping Garnishes: Fresh cilantro or extra lime juice elevates the dip’s presentation and taste.
  • Forgetting to Stir: Thorough mixing is crucial for an even distribution of flavors.

Essential Techniques

Char-Roasting the Corn is an essential technique that lends the dip its distinctive flavor. By dry-roasting corn in a skillet over high heat, you unlock a smoky depth that underpins the entire dish. The key to mastering this process is patience: allow the corn to sit undisturbed for the perfect sear before stirring.

Blending Spices ensures every bite of the Mexican Street Corn Dip is full of flavor. A uniform spice mix requires deliberate and thorough mixing; linger over this step to guarantee each kernel bursts with zest.

Balancing Acidity is crucial for a well-rounded dip. Lime juice not only enhances flavors but cuts through the dish’s richness, adding a necessary zing. Adjust to your taste, adding just enough to wake up the palate without overwhelming other flavors.

Pro Tips for Perfect Mexican Street Corn Dip

Achieve the ideal level of creaminess by carefully measuring your mayonnaise, avoiding an overly heavy or greasy dip. Less is often more, and you can always add additional mayonnaise to taste.

Don’t shy away from fresh herbs such as cilantro, which not only add vibrant color but also infuse the dip with aromatic freshness. Finely chop and sprinkle liberally for best results.

Explore cheese options: while Cotija offers traditional authenticity, Feta provides a comparable boldness, rendering a tangy alternative for times of need.

For a smokier, charred flavor, consider grilling the corn instead of using a skillet. If you have access to an outdoor grill, this method can intensify the street corn essence.

Make it spicier by incorporating additional chili powders or freshly diced jalapeños, tailoring the heat profile to your preference while staying in tune with Mexican culinary traditions.

Keep the presentation lively by reserving some charred corn and crumbled cheese for a final top-layer garnishing; this creates a dip with added visual appeal and layered texture.

Variations and Adaptations

Regional interpretations of Mexican Street Corn Dip abound. Infuse the dip with a taste of southern Mexico by adding diced avocado for creamy contrast, or take cues from the north by incorporating grilled red peppers.

Adopt a seasonal approach with your ingredients; autumn welcomes delicata squash, offering a sweet and nutty element that pairs harmoniously with corn.

Adapting the dip for dietary restrictions can be achieved using vegan mayonnaise and cheese, ensuring no one misses out on the savory delight of this popular dish.

Experiment with cheese profiles by swapping the sharp Cotija for creamy goat cheese, resulting in a softer, tangier dip that retains the vibrant corn-forward flavors.

Enhance the textural elements by stirring in crisp cooked bacon bits; their salty crunch infuses a new layer of satisfaction into every bite.

Explore different presentations by using hollowed bread bowls to serve the dip, adding a sophisticated touch to your serving style while offering guests an edible container.

Serving and Presentation Guide

For a visually stunning serving option, present the Mexican Street Corn Dip in a decorative bowl garnished with a sprinkle of chopped cilantro, a dusting of chili powder, and lime wedges strategically placed for added flair.

Opt for classic tortilla chips as the ideal vehicle for dipping, with freshly-baked varieties highlighting and complementing the flavorful nuances of the dish.

Beyond chips, consider pairing with hearty, crusty bread slices for a rustic twist, or serve alongside a colorful array of crisp vegetables like carrot sticks, bell pepper slices, and celery for a fresh accompaniment.

Temperature plays a role in taste perception; serve the dip slightly warm to unlock the richness of its flavors while retaining an inviting creaminess.

Balance portions by measuring out small individual dip containers for larger crowds, ensuring even distribution across guests and facilitating easy mingling that encourages conversation.

Wine and Beverage Pairing

Complement the richness of Mexican Street Corn Dip with a crisp, refreshing white or rosé wine, such as Sauvignon Blanc or a Grenache Rosé, providing a bright, clean finish to contrast the creamy dip.

Non-alcoholic options include a chilled, citrus-infused sparkling water that echoes the lime undertones of the dish or a gently sweetened hibiscus tea that complements the chili’s spice.

In colder weather, consider pairing the dip with a warm, robust coffee blend or spiced chai tea that mirrors the warmth of the chili and offers a cozy, satisfying experience.

Regardless of pairing choice, strive to maintain a consistent serving temperature for both the dip and the beverage to maximize their respective flavor profiles.

Storage and Shelf Life

For optimal freshness, store your Mexican Street Corn Dip in an airtight container in the refrigerator, ensuring it retains its creamy texture and vibrant flavors for up to three days.

Cool the dip to room temperature before sealing it away to prevent condensation that could impact texture. An even, consistent temperature throughout will extend its shelf life.

Recognize signs of spoilage by watching for any off-putting sour odors or discoloration, at which point the dip should be discarded.

To reheat, gently warm the corn dip in a skillet over low heat, stirring frequently. Avoid the microwave, which can alter textures unfavorably.

While the creamy base doesn’t freeze particularly well, consider making an extra batch of roasted corn to freeze separately. This allows you to thaw and integrate fresh corn into future dips.

Make Ahead Strategies

For a streamlined preparation, consider toasting your spices in advance and storing them in an airtight jar, preserving their flavor for later use.

Roast corn kernels the night before serving, allowing them to cool completely before refrigerating. This saves time and seals the corn’s charred goodness.

Prepare the mayonnaise mixture one day ahead, allowing the spices to meld together for a richer, more integrated flavor. Store it surrounded by an airtight lid to maintain freshness.

Keep key fresh elements, like cilantro, separate and add them just before serving to avoid wilting and ensure a fresh, aromatic quality throughout the dish.

Smooth reheating requires a skillet over low-to-medium heat, gently re-stirring to reach the proper serving temperature gradually, taking care to avoid overheating which could impact taste and texture.

When assembling, add fresh lime juice just prior to presenting to guests to maintain that zesty citrus kick, which lifts the entire palate.

Scaling Instructions

Adapting the Mexican Street Corn Dip recipe to suit a smaller crowd is simple: halve the ingredients while maintaining the cooking process, ensuring even, consistent flavor.

Expanding the recipe for a larger gathering involves doubling or tripling ingredient amounts, paying particular attention to maintaining a constant ratio of creaminess to spice.

Adjusting oven or stovetop capacity could also come into play with increased servings, where larger pans or batch cooking might be required to accommodate the volumes involved.

Should refrigeration be necessary at any stage, consider multiple containers to aid in even cooling, ensuring the dip’s quality remains intact over time.

Nutritional Deep Dive

Mexican Street Corn Dip provides a balanced nutritional profile. Each serving delivers a robust amount of fiber and antioxidants from corn, along with protein and calcium from cream and cheese.

Micronutrient-wise, expect a satisfying influx of vitamin B and iron crucial for overall health. Such elements make this dip a nutrient-dense option for shared meals.

For those mindful of calorie intake, take note of portion sizes – focus on mindful dipping to appreciate the depth of flavor while moderating consumption effectively.

The dip’s creamy base also contributes healthy fats, enhancing satiety after eating and providing essential energy for an active lifestyle.

With weight management in mind, utilizing grilled or air-fried corn instead of oil-roasted options can moderate calorie content without sacrificing the taste experience.

Dietary Adaptations

To make Mexican Street Corn Dip gluten-free, choose naturally gluten-free mayonnaise and check spice blends for gluten-containing additives.

Vegan adaptations can be achieved using plant-based alternatives for both mayonnaise and cheese. Options like vegan Cotija or nutritional yeast work remarkably well.

Reducing carbohydrate intake is feasible by using non-dairy yoghurt and lower-starch corn or cauliflower alternatives for similar dips mimicking the flavor palette.

Low-FODMAP considerations involve mindful selection of garlic-infused oils and lactose-free cheese, catering to specific dietary needs without losing the enjoyment of traditional flavors.

Troubleshooting Guide

  • Texture issues: If the dip turns runny, add fine breadcrumbs to absorb excess moisture or chill longer to solidify the base.
  • Flavor balance: Enhance lost seasonings with a pinch of salt or additional lime to draw out the flavors effectively.
  • Temperature problems: Overheating could break down the creaminess; reheat slowly over low heat while stirring gently.
  • Equipment challenges: Ensure proper kitchen setup with non-stick pans for efficient roasting and stirring, minimizing food wastage.
  • Ingredient substitutions: Utilize similar-tasting cheeses or non-dairy cream alternatives without losing the essence.
  • Timing concerns: Prepare all ingredients in advance for precise timing, especially for events, to ensure a seamless cooking process.
  • Recipe Success Stories

    Feedback from the community often highlights the dip’s bold, captivating flavor and its ability to elevate any occasion. People cherish how it effortlessly steals the spotlight at gatherings, regardless of the season or event.

    Variations have proved successful, with creative takes such as adding a dash of honey for a sweet-savory twist or integrating black beans for a heartier mix, both demonstrating the dip’s versatility and adaptability.

    Adaptation stories often reflect a journey of trying new ingredients or techniques without straying too far from the Mexican inspiration, and our readers never shy away from showcasing these proud moments creatively.

    Reader suggestions repeatedly reveal delightful twists, such as introducing roasted jalapeños for extra heat or playing with different herbs to create complementary flavors, showcasing an engaged community rich with ideas.

    Photographers among our readership love capturing this vibrant dip in all its colorful glory, often featuring stunningly plated examples adorned with fresh garnishes and warm lighting that entice the senses.

    Frequently Asked Questions

    Can I use canned corn for this recipe? Canned corn can be a convenient option but may lack the charred flavor of fresh or frozen corn. Be sure to drain and dry it well before incorporating it into the dip to maintain the correct texture.

    What if I can’t find Cotija cheese? If Cotija cheese isn’t available, feta provides a similar flavor profile and texture. Parmesan could also work in its stead to add the salty tang needed in the recipe.

    Is there a way to make this dip spicier? To increase the heat level, additional chili powder can be mixed in, or fresh jalapeños can be diced and added according to taste preference while preserving the original flavor balance.

    How long will leftovers keep? Leftover Mexican Street Corn Dip remains fresh for up to three days in the refrigerator. Ensure it is stored in an airtight container and refrigerated promptly to maintain peak quality.

    Can I serve this dip cold? While it’s traditionally served warm, the flavors hold together when chilled. Some diners prefer the dip cold as the creaminess stands out, while others appreciate the warm embrace of the served-hot version.

    What should I do if my dip curdles? Slowly warm the dip again in a pot while vigorously whisking to help reincorporate the ingredients. Avoid high heat, which causes separation, and aim for a consistent, low heat instead.

    Can mayonnaise be substituted entirely? You may replace mayonnaise with sour cream or plain Greek yogurt for a lighter twist, though adjust the quantity to maintain the same level of creaminess.

    Is freezing possible? While freezing isn’t recommended due to texture changes upon thawing, the dip’s ingredients may be prepped beforehand and assembled fresh when desired for better output.

    How can I add more protein? Incorporate cooked, diced chicken or firm tofu for a heartier version, creating a fusion of creaminess with extra nutrition from additional protein sources.

    What drinks pair best with Mexican Street Corn Dip? Refreshing citrus-based drinks such as lime-infused sparkling water or a light lager beer typically pair well, offering a counterbalance to the richness of the dip.

    Additional Resources

    Explore similar recipes within the blog, such as our delectable Guacamole Mash or Salsa Roja, both capturing the quintessential spirit of Mexican cuisine with accessible ingredients.

    Find guides to mastering grilling techniques that could serve to enhance the steaks and barbecue elements likely to accompany your Mexican Street Corn Dip, perfect for events and summer celebrations.

    Enhance your culinary knowledge further through our ingredient spotlight series, dedicated to uncovering secrets behind your recipes’ favorite household staples.

    Keep an eye on seasonal adaptations that help transform well-loved recipes across the calendar year, inspiring new twists based on the freshest ingredients available on the market.

    Join the Conversation

    Get involved with the community by sharing your own Mexican Street Corn Dip experience online. Social media platforms offer the opportunity for users to share images and generate discussions on their personalized adaptations.

    Exchange photography tips for better capturing your dip creation, from the best lighting setups to garnish arrangement suggestions that make the dip pop visually against its background.

    Engage in dialogue with fellow readers through comments and forum threads, offering reviews and reactions to this enticing, cherished dish as it becomes ever more popular across home kitchens.

    Discover new recipe directions inspired by user feedback, learning from each dip variation and offering insights that could lead to unexpected, delicious results when shared with others.

    The Recipe

    Mexican Street Corn Dip

    Serves: 6

    Prep Time: 15 mins

    Cook Time: 10 mins

    Total Time: 25 mins

    Kitchen Equipment Needed

    • Mixing bowl
    • Skillet
    • Spatula
    • Measuring spoons

    Ingredients

    • 4 ears of fresh corn (or 3 cups frozen corn)
    • 1/2 cup mayonnaise
    • 1/2 cup Cotija cheese, crumbled
    • 1 tsp chili powder
    • Juice of 1 lime
    • 1/4 cup chopped cilantro
    • Salt, to taste
    • Optional: sliced jalapeños for heat

    Directions

    1. Begin by charring the corn kernels. Heat a skillet over high heat, and once hot, add the corn. Allow it to cook undisturbed for a few minutes before tossing, ensuring a nice char is achieved. Once charred evenly, remove from heat.
    2. In a large mixing bowl, combine mayonnaise, half the cheese, chili powder, and lime juice. Mix until smooth, then season with salt to taste.
    3. Add the charred corn to the mayonnaise mixture, stirring gently until all ingredients are well incorporated.
    4. Transfer the mixture to a serving bowl, sprinkling the remaining cheese and cilantro on top. Add extra lime and jalapeños if desired for added zest.
    5. Serve with tortilla chips or accompaniments of choice, and enjoy!

    Recipe Notes

    • Using grilled corn elevates the smoky flavor, perfect for summer entertaining.
    • Consider cooling the dip slightly before serving for better flavor profile blending.
    • Try Colby Jack in place of Cotija for a milder alternative.

    Indulge in the Ultimate Red Velvet White Chocolate Cheesecake Recipe

    Red Velvet White Chocolate Cheesecake: A Dreamy Decadent Delight

    ⚖️
    Difficulty
    Intermediate

    ⏲️
    Prep Time
    30 mins

    🕒
    Cook Time
    60 mins

    ⏱️
    Total Time
    90 mins

    🍽️
    Servings
    12

    Indulge in the luxurious fusion of vibrant red velvet cake and creamy white chocolate cheesecake with this irresistible Red Velvet White Chocolate Cheesecake. Marrying the rich and slightly tangy flavors of classic red velvet with the smooth, decadent texture of white chocolate-infused cheesecake, this dessert guarantees to be the showstopper at any gathering. Each bite unravels a delightful layering of taste and texture that will enchant your senses and leave an unforgettable mark on your palate.

    Strong on both flavor and aesthetic fronts, this dessert melds the earthy tones of cocoa with the lusciousness of white chocolate and cream cheese filling. Dressed in its iconic deep red shade, this cheesecake not only tastes incredible but also captivates the eyes, making it a perfect centerpiece for festive occasions. Whether it’s for a special celebration or a treat-yourself moment, this Red Velvet White Chocolate Cheesecake recipe adds a touch of elegance and sweetness to your day.

    Quick Recipe Highlights

    • Flavor Profile: A blend of mild cocoa undertones with creamy white chocolate and tangy cream cheese, creating a sweet and slightly tart ensemble.
    • Texture: Silky smooth cheesecake layer contrasted with moist, crumbly red velvet base—a textural delight sure to satisfy.
    • Aroma: Warm, inviting notes of cocoa and vanilla with hints of white chocolate present a delightful olfactory symphony.
    • Visual Appeal: Striking deep red color with contrasting white cheesecake, often garnished with red crumbs or white chocolate shavings.
    • Skill Level Needed: Intermediate baking skills required, including basic mixing, baking, and cooling techniques.
    • Special Equipment: Requires a springform pan, electric mixer, and a water bath for even cooking.

    Recipe Overview

    • Difficulty Level: This dessert is rated intermediate due to the layering process and precise baking conditions, which demand close attention for perfect results.
    • Category: An ideal choice for dessert lovers, fitting perfectly in the category of baked goods and cheesecakes.
    • Cuisine: Drawing on American dessert traditions, influenced by the iconic red velvet cake and the classic New York-style cheesecake.
    • Cost: Moderately priced, mainly based on the quality of chocolate and cream cheese selected.
    • Season: Best enjoyed during holidays and celebrations, though equally enticing year-round.
    • Occasion: Perfect for birthdays, Valentine’s Day, or holiday feasts where an elegant dessert is in demand.

    Why You’ll Love This Recipe


    The Red Velvet White Chocolate Cheesecake is a delight for those who relish multi-dimensional flavors. The marriage of mild cocoa-rich red velvet cake with the creamy, luxurious white chocolate cheese layer creates an exceptionally inviting texture that practically melts in the mouth. Its slight tang from cream cheese is perfectly balanced by the sweetness of white chocolate, making it both a supremely satisfying and refined dessert choice.

    This recipe is an excellent option for those seeking an impressive dessert that doesn’t require day-long preparations. Preparing it involves straightforward techniques with a bit of attention to detail, particularly in ensuring the right consistency and even baking through a water bath method. Its make-ahead nature allows you to indulge in other entertaining tasks while this masterpiece sits beautifully in your refrigerator.

    Beyond indulgence, this cheesecake also offers some nutritional benefits. Cream cheese brings a decent dose of calcium and vitamin A, while the controlled sugar balance makes it a more moderated dessert option than many other decadent desserts. When shared among friends and family, one serving provides a symphony of flavor and delight without overwhelming caloric intake.

    Socially, this cheesecake fosters an inviting and warm atmosphere when presented at gatherings. Its striking presentation—in vibrant red hues against creamy white—makes it more than just a taste pleasure, but a visual delight. Sharing a slice of this cheesecake becomes a catalyst for conversations and cherished memories, making it both a culinary and social triumph.

    Cost-effectiveness and accessibility are further strengths of this cheesecake. Given that key ingredients like cream cheese, white chocolate, and basic baking elements are commonly available, you won’t have to hunt down hard-to-find items. Adjusting portions to fit your guest list makes it versatile, ensuring you deliver this exquisite dish without breaking the bank or spending an inordinate amount of time in the kitchen.

    Historical Background and Cultural Significance


    Red velvet cake, known for its dramatic color and smooth texture, has roots that trace back to the early 19th-century American South. Originally derived from the chocolate cake family, it featured less cocoa to create a gentler, velvety cake. The vivid red hue was more pronounced over time, partly due to the public fascination with bold and bright foods.

    The story of cheesecake is much older, dating back to ancient times. The combination of cream cheese, eggs, and sugar baked to a dense perfection has evolved significantly, with various regions adding their own twist. The fusion with red velvet is a modern innovation designed to appeal to both lovers of traditional cakes and those with a penchant for creamy cheesecakes.

    Culturally, this dessert represents indulgence—a nod to festive celebrations and decadent treats. It brings together historical elements with a modern twist, showcasing how culinary cultures continue to evolve while paying homage to their roots. This fusion dessert embodies diversity in flavor, texture, and presentation.

    As culinary artists experiment, many regional variations emerge, each adding unique touches. Whether it’s the tang of different cheeses used abroad, or the liberal use of local chocolates, the Red Velvet White Chocolate Cheesecake continues to adapt, retaining its core appeal while delighting an ever-growing audience internationally.

    Ingredient Deep Dive


    The foundation of this cheesecake is the cream cheese, a key ingredient in creating the signature creamy texture. Historically, it holds a place of importance in American kitchens, lending richness to countless desserts. It boasts excellent calcium levels, vital for bone health, and is known for its mild, slightly tangy flavor which pairs beautifully with both sweet and savory dishes.

    For the optimal quality cheesecake, selecting the freshest cream cheese is crucial. Choose varieties with full-fat content for superior creaminess. When storing, keep in a cool, dark area of the refrigerator and use within the expiration date for peak flavor. Should you find yourself out of cream cheese, mascarpone makes an excellent substitution, lending a slightly sweeter flavor and equally smooth texture.

    Red velvet elements bring cocoa and buttermilk into play, each adding depth to the flavor profile. Cocoa gives a hint of chocolatey richness, while buttermilk contributes to the cake’s soft, dense texture and moist crumb. Opt for the freshest dry cocoa you can find, and store it in a cool, dry place to maintain its rich aroma and taste.

    Last but not least, white chocolate is pivotal in this recipe, imbuing the cheesecake with its signature sweetness and creamy consistency. When selecting white chocolate, choose high-quality brands with a high cocoa butter content for that indulgent, smooth mouthfeel. Proper storage involves a cool, dry space to prevent blooming and extend shelf life.

    Common Mistakes to Avoid

    • Overmixing the batter, resulting in a less dense texture and potential cracking.
    • Skipping the water bath, risking an uneven bake and potential burning at the edges.
    • Using low-fat cream cheese, which affects the smoothness and taste of your cheesecake.
    • Not cooling the cheesecake completely before refrigerating, which compromises its structure.
    • Underbaking the red velvet layer, leading to a soggy or undercooked base.
    • Using artificial vanilla extract, which can impact the final flavor of your cheesecake.
    • Omitting an adequate rest period; this cheesecake tastes best when allowed to chill thoroughly.
    • Misjudging ingredient freshness, especially for key ingredients like cocoa and chocolate.

    Essential Techniques


    Mastering the water bath technique ensures your cheesecake cooks evenly and achieves its creamy texture without cracking. A water bath involves placing your springform pan in a larger pan filled with hot water, helping regulate the temperature as it bakes. Ensure the water remains at the same level throughout cooking, and keep an eye on potential spills.

    For a vortex-free, velvety batter, slow and steady wins the race. Mix your ingredients at moderate speed, stopping as soon as their cohesion is smooth. Overbeating introduces unwanted air, leading to a less desirable texture and possible cracking upon cooling.

    Layering precision is crucial, both aesthetically and for the desired flavor juxtaposition. Start with a perfectly baked red velvet base, followed by pouring your cheesecake batter gently to maintain clean, separate layers. Ensure each component has cooled properly before assembly to avoid bleeding colors or flavors.

    Pro Tips for Perfect Red Velvet White Chocolate Cheesecake


    Allow cream cheese and eggs to reach room temperature before mixing—this ensures a lump-free, smooth cheesecake batter. Firm yet pliable, it sets to the signature creamy texture upon baking and cooling.

    Be mindful of the balance between sugar and white chocolate since both contribute significant sweetness. Adjust according to personal preference, keeping in mind the cheesecake’s sweet and tangy signature.

    Invest in high-quality cocoa and chocolate, as their purity profoundly affects the cake’s final taste and consistency. Look for labels indicating high cocoa content to ensure deep flavors.

    For a perfectly baked cheesecake, monitor the doneness beyond time estimates—look for soft wobbling at the center which solidifies upon cooling.

    If you’re concerned about maintaining vibrant colors, select good quality red food coloring that withstands baking temperature without fading.

    After removing the cheesecake from the oven, let it cool gradually in a switched-off, ajar oven to prevent sudden temperature changes and cracks.

    When serving, use a hot knife to slice through the cheesecake for clean, smooth cuts, wiping the blade clean after each cut for a polished presentation.

    Variations and Adaptations


    Regional variations often involve diverse add-ins. Southeastern cooks may incorporate pecans or citrus zest to enhance the flavor profile, adding local flair to an enduring classic.

    During summer, swap red food coloring for naturally derived beetroot powder, delivering both color and a subtle earthy sweetness, for a seasonal twist on color.

    Dietary adaptations include gluten-free graham cracker crumbs for the base, making it accessible for individuals with gluten sensitivities without altering the taste greatly.

    For an extra burst of flavor, consider incorporating raspberry puree over the white chocolate, infusing the cheesecake with tartness that balances its rich creaminess.

    To adapt the texture, explore the incorporation of finely crushed nuts within the crust or as an overlay garnish, allowing for crunch and contrast to the classic silky texture.

    For show-stopping presentation, drizzle melted dark chocolate and sprinkle edible gold dust atop the cake, elevating it to a luxurious dessert status in either traditional layouts or elegant single servings.

    Serving and Presentation Guide


    The elegance of a Red Velvet White Chocolate Cheesecake shines most when thoughtfully plated. Balance your dish with contrasting hues—a classic white or black serving dish enhances its visual impact.

    Elevate the experience by garnishing with fresh berries or a dollop of whipped cream, which introduces an extra layer of flavor and texture while maintaining visual simplicity.

    Pair with complementary dessert wines or after-dinner coffees to expand the palate and enrich the dessert’s nuances, offering guests a cohesive dining experience.

    Modern serving methods involve individual mini cheesecakes or creatively stacked, pre-cut squares—each showcasing the brilliant layers with minimal upkeep.

    Mind the temperature: serve chilled but not too cold to maintain the soft texture, and let it sit briefly if refrigerated for a while before serving.

    Bear portion control in mind, as the richness packs significant flavor. Offer smaller servings to allow appreciation without excess, perfecting portion sizes for any occasion.

    Wine and Beverage Pairing


    Diving into wine pairings, opt for a fine Tawny Port or a subtly effervescent Moscato d’Asti, each harmonizing effortlessly with the layers of rich chocolate and cream.

    Non-alcoholic alternatives embrace mocktails or fresh berry shrubs, playing on the cake’s sweet-tart interplay and providing a palate-cleansing contrast.

    A warm cup of dark roast coffee or a robust Earl Grey tea accentuates the chocolate notes, grounding the dessert with a sophisticated touch that appeals to any connoisseur.

    Careful with temperatures—serve wines slightly chilled but not over-iced, and beverages promptly heated; these nuances ensure their optimal flavor synergy with the cheesecake.

    For presentation, consider serving wines in crystal glasses and coffee in delicate porcelain, lending an air of elegance comparable to the cheesecake’s own sophistication.

    Storage and Shelf Life


    Properly storing your Red Velvet White Chocolate Cheesecake ensures it remains as delicious on day three as it was fresh. Place in an airtight container or cover with plastic wrap, then refrigerate—keeping it from absorbing fridge odors.

    Maintain the ideal fridge temperature of around 35-38°F, which guards against spoilage while optimizing the dessert’s texture and flavor preservation for up to five days.

    To identify evolving spoilage, look for discoloration or a distinct sour smell, though with impeccable ingredient quality and cooking, these are scarce.

    Requiring room temperature before serving gives richer textures and fuller flavors, so remove from the fridge about 20 minutes ahead for best results.

    Freezing offers longer shelf life—as much as three months—where a tightly wrapped cheesecake resists freezer burn. Thaw in the fridge overnight for consistency without compromising the final mouthfeel.

    Make Ahead Strategies


    Adopt a make-ahead approach by crafting individual components. Prepare the red velvet base or cheesecake filling in advance, storing each separately to amalgamate closer to presentation day.

    Between each process step, refrigeration ensures firmness and prevents flavors or colors from muddying, maintaining distinct layers until final assembly.

    Balance these methods with an appreciation for flavor benefits—some components, like a resting cheesecake, mature over time, achieving a desirable complexity.

    Assembly is effortless closer to your event; ensure constituents arrive at similar temperatures for adhesion without distortion in texture or appearance.

    Reheat if necessary, utilizing microwave defrost functions with caution or a conventional oven at low heat. For consistency, avoid high temperatures leading to texture erosion.

    Introductions of fresh elements—berries, cream toppings, or sauces—just before serving spruces up your dessert with freshness contrasted by matured elements.

    Scaling Instructions


    When scaling your Red Velvet White Chocolate Cheesecake, careful plan adjustments ensure optimal results whether halving, doubling, or beyond. Ingredient accuracy is paramount; for significant modifications, a food calculator aids conversions.

    Adjust equipment to fit—use appropriately sized pans or bake in separate batches to prevent overcrowding, which affects baking times and results.

    Timings often necessitate adjustment; keep vigilant whether duration variations arise. Observe baking cues, not solely time: this method maintains texture and consistency.

    Consider storage space when planning larger batches—you’ll need ample refrigerator room or airtight containers for unserved portions, maintaining freshness.

    Divide portions according to the event; adjust serving presentations accordingly, ensuring each guest experiences the dessert’s sensory majesty without issue.

    Nutritional Deep Dive


    A Red Velvet White Chocolate Cheesecake, surprisingly rich in macronutrients like carbohydrates and fats, engages sensibly moderate servings to align beautifully with daily nutritional targets, extending luxury without excess.

    Micronutrient contributions in calcium, vitamin A, and magnesium further bolster the cheesecake’s appeal, enhancing dietary intake through enjoyable means.

    Health benefits burgeon around these minerals: fortified bone health and vision, sourced chiefly from cream cheese’s natural richness. Balancing with a mixed diet makes periodic indulgence a healthy choice.

    Dietary balance and conscious consumption mitigate its fat content, yielding a treat complementing weight management goals by assuring thoughtful portion control.

    Each serving is carefully tailored within artisan slices—an approach minimizing decadence with deliberate design, harmonizing taste without overextending dietary parameters.

    Dietary Adaptations


    For gluten-free adjustments, substitute a gluten-free cookie or cracker base and remain vigilant with ingredient cross-contamination risk—a surefire path to dietary inclusivity.

    Dairy-free options adapt to almond milk or coconut cream alternatives in filling albeit needing nuance to minimize flavor alterations—provide alternative leavening for consistent texture.

    A vegan cheesecake results with inventive swaps: cashew cream, coconut milk, and agar set fillings echo cream cheese solids, revolutionizing the traditional while upholding ethical standards.

    Low-carb advocates causally replace sugar and flour derivatives with market-available equivalents like almond meal or coconut sugar, offering custodial satisfaction without guilt.

    Keto adherents wage their macronutrient battle by embracing erythritol-based sweeteners, shifting gluten carbs to naturally low-counters akin to almond flour bases.

    Low-FODMAP solutions reside similarly, targeting ingredient consciousness with lactose-free alternatives and elemental tracking. This ensures your indulgence respects digestive harmony.

    Troubleshooting Guide


    Texture issues stem from improper mixing or inconsistent oven settings. Slow, deliberate blending and preheated environment secure the cheesecake’s smoothness and density.

    Where flavor feels imbalanced—overly sweet or unremarkably bland—reassess the interplay between chocolate potency and vanilla complement, personalizing proportions accordingly.

    If temperature proves problematic, confirm reliance on reliable kitchen thermometers, ensuring each element meets recommended guidelines for peak culinary results.

    Equipment challenges dissolve with acquiring essentials like springform pans—pursuing these apparatuses transforms recipe realizations into tangible excellence.

    Ingredient substitutions necessitate calculating alternate ingredient impacts—structural replacements or concentrate adjustments maintain outcome focus on anticipated results.

    Timing concerns will resolve with your patient devotion to intuition over impersonal estimations—muting your anxious anticipation or overdrawn suspicions during cooking.

    Recipe Success Stories


    Community feedback surrounding this exquisite recipe glows with enthusiasm—readers recount moments when their gatherings ended in applause precipitated by this remarkable dessert.

    Variations emerge amid diverse interpretations where culinary pundits stamp their creative license…from berry sauces to coconut shreds, each rendition conquers imaginations fully.

    Adaptations herald personal triumphs over dietary restrictions, resonating tales of empowerment, community creativity dovetailing culinary innovation with lifestyle harmony.

    Enthusiasts flood platforms with photos distilled in vibrant crimson kissed with delicate chocolate sprays: proof positive skilled frame captures augment flavor in vivid reflections.

    Frequently Asked Questions

    Can the cheesecake be made ahead of time? Yes, prepare and refrigerate the cheesecake a day in advance to enhance flavors. Just ensure it’s tightly covered to maintain its freshness.

    What can I use instead of a springform pan? A deep cake dish can be an alternative, but be cautious when serving to maintain neatness without the convenience of detachable sides.

    How do I prevent the top of my cheesecake from cracking? Ensure even baking by using a water bath and avoid overcooking—removing from heat when the center remains slightly jiggly.

    Can I freeze individual servings? Certainly! Wrap individual cheesecake slices in parchment paper followed by an additional airtight-wrap layer for three months of maintained quality.

    Do I need to refrigerate the cake after cooling? Absolutely—cool at room temperature, then refrigerate for at least four hours until thoroughly chilled for the best texture and flavor.

    What’s the best way to cut the cheesecake cleanly? Employ a warm, sharp knife dipped in hot water and wiped dry before slicing for polished, razor-sharp presentation sans crumble.

    Can I incorporate nuts for added texture? Yes, adding crushed nuts either within the base or as a topping garners a delightful contrast so long as any nut allergies are mindfully considered.

    Is it possible to use alternative sweeteners? Indeed—valid sugar substitutes like erythritol or stevia adapt this cheesecake, although taste adjustments and testing may perfect the chosen blend.

    What adjustments accommodate a deeper red color? Intensify your dramatic velvet hue by utilizing concentrated color gels or powders, mindful of achieving this without artisanal flavor masking.

    How do I store leftovers effectively? Seal the cheesecake in covered dishes or plastic wrap within the refrigerator, mindful to refresh it sooner rather than later to savor its sublime, untouched richness once more.

    Additional Resources


    Delve into related recipes that hold similar flavor profiles; red velvet twinning with other cheesecakes extend potential for personal exploits and palate expansion.

    Embrace technique manuals—thermometers to slicers—bridging the skill gap towards perfect cheesecakes, each replicable with undistorted success every recreation.

    Journey over ingredient databases facilitating detail-oriented knowledge over chocolate selections and vanilla brands, positioning you for adventurous pudding mastery.

    Equip your kitchen with indispensably modern gadgets—springform excellence, precision scales, and blender prowess—that redefine recipes, allowing for transformative culinary artacks.

    Seasonal twist guides align traditional offerings with solstice occasions and vibrant fall chapters—craft autumnal toppings or spring inclusions, further promoting cheesecake favor.

    Join the Conversation


    Engage effortlessly; share your cheesecake experiences across social media with captivating images and descriptive tags—your experiences spur culinary curiosity among others.

    Seek photography inspiration from enthusiastic food bloggers regarding framing, lighting, and composition—simple techniques elevating your presentation.

    Provide insightful reviews—your feedback catalyzes conversation, offering suggestions, collaborative secrets, and delightful variation outcomes—sharing is cultivating community.

    Connect humbly with earnest recipe elaborations and successes—inspire participants to input flavor interpretations keenly, igniting ongoing culinary creativity.

    Invite vibrant community interaction: your featured cheesecake narratives beckon both burgeoning chefs and veteran artisans, wielding knowledge fortification through shared earnestness.

    The Recipe

    Red Velvet White Chocolate Cheesecake

    Serves: 12

    Prep Time: 30 mins

    Cook Time: 60 mins

    Total Time: 90 mins

    Kitchen Equipment Needed

    • Springform pan
    • Electric mixer
    • Mixing bowls
    • Spatula
    • Water bath setup
    • Baking parchment paper

    Ingredients

    • 2 cups crushed graham crackers
    • 3 tablespoons unsweetened cocoa powder
    • 1/2 cup melted butter
    • 2 cups cream cheese, softened
    • 1 cup white chocolate chips, melted
    • 1 cup granulated sugar
    • 3 large eggs
    • 1 teaspoon vanilla extract
    • 1 tablespoon red food coloring
    • 1/2 cup buttermilk

    Directions

    1. Preheat your oven to 325°F (160°C) and line the base of a springform pan with parchment paper.
    2. Blend graham crackers and cocoa powder in a mixing bowl. Add melted butter, combining to create a wet sandy texture. Press mixture into the base of the prepared pan to form a layer.
    3. In a large bowl, beat softened cream cheese until creamy, gradually adding sugar, and mix until smooth.
    4. Incorporate melted white chocolate, blending until fully combined, then mix in vanilla extract and red food coloring.
    5. Add eggs one at a time, beating gently after each addition until well integrated. Finally, blend in buttermilk, ensuring consistency.
    6. Pour the batter over the crust and place the pan in a larger baking dish, filling the outer dish with hot water halfway up the sides of the springform pan.
    7. Bake for about 60 minutes or until the center has a slight jiggle. Turn off the oven, leaving the door ajar to let the cheesecake cool gradually.
    8. Once at room temperature, refrigerate for at least 4 hours, or overnight, to set.
    9. When serving, gently remove from the springform and adorn with optional white chocolate shavings or raspberry sauce.

    Recipe Notes

    • For best results, ensure all ingredients are at room temperature before starting.
    • Consider adding lemon or orange zest for an additional citrusy brightness.
    • If cracks form, a sour cream topping can elegantly mask and bring flavor depth.

    Crispy Delight: How to Make Perfect Fried Red Tomatoes

    Fried Red Tomatoes: The Perfect Southern Delight

    ⚖️
    Difficulty
    Easy

    ⏲️
    Prep Time
    15 mins

    🕒
    Cook Time
    10 mins

    ⏱️
    Total Time
    25 mins

    🍽️
    Servings
    4

    Crunchy on the outside and tender on the inside, fried red tomatoes are an exquisite Southern delicacy that brings warmth to the heart and comfort to the palate. This classic dish, seasoned with a hint of pepper and a touch of salt, offers a balance of flavors that speaks to the simplicity and richness of home-cooked meals. When the tomatoes sizzle in the pan, they release a sweet and tangy aroma that fills the kitchen with anticipation.

    As you take your first bite, the crisp, golden crust gives way to a juicy, savory tomato that embodies the essence of Southern cuisine. This dish combines textures and flavors in a way that’s both hearty and refreshing. It’s a versatile recipe that can be served as an appetizer, side dish, or snack, making it a perfect addition to any meal.

    Quick Recipe Highlights

    • Flavor Profile: The fried red tomatoes offer a rich blend of sweet, tart, and savory flavors, accented by a crispy coating that complements the tender interior.
    • Texture: Experience the satisfying crunch of the fried batter, followed by the soft, juicy texture of the tomatoes, creating a delightful contrast.
    • Aroma: The enticing smell of frying tomatoes, mingling with hints of spice, fills the air, promising a mouthwatering experience.
    • Visual Appeal: The vibrant red of the tomatoes provides a beautiful contrast to the golden-brown coating, creating an inviting visual treat.
    • Skill Level Needed: Easy enough for beginners, yet impressive enough for seasoned cooks, requiring only basic cooking techniques.
    • Special Equipment: A skillet or frying pan, and a wire rack for draining excess oil, are all you need to make these delicious tomatoes.

    Recipe Overview

    • Difficulty Level: Rated easy because the process of frying is straightforward with minimal steps, accessible to both novice and experienced cooks.
    • Category: This dish can fall under appetizers, side dishes, or snacks as it complements various types of meals effortlessly.
    • Cuisine: Fried red tomatoes are a staple of Southern American cuisine, showcasing the region’s love for simple, flavorful dishes.
    • Cost: Relatively inexpensive, the ingredients can be sourced easily and affordably, making it budget-friendly.
    • Season: Best enjoyed in summer when tomatoes are at their peak freshness, though it’s delightful year-round with the right tomatoes.
    • Occasion: Ideal for casual gatherings, picnics, or as a cozy family dish, perfect for both everyday meals and special occasions.

    Why You’ll Love This Recipe


    The taste and texture of these fried red tomatoes will captivate your senses. The crispness of the batter contrasts beautifully with the natural juiciness of the tomatoes, offering a flavor experience that’s both simple and rich in taste. Each bite delivers the fresh essence of tomatoes with a hint of spice, creating a satisfying savory treat.

    Convenience is another highlight of this dish. Whether you’re preparing a quick snack or an elegant side for dinner, this recipe’s straightforward approach means you can enjoy it without spending hours in the kitchen. The quick prep and cooking times make it an excellent choice for last-minute meal planning.

    Nutritionally, tomatoes are a great source of vitamins C and K, potassium, and folate. Frying them adds a touch of indulgence without overwhelming your diet, making it a balanced option for those mindful of their nutrition.

    For social gatherings, these fried tomatoes are sure to be a hit. They can be served on a platter as part of a festive buffet, or paired with other Southern favorites for a complete experience. Their visual and flavor appeal will quickly make them a centerpiece of any occasion.

    Cost-effectiveness is key; the ingredients are common and affordable, ensuring you can prepare this dish easily without denting your budget. It’s accessible in terms of both preparation and ingredients, making it a universally encouraging recipe to try.

    Historical Background and Cultural Significance


    Originating in the southern United States, fried red tomatoes have adorned tables from family homes to high-end restaurants. This iconic dish embodies the Southern tradition of utilizing ripe, fresh produce to create amazing meals from simple ingredients.

    Over the years, its cultural importance has only grown, symbolizing both the ingenuity and resourcefulness of Southern cooking. Fried tomatoes are often celebrated at food festivals and are a beloved culinary tradition passed down through generations.

    As the recipe evolved, variations sprouted regionally, incorporating local spices and preparation methods. However, the principle remains the same—elevating the humble tomato into something extraordinary through frying, providing a crispy contrast to their juicy softness.

    Each Southern state boasts its twist on the classic fried tomato, indicating the diversity and adaptability of the recipe. Whether served with a tangy aioli or a sprinkle of coarse salt, it highlights the regional diversities while staying true to its roots.

    Ingredient Deep Dive


    Tomatoes are the star of this recipe. Rich in history, they have been a staple in various cuisines worldwide, known for their versatility and nutritional benefits. Tomatoes are a good source of antioxidants, particularly lycopene, which has numerous health benefits including reducing the risk of heart disease.

    To choose the best tomatoes, look for those that are firm and deep red with a fragrant aroma. They should be stored at room temperature to maintain their flavor, only refrigerating if fully ripe to prolong shelf life. In case of unavailability, you can substitute red tomatoes with green ones for a tart alternative or opt for heirloom varieties for a colorful display.

    Breadcrumbs create the crispy crust synonymous with fried tomatoes. Choose seasoned breadcrumbs to add an extra layer of flavor, or make your own by toasting stale bread. They provide the necessary crunch that is integral to this dish, and fresh breadcrumbs are easily stored in an airtight container for extended shelf life. Substituting with panko breadcrumbs can make the coating lighter and crisper, enhancing the texture.

    Eggs play a crucial role in binding the coating to the tomato slices. As a reliable source of protein, they help build the essential structure of the crispy exterior. For storage, keep eggs in the refrigerator to maintain freshness. If dietary preferences require, eggs can be substituted with plant-based alternatives such as aquafaba.

    Common Mistakes to Avoid

    • Avoid slicing the tomatoes too thin, as this can lead to overcooking and a lack of texture differentiation between the coating and the tomato.
    • Ensure that the oil is adequately heated before frying; otherwise, the tomatoes may absorb excess oil and become soggy.
    • Do not overcrowd the pan, as it can lower the oil temperature and result in unevenly fried tomatoes.
    • Resist the urge to skip resting the tomatoes on a wire rack after frying, which helps to keep the coating crisp.
    • Avoid using overly ripe tomatoes, as they can lose their shape and become mushy during cooking.
    • Opt for neutral-flavored oils like vegetable or canola; using oils with strong flavors can overpower the taste of the tomatoes.
    • Be cautious with seasoning; over-salting can detract from the tomato’s natural flavors.
    • Don’t skip the breadcrumb-to-egg ratio; this balance ensures the ideal crust adhesion and texture.

    Essential Techniques


    Frying at the correct temperature is the cornerstone of mastering the perfect fried tomato. An ideal oil temperature of approximately 350°F (175°C) ensures that the tomatoes cook evenly while forming that coveted crispy crust without absorbing excess oil.

    Master the art of breading by setting up a systematic dredging station with flour, egg, and breadcrumbs. This will streamline your process and ensure every slice of tomato is perfectly coated, minimizing mess and maximizing efficiency.

    An often-overlooked visual cue for frying success is watching the tomato slices fry until the bubbling around each slice slows down significantly. This indicates the moisture content within the tomato has reduced adequately, achieving the optimal crispiness of the fried batter.

    Pro Tips for Perfect Fried Red Tomatoes


    Ensure the tomatoes are slightly chilled before preparation; this firmness aids in easier slicing and prevents them from being overly delicate during handling. Using a serrated knife provides better control and accuracy, resulting in uniform slices that cook evenly.

    Let the breaded tomatoes sit for a few minutes before frying, allowing the coating to adhere thoroughly, resulting in a more robust crust that stays intact during frying.

    Use a slotted spoon or spider skimmer for managing the tomatoes in the hot oil safely and efficiently, ensuring a quick and easy frying process with minimized risk of splashes and burns.

    Introduce a pinch of cayenne pepper to the breadcrumbs for a subtle hint of heat, balancing the sweetness of the tomatoes and adding depth to the overall flavor profile.

    Succinctly season the tomatoes before breading to lock in flavor, ensuring the final dish is rich in taste from the inside out rather than relying solely on the breading and seasoning.

    After frying, resist crowding the wire rack where the tomatoes rest; allow ample space to maintain optimal airflow and achieve a perfect crunch by draining excess oil thoroughly.

    Variations and Adaptations


    Southern states each have unique takes on fried red tomatoes. In some regions, adding a splash of hot sauce to the egg mixture introduces a zesty zing. Others might include cornbread crumbs in the breading mix for a distinctively Southern flair or even experiment with flavored oils.

    Seasonal adaptations can be a delightful twist; in autumn, you might integrate pumpkin spice into the seasoning mix for a warm, cozy flavor. In spring, serving them with fresh herbs like basil or dill enhances the tomatoes’ natural bite, lending a refreshing summery vibe.

    Dietary modifications are easily accommodated. For a vegan version, replace the egg wash with a mixture of non-dairy milk and a tablespoon of cornstarch. Those looking for gluten-free alternatives can substitute the breadcrumbs with crushed gluten-free crackers or cornbread mixture.

    The use of varying spices or herbs can inspire flamboyant flavor changes. Add fresh herbs like cilantro or oregano directly into the breadcrumb mix for a herbaceous enhancement. Alternatively, incorporating garlic powder or smoked paprika yields a more robust punch, boosting the savory element in each bite.

    For a texture modification, consider mixing in coarse cornmeal with the breadcrumbs; it will provide a coarser crunch that bursts with additional texture with every bite, offering a playful variation to the conventional recipe.

    When plating, stack the slices in a cascading fashion for a rustic look, or lean them against a ramekin filled with dipping sauce to create an elegant, modern presentation. Top them with a dollop of sour cream and chives for a contemporary, gourmet finish.

    Serving and Presentation Guide


    To create an eye-catching presentation, serve the fried red tomatoes on a decorative platter lined with fresh greens, such as arugula or baby spinach. This not only elevates the visual appeal but also adds a pop of color and freshness.

    Consider garnishing with thinly sliced green onions or a sprinkle of freshly grated Parmesan to enhance both the aesthetics and the flavor profile of the dish.

    Garlic aioli or a tangy remoulade sauce can be served alongside the tomatoes, offering contrasting flavors that complement and highlight their crisp tanginess.

    For a modern twist, stack the tomatoes alternating with layers of goat cheese or mozzarella, creating a savory take on the classic Caprese salad, providing a delightful balance of textures and tastes.

    Serving at room temperature is ideal, allowing the flavors to meld while ensuring the crust remains crisp and the tomatoes remain juicy.

    Portion control can be cleverly maintained by slicing tomatoes into even sizes, ensuring each serving is uniform, perfect for gatherings where consistency is desired.

    Wine and Beverage Pairing


    Pair these fried delights with a chilled glass of Sauvignon Blanc, which complements the tanginess of the tomatoes and cuts through the richness of the fried coating.

    For non-alcoholic options, a refreshing iced tea, particularly infused with citrus or mint, provides a subtle sweetness and freshness that accentuate the dish’s flavors.

    A robust cup of freshly brewed coffee adds depth, pairing uniquely with the savory notes of the recipe, making for an unexpected but delightful combination.

    Temperature is key; ensure that both alcoholic and non-alcoholic pairings are served crisp and cold to complement the textured warmth of the fried tomatoes.

    Present wine in large-bottomed glasses to allow for optimal aeration and flavor elevation, enhancing the pairing experience.

    Storage and Shelf Life


    Store leftover fried tomatoes in an airtight container in the fridge, consuming within 2 days for optimal freshness and taste.

    For best results, layer parchment paper between each slice to prevent them from clumping together and losing their crispy texture when reheating.

    A sign of spoilage includes an off aroma or sliminess; discard any slices that present these indicators to ensure quality and safety.

    Reheating is best done in an oven or air fryer to bring back the crispiness lost in refrigeration – avoid microwaving, which softens the crust.

    Freezing is not recommended as it can significantly alter the texture and integrity of the tomatoes upon thawing, detracting from the dish’s appeal.

    Make Ahead Strategies


    Prepare the dredging station and slice your tomatoes ahead of time, storing in the fridge. This readiness promotes efficiency when you’re ready to fry.

    Bread the tomato slices a few hours before you’re planning to serve, allowing them to firm up in the fridge before frying, enhancing the final texture.

    A quality impact assessment suggests briefly refrigerating the breaded slices can offer even better adherence of the coating when fried.

    For easy assembly later, store pre-prepared tomatoes in airtight containers with parchment layers, maintaining the integrity of the coating until use.

    Reheating guidelines point to using an air fryer or oven, which gently revives the crunchy texture without over-drying the tomatoes.

    Adding fresh herbs or a squeeze of lemon just before serving can revitalize pre-prepped tomatoes, ramping up the fresh flavor profile and presentation.

    Scaling Instructions


    When halving the recipe, maintain precise ratios of breadcrumbs and eggs to ensure even coating, minimizing food waste while retaining the dish’s quality.

    Doubling or tripling calls for careful spacing in the frying pan to avoid overcrowding, ensuring each slice fries up golden without absorbing excessive oil.

    Big batch preparation may require scaling up your tools; consider using a larger frying pan or working in batches to accommodate the additional slices.

    Timing modifications may be necessary when scaling, adding a few minutes to each cooking batch to ensure all slices reach the perfect crispness.

    Store the cooked slices in a warm oven between batch fryings to keep them crisp and hot until all are ready to serve.

    Nutritional Deep Dive


    Tomatoes are low in calories but rich in nutrients, providing a good source of vitamin C, potassium, and antioxidants. The frying process can add extra calories, primarily from the oil used, which should be factored into dietary plans.

    Macro breakdown reveals a balance between carbohydrates in the breading, fats from the frying oil, and proteins mainly from the egg coating.

    This dish offers micronutrients such as Vitamin A and K from the tomatoes and some B vitamins from the breadcrumbs, contributing to a balanced intake.

    Given the nutritional richness and relatively low-calorie content, these fried red tomatoes can fit into a diverse range of dietary preferences with considered portion sizing.

    Consumption tips suggest pairing with a light salad or lean protein to round out the nutritional profile, making it a comprehensive meal component.

    Weight management tips include enjoying the tomatoes as a flavorful side rather than the main entree, allowing you to indulge in their taste without overdoing calorie intake.

    Dietary Adaptations


    For those on gluten-free diets, replace regular breadcrumbs with gluten-free panko for similar texture without compromising dietary restrictions.

    Dairy-free versions can maintain their integrity by ensuring the egg wash remains purely egg-based, with no dairy required for crisp, perfect results.

    Vegans can quickly adapt this dish by using a flaxseed egg substitute, marrying well with gluten-free breadcrumbs for a plant-based crispy delight.

    To adapt to a low-carb lifestyle, pulverize pork rinds to substitute breadcrumbs, providing a unique, crisp crust without the carb content.

    Keto followers can adjust by using almond flour instead of traditional flour, crafting a dish compliant with keto guidelines while retaining fried deliciousness.

    Paleo-friendly modifications involve using arrowroot powder in place of flour and crushed nuts in place of breadcrumbs for a savory, compliant adaptation.

    For a low-FODMAP alternative, consider ripe tomatoes sparingly and appropriate flour and breadcrumb substitutes, allowing for enjoyment within dietary parameters.

    Troubleshooting Guide


    For texture issues, ensure the oil is correctly heated – inadequate temperature leads to oil absorption, causing sogginess.

    Achieving optimal flavor balance involves testing seasoned tomatoes before frying, as under-seasoning can leave them bland despite a crispy coating.

    Temperature problems often stem from overcrowding the pan, lowering oil heat; frying in small batches maintains the ideal frying temperature.

    Equipment challenges such as inadequate drainage must be overcome by using a wire rack post-frying to preserve the crunch and avoid excess oil.

    Substituting key ingredients may affect the taste balance and texture. Consider replacement effects and compensate with additional seasonings when necessary.

    Timing concerns can cause uneven cooking; ensuring similar-sized tomato slices promotes uniform cooking, thus maintaining consistency across batches.

    Recipe Success Stories


    Reader feedback consistently highlights the incredible simplicity of preparing these tomatoes while achieving gourmet results that delight both family and friends.

    Some have found success introducing regional spices as an adaptation, giving the dish a personal touch and resulting in unique flavor profiles.

    Community stories echo a shared love for pairing fried red tomatoes with other Southern staples, enhancing communal meals and shared dining experiences.

    Photographic tips from culinary enthusiasts suggest capturing the vibrant reds with natural lighting to highlight the deliciousness and professional flair.

    With unlimited adaptations possible, readers often find personalized ways to tweak the base, ensuring perfect results catered to individual tastes and dietary needs.

    Frequently Asked Questions

    Can I use green tomatoes instead of red? Yes, green tomatoes offer a firmer texture and tangier taste, making them an excellent substitute in this recipe.

    What type of breadcrumbs work best? Panko breadcrumbs provide a lighter, crispier coating, while traditional breadcrumbs give a denser crunch—either can be used based on preference.

    Is it necessary to peel the tomatoes? No, keeping the skin on adds an extra layer of texture, although personal preference can dictate peeling for a softer bite.

    What oils are best for frying? Neutral oils like canola or vegetable oil are preferred, as they do not overpower the taste of the tomatoes, maintaining their natural flavor.

    How do I achieve a non-soggy crust? Ensure the tomato slices rest on a wire rack post-frying to allow any excess oil to drip off, preserving the crunch.

    Can I make these in an air fryer? Yes, air frying is an excellent alternative to reduce oil use, requiring only slight adjustments for crispiness and texture.

    Will the crust hold with gluten-free breadcrumbs? Absolutely, using gluten-free breadcrumbs can still achieve the desired crispiness while adhering well through proper egg wash techniques.

    Are these suitable for freezing? Freezing is not recommended; freshly fried or reheated from the fridge offers the best texture and flavor.

    Any tips for slicing the tomatoes? Use a serrated knife; its saw-like edge provides clean cuts and reduces juice loss during slicing.

    Can spices be added to the breading? Yes, adding spices directly to the breadcrumbs enhances flavor depth, allowing personalization to taste preferences while customizing your dish.

    Additional Resources


    Explore more Southern-inspired recipes on our blog for authentic flavors and innovative twists on classic dishes, offering a culinary journey through heritage-rich meals.

    Enhance your technique by delving into our frying guide, offering comprehensive insights into achieving the crisp and golden finish that defines fried perfection.

    Discover fascinating ingredient histories and usage tips through our detailed series, tracing the journeys of culinary staples like tomatoes and their role in world cuisines.

    Our equipment recommendations provide time-tested feedback on achieving professional results with home tools, enabling anyone to create exceptional fried recipes with ease.

    Seasonal variations guides provide expert advice on adjusting recipes to harmonize with fresh produce availability, ensuring premium flavor and nutrition year-long.

    Join the Conversation


    Engage with fellow readers by sharing your fried red tomato creations on social media, tagging us to join a community of culinary enthusiasts who celebrate this classic dish.

    Refine your photography skills with tips from our expert photographers, helping your dish shine visually on social platforms through the lens of appetizing artistic presentation.

    Leave a heartfelt review or personal tweak in the comments, inspiring fellow travelers on their culinary adventures and opening doors to shared creative insights.

    Participate in our interactive community forums for new takes, adaptations, and exciting recipe challenges that make kitchen explorations both rewarding and fun.

    Create a legacy of family variations by documenting your discoveries and adaptations, enriching the shared tradition of fried red tomatoes for the next generation.

    The Recipe

    Fried Red Tomatoes

    Serves: 4

    Prep Time: 15 mins

    Cook Time: 10 mins

    Total Time: 25 mins

    Kitchen Equipment Needed

    • Skillet or frying pan
    • Wire rack
    • Serrated knife
    • Mixing bowls
    • Tongs or slotted spoon

    Ingredients

    • 4 medium red tomatoes
    • 1 cup all-purpose flour
    • 2 large eggs
    • 1 cup breadcrumbs
    • Salt and pepper to taste
    • Vegetable oil for frying

    Directions

    1. Slice each tomato into 1/4-inch thick rounds, and season with salt and pepper.
    2. Set up a dredging station with separate bowls for flour, beaten eggs, and breadcrumbs.
    3. Heat oil in a skillet over medium heat until shimmering.
    4. Coat each tomato slice first in flour, then egg, and finally breadcrumbs, pressing lightly.
    5. Fry the tomatoes in batches for 3 minutes per side, until golden brown.
    6. Transfer to a wire rack to drain excess oil and maintain crispiness.

    Recipe Notes

    • Add cayenne pepper to breadcrumbs for a spicy kick.
    • Use panko breadcrumbs for a lighter, extra crispy finish.
    • Serve with aioli or remoulade for enhanced flavor.

    Festive Red Velvet Wreath Cake Recipe for the Holiday Season

    Red Velvet Wreath Cake: A Festive Delight

    ⚖️
    Difficulty
    Intermediate

    ⏲️
    Prep Time
    30 mins

    🕒
    Cook Time
    50 mins

    ⏱️
    Total Time
    80 mins

    🍽️
    Servings
    10-12

    Imagine slicing into a beautifully decorated Red Velvet Wreath Cake at your next holiday gathering. The bright red sponge layers spell cheer and festivity, while the creamy frosting provides the perfect balance. This red velvet cake, shaped into a delightful wreath, is a visual and culinary delight that combines vibrant colors with rich flavors. Ideal for Christmas or Valentine’s Day, this Red Velvet Wreath Cake is easy enough for casual get-togethers yet elegant for formal occasions.

    The irresistible tang from the cream cheese frosting pairs perfectly with the soft, moist cake, creating a harmonious blend of textures and flavors in every bite. As the cake bakes, its aromas fill the kitchen, evoking warmth and anticipation. Whether you’re looking to impress your family or make your holiday dessert table extra special, this recipe promises to be a centerpiece both beautiful and delicious.

    Quick Recipe Highlights

    • Flavor Profile: This Red Velvet Wreath Cake blends a hint of cocoa with rich vanilla, offering a subtle but distinct depth of flavor enhanced by the creamy, slightly tangy frosting.
    • Texture: Soft and tender, each slice melts in your mouth with a light crumb, contrasted by the smooth and velvety frosting.
    • Aroma: The rich scent of cocoa and vanilla baking is complemented by the aromatic tang of cream cheese frosting.
    • Visual Appeal: With its vibrant red hue blanketed in snowy white frosting, the wreath shape adds a festive visual punch perfect for any celebration.
    • Skill Level Needed: While the recipe requires some baking fundamentals, the techniques are approachable for most home bakers with a little patience.
    • Special Equipment: A bundt pan is essential to shape the cake into its signature wreath form, alongside basic baking tools like mixers and measuring cups.

    Recipe Overview

    • Difficulty Level: This Red Velvet Wreath Cake is classified as intermediate due to its specific decoration requirements and mastering the right level of moisture and texture in the cake.
    • Category: This dessert sits comfortably in the sweet treat category perfect for after-dinner indulgence or special occasions.
    • Cuisine: Rooted in American tradition, red velvet cake has regional ties to the South, and has become a holiday staple due to its iconic color and flavor.
    • Cost: Generally, the cake is quite affordable, using standard baking ingredients, with a slight splurge on quality cocoa powder and cream cheese.
    • Season: Best enjoyed during the holidays, its bright red color and creamy frosting make it a fitting wintertime treat.
    • Occasion: Ideal for celebrations, the Red Velvet Wreath Cake is perfect for Christmas, anniversaries, or any festive gathering.

    Why You’ll Love This Recipe

    Firstly, the Red Velvet Wreath Cake is a crowd-pleaser due to its distinctive flavor that marries mild cocoa with sweet vanilla, enhanced with a creamy, tangy frosting. This combination creates a taste profile that is nuanced yet universally appealing, making every bite a delight.

    The convenience of preparing this cake will win over any baker. With a total baking and preparation duration of under two hours, it’s manageable even amidst busy schedules. Its striking appearance upon completion brings sophistication to your spread without an overwhelming commitment of time and effort.

    Further, the red velvet cake offers surprising nutritional benefits. The use of natural color enhancers like beet juice or powders for the red tint can replace artificial dyes, enhancing the cake’s health factor. The frosting, rich in dairy content, offers a modest source of calcium when consumed in moderation.

    Socially, serving this cake is bound to make any event memorable. Its vibrant red hue captures attention and becomes a conversational centerpiece at gatherings, providing a warm and inviting offering to your guests.

    Finally, this recipe remains cost-effective and easily accessible, mainly utilizing pantry staples. Opting for generic or store brands for certain ingredients can cut costs further without compromising taste or quality, ensuring a fancy-looking dessert does not translate to an extravagant expenditure.

    Historical Background and Cultural Significance

    The Red Velvet Wreath Cake, a variant of the classic red velvet cake, traces its origins to the late 19th century in the United States. Its initial purpose was more of a novelty, utilizing cocoa to soften the flour and create a tender crumb. The red hue originally derived from non-alkalized cocoa reacting with acidic components such as vinegar and buttermilk.

    Culturally, red velvet cake has its most profound ties in the American South, where it became a hallmark dessert associated with hospitality and warmth. Over time, red velvet evolved to become synonymous with celebration, from birthdays to weddings, and more prominently during the Christmas season due to its festive colors.

    As recipes spread and modernized, the cake’s associations broadened. The viral appeal of its hue and indulgent taste turned it into a Valentine’s Day favorite, symbolizing love and passion through its striking red coloration. Chefs and bakers continue to innovate with forms and decorations, like the wreath shape, keeping the red velvet tradition contemporary and exciting.

    Regional variations of red velvet cake have surfaced globally, each showcasing unique attributes while maintaining the core essence of the cake. Some integrate local spices, while others adapt the frosting flavors. However, the spirit of the original red velvet—celebratory and heartfelt—remains steadfast regardless of its rendition.