Irresistible Boston Cream Pie Cupcakes: A Decadent Delight
Irresistible Boston Cream Pie Cupcakes: A Delightful Twist on a Classic
⚖️
Difficulty
Medium
⏲️
Prep Time
30 mins
🕒
Cook Time
20 mins
⏱️
Total Time
50 mins
🍽️
Servings
12 cupcakes
Boston Cream Pie Cupcakes are a delightful fusion of flavors that bring a classic dessert to the palm of your hand. Imagine a rich, creamy vanilla custard nestled between layers of fluffy vanilla cupcake, all topped with a decadent chocolate ganache. The moment you take a bite, your taste buds will dance with joy at the harmonious blend of sweet, velvety textures and rich, bold flavors. Perfect for birthdays, dessert tables, or an indulgent treat for yourself, these cupcakes promise to enchant everyone.
This recipe marries nostalgia with modern convenience, making it easier than ever to create an impressive dessert. With every cupcake, you get the irresistible combination of moist cake, creamy filling, and a glossy chocolate coating. It’s a handheld treat that captures the spirit of the classic Boston Cream Pie while adding a fun twist that is sure to impress. Whether you’re an experienced baker or just starting, this recipe will guide you step-by-step to create a magical experience in your kitchen.
Quick Recipe Highlights
Flavor Profile: These cupcakes balance creamy sweetness with the richness of chocolate, embodying the beloved Boston Cream Pie flavor in every bite.
Texture: Expect a wonderfully soft and moist cake complemented by smooth custard and a luscious chocolate glaze.
Aroma: The inviting aroma of vanilla and chocolate mixture fills the kitchen as these cupcakes bake, making it hard to wait to try them.
Visual Appeal: The cupcakes are beautifully presented with a glossy chocolate top, creating a stunning contrast against the pale vanilla cake.
Skill Level Needed: While the recipe requires a few steps, it’s manageable for all skill levels, making it accessible yet impressive.
Special Equipment: Standard baking tools are sufficient, though a cupcake tin and piping bag elevate the appearance and ease of assembly.
Recipe Overview
Difficulty Level: The medium difficulty comes from preparing the custard and ganache but is rewarding as both can be made in advance.
Category: These cupcakes fall under the dessert category, perfect for satisfying your sweet tooth.
Cuisine: Boston Cream Pie originates from American cuisine, celebrating the sweet traditions of New England.
Cost: The ingredients are relatively inexpensive, making it a cost-friendly dessert for any occasion.
Season: These cupcakes are delightful year-round, suitable for any season or occasion.
Occasion: Perfect for birthday parties, holidays, or as a special treat to serve guests at gatherings.
Why You’ll Love This Recipe
Boston Cream Pie Cupcakes offer a unique taste experience that brings comfort and nostalgia in each bite. The harmonious pairing of vanilla, chocolate, and cream will evoke cherished memories, making these cupcakes perfect for any sweet occasion. Their delightful combination of moist vanilla cake and creamy custard creates a texture contrast you won’t forget. Each bite melts in your mouth, showcasing not just flavor but a delightful experience.
The convenience of this recipe shouldn’t be overlooked. While traditional Boston Cream Pie can be time-consuming, these cupcakes simplify the process, allowing you to enjoy the classic treat without the fuss. They’re perfect for baking ahead, letting you spend time enjoying your company instead of constantly in the kitchen. You can whip these up in a matter of minutes, with most of the time spent waiting for the cupcakes to cool or the ganache to set.
Nutritional benefits are also present, as these cupcakes use high-quality ingredients. Vanilla extract contains antioxidants, while eggs provide protein. Additionally, making them at home allows control over sweetness and quality—ensuring you enjoy a treat that’s both sweet and satisfying without unnecessary additives found in store-bought varieties.
Socially, these cupcakes are a great choice for gatherings. Their individual servings make them easy to share and enjoy among friends and family, promoting connection and celebration. Plus, the aesthetic appeal is sure to attract praise and conversation, enhancing your hosting experience.
Economically, Boston Cream Pie Cupcakes are a cost-effective treat. They utilize simple, widely-available ingredients that won’t break the bank, making them an ideal option for anyone looking to create a delicious dessert without overspending. You can treat yourself or guests to a gourmet dessert experience without the high cost.
Historical Background and Cultural Significance
The origin story of Boston Cream Pie traces back to the late 19th century, where it was first created by a French chef in Boston. Originally a cake rather than a cupcake, this dessert earned its name due to its layered structure resembling a pie. The pastry’s rise in popularity reflects America’s growing appreciation for both French baking techniques and American ingenuity.
Culturally, Boston Cream Pie has become emblematic of New England’s culinary heritage. The dessert was even declared the official state dessert of Massachusetts, solidifying its place in the hearts of locals and visitors alike. This recognition showcases the pie’s significance in representing the region’s warm, comforting spirit.
Over time, the recipe has evolved from its original format into various interpretations, including these delightful cupcakes. Bakers have embraced creativity, allowing for a wide array of flavors and textures, ultimately transforming it into a versatile dessert enjoyed by many.
Regional variations abound, with different areas putting their spin on the traditional recipe. Some might incorporate fruit fillings or different cake bases, showcasing the adaptability of this historic dessert that continues to thrive across the nation.
Ingredient Deep Dive
Vanilla is a key ingredient in these Boston Cream Pie Cupcakes, celebrated for its rich flavor and aroma. Historically, vanilla has been used across cultures as a flavor enhancer and natural sweetener. Nutritionally, vanilla contains antioxidants that may provide various health benefits, including improved quality of life. When selecting vanilla, opt for pure extract over artificial versions for the best flavor profile. Store it in a cool, dark place to maintain its potency.
Flour is another fundamental component, supplying structure to the cupcakes. High-quality flour ensures a light texture, a critical element in achieving the desired fluffiness. Whole wheat or gluten-free alternatives are available for those with dietary restrictions. Proper storage in an airtight container will prevent spoilage and clumping.
Eggs serve as a crucial binding agent while adding rich flavor and moisture. They deliver protein and essential nutrients, enhancing the overall nutritional profile of the cupcakes. When selecting eggs, fresh and organic options are recommended for quality assurance. Store them in the refrigerator to extend their freshness.
Milk contributes to the moistness and richness of the batter. Using whole milk or a dairy-free alternative can influence the cupcakes’ texture, so choose based on dietary preferences. Milk should be stored in the refrigerator and consumed before its expiration to prevent spoilage.
Chocolate is what creates the luscious ganache. High-quality dark chocolate adds depth to the flavor and enhances the overall richness of the dessert. When choosing chocolate, aim for brands containing at least 60% cocoa. Proper storage involves keeping it in a cool, dry place away from light to preserve flavor.
Common Mistakes to Avoid
Overmixing the Batter: Mixing too long can incorporate excess air, leading to dry, tough cupcakes. Mix just until ingredients are combined for the best texture.
Incorrect Oven Temperature: An oven that’s too hot or too cool can impact baking times and results. Always preheat your oven to ensure even baking.
Not Letting Cupcakes Cool: Removing cupcakes too soon can result in broken tops. Letting them cool in the pan for a few minutes ensures they set properly.
Poor Custard Handling: Custard can curdle if heated too quickly. Stir gently and maintain low heat to achieve a smooth consistency.
Using Cold Ingredients: Cold butter or eggs can lead to uneven
Delicious Greek Lemon Chicken and Potatoes Recipe for Dinner
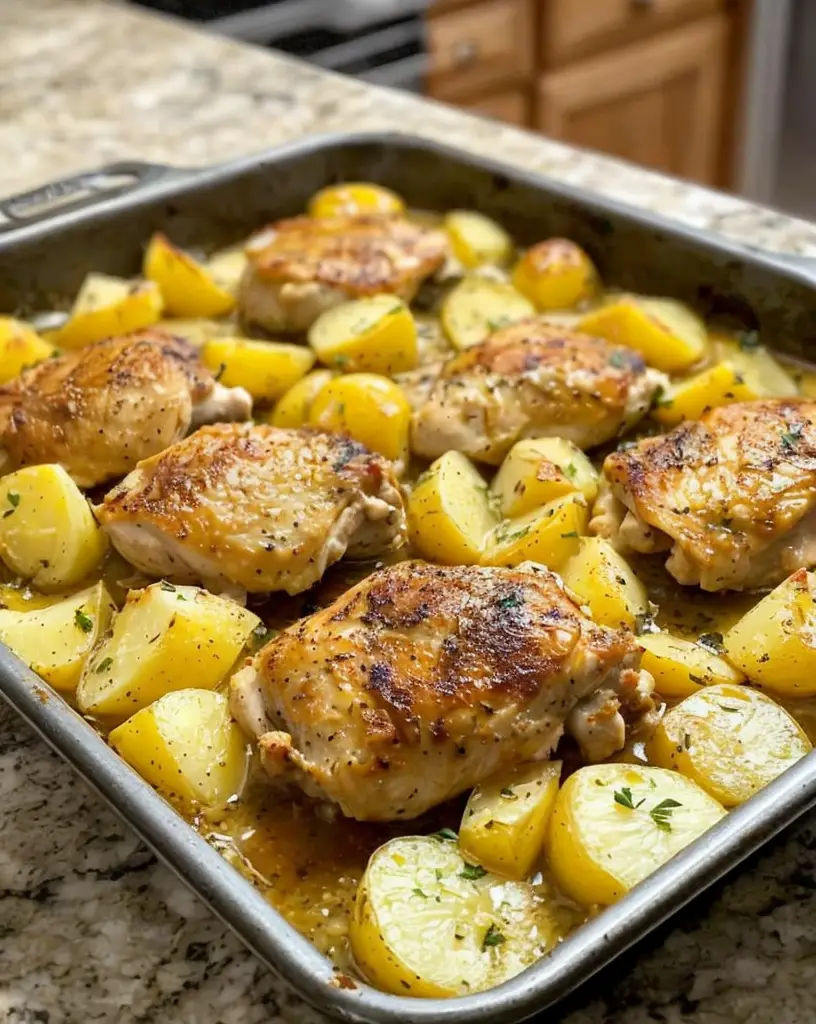
Greek Lemon Chicken and Potatoes: A Flavorful Mediterranean Delight
⚖️
Difficulty
Easy
⏲️
Prep Time
15 mins
🕒
Cook Time
45 mins
⏱️
Total Time
60 mins
🍽️
Servings
4 servings
Welcome to the vibrant world of Mediterranean cuisine with our Greek Lemon Chicken and Potatoes recipe. This dish combines succulent chicken marinated in zesty lemon juice and flavored with aromatic herbs, all lovingly roasted alongside golden, crispy potatoes. With every bite, you’ll experience the fresh and lively flavors of Greece, making this dish not just a meal, but an experience that transports you to sun-drenched shores and bustling tavernas. Ideal for family gatherings or a cozy dinner at home, this recipe embodies warmth, simplicity, and the joy of good food shared with loved ones.
The bold aromas of garlic and oregano mingle beautifully, while the tangy lemon brightens the rich flavors of the chicken and potatoes, creating a harmony that is truly satisfying. Imagine serving this colorful platter at your next dinner party, delighting your guests not only with a delicious dish but also with its beautiful presentation. It’s time to gather your ingredients and embark on this culinary adventure!
Quick Recipe Highlights
Flavor Profile: This Greek Lemon Chicken and Potatoes dish boasts a blend of citrusy brightness from fresh lemons, earthiness from potatoes, and a hint of savory herbs.
Texture: Enjoy tender, juicy chicken contrasted with crispy glazed potatoes that provide a delightful crunch, ensuring a satisfying mouthfeel with every bite.
Aroma: The aroma of roasted garlic combined with fresh lemon and herbs will fill your kitchen, invoking warm, homely feelings.
Visual Appeal: This dish is as visually inviting as it is delicious, with golden-brown chicken and vibrant, roasted potatoes accentuating your dinner table.
Skill Level Needed: This recipe is beginner-friendly, making it simple for new cooks but offering enough depth of flavor to please experienced chefs.
Special Equipment: All you need is a baking dish or sheet, a knife for prep, and basic kitchen utensils.
Recipe Overview
Difficulty Level: With straightforward steps and minimal techniques required, this recipe is labeled as easy, perfect for anyone looking to impress with minimal fuss.
Category: This dish fits wonderfully as a main course for family dinners, and it’s also a great option for meal prep, adding variety to your weekly menu.
Cuisine: Rooted in Greek culinary traditions, this recipe highlights the importance of fresh ingredients, simple flavors, and communal dining experiences.
Cost: The ingredients used are affordable and easy to source, making this dish a budget-friendly option without sacrificing quality or flavor.
Season: Enjoy this recipe year-round, but it shines particularly in the warmer months when fresh herbs are abundant and outdoor dining is a pleasure.
Occasion: Perfect for any gathering, from casual weeknights to festive celebrations, this dish tells a story of love and enjoyment around the dinner table.
Why You’ll Love This Recipe
This Greek Lemon Chicken and Potatoes will quickly become a favorite for many reasons. Its taste and texture offer a delightful balance of savory chicken with a hint of citrus freshness that brightens the palate. The tender meat paired with crispy potatoes creates an enjoyable contrast that elevates the entire meal experience.
Not only is this recipe delicious, but it also offers convenience in preparation. With simple steps and a hands-off cooking process, it allows you to engage with family or relax while the oven does the work. This dish is fuss-free yet presents beautifully, making it ideal for entertaining guests.
Health-wise, this dish packs an array of nutrients, thanks to the wholesome ingredients. Chicken is a great source of protein, while the potatoes provide carbohydrates and fiber. With fresh herbs and lemon, you also gain additional vitamins and antioxidant benefits, providing both flavor and nutrition in every bite.
Furthermore, this recipe is perfect for social gatherings. The warm, inviting aroma and colorful presentation create an appealing atmosphere, encouraging everyone to come together and share their love for food. This dish encourages conversation, laughter, and connection, enhancing any dining occasion.
Finally, its accessibility and cost-effectiveness set it apart from other complex recipes. The straightforward preparation and common ingredients make it a go-to option for both special occasions and everyday meals. Impressing your family or guests has never been easier!
Historical Background and Cultural Significance
Greek cuisine is known for its emphasis on fresh, high-quality ingredients, and this dish exemplifies that ethos perfectly. Originating in the Mediterranean region, Greek food celebrates the use of local produce, meats, and herbs, deriving its unique flavors from traditional cooking methods and local customs. Lemon chicken has been a staple in Greek households for generations, reflecting the agricultural abundance found in the region.
The significance of sharing meals in Greece cannot be overstated. Food is central to social gatherings and family life, where dishes like Greek Lemon Chicken and Potatoes invite people to gather around the table. This recipe encapsulates the essence of Greek hospitality, known as “philoxenia,” which translates to love of strangers, showcasing the welcoming nature of Greek culture.
Over time, the recipe has evolved, with numerous variations emerging in different regions of Greece, incorporating local ingredients and family traditions. This adaptability ensures that the dish remains a comforting and familiar option for many while allowing for personal touches to be added by each cook.
Regional variations can be seen with the use of different herbs or additional vegetables, reflecting personal and family preferences. This flexibility makes Greek Lemon Chicken and Potatoes not just a recipe, but a canvas for creativity, personalization, and culinary exploration.
Ingredient Deep Dive
– Chicken: Historically, chicken has been a preferred protein in Greek cuisine, valued for its versatility and availability. Rich in protein, chicken is beneficial for muscle health and overall nutrition. Choosing organic or free-range options tends to enhance flavor and quality. For storage, keep raw chicken refrigerated and use within 2 days for optimal freshness.
– Potatoes: A staple food in Greece, potatoes are embraced for their adaptability in recipes. They provide necessary carbohydrates and fiber, making them a filling addition. Look for firm potatoes without blemishes. Store in a cool, dry place. If you’re out of potatoes, consider substituting with sweet potatoes for a unique twist.
– Olives: A quintessential component of Greek cooking, olives add rich, briny notes that enhance many dishes. They are loaded with healthy fats, particularly oleic acid, which supports heart health. Choose high-quality olives and store them in brine for longevity. If unavailable, consider using sundried tomatoes as a substitute.
– Fresh Herbs: Oregano, thyme, and parsley bring freshness and complexity to the dish. Excellent sources of antioxidants, these herbs contribute both flavor and nutritional benefits. Purchase fresh herbs when possible for maximum flavor, and store them in a damp paper towel in the fridge. Dried alternatives can be used, but adjust quantities as needed.
– Lemons: The bright acidity of lemons not only flavors the dish but also enhances the overall aesthetic appeal. Lemons are packed with vitamin C and can aid digestion. Opt for organic lemons when possible. Store them at room temperature if used frequently or in the fridge for longer shelf life.
Common Mistakes to Avoid
Over-marinating the chicken can lead to a soggy texture; limit marinading time to 30-60 minutes.
Using unseasoned potatoes might result in blandness; seasoning them well ensures a flavorful bite.
Not letting the chicken rest after cooking can result in loss of juiciness, so allow it to sit for a few minutes.
Skipping olive oil can lead to dry chicken; a generous drizzle keeps everything moist and flavorful.
Ignoring cooking times can lead to undercooked or overcooked chicken; use a meat thermometer for accuracy.
Overcrowding the baking dish can prevent even cooking; use two dishes if needed to ensure proper heat circulation.
Choosing low-quality ingredients can diminish the overall flavor; invest in fresh, high-quality components.
Not adjusting seasonings after cooking can lead to unbalanced flavors; taste before serving and adjust accordingly.
Failing to preheat the oven can affect cooking times; always ensure the oven is properly heated before starting.
Not using enough lemons can lead to a dull taste; zest and juice generously for the best results.
Essential Techniques
Marinating chicken is crucial for flavor and tenderness. Use citrus, oil, and herbs to boost flavor profiles. Avoid long marinades as they can negatively affect the chicken’s texture; 30-60 minutes is ideal. Look for a silky texture before cooking, indicating the marinade has properly absorbed.
Roasting techniques elevate the dish’s flavor. Start with high heat to achieve a crispy exterior, followed by lower heat to cook through without drying out. Keep an eye on the color—golden-brown is the goal. Use a meat thermometer to check for doneness, targeting 165°F (75°C) in the thickest part of the chicken.
Pro Tips for Perfect Greek Lemon Chicken and Potatoes
– Opt for bone-in chicken pieces for extra flavor and juiciness compared to boneless cuts.
– Use a combination of yellow and red potatoes for color variety and different textures.
– Don’t skip the fresh herbs; they greatly enhance the flavor profile and aesthetic appeal.
– For a crispy finish, consider broiling the chicken for a few minutes before serving.
– Adding lemon slices on top of the chicken while baking enhances both flavor and appearance.
– Experiment with additional spices, like smoked paprika, for a unique flavor twist.
– Serve with extra lemon wedges on the side for guests to customize their plates.
– Pair this dish with a crisp Greek salad to add freshness and balance to the meal.
Variations and Adaptations
Regional variations of this dish may include the addition of Kalamata olives or capers for a tangy burst of flavor representative of Greek cuisine. In the summer, you can add seasonal vegetables like zucchini or bell peppers alongside the chicken and potatoes, enhancing the dish’s freshness.
For vegan adaptations, substitute chicken with marinated tofu or tempeh, ensuring to allow marination time to absorb the flavors. The potatoes can then be roasted with additional vegetables to create a hearty, flavorful meal.
Consider seasonal adaptations by incorporating herbs like rosemary in winter for a heartier flavor profile, whereas, in spring, fresh dill could brighten the dish beautifully. Feel free to play with spices to reflect your own taste preferences!
Serving and Presentation Guide
For an appealing presentation, serve the chicken and potatoes on a large platter, garnished with freshly chopped herbs. Consider adding lemon wedges around the circumference for a bright touch.
Use rustic serving dishes to enhance the Mediterranean vibe, and consider pairing the dish with a colorful salad, such as a traditional Greek salad, featuring feta cheese and olives to add additional textures and flavors.
Temperature is key for serving; ensure your dish is hot, but let it rest for a few minutes before carving for improved juiciness. For portion control, consider serving individual plates family-style, allowing guests to serve themselves.
Wine and Beverage Pairing
White wines such as Sauvignon Blanc or a crisp Greek Assyrtiko complement the citrusy notes of the dish beautifully, providing a refreshing contrast. Rose wine also works marvelously, enhancing the summer-inspired flavors while keeping the palate clean.
If you’re looking for non-alcoholic options, consider serving sparkling water flavored with lemon and mint to echo the dish’s freshness. Herbal infusions such as ginger tea can also serve well, balancing the richness of the meal with their brightness.
When serving coffee or tea, opt for lighter varieties that don’t overpower; a refreshing mint tea works particularly well, enhancing the Mediterranean experience.
Storage and Shelf Life
To store leftover Greek Lemon Chicken and Potatoes, place them in an airtight container and keep them in the refrigerator for up to three days. When reheating, make sure to do so in the oven or microwave until thoroughly heated through.
For longer storage, you can freeze the dish for up to three months. Make sure to use a freezer-safe container and label it with the date.
When reheating frozen portions, allow them to thaw overnight in the refrigerator or use the microwave for quick defrosting. Always reheat to a safe internal temperature of at least 165°F (75°C) to ensure food safety.
Make Ahead Strategies
You can marinate the chicken the night before, allowing the flavors to develop much deeper. Simply place the marinated chicken in a covered container in the fridge, then cook it when ready.
For potatoes, you can prep them by washing, peeling, and cutting them in advance, storing them in water to prevent browning. Just drain and season them when you’re ready to cook.
If you’re hosting, consider preparing a side salad ahead of time; it complements the main dish beautifully while saving you time on the day of the event.
Scaling Instructions
If you’re looking to halve the recipe, maintain the same flavor balance—just adjust cooking times as necessary. When doubling or tripling, ensure your baking dish is large enough to accommodate all components without overcrowding.
For times, you may need to increase overall cooking time slightly, checking for doneness with a meat thermometer. Be cautious not to overcook chicken, adjusting oven temperature or using multiple pans when necessary.
When scaling, keep storage considerations in mind; larger portions may require larger containers for proper refrigeration or freezing.
Nutritional Deep Dive
This Greek Lemon Chicken and Potatoes dish offers a solid macro breakdown, featuring lean protein from the chicken, complex carbohydrates from the potatoes, and healthy fats from olive oil. Portion control ensures balanced servings of every nutrient.
In terms of micronutrients, the dish is rich in vitamins C and B6, essential for immune function and energy metabolism, thanks to the lemon and chicken. Fresh herbs contribute antioxidants, promoting overall health.
This recipe supports weight management due to its high protein and fiber content, both of which provide satiety, helping to manage hunger levels effectively.
Dietary Adaptations
For gluten-free adaptations, this recipe is naturally gluten-free as all key ingredients do not contain gluten. Just be cautious of any cross-contamination with packaged ingredients.
If vegan, replace chicken with hearty vegetables or plant proteins. For a dairy-free option, simply omit cheese garnishes or creamy sides.
For low-carb diets, focus on using fewer potatoes or substitute them with cauliflower to create a lower-carb version while maintaining overall flavor.
For paleo diets, ensure to use fresh, whole foods and avoid processed ingredients, sticking to the natural ingredients in this recipe.
Troubleshooting Guide
If the chicken turns out dry, it may have been overcooked. Always use a meat thermometer to achieve the perfect temperature without exceedance.
Should the potatoes come out mushy, they were likely overcooked; ensure to check them frequently during the roasting process.
If flavors are unbalanced, take notes on portion sizes and adjust herbs and spices as per your preference in future attempts to suit your taste better.
Similar issues with texture could arise from improperly preheating your oven; ensuring it’s at the correct temperature before cooking can greatly impact final results.
Recipe Success Stories
Many home cooks have shared their successes, praising the dish for its relatable flavors and ease of preparation. Variations with seasonal vegetables have been particularly well-received, allowing everyone to personalize their experience.
Others have noted how it becomes a staple for family dinners, with readers often expressing their delight at how quickly it comes together. It’s created wonderful moments around the dinner table, connecting loved ones over shared deliciousness.
Photography tips offered by many community members, featuring vibrant colored plates and garnish suggestions, have showcased the beauty of this dish, making it a showstopper event after event.
Frequently Asked Questions
How long can I store leftovers?
You can safely store leftovers in the refrigerator for up to three days, or freeze them for up to three months.
Can I use different types of potatoes?
Yes, feel free to use any potatoes you prefer—golden, red, or even sweet potatoes can work beautifully in this recipe.
What herbs can I substitute?
If you don’t have oregano, try thyme or rosemary, which also capture some of the Mediterranean flavor profile.
Can I make this dish in advance?
Marinating the chicken overnight is a great make-ahead strategy, and you can prep the potatoes in advance as well.
Is this recipe suitable for meal prep?
Yes, portioned servings are perfect for meal prep! Simply reheat as needed during the week for quick, delicious meals.
What should I serve with this dish?
A Greek salad, tzatziki sauce, or crusty bread pair excellently with Greek Lemon Chicken and Potatoes.
Can I use skinless chicken?
Skinless chicken is workable but may lack some of the richness that the skin contributes. Adjust cooking time accordingly.
How spicy is this recipe?
This dish is mild; however, you can add red pepper flakes for a spicy kick if you prefer!
Can I use fresh tomatoes?
Absolutely! Fresh tomatoes can be a lovely addition, adding an extra layer of flavor.
Do I have to use lemon?
Lemon is a key component, but other citrus fruits like orange can be used for a sweeter flavor profile.
Additional Resources
Explore related recipes to expand your Mediterranean cooking repertoire, including flavorful Greek salads, tzatziki sauces, and other delightful main courses that share similar vibrant profiles. Consider technique guides for marinating and roasting chicken to further enhance your culinary skills.
For ingredient information, learning about the local flora of Greek cuisine can help in selecting the freshest herbs. Equipment recommendations can help ensure you have everything you need for optimal results, from sturdy roasting pans to quality kitchen knives.
Stay inspired with seasonal variations; think about combining this recipe with vegetables that are in season to add freshness and variety to your meals.
Join the Conversation
Engage with our community by sharing your unique experiences with this Greek Lemon Chicken and Potatoes recipe. Share your cooking tips, adaptations, and feedback through social media, enhancing our shared love for delicious food.
Photography enthusiasts can explore ways to capture the dazzling colors and textures of the dish, offering guidance and inspiration to others looking to showcase their culinary endeavors.
Don’t forget to leave a review and suggest any variations you’ve made to this beloved recipe—we love hearing from our community members and learning about your journey in the kitchen!
The Recipe
Greek Lemon Chicken and Potatoes
Serves: 4 servings
Prep Time: 15 mins
Cook Time: 45 mins
Total Time: 60 mins
Kitchen Equipment Needed
Baking Dish
Knife
Cutting Board
Cooking Spoon
Meat Thermometer
Ingredients
4 chicken thighs, bone-in
2 pounds potatoes, cut into wedges
1/4 cup olive oil
Juice and zest of 2 lemons
4 cloves garlic, minced
2 teaspoons dried oregano
Salt and pepper to taste
Fresh parsley for garnish
Directions
Preheat your oven to 400°F (200°C). In a large bowl, combine olive oil, lemon juice, lemon zest, garlic, oregano, salt, and pepper.
Add chicken thighs to the bowl, ensuring they are well coated in the marinade. Let marinate for at least 30 minutes.
Place potatoes in a separate bowl and drizzle with olive oil, salt, pepper, and any leftover marinade.
Arrange the chicken in a baking dish, placing the potatoes around them.
Bake for 45 minutes or until chicken is cooked through and reaches an internal temperature of 165°F (75°C) and the potatoes are golden brown.
Let rest for a few minutes before serving. Garnish with fresh parsley.
Recipe Notes
For added depth, you can include sliced onions or other vegetables in the roasting pan.
Feel free to adjust marination time based on your schedule; up to overnight is wonderful.
Leftovers can be stored in an airtight container and refrigerated for up to three days.
Delicious Garlic Parmesan Crusted Chicken for Easy Weeknight Dinners
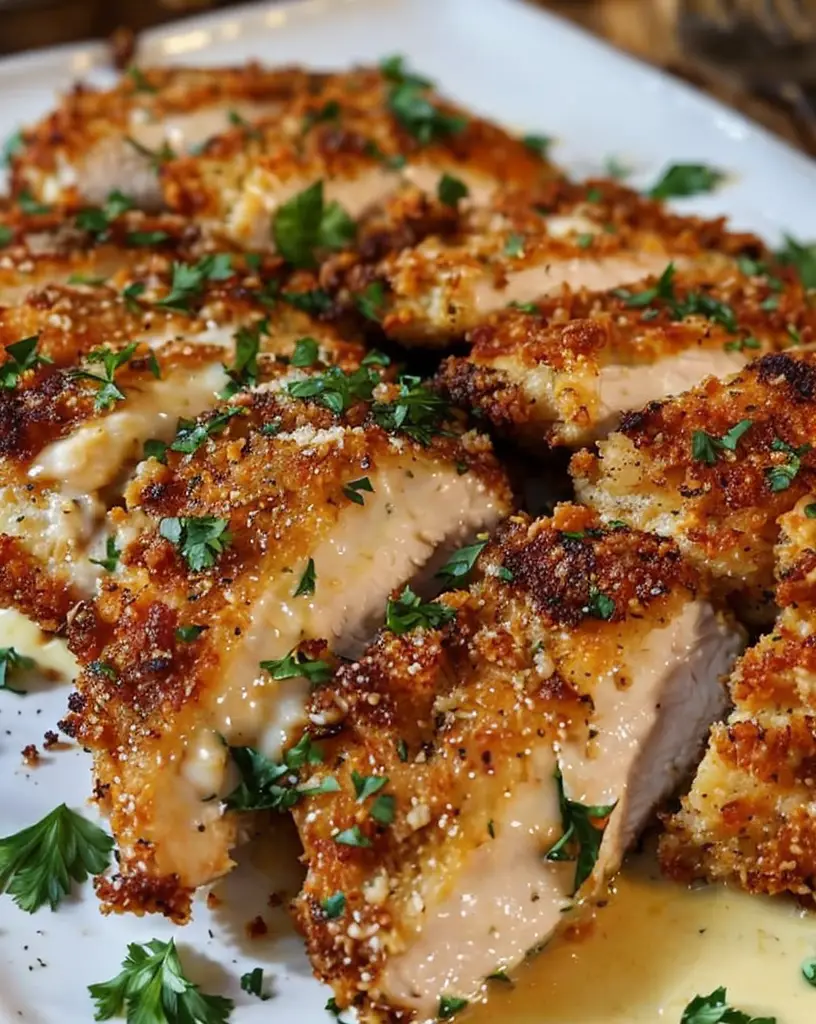
Garlic Parmesan Crusted Chicken: A Flavorful Delight
⚖️
Difficulty
Easy
⏲️
Prep Time
15 mins
🕒
Cook Time
30 mins
⏱️
Total Time
45 mins
🍽️
Servings
4 servings
Garlic Parmesan Crusted Chicken is a mouthwatering dish that is sure to impress family and friends with its rich flavors and satisfying crunch. In this simple yet exquisite recipe, chicken breasts are coated with a flavorful mixture of garlic, parmesan cheese, and breadcrumbs, creating a delectable crust that locks in the juicy tenderness of the chicken. As you take a bite, you’ll experience the harmonious blend of savory garlic and the nutty richness of parmesan, making it a true delight for your taste buds.
This dish is perfect for busy weeknights or special occasions, as it comes together quickly and easily, without sacrificing taste. The crispy crust paired with moist, tender chicken makes it a comforting choice for all ages. Whether served with a side of roasted vegetables or a fresh salad, Garlic Parmesan Crusted Chicken delivers a balance of flavors and textures that will make your dinner memorable.
Quick Recipe Highlights
Flavor Profile: The combination of garlic, parmesan cheese, and herbs provides an irresistible savory flavor with a touch of nuttiness.
Texture: The crispy outer layer contrasts beautifully with the juicy interior of the chicken, offering a satisfying bite.
Aroma: As the chicken cooks, the warm aroma of roasted garlic fills the kitchen, enticing everyone to the dining table.
Visual Appeal: The golden-brown crust on the chicken creates an appetizing contrast against its tender white meat, making it visually appealing.
Skill Level Needed: This recipe is approachable for cooks of all skill levels, making it an ideal choice for beginner chefs.
Special Equipment: Basic kitchen tools such as a baking sheet and mixing bowl are all you need for this easy recipe.
Recipe Overview
Difficulty Level: This Garlic Parmesan Crusted Chicken is categorized as easy, making it accessible even for novice cooks who are still learning their way around the kitchen.
Category: This dish is perfect for a main course, served alongside your favorite sides like pasta, rice, or vegetables.
Cuisine: While it embodies Italian influences through its use of parmesan and garlic, this recipe is adaptable and loved by many cultures worldwide.
Cost: The ingredients for Garlic Parmesan Crusted Chicken are relatively inexpensive, making it a cost-effective meal option.
Season: Ideal for any season, this dish’s warm flavors particularly shine during the colder months.
Occasion: Perfect for a family dinner, potluck, or gathering, this dish can easily be scaled for larger groups.
Why You’ll Love This Recipe
The taste and texture of Garlic Parmesan Crusted Chicken are truly captivating. The first bite reveals a wonderful crunch, followed by the juicy tenderness of the chicken. The robust flavor profile, enhanced by the garlic and cheese, creates a mouthwatering experience that keeps you coming back for more. Each serving encapsulates comfort food at its finest, sure to leave everyone satisfied.
In terms of convenience, this recipe is straightforward and quick, making it an excellent option for busy weeknights. With just 15 minutes of prep time and a total cooking time of 30 minutes, you can easily whip up a delicious homemade meal without the stress of complex techniques. The simplicity of the recipe allows for easy incorporation into your meal planning.
Nutritionally speaking, chicken is a great source of lean protein, aiding in muscle growth and repair while providing essential vitamins and minerals. Coupled with the healthy fats from the olive oil and the nutritional benefits of garlic, this dish not only tastes great but also supports a balanced diet.
Socially, this dish is an ideal choice for entertaining. The delightful aroma that wafts through the kitchen is bound to create a warm atmosphere, making your guests feel right at home. Garlic Parmesan Crusted Chicken is also versatile; it pairs well with many sides, making it easy to craft a complete meal that caters to various preferences.
Lastly, the cost-effectiveness of this recipe makes it an attractive choice for households on a budget. The ingredients are typically found in every pantry, and creating this flavorful dish at home is more economical than dining out. Plus, the satisfaction of serving a homemade dish is priceless.
Historical Background and Cultural Significance
The origins of garlic and chicken dishes can be traced back thousands of years, with garlic being revered in many ancient cultures for its health benefits. Garlic has long been used not only for its flavor but also for its medicinal properties. As for chicken, it has been a staple protein in various culinary traditions around the globe, cherished for its versatility and richness.
Garlic Parmesan Crusted Chicken, specifically, reflects the Italian culinary tradition, where using high-quality ingredients is paramount. The combination of garlic and parmesan is quintessentially Italian, representing comfort and indulgence. This dish allows home cooks to recreate the essence of Italian dining experiences in their own kitchens.
Over the years, this recipe has evolved, with variations adapting to different tastes and preferences. From the classic preparation to modern takes involving breadcrumbs and herb mixtures, each adaptation tells a story of culinary evolution, showcasing how traditional recipes can be enhanced while still retaining their essence.
Regional variations abound as well, with differences in seasoning and additional ingredients reflecting local tastes. For instance, some versions may incorporate herbs like basil or parsley, while others may suggest using different types of cheese, providing home cooks the flexibility to personalize the dish.
Ingredient Deep Dive
Chicken Breasts: This primary ingredient is favored for its lean protein content and versatility. Nutritionally, chicken breast is high in protein, low in fat, and a good source of B vitamins. Look for fresh, antibiotic-free chicken for the best quality, and store it properly in the refrigerator to maintain freshness. Substituting with turkey breast can be an option for a different flavor profile.
Parmesan Cheese: Known for its sharp, nutty flavor, parmesan cheese enhances many dishes, including this one. With its rich calcium content, it’s a great addition to a balanced diet. When choosing parmesan, opt for block cheese for a fresher taste, and keep it refrigerated. If you need a dairy-free option, consider nutritional yeast for a similar cheesy flavor.
Garlic: This aromatic bulb not only adds incredible flavor but also serves as a health powerhouse, known for its antioxidant properties. Fresh garlic should be selected for its potent flavor and nutritional benefits. Store garlic in a cool, dark place to avoid sprouting. For a milder flavor, roasted garlic can be used as a substitute.
Breadcrumbs: Essential for that crispy crust, breadcrumbs can be made from fresh or dry bread. They add texture and act as a binder for the ingredients. Whole-grain breadcrumbs can be a healthier option, and they should be stored in an airtight container. If gluten-free, use crushed gluten-free crackers or panko.
Common Mistakes to Avoid
Overcooking the chicken: To avoid dry chicken, ensure it is cooked to the proper internal temperature of 165°F (74°C).
Using stale breadcrumbs: Fresh breadcrumbs yield a better texture; always check the expiration date before using.
Not seasoning adequately: Make sure to season each component generously for optimal flavor.
Skipping the rest step: Letting the chicken rest for a few minutes after cooking ensures juiciness.
Using cold chicken: Allow chicken to sit at room temperature for 20-30 minutes before cooking for even cooking.
Choosing low-quality cheese: High-quality cheese makes a significant difference in flavor; opt for freshly grated parmesan.
Not preheating the oven: Always preheat your oven to ensure even cooking and proper crust development.
Neglecting to monitor the cooking time: Keep an eye on the chicken to prevent overcooking and maintain tenderness.
Using too much oil: Too much oil can make the crust soggy; a light drizzle is sufficient.
Not testing for doneness: Always use a meat thermometer to check for proper cooking temperature, rather than relying on cooking time alone.
Essential Techniques
Coating Techniques: Properly coating your chicken with breadcrumbs is essential for that crispy texture. Dredge in flour, dip in egg, and then coat in breadcrumbs for even coverage. Use your hands to press the breadcrumbs firmly onto the chicken for a better crust.
Cooking Method: Baking is a healthier alternative to frying while still yielding a crispy exterior. Ensure your baking sheet is lined or lightly greased to prevent sticking, and consider using a wire rack for better air circulation around the chicken.
Ingredient Preparation: Mincing garlic finely ensures an even distribution of flavor. When preparing your chicken, trim excess fat and pound the breasts to an even thickness for consistent cooking.
Meat Thermometer: Using a meat thermometer will guarantee that your chicken is cooked perfectly. Insert the thermometer at the thickest part of the meat without touching bone, aiming for an internal temperature of 165°F (74°C).
Pro Tips for Perfect Garlic Parmesan Crusted Chicken
Always season the chicken with salt and pepper before applying the crust for an extra flavor boost.
Mix in some Italian herbs with the breadcrumbs for added dimension, such as oregano or thyme.
For extra crispiness, broil the chicken for the last few minutes of cooking, keeping an eye on it to prevent burning.
Use freshly grated cheese rather than pre-shredded, as the latter often contains anti-caking agents that can affect melting.
Let the chicken rest after cooking; this keeps it juicy and allows flavors to meld.
For a lighter version, consider using almond flour or crushed nuts instead of breadcrumbs for a gluten-free option.
If you’re short on time, marinate the chicken in olive oil and garlic overnight for deeper flavor.
Melt some additional butter and brush it on the chicken before serving for a gorgeous finish and added richness.
Variations and Adaptations
If you’re looking to switch things up, consider trying different cheese varieties such as mozzarella or pecorino for a unique flavor profile. Adding herbs like rosemary or thyme can elevate the dish and add seasonal elements. For those who prefer a spicier kick, incorporating some red pepper flakes into the breadcrumb mixture will give your Garlic Parmesan Crusted Chicken an exciting twist.
For a seasonal adaptation, you can pair the chicken with fresh vegetables or a light salad in the summer. In fall or winter, serving it with creamy mashed potatoes or butternut squash adds comforting warmth. If you are following a specific diet, the recipe can easily be modified to be gluten-free using almond flour or gluten-free breadcrumbs, ensuring that everyone at your table can enjoy it without worry.
In terms of presentation, you can serve the chicken on a bed of sautéed vegetables or atop a fresh arugula salad for a touch of elegance. Drizzling balsamic reduction over the top gives a fancy finish and enhances the flavor profile.
Serving and Presentation Guide
Plating Garlic Parmesan Crusted Chicken can elevate your meal presentation significantly. Start with a simple white plate to let the dish shine. Place the chicken slightly off-center to allow room for sides, creating a visually interesting plate. Garnishing with fresh parsley or a sprinkle of extra parmesan adds a pop of color.
Consider serving with classic sides like roasted potatoes or steamed asparagus for a well-rounded meal. A small bowl of marinara sauce on the side can provide a flavorful dipping option. When serving, be mindful of portion sizes; a single chicken breast per person is typically sufficient, especially when accompanied by hearty sides.
Temperature is crucial for serving; allow the chicken to rest for a few minutes after cooking for optimal juiciness. Ensure that any sides are cooked and served hot to create a cohesive meal experience.
Wine and Beverage Pairing
When it comes to pairing beverages with Garlic Parmesan Crusted Chicken, opt for a crisp white wine like Sauvignon Blanc or a light-bodied red such as Pinot Noir. These wines complement the savory flavors of the chicken without overpowering it. If you prefer non-alcoholic alternatives, a sparkling water with lemon or a light iced tea works well, offering a refreshing counterpoint to the richness of the dish.
For a unique touch, consider pairing the meal with a light beer or cider, which echoes the dish’s comforting flavors and offers a nice balance. Always serve your beverages chilled, enhancing the overall dining experience.
Storage and Shelf Life
To store Garlic Parmesan Crusted Chicken, allow it to cool completely before placing it in an airtight container. Proper storage ensures freshness for up to three days in the refrigerator. For longer preservation, consider freezing the cooked chicken; properly wrapped in plastic wrap and aluminum foil, it can last for up to three months in the freezer.
When checking for spoilage, look for changes in color or smell before reheating. Reheating in an oven or air fryer is recommended to maintain crispiness; avoid microwaving as it may lead to sogginess. Always ensure that the chicken is heated to an internal temperature of 165°F (74°C) before consuming.
Make Ahead Strategies
You can prepare Garlic Parmesan Crusted Chicken in advance, making it perfect for meal prepping. The chicken can be coated with the breadcrumb mixture and refrigerated for up to 24 hours before cooking. This allows the flavors to deepen and makes for a quick dinner option.
To streamline your cooking process, you can also pre-chop your garlic and mix the breadcrumb coating in advance. Just store these ingredients separately in the refrigerator until you’re ready to cook.
If you’re looking to add fresh elements, consider preparing a salad or side dish the day of serving, ensuring that everything is fresh and delicious. This approach not only saves time but allows for a flavorful, stress-free meal.
Scaling Instructions
Scaling the Garlic Parmesan Crusted Chicken recipe can be done with ease. To halve the recipe, simply reduce each ingredient by half accordingly. For a larger gathering, doubling or tripling the ingredients will only require additional baking sheets and a slight extension in cooking time, ensuring everything is cooked evenly.
When adjusting quantities, remember to monitor the internal temperature of the chicken, as larger pieces may require more time to reach the desired doneness. If using a different size of baking sheets or pans, be aware that this could affect cooking time; smaller batches might cook faster, while larger ones may need more time.
Storing leftovers or excess portions should be done in batches, making it easier to reheat as needed while maintaining freshness.
Nutritional Deep Dive
Each serving of Garlic Parmesan Crusted Chicken offers a well-balanced profile of macronutrients, primarily lean protein from chicken, along with healthy fats from cheese and olive oil. The protein content aids in muscle recovery and satiation, beneficial for active individuals.
Analyzing the micronutrients, this dish provides essential vitamins such as B6 and niacin from the chicken, important for energy metabolism. Garlic lends additional health benefits, including antioxidants that help combat free radicals. This nutrient-rich profile makes the dish suitable for overall health and wellness.
When assessing portion sizes, control over serving sizes can help maintain a balanced diet and aid in weight management. Accompanying this dish with vegetables increases fiber intake, promoting a healthy digestive system alongside the benefits of lean protein.
Dietary Adaptations
For those following dietary restrictions, Garlic Parmesan Crusted Chicken can easily be modified. For gluten-free variations, replacing breadcrumbs with crushed rice crackers or gluten-free breadcrumbs ensures that those with sensitivities can enjoy this delicious dish.
Dairy-free options can be achieved using nutritional yeast as a substitute for parmesan, offering a similar depth of flavor without the dairy content. For a low-carb or keto adaptation, skipping the breadcrumbs altogether and seasoning the chicken with herbs can maintain flavor while aligning with dietary goals.
Vegan adaptations can involve substituting chicken with firm tofu or tempeh, ensuring to adjust cooking times accordingly for optimal results. Each substitution allows for a nutritious and satisfying meal while accommodating various dietary needs.
Troubleshooting Guide
In the event that your chicken comes out dry, ensure to monitor the cooking time and use a meat thermometer next time to gauge doneness accurately. If the crust is soggy instead of crispy, check that you’re using fresh breadcrumbs and ensure to bake at the recommended temperature for optimal results.
For flavor balance, if the dish tends to be overly salty, try reducing the salt in the breadcrumb mixture. If using highly seasoned ingredients, remember to adjust accordingly. If your chicken is falling apart during cooking, often a sign of overcooking or using chicken that’s been previously frozen, be cautious during the thawing phase and cook at the appropriate temperature.
Cooking equipment variations may also result in uneven cooking; ensure to use the right size of the baking sheet and rotate the chicken halfway through cooking for consistent results.
Recipe Success Stories
Many readers have shared their success stories with Garlic Parmesan Crusted Chicken, highlighting its ease and flavor. Home cooks have adapted the recipe to feature local spices, creating unique flavor profiles that resonate with local cuisines.
The versatility of the dish allows cooks to experiment, leading to variations that excite their families and friends. From adding a dash of hot sauce to incorporating locally sourced cheeses, the possibilities for adaptation are endless. Community members have even expressed how this recipe has become a staple in their weekly meal rotations due to its straightforward preparation.
With the supportive feedback shared in online groups, photography and plating tips have emerged, helping others present their creations beautifully. As cooks share their photos, they inspire others to attempt the dish as well, creating a community around a shared love for delectable food.
Frequently Asked Questions
Can I use thighs instead of breasts?
Yes, thighs can be used for a more flavorful result. They may require slightly longer cooking time, so always ensure they are cooked to the safe temperature of 165°F (74°C).
Can I make this dish ahead of time?
Absolutely! You can coat the chicken with the breadcrumb mixture and refrigerate it for up to 24 hours before baking. Just bake it when you’re ready to serve.
What can I serve on the side?
This dish pairs well with a variety of sides like roasted vegetables, garlic mashed potatoes, or a light salad for a balanced meal.
How do I ensure the crust stays crispy?
To maintain a crispy crust, avoid overcrowding the baking sheet and ensure proper air circulation during cooking. An air fryer can also yield excellent results.
Can I use frozen chicken?
While you can use frozen chicken, it’s best to thaw it first for even cooking. Exercise caution, ensuring it is cooked to the appropriate temperature.
Is this dish kid-friendly?
Yes! The flavors are mild yet appealing, making Garlic Parmesan Crusted Chicken a fantastic option for kids who may be picky eaters.
Can I add vegetables to this recipe?
Incorporating vegetables like zucchini or bell peppers alongside the chicken in the oven can create a wholesome, one-pan meal.
What if I don’t have parmesan cheese?
You can substitute with another hard cheese such as pecorino romano or even nutritional yeast for a dairy-free option with a similar flavor.
How should I store leftovers?
Store leftovers in an airtight container in the refrigerator for up to three days. You can reheat them in the oven for best results.
Can I change the herbs used?
Definitely! Feel free to experiment with different herbs such as thyme, oregano, or basil for a personalized touch.
Additional Resources
To further enhance your culinary skills, check out additional recipes featuring chicken, such as Lemon Herb Grilled Chicken or Chicken Piccata. These dishes also incorporate similar preparation techniques and delicious flavors.
Consider exploring technique guides that delve into proper breading, pan-frying, and baking styles to gain confidence with various cooking methods. Ingredient information on garlic and spices can deepen your understanding of flavor profiles and how to balance them in your cooking.
If you’re looking for equipment recommendations, investing in quality baking sheets and measuring tools can significantly improve your overall cooking experience, ensuring accurate results time after time.
Join the Conversation
We encourage you to share your experiences with Garlic Parmesan Crusted Chicken! Whether you’ve made your own twists, embraced different dietary adaptations, or simply enjoyed the dish, your feedback is invaluable. Connect with us on social media platforms to share photos, tips, and ideas for serving this delicious recipe.
Get involved in the community by commenting your variations or hosting recipe review sessions, where you can exchange insights and improve your own cooking endeavors. Join the conversation and let’s celebrate our love for culinary creativity together!
The Recipe
Garlic Parmesan Crusted Chicken
Serves: 4 servings
Prep Time: 15 mins
Cook Time: 30 mins
Total Time: 45 mins
Kitchen Equipment Needed
Oven
Baking sheet
Mixing bowl
Measuring cups and spoons
Meat thermometer
Ingredients
4 boneless, skinless chicken breasts
1 cup grated Parmesan cheese
1 cup breadcrumbs
3 cloves garlic, minced
2 tablespoons fresh parsley, chopped
1 teaspoon salt
½ teaspoon black pepper
½ teaspoon paprika
¼ cup olive oil
Directions
Preheat your oven to 375°F (190°C).
In a mixing bowl, combine breadcrumbs, grated Parmesan, garlic, parsley, salt, pepper, and paprika.
Brush chicken breasts with olive oil to ensure the breadcrumb coating sticks.
Dredge each chicken breast in the breadcrumb mixture, pressing down to ensure an even coating.
Place the coated chicken breasts on a lightly greased baking sheet.
Bake in the preheated oven for 25-30 minutes or until the internal temperature reaches 165°F (74°C).
After removing from the oven, let the chicken rest for a few minutes before serving.
Recipe Notes
You can substitute chicken breasts with thighs for a juicier result.
Feel free to experiment with different herbs and spices in the coating.
This dish can be easily doubled for larger gatherings.
Ultimate Dill Pickle Cheese Ball Recipe for Irresistible Snacking
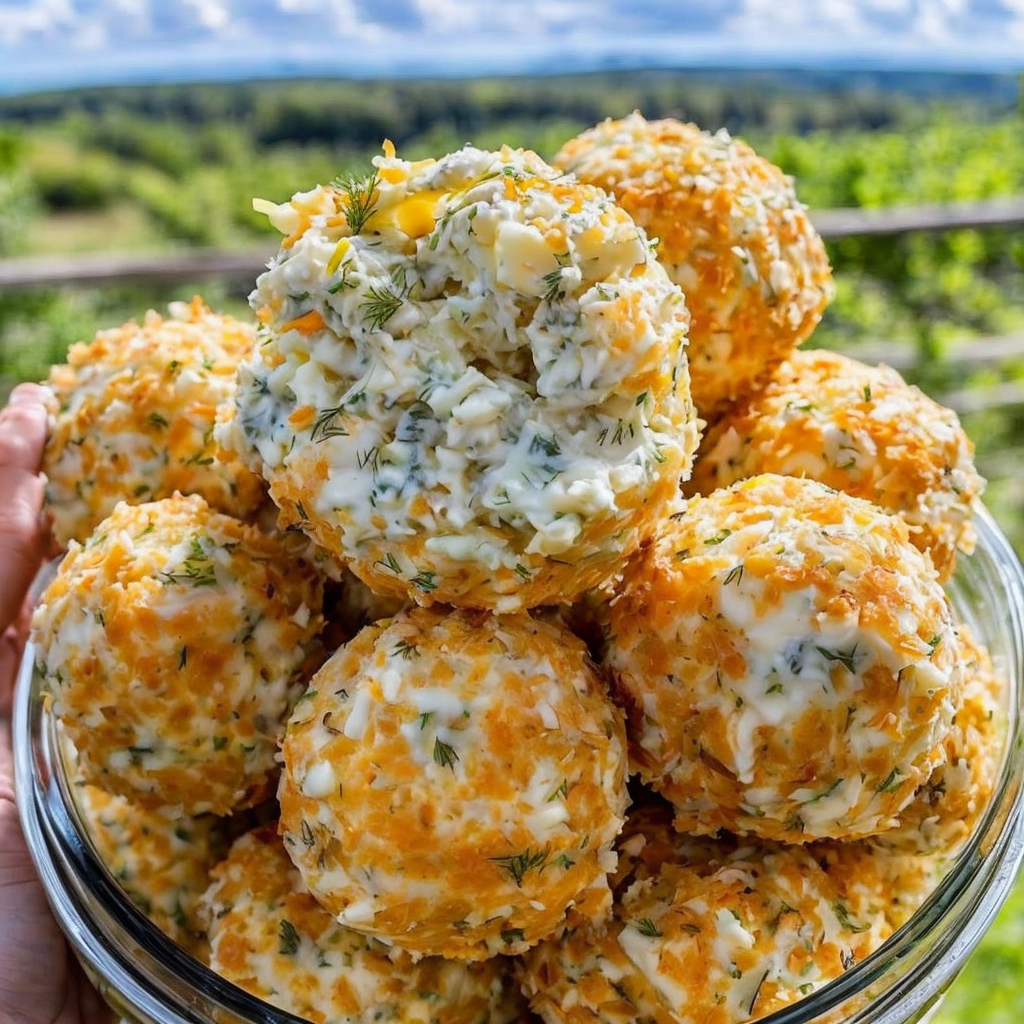
Dill Pickle Cheese Ball Recipe: A Fun and Flavorful Snack!
⚖️
Difficulty
Easy
⏲️
Prep Time
15 mins
🕒
Cook Time
0 mins
⏱️
Total Time
15 mins
🍽️
Servings
8 servings
Are you ready to elevate your next gathering with a deliciously quirky twist? The Dill Pickle Cheese Ball is a fun and flavorful snack that combines creamy cheesiness with the tangy crunch of dill pickles! A perfect appetizer for parties, game days, or even just a cozy night at home, this cheese ball captivates everyone with each bite, marrying the classic flavors of a cheese spread with the invigorating zest of pickles. You’ll love the balance of textures, from the smoothness of the cream cheese to the crispness of the dill pickles, making each mouthful a delightful experience.
Creating this Dill Pickle Cheese Ball is not only simple—taking just 15 minutes—but it also allows you to customize it with your preferred cheese and herbs. Imagine presenting this eye-catching cheese ball on a tray surrounded by crisp crackers or fresh veggies, making it the star of your snack table. With its attractive presentation and crowd-pleasing taste, this dish is sure to impress your family and friends!
Quick Recipe Highlights
Flavor Profile: The Dill Pickle Cheese Ball delivers a delightful blend of creamy cheeseiness balanced by the tangy crunch of dill pickles, with hints of garlic and onion for added depth.
Texture: This dip boasts a creamy, smooth texture enveloped in a crunchy exterior from the finely chopped nuts and herbs, making it incredibly satisfying to eat.
Aroma: The aromatic blend from fresh dill and garlic creates an enticing scent that draws everyone in as soon as it’s served.
Visual Appeal: The vibrant green pickle bits contrast beautifully with the pale cheese mixture, making the cheese ball look as appetizing as it tastes.
Skill Level Needed: This recipe is perfect for beginners and requires no specialized culinary skills beyond basic mixing and shaping.
Special Equipment: No special tools are required, just a mixing bowl and a spatula or wooden spoon to combine the ingredients!
Recipe Overview
Difficulty Level: The Dill Pickle Cheese Ball is considered easy to prepare, making it suitable for novice cooks or those in a rush. With just a few simple steps, anyone can whip it up and serve.
Category: This dish falls under appetizers or party snacks, ideal for social gatherings, holiday parties, or even casual get-togethers.
Cuisine: Drawing inspiration from classic American flavors, this recipe intermingles elements loved in many regional styles, showcasing the important role pickles play in American side dishes.
Cost: The estimated costs of ingredients are budget-friendly, primarily consisting of common items like cream cheese and dill pickles, making this a cost-effective option for party planning.
Season: The Dill Pickle Cheese Ball is a year-round favorite, but it shines particularly during the summer months when gatherings and outdoor events are abundant.
Occasion: Perfect for game days, picnics, potlucks, and holiday celebrations, this cheese ball is versatile enough to fit various occasions with ease.
Why You’ll Love This Recipe
The combination of taste and texture in the Dill Pickle Cheese Ball is nothing short of phenomenal. The creamy cheese base intertwines perfectly with the tangy pickles, producing flavors that are both comforting and refreshing. Each ingredient brings something unique, ensuring every bite is a delightful surprise. The crunchiness from the nuts adds an unexpected yet welcomed textural contrast that keeps you coming back for more.
Additionally, its convenience cannot be overstated. With a preparation time of just 15 minutes, you can easily whip up this engaging appetizer without the fuss of lengthy cooking procedures. Simply mix, shape, and serve! This makes it an excellent choice for unexpected guests or last-minute gatherings, ensuring you always have a crowd-pleasing snack on hand.
Nutritionally, the Dill Pickle Cheese Ball has some advantages. While it is indulgent with cheese and nuts, you can also incorporate lighter ingredients or serve it with nutritious dippers like veggies to boost the health factor. The pickles themselves contain beneficial probiotics and can aid digestion, making this appetizer not only delicious but a bit wholesome too.
When it comes to entertaining, the Dill Pickle Cheese Ball is sure to shine. It garners attention on a loveably platter and beckons guests to socialize around it, creating a fun and interactive dining experience. With serving options galore, such as crackers, pretzels, or fresh vegetables, you can customize how everyone enjoys it, amplifying the social aspect of food.
Lastly, its cost-effectiveness makes it an attractive option when feeding a crowd. The ingredients are inexpensive, and you can tailor the recipe portions according to your needs. This enables you to serve a large group without breaking the bank while still impressing them with fantastic flavors!
Historical Background and Cultural Significance
The origins of the cheese ball date back to the early 19th century in America, when cream cheese gained popularity. It was often used in savory dishes, and cheese balls evolved as a delightful party snack, showcasing a variety of flavors and ingredients. The love for pickles combined with cheese grew, leading to the creation of the Dill Pickle Cheese Ball, which embodies the spirit of entertaining and communal dining.
Historically, pickles have played a significant role in American cuisine, representing the country’s affinity for bold flavors and preservation methods. Dill pickles, with their sharp flavor, became symbolic of summer picnics and festive gatherings, contributing to the cheese ball’s lasting popularity. This dish reflects not only a harmony of textures and flavors but also the cultural importance of shared experiences and flavors in American food history.
As recipes have evolved, the Dill Pickle Cheese Ball has adapted through regional variations and personal preferences. While the core ingredients remain constant, creative twists from different locales feature different spices, cheese types, or toppings, which enrich this cheese ball’s narrative. Each variation tells a new story while connecting back to the original flavor inspirations.
Today, the Dill Pickle Cheese Ball stands as both a nostalgic and innovative dish. It’s embraced at casual family gatherings and upscale soirées alike, continually reminding us of the joy that simple, delicious food can bring. This beloved snack shines in diverse settings while holding a special place in the hearts—and stomachs—of those who partake.
Ingredient Deep Dive
Dill Pickles: Dill pickles are a classic condiment that has their roots in numerous culinary traditions worldwide. Their contributions to flavor can elevate many dishes, providing a sharp tang that cuts through richness. They’re low in calories yet high in flavor, making them an ideal addition to appetizers. When selecting dill pickles, opt for crisp, firm varieties without any blemishes for the best crunch. Store unopened jars in a cool, dark place, while opened jars should be kept in the refrigerator for maximum freshness. If you’re in a pinch, you can substitute with other pickle varieties, but ensure the flavor remains robust and tangy to achieve the desired taste.
Cream Cheese: Cream cheese is a staple in many American kitchens, originating in the 19th century when dairy processing techniques improved. Its creamy texture and mild flavor make it a versatile base for dips, spreads, and desserts. Nutritionally, cream cheese provides a good source of calcium, though it should be enjoyed in moderation due to its fat content. Look for fresh varieties at your local grocery store, avoiding ones that appear dull or discolored. Cream cheese can be stored in the refrigerator for several weeks; if you have leftovers, it’s excellent for use in cooking and baking. For a lighter option, consider alternatives like Greek yogurt or cottage cheese, which can still offer that creamy aspect while providing increased protein.
Common Mistakes to Avoid
Not letting the cream cheese soften at room temperature before mixing. This will make it difficult to incorporate ingredients evenly.
Overmixing the ingredients which can cause the cheese ball to become too soft and lose its shape.
Forgetting to taste and adjust seasoning before shaping the cheese ball. Flavors can vary between brands of pickles and cheese.
Using pickles that are too wet. Make sure to drain them well to avoid soggy cheese ball texture.
Skipping the chilling step before serving can result in a cheese ball that’s too soft to handle easily.
Choosing low-quality nuts for coating, which can lead to off-flavors. Fresh, quality nuts enhance the overall taste.
Not covering the cheese ball tightly when refrigerating. This can lead to dryness or absorption of other scents from the fridge.
Not adjusting for texture. If the mixture feels too dense, add a bit of yogurt or sour cream to improve spreadability.
Ignoring presentation; while taste is important, a cheese ball should look as good as it tastes to entice guests!
Essential Techniques
Mixing: Mixing is essential when preparing the cheese ball. The key is to blend the ingredients until they’re well integrated without overworking. Overmixing can make the texture too soft, losing that perfect consistency. Aim for a smooth blend while retaining some chunky pickles for texture. Trust your senses—visually, you should see even distribution, and when tasting, the flavors should bloom harmoniously.
Chilling: Chilling the cheese ball is crucial. This allows the flavors to meld while firming up the mixture, making it easier to handle and serve. Refrigerate for at least an hour before serving. To ensure successful chilling, wrap it tightly in plastic wrap and place it on a flat surface. If you want, you can even freeze it in advance for longer-term storage, simply defrost in the refrigerator before serving!
Pro Tips for Perfect Dill Pickle Cheese Ball
1. For extra flavor, consider adding a splash of pickle juice to the mixture—it can amplify the dill taste.
2. Mix in finely chopped herbs such as chives or parsley for added depth and color.
3. Experiment with different types of nuts for coating; walnuts and pecans offer unique flavors compared to traditional almonds.
4. If you prefer a stronger flavor, blend in some shredded cheddar or similar cheese with your cream cheese.
5. Garnish your cheese ball with additional pickles or fresh herbs for added appeal and a burst of freshness.
6. Serve with a variety of dippers—consider pretzel sticks, sliced baguette, or fresh veggies to cater to different tastes.
7. Create a themed platter by pairing the cheese ball with complementary dishes like charcuterie or olives.
8. Don’t hesitate to adapt the flavors based on your guests’ preferences! You might discover a new favorite combination.
Variations and Adaptations
Regional variations of the Dill Pickle Cheese Ball often include substituting different pickles, such as bread and butter or hot pickles, to create a sweet or spicy twist. Seasonal adaptations might involve incorporating fresh herbs during spring or adding roasted red peppers in the fall for a colorful presentation.
If dietary modifications are needed, vegan cream cheese works beautifully in place of regular cream cheese, resulting in a dairy-free option that still retains the essential flavors. Low-carb dieters can slap it on cucumber slices instead of crackers for a guilt-free treat!
For flavor variations, consider adding a dollop of horseradish or mustard to introduce a zesty kick. If you crave a cheesier profile, blending in smoked gouda or pepper jack will create an exciting fusion of flavors that your palate will love.
Texture modifications can be achieved as well; for instance, use cream cheese that has a higher fat content for a richer consistency. If you’d prefer a lighter texture, mix in some whipped cream cheese instead. Presentation can also change dramatically with the use of colorful garnishes or a creative serving platter!
Serving and Presentation Guide
When plating, consider using a beautiful serving platter to enhance visual appeal; round shapes work particularly well to enhance the cheese ball’s form. You can sprinkle chopped herbs or crushed nuts around the cheese ball for added color and contrast. Garnishing with dill sprigs and extra pickles can enhance the overall look, making it even more appetizing.
Pair the cheese ball with various accompaniments like crostini, crackers, or a veggie tray to provide plenty of choices for guests. Think about temperature considerations as well; serving the cheese ball slightly cooler allows flavors to concentrate, while allowing it to sit for a few minutes out of the fridge can make it easier to spread.
For portion control tips, consider providing small scoops or candy scoops alongside the cheese ball, allowing guests to serve themselves without needing to cut into it directly.
Wine and Beverage Pairing
When pairing wine with the Dill Pickle Cheese Ball, white wines like Sauvignon Blanc or a light Pinot Grigio complement the dish beautifully. Their acidity balances the richness of the cheese, enhancing the overall tasting experience. If you prefer non-alcoholic alternatives, sparkling water infused with citrus or a refreshing iced tea can provide a delightful match.
For coffee or tea lovers, consider a light herbal tea with mint undertones—this will add a refreshing dimension as well as clean the palate between bites. Ensure you serve all beverages chilled, as the refreshing temperature enhances the experience while enjoying this engaging appetizer.
Storage and Shelf Life
Proper storage methods are key to preserving the Dill Pickle Cheese Ball. Store it in an airtight container in the refrigerator if you have leftovers; it should remain fresh for up to one week. For optimal flavor and texture, consume within the first few days for best results. When checking for spoilage, look for off odors or a change in texture, which can indicate that it’s time to discard.
Reheating instructions are generally unnecessary, as the cheeseball is typically served cold, but if you prefer a warm version, place it in a 350°F oven for about 10-15 minutes until softened. Additionally, if you’re hoping to keep it longer, cheese balls can be frozen wrapped tightly in plastic wrap and then stored in a freezer bag—just be sure to consume it within 3 months for the best quality.
Make Ahead Strategies
If you’re planning a gathering, the Dill Pickle Cheese Ball shines as a make-ahead option. Prepare the mixture the day before your event, shape it into a ball, and wrap it tightly in plastic wrap. This allows the flavors to develop overnight. When you’re ready to serve, simply remove it from the fridge, coat with nuts, and present!
Quality can be affected if left out for too long, so if you prepare ahead, aim to have it chilled until serving time. Consider leaving out some garnishes until the last moment to ensure freshness; this also boosts visual appeal! For easy assembly, you can pre-chop your dippers and store them in sealed bags, ready for your next gathering.
Scaling Instructions
When scaling the Dill Pickle Cheese Ball recipe, consider the number of people you’re serving. For smaller gatherings, you can easily halve the recipe; simply adjust the ingredient quantities accordingly. Ensure you select a smaller bowl for mixing.
If doubling or tripling the recipe, doubling the mixing bowl size is key for ease of handling, and make sure to increase chilling time if necessary. Cooking times remain unchanged, as you’re preparing a cheese ball rather than cooking a dish. Storage considerations remain the same regardless of size, so be mindful of airtight containers for maintaining freshness.
Nutritional Deep Dive
When exploring the macros in the Dill Pickle Cheese Ball, it generally consists of a good balance of fats from the cream cheese and nuts, combined with carbohydrates from the pickles. A typical serving can yield around 200 calories; however, this can vary based on the portion size and ingredient types used.
The cheese ball contains several micronutrients as well. Cream cheese provides calcium and vitamin A, while dill pickles contribute antioxidants, vitamins A and K, and fiber. Portion control is key for weight management, so keep servings modest for enjoyable snacking without overspending caloric limits.
Dietary Adaptations
For a gluten-free option, simply ensure that all your accompaniments are certified gluten-free, as the cheese ball itself is naturally gluten-free. If you’re looking for dairy-free adaptations, plant-based cream cheese is widely available and can effectively replace regular cream cheese while keeping the flavors intact.
Vegans can enjoy this dish by using vegan cream cheese and ensuring all garnishes and accompaniments align with a vegan diet. For those pursuing a low-carb lifestyle, serve with sliced cucumbers or bell pepper strips instead of crackers to keep carbs at bay.
Keto followers can benefit from using full-fat cream cheese and enjoy this cheese ball as part of their high-fat diet while still delighting in incredible flavors. Paleo enthusiasts can opt for nut coatings and gluten-free dippers to create a version that aligns with their dietary needs, ensuring everyone can enjoy this delightful snack!
Troubleshooting Guide
If you encounter texture issues with your cheese ball, such as overly soft or runny mixtures, confirm you didn’t add too much pickle juice. If this happens, slowly incorporate additional cream cheese to balance it out.
For flavor balance problems, consider adding a pinch of salt or extra herbs to heighten the overall taste. If using a less intense cheese, a bit of garlic powder can help elevate the flavors. If your cheese ball is served too cold and hard, letting it sit at room temperature for about 15-20 minutes will restore spreadability.
If you face equipment challenges like a malfunctioning mixer, remember that almost everything can be mixed by hand! Having a sturdy spatula or wooden spoon at hand can make for smooth mixing. Should timing concerns arise, adjust chilling times based on size—larger rounds may need more time to firm.
Recipe Success Stories
Community feedback showcases broad enjoyment and creativity surrounding the Dill Pickle Cheese Ball. Many bakers and home cooks have shared their variation success stories, adapting ingredients based on local preferences or seasonal availability. The cheese ball’s versatility allows for unique spins, and readers frequently provide delightful photographs of their creations.
Accompanying suggestions often highlight additional flavors, with many recommending unique spices or herbs to infuse the cheese ball with personality and flair. Photography tips include utilizing natural light to enhance the dish’s brightness and refreshing appeal, creating mouthwatering images that garner attention.
Frequently Asked Questions
Can I make the cheese ball ahead of time?
Absolutely! The Dill Pickle Cheese Ball is a fantastic make-ahead recipe. You can prepare it up to two days in advance, allowing the flavors to meld beautifully. Just be sure to chill it in the fridge until you’re ready to serve.
What can I serve with the cheese ball?
You can enjoy the cheese ball with a variety of dippers, including crackers, pretzels, vegetable sticks, or sliced baguettes. These will provide that perfect crunch and enhance the flavors of the cheese ball.
How long will leftovers last?
If stored in an airtight container in the fridge, the cheese ball can last about a week. Ensure it’s wrapped tightly to maintain freshness, and consume it within that timeframe.
Can I freeze the cheese ball?
Yes, the cheese ball can be frozen! Wrap it tightly in plastic wrap, then place it inside a freezer-safe bag. When ready to enjoy, defrost it in the fridge overnight before serving.
Can I use different types of cheese?
Definitely! While cream cheese is essential for the base, feel free to incorporate other cheeses such as cheddar, gouda, or even pepper jack for added flavor variations.
Is this recipe spicy?
This Dill Pickle Cheese Ball is not inherently spicy; however, you can add spices like cayenne or hot sauce if you’d like to introduce some heat to the mixture!
What’s the best way to shape the cheese ball?
Once your mixture is ready, use your hands to form it into a ball shape. For less mess, you can also use a piece of plastic wrap to help shape it neatly.
Can I mix in other ingredients?
Absolutely! Feel free to get creative by mixing in ingredients like chopped bacon, olives, or herbs, customizing the cheese ball to your taste.
What is the best way to serve it?
Present the cheese ball on a beautiful platter surrounded by your choice of dippers. You could even garnish it with herbs or additional pickle slices for a polished look!
Are there any vegan alternatives?
Yes! You can easily make a vegan version of this cheese ball by using non-dairy cream cheese and ensuring all other ingredients are plant-based, such as nuts that are certified vegan.
Additional Resources
For those seeking related recipes, try exploring variations on classic cheese dips, which sometimes integrate different flavor profiles or seasonal ingredients. Additionally, look into technique guides for preparing cheese-based dishes for parties, ensuring you garner plenty of excitement!
Ingredient information can help you understand the nutritional benefits of the dish as well; learning about cream cheese and pickles enhances your cooking experience while also providing lots of fun facts to share! Finally, consider checking out equipment recommendations to optimize your cooking and presentation skills while experimenting with themed platters!
Join the Conversation
We encourage you to share your experiences with the Dill Pickle Cheese Ball by posting photos on social media or leaving comments below. Insights from your own kitchen adaptations or any twist you added can inspire fellow food lovers!
Photography tips for capturing your cheese ball can enhance your engagement; natural light and vibrant garnishes showcase its appetizing nature. If you’ve discovered new flavors or variations, be sure to share those suggestions, too. Engaging with the community helps to create a collective appreciation for culinary creativity and celebrates this fun dish’s versatility!
The Recipe
Dill Pickle Cheese Ball
Serves: 8 servings
Prep Time: 15 mins
Cook Time: 0 mins
Total Time: 15 mins
Kitchen Equipment Needed
Mixing bowl
Spatula or wooden spoon
Serving platter
Plastic wrap (optional)
Ingredients
16 oz cream cheese, softened
1 cup dill pickles, finely chopped
1/2 cup shredded cheese (optional for additional flavor)
1/4 cup green onions, chopped
1/2 cup chopped nuts (walnuts, almonds, etc. for coating)
1 tsp garlic powder
1 tsp onion powder
Salt and pepper to taste
Fresh dill or parsley for garnish (optional)
Directions
Start by mixing softened cream cheese in a mixing bowl until smooth.
Fold in the finely chopped dill pickles, green onions, shredded cheese (if using), garlic powder, onion powder, and a pinch of salt and pepper.
Once well-combined, shape the mixture into a ball using your hands. If it sticks, wet your hands slightly with water.
Roll the cheese ball in chopped nuts until fully coated.
Wrap the cheese ball in plastic wrap and refrigerate for at least one hour to firm up.
Before serving, remove from the fridge and garnish with fresh dill or parsley, if desired.
Serve with a platter of your favorite dippers like crackers, veggie sticks, and pretzels!
Recipe Notes
Feel free to substitute dill pickles with bread and butter pickles or spicy varieties for a different flavor.
You can adjust the garlic and onion powder according to your taste preferences.
This cheese ball can be made up to two days in advance; it stores well in the fridge.
Easy Homemade Soft Pretzels: A Delicious Recipe to Try
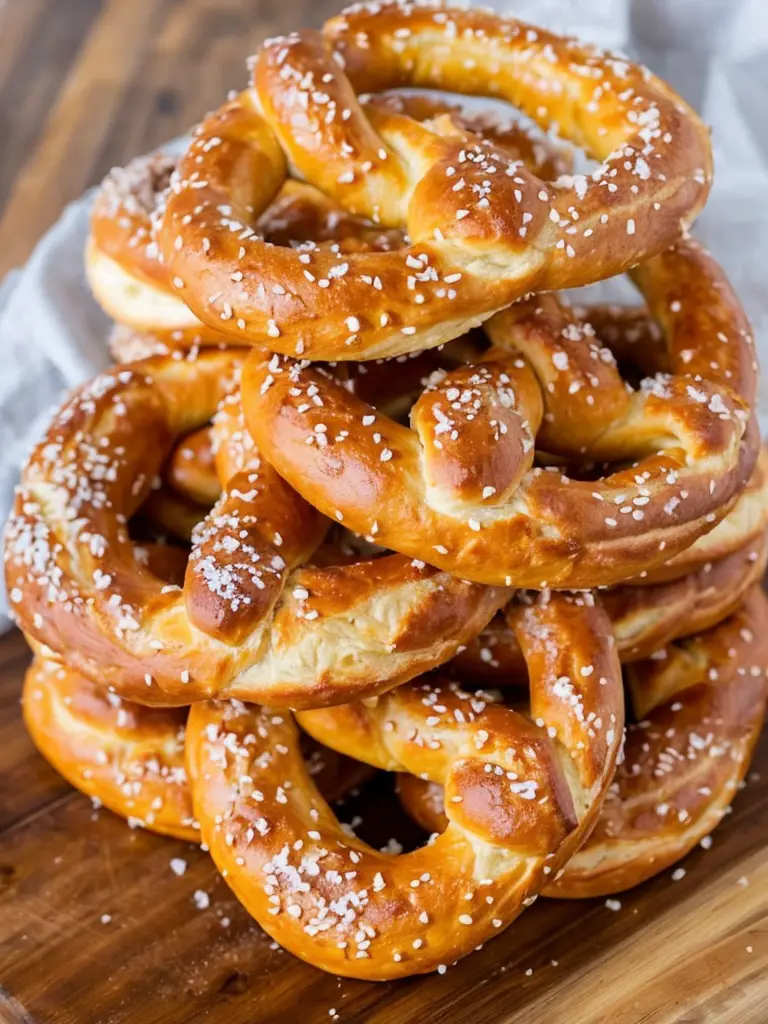
Homemade Soft Pretzels: A Delicious Snack for Any Occasion
⚖️
Difficulty
Moderate
⏲️
Prep Time
30 mins
🕒
Cook Time
15 mins
⏱️
Total Time
45 mins
🍽️
Servings
12 Pretzels
If you’re looking for a delightful homemade snack, this Homemade Soft Pretzels recipe is sure to satisfy your cravings. Imagine biting into a golden-brown pretzel with a perfectly chewy texture, bursting with flavor from a sprinkling of coarse sea salt. Not only are these pretzels a great snack, but they also make for an impressive treat at gatherings, parties, or game-day celebrations. The aroma of freshly baked pretzels wafting through your kitchen will transport you to your favorite street vendor while giving your home a warm, inviting atmosphere.
What makes this Homemade Soft Pretzels recipe even more appealing is the fact that they are surprisingly easy to make with simple ingredients you probably already have in your pantry. Whether you enjoy them plain or with a scrumptious cheese dip, these pretzels are versatile enough to match any palate. Cooking can be a wonderful family activity, and this recipe is perfect for getting everyone involved in the fun of twisting, shaping, and tasting! Get ready to enjoy the wonderful world of homemade pretzels.
Quick Recipe Highlights
Flavor Profile: Soft pretzels have an incredible balance of salty and slightly sweet flavors, enhanced by the baking soda bath that gives them their signature color and taste.
Texture: These pretzels boast a chewy outside and a soft, pillowy inside, creating a delicious contrast that is immensely satisfying.
Aroma: The toasty aroma of freshly baked dough and melted butter combined with a hint of salt makes these pretzels irresistible.
Visual Appeal: These heartwarming treats have a beautiful golden-brown hue, creating an inviting look that draws everyone in.
Skill Level Needed: Making pretzels requires a moderate skill level due to the dough preparation and shaping techniques, but the satisfying results are worth it!
Special Equipment: You will need basic kitchen equipment including a mixing bowl, baking sheet, and a pot for boiling the pretzels.
Recipe Overview
Difficulty Level: This recipe is of moderate difficulty, perfect for those who are comfortable with basic baking techniques. The most challenging part is shaping the pretzels, which becomes easier with practice.
Category: Soft pretzels can be categorized as snacks or appetizers, often enjoyed at parties, movie nights, or as a satisfying treat any time.
Cuisine: Pretzels have a rich history in German cuisine but have also been embraced by American culture, particularly at sporting events and fairs.
Cost: The approximate cost to make these delicious pretzels is low, typically around $5 to $10, depending on your ingredient choices.
Season: Soft pretzels can be enjoyed year-round, but are especially popular during fall and winter months when people crave warm, comforting snacks.
Occasion: Perfect for casual gatherings, sports events, or even simple family evenings at home, these pretzels add a fun twist to any occasion.
Why You’ll Love This Recipe
This Homemade Soft Pretzels recipe offers an amazing blend of taste and texture appeal that is hard to resist. Once you sink your teeth into the soft, pillowy dough coated in crunchy coarse salt, you’ll understand why these pretzels have become a beloved snack worldwide. Enjoyed on their own or with cheesy dips, each bite showcases a beautiful contrast in flavors that will keep you coming back for more.
Convenience plays a major role in this recipe’s allure. Unlike some baked goods that require intricate techniques or long explanations, these soft pretzels come together in one bowl, making it accessible for every home cook. You will enjoy the process of kneading and shaping the dough, encouraging family members to lend a hand and make lasting memories in the kitchen.
Let’s not forget the nutritional advantages these pretzels provide when made from scratch. You know exactly what goes into them, allowing you to control ingredients and portion sizes, ensuring a healthier snack option. By incorporating whole-grain flour or adding seeds for nutritional benefits, you can customize these pretzels to suit your dietary preferences.
Social gatherings become even more vibrant with homemade pretzels on the menu. Their interactive nature allows guests to participate in dipping sauces and flavor variations, fostering fun conversations and shared experiences around the table. Presenting these fresh pretzels at a party never fails to impress, making you the star of the event.
In terms of cost-effectiveness, creating homemade soft pretzels is a great way to indulge without breaking the bank. With just a few pantry staples, you can whip up a large batch for an affordable price, making them an ideal snack for large gatherings or family events.
Historical Background and Cultural Significance
The history of soft pretzels dates back to ancient times, believed to have originated with the Celts and Romans. These twisted bread formations were used as a reward for children who learned their prayers, symbolizing the embrace of religion through food. Over the centuries, they became popular in Germany, with various regions boasting their distinctive recipes, which eventually made their way to America.
During the 19th century, German immigrants introduced soft pretzels to the United States, particularly in Pennsylvania, which is now synonymous with this beloved snack. The Pennsylvania Dutch culture embraced the soft pretzel, leading to street vendors selling them in cities and towns across the region. Today, they have become a popular culinary staple at fairs and sporting events across the country.
As the recipe evolved, so did the method of preparation. Traditionally boiled in a special baking soda solution, the process creates the perfect chewy crust. This is one of the key modifications that distinguishes soft pretzels from other baked goods, showcasing the creativity and adaptability of chefs through the ages.
In the United States, regional variations have emerged, with cities like Philadelphia claiming the title of pretzel capital. Food trucks and small shops pop up featuring artisanal pretzels with localized toppings, celebrating the diversity of this simple yet delectable snack.
Ingredient Deep Dive
Flour: Flour, the foundation of pretzels, holds cultural significance in many societies and has been a central part of diets worldwide for centuries. Whole wheat flour offers more nutrients and fiber, whereas all-purpose flour provides a lighter texture. When selecting flour, look for high-protein content to yield a chewier pretzel. Store it in a cool, dry place and use it within six months for optimal freshness. Substitutions like gluten-free flour blends can be used for dietary restrictions.
Yeast: Yeast is a magical ingredient that brings the dough to life, causing it to rise and develop flavor. Yeast has a deep-rooted history in baking, with wild yeast strains being used since ancient Egypt. Nutritionally, yeast is a rich source of B vitamins and adds a unique flavor to baked goods. Opt for active dry yeast or instant yeast for best results, and always check expiration dates before using. Store yeast in a refrigerator or freezer for longevity, and if you’re out, baking powder could be used in limited quantities for different results.
Common Mistakes to Avoid
Not measuring ingredients accurately: Precision is key in baking, especially with flour and water. Use a kitchen scale for the best results, as an incorrect ratio can lead to dense or undercooked pretzels.
Overworking the dough: Kneading is essential, but overdoing it can cause a tough texture. Knead until just combined and slightly elastic for the best chewiness.
Skipping the boiling step: Boiling pretzels in a baking soda solution is what gives them that signature flavor and rich brown color. Don’t skip this crucial step!
Not preheating the oven: An adequately preheated oven is vital for ensuring that pretzels rise and brown evenly. Always allow at least 30 minutes for your oven to reach the right temperature.
Not allowing enough time for rising: Patience is important—allowing the dough to rest and rise is essential for a soft, airy texture.
Using insufficient salt: Coarse salt enhances flavor, so don’t skimp on the topping. Use the right amount for the best taste.
Cutting into the dough prematurely: Letting the dough rest helps with gluten formation. Be sure to allow it to rise adequately before shaping it into pretzels.
Failing to monitor baking time: Keep an eye on your baking pretzels as ovens can vary. A golden-brown appearance ensures they are perfectly baked.
Essential Techniques
Kneading: This essential technique develops the gluten structure in the dough, creating that desired chewy texture. Knead for about 5-7 minutes until the dough is smooth and elastic. To master this, make sure to use both hands, applying firm pressure while folding the dough over itself. Common pitfalls include not kneading enough or over-kneading, both of which can affect the texture. Look for a smooth surface and a slight bounce back when pressed to know you’ve succeeded.
Shaping: Shaping the dough into pretzels may seem intimidating, but it’s a fun process. Start with small pieces of dough, rolling them into long ropes before twisting and forming them into a classic pretzel shape. The aim is to create even thickness for a uniform bake. Common pitfalls include having too thick or thin parts, which can lead to uneven cooking. Aim for a rope about 20-24 inches long for ideal results, and practice makes perfect!
Pro Tips for Perfect Homemade Soft Pretzels
Here are some pro tips that can elevate your homemade pretzels. First, experiment with different types of salt for toppings. Flaky sea salt or seasoned salts can impart unique flavors. Second, try adding seasoning to your boiling water, like beer or garlic powder, to add an extra layer of flavor. Third, if you often have difficulty shaping dough, try using oily hands to prevent stickiness.
Consider pre-baking the pretzels for a few minutes to achieve a crispy exterior before finishing them in the oven. You can also brush them lightly with melted butter for an irresistible finish. If you prefer a sweeter twist, sprinkle cinnamon and sugar on top after baking. Lastly, remember that pretzels taste best served fresh out of the oven, so enjoy them immediately!
Variations and Adaptations
Variations on this Homemade Soft Pretzels recipe are endless. For seasonal adaptations, consider adding pumpkin spice to the dough in the fall or peppermint chips during the winter holidays. Dietary modifications can include gluten-free flour blends, making it friendly for those with gluten sensitivities.
Flavor variations allow you to infuse pretzels with different herbs and spices. Try mixing cheese into the dough for a savory cheese pretzel or topping the finished product with garlic powder and parmesan for an Italian twist. Tex-Mex adaptations can include jalapeños in the dough, while sweet caramel and chocolate sauces can be served for dessert-style pretzels.
Presentation alternatives can enhance the visual aspect of your pretzels. Try serving them on a rustic wooden board with various dips, like mustard, cheese, and marinara. You can also slice them into smaller bites for easy sharing at gatherings, making them an interactive treat for your guests.
Serving and Presentation Guide
Proper serving and presentation of your Homemade Soft Pretzels can elevate the eating experience. To plate your pretzels, arrange them neatly on a baking tray lined with parchment paper or a rustic wooden board. Add small bowls of dipping sauces, like homemade cheese sauce or spicy mustard, inviting guests to customize their flavors.
Consider garnishing pretzels with fresh herbs like parsley or rosemary for a colorful touch. For a modern feel, serve them in individual portion cups paired with a small bottle of craft beer. Temperature is important; pretzels are best served warm but can be reheated in an oven if needed. Portion control helps keep serving sizes manageable, allowing everyone to enjoy without overindulging.
Wine and Beverage Pairing
Pairing your Homemade Soft Pretzels with the right beverages can elevate your culinary experience. A light, crisp lager complements the salty chewiness of pretzels beautifully. For wine enthusiasts, a dry white wine like Sauvignon Blanc pairs well, cutting through the richness of toppings like melted cheese.
For non-alcoholic options, try pairing with sparkling water or homemade lemonade, refreshing the palate after each bite. Consider serving warm pretzels with spiced apple cider during fall gatherings for a seasonal treat. If coffee or tea is more your style, a robust dark roast can balance the salty flavors of the pretzels.
Storage and Shelf Life
Properly storing Homemade Soft Pretzels is essential for maintaining their fresh taste and texture. To store, allow them to cool completely, then place them in an airtight container at room temperature. They are best enjoyed fresh but can be kept this way for up to two days.
For longer storage, pretzels can be frozen. Wrap them tightly in plastic wrap and place them in a freezer bag, ensuring you remove as much air as possible. They can last up to three months in the freezer. To reheat, place them directly in a preheated oven until warm. Look out for signs of spoilage, such as hard textures or off-smells.
Make Ahead Strategies
If you want to save time, preparing the pretzel dough a day in advance is a great strategy. After the first rise, shape the pretzels and store them in the refrigerator. When you’re ready to bake, let them come to room temperature and proceed with the boiling and baking steps. This ensure that they are as fresh as possible.
Assembling pretzels ahead of time allows you to cut down on the effort needed on the day of serving. You can also freeze the shaped raw pretzels for a quick snack whenever needed. Just remember to thaw them fully before boiling and baking. Adding fresh toppings or dips upon reheating allows for an enjoyable experience each time.
Scaling Instructions
Scaling your Homemade Soft Pretzels recipe can be accomplished easily. To halve the recipe, simply divide all ingredients by two, keeping the same rising and cooking methods. For doubling or tripling, keep in mind the size of your mixing bowl and workspace, as you want enough room to knead and shape the dough properly.
Adjusting equipment may be necessary for larger batches, like using multiple baking sheets or larger pots for boiling. Keep an eye on timing as you scale; larger batches might require slightly more time in the oven depending on the size and arrangement. Lastly, always ensure your rise times remain consistent for optimal texture.
Nutritional Deep Dive
The nutritional breakdown of these Homemade Soft Pretzels reveals their merits as a snack. A typical pretzel contains approximately 150-200 calories, with an emphasis on carbohydrates and moderate protein content. Avoid refined white flour to increase the fiber content and decrease the glycemic index.
Vitamins and minerals present in pretzels depend on the type of flour used, with whole-grain flours providing additional nutrients. Consider adding toppings like sesame seeds, which are high in healthy fats, fiber, and essential vitamins. Overall, soft pretzels can fit into a balanced diet when enjoyed in moderation.
Dietary Adaptations
For those requiring gluten-free options, substitute the all-purpose flour with a gluten-free flour blend specifically designed for baking. Ensure that all other ingredients are gluten-free to maintain the integrity of the recipe.
Dairy-free adaptations can be made by using plant-based butter and ensuring that any dips are also dairy-free. Vegans can enjoy these pretzels by omitting the egg wash and instead using a plant-based milk alternative for the glossy finish.
Low-carb or keto dieters can explore recipes that utilize almond flour or coconut flour, which significantly alters the carbohydrate content and makes them more suitable for their dietary preferences. Such adaptations may require some experimentation for the desired texture and flavor.
Troubleshooting Guide
If you encounter texture issues with your pretzels, such as being too tough or too soft, check your kneading technique. Over-kneading can create a dense final product, while under-kneading can leave them too soft. Ensure proper rest times and gluten development to achieve the right balance.
Flavor balance can also be a concern; if they taste bland, consider adjusting the amount of salt or adding seasonings to the dough. If a specific ingredient isn’t cooperating, like baking soda, check that it’s fresh, and experiment by slightly tweaking the amount used in the boiling water solution.
Equipment challenges may arise with baking sheets or pans, leading to uneven results. Ensure that your selected pan allows for proper air circulation around the pretzels during baking. If you have timing concerns, verify the accuracy of your oven’s temperature and keep a close watch when baking for the best results.
Recipe Success Stories
Community feedback has showcased a significant joy for the shaping process, with families finding it fun to create unique twists and designs. Each individual’s adaptation tells a story, connecting home cooks with the joy of baking and sharing their creations.
Photography tips emphasize capturing the beautiful golden hues of the pretzels against rustic serving boards, adding to the visual allure of the final dish. Readers are encouraged to share their pretzel experiences, celebrating successes and learning together through photos and comments.
Frequently Asked Questions
1. Can I store leftover pretzels? Yes, homemade pretzels can be stored at room temperature in an airtight container, lasting 1-2 days. For longer storage, wrap them tightly and freeze them for up to three months.
2. Can I make the dough in advance? Absolutely, you can prepare the dough a day ahead and refrigerate it after the first rise. Just allow it to come to room temperature before shaping and boiling.
3. What can I serve with pretzels? Soft pretzels can be enjoyed with a variety of dips including mustard, cheese sauce, or even chocolate for a sweet treat. Get creative!
4. Can I make stuffed pretzels? Yes, you can stuff your pretzels with fillings like cheese, meats, or vegetables before shaping them for an exciting twist.
5. Are soft pretzels vegan? You can easily make soft pretzels vegan by omitting the egg wash and using plant-based butter or milk alternatives.
6. What should I do if my dough is too sticky? If your dough is sticky, sprinkle a little more flour to help it come together without overworking it.
7. Can I use whole wheat flour? Yes, whole wheat flour can be used for a healthier version of pretzels, although they may be denser.
8. What type of yeast should I use? Both active dry and instant yeast work well for this recipe. Just be sure to check the expiration date for freshness.
9. How do I make pretzels crispy? To achieve a crispier texture, ensure to bake them until golden brown and consider allowing them to cool completely on a rack after baking.
10. Can I make pretzel bites instead of full pretzels? Definitely! Just shape the dough into bite-sized pieces instead of traditional pretzel shapes for fun snackable bits.
Additional Resources
For more delicious recipes, consider exploring other dough-based snacks like homemade bagels or calzones. Supplement your baking skills with technique guides discussing kneading, resting dough, and proper ingredient ratios for success.
Learners can dive into ingredient information for better understanding of how different flours and yeasts interact in the kitchen, enhancing their overall baking experiences. Recommendations for kitchen equipment can also help aspiring bakers to choose versatile tools that promote kitchen efficiency and quality results.
Join the Conversation
Connect with fellow bakers by sharing your Homemade Soft Pretzels experiences on social media. Post your creations with hashtags to inspire others and garner feedback from the community. Engaging in recipe reviews allows for shared learning, further enhancing everyone’s baking abilities.
Don’t shy away from exploring variations! Share your creative takes on pretzels, as well as photography tips to improve the visual appeal of your delicious results. Together, we can celebrate the joy of cooking and the satisfaction of creating something wonderful for ourselves and our loved ones.
The Recipe
Homemade Soft Pretzels
Serves: 12 Pretzels
Prep Time: 30 mins
Cook Time: 15 mins
Total Time: 45 mins
Kitchen Equipment Needed
Mixing bowl
Baking sheet
Parchment paper
Pot for boiling water
Whisk
Measuring cups and spoons
Kitchen scale (optional)
Saucepan for cheese dip (optional)
Ingredients
4 cups all-purpose flour
1 packet (2 1/4 tsp) active dry yeast
1 1/2 cups warm water
1 tsp granulated sugar
1/4 cup baking soda
1 tbsp coarse salt (plus more for topping)
2 tbsp unsalted butter (melted, for brushing)
Directions
In a mixing bowl, combine warm water, sugar, and yeast. Allow it to foam for about 5-10 minutes.
Add the flour and 1 tbsp of coarse salt to the yeast mixture. Mix until a dough forms and knead for about 5-7 minutes until smooth.
Place the dough in a greased bowl, cover, and let rise for about 1 hour until doubled in size.
Preheat your oven to 425°F (220°C) and line a baking sheet with parchment paper.
Once the dough has risen, divide it into 12 equal pieces. Roll each piece into a long rope and shape it into a pretzel.
In a pot, bring 10 cups of water to a boil, then add the baking soda. Boil each pretzel for about 30 seconds, then remove and place on the baking sheet.
Brush the pretzels with melted butter and sprinkle with coarse salt.
Bake in the preheated oven for about 12-15 minutes or until golden brown. Allow to cool slightly before serving.
Recipe Notes
Experiment with toppings like garlic powder or sesame seeds for added flavor.
Store leftover pretzels in an airtight container; they are best enjoyed fresh.
Freeze shaped but uncooked pretzels for future snacking convenience.