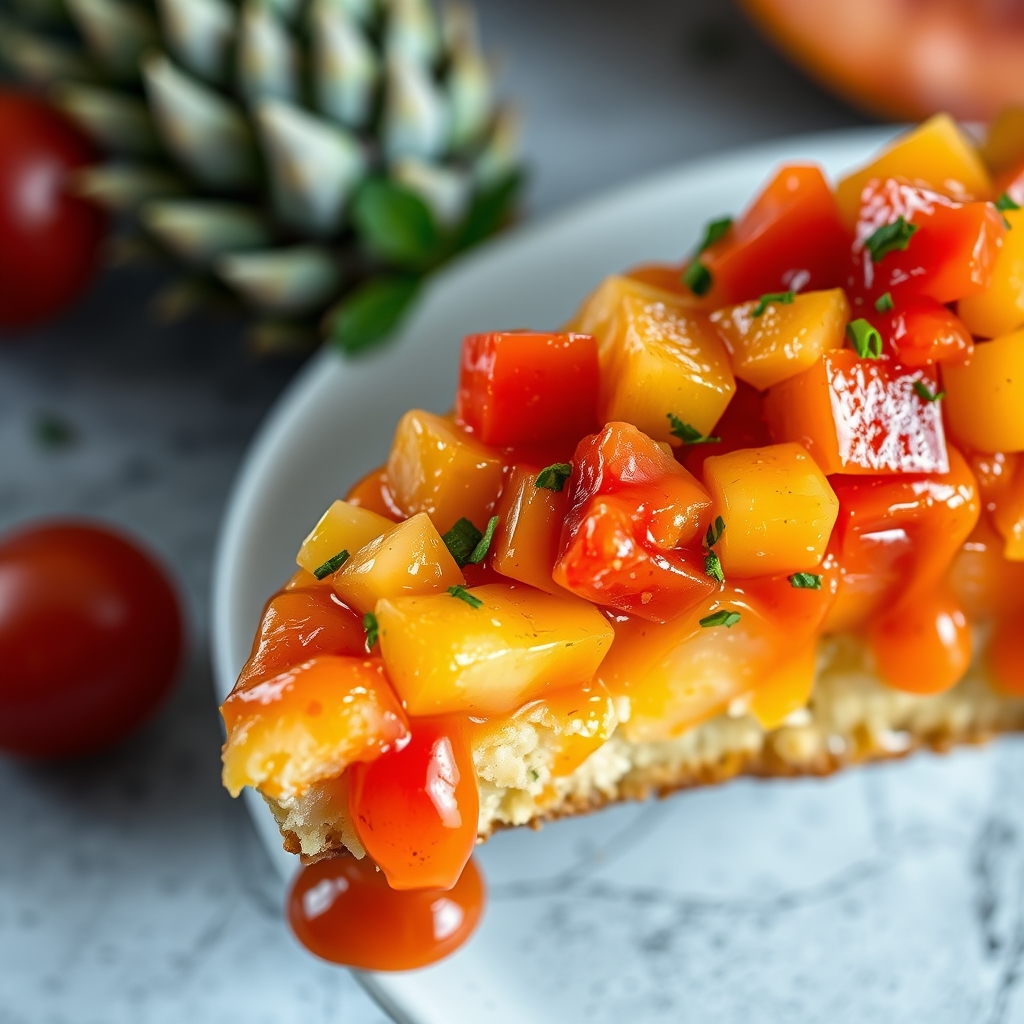
Pineapple Mango Salsa
There’s something undeniably magical about the combination of sweet, tangy pineapple and luscious mango, brought together with a hint of spice and fresh herbs. This Pineapple Mango Salsa is a vibrant, refreshing dish that dances on your taste buds and instantly transports you to a tropical paradise. Whether you’re hosting a summer cookout, looking for a quick snack, or wanting to add a burst of flavor to your meals, this salsa is a must-try. Let’s dive into why this recipe is a winner and how you can make it effortlessly at home.
Why You’ll Love This Recipe
First, let’s talk about why this Pineapple Mango Salsa deserves a permanent spot in your recipe rotation.
- Bursting with Freshness: The combination of ripe mango, juicy pineapple, and crisp vegetables creates a symphony of textures and flavors that’s impossible to resist.
- Versatile and Adaptable: Serve it with chips, spoon it over grilled fish or chicken, or use it as a topping for tacos—this salsa works in countless ways.
- Quick and Easy: With just 15 minutes of prep time and no cooking required, it’s perfect for last-minute gatherings or busy weeknights.
- Healthy and Nutritious: Packed with vitamins, fiber, and antioxidants, this salsa is as good for you as it is delicious.
- Crowd-Pleasing Flavor: The balance of sweet, spicy, and tangy makes it a hit with both kids and adults.
Ingredients Breakdown
Every great recipe starts with quality ingredients. Here’s what you’ll need and why each one matters:
- Fresh Pineapple: The star of the show, pineapple adds natural sweetness and a tropical flair. Look for one that’s golden and fragrant for the best flavor.
- Ripe Mango: Creamy and sweet, mango complements the pineapple beautifully. Choose one that yields slightly to gentle pressure.
- Red Bell Pepper: Adds a crisp texture and a subtle sweetness without overpowering the fruit.
- Red Onion: Provides a sharp, slightly spicy contrast to the sweetness of the fruits.
- Fresh Jalapeño: Brings a gentle heat. Remove the seeds for a milder salsa or leave them in for extra spice.
- Cilantro: Fresh cilantro lends a bright, herbaceous note that ties everything together.
- Lime Juice: A splash of acidity balances the sweetness and enhances the flavors.
- Salt: Just a pinch to elevate all the ingredients.
How to Make Pineapple Mango Salsa
Now, let’s walk through the simple steps to create this vibrant salsa.
- Prep the Fruits and Vegetables: Start by dicing the pineapple and mango into small, uniform pieces. Finely chop the red bell pepper, red onion, and jalapeño. For the best texture, aim for pieces that are roughly the same size.
- Combine the Ingredients: In a large mixing bowl, gently toss together the diced pineapple, mango, red bell pepper, red onion, and jalapeño.
- Add Fresh Herbs and Seasoning: Stir in the chopped cilantro, then squeeze fresh lime juice over the mixture. Sprinkle with salt to taste.
- Let It Rest: For the best flavor, cover the bowl and let the salsa sit in the refrigerator for at least 15 minutes before serving. This allows the flavors to meld beautifully.
- Serve and Enjoy: Give the salsa a final stir, then transfer it to a serving bowl. Pair it with tortilla chips, grilled meats, or your favorite dishes.
Pro Tips for the Best Results
Want to take your Pineapple Mango Salsa to the next level? Try these expert tips:
- Use the Ripest Fruit: The sweetness of your salsa depends on the quality of your pineapple and mango. If they’re underripe, the salsa will lack depth.
- Adjust the Heat: Control the spiciness by tweaking the amount of jalapeño. For extra kick, add a pinch of cayenne pepper.
- Chill Before Serving: Allowing the salsa to rest in the fridge enhances the flavors and gives the ingredients time to marry.
- Dice Evenly: Uniform pieces ensure every bite is balanced and visually appealing.
- Fresh Lime Juice Only: Bottled lime juice can’t compare to the brightness of freshly squeezed.
Variations and Substitutions
This recipe is wonderfully adaptable. Here are some ways to customize it:
- Spicy Version: Add minced serrano pepper or a dash of hot sauce for extra heat.
- Mild Version: Skip the jalapeño entirely or replace it with diced cucumber for crunch without spice.
- Extra Citrus: Add a bit of orange or grapefruit juice for a different citrusy twist.
- Herb Swap: Not a fan of cilantro? Try fresh mint or basil for a unique flavor profile.
- Add Protein: Mix in black beans or diced avocado for a heartier salsa that can double as a salad.
What to Serve With It
This Pineapple Mango Salsa pairs beautifully with a variety of dishes. Here are some serving ideas:
- With Chips: Classic tortilla chips or plantain chips make for an irresistible appetizer.
- Over Grilled Proteins: Spoon it over grilled chicken, fish, shrimp, or tofu for a burst of freshness.
- Taco Topping: Elevate your taco night by adding this salsa to fish tacos or carnitas.
- With Rice Bowls: Use it as a topping for grain bowls with quinoa or brown rice.
- Alongside Drinks: Serve with a chilled margarita, mojito, or sparkling water with lime for a refreshing pairing.
How to Store and Reheat
While this salsa is best enjoyed fresh, here’s how to store any leftovers:
- Refrigeration: Store in an airtight container in the fridge for up to 3 days. The flavors will continue to develop, but the texture may soften slightly.
- Freezing: Freezing is not recommended, as the fresh ingredients will lose their texture upon thawing.
- Serving Leftovers: Give the salsa a quick stir before serving again. If it seems too watery, drain any excess liquid.
Frequently Asked Questions (FAQs)
Here are answers to some common questions about Pineapple Mango Salsa:
- Can I use canned pineapple or mango? Fresh is always best for texture and flavor, but in a pinch, well-drained canned fruit can work. Avoid syrupy varieties.
- How do I know if my mango is ripe? A ripe mango will give slightly when pressed and have a sweet aroma near the stem.
- Can I make this salsa ahead of time? Yes, but for the best texture, prepare it no more than a few hours in advance.
- Is there a substitute for red onion? Green onions or shallots can be used for a milder flavor.
- How can I make this salsa less spicy? Omit the jalapeño or remove its seeds and membranes before dicing.
Final Thoughts
Pineapple Mango Salsa is more than just a condiment—it’s a celebration of fresh, vibrant flavors that can brighten any meal. Whether you’re serving it at a party, enjoying it as a snack, or using it to jazz up your dinner, this salsa is sure to impress. The best part? It’s so simple to make that you’ll find yourself whipping it up again and again. Give it a try, and let the tropical flavors take you on a mini-vacation with every bite.
Print
Pineapple Mango Salsa
Description
A vibrant and refreshing salsa combining sweet pineapple, juicy mango, and a hint of spice. Perfect for chips, tacos, or grilled fish.
Ingredients
For the Crust:
- For the salsa:
- 1 cup fresh pineapple, diced
- 1 ripe mango, peeled and diced
- 1/2 red bell pepper, finely diced
- 1/4 cup red onion, finely chopped
- 1 jalapeño, seeded and minced
- 1/4 cup fresh cilantro, chopped
- For the dressing:
- 2 tbsp lime juice
- 1 tbsp honey
- 1/2 tsp salt
- 1/4 tsp black pepper
Instructions
1. Prepare the Crust:
- 1. In a large bowl, combine pineapple, mango, red bell pepper, red onion, jalapeño, and cilantro.
- 2. In a small bowl, whisk together lime juice, honey, salt, and black pepper.
- 3. Pour the dressing over the fruit mixture and gently toss to combine.
- 4. Cover and refrigerate for at least 30 minutes to allow flavors to meld.
- 5. Serve chilled with tortilla chips, over grilled chicken, or as a topping for fish tacos.
Notes
For a spicier salsa, leave the seeds in the jalapeño. Dice ingredients uniformly for best texture. Store leftovers in an airtight container for up to 3 days.