Delicious Maraschino Cherry Chocolate Chip Cookies Recipe Made Easy

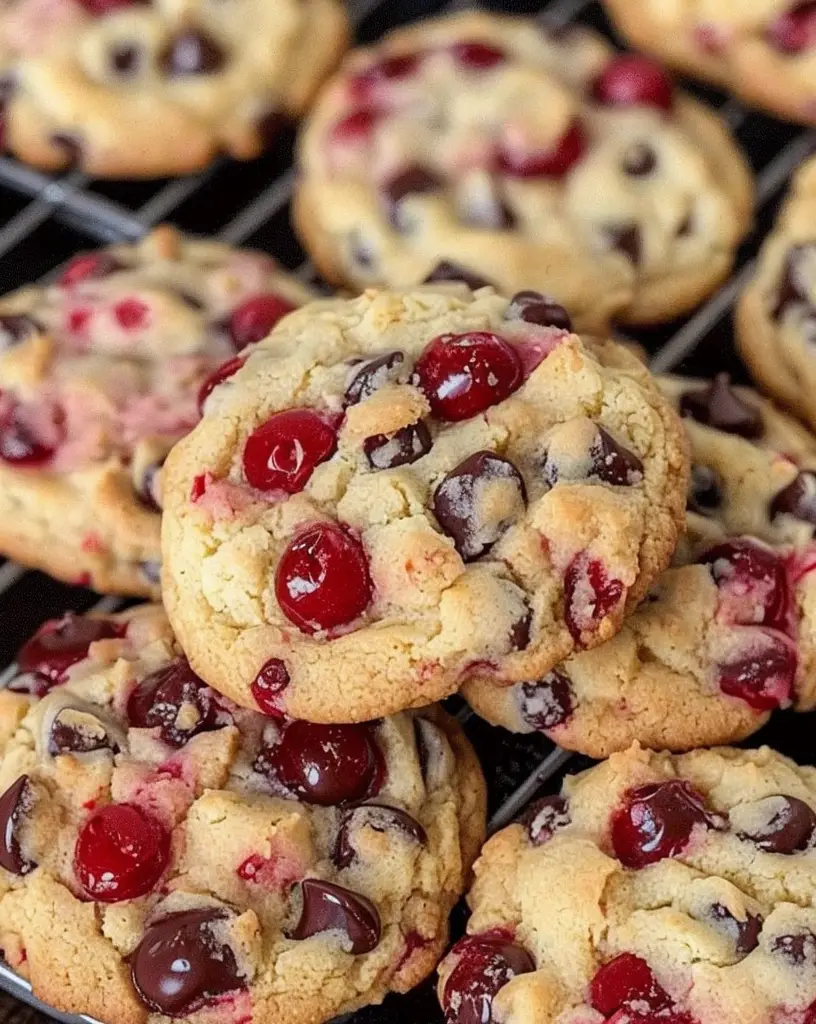
Maraschino Cherry Chocolate Chip Cookies – Easy & Delicious Recipe!

⚖️
Difficulty
Easy

⏲️
Prep Time
15 mins

🕒
Cook Time
12 mins

⏱️
Total Time
27 mins

🍽️
Servings
24 cookies

Maraschino Cherry Chocolate Chip Cookies are a delightful twist on the classic chocolate chip cookie, incorporating the sweet and tangy flavor of maraschino cherries. This easy and delicious recipe promises to satisfy your sweet tooth while bringing a touch of whimsy to your dessert table. Imagine biting into a freshly baked cookie, with the chocolate melting in your mouth and the cherry adding a burst of flavor—it’s a glorious experience for your taste buds.

The vibrant red cherries not only enhance the flavor but also make these cookies visually enticing, perfect for special occasions or a simple family treat. Whether you’re baking for a holiday party, a weekend gathering, or just to enjoy at home, these cookies offer the perfect balance of sweet and fruity goodness. Plus, they’re easy to make, ensuring you can whip up a batch in no time.

Quick Recipe Highlights

  • Flavor Profile: Sweet vanilla notes complement rich chocolate, while maraschino cherries add a delightful tartness.
  • Texture: Soft and chewy in the center with a slightly crisp edge, these cookies are perfect for dunking.
  • Aroma: The smell of freshly baked cookies mingled with the sweetness of cherries wafts through your kitchen, inviting everyone in.
  • Visual Appeal: The bright red maraschino cherries contrasting against the golden cookies creates a lovely presentation.
  • Skill Level Needed: This recipe is beginner-friendly, making it suitable for bakers of all ages and experiences.
  • Special Equipment: You’ll need basic baking tools such as mixing bowls, a baking sheet, and a spatula.

Recipe Overview

  • Difficulty Level: These Maraschino Cherry Chocolate Chip Cookies are considered easy due to their straightforward steps and minimal techniques required.
  • Category: Perfect for desserts or snacks, these cookies are versatile for any occasion.
  • Cuisine: This recipe draws inspiration from American cuisine, embracing classic flavors with a fun twist.
  • Cost: The typical ingredients are affordable, making this a budget-friendly treat.
  • Season: They shine in every season, particularly during holidays when sweet treats are in demand.
  • Occasion: These cookies are excellent for birthdays, holidays, or as a sweet pick-me-up anytime.

Why You’ll Love This Recipe

Experience the amazing taste and texture of Maraschino Cherry Chocolate Chip Cookies that will leave your guests asking for seconds. The combination of melt-in-your-mouth chocolate and juicy cherries creates a delightful contrast that is hard to resist. They not only provide a satisfying chewiness but also a burst of flavor with every bite, making them a favorite among all cookie enthusiasts.

The convenience of this recipe cannot be overstated. With simple steps and readily available ingredients, you can have delicious cookies in under 30 minutes. It’s perfect for a last-minute dessert or a fun afternoon baking activity with kids. You’ll appreciate how easy it is to go from mixing to baking, and before you know it, the smell of cookies will fill your home.

Nutritionally, these cookies bring a hint of fruitiness with the addition of cherries, which provide antioxidants and vitamins, offering a small health boost to your indulgence. While they are still a treat, incorporating fruit can make them feel a bit more wholesome.

Socially, baking these cookies can become an engaging activity to share with friends and family. Whether you’re inviting people over for a gathering or packaging them as gifts, these cookies can bring joy and create delightful memories together.

Finally, the affordability of the ingredients used in this Maraschino Cherry Chocolate Chip Cookies recipe makes it an accessible option for anyone looking to bake something sweet without breaking the bank. You won’t need to spend extravagantly to enjoy a delicious homemade treat.

Historical Background and Cultural Significance

Cookies have been a beloved dessert worldwide, with origins tracing back thousands of years. However, the fusion of chocolate chips and maraschino cherries in cookies is a uniquely American invention, showcasing the creativity of home bakers experimenting with flavors. This evolution reflects a wider trend in the culinary world where traditional recipes are updated for modern palates.

Maraschino cherries, originally preserved in alcohol, became a popular decorative item in American desserts in the 19th century. Their bright appearance and sweet flavor made them an ideal addition to many baked goods, including these cookies, signifying festivities and joy. Their utilization in cookie recipes becomes a symbol of celebration, often appearing in homes during holidays and family gatherings.

Over time, the chocolate chip cookie has evolved immensely, taking on various forms and ingredients. From being a simple butter and sugar concoction, bakers have explored adding unexpected elements like maraschino cherries, resulting in exciting and delicious variations that continue to capture the hearts of dessert lovers.

Regional variations of cherry treats also exist, with different parts of the world incorporating local flavors and techniques. This recipe stands as an example of how cultural influences intertwine in the kitchen, creating a dish that reflects both traditional American flavors and innovative baking practices.

Ingredient Deep Dive

Flour
Flour is the primary structural component in baked goods, providing the necessary protein for gluten formation. In cookie recipes, all-purpose flour is commonly used for its balanced properties. The gluten development contributes to the cookie’s chewy texture while allowing it to rise correctly. Look for high-quality flour, stored in a cool, dry place, to ensure its freshness. If you need a variation, consider using whole wheat flour for a nuttier flavor and added fiber.

Sugar
Sugar not only sweetens cookies but plays a vital role in texture and color. Brown sugar, often used in chocolate chip cookies, lends a deeper flavor and moisture, while granulated sugar contributes to crispness. Storing sugar in airtight containers keeps it from clumping and extends its shelf life. Alternatives like coconut sugar or maple sugar can be substituted for a unique taste profile and lower glycemic index.

Butter
Butter is crucial for providing moisture, flavor, and richness to cookies. Using unsalted butter allows for precise control over the salt content in the recipe. Be sure to soften butter properly before creaming with sugar to achieve the perfect cookie texture. For dairy-free options, coconut oil or vegan butter can serve as substitutes.

Chocolate Chips
Chocolate chips are a quintessential ingredient in chocolate chip cookies, available in various types, including semi-sweet, dark, and milk chocolate. They add bursts of chocolatey flavor and richness, complementing the sweetness of the cookie. For the best results, choose high-quality chips, and consider using a mix of different types for a complex flavor experience.

Maraschino Cherries
The maraschino cherry brings a vibrant color and a sweet, slightly tart flavor profile to the cookies. While they are often viewed simply as a decoration, their flavor enhances the entire cookie. Look for cherries that are naturally colored and flavored without artificial additives. To store, keep them in a sealed jar in the refrigerator for optimal freshness, and experiments with dried fruits or cranberries can offer interesting alternatives.

Common Mistakes to Avoid

  • Overmixing the Dough: This can lead to tough cookies due to excess gluten formation. Mix just until the ingredients are combined.
  • Using Cold Butter: Cold butter will not cream well with sugar, resulting in dense cookies. Ensure your butter is at room temperature.
  • Incorrect Oven Temperature: Always preheat your oven properly to ensure even baking, as inaccurate temperatures can lead to under or over-baked cookies.
  • Not Measuring Ingredients Accurately: Baking is a science that requires precise measurements. Use dry measuring cups for solids and liquid measuring cups for liquids.
  • Skipping Cooling Time: Allow cookies to cool on the baking sheet briefly before transferring to a wire rack to finish cooling. This prevents them from breaking.
  • Using Old Ingredients: Check the freshness of both baking soda and flour, as expired ingredients can affect texture and taste.
  • Not Chilling the Dough: Chilling the dough can help the flavors meld and can improve the texture, preventing cookies from spreading too much.
  • Forgetting to Line the Baking Sheet: This can lead to sticking and uneven baking. Use parchment paper or silicone baking mats for easy removal.
  • Overcrowding the Baking Sheet: Place cookies with sufficient space between them to allow for spreading; overcrowding can result in uneven cooking.
  • Ignoring the Visual Cues: Rely on the cookie’s color and firmness, not just the timer, to determine doneness; they should be golden-brown around the edges.

Essential Techniques

Creaming Butter and Sugar
This technique is crucial for achieving the right texture in your cookies. Creaming incorporates air into the butter, which helps leaven the cookies. It’s essential to beat the mixture until it turns light and fluffy—this usually takes about 2-3 minutes. Avoid over-creaming, as it can lead to overly airy cookies. Watch for the pale color and volume increase to determine success.

Proper Measurement
Accurate measurement is fundamental to baking success. Use measuring cups and spoons precisely suited for dry and liquid ingredients. For dry ingredients, spoon them into the measuring cup and level off with a knife rather than scooping directly to prevent packing. Properly measuring ensures you don’t inadvertently add too much flour or sugar, which can alter final outcomes significantly.

Baking Technique
Understanding your oven’s hot spots and how different materials influence baking can help you get perfect cookies. Always bake on the middle rack for the most even heating. Rotate the baking sheet halfway through the baking time for uniform results. Each oven is unique, so do note the color of your baked goods as a more reliable indicator than timing alone.

Cooling Cookies
Cooling is as critical as baking; transferring cookies too early can lead to broken pieces. Allowing cookies to cool on the sheet for a few minutes allows them to firm up before being moved. A wire rack helps circulate air around the cookies, preventing sogginess. Perfect cooling also enhances the texture for a satisfying bite.

Pro Tips for Perfect Maraschino Cherry Chocolate Chip Cookies

Use high-quality chocolate chips for the best flavor impact—Ghirardelli or Guittard brands are excellent choices. Cherries can be chopped to your desired size if you prefer more distributed flavor, or left whole for bursts of cherry in each bite. For added texture, sprinkle some sea salt before baking to enhance sweetness and complexity.

Consider adding chopped nuts like walnuts or pecans to introduce a delightful crunch. Experiment with adding a tablespoon of almond extract alongside the vanilla for enhanced flavor depth. For a chewier cookie, substitute bread flour for all-purpose flour to increase gluten content, providing a different mouthfeel.

If you’d like a bit of a healthier twist, try substituting half of the butter with unsweetened applesauce—it will reduce the fat while still maintaining moisture. Opt for dark chocolate instead of semi-sweet to offer a more complex, less sweet taste. Lastly, chilling the dough for at least 30 minutes before baking can help improve the overall texture and flavor meld.

Variations and Adaptations

For a seasonal twist, try adding peppermint extract during the winter months to create a Maraschino Cherry Candy Cane Cookie. You can also make a delightful citrus version by adding orange zest, creating a refreshing summertime cookie. For dietary needs, consider gluten-free flour blends, ensuring the chocolate chips are also gluten-free.

If you love a touch of spices, incorporate cinnamon or nutmeg for a cozy fall twist. Transform these cookies into a sandwich by using them with cream cheese frosting or chocolate ganache, creating an indulgent experience. For texture lovers, try breaking the chocolate chips into pieces, allowing pockets of chocolate to melt around fruity cherries.

Additionally, switching maraschino cherries with dried cranberries or raspberries can bring a completely new profile, delivering a more understated sweetness and chewier texture. You can also create a cookie bar by pressing the dough into a baking dish for a thicker texture, increasing baking time as necessary.

Serving and Presentation Guide

To plate your Maraschino Cherry Chocolate Chip Cookies beautifully, stack them in a clear glass jar, allowing their vibrant colors to shine. A dusting of powdered sugar or a drizzle of melted chocolate enhances visual appeal and adds an extra touch of sweetness. Dark-colored plates contrast beautifully against the bright red cherries, making them stand out.

When serving, consider pairing them with a glass of cold milk, hot cocoa, or even coffee to elevate the experience. You can include small plates or napkins printed with cherries to reinforce the theme. For parties or gatherings, arrange cookies on platters with decorative liners to add flair.

Temperature is key; these cookies are best served warm, with the chocolate still gooey. If serving later, warm them slightly in the microwave. Keep portion control in mind, as each treat should be around the size of your palm for optimal enjoyment without overindulgence.

Wine and Beverage Pairing

For wine enthusiasts, pairing your cookies with a sweet dessert wine like a Moscato or Riesling can create a delightful contrast with the chocolate and cherries. The fruity notes in the wine will complement the cookie’s sweet and tart flavors beautifully.

If you prefer non-alcoholic alternatives, opt for a rich hot chocolate or a spiced chai tea, both of which have a quality that blends well with the indulgent nature of the cookies. Iced coffee with a splash of flavored syrup offers a refreshing balance and can cool down the palate between bites.

Remember to serve all beverages chilled or warm, depending on the pairing, to enhance the overall enjoyment of your sweet treat experience.

Storage and Shelf Life

To store your Maraschino Cherry Chocolate Chip Cookies, place them in an airtight container at room temperature. They can last up to a week; however, for optimal freshness and taste, consume them within the first few days. If you notice any signs of moisture or staleness, they should be discarded.

For longer preservation, consider freezing the cookies. Place them in a single layer on a baking sheet to freeze briefly, then transfer to freezer-safe containers. They can last up to three months in the freezer. To reheat, simply pop them in a warm oven for a few minutes or microwave them for 15-20 seconds.

Additionally, if the cookies begin to harden, store them with a slice of bread in the container to help maintain moisture, extending their enjoyable life.

Make Ahead Strategies

If you want to prepare your Maraschino Cherry Chocolate Chip Cookies in advance, you can make the dough ahead of time and refrigerate it for up to 48 hours before baking. This allows flavors to blend beautifully, enhancing the overall taste.

You can also freeze dough balls before baking; simply scoop the dough, place them on a baking sheet lined with parchment, and freeze until solid. Once frozen, transfer the dough balls to a freezer bag. When you’re ready to bake, customize your baking time according to the dough’s temperature.

To keep the cookies fresh once baked, consider packaging them separately with wax paper between layers or in single servings to make them easy to grab and enjoy over the week or during gatherings.

Scaling Instructions

If you want to halve the recipe, simply adjust your measurements accordingly—this is often easier for quick snacks. To double or triple the batch, ensure you have enough mixing space and baking sheets available, as larger quantities will require more time for mixing and baking.

When baking in larger quantities, keep a close eye on the baking time; they may require additional time due to oven crowding or temperature variations. Using multiple racks can also help evenly distribute heat, leading to consistently baked cookies.

Lastly, consider the size of your mixing bowls and ensure that they’re large enough to accommodate the increased quantities without spilling or making a mess.

Nutritional Deep Dive

These Maraschino Cherry Chocolate Chip Cookies can be enjoyed mindfully, particularly when you consider a macro breakdown. Each cookie typically contains moderate carbohydrates from sugars and flour, balanced by fats from butter and chocolate. For a more precise view, consider adjusting portion sizes.

Micronutrient analyses show that cherries provide vitamin C and antioxidants, while dark chocolate can contribute to heart health when consumed in moderation. Understanding these benefits can help you enjoy luxuries like cookies guilt-free while maintaining nutritional balance.

Be aware of dietary considerations such as portion control—two cookies instead of four offers the same satisfaction without overindulgence. Always remember that mindful eating is key to enjoying treat items, ensuring they fit into your dietary preferences.

Dietary Adaptations

For those avoiding gluten, you can substitute regular flour with gluten-free flour blends that provide a similar texture and taste. Make sure to check that your chocolate chips are also gluten-free to keep the entire recipe accommodating.

Dairy-free individuals can create delicious results by using coconut oil or a vegan butter alternative instead of regular butter. Ensure the chocolate chips used are dairy-free as well for a fully plant-based treat.

If you’re following a keto or low-carb diet, you can substitute sugar with erythritol or other sugar alternatives, adjusting liquid ingredients to compensate for potential dryness. Adapting the recipe can still fulfill your cookie cravings.

Paleo dieters could utilize almond flour as a base, combined with maple syrup or honey as a natural sweetener, and add in more dried fruits for that chewy texture without compromising the integrity of the diet.

Troubleshooting Guide

If your Maraschino Cherry Chocolate Chip Cookies are coming out flat, it could be due to using warm butter or not chilling the dough long enough before baking. Try refrigerating the dough longer, and ensure your butter is softened but not melted.

If they’re too dry, overbaking could have occurred. Always keep an eye on the color of your cookies, and remove them from the oven just as the edges begin to set while the center remains slightly soft.

A too cakelike texture may arise from mistakenly adding too much flour. When measuring, use the scoop-and-level method to avoid overpacking; remember that less can often be more for cookie texture.

Lastly, if your cookies lack flavor, consider increasing vanilla or adding a pinch of salt to enhance the overall taste. These little tweaks can significantly elevate the cookie experience.

Recipe Success Stories

Many home bakers have found success with these Maraschino Cherry Chocolate Chip Cookies, often praising their flavor and texture. Community feedback highlights how children and adults alike enjoy the playful addition of cherries, transforming a classic into a family favorite.

Variations have also been shared by readers, who experiment with different chocolate types and nuts. Some suggest adding dried coconut for an exotic twist, while others have found success by making them into sandwiches filled with cream cheese frosting.

Adaptation stories showcase creativity, with bakers substituting maraschino cherries for fresh ones or even other fruits like raspberries, promising wonderful results. Photography tips shared in social media show off vibrant colors and many one-of-a-kind presentations.

Frequently Asked Questions

Can I use fresh cherries instead of maraschino cherries?
Yes! Fresh cherries can be used, but make sure to pit and chop them so that they blend well in the cookie dough. They may add a slightly different flavor and texture.

How do I keep my cookies soft after baking?
Store the cookies in an airtight container at room temperature. Consider adding a slice of bread to help maintain moisture.

Can I freeze the dough?
Absolutely! You can freeze cookie dough for up to 3 months. Just scoop the dough into balls, freeze them on a baking sheet, and then transfer them to a freezer bag.

What can I use instead of eggs in this recipe?
For an egg substitute, consider using 1/4 cup of unsweetened applesauce or a flax egg (1 tablespoon of ground flaxseed mixed with 2.5 tablespoons of water).

How do I prevent my cookies from spreading too much?
Chilling the dough prior to baking can help prevent spreading. Ensure you’re also using the right amount of flour using the spoon-and-level method.

Will these cookies still taste good if I omit the chocolate chips?
If you like, you can omit chocolate chips and replace them with nuts or oats to give a different texture and maintain the flavor profile.

Can the recipe be halved?
Yes, you can easily halve all ingredient measurements if you want a smaller batch of cookies.

What type of chocolate is best for these cookies?
Semi-sweet or dark chocolate chips work great, but feel free to experiment with your favorite chocolate type or combination.

How do I know when the cookies are done baking?
Cookies should be golden brown around the edges while still appearing soft in the center. They will firm up as they cool down.

Can I add other mix-ins to these cookies?
Absolutely! Feel free to add nuts, oatmeal, or even white chocolate chips for a personalized touch.

Additional Resources

For those who love to explore further, consider checking out related recipes like classic chocolate chip cookies, oatmeal raisin cookies, or our favorite monster cookies. These recipes share similar techniques and ingredient profiles, offering variety for your baking adventures.

Explore technique guides that detail the essential methods of creaming butter, egg incorporation, and proper rolling techniques. Understanding these foundation elements will improve your baking skills across all recipes.

Ingredient information, particularly focusing on flour types and sugars, can enhance your understanding of how each component affects your final product. Knowing options will help make informed choices in health and taste.

If you’re in need of new equipment, look at recommended baking sheets and mixers, ensuring you have the right tools to make your baking experience enjoyable and efficient. High-quality tools make a significant difference in results.

Lastly, if you want your baking to reflect the seasons, look into seasonal variations of cookies, incorporating spices like ginger for fall or citrus zests for refreshing summer treats.

Join the Conversation

We invite you to share your experiences with Maraschino Cherry Chocolate Chip Cookies on social media! Use #CherryChocolateCookieChallenge to connect with fellow bakers, share tips, and showcase your creative cookie designs.

Photography enhancements can make your cookies shine on your feed. Play with natural lighting and diverse angles to capture the vibrancy of the cherries and the textures of the cookie itself.

Review the recipe after trying it; community engagement often helps improve and adapt recipes based on feedback and experience. We’d love to hear your suggestions and any tweaks you made along the way.

If you try a variation, let us know how it went! Your contributions enrich the cooking journey for others seeking to delight in these delicious treats.

The Recipe

Maraschino Cherry Chocolate Chip Cookies

Serves: 24 cookies

Prep Time: 15 mins

Cook Time: 12 mins

Total Time: 27 mins

Kitchen Equipment Needed

  • Mixing bowls
  • Baking sheet
  • Parchment paper
  • Spatula
  • Measuring cups and spoons
  • Cooling rack

Ingredients

  • 2 1/4 cups all-purpose flour
  • 1 teaspoon baking soda
  • 1 teaspoon salt
  • 1 cup unsalted butter, softened
  • 3/4 cup granulated sugar
  • 3/4 cup packed brown sugar
  • 1 teaspoon vanilla extract
  • 2 large eggs
  • 1 1/2 cups chocolate chips
  • 1 cup maraschino cherries, chopped

Directions

  1. Preheat your oven to 350°F (175°C).
  2. In a medium bowl, mix flour, baking soda, and salt together. Set aside.
  3. In a large bowl, cream the softened butter, granulated sugar, and brown sugar until light and fluffy.
  4. Add vanilla and eggs, mixing thoroughly until combined.
  5. Gradually add the flour mixture to the wet ingredients, mixing until just combined.
  6. Fold in chocolate chips and chopped maraschino cherries.
  7. Drop dough by rounded tablespoons onto a baking sheet lined with parchment paper, spacing them about 2 inches apart.
  8. Bake for 10-12 minutes, or until edges are lightly golden.
  9. Remove from oven and let them cool on the baking sheet for 5 minutes before transferring to a wire rack to cool completely.

Recipe Notes

  • For a richer flavor, consider using dark chocolate chips.
  • You can substitute half of the butter for unsweetened applesauce for a healthier option.
  • Chill the dough for better texture and to prevent spreading if desired.
  • If using whole cherries, be sure to pit and chop them properly before incorporating into the dough.

Christmas Cranberry Pie: A Sweet and Tart Holiday Dessert

cranberry holiday pie, festive cranberry desserts, sweet cranberry tart, Christmas pie recipes, cranberry nut pie, easy cranberry dessert, holiday pie ideas

Christmas Cranberry Pie: A Festive Holiday Dessert


Christmas Cranberry Pie is a delightful holiday treat that combines tart cranberries with a sweet, buttery topping. Perfect for festive gatherings or a cozy dessert after dinner, this pie is a must-try for cranberry lovers. With simple ingredients and easy preparation, it’s a great addition to any holiday menu.


Why Christmas Cranberry Pie Is a Holiday Favorite

This dessert stands out for its unique balance of flavors. The tartness of the cranberries pairs beautifully with the sweet batter and crunchy nutty topping. Unlike traditional pies with complex crusts, Christmas Cranberry Pie skips the fuss by using a pour-over batter. For more festive recipes, check out No-Bake Pumpkin Cheesecake for another easy dessert idea.


Ingredients You’ll Need

Here’s a breakdown of the ingredients for the perfect Christmas Cranberry Pie:

  • Cranberries: Fresh or frozen work well.
  • Pecans: Adds crunch and complements the tartness.
  • Sugar: Sweetens the cranberries and batter.
  • Butter: Creates a rich and moist topping.
  • Almond Extract: Provides a subtle, aromatic depth.
  • Flour: All-purpose or gluten-free options work well.

For tips on making the perfect pie crusts and more baking essentials, visit Perfect Pie Crust Tips.


How to Make Christmas Cranberry Pie

1. Prepare the Cranberry Base

  • Toss fresh or frozen cranberries with sugar and pecans.
  • Spread evenly in a buttered 10-inch pie dish.

2. Mix the Topping Batter

  • Cream softened butter and sugar together until fluffy.
  • Beat in eggs and almond extract. Gradually add flour until smooth.

3. Assemble and Bake

  • Pour or dollop the batter over the cranberries.
  • Bake at 350°F for 40–50 minutes until golden and set.

4. Serve Warm

  • Pair with vanilla ice cream or whipped cream for extra indulgence.

Creative Variations

  • Citrus Cranberry Pie: Add orange zest to the cranberry base for a zesty flavor.
  • Nut-Free Option: Omit pecans and substitute with rolled oats for texture.
  • Vegan Christmas Pie: Use plant-based butter and flax eggs.
  • Spiced Cranberry Pie: Add cinnamon and nutmeg to the batter for a holiday twist.

Explore other unique pie variations like German Apple Pie for more inspiration.


Tips for Success

  • Balancing Tartness: Adjust the sugar level to suit your taste.
  • Avoiding Soggy Base: Use fresh cranberries and drain excess liquid if using frozen.
  • Golden Finish: Brush the top with milk and a sprinkle of sugar before baking.

FAQs

1. Can I use dried cranberries instead of fresh?

Yes, but soak them in warm water or orange juice to rehydrate before use.

2. How long can I store this pie?

Refrigerate for up to 3 days or freeze for up to a month.

3. Can I make this pie gluten-free?

Absolutely! Replace the flour with a gluten-free baking blend.

4. Is this pie best served warm or cold?

While delicious either way, it’s best served warm with ice cream or whipped cream.

5. Can I add a bottom crust?

Yes, but the traditional recipe skips it to focus on the cranberry and topping layers.


Internal Linking Opportunities

For readers who enjoyed this recipe, explore these related options on ExoRecipes:


Conclusion

Christmas Cranberry Pie is a delightful addition to your holiday menu, offering a mix of tart, sweet, and nutty flavors in every bite. With its simple preparation and versatility, it’s a dessert that’s sure to impress. Start your holiday baking with this easy yet impressive pie, and make it a tradition for years to come!

Easy Crock Pot Cheddar Chili Mac Recipe for Comfort Food Lovers

Crock Pot Cheddar Chili Mac: A Hearty Comfort Food Delight

⚖️
Difficulty
Easy

⏲️
Prep Time
15 mins

🕒
Cook Time
4 hours

⏱️
Total Time
4 hours 15 mins

🍽️
Servings
6

Crock Pot Cheddar Chili Mac is not just a meal; it’s an experience that wraps you in warmth and satisfaction. Imagine tender pasta enveloped in a rich, cheesy sauce with the bold flavors of chili, creating a dish that brings joy to every bite. This comforting recipe is perfect for busy families or anyone who enjoys a hearty bowl of goodness without spending hours in the kitchen.

As the delicious aroma of spices and melted cheese fills your kitchen, you’ll find it hard to resist the anticipation of diving into this delightful dish. The combination of creamy cheddar and zesty chili creates a symphony of flavors that evoke childhood memories and warm gatherings around the dinner table. Let’s prepare to indulge in a meal that is not only easy to make but is sure to become a new favorite in your household.

Quick Recipe Highlights

  • Flavor Profile: This dish balances the creaminess of cheddar cheese with the rich, spicy flavors of chili, resulting in a satisfying and comforting experience.
  • Texture: The tender pasta combined with the creamy sauce offers a delightful mouthfeel, while the chili adds a hearty and chunky texture.
  • Aroma: A tantalizing blend of spices, garlic, and melted cheese will fill your kitchen, inviting everyone to the table.
  • Visual Appeal: The warm golden pasta, speckled with red bits of chili and topped with green cilantro, makes for an inviting and colorful presentation.
  • Skill Level Needed: Perfect for beginner cooks, this recipe requires minimal techniques, making it accessible for all.
  • Special Equipment: You will need a reliable crock pot, measuring cups, and spoons for this recipe.

Recipe Overview

  • Difficulty Level: The Crock Pot Cheddar Chili Mac is classified as easy, making it a great choice for novice cooks or busy individuals. With only a few simple steps, you can create a satisfying meal without stress.
  • Category: This dish fits beautifully into the comfort food category, ideal for family dinners or potlucks.
  • Cuisine: While it draws on elements of American cuisine, particularly the classic mac and cheese and chili combination, it can be adapted with various spices and toppings.
  • Cost: This recipe is budget-friendly, with common ingredients that won’t break the bank, making it perfect for everyday meals.
  • Season: Crock Pot Cheddar Chili Mac is a fantastic fall or winter dish, perfect for cold evenings when you crave warmth and comfort.
  • Occasion: Whether it’s a casual family night, game day, or a cozy gathering, this recipe suits various occasions with its hearty and crowd-pleasing nature.

Why You’ll Love This Recipe

Crock Pot Cheddar Chili Mac delights with its mix of delectable taste and appealing texture. The creamy cheddar cheese melds perfectly with the spicy chili, creating a unique flavor combination that satisfies every craving. The pasta’s tenderness rounds out the dish, making it a comfort food bonanza that will have you going back for seconds.

The convenience of this recipe is unmatched; simply throw all the ingredients in the crock pot and let it do the work. This one-pot dish means less cleanup and more quality time with family and friends. You can prepare it in the morning and come home to a delicious hot meal without any fuss.

Nutritiously, this dish provides a balanced mix of protein from beans, carbs from pasta, and calcium from cheese. It offers a satisfying meal that can fuel your day while indulging in delightful flavors, promoting comfort and nourishment.

Crock Pot Cheddar Chili Mac is perfect for social gatherings, where everyone can gather around a warm bowl of goodness. It’s ideal for game days, family dinners, or potlucks, encouraging social interaction while sharing a meal that brings people closer together.

In addition to its taste and comfort, this recipe is exceptionally cost-effective. With budget-friendly ingredients and leftovers that can be enjoyed for days, it’s a smart choice that makes the most of your grocery list while providing unbeatable flavor.

Historical Background and Cultural Significance

The origins of chili mac can be traced back to classic American comfort foods. It blends elements of the familiar mac and cheese with zesty chili, capturing the essence of hearty home-cooked meals. This dish has evolved through various regional interpretations, often reflecting local ingredients and preferences.

Chili itself has roots in Tex-Mex cuisine, bringing a rich history of flavors and techniques that reflect the blending of cultures. The inclusion of pasta into traditional chili dishes emerged as a simple way to expand servings and enhance nourishment, creating a beloved and hearty meal.

Over time, recipes for chili mac have transformed, allowing for creativity and personal touches. Families have added their unique flair, using different types of pasta and varying spice levels, ensuring that each bowl is both nostalgic and modern.

Regional variations can include everything from Detroit-style to Cincinnati chili, showing just how versatile and loved this dish has become across the United States. Every family has their version, uniting generations around a common love for this comforting meal.

Ingredient Deep Dive

When considering the ingredients for Crock Pot Cheddar Chili Mac, pasta serves as the foundation. Its history as a staple food dates back centuries, and it carries significant cultural relevancy across various cuisines. Nutritionally, pasta is a great source of carbohydrates, essential for energy, and comes in many varieties, allowing for gluten-free or whole grain options.

Choosing the right pasta is crucial for this dish. Opting for smaller shapes, like elbow macaroni or shells, ensures they catch the sauce perfectly. Store pasta in a cool, dry place to maintain freshness, and consider using alternatives that suit dietary restrictions, such as chickpea or lentil pasta.

Cheddar cheese is another star ingredient, with its rich flavor and meltability. Its history traces back to the English countryside, evolving into the beloved cheese known worldwide today. Cheddar is known for being high in calcium and protein, and it adds creamy richness to the dish. Selecting aged cheddar provides deeper flavor, while young cheddar offers a milder taste. Store it in the fridge, wrapped tightly to maintain freshness.

The chili in this dish often consists of ground beef, beans, and spices. This hearty trio provides protein, fiber, and essential nutrients. Each component carries historical meaning—from the ancestral preparation methods of beans to the cultural significance of spices in flavoring meats. Choosing lean cuts of meat reduces fat content, while beans provide a plant-based protein alternative.

Common Mistakes to Avoid

  • Overcooking the pasta: Ensure that the pasta is only added during the last hour of cooking to prevent mushiness.
  • Using pre-shredded cheese: Pre-shredded cheeses often contain anti-caking agents, affecting meltability. Shred your cheese fresh for the best results.
  • Not seasoning properly: Taste and adjust seasoning throughout the cooking process to ensure balanced flavor.
  • Using too much liquid: Stick to the recipe measurements for liquids to avoid a soupy texture.
  • Neglecting to brown the meat: Browning the ground beef first adds depth of flavor to the dish and enhances its richness.
  • Skipping the aromatics: Onions, garlic, and spices are key to building flavor. Don’t skip sautéing these ingredients before adding them to the pot.
  • Cooking on high: If using a crock pot, opt for low and slow to allow flavors to meld beautifully.
  • Not letting it rest: Allow the dish to sit for a few mins after cooking. This helps thicken the sauce and improves texture.

Essential Techniques

To master the art of cooking in a crock pot, starting with browning your meat is vital. This technique enhances the flavor dramatically, as it caramelizes the meat’s surface. Sautéing adds a depth of color and richness to the finished dish, so don’t skip this step. Keep an eye on it, and aim for a nice golden-brown hue for optimum results.

Another essential technique is building flavor through layering ingredients. Start by adding aromatics like onions and garlic at the bottom of the crock pot, ensuring they release their flavors as they cook. Follow with beans and meat, and finally, pour in the liquids last. This technique creates a harmonious flavor in every bite, making it an integral part of your cooking process.

Finally, mastering correct timing is key when cooking. Crock pots are all about low and slow; different settings can produce significantly different results. Familiarize yourself with your device, checking the dish periodically so you can learn how it cooks. A well-cooked meal should be tender, with flavors that sing, so keep time and temperature in check for success.

Pro Tips for Perfect Crock Pot Cheddar Chili Mac

1. Layer flavors: Start by sautéing spices and aromatics to enhance their flavor before adding them to the crock pot.
2. Use high-quality cheese: Freshly grated cheese melts better and has superior flavor compared to pre-shredded cheese options.
3. Experiment with spices: Enhance your chili mac with additional spices like cumin or smoked paprika for added warmth and depth.
4. Add veggies: Incorporate bell peppers or corn for an extra layer of nutrition and flavor.
5. Adjust consistency: If the mac is too thick upon finishing, a splash of milk or broth can loosen it to your preferred texture.
6. Top with fresh herbs: A sprinkle of cilantro or green onions before serving brightens the dish and adds a fresh zing.
7. Cook low and slow: For best results, cook on low for a few hours to achieve perfect flavor and texture.
8. Let it sit: Allowing the dish to sit for 10 minutes after cooking helps the flavors meld and the sauce to thicken.

Variations and Adaptations

1. **Regional variations**: Experiment with Tex-Mex flavors by adding jalapeños or pepper jack cheese to enhance the dish’s heat and spice.
2. **Seasonal adaptations**: In fall, add diced pumpkin or butternut squash for a seasonal twist while maintaining creaminess and depth.
3. **Dietary modifications**: For a lower-carb option, substitute regular pasta with spiralized zucchini or cauliflower rice.
4. **Flavor variations**: Mix in barbecue sauce for a smoky flavor or taco seasoning for a Mexican-inspired take.
5. **Texture modifications**: Top the finished dish with crushed tortilla chips for crunch or some crispy bacon bits for added flavor.
6. **Presentation alternatives**: Serve in individual ramekins for a fun and personal touch, allowing guests to customize their toppings.

Serving and Presentation Guide

For beautiful plating, use shallow bowls that elevate the dish’s colors and textures. A simple swirl pattern can showcase the creamy sauce and pasta beautifully. Garnish generously with fresh cilantro or scallions, providing a splash of color and an inviting aroma that enhances the dish’s appeal.

Traditional accompaniments such as crusty bread or a fresh green salad can elevate the experience and provide a refreshing contrast to the richness of the mac. Consider serving with a side of tortilla chips for added crunch, which complements the soft and creamy pasta, creating a delightful contrast.

Temperature is critical; serve the dish piping hot to bask in its gooey cheese and flavors. Portions can be easily controlled by using smaller bowl sizes, allowing guests to enjoy as a starter or generous main course.

Wine and Beverage Pairing

When pairing wine with Crock Pot Cheddar Chili Mac, opt for a medium-bodied red like Merlot or Zinfandel. These wines offer enough fruitiness to balance out the spicy chili while complementing the richness of the cheese. For a white wine option, try a chilled Sauvignon Blanc, which can cut through the creaminess and enhance the overall flavor.

Non-alcoholic beverages also have great options; a refreshing iced tea with lemon or a bubbly sparkling water enhances the meal without overpowering the dish’s robust flavors. Should you prefer coffee, a robust dark roast can provide a nice contrast to the richness of the mac and cheese.

Temperature is essential; serve white wines chilled and allow reds to breathe at room temperature before savoring. This practice enhances the flavors and aromas, providing a delightful accompaniment to your meal.

Storage and Shelf Life

For proper storage, place any leftover Crock Pot Cheddar Chili Mac in an airtight container, ensuring it’s completely cooled before sealing. Store in the refrigerator for up to 3-4 days. Reheating the dish requires gentle heating in either the microwave or on the stovetop; adding a splash of milk can help revive the creaminess.

If you want to extend its life, freezing is an option; this dish can be frozen for up to 3 months. Ensure it is well-sealed in freezer-safe containers to prevent freezer burn. When ready to enjoy, thaw in the refrigerator overnight before reheating.

Signs of spoilage include off smells or unusual texture changes in the cheese or meat. Always trust your instincts; when in doubt, it’s better to discard any questionable food than to risk food safety.

Make Ahead Strategies

For those busy evenings, preparing components ahead of time can be a lifesaver. Chop onions, garlic, and any vegetables you plan to include in advance, storing them in the fridge for quick access on cooking day. You can also brown the meat a day before and refrigerate it for easy incorporation the next day.

Assembling the dish the night before is an excellent strategy. Simply layer all ingredients into the crock pot liner, cover, and refrigerate until ready to cook. On cooking day, set it to low and forget it until dinner time.

The impact on quality is minimal with this approach; the flavors often deepen when ingredients sit together in advance, resulting in a tastier final dish. Garnishing and any fresh ingredient additions, like herbs or avocado, should be reserved until serving for freshness.

Scaling Instructions

When scaling the Crock Pot Cheddar Chili Mac recipe, consider adjusting beans and meat proportions to ensure flavor remains balanced. Halving the recipe can be easily done by reducing ingredient amounts proportionally and ensuring you have a smaller crock pot to accommodate.

For larger gatherings, doubling or tripling the recipe is an excellent way to feed a crowd. Just be mindful that larger quantities may require additional time to cook thoroughly, so check for doneness and adjust cooking time wisely.

Equipment adjustments may also be necessary; ensure your crock pot is large enough to fit additional ingredients comfortably. If you have a smaller slow cooker, consider cooking batches instead.

Timing modifications will depend on the scale; larger volumes will take longer to heat through, while smaller amounts may cook faster, so keep an eye on the dish during the cooking time and adjust as needed.

Nutritional Deep Dive

In Crock Pot Cheddar Chili Mac, you’ll find a delightful balance of macros. Each serving contains protein from beef and beans, carbohydrates from pasta, and healthy fats from cheese. This balance makes it an excellent choice for sustaining energy levels throughout the day.

Micronutrient analysis reveals that this dish provides essential vitamins and minerals, including calcium from cheese, iron from meat, and dietary fiber from beans. Each of these nutrients contributes to a well-rounded meal that supports overall health.

Health benefits include the dish’s ability to provide comfort while still being nutritious. The combination of protein and carbohydrates offers a satisfying and satiating meal, ideal for families seeking warmth and satisfaction.

For portions, be mindful of serving sizes to manage caloric intake effectively. The richness from cheese and pasta can add up, so consider serving with a side salad for an additional fiber boost and a lighter meal presentation.

Dietary Adaptations

For those needing gluten-free options, substitute traditional pasta with gluten-free varieties made from rice or corn. Be sure to verify that all sauces and canned goods meet gluten-free standards for safety.

Individuals seeking dairy-free alternatives can use plant-based cheeses made from nuts or soy. Coconut milk can serve as a creamy base in place of regular dairy to maintain richness without compromising flavor.

Vegan adaptations are also easy—simply omit the meat and replace it with a hearty lentil or jackfruit mixture, which provides texture and protein. The remaining ingredients can typically remain the same to ensure flavor continuity.

Low-carb dieters can swap traditional pasta for spiralized veggies or edible “zoodles,” removing the starches while still enjoying the delightful flavors of chili mac.

For those following the keto diet, use cauliflower instead of regular pasta and ensure all your ingredients are low in carbs yet high in flavor, maintaining texture without overindulging in carbohydrates.

Troubleshooting Guide

If you encounter texture issues with your Crock Pot Cheddar Chili Mac, often the cause is overcooking. If pasta turns mushy, consider adding it towards the end of the cooking time. If undercooked, check the cooking time and give it a little longer until tender.

Flavor balance can easily shift; if too spicy, a dollop of sour cream or a splash of creaminess can help counteract. Adding extra cheese can also enhance flavor without overwhelming the palate.

Temperature problems may arise if using an older crock pot. Ensure you monitor the temperature settings, and if you notice uneven cooking, consider switching recipes to a stovetop option for better control.

If facing equipment challenges, such as a malfunctioning crock pot, it’s advisable to have a backup plan. An instant pot or stovetop can often replicate the crock pot experience, providing flexibility.

Ingredient substitutions can lead to unwanted changes; always test new brands or types to ascertain their effect on flavor and texture. Adjusting seasoning gradually when replacing offers greater control.

Timing concerns can lead to stress; always aim to start earlier to provide a buffer for unexpected delays or changes to the cooking process, ensuring you can still achieve your desired outcome.

Recipe Success Stories

Community feedback reinforces the widespread appeal of this Crock Pot Cheddar Chili Mac. Families have shared their experiences of children savoring every bite, an exciting evolution from traditional mac and cheese to a more robust meal that everyone enjoys.

Variation successes include numerous adaptations, with readers highlighting how they’ve personalized the recipe with specific family favorite ingredients. Adding their unique spins has made the dish a cherished family tradition.

Photo submissions from readers participating in a community hash-tag campaign have showcased the dish’s vibrant colors and inviting presentation. These visuals often spark further creativity in others looking to recreate the dish.

Suggestions from the community often highlight the ease of preparation along with its comforting flavors. Users express how this dish has become a go-to for busy weeknights due to its simplicity and satisfying nature.

Frequently Asked Questions

1. Can I cook this recipe on high instead of low?

Yes, you can cook this recipe on high, but be cautious as it may require shorter cook times. Check for doneness after about 2 hours.
2. How can I thicken the sauce?

If the sauce turns out too thin, you can thicken it by mixing a tablespoon of cornstarch with water and adding it to the pot, cooking for an additional 30 minutes.
3. Is it possible to freeze this dish?

Yes! This dish freezes well. Store it in airtight containers for up to three months and reheat as needed.
4. Can I use whole wheat pasta?

Absolutely! Whole wheat pasta can be substituted for regular pasta if desired, providing added nutritional benefits.
5. What if I don’t have chili powder?

If you don’t have chili powder, you can substitute it with a mix of paprika, cumin, and cayenne for a similar flavor profile.
6. How do I know when it’s done cooking?

The dish is done cooking when the pasta is tender and the cheese has melted through, typically about 4 hours on low.
7. Can I make this vegetarian?

Yes, by omitting the meat and using additional beans or lentils, you have a delicious vegetarian version.
8. What kind of toppings can I add?

Toppings like sour cream, chopped green onions, or shredded cheese enhance the flavor profile significantly.
9. How can I reduce the spice level?

To reduce spiciness, use less chili powder and incorporate dairy products like sour cream, which can neutralize heat.
10. What if my sauce is too salty?

If the sauce turns out too salty, add a bit of sugar or a splash of vinegar to help balance the flavor.
11. Can I make a larger batch?

Yes! Just ensure your crock pot is large enough for all ingredients and adjust cooking time accordingly.

Additional Resources

Explore related recipes and guides that complement this dish beautifully. Consider trying side dishes like cornbread or a fresh garden salad to provide balance to this hearty meal. Use technique guides to refine your skills in slow cooking, as well as ingredient information to understand how to choose the best components for your recipes.

For equipment recommendations, ensure you have a reliable crock pot and utensils that can help you create other delightful slow-cooked meals. Explore seasonal variations to keep the recipe fresh and exciting throughout the year.

Join the Conversation

We invite you to share your experiences cooking this recipe! Join our community by posting photos on social media, and share how you’ve made this dish uniquely yours. Provide feedback through comments or reviews, and engage with others who are eager to try their hand at this comforting meal. Your variations could inspire others in their cooking journey, so let’s keep the conversation going.

The Recipe

Crock Pot Cheddar Chili Mac

Serves: 6

Prep Time: 15 mins

Cook Time: 4 hours

Total Time: 4 hours 15 mins

Kitchen Equipment Needed

  • Crock pot
  • Measuring cups and spoons
  • Large skillet
  • Wooden spoon or spatula
  • Airtight storage containers

Ingredients

  • 1 pound ground beef
  • 1 medium onion, chopped
  • 2 cloves garlic, minced
  • 1 can (15 oz) kidney beans, drained and rinsed
  • 1 can (28 oz) diced tomatoes
  • 2 cups beef broth
  • 1 tablespoon chili powder
  • 1 teaspoon cumin
  • 8 ounces elbow macaroni
  • 2 cups shredded cheddar cheese
  • Salt and pepper to taste

Directions

  1. In a large skillet, brown the ground beef over medium heat until fully cooked. Drain excess fat.
  2. Add chopped onion and garlic to the beef. Sauté until the onion is translucent.
  3. Transfer the beef mixture to the crock pot and add the kidney beans, diced tomatoes, beef broth, chili powder, and cumin. Stir to combine.
  4. Cover and cook on low for 4 hours.
  5. During the last 30 minutes of cooking, add in the elbow macaroni and stir until well mixed.
  6. Once the macaroni is cooked through, stir in the shredded cheddar cheese until melted and creamy.
  7. Season with salt and pepper, and let it sit for 10 minutes before serving.

Recipe Notes

  • Feel free to substitute ground turkey or chicken for a leaner option.
  • For extra flavor, add your favorite hot sauce when serving.
  • Enjoy leftovers for lunch or freeze for up to 3 months.

Rum Balls: The Perfect No-Bake Treat for Holidays and Beyond

no-bake rum balls, holiday rum treats, chocolate rum balls, easy rum ball recipe, bourbon balls, festive no-bake desserts

Rum Balls: A Decadent No-Bake Treat for Every Occasion


Rum Balls are a timeless classic for holiday gatherings, featuring a blend of rich flavors and a boozy kick that makes them irresistible. These no-bake desserts are as versatile as they are delicious, perfect for parties, gifts, or simply indulging in a special treat.


Why Rum Balls Are a Holiday Staple

The popularity of Rum Balls lies in their simplicity and adaptability. Whether you’re looking for a quick dessert to whip up or an edible gift to share, this recipe has you covered. The no-bake aspect makes it accessible for all skill levels, while the customizable flavors allow for creative twists. To explore more holiday dessert options, check out No-Bake Pumpkin Cheesecake for another effortless treat.


Ingredients for Perfect Rum Balls

Creating Rum Balls requires a short list of pantry staples:

  • Vanilla Wafers: Provides a sweet, crumbly base. Substitute graham crackers for a different texture.
  • Dark Rum: The star ingredient. Options like Meyers Dark Rum offer a robust flavor.
  • Confectioners’ Sugar: Sweetens the mixture and doubles as a coating.
  • Chocolate: Use melted chocolate chips or cocoa powder for richness.
  • Corn Syrup: Acts as a binder, but honey is an excellent substitute.

For a guide on choosing the best rum for baking, visit How to Choose the Best Rum for Desserts.


Step-by-Step Recipe Guide

1. Prepare the Base

  • Crush vanilla wafers into fine crumbs using a food processor.
  • Melt chocolate chips in a microwave or on the stove, mixing in corn syrup for a smooth consistency.

2. Combine Ingredients

  • Mix wafer crumbs, melted chocolate, rum, and confectioners’ sugar in a large bowl.
  • Stir until the mixture forms a sticky dough.

3. Shape and Chill

  • Roll the dough into 1-inch balls using your hands.
  • Dust with confectioners’ sugar or alternative coatings like cocoa powder or crushed nuts.
  • Refrigerate for at least 30 minutes before serving.

Creative Variations for Every Taste

  • Bourbon Balls: Swap the rum for bourbon for a smokier flavor.
  • Nutty Rum Balls: Add finely chopped pecans, almonds, or walnuts to the mix.
  • Spiced Holiday Balls: Include cinnamon or nutmeg for a festive touch.
  • Coconut Rum Balls: Roll the finished balls in shredded coconut for a tropical twist.
  • Non-Alcoholic Version: Replace the rum with rum extract and add orange juice for moisture.

For more creative dessert recipes, explore Dunkaroo Dip for a nostalgic no-bake option.


Serving and Presentation Tips

  • Arrange Rum Balls on a decorative platter for an elegant presentation.
  • Gift them in festive tins or jars lined with wax paper.
  • Pair with a hot beverage like coffee or mulled wine for a complete treat experience.

Storage and Make-Ahead Options

  • Storage: Keep in an airtight container in the refrigerator for up to 2 weeks.
  • Freezing: Freeze for up to 3 months, thawing in the refrigerator before serving.
  • Make-Ahead: Prepare up to 2 days ahead to allow flavors to meld beautifully.

FAQs About Rum Balls

Can I make Rum Balls without alcohol?

Yes, substitute the rum with a combination of rum extract and fruit juice.

What type of rum works best?

Dark rums like Meyers add depth, but spiced rums or flavored options work well too.

Do Rum Balls get better with time?

Absolutely! The flavors meld over time, making them even more delicious after a day or two.

Can I customize the coating?

Yes, roll them in cocoa powder, crushed nuts, shredded coconut, or festive sprinkles.

How can I fix sticky dough?

Add more crushed wafers or confectioners’ sugar until the texture is manageable.


Internal Linking Opportunities

For readers diving into Rum Balls, here are other great no-bake recipes to explore:


Conclusion: A Treat for All Seasons

Rum Balls are the epitome of indulgence and convenience. With their rich flavor, easy preparation, and endless customization options, they’re perfect for any occasion. Whether you stick to the classic recipe or try a creative variation, this no-bake treat is sure to impress. So, roll up your sleeves and enjoy the process of creating a dessert that brings joy to every bite!

Irresistibly Tender Braised Oxtails Recipe for Ultimate Comfort Food

Braised Oxtails Recipe: A Comforting Culinary Delight

⚖️
Difficulty
Moderate

⏲️
Prep Time
30 mins

🕒
Cook Time
3 hours

⏱️
Total Time
3 hours 30 mins

🍽️
Servings
4

Braised oxtails are a perfect blend of rich, savory flavors that evoke a sense of comfort and warmth. Cooking oxtails low and slow allows the meat to become incredibly tender, while absorbing the delightful flavors of the accompanying broth and spices. This dish, often enjoyed during family gatherings, brings people together with its inviting aroma and satisfying taste. It pairs beautifully with a side of creamy mashed potatoes or crusty bread, making any meal feel special.

Whether you’re preparing a cozy dinner for loved ones or impressing guests at a dinner party, this braised oxtails recipe will surely be a crowd-pleaser. The lush, deep flavors and melt-in-your-mouth meat create a dish that is not only a meal but a heartfelt experience. With its enticing aroma and captivating taste, it captures the essence of home-cooked comfort food.

Quick Recipe Highlights

  • Flavor Profile: The rich umami of the oxtails, complemented by aromatic herbs and spices, creates a deeply satisfying flavor.
  • Texture: Expect tender, fall-off-the-bone meat enveloped in a silky sauce.
  • Aroma: A hearty blend of garlic, onion, and herbs fills the kitchen, promising a meal that is hard to resist.
  • Visual Appeal: The deep brown sauce glistens over tender oxtails, presenting a tempting dish on your table.
  • Skill Level Needed: Ideal for home cooks with moderate skills; the main challenge lies in time management.
  • Special Equipment: A heavy-bottomed pot or Dutch oven is essential for achieving the perfect braise.

Recipe Overview

  • Difficulty Level: Braising oxtails requires some patience and attention, but the process is straightforward, making it manageable for home cooks.
  • Category: This dish is perfect for a hearty dinner, particularly during colder months.
  • Cuisine: Traditionally, braised oxtails can be found in various culinary cultures around the world, bringing unique spice profiles and cooking methods.
  • Cost: Oxtails can be on the pricier side compared to other cuts, but the richness and flavor make it worth the investment.
  • Season: This dish shines during fall and winter, providing a warm and cozy meal option for gatherings and family dinners.
  • Occasion: Perfect for holiday feasts, special family dinners, or any occasion calling for comforting, hearty food.

Why You’ll Love This Recipe

Braised oxtails deliver a unique taste experience that melds savory flavors with comfort-driven heartiness. The long cooking process allows the fat to render out, leaving you with tender meat enveloped in a delicious sauce that makes every bite a joy. Pairing with sides such as creamy polenta or crusty bread helps capture the sauce, ensuring no flavor goes to waste.

Convenience in preparation is another reason to love this recipe. Once the initial sautéing is complete, the dish can simmer while you attend to other tasks or simply relax. This hands-off cooking method makes it perfect for dinner parties or family meals, allowing you to focus on enjoying time with loved ones rather than spending hours in the kitchen.

Nutritional advantages are also present in this dish, as oxtails are rich in collagen and healthy fats that can be beneficial for joint health. When coupled with vegetables like carrots and celery, you elevate the dish’s nutritional profile, making it a hearty option for nutritious family meals.

Socially, braised oxtails have a way of drawing people together. The inviting aroma and the eventual celebration around the dining table foster a sense of community and shared experience that enhances any gathering.

Last but not least, the cost-effectiveness of this dish makes it appealing. While oxtails may seem pricey, they can feed a crowd, providing a gourmet meal experience at a fraction of what you would pay at a restaurant. The depth of flavor you get from braising is unparalleled and leaves a lasting impression without breaking the bank.

Historical Background and Cultural Significance

The origins of braised oxtails are rooted in cultures around the world, where slow-cooking techniques have traditionally been employed to extract maximum flavor from tough cuts of meat. Historically, oxtails were considered a byproduct of butchering cattle and were often used in hearty stews and soups, making them a staple during harder times.

Culturally, the dish embodies community and family values. Across different cultures, such as Caribbean, Italian, and French, braised oxtail has evolved and adapted, showcasing the unique flavors and cooking methods of each region. Whether served alongside rice and beans or pasta, it’s a dish that unites cultures through shared cooking traditions and flavors.

Over the years, braised oxtail recipes have evolved, incorporating a variety of spices and cooking techniques that highlight regional preferences. This evolution has allowed for creative adaptations while maintaining the core essence of the dish.

Regional variations of braised oxtails exist across the globe, with each culture bringing its nuances to this comfort food staple. From savory Caribbean stews with spices like allspice to classic French oxtail soup, this dish continues to delight taste buds and provide a taste of home wherever it’s served.

Ingredient Deep Dive

Oxtails are the star of this recipe and carry with them not only a rich flavor but also cultural significance and history. As a cut mostly derived from the tail of cattle, they are known for their hearty, gelatinous texture which, once cooked, becomes incredibly tender. Oxtails are an excellent source of collagen, which is beneficial for skin and joint health. When selecting oxtails, look for pieces that have ample marbling and meat to ensure a flavorful dish. To store, keep them refrigerated for up to 3-4 days or freeze them for longer storage.

Onions, used in the braise, play a crucial role in providing sweetness and depth to the dish. Onions are rich in vitamins and antioxidants, which contribute to a healthier immune system. When storing, place them in a cool, dark place, and they can last several weeks. If you’re out of onions, shallots can be an excellent substitute that offers a milder flavor profile.

Garlic adds a pungent burst of flavor that enhances the overall dish. Known for its health benefits, garlic has been associated with improved heart health and immune function. When choosing garlic, look for firm cloves with no signs of sprouting. Store garlic in a cool and dry environment, and if needed, you can substitute fresh garlic with granulated garlic.

Carrots not only contribute sweetness and color but also added nutrition. They are a great source of beta-carotene and fiber. When selecting carrots, choose firm ones with a vibrant color. Store them in the refrigerator wrapped in a damp cloth to retain freshness. If unavailable, parsnips can be used as an alternative.

Celery adds a crunchy texture and enhances the flavor base. Known for its low-calorie content, celery is often ingested for its hydration and health benefits. Choose bright, crisp stalks, and store them in the fridge to prolong freshness. For a substitution, fennel can provide a unique flavor twist.

Common Mistakes to Avoid

  • Skipping the browning step: This is crucial for developing deep, rich flavors in your oxtails.
  • Cooking on too high heat: A gentle simmer ensures even cooking and maximum tenderness.
  • Not using enough liquid: The oxtails need sufficient liquid to braise properly; otherwise, they may dry out.
  • Over-seasoning: The natural flavors of the oxtails are enhanced by the slow cooking; adjust seasoning towards the end.
  • Rushing the cooking time: Patience is key; allow the oxtails to cook long enough to achieve the desired tenderness.
  • Not letting the dish rest: Allowing the dish to rest helps meld the flavors together and improves taste.
  • Using low-quality oxtails: Choose well-marbled, fresh cuts for the best results.
  • Ignoring the importance of proper storage: Store leftovers correctly to preserve flavor and texture.
  • Forgetting to skim the fat: Skimming excess fat after cooking helps create a cleaner sauce.
  • Neglecting to taste throughout: Tasting at various stages allows you to adjust the flavors better.

Essential Techniques

Browning the oxtails is a key technique in this braising process. It not only enhances the flavor but also contributes to the dish’s color. To master this, ensure your pot is appropriately heated before adding the oxtails, turning them to achieve an even browning on all sides. Avoid overcrowding the pan to ensure proper caramelization.

The braising process itself is vital for ensuring that the oxtails are tender and flavorful. Use a good mix of aromatic vegetables and herbs in the braising liquid to create a rich base. Pay attention to the simmering; the liquid should barely bubble, which indicates that the dish is properly cooking without becoming tough.

Monitoring the cooking time is important for achieving perfect tenderness. It’s best to test the meat with a fork; it should easily fall off the bone when done. If it isn’t tender enough, continue simmering and checking regularly.

Finally, deglazing the pot after browning the meat captures all the flavorful bits stuck to the bottom. Pour in your braising liquid and scrape the bottom with a wooden spoon, making sure not to leave any flavor behind.

Pro Tips for Perfect Braised Oxtails

1. **Choose your oxtails wisely:** Look for well-marbled pieces, as the fat will render down and keep the meat moist during cooking.

2. **Sear thoroughly:** Ensure each piece is browned nicely to develop a deeper flavor and rich color.

3. **Use homemade broth:** For an even better flavor, use homemade beef broth instead of store-bought.

4. **Add herbs and spices:** Experiment with herbs like thyme or bay leaves to elevate the flavor profile.

5. **Let it rest:** After cooking, let your dish sit for a bit to allow the flavors to develop further.

6. **Skim the fat:** Before serving, skim off any excess fat from the surface to achieve a cleaner taste.

7. **Adjust seasoning:** Taste the sauce before serving to check if any additional seasoning is required.

8. **Pair wisely:** Serve with sides that soak up the sauce, such as creamy polenta or mashed potatoes.

Variations and Adaptations

Regional variations of braised oxtails can transform the dish entirely. For instance, in Caribbean cuisine, spices like allspice and a touch of sugar might be added to create a sweet and spicy profile. Italian variations might call for tomatoes and herbs like rosemary, creating a different flavor journey.

Seasonal adaptations can also be made, incorporating root vegetables such as parsnips or sweet potatoes during the fall and winter. These ingredients complement the robust flavors and add an earthy sweetness to the dish.

For dietary modifications, consider swapping oxtails with other meats such as beef shank or short ribs if you’re looking for a leaner option. Additionally, you can use plant-based substitutes for a vegetarian version, using hearty vegetables like mushrooms to achieve a similar texture.

Texture modifications might include adding a touch of cornstarch slurry at the end of cooking to thicken the sauce if a richer, more decadent sauce is desired.

Presentation alternatives can elevate the dish further; serve over a bed of sautéed greens or in a rustic bowl with fresh bread on the side for a comforting and inviting display.

Serving and Presentation Guide

Plating braised oxtails can be an opportunity to impress your guests. Start by spooning a generous portion of the oxtails onto a shallow bowl, ensuring you include ample sauce. Use a large spoon to create a well, allowing the sauce to envelop the meat.

Garnish with fresh herbs, like chopped parsley or thyme, to add a burst of color and freshness. This not only enhances visual appeal but also brightens the dish before serving.

Consider traditional accompaniments, such as creamy polenta or soft mashed potatoes, which work well at soaking up the rich sauce. You can also introduce a modern twist by adding roasted vegetables to your plate for added flavor and nutrition.

Temperature is key—serve the dish piping hot to fully enjoy the flavors. Portion control is essential; a serving of two oxtail pieces along with sauce per person is generally recommended, ensuring everyone indulges without overdoing it.

Wine and Beverage Pairing

When it comes to pairing wines with braised oxtails, look for rich, full-bodied reds like Cabernet Sauvignon or Syrah. These wines enhance the hearty nature of the dish while their tannins cut through the richness of the meat.

For non-alcoholic alternatives, consider a robust sparkling grape juice, which can mimic the complexity of wine without the alcohol content. If you enjoy herbal teas, a dark, herbal brew with hints of spices like chai can complement the deep flavors of the oxtails wonderfully.

Serve red wines slightly below room temperature, around 65°F, to bring out their best flavors, while non-alcoholic options can be served chilled for a refreshing contrast to the meal.

Storage and Shelf Life

Proper storage of braised oxtails is crucial for preserving flavor and extending shelf life. Allow the dish to cool before transferring it to airtight containers. Braised oxtails can be stored in the refrigerator for 3-4 days. For extended shelf life, they can be frozen for up to 3 months.

To ensure safety, always check for signs of spoilage such as off colors or unpleasant odors before consuming leftovers. When reheating, use a low heat setting on the stove or microwave, adding extra broth if necessary to maintain moisture.

If freezing, ensure you use freezer-safe containers, leaving some space for the liquid to expand. Thaw in the refrigerator overnight before reheating to retain the best texture and flavor.

Make Ahead Strategies

Preparing braised oxtails in advance can be a real-time saver for busy cooks. To do so, you can complete the braising process a day or two ahead of your planned meal. Once cooked, allow the dish to cool, then refrigerate.

On the day of service, gently reheat on the stove, adding a splash of stock or water to achieve your desired sauce consistency. This method not only saves time but often enhances the flavor, as the ingredients have more time to meld together.

You can also prep individual ingredients like vegetables and seasonings in advance, storing them in the refrigerator until you’re ready to cook. This strategy not only streamlines the cooking process but ensures fresh flavors.

Additionally, consider making the sauce in bulk if you enjoy the dish frequently. Store it separately, and simply braise fresh oxtails when needed for a quick and fulfilling meal.

Scaling Instructions

Scaling this braised oxtails recipe up or down can be done easily. If halving the recipe, adjust the quantities accordingly but maintain the same cooking temperature and time frame, keeping an eye on tenderness.

When doubling or tripling the recipe, make sure your pot is large enough to accommodate the increased volume. You may need to extend the cooking time slightly to ensure all oxtails are equally tender.

Adjust your seasoning as well; scale back initially and taste throughout cooking, as the increased quantities can amplify flavors. Remember that cooking in larger batches may require more potential fat skimmed off before serving.

Store leftovers in airtight containers and refrigerate, ensuring the flavors remain intact in subsequent servings.

Nutritional Deep Dive

Braised oxtails are a source of rich nutrition, primarily providing protein and healthy fats. A serving can deliver approximately 25 grams of protein, essential for muscle repair and overall bodily function.

In terms of micronutrients, oxtails contain important vitamins and minerals, including Vitamin B12, which supports nerve function, and zinc, which is crucial for immune health. The collagen in oxtails contributes not only to joint integrity but also to skin health.

For those focused on dietary considerations, make mindful selections based on portion size. While rich in nutrients, braised oxtails are also calorie-dense, so balancing with lighter sides can enhance overall meal planning.

Weight management can be addressed by portion control and pairing with high-fiber vegetables, which contributes to a feeling of fullness while limiting caloric intake.

Dietary Adaptations

For gluten-free adaptations, ensure that any broths used are certified gluten-free, as many commercially available options may contain gluten.

Dairy-free versions can be easily achieved by skipping any dairy-based sides, instead opting for vegetable-based options like mashed potatoes or cauliflower purée.

If you’re looking for a plant-based version, consider using mushrooms or chunks of hearty vegetables, such as eggplant or squash, and loading up on spices and herbs to maintain flavor.

Low-carb and keto adaptations can involve serving the dish over steamed vegetables or a cauliflower mash rather than traditional carbs, while still benefiting from the rich meaty flavors.

For paleo diets, retain the natural ingredients and eliminate any processed options, focusing on whole-food sides, and adhering to clean ingredients throughout the recipe.

Troubleshooting Guide

Texture issues can arise if oxtails are not cooked long enough; further braising can remedy this by allowing more time for the collagen to break down.

Flavor balance may be off if the dish becomes too salty; adding a splash more water or unsalted stock during the cooking process can help even out the saline concentration in the sauce.

Temperature problems can occur if the pot is not adequately heated; always start with a well-heated pot to ensure proper browning.

Equipment challenges may arise when a standard pot does not suffice; having a heavy-bottomed Dutch oven can solve uneven cooking issues.

If substitutions were made, ensure that the replacements provide similar cooking times; for example, tougher cuts will generally require longer cooking than leaner meats.

Timing concerns can lead to overcooked oxtails if not monitored; always check tenderness periodically towards the end of the listed cooking time to avoid this.

Recipe Success Stories

Community feedback has been overwhelmingly positive, with many sharing their own variations of the braised oxtails recipe, incorporating family spices or local grocery finds. Several readers have experimented with different cooking techniques, finding joy in the trial and error process that ultimately leads to delicious outcomes.

Successes often unfold during family gatherings, where the dish becomes the star of the meal. Feedback shared on social media typically highlights the tender texture and bold flavors that have won over many family tastes.

Many have documented their own adaptation stories, sharing how they’ve made the dish their own by infusing regional flavors or seasonal ingredients, leading to new favorites.

Photography tips have also surfaced from the community, showcasing the rich colors and textures of braised oxtails, inspiring many home cooks to recreate their own versions and share the journey with others.

Frequently Asked Questions

1. Can I use frozen oxtails? Yes, you can certainly use frozen oxtails. Just ensure that they are completely thawed before beginning the cooking process to allow for even cooking.

2. How do I know when the oxtails are done? Oxtails are done when the meat is tender and easily falls off the bone. This typically takes about 3-4 hours of braising.

3. Can I make this dish in a slow cooker? Absolutely! You can adapt this recipe for a slow cooker, cooking on low for 6-8 hours until tender.

4. What can I serve with braised oxtails? Serve with mashed potatoes, polenta, or rice to soak up the delicious sauce. Roasted vegetables also pair beautifully.

5. How do I store leftovers? Store leftovers in airtight containers in the refrigerator for 3-4 days or freeze for up to 3 months.

6. Can I use a different cut of meat? Yes, you can use other cuts like beef shanks or short ribs, but cooking times may vary.

7. What is the best way to reheat braised oxtails? Reheat gently on the stove with a splash of broth to maintain moisture, or in the microwave on low power.

8. How do I make the sauce thicker? To thicken the sauce, you can add a cornstarch slurry towards the end of cooking or simmer it uncovered to reduce.

9. Can I omit the vegetables? While you can omit them, the vegetables contribute significant flavor and depth, so it’s recommended to keep at least some.

10. How can I make this dish spicier? Add crushed red pepper flakes or a dash of hot sauce during the braising process to enhance the heat level.

Additional Resources

If you’re looking for related recipes, consider exploring other braised dishes like coq au vin or beef bourguignon. Each recipe features slow-cooked tenderness and complex flavors. Technique guides for braising can provide deeper insights into mastering this method.

For ingredient information, delve into the nutritional benefits of underground vegetables and spices used in braising recipes. Equipment recommendations can guide you toward the best pots for braising, ensuring superior results.

Seasonal variations should inspire you to adapt dishes based on what’s available in your local markets, keeping your meals fresh and exciting.

Join the Conversation

Share your experiences with braised oxtails on social media, showcasing your culinary creations through beautiful photography. Engage with a community of home cooks by sharing tips, variations, and reviews to foster a lively exchange of ideas and inspiration.

Try asking for suggestions on unique adaptations or alternatives that have worked for others, creating an open dialogue around this comforting dish. Celebrate the joy of cooking braised oxtails together, while discovering new flavors and techniques.

The Recipe

Braised Oxtail

Serves: 4

Prep Time: 30 mins

Cook Time: 3 hours

Total Time: 3 hours 30 mins

Kitchen Equipment Needed

  • Large Dutch oven or heavy-bottomed pot
  • Wooden spoon
  • Measuring cups and spoons
  • Sharp knife
  • Cutting board

Ingredients

  • 3-4 lbs oxtails
  • 2 tablespoons olive oil
  • 1 large onion, chopped
  • 3-4 garlic cloves, minced
  • 2 carrots, chopped
  • 2 stalks celery, chopped
  • 4 cups beef broth
  • 1 cup red wine
  • 2-3 sprigs fresh thyme
  • 2-3 bay leaves
  • Salt and pepper to taste

Directions

  1. Preheat your oven to 300°F (150°C).
  2. Heat the olive oil in a large Dutch oven over medium-high heat. Season the oxtails with salt and pepper, then sear them on all sides until browned. Remove the oxtails and set aside.
  3. Add the onions, garlic, carrots, and celery to the pot, sautéing until softened.
  4. Pour in the red wine, scraping up any brown bits from the bottom of the pot.
  5. Add the beef broth, thyme, bay leaves, and the reserved oxtails back into the pot; bring to a gentle simmer.
  6. Cover and transfer the pot to the preheated oven. Braise for about 3 hours or until the meat is tender.
  7. Remove the pot from the oven, discard the bay leaves, and adjust seasoning as needed.
  8. Serve the oxtails with sauce over a bed of creamy potatoes or polenta.

Recipe Notes

  • Feel free to add other vegetables like potatoes or mushrooms for more texture.
  • For a spicier profile, consider adding crushed red pepper flakes during the cooking process.
  • Leftovers can be stored in the refrigerator for up to 4 days or frozen for longer storage.