Delicious Fried Pineapple with a Crispy Coconut Crust Recipe

Fried Pineapple with Coconut Crust: A Delicious Tropical Treat

⚖️
Difficulty
Easy

⏲️
Prep Time
15 mins

🕒
Cook Time
10 mins

⏱️
Total Time
25 mins

🍽️
Servings
4

Indulge in the mouthwatering experience of Fried Pineapple with Coconut Crust, a delightful dessert that promises to transport your taste buds to a tropical paradise. With its sweet, caramelized pineapple encased in a crispy coconut coating, each bite is a perfect blend of flavors and textures that will make your senses sing. This recipe is not just a delicious treat; it’s a celebration of summer vibes, making it an ideal choice for gatherings, barbecues, or just a cozy night in.

The contrast between the warm, soft pineapple and the crunchy coconut crust offers a unique taste sensation. When paired with a side of vanilla ice cream or a dollop of whipped cream, this dish becomes a symphony of indulgence that encourages you to savor every single bite. Moreover, the bright colors and enticing aroma of the fried pineapple will not only please your palate but also elevate the ambiance of any occasion.

Quick Recipe Highlights

  • Flavor Profile: The sweet, juicy pineapple perfectly complements the toasted coconut, delivering a sweet and savory taste with every bite.
  • Texture: Delight in the contrast of the crispy coconut outside and the tender, warm pineapple inside, creating a satisfying mouthfeel.
  • Aroma: The tantalizing aroma of frying coconut and caramelized pineapple will fill your kitchen, evoking feelings of summer and warmth.
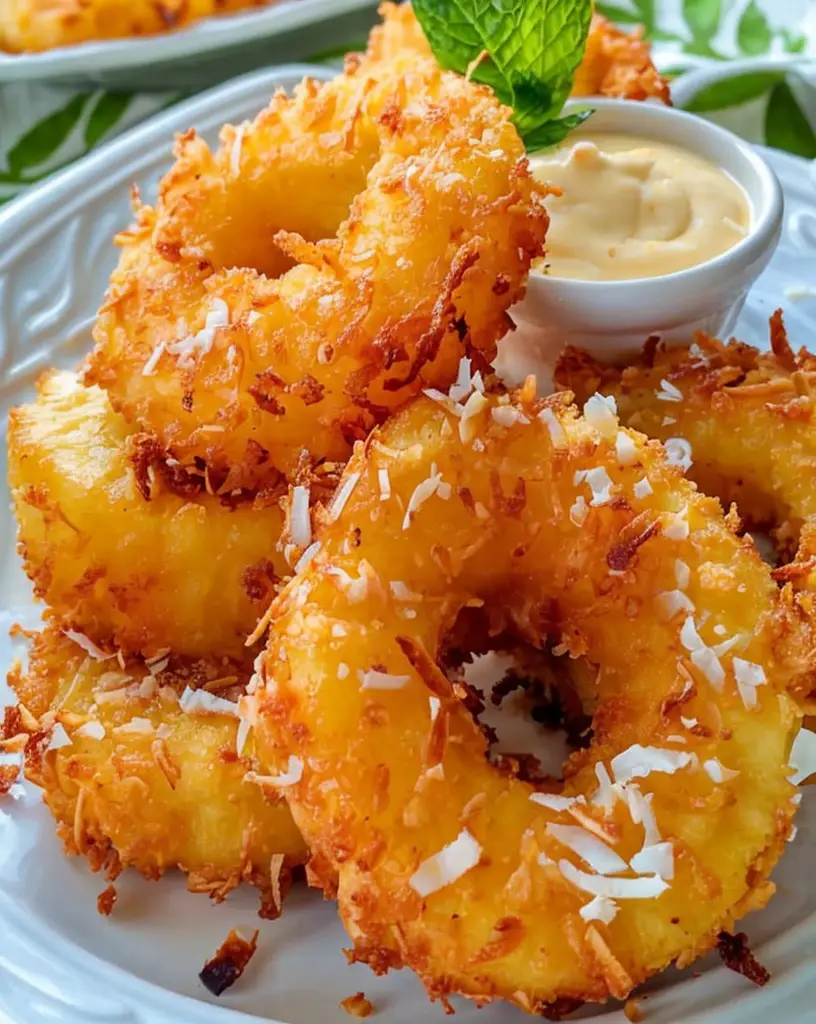
  • Visual Appeal: The golden-brown color of the coconut crust contrasted with the vibrant yellow of the pineapple creates an inviting presentation.
  • Skill Level Needed: Easy preparation and cooking make this recipe accessible to novice cooks and a fun challenge for experienced chefs.
  • Special Equipment: Just a skillet or frying pan is needed, making this recipe straightforward and easy to execute.

Recipe Overview

  • Difficulty Level: This recipe is categorized as easy, making it suitable for anyone looking to impress without spending hours in the kitchen. The steps are simple, with the main process involving frying.
  • Category: This dessert fits perfectly into the snack or dessert category, ideal for warm-weather gatherings or as a sweet treat after a meal.
  • Cuisine: Fried Pineapple with Coconut Crust is inspired by tropical cuisines, showcasing flavors typical of Southeast Asian desserts.
  • Cost: The cost of ingredients is relatively low, making this indulgent recipe affordable. Expect to spend around $10–$15 for four servings.
  • Season: Best enjoyed during the summer when pineapples are in season, this recipe embraces fresh, juicy fruit with a tropical flair.
  • Occasion: Perfect for barbecues, summer parties, or as a refreshing finale to a family dinner, Fried Pineapple is versatile for all occasions.

Why You’ll Love This Recipe

Fried Pineapple with Coconut Crust not only tantalizes your taste buds with its perfect balance of sweetness and crunch, but it also offers a delightful culinary experience that invites sharing and enjoyment. The unique blend of flavors, highlighted by the golden coconut crust, provides a satisfying treat that is both comforting and exotic. It is a dessert that will encourage you to savor every bite, boosting your mood instantly.

Moreover, the convenience of preparing this dessert makes it a winner among busy home cooks. With minimal prep time and a short cooking duration, you can whip up this exquisite dish quickly, leaving you free to enjoy time with family and friends. The ease of preparation ensures that even novice cooks can become dessert pros, presenting this beautiful dish with confidence.

From a nutritional standpoint, this recipe features fresh fruit and coconut, both of which offer benefits. Pineapple is known for its digestive properties and vibrant vitamin C content, while coconut provides healthy fats and adds a satisfying crunch. Together, they create a dessert that, while indulgent, can also fit within a healthier dietary framework when enjoyed in moderation.

For social occasions, this dish serves as an impressive centerpiece. Its striking visual appeal and exotic flavors will be a conversation starter, inviting guests to gather around and share in the experience. Whether served as a standalone dessert or paired with ice cream, the Fried Pineapple with Coconut Crust creates an inviting atmosphere of togetherness.

Lastly, the cost-effectiveness of this recipe simplifies dessert preparation. With budget-friendly ingredients and an accessible cooking method, you can treat your loved ones to a delightful dessert without breaking the bank. This accessibility allows everyone to enjoy a taste of the tropics at home.

Historical Background and Cultural Significance

The origins of fried pineapple can be traced back to various tropical regions where pineapples thrived, notably in Southeast Asia and the Caribbean. In these areas, the fruit is frequently featured in both savory and sweet dishes, showcasing its versatility and popularity. The practice of frying fruit with a crust has deep cultural roots, often used to create treats during festive occasions or as a special family recipe passed down through generations.

Culturally, pineapples symbolize hospitality and warmth, making a dessert like Fried Pineapple with Coconut Crust a delightful addition to social gatherings. This dish’s ability to bring people together is reflective of the communal eating traditions tied closely to many tropical societies, where sharing food fosters togetherness and connection.

As culinary traditions evolved, regional variations of fried pineapple emerged, each adapting the basic concept with local ingredients and flavors. For example, in some cultures, the addition of spices, such as cinnamon or nutmeg, gives the dish a unique twist that celebrates regional taste preferences.

Today, Fried Pineapple with Coconut Crust has gained popularity worldwide, celebrated by food enthusiasts for its delightful taste and unique presentation. The dish brings together the essence of tropical flavors, making it a favorite for those seeking an exotic yet accessible dessert option.

Ingredient Deep Dive

Pineapple

Pineapple holds great cultural significance, particularly in tropical regions where it is often seen as a symbol of hospitality and warmth. This fruit is bursting with nutrients, particularly vitamin C, and contains bromelain, an enzyme known for its digestive health benefits.

When selecting pineapples, look for one that is firm yet slightly soft when pressed, indicating ripeness. Store whole pineapples at room temperature for up to two days and refrigerate cut pieces to maintain freshness. For recipe adaptability, canned pineapple can be used, though be cautious of added sugars.

Coconut

Coconut is revered in many cultures, particularly in Southeast Asia, where it plays a significant role in cuisine and traditional practices. Beyond its delicious flavor, coconut offers health benefits, including healthy fats that can aid in heart health.

Choose unsweetened shredded coconut for this recipe, ensuring the best flavor and texture. It should be kept in a cool, dry place, and can be stored in the refrigerator for extended freshness. If needed, substitute with almond flour for a nutty twist, but ensure to adjust cooking times slightly.

Common Mistakes to Avoid

  • Not allowing the oil to heat properly before frying. This can lead to soggy coconut crust and improperly cooked pineapple.
  • Using ripe but not overripe pineapples, as overly ripe pineapples can be too soft and lose shape while cooking.
  • Overcrowding the skillet can cause uneven cooking. Fry the pineapple in small batches for better results.
  • Skipping the coating step. Ensure each piece of pineapple is adequately covered with coconut for an even crust.
  • Not monitoring the cooking time closely can result in burnt coconut or overly caramelized pineapple.
  • Failing to flip the pineapple at the right moment can lead to uneven cooking of the starches and sugars.
  • Using sweetened coconut instead of unsweetened can overpower the natural flavors of the fried pineapple.
  • Not allowing the fried pineapple to drain on paper towels can result in an oily texture that detracts from the dish.
  • Skipping the cooling period before serving can lead to melting ice cream if served together.
  • Neglecting to taste while preparing to determine if more seasoning is needed.

Essential Techniques

Frying is the key technique for this recipe, and it’s particularly important to master it to achieve the desired crunch and flavor. Proper frying involves preheating oil to the right temperature—this ensures an even cook and allows the coconut to crisp without soaking in excess oil.

Don’t rush the frying process. Each side should be cooked until golden brown, usually about 3-4 minutes per side. The color of the coconut crust is a visual cue that signifies readiness; a golden-brown crust indicates perfect frying.

Pro Tips for Perfect Fried Pineapple with Coconut Crust

To ensure your Fried Pineapple with Coconut Crust turns out exceptional, consider these tips:

1. Choose fresh, ripe pineapples for the best flavor. Look for pineapples that have a pleasant aroma and firm texture.
2. Toast the shredded coconut lightly in the oven before using, enhancing its flavor and crispness.
3. Experiment with dipping sauces, like chocolate or caramel, to elevate the serving experience.
4. Use a thermometer to check oil temperature; the ideal frying temperature is around 350°F to 375°F.
5. Allow the fried pineapple to rest on paper towels to absorb excess oil before serving.
6. For added flavor, mix a pinch of salt or cinnamon into the coconut coating.
7. Pair this dessert with a fresh fruit salsa for an added layer of taste.
8. Chill your plate or serving dish before plating to maintain the dish’s temperature.

Variations and Adaptations

Explore different regional variations by incorporating local spices, such as cardamom or chili powder, into the coconut batter. This adjustment can provide an exciting twist to the original flavor profile.

Seasonal adaptations could include using mango or banana instead of pineapple, giving it a unique seasonal flair while still keeping the same delicious coconut coating. For healthier options, consider baking the coconut-crusted fruit in the oven rather than frying, reducing oil consumption.

Those on specific dietary plans can easily modify this recipe. To create a gluten-free dessert, ensure the coating ingredients are free from gluten. For a vegan version, swap out any milk-based dips with coconut milk or a dairy-free alternative.

Texture modifications can also be made by crushing the coconut into finer crumbs, creating a different mouthfeel or even adding nuts for an additional crunch. Presentation can also vary by serving the fried fruit in parfaits with layered yogurt and granola.

Serving and Presentation Guide

To plate your Fried Pineapple with Coconut Crust beautifully, start by arranging the pineapple pieces in a circular pattern on a clean white plate, providing contrast to the vibrant colors of the dish. Drizzle with honey or a sauce of your choice to enhance visual appeal.

Consider garnishing the dish with fresh mint leaves or toasted coconut flakes for an elegant finish. Serve with a side of vanilla ice cream or whipped cream, allowing guests to customize their dessert experience.

Temperature is crucial; serve the dish warm for the best flavor and texture. For portion control, slice larger pieces of pineapple into smaller bites, making it easier for guests to enjoy during casual gatherings.

Wine and Beverage Pairing

Enhance your dining experience by pairing Fried Pineapple with Coconut Crust with a chilled glass of Moscato or a fruity Sauvignon Blanc. Both wines bring out the tropical flavors of the dish, balancing sweetness with acidity.

For non-alcoholic options, consider serving with coconut water or a refreshing fruit spritzer. These beverages will complement the tropical theme of the dish without overwhelming the palate.

A cup of herbal tea, such as chamomile or peppermint, can also serve as a soothing balance to the sweetness of the dessert. Ensure the drinks maintain a cool temperature to balance the warmth of the fried pineapple.

Storage and Shelf Life

To store leftover Fried Pineapple with Coconut Crust, place it in an airtight container and refrigerate for up to 3 days. For optimal texture, it’s better to consume it fresh.

While reheating, avoid using the microwave, as this can make the coconut crust soggy. Instead, use an oven at a low temperature to restore crispness.

For longer storage, consider freezing the fried pineapple. Lay the pieces on a baking sheet to freeze individually before transferring to a freezer-safe container. Ensure consumption within a month for best quality. Upon thawing, a quick re-fry in a hot skillet can revitalize the texture.

Make Ahead Strategies

For those looking to prepare in advance, the pineapple can be sliced and coated in coconut the day before serving. Store the prepared pieces in the refrigerator to maintain freshness.

If frying the day before an event, ensure to allow the fried pineapple to cool completely before storing, as residual heat can cause condensation and sogginess. Reheat just before serving for the best taste experience.

Quality can be impacted if the fried pineapple is made too far in advance, so aim to complete frying within two hours of serving. Consider adding fresh elements, like a fruit salsa or dipping sauce, just before serving for a refreshing touch.

Scaling Instructions

Scaling this recipe is simple and effective. To halve the recipe, adjust the ingredient amounts accordingly, ensuring even distribution of coconut and pineapple.

If doubling or tripling, consider the size of your skillet, as overcrowding can lead to uneven frying. You may need to work in batches for best results.

Timing modifications may be necessary when scaling up the recipe. Keep a close eye on cooking times, as larger quantities may require a few extra minutes for the perfect golden crust.

Also, when storing larger batches, use multiple containers to preserve freshness and quality.

Nutritional Deep Dive

This Fried Pineapple with Coconut Crust serves as a delightful indulgence with proper moderation. A typical serving can deliver about 200 calories, primarily from natural sugars in the pineapple and healthy fats in the coconut.

In terms of micronutrients, pineapple is rich in vitamin C and manganese, while coconut is a good source of dietary fiber and healthy saturated fats. Balancing this dessert with protein or healthy fats can create a more complete meal.

Dietary considerations should always be taken into account. For those managing weight, enjoying a smaller portion or serving it with fresh fruit can reduce overall caloric intake while still enjoying the flavors.

Dietary Adaptations

For families dealing with specific dietary needs, this recipe offers several adaptations. To make it gluten-free, ensure all coating ingredients are certified gluten-free, and use corn starch instead of flour if a binder is needed.

For a dairy-free version, pair the fried pineapple with coconut yogurt or a homemade cashew cream, amplifying that tropical flair. Those on a keto or low-carb diet could consider substituting the sweetener or reducing the sugar in the coating for fewer carbs.

Vegan diners can enjoy this dessert by ensuring the dipping sauce or side accompaniments are plant-based, while paleo enthusiasts can use natural sweeteners like honey or maple syrup to adhere to their dietary patterns.

Troubleshooting Guide

For texture issues, if the coconut crust is not crispy, the oil temperature may be too low. Ensure a steady temperature for optimal frying.

If the flavor balance feels off, consider adjusting the sweetness or acidity by adding a light squeeze of lime or sprinkling salt to enhance all flavors.

If you encounter temperature problems while frying, remember to monitor the heat closely; too high can burn the coconut, while too low can cause sogginess.

Should you face equipment challenges, like frying in a non-stick pan that isn’t working, switch to cast iron for better heat retention and even cooking.

Timing concerns can be resolved by preparing the components in advance, allowing you to fry only when ready to serve, ensuring the best texture and flavor.

Recipe Success Stories

Community feedback often highlights the joy brought by this recipe. Many readers share their experiences of serving Fried Pineapple with Coconut Crust at summer gatherings, impressing guests with its flavor.

Success with variations is a common theme, with users adapting the basic concept to include different tropical fruits, showcasing the versatility of the recipe. From mango to peaches, the adaptability allows for creativity while maintaining a delicious standard.

Photography tips shared by readers emphasize the vibrant colors and contrasting textures prevalent in the dish. Using natural lighting and simple plating techniques can help highlight the golden crust and juicy interior.

Variations suggested by the community feature unique sauces and accompaniments that enhance the overall dish while maintaining the essence of the Fried Pineapple.

Frequently Asked Questions

Can I use canned pineapple for this recipe?

Yes, you can use canned pineapple, but opt for the unsweetened variety for the best flavor. Drain and pat dry the pieces thoroughly before coating with coconut to avoid excess moisture.

Is it necessary to let the coconut toast before using?

Toasting the coconut enhances its flavor and can help achieve a crunchier texture. It’s not essential, but for optimal taste, it’s recommended.

What can I serve with Fried Pineapple?

This dish pairs well with vanilla ice cream, whipped cream, or a light fruit salsa. Adding a dip enhances the context of the dish while providing extra flavor.

Can I make this recipe gluten-free?

Absolutely! Ensure that all ingredients used, including the shredded coconut, are certified gluten-free to safely adapt this recipe for gluten-intolerant individuals.

How do I store leftovers?

Store leftovers in an airtight container in the refrigerator for up to 3 days. For better preservation, consider freezing, although the texture may not be as crisp upon reheating.

Can I bake instead of frying?

Yes, you can bake the coconut-crusted pineapple for a healthier option. Preheat the oven to 375°F and bake for about 15 minutes, flipping halfway through until golden brown.

How do I know when the pineapple is done frying?

The pineapple is typically ready when the coconut is golden brown and crispy. A visual cue in prickling color change is a good indicator of doneness.

Is this recipe suitable for a vegan diet?

Yes, simply ensure that any dipping sauces or additional toppings are made with plant-based ingredients to keep the dish vegan-friendly.

Can I substitute the pineapple with other fruits?

Yes! Other fruits such as mango, banana, or pear can be substituted to create unique flavor profiles while maintaining the same crispy coconut crust.

What type of coconut should I use?

For this recipe, it’s best to use unsweetened shredded coconut. Sweetened coconut can alter the flavor profile and is not recommended.

Additional Resources

Expanding on tropical desserts, check out our recipe for Coconut Macaroons or try a refreshing Mango Sorbet that complements the flavors found in this dish.

For guidance on perfect frying techniques, explore our technique guides, showcasing stovetop frying tips, and alternative cooking methods like air frying.

Incorporating our ingredient information on pineapples and coconuts can enrich your understanding of these key components, enhancing your culinary insights.

Lastly, consider exploring seasonal variations, bringing forth citrus flavors during winter months or berry adaptations in late summer, keeping your dessert experiences exciting year-round.

Join the Conversation

We invite you to connect with us by sharing your experiences and adaptations of the Fried Pineapple with Coconut Crust recipe. Post your photography and feedback on social media, tagging us for a chance to be featured.

Engage with fellow culinary enthusiasts in the comments section, discussing variations and providing tips for success. Recipe reviews and suggestions are welcome, fostering community collaboration in crafting this delightful dish.

Explore different flavor combinations and creative plating ideas that you’ve crafted, as we celebrate everyone’s unique approach to this tropical classic. Let’s create a conversation filled with culinary creativity together!

The Recipe

Fried Pineapple with Coconut Crust

Serves: 4

Prep Time: 15 mins

Cook Time: 10 mins

Total Time: 25 mins

Kitchen Equipment Needed

  • Skillet or frying pan
  • Tongs or a fork
  • Paper towels
  • Airtight container for storage

Ingredients

  • 1 ripe pineapple, peeled and sliced
  • 1 cup unsweetened shredded coconut
  • ½ cup all-purpose flour (or gluten-free substitute)
  • 2 eggs, beaten
  • ½ teaspoon vanilla extract
  • Oil for frying (coconut oil recommended)
  • Honey or maple syrup for drizzling (optional)

Directions

  1. Heat the oil in a skillet over medium-high heat.
  2. In a shallow bowl, combine shredded coconut and flour. In another bowl, beat the eggs and add vanilla extract.
  3. Dip each pineapple slice in the egg mixture, then coat with the coconut mixture, pressing lightly to adhere.
  4. Fry the coated pineapple slices in hot oil for about 3-4 minutes on each side, until golden brown.
  5. Transfer the fried pineapple onto paper towels to drain excess oil.
  6. Serve warm, drizzled with honey or syrup if desired.

Recipe Notes

  • For added crunch, toast the coconut before coating the pineapple.
  • Feel free to experiment with spices in the coconut coating for different flavor profiles.
  • Consider pairing the fried pineapple with ice cream or a fresh fruit salsa.

Buckeye Bars: Easy No-Bake Peanut Butter and Chocolate Treat

no-bake Buckeye bars, peanut butter chocolate bars, easy Buckeye dessert, chocolate peanut butter squares, Buckeye candy bars, quick Buckeye recipe

Buckeye Bars: A Decadent Peanut Butter and Chocolate Treat


Buckeye Bars are the ultimate no-bake dessert for any occasion. They combine creamy peanut butter and rich chocolate layers in an easy-to-make bar form, eliminating the need for rolling individual candies like traditional Buckeyes. This guide provides a detailed recipe, creative variations, and helpful tips for perfecting these crowd-pleasers.


Why Buckeye Bars Are a Must-Try

If you’re looking for a dessert that’s quick, delicious, and loved by everyone, Buckeye Bars are your answer. They offer the same flavor as classic Buckeye Balls with a fraction of the effort. For more no-bake inspiration, check out No-Bake Peanut Butter Oatmeal Cookies for another easy treat.

The smooth peanut butter layer and the chocolate topping create a harmony of flavors and textures that’s hard to resist. To master the chocolate layer, visit How to Melt Chocolate Perfectly.


Ingredients You’ll Need

To make Buckeye Bars, gather these simple ingredients:

  • Peanut Butter: Creamy peanut butter for a smooth filling.
  • Powdered Sugar: Adds sweetness and helps the mixture set.
  • Butter: For a rich, creamy texture.
  • Vanilla Extract: Enhances the overall flavor.
  • Chocolate Chips: Semi-sweet or dark chocolate for the topping.
  • Optional Add-Ins: Graham cracker crumbs for texture or Rice Krispies for crunch.

Step-by-Step Recipe Guide

1. Prepare the Peanut Butter Layer

  • Combine peanut butter, powdered sugar, butter, and vanilla extract in a bowl.
  • Mix until smooth, then press into a parchment-lined 9×13-inch baking pan.

2. Make the Chocolate Topping

  • Melt chocolate chips with a tablespoon of butter in the microwave, stirring until smooth.
  • Pour the melted chocolate over the peanut butter layer, spreading evenly.

3. Chill and Slice

  • Refrigerate for at least 2 hours to set.
  • Use a sharp knife to cut into bars before the chocolate hardens completely to avoid cracks.

Creative Variations

  • Rice Krispie Buckeye Bars: Add 2 cups of Rice Krispies to the peanut butter layer for crunch.
  • Graham Cracker Base: Mix in 1 cup of graham cracker crumbs for a cookie-like texture.
  • Salted Buckeye Bars: Sprinkle flaky sea salt over the chocolate layer for a salty-sweet combo.
  • Vegan Option: Use dairy-free chocolate chips and vegan butter.
  • Nutty Bars: Add chopped almonds, walnuts, or pecans to the peanut butter mixture.

For other quick dessert ideas, explore S’mores Jars for a layered treat.


Tips for Perfect Buckeye Bars

  • Avoid Sticky Layers: Use slightly chilled peanut butter for easier mixing and pressing.
  • Smooth Chocolate Topping: Pour the chocolate layer quickly and spread immediately to avoid streaks.
  • Clean Cuts: Dip your knife in hot water before slicing for clean, even edges.

FAQs

Can I make these bars gluten-free?

Yes, ensure all ingredients, especially powdered sugar and chocolate chips, are labeled gluten-free.

How do I prevent the chocolate layer from cracking?

Cut the bars when the chocolate is semi-set, not fully hardened.

Can I store Buckeye Bars at room temperature?

They’re best kept in the refrigerator to maintain their structure but can sit at room temperature for a few hours.

How long do Buckeye Bars last?

Stored in an airtight container, they remain fresh for up to 2 weeks in the refrigerator or 3 months in the freezer.

Can I double the recipe?

Yes, use a larger baking dish or prepare two pans for a bigger batch.


Internal Linking Opportunities

For readers who love Buckeye Bars, here are related recipes from ExoRecipes:


Conclusion

Buckeye Bars are a simple, no-bake dessert that delivers rich flavor in every bite. With their versatility, they’re perfect for holidays, parties, or everyday indulgence. Start experimenting with this recipe and make it your own!

Deliciously Addictive Praline Popcorn Recipe for Sweet Snacking

Delicious Praline Popcorn: The Ultimate Sweet Snack

⚖️
Difficulty
Easy

⏲️
Prep Time
10 mins

🕒
Cook Time
15 mins

⏱️
Total Time
25 mins

🍽️
Servings
8 servings

Indulge in the delightful experience of Praline Popcorn, a sweet and crunchy snack that will elevate any occasion. With its nutty flavor, rich caramel coating, and the satisfying crunch of popcorn, this treat is a perfect blend of textures and tastes that will leave you craving more. Whether you’re hosting a movie night, celebrating a special occasion, or simply looking for a sweet snack, this recipe will become a favorite for both kids and adults alike.

The combination of popcorn and praline is not only delicious, but it also evokes feelings of nostalgia and comfort. Picture fluffy popcorn pieces enveloped in a warm, buttery caramel, punctuated by the delightful crunch of pecans. As you take a bite, the sweet aroma wafts through the air, drawing everyone in for a taste. Enjoy this quick and simple recipe that transforms ordinary popcorn into a gourmet treat right in your kitchen.

Quick Recipe Highlights

  • Flavor Profile: The Praline Popcorn offers a rich, buttery sweetness with a hint of nuttiness from the pecans, creating an irresistible taste explosion.
  • Texture: Each bite is a delightful crunch, blending the crispness of freshly popped corn with the chewiness of caramel and the crunch of praline.
  • Aroma: Experience the enticing smell of caramelized sugar mixed with toasted pecans, making it hard to resist grabbing a handful.
  • Visual Appeal: Golden popcorn pieces glisten with a caramel sheen, sprinkled with crunchy pecans, making it visually stunning.
  • Skill Level Needed: This recipe is beginner-friendly and does not require specialized cooking techniques.
  • Special Equipment: A large pot for popping corn and a baking sheet for cooling the finished product are all you need.

Recipe Overview

  • Difficulty Level: Easy. This Praline Popcorn requires minimal cooking skills, making it perfect for beginners. Just keep an eye on the caramel to avoid burning.
  • Category: Snack/Dessert. Ideal for casual snacking or a sweet finish to your meal.
  • Cuisine: American. This recipe draws from traditional American treats, fusing classic caramel with popcorn for a unique twist.
  • Cost: The ingredients are budget-friendly, typically costing around $10 for multiple batches.
  • Season: Perfect year-round but is especially popular during holidays and celebrations when sweet treats are in demand.
  • Occasion: Great for movie nights, birthday parties, and gatherings where a sweet snack is welcome.

Why You’ll Love This Recipe

Praline Popcorn makes for a delicious and satisfying snack with a flavor profile that marries sweet and nutty, guaranteeing both children and adults will be delighted. The satisfying crunch of the popcorn contrasted with the chewy caramel offers a unique mouthfeel that is both indulgent and comforting. This treat can easily be whipped together within 25 minutes, making it a convenient option for unexpected gatherings or last-minute dessert needs.

In addition to tasting incredible, this popcorn also offers nutritional benefits due to the inclusion of pecans, which are known for their healthy fats and essential nutrients. They add a nutritious boost while keeping the indulgent feel that sweet treats offer. With this recipe, you can feel good about serving a snack that has a hint of healthiness amidst its sweetness.

Praline Popcorn is perfect for entertaining, as it brings an element of joy and nostalgia that encourages sharing and laughter—ideal for socializing. Plus, its budget-friendly nature allows you to treat your guests without breaking the bank. You can also package it beautifully for gifts or party favors, adding a personal touch to your events.

Additionally, this recipe is accessible to everyone, including those with limited cooking expertise. It’s a straightforward process that requires minimal ingredients and equipment. You can easily customize it further to cater to dietary preferences or flavor preferences while keeping the prodigious delight that this popcorn brings.

Finally, Praline Popcorn is an exceptional value; with just a few simple ingredients, you can create a large batch that satisfies a crowd’s craving for a sweet, crunchy snack. Whether for your own enjoyment or to share, this recipe strikes the wonderful balance between indulgence and practicality.

Historical Background and Cultural Significance

The origins of Praline Popcorn can be traced back to the traditional American relationship with snack foods that offers both indulgence and satisfaction. Pralines are a sweet treat themselves, originating from France, where nuts are combined with caramelized sugar. This French influence merges beautifully with American popcorn culture, which has evolved into a beloved snack throughout various regions of the country.

Historically, popcorn has been a popular snack worn on festive occasions, earning its fame in movie theaters and at fairs across America. The addition of caramelized nuts brings a celebratory twist to this classic snack, recalling memories of festivals, carnivals, and gatherings. Praline Popcorn serves as a bridge connecting old-world confectionery methods with modern American snacking habits.

Over the years, this recipe has evolved, allowing for creative spins on the traditional approach. Many regionally inspired variations have emerged, such as adding flavors like chocolate or different types of nuts. Each twist shares the core idea: the delicious combination of buttery sweetness, shared in joyful settings, continues to resonate with both families and friends.

As more people focus on homemade snacks, Praline Popcorn’s popularity resurges. It represents the essence of home cooking, evoking warmth, love, and shared moments. The cultural significance of this snack resonates beyond just taste; it encapsulates experiences and traditions that bring people together.

Ingredient Deep Dive

Popcorn: Popcorn is more than just a snack; it’s deeply ingrained in American culture. Derived from ancient corn varieties, it is rich in fiber and low in calories, making it a healthier alternative to other snacks. When selecting popcorn, look for organic varieties without added chemicals to ensure the best flavor. Store unpopped kernels in a cool, dry area to maintain freshness.

Pecans: Pecans are native to North America and are packed with essential nutrients, including healthy fats, vitamins, and minerals. They contribute a rich, buttery flavor to the popcorn. Choose fresh pecans that are plump and fragrant. Store them in an airtight container to avoid rancidity, and consider toasting them lightly before adding to the recipe for enhanced flavor.

Butter: Butter enhances the richness of the popcorn, creating a decadent experience. Made from churning milk or cream, it is an essential ingredient in countless recipes. Opt for unsalted butter for better control over flavor, and ensure it is fresh when cooking. Store butter in refrigeration for optimal longevity, and it can be frozen for extended shelf life if needed.

Brown Sugar: Brown sugar adds a deep, caramel-like flavor to Praline Popcorn. It contains molasses, which not only imparts a richer color but also enhances moisture content. It is readily available, but for the best results, look for organic options without additives. Store brown sugar in an airtight container to keep it fresh and avoid hardening.

Common Mistakes to Avoid

  • Overcooking the caramel: Keep a close eye on the caramel to avoid burning it, which can impart an unpleasant bitterness to the popcorn. Use a candy thermometer if necessary, aiming for a soft ball stage for the best texture.
  • Using old popcorn kernels: Stale popcorn kernels won’t pop well, leading to a disappointing texture. Always check the expiration date and buy fresh kernels for optimal popping.
  • Not coating evenly: Ensure all popcorn is coated evenly with the caramel to avoid clumping. Toss the popcorn gently with a spatula as you add the caramel to ensure even coverage.
  • Skipping the cooling time: Allowing the popcorn to cool is essential. It helps the caramel harden properly, creating that delightful crunchy texture instead of a gooey mess.
  • Inadequate stirring: Stirring the mixture well is critical to prevent sugar from crystallizing. Be quick and thorough while mixing to achieve a smooth caramel coating.
  • Inconsistent popping temperature: Popping popcorn at varying temperatures can lead to unpopped kernels or burnt popcorn. Use a consistent medium-high heat for even popping.
  • Neglecting the pecans: To enhance the flavor, toast the pecans briefly before incorporating them into the caramel mixture. This step adds depth and aroma.
  • Forgetting to line the baking sheet: Use parchment paper or silicone mats when spreading the popcorn to avoid sticking and ensure easy cleanup later.
  • Ignoring safety precautions: Caramel can reach very high temperatures, so use caution while cooking. Always keep children away during the cooking process.
  • Not measuring ingredients: Accurate measurements are crucial for creating the perfect caramel. Measure all your ingredients beforehand, avoiding errors during the cooking process.

Essential Techniques

Making popcorn: This step is crucial as it sets the foundation for your Praline Popcorn. Popcorn can be made using a stovetop method or an air popper. To master it, use fresh kernels and a suitable pot with a lid, maintaining a medium-high heat. The common pitfall is burning or under-popping; listen for the popping sounds and remove it once no more pops occur. Look for fluffy, white kernels as a cue to check for readiness.

Preparing caramel: Perfecting the caramel is key to achieving that gooey sweetness. Start by combining sugar, butter, and cream in a saucepan, heating gently until dissolved and then boiling. To master this, use a candy thermometer to monitor the temperature; it should reach 240°F for soft balls. A common mistake is to stir excessively once boiling; this can introduce air bubbles that affect texture. Look for a bubbly, golden mixture as a cue for doneness.

Pro Tips for Perfect Praline Popcorn

1. Use high-quality popcorn kernels to achieve the lightest and fluffiest results. Test a few kernels before committing to a large batch to ensure your popping method works well.
2. Toasting the pecans beforehand elevates the flavor significantly. Toasting enhances their natural oils, intensifying their nuttiness, so don’t skip this step.
3. Don’t shy away from experimenting with different nuts. Almonds, walnuts, or cashews can add exciting textures and flavors, creating your unique variation of Praline Popcorn.
4. If you prefer a deeper flavor, consider adding a pinch of sea salt to the caramel. This balance of sweet and salty creates a delightful contrast.
5. For a fun twist, drizzle melted chocolate over the cooled praline popcorn. Allow it to harden for a decadent chocolatey addition to this treat.
6. When storing leftover popcorn, use an airtight container to maintain freshness. You can also add a slice of bread to absorb excess moisture to keep popcorn crunchy longer.
7. If the caramel seems too thick to coat the popcorn easily, add a splash of cream and return it to low heat, giving it that pourable consistency.
8. For added visual appeal, use different colored popcorn and nuts to create a festive look, making it perfect for celebration snacks or holiday gifts.

Variations and Adaptations

Praline Popcorn can be easily adapted to suit different tastes and occasions. Consider adding seasonal spices during the caramel-making process for festive flavors. Cinnamon, nutmeg, or pumpkin spice can transform this treat into a fall delight. Additionally, try incorporating seasonal nuts such as chestnuts or hazelnuts to change up the flavor profile.

You can also create a holiday-themed version by adding colored sprinkles or candy canes crushed finely, providing a festive touch. For an indulgent twist, mix in small chocolate-covered candies or dried fruits to introduce varied textures alongside the classic caramel flavor.

Dietary modifications are also possible; for a vegan alternative, substitute butter with coconut oil and use maple syrup instead of traditional sugar. You can still enjoy that sweet and crunchy texture while catering to your dietary needs.

If you’re after a healthier version, consider using air-popped popcorn, reducing sugar in the caramel mixture, or using honey as a natural sweetener. This way, you maintain the satisfying crunch while lowering the total calories.

Serving and Presentation Guide

To create a stunning presentation for your Praline Popcorn, consider using clear jars or cellophane bags to showcase the colorful, glossy popcorn. Use decorative ribbon to tie the bags, making them perfect as gifts or party favors. You can also serve the popcorn in elegant bowls or on wooden platters for a rustic touch during gatherings.

For garnishing, sprinkle a pinch of sea salt on top just before serving for an enticing contrast to the sweetness. Consider pairing the popcorn with small portions of fruits like berries or sliced bananas for a pop of color and freshness.

Serving it warm is ideal for those cozy nights in, but if offering at a party, allow it to cool completely before presentation to ensure it stays crisp. For portion control, consider serving them in small cups or cones, making it easy for guests to grab and enjoy.

Wine and Beverage Pairing

Pairing beverages with Praline Popcorn can elevate your snacking experience. For wine enthusiasts, consider a sweet Riesling or a Moscato, as their fruity tones complement the rich caramel flavor. A light-bodied Pinot Noir can also work beautifully, offering a smooth contrast to the popcorn’s sweetness.

For those preferring non-alcoholic options, a cold apple cider or a refreshing iced tea can pair nicely. Chocolate or vanilla-flavored milk can provide a nostalgic touch that makes the snack more indulgent. If preferred, consider herbal teas that offer a calming experience, creating a pleasant balance to the sugary crunch.

When serving drinks, consider presentation; iced drinks in clear glasses with fresh fruit garnishes add to the overall festive feel and encourage guests to indulge.

Storage and Shelf Life

To maintain your Praline Popcorn’s freshness, store it in an airtight container at room temperature. This method preserves its crunchy texture while protecting it from humidity. Ideally, enjoy the popcorn within one week, although it can last up to two weeks if kept in optimal conditions.

To avoid spoilage, look for signs such as a stale smell or a chewy texture; these indicate the popcorn has taken on moisture. If you want to keep it for an extended period, consider freezing it. Place the popcorn in a freezer-safe bag or container, and it will maintain its quality for about a month.

Should you want to reheat popcorn that has lost its crunch, spread it on a baking sheet and pop it in the oven at a low temperature (around 250°F) for a few minutes. This method revitalizes the texture, bringing the popcorn back to deliciousness.

Make Ahead Strategies

Praline Popcorn can easily be made ahead of time for convenience during busy occasions. Prepare and cook it a day or two in advance, storing it in an airtight container to keep it fresh. This strategy is particularly useful for gatherings or holiday events, giving you more time to focus on other preparations.

If you’re looking to save time on assembly, measure and prepare the popcorn kernels and nuts a few days in advance, keeping them stored separately until you’re ready to make the caramel. This setup ensures a quicker preparation on the day of serving.

Quality may decrease slightly upon storing, so aim to pop and coat just before serving whenever possible. If you need to do some assembly in advance, treat the popcorn differently. Store any additions, like nuts or candy, separately to maintain their textures until you’re ready to combine everything, ensuring every mouthful remains a delightful crunch.

Scaling Instructions

Scaling your Praline Popcorn recipe is easy! If you want to halve it, simply adjust your ingredients proportionally—use ½ cup of popcorn, ½ cup of butter, etc. This allows for a simpler batch without compromising flavor or texture.

Conversely, if you’re planning on doubling or tripling your recipe, maintain an eye on your cooking times. Larger quantities often require longer caramel preparation, so you may need to adjust accordingly. Use larger pots for popping popcorn to accommodate the additional amount to ensure even cooking.

If you decide to make a larger batch, keep in mind the cooling times. Spreading out the popcorn on multiple baking sheets can assist in quick cooling, preserving its crunchiness.

Lastly, remember to adjust your storage containers if making larger quantities. Bigger portions will require elevated storage options to maintain freshness, so consider airtight bins or sealable bags suitable for the amounts prepared.

Nutritional Deep Dive

Praline Popcorn is a delightful treat that can easily fit into your snacking habits, especially with its unique blend of ingredients. It’s important to consider the macro breakdown, with popcorn serving as a low-calorie, high-fiber base; however, the caramel and nuts will add sugars and fats, hence moderation is key.

From a micronutrient perspective, pecans bring healthy fats, protein, and important vitamins like E and B, which can support heart health and provide energy. The nutritional benefits of popcorn can contribute to overall fullness and fiber intake, making it a more satisfying snack choice compared to typical sugary options.

While enjoying Praline Popcorn, be mindful of portion sizes. A typical serving can pack in considerable calories due to sugar and nuts, so managing your intake can assist in weight management. Consider balancing this sweet treat by pairing it with healthier snack options like fruits or yogurt for a more rounded dietary choice.

Finally, for weight management tips, try to savor the flavors slowly. Allowing yourself to enjoy each bite can reduce overall intake, satisfying cravings without the need for excessive quantities.

Dietary Adaptations

Creating dietary adaptations for Praline Popcorn can widen its appeal while accommodating various dietary preferences. For gluten-free diets, verify the popcorn brand to ensure it’s certified gluten-free, as most are inherently free of gluten.

For those following dairy-free or vegan lifestyles, substitute butter with coconut oil or vegan margarine. Opt for plant-based sweeteners such as maple syrup in the caramel to maintain that sweet flavor without compromising dietary restrictions.

Keto and low-carb individuals can replace brown sugar with sugar alternatives like erythritol or monk fruit sweeteners. This substitution will allow for sweetness without the carbs, making the treat more suitable for those watching their carb intake.

Another dietary modification includes reducing added sugars. You can significantly lower the sugar content by skipping or cutting back on caramel and relying on the natural sweetness of the toppings instead.

Troubleshooting Guide

If the popcorn is too chewy, it likely means the caramel hasn’t been heated enough—ensure you always reach the soft ball stage for the correct consistency. If the popcorn has a burnt flavor, it could be a sign of overcooked caramel. To avoid this, closely monitor the temperature while cooking.

Should you encounter texture issues with uneven coating, it’s typically due to cooling too quickly. Try reheating the caramel gently and mixing again to ease the coating process. If the popcorn is too sweet, consider adding a sprinkle of sea salt on top as it’ll cut through some of the sweetness.

If you find the flavor lacks balance, adding a splash of vanilla extract or a hint of cinnamon can improve the overall experience. For those who experience issues with sticking, consider using parchment paper during the cooling process to minimize any mess.

Recipe Success Stories

Home cooks share their experiences praising Praline Popcorn for its ease and impressiveness. Many have stated how this recipe allows for creativity—using various ingredients, such as chocolate, to personalize the treat for family gatherings or special events.

Readers have adapted the recipe, experimenting with adding other flavors like sriracha or lime zest, resulting in enjoyable variations that still capture the essence of sweet and crunchy. Photos shared in community groups showcase beautiful bowls filled with the popcorn, often garnished with colorful nuts and a drizzle of chocolate, emphasizing the treat’s versatility.

Tips from readers often focus on presentation, suggesting your popcorn can go beyond snacks to be the centerpiece of dessert tables, attracting attention and delight at parties. These success stories inspire others to give this sweet treat a try, often generating discussion on favorite adaptations.

Frequently Asked Questions

Can I use microwave popcorn for this recipe? Yes, you can use plain microwave popcorn. However, ensure it’s unsalted and unbuttered to control the sweetness and flavor of the final product.

How do I store leftover Praline Popcorn? Store it in an airtight container at room temperature to maintain crispness. If moisture seeps in, it can become chewy over time.

Can I make this recipe in advance? Absolutely! You can prepare it a couple of days before needed. Just keep it stored properly to maintain freshness.

What types of nuts can I use? While pecans are traditional, you can experiment with almonds, hazelnuts, or walnuts, all of which will offer different textures and flavors.

Is this a good option for gifts? Yes! Pack Praline Popcorn in decorative bags or jars for a sweet, homemade gift that’s sure to be appreciated.

Can I reheat the caramel if it hardens? Yes, you can gently reheat it in the microwave or on the stove over low heat to return it to a pourable consistency.

Is there a way to make this less sweet? You can reduce the sugar in the caramel recipe or add a pinch of salt to balance the sweetness.

Can Praline Popcorn be frozen? While it’s best enjoyed fresh, you can freeze it for up to a month. Just ensure it’s in an airtight container to protect against freezer burn.

What can I pair with Praline Popcorn? It pairs well with light beverages like sweet wine, iced tea, or even alongside fruit, creating a balanced and delightful snack platter.

Can I add chocolate? Absolutely! Drizzling or mixing in chocolate will add a delicious chocolatey flavor, enhancing the treat indulgently.

Additional Resources

For those who enjoy Praline Popcorn, consider exploring additional popcorn recipes, like savory cheese popcorn, or chocolate-covered popcorn for a varied snack table. Learning techniques on effective popcorn popping can also enhance your baking skills, ensuring consistently fluffy kernels.

Further, researching ingredient guides will enrich your understanding of how to choose the best nuts or sweeteners for your treats, ensuring quality in every batch. Equipment recommendations for popcorn makers can elevate your snack-making process.

Don’t forget to consider seasonal variations; incorporating flavors of the season can keep your snacking fresh and exciting throughout the year.

Join the Conversation

We encourage you to share your Praline Popcorn experiences on social media! Use hashtags, upload your stunning photos, and review the recipe to inspire others. Join our community to exchange ideas, suggest variations, and connect with fellow snack enthusiasts.

Photography tips can help others recreate the deliciousness visually, so don’t hold back on sharing your best shots. The joy of cooking and snacking is best when shared, so let’s create a dialogue around this delightful treat!

The Recipe

Praline Popcorn

Serves: 8

Prep Time: 10 mins

Cook Time: 15 mins

Total Time: 25 mins

Kitchen Equipment Needed

  • Large pot for popping popcorn
  • Baking sheet
  • Parchment paper (optional)
  • Medium saucepan
  • Spatula or wooden spoon

Ingredients

  • 1 cup popcorn kernels
  • ½ cup unsalted butter
  • 1 cup brown sugar
  • ½ cup light corn syrup
  • 1 cup pecan halves
  • ½ teaspoon salt

Directions

  1. Pop the popcorn kernels in a large pot over medium-high heat. Once popped, transfer them to a large bowl and set aside.
  2. In a medium saucepan, melt the butter over medium heat. Stir in the brown sugar, corn syrup, and salt.
  3. Bring the mixture to a boil, stirring constantly. Once it reaches a soft ball stage, remove from the heat.
  4. Quickly add the pecans to the caramel mixture and stir to coat evenly.
  5. Pour the caramel pecan mixture over the popped popcorn and mix gently to coat all the popcorn thoroughly.
  6. Spread the coated popcorn on a baking sheet lined with parchment paper, allowing it to cool completely.
  7. Break into pieces and serve or store in an airtight container.

Recipe Notes

  • Feel free to substitute the pecans with other nuts such as almonds or walnuts.
  • For added flavor, consider mixing in chocolate chips once the popcorn is out of the oven.
  • This recipe can also be made vegan by substituting butter with coconut oil and using a vegan-friendly sweetener.

Irresistible No-Peek Chicken Casserole: A Family Favorite Recipe

No-Peek Chicken Casserole: A Comforting Family Favorite

⚖️
Difficulty
Easy

⏲️
Prep Time
15 mins

🕒
Cook Time
45 mins

⏱️
Total Time
1 hour

🍽️
Servings
6

The No-Peek Chicken Casserole is a delightful dish packed with flavor and comfort. This recipe is perfect for busy weeknights when you’re searching for a meal that requires minimal effort but yields maximum satisfaction. With tender chicken, savory vegetables, and a creamy sauce, each bite invites you into a world of comforting home-cooked bliss. This casserole not only satisfies your appetite but also speaks to the heart, making it an ideal centerpiece for family gatherings or cozy dinners.

Imagining the aroma wafting through your kitchen as the casserole bakes is enough to make anyone’s mouth water. The combination of tender chicken mixed with hearty vegetables creates a welcoming dish that’s both colorful and inviting. In just one hour, you can prepare a wholesome meal that not only tastes delicious but also impresses your loved ones. Trust us; this is a recipe you’ll want to make again and again.

Quick Recipe Highlights

  • Flavor Profile: Savory and creamy, with hints of onion and garlic that enhance the overall taste.
  • Texture: A delightful combination of tender chicken, crunchy vegetables, and a smooth sauce creates a satisfying mouthfeel.
  • Aroma: The fragrance of baking chicken mixed with aromatic spices fills your kitchen with warmth.
  • Visual Appeal: Golden-brown topping with colorful vegetables makes for a visually appealing dish.
  • Skill Level Needed: This dish is beginner-friendly, ideal for anyone looking to expand their cooking repertoire.
  • Special Equipment: A large casserole dish is all you need to create this comforting meal.

Recipe Overview

  • Difficulty Level: The No-Peek Chicken Casserole is an easy-to-make recipe that requires basic cooking skills and minimal hands-on time.
  • Category: This casserole belongs to the comfort food category, ideal for family meals and gatherings.
  • Cuisine: This dish embodies classic American cuisine, often found in home kitchens across the country.
  • Cost: The ingredients are wallet-friendly, making this recipe accessible for any budget.
  • Season: Great for year-round enjoyment but shines particularly during cold months when comfort food is most appreciated.
  • Occasion: Perfect for family dinners, potlucks, and cozy gatherings.

Why You’ll Love This Recipe

You will adore the blend of flavors in the No-Peek Chicken Casserole! The combination of spices and creamy sauce creates a mouthwatering dish that keeps everyone coming back for seconds. It’s the kind of recipe that warms your heart and fills your stomach, making it a winning choice for family dining.

The convenience of this recipe is undeniable. Simply toss the ingredients together, place them in the oven, and let it do its work while you focus on other tasks. This makes it an excellent choice for busy days when you don’t want to spend hours in the kitchen.

From a nutritional standpoint, this casserole includes protein-rich chicken and a variety of vegetables, offering a balanced meal for your family. The dish can easily be adapted with additional veggies or whole grains, keeping it healthy and satisfying.

The social aspect of this recipe is also significant. Cooking and sharing meals like the No-Peek Chicken Casserole creates memorable experiences for family and friends. It fosters connections and encourages conversation around the dinner table.

Finally, you’ll love how budget-friendly this casserole is. It incorporates simple ingredients that won’t break the bank, making it an excellent option for families seeking delicious and economical meal choices.

Historical Background and Cultural Significance

The No-Peek Chicken Casserole has roots in traditional American home cooking, where casseroles were a staple for their simplicity and ability to feed many. Originating in the early 20th century, casseroles became popular as families searched for convenient cooking methods that maximized flavor and minimized effort.

This dish reflects a significant cultural aspect of American cuisine, where self-sufficiency and the essence of family gatherings are prioritized. Recipes like the No-Peek Chicken Casserole are passed down from generation to generation, embedding them into family traditions and celebrations.

Over the decades, this casserole has evolved, adapting to suit modern tastes and dietary needs. As people began to prioritize health, many variations emerged, focusing on using fresh ingredients and reducing fat levels without sacrificing flavor.

Regional variations of the casserole exist, highlighting the different culinary influences throughout the United States. Some may include cheese or unique spices, illustrating how this comforting dish has been embraced across diverse communities, making it a beloved staple everywhere.

Ingredient Deep Dive

Chicken is the primary protein in this casserole, known for its versatility and wide-ranging culinary application. As a staple protein in many diets, chicken contains essential nutrients like B vitamins and selenium. When selecting chicken, look for fresh, high-quality cuts, and if you can, choose organic or free-range options for optimal flavor. Store it in the refrigerator for no more than 2 days, and consider freezing it if not used within that time frame.

Canned cream soups contribute to the creamy texture of the casserole. Initially popularized as a quick meal solution in American kitchens, these soups provide rich flavors and save time. While convenient, they often contain preservatives, so consider making homemade cream sauces for a healthful alternative. When choosing canned options, look for low-sodium varieties and check for better-quality brands. These soups can last on the shelf for quite some time, and once opened, store in the refrigerator.

Vegetables add crucial nutrients to the dish, enhancing both flavor and texture. For this casserole, you may use common choices like carrots, celery, and peas. Each brings unique vitamins and fiber, making the dish more nutritious. When selecting vegetables, opt for fresh, colorful options to ensure maximum flavor. Properly stored, most vegetables can last up to a week in the refrigerator. If you want to adjust this recipe, consider substituting seasonal vegetables for freshness.

Common Mistakes to Avoid

  • Skipping the browning step: Not browning the chicken before adding it to the casserole can result in less flavor. Always sear your chicken for a richer taste.
  • Overcooking: Cooking the casserole for too long can dry out the chicken. Keep an eye on the time and check for tenderness.
  • Using frozen vegetables: While convenient, frozen veggies release excess moisture, making the casserole watery. Fresh vegetables perform better in this dish.
  • Not seasoning properly: Casseroles tend to need a bit more seasoning than you might expect. Be generous with your herbs and spices.
  • Incorrect layering: Proper layering of ingredients ensures even cooking and flavor distribution. Always follow the recipe guidelines for best results.
  • Skipping the resting time: Allowing your casserole to rest after baking helps flavors meld together and improves texture.
  • Ignoring storage tips: If you have leftovers, store them properly to maintain the casserole’s freshness and prevent spoilage.
  • Not adjusting for dietary preferences: Be mindful of modifications needed for specific diets before serving guests.

Essential Techniques

Browning is essential in cooking chicken, as it develops flavor and enhances the overall richness of the dish. To master this technique, ensure your pan is hot before adding oil and chicken. Look for golden brown edges before removing it from the heat, which indicates a deep flavor development.

Layering is another crucial technique that impacts the final outcome. Proper layering prevents soggy bottoms by allowing moisture to escape while ensuring that everything cooks evenly. Start with the more watertight ingredients at the bottom, such as cream soups, followed by veggies and finally the chicken.

Pro Tips for Perfect No-Peek Chicken Casserole

1. Use high-quality chicken for the best flavor and texture. Organic or free-range options are often more flavorful.
2. Feel free to mix in your favorite seasonal vegetables for freshness and variation.
3. Preheat your oven adequately to ensure even cooking throughout the casserole.
4. Consider using brown rice or quinoa instead of white rice for an added health kick.
5. Let the casserole rest for at least 10 minutes before serving to allow flavors to meld.
6. Garnish with fresh herbs for a pop of color and added freshness upon serving.
7. For a creamier texture, consider adding cream cheese or sour cream before mixing in the other ingredients.
8. Don’t be afraid to experiment with different spices or cheeses to create unique variations of this classic dish.

Variations and Adaptations

Regional variations of the No-Peek Chicken Casserole can include different types of cheeses or spices, creating unique flavors. For instance, try using pepper jack cheese for an added kick if you enjoy spicy dishes.

Seasonal adaptations allow you to utilize fresh produce that is abundant at various times of the year. Consider incorporating spring vegetables like asparagus or summer zucchini for a seasonal twist.

Dietary modifications are also easy; swap out traditional dairy products for plant-based alternatives to create a vegan version of this casserole. Other modifications include using gluten-free rice or flour for those with dietary restrictions.

Serving and Presentation Guide

When serving your No-Peek Chicken Casserole, consider thoughtful plating techniques. Use a large serving spoon to gently scoop portions while preserving the casserole’s shape. Garnishing with fresh herbs or a sprinkle of paprika enhances visual appeal and adds freshness.

Traditional accompaniments like a side salad or crusty bread are excellent options for a complete meal. On the modern side, consider presenting the casserole in individual ramekins for a more upscale look.

Always serve the casserole warm, ensuring that you check for proper temperature. For portion control, aim for balanced servings to keep everyone’s appetite in check while still enjoying the dish.

Wine and Beverage Pairing

When it comes to wine pairings, a crisp Chardonnay complements the creamy texture of the casserole beautifully. Its acidity balances the richness, elevating the meal. Alternatively, a light-bodied Pinot Noir provides a nice contrast without overwhelming the dish.

For non-alcoholic alternatives, consider sparkling water with a slice of lemon or a refreshing herbal iced tea. These beverages provide a light palate cleanser that elevates the dining experience.

If you enjoy coffee, opt for a subtly flavored brew, such as hazelnut or vanilla, which can enhance the comfort food vibe beautifully.

Storage and Shelf Life

After preparing your No-Peek Chicken Casserole, it’s essential to store any leftovers properly. Allow the casserole to cool before transferring it into airtight containers. Refrigerate for up to 3-4 days or freeze for up to 2-3 months.

For freezing, use heavy-duty freezer bags or containers designed for freezer use. Label and date your containers for easy identification later.

Check for signs of spoilage, such as off odors or visible mold, before reheating. When reheating, ensure the casserole reaches a minimum internal temperature of 165°F for safe consumption.

Make Ahead Strategies

To save time, consider prepping your No-Peek Chicken Casserole the night before. Chop your vegetables, and mix together your chicken, soups, and seasonings, storing them separately until you’re ready to assemble.

You can also assemble the entire casserole ahead of time and refrigerate it for up to 24 hours before baking. Adjust the cooking time accordingly, as it may need a few more minutes in the oven if it’s cold from refrigeration.

When reheating from frozen, allow the casserole to thaw in the fridge overnight before baking to ensure even cooking.

Scaling Instructions

To scale this recipe, simply adjust the ingredient quantities based on your portion needs. Halve or double the amounts for a smaller or larger group, keeping the ratios consistent for best results.

When doubling the recipe, use a larger dish to accommodate the increased volume while ensuring proper cooking times and temperatures are maintained.

Keep in mind that baking times may vary based on the size of your casserole, so always ensure the chicken is cooked through to 165°F.

Nutritional Deep Dive

This casserole is a balanced meal, featuring protein from chicken, carbohydrates from rice, and a host of vitamins and minerals from various vegetables. Each serving typically contains around 350-450 calories, making it a satisfying choice without being overly indulgent.

The casserole’s nutritional profile can be enhanced by adding a variety of vegetables, increasing fiber content and promoting satiety. Additionally, substituting with brown rice can increase the whole grain content, promoting better health outcomes.

For weight management, this dish can be portion-controlled by serving smaller sizes alongside a salad or vegetables, enhancing its health benefits while still being hearty.

Dietary Adaptations

To make the No-Peek Chicken Casserole gluten-free, swap traditional rice for quinoa or a gluten-free grain. Additionally, ensure that any canned soups you use are gluten-free labeled.

For a dairy-free alternative, choose plant-based cream products and skip the cheese. Many nut cheese alternatives provide a similar creaminess and flavor without dairy.

Vegetarian guests can enjoy a similar experience by substituting chicken with hearty vegetables or legumes, providing adequate protein and delightful texture without meat.

Troubleshooting Guide

If you encounter texture issues, such as a dry casserole, consider adding moisture by mixing in additional broth or cream before serving.

For flavor balance, taste before serving and adjust seasoning as needed, adding salt, pepper, or additional herbs to enhance the overall profile.

Temperature issues can often be remedied by ensuring the casserole is baked in an adequately preheated oven, checking the internal temperature with a meat thermometer for accuracy.

Ingredient substitutions may affect overall flavor; always strive to use similar flavor profiles to ensure the casserole remains delicious.

Timing concerns can arise if your ingredients are not cut evenly; ensure consistent sizes to promote uniform cooking.

Recipe Success Stories

Many community members have embraced the No-Peek Chicken Casserole, sharing their stories of successful modifications and family gatherings. Some readers have found joy in adding spice variations, creating their unique twist on the traditional recipe.

Adaptation stories are also common, where busy parents have successfully prepared this dish in advance, freeing up time during hectic weekday evenings.

Photography tips have included suggestions on capturing that golden top and colorful vegetable medley to showcase the dish’s appeal beautifully.

Frequently Asked Questions

Q: Can I use brown rice instead of white rice?
A: Yes! Brown rice is a nutritious substitute, but it may require a longer cooking time. Adjust the liquid slightly to accommodate for the increased absorbency of brown rice.

Q: What can I substitute for cream soup?
A: You can use homemade cream sauces made from butter, flour, and milk or even sour cream for a richer flavor.

Q: How can I make this dish spicier?
A: Incorporating jalapeños or using pepper jack cheese instead of regular cheese can add a wonderful kick to the casserole.

Q: Can I freeze leftover casseroles?
A: Absolutely! Store the casserole in airtight containers or heavy-duty freezer bags to preserve freshness when freezing for later use.

Q: How long can I keep leftovers?
A: Leftovers can be stored in the refrigerator for up to 3-4 days. If frozen, they can last for up to 3 months.

Q: Is it possible to make this casserole vegan?
A: Yes! Substitute chicken with tofu or chickpeas, and use a plant-based cream soup alternative for a delicious vegan option.

Q: How do I ensure my chicken stays moist?
A: Browning the chicken before adding it to the casserole and using a covered dish during baking can help retain moisture.

Q: Can I add cheese to this recipe?
A: Yes! Adding cheese can enhance the creaminess. Try grated cheddar or mozzarella for a delightful melty topping.

Q: What type of vegetables can I use?
A: Feel free to use a mix of your favorites, including bell peppers, corn, or even spinach, depending on your preference and what’s in season.

Q: How can I adjust the recipe for smaller servings?
A: To make smaller portions, simply halve the ingredient amounts while keeping cooking times similar.

Additional Resources

If you’re interested in exploring more comfort food recipes, check out our collection of casseroles that satisfy your cravings. For those new to cooking casseroles, we also offer technique guides focused on mastering the art of baking and preparation.

Interested in ingredient-specific information? Our detailed ingredient articles provide insights into freshness, nutritional benefits, and selection tips. No matter the occasion, we’ll help you find seasonal variations to keep your meals exciting.

Join the Conversation

We love hearing from our community! Share your No-Peek Chicken Casserole photos on social media and let us know what variations you’ve tried. Recipe reviews and suggestions for improvements are always welcome, as we encourage a collaborative cooking experience.

Your contributions help others spark joy in their cooking adventures, and together we can create a vibrant space for sharing flavors and experiences.

The Recipe

No-Peek Chicken Casserole

Serves: 6

Prep Time: 15 mins

Cook Time: 45 mins

Total Time: 1 hour

Kitchen Equipment Needed

  • Casserole dish
  • Large mixing bowl
  • Measuring cups and spoons
  • Wooden spoon or spatula

Ingredients

  • 1.5 pounds of chicken breast, diced
  • 1 cup of long-grain rice
  • 1 can of cream of chicken soup
  • 1 can of cream of mushroom soup
  • 1 cup of chicken broth
  • 1 cup of frozen mixed vegetables
  • 1 teaspoon of garlic powder
  • Salt and pepper to taste

Directions

  1. Preheat your oven to 350°F (175°C).
  2. In a large mixing bowl, combine the diced chicken, rice, cream soups, chicken broth, frozen vegetables, garlic powder, salt, and pepper. Mix well.
  3. Spread the mixture evenly in a greased casserole dish.
  4. Cover the dish tightly with aluminum foil.
  5. Bake for 45 minutes or until the chicken is cooked through and the rice is tender.
  6. Remove from the oven, let rest for about 10 minutes before serving.

Recipe Notes

  • Feel free to substitute the chicken with turkey or tofu for a different protein source.
  • Variations can include any of your favorite vegetables for a personal touch.
  • Cheese can be added on top during the last 10 minutes of baking for a cheesy finish.

Christmas Sugar Cookie Fudge: A Festive No-Bake Treat

holiday fudge recipe, sugar cookie fudge, no-bake Christmas treats, festive fudge dessert, easy fudge for holidays, cookie-inspired fudge, white chocolate fudge

Christmas Sugar Cookie Fudge: A Festive No-Bake Delight


Christmas Sugar Cookie Fudge is the perfect holiday treat, combining the sweet, nostalgic flavors of sugar cookies with the creamy texture of fudge. Whether you’re preparing desserts for a festive gathering or crafting edible gifts, this no-bake recipe will surely impress.


Why Christmas Sugar Cookie Fudge Is a Must-Try

This delightful dessert is quick and easy to prepare, requiring just a few ingredients and minimal effort. Its versatility allows you to customize the fudge with festive decorations like sprinkles, crushed candy canes, or colored icing. For more inspiration on holiday treats, explore No-Bake Pumpkin Cheesecake for another hassle-free recipe.

Christmas Sugar Cookie Fudge also makes an excellent edible gift. Wrap it in cellophane bags or decorative tins for a thoughtful present that friends and family will love. If you’re new to fudge-making, check out these Tips for Melting White Chocolate to ensure smooth results.


Ingredients for Christmas Sugar Cookie Fudge

Here’s what you’ll need to make this festive dessert:

  • White Chocolate Chips: The creamy base for the fudge.
  • Sweetened Condensed Milk: Adds sweetness and a rich texture.
  • Sugar Cookie Mix: Provides the classic sugar cookie flavor.
  • Butter: Adds richness and binds the ingredients.
  • Sprinkles: For a festive touch.
  • Optional Additions: Crushed candy canes, food coloring for swirls, or edible glitter for extra sparkle.

How to Make Christmas Sugar Cookie Fudge

1. Prepare Your Tools

  • Line a baking dish with parchment paper and lightly grease it.

2. Melt the Base Ingredients

  • In a large saucepan, heat sweetened condensed milk and butter over low heat.
  • Add white chocolate chips, stirring until fully melted.

3. Mix in Sugar Cookie Flavor

  • Gradually stir in the sugar cookie mix. Add festive food coloring if desired.

4. Pour and Decorate

  • Pour the mixture into the prepared dish. Smooth the top and sprinkle with festive toppings like candy canes or sprinkles.

5. Set the Fudge

  • Refrigerate for at least 2 hours or until firm. Slice into squares and serve.

Creative Variations

  • Peppermint Twist: Add peppermint extract and crushed candy canes for a minty flavor.
  • Vegan Sugar Cookie Fudge: Use plant-based condensed milk and dairy-free white chocolate chips.
  • Layered Fudge: Alternate layers of sugar cookie fudge with chocolate fudge for a striking visual.
  • Nutty Addition: Mix in crushed pecans or walnuts for extra crunch.

For more creative no-bake options, try Dunkaroo Dip for a nostalgic twist.


Tips for Success

  • Prevent Graininess: Use low heat to melt the chocolate and stir constantly.
  • Easy Cutting: Dip a knife in hot water before slicing the fudge for clean edges.
  • Storage: Store in an airtight container at room temperature or in the fridge for longer freshness.

FAQs

1. Can I use gluten-free sugar cookie mix?

Yes! Gluten-free cookie mix works perfectly in this recipe.

2. How do I prevent the fudge from sticking?

Use parchment paper and lightly grease it for easy removal.

3. How long does this fudge last?

When stored in an airtight container, it stays fresh for up to 2 weeks.

4. Can I make this recipe ahead of time?

Absolutely. It’s a great make-ahead treat for busy holidays.

5. Can I add food coloring?

Yes! Add a few drops of food coloring for festive swirls or layers.


Internal Linking Opportunities

For readers interested in Christmas Sugar Cookie Fudge, here are other related recipes on ExoRecipes:


Conclusion

Christmas Sugar Cookie Fudge is a delightful and versatile addition to your holiday dessert lineup. With its rich flavor, creamy texture, and festive decorations, it’s sure to be a crowd-pleaser. Try this recipe today and make your holiday celebrations even sweeter!