Christmas Mistletoe Margarita: A Festive Holiday Cocktail Recipe
Christmas Mistletoe Margarita: A Festive Cocktail to Elevate Your Holiday Gatherings
Christmas Mistletoe Margarita is the quintessential holiday cocktail. Its vibrant red color, refreshing flavors, and festive garnishes make it a centerpiece for Christmas parties and gatherings. Whether served in individual glasses or as a punch, it’s the perfect way to toast the season.
Why Mistletoe Margaritas Are a Must-Try for Christmas
The unique blend of sweet cranberry juice, zesty citrus, and smooth tequila gives this margarita its distinctive holiday charm. Garnished with rosemary sprigs and cranberries, it embodies the spirit of the season. Pair it with festive appetizers like Taco Pinwheels to create a harmonious holiday spread.
To make this stunning cocktail, gather the following:
Tequila: Silver or mezcal for a smoky variation.
Cranberry Juice: For a tart, festive base.
Orange Juice: Adds natural sweetness.
Lime Juice: Balances the flavors with acidity.
Grenadine or Cherry Juice: For color and depth.
Soda Water or Lemon-Lime Soda: Adds effervescence.
Garnishes: Fresh cranberries, rosemary sprigs, sugar or salt for rimming glasses.
For a twist, consider replacing cranberry juice with pomegranate juice for a richer flavor. Explore more holiday cocktails in Creative Holiday Cocktails.
How to Make Christmas Mistletoe Margarita
1. Prepare Your Ingredients
Juice fresh limes and oranges for the best flavor.
Chill all liquid ingredients in advance.
2. Mix the Margarita
In a shaker, combine tequila, cranberry juice, orange juice, lime juice, and grenadine.
Add ice and shake until thoroughly mixed.
3. Rim the Glasses
Dip glass rims in lime juice and then in sugar or salt for a frosted effect.
4. Serve and Garnish
Pour the margarita mix into prepared glasses.
Top with soda water and garnish with rosemary sprigs and cranberries.
Creative Variations
Frozen Mistletoe Margarita: Blend the ingredients with ice for a refreshing twist.
Spicy Margarita: Add a slice of jalapeño for heat.
Mocktail Version: Replace tequila with sparkling water and increase the citrus juice for a non-alcoholic option.
Herbal Infusion: Add muddled mint or basil for a fragrant variation.
Tips for the Perfect Margarita
Balance Flavors: Adjust the sweetness and acidity to suit your taste.
Presentation Matters: Use clear glasses to showcase the vibrant red color and garnishes.
Batch Preparation: Mix ingredients in a pitcher for easy serving at parties.
FAQs
What type of tequila works best?
Silver tequila is the most commonly used, but mezcal adds a smoky depth.
Can I make this in advance?
Yes, mix the base ingredients and store in the refrigerator. Add soda just before serving.
How do I make this keto-friendly?
Use sugar-free soda and skip the grenadine.
Why doesn’t my sugar stick to the rim?
Ensure the rim is wet with lime juice or water before dipping in sugar.
Can I double or triple the recipe?
Absolutely, scale the ingredients as needed and serve in a punch bowl for larger gatherings.
Internal Linking Opportunities
For a complete holiday experience, pair your Christmas Mistletoe Margarita with these recipes:
Dunkaroo Dip: A nostalgic dessert that complements cocktails.
Conclusion
The Christmas Mistletoe Margarita is more than just a cocktail—it’s a celebration in a glass. Its festive colors and refreshing flavors make it a must-have for holiday parties. Get creative with variations and enjoy the season with this beautiful, easy-to-make drink!
Ginger Sesame Chicken Coleslaw Salad: A Flavorful Delight
Ginger Sesame Chicken Coleslaw Salad: A Flavorful Fusion Delight
⚖️
Difficulty
Easy
⏲️
Prep Time
15 mins
🕒
Cook Time
10 mins
⏱️
Total Time
25 mins
🍽️
Servings
4 Servings
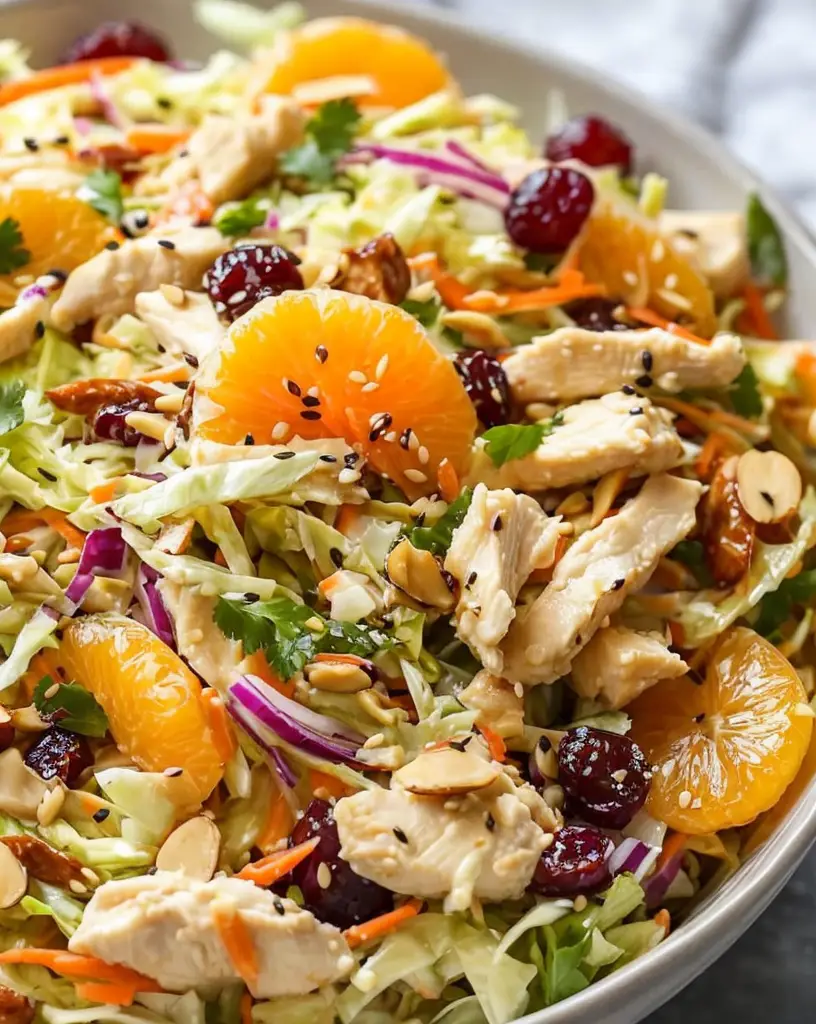
Ginger Sesame Chicken Coleslaw Salad is not just a dish—it’s a colorful, vibrant assembly of fresh ingredients that is as appealing to the palate as it is to the eye. The combination of tender chicken coated in a zesty ginger and sesame dressing mingled with crunchy cabbage, carrots, and scallions creates a harmonious blend of flavors and textures. Each bite offers a refreshing crunch paired with the savory notes of chicken, elevating the traditional coleslaw to a whole new level. Perfect for warm weather dining or as a side dish year-round, this salad is sure to impress at any gathering.
The secret to this dish’s irresistible allure lies in its dynamic flavor profile. The ginger adds a warm, peppery kick while the sesame presents a nutty undertone, creating a delightful contrast with the crispiness of the fresh vegetables. This is not your average salad; it bursts with flavor from the very first bite. Whether served at a potluck, picnic, or weeknight dinner, it is a crowd-pleaser that delivers both on taste and nutrition.
Quick Recipe Highlights
Flavor Profile: The warm, spicy flavor of ginger complements the nutty sesame dressing, bringing depth to each component in this salad.
Texture: The crisp cabbage and carrots contrast beautifully with the tender chicken, offering a satisfying crunch with every forkful.
Aroma: The fragrant ginger and toasted sesame oil create an enticing aroma that lingers, inviting everyone to the table.
Visual Appeal: Bright green cabbage, vivid orange carrots, and golden-brown chicken make this salad visually stunning on any plate.
Skill Level Needed: This recipe is easy and beginner-friendly, making it perfect for cooks of all experience levels.
Special Equipment: No special tools are required—just a sharp knife, cutting board, and mixing bowl!
Recipe Overview
Difficulty Level: This Ginger Sesame Chicken Coleslaw Salad is classified as easy, requiring minimal cooking skills and a straightforward method.
Category: Ideal for salads, this recipe serves as both a main dish or a side, fitting seamlessly into any meal plan.
Cuisine: Drawing inspiration from Asian cuisine, this salad showcases the delightful use of ginger and sesame, creating a dish that celebrates those flavors.
Cost: The cost is relatively low, especially considering the fresh vegetables and staple pantry items used, making it budget-friendly.
Season: This salad shines in the warmer months, showcasing seasonal produce, but can be enjoyed year-round for a crunchy treat.
Occasion: Whether at a family barbecue, a potluck, or just a quick weeknight meal, this dish is versatile enough for any occasion.
Why You’ll Love This Recipe
Taste and texture appeal play significant roles in making the Ginger Sesame Chicken Coleslaw Salad a must-try. The vibrant harmony of flavors—spicy ginger mixing with savory sesame and the freshness of crisp vegetables—offers a satisfying experience for your taste buds. The chicken adds protein without overshadowing the freshness of the coleslaw components, making every bite feel wholesome and balanced.
Convenience and preparation are standout benefits of this recipe. With just 15 minutes of prep time and only 10 additional cooking minutes, this salad is perfect for busy weeknights or last-minute events. It allows for a healthy meal without spending hours in the kitchen, making it an excellent choice for those who prioritize quick yet flavorful dining.
Nutritionally, this salad is a winner. Loaded with fresh vegetables, lean protein, and beneficial flavors from ginger and sesame, it delivers important vitamins and minerals while also satisfying cravings. This makes it an excellent choice for anyone looking to maintain a healthy lifestyle while enjoying food that tastes great.
Social and entertaining value is another compelling reason to whip up this dish. Its visual appeal and delicious taste make it a conversation starter at any gathering. Friends and family will love the fresh take on classic coleslaw, and its unique flavor profile is likely to spark recipe requests and discussions.
Cost-effectiveness and accessibility enhance its appeal. Most ingredients are pantry staples or available at any grocery store, making this dish easy to source. The balance of flavors also means you get gourmet taste without a gourmet price tag, allowing everyone the chance to enjoy a high-quality dish without breaking the bank.
Historical Background and Cultural Significance
The origins of ginger in cooking date back thousands of years, primarily rooted in Asian cultures, where it has been celebrated not only for its flavor but also its medicinal properties. In this Ginger Sesame Chicken Coleslaw Salad, ginger merges with sesame, a staple in many Asian cuisines, to create a dressing that enhances the taste of the dish and connects various culinary traditions.
Culturally, the use of coleslaw in various forms has been prevalent in different parts of the world, particularly in Western cuisine. This salad takes a classic recipe and transforms it by incorporating Asian flavors, thus showcasing the fusion of food cultures and their evolution over time.
As global influences on cooking continue to expand, dishes like this one symbolize the blending of culinary traditions. Modern recipes are increasingly incorporating diverse ingredients, allowing home cooks to explore and enjoy flavors from around the world.
Regional variations abound, showcasing local ingredients and preferences. For example, incorporating different vegetables or proteins can result in unique spins on this salad, further enriching its culinary significance and allowing for personalized family favorites.
Ingredient Deep Dive
Ginger:
Originating in Southeast Asia, ginger has gained global popularity, recognized for its distinctive spicy flavor and medicinal benefits. It is rich in antioxidants and has anti-inflammatory properties, making it beneficial for digestion and overall health. When selecting ginger, look for firm roots with smooth skin and avoid any with signs of mold or shriveling. Store ginger in a cool, dry place or in the refrigerator for longevity. Substitutions include galangal or powdered ginger, though fresh is always best.
Sesame Oil:
Sesame oil, a staple in Asian cooking, is made from pressed sesame seeds, praised for its rich aroma and flavor. It contains healthy fats and antioxidants, promoting heart health and skin vitality. Choose toasted sesame oil for its robust flavor, and it’s best kept in a dark, cold place to maintain freshness. If unavailable, grapeseed oil or olive oil can be used as alternatives, though they will alter the flavor profile slightly.
Chicken:
Chicken is a versatile protein option that forms the heart of this salad. It is low in fat while being a great source of essential proteins and nutrients, making it a favored choice in numerous diets. Opt for chicken breasts for a tender result, and ensure you handle raw chicken properly to avoid cross-contamination. Store cooked chicken in the refrigerator for 3-4 days or in the freezer for longer preservation. Substitutions like tofu or grilled shrimp can cater to different dietary preferences.
Cabbage:
Cabbage has a rich history, being a staple in various global cuisines. It’s low in calories yet high in vitamins K and C, offering beneficial health properties. When selecting cabbage, look for firm heads and vibrant leaves, avoiding any with soft spots. Store it in the refrigerator for maximum freshness, and consider using Napa or Savoy cabbage as alternatives for a different texture and flavor in this salad.
Common Mistakes to Avoid
Overcooking the chicken: Cooking chicken too long can lead to dry, tough meat. Use a cooking thermometer to ensure it reaches 165°F for optimal juiciness.
Using too much dressing: Balance is key; too much dressing can overpower other flavors. Start with a small amount, taste, and adjust as necessary.
Chopping vegetables unevenly: Uniform sizes ensure even crunch and flavor distribution. Take the time to chop cabbage and carrots into similar-sized pieces.
Not seasoning enough: While ginger and sesame oil are flavorful, a pinch of salt can enhance the overall taste profile.
Ignoring ingredient quality: Fresh, high-quality ingredients significantly improve the dish’s taste. Opt for fresh produce and quality oils.
Making a dressing too early: Preparing the dressing too far ahead can cause it to separate; mix it just before serving for the best results.
Neglecting to taste as you go: Adjusting flavors while cooking is essential. Make minor tweaks based on your palate for a personalized dish.
Not letting the salad sit: Allowing the salad to rest helps flavors meld together. A brief resting time before serving can enhance taste.
Essential Techniques
Chopping vegetables is crucial for this recipe. Properly slicing the cabbage and carrots ensures a uniform texture that enhances the dish’s overall enjoyment. To master this technique, use a sharp knife and practice stable cutting methods to prevent injury. Look for even sizes to guarantee the best mouthfeel and flavor experience.
Mixing the dressing is another pivotal step. It is important to thoroughly combine ginger, sesame oil, and other ingredients to create a cohesive flavor. Whisking helps infuse the flavors properly; aim for a balanced mix without any separation of oils or solids. A well-mixed dressing coats the salad evenly, elevating every bite.
Pro Tips for Perfect Ginger Sesame Chicken Coleslaw Salad
One of the best tips is to use fresh, seasonal ingredients. The freshness of the vegetables will enhance the texture and flavor complexity—plan your salad around what’s in season for the best results.
Make the dressing ahead and store it in an airtight container. This allows the flavors to develop further and can save time on days when you’re busy.
When preparing chicken, consider marinating it in the ginger and sesame dressing beforehand. This adds extra flavor to the meat, balancing it nicely with the salad.
To amp up the crunch factor, consider adding nuts like sliced almonds or crunchy peanuts. They offer a delightful contrast to the tender chicken and crisp vegetables, enriching each bite.
Don’t shy away from heat; adding a touch of red pepper flakes or sriracha to your dressing can introduce an exciting kick that complements the ginger beautifully.
For an artful presentation, layer the salad ingredients rather than tossing everything together. This allows for vibrant colors to shine through, making it visually appealing.
Ensure to use kitchen shears for cutting green onions directly into your salad. This traditional technique keeps your prep quick while adding fresh flavor without damaging the onions.
Lastly, don’t forget to taste before serving. A final check for seasoning can make a significant difference, ensuring that the balance of flavors is just right.
Variations and Adaptations
For regional variations, consider adding traditional elements from local cuisines, such as jalapeños for a southwestern twist or cilantro for a fresh, herby flavor.
Seasonal adaptations can include swapping vegetables based on what’s fresh at the market. Spring peas or radishes can provide exciting textures and flavors that change with the seasons.
Dietary modifications are also easy to incorporate. For a vegetarian option, replace chicken with tofu or chickpeas, and for a gluten-free option, use tamari instead of soy sauce in the dressing.
Flavor variations might involve different nut oils or the addition of fruit like mango or apples for sweetness, which complement the ginger’s spice and add a delightful contrast.
Texture modifications can be achieved by incorporating different types of shredded vegetables, like beetroot or daikon, which can provide unique flavors and colors.
Lastly, consider presentation alternatives. Serving the salad in small jars or bowls can make for a stunning display at events, allowing guests to enjoy their individual portions.
Serving and Presentation Guide
When plating Ginger Sesame Chicken Coleslaw Salad, variety is key. Use a large, shallow platter to showcase the colorful ingredients, allowing guests to see the vibrant colors mingling together.
For garnishing, a sprinkle of sesame seeds or freshly chopped cilantro adds a finishing touch that complements the dish’s flavors. Pile the salad high for a visually appealing effect, showcasing the fresh ingredients’ brightness.
For traditional accompaniments, serve with rice or crusty bread to create a well-rounded meal, or offer as a light lunch on its own.
Modern serving suggestions might include individual salad cups, a trendy way to serve salads that enhances both the visual appeal and functionality, especially for gatherings.
Temperature considerations are also vital. Serve the salad chilled or at room temperature for the freshest taste and best texture.
Finally, keep portion control in mind when serving. Aim for balanced portions that allow guests to experience all the flavors while avoiding excess.
Wine and Beverage Pairing
For wine pairings, consider a light, crisp white like Sauvignon Blanc or a dry Riesling. These wines enhance the salad’s vibrant flavors without overpowering them, ensuring a harmonious dining experience.
Non-alcoholic alternatives include sparkling water with a splash of lime or ginger-infused iced tea, both of which complement the ginger and freshness of the salad beautifully.
If coffee or tea are preferred options, consider serving a light green tea, which can cleanse the palate and match the dish’s lively character.
Temperature considerations are essential—for sparkling water or iced tea, serving them chilled enhances their refreshing nature, making them ideal accompaniments.
Serving suggestions could include pairing the salad with light appetizers, allowing for the flavors to mingle and create a harmonious buffet-style meal for any occasion.
Storage and Shelf Life
For optimal storage methods, place any leftover Ginger Sesame Chicken Coleslaw Salad in an airtight container, ensuring that it remains fresh. The ideal temperature for storage is the refrigerator, where it will last up to three days.
Container recommendations include glass or BPA-free plastic containers which are perfect for keeping the salad crisp without risk of contamination.
Signs of spoilage include wilted vegetables, an off odor, or excessive moisture collecting on the lid—discard if any of these signs are present.
Reheating guidelines suggest using the microwave for the chicken but avoid warming the coleslaw, as it is best consumed cold for the texture and flavor benefits.
Freezing is not recommended for this salad because the vegetables do not freeze well, losing their fresh taste and texture once thawed.
Make Ahead Strategies
To prepare ahead, chop all vegetables and store them separately in airtight containers within the fridge for up to two days. This approach allows you to assemble the salad quickly before serving.
For the dressing, make it in advance and refrigerate. Homemade dressing can last a week, giving you a flavor-packed base ready to use when cooking.
Quality impact assessment is important; while vegetables can withstand a few days prepped, avoid cutting them too early to prevent wilting—tackle them the day before for the freshest taste.
Assembly tips can facilitate an easier mealtime; consider creating a “salad bar” setup with separate containers for the components so everyone can customize their own bowls.
Reheating guidelines for the chicken can include warming it gently in a frying pan to keep it juicy without drying it out, while keeping the salad fresh.
Finally, adding fresh herbs or avocado just before serving can elevate flavors and provide that freshly prepared feel, enhancing the overall salad experience.
Scaling Instructions
When halving the recipe, adjust the ingredients accordingly, ensuring you maintain the flavor balance. This aspect is particularly important for sauces, which should be evenly proportioned.
Doubling or tripling the ingredients is manageable, but larger portions may require additional mixing bowl space for proper blending.
Equipment adjustments include using bigger bowls or utensils for larger quantities, ensuring everything mixes thoroughly without spillage.
Timing modifications should be considered; while prep time stays consistent, cooking in larger batches may take slightly longer, so monitor chicken temperature closely.
Storage considerations become essential when accommodating larger quantities—ensure your storage containers are adequate for the increased volume to avoid spoilage.
Nutritional Deep Dive
The macro breakdown of this salad reveals a balance of proteins from chicken, healthy fats from sesame oil, and fiber from the vegetables, making it a well-rounded meal. Each serving is designed to provide essential macros to fuel your day.
Micronutrient analysis highlights the salad’s vitamins from fresh vegetables, particularly Vitamin C and K, delivering key benefits to your immune function and bone health.
Health benefits of ginger and sesame also include improved digestion and inflammation reduction, making this dish not only delicious but also conducive to a healthy lifestyle.
Dietary considerations let you enjoy this dish within various eating plans, making it adaptable for those monitoring caloric intake or specific macronutrient goals.
Portion analysis is recommended to ensure balanced servings are enjoyed, catering to both light eaters and those needing more sustenance, providing versatility for different appetites.
Weight management tips include opting for lean protein and increasing vegetable intake to help with feelings of fullness while enjoying a flavorful dish that satisfies.
Dietary Adaptations
For gluten-free adaptations, simply replace soy sauce with gluten-free tamari or coconut aminos, allowing those with dietary restrictions to savor the flavors without concern.
For a dairy-free version, ensure no dairy products are used in the chicken preparation or dressing, keeping it aligned with lactose-free dietary needs.
Consider a vegan adaptation by substituting chicken with plant-based proteins like tofu or tempeh, ensuring you use vegan sauces and dressings.
A low-carb approach can be achieved by avoiding sugar in the dressing and incorporating additional fiber-rich vegetables, enhancing the salad’s nutritional profile.
Keto dieters might find this salad appealing with its high protein and low carb content, perfect for satisfying cravings without compromising dietary goals.
Paleo enthusiasts can enjoy the unprocessed components of this salad, allowing for a healthy, whole food option that aligns with their eating principles.
Low-FODMAP adaptations may require careful ingredient selection, particularly in the dressing; omit high-FODMAP ingredients to ensure suitability for affected individuals.
Troubleshooting Guide
For texture issues, ensure the chicken is not overcooked; if it is tough or dry, try brining next time to retain moisture.
Flavor balance can be adjusted by balancing salt and acidity levels—if the salad tastes flat, a splash of vinegar or citrus can bring flavors back to life.
Temperature problems arise if the chicken is too hot when mixed; ensure it cools slightly before adding to keep the salad crisp instead of wilting.
Equipment challenges can occur if your kitchen tools are insufficient—investing in a good knife will make chopping more efficient, maintaining consistent vegetable sizes.
Ingredient substitutions may result in unexpected flavors; stick close to suggested swaps for the most harmonious results.
Timing concerns may create challenges when everything should be served fresh—prepare components ahead but mix just before serving to maintain quality.
Recipe Success Stories
Community feedback highlights how adaptable this dish is, with many users customizing ingredients based on personal preferences or what they have on hand. It’s great to see families swapping in their favorites and creating new traditions.
Variation successes include converting this salad into a wrap; readers have reported delicious results using the salad fillings to embody flavor-packed wraps for lunch.
Adaptation stories also showcase how this recipe works well as meal prep; many find it holds up wonderfully throughout the week, making it a staple in their kitchens.
Reader suggestions have emphasized the benefits of adding fruits like apples or mandarin oranges to the salad, improving both sweet and savory elements significantly.
Photography tips are shared amongst readers, showcasing how vibrant colors of this dish can be best captured with natural light, enhancing its visual appeal for social media.
Frequently Asked Questions
Can I make this salad ahead of time? Yes, you can prepare the veggies and dressing in advance, but it’s best to mix them just before serving to maintain freshness and texture.
What can I substitute for the chicken? Tofu, tempeh, or chickpeas work well as alternative proteins, making this dish vegetarian or vegan-friendly.
How long does this salad last in the fridge? It’s best consumed within three days for optimal freshness.
Can I use different vegetables? Absolutely! Feel free to adapt the recipe to include your favorite crunchy veggies like peppers or radishes.
Is this dish gluten-free? It can be made gluten-free by using gluten-free tamari instead of regular soy sauce.
What’s the best way to store leftovers? Store any remaining salad in an airtight container in the fridge for up to three days, but keep the dressing separate if possible.
Can I freeze the salad? Freezing is not recommended, as the vegetables will lose their crispness once thawed.
How spicy is the dish? The spice level mainly depends on the amount of ginger used; feel free to adjust according to your preference.
What kind of sesame oil should I use? Toasted sesame oil is ideal for added flavor, but regular sesame oil can also work.
Can I add other proteins? Certainly! Grilled shrimp, seared beef, or even hard-boiled eggs can make great additions to this salad.
How do I make the dressing my own? Customize the dressing by adding ingredients like honey, mustard, or citrus for varied flavor profiles.
Is there a low-carb version of this salad? Yes, avoiding sugar and utilizing low-carb vegetables can easily create a low-carb version of the salad.
Additional Resources
For further exploration, check out related recipes that emphasize fresh vegetables and light dressings for additional meal ideas. Classic summer salads and Asian-inspired dishes can complement the Ginger Sesame Chicken Coleslaw Salad, broadening your culinary repertoire.
Technique guides focusing on knife skills, mixing sauces, and preparing proteins can enhance your overall cooking talents, making meal preparation easier and more enjoyable.
Ingredient information about sesame and ginger can deepen your understanding of their nutritional benefits and culinary uses, allowing you to incorporate them more creatively in your meals.
Equipment recommendations might include high-quality knives, mixing bowls, and storage containers to elevate your cooking experience, ensuring you are well-prepared for any recipe.
Lastly, seasonal variations can guide you to adapt the dish based on what’s available at farmers’ markets or grocery stores, embracing whatever is fresh and delicious.
Join the Conversation
Engagement on social media provides a platform where both photography enthusiasts and home cooks can share their creations. Consider using dedicated hashtags to connect with others who enjoy similar recipes.
Photography tips encourage experimentation with natural lighting, staging, and unique angles that highlight the vibrant colors in dishes like this salad. Sharing these photos not only boosts engagement but also inspires others to try the recipe.
Recipe reviews are valuable for both community building and helping others decide whether to try a dish. Sharing personal experiences, adaptations, or celebrations around the recipe can amplify its presence and encourage usage.
Community engagement around popular dishes enhances the overall experience, allowing you to foster a network of fellow cooking enthusiasts who share their successes and suggestions.
Encouraging recipe variations among readers sparks creativity and showcases how the Ginger Sesame Chicken Coleslaw Salad can act as a base for exploration and culinary adventure.
The Recipe
Ginger Sesame Chicken Coleslaw Salad
Serves: 4 Servings
Prep Time: 15 mins
Cook Time: 10 mins
Total Time: 25 mins
Kitchen Equipment Needed
Cutting board
Sharp knife
Mixing bowl
Whisk or fork
Measuring cups and spoons
Ingredients
2 cups shredded cabbage
1 cup shredded carrots
2 cups cooked chicken, diced
1/4 cup chopped scallions
1/4 cup sesame oil
1 tablespoon minced fresh ginger
2 tablespoons soy sauce
1 tablespoon rice vinegar
1 tablespoon honey (optional)
Sesame seeds for garnish
Directions
In a large mixing bowl, combine cabbage, carrots, chicken, and scallions.
In a small bowl, whisk together sesame oil, fresh ginger, soy sauce, rice vinegar, and honey until well combined.
Pour the dressing over the salad mixture and toss gently to combine.
Let the salad sit for about 10 minutes to allow flavors to meld.
Garnish with sesame seeds before serving.
Recipe Notes
Feel free to customize your salad with additional toppings such as nuts or seeds.
This dish can be made ahead of time; just remember to add the dressing right before serving.
Substitute any of the veggies based on your preference or seasonal availability.
Homemade Peanut Butter Christmas: A Festive Treat for All Ages
Homemade Peanut Butter Christmas treats are a delightful addition to your holiday celebrations. Whether it’s cookies, fudge, or peanut butter balls, these recipes bring a comforting flavor combination of peanut butter and chocolate to the festive season. Simple to make and perfect for gifting, they’re a versatile option for dessert spreads.
Why Homemade Peanut Butter Christmas Treats Are Perfect for the Holidays
The combination of peanut butter and chocolate is iconic, offering a nostalgic yet universally loved taste. These treats are not only delicious but also incredibly easy to prepare, making them ideal for holiday rush. If you’re looking for more festive ideas, check out Peanut Butter Blossoms for another peanut butter-inspired dessert.
With minimal ingredients and no baking required for many recipes, Homemade Peanut Butter Christmas treats are a go-to for anyone, even beginners. To master chocolate coating, visit How to Melt Chocolate Perfectly.
Ingredients for Peanut Butter Christmas Treats
Here’s what you’ll need:
Creamy Peanut Butter: The base for most recipes.
Powdered Sugar: Adds sweetness and structure.
Butter: Softens and binds the dough.
Vanilla Extract: Enhances flavor.
Chocolate Chips: For coating and decoration.
Sprinkles: Adds festive flair.
Optional add-ins include crushed nuts, Rice Krispies, or coconut flakes for unique variations. For more creative ideas, explore S’mores Jars for another crowd-pleasing dessert.
How to Make Peanut Butter Christmas Treats
1. Mix the Dough
Combine peanut butter, powdered sugar, and softened butter until smooth.
Adjust the consistency by adding more sugar if needed.
2. Shape and Chill
Roll into balls, spread on parchment-lined trays, and freeze for 15 minutes.
3. Coat with Chocolate
Melt chocolate chips using a double boiler.
Dip each ball into the melted chocolate, ensuring an even coat.
4. Decorate and Set
Add sprinkles or crushed candy canes before the chocolate hardens.
Let set in the refrigerator for at least 30 minutes.
Creative Variations
Crunchy Peanut Butter Balls: Mix in Rice Krispies for a crispy texture.
White Chocolate Drizzle: Use white chocolate for a decorative finish.
Festive Fudge: Layer peanut butter and chocolate fudge for a bar-style dessert.
Vegan Option: Substitute butter with coconut oil and use dairy-free chocolate.
Low-Sugar Treats: Replace sugar with erythritol or stevia.
Homemade Peanut Butter Christmas treats bring together simplicity, flavor, and festive cheer. Whether you’re making them for family, friends, or yourself, these easy recipes are a guaranteed hit. Start experimenting with different variations today and add your unique twist to these classic holiday desserts!
Deliciously Creamy Cheesy Pasta with Ground Beef Recipe
Creamy Cheesy Pasta with Ground Beef: A Comforting Delight
⚖️
Difficulty
Easy
⏲️
Prep Time
10 mins
🕒
Cook Time
20 mins
⏱️
Total Time
30 mins
🍽️
Servings
4 servings
The Creamy Cheesy Pasta with Ground Beef is a luscious dish that pleases both the palate and the heart. Picture a plate bursting with perfectly cooked pasta enveloped in a rich, creamy cheese sauce blended with seasoned ground beef. This recipe embodies comfort, making it a fantastic choice for busy weeknights or family gatherings. The melding of flavors—from the savory beef to the melted cheese—creates a dish that’s enticing and hearty.
Imagine the aroma wafting through your kitchen, a blend of fresh garlic, melting cheese, and sizzling beef. It’s a fragrance that promises a meal of indulgence and warmth. The beautiful golden color of the creamy sauce, when drizzled over the pasta, adds a visual feast to the plate, making it irresistible. Each forkful delivers a creamy texture that coats every piece of pasta, inviting seconds before the first plate is even finished.
Quick Recipe Highlights
Flavor Profile: The rich cheese melds beautifully with the savory taste of seasoned ground beef, creating a harmonious blend that excites the taste buds.
Texture: Each bite offers a creamy mouthfeel with a hint of chewiness from the pasta and a slight crunch from any added fresh herbs or toppings.
Aroma: The combination of sautéed garlic and onion with the warm scent of melted cheese fills your kitchen with an inviting fragrance.
Visual Appeal: The dish boasts a golden cheesy sauce that beautifully contrasts with the hearty beef, creating an appetizing look that’s sure to impress.
Skill Level Needed: This recipe is perfect for beginners and experienced cooks alike, with simple steps that yield impressive results.
Special Equipment: A large pot for cooking pasta and a skillet for sautéing the beef and preparing the creamy sauce are essential.
Recipe Overview
Difficulty Level: Creamy Cheesy Pasta with Ground Beef is an easy recipe, making it perfect for those new to cooking. The steps are straightforward, and the process is forgiving for beginners.
Category: This dish falls into the comfort food category, embodying warmth and satisfaction, perfect for family dinners or casual gatherings.
Cuisine: This recipe draws inspiration from Italian-American cuisine, famously known for its cheesy pasta dishes that combine hearty ingredients.
Cost: The ingredients are affordable and easy to find, making this a budget-friendly meal for families or small gatherings.
Season: While delightful any time of year, this dish shines in the cooler months when comfort food is most sought after.
Occasion: Ideal for a cozy family dinner, potluck gatherings, or even a weekday treat after a long day.
Why You’ll Love This Recipe
The creamy, cheesy texture combined with the savory flavor of ground beef offers an irresistible taste experience. Each bite melts in your mouth, making it a delightful meal that comforts and satisfies. The familiarity of pasta topped with a rich, cheesy sauce brings a nostalgic feeling that many love.
Another reason to adore this recipe is its convenience. The ingredient list is straightforward, the preparation is quick, and the cooking time is short. This allows busy individuals and families to whip up a delicious meal without spending all evening in the kitchen.
Nutritionally, this dish provides a good balance of proteins and carbohydrates, making it a filling option for any meal. You can add vegetables like spinach, peas, or bell peppers to sneak in some extra nutrients without sacrificing flavor.
Socially, it’s a fantastic dish for entertaining. Its wide appeal means it’s likely to please a crowd, making it a go-to for potlucks and gatherings. The comfort of creamy pasta paired with hearty ground beef creates a warm, inviting atmosphere at any table.
Lastly, the cost-effectiveness of this recipe cannot be ignored. Most ingredients are pantry staples, meaning you won’t have to spend a lot to create a hearty, delicious meal that feels indulgent without breaking the bank.
Historical Background and Cultural Significance
The origins of creamy pasta dishes can be traced back to Italy, where pasta is a dietary staple. Italian immigrants brought their pasta-making skills to America, adapting traditional recipes with locally available ingredients. This fusion gave rise to comfort food favorites, including our Creamy Cheesy Pasta with Ground Beef.
Culturally, pasta serves as a universal symbol of gathering and family. In Italy, meals are often celebrations centered around sharing food with loved ones. This recipe evokes similar sentiments, making it perfect for family dinners and communal occasions.
Over the years, the recipe has evolved, incorporating various ingredients and flavors based on regional preferences. While some prefer the classic version, many have adopted personal touches that enhance the dish’s uniqueness.
Regional variations have emerged, showcasing different types of cheese and meat. While ground beef is a favorite, some regions prefer sausage or even turkey, allowing for creativity in the kitchen and making this dish adaptable to personal tastes.
Ingredient Deep Dive
– **Pasta**: A staple in many cuisines, pasta has a rich history dating back thousands of years. Different types can alter the dish’s character, with shapes like penne or rotini providing distinct textures. For storage, keep pasta in a cool, dry place, and consider whole grain options for added fiber.
– **Ground Beef**: This versatile protein offers a savory flavor that beautifully complements the creamy sauce. Choose lean ground beef for a healthier option, and remember to store it in the refrigerator and use it within a couple of days, or freeze it for longer storage. Substitutions like turkey or plant-based ground meat can cater to various dietary preferences.
Common Mistakes to Avoid
Overcooking the pasta can lead to a mushy texture; always cook it al dente for the best results.
Not seasoning the ground beef adequately can result in bland meat, so don’t skimp on the salt and pepper.
Rushing the sauce preparation will prevent the flavors from fully melding, so take your time.
Using low-quality cheese can affect the creaminess of the dish; opt for freshly grated cheese for the best melt.
Overcrowding the skillet can lead to uneven cooking; cook in batches if necessary.
Skipping the pasta water when mixing can prevent the sauce from adhering well to the pasta, so reserve some before draining.
Not tasting the dish before serving can lead to unbalanced flavors; adjust seasoning as needed.
Forgetting to mix in any additional veggies reduces the nutritional value without enhancing the meal.
Essential Techniques
To perfect your creamy sauce, start with a roux made from butter and flour. This thickening agent is crucial for achieving the desired creaminess. Always whisk continuously to avoid lumps and ensure a smooth sauce. Cooking it gently is key to preventing burning and developing off-flavors.
Additionally, when browning ground beef, ensure it’s cooked evenly. Use a good-quality skillet over medium heat and break the meat into small pieces for consistent cooking. This also helps to develop depth of flavor through caramelization, enhancing the overall taste of the dish.
Pro Tips for Perfect Creamy Cheesy Pasta with Ground Beef
– Use freshly grated cheese instead of pre-packaged to enhance creaminess and flavor.
– Reserve some pasta water to adjust the sauce’s consistency when combining.
– Experiment with different cheeses for unique flavors; try blending mozzarella with cheddar for a delicious twist.
– Incorporate sautéed vegetables to add color and nutrition without altering the core recipe.
– For extra depth, consider adding a splash of white wine to the skillet after browning the beef.
– Don’t skip the garlic and onion; they are essential for building flavor in the dish.
– Allow the assembled dish to sit for a minute before serving to let the flavors meld.
– Garnish with fresh herbs like parsley or basil for a bright finish.
Variations and Adaptations
For those looking to customize, consider integrating seasonal ingredients such as fresh spinach or cherry tomatoes. These additions not only enhance flavor but also boost the nutritional profile. For a lighter option, swap ground beef for ground turkey or chicken, providing a deliciously lean substitute.
Additionally, vegetarians might appreciate a version featuring sautéed mushrooms and lentils for heartiness without meat. For a spicy kick, adding crushed red pepper or jalapeños to the sauce can elevate the dish, appealing to those who enjoy heat.
Texture modifications can also accommodate personal preferences; try adding crushed crackers to the top before baking for an added crunch. Lastly, experiment with presentation by serving the pasta in individual dishes garnished with fresh herbs or a sprinkle of grated cheese for an elegant touch.
Serving and Presentation Guide
Plating this dish beautifully adds to its appeal. Use shallow bowls to showcase the creamy sauce with pasta. Garnish with a combination of fresh herbs and a sprinkle of cheese to enhance visual appeal. To elevate your serving style, consider offering a side of garlic bread or a fresh salad to accompany the dish.
Temperature is key; serve immediately when the pasta is hot and creamy. Portion control is also important; serve in moderate portions to allow guests to enjoy seconds without overwhelming their plates. This makes for a refined dining experience when entertaining.
Wine and Beverage Pairing
Pairing this creamy pasta dish with the right beverage can enhance the dining experience. A crisp white wine, such as a Sauvignon Blanc, complements the creamy richness of the dish beautifully. Alternatively, a light-bodied red like Pinot Noir balances the flavors without overpowering the meal.
For those opting for non-alcoholic options, consider serving sparkling water with a slice of lemon for a refreshing contrast. A chilled herbal tea could also work well, especially in warmer months. Ensure all beverages are served at the appropriate temperatures to complement the dish effectively.
Storage and Shelf Life
To store leftovers, cool the dish completely before transferring it to an airtight container. This keeps flavors fresh while extending the shelf life. Refrigerated, it should last up to three days. For longer storage, consider freezing portions in freezer-safe containers for up to three months.
When reheating, a microwave works well for single portions, while using the stovetop preserves texture for larger quantities. Always check for signs of spoilage, such as an off smell or noticeable texture changes, before consuming.
Make Ahead Strategies
To streamline cooking, prep the ingredients beforehand. Chop vegetables, grate cheese, and brown the ground beef a day in advance. Storing them separately allows for quick assembly on the day of serving.
You can also prepare the sauce in advance. Simply reheat it on the stovetop and stir in the cooked pasta right before serving for a freshly made taste. Reheating at a low temperature helps maintain the dish’s creaminess, avoiding separation.
Scaling Instructions
When scaling this recipe, consider adjustments based on the number of servings desired. For halving the ingredients, simply divide each by two, ensuring you also check the seasoning levels as you adjust.
To double or triple the recipe, maintain proportions, but take care with cooking times. For such larger quantities, you may need to prepare in batches or utilize larger pots and pans. Furthermore, if storing, follow the same refrigeration or freezing guidelines as for the original recipe.
Nutritional Deep Dive
This creamy pasta dish is balanced in macronutrients, offering a good source of protein from the ground beef and carbohydrates from the pasta. Each serving provides essential energy and satisfaction, making it a perfect meal choice for any occasion.
Micronutrient analysis shows that adding vegetables can significantly enhance vitamins and minerals. Consider this when planning or preparing the dish. It’s also important to analyze portion sizes and calories to manage dietary needs effectively.
Dietary Adaptations
For a gluten-free version, swap traditional pasta for gluten-free varieties made from rice or lentils. This maintains the dish’s integrity without sacrificing taste. For a lighter option, consider using zucchini noodles or spaghetti squash.
Dairy-free individuals can experiment with cashew cream or almond milk for the sauce, achieving a similar creaminess without traditional dairy. Those on a keto diet might enjoy substituting the pasta with shirataki noodles to reduce carbohydrates while enjoying the dish’s flavors.
Troubleshooting Guide
If the sauce is too thick, gradually stir in reserved pasta water to achieve the desired consistency. If under-seasoned, taste and adjust with more salt, pepper, or herbs. For overly salty flavors, adding a splash of cream or additional cheese can help balance the taste.
In the event of pasta clumping together, ensure it is cooked in plenty of salted water and stirred frequently. If the sauce separates, reheat gently while stirring to bring it back together. Always taste and adjust along the cooking process to prevent common cooking pitfalls.
Recipe Success Stories
The Creamy Cheesy Pasta with Ground Beef has garnered praise from families who appreciate its comforting flavors. Many share how their children eagerly finish their plates, making it a go-to weeknight meal that satisfies everyone.
Readers often highlight how easy it is to customize the recipe, with some successfully incorporating seasonal vegetables or experimenting with different spices to create their unique variations. These adaptations often lead to delightful discoveries that enhance the recipe’s appeal.
Food photography tips have also emerged, with many readers excitedly posting their beautifully plated dishes. Vibrant garnishes and careful plating techniques enhance the dish’s visual appeal, inviting others to try it for themselves.
Frequently Asked Questions
Can I use a different type of meat?
Yes, ground turkey, chicken, or even vegetarian options like lentils can be used as substitutes. Each will bring its unique flavor and texture to the dish.
How do I store leftovers?
Allow the dish to cool completely before placing it in an airtight container. It will last in the fridge for up to three days or can be frozen for up to three months.
Can I make this dish ahead of time?
Absolutely! Prepare the sauce and cook the pasta ahead of time, then store them separately in the fridge. Combine them just before serving to retain freshness.
What type of cheese works best?
Sharp cheddar and mozzarella are popular choices for this dish. Feel free to mix different cheeses for a more complex flavor profile.
How can I make it spicy?
Adding crushed red pepper flakes or diced jalapeños to the sauce can infuse it with heat. Adjust according to your preference for spice.
Is this recipe suitable for meal prep?
Yes, it’s a great option for meal prep! Prepare larger batches, and portion them out for quick lunches or dinners throughout the week.
What sides pair well with this pasta?
A simple side salad, garlic bread, or steamed vegetables complement the creamy pasta nicely and offer balance to the meal.
Can I freeze this dish?
Yes, you can freeze it. Just ensure it cools completely and is stored in freezer-safe containers. Thaw in the refrigerator before reheating.
How do I reheat leftovers?
You can reheat it in the microwave or on the stovetop over low heat. If it’s too thick, add a splash of milk or reserved pasta water.
What if the sauce is too thick?
If you find the sauce too thick, gradually mix in reserved pasta water or a bit of cream to achieve the desired consistency.
Are there any good vegetarian alternatives?
Yes, replace meat with a mix of sautéed vegetables and plant-based proteins like mushrooms or lentils to create a hearty vegetarian version.
Additional Resources
If you enjoyed this Creamy Cheesy Pasta with Ground Beef, you may also appreciate related recipes. Try our Spinach and Ricotta Stuffed Shells for another cheesy delight. Explore our technique guides on making homemade pasta or perfecting macaroni and cheese.
For ingredient-specific information, check out our deep dives on cheeses or cooking meats. Looking for seasonal variations? Consider fresh summer vegetables mixed into your pasta for a delightful twist.
Join the Conversation
I invite you to share your experiences with this Creamy Cheesy Pasta recipe! Post your unique spins on the dish on social media, tagging us for a chance to be featured.
Photography enthusiasts can share tips on capturing the perfect plated dish to inspire others. Your reviews and comments create a community of food lovers who can learn from each other’s successes and challenges with this recipe!
The Recipe
Creamy Cheesy Pasta with Ground Beef
Serves: 4 servings
Prep Time: 10 mins
Cook Time: 20 mins
Total Time: 30 mins
Kitchen Equipment Needed
Large pot
Skillet
Wooden spoon
Colander
Measuring cups and spoons
Ingredients
8 oz pasta (such as penne or rotini)
1 lb ground beef
2 cups shredded cheese (cheddar or mozzarella)
1 cup heavy cream
1/2 cup chopped onion
2 cloves garlic, minced
Salt and pepper to taste
Fresh herbs for garnish (optional)
Directions
Boil salted water in a large pot and cook pasta according to package instructions until al dente. Drain and set aside.
In a skillet, brown the ground beef over medium heat. Add onion and garlic, cooking until softened.
Reduce heat, then stir in heavy cream and cheese until melted and combined. Season with salt and pepper.
Fold in the cooked pasta, ensuring all pasta is well coated in the sauce. Adjust seasonings as needed.
Serve hot, garnished with fresh herbs if desired.
Recipe Notes
Experiment with different cheeses for varied flavors.
Add vegetables like spinach or bell peppers for added nutrition.
Substitute ground beef with ground turkey or a plant-based alternative for dietary preferences.
Soft Sprinkle Cookies: Easy, Chewy, and Fun for Any Occasion
Soft Sprinkle Cookies: The Ultimate Chewy and Colorful Treat
Soft Sprinkle Cookies are a delightful, easy-to-make treat perfect for holidays, parties, or just satisfying a sweet tooth. These cookies, known for their buttery flavor and melt-in-your-mouth texture, are a hit among kids and adults alike. Their colorful sprinkles make them visually appealing and fun for any occasion.
Why Soft Sprinkle Cookies Are a Crowd Favorite
The versatility of Soft Sprinkle Cookies makes them a go-to dessert. Whether you’re baking for a birthday party or a cozy weekend, these cookies are always a hit. For more festive cookie ideas, explore Peanut Butter Blossoms, another timeless favorite.
Soft Sprinkle Cookies are incredibly easy to customize. You can swap out sprinkles for chocolate chips, add a hint of citrus zest, or even make them gluten-free. For tips on achieving perfect cookie dough, visit How to Achieve Perfect Cookie Dough.
Ingredients for Soft Sprinkle Cookies
Here’s what you’ll need:
All-Purpose Flour: The base of the dough.
Unsalted Butter: Adds richness and softness.
Granulated Sugar: Sweetens and helps achieve the chewy texture.
Egg: Binds the dough together.
Vanilla Extract: Enhances flavor.
Sprinkles: Choose jimmies for the best baking results.
For seasonal themes, swap rainbow sprinkles for holiday-colored ones. For more creative ideas, explore S’mores Jars for a layered dessert option.
Step-by-Step Recipe Guide
1. Prepare the Dough
Cream butter and sugar until fluffy.
Add egg and vanilla extract, mixing well.
Gradually mix in the flour and baking powder until combined.
2. Incorporate the Sprinkles
Gently fold in half the sprinkles, reserving the rest for decoration.
3. Bake the Cookies
Roll the dough into balls, coat them in the remaining sprinkles, and place them on a lined baking sheet.
Bake at 350°F for 10–12 minutes, ensuring the centers remain soft.
Creative Variations
Chocolate Sprinkle Cookies: Add cocoa powder for a chocolaty twist.
Seasonal Cookies: Use themed sprinkles for Christmas, Halloween, or Easter.
Gluten-Free Option: Substitute all-purpose flour with a gluten-free baking mix.
Citrus Infusion: Add lemon or orange zest for a refreshing flavor.
Tips for Perfect Soft Sprinkle Cookies
Refrigerate Dough: Chill the dough for 20 minutes for easier handling.
Avoid Overbaking: Remove cookies when edges are set, but centers are still soft.
Even Distribution: Roll cookies in sprinkles just before baking for a vibrant look.
FAQs
What makes the cookies soft?
The combination of butter, sugar, and slightly underbaking ensures a soft texture.
Can I freeze the dough?
Yes, freeze dough balls for up to 3 months and bake straight from frozen.
Can I make them vegan?
Use a flaxseed egg and dairy-free butter for a vegan-friendly version.
Are these cookies gluten-free?
They can be made gluten-free by substituting flour with a gluten-free mix.
What’s the best way to store them?
Store in an airtight container at room temperature for up to 5 days.
Internal Linking Opportunities
For readers interested in Soft Sprinkle Cookies, explore these related recipes from ExoRecipes:
Soft Sprinkle Cookies are a delightful addition to any dessert table. Their vibrant appearance, chewy texture, and customizable flavors make them a favorite for all ages. Start baking today and share these delicious treats with your loved ones!