Delicious Savory Pizza Tacos: A Unique Twist on Dinner

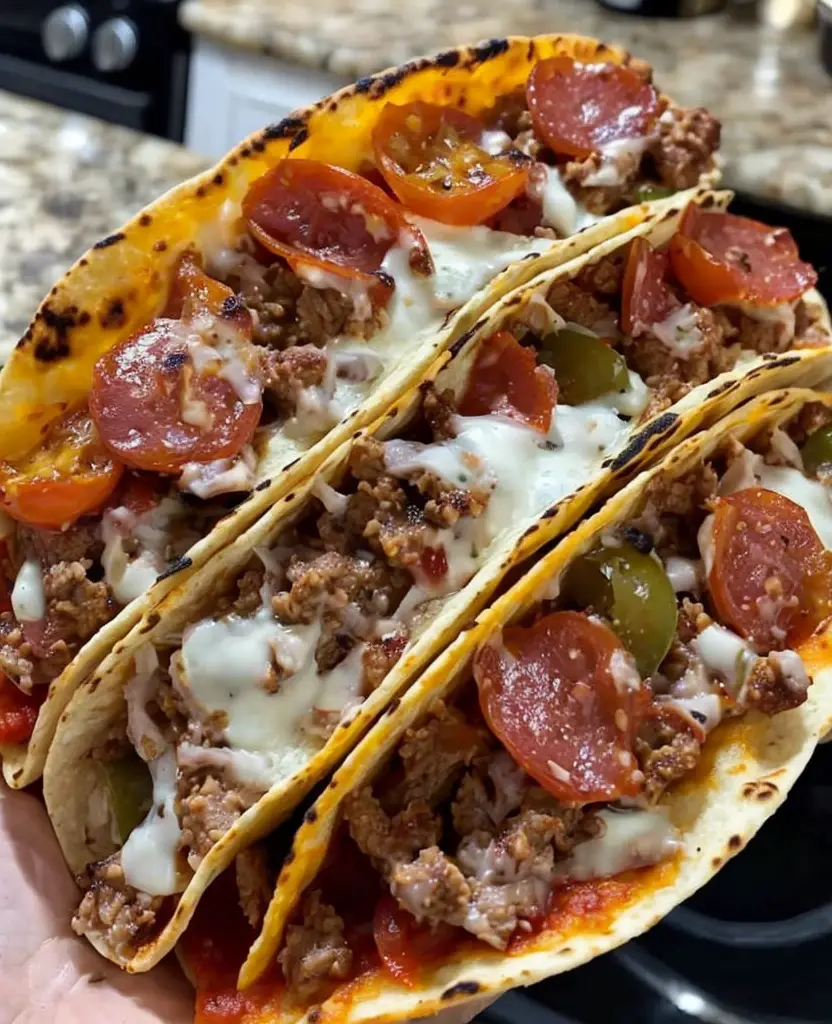
Savory Pizza Tacos Recipe: A Unique Twist on Two Classics

⚖️
Difficulty
Easy

⏲️
Prep Time
15 mins

🕒
Cook Time
10 mins

⏱️
Total Time
25 mins

🍽️
Servings
4

Pizza and tacos are two of the most beloved meals around the world. Imagine the combination of savory flavors, soft taco shells, and molten cheese encasing delicious toppings that tantalize your taste buds. Our Savory Pizza Tacos Recipe brings these two culinary staples together, creating a unique experience that is sure to please everyone at your dinner table. These pizza tacos are not only simple to prepare, but they also deliver a burst of flavor with every bite!

As you take your first bite of these savory pizza tacos, you’ll enjoy layering melt-in-your-mouth ingredients like spicy pepperoni, fresh vegetables, and rich mozzarella cheese. The warm, crispy taco shells act as the perfect vessel to hold all your favorite pizza toppings, making it a family-friendly dish that sparks smiles and appetites. Prepare to thrill your senses with a dish that’s both satisfying and fun to eat!

Quick Recipe Highlights

  • Flavor Profile: This recipe boasts a delightful mix of savory toppings, rich melted cheese, and the unique crunch of taco shells.
  • Texture: Enjoy the contrast of crispy taco shells with the gooey, melty cheese and tender toppings.
  • Aroma: The aroma of freshly baked tacos filled with savory meats and bubbling cheese is simply irresistible.
  • Visual Appeal: Vibrant colors from fresh vegetables and toppings make these tacos visually stunning.
  • Skill Level Needed: This dish requires minimal cooking skills; perfect for both beginners and seasoned chefs!
  • Special Equipment: You’ll only need a baking sheet and an oven to prepare these delightful tacos.

Recipe Overview

  • Difficulty Level: This recipe is easy to make, making it a great adventure for novice cooks looking to explore the kitchen.
  • Category: These savory pizza tacos can be categorized as a delightful main course, perfect for lunch or dinner.
  • Cuisine: Combining Italian and Mexican influences, this dish pays homage to the rich culinary traditions of both cultures.
  • Cost: Incredibly budget-friendly, this recipe utilizes easy-to-find ingredients that won’t break the bank.
  • Season: Ideal for any season, but these pizza tacos are especially perfect for summer gatherings and cozy winter nights.
  • Occasion: Suitable for casual family dinners, game nights, or even festive occasions with friends.

Why You’ll Love This Recipe

When it comes to feeding a crowd or satisfying picky eaters, the Savory Pizza Tacos Recipe is the perfect solution. Each bite offers a delightful balance of crispy taco shell and gooey cheese, which tantalizes the palate. The fun factor is undeniable—everyone can customize their taco with their favorite toppings, from spicy jalapeños to roasted red peppers.

The convenience of this meal is another of its appeal. With a prep time of just 15 minutes and a cook time of 10 minutes, you can whip up an impressive dish in no time. Additionally, you can use leftover ingredients from your fridge, reducing waste and ensuring a delightful taste.

From a nutritional perspective, this recipe is versatile. You can incorporate various vegetables, lean proteins, and whole grains, ensuring a balanced meal that fits your dietary preferences. Not only do these pizza tacos taste fantastic, but they also offer a nutritious option suitable for the whole family.

For social gatherings, these tacos bring people together. Set up a taco bar with different toppings, allowing friends and family to create their unique pizza tacos. This interactive meal fosters conversations and builds lasting memories as everyone showcases their creativity in the kitchen.

Cost-effective and accessible, there’s no need for exotic ingredients; most are available at your local grocery store. You can enjoy the rich flavors of pizza without the high restaurant price tag. The Savory Pizza Tacos Recipe proves that you don’t need to sacrifice taste for budget-friendly meals!

Historical Background and Cultural Significance

Pizza’s origins date back to Italy, where it began as a simple flatbread topped with olive oil and herbs before evolving into various styles worldwide. The taco, on the other hand, is a staple from Mexican cuisine, defined by its versatility filled with a myriad of ingredients like beans, meats, and vegetables. The combination of these two beloved dishes has created an exciting fusion meal that many enjoy.

The blending of pizza and tacos reflects a broader culinary trend that embraces multiculturalism. As food enthusiasts explore the world through their taste buds, they often seek innovative recipes that honor traditional flavors while being accessible and fun. The fusion of pizza tacos symbolizes this adventurous spirit, appearing in restaurants and home kitchens alike.

Over the years, the pizza taco has evolved, spawning various interpretations. From deep-fried variations to more health-conscious preparations, it’s clear that the pizza taco can be adapted to suit modern tastes without losing its essence.

Many regions in the United States have adopted this delicious fusion, making it a comfort food that resonates with multiple generations. Whether enjoyed casually on a weeknight or served at a party, pizza tacos have secured their place as a cherished dish in contemporary cuisine.

Ingredient Deep Dive

Taco Shells

Taco shells have rich cultural significance as a crucial aspect of Mexican cuisine. Traditionally made from corn, they serve as a base for countless fillings. Nutritionally, they provide carbohydrates, and when sourced from whole grains, they can offer added fiber. When selecting taco shells, look for those made without preservatives and aim for organic options if possible. Store them in a cool, dry place and consume them by the expiration date to ensure they maintain their crunch. If you prefer a healthier alternative, consider using lettuce wraps or whole grain tortillas.

Pizza Sauce

The pizza sauce is pivotal in defining flavor, often made from tomatoes, herbs, and spices. Historically rooted in Italian cuisine, pizza sauce offers a rich history and depth of flavor. Nutritionally, it’s a source of vitamins A and C due to the tomatoes. When choosing pizza sauce, look for brands that use high-quality tomatoes and avoid added sugars. Keep it refrigerated after opening, and it can last up to a week in the fridge. For a healthier option, consider making your sauce from scratch using fresh tomatoes.

Cheese

Cheese is an essential component of both pizza and tacos. Different types of cheese, such as mozzarella, cheddar, and queso fresco, can elevate any dish with their creamy textures and flavors. Cheese not only provides a rich source of calcium and protein but also plays a crucial role in the melting quality that makes pizza delicious. Opt for freshly grated cheese for best results, and store it in the refrigerator, ensuring it stays sealed to avoid spoilage.

Vegetables

Vegetables add freshness, flavor, and nutrients to pizza tacos. Ingredients like bell peppers, onions, and olives are common choices that provide a variety of vitamins and minerals. Incorporating fresh veggies into your meals is a great way to enhance flavor and contribute to a balanced diet. For selection, choose vibrant and crisp vegetables, and store them in the fridge in breathable bags for longevity.

Meats

When it comes to proteins, consider using options like pepperoni, chicken, or ground beef to create a heartier taco. These ingredients not only boost the protein content but add a savory dimension. As a tip, opt for lean meats to keep the dish healthy. Ensure to store meats in the fridge or freezer, and always check for sell-by dates to avoid spoiling.

Common Mistakes to Avoid

  • Using stale taco shells can lead to a disappointing texture. Always check for crispiness before starting.
  • Overloading tacos with toppings can cause the shell to break. Aim for a balanced filling to keeping your taco intact.
  • Not letting the cheese melt sufficiently can result in a less-than-appealing experience. Be sure to bake until bubbly!
  • Using cold ingredients straight from the fridge can prevent the proper melting of cheese. Let toppings come to room temperature before assembling.
  • Choosing high-sodium sauces can overpower the taco’s flavoring. Always opt for low-sodium or homemade sauces whenever possible.
  • Skipping the preheating of your oven can lead to uneven cooking. Always preheat for optimal results.
  • Ignoring personal preference while making toppings can make the dish less enjoyable. Customize according to your taste!
  • Focusing solely on one flavor profile can make the meal boring. Use diverse toppings for a burst of flavor.
  • Not storing the ingredients properly before assembling can lead to spoilage. Always refrigerate perishables.
  • Not allowing sufficient cooling time after baking can burn mouths. Give your tacos a few minutes to cool!

Essential Techniques

Assembling the Taco

The technique of properly assembling the taco is essential for balance. Layer cheese first to create a barrier between the shell and toppings; this prevents sogginess. Aim to disperse ingredients evenly to ensure a delightful experience in every bite.

Baking for Melting

Baking the assembled pizza tacos allows the cheese to reach perfect gooeyness. Preheat your oven for consistent heat distribution. Visual cues for success include bubbling cheese and crispy edges of taco shells.

Flavor Balancing

Combining various ingredients ensures a well-rounded flavor profile. Balance savory, sweet, and spicy elements in topping choices, such as pairing spicy pepperoni with sweeter sautéed onions, to create depth.

Chopping Vegetables

Proper chopping techniques enhance the taco’s texture and visual appeal. Dice vegetables uniformly to ensure even cooking and prevent large chunks that may disrupt flavors in the taco.

Pro Tips for Perfect Savory Pizza Tacos

1. Experiment with different sauces like pesto or Alfredo for a unique flavor twist.
2. Use fresh herbs like basil or cilantro to elevate taste and presentation.
3. Opt for fresh dough for a homemade taco shell experience; it’s simpler than you think!
4. Incorporate whole grain or low-carb tortillas for a healthier option.
5. Bake tacos in a stand-up position to get all sides crispy.
6. Add a layer of cheese both inside and on top of the toppings for extra indulgence.
7. Garnish with fresh greens before serving for visual appeal.
8. Allow time for prep; a taco bar can be a fun, interactive experience for guests.

Variations and Adaptations

For a twist on the classic Savory Pizza Tacos, consider preparing a barbecue chicken version. Shredded chicken mixed with barbecue sauce delivers a smoky flavor that pairs beautifully with cheddar cheese and fresh cilantro, creating a something special!

For a seasonal adaptation, incorporate fall flavors by using roasted butternut squash with sage and ricotta cheese as a filling. This variation brings an earthy sweetness that is perfect for cozy nights.

For dietary modifications, try a vegan approach by utilizing plant-based cheese and filling taco shells with sautéed veggies and beans. This adaptation ensures everyone can enjoy a pizza taco, regardless of dietary preferences.

Consider flavor variations by adding spice! Incorporating spicy jalapeños or sriracha sauce can elevate the heat level for those craving extra kick. Alternatively, for a comforting touch, top the tacos with creamy ranch dressing.

For texture modifications, consider adding crunchy toppings like crushed tortilla chips or fried onions for contrast against the melty cheese and soft tortillas.

Lastly, presentation alternatives can elevate the appeal. Use colorful eye-catching bowls for toppings and serve tacos on wooden boards for rustic charm at your gathering.

Serving and Presentation Guide

To achieve visually stunning tacos, consider using contrasting colors for ingredients. Preparing your toppings in small colorful bowls not only makes a vibrant presentation but encourages guests to customize their servings.

Incorporate garnishing ideas such as freshly chopped herbs sprinkled on top or a drizzle of sauce to add a pop of color. Consider garnishing with lime wedges to offer guests the option to enhance their tacos with a citrus touch.

For traditional accompaniments, pair these tacos with classic salsa, guacamole, or sour cream on the side. These elements not only add flavor but also enhance the presentation with contrasting colors and textures.

For modern serving suggestions, consider cutoff taco holders to keep tacos upright during serving. This option not only provides ease of access but also adds height to your table setup.

Temperature considerations are important; serve pizza tacos immediately after removing them from the oven for the best experience. Maintain the warmth of your ingredients with warming trays or by keeping them in a low oven.

Finally, keep portion control in mind, especially at gatherings. Offering mini taco shells or allowing guests to assemble their own creates a fun, interactive atmosphere while allowing for moderation in serving sizes.

Wine and Beverage Pairing

When it comes to wine pairings, a fruity red like a Chianti or a light sparkling wine complements the savory flavors beautifully. These wines refresh the palate and enhance the richness of the cheese.

For non-alcoholic options, consider serving iced tea or a fresh fruit soda, which mirrors the flavor profile and offers a refreshing contrast to the savory elements of the taco.

If you’re looking to pair coffee or tea, a robust cup of dark roast coffee could provide a rich complement to your meal, while a herbal tea can promote a soothing finish.

Temperature considerations for beverages are essential; serve whites chilled and reds slightly below room temperature for optimal enjoyment. Be sure to present non-alcoholic beverages in fun glasses to enhance the dining experience visually.

Storage and Shelf Life

To store leftover pizza tacos, keep them in an airtight container in the refrigerator for up to three days. For optimal quality, consume them within the first 24 hours.

When it comes to reheating, use an oven or air fryer to restore the taco’s crispiness. Avoid using the microwave as it may result in soggy taco shells.

For longer-term storage, consider freezing individual components rather than fully assembled tacos. Taco shells can stay fresh for up to three months in the freezer, while filling ingredients must be stored properly to avoid freezer burn.

Check for signs of spoilage such as off-smells or mold before consuming any stored ingredients. Fresh ingredients are essential for maintaining the deliciousness of your tacos.

Make Ahead Strategies

To streamline your meal prep, consider making the filling a day in advance. Store it in the fridge to allow flavors to meld, making the assembly of tacos quicker when you’re ready to cook.

When prepping taco shells, it’s effective to bake them ahead and store them in a sealed container to maintain crispness throughout the day. Just reheat briefly in the oven before serving.

Assemble your ingredients but store them separately until serving to maintain temperature and texture integrity. This method also allows your guests to personalize their tacos on the spot.

For quality maintenance, assess which components hold up well when stored ahead and which need to be added fresh at serving.

Finally, when reheating, give guests guidelines on options for adding fresh elements, such as herbs or cheeses, to ensure a delightful taco experience.

Scaling Instructions

When halving the Savory Pizza Tacos Recipe, ensure to adjust ingredient portions accordingly to maintain flavor balance. For sous-vide precision, halve cooking times where applicable.

Doubling or tripling the recipe requires understanding batch cooking. Fill ingredients should remain consistent, but the time can slightly increase, especially if cooking multiple trays at once.

Be prepared to adjust equipment sizes, including using larger baking sheets or multiple trays, to ensure even cooking when scaling up.

Keep an eye on additional timing considerations when scaling your recipe. Monitoring the doneness for larger batches is essential, and rotating trays halfway through can ensure even cooking.

In all cases, storage considerations remain important. Ensure that the method of scaling fits your storage capacity, especially when dealing with freezer space.

Nutritional Deep Dive

When analyzing the macro breakdown of pizza tacos, you’ll find they can be balanced in carbohydrates, proteins, and fats. Focus on incorporating lean proteins and adding healthy fats through avocado or cheese for nutritional benefits.

The micronutrient analysis reveals that using fresh vegetables can enhance vitamin intake significantly. Combining diverse ingredients enhances the nutrient profile and supports overall health.

For health benefits, consider using whole grain shells and leaner meats to support weight management while still enjoying a delicious meal.

When evaluating portion analysis, ensure that servings provide a satisfying experience without excessive calorie consumption. Adjust ingredients to suit individual dietary needs while maintaining flavor.

Mindful eating practices for portion control can help ensure enjoyment of the dish while preventing overindulgence.

Dietary Adaptations

To achieve a gluten-free version, opt for corn tortillas instead of traditional taco shells. Be sure to check for gluten-free labels on any sauces or processed ingredients.

For dairy-free nutrition, consider using cashew cheese or nutritional yeast as a substitute for cheese, maintaining flavor without compromising dietary restrictions.

For vegan adaptations, replace meat with beans or lentils and enhance protein with quinoa or nuts, creating a delicious and satisfying option for those following plant-based diets.

Maintain low-carb goals with cheese taco shells, which can be baked to form crunchy vessels without traditional carbs, perfect for those adhering to Keto or Paleo lifestyles.

For hearty meals without FODMAPs, avoid using onions and garlic. Instead, use safe-level vegetables such as kale or carrots.

Troubleshooting Guide

If you encounter texture issues, such as soggy taco shells, ensure that you allow for proper drainage of ingredients before assembling. This simple step can significantly enhance the final texture.

Adjusting flavor balance is crucial; if overly salty, consider adding acidic elements like vinegar or citrus to counteract. Testing spices gradually can also maintain balance.

For temperature problems, make sure to preheat your oven adequately; an unheated oven can result in uneven cooking. Regular checks throughout the baking process can also help avoid overcooking.

If particular equipment challenges arise, such as sticking taco shells, consider using parchment paper on baking sheets to create a non-stick surface.

To address timing concerns, utilize a kitchen timer to aid in keeping track of cooking periods. This ensures food is cooked just right, preventing potential mishaps.

Recipe Success Stories

Community feedback on our Savory Pizza Tacos has been overwhelmingly positive! Readers have highlighted the joy of creating pizza tacos as a family activity, bringing kids into the kitchen for assembly.

Variation successes have also emerged; some have shared their creative takes, opting for unusual fillings like Thai-inspired chicken or Mediterranean flavors with feta and olives.

Reader suggestions for topping combinations have proven helpful—everyone has a unique take that inspires creativity in others, creating a buzz around this dish.

Additionally, photography tips from the community have elevated the visual presentation of the tacos; plating ideas have shown just how beautiful these fusion creations can be.

Social shares of friends and family enjoying these tacos have helped spread the word about the joy of this recipe, ensuring it finds a permanent place in kitchens far and wide.

Frequently Asked Questions

Can I make Savory Pizza Tacos ahead of time? Yes, you can prepare the filling in advance and store it in the refrigerator for up to a day. Assemble the tacos right before baking for the best texture and flavor.

Can I freeze leftover pizza tacos? Yes, it’s best to freeze the filling separately from the taco shells. You can assemble them later for fresh-tasting tacos.

What can I substitute for taco shells? Lettuce wraps or whole grain tortillas can be suitable substitutes for those seeking a low-carb option.

What are some popular toppings for pizza tacos? Classic toppings include pepperoni, bell peppers, olives, and fresh herbs like basil or cilantro, but feel free to get creative!

Is this recipe suitable for children? Absolutely! The interactive nature of assembling tacos makes it a fun meal for kids, all while letting them customize their flavors.

Can I use store-bought pizza sauce? Yes, store-bought pizza sauce works well for this recipe. Opt for low-sodium varieties for a healthier choice.

How do I make this recipe vegan? Replace meat and cheese with plant-based options, such as beans, lentils, and dairy-free cheese alternatives.

What’s the best way to serve these tacos? Serve immediately after baking while warm, offering your favorite condiments on the side for a delightful taco bar experience.

How can I enhance the flavor of my taco filling? Consider marinating proteins or roasting vegetables with garlic, herbs, and spices to boost their flavor before assembling your tacos.

Can I adjust the spice level in my pizza tacos? Definitely! You can add jalapeños, hot sauce, or spicy sausage to increase the heat according to your preference.

Additional Resources

If you loved making Savory Pizza Tacos, you’ll want to check out our related recipes that celebrate fusion cooking. Explore other dishes that blend international flavors, or dive into technique guides that specialize in taco assembly.

Ingredient information can help you learn how to spice up your tacos with seasonal vegetables or delve into the art of sauce making, ensuring that your next meal is just as exciting.

For kitchen equipment recommendations, consider needed tools that can simplify the cooking process and enhance your taco-making experience.

You might also find valuable tips on planning seasonal variations, adding fresh and vibrant ingredients that celebrate the flavors of similar dishes throughout the year.

Join the Conversation

We want to hear from you! Share your experiences making Savory Pizza Tacos on social media, and tag us in your delicious creations. Your photography tips and feedback can inspire others in the community to get cooking!

Join our forums to connect with fellow cooking enthusiasts, share recipe variations, and discuss the best taco toppings you’ve discovered along your culinary journey.

Leave a review on this recipe to let us know how your pizzas tacos turned out, and post pictures of your finished product to motivate others to try this delightful dish!

Get involved in our community and find inspiration from fellow food lovers. There’s so much to explore, and we can’t wait to see where your culinary adventures take you!

The Recipe

Savory Pizza Tacos

Serves: 4

Prep Time: 15 mins

Cook Time: 10 mins

Total Time: 25 mins

Kitchen Equipment Needed

  • Baking sheet
  • Oven
  • Mixing bowls

Ingredients

  • 8 taco shells
  • 1 cup pizza sauce
  • 2 cups shredded mozzarella cheese
  • 1 cup pepperoni slices
  • 1 cup bell pepper, diced
  • 1/2 cup onion, diced
  • Olive oil for drizzling
  • Fresh basil or cilantro for garnish

Directions

  1. Preheat your oven to 400°F (200°C).
  2. Arrange the taco shells on a baking sheet.
  3. Spread a spoonful of pizza sauce on the inside of each taco shell.
  4. Fill the shells with pepperoni, bell peppers, and onions.
  5. Top generously with shredded mozzarella cheese.
  6. Drizzle with olive oil for added flavor.
  7. Bake for 10 minutes or until the cheese is bubbling and slightly golden.
  8. Remove from the oven and garnish with fresh basil or cilantro before serving.

Recipe Notes

  • Feel free to customize your toppings based on personal preferences or dietary needs.
  • Experiment with different cheeses for varied flavors.
  • If you like a cheesy crust, add extra cheese on the edges of the taco shell before baking.

Easy Christmas Fudge Recipe: Perfect Holiday Treats to Gift

Christmas Fudge Recipe – Easy Holiday Treats to Gift

⚖️
Difficulty
Easy

⏲️
Prep Time
15 mins

🕒
Cook Time
5 mins

⏱️
Total Time
20 mins

🍽️
Servings
16 pieces

Christmas fudge is a delightful and luxurious holiday treat that embodies the spirit of giving. This Christmas Fudge Recipe is a festive gem that is not only simple to prepare but also makes the perfect gift for friends and family. Imagine unwrapping a beautifully packaged square of rich, creamy fudge that melts in your mouth, offering a burst of sweet flavor with every bite. The combination of chocolate, sweetness, and the joy of sharing makes this fudge a cherished holiday tradition.

The fudge has a lovely texture that balances smoothness and a bit of chewiness, giving you that comforting sensation with each indulgent piece. Made with flavorful ingredients, the sweetness is perfectly complemented by the deep richness of chocolate. Notably, the aroma of freshly made fudge wafts enticingly through your kitchen, creating a warm, cozy atmosphere that sets the stage for a delightful holiday gathering. Whether you’re enjoying it yourself or gifting it to loved ones, this easy recipe promises happiness and joy this Christmas season.

Quick Recipe Highlights

  • Flavor Profile: This fudge boasts a decadent chocolate flavor with a touch of sweetness, making it irresistibly good. Adding nuts or peppermint further enhances its festive taste.
  • Texture: The fudge is incredibly smooth with a creamy consistency, creating a delightful melt-in-your-mouth experience perfect for the holiday season.
  • Aroma: The warm scent of vanilla and chocolate fills the air while you make this fudge, immediately drawing everyone to the kitchen.
  • Visual Appeal: Rich, dark fudge decorated with colorful sprinkles or nuts adds a festive touch, perfect for holiday presentations.
  • Skill Level Needed: This Christmas Fudge Recipe is easy enough for beginners, requiring no specialized skills beyond basic cooking techniques.
  • Special Equipment: A microwave-safe bowl and a loaf pan are all you’ll need to create this delicious treat.

Recipe Overview

  • Difficulty Level: This recipe is considered easy, making it accessible for beginners while still being satisfying for more experienced cooks. The straightforward steps ensure success on the first attempt.
  • Category: This Christmas Fudge falls under holiday treats and desserts, making it an ideal choice for Christmas celebrations, potlucks, or gifting.
  • Cuisine: Rooted in Western culinary traditions, fudge making has transformed into a favorite dessert worldwide, especially during festive occasions.
  • Cost: The ingredients are relatively inexpensive, typically costing less than $10 while making a batch that can serve many.
  • Season: Fudge is particularly popular during the winter months, especially around the holidays, making it a seasonal staple.
  • Occasion: Perfect for Christmas parties, cookie exchanges, or even as a thoughtful handmade gift during the holidays.

Why You’ll Love This Recipe

Christmas fudge appeals to the taste buds with its rich, sweet flavor profile that embodies the essence of festive treats. The luxurious, creamy texture adds another layer of indulgence, making every bite a treat to savor. Preparing this fudge is a breeze, allowing you to whip up a delicious dessert in just 20 minutes. You’ll find yourself enjoying the process of making it as much as you enjoy eating it.

Another significant advantage is the nutritional appeal, as this fudge can be easily made with variations including nuts and dried fruits, which add texture and nutrients. Sharing homemade fudge during the holiday season evokes a sense of community and warmth, making it a beloved choice for gatherings. Furthermore, the cost-effectiveness of this recipe means you can treat many friends and family without breaking the bank, ensuring you share love and joy in delicious form.

Fudge is not just about hunger; it’s about creating moments. It’s a perfect conversation starter for gatherings; its rich taste leads to delightful discussions. Its versatility allows you to tailor it to personal preferences, making it an endlessly adaptable recipe. Christmas fudge has the potential to become a cherished tradition that enhances the spirit of giving during this wonderful season.

Historical Background and Cultural Significance

The history of fudge can be traced back to the late 19th century in the United States, initially created by accident when sugar was combined with butter and chocolate. Over the years, this simple confectionery transformed into a beloved treat across the nation, especially during Christmas. Its adaptability led to numerous variations, making it a classic holiday offering.

Culturally, fudge holds a significant place in American culinary evolution, representing the home baking tradition that has been passed down through generations. During festive seasons, sharing fudge has become synonymous with the spirit of gift-giving and hospitality. Families often create their own recipes, which become cherished heirlooms, reminding them of holiday gatherings and joyful times.

The evolution of the fudge recipe has seen the addition of various flavors such as peppermint, nuts, and more, reflecting regional preferences and available ingredients. These variations showcase the creativity of home bakers and their desire to make their confections unique and special for the holidays.

Regional variations of fudge have emerged, each with distinctive twists and local ingredients, reflecting the diverse culinary tapestry across the United States. From the salted varieties of New England to the decadent chocolate-infused iterations found in the South, every area has its unique take on this quintessential holiday treat.

Ingredient Deep Dive

Chocolate

Chocolate is the heart of any fudge recipe. Rich in antioxidants, it can provide a sumptuous depth of flavor while offering potential health benefits when consumed in moderation. When selecting chocolate for fudge, look for high-quality dark or semi-sweet options to achieve the best flavor. For storage, keep chocolate in a cool, dry place to maintain its freshness. If unavailable, you can substitute with cocoa powder, adjusting the sugar accordingly.

Condensed Milk

Condensed milk brings sweetness and a creamy dimension to fudge. It is a staple ingredient in many dessert recipes due to its ability to create a rich texture. When purchasing condensed milk, choose brands that contain minimal additives for the best results. Store unopened cans in a cool pantry, and once opened, transfer any leftovers to an airtight container in the fridge. If you’re looking for a dairy-free alternative, coconut milk can work well in fudge recipes, providing a unique flavor twist.

Common Mistakes to Avoid

  • Overheating the chocolate can cause it to seize, preventing a smooth fudge texture. Always melt it gently and avoid boiling.
  • Not using a candy thermometer can lead to under or overcooking the fudge, which affects its firmness and consistency.
  • Skipping the greasing or lining of the pan will result in sticky fudge that is difficult to remove.
  • Mixing in ingredients like nuts or candy too soon can cause them to sink instead of staying evenly distributed throughout the fudge.
  • Allowing fudge to cool too quickly can lead to a grainy texture. Let it set at room temperature for best results.
  • Using subpar ingredients compromises flavor and texture. Always invest in good-quality chocolate and vanilla.
  • Failing to let the fudge chill completely before cutting can ruin its shape, leading to messy servings.
  • Not adjusting for high humidity can affect the fudge. If conditions are particularly humid, consider reducing the liquid ingredients slightly.
  • Skipping taste tests while making can lead to imbalance; always check for sweetness and flavor during preparation.
  • Not having all ingredients prepped and measured can lead to a chaotic cooking environment, increasing the chance of mishaps.

Essential Techniques

Melting chocolate: This step is crucial to the fudge-making process. Always melt chocolate in a microwave or over a double boiler, stirring frequently to avoid scorching. The ideal texture should be smooth and glossy. Common pitfalls include overheating and burning, which can ruin your fudge, so watch it closely.

Cooling and setting: Allow your fudge to cool at room temperature before cutting it. This process is key to ensuring the fudge retains its shape and doesn’t become too soft. Look for it to firm up without remaining too sticky at the surface – this is a sign of successful cooling.

Pro Tips for Perfect Christmas Fudge

1. Use a good quality chocolate for a richer taste and smooth texture, as the chocolate’s quality can significantly impact the fudge’s flavor.
2. Consider adding a pinch of salt to enhance the chocolate flavor and balance the sweetness.
3. Allow the fudge to set in the refrigerator after cooling at room temperature for a firmer texture and easier cutting.
4. Experiment with festive add-ins like crushed peppermint candies or seasonal spices like cinnamon for a unique twist.
5. To create a beautiful presentation, use a sharp knife for cutting and clean the knife between cuts for neater edges.
6. Label your fudge gifts with ingredient information, especially if you include nuts or allergens.
7. Soften hard edges by carefully warming them with your hands before cutting, making the process easier and preventing crumbling.
8. Store any leftover fudge in an airtight container at room temperature for up to two weeks, or freeze for longer storage.

Variations and Adaptations

There are countless ways to personalize your Christmas fudge. Add-ins can vary widely; think of seasonal favorites like white chocolate, toffee bits, or even dried fruit for a chewy texture. For a festive twist, a dash of peppermint extract can elevate the flavor and pair beautifully with chocolate.

Seasonal adaptations can include evoke autumn flavors by introducing pumpkin spice for fall or marshmallows during winter. For dietary needs, consider gluten-free or dairy-free versions by substituting traditional ingredients with suitable alternatives like coconut cream or nut milks.

Flavor variations can be endless. Incorporate can make fudge creamy and decadent. Leverage weekend baking events with friends to try new flavors while swapping gifts and enjoying seasonal cheer. Presentation alternatives can also be adjusted; for instance, shaping fudge into festive shapes using cookie cutters can be a fun surprise for all ages.

Serving and Presentation Guide

To serve your Christmas fudge elegantly, cut it into bite-sized squares and arrange them on a festive platter. Enhance the visual appeal by garnishing with chocolate shavings, sprinkles, or edible glitter that adds sparkle. Traditional accompaniments like peppermint sticks or candy canes can make the sweet treat stand out even more.

For a modern twist, serve fudge in small mason jars tied with festive ribbons, making lovely gift snapshots that guests can take home. Ensure that fudge is stored in a cool place to maintain its consistency and flavor. Consider portion control by offering individual servings, which help guests not to overindulge while enjoying this sweet treat.

Wine and Beverage Pairing

Pairing your Christmas fudge with beverages can enhance the tasting experience. A rich, dark red wine, such as Merlot or Cabernet Sauvignon, complements the deep chocolate flavors beautifully. For something lighter, sparkling wine like Prosecco adds a refreshing contrast.

If wine isn’t your style, consider non-alcoholic alternatives such as a creamy hot chocolate or spiced cider that know how to bring warmth and a festive vibe. A dash of nutmeg or cinnamon can elevate classic flavors, making any drink exciting.

For coffee lovers, opt for a smooth espresso or a velvety cappuccino to contrast the sweetness of the fudge. Brewing a warm cup of chai tea also brings delicious warmth while enhancing those buttery undertones in the dessert.

Storage and Shelf Life

When storing your Christmas fudge, keep it in an airtight container at room temperature away from humidity. This ensures that it stays fresh and maintains its texture. If refrigerated, it can last up to two weeks, but allow it to come to room temperature before serving for the best texture.

Freezing fudge is possible; wrap it tightly in plastic wrap and then place it in an airtight container. This can extend its shelf life for several months. Always label the container with the date to help track its freshness.

For any signs of spoilage, watch for changes in color or an off smell, which indicates that it should be discarded. When reheating, remember that fudge is not meant to be heated too much, especially if frozen; simply let it sit out until softened rather than using heat.

Make Ahead Strategies

Making Christmas fudge ahead of time is a convenient strategy for busy holiday schedules. Prepare the fudge up to two weeks ahead of your planned events to alleviate last-minute stress. To maintain freshness, ensure that it is properly stored.

Consider setting a prep timeline for making larger batches in one day, allowing half to cool before making additional flavors. If you’re making different types, label them clearly to avoid mix-ups.

As for quality impact, allowing the fudge to rest for a day enhances flavor as ingredients meld, making it even tastier. If you’re unsure about serving the fudge, make it a day or two in advance for optimal taste.

Scaling Instructions

Scaling your Christmas fudge recipe can be easily achieved. If you prefer to make smaller quantities, simply halve the recipe while keeping the ingredient ratios consistent. Conversely, when doubling or tripling the recipe, ensure that your mixing bowl and equipment can accommodate larger volumes.

Timing adjustments may be required during cooking, particularly if the batches are larger. Always monitor the fudge closely to avoid over or undercooking. When scaling, plan for additional storage containers to hold the fudge, as larger batches yield more treats.

Make sure to factor storage considerations for larger quantities, since longer shelf lives can apply if you’re making fudge for gifting, so re-evaluation of the number of pans used may assist in optimal organization.

Nutritional Deep Dive

Understanding the nutritional components of Christmas fudge can help in mindful indulgence. Each serving typically provides a unique macro breakdown, including carbohydrates mostly from sugar. It’s essential to consider the fat content from chocolate, which can vary based on the type used.

Fudge can offer beneficial micronutrients from added ingredients such as nuts, which contribute protein and healthy fats. Substitutions like using dark chocolate can enhance antioxidant intake, making the dessert a little more favorable. Awareness of portion size will also affect overall caloric intake, especially during the holiday season.

Dietary considerations are paramount, especially for special dietary requirements like gluten-free or dairy-free, where specific substitutions can round out the nutritional profile without compromising the indulgence.

Dietary Adaptations

For those needing gluten-free options, using specific brands of chocolate or ensuring that all add-ins are gluten-free will keep the holiday fudge accessible. Similarly, for dairy-free recipes, substituting regular condensed milk with coconut or other nut-based alternatives provides the same creaminess without dairy.

Vegan adaptations can use plant-based fats and sugars to create creamy and richly flavored fudge that suits various diets. Low-carb and keto adaptations can leverage sugar substitutes to create a dessert that satisfies sweet cravings without high glycemic impact.

As dietary trends evolve, being aware of paleo or low-FODMAP adjustments can also help provide festive options to suit different guest preferences while gathering, ensuring everyone can enjoy a piece of the delicious fudge.

Troubleshooting Guide

If your fudge turns out too soft, it likely didn’t set correctly. Make sure to let it cool at room temperature before chilling. Conversely, if it’s too hard, reducing cooking time next batch can help achieve the perfect consistency.

A grainy texture may surface from sugar crystals forming. To avoid this, stir consistently while heating and maintain the correct temperature. If the flavor is too sweet, consider adding a touch of salt or cocoa powder during the next preparation for balance.

For ingredient substitutions, ensure the proportions remain accurate, as a lack of balance can lead to unwanted results. Timing concerns can also influence the outcome; always pre-measure ingredients to help keep track of cooking times accurately.

Recipe Success Stories

Community feedback often highlights excitement and joy surrounding this Christmas Fudge Recipe. Many users have shared their personal variations, such as adding caramel swirls or including different festive toppings that resonate with their family traditions.

Readers have suggested fun adaptations like using seasonal flavored chocolate, which brings new life into a classic dish, proving that this fudge recipe easily becomes a blank canvas for creativity. Successful execution often leads to photography tips for presenting fudge, showcasing its vibrant colors and texture that tempt anyone during tastings.

Adaptation stories further emphasize how this simple fudge has transformed into unique holiday creations shared among friends, each sparking joyful memories. The act of making it not only creates delicious treats but also builds connections, with many eager to share their experiences.

Frequently Asked Questions

How do I store Christmas fudge?

To store Christmas fudge, keep it in an airtight container at room temperature for up to two weeks. If you prefer, you can also refrigerate it for a longer shelf life or freeze it for up to three months. Ensure any leftovers are wrapped tightly to maintain freshness.

Why did my fudge turn out grainy?

Graininess in fudge usually occurs if the sugar didn’t dissolve fully or if it was overheated. To avoid this, melt the mixture gently and stir consistently without letting it reach boiling point. A candy thermometer can help maintain the correct temperature for smooth fudge.

Can I use flavored chocolate for this recipe?

Absolutely! Flavored chocolates can add a unique twist to your Christmas fudge. White chocolate, caramel, and flavored dark chocolates can all be used effectively. Adjust other sweeteners accordingly to balance the flavors.

What can I use instead of condensed milk?

If you’re looking for an alternative to condensed milk, coconut milk or any non-dairy milk thickened with a bit of sugar can be effective substitutes. You can also consider using homemade evaporated milk for a richer taste.

How long does homemade fudge last?

Homemade fudge can last up to two weeks when stored properly at room temperature. If refrigerated, it can maintain its freshness for longer periods, and if frozen, it can last for several months.

Can I add nuts or candy pieces to my fudge?

Yes, adding nuts or candy pieces is a wonderful way to enhance your Christmas fudge. Be sure to incorporate them at the right time to evenly distribute them without disrupting the melting process.

Is this fudge recipe suitable for vegan diets?

To make this fudge recipe vegan, simply replace any dairy ingredients, like chocolate and condensed milk, with plant-based alternatives. Be mindful to check labels to ensure all ingredients are vegan-friendly.

Can I use low-carb sweeteners in place of sugar?

Low-carb sweeteners can be utilized, but keep in mind that texture and taste may differ. It’s crucial to choose a suitable sweetener designed for baking, and always check the serving recommendations for best outcomes.

How do I know when my fudge is set?

Fudge is set when it has cooled completely and becomes firm to the touch. When ready to slice, it should hold its shape well and not feel overly soft or sticky. For the best cuts, let it chill in the refrigerator.

Can I make fudge ahead of time for the holidays?

Definitely! Fudge is an excellent make-ahead treat. Prepare it several days in advance, and store it properly to keep it fresh. It often tastes even better after a day or two as flavors develop.

Additional Resources

If you enjoyed this Christmas fudge recipe, explore related recipes that showcase holiday treats and desserts. Check out technique guides for candy making or ingredient information focusing on chocolate and sweeteners. Equipment recommendations can help streamline your cooking experience, especially for holiday baking needs. Lastly, consider seasonal variations to keep festive flavors exciting throughout the winter months.

Join the Conversation

We love hearing about your experiences with our recipes! Share your photos and feedback on social media, and feel free to adapt the recipes to suit your taste. Engaging with our community not only helps others discover delightful variations but also inspires new ideas and improvements. Together, we can create cherished memories and festive traditions through cooking and sharing delicious recipes like this Christmas fudge.

The Recipe

Christmas Fudge

Serves: 16 pieces

Prep Time: 15 mins

Cook Time: 5 mins

Total Time: 20 mins

Kitchen Equipment Needed

  • Microwave-safe bowl
  • Loaf pan or square baking dish
  • Spatula for mixing
  • Parchment paper (optional, for easy removal)

Ingredients

  • 2 cups semi-sweet or dark chocolate chips
  • 1 cup sweetened condensed milk
  • 1 teaspoon vanilla extract
  • 1 cup nuts, chopped (optional)
  • Sprinkles or crushed candy canes for topping (optional)

Directions

  1. In a microwave-safe bowl, combine the chocolate chips and sweetened condensed milk.
  2. Microwave in 30-second intervals, stirring in between until the mixture is fully melted and smooth.
  3. Add vanilla extract and stir until incorporated. If using, fold in chopped nuts.
  4. Pour the fudge mixture into a lined or greased loaf pan, spreading it evenly.
  5. Top with sprinkles or crushed candy canes if desired, and gently press them into the surface.
  6. Allow the fudge to cool at room temperature for about 2 hours, then refrigerate for an additional hour for a firmer texture.
  7. Once set, cut into squares and enjoy or gift to loved ones!

Recipe Notes

  • For a richer fudge, use a combination of semi-sweet and dark chocolate.
  • Feel free to customize add-ins according to your preferences or seasonal favorites.

Create Irresistible Butterfinger Caramel Crunch Bars at Home

Irresistible Butterfinger Caramel Crunch Bars: An Indulgent Treat

⚖️
Difficulty
Easy

⏲️
Prep Time
20 mins

🕒
Cook Time
30 mins

⏱️
Total Time
50 mins

🍽️
Servings
16 bars

These Irresistible Butterfinger Caramel Crunch Bars are a delightful dessert that combines crunchy textures and rich flavors. Each bite delivers a sweet explosion of buttery caramel enveloped in a crispy base with the unique taste of Butterfinger candy. Perfect for sharing at gatherings or simply for indulging yourself, these bars are a great treat that everyone will love. The balance of sweetness and crunch creates an irresistible combination that will leave your taste buds craving more.

This recipe not only brings nostalgic candy flavors to life but also adjusts them for a homemade experience. The buttery, sweet aroma fills the kitchen as these bars bake, enticing you to grab a piece as soon as they cool down. With simple ingredients and straightforward steps, you can whip up these bars quickly, making it a go-to recipe for a last-minute dessert choice.

Quick Recipe Highlights

  • Flavor Profile: Sweet caramel combined with the nutty taste of Butterfinger, layered on a buttery crust.
  • Texture: Crisp, crunchy base with a sticky caramel layer and chocolate topping.
  • Aroma: Buttery and sweet caramel scents waft through the air while baking.
  • Visual Appeal: These bars boast a lovely golden-brown crust with a rich chocolate drizzle on top.
  • Skill Level Needed: This recipe is beginner-friendly, requiring minimal baking skills.
  • Special Equipment: All you need is a baking dish, mixing bowl, and a spatula.

Recipe Overview

  • Difficulty Level: These bars are classified as easy to make, making them suitable for bakers of all skills. The recipe involves simple steps and does not require advanced techniques.
  • Category: This treat falls under desserts and is perfect for satisfying a sweet tooth after dinner or during celebrations.
  • Cuisine: This recipe is an American favorite, reflecting the country’s love for sweet treats and creative desserts.
  • Cost: The ingredients are budget-friendly, with most commonly available at your grocery store, making it an economical choice for homemade desserts.
  • Season: These bars are ideal for year-round enjoyment but shine in the fall when sweet treats are especially popular.
  • Occasion: Perfect for birthday parties, potlucks, or family gatherings where a sweet treat is welcomed.

Why You’ll Love This Recipe

The taste and texture of these Butterfinger Caramel Crunch Bars make them a delightful addition to any dessert table. The buttery base perfectly complements the sweet, sticky caramel and crunchy Butterfinger pieces, providing a satisfying mouthfeel with every bite. The drizzle of chocolate on top adds an extra layer of sweetness that enhances the overall flavor. Each bite is a harmonious blend of textures—crispy, chewy, and creamy all at once, making it a dessert that truly tantalizes the taste buds.

This recipe is also incredibly convenient, allowing you to prepare these bars quickly with minimal ingredients needed. You can mix and bake everything in under an hour, and once they cool, they’re ready to be enjoyed any time of day. Whether you need a quick dessert for unexpected guests or want to treat yourself after a long day, these bars offer an easy, delicious solution that requires little time and effort.

Nutritionally, while these bars are certainly indulgent, they can still fit into a balanced diet in moderation. They provide a source of energy, thanks to the sugars and carbohydrates from the candy and the base. Additionally, homemade treats can often be made with fresher ingredients compared to store-bought options, allowing for better quality in every bite.

When entertaining, these Butterfinger Caramel Crunch Bars add a touch of sweetness to your spread and are easy to serve. They can be cut into small squares, making them ideal for sharing, and the nostalgia surrounding Butterfinger candy often evokes fond memories for many. Adding these bars to your dessert table ensures that they’re always a hit with friends and family.

Ultimately, the cost-effectiveness and accessibility of this recipe make it even more appealing. Ingredients are easy to find and won’t break the bank, allowing you to create an impressive dessert without spending a fortune. The combination of affordability and scrumptious taste keeps the recipe as a go-to for any occasion.

Historical Background and Cultural Significance

Butterfinger bars have been an American favorite since their introduction in the 1920s, marketed for their unique crunchy texture. These chocolate-covered bars quickly gained popularity due to their delightful combination of flavors. The transition of Butterfinger from store-candy to a homemade treat reflects the evolution of food culture, with many seeking to recreate familiar flavors in their own kitchens.

Culturally, Butterfinger holds a special place in the hearts of many, often associated with childhood snacks and treats. Over the years, the versatile candy has found its way into various dessert recipes, diversifying its use beyond mere snacking. This particular recipe shines a light on how candy can be transformed into delicious bars that are perfect for celebrations or casual get-togethers, demonstrating the blend of nostalgia with innovative home cooking.

The evolution of dessert bars has also seen many regional variations, where different communities experiment with flavors and textures. Some might add nuts or even fruits for added complexity, while others stick closely to the classic Butterfinger flavor. This variety showcases the American palate’s adaptability and eagerness to enjoy diverse dessert options.

While the Butterfinger Caramel Crunch Bars may have started as a spin on a classic candy bar, they have evolved into a beloved recipe that can be shared and enjoyed in various settings. The cultural significance of this treat continues to grow as more people discover the joys of making their favorite candies into homemade delights.

Ingredient Deep Dive

The main ingredient in Butterfinger Caramel Crunch Bars is the beloved Butterfinger candy. With its unique blend of creamy peanut butter and crunchy toffee pieces, Butterfinger has become a classic chocolate bar known for its distinct taste. Rich in sugar and fats, it’s a suitable treat but should be consumed in moderation due to its caloric density. When selecting Butterfinger for your recipe, ensure to choose fresh bars, as older ones may lose their crunch. Store them in a cool, dry place to maintain their quality, especially if you plan to use them in baking.

Next, we have caramel, which is integral to the richness of these bars. Caramel is made by slowly heating sugar until it liquefies and turns into a golden-brown syrup. It brings sweetness and a sticky texture that binds the bars together. When making or buying caramel, look for high-quality options without artificial additives for the best flavor. Storing homemade caramel requires keeping it in an airtight container in a cool place, as heat can cause it to become overly sticky or hard.

Common Mistakes to Avoid

  • Not cooling the bars completely before slicing can lead to messy pieces. Be sure to let them rest until they’re firm.
  • Using old Butterfinger bars can affect the texture; always select the freshest candy available.
  • Overcooking the caramel can lead to a hard consistency; keep a close watch on it while it cooks.
  • Not lining your baking dish properly may cause sticking; use parchment paper for easy removal.
  • Skipping the chocolate drizzle can leave the bars looking less appealing; add this finishing touch for presentation.
  • Inaccurate measurements can lead to inconsistencies; always measure carefully, especially for sugar and flour.
  • Rushing the cooling process by placing bars in the fridge can cause condensation; let them cool at room temperature.
  • Forgetting to chop the Butterfinger pieces can lead to uneven distribution; chop them into small, manageable sizes.
  • Using unsalted butter instead of salted can alter the flavor; follow the ingredient list for the best results.
  • Not using a sharp knife to cut the bars can result in jagged edges; ensure to use a sharp knife for clean slices.

Essential Techniques

When making Butterfinger Caramel Crunch Bars, mastering the melting technique is vital for both the butter and the chocolate. Melting butter helps create a smooth base, while melting chocolate for drizzling requires gentle heat to avoid burning. Using a double boiler is recommended for best results, as it provides an even temperature and prevents overheating. When mastered, this technique allows for a perfect consistency that enhances the flavor and texture of your dessert.

Another important technique is the layering process when combining the ingredients. You’ll need to evenly distribute the caramel and chocolate layers over the base and into the mixture. Use an offset spatula for precision and ensure that the filling reaches all corners of the pan. Proper layering will not only make the bars visually appealing but also ensure an even distribution of flavors in every bite.

Pro Tips for Perfect Irresistible Butterfinger Caramel Crunch Bars

1. Allow your baking dish to cool completely before attempting to slice the bars. This will give you clean cuts and prevent toppings from smearing.

2. Drizzle the chocolate while it is still warm to ensure it spreads evenly and adheres perfectly to the bars.

3. Experiment with adding extra toppings such as chopped peanuts or drizzling caramel for added flavor and texture variations.

4. When storing, use an airtight container to keep bars fresh and prevent them from becoming overly hard or dry.

5. If you want to enhance chocolate flavor, consider using dark chocolate for the drizzle instead of milk chocolate.

6. Prioritize finely chopping the Butterfinger candy for an even distribution throughout the bars, enhancing the overall texture.

7. Serve the bars at room temperature for the best taste, as refrigeration can alter the texture of the caramel.

8. Use a kitchen scale for more precise measurements if needed, ensuring perfect ratios for success.

Variations and Adaptations

To create regional variations of these bars, consider adding local flavors such as sea salt or using different types of chocolate, such as a rich dark chocolate or white chocolate drizzle. Seasonal adaptations can include adding pumpkin spice or peppermint during the holidays, allowing the bars to align with the flavor profiles that are popular during certain times of the year.

If you’re looking for dietary modifications, consider using vegan caramel or gluten-free graham crackers, allowing those with dietary restrictions to still enjoy these delicious treats. For flavor variations, adding crushed nuts, like almonds or pecans, can bring new textures and flavors to the bars.

For a unique texture modification, try adding layers of crispy rice cereal for an extra crunch, or use whole grains for the crust to make it more nutritious. Presentation alternatives, such as plating the bars with a scoop of ice cream or fresh fruits, can elevate the overall dining experience.

Serving and Presentation Guide

When it comes to plating these Butterfinger Caramel Crunch Bars, aim for visually appealing presentations to impress your guests. Cut the bars into uniform squares and arrange them on a beautiful serving platter. Consider garnishing with crushed Butterfinger pieces sprinkled on top or a dusting of cocoa powder to add visual interest.

Traditional accompaniments include a scoop of vanilla ice cream, which complements the sweet and crunchy flavor of the bars beautifully. For modern serving suggestions, create individual servings by wrapping each bar in decorative parchment paper tied with twine for an attractive party treat. Temperature considerations are essential; serve these bars at room temperature to showcase their delightful texture and flavor profile.

Lastly, for portion control tips, aim for small squares to allow indulgence without overwhelming guests, making these bars the perfect addition to a dessert table.

Wine and Beverage Pairing

When looking for the perfect wine pairing for your Butterfinger Caramel Crunch Bars, opt for sweet dessert wines like Moscato or a fruity Riesling that will enhance the sweet notes of the bars without overpowering them. For a richer option, consider a tawny port, which complements the caramel beautifully with its nutty undertones.

If you prefer non-alcoholic alternatives, complement your bars with a sweetened iced coffee or hot cocoa, as the chocolate and caramel flavors will blend seamlessly and offer a delightful flavor experience. Temperature considerations are always key; ensure that beverages served are chilled or warm based on preference to enhance the tasting experience.

Storage and Shelf Life

For optimal storage of these Butterfinger Caramel Crunch Bars, keep them in an airtight container at room temperature, away from direct sunlight. This will help ensure that they stay fresh and maintain their delightful texture. The bars can be kept for up to a week when stored correctly.

If you need to store them for a longer period, they can also be frozen. Wrap them individually in plastic wrap and place them in a freezer-safe container. They can last for up to three months in the freezer. When ready to enjoy, allow them to thaw at room temperature. Signs of spoilage include a change in texture (becoming hard or sticky), so it’s essential to check before serving.

Make Ahead Strategies

To make your baking experience efficient, consider preparing the Butterfinger Caramel Crunch Bars ahead of time. You can bake the base a day in advance, allowing it to cool completely before adding the layers of caramel and chocolate. Evidence indicates that the flavors deepen and meld beautifully when allowed to sit overnight.

You can also store each component separately until ready to assemble, ensuring that your bars are fresh and flavorful when served. Just remember to allow for enough time for cooling after baking and before slicing, as this significantly impacts the final texture and presentation of the desserts.

Scaling Instructions

If you need to scale your recipe, halving or doubling the ingredients is straightforward. For halving, carefully adjust the ingredients to ensure the proportions remain as intended. For larger gatherings, doubling or even tripling the recipe can be done with ease, just ensure you’re using the appropriate sizes of baking dishes.

When scaling, keep an eye on baking times. Larger quantities may require additional time in the oven, while smaller batches may need less. Always check for doneness with a toothpick; it should come out clean when the bars are ready. Storage considerations also come into play; larger batches may require more container space, so plan accordingly.

Nutritional Deep Dive

Examining the nutritional aspects of Butterfinger Caramel Crunch Bars reveals a balance of energy-boosting macros. The bars contain high amounts of carbohydrates primarily from sugars and graham crackers along with moderate protein content from the Butterfinger candy.

Micronutrient analysis shows that these bars provide some vitamins and minerals mainly from the butter and small amounts from the Butterfinger itself. However, due to their high sugar concentration, moderation is key. Understanding portion analysis is essential for enjoying these bars while managing calorie intake for those monitoring their dietary habits or seeking weight management strategies.

Dietary Adaptations

For those needing to modify the Butterfinger Caramel Crunch Bars for gluten-free diets, substitute regular graham crackers with gluten-free alternatives designed for baking. This ensures the base remains tasty while accommodating dietary restrictions.

To make the bars dairy-free, consider using coconut oil instead of butter and opting for non-dairy versions of chocolate and caramel. For a vegan take, you can also find plant-based butter alternatives, ensuring everyone can enjoy this delightful dessert without compromising their dietary choices.

For those following low-carb or keto diets, almond flour can replace traditional graham crackers to maintain low carbohydrates. Creating a similar experience without the high sugar is achievable by using sugar substitutes. This flexibility makes the recipe accessible to a broader audience with various dietary needs.

Troubleshooting Guide

If you’re experiencing texture issues with your Butterfinger Caramel Crunch Bars, check your caramel preparation—overcooked caramel can turn hard. For an ideal consistency, keep the cooking time short and stir regularly during preparation.

Flavor balance may also add a challenge; if your bars taste too sweet or flat, consider an additional pinch of salt to elevate the flavor profile. Incorporating nuts can also provide a complementary crunch and earthy flavor to balance sweetness.

Temperature problems often arise when baking—ensure your oven is properly calibrated to avoid undercooked or burnt bars. Equipment challenges can often stem from using mismatched baking dish sizes; ensure you use the correct size specified in the recipe for even baking.

When it comes to ingredient substitutions, ensure that the replacements have similar properties as the originals, especially with chocolate, as variations in fat content can significantly affect melting and texture.

Recipe Success Stories

Community feedback around these bars suggests they create cherished memories during gatherings. Many have shared their enjoyment of incorporating personal messages and stories into their baking experiences, with families bonding over cutting and decorating their bars together.

Variation successes abound, with individuals adapting the basic recipe to create their unique spins, like adding flavored extracts for an added twist. Photographers in the community also recommend staging shots outdoors for natural lighting to showcase the rich colors of the bars.

Many readers have provided suggestions, indicating that replacing Butterfinger with different candy varieties creates innovative alternatives, bringing a sense of adventure to the baking process. These stories highlight the recipe’s adaptability in bringing people together through creativity and shared culinary experiences.

Frequently Asked Questions

Can I use other types of candy instead of Butterfinger? Absolutely! Other crunchy chocolate bars like Twix or Reese’s can work well, providing unique flavor variations to the recipe.

How should I store the bars? Keep them in an airtight container at room temperature for up to a week or freeze them for longer storage.

Can I make these bars in advance? Yes, these bars can be made a day or even two in advance, allowing the flavors to meld beautifully.

What can I do if my caramel hardens? If your caramel turns hard, try reheating it gently with a splash of cream or milk to restore its smooth texture.

Are these bars customizable for dietary needs? Yes, you can easily adapt the recipe for gluten-free, dairy-free, or vegan diets with appropriate substitutions.

What’s the best way to cut the bars? Use a warm, sharp knife for clean cuts to avoid crumbling the edges of the bars.

Can I add nuts or other toppings? Yes! Chopped nuts, sprinkles, or an additional chocolate drizzle can enhance both the flavor and visual appeal of the bars.

Is it necessary to chill the bars before serving? Chilling is not necessary, but if you prefer a firmer texture, refrigerating for a short time can help.

How do I prevent my chocolate from seizing? Ensure no water or steam comes in contact with the chocolate while melting, as this can cause it to seize up.

What is the best type of chocolate for drizzling? A good-quality chocolate, either milk chocolate or dark chocolate, will provide great flavor; use what you prefer!

Additional Resources

If you’re interested in exploring more dessert recipes, consider trying variations involving other candy bars or different flavor profiles. A great way to elevate your baking skills is to delve into technique guides that detail how to make caramel from scratch or tips for perfecting your chocolate melting.

Additionally, seeking ingredient information is valuable—understanding how chocolates differ or how to choose the best caramel can uniquely adjust your recipe. Recommendations of kitchen tools are also crucial; investing in quality baking dishes and utensils can significantly enhance your cooking experience.

Join the Conversation

Sharing your baking adventures through social media helps build a community of fellow enthusiasts who love to explore baking. When you try out these Butterfinger Caramel Crunch Bars, consider posting pictures and notes about your unique touches or adaptations.

Engage with fellow bakers by sharing the recipe along with your feedback and suggestions, forming connections that can lead to discovering even more incredible recipes. Contributing your recipe variations can inspire others, creating a lively exchange of ideas within the baking community.

The Recipe

Irresistible Butterfinger Caramel Crunch Bars

Serves: 16 bars

Prep Time: 20 mins

Cook Time: 30 mins

Total Time: 50 mins

Kitchen Equipment Needed

  • Baking dish (9×13 inch)
  • Mixing bowls
  • Spatula
  • Cutting board
  • Sharp knife

Ingredients

  • 1 cup graham cracker crumbs
  • ½ cup unsalted butter, melted
  • 1 cup Butterfinger candies, chopped
  • 1 cup caramel sauce
  • 1 cup chocolate chips

Directions

  1. Preheat your oven to 350°F (175°C) and grease the baking dish.
  2. In a mixing bowl, combine graham cracker crumbs with melted butter and press the mixture into the bottom of the prepared baking dish.
  3. Bake for 10 minutes, then remove from the oven and sprinkle the chopped Butterfinger candies on top.
  4. Drizzle the caramel sauce over the Butterfinger layer evenly.
  5. In a microwave-safe bowl, melt the chocolate chips and pour over the caramel layer.
  6. Return to the oven and bake for an additional 15-20 minutes until set.
  7. Allow to cool completely before slicing into bars.

Recipe Notes

  • Feel free to modify the toppings as desired, adding nuts or additional chocolate drizzle.
  • Store in an airtight container for up to a week.
  • For best results, use fresh Butterfinger bars, and allow to cool completely for easy slicing.

Delicious Lemon Cheesecake Filled Crescent Rolls Recipe to Try

Lemon Cheesecake Filled Crescent Rolls: A Delightful Sweet Treat

⚖️
Difficulty
Easy

⏲️
Prep Time
15 mins

🕒
Cook Time
25 mins

⏱️
Total Time
40 mins

🍽️
Servings
8 servings

Indulge in the luscious flavors of our Lemon Cheesecake Filled Crescent Rolls that combine the brightness of lemons with the creamy goodness of cheesecake, all wrapped in flaky pastry. This delightful dessert is perfect for any occasion, whether you’re treating yourself, hosting a family gathering, or looking for a fantastic addition to your brunch menu. The moment you bite into these rolls, you’ll experience a delightful contrast of textures: the crisp outside and the creamy, tangy filling that melts in your mouth.

Imagine the aroma of fresh lemons, sugar, and buttery layers baking in your oven, filling your kitchen with an irresistible fragrance. These Lemon Cheesecake Filled Crescent Rolls not only taste divine, but they also look stunning with their golden-brown crust and glossy glaze. They are sure to impress your guests and elevate your dessert game!

Quick Recipe Highlights

  • Flavor Profile: Bright, zesty lemon combined with rich cream cheese creates a splendidly balanced taste experience.
  • Texture: The flaky outer layer gives way to a creamy, velvety filling, providing a delightful mouthfeel.
  • Aroma: A wonderful citrus aroma blends with the sweet scent of baked pastry, making them simply irresistible.
  • Visual Appeal: Their golden-brown exterior, sometimes dusted with powdered sugar, creates an inviting appearance.
  • Skill Level Needed: Perfect for beginners and experienced bakers alike, the recipe is straightforward with minimal steps.
  • Special Equipment: All you need are basic baking tools, making this recipe approachable for everyone.

Recipe Overview

  • Difficulty Level: The simplicity of the ingredients and steps makes this recipe suitable for all levels, perfect for beginners or a fun activity with kids.
  • Category: Ideal for desserts, brunch, or snack time, these Crescent Rolls can elevate any meal.
  • Cuisine: This recipe showcases classic American comfort food with a twist of tangy lemon, rooted in both casual and festive food traditions.
  • Cost: With minimal ingredients and tools, this recipe is budget-friendly, costing approximately $10 for a batch.
  • Season: Lemon desserts are refreshing year-round but are especially appreciated in spring and summer when citrus fruits are in season.
  • Occasion: Whether it’s a birthday, brunch, or casual gathering, these rolls will make a memorable addition to your spread.

Why You’ll Love This Recipe

Delight in the wonderful flavors and textures these Lemon Cheesecake Filled Crescent Rolls offer! The combination of creamy cheesecake with the vibrant taste of lemon creates an incredibly satisfying experience. Each bite is a burst of flavor, making them a hit with everyone from kids to adults. The buttery, flaky pastry adds a wonderful layer of richness that pairs perfectly with the tangy filling.

In addition to their taste, these rolls are easy and quick to prepare. With only a few ingredients and less than an hour, you can create a delicious dessert that looks and tastes like it came from a bakery. They can be made ahead, frozen, or prepped in advance, allowing you to enjoy them fresh out of the oven when company arrives.

Not only are these rolls indulgent and tasty, but they also provide some nutritional benefits. Lemons are a great source of vitamin C, and cream cheese offers protein and calcium. When enjoyed in moderation, this dessert can fit into a balanced diet, making it a guilt-free treat.

They serve wonderfully at gatherings, acting as delightful finger foods that spark conversations among guests. The beauty of these Lemon Cheesecake Filled Crescent Rolls will attract attention on any dessert table, elevating your hosting game effortlessly.

Budget-conscious bakers will appreciate the cost-effectiveness of this recipe. With simple ingredients that can easily be found in your kitchen or at your local grocery store, you can create a show-stopping dessert without breaking the bank. These Crescent Rolls make sweet treats accessible for any occasion.

Historical Background and Cultural Significance

The origin of cheesecake dates back to ancient Greece, where it was served to athletes during the first Olympic Games in 776 B.C. Over the centuries, cheesecakes evolved, with variations emerging across different cultures, including the rich New York style that we often encounter today. The combination of lemon with cheesecake has roots in American culinary traditions that celebrate citrus flavors, especially in sunny states like Florida and California.

Cultural importance of lemon desserts stretches across multiple cuisines, especially in Mediterranean dishes where lemon is used extensively to provide a refreshing zest. In America, lemonades and lemon meringue pies often take center stage during summer gatherings, and lemon-flavored cheesecakes have become a festive favorite, often showcased at holiday parties or family get-togethers.

As bakeries experimented with pastries, the rise of crescent rolls in American cuisine allowed for a quick and easy way to serve up sweet and savory fillings. The adaptability of this baked good opened the doors for chefs to fill them with an array of ingredients, including the beloved cheesecake. This practice not only preserves the traditional flavors of cheesecake but also introduces them in a playful, approachable manner.

Regional variations exist with lemon cheesecake desserts found from the East Coast to the West Coast, often featuring local ingredients and preparation techniques. In the South, for instance, you might find these rolls drizzled with a buttery glaze, while in the North, a sprinkle of seasonal berries may be added, showcasing local flavors through every bite.

Ingredient Deep Dive

Crescent Roll Dough: This versatile dough offers convenience, allowing home bakers to create flaky pastries quickly. Made with enriched dough, it’s an ideal canvas for both sweet and savory fillings. Crescent rolls are beloved for their buttery flavor and flaky texture. Properly sealed, they maintain their shape while baking, creating delightful layers. Look for dough that hasn’t been left in your pantry for too long to ensure optimal freshness in your recipes.

Cream Cheese: An essential ingredient in cheesecake, cream cheese provides creaminess that’s hard to replicate. Its rich texture pairs beautifully with lemon’s acidity, creating a well-balanced filling. When selecting cream cheese, opt for blocks rather than spreads for a firmer consistency, and ensure it’s softened to room temperature for easy mixing. Store leftover cream cheese tightly wrapped in the refrigerator to extend its shelf life.

Lemon Juice and Zest: Fresh lemon juice and zest add a refreshing brightness to recipes. Lemons are versatile fruits often used in both sweet and savory dishes. Incorporating both juice and zest amplifies the lemon flavor, making every bite delectably tangy. When selecting lemons, look for heavier ones with a bright, smooth skin for maximum juiciness. Fresh lemons should be stored at room temperature for up to a week or in the fridge for longer preservation.

Sugar: The sweetness of sugar balances out the tartness of lemons and cream cheese. You can use regular granulated sugar or experiment with alternatives like coconut sugar for a different taste. Sugar should be kept in an airtight container in a cool, dry place to prevent clumping. Always measure accurately for best results in both baking and cooking methods.

Common Mistakes to Avoid

  • Not sealing the rolls properly: Ensure that the seams are tightly pressed together to prevent the filling from leaking out during baking.
  • Using cold cream cheese: Start with cream cheese at room temperature for smooth mixing and a creamy filling.
  • Overbaking the rolls: Keep an eye on them while in the oven; they should be golden brown, not overly browned, for the best texture.
  • Skipping the zest: Leaving out lemon zest reduces the intensity of flavor; it adds a delightful brightness that complements the filling.
  • Piling too much filling: Using too much filling can cause the rolls to burst; adhere to the recommended amount for perfect pastry.
  • Not preheating the oven: Always ensure your oven is preheated, leading to even cooking and rise for your rolls.
  • Using bottled lemon juice: Freshly squeezed lemon juice offers superior flavor and freshness over bottled alternatives.
  • Omitting the glaze: A glaze enhances the visual appeal and adds a touch of sweetness; consider drizzling it on just before serving for maximum impact.

Essential Techniques

Sealing the Dough: This involves pressing the seams of the crescent roll dough tightly to keep the filling from leaking out. Proper sealing is crucial for ensuring that the cheese mixture stays inside while baking. To master this technique, firmly pinch the edges with your fingers or use a fork to create a decorative press. Watch out for excess filling as it can make sealing difficult. A good visual cue is when the dough looks smooth and closed without visible openings.

Mixing the Filling: Achieving a smooth, creamy cheesecake filling is all about proper mixing. Start with softened cream cheese to avoid lumps and to allow for even blending. Beat the cream cheese until it’s consistently smooth before adding other ingredients for optimal texture. Avoid overworking the mixture once other ingredients are added to prevent aeration, which can lead to cracks during baking. The end result should be a thick yet spreadable consistency.

Pro Tips for Perfect Lemon Cheesecake Filled Crescent Rolls

1. Use fresh lemons for the best flavor. The zest contains essential oils that enhance the overall taste of the filling.
2. Chill the filling slightly before using it; this can make it easier to spread and minimize excess leakage during baking.
3. Don’t overcrowd the baking sheet; give each roll space to expand and brown evenly during baking.
4. For added flair, consider mixing in fresh berries in the filling or as a garnish on the finished product.
5. Brush the tops with melted butter before baking for an extra flaky, golden finish.
6. Allow the rolls to cool slightly before glazing; this will help the glaze adhere better without melting away.
7. Keep an eye on the rolls as they bake to prevent over-browning; oven temperatures can vary widely.
8. For a fun twist, try adding chocolate chips or nuts to the filling for some added texture and flavor variation.

Variations and Adaptations

These Lemon Cheesecake Filled Crescent Rolls can be easily adapted to suit various tastes. For a regional twist, try adding key lime juice and zest to your filling for a Florida-inspired treat. Seasonal adaptations can also take shape; in the fall, consider incorporating pumpkin puree and spices for a unique spin. Dietary modifications are simple too; swap cream cheese for a dairy-free alternative to cater to those with lactose intolerance.

Experimenting with different flavors in the rolls is another delightful option. Add a layer of blueberry or raspberry jam in the filling for a fruity burst. For texture modifications, chop up nuts or chocolate pieces and fold them into the filling before baking. Lastly, presentation can be varied by serving the rolls alongside a fresh fruit compote or drizzle of chocolate sauce.

Serving and Presentation Guide

To create an inviting presentation with your Lemon Cheesecake Filled Crescent Rolls, consider serving them on a beautiful platter lined with parchment paper. You can garnish with a dusting of powdered sugar or a light drizzle of lemon glaze for added visual appeal. Traditional accompaniments may include whipped cream or a scoop of vanilla ice cream for an indulgent treat.

For modern serving suggestions, pair them with a fresh berry medley or a light lemon curd for dipping. Keeping temperature considerations in mind, these rolls are delicious served warm but can also be enjoyed at room temperature. Portion control is important; consider cutting each roll in half for serving as a bite-sized treat to encourage sharing.

Wine and Beverage Pairing

For a delightful pairing, opt for a light and zesty white wine, such as a Sauvignon Blanc, which complements the refreshing lemon flavor in these rolls. If you prefer a non-alcoholic alternative, serve them with a sparkling lemonade or iced tea for a refreshing contrast. For coffee lovers, a lightly brewed tea, such as a chamomile infusion, can provide a pleasant balance to the rich filling.

Temperature considerations for serving drinks alongside the rolls enhance the overall experience, ensuring everything complements each other. Serve wines chilled, and make sure that any iced drinks arrive cold and refreshing.

Storage and Shelf Life

To maintain the freshness of your Lemon Cheesecake Filled Crescent Rolls, store them in an airtight container at room temperature for up to two days. For longer storage, they can be refrigerated for up to a week. It’s advisable to consume any leftovers within this timeframe for the best taste and texture.

For freezing, wrap the rolls securely in plastic wrap, then place them in a freezer-safe container. They can last up to three months in the freezer. When ready to enjoy again, simply thaw them in the refrigerator overnight and reheat in the oven to restore their flaky texture. Watch for any signs of spoilage; if they show an unusual odor or texture, it’s best to discard them.

Make Ahead Strategies

To save time, consider preparing your filling and dough ahead of time. You can mix the cheesecake filling in advance and store it in the refrigerator until you’re ready to assemble the rolls. The crescent dough can also be rolled out and filled but should be baked fresh the day you plan to serve for optimal taste and texture.

If you plan to free some rolls, bake them and then freeze the finished product for an easy dessert option later. Assembly tips include keeping the filling well-chilled to prevent the dough from becoming soggy. Just ensure that if you’re making ahead, you account for the time needed to either reheat or bake the rolls before serving.

Scaling Instructions

Scaling the recipe is easy, whether you’d like to halve it for a smaller gathering or double it for a holiday feast. When halving, ensure that you adapt the fillings and dough proportions accurately to maintain flavor balance. For doubling or tripling, assess your baking sheet sizes; you may need to bake in batches.

Timing modifications are key when scaling; larger amounts typically require longer baking times, so keep an eye on them to avoid overcooking. Additionally, ensure you have the right equipment on hand; larger batches may require larger pans or additional baking sheets.

Nutritional Deep Dive

Exploring the nutrition in Lemon Cheesecake Filled Crescent Rolls reveals a delightful mix of macronutrients. A standard serving contains carbohydrates primarily from the dough and sugars, protein from the cream cheese, and fats that contribute to a satisfying mouthfeel.

Micronutrient analysis shows that lemons bring beneficial vitamin C and fiber into the mix. Incorporating cream cheese adds calcium and essential fats, providing a well-rounded dessert option. Health benefits may include a boost to the immune system from the vitamin C content in lemons, while enjoyment in moderation can fit within a balanced diet.

Dietary considerations are essential; for those watching their intake, these rolls can be adjusted to lower sugar content by using alternatives like stevia, keeping the delightful taste intact. Portion analysis suggests that enjoying one roll as a treat can integrate well into an overall healthy eating pattern, emphasizing mindfulness around sweets.

Dietary Adaptations

For those with gluten sensitivities, gluten-free crescent rolls can be utilized, allowing everyone to partake in the deliciousness. Vegans can opt for non-dairy cream cheese and avoid egg wash for sealing the rolls, ensuring all adaptions honor dietary concerns.

Low-carb and keto variations can replace traditional sugar with erythritol, but adjustments may be necessary in ratios to achieve balancing sweetness. Additionally, incorporating nut flour in place of pastry dough can create a low-carb alternative.

A low-FODMAP approach can be achieved by ensuring minimal lactose is used. Lemon desserts are often naturally high in flavor without requiring excessive sugar, so those adhering to this diet can still enjoy them in moderation as a special treat.

Troubleshooting Guide

When facing texture issues such as sogginess in crescent rolls, it often results from overly wet fillings; ensure that the mixture is thick enough to prevent leakage. To rebalance flavor, consider adjusting the acidity by adding more sugar or cream cheese to the mixture to promote an enjoyable taste.

For temperature problems, ensure your baking sheet is preheated, as a cold surface can cause rolls to spread rather than rise. When confronting equipment challenges, if you don’t have a hand mixer, whipping by hand with a fork can still yield a creamy filling, but it may take more time.

Ingredient substitutions can lead to inconsistencies; maintain ratios and consistencies as closely as possible for best results. Lastly, timing concerns can be solved by utilizing a kitchen timer to avoid forgetting rolls in the oven; they should be checked for doneness a few minutes early.

Recipe Success Stories

Community feedback has consistently praised the ease and flavor of Lemon Cheesecake Filled Crescent Rolls, with many users expressing surprise at how quick the preparation was. Variations have become popular as people showcase their versions on social media, ranging from using different fruit fillings to experimenting with spices.

Reader suggestions encourage personalization, with everyone highlighting the ability to adjust aspects like sweetness or tanginess to their preferences effortlessly. Some have shared their photos, noting that creative plating made the rolls a centerpiece rather than just a dessert.

Photography tips abound as other bakers showcase their success stories, often attributing their artistic food styling to fun garnishes and fresh fruit accompaniments. Many indicate that their twists on the original recipe turned out just as well, inspiring others to try variations with confidence.

Frequently Asked Questions

How long can I store Lemon Cheesecake Filled Crescent Rolls?

They can be stored in an airtight container at room temperature for up to two days or refrigerated for up to a week. For long-term storage, they can be frozen for up to three months.

Can I freeze the filling separately?

Yes, you can freeze the cheesecake filling separately in an airtight container. When ready to use, allow it to thaw in the refrigerator before assembling with the dough.

What can I substitute for cream cheese?

You can use dairy-free cream cheese or Greek yogurt as substitutes, but make sure the consistency is similar for optimal results.

Can I make these rolls vegan?

Absolutely! Use plant-based crescent dough and non-dairy cream cheese, ensuring to skip any egg wash steps for a completely vegan dish.

Can I use other fruits in the filling?

Yes! Feel free to experiment with other fruits like blueberries, raspberries, or strawberries mixed into the cheesecake filling for a delightful twist.

What’s the best way to reheat leftover rolls?

Reheat in the oven at 350°F for about 10-15 minutes until warmed through and the pastry is crispy again. Avoid the microwave, as it can make them soggy.

How do I improve the flavor of the filling?

Enhance the filling by incorporating more lemon zest or a splash of vanilla extract. This will deepen the overall flavor and elevate the experience.

What if my rolls are coming out too doughy?

Ensure you are not overcrowding the rolls on the baking sheet and that your oven temperature is accurate. Sometimes, underbaking leads to a doughy texture.

Can I double this recipe?

Yes, you can easily double the recipe. Just ensure you have enough baking sheets and maintain time adjustments accordingly.

What would be good accompaniments with these rolls?

They are wonderful served with whipped cream, a dusting of powdered sugar, or a light fruit compote to balance the richness.

Additional Resources

For more delightful recipes, check out our other citrus desserts, such as lemon meringue pie or lemon bars. We also offer technique guides for perfecting your baking skills, including pastry techniques and filling preparation methods. If you’re curious about the types and uses of cream cheese, we’ve compiled a detailed breakdown for your convenience.

Equipment recommendations feature must-have tools like pastry brushes and tart pans that can enhance your baking experience. Don’t miss seasonal variations that highlight seasonal ingredients and showcase variations on classic flavors!

Join the Conversation

We invite you to share your experience making Lemon Cheesecake Filled Crescent Rolls! Connect with us on social media using #MyCrescentRolls to showcase your creativity, adaptations, and tips. We love to see your photography and would be excited to share your success stories with our community.

Engagement is key in crafting delicious recipes, so feel free to leave your suggestions and questions in the comments section. Let’s build a supportive community for all bakers and food lovers who enjoy a hint of lemony goodness in their lives.

The Recipe

Lemon Cheesecake Filled Crescent Rolls

Serves: 8 servings

Prep Time: 15 mins

Cook Time: 25 mins

Total Time: 40 mins

Kitchen Equipment Needed

  • Baking sheet
  • Parchment paper
  • Mixing bowl
  • Hand mixer or whisk
  • Backing brush (if egg wash is used)

Ingredients

  • 1 can (8 oz) crescent roll dough
  • 8 oz cream cheese, softened
  • 1/2 cup powdered sugar
  • 1/4 cup lemon juice
  • 1 tablespoon lemon zest
  • 1 egg, beaten (optional for egg wash)
  • Additional powdered sugar for dusting, if desired

Directions

  1. Preheat your oven to 375°F (190°C) and line a baking sheet with parchment paper.
  2. In a mixing bowl, combine cream cheese, powdered sugar, lemon juice, and lemon zest until smooth and creamy.
  3. Open the crescent roll dough and separate it into triangles.
  4. Place a generous tablespoon of filling at the wide end of each triangle.
  5. Roll each triangle towards the point, sealing the filling inside, and press the edges to seal tightly.
  6. If using, brush the tops lightly with the beaten egg for a golden finish.
  7. Bake the rolls in the preheated oven for 15-20 minutes, or until golden brown.
  8. Allow cooling slightly before dusting with powdered sugar and serving.

Recipe Notes

  • For extra flavor, consider adding a pinch of salt to the filling.
  • These rolls can be made ahead of time and frozen; just reheat them before serving for best results.
  • Feel free to play with different fruit fillings for various flavor experiences.

Indulge in Heavenly White Chocolate Cake with Pineapple Filling

Heavenly White Chocolate Cake with Pineapple Filling: A Tropical Indulgence

⚖️
Difficulty
Moderate

⏲️
Prep Time
30 mins

🕒
Cook Time
40 mins

⏱️
Total Time
1 hr 10 mins

🍽️
Servings
12

Indulge your senses in a slice of our Heavenly White Chocolate Cake with Pineapple Filling. This exquisite cake promises a delightful balance of creamy sweetness and tropical zest, making it an ideal choice for any special occasion or simply to elevate your day-to-day gatherings. Every bite reveals layers of luscious white chocolate cake and a refreshing pineapple filling, capturing the essence of paradise. The cake’s light and airy texture pairs perfectly with the juicy fruit layers, inviting you to savor the moment.

Imagine serving this stunning cake at your next celebration; its elegant appearance will make it the centerpiece of your dessert table, enticing everyone to take a piece. The combination of rich white chocolate and tangy pineapple not only creates a flavor explosion but also delivers a delightful aroma that fills the kitchen, teasing your taste buds long before it’s served. This cake doesn’t just satisfy a sweet tooth; it brings joy and warmth, making every gathering memorable.

Quick Recipe Highlights

  • Flavor Profile: The cake offers a harmonious blend of sweet white chocolate complemented by tangy pineapple, resulting in a refreshing treat.
  • Texture: Each layer is soft and moist, with a creamy filling that melts in your mouth.
  • Aroma: A delightful mix of sweet chocolate and tropical pineapple wafts through the air while baking.
  • Visual Appeal: With its layers and lush cream frosting, this cake is a feast for the eyes, boasting an inviting white and yellow color palette.
  • Skill Level Needed: Moderate skill is required for mixing the batter and decorating the cake with finesse.
  • Special Equipment: You will need basic baking tools, including cake pans, mixing bowls, and a stand mixer for best results.

Recipe Overview

  • Difficulty Level: This Heavenly White Chocolate Cake strikes the perfect balance between elevated baking techniques and accessibility, making it a satisfying challenge for intermediate bakers.
  • Category: This dessert fits perfectly into the cake category, ideal for birthdays, weddings, and holiday celebrations.
  • Cuisine: With influences from classic American baking and tropical flavors, this cake merges traditions to create something uniquely delightful.
  • Cost: The estimated cost for this recipe is reasonable, considering the overall luxe flavors it brings—most ingredients are pantry staples.
  • Season: Although perfect for summer with its fruity filling, this cake can be enjoyed year-round, making it versatile for all occasions.
  • Occasion: Whether it’s a casual get-together or a grand event, this cake is suitable for a variety of gatherings, promising to impress your guests.

Why You’ll Love This Recipe

The taste and texture appeal of this Heavenly White Chocolate Cake with Pineapple Filling will leave you craving more after the very first bite. The rich chocolate flavor is elevated with the tartness of the pineapple, providing a unique taste that’s both familiar yet exhilarating. The cake’s fluffy layers create a light mouthfeel, making it easy to enjoy multiple slices without feeling weighed down.

Convenience and preparation benefits make this cake a winner in any kitchen. You can prepare the filling ahead of time, allowing for a streamlined baking process when it’s time to assemble. Moreover, the cake keeps well for a few days in the refrigerator, maintaining its moisture and flavor, making it perfect for prepping in advance of an event.

From a nutritional standpoint, using fresh pineapple offers health benefits such as vitamin C and antioxidants, while the white chocolate contributes to indulgence without overpowering the palate. This cake is a treat you won’t feel guilty serving to friends and family, as it includes whole ingredients that are both satisfying and nourishing.

The social and entertaining value of serving this cake cannot be overstated. Whether during a festive gathering or a simple dinner party, this cake catalyzes conversation and is sure to delight guests of all ages. Its impressive presentation makes it a great icebreaker, and the flavor provides a memorable dessert experience that everyone will talk about afterward.

Cost-effectiveness and accessibility make this recipe an attractive option for both novice and seasoned bakers. Many ingredients are readily available at local grocery stores, and their prices are generally budget-friendly, allowing you to create an indulgent dessert without breaking the bank.

Historical Background and Cultural Significance

The Heavenly White Chocolate Cake’s roots can be traced back to the rise of chocolate as a beloved ingredient in American baking. Initially introduced by European settlers, chocolate quickly became a staple in desserts. White chocolate, in particular, gained popularity in the late 20th century, inspiring creative cake recipes, such as this one.

Culturally, this cake represents a fusion of flavors, celebrating both the artistry of baking and the tropical essence embodied by pineapple. Its incorporation of fresh fruit into desserts echoes the tradition of using seasonal produce to enhance sweetness and flavor, a concept widely embraced in various culinary practices.

Over time, this recipe has evolved, with variations appearing in kitchens across the world. Bakers have adapted it using different fruit fillings, frostings, and even gluten-free ingredients, showcasing the cake’s versatility and appeal to diverse dietary needs.

Regionally, this cake can take on different identities based on ingredient substitutions and local flavors. In tropical regions, bakers might use local fruits like mango or passionfruit, while chocolate lovers may add dark chocolate layers to enhance the overall experience.

Ingredient Deep Dive

The main ingredients in this decadent cake each carry their own cultural significance and history. Starting with white chocolate, its creation dates back to the early 20th century when it was developed as a sweeter alternative to dark chocolate, appealing to those seeking a milder taste. Rich in calories but low in cocoa solids, white chocolate is often used in desserts for its creamy texture, but it should be noted that it lacks some of the health benefits associated with dark chocolate.

When it comes to nutritional benefits, white chocolate contains a fair amount of milk fat and sugar, providing a significant source of energy. It’s crucial, however, to select high-quality white chocolate with a high cocoa butter content for maximum flavor. Store this ingredient in a cool, dry place, and be mindful of its heat sensitivity during baking.

Pineapple, on the other hand, has a storied history, originating in South America and spreading throughout the world as one of the most recognizable tropical fruits. Beyond its sweet, juicy flavor, pineapple is rich in bromelain, an enzyme known for its digestive benefits. It’s best to use fresh pineapple for optimal taste and texture, and it’s essential to discard any that appear overly ripe or bruised.

Common Mistakes to Avoid

  • Overmixing the Batter: Avoid mixing the batter too much after adding the flour to the wet ingredients, as this can result in a dense cake.
  • Not Measuring Ingredients Accurately: Baking is a science, so improper measurements can alter the cake’s texture and flavor.
  • Using Cold Ingredients: For best results, ensure that butter and eggs are at room temperature before mixing them into the batter.
  • Undercooking or Overcooking: Be mindful of the baking time—check for doneness with a toothpick and avoid overbaking to prevent dryness.
  • Skipping the Cooling Time: Allow the cake to cool completely before frosting; otherwise, the frosting may melt or slide off.
  • Neglecting to Use Parchment Paper: Line the cake pans with parchment paper for easy release and to maintain the cake’s perfect shape.
  • Rushing the Assembly: Take your time when layering and frosting the cake to achieve a clean and beautiful appearance.
  • Not Tasting the Filling: Ensure the pineapple filling is not too sweet or tart; adjust sweetness according to your taste preferences.

Essential Techniques

To ensure that your Heavenly White Chocolate Cake is a success, it’s essential to master a few key techniques. First, proper creaming of the butter and sugar is vital. This step incorporates air into the batter, producing a light, fluffy cake. To master this technique, beat the ingredients together until light in color and texture, about 5-7 minutes.

Additionally, when melting white chocolate, it’s crucial to do so gently. Use a double boiler or microwave at low power, stirring often to prevent scorching. Visual cues for success include the chocolate melting smoothly without any lumps. This ensures a creamy texture in your cake.

Pro Tips for Perfect Heavenly White Chocolate Cake

To enhance your baking experience, consider these pro tips for achieving the perfect cake. First, always use high-quality ingredients; they make a significant difference in flavor and texture. Invest in good chocolate and fresh fruits for the best results.

Next, ensure your oven temperature is accurate. An oven thermometer can help determine if your device needs calibration, ensuring even baking throughout your cake.

When layering the cake, level the tops of your baked cakes with a serrated knife for even stacking. This simple step elevates the appearance of your cake and ensures a visually appealing presentation.

If you find the pineapple filling to be too sweet, balance it with a touch of lemon or lime juice to enhance flavor depth. A little acidity can elevate the overall taste profile of your dessert.

Lastly, for an eye-catching finish, consider garnishing with fresh pineapple slices or chocolate shavings just before serving. This adds a vibrant touch and invites your guests to indulge in the delightful flavors awaiting them.

Variations and Adaptations

This Heavenly White Chocolate Cake can easily be adapted to suit various tastes and dietary preferences. For those craving a richer flavor, consider dark chocolate ganache instead of traditional white chocolate frosting. The bittersweet chocolate will contrast beautifully with the sweet pineapple filling.

Seasonal adaptations work wonderfully with this recipe; during the fall, adding spices like cinnamon or nutmeg to the batter will invoke a cozy autumn flavor, while using fresh berries in the summer can provide a refreshing change.

If adhering to dietary restrictions, consider making a gluten-free version using a quality gluten-free flour blend. Similarly, for a dairy-free option, substitute the butter and milk with non-dairy alternatives without compromising the cake’s texture.

Flavor variations are also possible—try replacing the pineapple with berries or stone fruits for a unique twist. Each alternative brings about its distinct taste and richness to the dessert.

Finally, when it comes to presentation, consider using a naked cake style, leaving the sides of the cake exposed for a rustic look. Top with fresh fruits for a touch of elegance and natural beauty.

Serving and Presentation Guide

Presenting your Heavenly White Chocolate Cake beautifully can elevate the dining experience for your guests. Begin with plating techniques, such as using a large, decorative cake stand that draws the eye. Serve slices on vintage dessert plates with forks to enhance the cake’s elegance.

Garnishing can take your cake to the next level. Consider fresh tropical fruit, like slices of pineapple or kiwi, to complement the cake’s flavors. A drizzle of chocolate sauce across the plate adds a gourmet touch, creating a pleasing contrast.

Traditional accompaniments could include whipped cream or vanilla ice cream, providing a delightful contrast in temperature and texture. For modern serving suggestions, individual mini cakes or jarred versions are fun alternatives for parties or gatherings.

Temperature considerations are key; allow the cake to come to room temperature before serving for optimal enjoyment. When it comes to portion control, aim for even slices, ensuring that everyone gets a taste of this delightful dessert without overindulging.

Wine and Beverage Pairing

Pairing beverages with your Heavenly White Chocolate Cake can greatly enhance the tasting experience. A light and fruity white wine such as a Riesling or Moscato complements the cake’s creaminess and tropical flavors beautifully. The sweetness of these wines balances out the richness of the chocolate, creating a harmonious experience.

For non-alcoholic alternatives, consider serving a chilled sparkling lemonade or coconut water. These refreshing beverages offer a beautiful contrast and enhance the tropical essence of the dessert.

If coffee or tea is more suitable, opt for a mild brew such as a lightly roasted coffee or a delicate green tea. Both drinks provide a nice counterbalance to the cake’s sweetness without overpowering the flavors.

Be mindful of serving temperatures; serve wines chilled but allow them a few minutes to warm slightly in the glass to release their full bouquet.

Storage and Shelf Life

Proper storage of your Heavenly White Chocolate Cake will ensure that it remains fresh and delicious for days. Store leftover cake in an airtight container in the refrigerator to maintain moisture and flavor. If properly stored, the cake can last up to 4-5 days without losing its delightful texture.

When it comes to temperature requirements, keep the cake chilled, especially if it’s layered with fresh fruit filling. However, allow it to sit at room temperature for about 30 minutes before serving for the best flavor.

Use containers that ensure no air exposure to prolong freshness. Glass containers or high-quality plastic wrap are suitable options that effectively seal in moisture.

Always be aware of signs of spoilage; if the cake shows any signs of mold or an unpleasant odor, it’s best to discard it. For reheating, simply place a slice in the microwave for a few seconds to warm it gently and revive its flavors.

Finally, if you wish to freeze the cake, consider freezing it without frosting first. Once the cake is completely cooled, wrap it tightly in plastic wrap and then in foil before placing it in the freezer, where it can last for up to 3 months.

Make Ahead Strategies

Planning ahead while preparing your Heavenly White Chocolate Cake can elevate your baking experience significantly. Start by making the pineapple filling one or two days before you plan to assemble the cake. This not only enhances the flavor as it sits, but also saves you time on the day of assembly.

Consider storing baked and cooled cake layers in the freezer; wrapping them tightly in plastic can preserve their freshness. When you’re ready, simply thaw them a few hours before frosting.

Quality impact is paramount—fresh cake layers will retain moisture and flavor when frozen properly. Additionally, while icebox cakes are popular, the individual layers remain fresher if caramelized or filled just before serving.

For assembly tips, it helps to prepare your frosting and gathering all necessary tools ahead of time, streamlining the decoration process. Finally, consider adding elements like fresh fruit or whipped cream close to serving, as this preserves their texture and juiciness.

Scaling Instructions

Scaling your Heavenly White Chocolate Cake recipe can be done easily with just a few adjustments. To halve the recipe, reduce each ingredient accordingly and use smaller cake pans to ensure proper baking and even cooking.

If doubling or tripling the recipe, be sure to mix in batches, as larger quantities can affect the consistency of the batter. Investing in larger mixing equipment will also save time and effort.

For equipment adjustments, ensuring you have enough cake pans or utilizing a baking sheet for a layer cake can make the process seamless. Bake the cakes in batches, if necessary, without compromising on quality.

Timing modifications are crucial; larger cakes may require additional baking time, so always check for doneness with a toothpick inserted into the center.

Lastly, consider storage considerations when scaling; larger cakes will take up more space in storage containers, so plan accordingly to keep your delicious creation safe.

Nutritional Deep Dive

While indulging in Heavenly White Chocolate Cake, it’s enlightening to explore its nutritional content. This cake provides a balanced mix of macronutrients, with carbohydrates from sugar and flour, fats from butter and chocolate, and some essential proteins from eggs.

In terms of micronutrient analysis, white chocolate is lower in essential nutrients compared to dark chocolate but still offers energy-dense calories. Pineapple adds a bountiful source of vitamin C and manganese, contributing to overall health benefits.

The cake’s health benefits include the potential digestive support from fresh pineapple and the satisfaction it provides due to its rich flavors, which can curb sweet cravings effectively.

When considering dietary restrictions, bear in mind portion size; small servings can offer enjoyment without excessive caloric intake, fitting well into a balanced diet.

For those managing weight, this cake is a delightful treat to enjoy on special occasions, encouraging mindful consumption alongside healthy methods in everyday meals.

Dietary Adaptations

This versatile Heavenly White Chocolate Cake can cater to various dietary needs with a few simple modifications. For a gluten-free version, substitute the all-purpose flour with a quality gluten-free flour blend, ensuring all other ingredients are also gluten-free.

Dairy-free adaptations can easily be accomplished by using plant-based butter and non-dairy milk alternatives. This not only preserves the cake’s texture but also its delightful taste.

If you need a vegan option, replace eggs with flaxseed meal or applesauce and use vegan chocolate. This ensures everyone can enjoy the cake while sticking to their dietary restrictions.

For low-carb or keto diets, consider using almond flour or coconut flour instead and a sugar substitute suitable for baking. Although texture may vary slightly, it remains enjoyable.

Additionally, paleo and low-FODMAP individuals can find adaptations that allow them to savor this dessert as well, using natural sweeteners and avoiding high-FODMAP fruits in the filling.

Troubleshooting Guide

If challenges arise while making your Heavenly White Chocolate Cake, consider these effective solutions. Common texture issues can include a dense cake, often caused by overmixing the batter. To remedy this, gently fold the ingredients together until just combined for a lighter texture.

Flavor balance may pose a concern; if the cake tastes too sweet, try incorporating a pinch of salt to enhance the overall flavor and balance sweetness.

Temperature problems can arise if the oven is not properly calibrated, so ensure your oven thermometer is accurate. If you notice uneven baking, rotate the cake halfway through to promote even heat distribution.

For equipment challenges, if a cake pan is not available, consider using a baking dish to create a sheet cake version, adjusting baking time as necessary.

When facing ingredient substitutions, always test small batches if trying an alternative, allowing you to explore new flavors without sabotaging the final product.

Timing concerns are also prevalent; if you run out of time while preparing, consider cutting the cake into smaller layers and frosting them quickly for a more casual yet delightful approach.

Recipe Success Stories

This Heavenly White Chocolate Cake has garnered numerous success stories from its appreciative bakers. Community feedback highlights how versatile this recipe can be, with people sharing their adaptations like adding a mango filling or experimenting with different frostings for varied delights.

Many have shared variation successes, where they substituted ingredients based on what they had on hand yet preserved the cake’s enchanting flavor. This speaks to the adaptability of the recipe, making it a beloved choice in many households.

Readers have submitted adaptation stories, showcasing their creativity in transforming the cake for various dietary needs without compromising its rich taste. These user innovations inspire more to take on the recipe, adding their unique flair.

For photography tips, many users suggest displaying the cake on beautiful serving dishes and ensuring proper lighting to capture its stunning details. The visual appeal greatly enhances engagement on social media.

Lastly, the stories of people enjoying this cake during special occasions, from birthdays to weddings, have solidified its place as a cherished recipe within the community.

Frequently Asked Questions

Q: Can I substitute the white chocolate?

A: Yes, you can substitute dark or semi-sweet chocolate for a different flavor profile. However, keep in mind the sweetness level may change, and adjustments might be necessary for balance.

Q: How can I make the cake more moist?

A: To ensure a moist cake, avoid overbaking and consider brushing the layers with simple syrup before frosting. This adds extra moisture and enhances flavor.

Q: Can I make this cake ahead of time?

A: Absolutely! Bake the layers in advance and freeze them, or prepare the filling a day or two ahead for convenience.

Q: What’s the best way to store leftovers?

A: Store leftovers in an airtight container in the refrigerator for up to 5 days. You can freeze the cake for longer preservation.

Q: Can I use canned pineapple instead of fresh?

A: Yes, canned pineapple is a convenient alternative. Just ensure to drain the excess juice to prevent the filling from becoming too soggy.

Q: Does this cake freeze well?

A: Yes, but it’s best to freeze layers without frosting. Wrap them tightly in plastic wrap and foil before placing them in the freezer.

Q: How do I adjust the recipe for high altitudes?

A: At high altitudes, reduce sugar slightly and increase the liquid. Adjust baking time as needed, noting changes in consistency and texture.

Q: Can I use a different filling?

A: Absolutely! Feel free to experiment with other fillings such as raspberry or lemon curd for different flavor profiles.

Q: Will this recipe work for cupcakes?

A: Yes! This recipe is suitable for cupcakes as well, but adjust the baking time to around 18-20 minutes.

Q: Can I add nuts to the batter?

A: Yes, adding chopped nuts can provide a lovely crunch. Just be sure to mix them in gently to avoid overmixing the batter.

Additional Resources

If you’re intrigued by this Heavenly White Chocolate Cake, explore related recipes that complement its rich flavors, such as tropical fruit tarts or chocolate mousse. Additional technique guides on cake baking can boost your confidence and skills for future creations.

For those interested in ingredient information, learning about the benefits of different chocolate types could enhance your baking knowledge and inspire future experimentation.

Equipment recommendations are also available, highlighting must-have baking tools that can streamline your baking process, ensuring you have the right tools for the task.

Lastly, consider seasonal variations in your baking; adapting your ingredients based on seasonal produce can elevate your cakes and keep them exciting throughout the year.

Join the Conversation

We’d love to see your creations of the Heavenly White Chocolate Cake! Share your experiences on social media and engage with our growing community of passionate bakers. Photography tips can help you showcase your beautiful cake, and recipe reviews allow you to provide feedback on any variations you tried.

Engage with others in the community by discussing your adaptations or favorite tricks to make the recipe your own. Sharing recipes can spark creativity and inspire others to try new things in the kitchen.

The Recipe

Heavenly White Chocolate Cake with Pineapple Filling

Serves: 12

Prep Time: 30 mins

Cook Time: 40 mins

Total Time: 1 hr 10 mins

Kitchen Equipment Needed

  • 2 9-inch round cake pans
  • Mixing bowls
  • Stand mixer or handheld mixer
  • Rubber spatula
  • Measuring cups and spoons
  • Cooling rack
  • Offset spatula for frosting

Ingredients

  • 1 cup unsalted butter, softened
  • 1 ½ cups sugar
  • 4 large eggs
  • 2 cups all-purpose flour
  • 1/2 cup milk
  • 1 cup white chocolate, melted
  • 1 tsp baking powder
  • Pinch of salt
  • 2 cups pineapple, crushed and drained
  • 1 cup heavy cream for frosting
  • 1/2 cup powdered sugar
  • Fresh pineapple slices for garnish (optional)

Directions

  1. Preheat your oven to 350°F (175°C). Grease and flour the cake pans.
  2. In a large bowl, cream together the butter and sugar until light and fluffy.
  3. Add the eggs, one at a time, mixing well after each addition. Slowly mix in the melted white chocolate.
  4. In another bowl, sift together the flour, baking powder, and salt.
  5. Gradually add the dry ingredients to the wet mixture, alternating with the milk, starting and ending with dry ingredients.
  6. Divide the batter evenly between the prepared pans and smooth the tops with a spatula.
  7. Bake for 30-35 minutes, or until a toothpick inserted into the center comes out clean.
  8. Once baked, allow the cake layers to cool in the pans for 10 minutes, then transfer them to a cooling rack to cool completely.
  9. While the cakes cool, prepare the filling by combining crushed pineapple and a little sugar if desired.
  10. In a clean mixing bowl, whip the heavy cream until stiff peaks form and gently fold in the powdered sugar.
  11. Once the cakes are completely cool, level the tops if necessary. Place one layer on a serving plate and spread a layer of pineapple filling over it.
  12. Add the second cake layer on top and frost the entire cake with the whipped cream mixture. Garnish with fresh pineapple slices if desired.
  13. Slice and serve the cake chilled or at room temperature, savoring every bite!

Recipe Notes

  • For a richer flavor, consider adding a teaspoon of vanilla extract to the batter.
  • Experiment with different fruit fillings based on seasonal availability.
  • This cake can also be made in advance and stored in the refrigerator for up to 5 days.
  • Substitute pineapple with mixed berries or any preferred fruit to customize your cake.