Deliciously Rich Old-Fashioned Penuche Fudge Recipe to Try!

Old-Fashioned Penuche Fudge: A Sweet Delight

⚖️
Difficulty
Medium

⏲️
Prep Time
15 mins

🕒
Cook Time
20 mins

⏱️
Total Time
35 mins

🍽️
Servings
24 pieces

Penuche fudge is a delightful treat that brings back memories of simpler times and family gatherings. This old-fashioned candy resonates with nostalgia, tantalizing your taste buds with its rich, caramel-like flavor and creamy texture. Made with brown sugar, butter, and whole milk, this fudge melts in your mouth, transporting you to grandma’s kitchen with every heavenly bite.

The allure of this old-fashioned penuche fudge lies not only in its taste but in its charming simplicity. This recipe is straightforward, making it accessible even to novice cooks. The process yields an irresistible fudge that can turn any occasion into a celebration, whether it’s a holiday gathering or a quiet evening at home. There is something magical about enjoying homemade fudge that enhances the flavors of life, inviting you to savor the sweet moments.

Quick Recipe Highlights

  • Flavor Profile: The heavenly blend of caramel and vanilla in penuche fudge offers an exquisite taste that is both rich and creamy.
  • Texture: This fudge boasts a smooth, melt-in-your-mouth consistency that is perfectly satisfying.
  • Aroma: As it cooks, the warm scent of brown sugar and buttery goodness fills your kitchen, drawing everyone in.
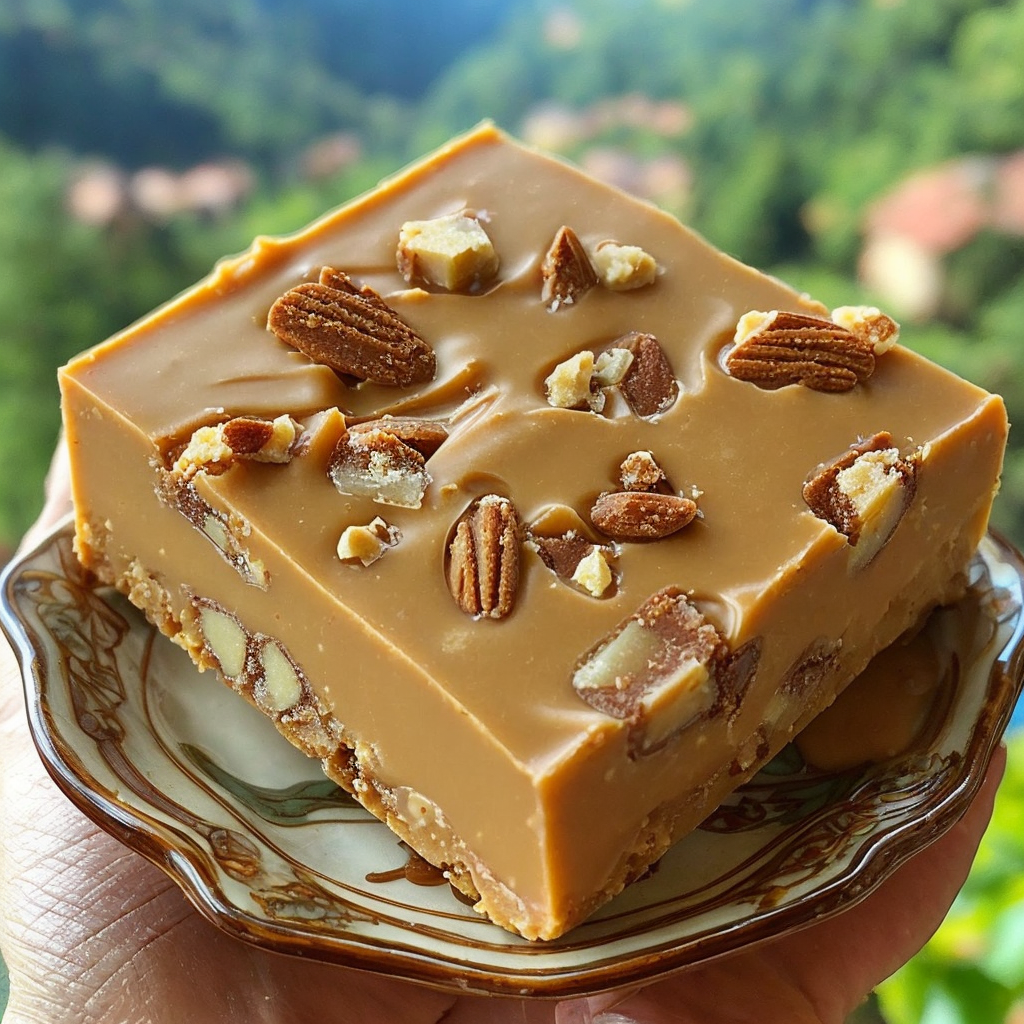
  • Visual Appeal: Penuche fudge is typically light tan, invitingly contrasted with darker, rich toppings for a delightful presentation.
  • Skill Level Needed: While this recipe requires some basic cooking techniques, it remains beginner-friendly with clear instructions.
  • Special Equipment: A candy thermometer and a sturdy saucepan are essential for crafting the perfect fudge.

Recipe Overview

  • Difficulty Level: Creating old-fashioned penuche fudge requires a balance of patience and attention. While it’s moderately challenging, with practice, anyone can master it.
  • Category: This recipe falls under desserts, specifically candy-making, making it a perfect ending to any meal.
  • Cuisine: Penuche fudge is rooted in traditional American baking, reflecting the culinary influences of the Northeastern United States.
  • Cost: This recipe is economical, utilizing common pantry staples such as sugar, butter, and milk, which are budget-friendly ingredients.
  • Season: Penuche fudge shines particularly during the fall and winter seasons, complementing holiday celebrations wonderfully.
  • Occasion: It’s a classic treat perfect for gifting during holidays or serving at family gatherings.

Why You’ll Love This Recipe

The taste and texture of old-fashioned penuche fudge make it truly irresistible. Rich and buttery flavors meld seamlessly with the sweetness of brown sugar, providing a comforting dessert experience. The creamy, melt-in-your-mouth consistency adds to its appeal, making each bite a delightful indulgence. It’s a treat that transcends generations, reminding us of lazy afternoons spent enjoying simple pleasures.

In terms of convenience, this recipe is as straightforward as they come. With just a few ingredients, you can whip up a rich and indulgent fudge that is ready to share with friends and family. The preparation time is quick, allowing you to produce a batch in under an hour. This makes it an excellent option for those last-minute dessert needs or festive celebrations.

Nutritionally, while fudge is a treat meant to be enjoyed in moderation, it offers some benefits due to the inclusion of real butter and whole milk, which provide fat-soluble vitamins. When made at home, you have control over the ingredients and can avoid any preservatives found in store-bought varieties, making it a healthier choice.

Socially, penuche fudge plays a significant role in gatherings, serving as a delicious conversation starter and an inviting gift during holidays. The act of sharing homemade treats strengthens bonds and creates lasting memories, making this fudge a perfect addition to any occasion.

From a cost-effectiveness standpoint, old-fashioned penuche fudge is a great value. It allows you to create a gourmet experience at home without breaking the bank. The simple ingredients are readily available year-round, making this recipe both accessible and economical.

Historical Background and Cultural Significance

The origin of penuche fudge can be traced back to New England, where the rich tradition of candy-making flourished in the 19th century. Penuche, derived from the Spanish word for “brown sugar,” symbolizes the utilization of locally sourced ingredients during early American settlements. Its simple preparation reflects the resourcefulness of home cooks who sought to create delicious treats with available pantry items.

Culturally, penuche fudge holds a special place in American culinary heritage. It is often associated with family gatherings, particularly during the holidays, where it serves as a sweet reminder of cherished traditions. Many families pass down their unique recipes through generations, making this fudge a symbol of both culinary creativity and familial love.

Over the years, the recipe has evolved, with various adaptations emerging that incorporate different flavors such as chocolate, nuts, and spices. These regional variations demonstrate the versatility of penuche fudge while maintaining its classic foundation. As home bakers experiment, the essence of this sweet treat continues to resonate, appealing to both old and new generations.

In contemporary culture, penuche has retained its status as a beloved confection. Its allure is found in its nostalgic flavors and homemade touch, making it a staple at potlucks and gatherings. Whether enjoyed plain or dressed up with toppings, old-fashioned penuche fudge remains a celebrated dessert that resonates with sweet memories.

Ingredient Deep Dive

Brown Sugar: Brown sugar is the quintessential element that defines penuche’s flavor. It contains molasses, which contributes to the fudge’s characteristic caramel tones. Nutritionally, it retains some minerals and has a lower glycemic index compared to white sugar. Look for a soft, moist variety, and store it in an airtight container to prevent hardening. For substitutes, you can use white sugar with a splash of molasses.

Butter: In this fudge recipe, real butter provides richness and flavor, serving as the base for the creamy texture. It also enhances the mouthfeel and plays a critical role in achieving the correct consistency. Consider using unsalted butter for better control over flavor, and store it in a cool, dry place. Should you need a dairy-free alternative, coconut oil or vegan butter can be used instead.

Whole Milk: Whole milk adds moisture and a creamy texture to the fudge, creating a rich base that binds the ingredients together. It’s a good source of calcium and vitamin D, contributing to overall dietary health. When selecting milk, opt for fresh, high-quality products, and keep it refrigerated. As a substitute, you can use heavy cream for a richer taste or a plant-based milk for dairy-free options.

Common Mistakes to Avoid

  • Not Using a Candy Thermometer: Without a thermometer, it’s challenging to reach the correct temperature, leading to inconsistent results.
  • Overcooking the Fudge: Cooking the fudge too long can result in a grainy texture, so watch the temperature carefully.
  • Under-Whipping: Insufficient whipping can cause the fudge to lose its creamy texture, so be sure to incorporate air during cooling.
  • Inadequate Cooling Time: Cutting into warm fudge can lead to a crumbly mess, so allow it to set properly before slicing.
  • Not Greasing the Pan: Fudge can stick to pans, so be sure to lightly grease your dish or line it with parchment paper.
  • Using Cold Ingredients: Cold ingredients can impact the melting process, resulting in a lumpy texture, so ensure all items are at room temperature.
  • Poor Storage: Improper storage can lead to fudge drying out or absorbing odors, so wrap it tightly in plastic wrap.
  • Ignoring Ingredients: Always follow the measurements precisely; small variances can seriously affect the outcome of your fudge.

Essential Techniques

Temperature Control: Mastering temperature control is crucial when making penuche fudge. Proper temperature ensures that the sugar dissolves fully, creating a smooth texture. To master this, always use a reliable candy thermometer and regularly check on the cooking process. Look for signs that indicate readiness, such as a grainy texture dissolving into a shiny surface.

Whipping the Fudge: Once removed from the heat, whipping the fudge allows it to aerate and obtain its creamy consistency. Aim for a vigorous stirring motion; this introduces air that helps the fudge maintain its structure as it cools. Beware of common pitfalls like over-whipping, which can lead to a too-stiff consistency; aim for a spreadable texture with a slight sheen.

Pro Tips for Perfect Old-Fashioned Penuche Fudge

1. Use fresh ingredients for the best flavor; stale sugar or butter can negatively impact the taste.
2. Opt for a heavy-bottomed saucepan to distribute heat evenly and prevent burning.
3. Allow the fudge to cool slightly before pouring to prevent it from sticking to the sides of the pan.
4. Experiment with flavor variations by adding vanilla extract or chopped nuts for a unique twist.
5. Taste your fudge mixture before allowing it to set; tweak sweetness if necessary.
6. For a more indulgent treat, top with chocolate ganache or sprinkle sea salt on top.
7. Keep it cool and stored properly to maintain its creamy texture.
8. Remember that practice makes perfect; don’t be discouraged by the first attempt, as techniques improve over time.

Variations and Adaptations

Penuche fudge can be tailored to suit various tastes and preferences. Consider adding regional flavors, such as maple syrup or whiskey for a unique twist on the traditional taste. Seasonal adaptations can include spices like cinnamon or nutmeg during the cold months for a warm, cozy flavor profile.

Dietary modifications are also possible; for a gluten-free version, simply ensure no additives are included in your sugar and other ingredients. For a more health-conscious approach, try using alternatives like coconut oil instead of butter or agave syrup in place of traditional sugar.

Flavor variations can expand beyond the classic caramel-like taste by incorporating ingredients like espresso or citrus zest. For those who enjoy added texture, consider mixing in mini marshmallows or dried fruits for delightful surprises in each bite.

Finally, presentation alternatives can elevate your old-fashioned fudge into a gourmet treat. Slice the fudge into different shapes or layer it within a gift box arranged with toppings, making it visually appealing for any occasion.

Serving and Presentation Guide

When serving old-fashioned penuche fudge, presentation matters. Cut the fudge into neat squares or rectangles for a polished appearance. Consider stacking the pieces or arranging them on a decorative platter surrounded by nuts or fruit for a stylish touch.

Garnish the fudge with a light dusting of powdered sugar or drizzle with melted chocolate for an enhanced visual allure. Temperature-wise, serve fudge at room temperature to maintain its creamy texture, allowing guests to savor each bite fully.

Pair your fudge serving with coffee or tea, offer it as part of a dessert platter at gatherings, or include it in a homemade gift basket. Portion control is also essential; aim for bite-sized pieces that satisfy without overwhelming your guests’ palates.

Wine and Beverage Pairing

Pairing wines with old-fashioned penuche fudge can elevate your dessert experience. A sweet dessert wine like Sauternes or Port harmonizes beautifully with the fudge’s buttery notes. For a more adventurous option, consider a spiced mead that complements the caramel flavors.

For non-alcoholic alternatives, rich hot chocolate or spiced chai lattes provide a comforting backdrop to the fudge. If you desire a refreshing accompaniment, iced herbal teas can cleanse the palate between bites.

When serving these beverages, consider their temperatures; warm drinks should be paired with warm fudge for a cozy experience. Offering a variety of options ensures that all guests can find their perfect match for indulging in this classic treat.

Storage and Shelf Life

Storing old-fashioned penuche fudge properly can significantly extend its shelf life. Store it in an airtight container at room temperature to maintain its texture and flavor. If your home is particularly warm, refrigerating the fudge can help it stay fresh longer.

Each piece should be wrapped individually in plastic wrap or wax paper to prevent sticking and maintain freshness. Be sure to check for signs of spoilage, such as an off smell or dry texture, which can indicate it’s time to toss the fudge.

If you wish to freeze your fudge, cut it into pieces and store it in a freezer-friendly bag. Thaw pieces overnight in the refrigerator before serving for the best texture. Reheating isn’t necessary; simply allow it to return to room temperature for a delightful, soft bite.

Make Ahead Strategies

Preparing old-fashioned penuche fudge ahead of time not only saves time but also enhances the beauty of your gatherings. Aim to make the fudge at least a day in advance; this allows the flavors to deepen and the texture to set perfectly.

You can store the fudge in an airtight container while leaving it at room temperature between steps. The quality remains intact when stored properly, so you can focus on other preparations leading up to your event.

When you’re almost ready to serve, consider adding fresh elements like sprinkle toppings or a drizzle of chocolate for a last-minute, eye-catching enhancement. Reheating isn’t necessary but ensure you allow the fudge to reach room temperature before serving for optimal flavor and texture.

Scaling Instructions

If you want to enjoy more or less fudge than the original recipe offers, scaling is straightforward. For halving the recipe, reduce all ingredients accordingly, ensuring measurement precision is maintained for the best results.

When doubling or tripling the recipe, be mindful of your saucepan size; a larger pot may be necessary to accommodate increased volume without overflowing. Adjust cooking times slightly, as larger batches may require extra simmering.

Additionally, consider storage adjustments. More fudge translates to additional containers or bags to store your treats properly. Always monitor the texture and temperature to match the original recipe regardless of your final quantity.

Nutritional Deep Dive

Understanding the nutritional value of old-fashioned penuche fudge can inform your enjoyment of this decadent treat. Each serving primarily comprises sugars and fats, typical for desserts, making moderation key.

The macronutrient breakdown typically reveals a significant carbohydrate content, primarily from sugars, while the fats from butter play a crucial role in flavor and texture. Additionally, one can glean micronutrient insights, such as vitamins and minerals, derived from whole milk and brown sugar.

As with all treats, portion analysis is vital, especially if you’re managing calorie intake. Enjoying one or two pieces at a time can satisfy cravings without derailing dietary goals, allowing you to relish the rich flavors without guilt.

Dietary Adaptations

Old-fashioned penuche fudge can be modified to cater to various dietary needs. For a gluten-free version, simply ensure all your ingredients are free from gluten additives; this fudge naturally meets that criterion.

Dairy-free adaptations can be made by substituting cow’s milk with almond or coconut milk and using dairy-free butter alternatives in place of traditional butter. For a vegan twist, consider opting for a plant-based cream for the same creamy texture.

If you’re looking for low-carb or keto adaptations, consider using sugar substitutes like erythritol or monk fruit, creating a similarly rich flavor without the carbs. Each of these modifications allows penuche fudge to accommodate different dietary preferences while maintaining its delightful charm.

Troubleshooting Guide

If you encounter texture issues with your fudge, note that this often results from either overcooking or undercooking. If it’s too runny, a return to the heat for a brief period can help it set better. Conversely, boiling it for too long leads to a dry outcome; balancing temperature and timing is crucial.

Flavor balance is another common issue. If your fudge is too sweet, consider adjusting the recipe next time by reducing sugar slightly or adding a pinch of salt to enhance flavor depth. For too much butter flavor, cutting back on the butter can yield a more balanced taste.

Challenges with equipment may arise, particularly with candy thermometers. If you find readings inconsistent, ensure that your thermometer is calibrated properly. Invest in a quality tool to guarantee accurate temperature readings for fudge-making.

Timing concerns can affect how fudge sets. Make sure you allow adequate cooling time before cutting into pieces; patience is vital for achieving the best texture and presentation.

Recipe Success Stories

Our community is filled with success stories featuring old-fashioned penuche fudge. Family traditions often share the joy of creating and perfecting this recipe, with many posting adaptations and variations that highlight their creativity.

Some readers have embraced flavor ideas from local culinary customs, exploring new possibilities that blend heritage with innovation, resulting in unique twists on the classic fudge. These personalized tales add to the richness of the recipe and inspire others to experiment with their versions.

Photography and presentation tips from our community have showcased indulgent servings of penuche fudge, often paired with complementary items that enhance both appearance and taste. Sharing these moments fosters connection and encourages dialogue around beloved traditions.

Frequently Asked Questions

Q: Why is my fudge grainy?

A: Graininess often occurs when sugar crystallizes, possibly due to undercooking or stirring too vigorously. Ensure to maintain proper cooking temperature and avoid excessive agitation after removing it from heat.

Q: Can I use light brown sugar instead of dark?

A: Yes, light brown sugar can be used, but it will result in a milder flavor. The darker sugar will impart more complexity, so choose according to your taste preference.

Q: How do I know when my fudge is ready?

A: When the fudge reaches the soft-ball stage at around 234°F (112°C) on a candy thermometer, it is ready. The mixture should hold its shape when dropped into cold water.

Q: Can I add nuts to my fudge?

A: Absolutely! Chopped nuts such as walnuts or pecans can be added just before pouring the mixture into a pan. This introduces a delightful crunch and adds flavor complexity.

Q: How long does penuche fudge last?

A: When stored properly in an airtight container, penuche fudge can last up to two weeks at room temperature and even longer if refrigerated or frozen.

Q: Can I freeze penuche fudge?

A: Yes, penuche fudge freezes well. Wrap it securely in plastic wrap or aluminum foil, place it in a freezer bag, and it can be kept for up to three months. Thaw in the fridge before serving.

Q: Is penuche fudge suitable for gifting?

A: Definitely! Penuche fudge makes a wonderful homemade gift. Package it neatly in a box or jar, and it’s perfect for sharing with family and friends during the holidays.

Q: How can I make my fudge softer?

A: If your fudge turns out too hard, try adding a little extra butter or cream when reheating it gently on the stove. This will help to soften the texture.

Q: Can I reduce the sugar in the recipe?

A: While you can reduce sugar, it may alter both flavor and texture. Consider using sugar substitutes if you aim for lower sweetness while retaining the fudge-like qualities.

Q: Do I need a special pan for making fudge?

A: A heavy-bottomed saucepan is recommended to avoid burning. Additionally, a square baking pan lined with parchment paper makes for easy cutting and cleanup.

Additional Resources

If you loved making old-fashioned penuche fudge, exploring related recipes can inspire new culinary adventures. Check out similar confections like chocolate fudge, peanut butter fudge, or caramel candies to broaden your dessert repertoire.

Deepen your knowledge with technique guides on candy-making, including tips on tempering chocolate or mastering various types of syrups. For ingredient information, understand the varieties of sugars and their impacts on flavor and texture.

Investing in quality kitchen equipment will enhance your cooking experience, and exploring seasonal variations can introduce fresh, delightful elements that spark creativity in the kitchen.

Join the Conversation

We invite you to join our vibrant community of dessert enthusiasts! Share your own experience with old-fashioned penuche fudge or post pictures of your beautifully crafted pieces on social media. Engage with other bakers to exchange tips and variations you’ve tried.

Your feedback on this recipe can help others as they embark on their own fudge-making adventures. We encourage you to leave a review or comment about how you personalized your fudge to inspire creativity in our kitchen community!

The Recipe

Old-Fashioned Penuche Fudge

Serves: 24 pieces

Prep Time: 15 mins

Cook Time: 20 mins

Total Time: 35 mins

Kitchen Equipment Needed

  • Candy thermometer
  • Heavy-bottomed saucepan
  • Wooden spoon or spatula
  • Square baking pan (8-inch)
  • Parchment paper

Ingredients

  • 2 cups brown sugar
  • 1/2 cup whole milk
  • 1/2 cup unsalted butter
  • 2 teaspoons vanilla extract
  • 1/4 teaspoon salt

Directions

  1. In a heavy-bottomed saucepan, combine the brown sugar, whole milk, and butter. Cook over medium heat, stirring frequently until the mixture comes to a boil.
  2. Attach a candy thermometer to the side of the pan and continue to cook the mixture, without stirring, until it reaches 234°F (soft ball stage).
  3. Remove the pan from heat and let it cool for a few minutes until it cools to about 200°F.
  4. Stir in the vanilla extract and salt until well combined, then beat the fudge mixture with a wooden spoon or spatula until it thickens and loses its gloss.
  5. Quickly pour the fudge into a greased or parchment-lined baking pan, spreading evenly.
  6. Let the fudge cool completely at room temperature before cutting into squares.

Recipe Notes

  • For added flavor, you can mix in chopped nuts or top the cooled fudge with sea salt.
  • Store fudge in an airtight container at room temperature or refrigerate for extended freshness.
  • Fudge can be frozen for up to three months. Just make sure it’s well wrapped to prevent freezer burn.

Irresistible Strawberry Cheesecake Cookie Cups: Easy Christmas Dessert Delight

Irresistible Strawberry Cheesecake Cookie Cups: The Perfect Easy Christmas Dessert

⚖️
Difficulty
Easy

⏲️
Prep Time
20 mins

🕒
Cook Time
15 mins

⏱️
Total Time
35 mins

🍽️
Servings
12 Cookie Cups

Strawberry Cheesecake Cookie Cups are the quintessential festive dessert that can brighten up any gathering. As you bite into these delightful cookie cups, the sweet and creamy cheesecake filling perfectly complements the tangy burst of fresh strawberries, creating a harmonious flavor profile that is irresistible. Perfectly sized as single servings, these cookie cups not only satisfy your sweet cravings but also provide a visual treat with their vibrant colors and delightful textures.

There’s something undeniably comforting about homemade desserts, especially during the holiday season. With their buttery cookie base and luscious cheesecake filling, these cookie cups are remarkably simple to prepare yet yield impressive results. Whether you’re entertaining guests or simply seeking a cozy treat at home, these cookies will undoubtedly bring joy and festivity to your table.

Quick Recipe Highlights

  • Flavor Profile: Sweet, creamy cheesecake paired with fresh strawberries makes each bite a delightful experience.
  • Texture: A perfect balance of soft cookie and creamy filling gives a delightful mouthfeel.
  • Aroma: The scent of baked sugar cookies mingled with fresh strawberries creates a warm and inviting aroma.
  • Visual Appeal: The red strawberries atop the creamy white filling make for an eye-catching presentation.
  • Skill Level Needed: This recipe requires basic baking skills, making it perfect for beginners and seasoned bakers alike.
  • Special Equipment: You will need a muffin tin and mixing bowls to create these delicious treats.

Recipe Overview

  • Difficulty Level: These Irresistible Strawberry Cheesecake Cookie Cups are classified as easy to make, making them accessible for all levels of bakers.
  • Category: They fit perfectly into the dessert category, ideal for serving at parties, family gatherings, or as a holiday treat.
  • Cuisine: This dessert draws inspiration from classic cheesecake recipes, blending traditional techniques with modern flair.
  • Cost: Approximately $15 to make 12 cookie cups, depending on ingredient quality and local prices.
  • Season: The best time to enjoy these delicious cookie cups is during holidays and summer, when strawberries are at their peak.
  • Occasion: Perfect for Christmas gatherings, birthday celebrations, or any festive occasion that calls for delightful sweets.

Why You’ll Love This Recipe

The combination of taste and texture in these Strawberry Cheesecake Cookie Cups is simply enchanting. Each bite presents a wonderful mix of the soft cookie base and the smooth, rich cheesecake filling, contrasted by the freshness of the strawberries. This layered experience not only captivates the palate but also leaves a lasting impression on dessert lovers.

Convenience is another great aspect of this recipe. It can be prepared in under an hour, allowing you to whip up a beautiful dessert even on a busy day. The simplicity of the preparation means you can enjoy more time with your loved ones during festive gatherings, rather than being stuck in the kitchen.

Nutritionally, these cookie cups can be enjoyed in moderation as part of a balanced diet. Strawberry Cheesecake Cookie Cups contain a source of calcium from the cream cheese and fresh vitamin C from strawberries, making them a delightful treat with some health benefits.

Socially and entertaining-wise, these cookie cups serve as a fantastic conversation starter at any gathering. Guests will be thrilled by the vibrant colors and elegant presentation, making them eager to taste these adorable desserts.

Finally, the cost-effectiveness of this dessert is hard to beat. With simple, accessible ingredients, you can create an attractive and delicious treat that’s sure to impress without breaking the bank. These cookie cups prove that great desserts don’t have to be complicated or expensive.

Historical Background and Cultural Significance

The cookie cup concept merges the beloved traditional cheesecake with a modern twist, making it a fun and portable version of the classic dessert. Cheesecake itself has a rich history dating back to Ancient Greece, where it was served to athletes during the first Olympic Games. Over centuries, various cultures have put their spin on cheesecake, leading us to the many variations we enjoy today.

Culturally, desserts often bring people together, celebrating both everyday moments and special occasions. The Strawberry Cheesecake Cookie Cup is no exception—it has become a favorite among families during holiday celebrations, particularly in American culture, where both strawberries and cream cheese are widely embraced.

As for the recipe’s evolution, it has transformed from classic cheesecake slices into creative forms like these cookie cups. This innovative approach allows for easier serving and enjoyment at events, reinforcing that desserts can be both practical and delightful.

Regional variations often appear with this dessert, incorporating different fruits such as blueberries or raspberries, depending on local preferences and seasonal availability. These variations allow bakers to personalize their creations and engage with their local heritage.

Ingredient Deep Dive

Strawberries: Strawberries are a symbol of summer and celebration, often featured in various global cuisines. They offer numerous health benefits, including high levels of vitamin C, antioxidants, and dietary fiber. When selecting strawberries, look for bright red, firm fruit without blemishes. Store them in the refrigerator and consume them within a few days for the best flavor—frozen strawberries can also be used as a substitute.

Cream Cheese: Cream cheese serves as the heart of the cheesecake filling, bringing a rich, velvety texture. Originating in the United States in the late 19th century, cream cheese has since become a staple in many desserts. Nutritionally, it provides essential fats and calcium. Choose full-fat cream cheese for the best results, and keep it refrigerated until needed. If you’re looking for a lighter alternative, consider using Greek yogurt, though the texture will differ slightly.

Granulated Sugar: As a foundational sweetener, granulated sugar enhances the flavors of every ingredient in the cookie cups while promoting a lovely caramelization. Use sugar with caution, balancing sweetness with other flavors. Store sugar in a cool, dry place, and consider alternatives like honey or maple syrup in moderation if you’re experimenting with different flavors.

Unsalted Butter: Butter is vital for creating a flaky cookie base. It brings richness and moisture, making every bite satisfying. Unsalted butter is preferred to control salt levels in baking. Look for high-quality butter for the best taste. Store butter in the fridge and allow it to soften before use. Coconut oil can be an interesting dairy-free substitute in some recipes.

Common Mistakes to Avoid

  • Overmixing the Dough: Overworking the batter can lead to tough cookie cups. Mix just until combined to keep the texture soft.
  • Underbaking: If you remove the cookie cups too early, they may collapse. Look for a golden edge to ensure proper baking.
  • Skipping Chilling Time: Not chilling the dough can make it difficult to shape. Chill for proper consistency and easier handling.
  • Using Cold Ingredients: Cold cream cheese can create lumps in the filling. Let it sit at room temperature to soften before mixing.
  • Overfilling the Cups: Filling too much can lead to overflowing during baking. Stick to the recommended amount for perfect results.
  • Using Old Ingredients: Ensure everything, especially baking powder and dairy, is fresh; expired ingredients can ruin the taste.
  • Neglecting To Adjust Oven Temperatures: Each oven behaves differently; using an oven thermometer can help get the right temperature.
  • Rushing the Cooling Process: Allowing the cookie cups to cool properly before serving will ensure they hold their shape and flavor.
  • Inconsistent Sizing: Use a cookie scoop for even sizing; this will help ensure all cookie cups bake uniformly.
  • Ignoring Flavorings: Adding vanilla extract or lemon zest can enhance the flavor—don’t skip on flavor enhancers!

Essential Techniques

Preparing Cookie Cups: Creating the perfect cookie cup shape is essential for holding the filling. Start by greasing the muffin tin well, then press the dough evenly into the bottom and sides of the cups. This technique ensures even baking and easy release from the pan. Watch for a golden brown color to indicate doneness.

Making the Cheesecake Filling: Combine cream cheese, sugar, and flavorings gently. It’s important to cream these ingredients until smooth, but don’t overmix as it can incorporate too much air, causing cracks during baking. Look for a creamy consistency without lumps for the best texture.

Pro Tips for Perfect Irresistible Strawberry Cheesecake Cookie Cups

1. Use fresh strawberries for the best flavor, or consider macerating them in a little sugar to enhance their sweetness.
2. Let the cream cheese sit out before mixing; a softer texture will help prevent lumps in the filling.
3. For an added twist, consider using a graham cracker crust base instead of a cookie dough for a true cheesecake effect.
4. Refrigerate the cookie cups after baking to help them set properly and enhance their texture before serving.
5. Top the assembled cups with whipped cream for an elegant finishing touch that adds extra flavor and visual appeal.
6. Experiment with flavored extracts—like almond or lemon— for unique takes on the classic filling.
7. Store any leftovers in an airtight container in the refrigerator for freshness.
8. Consider adding a touch of vanilla extract to the cookie dough for enhanced flavor throughout.

Variations and Adaptations

One popular regional variation of the Strawberry Cheesecake Cookie Cups is to incorporate different seasonal fruits—like blueberries, raspberries, or even peaches—creating a delightful medley of flavors. Alternatively, adding chocolate chips to the cookie base brings a rich and decadent twist.

For seasonal adaptations, try spicing up the filling during the fall with pumpkin puree or ginger spices for a seasonal flavor enhancement. Those with dietary restrictions can also modify the cookie base to be gluten-free using almond flour or coconut flour while ensuring all ingredients align with their dietary needs.

If you’re looking for creative presentation alternatives, consider placing individual cookie cups in decorative cupcake liners or serving them on a tiered cake stand for visually stunning arrangements at gatherings.

Serving and Presentation Guide

Plating techniques for these cookie cups can be simple yet elegant. Consider arranging the cookie cups on a beautiful platter garnished with fresh strawberries and mint leaves to contrast with the vibrant colors of the dessert.

To elevate the experience, you might garnish the tops with a dollop of whipped cream or a drizzle of chocolate sauce. Simple decorations like powdered sugar or crushed nuts can also add an attractive touch.

Traditionally, these cookie cups are perfect as standalone desserts; however, pairing them with a side of vanilla ice cream or a fruit coulis can add a delightful twist. For temperature considerations, serve the cups chilled, allowing the cheesecake filling to hold its shape while indulging in every heavenly bite.

Wine and Beverage Pairing

Pairing these Strawberry Cheesecake Cookie Cups with a sweet dessert wine like Moscato can enhance the overall experience, bringing out the fruity notes in the strawberries while balancing the creamy texture of the cheesecake. Alternatively, a light sparkling rosé can provide refreshing contrasts.

For non-alcoholic options, consider serving with iced tea garnished with lemon. A strawberry lemonade can also complement the flavors beautifully, providing a refreshing balance to the richness of the cookie cups.

If you enjoy coffee or tea, a cup of smooth cappuccino or a chai latte can enhance the dessert experience, providing warmth and depth to the sweet and tangy flavors.

Storage and Shelf Life

These Strawberry Cheesecake Cookie Cups are best stored in an airtight container in the refrigerator, where they will stay fresh for up to 3-4 days. To prevent the cookie base from getting soggy, place parchment paper between layers if stacking.

When reheating them, use a microwave in short intervals to avoid melting the cheesecake filling completely. The cookie cups can also be frozen for up to a month; wrap them tightly in plastic wrap or use freezer-safe containers for longer storage.

Be mindful of signs of spoilage, such as off-odors or changes in texture. If there are any uncertainties around freshness, it’s better to err on the side of caution and discard them.

Make Ahead Strategies

To make these Strawberry Cheesecake Cookie Cups ahead of time, prepare the cookie dough and store it in the refrigerator for up to 24 hours before baking. The cheesecake filling can also be made a day in advance and stored separately.

For optimal freshness, consider freezing the assembled cookie cups, placing them in the freezer right after baking. Allow them to thaw in the refrigerator before serving. This method will help maintain texture while providing convenience on the day of your event.

When assembling, add fresh strawberries just before serving to retain their color and freshness, enhancing the overall presentation and flavor.

Scaling Instructions

Scaling these Strawberry Cheesecake Cookie Cups is easy; simply double or triple the ingredient amounts according to your desired servings. Keep in mind that batch sizes should fit within your available mixing and baking equipment.

For halving the recipe, keep an eye on the baking time as smaller batches may require less time in the oven. Additionally, if you choose to utilize multiple pans, make sure to rotate them during cooking for consistent results.

When adjusting portions, be sure to calculate any necessary changes in baking times while ensuring the proper working temperature for ingredients. Extra care should be taken if you’re using a larger pan to accommodate more cookie cups.

Nutritional Deep Dive

The nutritional breakdown of each Strawberry Cheesecake Cookie Cup offers a delightful treat that still contains essential nutrients. Each cookie cup typically includes carbohydrates from the cookie base, fats from the cream cheese, and proteins that lend themselves to a balanced dessert in moderation.

A serving provides a good source of calcium and vitamins, particularly if you incorporate fresh strawberries, which contribute antioxidants that fight inflammation and boost the immune system. Balancing dessert intake with a nutrient-rich diet is key for maintaining health and wellness.

While enjoying these delicious treats, keep portion sizes in mind to manage calorie intake effectively. Remember, desserts can fit into a healthy lifestyle when enjoyed in moderation and balanced with nutritious foods.

Dietary Adaptations

Accommodating various dietary needs is possible with Strawberry Cheesecake Cookie Cups. For a gluten-free version, substitute all-purpose flour with almond flour or gluten-free flour blends, keeping consistency in mind.

Dairy-free options can be achieved using vegan cream cheese and dairy-free butter, offering a similar flavor and texture. For those on vegan diets, ensure all ingredients align, including the sugar used.

For low-carb or keto adaptations, switching to almond flour and using a sugar substitute like erythritol will allow compliance without sacrificing flavor. Each adaptation ensures that everyone can enjoy these delightful cookie cups.

Troubleshooting Guide

Should texture issues arise, check the cookie base for overmixing, which can create a dense product. Incorporate just enough until the ingredients are combined to maintain softness.

If flavor balance seems off, ensure to sample during preparation—adding more vanilla or sugar can often help achieve a delightful equilibrium.

Temperature problems can typically be solved with an accurate oven thermometer to ensure the right baking temperature. If ingredients aren’t at room temperature when combining, this could affect the cookie and filling’s consistency.

If facing equipment challenges, like sticky cookie dough, lightly flour your hands or work surface to help manage it better. Prepare for any adjustments that your specific tools may require.

Timing concerns can be managed with a well-prepared baking timeline, checking cookies regularly to ensure they aren’t under or overbaked.

Recipe Success Stories

Bakers from across our community have shared their success with these delightful Strawberry Cheesecake Cookie Cups. Many reported impressing guests at holiday celebrations, where the cookie cups not only tasted delicious but also added vibrant color to dessert tables.

Readers have enjoyed adapting the recipe, substituting strawberries with alternatives like peaches or blueberries, yielding incredible results and rave reviews from family members. The versatility of this recipe proves that small changes can lead to delightful discoveries in flavor combinations.

Photographers capturing these cookie cups have highlighted the visual aspect, noting how the red strawberries pop against the creamy filling, inspiring others to share their own creations online. Positive feedback reinforces that these cookie cups are a household favorite.

Frequently Asked Questions

Can I freeze the cookie cups?

Absolutely! These cookie cups can be frozen for up to a month. Just ensure they are wrapped tightly and stored in an airtight container. Allow them to thaw in the refrigerator when you’re ready to enjoy them.

How do I know when the cookie cups are done?

Look for a golden brown color on the edges of the cups. The centers might still look slightly soft, but they will firm up as they cool.

Can I use other fruits?

Yes, this recipe is quite adaptable! You can replace strawberries with your choice of fruits like blueberries, raspberries, or even seasonal fruits like peaches. Adjust the sweetness as needed.

What do I do if my cheesecake filling is lumpy?

If your filling is lumpy, it may be due to cold cream cheese. Ensure your cream cheese is at room temperature before mixing. If lumps persist, you can blend it briefly until smooth.

Is there a way to make them gluten-free?

Absolutely! Simply substitute all-purpose flour with a gluten-free blend, almond flour, or oat flour to keep the recipe gluten-free and still delicious.

Can I make these cookie cups ahead of time?

Yes! You can prepare the cookie dough and filling a day ahead. Store them separately until you’re ready to assemble and bake.

What other toppings can I use?

Consider topping them with whipped cream, chocolate drizzle, or sprinkle crushed nuts for an added crunch. You can even use a berry compote for a berry-rich experience!

How should I store leftover cookie cups?

Keep the cookie cups in an airtight container in the refrigerator for 3-4 days. Consider layering parchment paper if stacking to avoid sogginess.

Can I substitute sugar with a sugar alternative?

Yes, feel free to use sugar replacements like stevia or erythritol in equal portions according to your preference for reduced sugar options.

Will these cookie cups hold their shape when baked?

Yes! If the dough is well-made and pressed evenly in the muffin tin, they will hold their shape wonderfully during baking.

Additional Resources

For more delightful dessert recipes that complement these Strawberry Cheesecake Cookie Cups, check out our guides on making classic cheesecakes, exploring seasonal fruit-infused desserts, or crafting simple cookie bases. You may also find tips on the best kitchen tools to streamline your baking process, alongside insights into seasonal dessert trends.

Join the Conversation

We encourage you to share your experiences and variations of the Strawberry Cheesecake Cookie Cups on social media. Tag us in your baking photos, share tips, or leave feedback on how your cookie cups turned out. Engaging with our community allows everyone to learn new ideas and celebrate their creative efforts!

The Recipe

Irresistible Strawberry Cheesecake Cookie Cups

Serves: 12 Cookie Cups

Prep Time: 20 mins

Cook Time: 15 mins

Total Time: 35 mins

Kitchen Equipment Needed

  • Muffin tin
  • Mixing bowls
  • Electric mixer
  • Spoon or cookie scoop
  • Parchment paper (optional)

Ingredients

  • 1 cup all-purpose flour
  • 1/2 cup granulated sugar
  • 1/2 cup unsalted butter, softened
  • 1 cream cheese (8 oz), softened
  • 1/4 cup granulated sugar for filling
  • 1 egg
  • 1 teaspoon vanilla extract
  • 12 fresh strawberries, cut in half
  • Pinch of salt

Directions

  1. Preheat the oven to 350°F (175°C) and grease the muffin tin.
  2. In a mixing bowl, cream together the butter and sugar until light and fluffy.
  3. Add the flour and salt, mixing until just combined.
  4. Press the cookie dough evenly into the muffin cups to form a base.
  5. Bake for 10-12 minutes, or until golden brown.
  6. In another bowl, beat together cream cheese, sugar, egg, and vanilla until smooth.
  7. Once cookie cups are baked, pour the cheesecake filling into each cup.
  8. Top each with a half strawberry, pressing lightly into the filling.
  9. Bake for an additional 10-12 minutes until the filling is set.
  10. Let cool completely before removing from the tin; serve chilled or at room temperature.

Recipe Notes

  • Feel free to use different fruits for topping based on your seasonal preferences.
  • These cookie cups can be made ahead of time and stored in an airtight container for freshness.
  • Substitute sugar with a sweetener of your choice for a healthier alternative.

Savor Cheesy Baked Sausage and Peppers for Dinner Tonight

Cheesy Baked Sausage and Peppers: A Delicious Casserole Delight

⚖️
Difficulty
Easy

⏲️
Prep Time
15 mins

🕒
Cook Time
35 mins

⏱️
Total Time
50 mins

🍽️
Servings
4

Indulge in the warm, comforting flavors of Cheesy Baked Sausage and Peppers. This delightful casserole is packed with savory Italian sausage, vibrant bell peppers, and a blend of melty cheeses that will have everyone asking for seconds. The combination of hearty protein and colorful vegetables makes this dish not only satisfying but also visually appealing, perfect for family dinners or gatherings. With its delightful aroma wafting through your kitchen, your loved ones will flock to the table in anticipation of this cheesy, hearty treat.

This Cheesy Baked Sausage and Peppers recipe is all about convenience and flavor. Prepped in just 15 minutes and baked to perfection in 35, this dish allows you to enjoy a delicious home-cooked meal without spending all day in the kitchen. With its perfect balance of protein and veggies, this dish promises to become a family favorite, satisfying even the pickiest eaters. Ready to elevate your dinner game? Let’s dive into the details!

Quick Recipe Highlights

  • Flavor Profile: The rich, savory taste of sausage harmonizes beautifully with the sweetness of roasted peppers and a kick of seasoning.
  • Texture: Expect a delightful contrast between the tender, succulent sausage, soft roasted peppers, and the gooey melted cheese.
  • Aroma: The warm, inviting smells of Italian herbs and sautéing vegetables fill your kitchen with comfort.
  • Visual Appeal: A gorgeous medley of red, yellow, and green peppers contrasts with the golden-brown cheese, making it as beautiful as it is delicious.
  • Skill Level Needed: This dish is ideal for any home cook; even beginners can master this simple casserole.
  • Special Equipment: You’ll need a baking dish, a skillet for sautéing, and basic cooking utensils.

Recipe Overview

  • Difficulty Level: This recipe is easy, making it perfect for weeknight dinners and casual entertaining.
  • Category: It falls under the casserole category, which is a great dish for one-pot meals.
  • Cuisine: This dish is inspired by Italian cuisine, featuring traditional ingredients like sausage, peppers, and herbs.
  • Cost: The ingredients are affordable, ranging from $15 to $20 total, depending on local prices.
  • Season: This comforting dish is perfect for fall and winter, but can be enjoyed year-round.
  • Occasion: Ideal for family dinner nights, potlucks, or cozy gatherings with friends.

Why You’ll Love This Recipe

This Cheesy Baked Sausage and Peppers casserole delivers exceptional taste and texture that will keep you coming back for more. The first bite reveals juicy sausage that complements the sweet roasted bell peppers, creating a mouthwatering flavor explosion. Enhanced with rich cheese, the dish achieves a satisfying creaminess that ties all the elements together perfectly.

Convenience is a standout feature of this dish; it requires minimal prep work and less than an hour to cook! With just one skillet for sautéing and one baking dish, you’ll have less cleanup than many other complex meals. This recipe truly captures the essence of a wholesome meal without the fuss, making it a go-to for busy weeknights.

Nutritionally, the combination of sausage and peppers offers a good balance of protein and vitamins. The bell peppers are bursting with vitamin C, while sausage packs in the protein you crave. Add a side salad, and you have a complete meal that is both hearty and satisfying.

Socially, this recipe is a crowd-pleaser, perfect for entertaining. The inviting aroma and colorful presentation make it a wonderful centerpiece for gatherings. It encourages sharing and allows for friendly conversation around the table, as everyone digs in to enjoy a delicious, cheesy portion.

Finally, cost-effectiveness ensures that this dish can fit into any budget. With fewer than 10 ingredients needed, you won’t break the bank while still delivering a flavorful, comforting meal that your friends and family will adore. It’s an accessible recipe that can bring everyone together around the dinner table.

Historical Background and Cultural Significance

The origins of this Cheesy Baked Sausage and Peppers dish draw significantly from Italian culinary traditions. Italian immigrants brought flavors and recipes from their homeland to the United States, and the blending of local ingredients transformed these dishes into beloved staples in American kitchens. Sausage, in particular, is a popular element, known for its versatility and rich taste.

Culturally, the combination of sausage and peppers is often seen at family gatherings and community celebrations. It embodies the spirit of communal dining, where everyone comes together to enjoy the same hearty meal, fostering connections and memories. The dish carries the warmth of shared experiences, a tradition that has cultivated a sense of belonging within families.

Over the years, the recipe has evolved. While the classic elements remain, modern adaptations include variations such as adding different vegetables or cheese types, reflecting individual tastes and dietary needs. These innovative tweaks make the dish even more inclusive and versatile, adaptable for today’s diverse palates.

Regional variations highlight the dish’s flexibility; in the South, for example, you might find a spicy kick with the addition of jalapeños, whereas in the Midwest, sweet Italian sausage is a favored choice. Whichever version you try, this dish continues to signify comfort and satisfaction across different tables and settings.

Ingredient Deep Dive

For the sausage, its cultural significance goes hand in hand with Italian cuisine. Sausage has long been a staple due to its robust flavor and ease of preparation. Nutritionally, it provides a hearty dose of protein, essential for muscle repair and growth. When selecting sausage, look for high-quality options with minimal fillers, and store it in the refrigerator for up to two days or freeze it for longer shelf life.

Bell peppers not only offer beautiful color and crunch to the dish, but they also pack a nutritional punch with vitamins A and C. Fresh, vibrant peppers should be chosen for their firmness and shiny skin, which indicates freshness. Store them in a cool, dry place or in the vegetable crisper drawer of your fridge. If you’re looking for substitutions, zucchini or eggplant can provide a similar texture and flavor in this recipe.

Cheese is the star that brings everything together. Typically, a mix of mozzarella and provolone is used for their melting properties, but feel free to explore other options such as cheddar or gouda for added flavor depth. Cheese contains calcium and protein, making it a great addition to your diet when consumed in moderation. Keep cheese covered and refrigerated to maintain freshness and flavor.

Common Mistakes to Avoid

  • Using low-quality sausage can result in a bland dish; opt for well-seasoned, high-quality sausage for the best flavor.
  • Overcrowding the baking dish may prevent sausage and peppers from roasting evenly; ensure there’s sufficient space for airflow.
  • Neglecting to pre-cook the sausage could lead to uneven cooking; always brown it first for better texture and flavor.
  • Skipping the seasoning can leave your dish flat; season each layer to enhance the overall flavor.
  • Not allowing the dish to rest after baking can affect texture; a brief resting period helps set the flavors.
  • Using shredded cheese instead of block cheese can lead to a greasy consistency; opt for freshly shredded for a better melt.
  • Not tasting during cooking can lead to an unbalanced flavor; adjust seasoning to your liking as you go.
  • Ignoring cooking times may result in undercooked sausage; always check for doneness to ensure safety.
  • Forgetting to preheat your oven can lead to inconsistent cooking; always preheat to the temperature specified in recipes.
  • Not covering during the last few minutes of baking can lead to over-browning; loosely cover if necessary to retain moisture.

Essential Techniques

Cooking sausage to perfection ensures a great base for your dish. It’s crucial because properly cooked sausage enhances flavor and provides a deliciously savory base for the casserole. Master it by cooking in batches to achieve even browning and avoiding overcrowding the pan. Look for a deep golden-brown color as a sign of doneness.

Sautéing peppers effectively ensures they contribute flavor and texture. This technique is important for bringing out the natural sweetness of the peppers and resulting in a tender bite. To master this, maintain high heat and stir occasionally; the goal is tender but slightly crisp peppers. Watch for bright colors and slight charring for the best results.

Pro Tips for Perfect Cheesy Baked Sausage and Peppers

To achieve the perfect dish, start with fresh ingredients; this makes a noticeable difference in flavor and texture. Don’t be shy about experimenting with spices – a sprinkle of red pepper flakes can elevate the heat!

Pre-cook your ingredients separately for deeper flavors; this can include browning the sausage and sautéing the peppers. Consider adding chopped onions for an extra layer of flavor.

Layering is key; alternate layers of sausage, peppers, and cheese to ensure every bite is deliciously cheesy. Don’t overload on cheese, as it can overshadow the peppers and sausage flavor.

For added flavor, drizzle with balsamic reduction before serving for a sweet-tart finish that complements the richness of the dish.

For meal prep, this dish can be assembled ahead and stored in the fridge, then baked just before serving. If frozen, allow extra time for cooking as it’ll be starting from a cold state.

Finally, let it rest after baking; this allows the juices to redistribute, ensuring every slice is as good as the last.

Variations and Adaptations

Experiment with regional variations by substituting the sausage; try spicy chorizo for a Latin twist or turkey sausage for a lighter option. Add seasonal vegetables like zucchini or eggplant during summer for extra flavors and textures, keeping the dish fresh and vibrant.

For dietary modifications, use plant-based sausage for a vegan alternative. Additionally, if you’re looking to reduce carbs, consider replacing regular potatoes with cauliflower, offering the same satisfying feel without the carbs.

In terms of flavor, herbs can enhance the overall dish; fresh basil or parsley can provide a refreshing finish. If you’re looking for texture changes, try mixing in cooked quinoa or rice before baking, giving a delightful twist to the usual serve.

Presentation alternatives can also elevate your dish – serve in a large skillet or individual ramekins for a rustic, comforting vibe that encourages sharing.

Serving and Presentation Guide

When serving, consider plating techniques that highlight the colorful layers of sausage, peppers, and cheese. Use a large spoon to serve a generous portion into bowls, allowing for a family-style dining experience.

Garnish with fresh parsley or basil to add a pop of color and freshness, enhancing both visual appeal and flavor. Traditional accompaniments such as crusty bread or garlic bread make excellent pairings, perfect for scooping up cheesy goodness.

For modern serving suggestions, incorporate side salads made with seasonal vegetables to balance out the hearty dish. Temperature is essential; serve warm for the best flavor and texture.

For portion control, consider using smaller plates to encourage guests to enjoy the meal slowly, savoring every bite. Encourage taking seconds if desired to promote a relaxed dining atmosphere.

Wine and Beverage Pairing

When it comes to wine pairings, opt for a medium-bodied red like Chianti or Sangiovese, which complement the robust flavors of sausage beautifully. The acidity in these wines pairs well with the richness of the melted cheese and adds a refreshing contrast.

For non-alcoholic alternatives, consider sparkling water with a splash of lemon or a homemade iced tea infused with herbs, which can cleanse the palate between rich bites.

If coffee or tea is more your style, an herbal tea with hints of chamomile can provide a soothing end to the meal. Always ensure beverages served are at a suitable temperature; chilled drinks during warm seasons and warm drinks in colder months enhance the overall dining experience.

Storage and Shelf Life

For optimal storage, store leftover Cheesy Baked Sausage and Peppers in an airtight container in the refrigerator for up to three days. When freezing, make sure to use freezer-safe containers, and it can last up to three months without losing flavor.

Temperature regulations are critical, ensure food is cooled to room temperature before freezing to prevent moisture condensation. Check for signs of spoilage, such as discoloration or sour smells, before consuming leftovers.

When reheating, consider using the oven to maintain the crispy texture of the dish. Heat at a low temperature until warmed through. If reheating in the microwave, cover to retain moisture, but it may lose its crispness.

If you decide to freeze leftovers, allow time for thawing in the fridge overnight before reheating to preserve quality and prevent uneven heating.

Make Ahead Strategies

When planning to make Cheesy Baked Sausage and Peppers ahead of time, start by prepping ingredients early. Chop bell peppers and onions the night before to save time on cooking day, ensuring everything is ready for assembly.

Storing separate components is helpful; keep sausage cooked and chilled, while peppers can be sautéed just before baking. This not only saves time but enhances flavor by keeping ingredients fresh.

Quality may be impacted if prepared too far in advance; aim for a day or two before baking.

Assembly tips include lining your baking dish with parchment paper for an easy cleanup, and layering ingredients evenly for optimal cooking results. Fresh herbs or garnishes can be added after reheating for a fresh finish, enhancing both flavor and visual appeal before serving.

Ensure to provide clear reheating guidelines to anyone enjoying leftovers, focusing on maintaining texture and flavor while enjoying a fresh experience.

Scaling Instructions

Scaling this Cheesy Baked Sausage and Peppers recipe is simple. For halving the recipe, store excess ingredients safely, as sausage and peppers can be frozen for later use. Adjust cooking times to ensure everything cooks evenly; a smaller dish may need less baking time.

For doubling or tripling the recipe, consider using multiple baking dishes to avoid overcrowding. Equipment adjustments may include choosing larger pans or cooking components in batches if your kitchen equipment is limited.

As for timing modifications, always keep a close eye on the dish to ensure proper cooking. Oven thermostats can vary, so check internal temperatures to ensure safety and doneness.

Storage considerations become important when scaling; label ingredients to avoid confusion and maintain freshness while preparing larger batches.

Nutritional Deep Dive

In terms of macro breakdown, each serving of Cheesy Baked Sausage and Peppers offers a balanced intake of proteins, carbohydrates, and fats. This makes it an attractive option for those looking to fuel up after a long day or before engaging in physical activities.

Micronutrient analysis shows a good dose of vitamin C from the bell peppers, while calcium and iron come from the cheese and sausage. The dish supports immunity and bone health, providing essential nutrients to help maintain an active lifestyle.

The nutritional benefits cannot be overlooked; the combination of sausage and peppers provides a good source of vitamins and minerals essential for overall health, especially when balanced with a side salad or greens.

Considering portion analysis, it’s important to be mindful of serving sizes, particularly with richer ingredients like cheese. This can help with weight management.

Weight management tips include balancing this meal with lighter options throughout your day to help maintain consistent energy levels, making it a satisfying yet balanced choice.

Dietary Adaptations

For gluten-free options, use gluten-free sausage and ensure no other ingredients contain gluten, making this dish accessible to those with dietary restrictions.

Dairy-free alternatives are possible with plant-based cheeses that melt well; many brands mimic the consistency and flavor of traditional cheese effectively.

For vegan adaptations, substitute sausage for a plant-based protein option and ensure all ingredients are free of animal products.

Low-carb dieters can replace potatoes with cauliflower rice, while keto followers might choose to eliminate sugar content by opting for no added sauces.

Paleo enthusiasts can swap sausage for lean meat options like chicken or turkey and embrace the pepper and cheese combo. Keeping ingredients whole and natural aligns with the principles of a Paleo diet.

Low-FODMAP adaptations might involve using more robust herbs and spices to compensate for missing flavor due to onion and garlic restrictions, tailoring the dish without sacrificing flavor.

Troubleshooting Guide

To avoid texture issues, ensure that sausages are cooked through before adding them to the baking dish; undercooked sausage leads to chewiness, which detracts from flavor.

If flavor balance seems off, don’t hesitate to add salt or fresh herbs during cooking for a nice finish; tasting throughout the process can ensure optimal flavor.

Overcooking can lead to dryness; always follow the recipe’s cooking time recommendations, adjusting as needed based on your oven and equipment.

Equipment challenges, such as using a dish too small for adequate baking, can hinder even cooking; choose appropriately sized cookware to ensure all ingredients cook uniformly.

For ingredient substitutions, note that cooking times may differ depending on the ingredient’s moisture content or density, so monitor closely for desired results.

Lastly, address timing concerns by allowing ingredients to reach room temperature before cooking, as this can lead to more even cooking and better overall flavor development.

Recipe Success Stories

Community feedback on this Cheesy Baked Sausage and Peppers recipe has been overwhelmingly positive, with many readers expressing delight in how simple yet delicious the dish is. Readers have shared their own variations, swapping in different vegetable combinations or experimenting with various cheeses, showcasing the recipe’s versatility.

Adaptation stories highlight a growing trend of engaging kids in the kitchen; with its colorful presentation and interactive assembly process, family members of all ages have enjoyed this recipe.

Suggestions for photography tips also flowed in, with angles showcasing the bubbling cheese and vibrant peppers creating mouthwatering visuals. With such significant community engagement, all variations remain popular, encouraging creativity among home cooks.

Ultimately, the dish stands as a testament to easy, satisfying cooking that inspires families to gather around the table and enjoy a meal together.

Frequently Asked Questions

Can I use other types of sausage for this recipe?
Absolutely! Feel free to use chicken sausage for a leaner option or spicy Italian sausage to add a kick to the dish.

Can I make this dish ahead of time?
Yes! You can prepare the casserole a day ahead, store it in the refrigerator, and bake it just before serving.

Can I freeze leftovers?
Yes, this dish freezes well. Make sure to store it in an airtight container and enjoy within three months for the best quality.

What are good sides to serve with this dish?
A light green salad or crusty garlic bread pairs wonderfully, balancing the robust flavors of the casserole.

How can I modify the recipe for a low-carb diet?
You can substitute potatoes for cauliflower or zucchini, keeping the dish hearty while minimizing carbs.

Is there a vegetarian version of this recipe?
Yes! Use plant-based sausage and add extra veggies like mushrooms for added flavor and texture.

Can I add other vegetables to the mix?
Definitely! Feel free to include vegetables like zucchini, carrots, or mushrooms for additional nutrition and flavor.

What is the best way to reheat leftovers?
Reheat in the oven at a low temperature to keep the texture nice and avoid drying out the dish.

How spicy is this dish?
The spiciness may vary depending on the sausage used; you can always opt for mild sausage if you want a less spicy option.

What makes this recipe a crowd-pleaser?
The combination of cheesy goodness, savory sausage, and sweet roasted peppers creates a well-rounded flavor profile that delights most palates.

Additional Resources

Explore related recipes such as classic Italian lasagna or pepper-stuffed shells for more comforting meal ideas. Dive deeper into technique guides covering essential casserole tips or ingredient information to enhance your cooking skills. Look into equipment recommendations to ensure you have all the essential tools for success in the kitchen. Seasonal variations can include substitute vegetables based on what’s fresh in your area, keeping your meals exciting and diverse.

Join the Conversation

We’d love to hear your thoughts! Share your own experiences with Cheesy Baked Sausage and Peppers by commenting below or posting your dish on social media. Don’t forget to take a photo and tag us! Recipe reviews enrich our community, and we encourage you to share any adaptations you’ve made or tips you’ve found useful. Engage with fellow food enthusiasts and enjoy the delicious journey together!

The Recipe

Cheesy Baked Sausage and Peppers

Serves: 4

Prep Time: 15 mins

Cook Time: 35 mins

Total Time: 50 mins

Kitchen Equipment Needed

  • Large Skillet
  • Baking Dish
  • Cutting Board
  • Chef’s Knife
  • Measuring Cups and Spoons

Ingredients

  • 1 pound Italian sausage (sweet or spicy)
  • 3 bell peppers (red, yellow, and green), sliced
  • 1 onion, sliced
  • 2 cups mozzarella cheese, shredded
  • 1 teaspoon Italian seasoning
  • 1/2 teaspoon garlic powder
  • Salt and pepper to taste
  • Olive oil for sautéing

Directions

  1. Preheat your oven to 350°F (175°C).
  2. In a large skillet, heat olive oil over medium heat. Add the sausage and cook until browned and cooked through, about 8-10 minutes. Remove from skillet and set aside.
  3. Add sliced onion and bell peppers to the same skillet and sauté until softened, about 5-7 minutes.
  4. Return the sausage to the skillet and mix with the peppers and onions. Season with Italian seasoning, garlic powder, salt, and pepper.
  5. Transfer the sausage and pepper mixture to a baking dish and top with shredded mozzarella cheese.
  6. Bake in preheated oven for 25-30 minutes, until the cheese is bubbly and golden brown.
  7. Let rest for a few minutes before serving, and enjoy!

Recipe Notes

  • You can substitute the sausage for chicken sausage or plant-based sausage for dietary needs.
  • Add spices according to taste; red pepper flakes can add heat.
  • For a cheesy twist, mix different cheese varieties, like provolone or cheddar.
  • Leftovers can be refrigerated for up to 3 days or frozen for later use.

Deliciously Moist Chocolate Chip Zucchini Banana Bread Recipe

Decadent Chocolate Chip Zucchini Banana Bread: A Deliciously Unique Treat

⚖️
Difficulty
Easy

⏲️
Prep Time
15 mins

🕒
Cook Time
50 mins

⏱️
Total Time
65 mins

🍽️
Servings
8 slices

Chocolate Chip Zucchini Banana Bread is a wonderfully moist and rich treat that amalgamates the sweetness of ripe bananas with the subtle earthiness of zucchini, all intertwined with luxurious chocolate chips. This scrumptious quick bread is not just a fantastic way to use up those overripe bananas and an abundance of summer zucchinis; it also provides a delightful flavor profile that pleases both kids and adults alike. Imagine a warm slice fresh from the oven, the decadent chocolate melding perfectly with the soft, tender crumb—this is the epitome of comfort food.

The joy of baking this Chocolate Chip Zucchini Banana Bread goes beyond the taste. Your kitchen will be filled with an inviting aroma that beckons anyone nearby. The combination of cinnamon and vanilla adds depth to the smell, making it irresistible. Plus, the vibrant flecks of zucchini peeking through the sweet, golden-brown crust provide a visually appealing touch that will entice friends and family to grab a slice. It’s perfect for breakfast, an afternoon snack, or even as a delicious dessert after dinner.

Quick Recipe Highlights

  • Flavor Profile: This bread has a delightful sweetness from the ripe bananas and a subtle earthiness from the zucchini, all balanced beautifully by rich chocolatey notes.
  • Texture: Moist and fluffy with a tender crumb, the bread offers a satisfying contrast to the semi-melted chocolate chips throughout.
  • Aroma: Inviting scents of baked banana, cinnamon, and chocolate fill the air, creating a warm and homey atmosphere.
  • Visual Appeal: The dark chocolate chips glisten against the golden-brown crust, while the flecks of green from the zucchini add color.
  • Skill Level Needed: An easy recipe, perfect for beginner bakers, requiring basic mixing and baking techniques.
  • Special Equipment: A mixing bowl, loaf pan, and a simple whisk are all you need to create this delicious loaf.

Recipe Overview

  • Difficulty Level: This Chocolate Chip Zucchini Banana Bread is an easy recipe that is great for novice bakers. The steps are straightforward, making it accessible for anyone keen to whip up a delightful loaf.
  • Category: Ideal for breakfast or snacks, this recipe falls into the quick bread category, which is versatile and perfect for any time of day.
  • Cuisine: This bread is a beautiful fusion of American baking traditions, leveraging common ingredients found in many households, particularly in the summer when zucchinis are abundant.
  • Cost: Estimated at a budget-friendly price, this recipe includes staple ingredients like flour, sugar, and zucchini, making it easy to enjoy without breaking the bank.
  • Season: Best enjoyed during summer and fall when zucchinis are fresh, it’s a great way to celebrate seasonal produce.
  • Occasion: This delightful bread works wonderfully for brunch, picnics, or casual gatherings, and it’s a perfect homemade gift.

Why You’ll Love This Recipe

The appeal of Chocolate Chip Zucchini Banana Bread lies in its incredible taste and deceptive health benefits. By integrating zucchini, this bread adds an extra layer of moisture without overwhelming sweetness, making each slice not only indulgent but deceptively nutritious. The chocolate offers a delightful contrast of richness, ensuring that every bite is both satisfying and enjoyable.

In terms of convenience, this recipe can be made in just over an hour, allowing busy individuals or families to prepare a wholesome snack quickly. The ease of mixing and baking means you can involve kids in the kitchen, making it a fun family activity that results in a delicious reward for everyone.

From a nutritional standpoint, this recipe packs in the benefits of bananas and zucchini, rich in potassium, vitamins, and fiber. This loaf is an excellent option for breakfast or a snack, providing not just energy but also vital nutrients to fuel your day.

Socially, nothing beats sharing a freshly baked loaf with friends and family. This Chocolate Chip Zucchini Banana Bread is perfect for sharing at gatherings, bringing people together over a slice of homemade joy and creating memorable experiences.

Lastly, it’s a cost-effective recipe that utilizes pantry staples and leftover produce. This not only minimizes food waste but offers a delectable treat without needing specialty ingredients that can often be costly.

Historical Background and Cultural Significance

Bread has been an essential part of cuisines worldwide, but the specific history of quick breads, like this Chocolate Chip Zucchini Banana Bread, is particularly fascinating. Quick breads emerged around the time baking powder and baking soda became commonly used in the late 19th century. These leavening agents allowed home bakers to create light and airy breads without the lengthy fermentation processes associated with traditional yeast bread.

Zucchini bread traces its origin back to the times when gardeners sought to use up their abundant summer harvests. Combining this vegetable with bananas not only enhanced the flavor but also contributed moisture to the dough, allowing it to remain tender and delicious. The integration of sweet and savory ingredients Create an unexpected but delightful flavor profile that has endured over the years.

As this recipe evolved, various iterations have appeared worldwide, reflecting local preferences and available ingredients. For instance, in some cultures, spices such as nutmeg or cardamom might be added, highlighting regional variations in flavor profiles.

In contemporary communities, the adaptation of this recipe to include chocolate has made it a favorite for dessert lovers, linking generations through the joy of sweet treats. The cultural importance of sharing homemade goods with family remains strong, emphasizing connection and nurturing through food.

Ingredient Deep Dive

Bananas

Bananas are a staple fruit known for their rich flavor and versatility. Originating from Southeast Asia and now popular worldwide, they are celebrated for their creamy texture and natural sweetness. In baking, particularly for this Chocolate Chip Zucchini Banana Bread, ripe bananas lend moisture and sweetness, reducing the need for additional sugar.

Nutritionally, bananas are an excellent source of potassium, vitamin C, and dietary fiber, which contribute to heart health and digestion. When selecting bananas, look for ones that are heavily speckled with brown for optimal sweetness. They can be stored at room temperature until ripe, after which refrigeration can prolong their life, though the skin may darken. If you need a substitute, unsweetened applesauce works well to maintain moisture.

Zucchini

Zucchini, a summer squash, is famed for its mild flavor and versatility in both savory and sweet dishes. It has its origins in Central America and has morphed into favorites across various cuisines. Its inclusion in baked goods, such as this Chocolate Chip Zucchini Banana Bread, provides moisture without adding calories, making it an excellent addition for healthier recipes.

Nutritional benefits of zucchini include vitamins A and C, as well as numerous antioxidants. When selecting zucchini, choose firm ones with shiny skin and a vibrant color. They can be stored in the refrigerator for a week or so. For substitutes, you can utilize shredded yellow squash or pureed pumpkin, though the latter will yield a different taste.

Chocolate Chips

Chocolate chips are a delightful addition to many baked goods, adding an indulgent touch that elevates the recipe. Originating in the United States in the 1930s, chocolate chips quickly became a pantry staple, especially for cookies and sweet bread.

Beyond flavor, chocolate adds antioxidants and can elevate mood thanks to its chemical components. When choosing chocolate chips, opt for semi-sweet or dark varieties, which tend to have richer flavors. Store them in a cool, dry place, and they can last for months. For substitutions, feel free to use chopped chocolate bars or even white chocolate for a different flavor.

Common Mistakes to Avoid

  • Overmixing the batter: Mixing too much can result in tough bread. Stir until just combined for the best texture.
  • Using unripe bananas: Ensure bananas are fully ripe to maximize sweetness and moisture in the bread.
  • Not draining excess moisture from zucchini: Squeeze out excess liquid before adding to the batter; otherwise, the bread may become soggy.
  • Incorrect oven temperature: Always preheat your oven for consistent baking results, as an unheated oven may affect the rise.
  • Not testing for doneness: Use a toothpick inserted in the center to check if it comes out clean; underbaking could lead to a gooey center.
  • Skipping parchment paper: Even if greasing, parchment paper ensures easy removal and avoids sticking.
  • Not letting it cool completely: Allow the bread to cool in the pan before transferring to a wire rack to prevent a wet or gummy texture.
  • Ignoring ingredient temperature: Room-temperature ingredients mix better and contribute to the bread’s overall rise and texture.
  • Cutting into the bread too soon: Allow the loaf to cool to set the texture perfectly; cutting too early can result in crumbling.
  • Replacing ingredients randomly: Make sure to use substitutes that match the properties of the original ingredients to achieve desired results.

Essential Techniques

Mixing the Batter

Proper mixing ensures a tender loaf. Mix wet ingredients separately from dry ingredients to prevent overmixing. Combine both gently until just incorporated; this method minimizes gluten development, yielding a soft texture. Look for visual cues, like a slightly lumpy batter, indicating it’s ready for the oven.

Measuring Ingredients

Accurate ingredient measurements are crucial for success. Use a kitchen scale or proper measuring cups to ensure precision, especially with flour. Spoon flour into the cup and level it off gently. Improper measurements can cause alterations in texture and flavor.

Squeezing Zucchini

To prevent overly moist batter, squeezing excess liquid from shredded zucchini is essential. Use a clean dish towel or cheesecloth, and press until mostly dry. This step helps maintain the right moisture balance in your bread.

Oven Thermometer Use

Using an oven thermometer can help ensure your oven heats accurately. Many ovens can be off by significant degrees, leading to under- or over-cooked bread. Use this tool for the best baking results; your baked goods will always come out perfect.

Pro Tips for Perfect Chocolate Chip Zucchini Banana Bread

1. For extra flavor, add a teaspoon of vanilla extract or a sprinkle of cinnamon to the batter.
2. Experiment with different types of chocolate chips, such as dark, milk, or even white chocolate, for varied flavor profiles.
3. Add nuts, such as walnuts or pecans, for added texture and nutty flavors.
4. Use a combination of whole wheat flour and all-purpose flour for a healthier twist.
5. If the zucchinis are abundant, double the recipe and freeze one loaf for later!
6. To enhance moisture, try adding a few tablespoons of yogurt or sour cream to the batter.
7. If you like crunch, sprinkle some oats or granola on top before baking.
8. Top your warm loaf with a dusting of powdered sugar for a beautiful finish!

Variations and Adaptations

For a seasonal summer twist, consider adding fresh blueberries to your Chocolate Chip Zucchini Banana Bread. The burst of juicy fruit pairs beautifully with the rich chocolate and complements the banana flavor. During fall, a touch of nutmeg and chopped pecans could give it a delightful autumn feel.

For health-conscious eaters, make it gluten-free by substituting all-purpose flour with gluten-free blends tailored for baking. Dairy-free options exist as well—using coconut oil in place of butter creates a delightful flavor and moist texture without dairy.

If someone prefers a lower-sugar option, opt for dark chocolate chips or even sugar alternatives for a lighter take. For a unique texture upgrade, consider swirling in cream cheese batter before baking for a deliciously decadent marble effect.

Presentation is key! Serve in muffin tins for perfect individual portions or slice and package as gifts for friends and family, topped with homemade fruit preserves.

Serving and Presentation Guide

When serving Chocolate Chip Zucchini Banana Bread, consider slicing it into thick pieces for a rustic look, or opt for slender slices for a more refined presentation. A dusting of powdered sugar on top adds charm and brightness, enhancing its visual appeal.

Garnishing with fresh mint leaves can bring a splash of color and freshness, while a dollop of whipped cream or a scoop of vanilla ice cream elevates it to a decadent dessert. For an elegant touch, serve it on a wooden board with a selection of gourmet jams and butter, inviting guests to create their combinations.

Temperature matters! Serve this bread warm or at room temperature. Storing it in a beautifully wrapped cloth can keep it fresh and inviting, and ensure guests can easily help themselves.

Wine and Beverage Pairing

Pairing wines with chocolate desserts can be delightful. A fruity Pinot Noir nicely complements the rich flavors of chocolate while balancing the sweetness of bananas. Alternatively, a sparkling wine like Prosecco could add a refreshing contrast.

For non-alcoholic options, consider pairing with a spiced chai tea or a rich dark hot chocolate to enhance the chocolatey experience. Fresh fruit juices or mocktails can also serve as fantastic refreshers.

When serving iced beverages, ensure they are chilled but not overly cold to avoid overpowering the bread’s warm, comforting flavors. For coffee aficionados, a warm mug of fresh brewed coffee, particularly a smooth latte, harmonizes exceptionally well with the dessert-like qualities of the bread.

Storage and Shelf Life

To maximize freshness, store Chocolate Chip Zucchini Banana Bread in an airtight container at room temperature. It can last up to four days; however, for longer shelf life, refrigeration is an option, extending it to about a week.

For freezing, wrap slices individually in plastic or aluminum foil and place them in a zip-lock freezer bag. This method retains moisture and flavor for up to three months. To thaw, simply let them sit at room temperature or microwave briefly for warmth.

Signs of spoilage include an off smell or mold growth. If you notice any, it is best to discard the loaf. Proper reheating methods involve using an oven at low temperatures or the microwave to gently warm without drying it out.

Make Ahead Strategies

You can easily prepare the ingredients for Chocolate Chip Zucchini Banana Bread in advance. Pre-grate zucchini and store it in the refrigerator for up to two days before use. Likewise, you can mash bananas and combine with other wet ingredients ahead of time.

Make batter the night before and refrigerate it, covering the bowl tightly. Just remember to bring it back to room temperature before baking, as cold batter may affect the rise. This way, you can enjoy freshly baked bread in the morning with minimal effort.

For added convenience, consider prepping and storing dry ingredients in a mason jar. It makes the process even faster the day you decide to bake. Just pour the contents into a bowl, mix in your wet ingredients, and you’re ready to bake!

Scaling Instructions

If you need to halve the recipe, simply divide all the ingredient quantities in two. It’s that simple! Be careful when adjusting baking times; check for doneness a few minutes earlier than indicated.

Doubling or tripling the recipe is entirely feasible, especially for gatherings. Use larger mixing bowls and ensure you have ample baking space. Be wary, as larger batches may require a more extended baking time, so watch carefully and do the toothpick test for doneness.

When scaling up, consider the size and type of your baking dish; a larger loaf pan will require a longer baking time compared to smaller ones. Adjust accordingly, and be patient as your delicious creation bakes to perfection.

Nutritional Deep Dive

A piece of Chocolate Chip Zucchini Banana Bread is a delicious way to gather essential nutrients. Each slice typically contains a healthy balance of macro and micronutrients, primarily due to bananas and zucchini, which provide vitamins A and C, potassium and fiber essential for digestion.

On the macro level, this bread offers carbohydrates for energy, while the fats from chocolate chips provide a small dose of healthy fats when made with higher cocoa content chocolate. Additionally, using whole wheat flour adds dietary fiber, which assists with digestion and maintaining a healthy diet.

When considering portion sizes, one slice is satisfying enough due to its rich flavors. For those managing weight, enjoying this bread in moderation is key; enjoying a slice can fit perfectly into an otherwise balanced diet without compromising indulgence.

Dietary Adaptations

Chocolate Chip Zucchini Banana Bread can easily be tailored to fit various dietary needs. For a gluten-free option, opt for gluten-free flour blends that closely mimic traditional all-purpose flour to ensure the right texture in your bread.

Dairy-free diets can benefit from using coconut oil instead of butter, providing a delightful coconut flavor while maintaining moisture. Substituting the chocolate for dairy-free varieties is another essential step for those avoiding dairy.

For a vegan version, replace eggs with flaxseed meal mixed with water, or opt for ripe bananas, as they act as a binder, adding flavor and moisture. Maple syrup can replace sugar to increase sweetness while keeping the recipe vegan-friendly.

Low-carb or keto adaptations can be made by substituting all-purpose flour with almond flour and reducing or replacing sugars with low-carb sweeteners. Each modification can be achieved while still enjoying a delectable bread.

Troubleshooting Guide

If your Chocolate Chip Zucchini Banana Bread doesn’t rise as expected, check to ensure your baking powder is fresh, as expired leavening agents can hinder the rising process. Overmixing can also create dense bread; use gentle folding techniques instead of vigorous mixing.

Flavor balance issues can arise from using unripe bananas; always ensure bananas are adequately ripened for optimal sweetness. For overly sweet bread, consider cutting sugar next time or adding a pinch of salt.

Temperature problems often result from inconsistent oven heat. An oven thermometer can help ensure proper baking temperature. If your bread is browning too quickly, use aluminum foil to tent over the top.

Ingredient substitutions require the right adjustments. For example, if using whole wheat flour, a bit more moisture may be necessary. Adjusting wet ingredients accordingly can prevent drying or dense textures.

Recipe Success Stories

Readers consistently rave about their experiences making Chocolate Chip Zucchini Banana Bread, sharing joy in its easy preparation and delicious results. Many report incorporating various mix-ins, such as nuts or fruits, leading to delightful variations that their families adore.

Some bakers discover that using overripe bananas lends their loaves an even more pronounced sweetness, enhancing the overall flavor profile. Others have shared success stories about turning the recipe into muffins, achieving perfect portions for kids’ snacks or school lunches.

Feedback from readers also highlights the wonderful aroma that fills their kitchens, creating warm memories of baking and family gatherings. Photographers have shared stunning images showcasing their beautifully baked loaves, proving that this recipe is not only tasty but visually appealing.

Finally, countless adaptation stories show how creative bakers have put their twist on the original recipe, enhancing its versatility and making it their own in the process. Many find joy in the sharing nature of this recipe, fostering connection and conversation over a simple yet delightful loaf.

Frequently Asked Questions

Can I freeze Chocolate Chip Zucchini Banana Bread?

Yes! You can freeze the bread. Wrap it well in plastic wrap and foil or place slices in an airtight container. It can be stored for up to three months. Thaw overnight in the fridge or at room temperature before consuming.

How can I ripen bananas quickly?

If you’re short on time, place bananas in a preheated oven at 300°F (149°C) for about 15-20 minutes, until the skin turns dark. Let them cool before using them in your recipe.

What can I use if I don’t have chocolate chips?

You can substitute with chopped chocolate bars or even dried fruits like raisins or cranberries for a twist. Adjust depending on your desired flavor profile.

Is it necessary to peel the zucchini?

No, it’s not necessary! The skin of zucchini is quite tender and will blend seamlessly in the final product. Just wash the zucchini thoroughly before shredding.

Can I use whole wheat flour instead of all-purpose flour?

Yes, you can use whole wheat flour. Keep in mind that it may create a denser texture, so consider mixing it with all-purpose flour for a lighter loaf.

How can I make my bread moister?

Ensuring you properly drain the zucchini and using ripe bananas will contribute to moisture. Adding yogurt or sour cream to your batter can also help.

What can I add to enhance the flavor?

Spices like cinnamon, nutmeg, or vanilla extract enrich the bread’s flavor. You can also consider adding chopped nuts or a swirl of cream cheese for an added taste dimension.

How do I store the bread properly?

Store the bread in an airtight container at room temperature for about four days. If refrigerating, it can last up to a week or freeze for longer storage.

Can I make mini loaves or muffins instead?

Yes, this recipe works great for mini loaves or muffins! Adjust the baking time accordingly; muffins generally take 15-20 minutes while mini loaves may take around 35-40 minutes.

What should I do if my bread is too dry?

If your bread turns out dry, it could be due to overbaking. Next time, reduce the baking time slightly and check for doneness with a toothpick earlier.

Additional Resources

If you enjoyed this Chocolate Chip Zucchini Banana Bread, check out related recipes such as classic banana bread, zucchini muffins, or other delightful quick breads. Technique guides on baking tips and ingredient handling can enhance your skills, while ingredient information ensures you’re well-equipped for your next baking adventure.

Investing in quality kitchen equipment can also elevate your baking game, including reliable loaf pans, measuring tools, and mixing bowls to ensure consistency in your results. Seasonal variations highlight how to adapt dishes based on what ingredients are in season.

Join the Conversation

Engaging with others in the kitchen can lead to a wealth of ideas and inspiration. Share your photos of your completed Chocolate Chip Zucchini Banana Bread on social media platforms using hashtags for community interaction.

Encourage others to review the recipe and share their experiences, variations, and creative adaptations. Building a vibrant community around cooking allows everyone to learn and embrace unique flavors rooted in shared traditions.

Don’t miss out on trying this delightful recipe! Whether you’re a novice or a pro, and whether you enjoy baking for yourself or sharing with loved ones, this Chocolate Chip Zucchini Banana Bread is sure to become a favorite in your collection.

The Recipe

Chocolate Chip Zucchini Banana Bread

Serves: 8 slices

Prep Time: 15 mins

Cook Time: 50 mins

Total Time: 65 mins

Kitchen Equipment Needed

  • Mixing bowls
  • Loaf pan
  • Whisk
  • Grater for zucchini
  • Measuring cups and spoons
  • Oven mitts

Ingredients

  • 1 cup mashed ripe bananas (about 2-3 bananas)
  • 1 cup grated zucchini (drained)
  • 1/3 cup melted coconut oil or butter
  • 1/2 cup brown sugar
  • 1/4 cup granulated sugar
  • 2 large eggs
  • 1 teaspoon vanilla extract
  • 2 cups all-purpose flour
  • 1 teaspoon baking soda
  • 1/2 teaspoon baking powder
  • 1/2 teaspoon cinnamon
  • 1/4 teaspoon salt
  • 1 cup semi-sweet chocolate chips

Directions

  1. Preheat your oven to 350°F (175°C) and grease a 9×5 loaf pan or line it with parchment paper.
  2. In a mixing bowl, combine the mashed bananas, grated zucchini, melted coconut oil or butter, brown sugar, granulated sugar, eggs, and vanilla extract. Mix until well blended.
  3. In another bowl, whisk together the flour, baking soda, baking powder, cinnamon, and salt.
  4. Gradually add the dry ingredients to the wet ingredients, gently combining until just mixed. Do not overmix.
  5. Fold in chocolate chips carefully, ensuring they are evenly distributed in the batter.
  6. Pour the batter into the prepared loaf pan and smooth the top with a spatula.
  7. Bake for 50-60 minutes or until a toothpick inserted into the center comes out clean.
  8. Allow the bread to cool in the pan for about 10 minutes before transferring it to a wire rack to cool completely.

Recipe Notes

  • Store leftovers in an airtight container at room temperature for up to 4 days.
  • Freeze leftovers for up to 3 months for a delicious treat later.
  • Feel free to swap in nuts or different types of chocolate for variety!

Savor Seared Lemon Garlic Butter Scallops for Dinner Tonight

Seared Lemon Garlic Butter Scallops: A Culinary Delight for Seafood Lovers

⚖️
Difficulty
Easy

⏲️
Prep Time
10 mins

🕒
Cook Time
10 mins

⏱️
Total Time
20 mins

🍽️
Servings
4 servings

Seared Lemon Garlic Butter Scallops are not just a meal; they are an experience that transports you to the shores of the ocean with each delightful bite. The tender, juicy scallops are perfectly seared to a golden brown, creating a crispy exterior that contrasts with the moist and buttery interior. The rich flavor profile is enhanced with fresh zesty lemon and aromatic garlic, making every mouthful a burst of brightness. Whether served over creamy risotto or alongside a fresh garden salad, these scallops provide a restaurant-quality dish that is achievable in your own kitchen.

This recipe is ideal for seafood lovers seeking a quick and easy dinner option or a stunning dish to impress guests at your next gathering. The simplicity of the ingredients paired with the vibrant flavors creates a satisfying meal that feels luxurious without the hassle. In just 20 minutes, you can elevate your dinner table with this gourmet dish that is sure to become a favorite.

Quick Recipe Highlights

  • Flavor Profile: The sweet taste of scallops is beautifully complemented by the bright acidity of lemon and the robust flavor of garlic, offering a well-rounded taste sensation.
  • Texture: With a golden crust that gives way to a tender and succulent interior, these scallops offer a delightful contrast in every bite.
  • Aroma: The inviting aroma of melted butter, garlic, and fresh lemon infuses your kitchen, making this dish irresistible.
  • Visual Appeal: The gorgeous golden-brown crust of the scallops against a backdrop of vibrant lemon slices and parsley creates a plate that is pleasing to the eye.
  • Skill Level Needed: This scallop recipe is easy enough for beginners but also satisfying for seasoned chefs looking to perfect their searing technique.
  • Special Equipment: A good quality skillet or frying pan is essential to achieve the perfect sear on the scallops.

Recipe Overview

  • Difficulty Level: Seared Lemon Garlic Butter Scallops are easy to prepare, making this dish suitable for novice cooks while still being rewarding for more experienced cooks.
  • Category: Perfect for a main course or as an elegant appetizer, this dish fits seamlessly into various dining occasions.
  • Cuisine: Rooted in classic French cooking, scallops are a beloved delicacy that has made its mark across many cuisines, highlighting their versatility.
  • Cost: Ingredients are relatively affordable, especially when purchasing scallops seasonally, making this dish accessible for most budgets.
  • Season: Ideal for all seasons, scallops shine especially brightly during warmer months when fresh ingredients like lemons and herbs are abundant.
  • Occasion: Whether it’s a cozy weeknight dinner or a glamorous dinner party, Seared Lemon Garlic Butter Scallops are perfect for any celebration.

Why You’ll Love This Recipe

Indulging in Seared Lemon Garlic Butter Scallops means delighting in a perfect pairing of taste and texture that seafood enthusiasts crave. The searing technique brings out the natural sweetness of the scallops while the buttery goodness combined with zesty lemon elevates the dish to a new level of flavor. The savory garlic adds an aromatic depth, enhancing the overall taste experience and making it a fantastic option for any dinner.

Preparation is remarkably straightforward, allowing you to spend less time in the kitchen and more time enjoying your meal. The quick cooking time means you can whip up this dish last minute when unexpected guests arrive or when you desire a special treat after a long day. Having just a handful of fresh ingredients keeps things simple yet delicious, proving that gourmet cooking can often be uncomplicated.

Nutritionally, scallops are a fantastic seafood choice, providing a lean source of protein and essential nutrients like vitamin B12 and omega-3 fatty acids. These nutrients support heart health and overall well-being, so you can enjoy your meal knowing it’s packed with health benefits. Pair these scallops with a side of greens or whole grains to create a balanced dish.

This recipe shines in social settings; the elegant presentation of seared scallops paired with aromatic butter sauce invites conversation and compliments at any dining table. It’s a dish that brings people together, making it ideal for gatherings, celebrations, or just a special night at home.

Cost-effectively, this recipe allows for a touch of elegance without breaking the bank. By choosing high-quality, seasonal scallops and pairing them with affordable pantry staples, you can create an impressive dish that feels indulgent yet accessible. It’s a fantastic way to treat yourself and your loved ones to a fine dining experience from the comfort of your home.

Historical Background and Cultural Significance

The history of scallops dates back centuries, primarily enjoyed by coastal cultures. With their natural abundance in the oceans, these shellfish became essential to various cuisines around the world. The versatility of scallops is admirable; they can be prepared in numerous ways, from baking to grilling, showcasing their global culinary importance.

Culturally, scallops are often associated with fine dining and gourmet meals. Many people have fond memories of sharing meals featuring scallops during significant life events, making them a symbol of celebration and joy. Their status as a delicacy makes them a luxurious choice for special occasions, affirming their place in culinary traditions worldwide.

Over the years, the preparation of scallops has evolved significantly. In modern cuisine, methods like searing have gained popularity, highlighting the scallops’ natural quality and allowing flavors to shine through with minimal additions. Chefs around the world continue to explore new techniques, ensuring the dish remains fresh and exciting.

Regional variations abound, from creamy scallop dishes in Italian cuisine to spicy scallop preparations in Asian cooking, showcasing the scallop’s adaptability. This rich culinary history offers a glimpse into how scallops have become essential to various gastronomies worldwide.

Ingredient Deep Dive

Scallops hold immense cultural significance in seafood cuisines globally. They symbolize simplicity and sophistication, often serving as the centerpiece of many notable dishes. Nutritionally, scallops are rich in protein, low in calories, and packed with vitamins and minerals necessary for a healthy diet. When selecting scallops at the market, opt for moist, firm specimens that have a fresh ocean smell without any fishy odor. Proper storage is crucial; keep them chilled in the refrigerator and use them within a day or two to ensure peak freshness. For substitutions, consider shrimp or firm fish if scallops are not available.

Garlic, in addition to its flavor, carries a wealth of health benefits, including enhanced immune function and improved cardiovascular health. It’s versatile and used widely in cooking due to its aromatic profile and taste enhancement qualities. When selecting garlic, choose bulbs that are firm and free from blemishes. Store garlic in a cool, dry place to maximize its freshness. If you’re looking for substitutions, you can use garlic powder in a pinch, though fresh garlic will yield the best flavor.

Lemon, with its zesty brightness, adds a refreshing tang that complements the richness of scallops beautifully. It is rich in vitamin C and antioxidants, contributing to overall health. When selecting lemons, look for ones that are heavy for their size with a vibrant yellow color. To maximize their shelf life, store them in the refrigerator. If you don’t have lemons on hand, lime can serve as a suitable substitute, though it will impart a different flavor profile.

Common Mistakes to Avoid

  • Not patting the scallops dry: Failing to remove excess moisture can hinder the searing process, preventing a desirable crust.
  • Crowding the pan: This can lead to steaming instead of searing, resulting in less flavorful scallops.
  • Using low-quality seafood: It’s essential to select fresh, high-quality scallops for the best taste and texture, as inferior quality will affect the final dish.
  • Overcooking the scallops: Scallops cook quickly; overcooking can lead to a rubbery texture. Aim for a golden crust on the outside while keeping the center tender.
  • Skipping the pre-heating of the skillet: A properly heated pan is crucial for achieving the perfect sear.
  • Imprecise measurements of ingredients: Cooking requires accuracy. Balance between acid (lemon) and fat (butter) is vital for flavor.
  • Not seasoning properly: Scallops should be seasoned well to bring out their natural flavor. Don’t skip on salt and pepper.
  • Using a dull knife: A sharp knife is essential for cleanly slicing lemon and garnishes, aiding in presentation.
  • Ignoring visual cues: Familiarize yourself with what perfectly seared scallops should look like — a golden crust signifies readiness.
  • Allowing scallops to rest on the counter for too long before cooking: Bringing them to room temperature ensures even cooking.

Essential Techniques

Searing scallops is a critical technique that enhances flavor and texture. Proper searing locks in juices while creating a crispy exterior. To master this technique, ensure your pan is adequately pre-heated and dry scallops before cooking. The visual cue for success is a beautiful golden crust; flip once you’ve achieved this color for a perfect sear.

Flavor infusion through butter basting is essential in this recipe. As the scallops cook, spooning melted butter over them not only adds richness but also enhances flavor. To successfully master this technique, create a hot pan and start with butter that foams before adding scallops. Pay attention to the color; once the butter browns and seasons the scallops, you’ll know you’ve done it right.

Pro Tips for Perfect Seared Lemon Garlic Butter Scallops

1. Always use dry scallops for the best results; they sear better and develop a superior crust.

2. Invest in a high-quality skillet that retains heat well and distributes it evenly for optimal cooking.

3. Preheat your skillet on medium-high heat before adding butter to set the scene for that beautiful sear.

4. Use unsalted butter to maintain control over the seasoning and avoid overpowering the scallop’s natural flavor.

5. Allow scallops to rest briefly at room temperature before cooking to promote even cooking throughout.

6. Don’t flip the scallops too soon; let them develop color and texture before turning them over.

7. If using garlic, add it during the last minute of cooking to avoid burning and maintain a fresh flavor.

8. Experiment with different herbs like thyme or parsley for unique flavor profiles alongside the classic lemon and butter.

Variations and Adaptations

Regional variations of scallops can include different herbs and spices tailored to local flavors. For instance, incorporating cilantro and lime in a Mexican twist can bring a refreshing contrast. Seasonal adaptations may include adding sautéed asparagus in the spring or sweet corn salsa in the summer to enhance the dish’s complexity.

For dietary modifications, you can use dairy-free alternatives like olive oil instead of butter for a lighter version. You may also prepare these scallops on a bed of quinoa or brown rice to offer a more textured foundation.

Flavors can be varied with citrus alternatives; for example,.Try using grapefruit or blood orange in place of lemon for a unique brightness and a touch of sweetness.

Textural modifications could include breadcrumbs or nuts for added crunch. A sprinkle of toasted almond slivers over the scallops before serving can introduce pleasing texture contrast without overwhelming the main dish.

For presentation alternatives, arrange scallops on a bed of microgreens or drizzle with balsamic reduction for a gourmet look that impresses without extra effort.

Serving and Presentation Guide

Plating is an art: arrange the scallops in a circular pattern to draw the eye. A light sprinkle of fresh herbs enhances the visual appeal and adds a pop of color. Garnish with lemon wedges for guests to add at their own discretion, encouraging an interactive eating experience.

For modern serving suggestions, consider individual appetizer plates with scallops served side by side instead of family-style. This adds an upscale feel that can impress in a more intimate setting.

Temperature considerations are essential; serve scallops immediately after cooking for the best texture, as they can cool quickly. Portion control is key; two to three medium-sized scallops per serving works well, especially when serving alongside a couple of complementary sides.

Wine and Beverage Pairing

For wine pairings, a crisp Sauvignon Blanc or a light Chardonnay complements the buttery flavors beautifully. These wines enhance the scallops’ natural sweetness and richness. If you prefer a red, choose a light Pinot Noir to avoid overwhelming the seafood’s delicate taste.

For non-alcoholic alternatives, sparkling water with a slice of lemon is refreshing and complements the dish’s brightness. Herbal iced teas can also share a delicate balance, especially during warmer months.

If coffee or tea is suitable with your meal, opt for a light herbal tea that won’t clash with the flavors, allowing the scallops to take center stage.

Storage and Shelf Life

Store leftover cooked scallops in an airtight container in the refrigerator for up to 2 days. Ensure they cool before sealing to avoid condensation, which can lead to spoilage. Fresh, uncooked scallops should ideally be used within a day to ensure peak flavor and texture.

Avoid freezing cooked scallops, as this can alter their texture negatively; however, uncooked scallops can be frozen for up to three months if placed in a tightly sealed freezer-safe container. Reheating cooked scallops requires gentle methods like steaming or warming in a low-temperature oven to preserve their tenderness and flavor.

Signs of spoilage include off-odors, discoloration, or a slimy texture. Always trust your senses when assessing the safety of stored seafood; when in doubt, throw it out.

Make Ahead Strategies

For successful meal prep, clean and trim scallops the night before, storing them in the refrigerator to save time. Combine your other ingredients, such as the lemon zest and garlic, into a quick mixture that can be ready for use when you’re set to cook.

Cold scallops should not sit out before cooking; however, you can prepare accompanying sides like salads or sauces in advance to streamline the meal assembly once you’re ready to serve. If making a dinner for guests, consider pre-searing the scallops and briefly warming them before serving.

Always assess the quality impact when making ahead; fresh ingredients yield the best results. For fresh elements like herbs, add them just before serving to maintain their vibrant flavor and colors.

Scaling Instructions

When halving the recipe, adjust cooking times slightly shorter and account for reduced ingredient measurements to maintain flavor balance. If doubling or tripling the dish, ensure your cooking vessel is large enough to accommodate all scallops without crowding. Always keep an eye on cooking times, as larger quantities may alter heat distribution.

Consider timing modifications when making adjustments; thicker scallops may require roper timing to achieve the perfect sear. Also, when scaling for larger groups, prepare accompaniments ahead of time to focus on the scallops when they’re ready to cook.

Pay attention to storage concerns when scaling; larger batches often require more significant containment solutions while ensuring food safety standards are met throughout meal preparation and serving.

Nutritional Deep Dive

Scallops are low-calorie but high-in-protein seafood, making them an ideal choice for those looking to maintain a balanced diet. Each serving provides essential amino acids, vitamin B12, and omega-3 fatty acids, contributing to improved heart health and brain function. The fat content primarily comes from the preparation method, with butter offering a rich choice for flavor, which can be adjusted to accommodate varying dietary needs.

The micronutrient analysis reveals that scallops are an excellent source of selenium, promoting antioxidant processes naturally found within the body. When served with complementary sides such as vegetables, this dish offers an enriched nutrient profile that supports overall wellness. Familiarize yourself with portion analysis to help with weight management; balancing scallops with suitable side dishes contributes to a well-rounded meal.

Dietary Adaptations

For gluten-free options, ensure that any accompanying products or sauces remain entirely free of gluten-containing ingredients. Scallops themselves are naturally gluten-free and can pair wonderfully with gluten-free grains or vegetables.

Dairy-free adaptations can easily swap butter with olive oil or other plant-based alternatives, ensuring the dish stays creamy and luscious while meeting dietary restrictions. Vegetarian or vegan adaptations can explore rich mushroom alternatives or tofu, although these will change the overall flavor profile dramatically.

Low-carb diets can particularly benefit from this dish, pairing scallops with leafy greens or cauliflower rice for a nutritious, satisfying meal that stays within carb restrictions.

Troubleshooting Guide

If your scallops turn out rubbery, it’s often due to overcooking; always watch closely and rely on the visual cues of doneness. To adjust flavor balance, seasoned ingredients can be added throughout cooking, understanding it may need additional salt or acidity depending on personal taste preferences.

For temperature problems, if scallops are undercooked, return them gently to the heat; conversely, for burnt scallops, reduce the heat next time while ensuring an even cooking experience throughout the batch. If equipment challenges arise, like non-stick pans not performing well, consider enlisting a well-seasoned cast iron skillet for improved results.

Recipe Success Stories

Community feedback emphasizes the ease of this recipe, showcasing its accessibility for both novice and experienced cooks alike. Individuals have taken the recipe further, experimenting with different spices or sauces, which has resulted in varied successes that resonate with broader audiences.

Photography tips encourage showcasing the vibrant colors and textures to attract attention and highlight the meal’s appeal. Engaging readers by sharing their adaptations fosters a sense of community and encourages more individuals to experiment with their take on this delightful dish.

Frequently Asked Questions

Q: Can I use frozen scallops?
A: Yes, you can use frozen scallops! However, thaw them completely in the refrigerator before cooking for the best texture and flavor.

Q: What if scallops are overcooked?
A: Overcooked scallops can become rubbery. Be mindful and keep a close eye while cooking to achieve the perfect sear.

Q: Can this recipe be doubled?
A: Absolutely! Just ensure not to overcrowd the pan; sear in batches if necessary.

Q: What side dishes go well with scallops?
A: Excellent pairings include asparagus, a fresh garden salad, or creamy risotto, all complement the scallops beautifully.

Q: How do I know when scallops are done cooking?
A: Perfectly cooked scallops should be opaque and firm to the touch, typically taking around two to three minutes per side.

Q: Can I use other types of seafood in this recipe?
A: Yes, shrimp or fish fillets may also be used, but adjust cooking times accordingly.

Q: Is there a vegan alternative to scallops?
A: While it won’t be the same, mushroom scallops (like king oyster) can be a great substitute, mimicking the texture.

Q: How should I store leftovers?
A: Store leftover cooked scallops in an airtight container in the refrigerator for up to 2 days.

Q: What’s the best way to reheat cooked scallops?
A: For reheating, use gentle heat on the stovetop, or in the oven at low temperature to avoid overcooking.

Q: Can I use garlic powder instead of fresh garlic?
A: Yes, you can use garlic powder, but fresh garlic will yield a more robust flavor.

Additional Resources

If you enjoyed this recipe, explore related seafood dishes like Garlic Butter Shrimp or Herb-Crusted Salmon. Techniques guides focusing on searing perfect proteins or prepping seafood may also enhance your culinary skills. Learn about the nutritional profiles of various seafood to create balanced meals that suit your lifestyle. Recommendations for kitchen equipment will help ensure you have the right tools for successful cooking adventures.

Join the Conversation

We encourage you to share your culinary creations on social media! Tag us when posting your version of Seared Lemon Garlic Butter Scallops. Community engagement fosters creativity and offers inspiration for others, guiding them through their journey in the kitchen. Share your photography tips and what variations you’ve tried to inspire even more palates!

The Recipe

Seared Lemon Garlic Butter Scallops

Serves: 4 servings

Prep Time: 10 mins

Cook Time: 10 mins

Total Time: 20 mins

Kitchen Equipment Needed

  • Skillet or frying pan
  • Spatula
  • Measuring spoons
  • Knife
  • Cutting board

Ingredients

  • 1 pound sea scallops, cleaned and patted dry
  • 2 tablespoons unsalted butter
  • 3 cloves garlic, minced
  • Juice and zest of 1 lemon
  • Salt and pepper to taste
  • Fresh parsley, chopped for garnish

Directions

  1. Heat a skillet over medium-high heat and add butter, letting it melt and foam.
  2. Season the scallops with salt and pepper, placing them in the skillet, ensuring they are not overcrowded.
  3. Cook for 2-3 minutes on each side until golden brown and opaque in the center.
  4. Add the minced garlic and lemon zest to the pan during the last minute of cooking.
  5. Remove scallops from the skillet and squeeze fresh lemon juice over them.
  6. Garnish with chopped parsley and serve immediately.

Recipe Notes

  • For best results, use dry scallops and avoid excess moisture.
  • These scallops pair beautifully with risotto or a crisp salad.
  • Leftovers can be stored in the fridge and reheated gently.