Decadent Gourmet Meatballs with Irresistible Mushroom Sauce Recipe

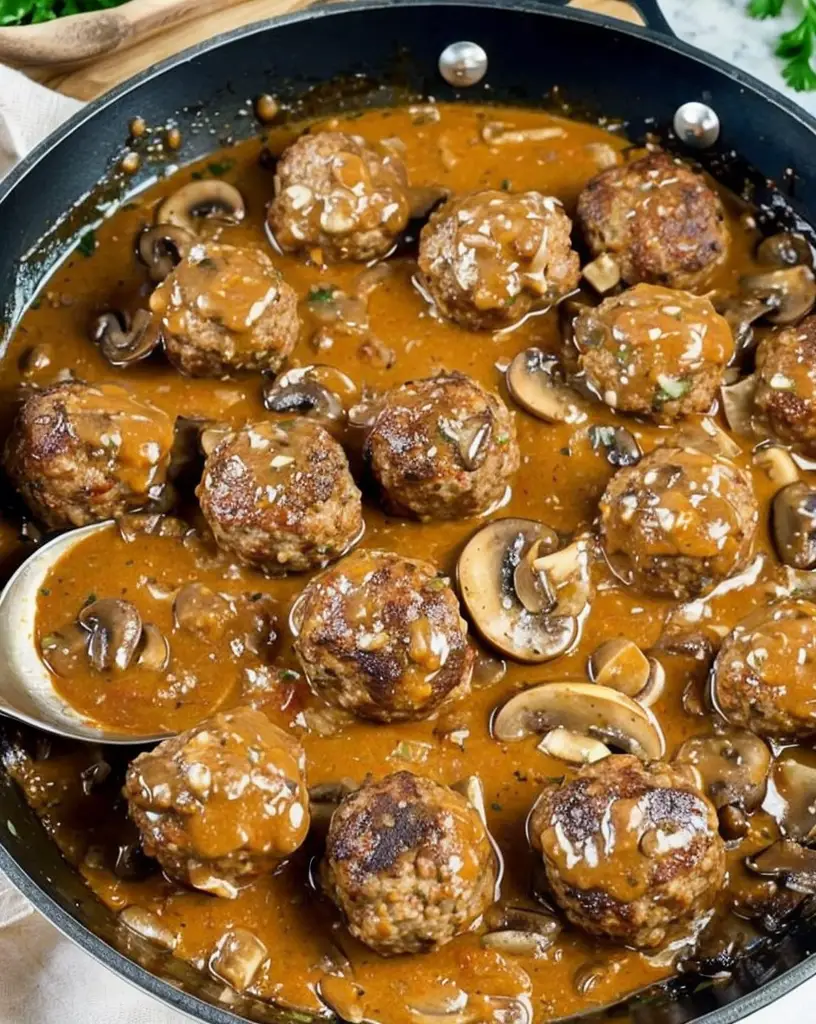
Gourmet Meatballs with Mushroom Sauce: A Deliciously Elegant Dish

⚖️
Difficulty
Medium

⏲️
Prep Time
30 mins

🕒
Cook Time
45 mins

⏱️
Total Time
75 mins

🍽️
Servings
4 servings

Indulge in the rich flavors and satisfying textures of these Gourmet Meatballs with Mushroom Sauce, a dish that brings warmth and comfort to any dinner table. These meatballs are packed with a blend of savory herbs and spices, creating a flavor explosion with each bite. Paired perfectly with a creamy, umami-rich mushroom sauce, this meal is not just food; it’s a culinary experience that delights the senses.

The tender meatballs are seared to golden perfection, providing a delightful contrast to the smooth, luscious sauce that blankets them. As they simmer together, the flavors meld into a comforting dish that’s excellent for gatherings or an intimate dinner at home. With a touch of elegance and a hint of gourmet flair, this recipe will impress friends and family alike.

Quick Recipe Highlights

  • Flavor Profile: Savory meatballs complemented by a creamy, earthy mushroom sauce.
  • Texture: Juicy meatballs with a tender, smooth sauce that glides over your palate.
  • Aroma: An inviting blend of sautéed garlic, fragrant herbs, and roasted mushrooms.
  • Visual Appeal: Richly colored sauce with beautifully seared meatballs garnished with fresh parsley.
  • Skill Level Needed: Perfect for home cooks with basic kitchen skills and a passion for delicious food.
  • Special Equipment: Requires a frying pan, mixing bowl, and a saucepot for preparation.

Recipe Overview

  • Difficulty Level: This recipe is a medium difficulty, ideal for those wanting to elevate their cooking while still achieving fantastic results without complex techniques.
  • Category: Perfect for a main course that fits seamlessly into dinner parties, family meals, or romantic dates.
  • Cuisine: This dish borrows inspiration from Italian cuisine, emphasizing the harmony of meat and rich sauces.
  • Cost: The ingredients are relatively budget-friendly, making this dish both an affordable and sophisticated option.
  • Season: Enjoy it year-round, but it shines particularly in colder months when comfort food is most desired.
  • Occasion: An excellent choice for gatherings, holidays, or simply when you want to treat yourself or your loved ones.

Why You’ll Love This Recipe

The combination of tender meatballs and a succulent mushroom sauce will create an irresistible dish that becomes a staple in your kitchen. Each bite is a satisfying blend of juicy meat and rich sauce that dances in harmony. The play of flavors is enhanced by the inclusion of spices, which brings a depth that’s incredibly appealing and comforting. Plus, it’s versatile enough to pair with pasta, rice, or even crusty bread.

Preparation is straightforward, making it an ideal recipe for both novice cooks and seasoned chefs. You can whip it up in under 75 minutes—a perfect balance of flavor and efficiency. The meatballs can be made ahead and frozen, giving you flexibility. This makes it a fantastic option for busy nights or meal prepping for the week.

From a nutritional perspective, these meatballs pack a protein punch, providing essential nutrients in each serving. The mushrooms contribute fiber, vitamins, and minerals, making this dish not just delicious but also nourishing for your body.

Sharing this dish with friends and family will create lasting memories around the dinner table. The gourmet presentation will impress, evoking feelings of warmth and togetherness that comes from enjoying a home-cooked meal. It’s a feel-good dish that brings everyone together.

Moreover, this gourmet meal is cost-effective. Most ingredients are easy to source, allowing for a luxurious dish without breaking the bank. The accessible nature of meatball recipes also invites creativity—whether you’re adding your favorite spices or experimenting with different sides, the possibilities are endless.

Historical Background and Cultural Significance

The humble meatball has a rich history that traces back to ancient civilizations. Originally crafted from leftover meats, they evolved over centuries into the flavorful delicacies we know today. Their versatility is rooted in cultures across the globe, from Swedish köttbullar to Italian polpette, showcasing the adaptability of this delightful dish.

In Italian cuisine, meatballs often symbolize comfort and familial bonds. Recipes are passed down through generations, integrating personal touches and regional specialties, creating a tapestry of flavors that resonates with many households. They’re often featured at gatherings, reinforcing their role as a unifying dish.

Throughout the years, gourmet variations have emerged, showcasing high-quality ingredients and refined techniques. This evolution reflects broader culinary trends, highlighting the shift towards sophistication in traditional dishes. The mushroom sauce in this recipe exemplifies this trend, elevating a simple meatball into a gourmet treat.

Regional variations abound, with different cultures contributing unique spices, sauces, and preparation methods. From adding cheese to using various meats, the meatball continues to be a canvas for creativity in kitchens worldwide, celebrating diverse culinary traditions and flavors.

Ingredient Deep Dive

Ground Beef: Ground beef is the star ingredient in meatballs, offering rich flavor and texture. Originating from various cuts of meat, it provides a protein-rich base for this dish. When selecting ground beef, look for a blend of lean meat and fatty portions for optimal flavor and moisture. Store it refrigerated and use it within a few days, or freeze it for prolonged freshness. Ground turkey or chicken can serve as healthier substitutions.

Mushrooms: Mushrooms add depth to the sauce, introducing umami flavor that elevates the dish. Varieties like cremini and shiitake are popular due to their robust taste and nutritional profile. They are low in calories yet rich in antioxidants and vitamins. When choosing mushrooms, look for firm, plump specimens free of blemishes. Store them in a paper bag in the fridge to maintain freshness. Consider substituting with different varieties or even dried mushrooms for unique flavor profiles.

Common Mistakes to Avoid

  • Overmixing the meat mixture—this can lead to tough meatballs; mix just until combined for tender results.
  • Skipping browning the meatballs—browning adds flavor and texture; don’t rush this step.
  • Using the wrong mushroom type—always choose mushrooms that enhance the flavor you desire in your sauce.
  • Cooking meatballs at too high a heat—this can result in burnt outsides and raw insides; use medium heat for even cooking.
  • Not allowing the meatballs to rest—letting them sit after cooking ensures they stay juicy and flavorful.
  • Using dried herbs instead of fresh—fresh herbs provide more flavor and aromatic appeal.
  • Adding salt too early in the cooking process—this can toughen the meat; instead, season at the end.
  • Skipping the simmering time for the sauce—allowing the sauce to develop flavors is crucial for depth.
  • Neglecting to coat the meatballs in the sauce before serving—they should be well covered for optimal flavor.

Essential Techniques

Mixing Meatballs: This step is crucial for achieving the right texture. Combine meat gently, as overmixing can result in dense, chewy meatballs. Use your hands or a fork to mix just until everything is incorporated. Look for a uniform blend of ingredients while ensuring the mixture is still light and airy.

Browning Meatballs: Browning before simmering adds depth to the flavor. Heat a skillet until it’s hot, add oil, and place meatballs in without crowding. Turn them occasionally for even browning. Visual cues include a deep golden color on the outside that enhances flavor while retaining juicy meat inside.

Pro Tips for Perfect Gourmet Meatballs with Mushroom Sauce

1. Use day-old bread soaked in milk for extra moist and flavorful meatballs—this traditional trick works wonders.
2. Incorporate diced onions and garlic into the meat mixture for added depth.
3. Experiment with spices like crushed red pepper or smoked paprika for a unique twist on flavor.
4. Allow the meatballs to rest in the pan after cooking to absorb the sauce’s flavor effectively.
5. For a lighter sauce, use low-sodium broth or Greek yogurt instead of heavy cream.
6. Pair the meatballs with sautéed spinach or a fresh salad for a balanced meal.
7. Serve with fresh herbs on top for an eye-catching garnish that brightens the dish.
8. For an elevated experience, serve with truffle oil drizzled on top just before serving.

Variations and Adaptations

Regional variations of gourmet meatballs can include Italian-style, which often feature ricotta cheese or parmesan, or Asian-inspired versions using ginger and soy sauce. Seasonal adaptations like adding pumpkin or squash puree during fall can rejuvenate this classic dish.

Dietary modifications can cater to various preferences; for example, using ground turkey or plant-based meat substitutes for a lighter or vegan option. Flavor variations might include different sauces like a spicy arrabbiata or honey-soy glaze, which offer bold contrasts.

Texture modifications can be made by incorporating breadcrumbs or oats for a heartier meatball, while presentation alternatives could mean serving over creamy polenta or in a bread bowl for rustic charm.

Serving and Presentation Guide

Serving gourmet meatballs beautifully enhances their appeal. For plating, consider a wide, shallow bowl with a sprinkle of parsley and a drizzle of sauce around the sides for elegance. Garnishing with fresh herbs or a dusting of grated parmesan will add vibrancy.

Pair your plated dish with rustic bread or over creamy polenta, presenting an inviting contrast in colors and textures. Serve the dish warm and address portion control to avoid overwhelming guests, allowing them to savor each bite.

Wine and Beverage Pairing

When it comes to pairing wine with gourmet meatballs, a medium-bodied red like Chianti or a smooth Pinot Noir will enhance the dish’s flavors beautifully. A crisp white wine such as Sauvignon Blanc also complements the richness of the mushroom sauce, providing a refreshing contrast.

For non-alcoholic options, consider a sparkling water infused with lemon or a light herbal tea that won’t overpower the meal. Quality coffee or a rich, fragrant black tea can also serve as delightful complements if serving meatballs during a brunch or casual gathering.

Storage and Shelf Life

Storing gourmet meatballs requires careful attention to preserve freshness. Keep the meatballs in an airtight container in the fridge for up to three days. If you plan to keep them for longer, freezing is an excellent option—place them in a freezer-safe container or bag for up to three months.

Be vigilant for signs of spoilage—foul odors or discoloration indicate it’s time to discard. For reheating, thaw overnight in the fridge and warm gently in a skillet or oven to maintain texture and flavor. Microwaving can also work in a pinch, but be cautious to avoid overcooking.

Make Ahead Strategies

Planning ahead makes this gourmet dish even more enjoyable. Prepare the meatballs a day or two in advance and freeze them before cooking. This allows you to have meals ready to go during busy weeks while retaining fresh flavor.

Assemble the mushroom sauce ahead of time as well, cooling it completely before storing in the fridge. Reheating the sauce while cooking the frozen meatballs creates a seamless cooking experience that ensures warm, flavorful meals that feel homemade even on the busiest evenings.

Scaling Instructions

For gatherings or family meals, scaling this recipe can be simple. To halve, just divide each ingredient accordingly, ensuring you maintain the balance of flavors. Doubling or tripling the recipe works well too; just ensure your cooking vessels can accommodate the extra meatballs.

Timing adjustments are necessary when cooking bigger batches; allow for a longer simmering time to ensure all meatballs are evenly cooked and infused with flavor. Be mindful of storage space, as larger quantities may require more space in the fridge or freezer.

Nutritional Deep Dive

Understanding the nutrition behind gourmet meatballs enriches your cooking practice. A typical serving provides a robust protein source, essential for muscle health and overall body function. Fat content varies based on the meat used; opting for leaner cuts can help manage dietary goals without sacrificing flavor.

Micronutrient analysis shows that mushrooms provide vital vitamins, including vitamin D and B-complex vitamins, important for energy metabolism. This classic dish can also be adapted for various dietary considerations, making it not just delicious but beneficial for diverse nutritional needs.

Understanding portion sizes can help maintain a balanced diet while still enjoying gourmet dishes. Aiming for a two to three meatball serving ensures satisfaction without excessive calorie intake.

Dietary Adaptations

For those who follow specific dietary regimes, gourmet meatballs can be adapted easily. For a gluten-free option, substitute breadcrumbs with almond flour or ground oats. Dairy-free individuals can use cashew cream instead of heavy cream in the mushroom sauce.

Vegans can experiment with plant-based meat substitutes and cashew cheese, ensuring rich flavors without animal products. Low-carb or keto diets benefit from using ingredients like zucchini noodles instead of traditional pasta, providing a nutrient-rich alternative.

Each modification retains the core of what makes gourmet meatballs delectable, allowing enjoyment across dietary preferences and restrictions.

Troubleshooting Guide

If your meatballs turn out too dense, ensure minimal mixing and use enough fat for moisture. If the flavors lack balance, adjust seasoning gradually during cooking, tasting as you go to achieve the desired outcome.

Temperature problems can arise if the heat is too high; ensure you’re cooking on medium heat for even distribution of heat. Equipment issues like non-stick pans can make browning tricky; using cast iron or stainless-steel cookware can enhance flavor and prevent sticking.

Ingredient substitutions like using dried herbs instead of fresh ones can affect flavor profiles; always aim for fresh for the best taste experience. Timing concerns such as overcooking can be reduced by keeping an eye on meatballs during the simmering phase and adjusting cooking times based on size.

Recipe Success Stories

Our community has shared multiple success stories featuring gourmet meatballs, highlighting personal touches that led to amazing outcomes. Readers have loved experimenting with various sauces, with some opting for spicy variations that added an exciting twist.

Adaptations for dietary restrictions have showcased the versatility of this dish, with feedback praising the flavor retained even with gluten-free or vegan ingredients. Sharing photography of their crafted dishes, readers emphasize the visual appeal and gourmet presentation that can be achieved at home.

Every adaptation and feedback further encourages creativity, allowing home chefs to discover what works best for them and their loved ones, resulting in dishes that feel uniquely personalized.

Frequently Asked Questions

Q1: Can I use lean meat for this recipe?

Absolutely! Lean meats, such as ground turkey or chicken, can be used for a healthier twist. Just remember, they may require additional moisture like eggs or bread crumbs to keep the meatballs juicy.

Q2: How can I prevent meatballs from falling apart?

To prevent your meatballs from falling apart during cooking, make sure to include binding agents like eggs and breadcrumbs. These ingredients help keep the meat together, ensuring they hold their shape.

Q3: Can I make the meatballs ahead of time?

Yes! You can prepare the meatballs in advance and refrigerate or freeze them. Just ensure they’re fully cooled before storing and use them within 3 months if freezing.

Q4: What if I don’t have fresh herbs?

If you don’t have fresh herbs on hand, dried herbs can work as well. Use about one-third the amount of dried herbs compared to fresh, as dried herbs are more concentrated.

Q5: How do I know when the meatballs are done?

Cooked meatballs should have a temperature of 165°F (75°C) inside, and they should be golden brown on the outside when you check them carefully for doneness.

Q6: Can I use a different type of sauce?

Absolutely! Feel free to experiment with different sauces, such as marinara, barbecue, or even an Asian-inspired teriyaki sauce, to give your meatballs a unique flavor profile.

Q7: Are these meatballs suitable for freezing?

Yes! Gourmet meatballs freeze beautifully. Just make sure they’re completely cooled before placing them in an airtight container or freezer bag.

Q8: What side dishes go well with meatballs?

These meatballs pair wonderfully with pasta, rice, mashed potatoes, or a fresh garden salad. Garlic bread is also a fantastic accompaniment to soak up the delicious sauce!

Q9: Can children enjoy these meatballs?

Yes, gourmet meatballs are generally a hit with kids! Their familiar flavors and textures make them a great meal for the entire family. You can reduce spice levels or modify the sauce to suit their tastes.

Q10: How do I modify the spice level?

To adjust the spice level, control the amount of black pepper or red pepper flakes you use in the meat mixture and the sauce. Start with a small amount and adjust according to your preference.

Additional Resources

For those looking to expand their culinary repertoire, explore more related recipes, such as traditional spaghetti with marinara sauce or mashed potatoes that pair perfectly with these gourmet meatballs.

Seek out technique guides for mastering meat sauces, as well as ingredient information to help you make the best choices when shopping for fresh produce. Investing in quality kitchen equipment will also boost your cooking experience, making it easier to prepare gourmet dishes at home.

Don’t forget to consider seasonal variations for your meals—adapting ingredients based on what’s fresh will enhance flavors and support local markets.

Join the Conversation

We encourage our readers to share their experiences and photos when making these gourmet meatballs with mushroom sauce. Connect with us on social media platforms and use our tags to showcase your culinary creations.

Recipe reviews and feedback help our community grow, and we love to hear about any variations you’ve tried or tips you might have. Your creativity can inspire others to step into the kitchen and try their hand at crafting this delightful dish.

The Recipe

Gourmet Meatballs with Mushroom Sauce

Serves: 4 servings

Prep Time: 30 mins

Cook Time: 45 mins

Total Time: 75 mins

Kitchen Equipment Needed

  • Mixing bowls
  • Frying pan
  • Wooden spoon or spatula
  • Meat thermometer
  • Oven-safe baking dish

Ingredients

  • 1 lb ground beef
  • 1/2 cup breadcrumbs
  • 1/4 cup grated parmesan cheese
  • 1/4 cup chopped parsley
  • 1 egg
  • 2 cloves garlic, minced
  • Salt and pepper to taste
  • 1 lb mushrooms, sliced
  • 1 cup heavy cream
  • 1 cup beef broth
  • 1 tbsp olive oil
  • 1 tsp dried thyme

Directions

  1. Preheat your oven to 375°F (190°C).
  2. In a large bowl, combine ground beef, breadcrumbs, parmesan cheese, parsley, egg, garlic, salt, and pepper. Mix until just combined.
  3. Form meatballs using your hands, roughly the size of golf balls.
  4. Heat olive oil in a frying pan over medium heat. Add meatballs in batches and brown all sides, about 5-6 minutes.
  5. Once browned, transfer meatballs to an oven-safe dish and set aside.
  6. In the same pan, add sliced mushrooms and cook until softened, about 5-7 minutes.
  7. Add broth, cream, thyme, and season with salt and pepper. Stir to combine and bring to a simmer.
  8. Pour mushroom sauce over meatballs in the dish and cover with foil.
  9. Bake for 25-30 minutes or until meatballs are cooked through.
  10. Serve warm with your favorite sides, and enjoy!

Recipe Notes

  • Feel free to substitute ground beef for ground turkey or chicken as needed.
  • These meatballs can be frozen; just ensure they are cooled properly before storage.
  • If you prefer a lighter sauce, replace heavy cream with half-and-half or Greek yogurt.

Indulge in a Delicious Black Forest Roll Cake Recipe

Black Forest Roll Cake – A Chocolate & Cherry Delight

⚖️
Difficulty
Moderate

⏲️
Prep Time
30 mins

🕒
Cook Time
20 mins

⏱️
Total Time
50 mins

🍽️
Servings
8 servings

Black Forest Roll Cake is a stunning dessert that beautifully combines layers of rich chocolate cake with luscious cherries and whipped cream. This delightful treat not only satisfies your sweet tooth but also showcases a beautiful presentation that is perfect for any celebration. Imagine rolling together moist chocolate cake, cherries, and whipped cream to create a delightful spiral that tastes as good as it looks. It’s a treat that evokes feelings of indulgence and joy, perfect for sharing with friends and family.

Each bite of this chocolate and cherry delight invites you into a world of flavor where the sweetness of cherries balances perfectly with the bittersweet cocoa. The whipped cream adds an element of lightness, ensuring that this dessert feels festive yet refined. As you prepare this roll cake, the enticing aroma of cocoa baking in the oven will fill your kitchen, creating an atmosphere of warmth and anticipation. This recipe will not only impress your guests but will also become a beloved favorite in your dessert repertoire.

Quick Recipe Highlights

  • Flavor Profile: The rich chocolate pairs perfectly with tart cherries, creating a harmonious balance that is both sweet and slightly tangy.
  • Texture: The cake is fluffy and light, while the filling adds a creamy element that melts in your mouth, providing a delightful contrast.
  • Aroma: The enticing scent of baked cocoa lingers temptingly, making it hard to resist sneaking a taste before it’s ready to serve.
  • Visual Appeal: Swirls of chocolate and vibrant red cherries create a visually striking dessert that is a feast for the eyes.
  • Skill Level Needed: While the recipe requires some baking skills, it is approachable for both novice and experienced bakers.
  • Special Equipment: A parchment-lined baking tray and an electric mixer facilitate the preparation of this cake.

Recipe Overview

  • Difficulty Level: The Black Forest Roll Cake is considered moderate in difficulty due to the rolling process, which requires careful technique to ensure the cake doesn’t crack.
  • Category: This decadent dessert falls under the category of cakes and is perfect for celebrations or special occasions.
  • Cuisine: Originating from Germany, this recipe reflects traditional culinary influences that highlight chocolate and cherries as key ingredients.
  • Cost: The approximate cost of ingredients can vary, but it is an affordable cake that won’t break the bank, equaling great value for a spectacular dessert.
  • Season: Enjoy this delightful roll cake year-round, although it shines especially in summer when cherries are in season.
  • Occasion: Ideal for birthdays, holidays, or any gathering where you want to impress your guests with a show-stopping dessert.

Why You’ll Love This Recipe

This Black Forest Roll Cake is not just visually stunning; it delivers an exceptional taste that will leave your guests craving more. The delightful combination of chocolate and cherries creates a mouthwatering experience that plays with flavors and textures. You’ll appreciate the precision of balancing the tartness of the cherries with the sweet chocolate frosting, which culminates in a memorable dessert that feels indulgent yet light.

Preparing this roll cake is also a fun and engaging process, making it perfect for baking enthusiasts who enjoy hands-on projects. As you layer the ingredients, you’ll appreciate the pleasure that comes from creating something beautiful that will impress your friends and family. With each step, from baking to rolling, you’ll be delighted by the transformation of simple ingredients into a delightful masterpiece.

From a nutritional standpoint, the Black Forest Roll Cake offers some advantages as well. Using fresh cherries contributes vitamins, antioxidants, and fiber, enriching this dessert beyond just indulgence. Coupled with the right portion sizes, it can fit comfortably into a balanced diet while still satisfying your sweet cravings.

When it comes to social gatherings, this roll cake serves as a conversational starter at any table. Its elegant presentation and exquisite taste make it a highlight for guests, fostering a sense of warmth and connection as everyone enjoys a piece together. Plus, the cost-effectiveness of creating a stunning dessert at home rather than purchasing one from a bakery makes it an accessible treat for all.

Last but not least, the recipe has great versatility. You can adjust its sweetness or tweak flavors to suit your preferences, leading to endless variations that can keep this dessert fresh and exciting each time you prepare it. Whether it’s substituting the cherries for other berries or playing with additional flavors, the Black Forest Roll Cake remains an adaptable classic.

Historical Background and Cultural Significance

The origins of the Black Forest Roll Cake trace back to Germany, a nation renowned for its rich chocolate desserts and celebratory cakes. Traditionally enjoyed in the Black Forest region, the cake beautifully encapsulates elements of local culture, where the bold flavors of chocolate intertwine with the region’s famous cherries. This dessert has evolved to symbolize festivities and is often associated with significant celebrations, adding to its cultural richness.

As this dessert gained popularity, it transcended geographical boundaries and became a beloved dish worldwide. The distinct layering and rolling technique signified a peak of creativity in pastry making, showing that even within traditional recipes, there exists room for evolution. It stands today as a prime example of how culture influences culinary traditions while allowing room for innovation.

The recipe has evolved, incorporating various flavor adaptations and presentation styles worldwide. Each region has taken its own spin, leading to delightful variations that still maintain the essence of the classic roll cake. In modern times, the Black Forest Roll Cake has made its way into countless homes, becoming a staple for many families and cherished during special occasions.

Different variations have also emerged, such as integrating liqueurs or other fruits to elevate the flavor profile. As baking styles continue to evolve, the classic Black Forest Roll Cake remains a foundation upon which many like-minded recipes are built, holding its legacy as a timeless cake that is both historic and beloved.

Ingredient Deep Dive

Chocolate: As a fundamental ingredient, chocolate is rich in flavor and history. It has been revered in culinary traditions for centuries, originating from the cacao tree, native to Central America. The health benefits of dark chocolate, particularly its antioxidants, contribute to heart health and overall well-being. When selecting chocolate, opt for high-quality brands with at least 70% cocoa content for a richer taste. Store chocolate in a cool, dry place to maximize its longevity, and consider substituting it with cacao powder for a lighter dessert.

Cherries: Cherries bring not only vibrant color but also a plethora of health benefits, being rich in vitamins C and A, antioxidants, and fiber. This stone fruit has historical significance in various cultures, often representing abundance and prosperity. When choosing cherries, look for firm, plump, and deep-colored fruits. If fresh cherries are unavailable, frozen options can also work well. Always store cherries in a refrigerator for freshness, and consider using dark sweet cherries for a richer flavor in the roll cake.

Whipped Cream: Whipped cream adds a light, airy texture that beautifully complements the richness of the chocolate. Its history dates back to the 16th century, becoming a popular staple in desserts around the world. The nutrition in whipped cream primarily consists of fats, making it a source of energy. For the best results, use heavy cream that can hold peaks and can be flavored with vanilla for added depth. Keep whipped cream refrigerated until use, and consider alternatives like coconut cream for a dairy-free version.

Sugar: As a sweetener, sugar plays an essential role in enhancing flavors and balancing the tartness of the cherries. Derived from sugar cane or sugar beets, it has a long history of use in cooking and baking. Sugar not only provides sweetness but also aids in texture and moisture retention in baked goods. Opt for granulated sugar for best results in this cake, and it’s advisable to store sugar in an airtight container to prevent clumping and moisture. Brown sugar can be used for a deeper flavor if desired.

Common Mistakes to Avoid

  • Overmixing the batter: Incorporating too much air can lead to a dense cake. Mix just until combined for a light texture.
  • Not lining the baking tray: A parchment paper lining is crucial for easy removal. Failing to do so may ruin the cake’s shape.
  • Using old ingredients: Always check the expiration dates on your baking ingredients, especially baking powder and flour, to ensure freshness.
  • Skipping the chilling step: Allowing the cake to cool completely before rolling is essential to prevent cracks and breakage.
  • Rolling while warm: Always roll the cake while it’s still warm but not hot to maintain its structure and avoid tearing.
  • Not measuring ingredients correctly: Accurate measurements are key in baking. Use a kitchen scale for precision if possible.
  • Cooling on a wire rack: Cooling the cake directly on the pan can lead to condensation and unwanted moisture in the cake.
  • Underestimating filling quantities: Ensure that you spread enough filling to enhance flavor without overwhelming the roll.
  • Neglecting decoration: The final presentation is important, so take care to dust with powdered sugar or add cherries on top before serving.
  • Serving too hot: Allow the roll to chill for proper slicing. A warm roll can crumble and ruin the presentation.

Essential Techniques

Rolling the Cake: Mastering the rolling technique is fundamental to creating a beautiful Black Forest Roll Cake. Start with a clean, floured kitchen towel to help guide the cake as you roll it. The key is to be gentle but firm, allowing the cake to follow its natural shape without forcing it. A common pitfall is applying too much pressure, which can cause cracks. Visual success cues include a tight, even spiral without tearing.

Making Whipped Cream: To create perfect whipped cream, start with chilled equipment and cream. This will help it whip faster and achieve a stable consistency. Gradually add sugar and flavoring while mixing at medium speed. A common mistake is over-whipping, which can lead to a grainy texture. Look for peaks that hold their shape without being too stiff.

Pro Tips for Perfect Black Forest Roll Cake

1. Use room temperature eggs to improve aeration in the batter for a lighter cake.
2. Ensure that your baking powder is fresh for optimal rising results.
3. Allow the cake to cool in the pan for a few minutes before transferring it to prevent sticking.
4. Lightly dust the towel with powdered sugar to prevent the cake from sticking when rolling.
5. Experiment with different fruits, like raspberries or strawberries, for a unique take on the classic recipe.
6. Always chill the finished cake before slicing to achieve clean, precise cuts.
7. To enhance flavor, consider adding a splash of cherry liqueur to the whipped cream.
8. Store any leftover cake in an airtight container to maintain moisture and flavor.

Variations and Adaptations

The Black Forest Roll Cake can be made with a variety of fruits, with seasonal adaptations making it a versatile dessert. In the fall, try replacing cherries with cranberries to create a tart and festive dessert that complements autumn flavors. For a unique twist, add spices like cinnamon or nutmeg to the chocolate batter for a warming depth suitable for the cooler months.

Dietary modifications are also easily achievable. For a gluten-free version, substitute all-purpose flour with gluten-free flour blends that are designed for baking. If you’re looking for a lower sugar alternative, consider using natural sweeteners, such as stevia or monk fruit, to create a healthier option that doesn’t sacrifice taste.

Flavor variations can be achieved by adding orange zest or almond extract to the batter for a citrusy twist. The use of different chocolate types can also significantly alter the flavor profile; try white chocolate frosting for a sweeter contrast to the cocoa.

Finally, explore modern presentation alternatives, such as serving in individual portions with layered jars or parfait-style, which can make for a visually appealing layout while maintaining the dessert’s rich flavors.

Serving and Presentation Guide

Plating this Black Forest Roll Cake elegantly can elevate your table setting. To serve, slice the roll into even sections, showcasing the beautiful spiral of chocolate and cherries. Use a sharp knife, dipped in hot water and wiped dry, to ensure clean cuts. For garnishing, a dusting of powdered sugar or a drizzle of chocolate sauce creates visual contrast and sophistication.

Traditional accompaniments include fresh cherries or a dollop of extra whipped cream on the side. For a modern twist, serve the roll slices on individual plates with a berry coulis drizzled alongside for added color and flavor. Temperature also plays a role; this cake is best served chilled, as it enhances the flavors and makes the textures more enjoyable.

Consider portion control by cutting smaller slices, especially if serving at a larger gathering. Guests often enjoy sampling multiple desserts, so smaller portions allow them to indulge without overindulging.

Wine and Beverage Pairing

For the perfect pairing with your Black Forest Roll Cake, consider a glass of light red wine, such as Pinot Noir. The wine’s fruity notes complement the cherries and rich chocolate effortlessly. If you prefer white wine, a sweet Riesling can also hold its own against the flavors in the cake.

For non-alcoholic alternatives, a sparkling cherry soda can enhance the sweet and tart flavors harmoniously. Pairing with coffee or espresso adds a delightful bitterness that contrasts beautifully with the cake’s sweetness. Ensure that beverages are served chilled or at the right temperature to beautifully complement the dessert.

Consider serving the cake alongside a refreshing herbal tea, such as chamomile or mint, as these can cleanse the palate and highlight the chocolate’s richness without overpowering the flavors.

Storage and Shelf Life

Proper storage is crucial for maintaining the freshness of your Black Forest Roll Cake. Keep the cake in an airtight container in the refrigerator to ensure it remains moist and flavorful. Properly stored, it typically lasts for about 3-4 days without losing quality.

Avoid leaving the cake at room temperature for extended periods, as this can lead to spoilage. If you’ve made a larger batch, consider freezing portions of the cake. Wrap slices individually in plastic wrap and place them in a freezer-safe bag, allowing the cake to be enjoyed months later while maintaining its integrity.

Signs of spoilage include a sour smell or significant changes in texture. For reheating, place slices in the microwave for a few seconds or serve chilled for the best experience. Consider refreshing the whipped cream topping just before serving to revive its peak texture.

Make Ahead Strategies

You can prepare various components of your Black Forest Roll Cake ahead of time to streamline your baking experience. For instance, bake the cake a day in advance, allowing it to cool completely before wrapping it in plastic wrap and storing it in the refrigerator. This step allows the flavors to marry, enhancing the overall taste.

You can also prepare the whipped cream and cherries in advance, keeping them refrigerated until it’s time to assemble the roll. Just before serving, roll the cake with the filling and add cherry topping for freshness. Always ensure that any elements stored separately are combined right before serving for optimal texture and flavor contrast.

When reheating any frozen portions, allow the cake to thaw in the refrigerator overnight instead of microwaving it. This helps maintain moisture and flavor integrity. Lastly, consider adding fresh garnishes like mint leaves just before serving for a vibrant, fresh touch.

Scaling Instructions

Scaling your Black Forest Roll Cake recipe up or down is quite straightforward with a few adjustments. If halving the recipe, use half the amount of each ingredient while maintaining the same mixing and baking techniques. Be aware that baking time may need to be adjusted slightly.

Doubling or tripling the recipe requires larger equipment, such as multiple baking trays or a larger mixing bowl. Additionally, ensure that you mix in larger batches for thorough consistency. Keep an eye on your baking time, as larger batches can affect cooking times; always check doneness by using the toothpick method.

When scaling, consider your storage options, as larger portions may require additional space in your refrigerator or freezer. Portion control becomes essential in these cases, ensuring each serving is beautifully presented and easy to manage.

Nutritional Deep Dive

Understanding the nutritional profile of the Black Forest Roll Cake can enhance your appreciation of this indulgent dessert. Each slice typically contains macros of carbohydrates, primarily from sugar and cherries, along with fat and protein from the whipped cream and eggs. This satisfying dessert can serve as an occasional treat within a balanced diet.

Micronutrient analysis reveals that cherries contribute essential vitamins, including vitamin C, which supports immune health and skin integrity. Moreover, dark chocolate contains minerals like iron and magnesium, offering additional health benefits. Balancing indulgence with moderation is key, recognizing that while this dessert is a celebratory dish, it can contribute positively to a healthier lifestyle.

For those mindful of dietary needs or weight management goals, considering portion sizes is critical. Smaller portions allow you to enjoy the flavors without excessive caloric intake, making it easier to fit dessert into a variety of meal plans. Each piece of the roll cake provides a pleasurable choice, reminding us of the importance of mindful indulgence.

Dietary Adaptations

To cater to various dietary preferences and restrictions, the Black Forest Roll Cake can be easily modified. A gluten-free version can be achieved by substituting the all-purpose flour with a gluten-free flour blend, ensuring a similar texture and flavor. This allows those who are gluten sensitive to enjoy this delicious dessert without compromise.

For those pursuing dairy-free options, substituting regular cream with coconut whipped cream or other non-dairy options can yield a delightful and creamy filling. Always check labels for hidden dairy products in baking ingredients as you adapt the recipe.

Vegans can enjoy this dessert too! Replacing eggs with flaxseed meal or aquafaba for an egg alternative maintains the cake’s structure. Adjusting sugar content to include natural sweeteners like maple syrup can suit those looking for a healthier twist while preserving the delicious flavors of the cake.

Low-carb and keto adaptations can be made by swapping regular flour and sugar with almond flour and erythritol, respectively. This allows for a more diet-friendly version, perfect for those managing carbohydrate intake while enjoying a harmonious dessert.

Troubleshooting Guide

Common challenges in making the Black Forest Roll Cake can be addressed with careful attention and practice. If the cake turns out too dry, consider adjusting your baking time, as overbaking can lead to moisture loss. Ensuring your oven temperature is accurately set can also make a significant difference.

If rolling the cake results in cracks, it may be too cool—try gently warming it before rolling, or roll it while slightly warm to maintain flexibility. Inconsistent flavor can arise from using insufficient or stale ingredients. Always ensure your baking supplies are fresh and properly measured.

For texture issues like a dense cake, check that you’ve whipped the eggs sufficiently to introduce adequate air before adding dry ingredients. Each step matters in creating that fluffy texture, so being mindful is crucial.

Lastly, if the cake fails to hold its shape upon slicing, ensure thorough chilling. A well-chilled cake becomes firmer and allows for cleaner, more appealing slices.

Recipe Success Stories

The Black Forest Roll Cake has been embraced by many home bakers, leading to numerous success stories that showcase creativity. One community member shared their delightful experience of adding an orange zest twist, which beautifully complemented the chocolate flavor and was a hit at their family gathering.

Photographic tips from readers reveal that enhancing presentation can be achieved simply by incorporating contrasting garnishes like mint leaves or edible flowers. This not only elevates the visual appeal but also serves as an invitation to take a bite.

Additionally, some bakers have successfully adapted this recipe to suit allergy-friendly diets, showcasing the versatility of the Black Forest Roll Cake. Many have shared special occasions where this dessert was the showstopper, with praise from friends and family alike on how delicious it was.

As more bakers try their hands at this classic recipe, the community continues to thrive, sharing variations and unique adaptations based on personal tastes. Each success story adds to the narrative of the Black Forest Roll Cake, proving it to be a timeless dessert that stands the test of time.

Frequently Asked Questions

Q: Can I make this cake ahead of time?

A: Absolutely! You can bake the cake a day in advance and store it in the refrigerator. Just wait to roll it until you’re ready to serve, keeping the fresh filling intact.

Q: How do I prevent my roll cake from cracking?

A: The key to preventing cracks is to ensure your cake is rolled while still warm and to use a gentle but firm hand while rolling. Dusting the towel with powdered sugar can also help.

Q: What should I do if I don’t have fresh cherries?

A: If fresh cherries aren’t available, you can use frozen or canned cherries. Just be sure to drain canned cherries to avoid excess moisture in your cake.

Q: Can I use a store-bought cake for this recipe?

A: While it’s best to bake your own cake for the best texture, using a store-bought flat chocolate cake can speed up the process if you’re short on time.

Q: Is this dessert suitable for freezing?

A: Yes, you can freeze the Black Forest Roll Cake, but it’s best to wrap slices individually to preserve freshness. Thaw slowly in the refrigerator when you’re ready to enjoy.

Q: How do I make this cake gluten-free?

A: Substitute all-purpose flour with a gluten-free flour blend specifically meant for baking. Ensure that all other ingredients are also gluten-free.

Q: Is there a vegan option available for this recipe?

A: Yes! You can replace eggs with flaxseed meal mixed with water, and use coconut cream instead of traditional whipped cream for a vegan version.

Q: What can I use instead of whipped cream?

A: For a lighter alternative, you can make a whipped coconut cream that works well in this recipe and adds a unique flavor.

Q: How do I adjust the sweetness for personal preference?

A: You can reduce the sugar in the cake and whipped cream, or substitute with natural sweeteners like honey or maple syrup, keeping in mind to adjust for moisture content.

Q: Can I decorate my roll cake in a different way?

A: Definitely! Get creative with decorations by using chocolate shavings, nuts, or colorful edible flowers to enhance the cake’s appeal.

Additional Resources

For those looking to expand their baking repertoire, consider exploring related recipes such as Chocolate Swiss Roll or Cherry Cheesecake Bars that share similar flavors with the Black Forest Roll Cake. Technique guides focusing on effective rolling methods and cake decorating tips can also be valuable resources for improving your skills.

Understanding more about chocolate and cherry sourcing can enhance your baking experience, ensuring you select the best ingredients. Recommendations on essential kitchen equipment, such as stand mixers or specific baking trays, can also contribute to better outcomes in your baking pursuits. Seasonal variations, like incorporating pumpkin spice or cranberries during the holidays, allow for endless creativity in your dessert-making adventures.

Join the Conversation

We invite you to share your experiences, variations, and successes with the Black Forest Roll Cake! Engage with our community on social media to showcase your beautiful creations or to ask for tips and feedback. Readers are encouraged to submit their favorite photography tips taken from their own baking sessions; these can help you connect with fellow enthusiasts and spark inspiration.

Furthermore, recipe reviews are incredibly valuable—your feedback can assist fellow bakers in attempting this classic dessert. Share your adventurous variations, include substitutions you’ve tried, and inspire others to make their version of this delectable roll cake. Together, we can build a vibrant community of baking aficionados dedicated to celebrating desserts like the Black Forest Roll Cake.

The Recipe

Black Forest Roll Cake

Serves: 8 servings

Prep Time: 30 mins

Cook Time: 20 mins

Total Time: 50 mins

Kitchen Equipment Needed

  • Baking tray
  • Parchment paper
  • Fine sieve
  • Kitchen towel
  • Sharp knife

Ingredients

  • 3/4 cup all-purpose flour
  • 1/2 cup cocoa powder
  • 3 large eggs, room temperature
  • 3/4 cup granulated sugar
  • 1 teaspoon baking powder
  • 1/4 teaspoon salt
  • 1 cup heavy cream
  • 1 cup cherries, pitted and halved
  • Powdered sugar for dusting

Directions

  1. Preheat the oven to 350°F (175°C) and line a 15×10-inch baking tray with parchment paper.
  2. In a bowl, whisk together the flour, cocoa powder, baking powder, and salt.
  3. In another bowl, use an electric mixer to beat the eggs and sugar until thick and pale.
  4. Gently fold the dry ingredients into the egg mixture until just combined.
  5. Pour the batter into the prepared tray, spreading it evenly.
  6. Bake for 15-20 minutes, or until a toothpick comes out clean.
  7. Once baked, immediately turn the cake onto a kitchen towel dusted with powdered sugar.
  8. Remove the parchment paper and roll the cake gently with the towel. Let cool completely.
  9. In a separate bowl, whip the heavy cream until soft peaks form.
  10. Unroll the cooled cake, spread whipped cream evenly, and add cherries on top.
  11. Roll the cake back up, gently pressing to secure the filling.
  12. Dust with powdered sugar before slicing and serving.

Recipe Notes

  • Keep it chilled until ready to serve for the best texture.
  • Feel free to use different fruits as fillings or toppings for a fresh twist.
  • Store leftovers in an airtight container in the fridge for up to 3 days.
  • Customize the richness by adjusting the sugar or cream based on personal preference.

Delicious Creamy Alfredo Lasagna Soup Recipe for Cozy Nights

Creamy Alfredo Lasagna Soup: A Comforting Twist on Classic Flavors

⚖️
Difficulty
Medium

⏲️
Prep Time
20 mins

🕒
Cook Time
30 mins

⏱️
Total Time
50 mins

🍽️
Servings
6 servings

Imagine indulging in a cozy bowl of Creamy Alfredo Lasagna Soup after a long day. This delightful dish captures the essence of traditional lasagna but with an inviting soup twist that adds warmth and culinary excitement to your dining table. With rich, creamy Alfredo sauce, savory ground meat, and succulent pasta, every spoonful is a comforting embrace. The flavors meld together beautifully, evoking a sense of nostalgia while also pleasing the taste buds with each delectable layer of flavor.

As you dive into a bowl filled with this creamy goodness, the alluring aroma of garlic, fresh herbs, and melted cheese wafts through the air, instantly transporting you to an Italian kitchen bustling with warmth. Garnished with fresh basil and a sprinkle of Parmesan, this culinary treat not only satiates your hunger but also ignites joy and family connections around the dinner table. Perfect for cold evenings or simple gatherings, this Creamy Alfredo Lasagna Soup is sure to become a family favorite.

Quick Recipe Highlights

  • Flavor Profile: This dish combines the rich creaminess of traditional Alfredo sauce with a robust blend of herbs and spices. The addition of ground meat and cheese layers enhances the savory depth, making it a satisfying meal.
  • Texture: Each bowl offers a delightful assortment of textures, from tender pasta to velvety sauce and juicy meat, ensuring every bite is a pleasing combination of softness and richness.
  • Aroma: The tantalizing scent of garlic, simmering tomatoes, and freshly grated Parmesan fills the kitchen, creating an irresistible aroma that draws everyone to the table.
  • Visual Appeal: Served in a large bowl, this soup presents itself with a beautiful creamy base flecked with herbs and topped with bubbling cheese, creating a warm and inviting visual that entices diners.
  • Skill Level Needed: This recipe is of medium difficulty, requiring basic cooking skills like sautéing, simmering, and assembling ingredients. Ideal for home cooks looking to hone their culinary expertise.
  • Special Equipment: You’ll need a large pot or Dutch oven for cooking the soup and a baking dish for the cheese topping, ensuring that you can create a lovely layering effect.

Recipe Overview

  • Difficulty Level: The creamy Alfredo lasagna soup is categorized as medium in difficulty due to the multiple layers of preparation involved, including cooking meat, simmering sauce, and assembling the final dish.
  • Category: This dish is perfect as a comforting meal for lunch or dinner, especially appealing during cooler weather or on busy weeknights.
  • Cuisine: Drawing inspiration from Italian cuisine, this soup infuses classic lasagna components with convenience by transforming it into a delectable soup format that is easy to serve and enjoy.
  • Cost: The estimated cost for preparing this meal is quite budget-friendly; with affordable ingredients such as ground meat, pasta, and cheese, it’s a great option for feeding larger families.
  • Season: Creamy Alfredo Lasagna Soup shines best in fall and winter months, as people tend to gravitate towards hearty and comforting meals that provide warmth and satisfaction.
  • Occasion: This dish is exceptionally versatile, making it perfect for family dinners, gatherings, or potlucks, where everyone can share in the creamy goodness!

Why You’ll Love This Recipe

This Creamy Alfredo Lasagna Soup is a true delight for the senses. The enticing flavors combine the creamy richness of Alfredo with the heartiness of traditional lasagna, delivering a unique and comforting taste experience that you won’t forget. Each spoonful leaves you craving more, as the savory blend of spices and herbs immerse you in aromatic bliss. The added textures of the perfectly cooked pasta and ground meat create a robust mouthfeel that adds even more satisfaction to this already delightful dish.

In addition to its deliciousness, this recipe is convenient and straightforward to prepare. It allows you to enjoy the essence of lasagna without the time-intensive layering process that can often be daunting. With all the ingredients simmering together in one pot, you’ll find that clean-up is a breeze, allowing you to focus on enjoying the meal and sharing it with your loved ones rather than being stuck in the kitchen for hours.

From a nutritional standpoint, Creamy Alfredo Lasagna Soup provides a well-rounded mix of protein, carbs, and healthy fats. Packed with ingredients, each bowl delivers essential vitamins and minerals necessary for a nutritious diet. Plus, the ability to incorporate additional vegetables allows you to customize the soup to meet your family’s preferences and dietary needs.

Socially and entertaining-wise, this dish is a real crowd-pleaser. Nothing brings people together like a warm bowl of soup, especially when paired with crusty bread or a fresh salad. Whether it’s gathering with friends for a cozy night in or serving a meal to family after a busy day, this soup fosters connection and conversation.

Finally, the cost-effectiveness of this Creamy Alfredo Lasagna Soup cannot be overstated. With relatively inexpensive ingredients, you can feed a family of six or more without breaking the bank. This makes it an ideal choice for budget-conscious cooks who still want to deliver a delicious, homemade meal that feels indulgent and special.

Historical Background and Cultural Significance

The roots of lasagna can be traced back to ancient Greece and Rome, where pasta became a staple in the Mediterranean diet. Over centuries, different regional variations emerged, solidifying lasagna as a beloved dish within Italian culture. The introduction of creamy sauces, particularly Alfredo, evolved the dish into a more decadent experience, gaining popularity in American homes. Creamy Alfredo Lasagna Soup pays homage to this historical evolution while introducing an approachable twist to a classic.

Culturally, lasagna represents family gatherings, celebrations, and Italian feasts, symbolizing warmth and togetherness. This soup variation embodies those very same characteristics, inviting loved ones to share in a memorable meal while preserving the richness of Italian heritage. As families adapt this recipe to their preferences, it takes on new significance, becoming a comfort food that reflects their shared experiences and traditions.

As the recipe continues to evolve, the introduction of soup elements signifies a shift towards quicker, more convenient cooking. Modern cooks are constantly looking for ways to streamline meals without sacrificing authenticity and flavor. This Creamy Alfredo Lasagna Soup showcases how culinary traditions can adapt and flourish in contemporary kitchens.

Regional variations of lasagna can be seen globally, with numerous interpretations featuring varying ingredients and even methods of preparation. This versatility helps unite different cultural influences while maintaining the essence of lasagna, appealing to diverse tastes and preferences.

Ingredient Deep Dive

– Ground Meat: A cornerstone of this recipe, ground meat adds both protein and richness. Versatile in nature, it allows for various substitutions, such as turkey or plant-based options, accommodating different dietary needs. When selecting ground meat, look for high-quality, lean options for optimal flavor and health benefits.

– Pasta: Traditionally a lasagna noodle, the type of pasta significantly impacts the soup’s overall texture and mouthfeel. Opting for a quality pasta ensures it holds up well in the broth, preventing overly soft or mushy noodles. You can easily substitute gluten-free pasta for a dietary adaptation.

– Alfredo Sauce: This creamy blend of butter, cream, and cheese serves as the flavor backbone of the dish. Made from scratch or purchased, it’s essential to choose a sauce with the right balance of flavors. Preparing homemade Alfredo sauce allows you to control the ingredients and create a fresher, more customized taste.

– Vegetables: Common additions such as spinach, mushrooms, or zucchini enhance nutritional benefits while adding depth of flavor. Incorporating fresh or frozen vegetables into the soup allows for customization depending on seasonal availability and personal preference.

– Cheese: A crucial component, cheese not only imparts flavor but also adds creaminess. Freshly grated Parmesan serves as an ideal finishing touch for this soup, bringing everything together with its nutty, savory notes. Consider using different cheese varieties to create unique flavor profiles.

Common Mistakes to Avoid

  • Skimping on Seasoning: One major pitfall is not seasoning the components of the soup adequately. Each layer of flavor, from the meat to the Alfredo sauce, should be seasoned well to enhance the overall taste. Always taste as you go!
  • Overcooking Pasta: Another common mistake is cooking the pasta too much before adding it to the soup. It’s crucial to undercook the noodles slightly as they will continue to soften in the broth.
  • Using Low-Quality Sauce: Opting for a low-quality Alfredo sauce significantly impacts flavor. Homemade or high-quality store options yield richer and more robust results that elevate the dish.
  • Skipping the Sauté Step: Neglecting to sauté the garlic and onions can result in a flat broth. Sautéing these ingredients releases essential oils and flavors that enrich the overall taste.
  • Not Adjusting Consistency: Sometimes the soup can become too thick or too thin based on personal preference. Always adjust the broth according to your liking by adding more liquid or cooking uncovered to reduce thickness.
  • Inadequate Blending: If freshly grated cheese is not blended properly, it can clump together, becoming challenging to distribute throughout the soup. Stir continuously to ensure a smooth, creamy texture.
  • Overloading Ingredients: While it’s tempting to add lots of ingredients, maintaining balance is essential. Too many components can overshadow the deliciousness of the Alfredo sauce.
  • Forgetting to Garnish: Presentation plays a huge role in the enjoyment of food. Skipping garnishes like fresh basil or extra cheese can make the dish look unappetizing.
  • Not Prepping Ahead: Failing to prep ingredients beforehand can lead to a chaotic cooking experience. Organizing ingredients in advance ensures smooth cooking and better results.
  • Ignoring Leftovers: Many people overlook storing and reheating their soup properly. Proper storage helps retain flavor and quality for future meals.

Essential Techniques

– Sautéing: This technique allows for the development of flavors by cooking ingredients in a small amount of fat over medium heat. The goal is to soften and release essential oils, enhancing the taste of your dish. Mastery involves monitoring the cooking temperature and stirring often to avoid burning. Signs of success include softened onions and aromatic garlic.

– Layering Flavors: Achieving a depth of flavor requires thoughtful layering in your cooking process. Begin with aromatics, add proteins, then incorporate liquids, enriching the final result. To master this, always consider the overall balance of tastes and adjust accordingly. A well-layered dish will have a harmonious medley of flavors.

– Adjusting Consistency: Managing the soup’s consistency is key to mastering this recipe. Creating a velvety texture may require altering the liquid levels or cooking uncovered to evaporate excess moisture. Ensure you sample the broth regularly to determine the desired thickness and make modifications if needed, as this can elevate the soup experience.

Pro Tips for Perfect Creamy Alfredo Lasagna Soup

– Use high-quality ingredients for the best flavor; fresh herbs, good cheese, and homemade sauce can make a big difference.
– Consider using multiple cheese varieties for added depth; combinations of mozzarella and provolone enhance the cheesy goodness.
– Always taste and adjust seasonings throughout the cooking process. Flavors intensify as they blend, so getting it just right is important!
– If you prefer a vegetable-rich soup, consider adding sautéed vegetables like bell peppers or carrots alongside the meat for added flavor and nutrition.
– For a spicy twist, try adding a pinch of red pepper flakes to the sauce, offering a delightful kick to your creamy dish.
– Cooking the soup in a Dutch oven helps maintain an even heat distribution, improving overall cooking results.
– If time permits, allow the flavors to meld by letting the soup simmer for a longer duration, enhancing its taste and complexity.
– To present beautifully, serve your soup in individual bowls garnished with freshly chopped basil and a sprinkle of Parmesan for a professional touch.

Variations and Adaptations

– Regional variations may include additional spices or herbs specific to different Italian regions, such as bay leaves or fresh oregano, which can be incorporated to enhance the flavor profile, adding authenticity to the dish.
– Seasonal adaptations offer opportunities for unique twists. For instance, during summer months, incorporating fresh zucchini or other seasonal vegetables can freshen the flavor and add nutrition.
– Dietary modifications can be made by substituting gluten-free pasta for traditional noodles or using almond milk and dairy-free cheese for a vegan-friendly option, catering to different dietary preferences.
– Flavor variations can be achieved by introducing different meats. Ground turkey or sausage adds a savory depth, while incorporating seafood can lend a unique coastal spin.
– Texture modifications, such as blending some of the soup before serving, can create a creamier consistency while leaving some chunky bits for contrast.
– Presentation alternatives might include serving the soup in bread bowls for a delightful dining experience that adds to the meal’s aesthetic and taste.

Serving and Presentation Guide

– Plating techniques that emphasize visual appeal include using oversized, shallow bowls and a light drizzle of cream or a touch of green for contrast.
– Garnishing ideas like a sprinkle of fresh herbs, a dash of olive oil, or a twist of lemon zest can elevate the soup’s presentation and flavor profile.
– Traditional accompaniments such as garlic bread or a fresh salad pair beautifully and round out the meal, enhancing the dining experience.
– For modern serving suggestions, consider creating a charcuterie board with complementary appetizers before serving the soup to set a festive tone.
– Temperature considerations are important; serve immediately after preparation while the soup is still steaming hot for the best taste and experience.
– Portion control tips can help moderate serving sizes; aim for 1-2 cups per serving for a well-balanced meal that satisfies without overeating.

Wine and Beverage Pairing

– Wine pairings for this hearty soup include a medium-bodied Chardonnay or a light Pinot Grigio, which complements the creaminess of the Alfredo sauce without overwhelming the flavors.
– For non-alcoholic alternatives, a crisp sparkling water infused with fresh citrus or herbal tea can refresh the palate between spoonfuls of rich soup.
– Coffee or tea pairings may be less common but can provide a pleasant finish; opt for a light herbal tea mixed with a touch of honey to cleanse the palate after enjoying the dish.
– Temperature considerations play a role in wine selections; serve whites chilled for refreshing contrast against the warm soup.
– Serving suggestions could include presenting wine in elegant glasses alongside the meal to enhance the overall dining experience, creating a warm and inviting atmosphere.

Storage and Shelf Life

– Store leftovers in airtight containers in the fridge for up to three days, ensuring that the soup retains its flavor and texture.
– Maintain temperature requirements by allowing the soup to cool to room temperature before refrigerating, helping to prevent bacterial growth.
– Container recommendations include glass or sturdy plastic containers that can withstand being stored and reheated without issues.
– Signs of spoilage to watch for include an off smell, changes in color, or separation of ingredients, all indicators that the soup should not be consumed.
– Reheating instructions suggest using a saucepan over low heat, stirring frequently until warmed throughout; microwaving is also an option but should be done in 30-second intervals to avoid overheating.
– For longer storage, consider freezing the soup in portions, ensuring it’s labeled with the date for easy tracking, and use within three months for the best quality.

Make Ahead Strategies

– Prep timeline suggests chopping vegetables and measuring ingredients a day in advance, allowing for a smoother cooking experience.
– Storage between steps can involve preparing the soup base in advance and saving the finishing touches, such as cheese and fresh herbs, for just before serving.
– Quality impact assessment indicates that some flavors, like garlic and herbs, may deepen in taste when allowed to sit overnight, which can positively impact the final dish.
– Assembly tips involve preparing components separately and quickly bringing together in one pot close to meal time—this ensures freshness without compromising on taste.
– Reheating guidelines suggest a gentle reheat process to maintain the integrity of ingredients, providing a quality dish that feels freshly made.
– Fresh element additions, such as a drizzle of olive oil or fresh basil upon serving, can elevate the final presentation and flavor, making it feel like a made-to-order meal.

Scaling Instructions

– Halving the recipe is straightforward; simply reduce each ingredient by half while keeping cooking times consistent, ensuring that flavors remain balanced.
– Doubling or tripling the recipe requires greater care in managing cooking times; larger pots may be necessary to prevent overcrowding.
– Equipment adjustments may include using multiple pots if doubling the recipe or a larger stockpot to contain all the ingredients effectively.
– Timing modifications should account for the increase in volume to ensure all flavors meld properly. Adjust simmering time based on volume for the best results.
– Storage considerations include using larger containers when freezing portions for later use, ensuring each portion is accessible for quick meals.

Nutritional Deep Dive

– Macro breakdown reveals the balance of protein, carbohydrates, and fats within a serving of Creamy Alfredo Lasagna Soup, making it a well-rounded meal option that fuels energy.
– Micronutrient analysis typically shows an array of vitamins and minerals provided by the vegetables and cheeses used, promoting overall health.
– Health benefits include the protein and calcium provided by the cheese and meat, supporting muscle and bone health, essential for a balanced diet.
– Dietary considerations arise, especially for those monitoring caloric intake; opting for lean meat and controlling portion sizes can facilitate better health outcomes.
– Portion analysis encourages mindful eating; one serving provides a fulfilling experience without excessive caloric intake.
– Weight management tips suggest being cautious with additional toppings or sides, as they can quickly alter the meal’s caloric density.

Dietary Adaptations

– Gluten-free options can be easily made by substituting traditional pasta with gluten-free varieties or using zucchini noodles for a lower-carb option.
– Dairy-free adaptations may involve using almond or coconut milk in the Alfredo sauce with the incorporation of nutritional yeast for a cheesy flavor.
– Vegan versions utilize plant-based ground meat and cheese substitutes to achieve a similar creamy texture while adhering to a strict dietary lifestyle.
– Low-carb variations can employ cauliflower or squash as replacements for pasta, maintaining a hearty feel while reducing carbohydrates.
– Keto adaptations require careful selection of low-carb ingredients, ensuring adherence to the dietary guidelines while still enjoying this comforting soup.
– Paleo options can be achieved by focusing on whole ingredients, eliminating dairy and refining carbs for a clean, nutrient-dense dish.
– Low-FODMAP modifications may involve using lactose-free cheese or avoiding specific high-FODMAP ingredients to cater to unique dietary needs without sacrificing flavor.
– Exploring other specific diets can lead to excellent adaptations, such as Mediterranean versions featuring olives and capers or Asian influences with ginger and sesame oil to create a diverse range of flavors.

Troubleshooting Guide

– Texture issues can arise if the pasta is overcooked; it’s best to keep it slightly undercooked, as it continues to soften in hot soup.
– Flavor balance challenges include overly salty soup; using low-sodium broth or carefully monitoring salt levels during preparation can help avoid this issue.
– Temperature problems often come down to improper simmering; too high a heat can lead to uneven cooking. Maintain a gentle simmer for even results.
– Equipment challenges can arise from the wrong pot size; ensure you’re using a pot large enough to accommodate all ingredients without overcrowding.
– Ingredient substitutions should be approached with care; introducing new ingredients may require adjustments in seasoning or cooking times.
– Timing concerns can affect flavor quality—ensure you factor in additional time when scaling or adapting recipes to retain their integrity.

Recipe Success Stories

– Community feedback consistently praises the comforting nature of this dish, often shared during gatherings and special occasions, showcasing its universal appeal.
– Variation successes demonstrate adaptability; readers commonly share tips on incorporating personal favorites, such as different vegetables or meats, enhancing the soup’s versatility.
– Adaptation stories highlight those who have made this recipe gluten-free or vegan, proving the soup’s flexibility across dietary spectrums, making it inclusive for various eaters.
– Reader suggestions frequently recommend pairing the soup with a fresh salad or crusty bread, highlighting its compatibility with other dishes for a complete meal.
– Photography tips emphasize capturing the soup’s rich texture and creamy appearance; appealing servings encourage others to try this delightful dish, showcasing its potential.

Frequently Asked Questions

Q: Can I make this soup ahead of time?

A: Absolutely! You can prepare the soup, store it in the fridge, and reheat just before serving. This allows the flavors to meld even better.

Q: Can I freeze Creamy Alfredo Lasagna Soup?

A: Yes! This soup freezes well in an airtight container. Just be sure to let it cool completely before freezing and consume within three months.

Q: Is the soup gluten-free?

A: It can be! Simply use gluten-free pasta, and check soy sauce if used, ensuring that all ingredients meet your needs.

Q: How do I store leftovers?

A: Leftovers should be stored in airtight containers in the refrigerator for up to three days. Reheat gently before serving.

Q: Can I add vegetables to the soup?

A: Yes, adding vegetables can enhance the nutritional profile; consider spinach, mushrooms, or any other seasonal veggies!

Q: What can I use instead of heavy cream?

A: You can substitute milk mixed with a bit of cornstarch for a lighter version, or use non-dairy alternatives for a vegan option.

Q: How spicy can I make this soup?

A: Adjusting the spice level is easy—simply add red pepper flakes or hot sauce to taste, and always start with a little to not overpower the flavors.

Q: Can I use different meats?

A: Certainly! Ground turkey, chicken, or even sausage can work well, creating unique flavors and textures for the soup.

Q: What is the best way to reheat the soup?

A: Reheat slowly over a burner, stirring often. Avoid using too high heat, which could alter the creaminess of the soup.

Q: Can I skip the pasta altogether?

A: Yes! This soup is delicious as a creamy sauce on its own; simply omit the pasta for a low-carb version.

Additional Resources

– Related recipes such as traditional lasagna or baked ziti can provide inspiration for upcoming meals, allowing you to explore similar flavors.
– Technique guides on making homemade Alfredo sauce or prepping vegetables can elevate your culinary skills and enhance your cooking experience.
– Ingredient information sources can serve as helpful references to understand the nutritional value and origins of the ingredients used in this recipe.
– Equipment recommendations for ideal pots and pans can assist in the cooking process, ensuring success in your kitchen endeavors.
– Seasonal variations provide an opportunity to adapt this soup throughout the year with the addition of fresh, seasonal ingredients that change with availability.

Join the Conversation

– Social media sharing can amplify your experience; consider posting photos of your finished dish and tagging friends to inspire them to try this Creamy Alfredo Lasagna Soup.
– Photography tips emphasize capturing the beautiful creamy layers and inviting colors of the soup, potentially prompting others to join in and recreate your masterpiece.
– Recipe reviews can provide insight into cooking adventures, documenting what worked well and adjustments made, fostering a sense of community among food lovers.
– Community engagement is encouraged, as sharing personal stories or variations of the recipe leads to new ideas and encourages collaboration within the culinary world.
– Recipe variations are highly welcome; share your unique twists or creative adaptations for others to try at home and enhance the dish’s legacy.

The Recipe

Creamy Alfredo Lasagna Soup

Serves: 6 servings

Prep Time: 20 mins

Cook Time: 30 mins

Total Time: 50 mins

Kitchen Equipment Needed

  • Large pot or Dutch oven
  • Wooden spoon
  • Measuring cups and spoons
  • Knife and cutting board
  • Colander for draining pasta

Ingredients

  • 1 pound ground beef or turkey
  • 1 onion, diced
  • 2 cloves garlic, minced
  • 4 cups chicken broth
  • 1 can (15 oz) crushed tomatoes
  • 1 teaspoon dried oregano
  • 1 teaspoon dried basil
  • 8 ounces lasagna noodles, broken into pieces
  • 1 cup heavy cream
  • 1 cup shredded mozzarella cheese
  • 1/2 cup grated Parmesan cheese
  • Salt and pepper to taste
  • Fresh basil for garnish

Directions

  1. In a large pot or Dutch oven, cook the ground meat over medium heat until browned. Drain excess fat.
  2. Add the onion and garlic to the pot, sautéing until the onion is translucent.
  3. Stir in the chicken broth, crushed tomatoes, oregano, and basil. Bring to a boil.
  4. Add the broken lasagna noodles and cook for about 10 minutes, until tender.
  5. Lower the heat and stir in the heavy cream, mozzarella, and Parmesan. Mix until cheese is melted and soup is creamy.
  6. Season with salt and pepper to taste, and let simmer for an additional 5 minutes.
  7. Serve hot, garnished with fresh basil and extra cheese if desired.

Recipe Notes

  • For a richer flavor, consider adding a splash of white wine while cooking.
  • Feel free to substitute the ground meat with plant-based alternatives for a vegetarian version.
  • Leftovers can be stored in an airtight container for up to three days.
  • You can use any type of pasta; however, lasagna-style will achieve the most authentic taste.

Deliciously Easy Caramel Apple Dip Recipe for Fall Celebrations

Delicious Caramel Apple Dip: The Perfect Fall Treat!

⚖️
Difficulty
Easy

⏲️
Prep Time
10 mins

🕒
Cook Time
5 mins

⏱️
Total Time
15 mins

🍽️
Servings
6 servings

Caramel Apple Dip is a delightful treat that perfectly captures the essence of fall. Imagine diving into a creamy, sweet dip that marries the buttery richness of caramel with the tartness of crisp apples. The smooth texture of the dip wraps around every slice of apple, creating an indulgent experience with each bite. This Caramel Apple Dip is not only a fantastic dessert option but also an ideal snack for gatherings, making it a crowd-pleaser that will leave everyone wanting more.

Whether you’re preparing for a family gathering or just looking for a quick and easy dessert, this recipe is simple and requires minimal effort. The combination of flavors in this Caramel Apple Dip is irresistible — the sweetness of the caramel perfectly balances the freshness of the apples, making it a versatile dip that pairs well with a variety of fruits. This dip can also serve as a delicious companion to pretzels or other dippable snacks, ensuring there’s something for everyone.

Quick Recipe Highlights

  • Flavor Profile: The Caramel Apple Dip boasts a sweet and creamy flavor, enhanced by a hint of vanilla and a touch of salt to balance the sweetness.
  • Texture: This dip is luxuriously creamy and smooth, providing a delightful contrast to the crisp texture of fresh apple slices.
  • Aroma: As you dive into this dip, the warm, buttery aroma of caramel mingles with the fresh fragrance of sliced apples, creating an inviting scent.
  • Visual Appeal: The dip’s golden brown hue paired with vibrant apple slices makes for a visually stunning display at any gathering.
  • Skill Level Needed: This recipe is extremely beginner-friendly, making it perfect for those new to cooking or baking.
  • Special Equipment: All you need is a mixing bowl, a whisk, and a microwave or stovetop for melting the caramel.

Recipe Overview

  • Difficulty Level: This Caramel Apple Dip is incredibly easy to prepare and perfect for beginners. It involves simple mixing and minimal cooking, making it accessible for anyone.
  • Category: This dip fits beautifully into the dessert and snack categories, making it versatile for any occasion.
  • Cuisine: While the recipe has American roots, the combination of caramel and apples has made it popular in various culinary traditions, especially in fall-themed gatherings.
  • Cost: The ingredients for this dip are relatively inexpensive, making it a budget-friendly option for entertaining.
  • Season: This Caramel Apple Dip shines bright during the fall season, coinciding with apple harvesting and festive gatherings.
  • Occasion: Perfect for parties, picnics, or cozy nights in, this dip is a delightful addition to any celebration or snack time.

Why You’ll Love This Recipe

There are many reasons why this Caramel Apple Dip will quickly become a favorite. First and foremost, the delightful combination of textures and flavors creates a sensational experience. The creamy, buttery caramel enveloping the crisp apples provides a contrast that’s simply addictive. It’s a beautiful way to enjoy fresh fruit while indulging in a sweet treat.

Furthermore, this dip is incredibly convenient. Preparation takes just minutes, and it can be made ahead of time and stored in the refrigerator. This flexibility allows you to focus on other aspects of your event without sacrificing taste or quality. It’s a fantastic time-saver for busy hosts who still want to impress their guests.

Nutritionally, while it is a treat, the dip includes apples, which are rich in vitamins and provide some fiber. This makes enjoying the dip guilt-free compared to other dessert options. Pairing the apples with caramel allows for a dessert that feels indulgent while still offering a healthier snack alternative.

Socially, this dip is bound to be the talk of the table, as it’s perfect for sharing. The act of dipping and sampling creates a communal atmosphere, making it a great dish for gatherings. Friends and family can gather around and enjoy this delightful treat together, fostering connection and joy.

Lastly, the cost-effectiveness of this Caramel Apple Dip is appealing for any budget. Simple ingredients lead to a big impact, making it possible to feed a crowd without breaking the bank. This recipe proves that hosting doesn’t have to be costly to be delicious and enjoyable.

Historical Background and Cultural Significance

The origins of caramel apple dip can be traced back to classic desserts that have utilized apples and caramel for decades. This combination has its roots in American cuisine, where caramel-coated apples became a popular fall treat. The dip version emerged as an effortless way to enjoy the beloved flavors without the need for elaborate preparations.

Culturally, the appeal of caramel apples and dips was heightened during autumn months, closely tied to harvest festivals and Halloween traditions. The caramel apple symbolized the season, representing both the harvest and festivities. This dessert has evolved over the years, becoming a staple at fairs, carnivals, and family gatherings, often linked with nostalgia and joy during childhood.

As this recipe has evolved, regional variations have emerged, with different cultures adding their unique twists. Some have incorporated spices like cinnamon or nutmeg, while others have experimented with incorporating chocolate or nuts. These variations only serve to enrich the cultural significance of caramel apple dip further.

In contemporary times, the dip has gained popularity in holiday celebrations, proving versatile enough to serve as both a dessert and a snack. Its evolution from a fairground treat to a cherished family recipe reflects the adaptability of food to fit into various contexts while retaining its comforting essence.

Ingredient Deep Dive

  • Apples: Apples are an iconic fruit in many cultures, symbolizing health and wisdom. They provide essential vitamins like Vitamin C and dietary fiber, which are beneficial for overall health. When selecting apples for this dip, look for firm varieties like Granny Smith or Honeycrisp. Store apples in a cool, dry place and they can last several weeks in the fridge. If you need substitutions, consider pears for a different flavor profile.
  • Caramel Sauce: Caramel sauce has a rich culinary history, often used in desserts around the world. It provides a high dose of sweetness and contrast to the tartness of the apples. When choosing caramel sauce, opt for one made with real sugar for the best taste. Store in an airtight container in the fridge and use within a few weeks. For a healthier option, consider making a homemade version using coconut sugar or maple syrup.
  • Cream Cheese: Cream cheese originated in France but became a staple in American kitchens, particularly in desserts. It adds a creamy texture and a slight tang, which balances the sweetness of the caramel. When selecting cream cheese, choose full-fat options for a richer flavor. Store it in the fridge, and it can last several weeks unopened. Turn to Greek yogurt as a suitable alternative for a lighter version.

Common Mistakes to Avoid

  • Overheating the caramel can lead to a scorched taste. Heat gently and stir frequently to avoid this.
  • Using overly ripe apples can cause them to become mushy. Select firm apples for the best dipping experience.
  • Not allowing the cream cheese to reach room temperature before mixing can result in lumps. Let it sit out for about 30 minutes prior to use.
  • Underestimating the salt needed can lead to an unbalanced flavor. A pinch of salt enhances sweetness remarkably.
  • Forgetting to taste test the dip before serving may lead to an overly sweet or bland outcome. Always adjust flavors to your liking.
  • Not allowing the dip to chill can affect its texture and making it hard to serve. Chill for at least 30 minutes before serving.
  • Not planning for enough apples can lead to running out before the dip is finished. Ensure a plentiful supply for everyone to enjoy.
  • Rushing the preparation can lead to mistakes. Take your time to ensure that every step is completed properly.

Essential Techniques

  • Melting Caramel: It’s crucial to master the art of melting caramel to ensure a smooth consistency. Always melt over low to medium heat to prevent burning. Stirring continuously allows the caramel to heat evenly. Watch for a thick but pourable consistency as the visual cue for success.
  • Mixing Cream Cheese: To achieve a beautifully creamy dip, let your cream cheese come to room temperature before mixing. Use a hand mixer or whisk to blend until smooth to avoid lumps. A well-mixed dip creates a luscious texture that’s inviting to dip into.

Pro Tips for Perfect Caramel Apple Dip

  • Use a mix of apple varieties for an interesting flavor combination. Combining sweet and tart varieties adds depth to the dish.
  • Drizzle extra caramel sauce over the dip before serving for an eye-catching presentation and added sweetness.
  • Consider adding a sprinkle of sea salt on top to enhance the flavor further and create a sophisticated balance.
  • Garnish with chopped nuts or mini chocolate chips for an additional flavor and texture contrast.
  • Serve the dip with a variety of dippables, such as pretzels, graham crackers, or even marshmallows to cater to different tastes.
  • If making ahead, store the dip in an airtight container and press a piece of plastic wrap against the surface to prevent it from drying out.
  • Experiment with flavored caramel sauce, like vanilla or sea salt, for a unique twist on the classic.
  • Let the dip sit for a few minutes at room temperature before serving to soften the texture for easier dipping.

Variations and Adaptations

  • Regional Variations: In different cultures, influenced flavors like cinnamon, nutmeg, or even spices from chai teas can be added to create a unique dip.
  • Seasonal Adaptations: Transition from fall to winter by incorporating peppermint extract or crushed candy canes for a festive variation around holiday times.
  • Dietary Modifications: For a healthier option, swap out cream cheese for Greek yogurt or a plant-based alternative for a vegan version without sacrificing creaminess.
  • Flavor Variations: Enhance the flavor by adding peanut butter or chocolate syrup for a more decadent experience.
  • Texture Modifications: For a crunchier dip, mix in some chopped nuts or granola for added texture contrast.
  • Presentation Alternatives: Serve the dip in individual cups or jars for personalized portions and ease during gatherings.

Serving and Presentation Guide

  • Plating Techniques: Use shallow bowls for the dip to create a more appealing surface area for dipping. A decorative platter can be great to add visual interest.
  • Garnishing Ideas: Garnish with a sprinkle of cinnamon and a drizzle of caramel for an inviting touch that catches the eye.
  • Traditional Accompaniments: Pair with fresh apple slices, but don’t shy away from offering pretzels or graham crackers for additional dipping options.
  • Modern Serving Suggestions: Use clear cups to showcase layers of cake or dip for a modern twist at a dessert table.
  • Temperature Considerations: Serve the dip at room temperature for optimal flavor and texture, allowing guests to fully enjoy its richness.
  • Portion Control Tips: Encourage sharing by setting the dip in the center of the table; providing small cups for individual servings can help with control.

Wine and Beverage Pairing

  • Wine Pairings: A sweet Riesling or Moscato pairs beautifully with the caramel and apple flavors, enhancing the dessert experience.
  • Non-alcoholic Alternatives: Sparkling cider is an excellent choice that complements the fall theme and pairs beautifully with the dip.
  • Coffee/Tea Pairings: A rich cup of coffee or a spiced chai tea could create a warm, inviting way to enjoy the dip during cooler months.
  • Temperature Considerations: Serve beverages chilled or at room temperature to avoid contrasting temperatures with the dip.
  • Serving Suggestions: Consider creative serving options like mini mugs for coffee or festive cups for cocktails to create a joyful atmosphere.

Storage and Shelf Life

  • Storage Methods: Store the Caramel Apple Dip in an airtight container in the refrigerator to maintain its freshness.
  • Temperature Requirements: Keep it chilled to prevent spoilage and preserve the creamy consistency of the dip.
  • Container Recommendations: Use glass or food-safe plastic containers for storage, ensuring they seal tightly to prevent oxidation.
  • Signs of Spoilage: Check for any off-smells or changes in color indicating spoilage; discarding when in doubt is best.
  • Reheating Instructions: If serving warm, gently reheat in the microwave in short bursts to prevent overheating.
  • Freezing Guidelines: It’s not recommended to freeze this dip as the texture may change upon thawing; however, leftover caramel can be kept for later use.

Make Ahead Strategies

  • Prep Timeline: You can prepare the dip a day before serving and store it in the refrigerator to save time on the day of your event.
  • Storage Between Steps: Keep individual components like caramel, cream cheese, and apples sealed separately until assembly for the best freshness.
  • Quality Impact Assessment: Assembling too early may lead to apples softening, so aim to mix shortly before serving.
  • Assembly Tips: When ready to serve, combine and re-whip the dip to restore its creamy texture if it thickens while chilling.
  • Reheating Guidelines: Warm the dip slightly before serving for a comforting touch; gently warm and stir to mix back together.
  • Fresh Element Additions: Add fresh apple slices just before serving to maintain their crispness and vibrant appeal.

Scaling Instructions

  • Halving the Recipe: For smaller gatherings, simply halve each ingredient while still ensuring flavor balance remains intact.
  • Doubling or Tripling: To scale up for larger groups, doubling works well, but prepare and mix in batches to maintain quality and consistency.
  • Equipment Adjustments: Larger mixing bowls and serving platters will be needed when scaling the recipe up significantly to ensure comfort and accessibility.
  • Timing Modifications: When preparing larger quantities, allocate additional time for melting, mixing, and serving the dip.
  • Storage Considerations: Ensure that you have sufficient sealed containers to store any leftovers if serving larger batches.

Nutritional Deep Dive

  • Macro Breakdown: Caramel Apple Dip can be high in sugars and fats, primarily from the caramel and cream cheese. That’s why it’s important to enjoy in moderation.
  • Micronutrient Analysis: Apples offer vital nutrients, including Vitamin C and various antioxidants, contributing to a balanced diet.
  • Health Benefits: While serving as a delicious treat, the inclusion of apples can boost overall dietary fiber intake.
  • Dietary Considerations: Be mindful of portion sizes if you are watching sugar intake; consider reducing caramel or replacing it with a healthier option.
  • Portion Analysis: A serving is typically a couple of tablespoons of dip with a substantial piece of apple; measure to avoid overindulgence.
  • Weight Management Tips: Serve alongside healthy options like fresh cut vegetables or nuts to balance the sweet dip.

Dietary Adaptations

  • Gluten-free: This Caramel Apple Dip is naturally gluten-free, making it a great option for those following a gluten-free diet.
  • Dairy-free: Substitute cream cheese with a dairy-free alternative like coconut cream or vegan cream cheese for a dairy-free version.
  • Vegan: Use vegan caramel sauce and non-dairy cream to fully enjoy this recipe without animal products.
  • Low-carb: Choose sugar-free caramel and serve with lower-carb vegetables for a sugar-free treat.
  • Keto: A keto-friendly caramel sauce and cream cheese can make this dip enjoyable for those on a strict low-carb diet.
  • Paleo: Employ natural sweeteners like honey or maple syrup as alternatives to processed sugars for a paleo-friendly version.
  • Low-FODMAP: Limit or replace apples with permitted fruits in smaller portions to meet low-FODMAP dietary requirements.

Troubleshooting Guide

  • Texture Issues: If the texture is too thin, add more cream cheese gradually to thicken up the dip. If it’s too thick, a little milk or cream can help loosen it.
  • Flavor Balance: If the dip is overly sweet, a small pinch of salt or splash of lemon juice can help create a more balanced flavor.
  • Temperature Problems: If the caramel hardens when cooled, gently reheat it to restore its original consistency before serving.
  • Equipment Challenges: If your mixer won’t incorporate the cream cheese properly, consider letting it soft completely and using a whisk to manually mix.
  • Ingredient Substitutions: If you don’t have caramel sauce, you can make a quick homemade caramel using sugar and butter as a substitute.
  • Timing Concerns: If running late, consider making the dip in advance and refrigеrating until guests arrive for quick serving.

Recipe Success Stories

  • Readers have consistently shared how the Caramel Apple Dip became a party favorite, often featuring it at their celebrations.
  • Many have customized the recipe by adding their ingredients, such as chocolate chips, which only enhanced its appeal.
  • Success stories of last-minute pinnings showcase how this easy dessert saved the day during unexpected gatherings.
  • Individuals have enjoyed creating stunning social media posts, accentuating the dip’s appealing dimensions and capturing the festive spirit.
  • A lot of great feedback suggests that simple tweaks, like using salted caramel sauce, have created delightful versions tailored for family preferences.

Frequently Asked Questions

Can I make the Caramel Apple Dip ahead of time?
Absolutely! You can prepare it a day in advance and store it in the fridge. Just give it a little stir before serving for the best texture.

How long does the dip last in the fridge?
It should be good for about 3-5 days in an airtight container. Just keep an eye on the apples to ensure they stay fresh.

Can I freeze the Caramel Apple Dip?
Freezing is not recommended as it may change the texture upon thawing. It’s best enjoyed fresh or chilled.

What kind of apples are best for dipping?
Firm varieties like Granny Smith, Honeycrisp, or Fuji work best due to their crisp texture and refreshing tartness.

Is this recipe suitable for kids?
Definitely! Kids love the sweet and creamy flavor of Caramel Apple Dip, and it’s perfect for parties and snacks.

Can I use store-bought caramel sauce?
Yes, store-bought caramel sauce is a great time-saver and works perfectly for this dip!

How can I enhance the flavor of the dip?
Adding a touch of vanilla extract or a sprinkle of sea salt can elevate the flavor and create an even more delicious treat.

What can I serve with the dip?
Besides apple slices, consider serving pretzels, graham crackers, or marshmallows as fantastic accompaniments!

How do I prevent the apples from browning?
You can toss your apple slices in a bit of lemon juice to keep them from browning too quickly.

Is there a way to make it healthier?
Yes! You can use Greek yogurt instead of cream cheese and opt for sugar-free caramel sauce for a lighter version!

Additional Resources

  • Check out our other fruit dip recipes for more delicious options to enjoy with your favorite fruits!
  • Explore technique guides on how to prepare fresh fruit to enhance texture and flavor in your dishes.
  • Read our ingredient information to learn about the benefits and history of the fruits and sauces commonly used.
  • Consider our equipment recommendations to find the best kitchen tools to help you create this and other recipes.
  • Discover seasonal variations that you can incorporate into your caramel apple dip for a fresh twist every year.

Join the Conversation

  • Share your version of the Caramel Apple Dip on social media! Tag us and let us know how you customized your recipe.
  • We love to see your photography tips! Share your best snapshots of this dip in action for a chance to be featured.
  • Leave a review below! We love hearing about your experiences and suggestions to improve this recipe.
  • Engage with our community by sharing variations that you’ve tried or other fruits that you think would pair well with this dip.
  • Join the conversation and let us know what events you plan to serve this delicious Caramel Apple Dip!

The Recipe

Caramel Apple Dip

Serves: 6 servings

Prep Time: 10 mins

Cook Time: 5 mins

Total Time: 15 mins

Kitchen Equipment Needed

  • Mixing bowl
  • Whisk or hand mixer
  • Microwave-safe bowl or saucepan

Ingredients

  • 1 cup caramel sauce
  • 8 oz cream cheese, softened
  • 1 tsp vanilla extract
  • Apples, sliced, for dipping

Directions

  1. In a mixing bowl, combine softened cream cheese and vanilla extract. Mix well until creamy and smooth.
  2. In a microwave-safe bowl, heat the caramel sauce until it becomes pourable, about 30 seconds in the microwave.
  3. Gradually pour the warm caramel into the cream cheese mixture, stirring continuously until fully blended.
  4. Transfer the dip to a serving bowl and refrigerate for at least 30 minutes before serving.
  5. Serve chilled with apple slices, and enjoy!

Recipe Notes

  • For added flavor, consider incorporating spices like cinnamon or nutmeg into the dip.
  • If you want a chocolatey touch, swirl chocolate syrup into the dip before serving.
  • Keep apples sliced and dipped in lemon juice to prevent them from browning before serving.

Revitalize Your Snack Game with Chicken Pecan Cranberry Salad

Chicken Pecan Cranberry Salad – A Healthy Snack Delight

⚖️
Difficulty
Easy

⏲️
Prep Time
15 mins

🕒
Cook Time
10 mins

⏱️
Total Time
25 mins

🍽️
Servings
4

The Chicken Pecan Cranberry Salad is not only a delight for your taste buds but also a nutritious option for those looking for a healthy snack or meal. The combination of tender chicken, crunchy pecans, and tart cranberries creates a perfect balance of flavors that tantalizes the palate. Whether it’s a hot summer day or a cozy winter evening, this salad provides a refreshing taste of joy, making it an adaptable dish for any occasion.

The salad features a vibrant mix of greens that adds a splash of color to your table, enhancing its visual appeal. Fresh ingredients come together harmoniously to create a dish that is as pleasing to the eye as it is to the taste. The nutty essence of pecans, paired with the sweetness of cranberries, makes every bite a delightful experience. It’s perfect for meal prep, picnics, or as a quick dinner option, demonstrating how healthy eating doesn’t need to be boring.

Quick Recipe Highlights

  • Flavor Profile: This salad balances savory and sweet flavors with the richness of chicken and the tartness of cranberries.
  • Texture: Enjoy the crunch of pecans alongside tender chicken and crispy greens—with every bite offering a delightful mouthfeel.
  • Aroma: The aroma is inviting, with nutty notes from the pecans and a hint of sweetness from the cranberries.
  • Visual Appeal: The vibrant colors of fresh greens and cranberries make the salad visually alluring and appetizing.
  • Skill Level Needed: An easy recipe, perfect for beginner cooks with minimal preparation steps.
  • Special Equipment: All you need is a mixing bowl and basic kitchen utensils.

Recipe Overview

  • Difficulty Level: This Chicken Pecan Cranberry Salad ranks easy due to straightforward steps and accessible ingredients, making it ideal for cooks of all skill levels.
  • Category: It falls under the category of salads, ideal for lunch, dinner, or as a side dish.
  • Cuisine: This recipe showcases American culinary influences, combining classic flavors with a modern twist.
  • Cost: It’s relatively inexpensive, with an approximate cost of $15 for the ingredients, serving 4 people.
  • Season: Enjoy this dish year-round, as it utilizes ingredients that are readily available, regardless of the season.
  • Occasion: Perfect for casual gatherings, lunch boxes, or even a light dinner with friends.

Why You’ll Love This Recipe

This Chicken Pecan Cranberry Salad features a delightful interplay of flavors and textures that are sure to please. The tender chunks of chicken provide a satisfying protein boost, while the crunchy pecans offer a nutty flavor complimented effectively by the sweetness of cranberries. Each bite is a balance of savory, sweet, and crunchy elements that make it exciting.

Convenience is another reason to love this salad. With a quick preparation and cooking time, it’s an accessible meal that you can whip up in less than thirty minutes. For those with busy lifestyles, this recipe is an excellent choice for meal prep. You can make it in advance and enjoy it throughout the week.

Nutritionally, this salad is a powerhouse. Packed with protein from the chicken, healthy fats from the pecans, and a punch of antioxidants from the cranberries, it supports a healthy lifestyle while satisfying your hunger. Also, it’s a great way to add more vegetables to your diet, making it a well-rounded meal.

For social gatherings, this dish shines. Its colorful presentation and mix of flavors make it an excellent choice for sharing. Guests will appreciate a healthy option that still feels indulgent. It’s a salad that transforms a simple meal into an exciting culinary experience.

Finally, this recipe is cost-effective. With basic ingredients that can be sourced without breaking the bank, it’s an affordable meal option. You can enjoy high-quality flavors and nutrition without overspending, making it suitable for families or individuals seeking budget-friendly meals.

Historical Background and Cultural Significance

The Chicken Pecan Cranberry Salad has its roots in American cuisine, drawing upon the southern tradition of pecan use in cooking. Pecans are native to North America and have become a staple in many American recipes, particularly southern dishes. Their nutty flavor enhances both sweet and savory dishes, making them versatile.

The cultural significance of this salad lies in its embodiment of comfort food while also adhering to modern health trends. The blend of ingredients reflects a move towards healthier eating while still valuing rich flavors. This salad represents a harmonious blend of health and indulgence that is celebrated in many gatherings and meals.

Over the years, this recipe has evolved from basic chicken salads to incorporate more diverse ingredients, such as nuts and fruits. Variations now exist globally, adapting to local tastes and available ingredients. The addition of cranberries reflects a trend towards combining tart and sweet flavors, enriching the overall experience.

Regional variations exist, especially with different nuts and fruits prevalent in various areas. For example, walnuts or almonds may replace pecans in certain contexts. These adaptations keep the spirit of the dish alive while introducing unique local flavors, showcasing the dish’s flexibility in American cuisine.

Ingredient Deep Dive

Chicken

Chicken plays a pivotal role in this salad, providing lean protein essential for muscle repair and overall health. Historically, chicken has been a staple protein source in many cuisines due to its availability and versatility. When selecting chicken for this recipe, opt for free-range or organic options for better flavor and quality. It’s best stored in the refrigerator if used within a couple of days or can be frozen for longer freshness.

Pecans

Pecans are not only delicious but also carry cultural significance, particularly in the southern United States where they are native. These nuts are rich in healthy fats and essential nutrients, making them a fantastic addition to salads. When buying pecans, look for ones that are plump and have a fresh aroma. Store them in an airtight container in a cool, dark place to maintain their freshness. Pecans can often be substituted with walnuts if necessary, changing the flavor profile slightly.

Cranberries

Cranberries have a rich history, known for their antioxidant properties and benefits to urinary health. Fresh cranberries can be tart, so this recipe takes advantage of dried cranberries, which provide a sweet contrast to the chicken and nuts. When selecting cranberries, ensure they are plump and vibrant in color. Store them in an airtight container to keep them fresh. If you wish to lower the sugar content, look for unsweetened varieties or consider swapping with chopped apples for a different twist.

Mixed Greens

Mixed greens add not only nutritional value but also a beautiful color to this salad. The variety in flavor and texture, from crunchy to peppery greens, enhances the overall dining experience. Always choose fresh and vibrant greens, and wash them thoroughly before use. For storage, keep them wrapped in a damp paper towel inside a container to maintain crispness. For variations, other hearty greens like kale or spinach can also be used.

Common Mistakes to Avoid

  • Not seasoning the chicken adequately: Ensure to season your chicken with salt, pepper, or marinades to enhance flavor.
  • Using stale nuts: Check the freshness of pecans before use; they can go rancid if stored improperly.
  • Overcooking the chicken: Cook the chicken just until it’s done to maintain tenderness and moisture.
  • Skimping on the dressing: A good dressing ties the salad together; don’t be afraid to generously coat your salad.
  • Not mixing the salad well: Tossing ensures each bite contains an equal balance of flavors.
  • Using pre-packaged greens: Fresh greens have better flavor and nutritional content—opt for whole heads of lettuce if possible.
  • Forgetting to add textural elements: Don’t omit the nuts or fruits as they provide essential crunch and flavor balance.
  • Storing leftovers improperly: Keep leftover salad separate from dressings to prevent sogginess.
  • Ignoring ingredient quality: Fresh, high-quality ingredients significantly impact the final flavor of your dish.
  • Following the recipe too rigidly: Feel free to substitute ingredients based on personal preference or availability.

Essential Techniques

Chopping Chicken

Chopping cooked chicken correctly is essential for achieving the right texture and bite size. Use a sharp knife and chop against the grain for tenderness. It’s beneficial to allow the chicken to cool before chopping—this helps maintain its juices.

Tossing the Salad

Tossing the salad ensures an even distribution of ingredients and dressing. Use a gentle hand to mix delicate greens, and avoid bruising them. Aim for light, folding motions to maintain freshness and structure.

Making the Dressing

The dressing can significantly improve your salad. Whisking together oil, vinegar, and seasonings emulsifies them perfectly. Experiment with ratios according to your taste preferences and adjust seasoning accordingly.

Storing Ingredients

Proper storage of salad ingredients is crucial. Keep chicken and salad components separate until serving to maintain freshness. This prevents wilting and ensures your salad remains appetizing.

Pro Tips for Perfect Chicken Pecan Cranberry Salad

Use leftover chicken or rotisserie chicken for convenience. This saves time and effort while providing great flavor. For added richness, consider toasting the pecans before adding them to the salad; this enhances their flavor significantly.

Pair your salad with a light, tangy vinaigrette to complement the sweetness of the cranberries. Experiment with different ratios of oil to vinegar to find your ideal balance. Adding fresh herbs like parsley or cilantro can elevate the freshness of your salad, adding depth to the overall taste.

Make sure to adjust portions according to your crowd, as this salad can easily be scaled up or down. For a heartier version, consider adding grains such as quinoa or brown rice.

Store any leftovers properly by separating the greens from the other ingredients to keep them fresh. When ready to enjoy, reassemble and dress just before serving for the best flavor.

Variations and Adaptations

Consider regional variations by incorporating local nuts or fruits. If pecans are unavailable, walnuts or almonds make excellent substitutes, providing a similar crunch. For a seasonal touch, add roasted butternut squash in the fall or swap cranberries for fresh berries in the summer, enhancing the dish’s adaptability.

For dietary modifications, this salad can easily cater to gluten-free or dairy-free diets by substituting or omitting certain ingredients while retaining its core flavors. If you are looking for a low-carb version, replace traditional greens with leafy vegetables like kale or spinach.

Enhancing the dish with texture can be done by adding crispy bacon or croutons for extra crunch. If you’re after a more substantial meal, serve the salad over whole grain pasta or Couscous to turn it into a filling main dish.

Presentation can also be varied; try serving this salad in a mason jar or on a large platter to create a beautiful centerpiece at a gathering. For elegance, serve alongside a light soup to make a complete meal.

Serving and Presentation Guide

For an impressive presentation, consider layering the ingredients in a bowl to showcase the vibrant colors. Drizzle the dressing on top just before serving to keep the greens fresh and crisp.

Garnishing with additional pecans or a sprinkle of feta cheese can enhance the visual appeal of your salad while adding complementary flavors.

Pair the salad with crusty bread or whole grain rolls as a side to create a balanced meal. Alternatively, elevate the serving method by plating individual portions on chilled plates for a more formal dining experience.

Temperature considerations are essential; serve this salad chilled for an optimal taste experience. Allow the components to reach room temperature before combining for the freshest flavor.

For portion control, consider using small bowls or jars to serve individual portions, making it easier for guests to enjoy without being overwhelmed by serving sizes.

Wine and Beverage Pairing

Pair this Chicken Pecan Cranberry Salad with a crisp white wine such as Sauvignon Blanc or a light-bodied red wine like Pinot Noir. These options complement both the nutty and fruity flavors in the salad.

For non-alcoholic alternatives, consider sparkling water with a slice of lemon or a chamomile iced tea that balances the sweetness of the cranberries.

If incorporating coffee or tea, opt for a mild green tea served at a slightly cooler temperature to enhance the salad’s freshness without overpowering it.

Consider temperature considerations while serving beverages; chilled wines and teas pair well with salad for a refreshing combination. Additionally, ensuring all elements are served at appropriate temperatures enhances the overall dining experience.

Storage and Shelf Life

To store your Chicken Pecan Cranberry Salad, place it in an airtight container to keep it fresh. Ideally, it should be consumed within 3 days for the best taste and texture.

The salad can be stored in the refrigerator, but separate the greens from the dressing until ready to serve to avoid sogginess. Pecans should be kept in a cool, dry place to maintain their crunch.

Signs of spoilage include a foul odor or a noticeable change in texture or color of the greens. If these occur, it’s best to err on the side of caution and dispose of the salad.

For reheating, if you’d like to warm up any leftovers, gently warm the chicken separately and toss it back into the salad. Avoid microwaving the entire salad, as this may wilt the greens.

Freezing is not recommended for this salad due to the fresh and delicate ingredients, which do not hold up well to freezing and thawing.

Make Ahead Strategies

Preparation can be streamlined by prepping individual components ahead of time. Cook the chicken and allow it to cool before chopping, and store in the refrigerator for up to 3 days.

Greens can also be washed and dried in advance, then wrapped neatly in a paper towel in a container to keep them fresh and crisp until serving. Dressing can be made a day ahead and stored separately to avoid sogginess.

While assembling, consider doing so a few hours before serving—this enables the flavors to meld while keeping textures intact.

Ideally, add remaining fresh ingredients just before serving for the best flavor and texture experience.

If you want to add fresh ingredients like nuts or fruits at the last moment, consider preparing them in small batches to retain their flavor and crunch.

Scaling Instructions

Scaling the Chicken Pecan Cranberry Salad recipe is simple. Halving the recipe can be done easily; just adjust ingredient portions accordingly, ensuring the ratios remain consistent.

Doubling or tripling the salad will require a larger mixing bowl and possibly additional storage containers. A larger bowl allows for easier mixing and distribution of dressing.

Timing modifications may be needed based on quantities—if making a larger batch, the mixing may take longer but scale well with proper techniques.

Keep the preparation techniques in mind; consider chopping and prepping ingredients in batches to ensure all elements are fresh when it’s time to combine them.

Storage considerations are especially important when scaling; the salad may need to be stored in multiple containers or a larger one to maintain freshness, keeping components separated when possible.

Nutritional Deep Dive

Macronutrient analysis reveals that this Chicken Pecan Cranberry Salad is a balanced meal, providing protein from chicken, healthy fats from pecans, and fiber from greens and cranberries.

Micronutrient content is impressive, with numerous vitamins and minerals derived from fresh ingredients. The nuts provide manganese, while chicken is a source of B vitamins.

The health benefits include supporting muscle repair and overall body functions from the protein and antioxidants found in cranberries that can improve heart health and reduce inflammation.

Each serving can be tailored to dietary considerations; adjust portions to fit personal calorie needs while serving a wholesome, nutrient-dense dish.

Weight management benefits can also be achieved by including this salad in your meal plan, which delivers satiety through its combination of protein, fiber, and healthy fats.

Dietary Adaptations

For gluten-free adaptations, ensure all ingredients are certified gluten-free; this applies particularly to any packaged dressings used.

Those seeking dairy-free options can easily remove cheese or creamy dressings, replacing them with vinaigrettes that ensure delicious flavors without dairy content.

Vegans can benefit from substituting chickpeas or tofu for chicken, providing the necessary protein while maintaining the salad’s flavor profile.

For low-carb versions, consider using more leafy greens and avoiding high-carb ingredients such as croutons. Similarly, keto adaptations can similarly focus on healthy fats and moderate protein.

Paleo dieters can enjoy this salad by omitting any processed ingredients and focusing on whole, unprocessed foods packed with nutrients.

Individuals following a low-FODMAP diet may want to avoid excess nuts and cranberries, considering substitutions with other low-FODMAP fruits such as strawberries or oranges.

Troubleshooting Guide

Texture issues may arise if the greens become wilty due to improper storage. Keep ingredients separate until serving time to maintain freshness.

For flavor balance concerns, taste the dressing before adding it to the salad; adjust the sweetness or acidity as necessary to achieve the desired flavor.

Temperature problems may occur if the chicken is either too hot or too cold. Allow it to cool before mixing with salad ingredients to prevent wilting greens.

Equipment challenges can arise if you lack adequate mixing bowls or utensils. Ensure you gather necessary tools before beginning to facilitate a smooth cooking experience.

Ingredient substitutions may sometimes result in unexpected flavors. It’s often wise to test new ingredients separately before incorporating them into the salad.

Timing concerns can lead to undercooked or overcooked chicken. Nursing the chicken while monitoring its internal temperature becomes crucial—165°F is the target for safe cooking.

Recipe Success Stories

Community feedback often highlights the delightful balance of flavors in this salad, emphasizing its versatility across various occasions. Many readers have shared their successful variations, incorporating seasonal ingredients to adapt the dish year-round.

Success stories often spotlight the salad as a potluck favorite, with attendees drawn to its colorful presentation and fresh ingredients. The salad’s adaptability has led to individual adaptations that reflect local culture or family preferences.

Among adaptations, readers suggest using ground spices to enhance flavors or integrating different fresh fruits, showcasing the recipe’s flexibility with minimal effort.

Photography tips often accompany sharing, with an emphasis on using natural light to capture the vibrant colors of the salad ingredients beautifully.

Frequently Asked Questions

Can I make the salad ahead of time?

Yes, you can prep the individual ingredients about 1-2 hours before serving. It’s best to mix them right before serving to maintain the freshness of the greens.

What can I substitute for chicken?

Consider chickpeas, tofu, or roasted vegetables as alternatives if you’re looking for a vegetarian option while keeping the flavor intact.

Are pecans essential for this recipe?

Pecans add a unique flavor and crunch, but you can substitute them with any nuts like walnuts or almonds as per availability or preference.

Can I add fruits other than cranberries?

Absolutely! Seasonal fruits like apples, pears, or fresh berries can bring exciting flavors and textures to your salad.

How long can I store leftovers?

Leftovers can be stored in the fridge for up to 3 days, but it’s best to keep dressing separate to maintain freshness.

Is this a suitable dish for meal prep?

Definitely! This salad is perfect for meal prep as you can prepare the ingredients and just mix them when needed.

What dressing goes best with this salad?

A vinaigrette made with olive oil and vinegar or a citrus-based dressing pairs wonderfully with this salad, enhancing its fresh flavors.

Can I freeze this salad?

Freezing is not recommended due to the fresh greens that may lose their texture upon thawing. It’s best enjoyed fresh.

Is this salad gluten-free?

The salad can easily be made gluten-free by avoiding croutons or any gluten-containing dressings, ensuring all ingredients are certified gluten-free.

What’s the best way to pack this salad for lunch?

Keep the dressing separate from the salad and pack in an airtight container to ensure freshness. Add the dressing just before eating.

Additional Resources

For those looking to explore more salad recipes, consider trying variations with seasonal vegetables, hearty quinoa salads, or roasted vegetable mixes.

Technique guides focusing on salad dressings can also elevate your culinary experience, helping you create custom flavors that align with your taste preferences.

Ingredient information can provide insight into the health benefits of various nuts and fruits, allowing for informed choices during meal prep.

Equipment recommendations focus on helpful kitchen tools, such as salad spinners for greens and high-quality knives for efficient chopping.

Seasonal variations can inspire new takes on the classic Chicken Pecan Cranberry Salad, showcasing different ingredients relevant to the time of year.

Join the Conversation

Share your experience with this Chicken Pecan Cranberry Salad by connecting on social media! Tag friends and encourage them to explore this healthy snack delight and other variations you try.

Photography tips on capturing the bright colors and textures can enrich our community’s visual engagement, enhancing our shared joy of cooking.

Recipe reviews are a great way to build engagement; sharing your favorite tweaks or successes helps others discover new ideas to implement in their kitchens.

Engagement in our community discussions can enhance the learning experience, as members exchange tips and tricks about their personal adaptations of this recipe.

Molding this salad into various unique presentations fosters creativity, allowing each cook to leave their signature touch when sharing with others.

The Recipe

Chicken Pecan Cranberry Salad

Serves: 4

Prep Time: 15 mins

Cook Time: 10 mins

Total Time: 25 mins

Kitchen Equipment Needed

  • Mixing bowl
  • Sharp knife
  • Cutting board
  • Whisk
  • Airtight container for storage

Ingredients

  • 2 cups cooked chicken, diced
  • 1 cup pecans, chopped
  • 1 cup dried cranberries
  • 4 cups mixed greens (spinach, arugula, romaine)
  • 1/4 cup vinaigrette dressing
  • Salt and pepper to taste

Directions

  1. Begin by preparing your ingredients: chop the cooked chicken and measure out the pecans and cranberries.
  2. In a mixing bowl, combine the mixed greens and add the diced chicken, pecans, and cranberries.
  3. Toss the salad gently to mix all ingredients evenly.
  4. Drizzle the vinaigrette dressing over the salad and toss lightly to coat.
  5. Season with salt and pepper to taste before serving.
  6. Serve immediately for maximum freshness or refrigerate if enjoying later (see storage instructions).

Recipe Notes

  • Feel free to adjust ingredient quantities based on personal preferences.
  • Experiment with different dressings to enhance flavors.
  • Consider adding fresh herbs for additional flavor.
  • Leftovers should be stored in an airtight container, keeping dressing separate for best results.