Delicious Beef-Stuffed Pasta Shells with Creamy Ricotta Filling Recipe

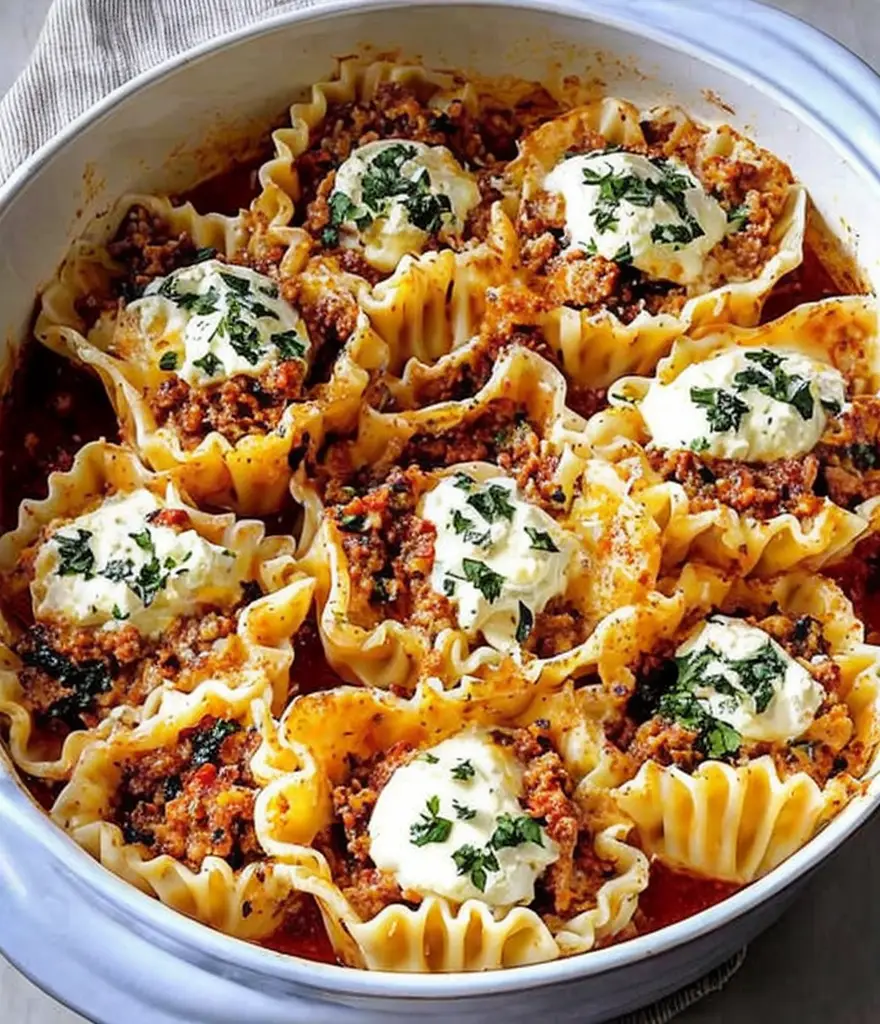
Beef-Stuffed Pasta Shells with Creamy Ricotta Filling: A Comfort Food Delight

⚖️
Difficulty
Medium

⏲️
Prep Time
30 mins

🕒
Cook Time
45 mins

⏱️
Total Time
75 mins

🍽️
Servings
4-6

Indulge in the delicious layers of flavor found in these Beef-Stuffed Pasta Shells with Creamy Ricotta Filling. This recipe brings a comforting taste of home straight to your dinner table, blending rich beef with creamy ricotta and savory spices. Each shell is generously stuffed and baked to perfection, enveloped in a rich tomato sauce that ties all the flavors together. It’s a meal that’s sure to satisfy both your stomach and your soul.

This dish is not only rich in flavor but also visually stunning with its vibrant colors and beautifully presented shells. The satisfying crunch of the cheese melted on top combined with the tender pasta creates a delightful mouthfeel that you will crave again and again. Perfect for family gatherings or cozy dinners, these pasta shells stand out as a cherished classic that everyone will love.

Quick Recipe Highlights

  • Flavor Profile: A meeting of rich beef, a creamy ricotta filling, and tangy tomato sauce creates a balanced, hearty flavor.
  • Texture: A delightful contrast of soft pasta shells, creamy filling, and crispy, melted cheese create a satisfying experience.
  • Aroma: The aroma of garlic and herbs mingling with the hearty beef makes this dish irresistible as it bakes.
  • Visual Appeal: Each serving of beautifully arranged stuffed shells topped with melted cheese is a feast for the eyes.
  • Skill Level Needed: This medium-level dish requires basic cooking skills but is manageable for home cooks willing to learn.
  • Special Equipment: Basic kitchen tools like a large pot, baking dish, and mixing bowl are all you’ll need.

Recipe Overview

  • Difficulty Level: This recipe is categorized as medium difficulty, making it accessible for most home cooks. While some techniques, like stuffing pasta shells, require patience, the overall process is straightforward.
  • Category: Beef-Stuffed Pasta Shells can be categorized as a main course, perfect for comforting family meals and satisfying hungry appetites.
  • Cuisine: This dish is rooted in Italian cuisine, showcasing classic ingredients like pasta, ricotta, and beef, highlighting the country’s traditional flavors.
  • Cost: With everyday ingredients, this recipe is affordable, costing around $15 for a meal that serves 4-6 people.
  • Season: Beef-Stuffed Pasta Shells are great year-round; however, they are particularly comforting during the colder months as a warming meal.
  • Occasion: Serve these shells for family dinners, potlucks, or any gathering where comfort food is welcomed.

Why You’ll Love This Recipe

Taste and texture appeal: The rich, savory taste of browned beef blends seamlessly with the creamy ricotta in every bite. Such harmony of flavors is augmented by the slight sweetness of the marinara sauce, making these shells an absolute delight. The experience is a perfect blend of hearty and comforting that many will find enchanting.

Convenience and preparation benefits: These stuffed pasta shells are a one-dish meal that can be prepared ahead of time, allowing for a stress-free cooking experience. Plus, clean-up is a breeze, as most of the cooking happens in one baking dish.

Nutritional advantages: Packed with high protein from the beef and calcium from the ricotta, this recipe provides essential nutrients that contribute to a balanced meal. When paired with a side salad, it creates a wholesome dining experience full of vitamins.

Social and entertaining value: This is a dish that easily feeds a crowd, making it ideal for entertaining guests or family. The fun of serving personalized portions allows for a casual yet satisfying dinner atmosphere.

Cost-effectiveness and accessibility: Using simple ingredients that are often found in your pantry, this recipe is budget-friendly. It’s a fantastic way to get the best value while enjoying a delicious homecooked meal.

Historical Background and Cultural Significance

The origins of stuffed pasta date back centuries, with its roots firmly planted in Italian culinary tradition. Pasta was first created as a simple staple food and slowly evolved into various forms, with stuffed versions emerging as a gourmet touch to traditional meals.

Culturally, stuffed pasta symbolizes abundance and family gatherings, representing a meal meant to share and enjoy together. These types of dishes are often served at communal events or holidays, reinforcing their place in traditional Italian family culture.

Over time, the recipe for stuffed pasta has evolved significantly; from simple fillings to elaborate combinations of meats, vegetables, and cheeses to suit different tastes and preferences. With globalization, many influences have been incorporated, though traditionally Italian flavors remain dominant.

Regional variations abound, with different areas of Italy showcasing their unique takes on stuffed pasta. For instance, in Naples, one might find them filled with seafood, while in Bologna, many prefer a ragu-style filling. This diverse interpretation showcases the flexibility and creativity inherent in Italian cuisine.

Ingredient Deep Dive

Pasta Shells: A staple in Italian cooking, pasta shells are versatile and hold fillings beautifully. When selecting, look for larger shells that are sturdy enough to hold the filling without breaking. Store in a cool, dry place, and for substitutions, consider using large tubes of cannelloni.

Ground Beef: A common protein in many cuisines, ground beef is packed with flavor and easy to work with. Choose lean beef to keep the dish healthier. Store in the fridge and use within a few days or freeze for longer storage. Can be substituted with turkey or plant-based options for a lighter alternative.

Ricotta Cheese: A creamy cheese essential for stuffed pasta, ricotta has its roots in Italian cuisine, especially in desserts. It’s rich in calcium and has a distinct sweetness. Always select fresh ricotta, and for storage, it should be refrigerated. Substitute with cottage cheese or even a vegan alternative for dietary needs.

Marinara Sauce: Essential for the dish’s base, marinara is a classic Italian tomato sauce that adds flavor and moisture. Homemade is ideal, but store-bought can save time. Always select sauces with no added sugars for the healthiest option. For a twist, use pesto or Alfredo sauce instead.

Common Mistakes to Avoid

  • Overcooking the pasta shells can lead to mushiness. Ensure they are al dente before stuffing.
  • Using too much filling may cause the shells to burst during baking. Fill them generously but do not overstuff.
  • Not seasoning the ricotta mixture can yield bland results. A pinch of salt and other spices enhance the dish’s flavor.
  • Skipping the sauce on the bottom of the baking dish leads to a dry pasta experience. Always provide a layer of sauce for moisture.
  • Baking at too high a temperature may cause the cheese to burn. Follow the suggested temperature to ensure cheese melts perfectly.
  • Using pre-shredded cheese can result in a drier texture. Freshly grated cheese melts better and adds flavor.
  • Not letting the dish rest after baking can make serving difficult. A short resting period helps set the fillings.
  • Neglecting to cover the baking dish with foil while baking can lead to over-browning. Covering keeps the moisture in.
  • Choosing the wrong type of beef can affect flavor. Ground chuck provides the best richness.
  • Not adjusting cooking time based on your oven can lead to unevenly cooked shells. Familiarize yourself with your oven’s quirks.

Essential Techniques

Mastering the art of pasta cooking is crucial. It’s vital to boil the pasta shells until they are just al dente, as they will continue to cook in the oven. Always add salt to the boiling water for flavor. The visual cue for readiness is when the pasta has a slight firmness to the bite.

Stuffing the shells correctly will take practice. Use a spoon or a piping bag to ensure even filling; a common pitfall is overstuffing. The best way to master this technique is to start with a small amount and adjust as you go. Look for a neat appearance without overflowing filling.

Pro Tips for Perfect Beef-Stuffed Pasta Shells

1. To elevate flavors, add a splash of red wine to the beef mixture while sautéing. This enhances depth and brings out richer flavors.

2. Incorporate fresh herbs such as basil or parsley into the ricotta for brightness and freshness.

3. Consider adding chopped spinach or other greens to the filling for extra nutrition and color.

4. Mix different cheeses in with the ricotta, such as mozzarella or Parmesan, for a delightful fusion of flavors.

5. Use homemade marinara sauce when possible to control the ingredients and enhance the overall taste.

6. For an exquisite finish, broil the pasta shells for the last 2-3 minutes of baking to achieve a golden, crispy top.

7. Prepare the filling a day in advance and let it rest in the fridge, allowing flavors to meld.

8. Serve with a sprinkle of fresh herbs or additional cheese for a beautiful presentation.

Variations and Adaptations

Regional variations abound for stuffed pasta; for instance, Neapolitan-style often includes seafood or vegetables in the filling rather than beef. Adjusting spices or flavor profiles allows for creative expressions suited to different tastes.

Seasonal adaptations work wonderfully; consider adding roasted butternut squash or mushrooms in fall for a delicious variation. Using seasonal ingredients can bring freshness and variety to this classic dish.

If dietary restrictions apply, a dairy-free ricotta made from cashews can replace traditional ricotta, making the recipe accessible to everyone.

In terms of flavor variations, experiment with different sauces like Alfredo for a rich experience or pesto for a herby twist, altering the taste profile significantly.

Texture modifications, such as adding breadcrumbs to the beef mixture, can provide a delightful crunch that contrasts the creamy filling. Adjusting cooking times to enhance texture can also be beneficial.

For presentation alternatives, consider placing the stuffed shells in a baking dish, topping them with cheese, then drizzling with balsamic reduction for an elegant finish.

Serving and Presentation Guide

Plating your beef-stuffed pasta shells beautifully enhances the dining experience. Start by placing the shells on a bed of marinara sauce and top them with a sprinkle of freshly grated cheese. A sprig of basil can add a touch of color and freshness.

Garnishing ideas include a drizzle of olive oil or a light dusting of crushed red pepper for those who enjoy spice. Serving with a side of garlic bread provides a wonderful combination that completes the meal.

Traditionally, stuffed pasta is served warm, but for a modern twist, consider serving it at room temperature during gatherings, which allows guests to enjoy the flavors without feeling rushed.

Temperature considerations are essential; serve the pasta shells straight from the oven for maximum meltiness in the cheese, and ensure they rest for a few minutes before slicing to keep the filling intact.

Portion control tips recommend serving two to three shells per person, depending on the size and appetite. This allows everyone to fully enjoy the meal without waste.

Wine and Beverage Pairing

To complement your Beef-Stuffed Pasta Shells, a glass of Chianti or a smooth red blend is a fantastic choice. Both wines enhance the rich beef flavors while providing a pleasant contrast to the creamy ricotta.

For those seeking non-alcoholic options, a sparkling water with lemon or a fresh herbal iced tea can serve as refreshing accompaniments to balance out the richness of the dish.

If coffee or tea is more suitable for your gathering, consider a cappuccino, as its frothy milk mirrors the dish’s creamy texture. When choosing beverages, keep in mind that moderately warm drinks pair well with warm pasta dishes.

Storage and Shelf Life

To store leftovers, keep them in an airtight container in the refrigerator for up to 3 days. This allows the flavors to meld further, creating an even tastier reheated meal.

Ensure the pasta shells have cooled completely before storing to prevent condensation and resultant sogginess. For prolonged storage, consider freezing the assembled, unbaked dish for up to three months—just be sure to thaw before baking.

Signs of spoilage include an off-smell or any discoloration. Always check food quality before reheating, as spoiled ingredients can affect the meal’s safety.

Reheating instructions recommend using the oven when possible for the best texture. Bake at 350°F until heated through, usually taking about 20-30 minutes.

Make Ahead Strategies

For busy days, prepare the beef mixture a day in advance, storing it in the refrigerator to allow flavors to deepen. Assemble the stuffed shells just before you’re ready to bake, making for a quick, convenient dinner option.

Between steps, store any unused components separately—such as leftover filling or sauce, which can extend the life of each ingredient while maintaining freshness.

Quality impact assessment shows that, while prepped ingredients can save time, freshness is critical for flavor and texture. Always prioritize fresh ingredients, particularly for the pasta and herbs.

When assembling, ensure your pasta shells are filled just before baking to avoid sogginess. A quick reheat may be necessary for the filling if it’s been sitting out for a while.

Incorporate fresh basil or other greens just before serving for added brightness and flavor contrast, making your dish pop with color.

Scaling Instructions

To halve the recipe, simply adjust the ingredient amounts accordingly. Use smaller baking dishes for smaller yields, which can help maintain moisture and flavor intensity.

Doubling or tripling the recipe is feasible when cooking for larger crowds—just ensure you have an adequately sized baking dish and plan for extended baking times if necessary.

Equipment adjustments should involve larger pots for boiling the pasta and potentially bigger mixing bowls for your fillings and sauces.

Timing modifications may be necessary when increasing the yield, as larger batches can take longer to cook through evenly. Monitor the baking time closely.

When storing scaled versions, ensure each portion is packaged appropriately to maintain quality. Labeling containers with dates can help keep track of freshness.

Nutritional Deep Dive

This recipe provides an impressive macro breakdown with substantial protein from the beef and ricotta cheese. Depending on serving size, it offers a good balance of carbohydrates from the pasta alongside healthy fats.

Micronutrient analysis reveals a hearty dose of calcium and iron, along with vitamins provided by the tomato sauce and any added vegetables—important considerations for balanced diets.

Health benefits include the satiating effect of protein-rich foods, which can help maintain energy levels throughout the day. This dish promotes a feeling of fullness while being nutrient-dense.

Dietary considerations should always take into account individual needs, adjusting ingredients where necessary, and being mindful of portion sizes for weight management.

Portion analysis suggests serving two to three shells to balance enjoyment and healthfulness, providing adequate calories without overindulging.

Dietary Adaptations

For gluten-free needs, using gluten-free pasta shells is easily available on the market. This allows everyone to enjoy this delightful dish without compromising dietary restrictions.

Dairy-free alternatives can replace ricotta with cashew or tofu-based fillings. This ensures those with lactose intolerance still experience the creaminess everyone loves.

Vegan modifications require replacing beef with a plant-based protein and ensuring that all other fillings are plant-derived. With creative substitutions, this dish can be enjoyed by a wide range of diets.

Low-carb adaptations may use zucchini boats or eggplant instead of pasta, maintaining that delicious beef filling while significantly reducing carbohydrate content.

Keto and Paleo followers can adapt fillings accordingly using nuts and seeds mixed with herbs for a flavor profile that stays true to tradition without losing diet compliance.

Low-FODMAP variations focus on low-sugar ingredients, substituting garlic in the sauce and avoiding certain high-FODMAP vegetables in the filling.

Other specific diets can tailor the ingredients further, ensuring healthy choices are honored while keeping in mind individual taste preferences and dietary needs.

Troubleshooting Guide

If you experience texture issues such as overly mushy pasta, ensure to not overcook the shells before stuffing. Always aim for al dente as a base for the best integrity.

Flavor balance can be a common concern. Ensure to adjust seasoning as you go, tasting both the beef mixture and the sauce to ensure a vibrant flavor in each bite.

Temperature problems arise when baking. Be aware of your oven’s actual temperature as variations can impact the baking outcome, possibly requiring longer or shorter cooking times.

Equipment challenges, such as the pasta sticking together, can be alleviated by ensuring the water is salted adequately and that pasta is stirred during cooking times.

Ingredient substitutions may change the outcome; always test combinations beforehand to ensure they produce a result that meets your expectations.

Timing concerns often come into play when scaling recipes. It’s crucial to adjust both cooking and prep times according to the amount being prepared to avoid undercooking or overcooking.

Recipe Success Stories

Community feedback on this recipe highlights its versatility and reliability as a go-to family meal. Many have enjoyed the satisfaction of serving these stuffed shells as a weekly dinner staple.

Variation successes have been noted—readers report success when substituting vegetables or trying different meat options, showcasing the dish’s adaptability to preferences.

Adaptation stories often reflect personal preferences, with individuals sharing how they have infused custom spices or additional ingredients into the filling, making it uniquely their own.

Readers encourage others to experiment with presentation ideas, showing pictures of beautifully arranged stuffed shells topped with fresh herbs or additional cheese for a gorgeous finish.

Frequently Asked Questions

Can I make Beef-Stuffed Pasta Shells ahead of time?

Absolutely! You can prepare the shells ahead of time and store them in the fridge or freezer before baking. Just be sure to adjust cooking time accordingly.

What can I use instead of ricotta cheese?

Cottage cheese is a great substitute for ricotta, or for a dairy-free option, try a cashew cream or tofu-based ricotta.

How do I prevent the pasta from sticking together?

Ensure to stir the pasta occasionally while boiling and rinse with cold water after cooking, which can help prevent sticking.

Can I freeze leftovers?

Yes, you can freeze leftovers for up to three months. Just package them in airtight containers to avoid freezer burn.

What type of ground beef should I use?

Lean ground beef is most commonly used, but ground turkey or chicken can also provide a lighter option.

How do I reheat stuffed shells?

Reheat the stuffed shells in the oven at 350°F for about 20-30 minutes, or until heated through. Cover with foil to retain moisture.

Can I use a different type of sauce?

Absolutely! While marinara is traditional, feel free to use Alfredo, pesto, or even a homemade cheese sauce for a unique twist.

What other fillings can I use?

Consider using a mix of vegetables, different cheeses, or even seafood to vary the flavor and texture.

How do I making these shells vegetarian?

Replace the beef with a variety of vegetables, such as spinach, mushrooms, or zucchini for a hearty vegetarian option.

What are good side dishes to serve with stuffed shells?

Pair the stuffed shells with a side salad, garlic bread, or some roasted vegetables for a complete meal.

Additional Resources

For more delicious recipes, check out our collection of pasta dishes that will satisfy your cravings for Italian cuisine. Explore technique guides focused on perfecting your pasta-making skills. Ingredient information can help you understand what to look for when shopping for quality items to elevate your dishes. Don’t forget to check out our equipment recommendations to find the best tools to help in your cooking adventures!

Join the Conversation

We’d love to hear your thoughts on this recipe! Share your cooking experiences on social media or leave a comment below. We encourage you to share your own variations and adaptations. Don’t forget to upload your photos—we enjoy seeing how you present your Beef-Stuffed Pasta Shells!

The Recipe

Beef-Stuffed Pasta Shells with Creamy Ricotta Filling

Serves: 4-6

Prep Time: 30 mins

Cook Time: 45 mins

Total Time: 75 mins

Kitchen Equipment Needed

  • Large pot for boiling pasta
  • Baking dish
  • Mixing bowl
  • Spoon or piping bag for stuffing shells
  • Oven

Ingredients

  • 20-25 jumbo pasta shells
  • 1 pound ground beef
  • 15 oz ricotta cheese
  • 2 cups marinara sauce
  • 1 cup shredded mozzarella cheese
  • 1/2 cup grated Parmesan cheese
  • 1 egg
  • 2 cloves garlic, minced
  • 2 tablespoons chopped fresh basil
  • Salt and pepper to taste

Directions

  1. Preheat your oven to 375°F (190°C).
  2. Cook the jumbo pasta shells according to package instructions until al dente. Drain and set aside.
  3. In a large skillet over medium heat, cook the ground beef until browned. Drain excess fat and add garlic; sauté for an additional minute.
  4. In a mixing bowl, combine cooked beef, ricotta cheese, egg, basil, salt, and pepper.
  5. Spread a thin layer of marinara sauce on the bottom of a baking dish.
  6. Stuff each pasta shell with the beef mixture and place them in the baking dish. Top with remaining marinara sauce and sprinkle with mozzarella and Parmesan cheese.
  7. Cover the baking dish with aluminum foil and bake for 25 minutes. Remove the foil and bake for an additional 15-20 minutes or until the cheese is bubbly and golden.
  8. Let cool for a few minutes before serving. Enjoy!

Recipe Notes

  • Feel free to make ahead and freeze before baking.
  • For a spicier flavor, add red pepper flakes to the ground beef mixture.
  • Substitutions can be made for ground turkey or meat alternatives for a lighter version.

Satisfy Your Cravings with Cheesy Potato and Sausage Casserole

Cheesy Potato and Sausage Casserole: A Comforting Delight for Any Occasion

⚖️
Difficulty
Easy

⏲️
Prep Time
15 mins

🕒
Cook Time
45 mins

⏱️
Total Time
60 mins

🍽️
Servings
6

Comfort food at its finest, Cheesy Potato and Sausage Casserole combines savory sausage, creamy cheese, and tender potatoes in a dish that’s perfect for any meal. Whether it’s a casual weeknight dinner or a gathering with friends and family, this casserole delivers warmth and satisfaction in every bite. The layers of melted cheese create a gooey texture that harmonizes beautifully with the robust flavors of the sausage, while the potatoes add heartiness that makes this a complete meal.

As the casserole bakes, the aroma wafts through your home, inviting everyone to gather around the table. The golden crust on top hints at the rich flavors contained within, making it impossible to resist serving up a generous portion. This dish not only captivates with its deliciousness but also creates a sense of nostalgia, often reminding many of family gatherings and special occasions shared around the dinner table.

Quick Recipe Highlights

  • Flavor Profile: This casserole features a delightful mix of flavors, with the spicy sausage complementing the creamy cheese and fluffy potatoes, making it a favorite among comfort food lovers.
  • Texture: The combination of a crispy golden top layer and soft, tender insides creates a harmonious balance in texture that pleases the palate.
  • Aroma: The dish emits a mouthwatering aroma of melty cheese and savory sausage, enticing everyone to dig in.
  • Visual Appeal: The casserole is beautifully golden, with layers of cheese bubbling around the edges, making it a stunning centerpiece on any table.
  • Skill Level Needed: This recipe is beginner-friendly and only requires basic cooking skills, making it accessible for anyone looking to create a memorable meal.
  • Special Equipment: All you need is a baking dish, a mixing bowl, and standard kitchen utensils to whip up this delightful casserole.

Recipe Overview

  • Difficulty Level: The Cheesy Potato and Sausage Casserole is classified as easy, making it ideal for novice cooks. With straightforward steps, anyone can achieve great results with minimal effort.
  • Category: This dish belongs to the comfort food category, perfect for family meals, potlucks, or casual weeknight dinners when you need something hearty and satisfying.
  • Cuisine: The casserole draws inspiration from traditional American comfort food with influences from European sausage dishes, melding savory flavors into one delightful recipe.
  • Cost: The ingredients used are budget-friendly, making this casserole a great option for families looking for an affordable, delicious meal.
  • Season: This comforting casserole is perfect for all seasons, especially in winter when you crave something warm and filling to counter the chill.
  • Occasion: Whether celebrating a holiday, hosting a gathering, or simply enjoying a family night in, this casserole fits any occasion beautifully.

Why You’ll Love This Recipe

The taste and texture of the Cheesy Potato and Sausage Casserole are truly irresistible. The blend of creamy, melted cheese and hearty potatoes creates a satisfying base, while the savory sausage adds a depth of flavor. Each bite offers a comforting combination that warms the soul.

One of the most appealing aspects of this recipe is its convenience. It comes together in just a few simple steps, allowing you to spend less time in the kitchen and more time enjoying with loved ones. Additionally, it can be prepared in advance, making it perfect for busy weeknights or when entertaining guests.

Nutritionally, this casserole packs a protein punch thanks to the sausage, and the potatoes provide valuable carbohydrates to keep you energized throughout your day. You can even add in vegetables for an extra boost of nutrients, making it a well-rounded meal.

Socially, this recipe is a crowd-pleaser. The hearty nature of the dish encourages sharing and conversation, making it ideal for gatherings. It’s also easy to scale up for larger groups without significantly increasing your preparation time.

Lastly, the cost-effectiveness of the Cheesy Potato and Sausage Casserole can’t be overlooked. Using accessible and affordable ingredients ensures that feeding your family or guests does not break the bank, all while satisfying even the heartiest appetites.

Historical Background and Cultural Significance

The origins of the casserole can be traced back to the mid-19th century, where it became popular in American kitchens as a way to use leftovers and create filling meals. The combination of potatoes and sausage has long been favored due to its ability to keep families nourished and satisfied.

Culturally, casseroles have always held significance as comfort food. They symbolize warmth, togetherness, and the simple joys of sharing a meal with family. This Cheesy Potato and Sausage Casserole reflects these values, combining traditional elements with modern convenience.

Over the years, the recipe has evolved, adapting to changing tastes and ingredient availability. Today, it stands as a testament to home cooking, cherished in many households across the country.

Regional variations often utilize different types of sausage, reflecting local flavors and preferences. Such adaptations showcase the versatility of casseroles and reinforce their importance in American cuisine.

Ingredient Deep Dive

Potatoes: Potatoes, a staple in many diets, have historical significance as a source of nourishment worldwide. Rich in carbohydrates, they offer energy, and are a good source of vitamins C and B6. When selecting potatoes, look for those that are firm with no blemishes and store in a cool, dark place to prolong freshness. You can substitute with sweet potatoes for a unique twist, adding a slight sweetness.

Sausage: Sausages have a long history in various cultures, often made from leftover meats to minimize waste. Nutritionally, they provide protein and fat, essential for energy. Choose high-quality sausages, preferably made from lean meats, and store in the refrigerator for up to a week. You can substitute with turkey or chicken sausage for a leaner option while still delivering on flavor.

Common Mistakes to Avoid

  • Not preheating the oven: Always ensure your oven is preheated before placing the casserole inside to achieve an even bake and optimal texture.
  • Overcooking the casseroles: Keep an eye on cooking times to avoid dry and overly browned surfaces. Aim for a golden melting top instead.
  • Incorrect layering: Layering the ingredients correctly ensures even cooking and flavor distribution, so take your time with this step.
  • Skipping resting time: Allow the casserole to rest before serving; it helps the flavors meld together and makes serving easier.
  • Using too much cheese: While cheese is a star component, moderation is key. Too much can overwhelm the other flavors.
  • Ignoring ingredient quality: Opt for fresh, high-quality ingredients for the best flavor, rather than relying on pre-packaged products.
  • Undercooking the sausage: Be sure to cook the sausage thoroughly before assembling, avoiding any food safety issues.
  • Using a too-small baking dish: Ensure your baking dish is adequate to hold all the ingredients without overflowing during cooking.
  • Not seasoning adequately: Taste as you prepare to ensure the casserole is well-seasoned throughout for maximum flavor.
  • Neglecting to cover: Use foil during cooking to prevent excessive browning, removing it towards the end to achieve a crispy top.

Essential Techniques

Layering: Proper layering is crucial to ensure that all ingredients cook evenly. Mastering this technique involves placing the heaviest ingredients at the bottom and lighter ones on top. A common pitfall is overcrowding layers, which can lead to uneven cooking, so take care to distribute ingredients evenly.

Baking: Baking is where the casserole transforms into a delightful dish. Make sure to monitor your oven’s heat; a visual cue for readiness is a bubbling center and a golden top. Understanding your oven’s nuances is essential for perfect results.

Pro Tips for Perfect Cheesy Potato and Sausage Casserole

1. For added flavor, sauté onions and garlic before mixing them into the casserole. This enhances depth and aroma.

2. Consider adding fresh herbs like parsley or thyme for a burst of freshness that complements the dish.

3. Use a mix of different cheeses for more complex flavors. Cheddar, mozzarella, and gouda work wonderfully together.

4. Swap half the potatoes for cauliflower for a lower-carb version without sacrificing texture.

5. Ensure all ingredients are at room temperature for more even cooking throughout.

6. Let leftovers cool completely before storing; this helps avoid moisture buildup in containers.

7. Experiment with different sausage varieties, such as spicy Italian or apple sausage, for unique flavor profiles.

8. Garnish with fresh chives or green onions just before serving for an appealing presentation and flavor complement.

Variations and Adaptations

Regional variations of this casserole can include local sausage types, each adding its unique flavor. For instance, a Southern twist might incorporate andouille sausage, while a Midwest version can feature bratwurst.

Seasonal adaptations can include adding fresh vegetables such as zucchini or bell peppers during summer months or incorporating roasted butternut squash in fall for a sweeter touch.

For dietary modifications, gluten-free breadcrumbs can replace regular ones to suit guests with gluten sensitivity, maintaining texture without compromising flavor.

To switch up flavors, try adding different spices like paprika or cayenne pepper for a bit of heat, or experiment with cheese types to find your perfect blend.

Texture modifications can include using sweet potatoes or mixing in riced cauliflower for an interesting twist while keeping it light.

Presentation alternatives could include serving the casserole in individual ramekins for an elegant touch, especially during dinner parties.

Serving and Presentation Guide

When plating your Cheesy Potato and Sausage Casserole, consider using a deep dish that allows for generous portions. A sprinkle of fresh herbs on top can add color and freshness to the dish.

Garnishing with a dollop of sour cream or a drizzle of balsamic reduction can elevate the presentation, providing contrast against the cheesiness of the casserole.

As for traditional accompaniments, a fresh green salad or steamed vegetables provide balance and complement the richness of the casserole.

For modern serving suggestions, consider pairing with crunchy garlic bread for a satisfying meal experience that rounds out the flavors.

Temperature considerations are vital; serve the casserole hot from the oven and allow it to cool slightly for easier serving.

Portion control tips include using a large spoon to serve equal portions and avoiding overly generous servings which could lead to wastage.

Wine and Beverage Pairing

For wine pairings, a medium-bodied white wine like Chardonnay complements the casserole’s richness beautifully, while a red blend adds a robust flavor contrast.

Non-alcoholic alternatives include sparkling water with a slice of lemon, providing a refreshing palate cleanser between bites, or a smooth iced tea for a more relaxed dining experience.

If you enjoy coffee or tea, a light chai could harmonize with the savory flavors of the dish while providing an aromatic experience.

Keep temperature considerations in mind: serve white wines chilled and red wines at room temperature, ensuring each sip enhances the dining experience.

For serving suggestions, consider a decanter for red wine and a pretty pitcher for iced tea, making your table setting feel special.

Storage and Shelf Life

To store your Cheesy Potato and Sausage Casserole, transfer it to an airtight container once cooled to room temperature. It will keep well in the fridge for up to three days.

Freezing is an option for longer storage; place the cooled casserole in a freezer-safe dish. Be sure to label it with the date for easy tracking.

Signs of spoilage include an off smell or visible mold; when in doubt, it’s best to discard any questionable leftovers.

For reheating, use either an oven or microwave. If baking, cover with foil to prevent drying out, reheating until warm throughout.

For freezing guidelines, thaw in the refrigerator overnight before reheating to maintain the best texture and flavor.

Make Ahead Strategies

To get ahead with this casserole, prep your ingredients the night before. Chop the potatoes and sausage, and store them separately in the refrigerator to save time during assembly.

Assemble the casserole entirely the day before, then cover and refrigerate until it’s time to bake, ensuring you’re ready to serve a delicious hot dish without last-minute fuss.

Qualities may change slightly if made too far in advance, so aim to prepare 1-2 days ahead for the best freshness.

When it’s time to bake, remove from the refrigerator at least 30 minutes ahead to bring it to room temperature, allowing for even cooking.

For fresh element additions, consider adding crisp toppings such as breadcrumbs or crushed crackers during the last few minutes of baking to maintain crunch.

Scaling Instructions

Halving the recipe is straightforward; simply use half the amount of each ingredient and opt for a smaller baking dish.

If doubling or tripling, consider using larger baking dishes and adjust the baking time accordingly, as a larger casserole may require additional time to heat through.

Equipment adjustments might be necessary; ensure you have suitable tools for preparing larger quantities, such as a big enough pot for pre-cooking potatoes or a larger bowl for mixing.

Timing modifications are important; monitor the casserole closely, as larger or smaller versions might cook differently, adjusting accordingly.

When storing scaled recipes, use labeled containers to differentiate between sizes, ensuring leftovers are easy to identify later.

Nutritional Deep Dive

In terms of macros, this casserole provides a balanced meal with proteins from sausage, carbs from potatoes, and fats from cheese, making it a well-rounded option for a hearty meal.

Micronutrient analysis reveals that potatoes are rich in potassium and vitamin C, while the cheese adds calcium and additional vitamins, contributing to overall health benefits.

The health benefits of this recipe can support energy levels and muscle recovery, particularly after active days or workouts when nourishing meals are essential.

For dietary considerations, those monitoring portion sizes should be mindful of serving sizes since, while satisfying, it can be easy to overindulge in such a comforting dish.

When engaging in weight management, consider pairing the casserole with a side of fresh salad to increase fiber intake without adding substantial calories.

Dietary Adaptations

For gluten-free guests, rice or a gluten-free breadcrumb topping can easily replace regular breadcrumbs, ensuring everyone can enjoy this dish without worry.

Dairy-free alternatives are readily available; using nut-based cheeses or vegan cheese can create a similar creamy texture without using dairy.

Vegans can opt for plant-based sausage and use vegetable broth when needed, ensuring a hearty option that fits their dietary needs.

Those on low-carb or keto diets might consider replacing potatoes with cauliflower or zucchini, maintaining similar textures while reducing carbs considerably.

For paleo diets, using compliant sausages and fresh vegetables instead of cheese caters to dietary guidelines while still providing a filling dish.

Low-FODMAP diet adaptations can be made by choosing lactose-free cheese and low-FODMAP sausage options, ensuring that the casserole remains digestible for sensitive individuals.

Troubleshooting Guide

If you encounter texture issues, such as dryness, consider adjusting liquid levels and keeping an eye on baking times to ensure ingredients do not overcook.

Flavor balance can be addressed by tasting and adjusting seasoning, particularly salt and pepper, before baking to enhance overall flavor integration.

Should you run into temperature problems, ensure your oven’s calibration is accurate, as inconsistent performances can lead to undercooked or burnt results.

For equipment challenges, proper tools can save you time and trouble; make sure you’re using the right size baking dish and mixing bowl to avoid spillage.

If ingredient substitutions are causing issues, stick to proportions when replacing key components, paying attention to moisture levels and cooking requirements.

Timing concerns can be managed through advanced prep work, reducing stress while cooking; set timers as you go to ensure even cooking.

Recipe Success Stories

Many community members on social media have shared their creations and personal adaptations of the casserole, highlighting how they made it unique. From adding spinach for extra nutrients to experimenting with different types of sausages, the feedback has been overwhelmingly positive.

Variation successes featured include gluten-free versions that remain completely satisfying. Readers have praised the flexibility of the recipe, proving that with a few changes, this dish can accommodate various dietary needs.

Adaptation stories emphasize the joy of experimenting, revealing how others have incorporated seasonal ingredients, showcasing how this dish evolves with the seasons.

Photography tips shared among food bloggers highlight the best angles and essential lighting techniques to capture the appealing aesthetics of the casserole, encouraging others to post their delicious outcomes.

Frequently Asked Questions

Q: Can I use frozen potatoes for this casserole?

A: Yes, frozen potatoes can be used, saving you prep time; ensure they are partially thawed before assembling the casserole for even cooking.

Q: Can leftovers be refrozen?

A: While it’s generally not recommended to refreeze leftovers, if they have been stored properly and cooled down entirely, it can be done with caution.

Q: How do I know when the casserole is done?

A: Look for bubbling edges and a golden top layer. A toothpick inserted in the center should come out clean, indicating that it’s cooked through.

Q: How can I make the casserole spicier?

A: Introducing spicy sausage or adding crushed red pepper flakes to the cheese mixture before assembling can elevate the flavor profile significantly.

Q: What can I serve alongside the casserole?

A: Pair with a crisp green salad, roasted vegetables, or garlic bread for a complete meal experience that balances the casserole’s richness.

Q: Is it possible to meal prep this casserole?

A: Absolutely! You can prepare it a day in advance and store it in the fridge before baking, making it an excellent option for busy weeks.

Q: How long does this casserole last in the fridge?

A: When stored in an airtight container, the casserole will last up to three days in the fridge. Be sure to cool it completely before storage.

Q: Should I cover the casserole while it bakes?

A: Covering with foil during the initial baking keeps moisture in and prevents over-browning, removing it towards the end for a crispy top.

Q: Can I substitute the cheese?

A: You can swap cheeses according to your taste, considering varieties like gouda or pepper jack, but note that different melting properties may affect texture.

Q: How do I reheat leftovers?

A: Reheat in the oven at 350°F until warmed through, covering with foil to retain moisture, or microwave individual portions for convenience.

Additional Resources

For those looking to explore more comfort food, check out our related recipes including creamy mac and cheese and hearty lasagna, which share similar qualities of warmth and satisfaction.

Technique guides for baking and ingredient selection can enhance your culinary skills, helping you master the art of creating delicious casseroles.

Explore ingredient information on seasonal vegetables to determine when to use fresh produce, promoting better flavors and nutrition in your dishes.

Equipment recommendations for baking, including dishware and utensils, can improve your overall cooking experience, making every step easier and more enjoyable.

Keep an eye on seasonal variations of the casserole, allowing you to create new versions that adapt to the changing seasons, keeping your

Indulge in Decadent Chocolate Chip Cookie Dough Mousse Recipe

Delicious Chocolate Chip Cookie Dough Mousse: A Decadent Dessert

⚖️
Difficulty
Easy

⏲️
Prep Time
20 mins

🕒
Cook Time
0 mins

⏱️
Total Time
20 mins

🍽️
Servings
6 servings

Chocolate Chip Cookie Dough Mousse is the perfect fusion of two beloved desserts: creamy mousse and bite-sized cookie dough treats. This decadent chocolate mousse is laced with chunks of soft, chewy cookie dough that melt in your mouth. The combination of rich chocolate, brown sugar sweetness, and buttery vanilla creates a dessert experience that is equal parts indulgent and comforting. It’s the ultimate treat for cookie lovers seeking a new twist on their favorite flavors.

Not only is this mousse incredibly delicious, but it’s also quick and easy to prepare. With no baking required, you can whip it up in just 20 minutes, making it perfect for last-minute gatherings or weekday treats. The fluffy texture of the mousse contrasts beautifully with the firm cookie dough bites, creating a pleasing mouthfeel that will leave your guests craving more. Serve it in individual cups for a stylish presentation that showcases both the color and the enticing layers of cookie dough and chocolate.

Quick Recipe Highlights

  • Flavor Profile: Rich chocolate harmonizes with the nostalgic taste of raw cookie dough, creating a delightful dessert that satisfies both cravings.
  • Texture: The mousse is smooth and velvety, while the cookie dough provides a chewy, satisfying element.
  • Aroma: The fragrant blend of vanilla, chocolate, and brown sugar creates an irresistible aroma that will fill your kitchen.
  • Visual Appeal: Layers of creamy mousse and chunks of cookie dough make for an inviting dessert presentation.
  • Skill Level Needed: This recipe requires basic mixing and folding skills, making it accessible for beginners.
  • Special Equipment: You’ll need mixing bowls, a hand mixer or stand mixer, and serving cups or bowls.

Recipe Overview

  • Difficulty Level: This Chocolate Chip Cookie Dough Mousse is categorized as easy due to its simple preparation steps, allowing even beginner cooks to succeed.
  • Category: This dessert falls under the “no-bake” category, perfect for warm weather or when you want to minimize oven usage.
  • Cuisine: While it has American roots, this mousse brings together classic dessert elements recognizable in many global cuisines.
  • Cost: The approximate cost of this dessert is relatively low, making it a budget-friendly option for gatherings.
  • Season: This dessert is perfect for all seasons, offering a refreshing and indulgent sweet treat year-round.
  • Occasion: Ideal for parties, birthdays, or casual gatherings, it adds a touch of elegance to any dessert table.

Why You’ll Love This Recipe

The taste and texture of Chocolate Chip Cookie Dough Mousse are truly irresistible. Imagine creamy, luscious chocolate that melts in your mouth, perfectly complemented by bites of sweet and soft cookie dough scattered throughout. Each spoonful delivers a delightful burst of flavor that satisfies every sweet tooth. The carefully balanced chocolate richness ensures that your palate is delighted without being overwhelmed, making this dessert a favorite for all ages.

Convenience is another aspect that makes this mousse a winner. With no baking necessary, you can prepare this delicious dessert in under 30 minutes. It’s perfect for those unexpected guests or when you’re in a rush. Just mix, layer, and chill! Additionally, it’s a make-ahead dessert, allowing you to prepare it a day in advance, saving time on the day of your event.

From a nutritional standpoint, while this treat is indulgent, there are ways to balance it out with ingredient choices. Using high-quality chocolate can provide antioxidants. The cookie dough includes butter and brown sugar, which can be enjoyed in moderation for a sweet treat that doesn’t completely derail your diet.

Socially, Chocolate Chip Cookie Dough Mousse is a crowd-pleaser that sparks conversation and delight. Sharing this dessert not only brings joy to your guests but also encourages connection and laughter as they indulge in this comforting treat. Whether it’s a dinner party or a family gathering, this mousse is bound to elicit smiles and satisfied sighs.

Cost-effectiveness is inherent in this recipe as many of the ingredients are pantry staples. Chocolate chips, cream, and basic baking ingredients make this dessert accessible without straining your budget, proving that you don’t need to spend a fortune to create something magical.

Historical Background and Cultural Significance

Chocolate chip cookies, a quintessential American treat, originated in the 1930s with Ruth Wakefield’s famous recipe. The cookie dough concept often enjoyed adventures in popular culture, leading to delightful adaptations like this mousse. The allure of raw cookie dough has become a beloved indulgence, creating nostalgia and joy, particularly in childhood memories shared among friends and family.

The cultural significance of chocolate chip cookie dough is rooted in its comfort food status. As a dessert loved in American households, it evokes warmth and connection during gatherings and celebrations. The advent of cookie dough in various forms, including ice cream and edible variations, showcases its versatility and enduring popularity.

Over the years, the evolution of the recipe has expanded beyond traditional cookies. Innovative dessert makers have fused flavors and textures, leading to exciting new treats like this mousse. The pairing of silky chocolate with chewy cookie dough creates a fresh way to enjoy a classic favorite while exploring new dessert realms.

Regional variations of cookie dough recipes can be fascinating. Many cultures have adopted similar concepts, introducing unique ingredients based on local tastes. The explosion of dessert trends featuring cookie dough-based items has made this once simple recipe a culinary sensation across the globe.

Ingredient Deep Dive

Chocolate Chips: High-quality chocolate chips are essential for achieving a rich and satisfying flavor in your mousse. Dark chocolate offers a more intense cocoa kick and pairs excellently with the sweetness of cookie dough. The health benefits of dark chocolate, such as antioxidants and heart health, make it a preferable option. When shopping, seek out chocolate chips that have a high cocoa content and check for fair trade certifications. Store your chocolate in a cool, dry place to maintain its freshness, and look out for brands that offer chocolate alternatives suitable for various dietary needs.

Cookie Dough: The cookie dough in this mousse typically includes butter, sugar, flour, and chocolate chips. Each of these ingredients contributes to the overall flavor and texture. The butter imparts a rich base, while the sugar adds sweetness and moisture. To cater to different dietary preferences, consider using alternatives like coconut flour or almond flour for gluten-free options. Storing cookie dough is easy; keep it in an airtight container, and check for signs of spoilage like off smells or discoloration. When making substitutions, note that ingredient ratios might need adjustments to maintain the desired cookie dough texture.

Common Mistakes to Avoid

  • Not chilling the mousse long enough: Chilling is crucial for the mousse to set properly and achieve the desired texture. Plan to allow for adequate refrigeration time.
  • Using low-quality chocolate: The quality of chocolate greatly influences the flavor of the mousse. Opt for high-quality chocolate for the best results.
  • Overmixing the mousse: Gentle folding is essential to maintain the light and airy texture. Overmixing can lead to a dense mousse.
  • Skipping the sifting step for dry ingredients: Sifting helps incorporate air into the dry ingredients, preventing clumps and ensuring a smooth mousse.
  • Insufficient cream whipping: Make sure the heavy cream is whipped to stiff peaks to ensure the mousse maintains its structure.
  • Using too much flour in the cookie dough: This can yield a dry texture; stick to the precise measurement for a chewy finish.
  • Not allowing the mousse to rest: Letting the mousse rest enhances flavor as the ingredients meld together.
  • Serving too soon: While the temptation may be strong, letting it chill allows flavors to develop and the texture to improve.
  • Skipping the taste test: Always taste the mixture before serving; adjusting sweetness levels may be necessary as personal preferences vary.
  • Ignoring dietary restrictions: Be mindful of guests’ dietary needs and consider alternatives when preparing the mousse.

Essential Techniques

To create the perfect mousse, mastering the art of whipping cream is critical. It adds volume and lightness to the dessert. Begin with a chilled bowl and beat the cream at medium speed, gradually increasing to high. The goal is to achieve stiff peaks while avoiding overwhipping. The right visual cue is when the cream holds its shape and maintains a glossy sheen.

Folding is another key technique. It involves gently incorporating whipped cream into the chocolate mixture without deflating it. Using a spatula, fold the mixture in a gentle motion, cutting through the center and turning over. Common pitfalls include heavy-handed mixing which can ruin the mousse’s light texture. Look for well-integrated but airy results as your cue for success.

Pro Tips for Perfect Chocolate Chip Cookie Dough Mousse

Start with all ingredients at room temperature to ensure proper incorporation. Chilled heavy cream whips better, so keep that in the fridge until you’re ready to use it. For added flavor depth, consider using vanilla bean paste instead of extract. Optional toppings like whipped cream or chocolate shavings can enhance presentation. Layering the mousse and cookie dough in serving glasses not only looks beautiful but also allows guests to appreciate the contrast of textures. Ensure proper chilling time before serving to achieve the best flavor and consistency. Finally, don’t forget to enjoy the preparation process, as it can be just as delightful as consuming the dessert!

Variations and Adaptations

For regional variations, consider incorporating local flavors; for instance, adding spices like cinnamon can give the mousse a warm twist reminiscent of certain cultural desserts. Seasonal adaptations might involve infusing the mousse with peppermint extract during winter holidays or adding fresh berries in summer for a refreshing burst. Dietary modifications can cater to gluten-free lifestyles by substituting traditional flour for almond or coconut flour in the dough. Flavor variations could include using butterscotch chips instead of chocolate or adding caramel swirls in the mousse for a salted caramel effect. Texture modifications can take the form of incorporating crushed cookies or nuts into the layers for added crunch, while presentation alternatives can showcase the mousse in jars, parfait-style, for a trendy touch.

Serving and Presentation Guide

Plating techniques can elevate your dessert’s visual appeal. Use clear glasses to showcase the beautiful layers of chocolate mousse and cookie dough. Garnishing with whipped cream, chocolate shavings, or drizzles of caramel or chocolate sauce adds a special touch. Traditional accompaniments like fresh fruit can brighten the plate, while modern serving suggestions might include a side of espresso for a sophisticated pairing. Serve the mousse chilled but not ice-cold; aim for a refreshing temperature that enhances flavor without dulling it. Portion control is essential, especially when serving at parties; consider serving in smaller cups to encourage guests to enjoy multiple flavors.

Wine and Beverage Pairing

Pair the rich taste of Chocolate Chip Cookie Dough Mousse with a luscious dessert wine, such as a late harvest Riesling or a ruby port. These choices complement the mousse’s sweetness and enhance its chocolatey depth. For non-alcoholic alternatives, serve with a creamy iced coffee or a rich hot chocolate, echoing the dessert’s flavors. If pairing with tea, opt for a sweet chai or a vanilla-infused herbal tea that matches the mousse’s warmth. Always consider temperature upon serving; chilled wines should be slightly cooler than room temperature to highlight the desired sweetness without overwhelming flavors.

Storage and Shelf Life

To store Chocolate Chip Cookie Dough Mousse, keep it in airtight containers in the refrigerator. It can last up to three days while maintaining its freshness and integrity. Temperature requirements should be strictly maintained, ensuring the mousse remains chilled. For ease of access, consider separating the mousse and cookie dough into different containers if you anticipate leftovers. Signs of spoilage include separation and a change in texture or color, both clear indicators that it’s time to discard. If you need to reheat the dessert—though it is traditionally served chilled—make sure to do it gently to maintain texture and flavor balance. Freezing is not recommended due to the high cream content, which can alter texture upon thawing.

Make Ahead Strategies

Plan your prep timeline by making the mousse a day in advance. This allows optimal chilling time for flavors to mature. Store the mousse in the fridge while keeping the cookie dough separate until it’s time to serve to prevent moisture from affecting texture. To assess quality impact, prepare a small test batch to explore flavors and creaminess before serving at an event. When assembling, layer elements gradually to maintain visual appeal and texture integrity. If needed, components can be prepped and stored separately. Fresh elements, like whipped cream, can be added just before serving for a vibrant touch.

Scaling Instructions

Scaling this recipe can be easily done. To halve the recipe, divide each ingredient’s measurement by two, ensuring you keep the same method for preparation. Doubling or tripling the recipe is also simple; just multiply the ingredient quantities accordingly. However, consider adjusting the mixing bowl size and chilling containers to accommodate larger batches. Timing modifications may be necessary when increasing volume; while the prep remains the same, give extra time for chilling to ensure each portion sets adequately. For storage, be mindful that larger volumes might not fit within standard fridge arrangements.

Nutritional Deep Dive

From a macro perspective, this mousse primarily consists of carbohydrates from the cookie dough, fats from cream and butter, and some protein from milk. Micronutrient analysis reveals vitamins and minerals present in chocolate and dairy, while the sugar content should be monitored due to its high level. Remember the health benefits of dark chocolate and the need for balanced portion sizes to enjoy indulgent desserts without exceeding caloric intake. Weight management tips include savoring smaller portions and pairing the mousse with fresh fruit for added fiber to balance the dessert experience.

Dietary Adaptations

For gluten-free options, consider using almond flour or gluten-free all-purpose blends in place of traditional flour in the cookie dough. For dairy-free adaptations, vegan butter and coconut cream can create similar textures while maintaining flavor. This recipe can be made vegan by substituting aquafaba for whipped cream and using dairy-free chocolate chips. Low-carb variations may use sugar alternatives and reduce the flour. Keto enthusiasts can adapt the recipe further by opting for almond flour and low-carb sweeteners. Ensure to check each ingredient label for hidden allergens when catering to dietary needs.

Troubleshooting Guide

If you encounter texture issues, overwhipping the cream can lead to a grainy mousse, while underwhipping can yield a liquidy consistency—aim for stiff peaks. Flavor balance problems may arise from excessive sweetness; consider adding a pinch of salt or acid (like lemon juice) for contrast. If the mousse doesn’t set, ensure adequate chilling time is provided. Equipment challenges might include mixers malfunctioning; always have backups or hand-whisking as alternatives. Ingredient substitutions can lead to unexpected outcomes; rely on verified adaptations for the best results. Adjust timing based on the scale of your recipe, ensuring proper cooking and resting times for the best outcome.

Recipe Success Stories

The success of this recipe has led to rave reviews from the community, with many praising the delightful blend of flavors and textures. Variations of the mousse have inspired readers to create their twists, from adding mint to using white chocolate for unique presentations. User-generated variations have often resulted in catchy hashtags and social media shares, spreading the joy of this dessert beyond your kitchen. Photography tips include capturing the layered effect clearly to evoke the mousse’s deliciousness, showcasing its creamy texture and cookie pieces prominently.

Frequently Asked Questions

Can I use store-bought cookie dough? Absolutely! Using store-bought cookie dough is a time-saver and will still yield a delicious mousse.

Can this mousse be frozen? It is not recommended to freeze the mousse as it can alter the texture. It’s best enjoyed freshly made.

How can I make this mousse less sweet? You can reduce the sugar in both the mousse and cookie dough, or add a bit of salt for balance.

Can I make this recipe gluten-free? Yes! Use gluten-free flour blends or almond flour to replace regular flour.

What is the best way to serve this mousse? Serve in individual cups or jars for an elegant presentation, topped with whipped cream or chocolate shavings.

Can I add other mix-ins? Definitely; consider adding nuts, dried fruits, or using different chocolate varieties for unique flavors.

How long does this mousse stay fresh? This mousse can last up to three days in the refrigerator when stored properly in an airtight container.

Is this recipe suitable for kids? Yes! This mousse is a fun treat for kids; just ensure parents are aware of the ingredients used.

What’s the best way to store leftovers? Keep the mousse in an airtight container in the fridge to maintain its freshness.

Can I customize the chocolate? Certainly! You can use dark, milk, or white chocolate based on your preference.

Additional Resources

Explore related recipes such as classic chocolate mousse or no-bake desserts for more delightful treats. Technique guides on whipping cream and folding aerated mixtures provide foundational skills for dessert preparation. Ingredient information can enhance your understanding and choice among varieties, especially in chocolate types. Equipment recommendations for mixers and measuring tools can improve accuracy and ease during prep. Seasonal variations can inspire you to infuse seasonal fruits or spices into your dessert.

Join the Conversation

Share your creations on social media and engage with fellow dessert lovers by tagging photos of your Chocolate Chip Cookie Dough Mousse. Photography tips can enhance your recipe sharing, capturing the beautiful layers and inviting textures. Recipe reviews are vital for community engagement, allowing others to learn from your experiences. Feel free to suggest variations or adaptations that you’ve tried, as they can spark new ideas among fellow cooks. Invite others to share their thoughts or tips, building a community around this delicious dessert.

The Recipe

Chocolate Chip Cookie Dough Mousse

Serves: 6

Prep Time: 20 mins

Cook Time: 0 mins

Total Time: 20 mins

Kitchen Equipment Needed

  • Mixing bowls
  • Hand mixer or stand mixer
  • Spatula
  • Serving cups

Ingredients

  • 1 cup heavy cream
  • 1/2 cup granulated sugar
  • 1/2 cup brown sugar
  • 1 cup chocolate chips
  • 1/2 cup butter, softened
  • 1 cup flour
  • 1 tsp vanilla extract
  • 1/4 tsp salt

Directions

  1. In a large bowl, whip the heavy cream until stiff peaks form.
  2. In another bowl, mix the softened butter, granulated sugar, brown sugar, and vanilla until well combined.
  3. Gradually add the flour and salt to the butter mixture, mixing until combined.
  4. Fold in the chocolate chips to the cookie dough mixture.
  5. Gently fold the whipped cream into the chocolate mixture until just combined.
  6. Layer cookie dough and mousse in individual serving cups.
  7. Chill for at least 1 hour before serving.

Recipe Notes

  • Feel free to add nuts or additional flavorings!
  • To make gluten-free, use gluten-free flour for the cookie dough.
  • For a richer flavor, use dark chocolate chips.

Indulge in Fluffy Cheesy Garlic Bread: A Perfect Treat

Fluffy Cheesy Garlic Bread: The Ultimate Recipe

⚖️
Difficulty
Easy

⏲️
Prep Time
15 mins

🕒
Cook Time
25 mins

⏱️
Total Time
40 mins

🍽️
Servings
8 servings

Fluffy cheesy garlic bread is an irresistible side dish that perfectly complements any meal. With its golden top and a fluffiness that beckons, each bite is a delight. The combination of melted cheese and rich garlic butter creates an explosion of flavor that lingers long after the meal is over. It’s the kind of dish that not only satisfies hunger but also warms the heart, making it a staple at family gatherings and gatherings with friends.

This cheesy garlic bread recipe is straightforward, ensuring that even novice cooks can achieve delicious results. The warm, buttery aroma fills your kitchen as you prepare to serve a dish that truly feels like a hug in food form. The visual appeal, with melted cheese oozing over soft, fluffy bread, is enough to make anyone’s mouth water in anticipation.

Quick Recipe Highlights

  • Flavor Profile: Buttery, garlicky goodness meets the richness of melted cheese for a savory delight.
  • Texture: Soft and fluffy inside, with a perfectly crisp, cheesy exterior that creates a satisfying crunch.
  • Aroma: The intoxicating smell of roasting garlic mingling with the warmth of fresh bread fills the air.
  • Visual Appeal: Golden-brown crust loaded with bubbling cheese, making it irresistible.
  • Skill Level Needed: Perfect for beginners, but even seasoned cooks will enjoy this easy, rewarding dish.
  • Special Equipment: Just a baking sheet and aluminum foil—the essentials for creating this scrumptious bread.

Recipe Overview

  • Difficulty Level: Easy enough for a weekday dinner yet impressive enough for gatherings or special occasions.
  • Category: Perfect as an appetizer, side dish, or even a delightful snack any time of the day.
  • Cuisine: A beloved staple in various cuisines, notably Italian and American, enjoyed globally.
  • Cost: Affordable, utilizing basic pantry ingredients along with a few fresh items.
  • Season: Great year-round, but especially popular in cool months when comfort food is most desired.
  • Occasion: Ideal for parties, movie nights, or as part of a festive holiday feast.

Why You’ll Love This Recipe

Fluffy cheesy garlic bread offers a scrumptious taste and texture that keeps you coming back for more. The blend of garlic and butter enhances any dish, making it a perfect companion for pasta, soups, or salads. Its perfectly toasted surface adds a delightful crunch that contrasts beautifully with the soft, warm bread inside.

Convenience is another reason to adore this recipe. With minimal prep time and straightforward instructions, you can whip it up even on the busiest days. This recipe is not only flavorful but also a great way to quickly elevate any meal, impressing family and guests alike without significant effort.

From a nutritional standpoint, using quality ingredients allows you to control what goes into your dish. Whole-grain bread options can elevate the nutritional profile, while cheese provides calcium and protein. Thus, this recipe can be both a treat and a beneficial addition to your diet.

The social aspect of fluffy cheesy garlic bread cannot go unnoticed. It is a crowd-pleaser, making it the center of attention at gatherings. Friends and family indulge in this delightful dish, creating lasting memories around the table.

Cost-effectiveness is a key factor that enhances the appeal of this recipe. Utilizing basic staples from your pantry and fresh ingredients, you can create a comfort food classic without breaking the bank. It’s accessible, satisfying, and wonderful for any occasion or gathering.

Historical Background and Cultural Significance

The origin of cheesy garlic bread can be traced back to ancient times when garlic was celebrated not only for its flavor but also for its medicinal properties. Cultures around the world have incorporated garlic into various dishes to enhance flavor and health benefits.

In Italian cuisine, garlic bread is commonly served alongside pasta to complement the meal. Over the years, this simple dish has evolved, integrating various cheeses and herbs, making it a versatile staple in modern cooking. As it spread to different regions, local variations began to emerge, showcasing unique flavors and ingredients while maintaining the essence of the original recipe.

Within American cuisine, garlic bread gained popularity as a side dish for Italian-American meals. The rise of pizzerias in the mid-20th century saw the dish become a beloved accompaniment to pizza, further embedding it into the cultural food landscape. Today, it’s a common offering in restaurants and at home, cherished by families.

Regional variations have also surfaced, with some versions featuring herbs such as parsley or oregano, while others may use spreads like pesto. These adaptations highlight the dish’s adaptability and enduring popularity across cultures.

Ingredient Deep Dive

Garlic, a central ingredient in this recipe, not only enhances flavor but is celebrated for its health benefits. It’s rich in antioxidants and has been linked to improved heart health. When selecting garlic, opt for firm bulbs, free of blemishes. Store it in a cool, dark place to maintain freshness, as it can sprout if not stored properly. For a different flavor profile, consider substituting fresh garlic with roasted garlic, which adds a creamy, sweet element to your dish.

Butter is another essential component, offering richness and depth. Unsalted butter is preferred, allowing you to control the seasoning of your bread. When selecting butter, look for high-quality brands that use pure cream. Proper storage is crucial; keep it wrapped in the fridge to preserve its freshness. If you’re looking for a healthier option, olive oil can be a wonderful substitute, imparting a unique flavor while offering beneficial fat.

Cheese serves as the crowning glory of fluffy cheesy garlic bread. Varieties such as mozzarella provide supple meltiness, while parmesan adds sharpness. When choosing cheese, consider both flavor and meltability. Store cheese in wax paper or parchment to breathe in the fridge. For a twist, try adding a blend of cheeses, such as cheddar for a sharper taste or goat cheese for creaminess.

Common Mistakes to Avoid

  • Using stale bread: Fresh bread is essential for achieving the desired fluffy texture. Stale bread will result in a denser and less enjoyable outcome.
  • Overbaking: Keep an eye on the bread while baking to avoid burning. Aim for a golden-brown top for the best flavor and texture.
  • Under-seasoning: Garlic and butter should be generously seasoned. Taste before applying, ensuring the flavors are well balanced.
  • Skipping the resting time: Allowing the bread to cool slightly before slicing helps maintain its structure, preventing it from falling apart.
  • Not using enough cheese: Cheese is the star of the show, so don’t be shy! Generously layer it for a gooey texture.
  • Neglecting portion control: While it’s tempting to overindulge, serving the right portions ensures a delightful experience without waste.
  • Using the wrong type of garlic: Fresh garlic is ideal for this recipe; avoid garlic powder as it lacks the punch needed.
  • Not preheating the oven properly: Ensure the oven is preheated to achieve even baking and a perfect crust.

Essential Techniques

Using good quality garlic is vital for flavor impact. To enhance its natural richness, you can roast it in the oven until soft, which creates a buttery consistency. Mastering the technique of infusing garlic into butter ensures that each bite is incredibly flavorful. Look for visual cues, like the garlic turning golden, to indicate readiness.

Perfectly baking your fluffy garlic cheesy bread requires attention to temperature. Position your baking rack in the center of the oven for even heat distribution, ensuring the bread does not burn on the bottom. Trust your senses; look for the golden crust and bubbling cheese as indicators of doneness.

Pro Tips for Perfect Fluffy Cheesy Garlic Bread

Add a sprinkle of herbs for a fresh finish—it elevates the dish’s flavor. Fresh parsley or basil can add brightness and an extra layer of taste.

Experiment with different cheeses; mixing varieties can introduce new flavors and textures, making each batch unique. Consider trying gouda for smokiness or pepper jack for a spicy kick.

Spread softened butter evenly to ensure every part of the bread is infused with flavor, contributing to that perfect bite.

Let the garlic butter sit briefly before applying it to enhance integration of flavors; this small step can significantly amplify taste.

For a crispier crust, consider toasting it under the broiler for the last minute of cooking. Just keep a close eye to prevent burning.

If time allows, let the dough rise slightly longer to achieve an even fluffier interior. The longer fermentation promotes a lighter texture and tastier loaf.

Variations and Adaptations

Regional variations can include local ingredients; you might try adding diced jalapeños for a kick of heat or using herbs native to your region. Seasonal adaptations include using fresh herbs in the summer or adding roasted vegetables for additional nutrition and flavor.

Dietary modifications can also be made to cater to needs. A gluten-free bread option is easily achievable with gluten-free flour blends, while vegan butter can substitute dairy to suit plant-based diets. For those watching their carbs, using almond flour could create a low-carb version.

Flavor variations are endless—add sun-dried tomatoes or a splash of balsamic for unexpected sweetness and acidity. Changing the type of cheese used can also lead to new and exciting flavor profiles.

For texture modifications, consider briefly grilling the bread before adding toppings for a smoky background that complements the garlic and cheese. Presentation alternatives may include cutting the bread into elegant triangles or serving in a rustic wooden board style for that casual, inviting feel.

Serving and Presentation Guide

Plating techniques can enhance the feel of your dish. Consider slicing the garlic bread into individual servings and arranging them on a platter with sprigs of fresh herbs for a colorful touch.

Garnishing with additional cheese or herbs right before serving adds visual appeal and draws attention. Pairing it with fresh marinara or dipping sauces invites guests to enjoy a more interactive meal.

Traditional accompaniments often include pasta dishes or salads, while modern serving suggestions incorporate serving alongside charcuterie boards or soups. Temperature considerations are vital; the bread should be warm but not steaming hot to allow for better handling.

Portion control plays a role in serving; offer a few slices per person for samplings, encouraging guests to return for more without overwhelming them initially.

Wine and Beverage Pairing

When it comes to wine pairings, a crisp white like Pinot Grigio offers refreshing acidity that balances the richness of the cheese and garlic. For those who prefer red, a light-bodied option like Chianti complements the flavors without overwhelming them.

Non-alcoholic alternatives, such as sparkling water with lemon, can cleanse the palate while adding a refreshing contrast. If coffee or tea accompanies your meal, opt for a lighter brew, like green tea, to match the bread’s savory profile.

Temperature considerations are vital when serving beverages—wine should be chilled, while any teas should be brewed fresh and served warm for the best experience.

Storage and Shelf Life

Storing fluffy cheesy garlic bread is simple. Wrapping it tightly in aluminum foil or placing it in an airtight container helps keep it fresh for up to three days at room temperature.

For longer storage, freezing is a great option. Simply slice the bread, wrap individual portions, and place them in a freezer-safe bag; they can stay at peak freshness for up to three months. Signs of spoilage include an off smell or visible mold.

Reheating instructions are straightforward; simply pop the sliced bread in the toaster or oven until warmed through and the cheese is bubbly again. For best results, cover with foil to retain moisture and avoid drying it out.

Make Ahead Strategies

Making fluffy cheesy garlic bread ahead of time is doable. Prepare the garlic butter blend and store it in the fridge, ready to go just before baking. This keeps flavors fresh and intense while saving prep time on the day of serving.

Consider par-baking the bread for a few minutes before storing it. This allows you to simply finish baking when needed, providing a freshly baked taste without extensive waiting time.

Quality impact assessment is essential when preparing ahead. The bread’s texture may slightly change over time, but reheating properly can revive much of its original fluffiness.

When assembling your bread for storage, keeping toppings separate is key. Add cheese just before baking to ensure it melts evenly and produces that irresistibly gooey texture.

Fresh element additions, like herbs, can be incorporated before serving. Chopped parsley or oregano added just after baking freshens and elevates the flavor.

Scaling Instructions

Halving the recipe is simple. Just divide all ingredient quantities by two, and adjust cooking time, especially if using a smaller baking dish; monitor doneness closely.

Doubling or tripling the recipe can also be done without hassle, using larger baking sheets or multiple trays. Be prepared for adjustments in cooking times, as your oven’s temperature may fluctuate with more items inside.

Equipment adjustments may include using multiple baking sheets or pans to prevent overcrowding, ensuring even baking. Be aware of timing modifications; larger quantities may need slightly longer to bake thoroughly.

When considering storage for large batches, using aluminum foil to cover portions keeps them fresh and ready for reheating without losing flavor.

Nutritional Deep Dive

The macro breakdown of fluffy cheesy garlic bread reveals a balance of carbohydrates from the bread, fats from the butter, and protein from the cheese, creating a satisfying energy source.

Micronutrient analysis indicates the potential for various vitamins and minerals, particularly calcium from the cheese and antioxidants from garlic. This combination contributes to overall health despite being a comfort food.

Health benefits of this bread can be maximized through ingredient choices. Opting for whole grain bread increases fiber content, while using olive oil instead of butter can add healthier fats.

Dietary considerations come into play for those monitoring their intake. By adjusting fat sources and bread type, individuals can tailor the recipe to fit their nutritional goals without sacrificing deliciousness.

For portion analysis, consider an average serving size of one slice for a balanced intake. Strategies for weight management may involve pairing with lighter meals, such as salads, to create a well-rounded dining experience.

Dietary Adaptations

For a gluten-free version of fluffy cheesy garlic bread, replace all-purpose flour with a gluten-free flour blend, ensuring it maintains similar textures.

Dairy-free or vegan adaptations can utilize plant-based cheese along with dairy-free butter, ensuring that those with dietary restrictions can still enjoy the same rich flavors.

Low-carb dieters may substitute regular bread with cloud bread or cauliflower crust, creating a satisfying option that keeps carbs in check while still delivering intense cheesy flavors.

Keto enthusiasts can explore almond flour alternatives for a low-carb base, ensuring it fits into their dietary regimen while remaining delightful.

A paleo version would focus on using natural ingredients like almond flour and coconut oil, avoiding processed sugars or dairy to align with paleo guidelines.

Low-FODMAP variations can replace garlic with garlic-infused olive oil, balancing flavors without triggering digestive concerns for those sensitive to FODMAPs.

Troubleshooting Guide

If your garlic cheese bread turns out too dry, revisit the butter content; under-spreading can lead to a less flavorful and dryer side. Ensuring that the loaf is adequately covered will mitigate dryness.

Flavor balance is critical; if your garlic bread tastes bland, boost the seasonings in your garlic butter. Adding fresh herbs can enhance flavors significantly, providing freshness.

Temperature problems often arise when baking improperly; checking the accuracy of your oven’s temperature can prevent undercooking or overcooking in the future.

Equipment challenges could involve unforeseen issues with baking sheets or ovens overheating; be prepared with additional trays just in case, not all equipment may equally distribute heat.

Ingredient substitutions may lead to unexpected results; always taste your batter before baking to adjust flavors as needed. If you lack fresh herbs, a good quality dried option can work remarkably well.

Timing concerns often catch new cooks by surprise; make use of a kitchen timer to keep track of cooking times and check bread earlier rather than risk overbaking.

Recipe Success Stories

Community feedback on this cheesy garlic bread recipe has been overwhelmingly positive, with many celebrating its simplicity and flavor. Readers find it a fantastic addition to family-meal rotations, filling their homes with delicious aromas.

Variation successes highlight the versatility of the recipe. Many have tried different herb combinations, creating new favorite versions they share among friends and family.

Adaptation stories reflect how this garlic bread brings people together, whether for casual gatherings or special events, each batch enjoyed and cherished.

Reader suggestions prompt exciting and innovative changes, leading to a community where culinary creativity thrives.

Photography tips shared in the comments have encouraged many to present their fluffy cheesy garlic bread in creative and visually appealing ways, elevating the experience even further.

Frequently Asked Questions

Can I make cheesy garlic bread ahead of time?

Absolutely! You can prepare the garlic butter and even bake the bread ahead of time. Reheat it when you’re ready to serve for optimal freshness. Ensuring it’s wrapped properly will maintain moisture and flavor.

What type of bread works best for this recipe?

French or Italian bread are excellent choices due to their sturdy texture and ability to hold toppings well. You can also experiment with other types, though results may vary.

How do I store leftover garlic bread?

Wrap leftover garlic bread tightly in foil or store it in an airtight container. It keeps well at room temperature for about three days. For longer storage, freeze it in a foil wrap for up to three months.

What can I serve with cheesy garlic bread?

This bread pairs beautifully with pasta, soups, stews, or salads. It also makes a delicious side for any main course or as an appetizer at parties.

Is it possible to make this recipe vegan?

Yes! You can easily make this recipe vegan by using plant-based butter and cheese. Many brands offer enjoyable alternatives that will still provide a cheesy flavor.

Can I customize the flavors of this recipe?

Definitely! Feel free to experiment with adding spices, herbs, or even combining cheeses to get your favorite flavor combinations.

How can I achieve a crispier crust?

The best way to achieve a crispier crust is to bake the garlic bread in the oven until golden brown and try broiling it for a minute or two at the end while keeping a close watch.

What if my cheese isn’t melting?

If your cheese isn’t melting as you’d like, ensure it’s shredded or cut into small pieces. Also, use cheese with good melting qualities, like mozzarella or fontina, for best results.

Can I add extras, like vegetables or meats?

Absolutely! Feel free to pile on toppings like sautéed mushrooms, chopped peppers, or even cooked bacon. These additions can elevate the flavor and make it heartier.

What to do if I overbake the bread?

If you’ve overbaked the bread, consider serving it with a dip like marinara or olive oil, as it can help mask the dryness. For next time, keep an eye on cooking times for ideal results.

Additional Resources

For those interested in expanding their culinary repertoire, consider exploring related recipes featuring garlic and cheese, such as creamy garlic pasta or cheesy stuffed peppers.

Technique guides on bread-making can further enhance your skills, providing you with insights on how to perfect your craft in the kitchen.

Understanding ingredient information can lead to informed choices when bringing garlic and cheese into your meals. Look for fresh, high-quality options that will elevate your dishes.

Equipment recommendations can aid your baking experience; investing in good-quality baking sheets can make a noticeable difference in results.

Lastly, exploring seasonal variations can inspire your cooking. Experimenting with seasonal ingredients like spring garlic or fresh herbs can bring delightful twists to your garlic bread recipes.

Join the Conversation

Sharing your culinary adventures on social media can inspire others to recreate this fluffy cheesy garlic bread at home. Don’t forget to capture stunning photos of your delicious results to showcase your skills!

Engaging in recipe reviews allows for valuable feedback, encouragement within the culinary community, and helpful tweaks for future batches.

Inviting conversations about recipe variations fosters an interactive space where delicious creativity thrives, and everyone brings their own touch to the beloved cheesy garlic bread recipe.

The Recipe

Fluffy Cheesy Garlic Bread

Serves: 8 servings

Prep Time: 15 mins

Cook Time: 25 mins

Total Time: 40 mins

Kitchen Equipment Needed

  • Baking sheet
  • Aluminum foil
  • Mixing bowl
  • Knife for slicing
  • Brush for butter

Ingredients

  • 1 large loaf of French or Italian bread
  • 1/2 cup unsalted butter, softened
  • 4 cloves garlic, minced
  • 1 cup shredded mozzarella cheese
  • 1/2 cup grated Parmesan cheese
  • Salt and pepper, to taste
  • 1 tablespoon fresh parsley, chopped (optional)

Directions

  1. Preheat your oven to 375°F (190°C).
  2. In a mixing bowl, combine the softened butter, minced garlic, salt, and pepper until smooth.
  3. Cut the bread in half lengthwise and spread the garlic butter mixture evenly on both halves.
  4. Sprinkle the mozzarella and Parmesan evenly over the buttered sides of the bread.
  5. Wrap the halves in aluminum foil and place them on a baking sheet.
  6. Bake for 15 minutes covered with foil, then remove foil and bake for another 10 minutes, until cheese is melted and bubbly.
  7. Remove from the oven and let cool slightly before slicing. Garnish with fresh parsley if desired.

Recipe Notes

  • Substitute softened herbal butter for a flavor twist.
  • Use a variety of cheese for different flavor profiles.
  • Feel free to add spices or herbs to the butter for extra flavor.
  • Store leftovers wrapped tightly to keep them fresh.
  • Reheat in the oven for best results.

Delicious Cheesy Beef Burrito Recipe for Easy Weeknight Dinners

Cheesy Beef Burrito – Easy Dinner Ideas!

⚖️
Difficulty
Easy

⏲️
Prep Time
15 mins

🕒
Cook Time
20 mins

⏱️
Total Time
35 mins

🍽️
Servings
4

Welcome to your next favorite dinner idea – the Cheesy Beef Burrito! This recipe is designed to satisfy your cravings with flavorful beef, gooey cheese, and a medley of spices, all wrapped in a warm tortilla. Picture yourself diving into a burrito bursting with taste and texture, where every bite offers a delightful blend of savory and cheesy goodness. Not only is this dish a hit for family dinners, but it also serves as an incredible option for gatherings, ensuring everyone walks away happy and full.

Crafting this cheesy beef burrito is easier than you may think. With simple ingredients and straightforward steps, you’ll have a delicious meal on the table in no time. Each burrito is packed with juicy beef, perfectly melted cheese, and a hint of spice, creating a comforting meal that feels like a warm hug on a plate. Everyone, from the kids to your dinner guests, will love the comforting flavors—making this an easy go-to in your weekly meal rotation!

Quick Recipe Highlights

  • Flavor Profile: The combination of seasoned beef, melted cheese, and fresh toppings creates a savory explosion in every bite.
  • Texture: The outside of the burrito is soft and warm while delivering a satisfying cheesy and meaty filling.
  • Aroma: The inviting smell of seasoned beef mingles with rich cheese, tantalizing your senses as it cooks.
  • Visual Appeal: Drenched in cheese and colorful toppings, each burrito looks festive and appetizing on the plate.
  • Skill Level Needed: Perfect for beginner cooks, as it requires minimal techniques and simple cooking methods.
  • Special Equipment: Just a skillet or frying pan and a baking sheet are needed, making it accessible for anyone.

Recipe Overview

  • Difficulty Level: This Cheesy Beef Burrito is categorized as easy, suitable for novice cooks with an uncomplicated preparation process.
  • Category: A classic dinner recipe that fits well into casual meal planning and family-friendly dinners.
  • Cuisine: Drawing from Mexican culinary traditions, this dish combines elements of delicious burritos and cheesy quesadillas.
  • Cost: With affordable ingredients, this recipe can be made for approximately $10, serving four people comfortably.
  • Season: Although delightful year-round, this recipe shines in the cooler months when comfort food is most sought after.
  • Occasion: Perfect for casual dinner nights, game day feasts, or even a quick weeknight meal with minimal fuss.

Why You’ll Love This Recipe

This Cheesy Beef Burrito offers an incredible taste and texture appeal that will make you crave it time and again. The combination of seasoned beef paired with melted cheese creates a rich flavor profile that tantalizes your taste buds, while the warm tortilla offers a comforting wrap around the delicious filling.

Convenience is a focal point of this recipe. With minimal prep and cooking time, you’ll find this dish is quick to prepare after a long day. It’s an ideal recipe when you need a homemade meal without extensive fuss, and it gives you the opportunity to engage with family or friends while cooking together.

Additionally, this recipe comes with nutritional advantages. Ground beef is a great source of protein, and you can enhance the health aspect by adding beans or vegetables to the mix. Making this burrito gives you control over your ingredients, allowing for healthier choices and balanced meals.

The social and entertaining value of the Cheesy Beef Burrito cannot be understated. Picture yourself hosting a gathering, and presenting guests with the option to customize their burritos with an array of toppings. This interactive element makes it a fun and inclusive meal, perfect for shared experiences.

Lastly, the cost-effective nature of this recipe makes it an accessible option for everyone. With simple ingredients and a yield of four servings, the Cheesy Beef Burrito is not just delicious but also budget-friendly, making it perfect for families looking to eat well without breaking the bank.

Historical Background and Cultural Significance

The burrito’s origins can be traced back to Mexico, where it was traditionally filled with various ingredients and wrapped in a flour tortilla. Over the years, it has evolved into the popular fast food item we know today, embracing countless variations across regions. The Cheesy Beef Burrito specifically highlights the fusion of Mexican flavors with an American twist, as it incorporates gooey cheese to enhance the taste.

Culturally, burritos have established themselves as markers of Mexican cuisine, often celebrated for their versatility. They have become symbols of comfort food and convenience, appealing to people of all ages. The dish’s migration into American cuisine further solidified its reputation, transforming into a beloved staple in many households.

As the recipe has evolved, so have its fillings—adaptations to fit various tastes and dietary preferences have made burritos an incredibly flexible dish. From vegetarian and vegan options to additional toppings, the classic recipe has expanded beyond its original confines while still maintaining its comforting essence.

Further, regional variations, like the California burrito featuring french fries or the breakfast burrito filled with eggs, showcase the culinary creativity inspired by this beloved dish. Each version contributes something unique, yet they all celebrate the core concept of a burrito: a flavorful filling wrapped in a warm tortilla.

Ingredient Deep Dive

Ground Beef

Ground beef is a versatile and widely used ingredient in many cultures. Its flavor and texture lend themselves well to numerous recipes, making it a staple in many kitchens. Nutritionally, ground beef is a robust source of high-quality protein, iron, and B vitamins—essential for muscle development and overall energy levels. When selecting ground beef, look for lean options to reduce fat content, and it can be stored in the refrigerator for 1-2 days or frozen for longer periods. If ground beef is not available, turkey or plant-based alternatives can be excellent substitutions.

Flour Tortillas

Flour tortillas form the basis of a burrito and have a long history, originating from the indigenous peoples of Mexico. These soft, pliable tortillas are ideally used for wrapping fillings securely. Nutritionally, they provide carbohydrates for energy but can be high in calories. When selecting tortillas, opt for those made with whole wheat for extra fiber and nutrients. Store them in a cool, dry place or refrigerate to maintain freshness. For gluten-free options, corn tortillas are a wonderful substitute.

Cheese

Cheese adds a rich creaminess and depth of flavor to burritos. Its origins can be traced back thousands of years across various cultures. Nutritionally, cheese brings calcium and protein to the dish, promoting bone health and muscle strength. When choosing cheese for your burrito, consider using melting varieties like cheddar or Monterey Jack. Cheese can be stored in the refrigerator, but check for signs of spoilage. You can also experiment with vegan cheese options if desired.

Beans

Beans are a traditional filling in many burritos, providing significant cultural importance in Latin American diets. They offer essential nutrients, fiber, and protein, aiding in digestion and overall health. When selecting beans, opt for canned varieties for convenience or dried beans for a more economical choice. Store dried beans in a cool, dry place, while canned beans should be consumed before their expiration date. Substitute beans with lentils or quinoa for different textures.

Sour Cream

Sour cream garnishes the burrito, imparting a tangy flavor and creamy texture. It originated as a way to preserve dairy products. Nutritionally, sour cream is rich in calcium but can be high in fats. When purchasing, look for varieties labeled as organic or low-fat for healthier options. Store sour cream in the refrigerator, keeping an eye on the expiration date. As a substitute, consider using Greek yogurt for a similar flavor with added protein.

Common Mistakes to Avoid

  • Overfilling the burrito: Adding too much filling can cause it to break while wrapping. Aim for a handful of filling per tortilla.
  • Not warming the tortillas: Failing to warm tortillas makes them brittle. Heat them in a pan or microwave for optimal flexibility.
  • Using cold ingredients: Cold ingredients can result in a less flavorful burrito. Ensure your beef and cheese are heated properly before assembly.
  • Skipping seasoning: Not seasoning the meat can lead to bland flavor profiles. Use spices such as cumin and chili powder for depth.
  • Not letting cheese melt: Skipping the melting step can hinder the gooey texture that makes burritos delicious. Ensure the cheese is well melted.
  • Poor wrapping technique: Not rolling the burrito correctly may lead to leaking fillings. Practice wrapping tightly while tucking in the sides.
  • Ineffective storage: Not sealing burritos well for storage can lead to dryness. Use plastic wrap or a tight container to keep them fresh.
  • Ignoring browning: Not browning the burrito in a skillet can result in a less appealing look. A golden color offers a perfect crunchy exterior.
  • Inadequate cooking time: Failing to cook the beef thoroughly can lead to food safety concerns. Always ensure it’s at least 160°F.
  • Neglecting toppings: Forgetting toppings can lead to a one-dimensional dish. Consider adding salsa, jalapeños, or avocado for enhanced flavor.

Essential Techniques

Wrapping a burrito might seem simple, but mastering the technique is key to avoiding mess and ensuring fillings stay intact. Start by laying your tortilla flat and placing the filling in the center, leaving room on the edges. Tuck the sides in towards the center before rolling from the bottom upwards. This technique encapsulates all the deliciousness inside the burrito, preventing it from falling apart during eating.

Seasoning the beef properly is crucial for flavor. A blend of spices such as cumin, paprika, garlic powder, and salt heightens the meat’s taste. Letting the seasoning meld with the meat while cooking ensures a rich, savory experience. Taste the meat mixture before wrapping the burritos to adjust seasoning as needed, guaranteeing a flavorful outcome.

Cooking the beef thoroughly is non-negotiable for food safety and flavor. Use a meat thermometer to ensure the internal temperature reaches 160°F. Proper browning gives the meat a depth of flavor while also providing a richer color that enhances the visual appeal of your dish.

Pro Tips for Perfect Cheesy Beef Burrito

– Use freshly prepped or cooked beans instead of canned for a more authentic taste, if time allows.
– Incorporate a variety of cheeses for a more complex flavor and a delightful melty texture.
– Experiment with different spices and herbs in your beef seasoning to match your palate or the preferences of your guests.
– Always taste your filling before assembling to ensure the spices are balanced, adjusting as necessary.
– If possible, let the beef mixture cool slightly before filling your burrito; this prevents the tortilla from becoming soggy.
– Encourage customizable toppings, like guacamole or shredded lettuce, to allow family and friends to build their ideal burrito.
– For an extra crispy outside, pan-fry the wrapped burritos in a skillet after filling them.
– When freezing, secure burritos in a vacuum-sealed bag to maximize freshness and prevent freezer burn.

Variations and Adaptations

– Regional variations include the California burrito, which incorporates french fries inside for a hearty twist.
– Seasonal adaptations might include including corn or roasted peppers during the summer for a fresher take on this dish.
– Dietary modifications can easily be accommodated by using turkey or lentils as alternatives to ground beef for a lighter option.
– Flavor variations allow you to experiment with different ingredients—try BBQ sauce instead of traditional seasoning for a unique barbecue burrito.
– For texture modifications, you can add crispy bacon bits or crushed tortilla chips for added crunch.
– Presentation alternatives such as slicing the burrito in half and serving it with salsa and fresh cilantro can enhance the visual appeal.

Serving and Presentation Guide

When plating your Cheesy Beef Burritos, consider slicing them diagonally to showcase the colorful filling. This also allows for easier serving and portion control. Garnish each plate with a dollop of sour cream, a sprinkle of fresh cilantro, or sliced jalapeños for a burst of color and flavor.

Traditional accompaniments like cilantro-lime rice or refried beans add a nice touch to your meal. For modern serving suggestions, consider presenting the burritos wrapped in parchment paper for a rustic-chic look.

Temperature considerations are essential; serve your burritos hot for the best experience. To achieve this, wrap them in foil while finishing your toppings or sides. This not only keeps them warm but can also enhance the overall presentation by creating an inviting display.

Portion control tips suggest serving individual burritos with sides of toppings, allowing guests to personalize their meal while limiting waste.

Wine and Beverage Pairing

For wine pairings, a light red like Pinot Noir or a fruity white such as Riesling complements the flavors of beef and cheese beautifully. If you prefer something more effervescent, a sparkling water with a twist of lime offers a refreshing balance to the rich flavors of the dish.

For non-alcoholic alternatives, consider serving a fruity iced tea or a tangy lemonade, both of which provide a refreshing contrast to the savory burrito. If you opt for coffee or tea, a dark roast coffee could harmonize with the dishes’ comforting nature, adding a cozy touch to your meal.

Make sure to serve all beverages at a pleasant temperature—cool drinks alongside heated burritos create balance, enhancing the overall dining experience.

Storage and Shelf Life

Storing your Cheesy Beef Burritos correctly extends their shelf life. To store in the refrigerator, wrap them tightly in aluminum foil or plastic wrap. They’ll last up to 3 days. For longer storage, consider freezing them—ensure they’re tightly wrapped or placed in an airtight container to prevent freezer burn. Frozen burritos can be reheated in the microwave or oven.

Temperature requirements are straightforward: keep cooked burritos in the fridge to maintain freshness. Signs of spoilage include an off odor or a change in the tortilla’s texture; these indicate that it’s best to discard them.

Reheating instructions suggest using an oven or toaster oven to regain that crispy exterior. If reheating from frozen, allow them to thaw in the refrigerator overnight before warming to ensure even heating.

Make Ahead Strategies

To effectively make your Cheesy Beef Burrito ahead of time, consider prepping the filling and storing it in the fridge a day in advance. This saves time and ensures flavors meld perfectly. You can assemble the burritos just before serving or reheat the filling if needed.

Batch cooking the beef mixture is a fantastic strategy; it can be frozen in portions, making it convenient for future meals. When assembling, leave the fresh ingredients like lettuce, salsa, or sour cream aside until serving time to maintain their freshness and texture.

Quality impact assessment indicates that preparing the filling ahead improves flavor, as spices and seasonings often deepen over time. Finally, include fresh elements, like chopped cilantro or diced avocado, to add vibrancy and freshness when serving.

Scaling Instructions

Scaling the Cheesy Beef Burrito is straightforward and can be adapted to suit your needs. To half the recipe, simply adjust ingredient amounts accordingly. For gathering or parties, doubling or tripling the recipe ensures there’s plenty for everyone.

Equipment adjustments might include using larger pots or pans or cooking in batches if the quantity is too much for your current cookware. Timing modifications can be managed by preparing several burritos efficiently in stages, ensuring all components are heated simultaneously.

Storage considerations for scaled recipes mean ensuring you have sufficient containers to store your extra burritos if not consumed immediately. These burritos keep well and are easy to reheat later.

Nutritional Deep Dive

A macro breakdown reveals that a typical Cheesy Beef Burrito is high in protein due to its beef filling, which aids in muscle repair and overall health. Carbohydrates from the tortilla serve as a primary energy source, and a moderate amount of fats from the cheese contributes to satiety.

A micronutrient analysis indicates essential vitamins and minerals from the ingredients, including vitamin C from toppings like lettuce or salsa, calcium from cheese, and iron from beef. However, adjusting ingredient types can enhance the nutritional content significantly, such as using whole grain tortillas or lean cut beef.

Health benefits highlight the value of incorporating variety, as adding vegetables not only boosts fiber but also increases essential nutrients. Portion analysis recommends moderate servings to balance between enjoyment and nutritional intake, especially for those managing their calorie consumption.

To facilitate weight management, consider promoting homemade versions of burritos, allowing for healthier ingredients and portion control.

Dietary Adaptations

– Gluten-free adaptations include using corn tortillas or lettuce wraps to accommodate those with gluten sensitivities.
– Dairy-free options feature plant-based cheeses or avoidance of cheese altogether, maintaining the heartiness of a burrito while fitting dietary needs.
– Vegan adaptations replace meat with lentils or beyond meat, yielding similar flavor profiles while remaining plant-based friendly.
– Low-carb variations can be achieved by using zucchini or eggplant slices as wraps, providing a vegetable-rich alternative.
– Keto-friendly alternatives focus on meat, cheese, and low-carb veggies, minimizing carbohydrates for dietary requirements.
– Paleo adaptations emphasize whole foods, excluding processed ingredients and utilizing natural sources of protein and veggies.
– Low-FODMAP followers can explore utilizing tuna or chicken instead of beef, ensuring their dietary needs are met while still enjoying burrito flavors.
– Other specific diets can often be catered to by substituting or excluding key ingredients to fit individual health requirements.

Troubleshooting Guide

When addressing texture issues, such as overly soggy burritos, ensure that all components are dry and well-drained before assembly. A light toast or pan-frying the burrito can help achieve a crispier exterior, enhancing texture.

For flavor balance, if the burrito is too salty or bland, adding fresh toppings like diced tomatoes or avocado can refresh and highlight the flavors. You can also incorporate fresh herbs after cooking to add dimension.

Temperature problems arise when fillings aren’t heated adequately. To avoid this, make sure to warm the beef mixture to piping hot before assembling. If reheating, ensure even heat distribution by avoiding overcrowded microwaves.

Ingredient substitutions may pose challenges; being creative with spice mixes or different proteins can transform a dish without falling flat. Adjusting cooking time based on new ingredients’ needs ensures a successful outcome.

Timing concerns are manageable by organizing ingredients, pre-chopping components, and employing cooking methods that save time, like slow cookers or instant pots.

Recipe Success Stories

Feedback from the community around this Cheesy Beef Burrito has been overwhelmingly positive, with many praising its simplicity and taste. Success stories frequently highlight how adapting the basic recipe led to incredible family dinners or social gatherings where guests couldn’t get enough.

Readers have shared their own variations, from using different proteins to adding unexpected spices, showcasing the recipe’s versatility to fit personal preferences.

Many have expressed appreciation for the easy prep, which makes busy weeknights a breeze. Photography tips shared by the community often recommend capturing the melty cheese and vibrant colors of toppings to entice others to try it!

Frequently Asked Questions

Can I make these burritos ahead of time?
Yes! You can prepare the beef mixture ahead and assemble the burritos just before you plan to serve them. Refrigerate the beef filling and wrap the burritos when ready to cook.

How do I reheat leftovers?
Reheat in an oven preheated to 350°F wrapped in foil for about 10-15 minutes or in a microwave for about 1-2 minutes, making sure they are heated through.

What toppings can I add?
You can add a variety of toppings including salsa, guacamole, shredded cheese, lettuce, diced tomatoes, sour cream, or jalapeños for extra flavor.

How can I customize this recipe?
This recipe is versatile! You can swap out beef for chicken, turkey, or plant-based meat. Experiment with different types of cheese and variety of beans.

Are these burritos freezer-friendly?
Absolutely! Store assembled burritos individually wrapped in foil or in airtight containers for up to 3 months. Thaw and reheat as needed.

Can I make these burritos vegetarian?
Yes! Simply substitute the ground beef with a mix of beans, lentils, or vegetables to create a delicious vegetarian option.

What should I serve with burritos?
Burritos pair well with sides like rice, beans, salad, or chips and salsa. They can also be enjoyed with a side of soup for a cozy meal.

Can I use whole wheat tortillas?
Yes, whole wheat tortillas are a healthy alternative that will add more fiber to your meal. You can use any type of tortilla you prefer.

How do I prevent the burrito from falling apart?
Make sure to fill it properly, leaving space for wrapping, and roll it tightly. You can also secure it with a toothpick if needed.

How spicy can I make these burritos?
The spice level is entirely up to you! You can add more chili powder or include jalapeños in your filling to increase the heat according to your preference.

Additional Resources

If you loved this Cheesy Beef Burrito recipe, explore other related recipes on our blog like Classic Beef Tacos or Enchiladas with Cheese. Enhance your cooking skills with technique guides on how to perfectly brown meat or make homemade tortillas.

For ingredient information, check out our posts on the health benefits of beans or the importance of using fresh produce in your recipes. Don’t forget seasonal variations, as adapting to what’s fresh can make your meals even more tasty!

Join the Conversation

Engage with us on social media by sharing your Cheesy Beef Burrito experiences! We’d love to see your photos and hear your feedback. Your reviews help others find this delicious recipe. Consider sharing your unique twists and variations, and join our community of food lovers.

Don’t forget to explore our photography tips for dish presentation! Share your creations using the hashtag #CheesyBeefBurrito to connect and inspire fellow cooks.

The Recipe

Cheesy Beef Burrito

Serves: 4

Prep Time: 15 mins

Cook Time: 20 mins

Total Time: 35 mins

Kitchen Equipment Needed

  • Large skillet or frying pan
  • Mixing bowl
  • Spatula
  • Aluminum foil or plastic wrap for storage

Ingredients

  • 1 lb ground beef
  • 1 cup shredded cheese (cheddar or Monterey Jack)
  • 4 large flour tortillas
  • 1 can black beans, drained and rinsed
  • 1 teaspoon taco seasoning
  • 1 cup lettuce, shredded
  • 1 tomato, diced
  • 1/2 cup sour cream
  • Optional toppings: salsa, jalapeños, avocado

Directions

  1. In a skillet over medium heat, cook the ground beef until browned. Drain excess fat.
  2. Add taco seasoning and beans to the beef, mixing well until heated through.
  3. On a warm tortilla, layer beef mixture and top with shredded cheese, lettuce, tomatoes, and any extra toppings.
  4. Wrap the burrito tightly by tucking the sides and rolling it up from the bottom.
  5. Optionally, place burritos seam-side down in the pan and toast for a few minutes until crispy.
  6. Serve hot with a side of sour cream and salsa!

Recipe Notes

  • Add black olives or corn for extra flavor.
  • Substitute ground beef with chicken, turkey, or plant-based options.
  • Wrap burritos in foil for easy transportation or freezer storage.