Indulge in Gourmet Meatballs with Savory Mushroom Gravy Recipe

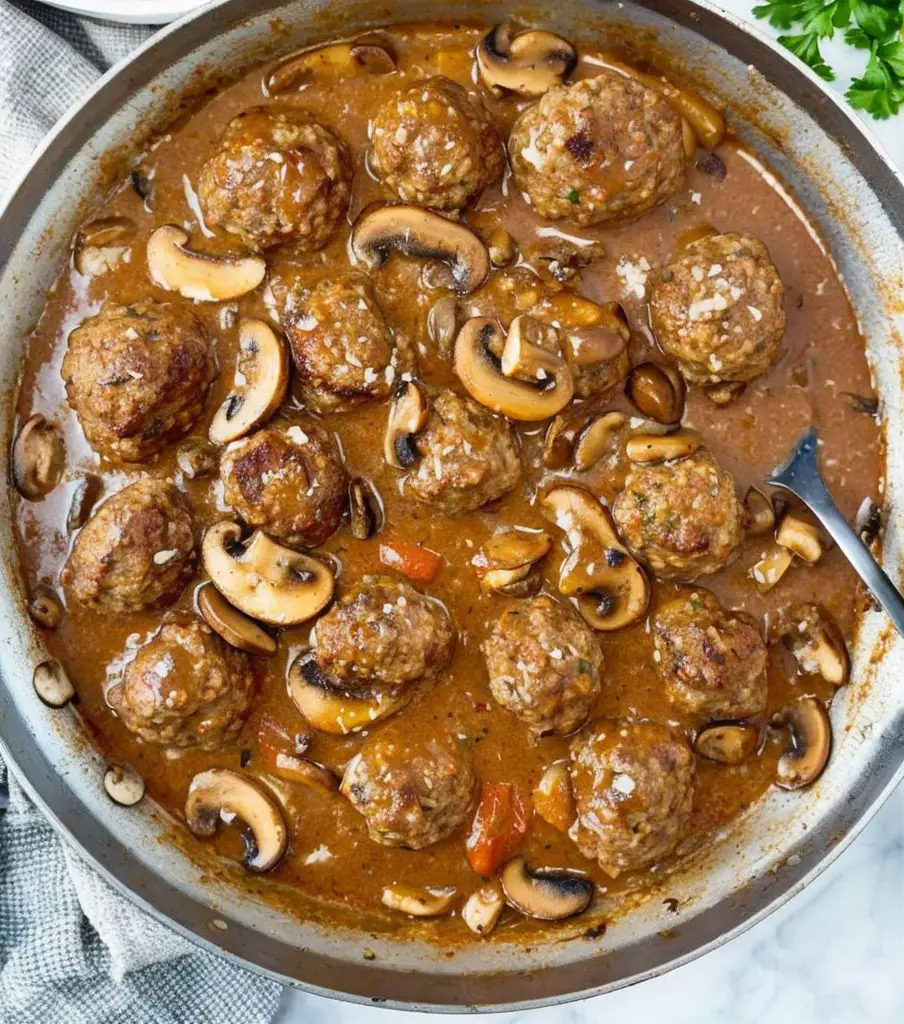
Gourmet Meatballs with Rich Mushroom Gravy: A Comfort Food Classic

⚖️
Difficulty
Intermediate

⏲️
Prep Time
20 mins

🕒
Cook Time
30 mins

⏱️
Total Time
50 mins

🍽️
Servings
4

Indulge in the rich flavors of Gourmet Meatballs with Rich Mushroom Gravy, a dish that celebrates the comforting essence of home cooking. These meatballs are lovingly crafted from high-quality ground meat, combined with fragrant herbs and spices, and enhanced by the umami notes of freshly sautéed mushrooms. The elegance of this recipe makes it perfect for any occasion, whether it’s a family dinner or a special gathering with friends.

Each bite offers a delightful combination of textures—from the tender meatballs to the velvety gravy that envelops them, making this dish a true feast for the senses. The savory aroma wafting from your kitchen as the mushrooms simmer alongside the meatballs will have your family eagerly awaiting mealtime. Experience the joy and satisfaction of serving a classic comfort food that balances heartiness with gourmet flair.

Quick Recipe Highlights

  • Flavor Profile: The gourmet meatballs deliver a savory balance of herbs, spices, and the earthy richness of mushrooms, covered in a luscious gravy that enhances each bite.
  • Texture: Expect tender meatballs complemented by a smooth, creamy gravy that adds a luxurious mouthfeel.
  • Aroma: The fragrant blend of sautéed mushrooms, garlic, and fresh herbs fills your kitchen with an irresistible scent.
  • Visual Appeal: Serve the meatballs in a deep, rich gravy, garnished with fresh parsley for a pop of color against the warm brown tones.
  • Skill Level Needed: This recipe requires intermediate cooking skills, including sautéing and sauce-making, suitable for home cooks looking to elevate their culinary abilities.
  • Special Equipment: A skillet for browning the meatballs, a mixing bowl, and measuring tools are essential for success in this recipe.

Recipe Overview

  • Difficulty Level: This recipe falls into an intermediate category due to the need for multitasking and the techniques involved in creating the perfect meatball and gravy.
  • Category: Gourmet Meatballs with Rich Mushroom Gravy is ideal for hearty dinners and special occasions, embodying a comforting yet refined dining experience.
  • Cuisine: This dish draws inspiration from traditional Italian and American cooking, marrying rich flavors with comfort elements.
  • Cost: The ingredients are moderately priced, providing good value for a gourmet meal that can impress guests.
  • Season: Perfect for fall and winter, this dish offers warmth and comfort during colder months, making it a family favorite.
  • Occasion: Great for family gatherings, dinner parties, or as a satisfying weeknight meal when you want something special.

Why You’ll Love This Recipe

The Gourmet Meatballs with Rich Mushroom Gravy will quickly become a favorite thanks to their incredible taste and texture. The combination of premium ground meat and aromatic mushrooms creates a depth of flavor that is hard to resist. Each meatball is juicy, while the gravy contributes a luxurious richness that coats every bite, making it perfect over pasta or mashed potatoes.

Convenience is another reason to love this dish. Although it requires some prep time, the steps are straightforward, allowing you to create a restaurant-quality meal right in your home kitchen. Plus, the ingredients are generally available in most grocery stores, making it easy to gather what you need.

From a nutritional perspective, this recipe provides protein from the meatballs, while the mushrooms add fiber and essential nutrients. This balance makes it a wholesome option for those seeking to maintain a healthy diet without sacrificing flavor.

When it comes to entertaining, these gourmet meatballs shine. Their elegant presentation and delicious taste make them a fantastic choice for serving guests. Pair them with a side salad or crusty bread, and you have a complete meal that everyone will enjoy.

Lastly, consider the cost-effectiveness of this dish. With just a few high-quality ingredients, you can make a substantial meal that satisfies everyone at the table. This recipe is designed to impress without breaking the bank, allowing for an elegant dining experience at home.

Historical Background and Cultural Significance

Gourmet meatballs have a storied history that traverses various cultures, with roots in ancient Roman cuisine. Initially, meatballs were fashioned as a way to use leftover meats, making them a humble yet resourceful dish. Over time, the concept evolved, gaining prominence in traditional Italian and American households, each adding their unique spin on flavors and cooking techniques.

Culturally, meatballs represent comfort and home-cooked meals. They have been served at family gatherings and festive occasions, symbolizing togetherness and warmth. Whether in an Italian Sunday dinner or served at a holiday buffet, these tasty morsels bring people together, creating cherished memories around the table.

The evolution of the gourmet meatball reflects changing tastes and trends in cuisine. Once merely a simple meal, it has transformed into a beloved dish featured in high-end restaurants and home kitchens alike, where chefs innovate with spices, sauces, and presentation.

Regional variations of meatballs showcase local ingredients and flavors. For example, Swedish meatballs feature a creamy sauce, while Middle Eastern kofta incorporates fragrant spices and herbs, each telling a story of its cultural heritage.

Ingredient Deep Dive

Ground Beef: This versatile ingredient is central to the meatball, providing a robust flavor and satisfying texture. Rich in protein, iron, and essential nutrients, it’s a staple in many diets. When selecting ground beef, look for blends with a good fat content for moisture without excessive grease. Store it in the refrigerator for 1-2 days or freeze it for longer preservation, and consider leaner cuts if health is a priority.

Mushrooms: Known for their umami flavor, mushrooms enrich the gravy and add depth to the dish. They’re low in calories but high in nutritional value, offering fiber, vitamins, and antioxidants. Fresh mushrooms are ideal, but dried varieties can be used for intense flavor. Store fresh mushrooms in a paper bag in the fridge, and be sure to substitute with other types like shiitake or cremini for variety.

Breadcrumbs: These are often used as a binding agent in meatballs, contributing to their texture. Made from stale bread, breadcrumbs offer a crispy finish when baked. Opt for homemade or whole-grain options for better nutrition. Keep breadcrumbs in a cool, dry place, and they can last several months. If gluten sensitivity is a concern, consider almond or oat flour as alternatives.

Common Mistakes to Avoid

  • Overmixing: When combining the meat mixture, don’t overdo it. Overmixing can lead to tough meatballs rather than tender, juicy ones.
  • Skipping the resting time: Allowing the meatballs to rest before cooking helps them hold their shape and enhance their flavor.
  • Not browning properly: Give meatballs enough time in the skillet to develop a good sear. This step is crucial as it adds depth to the final dish.
  • Using the wrong meat: Opt for a blend of meats for a richer flavor. Using only lean meat may result in dry meatballs.
  • Cooking at too high heat: Cooking meatballs over high heat can burn them on the outside while leaving them raw in the center.
  • Thickening the gravy improperly: Avoid adding cornstarch directly to the sauce without mixing it in a separate bowl, which can lead to lumps.
  • Serving immediately: Allow the meatballs to rest after cooking to let the flavors meld for a more cohesive dish.
  • Ineffective storage: Store leftovers properly in airtight containers to maintain their freshness and flavor.

Essential Techniques

Browning Meatballs: This technique is crucial for developing flavor. Browning creates a crust that enhances the overall taste of your dish. To achieve perfect browning, ensure your pan is hot enough before adding the meatballs, and avoid crowding the pan to maintain high heat.

Making a Rich Gravy: Creating a flavorful gravy is an art. Start by sautéing onions and mushrooms in the renderings from the meatballs to build a flavor base. Gradually add in broth to deglaze the pan, scraping up lovely browned bits that contribute to the sauce’s complexity.

Pro Tips for Perfect Gourmet Meatballs with Rich Mushroom Gravy

1. Use a combination of meats: Mixing ground beef with ground pork can elevate flavors and improve moisture.
2. Don’t forget seasoning: Be generous with salt, pepper, and spices, as the flavor of the meat must shine through the gravy.
3. Opt for fresh, high-quality breadcrumbs: Fresh breadcrumbs have a lighter texture and better flavor than store-bought varieties.
4. Control the size: Using a scoop to form uniform meatballs ensures even cooking and consistent texture.
5. Allow time for flavors to meld: Let the meatballs simmer in the gravy for a few minutes before serving to enhance the overall flavor.
6. Modulate the gravy thickness: Adjust the consistency of the gravy to your liking by adding more broth or allowing it to reduce further on the heat.
7. Garnish creatively: Fresh herbs like parsley or chives add a beautiful touch and a burst of freshness.
8. Experiment with spices: Don’t hesitate to introduce different herbs and spices to customize your meatballs to your taste.

Variations and Adaptations

Regional Variations: Explore different flavor profiles by integrating regional spices. For instance, try adding cumin and coriander for a Middle-Eastern flair or parmesan cheese for an Italian twist.

Seasonal Adaptations: In summer, you can grill the meatballs for a smoky flavor. In winter, incorporate warming spices like cinnamon for a comforting meal.

Dietary Modifications: To make this dish gluten-free, substitute regular breadcrumbs with gluten-free options like almond flour or crushed rice cakes.

Flavor Variations: Infuse the meatball mixture with different cheeses, herbs, or citrus zest for a personal flavor touch.

Texture Modifications: For added crunch, consider incorporating finely chopped vegetables like carrots or bell peppers in the meatball mixture.

Presentation Alternatives: Serve the meatballs over roasted vegetables or zoodles for a lighter, more modern take on the dish.

Serving and Presentation Guide

Plating techniques are essential for an elegant presentation. Use a clean, white plate to contrast the colors of the dish. Lay a bed of mashed potatoes or pasta, and then artistically pile the meatballs on top, cascading the rich gravy over them.

Garnishing ideas include a sprinkle of freshly chopped parsley or a drizzle of balsamic reduction to add visual interest and flavor. Complement your servings with crusty bread or a fresh green salad for added textures and colors.

For modern serving suggestions, consider using small cast iron skillets for individual portions, bringing a rustic touch to your table. Temperature is crucial—ensure meatballs are served hot to enhance their appeal and ensure a comforting experience.

Portion control tips recommend serving two meatballs per person, depending on their size, allowing room for sides without overwhelming the plate.

Wine and Beverage Pairing

Wine pairings for Gourmet Meatballs with Rich Mushroom Gravy can enhance the dining experience. A robust red wine like Cabernet Sauvignon or a smooth Merlot complements the savory flavors beautifully. For a lighter option, consider a Pinot Noir which tends to have a fruity, acidic profile that pairs well with meat dishes.

Non-alcoholic alternatives might include sparkling grape juice or a refreshing iced tea with lemon. The acidity in these beverages works well to balance the richness of the dish.

If coffee is your preference post-dinner, choose a medium roast that highlights the earthiness of the meatballs while providing a delightful end to the meal.

Temperature considerations matter too; serve red wine slightly chilled to keep it refreshing, especially during warmer seasons.

Storage and Shelf Life

To keep your Gourmet Meatballs and Gravy fresh, store leftovers in airtight containers in the refrigerator for up to three days. Make sure they cool before sealing them to avoid condensation. If you want to preserve them longer, freezing is an option—just ensure they are well-packed in freezer-safe containers or bags.

Temperature requirements demand your meatballs be reheated to an internal temperature of 165°F before serving. Reheat gently on the stovetop or in the microwave, adding extra broth if the gravy seems thick.

Signs of spoilage include an off smell or discoloration, so always check before consuming leftovers.

For best results, freeze meatballs without the gravy to maintain their texture, adding the sauce after reheating.

Make Ahead Strategies

To streamline your cooking process, consider preparing the meatball mixture a day in advance, allowing flavors to meld. Store the uncooked mixture in the refrigerator and form meatballs just before cooking.

For step-wise storage, prepare the gravy and refrigerate it separately from the meatballs. This prevents the meat from becoming soggy.

Assess the quality impact: While you can make meatballs in advance, they are best when freshly cooked. However, cooked meatballs can last well in the fridge and remain delicious next day.

Timing during prep can be crucial; prepare the meatball mix while the gravy is simmering to optimize kitchen time.

Reheating guidelines suggest gentle warming over low heat with a splash of broth to keep them moist.

Don’t forget to add any fresh herbs just before serving to brighten the dish after reheating.

Scaling Instructions

Halving the recipe is straightforward—just divide all ingredients by two—ideal for smaller households. Keep in mind the cooking time may slightly decrease.

For doubling or tripling, ensure you have adequate cooking space; larger batches may require cooking in batches for optimal results. Adjust the timing slightly, as larger quantities may take longer to heat through.

When scaling up, consider using larger pots or skillets to accommodate the expanded volume, ensuring even cooking.

Don’t forget about storage considerations: left over meatballs can be stored for future meals, keeping portion sizes manageable.

Nutritional Deep Dive

In terms of macronutrients, these meatballs provide significant protein, essential for muscle repair and growth. The combination of meat and mushrooms contributes valuable fiber, aiding digestion, and enhancing satiety.

Micronutrient analysis reveals the richness of iron in the beef paired with vitamin D and B vitamins often found in mushrooms, making this a nutritionally robust dish.

Health benefits abound as this meal is packed with iron and protein while being lower in carbohydrates, depending on the serving choice of sides.

Dietary considerations also come into play; adjust portions for overall caloric intake and consider accompanying sides that align with personal nutrition goals.

Weight management tips advise pairing meatballs with vegetables or whole grains to enhance fullness while enjoying this gourmet dish.

Dietary Adaptations

For gluten-free adaptations, use certified gluten-free breadcrumbs or explore alternatives like quinoa or almond flour for binding.

If you need a dairy-free version, omit any cheese and use non-dairy options for the gravy. Coconut milk is a great alternative that offers creaminess without the dairy.

For a vegan take, replace meat with lentils or mushrooms, and use flaxseed meal as a binder in place of eggs, ensuring the same comforting flavor profile.

Adjustments can also be made to fit low-carb or keto diets, swapping breadcrumbs with crushed pork rinds or almond exteriors to keep the meatballs satisfying without the carbs.

Paleo followers can utilize ground turkey or chicken, for a lighter meat while adhering to paleo-friendly ingredients.

Troubleshooting Guide

Texture issues often arise if meatballs are overmixed. Ensure you mix just until combined to prevent dense meatballs. If they fall apart while cooking, consider adding an egg to the mixture for better binding.

Flavor balance can be challenging; always taste and adjust seasoning. If the meatballs turn out bland, a double check on salt before serving can go a long way.

Temperature problems may occur if your meatballs are not fully cooked. Invest in a meat thermometer to ensure they reach an internal temperature of 165°F.

Equipment challenges might include the need for larger skillets when cooking in batches. Have more than one cooking surface ready, or cook smaller batches to avoid overcrowding.

Ingredient substitutions need to be planned ahead—if you need to swap out an ingredient last minute, ensure you have an alternative that complements the dish’s flavor profile.

Timing concerns can be addressed by prepping components ahead of time. If you’re short on time, consider making the meatballs in advance or using frozen meatballs for an even quicker option.

Recipe Success Stories

Community feedback often highlights how gourmet meatballs bring families together over a comforting plate of food. Many have noted adjustments they made, from tweaking seasoning to leveraging local ingredients for unique variations.

Variation successes speak to the flexibility of the recipe; some users have successfully incorporated vegetarian alternatives, creating delightful lentil-based meatballs that still satisfy.

Adaptation stories showcase creative takes on this classic, with readers sharing how they innovated the dish to fit dietary needs while maintaining its essence.

Photography tips reveal that presenting the dish with a sprinkle of vibrant herbs not only enhances visual appeal but makes a dish memorable, urging others to recreate these gourmet meatballs in their kitchens.

Frequently Asked Questions

Can I freeze the meatballs and gravy?

Yes, you can freeze the meatballs separately from the gravy for optimal texture. Store in airtight containers, ensuring they are cooled completely before freezing. Thaw in the fridge overnight and reheat before serving.

What can I serve with gourmet meatballs?

Gourmet meatballs pair beautifully with sides like mashed potatoes, pasta, or a fresh green salad. Crusty bread is also a fantastic option for soaking up the delicious gravy!

Can I make this dish ahead of time?

Absolutely! You can prepare meatballs and the gravy a day ahead. Just reheat gently before serving for best results.

What type of ground meat works best?

A mix of ground beef and pork often yields the best flavor and moisture. However, feel free to experiment with turkey or chicken for leaner options.

Can I make this recipe dairy-free?

Yes, simply skip any dairy ingredients in the gravy. Coconut milk can be a delicious alternative that provides creaminess without dairy.

How do I prevent meatballs from falling apart?

To help meatballs hold their shape, do not overmix your ingredients, and ensure you are using the right amount of breadcrumbs or fillers. Adding an egg can also provide extra binding.

What spices are essential for flavor?

Essentials include salt, black pepper, garlic powder, and Italian seasoning. Fresh herbs like parsley or basil can enhance flavor greatly.

Can I use dried mushrooms in the gravy?

Absolutely! Dried mushrooms can add an intense flavor to the gravy. Be sure to rehydrate them in warm water before adding to your sauce.

How many servings does this recipe make?

This recipe serves about four people, depending on portion sizes and side dishes served. It can be easily scaled up or down.

What kitchen tools do I need?

You will need a mixing bowl, a skillet for browning the meatballs, and a pot for making the gravy. A meat thermometer can also be useful for ensuring proper cooking temperature.

Additional Resources

Explore related recipes for more comfort food ideas, including classic spaghetti and meatballs or creamy mushroom risotto. Discover technique guides for mastering meatball-making and browse ingredient information for substitutions and tips on freshness.

Look for equipment recommendations focused on essential kitchen tools that can enhance your cooking experience, and don’t miss out on seasonal variations that highlight fresh produce throughout the year.

Join the Conversation

We’d love to hear about your experiences with this Gourmet Meatballs with Rich Mushroom Gravy recipe! Share your photographs, provide feedback, and engage with the community through social media. Together, we can inspire more culinary adventures and discover delicious variations.

The Recipe

Gourmet Meatballs with Rich Mushroom Gravy

Serves: 4

Prep Time: 20 mins

Cook Time: 30 mins

Total Time: 50 mins

Kitchen Equipment Needed

  • Mixing bowl
  • Skillet
  • Measuring tools
  • Spatula
  • Meat thermometer

Ingredients

  • 1 lb ground beef
  • 1/2 lb ground pork
  • 1/2 cup breadcrumbs
  • 1/4 cup milk
  • 1 egg
  • 2 cloves garlic, minced
  • 1 tsp salt
  • 1/2 tsp black pepper
  • 1 tsp Italian seasoning
  • 8 oz mushrooms, sliced
  • 1 onion, chopped
  • 2 cups beef broth
  • 2 tbsp olive oil
  • Fresh parsley for garnish

Directions

  1. In a mixing bowl, combine ground beef, ground pork, breadcrumbs, milk, egg, garlic, salt, pepper, and Italian seasoning. Mix until just combined.
  2. Form the mixture into approximately 1-inch meatballs.
  3. Heat olive oil in a skillet over medium heat. Add meatballs and brown on all sides. Remove from skillet and set aside.
  4. In the same skillet, add onions and mushrooms. Sauté until softened. Pour in beef broth, scraping the bottom of the pan for flavor.
  5. Return the meatballs to the skillet, cover, and let simmer for 15-20 minutes.
  6. Adjust seasoning if needed, and garnish with fresh parsley before serving.

Recipe Notes

  • For extra flavor, add grated parmesan cheese to the meat mixture.
  • Feel free to substitute any ground meat for the beef and pork.
  • This dish pairs well with spaghetti or mashed potatoes.

Hearty Beef Barley Soup Recipe for Cozy Comfort Food

Hearty Beef Barley Soup: Comfort in Every Spoonful

⚖️
Difficulty
Moderate

⏲️
Prep Time
15 mins

🕒
Cook Time
1 hr 30 mins

⏱️
Total Time
1 hr 45 mins

🍽️
Servings
6 servings

Warm, nourishing, and brimming with flavor, this Beef Barley Soup is the perfect dish to enjoy on a chilly day. Rich beef broth combines with tender chunks of beef, plump barley grains, and a medley of fresh vegetables to create a hearty meal that comforts the soul. The balance of protein and fiber in this stew not only makes it delicious but also satisfying, ensuring that every bowl leaves you feeling nourished and content.

What sets this Beef Barley Soup apart is its incredible depth of flavor. With every spoonful, you’ll experience the savory notes from the beef, enhanced by aromatic herbs and spices. The barley adds a unique chewiness that contrasts beautifully with the tender vegetables, creating a symphony of textures. Whether you’re serving it for a family dinner or a cozy night in, this soup is sure to please and leave everyone asking for seconds!

Quick Recipe Highlights

  • Flavor Profile: Savory beef flavor combined with earthy herbs and a hint of garlic gives this soup a robust taste.
  • Texture: The barley lends a delightful chewiness while the beef remains tender and juicy, creating a satisfying mouthfeel.
  • Aroma: The smell of simmering beef, fresh vegetables, and fragrant herbs will fill your kitchen and invite everyone to the table.
  • Visual Appeal: The rich golden-brown broth, flecks of vibrant vegetables, and soft grains of barley make this soup an enticing dish.
  • Skill Level Needed: This recipe is moderate in difficulty, as it requires some knife skills and understanding of simmering techniques.
  • Special Equipment: A sturdy pot or Dutch oven is essential for proper cooking and to achieve that deep, flavorful broth.

Recipe Overview

  • Difficulty Level: This Beef Barley Soup comes with a moderate level of difficulty. It involves browning beef and lengthy simmering, both of which require attention to detail for the best flavor development.
  • Category: This dish falls under the category of soups and stews, perfect for a warming meal on cold days.
  • Cuisine: Beef Barley Soup has roots in Eastern European cuisine, where hearty, warming dishes are the staples of family meals.
  • Cost: With affordable ingredients like beef, barley, and seasonal vegetables, this soup is budget-friendly while providing great flavor and nourishment.
  • Season: Ideal for autumn and winter, this soup brings warmth and comfort during the colder months.
  • Occasion: Beef Barley Soup is great for family dinners, meal prep, or even festive gatherings where comfort food is a necessity.

Why You’ll Love This Recipe

This soup is a delightful balance of taste and texture that everyone will love. The robust flavors meld together beautifully, resulting in a savory broth that warms the soul. It’s perfect for cozy nights and comforting dinners. The tenderness of the beef, paired with the chewiness of the barley and the freshness of the vegetables, creates an irresistible dish that you’ll be eager to share.

Aside from its delightful taste, the convenience of this Beef Barley Soup is a standout feature. It can be made in large batches, perfect for meal prep or family nights when you want to ensure plenty of leftovers. You can prepare it in advance, reheat it, and enjoy the same comforting flavors all week long without extra effort. Just make sure to let everyone know to expect seconds!

This hearty soup offers nutritional advantages, packing in protein from the beef and fiber from the barley and vegetables. It serves as a wholesome meal that can satisfy hunger without needing excessive calories. This ensures you have a well-rounded meal that you feel good about feeding your family.

Socially, this recipe is fantastic for gatherings. It promotes sharing and togetherness, offering a meal that everyone can enjoy equally. The aromatic scent draws people to the kitchen, creating an inviting atmosphere where stories can be shared over warm bowls of soup.

In terms of cost, this recipe is highly accessible. The ingredients are typically inexpensive, especially if you buy in bulk or seasonal. This allows you to enjoy a delicious, nourishing meal without straining your budget, making it a practical choice for any household.

Historical Background and Cultural Significance

Beef Barley Soup has its origins in Eastern Europe, where farmers and families relied on hearty meals that could sustain them through the long, harsh winters. This soup not only provided nourishment but also a sense of community, as families gathered around the table to share a warm bowl together.

Culturally, the soup represents comfort and tradition, often being passed down through generations of families. It reflects a time when food was prepared with love and shared, creating bonds between those who ate it together. Over the years, various cultures have adopted and adapted the recipe, adding local spices, or vegetables, enriching the soup with different flavors and character.

As the recipe evolved, regional variations emerged. Some might add mushrooms for an umami boost, while others incorporate root vegetables or spices to give it a unique twist. This adaptability showcases how a simple recipe can bring people together and remain relevant in diverse culinary traditions.

Today, Beef Barley Soup is celebrated not only for its flavor and nutritional benefits but also for its story—one that is steeped in cultural heritage and familial love. It continues to be a favorite among home cooks seeking to connect with tradition while enjoying a satisfying meal.

Ingredient Deep Dive

Beef: The star of the soup, beef provides protein and richness. Opt for cuts like chuck or brisket for their ideal fat content. These tougher cuts become tender after slow cooking, adding depth to the broth. Storage in the refrigerator for a few days is ideal, but can also be frozen for longer preservation. If needed, substitutes can include lean cuts, although they might alter the soup’s richness.

Barley: Barley isn’t just a traditional grain; it’s incredibly nutritious, containing fiber and essential nutrients. It acts as a thickener, giving the soup its hearty consistency. When selecting barley, choose hulled or pearl barley for tenderness. Store in a cool, dry place, and if necessary, it can be replaced with quinoa or farro, though cooking times may vary.

Vegetables: Carrots, celery, and onions form the mirepoix, bringing sweetness and flavor. Freshness in preparation directly impacts the flavor, so opt for seasonal, vibrant produce. Properly store them in the refrigerator, and for substitutes, consider adding bell peppers or peas for variety.

Herbs and Spices: Fresh herbs like thyme and bay leaves enhance the aromatic quality of the soup. They hold historical significance in cooking, often used to impart flavor in dishes over time. Always use fresh herbs when possible; if needed dried herbs can be used but in smaller quantities.

Common Mistakes to Avoid

  • Skipping the Browning Step: Not browning the beef before adding it to the soup can lead to a lack of depth in flavor. Browning creates a rich base that elevates the soup.
  • Adding Barley Too Early: If you add the barley too soon, it can become overly mushy. Instead, add it in the last 30-40 minutes of cooking to ensure it retains its texture.
  • Overcooking Vegetables: Cooking vegetables for too long can result in them losing their texture and flavor. Add hearty vegetables like carrots at the right time to maintain a slight crunch.
  • Using Low-Quality Broth: Stock or broth provides the backbone of this soup. Using low-quality or overly salty broth can detract from the overall flavor. Opt for homemade or good-quality broth whenever possible.
  • Neglecting to Skim the Foam: During simmering, foam may develop. Skim this off for a clearer and more pleasant broth.
  • Not Tasting as You Go: Failing to taste the soup during cooking means you may miss out on adjusting flavors. Regular tasting helps achieve the desired balance.
  • Cooking at High Heat: A common mistake is cooking the soup on high heat. This can lead to tough meat and uneven cooking. Slow and steady is key.
  • Overseasoning: It’s important to season as you go, but avoid dumping all the salt and pepper at once; this can make the soup too salty. Season gently and adjust later.

Essential Techniques

Browning Meat: Browning the beef is crucial for enhancing flavor through the Maillard reaction. To master this, ensure your pot is hot enough to sear the meat without boiling. Look for a golden crust before removing the beef, which indicates a successful browning.

Simmering: Simmering transforms the ingredients, allowing the flavors to meld beautifully. To achieve it, bring your soup to a gentle boil then reduce heat until tiny bubbles rise. Watch for signs of bubbling; too vigorous can lead to toughness, while too little can undercook.

Knife Skills: Proper chopping of vegetables ensures even cooking. To master this, practice uniform cuts; this not only improves presentation but also ensures they cook uniformly. Gauge doneness by testing with a fork.

Deglazing: After browning the meat, deglazing with broth lifts flavorful browned bits from the pot. It’s essential for flavor depth; simply add broth and scrape while simmering. A good deglaze results in a richer soup.

Pro Tips for Perfect Beef Barley Soup

1. Always start with quality beef to ensure a rich and satisfying flavor throughout the soup. Cut against the grain for the most tender bites.

2. Use a mix of fresh herbs for a more complex flavor profile. Thyme and bay leaves are staples, but don’t hesitate to bring in rosemary or parsley for variety.

3. To enhance the broth, consider adding a splash of red wine after browning the meat and before adding the broth to give extra depth.

4. If time allows, let the soup sit for an hour after cooking. This rest period allows the flavors to meld and develop, making the soup even better.

5. When reheating leftovers, add a splash of water or broth to maintain the soup’s consistency, as it may thicken in the fridge.

6. If you’re planning to freeze leftovers, consider omitting the barley from the soup. Adding it fresh when reheating ensures optimal texture.

7. Use a slow cooker for this recipe if you prefer a hands-off approach. Browning the ingredients on the stovetop first, then transferring to a slow cooker can develop flavors beautifully.

8. Experiment with garnishing fresh herbs or a sprinkle of grated parmesan before serving for a touch of elegance and added flavor.

Variations and Adaptations

Regional variations of Beef Barley Soup often intrude delightful twists. For instance, adding mushrooms brings a wonderful umami quality that complements the beef beautifully. In autumn, throwing in seasonal squash or pumpkin can lend a hint of sweetness and vibrant color.

For dietary preferences, consider a gluten-free version using quinoa in place of barley. It retains a similar texture, making it just as satisfying. Additionally, swapping in lentils can introduce a plant-based protein that’s both hearty and nutritious.

Serving styles can also vary; consider presenting the soup in a bread bowl for a delightful twist. The bread absorbs the delicious broth, adding to the experience of enjoying every last bite. You can also serve it beside a fresh green salad or crusty bread for a balanced meal.

Seasonal adaptations can enhance flavors—try experimenting with fresh herbs available in your garden during the summer months or adding fresh peas for a touch of sweetness. The possibilities are endless!

Serving and Presentation Guide

For an appealing presentation, serve the soup in wide bowls to showcase its rich, colorful ingredients. Consider garnishing with freshly chopped parsley or a sprinkle of black pepper to enhance visual appeal. Accompany with crusty bread, ideally artisanal, for dipping and enjoying the broth.

Temperature is essential; serve the soup hot, ensuring the flavors are vibrant. For portion control, consider serving smaller bowls and allowing guests to return for refills rather than overwhelming them at once.

For a modern touch, serve the soup alongside a fresh side salad dressed lightly with vinaigrette. This creates a well-rounded meal with contrasting textures and flavors.

Lastly, encourage guests to top their soup with a dollop of sour cream or a splash of vinegar, which can balance the richness of the broth wonderfully.

Wine and Beverage Pairing

Beef Barley Soup pairs beautifully with a medium-bodied red wine, such as a Merlot or Pinot Noir, which complements the savory flavors without overpowering them. Serve it slightly chilled to enhance the experience.

For non-alcoholic options, a robust grape juice or sparkling water with a squeeze of lemon can be refreshing and pairs well with the meal’s hearty elements.

If coffee or tea is more your style, a rich coffee would work well, while a medium-strength black tea can also provide a complimentary taste profile. Just ensure both beverages are served brewed hot for an optimal experience!

Storage and Shelf Life

To ensure lasting flavors, store leftover Beef Barley Soup in an airtight container in the fridge for 3-4 days. Divide portions to make reheating easier later. Ensure it cools before refrigerating to maintain quality.

For longer storage, consider freezing the soup. Divide it into freezer-safe containers for individualized servings. This allows you to enjoy a bowl at a moment’s notice. Defrost in the fridge overnight and reheat gently for the best results.

Watch for signs of spoilage, such as off smells or discolored ingredients. If you observe any changes in color or texture after prolonged storage, it’s best to err on the side of caution and discard.

When reheating, do so gently on the stove, adding a splash of water or broth as needed to restore consistency. Always ensure the soup reaches a safe serving temperature before enjoying again!

Make Ahead Strategies

This Beef Barley Soup is an excellent candidate for make-ahead meals. Prepare the broth and base ingredients a day in advance; the flavors develop beautifully when they sit overnight. Store separately until ready to simmer with the barley just before serving.

After cooking, allow the soup to cool before storing it in the refrigerator. This will enhance the flavors and make it easier to serve the next day. When reheating, remember to add fresh herbs for a pop of flavor.

If you plan to assemble later, consider pre-chopping vegetables and marinating the beef in herbs overnight. This prep reduces time in the kitchen and maximizes flavor development.

Finally, consider adding fresh elements like spinach or herbs just before serving to retain their color and nutritional value.

Scaling Instructions

If you need to adjust quantities, this Beef Barley Soup scales beautifully. To halve the recipe, simply use the same proportions, ensuring you still follow timing for cooking to maintain flavor balance.

To double or triple the recipe, use a larger pot to accommodate increased volume. You may need to adjust the simmering time slightly for optimum flavor extraction as larger batches may take longer to reach appropriate temperatures.

Keep an eye on the soup during simmering; more significant amounts require careful monitoring to avoid overcooking. For any adjustments, rely on taste often to ensure it remains delicious!

Make sure to consider your storage plan, as larger batches will require more containers. Utilize the freezer effectively, allowing you to store excess portions in manageable sizes for future meals.

Nutritional Deep Dive

This Beef Barley Soup provides a nourishing blend of macronutrients, making it a wholesome choice. The beef offers a significant source of protein, essential for muscle repair and maintenance, while the barley contributes complex carbohydrates and dietary fiber.

Additionally, a careful balance of vegetables introduces essential vitamins and minerals, aiding in wellness and immunity. The broth, flavored with herbs and spices, packs antioxidants that contribute to overall health.

For portion analysis, consider a standard serving of one generous cup as a single serving—ideal for most diets. Keep in mind that while hearty, moderation is crucial for overall caloric control, especially if paired with bread or other side dishes.

The inclusion of barley can also assist those focusing on weight management, as its high fiber content can promote satiety, keeping you fuller longer. Just be mindful of portion control and have balanced accompaniments!

Dietary Adaptations

This Beef Barley Soup can easily be adapted for various dietary preferences. For a gluten-free version, swap barley with quinoa or millet, both of which lend a similar texture without the gluten content.

For those needing dairy-free options, ensure that any garnishes, like sour cream, are omitted or replaced with cashew cream for a creamy touch—an excellent dairy alternative.

If you’re following a vegan diet, replace the beef with lentils or mushrooms to still deliver heartiness while retaining protein. Choose vegetable broth as a base, and pile in colorful veggies for nutritional variety.

Low-carb dieters can utilize cauliflower rice or shredded zucchini instead of barley, offering a lighter, yet still delicious option. Be sure to adjust cook times as necessary to accommodate these ingredients.

Troubleshooting Guide

Too Salty: If your soup turns out too salty, add a diced potato during cooking—it’ll absorb some of the excess saltiness. Be sure to remove it before serving!

Too Thick: If the soup thickens too much during storage or cooking, simply add a splash of broth or water while reheating to attain the desired consistency.

Flavor Lacking: If flavors are muted, consider enhancing it with a dash of vinegar or a squeeze of lemon just before serving to brighten the dish.

Vegetables Overcooked: If the vegetables turn mushy, add fresh ones as a garnish during serving for texture, or serve alongside for contrast.

Recipe Success Stories

Many home cooks have celebrated the comforting flavors of this Beef Barley Soup. Readers praise its heartiness and the ability to feed a crowd, making it a staple for family gatherings and chilly days.

Variations abound, with individuals sharing success stories of adjustments made, such as using leftover roast beef or adding different spices for personal flair. Each adaptation showcases the recipe’s versatility, proving it’s a canvas on which to create and experiment.

Engaged readers often mention the joy of serving it at “soup night” events, leading to shared experiences and photograph-worthy moments captured around the table.

Photography tips have also emerged from community members, with many highlighting the importance of natural light for capturing the vibrant colors of this delicious dish.

Frequently Asked Questions

1. Can I freeze Beef Barley Soup? Absolutely! This soup freezes well, but it’s best to add the barley when you reheat it, to retain its texture.

2. How long can I store leftovers? Leftovers can be stored in the fridge for 3-4 days. Just ensure they’re in an airtight container.

3. What can I use instead of beef? For a vegetarian twist, try lentils or mushrooms instead, paired with vegetable broth.

4. Is this soup gluten-free? Traditional barley contains gluten, but you can substitute it with quinoa or millet to make it gluten-free.

5. How can I make it spicier? Add crushed red pepper flakes or a dash of hot sauce while it’s simmering for a delightful kick.

6. Can I make this in a slow cooker? Yes! Brown the beef first, then cook on low for 6-8 hours. Add barley for the last hour.

7. What’s a good side dish? Crusty bread or a fresh salad pairs beautifully with Beef Barley Soup.

8. How do I know when the beef is tender? The beef should easily break apart with a fork when it’s properly cooked.

9. Can I add beans to the recipe? Yes! Adding beans can boost fiber and protein; just adjust the cooking time accordingly.

10. What’s the origin of Beef Barley Soup? It has roots in Eastern European cuisine, where hearty soups have long been a staple for comfort and nutrition.

Additional Resources

For further cooking guides, check out our technique resources covering knife skills, browning meat, and simmering essentials. If you loved this recipe, consider trying other hearty soups such as Chicken Noodle or Lentil Soup.

Equipment recommendations include sturdy Dutch ovens for even cooking or high-quality knives for precision in chopping. Seasonal variations enhance flavors, so look out for produce specials to keep your meals fresh and exciting!

Join the Conversation

We encourage readers to share their successes and variations of this Beef Barley Soup. Join us on social media to connect—post your images, share your thoughts, and discuss improvements or personal twists you’ve made. Each story enriches our community.

Feedback and suggestions are essential; feel free to comment below or reach out with questions. Every bowl tells a story—what’s yours?

The Recipe

Beef Barley Soup

Serves: 6 servings

Prep Time: 15 mins

Cook Time: 1 hr 30 mins

Total Time: 1 hr 45 mins

Kitchen Equipment Needed

  • Large pot or Dutch oven
  • Cutting board
  • Knife
  • Wooden spoon or ladle
  • Cup measuring tools

Ingredients

  • 2 pounds beef (chuck or brisket), cubed
  • 1 cup pearled barley
  • 3 carrots, diced
  • 2 stalks celery, diced
  • 1 onion, chopped
  • 4 cloves garlic, minced
  • 8 cups beef broth
  • 2 bay leaves
  • 1 teaspoon thyme
  • Salt and pepper to taste
  • Fresh parsley for garnish

Directions

  1. In a large pot or Dutch oven, brown the beef cubes over medium-high heat. Remove and set aside.
  2. Add onions, carrots, celery, and garlic to the pot, and sauté for about 5 minutes until softened.
  3. Return beef to the pot and add beef broth, bay leaves, and thyme. Bring to a simmer.
  4. Cover, reduce heat, and let it simmer for about 1 hour.
  5. Add barley to the pot and stir; cook for an additional 30-40 minutes until barley is tender.
  6. Season with salt and pepper to taste. Remove bay leaves before serving.
  7. Garnish with fresh parsley and serve hot.

Recipe Notes

  • For extra flavor, add a splash of red wine after browning the meat.
  • Adjust seasoning to personal preference, adding more herbs as desired.
  • This soup can be made ahead and tastes even better the next day!

Hearty Beef Vegetable Soup: Comfort in Every Spoonful

Hearty Beef Vegetable Soup: A Comforting Classic

⚖️
Difficulty
Easy

⏲️
Prep Time
20 mins

🕒
Cook Time
1 hour

⏱️
Total Time
1 hour 20 mins

🍽️
Servings
6 servings

Beef Vegetable Soup is a beloved classic that brings warmth and comfort to any meal. Packed with nutritious vegetables and tender beef, this soup is not just hearty, but also filling and delicious. Imagine the fragrance of savory beef mingling with fresh herbs, complementing vibrant vegetables, and simmering in a rich broth. This dish is not only satisfying, but it also creates a sense of nostalgia, making it an excellent choice for family dinners or gatherings with friends.

The beauty of this Beef Vegetable Soup lies in its versatility. You can customize it with your favorite seasonal vegetables or let the ingredients you have on hand inspire your creation. Each bowl is filled with colorful veggies, succulent beef chunks, and a flavorful broth that warms the soul. With the first spoonful, you’ll feel connected to the heart of home cooking, embracing the comfort that only a bowl of soup can provide.

Quick Recipe Highlights

  • Flavor Profile: A perfect blend of savory beef, earthy vegetables, and aromatic herbs creates a comforting and satisfying experience.
  • Texture: The tender beef complements the crunch of fresh vegetables, providing a delightful contrast that enhances the enjoyment with every bite.
  • Aroma: The fragrance of slow-simmered broth infused with herbs fills your kitchen, inviting everyone to come together for a warm meal.
  • Visual Appeal: The vibrant colors of carrots, peas, and potatoes make the soup visually appealing and appetizing.
  • Skill Level Needed: This is an accessible recipe suitable for beginner cooks looking to explore the joys of hearty soups.
  • Special Equipment: A large pot or Dutch oven is ideal for creating this comforting dish efficiently and thoroughly.

Recipe Overview

  • Difficulty Level: This Beef Vegetable Soup is easy to prepare, making it perfect for both novice cooks and seasoned chefs looking for a quick meal.
  • Category: It serves as an excellent main course, ideal for lunch or dinner any day of the week.
  • Cuisine: Influenced by home-cooked traditions, this soup reflects comfort food at its finest, commonly found in various culinary cultures worldwide.
  • Cost: Generally budget-friendly, the ingredients can be sourced at local markets without breaking the bank.
  • Season: Enjoy this soup year-round, utilizing seasonal vegetables to enhance its freshness and flavor.
  • Occasion: Perfect for cozy family nights, holiday gatherings, or even potluck dinners, this soup brings everyone together.

Why You’ll Love This Recipe

The taste and texture of Beef Vegetable Soup make it a crowd-pleaser. The juicy, tender beef pairs harmoniously with a medley of vegetables like carrots, celery, and potatoes, creating a satisfying and flavorful dish. As you savor each spoonful, the warmth and heartiness keep you coming back for more.

Convenience is another reason to love this recipe. With just a few simple steps, you can have a pot of delicious soup simmering on the stove. Perfect for busy weeknights, or you can prepare a large batch ahead for meal prep. The leftovers taste even better the next day, making it a great dish for busy days.

Nutritionally, this soup is packed with vitamins and minerals from the vegetables and protein from the beef. A bowl is not only satisfying but also a wholesome way to nourish your family, ensuring everyone gets their daily intake of nutrients.

Gathering around a pot of Beef Vegetable Soup creates a sense of community and warmth. It’s an excellent dish for sharing, whether with friends or family, inviting conversation and connection over a comforting meal.

Lastly, the cost-effectiveness of this recipe can’t be overlooked. Utilizing affordable ingredients, it’s simple to feed a crowd without overspending. Plus, making your own soup at home allows you to control the ingredients and avoid preservatives found in store-bought options.

Historical Background and Cultural Significance

Beef Vegetable Soup has its roots in traditional comfort food, appreciated across various cultures for its heartiness and rich flavors. Historically, families utilized leftover meats and seasonal vegetables to create a dish that would stretch their food supply, making it both economical and nourishing. Orthodox and seasonal adaptations often arose, from Italian minestrone to hearty Irish stews, all embodying the spirit of home-cooked meals.

Culturally, this soup holds a significant place in many households as a communal dish. It’s not just about sustenance; it embodies family gatherings and shared moments, capturing the essence of nurturing and comfort. The act of sharing a bowl of soup represents hospitality, making it a staple for welcoming guests or celebrating occasions.

As time has progressed, the recipe has evolved. Various adaptations have incorporated different meats and spices, reflecting regional tastes and available ingredients. This evolution speaks to the dynamism of home cooking, allowing personal touches while maintaining the comfort that the dish is known for.

In terms of regional variations, Beef Vegetable Soup finds a unique expression in many places. Each community adapts the recipe using local vegetables and spices, ensuring that every bowl tells a story of its cultural influence and the ingredients at hand.

Ingredient Deep Dive

  • Beef: A staple protein, beef provides essential nutrients like iron and protein, helping to build muscles and maintain energy. When selecting beef for soup, opt for tougher cuts, like chuck roast, which become tender when cooked slowly. Store beef in the refrigerator for up to three days or freeze for longer storage. If you’re looking for alternatives, turkey or chicken can also work well.
  • Carrots: A common soup add-in, carrots offer sweetness and color, along with beta-carotene for eye health. Look for firm carrots with a rich color, and store them in a cool, dry place. If you need a substitute, parsnips can provide a similar texture with a slightly different flavor.
  • Celery: This vegetable adds crunch and a mild flavor, balancing the richness of the beef. Nutritionally, celery is low in calories and high in hydration. Choose fresh, bright green stalks; they should feel firm and crisp. You can replace celery with bell peppers if desired.
  • Potatoes: Potatoes give bulk and heartiness to soup, enhancing the filling nature of the dish. High in potassium and vitamin C, they’re a nutritious choice. Select potatoes that are smooth and firm, without any sprouts. Sweet potatoes or squash can provide a different twist on this classic recipe.

Common Mistakes to Avoid

  • Overcooking the vegetables: While you want them tender, mushy vegetables can ruin the texture. Be mindful of cooking times.
  • Using lean cuts of beef: Lean cuts will not yield the tenderness and flavor that fatty cuts offer when slow-cooked.
  • Skip seasoning: Don’t forget to season the broth well; underseasoned soup can taste bland and uninviting.
  • Neglecting to brown the beef: This creates a rich depth of flavor that elevates your soup.
  • Not letting it simmer: A shorter cooking time limits the flavors from developing; be patient and allow it to simmer fully.
  • Adding cold ingredients: Ensure that all ingredients are at room temperature before adding them to the pot for even cooking.
  • Piling too many ingredients: Keep it simple; a cluttered soup can lose its individual flavors.
  • Skipping the herbs: Fresh herbs can significantly elevate the flavor profile of your soup.

Essential Techniques

  • Browning the meat: This technique builds flavor through the Maillard reaction. To master it, ensure your pot is hot before adding beef; avoid overcrowding to achieve a good sear. Look for a deep brown color on the meat for success.
  • Simmering: Simmering gently extracts flavors without boiling the broth away. Master this by adjusting the heat—if bubbles break the surface, it’s too hot. A slow bubble is perfect for achieving soft textures.
  • Chopping vegetables: Uniform cuts ensure even cooking. Invest time in mastering the dice and julienne techniques for presentation and texture. Visually, cuts should be consistent in size for an appealing finish.
  • Layering flavors: Start with aromatics (like onions and garlic) before adding other ingredients for depth. Add spices early to release their oils and maximize their impact throughout cooking.

Pro Tips for Perfect Beef Vegetable Soup

  • Use bone-in beef for richer flavor—bones impart an additional depth to your broth.
  • Incorporate fresh herbs such as thyme or parsley at the end to brighten the flavor.
  • To thicken the soup, mash a few potatoes once cooked, then stir them back in.
  • For an umami boost, add a splash of Worcestershire sauce or soy sauce during the simmer.
  • Ensure your broth is flavorful—homemade broth is best for an authentic taste.
  • Adjust the consistency by adding more broth or water if your soup is too thick.
  • Top with a dollop of sour cream or some shredded cheese for a creamy finish.
  • Let the soup sit for an hour before serving; this allows the flavors to meld beautifully.

Variations and Adaptations

  • Regional variations: Change the protein; for a Mexican twist, switch beef for chorizo and add corn and black beans.
  • Seasonal adaptations: Use seasonal vegetables like zucchini in summer or root vegetables in winter for freshness.
  • Dietary modifications: For a lighter option, you can make it with ground turkey or add more lentils for protein.
  • Flavor variations: Spice up with red pepper flakes or serve with a squeeze of lemon for brightness.
  • Texture modifications: If you prefer a smoother soup, blend a portion and return to the pot.
  • Presentation alternatives: Serve in bread bowls for a rustic feel or garnish with microgreens or croutons for added texture.

Serving and Presentation Guide

  • Plating techniques: Ladle soup carefully into deep bowls, allowing it to fill without spilling over.
  • Garnishing ideas: Sprinkle chopped parsley or chives on top for a pop of color and added flavor.
  • Traditional accompaniments: Serve with crusty bread or biscuits for a satisfying meal.
  • Modern serving suggestions: Consider offering a side salad for a refreshing balance to the soup.
  • Temperature considerations: Beef Vegetable Soup is best served piping hot; keep it warm until ready to serve.
  • Portion control tips: Use measuring cups if serving at a gathering to maintain even portions.

Wine and Beverage Pairing

  • Wine pairings: A full-bodied red wine like Cabernet Sauvignon pairs wonderfully with the rich flavors of beef.
  • Non-alcoholic alternatives: Try a sparkling water with a lime wedge or a refreshing iced tea to cleanse the palate.
  • Coffee/tea pairings: A robust black tea can balance the hearty flavors, enhancing your meal experience.
  • Temperature considerations: Serve wine lightly chilled to maintain its refreshing qualities alongside a warm soup.
  • Serving suggestions: Offer wine in elegant glasses to elevate your dining experience when enjoying the soup.

Storage and Shelf Life

  • Storage methods: Cool the soup completely before transferring it to airtight containers for storage.
  • Temperature requirements: Refrigerate leftovers and consume within 3–4 days or freeze for longer storage options.
  • Container recommendations: Use glass or BPA-free plastic containers; glass allows you to reheat directly.
  • Signs of spoilage: If the soup develops an off-smell, discoloration, or any mold, discard it immediately.
  • Reheating instructions: Reheat on the stove over medium heat, stirring until heated through, or microwave until boiling.
  • Freezing guidelines: Label containers with dates to track freshness; thaw in the refrigerator overnight before reheating.

Make Ahead Strategies

  • Prep timeline: Chop the vegetables and marinate the beef one day in advance for maximum flavor.
  • Storage between steps: Store ingredients separately until you are ready to cook to maintain freshness.
  • Quality impact assessment: Preparing soup a day ahead enhances the flavors as they meld overnight.
  • Assembly tips: Gather all ingredients beforehand to expedite the cooking process and simplify your workflow.
  • Reheating guidelines: If you’ve made the soup ahead of time, ensure it’s heated gently to preserve the texture.
  • Fresh element additions: Add fresh herbs just before serving to elevate the soup and add new flavors.

Scaling Instructions

  • Halving the recipe: For smaller servings, simply divide all ingredients in half while maintaining cooking times.
  • Doubling or tripling: Increase ingredient quantities accordingly and adjust pot size to accommodate more volume.
  • Equipment adjustments: Ensure that your pot is large enough to handle increased portions for even cooking.
  • Timing modifications: Larger batches may require longer simmering times to achieve tenderness.
  • Storage considerations: Consider portioning into smaller containers for freezing to make reheating easier later on.

Nutritional Deep Dive

  • Macro breakdown: Each serving offers a balance of carbohydrates, proteins, and healthy fats, making it a well-rounded meal.
  • Micronutrient analysis: The vegetables provide essential vitamins like A and C, supporting immune health and vision.
  • Health benefits: This soup promotes satiety, making it a great choice for maintaining healthy eating habits.
  • Dietary considerations: Full of nutrients while being low in calories, it’s beneficial during weight management.
  • Portion analysis: Keeping servings consistent helps control calorie intake while ensuring satisfaction.
  • Weight management tips: Pair it with a salad or veggies for a low-calorie, nutrient-dense meal option.

Dietary Adaptations

  • Gluten-free: This recipe is naturally gluten-free; just ensure your beef broth is gluten-free as well.
  • Dairy-free: The soup does not require dairy; enjoy it as is or enhance with dairy-free toppings.
  • Vegan: Substitute beef with lentils or mushrooms and vegetable broth to create a plant-based version.
  • Low-carb: Skip the potatoes or replace them with cauliflower for a lower-carb meal.
  • Keto: Use more high-fiber vegetables and choose fats like olive oil for added richness without compromising carb limits.
  • Paleo: Ensure all ingredients align with paleo standards, focusing on whole foods without preservatives.
  • Low-FODMAP: Use suitable vegetables and spices to manage symptoms associated with digestive sensitivities.
  • Other specific diets: Customize the soup to fit within different dietary lifestyles by being mindful of ingredient choices.

Troubleshooting Guide

  • Texture issues: If the soup is too thin, cook it uncovered for a bit to reduce liquid; if too thick, add water or broth gradually.
  • Flavor balance: If bland, consider adding more salt, herbs, or fresh ingredients to enhance the overall taste.
  • Temperature problems: Ensure your pot is adequately heated before adding ingredients; adjust heat as necessary during cooking.
  • Equipment challenges: If you lack a Dutch oven, a heavy-bottomed stock pot works perfectly for an even simmer.
  • Ingredient substitutions: Be resourceful with substitutes if you’re out of specific ingredients—most will work fine in this flexible recipe.
  • Timing concerns: If beef isn’t tender, increase simmering time while keeping an eye for doneness.

Recipe Success Stories

  • Community feedback: Readers have praised this soup for its simplicity and taste, often sharing their own adaptations and secret ingredients.
  • Variation successes: Many have enjoyed adding different vegetables and proteins, making it their own family favorite.
  • Adaptation stories: Families have created tradition around this soup, customizing it yearly for celebrations.
  • Reader suggestions: Numerous suggestions include adding unique spices for an adventurous twist that updates the classic recipe.
  • Photography tips: Stunning images have emerged showcasing this soup’s vibrant colors, encouraging others to try it themselves.

Frequently Asked Questions

Can I freeze Beef Vegetable Soup? Yes, it freezes well. Allow it to cool completely before transferring to airtight containers. It can be stored in the freezer for up to three months.

How do I make the soup spicier? You can add red pepper flakes, diced jalapeños, or hot sauce to the pot during cooking to increase the heat.

What vegetables work best in this soup? Carrots, potatoes, celery, and peas are classic choices, but feel free to incorporate any vegetables you enjoy or have on hand!

Can I add noodles to this soup? Absolutely! Add cooked noodles towards the end of cooking to avoid overcooking them. Egg noodles or whole grain options work great.

What if I don’t have beef broth? You can use vegetable or chicken broth as an alternative to create a lighter version.

How long does it take for the beef to become tender? Depending on the cut, beef usually takes around 1-1.5 hours to become tender when simmered properly.

Is this soup good for meal prep? Yes, it’s perfect for meal prep and tastes even better the next day as the flavors meld together.

What’s the best way to reheat the soup? Heat the soup gently on the stovetop or in the microwave until hot. Stir occasionally for even heating.

Can I make this soup in a slow cooker? Yes! Brown the beef first, then add all ingredients into the slow cooker and cook on low for 6-8 hours or high for 4-5 hours.

What herbs should I add for flavor? Fresh herbs such as thyme, parsley, or bay leaves can enhance the flavor of the soup tremendously.

How can I thicken Beef Vegetable Soup? Simmering uncovered helps reduce liquid, or you can mash some potatoes into the soup for a thicker texture.

Additional Resources

  • Related recipes: Explore other comforting soup recipes like Chicken Noodle Soup or Vegetable Lentil Soup for more variations.
  • Technique guides: Check out guides on how to chop vegetables efficiently or how to properly season your meals.
  • Ingredient information: Dive deeper into the nutritional benefits of root vegetables or the best cuts of beef for soup.
  • Equipment recommendations: Invest in quality knives and pots that will elevate your cooking experience.
  • Seasonal variations: Discover recipes that highlight seasonal produce, ensuring freshness and flavor throughout the year.

Join the Conversation

  • Social media sharing: Share your Beef Vegetable Soup experiences on social media, tagging friends and inspiring them to participate.
  • Photography tips: Take captivating photos of your soup and share your creations with the community, inspiring others to try the recipe.
  • Recipe reviews: Leave feedback on how the recipe turned out for you; your experience can guide others in their cooking journey.
  • Community engagement: Engage with others by sharing substitutes and variations you’ve tried, creating a communal cooking experience.
  • Recipe variations: Post about your unique takes on the recipe, showcasing regional ingredients and personal touches.

The Recipe

Beef Vegetable Soup

Serves: 6 servings

Prep Time: 20 mins

Cook Time: 1 hour

Total Time: 1 hour 20 mins

Kitchen Equipment Needed

  • Large pot or Dutch oven
  • Cutting board
  • Sharp knife
  • Measuring cups and spoons
  • Wooden spoon or spatula

Ingredients

  • 1 lb beef chuck roast, cut into 1-inch cubes
  • 2 tablespoons olive oil
  • 1 large onion, diced
  • 3 cloves garlic, minced
  • 3 carrots, sliced
  • 2 celery stalks, sliced
  • 3 potatoes, diced
  • 1 cup peas (fresh or frozen)
  • 6 cups beef broth
  • 1 teaspoon dried thyme
  • 1 bay leaf
  • Salt and pepper to taste

Directions

  1. In a large pot, heat olive oil over medium heat. Add the beef and brown on all sides.
  2. Add onion and garlic, cooking until softened.
  3. Stir in carrots, celery, and potatoes. Cook for a few minutes until vegetables begin to soften.
  4. Add the beef broth, thyme, bay leaf, salt, and pepper. Bring to a boil.
  5. Reduce heat and let it simmer for about 1 hour until the beef is tender and vegetables are cooked through.
  6. Last 5 minutes of cooking, add in peas and stir to combine.
  7. Remove bay leaf and serve hot with your favorite crusty bread.

Recipe Notes

  • Feel free to add any vegetables you have on hand.
  • This soup can be made ahead of time and reheats well.

Indulge in Luxurious Seafood Bisque with Crab, Shrimp, and Lobster

Seafood Bisque: A Luxurious Blend of Crab, Shrimp, and Lobster

⚖️
Difficulty
Medium

⏲️
Prep Time
30 mins

🕒
Cook Time
60 mins

⏱️
Total Time
90 mins

🍽️
Servings
4 servings

Experience the rich, velvety texture of our Seafood Bisque—perfectly blending the tastes of crab, shrimp, and lobster into a decadent soup that warms the soul. From the first spoonful, the bisque captivates your senses with its creamy consistency and luxurious flavors. Infused with aromatic spices and herbs, each bite is a delightful journey, evoking memories of seaside dinners and gourmet bistros.

This Seafood Bisque not only delights the palate but also brings the ocean’s bounty to your table. Its rich and savory essence is elevated by a touch of sherry, perfectly balancing the sweetness of the seafood. Ideal for a cozy dinner or an elegant gathering, this recipe shines in its simplicity and sophistication, delivering comfort with an air of elegance.

Quick Recipe Highlights

  • Flavor Profile: This bisque showcases the sweet, succulent flavors of crab, shrimp, and lobster, enhanced by a savory base of broth and aromatic vegetables.
  • Texture: The creamy bisque offers a rich and smooth mouthfeel, with tender pieces of seafood providing delightful contrast.
  • Aroma: The enticing aroma of simmering seafood and fresh herbs fills the kitchen, creating an inviting atmosphere.
  • Visual Appeal: The bisque presents beautifully in a bowl, with vibrant flecks of seafood against the creamy backdrop, garnished with fresh herbs.
  • Skill Level Needed: Suitable for home cooks with a moderate skill level, this recipe requires a knack for balancing flavors and textures.
  • Special Equipment: A high-quality blender or immersion blender is recommended for achieving the perfect creamy consistency.

Recipe Overview

  • Difficulty Level: This medium-difficulty recipe requires basic cooking techniques like sautéing and simmering, making it accessible to most home cooks.
  • Category: Seafood Bisque falls into the soup category, specifically within the realm of gourmet dining.
  • Cuisine: With French and coastal influences, this bisque incorporates classic culinary techniques that highlight seafood.
  • Cost: While fresh seafood can be an investment, the overall cost is justifiable for a comforting dish that serves multiple people.
  • Season: Best enjoyed during the cooler months, when the warmth of the bisque is most comforting.
  • Occasion: Perfect for special occasions, elegant gatherings, or holiday dinners, Seafood Bisque elevates any event.

Why You’ll Love This Recipe

When the rich, savory taste of Seafood Bisque dances on your palate, it’s hard not to fall in love with this luxurious dish. Each spoonful transports you to a coastal paradise, filled with the sweet flavors of crab, shrimp, and lobster. The combination of these seafood marvels creates a symphony of flavors that is satisfying and indulgent, making it a perfect centerpiece for a dinner party or a comforting family meal.

Preparing this bisque is a rewarding endeavor. The step-by-step process allows you to immerse yourself in the kitchen, from sautéing the aromatic vegetables to simmering the seafood in a harmonious broth. As the ingredients meld together, the kitchen fills with delightful aromas that are sure to make everyone eager to dig in. Plus, the option to blend the bisque provides a delightful textural experience, allowing you to customize smoothness to your preference.

The nutritional benefits of this Seafood Bisque are truly impressive. Packed with protein and omega-3 fatty acids from the seafood, it contributes to a well-balanced diet while delivering essential nutrients. Additionally, the presence of vegetables like onions, carrots, and celery contributes fiber and vitamins, making the bisque feel even more wholesome.

In a social setting, serving Seafood Bisque can elevate your hosting game. It impresses guests with its sophisticated flavors and presentation, encouraging conversation and delight at the table. You’ll find that it becomes a memorable highlight of the meal, prompting requests for the recipe.

Lastly, while seafood might sometimes come with a higher price tag, preparing this bisque at home is often more economical than dining out. With the ability to serve several people at once, it’s an accessible luxury you can create in your kitchen without breaking the bank.

Historical Background and Cultural Significance

Seafood bisques have a rich history rooted in French culinary tradition, originally crafted by fishermen to make use of their freshest catches. The term “bisque” is thought to derive from the Spanish word “bizcocho,” referring to the toasting of crab shells used in its preparation. Over time, this method evolved, leading to the luxurious versions we enjoy today.

In coastal regions, the bisque symbolizes culinary heritage and a connection to the sea. It showcases local ingredients and reflects the ebb and flow of fishing traditions. The dish often represents celebration, making appearances during special occasions and gatherings where seafood is abundant.

Various adaptations of the bisque can be found, influenced by regional ingredients and trends. While the classic version highlights crab, others incorporate shellfish and different blends of fish, evolving alongside culinary innovations over the years. The combination of creaminess and seafood evokes feelings of nostalgia and comfort that resonate through generations.

From elegant restaurants to home kitchens, Seafood Bisque continues to adapt. It remains a staple on menus and a beloved dish for many, embodying warmth and sophistication that makes any meal feel special.

Ingredient Deep Dive

Crab: Crab not only offers a delightful sweetness to the bisque but also adds a touch of elegance. Rich in protein and omega-3 fatty acids, it contributes to heart health. When selecting crab meat, look for lump or backfin varieties for best texture. Fresh crab is ideal, but pasteurized crab can be a great time-saver. Store crab in the coldest part of your fridge and use it within a few days for optimal freshness.

Shrimp: Shrimp is a universal favorite due to its juicy texture and versatility. Packed with protein and low in calories, shrimp is a nutritious addition to any meal. Choose shrimp that are firm and odorless, with a glossy appearance. Properly store shrimp in the refrigerator and consume them within one to two days. Frozen shrimp are also an excellent option for convenience, ensuring you always have some on hand for spontaneous bisque cravings.

Lobster: Lobster brings an opulent flavor to this bisque, with its sweet, succulent meat elevating the overall dish. It is high in protein and low in fat, making it a guilt-free luxury. When purchasing lobster, choose live or fresh lobster tails for the best flavor. If you’re using frozen lobster, ensure it is thawed properly before cooking. Store live lobster in a cool, damp environment, and consume it promptly for the freshest flavor.

Common Mistakes to Avoid

  • Using frozen seafood: While frozen seafood can be convenient, fresh seafood yields the best flavor and texture for your bisque.
  • Not sautéing the vegetables properly: Sautéing releases flavors; undercooking can result in a bland soup.
  • Overcooking the seafood: Adding seafood too early can lead to a rubbery texture; it’s best to add it during the last few minutes of cooking.
  • Skipping the blending step: Blending ensures a creamy texture; skipping it leaves the bisque chunky.
  • Using low-quality broth: A rich broth is essential; use homemade or high-quality stock for maximum flavor.
  • Neglecting to season adequately: Seasoning is vital; taste as you go to avoid blandness.
  • Not allowing the flavors to meld: Allow the bisque to simmer adequately to ensure the flavors develop.
  • Ignoring garnishes: Beautiful garnishes enhance presentation; they also add freshness.
  • Improper storage of seafood: Always follow safe seafood handling guidelines to prevent spoilage.

Essential Techniques

Sautéing: This critical technique involves cooking ingredients in a small amount of fat over medium-high heat. It helps to release and develop flavors essential for the bisque. To master sautéing, use a heavy-bottomed pot and avoid overcrowding, which can lead to steaming instead of browning.

Simmering: Simmering is crucial for allowing flavors to meld. To achieve a perfect simmer, maintain a gentle bubbling and watch for ingredients to soften while developing a flavorful broth. It’s important to monitor closely to avoid boiling, which can dilute flavors.

Pro Tips for Perfect Seafood Bisque

1. Invest in good-quality seafood for an unbeatable flavor that shines.
2. Experiment with different herbs and spices for your personalized twist.
3. Always taste your bisque as it cooks to adjust seasoning appropriately.
4. For extra richness, consider adding a splash of cream at the end.
5. If you prefer a thicker bisque, let it simmer longer before blending.
6. Pair your seafood with complementary vegetables, like leeks or fennel.
7. For a sophisticated garnish, drizzle with truffle oil for enhanced flavor.
8. Serve alongside crusty bread or a fresh garden salad for a complete meal.

Variations and Adaptations

Seafood Bisque can be adapted in many delightful ways. For a regional twist, consider using local seafood options that cater to the area’s fishery. Seasonal adaptations, such as incorporating fresh spring vegetables like asparagus or peas, can lighten the bisque.

Dietary modifications are also easily achievable; for a dairy-free version, substitute cream with coconut milk or nut-based cream. If you’re looking to amp up the flavor, consider adding a splash of white wine or sherry during cooking for an added depth.

Texture modifications can also create variety; some may prefer a chunkier bisque with larger pieces of seafood, while others might enjoy the smooth consistency of a pureed version.

Lastly, for a creative presentation, serve in individual cups or bowls, garnished with microgreens or edible flowers, transforming this classic dish into an artistic delight.

Serving and Presentation Guide

Plating Seafood Bisque with care elevates its dining experience. Use shallow, wide bowls to showcase the creamy texture and garnishes. Fresh herbs like chives or parsley can brighten the dish visually and add a pop of color.

For garnishing, consider a dollop of crème fraîche or a drizzle of flavored oil to enhance flavor and presentation. Traditional accompaniments include freshly baked bread, which pairs wonderfully with the bisque.

Temperature is vital; serve the bisque hot but not boiling to improve the tasting experience. In terms of portion control, these bowls should comfortably serve 1-2 ladles of bisque, ensuring that each guest is well satisfied.

Wine and Beverage Pairing

When it comes to pairing beverages, a crisp white wine, such as Sauvignon Blanc or Chardonnay, works beautifully with Seafood Bisque. The acidity and light fruity notes balance the creaminess of the soup.

For those who prefer non-alcoholic options, sparkling water with a hint of lemon can provide a refreshing contrast. Alternatively, a light herbal iced tea adds an aromatic element that complements the bisque well.

If you enjoy coffee or tea, consider pairing with a delicate green tea or an herbal blend that accentuates the flavors of this exquisite dish. Always serve these beverages chilled or at optimal temperatures to enhance the overall dining experience.

Storage and Shelf Life

To maximize the shelf life of your Seafood Bisque, store it in an airtight container in the refrigerator promptly after it cools. It can typically last up to 3 days in the fridge. For longer storage, consider freezing the bisque; use freezer-safe containers and store it for up to 3 months.

Ensure the bisque is completely cooled before freezing to prevent ice crystals from forming. When reheating, do so gently on the stove, adding a splash of water or stock to restore its original creamy consistency. Signs of spoilage include a sour smell or odd texture, so it’s best to release and use your senses when judging freshness.

Make Ahead Strategies

To prepare a delightful Seafood Bisque ahead of time, focus on the base. You can cook the broth with vegetables and let it cool overnight in the refrigerator. The next day, simply blend it, add the seafood, and finish the cooking process.

When storing between steps, keep seafood separate until you’re ready to serve to preserve freshness. This will allow you to serve it freshly cooked, providing the best texture.

Consider how flavors develop over time; the bisque can taste even better the next day as the ingredients meld. When reheating, always do so at a gentle simmer to avoid overcooking.

Adding fresh herbs or a squeeze of citrus just before serving can brighten flavors and give the soup a fresh finish.

Scaling Instructions

Scaling your Seafood Bisque recipe can be easily done. If you’re looking to halve the recipe, simply divide the amounts for each ingredient. This is ideal for intimate dinners or smaller families.

When doubling or tripling the recipe, ensure your equipment is large enough to handle the increased volume. Opt for a larger pot to prevent overflow during cooking.

Timing adjustments are also crucial; while most cooking times will remain similar, you may need to account for longer heating times when dealing with larger quantities.

If not serving all at once, consider cooling and storing excess bisque promptly after cooking. This approach maximizes freshness while allowing you to enjoy leftovers later.

Nutritional Deep Dive

Seafood Bisque offers a rich macro breakdown, with a substantial amount of protein from the seafood and healthy fats from the cream. Each serving contains a balance of carbohydrates and fat, making it both filling and nutritious.

In terms of micronutrients, this bisque is rich in vitamins, such as B12 from shellfish and vitamin A from stock ingredients. Additionally, the vegetables contribute dietary fiber, promoting digestive health.

Health benefits are abundant; omega-3 fatty acids from seafood support cardiovascular health, while the vitamins and minerals contribute to overall wellness.

When analyzing portions, consider size and richness; a standard serving can be both satisfying and complement a well-balanced meal when served with side dishes.

Lastly, weight management tips suggest enjoying Seafood Bisque in moderation due to its rich ingredients while focusing on nourishing components like seafood and vegetables.

Dietary Adaptations

For gluten-free variations of Seafood Bisque, ensure all broths and seafood ingredients are labeled gluten-free. You can use alternative thickening agents like cornstarch or arrowroot powder for a gluten-free alternative to flour.

To create a dairy-free version, opt for coconut cream or almond milk instead of traditional dairy cream, providing a unique flavor twist while catering to lactose sensitivities.

Vegan adaptations, while more complex, can substitute seafood with mushrooms and hearty vegetables, using seaweed to impart a marine flavor.

Keto enthusiasts can embrace the high-protein, low-carb aspects of this dish by focusing on seafood and eliminating high-carb thickeners.

For Paleo dieters, maintain the use of whole ingredients and fresh seafood while avoiding dairy and grain-based thickeners for a healthy alternative.

Specific diets like Low-FODMAP may limit the types of onions or garlic, but alternatives such as shallots can add flavor without the discomfort.

Troubleshooting Guide

For texture issues, the prime consideration is the blending stage; ensuring that your bisque is puréed smoothly will resolve any grainy texture. If the bisque becomes too thick, add broth or water to reach the desired consistency.

Flavor balance is critical; if your bisque becomes too salty, incorporate additional cream or a sugar agent to mellow out the saltiness. Spicy elements can be balanced with cream, while acidity can be softened with sugar.

Temperature problems can arise if the bisque is boiling rapidly; reduce to a simmer for even cooking, preventing seafood from overcooking, which can result in rubberiness.

Equipment challenges often involve dealing with overflows or improper heating; ensure to select pots suited to the quantity of soup being made and monitor carefully.

Ingredient substitutions may alter flavors; when swapping seafood, be aware that less flavorful fish may require additional seasoning to balance.

Timing concerns can lead to overcooked seafood or underdeveloped flavors; always prepare vegetables and broth before adding seafood, judging the cooking time carefully.

Recipe Success Stories

Community feedback surrounding Seafood Bisque highlights how this dish can bring people together. Many readers commented on their successful adaptations, from adding their favorite spices to tailoring seafood quantities based on what they had at hand.

Several home cooks have shared beautiful photography of their Seafood Bisque creations, showcasing vibrant colors and appetizing garnishes that invite others to try their hand at this gourmet recipe.

Story adaptations abound, with families sharing traditions of cooking Seafood Bisque during holidays or as a special treat, making the recipe part of their customs.

Readers often exchange tips on how to make the soup their own, encouraging creativity and experimentation in the kitchen.

Photography insights reveal the importance of lighting and plating in creating mouthwatering images; capturing the elegance of this bisque can inspire others to dive into seafood cooking.

Frequently Asked Questions

Can I use frozen seafood for the bisque? Absolutely! Frozen seafood can be a convenient option; just ensure it is thawed properly before adding it to your bisque. Fresh seafood will enhance the flavors, but frozen can work well in a pinch.

How do I store leftovers? Store any leftover bisque in an airtight container in the refrigerator and enjoy within 3 days. You can also freeze it for longer storage.

Can I make this bisque without dairy? Yes! Substitute the cream with coconut cream or other non-dairy alternatives for a delicious and creamy texture without using dairy.

What can I substitute for crab in this recipe? If crab is unavailable, you can use additional shrimp or lobster. Alternatively, consider using crab-flavored imitation seafood for a similar experience.

Is it possible to make Seafood Bisque spicy? Absolutely! You can add crushed red pepper flakes or a dash of cayenne pepper to the bisque during cooking to adjust the heat to your liking.

Can the recipe be doubled easily? Yes, this recipe can be doubled or even tripled, but ensure you use a large enough pot to accommodate the increased quantity without overflowing.

How long should I blend the bisque? Blend until smooth, typically taking about 30 seconds to a minute, depending on your blender. You can adjust the texture based on personal preference.

What are some great side dishes to serve with Seafood Bisque? Pair your bisque with crusty bread, a crisp salad, or vegetable sides to create a well-rounded meal experience.

Can I freeze leftover bisque? Yes, you can freeze Seafood Bisque for up to 3 months. Ensure it is cooled completely and stored in freezer-safe containers.

What kind of wine pairs well with Seafood Bisque? Crisp white wines, such as Sauvignon Blanc or a light Chardonnay, complement the flavors of Seafood Bisque beautifully.

Additional Resources

If you loved making this Seafood Bisque, explore other recipes such as Lobster Ravioli, Clam Chowder, or Shrimp Scampi to further your seafood culinary adventures.

For those interested in elevating their cooking techniques, check out our technique guides addressing sautéing, simmering, and blending to enhance your skills in the kitchen.

Understanding seafood selections and the importance of sourcing fresh ingredients can vastly improve your culinary creations.

Equipment recommendations can provide you with the necessary tools to achieve perfect textures and flavors; don’t hesitate to invest in a high-quality blender or a good pot.

Seasonal variations invite you to explore cooking with fresh, in-season ingredients; consider adapting the recipe depending on what’s available in your area.

Join the Conversation

We invite you to share your experiences making Seafood Bisque or discuss your favorite seafood recipes with us on social media. Photography enthusiasts can join our community, exchanging tips for capturing the perfect seafood dish.

Your recipe reviews and feedback are invaluable; tell us what you loved about this bisque and how you made it your own. We encourage engagement and enthusiasm in the kitchen, fostering a vibrant cooking community.

Explore the variations you’ve created or found delightful and inspire others to join the culinary journey with this Seafood Bisque!

The Recipe

Seafood Bisque

Serves: 4 servings

Prep Time: 30 mins

Cook Time: 60 mins

Total Time: 90 mins

Kitchen Equipment Needed

  • Large pot
  • Blender or immersion blender
  • Cutting board
  • Chef’s knife
  • Ladle
  • Airtight containers for storage

Ingredients

  • 1 lb crab meat
  • 1 lb shrimp, peeled and deveined
  • 1 lobster tail, cooked and chopped
  • 4 cups seafood stock
  • 1 cup heavy cream
  • 1 onion, finely chopped
  • 2 carrots, diced
  • 2 celery stalks, diced
  • 2 cloves garlic, minced
  • 1 tsp tomato paste
  • 1/2 cup dry sherry
  • 2 tbsp olive oil
  • Salt and pepper to taste
  • Fresh herbs for garnish

Directions

  1. In a large pot, heat olive oil over medium heat. Sauté onion, carrots, and celery until soft, about 5-7 minutes.
  2. Add garlic and tomato paste, cooking for another minute until fragrant.
  3. Pour in the seafood stock and dry sherry; bring to a simmer and cook for 20 minutes.
  4. Reduce heat, add crab meat, shrimp, and lobster. Cook for an additional 10 minutes.
  5. Blend the mixture until smooth. Return to the pot and stir in heavy cream.
  6. Season with salt and pepper. Simmer gently for 10 more minutes, ensuring seafood is cooked through.
  7. Serve hot, garnished with fresh herbs.

Recipe Notes

  • Adjust the thickness by adding more or less seafood stock based on preference.
  • Feel free to use additional seafood or substitute based on availability.
  • This bisque can be enjoyed with crusty bread or a light salad.

Delicious Lemon Zucchini Cake with Cream Cheese Filling Recipe

Lemon Zucchini Cake with Cream Cheese Filling: A Refreshing Delight

⚖️
Difficulty
Medium

⏲️
Prep Time
30 mins

🕒
Cook Time
40 mins

⏱️
Total Time
1 hr 10 mins

🍽️
Servings
12

Indulging in a slice of Lemon Zucchini Cake with Cream Cheese Filling is like enjoying a slice of sunshine! This delightful cake combines the refreshing zesty flavor of lemon and the light, moist texture of zucchini, offering a truly unique dessert experience. Each bite showcases the sweet tanginess of lemon paired with the creamy richness of the cream cheese filling, making it a perfect dessert for spring and summer gatherings.

The addition of zucchini not only adds moisture but also packs this cake with extra nutrients, making it a guilt-free treat. The bright, cheerful flavors and the beautifully layered aesthetic cater to both the eye and the palate, making it a hit at any celebration, from birthday parties to casual afternoon tea.

Quick Recipe Highlights

  • Flavor Profile: This cake features a splendid balance of sweet and tart, with the citrusy lemon brightening the overall taste.
  • Texture: The cake is tender and moist thanks to the zucchini, complemented by the silky smooth cream cheese filling.
  • Aroma: The aroma is inviting and fresh, with the scent of lemon zest filling your kitchen as it bakes.
  • Visual Appeal: With its vibrant yellow colors and white cream cheese layers, this cake is visually stunning and sure to impress.
  • Skill Level Needed: This recipe is perfect for home bakers with some experience, given its layering technique and baking time.
  • Special Equipment: A stand mixer and a good quality cake pan are essential to achieve perfect results.

Recipe Overview

  • Difficulty Level: The recipe requires a medium skill level due to the multiple components, including the cake and the filling.
  • Category: This cake fits perfectly into the dessert category and is great for both casual and formal occasions.
  • Cuisine: Combining traditional American baking with a fresh citrus twist, it’s an ideal representation of modern dessert trends.
  • Cost: Ingredients like zucchini, flour, and cream cheese are reasonably priced, making this cake a cost-effective choice.
  • Season: Best enjoyed in the warmer months when zucchini is plentiful and lemons are at their prime.
  • Occasion: Ideal for picnics, potlucks, or family celebrations, this cake will be a delightful centerpiece.

Why You’ll Love This Recipe

This Lemon Zucchini Cake with Cream Cheese Filling delivers both taste and texture that seems to dance on your palate. The harmonious blend of lemon’s brightness and the zucchini’s moisture creates a cake that’s soft yet sturdy. Perfect for birthdays or brunches, this cake is sure to get rave reviews from all ages. It doesn’t just taste great; its beautiful layers make it a showstopper at any gathering.

Beyond its amazing flavor, the recipe is relatively straightforward, allowing you to whip it up even on a busy day. You can prepare the cake and filling in under an hour, then let it cool while you set the table or prepare other dishes. This added convenience makes it a beloved recipe in many households.

Nutritionally, the zucchini adds a boost of fiber and vitamins, making this cake a heartier option compared to traditional cakes. It’s a simple way to sneak in vegetables without compromising indulgence.

Socially, sharing this dessert invites smiles and compliments from friends and family, sparking conversations and creating lasting memories around the dinner table.

Finally, considering the cost-to-reward ratio, it’s an accessible recipe that won’t break the bank but promises to impress guests with its delightful flavor and intricate presentation.

Historical Background and Cultural Significance

The Lemon Zucchini Cake has roots in traditional American baking but has evolved into a modern favorite. Zucchini is often used in various baked goods, commonly seen in muffins and bread, as a way to utilize an abundant summer crop.

Culturally, this cake stands as a symbol of resourcefulness in baking, marrying the often-overlooked vegetable into a dessert that everyone can enjoy. The trend of using vegetables in sweets not only showcases creativity but also reflects a movement towards healthier eating habits while enjoying indulgent treats.

As with many recipes, this Lemon Zucchini Cake has seen variations through the years, with bakers adding their twists, such as incorporating nuts or varying the icing. Each homemade version tells a story, contributing to a communal history where food brings people together.

Regionally, different areas might lean towards specific spices or techniques, emphasizing local tastes and trends which make every Lemon Zucchini Cake a unique creation based on where one is located.

Ingredient Deep Dive

The star of the show, zucchini, holds a significant place in American gardens and kitchens. This versatile vegetable is not just low in calories but adds moisture and a slight tenderness to baked goods. When selecting zucchini, look for firm, bright green skin without blemishes. Store your zucchini in the fridge, where it will remain fresh for up to a week. This ingredient can easily be substituted with yellow squash if needed.

Another key ingredient is lemon, which contributes its zesty flavor and aroma to the cake. Lemons are high in Vitamin C and have numerous health benefits, including boosting the immune system. Choose organic lemons if possible, as their zest often has more flavor. Store lemons in a cool, dark place or refrigerate them to maintain freshness.

Lastly, cream cheese is the foundation for the luxurious filling. Rich in calcium, it elevates the texture of the cake. When selecting cream cheese, opt for full-fat for a creamier texture. It can be stored in the fridge and used within two weeks. You can explore vegan cream cheese alternatives if desired for dairy-free options.

Common Mistakes to Avoid

  • Not squeezing excess moisture from the zucchini can lead to a soggy cake. Always grate and press the zucchini before adding it to your batter.
  • Overmixing the batter can cause a dense cake; mix until just combined to keep it light and fluffy.
  • Using stale baking powder may prevent the cake from rising properly; always check the expiration date.
  • Forgetting to preheat the oven can lead to uneven baking. Always ensure your oven is at the right temperature before baking.
  • Allowing the cake to cool in the pan for too long can make it stick. Transfer it to a wire rack after a few minutes.
  • Skipping the cream cheese filling or not letting it chill can result in a runny consistency—be patient for the best effect.
  • Not adjusting baking times for different oven types can affect your cake; always use a toothpick to test for doneness.
  • Neglecting to grease and flour the cake pans can cause sticking, making it difficult to layer.

Essential Techniques

Mastering the art of grating zucchini is crucial for preparing this cake. Use a box grater for consistency and remember to squeeze out excess moisture for a firmer texture. This will help prevent the cake from turning out soggy.

Another technique is the proper creaming of butter and sugar. This step incorporates air into the mixture, contributing to a light and airy cake. Beat until the mixture is pale and fluffy, typically 4-5 minutes for optimal results.

Layering the cake may seem daunting, but it’s essential for a professional finish. Ensure each layer is evenly spread with filling, maintaining balance with the top layer. Using a turntable can help achieve neat edges.

Lastly, chilling the cream cheese filling before spreading helps it maintain its shape and texture, making it easier to layer without spilling.

Pro Tips for Perfect Lemon Zucchini Cake

– Use freshly grated lemon zest for a more potent flavor against the zucchini’s subtleness.
– For an added twist, incorporate lemon juice into the cake batter to enhance the citrus flavor throughout.
– If the cake layers rise unevenly, trim the tops to create a flat surface before layering with cream cheese.
– Chill the cake after assembling so that the filling firms up and holds together for easier slicing.
– Consider adding chopped walnuts or pecans for a delightful crunch that contrasts with the soft cake.
– For decorative purposes, dust powdered sugar on top before serving for that professional bakery look.
– Always use room temperature ingredients for a smoother batter and more consistent baking.
– Test the cake’s doneness by inserting a toothpick; it should come out clean or with a few moist crumbs.

Variations and Adaptations

You can experiment with this cake by replacing the lemon with lime, offering a different yet equally refreshing citrus experience. Seasonal adaptations could include adding cranberries or blueberries, providing natural sweetness and vibrant color.

For those with dietary restrictions, a gluten-free flour blend can work perfectly in place of all-purpose flour, while coconut cream can serve as a dairy-free alternative for the filling.

Flavor variations are endless; consider infusing the cream cheese with vanilla or almond extract for a twist on traditional flavor profiles. You can also enhance the cake with a layer of lemon glaze for extra sweetness and shine.

When presenting the cake, consider serving it as mini-cakes or cupcakes for easy handling at gatherings, creating a beautiful dessert table display.

Serving and Presentation Guide

Achieving beautiful presentation starts with careful slicing of the cake; use a serrated knife for clean edges. Plating can be enhanced by placing a slice on a colorful dish and garnishing with fresh berries or mint sprigs for added color.

Traditional accompaniments like a scoop of vanilla ice cream or whipped cream can elevate the experience. For creative modern serving, consider layering the cake in a glass jar for individual servings—the layered look will showcase the vibrant colors.

Temperature-wise, serving the cake chilled enhances its flavors, making each bite refreshing and irresistible, particularly on hot days.

For portion control, cut smaller slices as this cake is rich in flavor and filling, ensuring guests can savor without feeling overwhelmed. Remember, presentation is key; a sprinkle of lemon zest on top can give a lovely finishing touch.

Wine and Beverage Pairing

When it comes to wine pairings, consider a light, crisp white wine like Sauvignon Blanc, which complements the citrus flavors beautifully. This refreshing choice enhances the cake’s zesty notes while balancing its richness.

For non-alcoholic alternatives, a refreshing lemonade or iced herbal tea can serve as a delightful accompaniment, mirroring the cake’s refreshing qualities.

If you’re a coffee lover, pairing a slice with a light roast coffee can bring out the sweetness of the cake and provide a contrasting experience to its tartness.

Ensure that beverages are served chilled to maintain that refreshing vibe which the Lemon Zucchini Cake embodies.

Storage and Shelf Life

To keep your Lemon Zucchini Cake fresh, store it in an airtight container at room temperature for up to two days. For longer storage, keep it in the refrigerator, where it can last up to a week.

For freezing, wrap individual slices in plastic wrap and then in aluminum foil to avoid freezer burn. Thaw in the fridge overnight before serving for the best texture.

Signs of spoilage include an off smell, visible mold, or a change in texture. If the filling appears watery or separated, it’s best to discard.

Reheating slices in the microwave for a few seconds can restore that fresh-out-of-the-oven warmth, making for a comforting treat any time.

Make Ahead Strategies

To streamline your baking process, consider preparing the zucchini and lemon zest ahead of time, storing them in the fridge until you’re ready to bake.

You can bake the layers a day in advance and store them wrapped tightly in plastic wrap—this actually improves the texture of the cake! Allow the layers to cool completely before wrapping to avoid condensation.

As for the cream cheese filling, it can be made ahead and chilled; this will make it easier to spread when assembling.

Once assembled, the cake can be stored in the refrigerator for 1-2 days, blending the flavors as it rests. Just add any decorative elements right before serving, ensuring freshness.

Scaling Instructions

If you need to halve the recipe, simply reduce all ingredients by half, ensuring you still match egg sizes and ratios where possible. This is perfect for smaller gatherings.

Doubling or tripling the recipe for larger events requires adjusting your baking pans accordingly; larger pans may need longer baking times, so keep an eye on doneness with toothpick tests.

For equipment adjustments, ensure your mixer can handle larger batches to maintain consistency across layers. Timing may vary, so be prepared to test for readiness consistently.

Leftover batter can be stored in the refrigerator for a short period but is best used immediately for optimal freshness.

Nutritional Deep Dive

The macros of Lemon Zucchini Cake vary depending on portion size, but a single slice typically contains around 250-300 calories, making it a satisfying yet reasonable dessert.

Micronutrient analysis shows that each slice provides a good dose of Vitamin C from the lemon, while zucchinis contribute potassium and several B vitamins.

Health benefits extend beyond vitamins; the fiber from zucchini can aid digestion, making this dessert an unexpectedly nutritious indulgence.

When considering portion sizes, moderation is key—enjoying a slice (or two) in the context of an overall balanced diet can be classified as a nice treat without overspending calories.

Weight management remains feasible when incorporating such delightful cakes; simply ensure you’re pairing with healthy meals overall.

Dietary Adaptations

For gluten-sensitive individuals, using a gluten-free flour blend will allow enjoyment of this Lemon Zucchini Cake without dietary stress.

Dairy-free modifications can be achieved with plant-based alternatives to cream cheese, ensuring all guests can indulge without discomfort.

Vegan bakers can replace eggs with flaxseed meal or applesauce, adapting moisture while preserving the cake’s integrity.

Low-carb and keto modifications can involve substituting regular flour with almond or coconut flour, coupled with a sugar substitute to maintain sweetness.

For those following a Paleo lifestyle, consider using almond flour combined with honey as a natural sweetener, keeping the cake wholesome and clean.

If you’re following a low-FODMAP diet, using lactose-free cream cheese will make this dessert suitable for your needs without sacrificing flavor.

Troubleshooting Guide

Texture issues might arise if zucchini is not properly drained; ensure it’s grated and squeezed thoroughly for the best results.

Flavor balance problems can often result from over-sweetening—if this happens, include a pinch of salt or an extra squeeze of lemon to brighten it up.

Temperature problems can be addressed by checking your oven’s accuracy; an oven thermometer can ensure even baking times.

If you face equipment challenges, familiarize yourself with your tools prior to starting, ensuring your mixer is up to the task of blending properly.

Ingredient substitutions can be tricky; be aware that replacing key ingredients may change both flavor and texture, often requiring careful assessment.

Timing concerns can lead to dense layers; make sure to follow instructions closely and check for doneness several minutes before the expected time.

Recipe Success Stories

Feedback from the community highlights how this Lemon Zucchini Cake has delighted many with its refreshing flavor.

Variation successes from readers showcase the versatility of the recipe—from adding nuts for crunch to incorporating different fruit purees for a unique twist.

Adaptation stories reveal how bakers adjusted the sweetness levels, making the recipe more suited to their taste preferences without compromising the overall experience.

Photography tips from bakers suggest utilizing natural light to capture the cake’s vibrant colors and intricate layers, making the cake even more appealing.

Reader suggestions often include serving with a scoop of ice cream or fresh fruits, enhancing the cake’s delectability and presentation on social media.

Frequently Asked Questions

Can I use frozen zucchini in this recipe?

While fresh zucchini is preferred for its moisture content, frozen zucchini can be used. Just be sure to thaw and drain it well before adding to the batter.

What’s the best way to store leftovers?

The best way to store leftover Lemon Zucchini Cake is in an airtight container in the refrigerator, where it will stay fresh for up to a week.

Can I make this cake in advance?

Yes! You can bake the cake layers a day in advance and refrigerate them. Just add the filling before serving for the best texture.

How can I make this cake more lemony?

To enhance the lemon flavor, consider adding more lemon zest and juice into the batter, or use lemon extract for a more potent flavor.

Is it necessary to peel the zucchini?

No, it’s not necessary! The skin adds color and nutrients without affecting the flavor. Just ensure it’s well washed before grating.

Can other fruits be added to this cake?

Yes, diced apples, blueberries, or raspberries can be added to the batter for extra flavor and variety. Adjust the sugar according to the fruit’s sweetness.

What is the best way to ice the cake?

For a beautiful finish, use a piping bag to apply the cream cheese filling between layers and along the top. You can also use a spatula for a more rustic look.

How can I make this cake gluten-free?

Simply substitute regular flour with a good quality gluten-free flour blend that works for baking, and follow the recipe as directed.

Can I freeze this cake?

Yes, this cake freezes well! After slicing, wrap it individually and freeze. When ready to eat, thaw overnight in the refrigerator.

How long does the cream cheese filling last?

The cream cheese filling can be stored in the fridge for up to a week. Always check for freshness before use.

Additional Resources

This Lemon Zucchini Cake pairs well with other recipes, such as light summer salads and refreshing cold soups. Check out our other dessert recipes to complement your meal.

For mastering the art of making cake layers, consider our technique guide on baking and layering cakes for professional results every time.

Information regarding ingredient substitutions can help you understand how to modify recipes for dietary needs or preferences.

To ensure your baking experience is enjoyable, be sure to check our equipment recommendations to find the best-quality tools for your kitchen.

Lastly, explore seasonal variations throughout the year to see how you can integrate fresh produce into your baking recipes, enhancing flavors and textures.

Join the Conversation

We want to hear about your experiences with making our Lemon Zucchini Cake! Share your photos and thoughts on social media—tagging us for a chance to be featured.

Engage with the community by leaving reviews for the recipe, suggesting your adaptations, and sharing tips that could help others.

Photography tips can elevate your food photography, helping you capture the essence of your baking creations beautifully.

Whether you’ve made this cake or are inspired to adapt it, sharing your stories creates a lively interaction among fellow baking enthusiasts.

Let’s celebrate the joy of sharing delicious food and the love of baking together!

The Recipe

Lemon Zucchini Cake with Cream Cheese Filling

Serves: 12

Prep Time: 30 mins

Cook Time: 40 mins

Total Time: 1 hr 10 mins

Kitchen Equipment Needed

  • Stand mixer
  • Grater
  • Two 9-inch round cake pans
  • Offset spatula
  • Wire cooling rack

Ingredients

  • 1 ½ cups all-purpose flour
  • 1 tsp baking powder
  • ½ tsp baking soda
  • ½ tsp salt
  • ½ cup unsalted butter, softened
  • 1 cup granulated sugar
  • 2 large eggs
  • 1 tsp vanilla extract
  • 1 cup finely grated zucchini
  • 1 tbsp lemon zest
  • ½ cup whole milk

Cream Cheese Filling

  • 8 oz cream cheese, softened
  • 1 cup powdered sugar
  • 1 tbsp lemon juice
  • 1 tsp lemon zest

Directions

  1. Preheat your oven to 350°F (175°C). Grease and flour two 9-inch round cake pans.
  2. In a bowl, whisk together flour, baking powder, baking soda, and salt. Set aside.
  3. In a stand mixer, beat butter and sugar until light and fluffy. Add eggs one at a time, mixing well after each addition.
  4. Mix in vanilla extract, lemon zest, and grated zucchini until well combined.
  5. Gradually add dry ingredients and milk, alternating between them. Start and end with dry ingredients. Mix until combined.
  6. Pour batter evenly into prepared pans and bake for 25-30 minutes or until a toothpick comes out clean.
  7. Let cakes cool in pans for 10 minutes before transferring them to a wire rack to cool completely.
  8. For the filling, beat softened cream cheese until smooth. Gradually add powdered sugar, lemon juice, and zest until combined.
  9. Once cakes are cool, spread cream cheese filling between the layers. Top with remaining cake layer and frost the top and sides if desired.
  10. Chill the assembled cake for 20-30 minutes before slicing and serving.

Recipe Notes

  • For added flavor, consider adding poppy seeds to the cake batter.
  • You can substitute the zucchini for a similar amount of grated carrot in a pinch.
  • This cake can be decorated with fresh berries or lemon wedges for a festive look.