Christmas Homemade Eggnog is a classic holiday beverage that has delighted generations. Its creamy texture, sweet flavors, and warm spices make it a staple during the festive season. Unlike store-bought versions, homemade eggnog allows you to tailor the sweetness, spice, and texture, making it perfect for any gathering. This guide will take you through the history, preparation techniques, variations, and tips for creating the best homemade eggnog.
For a deep dive into the origins and cultural significance of eggnog, explore this history of eggnog. Additionally, mastering the science behind tempering eggs can make the process safer and smoother; refer to this guide to tempering eggs.
Ingredients and Tools for Homemade Eggnog
Essential Ingredients
Creating the perfect eggnog requires high-quality ingredients. Here’s what you’ll need:
Eggs: The star ingredient for richness and texture.
Milk and Heavy Cream: These create the creamy base.
Granulated Sugar: Balances the flavors.
Spices: Ground nutmeg and cinnamon for the festive aroma.
Vanilla Extract: Adds depth to the flavor.
Optional Alcohol: Rum, bourbon, or brandy for a classic adult twist.
Tools You’ll Need
Whisk or hand mixer for blending.
Thermometer for tempering eggs safely.
Fine sieve to remove lumps.
Airtight container for storage.
For a plant-based twist, try substituting milk and cream with almond or oat milk. Explore more non-dairy options with this vegan eggnog recipe.
How to Make Traditional Eggnog
Prepare the Ingredients:
Separate the egg yolks and whites.
Whisk yolks with sugar until light and creamy.
Cook the Base:
Heat milk, cream, and spices in a saucepan over medium heat.
Gradually temper the egg mixture by adding hot milk slowly, whisking constantly.
Combine and Chill:
Return the mixture to the saucepan and cook until thickened.
Strain and cool before adding vanilla extract and optional alcohol.
Finish with Whipped Egg Whites:
Beat egg whites until soft peaks form and fold them into the cooled mixture for a frothy texture.
Variations and Creative Twists
Spiced Eggnog:
Infuse with additional spices like cloves and allspice for a bold flavor.
Chocolate Eggnog:
Add cocoa powder or melted chocolate to the base.
Non-Alcoholic Eggnog:
Skip the alcohol and adjust the sweetness for a family-friendly option.
Vegan Eggnog:
Use almond milk, coconut cream, and cornstarch as a thickening agent.
Homemade eggnog captures the essence of Christmas in every sip. Whether you stick to the classic recipe or experiment with creative variations, this festive drink is sure to be a crowd-pleaser. So, gather your ingredients, embrace the holiday spirit, and craft a batch of Christmas Homemade Eggnog to share with loved ones.
Happy Holidays!
Indulge in Big Fat Pecan Sticky Buns for Breakfast
Big Fat Pecan Sticky Buns: A Sweet Indulgence for Any Occasion
⚖️
Difficulty
Intermediate
⏲️
Prep Time
45 mins
🕒
Cook Time
30 mins
⏱️
Total Time
1 hr 15 mins
🍽️
Servings
12 servings
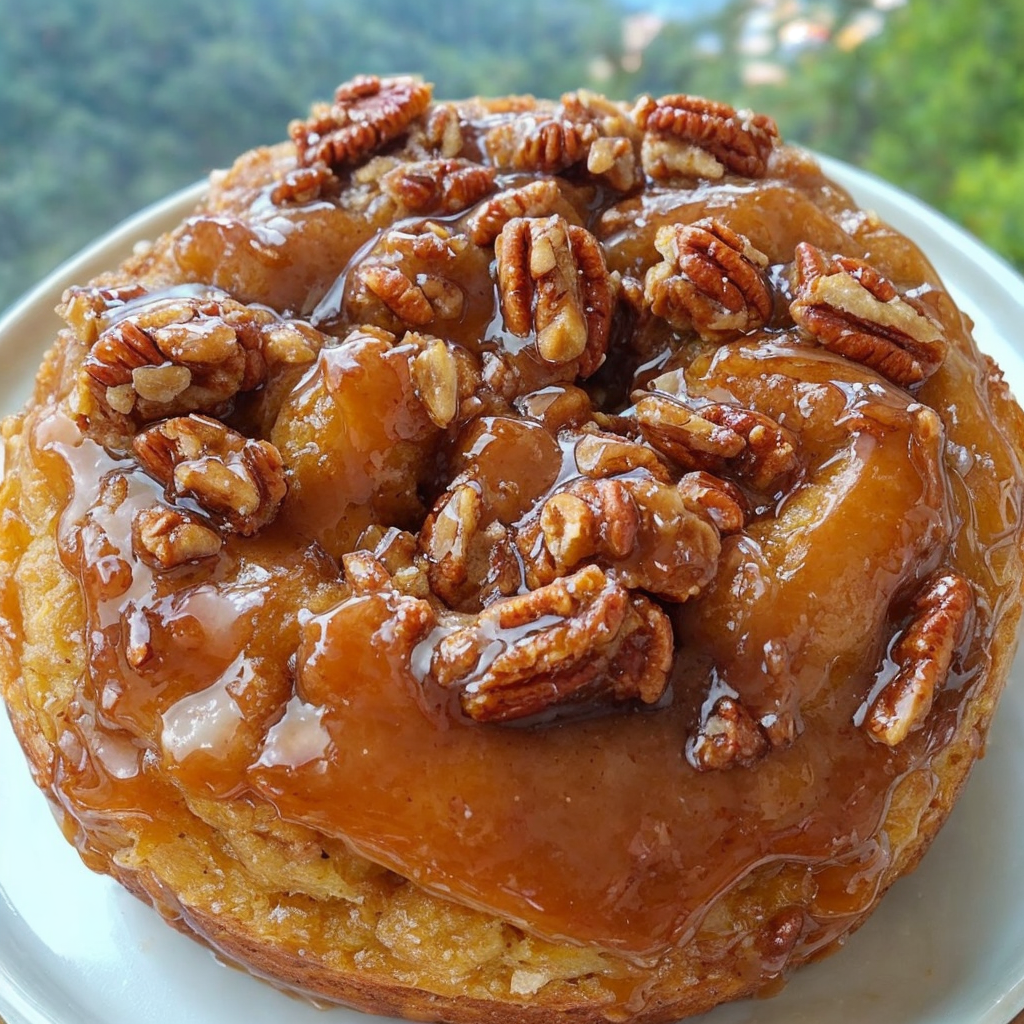
Big Fat Pecan Sticky Buns are the ultimate treat for those who love a sweet, gooey breakfast pastry. These buns are enveloped in a rich, buttery dough that’s infused with cinnamon, while the pecan-studded caramel topping adds an irresistible crunch and depth of flavor. Each bite delivers a perfect balance of sweetness and nuttiness, making it hard to resist reaching for just one more! Whether you’re celebrating a special occasion or treating yourself on a lazy Sunday morning, these sticky buns are guaranteed to bring joy to your breakfast table.
Imagine the aroma wafting through your kitchen as these sticky buns bake to golden perfection. The combination of sugary caramel and toasted pecans creates a mouthwatering scent that will make everyone eager to dig in. Warm, decadent, and utterly satisfying, these Pecan Sticky Buns are more than just a dish; they are a heartfelt invitation to indulge and savor life’s sweet moments.
Quick Recipe Highlights
Flavor Profile: Sweet, buttery, and nutty with delightful cinnamon notes.
Texture: Soft and fluffy with a gooey center and a crunchy topping.
Aroma: Heady scent of cinnamon, caramel, and toasted pecans.
Visual Appeal: Golden-brown buns drizzled with shiny caramel and speckled with pecans.
Skill Level Needed: Suitable for intermediate bakers who enjoy a bit of a challenge.
Special Equipment: Stand mixer, baking dish, and parchment paper.
Recipe Overview
Difficulty Level: This recipe is classified as intermediate due to the multiple steps involved, including yeast dough preparation and caramel sauce making.
Category: These buns are perfect for breakfast, brunch, or as a sweet treat at any time.
Cuisine: Heavily influenced by American baking traditions, especially popular in Southern cuisine.
Cost: Prepare these buns with moderate expenses, mainly for the ingredients like pecans and butter.
Season: Ideal for any season, but especially delightful during fall and winter when warm, comforting flavors are craved.
Occasion: Perfect for family gatherings, weekend brunches, or festive celebrations.
Why You’ll Love This Recipe
The taste and texture of Big Fat Pecan Sticky Buns are simply irresistible. Each piece is a harmonious blend of sweet and nutty that can elevate your morning routine. The soft and fluffy dough, combined with the crunchy topping, creates an experience that is both satisfying and decadent, making your taste buds sing.
Not only are these sticky buns delicious, but they’re also relatively easy to prepare. The recipe follows straightforward steps that allow even novice bakers to shine. The preparation involves simple techniques like mixing, proofing, and baking, making the process enjoyable and rewarding for home cooks.
When it comes to nutrition, these buns can be a comforting indulgence in moderation, thanks to wholesome ingredients like pecans, which provide healthy fats and protein. They can be a part of a balanced breakfast when paired with fruit or yogurt.
Sticky buns are perfect for sharing and are sure to impress family and friends. Whether served at brunch or during holiday gatherings, they serve as a delightful centerpiece that encourages togetherness and joy.
Lastly, making these at home is cost-effective compared to buying them from a bakery. Utilize common pantry staples and elevate them to create an indulgent treat that rivals any bakery specialty.
Historical Background and Cultural Significance
The origin of sticky buns dates back centuries, with various forms present in different cultures. Initially resembling a Swiss pastry called “Schnecken,” the American version adopted unique elements, often using pecans, a staple in Southern kitchens. The evolution of the sticky bun showcases how regional tastes influence beloved recipes.
Culturally, sticky buns symbolize sweetness and togetherness, often served during significant life events like weddings and holidays. They represent a moment to pause and enjoy life’s pleasures, a tradition that has been cherished for generations.
The recipe for sticky buns has evolved over the years, incorporating local ingredients and preferences, such as the inclusion of nuts or dried fruits. As trend shifts continue to influence cooking, many adaptations speak to current tastes while honoring the traditional roots.
Regionally, variations abound, from cinnamon rolls drizzled with caramel in the Midwest to the signature use of pecans in the South. Each area brings its own flair, contributing to the rich tapestry of sticky bun history.
Ingredient Deep Dive
Pecans: A beloved nut in Southern cuisine, pecans are not just tasty but also rich in healthy fats, fiber, and protein. When selecting, look for fresh, plump nuts and store them in a cool place to maintain their flavor. They can be substituted with walnuts if necessary.
Butter: The key to rich and flavorful sticky buns, butter enhances both the dough and caramel topping. Always use unsalted butter for greater control over flavor. Store butter in a cool place, and it can be frozen for longer shelf life.
Common Mistakes to Avoid
Not letting the dough rise sufficiently can result in dense buns. Always follow the rise times based on your kitchen’s temperature.
Using too much flour can lead to tough dough; instead, use a light hand when measuring.
Forgetting to preheat the oven may lead to uneven baking.
Skipping the caramel sauce; it’s what makes sticky buns, well, sticky!
Overbaking the buns will lead to dryness; keep an eye on them during the final minutes.
Not cooling buns slightly before serving, as they can be very hot to the touch.
Using cold ingredients straight from the fridge can inhibit yeast activation; let them come to room temperature first.
Mismatched baking dish size can affect baking time and results; always use the recommended size.
Essential Techniques
Yeast Activation: The most critical step, ensuring the yeast is activated properly leads to yeast dough rising beautifully. To master it, warm liquid and sugar can be mixed with yeast and left for 5-10 minutes until foamy.
Caramel Making: A pivotal technique for achieving that gooey topping; caramel needs patience. Cook over medium heat, stirring continuously until the sugar dissolves, avoiding burning by watching the color change closely.
Pro Tips for Perfect Big Fat Pecan Sticky Buns
1. Use fresh yeast for better rising results; expired yeast can ruin your dough.
2. Feel the dough; it should be soft and slightly tacky but not overly sticky. Adjust flour as needed.
3. For added flavor, toast the pecans lightly before adding them to the caramel.
4. Always check buns a few minutes before the suggested bake time; ovens vary, and you want them just golden.
5. Allow the sticky buns to cool in the pan for a few minutes before inverting to prevent breakage.
6. Use a serrated knife when slicing the buns; it helps keep their shape.
7. Drizzle extra caramel over the top just before serving for that additional indulgence.
8. Enjoy leftovers; they can be reheated in the microwave for a few seconds for a warm treat the next day.
Variations and Adaptations
Consider seasonal variations like adding apple or pumpkin puree for a fall-inspired version. During Easter, chocolate chips can be folded into the dough for a festive twist. For those who prefer less sugar, substitute with honey in the caramel sauce. Gluten-free alternatives can also be achieved using specialized baking flour that suits your dietary needs.
Serving and Presentation Guide
For serving, consider using a beautiful platter or a wooden cutting board for a rustic touch. Drizzle the warm caramel sauce over each bun and sprinkle extra pecans on top for visual appeal. Pair with a side of fresh fruit or whipped cream for an elegant finish.
Wine and Beverage Pairing
Pair your sticky buns with a light sparkling wine or a creamy coffee for an indulgent breakfast. A sweet Riesling goes well with the pecan flavors, while a rich coffee balances the sweetness beautifully. Alternatively, offer herbal teas for a refreshing contrast.
Storage and Shelf Life
Store leftover sticky buns in an airtight container at room temperature for up to 2 days. For longer storage, wrap them tightly and freeze for up to 2 months. Reheat directly from the freezer in a warm oven until heated through.
Make Ahead Strategies
To simplify your baking, consider preparing the dough the night before and letting it rise in the fridge overnight. The next morning, you can easily shape and bake your sticky buns fresh from the oven.
Scaling Instructions
If you want to make a smaller batch, simply halve the ingredients. For larger gatherings, double the recipe and use two baking dishes to ensure even cooking.
Nutritional Deep Dive
Understanding the macro breakdown of these sticky buns reveals that they offer a mix of carbohydrates, fats, and proteins. This balance, when consumed in moderation, can be part of a fulfilling breakfast. Incorporate protein-rich pairings, like yogurt, to enhance your meal.
Dietary Adaptations
For a gluten-free version of Big Fat Pecan Sticky Buns, substitute traditional flour with a gluten-free all-purpose blend. Ensure all ingredients, especially the baking powder, are gluten-free. For a dairy-free option, use plant-based butter and non-dairy milk alternatives in the recipe.
Troubleshooting Guide
If your sticky buns are too dense, it might be due to insufficient rising time or overworking the dough. Ensure that both factors meet the requirements for a light texture. If caramel seizes up, gently reheating while stirring can often revive the sauce.
Recipe Success Stories
Read through feedback from our community who have successfully made these buns, sharing tips and variations that worked well for them. Adaptations have included everything from chocolate additions to different nut choices, all of which provide a unique twist on this classic recipe.
Frequently Asked Questions
Q1: Can I use a different nut? A1: Yes! Feel free to substitute pecans with walnuts or almonds, tailoring the recipe to your preference.
Q2: How do I know when the buns are properly baked? A2: The tops should be golden brown, and a toothpick inserted in the center should come out clean.
Q3: Can I prepare the dough in advance? A3: Absolutely! You can prepare the dough the night before and let it rise in the refrigerator overnight.
Q4: What should I do if my dough doesn’t rise? A4: Ensure your yeast is active and your environment is warm. If it’s cold, consider placing it in a warm area.
Q5: Can these buns be made vegan? A5: Yes! You can substitute eggs with flax eggs and use plant-based butter and milk.
Q6: Is it okay to freeze the buns? A6: Yes! They can be frozen for up to 2 months and reheated in the oven when you’re ready to enjoy them.
Q7: How do I store leftovers? A7: Store in an airtight container at room temperature for up to 2 days, or freeze for longer storage.
Q8: How can I make them more decadent? A8: Consider adding a drizzle of cream cheese frosting for an extra treat.
Q9: Can I add fruit to the filling? A9: Indeed, adding diced apples or raisins can enhance flavor and texture. Just be cautious with moisture levels.
Q10: What kind of flour should I use? A10: All-purpose flour works best, but you can also use bread flour for a chewier texture.
Additional Resources
Explore related recipes like cinnamon rolls or other sweet pastries to enrich your baking repertoire. Check out guidebooks on yeast dough techniques and ingredient substitutions to further enhance your baking skills.
Join the Conversation
Engage with our community by sharing photos of your sticky buns along with your tips and variations. Discuss your favorite flavor combinations and how this recipe turned out for you! Join the conversation on social media platforms where our baking family shares inspirations and successes.
The Recipe
Big Fat Pecan Sticky Buns
Serves: 12 servings
Prep Time: 45 mins
Cook Time: 30 mins
Total Time: 1 hr 15 mins
Kitchen Equipment Needed
Stand mixer
Baking dish
Parchment paper
Ingredients
For the dough: 4 cups all-purpose flour, 1 packet active dry yeast, 1/4 cup sugar, 1/2 cup milk, 1/2 cup butter, 2 eggs, and pinch of salt.
For the filling: 1/2 cup brown sugar, 2 tablespoons ground cinnamon, 1/4 cup melted butter.
For the topping: 1 cup chopped pecans, 1 cup caramel sauce.
Directions
In a saucepan, warm milk and butter until melted; let cool to 110°F. Sprinkle yeast and sugar over the mixture, set aside for 10 minutes.
In a large bowl, combine flour and salt. Add the yeast mixture and eggs; mix until a dough forms.
Knead the dough for about 8 minutes until smooth. Place in a greased bowl and let rise for about 1 hour, or until doubled in size.
Preheat the oven to 350°F and grease your baking dish with butter.
On a floured surface, roll out dough into a rectangle. Spread melted butter, sprinkle brown sugar and cinnamon over it, then roll tightly.
Cut into slices and place in the prepared baking dish, sprinkle with chopped pecans.
Combine caramel sauce with a splash of cream and pour over buns. Bake for 30 minutes, until golden brown.
Allow buns to cool slightly before inverting onto a serving platter; enjoy warm.
Recipe Notes
Feel free to experiment with different types of nuts or add raisins or chocolate chips to the filling.
For a fun twist, drizzle a glaze over the top once cooled.
Classic Christmas Shortbread Cookie Bites: A Festive Holiday Delight
Classic Christmas Shortbread Cookie Bites
Introduction
Classic Christmas Shortbread Cookie Bites are a quintessential holiday treat, combining the rich, buttery flavor of traditional shortbread with festive decorations like colorful sprinkles or icing. These cookies, often bite-sized, bring together simplicity and elegance, making them perfect for gift-giving, family gatherings, or as a delightful addition to any holiday spread.
Shortbread cookies have their roots in Scottish culinary traditions, but their transformation into holiday favorites showcases the adaptability of this humble recipe. For example, this guide on storing cookies can ensure your baked goods remain fresh throughout the festive season.
Ingredients and Tools for the Perfect Shortbread Bites
Creating the perfect Christmas Shortbread Cookie Bites starts with high-quality ingredients. The beauty of this recipe lies in its simplicity, requiring only a few pantry staples.
Essential Ingredients:
1 cup of unsalted butter, cold and cubed.
3/4 cup powdered sugar.
1 teaspoon vanilla extract.
1 3/4 cups all-purpose flour.
Festive sprinkles or colored sugar.
Optional Additions:
Almond extract for a nutty undertone.
Cocoa powder for a chocolate twist.
Food coloring for a custom holiday palette.
Tools Needed:
Mixing bowls.
Hand or stand mixer.
Rolling pin.
Baking sheets lined with parchment paper.
For tips on ensuring cookie perfection, explore this comprehensive baking guide to refine your technique.
Step-by-Step Recipe for Shortbread Cookie Bites
Preparation:
Preheat the oven to 350°F (175°C).
Line baking sheets with parchment paper.
Mixing the Dough:
Beat the butter and powdered sugar until light and fluffy.
Add vanilla extract and mix well.
Gradually incorporate the flour until the dough comes together.
Adding Festive Touches:
Divide the dough and mix sprinkles into one portion.
For plain bites, roll the dough into 1-inch balls or press it into molds for uniformity.
Baking:
Bake for 12–15 minutes or until the edges are golden brown.
Cool completely before storing.
Variations on the Classic Recipe
Creative Twists:
Chocolate Dipped: Dip cooled cookies in melted chocolate and sprinkle crushed peppermint for a festive touch.
Vegan Version: Substitute butter with vegan margarine and use plant-based powdered sugar.
Savory Style: Add rosemary or cheddar for a savory holiday appetizer.
Shortbread bites are as much about their visual appeal as their taste. Here’s how to make them shine:
Arrange in layers using decorative tins or boxes.
Wrap in clear cellophane with festive ribbons for easy gifting.
Pair them with hot cocoa kits for a thoughtful, themed present.
Storage and Longevity
To maintain the freshness and texture of your cookies:
Store in an airtight container at room temperature for up to 2 weeks.
Freeze the dough or baked cookies for up to 3 months.
FAQs About Classic Shortbread Bites
What makes shortbread different from sugar cookies?Shortbread has a higher butter content and lacks leavening agents, resulting in a denser, melt-in-your-mouth texture.
Can I freeze shortbread dough?Absolutely! Wrap it tightly in plastic wrap and store it in the freezer for up to three months.
How do I avoid crumbly shortbread?Ensure the dough is not overmixed and bake at the right temperature to maintain its structure.
Can I use salted butter?Yes, but reduce or omit any added salt in the recipe.
Internal Linking Opportunities
Within your content, link to relevant recipes for seasonal inspiration, such as:
Classic Christmas Shortbread Cookie Bites are a timeless favorite that combines the spirit of the holidays with the satisfaction of homemade treats. Whether you stick to the basics or experiment with creative variations, these cookies are guaranteed to bring joy to every celebration.
Delicious Beef Lombardi Casserole: A Comfort Food Favorite
Beef Lombardi Casserole: A Comforting Feast for Family and Friends
⚖️
Difficulty
Easy
⏲️
Prep Time
15 mins
🕒
Cook Time
45 mins
⏱️
Total Time
1 hour
🍽️
Servings
6 servings
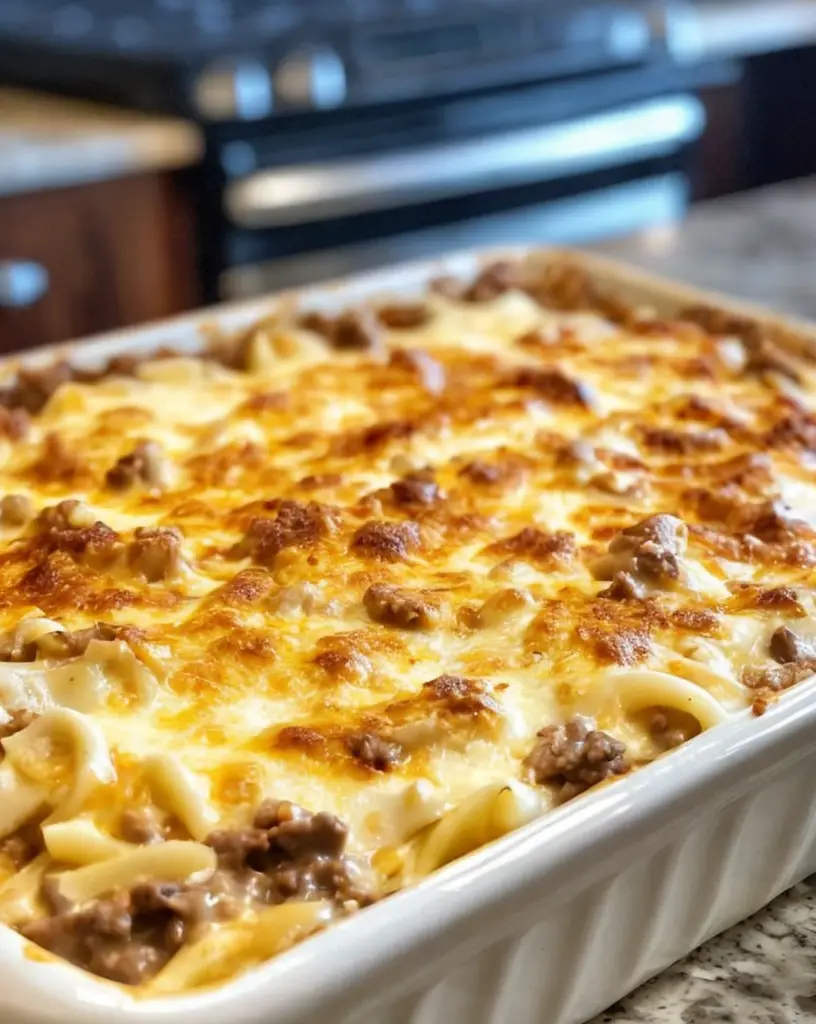
Beef Lombardi Casserole is a delightful dish that embodies comfort and warmth, making it perfect for family gatherings or cozy dinners. This casserole brings together juicy ground beef, rich tomato sauce, and creamy cheese, all layered with fluffy pasta. Each bite offers a medley of flavors and textures, creating a satisfying meal that warms the soul. The comforting aromas wafting through your kitchen as it bakes will have everyone eagerly awaiting the table.
Not only is Beef Lombardi Casserole a feast for the senses, but it is also incredibly versatile. Whether you wish to enjoy it on a chilly evening or make it for a potluck, this dish will surely please your guests. The combination of hearty ingredients and robust flavors makes this casserole a wonderful main course option for various occasions, including family dinners or casual get-togethers with friends.
Quick Recipe Highlights
Flavor Profile: This casserole boasts a rich and savory taste, with bold notes of garlic and herbs complementing the beef’s natural flavor.
Texture: The dish features a delightful contrast between the tender pasta, chunky meat, and gooey melted cheese, creating a comforting mouthfeel.
Aroma: The baking process releases fragrant scents of garlic, onions, and tomatoes, mingling with the warmth of baked cheese.
Visual Appeal: The vibrant colors of the red sauce, golden cheese, and green herbs come together for a visually appealing dish that invites you to dig in.
Skill Level Needed: This casserole is easy to prepare, making it suitable for novice cooks while still being satisfying for more experienced chefs.
Special Equipment: No special tools are required – just a large pot for cooking the pasta and a baking dish to bring everything together.
Recipe Overview
Difficulty Level: Making Beef Lombardi Casserole is simple, requiring minimal cooking skills. The step-by-step directions guide even inexperienced cooks to a delicious result.
Category: This dish falls under the category of casseroles, which are perfect when looking for hearty, all-in-one meals that are easy to prepare.
Cuisine: While the origins of casserole dishes can be traced back to early French cooking, this recipe has been tweaked with Italian influences, evident in the use of pasta and rich tomato sauce.
Cost: Affordable ingredients make this casserole a budget-friendly option. Ground beef, pasta, and cheese are staples that won’t break the bank.
Season: This dish is perfect for year-round enjoyment, making it an ideal comfort food during both winter and summer months.
Occasion: Beef Lombardi Casserole is suitable for casual weeknight dinners, festive potlucks, or family rewards for an accomplished week.
Why You’ll Love This Recipe
The first reason to love Beef Lombardi Casserole is the satisfying balance of taste and texture it offers. The savory ground beef is complemented by soft pasta and a creamy cheese blend that melts uniformly. This comforting mix creates a dish that feels like a warm hug with every forkful.
Another significant advantage of this recipe is its convenience. With a quick prep time and a simple cooking process, it is ideal for busy individuals and families. You can easily prepare the ingredients, layer them in the baking dish, and let the oven do the work. Plus, it’s a great make-ahead option; just prepare it earlier in the day and reheat when ready to serve.
In addition to being delicious, Beef Lombardi Casserole is packed with nutritional benefits. Ground beef provides essential protein, while the pasta offers carbohydrates for energy. The tomato sauce adds a dose of vitamins and antioxidants, making this dish both satisfying and nutritious.
This recipe also shines when it comes to entertaining and socializing. The casserole can easily feed a crowd, making it perfect for gatherings or family meals. Its minimal fuss allows you to spend more time with your guests rather than stuck in the kitchen.
Finally, the affordability of the ingredients means that this dish is accessible to everyone. You can whip up a comforting meal on a budget, demonstrating that good food doesn’t have to come at a high price.
Historical Background and Cultural Significance
The origin of casserole dishes like Beef Lombardi Casserole can be traced back to rural cooking in France, where families would use one pot to combine various ingredients over a slow fire. Over time, this cooking method made its way to America, evolving with the country’s culinary influences. Beef Lombardi itself embraces Italian flavors, showcasing how recipes adapt and blend across cultures.
Casseroles have become a staple in American households, signifying comfort and togetherness. They are often served at family gatherings, potlucks, and church functions, symbolizing community and hospitality. Beef Lombardi positions itself perfectly within this tradition, encapsulating a dish that is meant to be shared and enjoyed together.
Throughout the years, Beef Lombardi Casserole has undergone many transformations. Early versions might not have included pasta; they focus more on meat and vegetables. Today’s recipes allow for the creative addition of ingredients based on local availability and personal preferences, ensuring that this dish remains relevant and adaptable.
Regional variations exist, with some using different proteins or vegetables, while others might add spicy elements for a kick. This diversity speaks to the versatility of casseroles, making them beloved in various forms across different culinary landscapes.
Ingredient Deep Dive
Ground Beef: Ground beef is a versatile base for many dishes, rich in protein and essential nutrients such as iron and vitamin B12. When selecting, look for high-quality meat with a balanced fat content for better flavor and juiciness. Store any leftovers in the refrigerator for up to three days or freeze for long-term use. If you prefer, ground turkey or chicken could serve as a lighter substitute.
Pasta: Pasta serves as the core structure of this casserole, providing energy-boosting carbohydrates. Common options for this dish include egg noodles or penne. When choosing pasta, always go for a shape that holds sauce well. Cook pasta al dente before mixing to avoid sogginess. Store uncooked pasta in a cool, dry place, and keep cooked pasta in an airtight container in the fridge for up to five days.
Tomato Sauce: The rich tomato sauce adds acidity and depth to the casserole. Opt for homemade sauce or high-quality store-bought varieties to enhance the dish. Tomatoes are loaded with vitamins C and K, and their antioxidants have health benefits. When storing leftover sauce, refrigerate it in a glass container or freeze it in portions for easy future use.
Cheese: A blend of mozzarella and cheddar cheese creates that gooey, melted quality that pulls you into this dish. Cheese is a source of calcium and protein. When purchasing cheese, choose blocks over pre-shredded varieties for superior flavor. Cheese should be wrapped tightly in its packaging and stored in the fridge. Alternatives include dairy-free cheeses for lactose-intolerant individuals.
Common Mistakes to Avoid
Overcooking the pasta: Cooking it too long before mixing with the other ingredients can lead to mushy pasta in the final casserole. Always aim for al dente.
Skipping the browning step: Not browning the beef can result in a lackluster flavor. Always take the time to brown your meat properly.
Using only one type of cheese: Limiting yourself to just one cheese can affect both flavor and texture. For livelier taste, combine different kinds.
Neglecting cooling time: Cutting into the casserole immediately after baking can make it fall apart. Allow it to cool for a few minutes for the layers to set.
Not seasoning enough: Under-seasoning can make your casserole taste flat. Always taste and adjust your seasoning before baking.
Overloading with ingredients: While it’s tempting to add more layers or toppings, too much can negatively influence cooking time and texture. Stick to the recommended layers.
Incorrect storage: Not storing leftovers properly can result in food loss. Ensure you use airtight containers and refrigerate promptly.
Skipping reheating guidelines: Not reheating thoroughly can lead to uneven heating. Use the oven rather than the microwave for best results.
Essential Techniques
Browning the beef: Browning is crucial as it develops flavors through the Maillard reaction. Cook the beef in batches if necessary to avoid steaming. Look for a deep brown color on the meat, which indicates that it’s properly cooked.
Layering ingredients: Layering ensures even cooking and flavor distribution. Start with sauce on the bottom, followed by pasta, beef, and cheese. This order allows moisture to seep into the pasta and prevent it from drying out.
Cooking pasta al dente: Cooking pasta until just tender is crucial to avoid mushiness. Taste a piece a minute or two before the package recommends to find that perfect bite. Following this technique will enhance the dish, giving each bite the right structure.
Checking for doneness: Knowing when your casserole is ready is key to perfecting it. Look for bubbly cheese on top and a steaming center. An instant-read thermometer should read 165°F in the center for been thoroughly cooked.
Pro Tips for Perfect Beef Lombardi Casserole
1. Always use fresh ingredients for the best flavors. Fresh herbs, quality cheese, and properly sourced meat can make a significant difference in the final dish.
2. Consider adding sautéed vegetables like bell peppers or mushrooms for additional flavor and nutrition. They can complement the beef beautifully.
3. Experiment with spices! A pinch of red pepper flakes can spice up your casserole, while adding Italian seasoning brings an aromatic depth.
4. For a crispy topping, consider adding breadcrumbs or an extra layer of cheese on top before the final bake. This creates a delicious crunchy contrast to the softer layers.
5. As this dish is extremely versatile, don’t hesitate to switch up ingredients based on your preferences or what you have on hand. Be creative!
6. For an extra flavor kick, try adding a splash of red wine to the ground beef while it’s browning. This will add complexity to the dish.
7. When cooking for a crowd, prepare double the recipe and freeze one for later. It thaws and reheats wonderfully for future busy nights.
8. Lastly, make sure to let the casserole sit for a few minutes before serving. This helps all the ingredients to meld and makes serving easier.
Variations and Adaptations
Regional variations of Beef Lombardi Casserole may include local cheeses or spices to give it a unique twist. For instance, in some areas, you might find a smoky flavor introduced by using smoked cheeses.
Seasonal adaptations are also possible; consider adding seasonal vegetables like zucchini in the summer or butternut squash in the fall to enrich the dish.
For those following dietary restrictions, this casserole is easily made gluten-free by swapping regular pasta for gluten-free noodles or using vegetables like zucchini noodles.
Flavor variations can stem from different sauces; you may opt for a spicy arrabbiata sauce instead of a plain tomato sauce for an exciting kick.
Texture modifications can be achieved by adding a layer of crispy bacon on top before serving, providing an excellent contrast to the soft casserole.
Finally, presentation alternatives such as serving in individual ramekins can make for a visually appealing meal, especially for dinner parties or special occasions.
Serving and Presentation Guide
When plating Beef Lombardi Casserole, focus on portions that highlight its layers. Using a large spoon, serve square servings onto bowls or plates, ensuring an even distribution of pasta, beef, and cheese.
Garnishing ideas include freshly chopped parsley or basil to add a pop of color and freshness. Serve with a side salad and warm garlic bread for a complete meal experience.
Traditional accompaniments include a simple green salad dressed in vinaigrette, which balances the richness of the casserole. Consider modern serving suggestions such as providing a variety of hot sauces for added flavor depth.
Temperature considerations are vital; serve the casserole hot straight from the oven but ensure that guests can enjoy it without burning their mouths. This dish reheats well; serving leftovers is just as delicious.
For portion control, think about the size of your servings—especially for gatherings. A larger dish can be cut into smaller portions, facilitating leftovers rather than excessive waste.
Wine and Beverage Pairing
The rich flavors of Beef Lombardi Casserole shine alongside robust wine selections. A hearty red like Chianti or Cabernet Sauvignon pairs exquisitely with this dish, complementing the savory beef and tomato sauce.
For non-alcoholic alternatives, consider serving a tangy cranberry spritzer or a flavorful herbal tea that can balance the richness of the meal.
If you prefer coffee or tea, opt for bold flavors, such as an espresso, which offers a satisfying close to the meal, bringing forward the rich flavors of the casserole.
Temperature considerations are crucial for wine; serve reds at room temperature and chill whites slightly for the best drinking experience while dining.
Serving suggestions can include offering a wine tasting alongside the meal for a more engaging dining atmosphere, allowing guests to explore flavor profiles.
Storage and Shelf Life
Proper storage methods ensure the longevity of your casserole. After cooling, cover the dish with plastic wrap or aluminum foil and refrigerate for up to three days.
Temperature requirements are essential; always allow the casserole to cool to room temperature before covering and placing in the fridge to prevent moisture buildup.
For long-term storage, consider transferring portions to airtight containers for easy reheating. Casseroles can be frozen for up to three months—just make sure to label them accordingly with dates.
Signs of spoilage typically include off smells, discoloration, or unusual texture changes. When in doubt, always err on the side of caution and discard questionable food.
Reheating instructions are straightforward: preheat the oven to 350°F and heat until the center reaches an internal temperature of 165°F for even warming.
Freezing guidelines are crucial; if you plan on freezing, consider undercooking slightly to ensure it doesn’t turn mushy when reheated. A slight adjustment can make all the difference.
Make Ahead Strategies
To prepare Beef Lombardi Casserole ahead of time, consider prepping ingredients the night before and mixing them in the baking dish. Store covered in the fridge overnight for a quick baking session the next day.
Storage between steps can help maintain freshness; keep cooked beef, pasta, and sauce separate until ready to combine. This will prevent sogginess and maintain texture.
A quality impact assessment indicates that you should not fully cook it before refrigerating; instead, bake for around 15-20 minutes, cool, and then finish baking when ready to serve.
For assembly tips, line your baking dish with parchment paper for easy removal and cutting once prepared. It also helps keep edges from sticking.
Reheating guidelines are notable; if you plan to reheat after freezing, allow the casserole to thaw in the refrigerator overnight before warming for a better quality meal.
Adding fresh elements, like herbs or a sprinkle of cheese, before serving enhances flavor and presentation, making it feel brand new even after reheating.
Scaling Instructions
Halving the recipe is easy; just divide all ingredients by two and adjust cooking times slightly. A smaller baking dish is also essential for more efficient cooking.
Doubling or tripling requires you to pay special attention to your cooking vessel’s size. Ensure that the dish can hold the extra ingredients without overflowing.
Equipment adjustments may be necessary; larger quantities might need to be prepared in batches, particularly when browning the meat. An ample space in the kitchen can help alleviate cooking stress.
Timing modifications should be observed; more significant portions may require longer cooking times to heat thoroughly. Always check for doneness before serving.
Storage considerations increase with larger servings; ensure you have adequate containers to store any leftovers neatly and safely after the meal.
Nutritional Deep Dive
A macro breakdown for Beef Lombardi Casserole typically reveals a combination of carbohydrates, protein, and fats, making it a well-rounded meal. Each serving provides substantial energy content, ideal for families on the go.
Micronutrient analysis shows that ground beef contributes vitamins and minerals important for health, including zinc and iron, while the tomatoes offer essential vitamins A and C, forming a balanced nutritional profile.
The health benefits of ingredients like whole grain pasta can enhance fiber intake, while the convenience of a one-pot meal can support balanced dieting by eliminating the need for multiple side dishes.
Dietary considerations should be made for anyone monitoring their intake; those looking for lower calories can easily use lean ground meats or substitute pasta with lighter options like zucchini noodles.
Portion analysis suggests that awareness of serving sizes is key, particularly for calorie-dense dishes like this casserole, which can quickly add up depending on how generous servings become.
Weight management tips advise individuals examining their caloric intake to consider serving smaller portions, possibly serving with a side of salad to curb appetite without compromising flavor.
Dietary Adaptations
For gluten-free versions, opt for rice noodles or gluten-free pasta—ensuring that all other ingredients are certified gluten-free to avoid cross-contamination.
Dairy-free adjustments can be made by using plant-based cheeses or eliminating cheese altogether while enhancing the flavor with extra herbs and spices to maintain richness.
Vegans can replace the beef with lentils or tofu, use vegetable broth instead of meat-based sauces, and select dairy-free cheese for a satisfying plant-based alternative.
Low-carb options encourage using spiralized vegetables instead of pasta, making it an ideal dish for those on ketogenic plans without sacrificing flavor.
For those following the paleo diet, aim for high-quality grass-fed ground beef and non-processed ingredients, utilizing root vegetables as a pasta substitute.
Adapting for low-FODMAP diets involves avoiding certain ingredients like beans and opting for low-FODMAP alternatives in sauces.
Discussion with a healthcare provider or dietitian may be necessary for specific dietary needs or allergies—tailor the recipe to ensure safety and enjoyment for all diners.
Troubleshooting Guide
If you encounter texture issues, overly dry casserole highlights the need for additional sauce or liquids. Conversely, too much moisture indicates that cooking time might need adjustment.
Balanced flavors can sometimes be tricky; if your casserole lacks seasoning, consider adding a pinch of salt or an extra herb at the end to invigorate the dish while it’s cooling.
Temperature problems arise from undercooked centers; always ensure that the casserole is baked until bubbly throughout. An internal thermometer reading of 165°F confirms safety.
Equipment challenges, like baking dish sizes, often imply necessity for cooking times to be discussed. Ensure trays are appropriately sized to maintain even baking.
Ingredient substitutions often come with surprises; a missing ingredient may result in a flavor loss—always think of replacements that won’t drastically alter the essential profile.
If timing concerns happen, remember to always prepare in advance where possible. Reheating works best when given the time to do so without rushing.
Recipe Success Stories
Community feedback on our Beef Lombardi Casserole has been overwhelmingly positive. Many families have shared about how it became a staple in their weeknight rotation, often serving as a quick solution on busy days.
Variation successes showcase how creative interpretations have led to unique recipes that maintain the spirit of the original while catering to varied taste buds.
Readers have also begun to share their adaptations, illustrating the versatility of this dish—from introducing new seasonings to utilizing different pasta shapes, inspiring others in the process.
Photography tips shared by followers include focusing on capturing the golden cheese on top or vibrant layers of vegetables to highlight the dish’s appeal on social media.
Frequently Asked Questions
Can I make this recipe ahead of time? Yes! You can prepare the casserole earlier in the day or even the night before. Just cover it and store it in the refrigerator until you are ready to bake it.
Can I freeze the Beef Lombardi Casserole? Absolutely! Just make sure to let it cool down before covering and freezing it. It keeps well for up to three months.
What pasta works best for this recipe? Egg noodles or penne pasta are great choices as they hold sauce well and provide a robust texture.
Can I add additional vegetables? Certainly! Feel free to incorporate bell peppers, mushrooms, or spinach for added nutrition and flavor.
What can I substitute for ground beef? Ground turkey or plant-based meat are excellent substitutes for a leaner or vegetarian option, respectively.
How can I keep the casserole from drying out? Ensure you monitor the baking time, cover with foil if necessary, and don’t under-season, as moisture helps flavor retention too.
Is there a way to make this dish lower in calories? Yes! Consider using whole-grain pasta, low-fat cheese, or increasing vegetables to add bulk without many calories.
What should I serve with the casserole? A simple green salad or garlic bread pairs nicely and adds freshness to offset the richness of the casserole.
Can I use homemade sauce instead of store-bought? Homemade sauce often provides a fresher and more personalized taste, so feel free to use it!
How do I reheat leftovers? Reheat in the oven at 350°F until warmed through or microwave individual portions until reaching an internal temperature of 165°F.
Additional Resources
For related recipes, consider exploring our collection of comforting casseroles that are equally gratifying, including classic lasagna and chicken pot pie!
Technique guides focusing on pasta cooking and browning meat are helpful for beginners wanting to refine their culinary skills before preparing the casserole.
Ingredient information is also important; brush up on the advantages of various cheeses or different types of ground meats to enhance your dish.
Equipment recommendations include essential kitchen tools for casserole preparation, ensuring that your cooking experience remains seamless and enjoyable.
Explore seasonal variations of recipes that adapt according to the availability of fresh produce, which can inspire you to connect with local food sources.
Join the Conversation
Share your experiences on social media by tagging us in your Beef Lombardi Casserole creations! We love seeing how our community puts their spin on beloved recipes.
Photographers can also share their culinary snaps for a chance to be featured on our pages. The more creativity, the better!
We encourage recipe reviews, so feel free to leave comments and feedback on your experience trying the dish—your insights could inspire others!
Engaging in discussions about cooking techniques and variations can provide a wealth of knowledge to novice cooks eager to learn from the community.
The Recipe
Beef Lombardi Casserole
Serves: 6 servings
Prep Time: 15 mins
Cook Time: 45 mins
Total Time: 1 hour
Kitchen Equipment Needed
Large pot
Baking dish (9×13 inch)
Skillet
Mixing spoons
Measuring cups and spoons
Aluminum foil
Ingredients
1 lb ground beef
3 cups egg noodles
2 cups tomato sauce
2 cups shredded mozzarella cheese
1 cup shredded cheddar cheese
1 onion, diced
2 cloves garlic, minced
1 teaspoon dried oregano
Salt and pepper to taste
Fresh parsley (optional, for garnish)
Directions
Preheat your oven to 350°F (175°C).
In a large pot, cook the egg noodles according to package instructions until al dente. Drain and set aside.
In a skillet, brown the ground beef over medium heat. Add the onion and garlic, cooking until the onions are translucent.
Stir in the tomato sauce, oregano, salt, and pepper. Simmer for 5 minutes.
In a large mixing bowl, combine the cooked noodles and meat sauce. Mix well.
In a greased baking dish, layer half of the noodle mixture, then sprinkle half of the cheeses on top.
Repeat the layers, finishing with cheese on top.
Cover with aluminum foil and bake for 30 minutes, then uncover and bake for an additional 15 minutes, or until the cheese is bubbly and golden.
Let it cool for a few minutes before serving. Garnish with fresh parsley if desired.
Recipe Notes
Feel free to add seasonal vegetables for added nutrition.
You can substitute ground beef for ground turkey or a plant-based meat alternative.
This casserole can be frozen before baking; just thaw overnight in the fridge before cooking.
Indulge in Decadence with Triple Chocolate Mousse Cake Recipe
Decadent Triple Chocolate Mousse Cake: A Heaven for Chocolate Lovers
⚖️
Difficulty
Advanced
⏲️
Prep Time
30 mins
🕒
Cook Time
60 mins
⏱️
Total Time
90 mins
🍽️
Servings
10
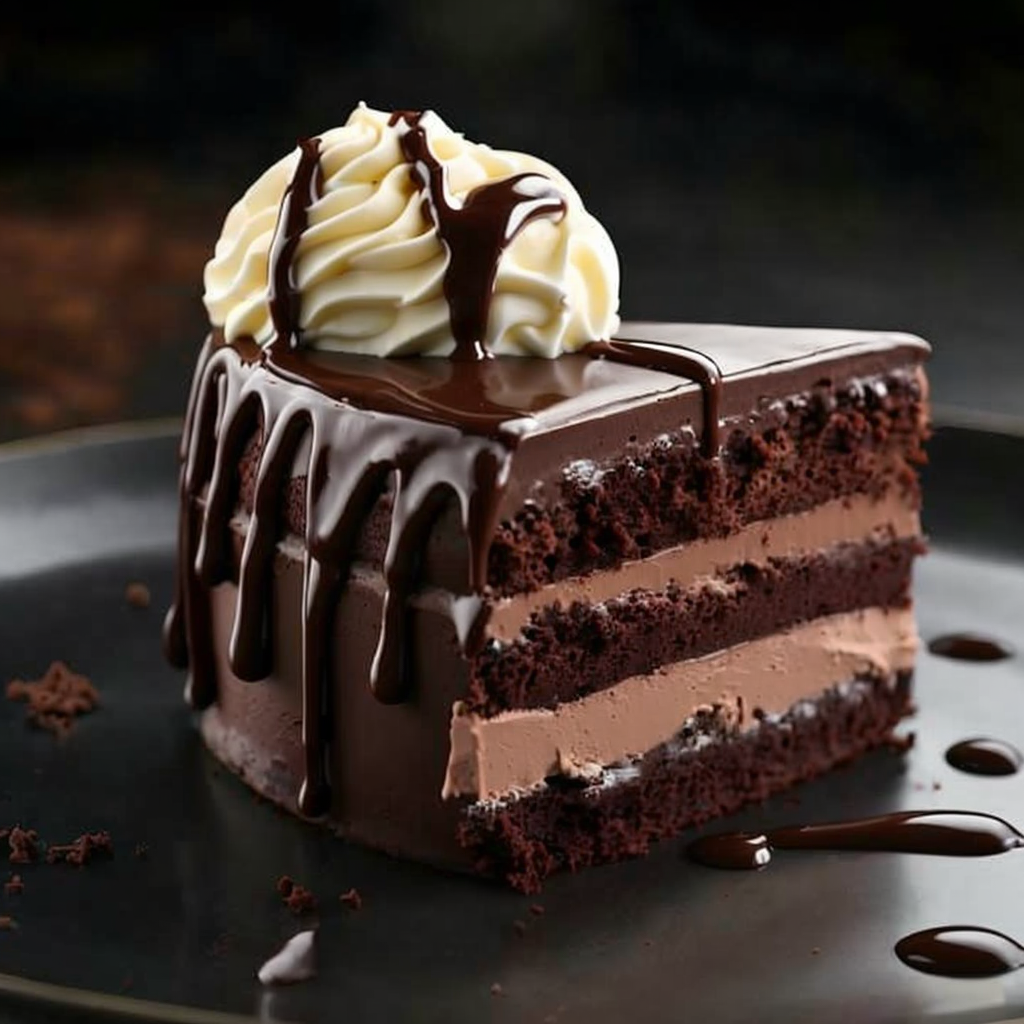
Indulge your senses with this Triple Chocolate Mousse Cake, a dessert that embodies richness and sophistication. This cake is designed for true chocolate aficionados, layering dark, milk, and white chocolate to create a delectable trifecta. The velvety mousse texture melts in your mouth, providing a luxurious experience that is both pleasing to the palate and eye.
The moment you slice into this cake, you unveil three distinct layers of luscious chocolate, enticing everyone for a taste. The combination of flavors—bitter dark chocolate, sweet milk chocolate, and creamy white chocolate—plays perfectly together, offering a round, harmonious taste that leaves a lingering sweetness. It’s an impressive showpiece that’s perfect for special occasions or a decadent treat at home.
Quick Recipe Highlights
Flavor Profile: Experience a rich blend of dark, milk, and white chocolates that create a symphony of chocolatey goodness.
Texture: The mousse layers are light yet rich, providing a delightful contrast to the chocolate cake base.
Aroma: The bouquet of melted chocolate, buttery notes, and hints of vanilla fill the air as you prepare this dessert.
Visual Appeal: This cake showcases stunning layers of chocolate, each layer contrasting beautifully with the others, topped with elegant chocolate shavings.
Skill Level Needed: This advanced recipe requires precision and attention to detail but is absolutely worth the effort.
Special Equipment: A springform pan and a mixer are essential for achieving that perfect mousse consistency.
Recipe Overview
Difficulty Level: This recipe is classified as advanced due to the need for careful technique in layering and working with multiple types of chocolate.
Category: This dessert falls under the category of cakes and is perfect for celebratory events.
Cuisine: Rooted in French culinary tradition, the mousse technique adds an air of elegance to this delightful cake.
Cost: The approximate cost includes premium chocolate and quality ingredients, totaling around $30.
Season: Ideal for any time of year, it’s especially popular during holidays and special celebrations.
Occasion: Perfect for birthdays, anniversaries, and dinner parties where you want to impress guests with a stunning dessert.
Why You’ll Love This Recipe
This Triple Chocolate Mousse Cake is a remarkable dessert that promises to tantalize taste buds with its rich and layered chocolate flavors. Every bite offers a delightful texture, providing a perfect balance between creaminess and lightness. Not only does it satisfy a chocolate craving, but it also serves as a showstopper for any occasion, making it a favorite among guests.
The convenience in preparing the mousse separately allows for an organized approach to baking. Although it’s an intricate process, each component can be made ahead of time and assembled just before serving. This cakes offers impressive nutritional benefits thanks to the antioxidants present in dark chocolate, promoting heart health while indulging in a treat.
Beyond its taste and preparation ease, this cake also serves as a fantastic centerpiece for social gatherings. The experience of sharing a beautiful dessert, coupled with conversation, adds warmth to any occasion. It’s an enticing dessert that invites everyone to partake in the joy and celebration of culinary creativity.
Cost effectiveness is another appealing aspect of this recipe. By choosing high-quality ingredients, you enhance the flavor while still being mindful of your budget. With portions allowing for sharing, this dessert spreads joy without breaking the bank.
Finally, the versatility of flavors means that this recipe is adaptable. You can easily modify the chocolate types, experiment with additions like fruit or spices, and create variations that suit your preferences or dietary needs, making it a cherished recipe you’ll enjoy time and again.
Historical Background and Cultural Significance
Chocolate mousse originated in France and has since captivated dessert lovers around the globe. Dating back to the 18th century, the word ‘mousse’ translates to ‘foam’ in French, referring to its light, airy texture that was revolutionary for the time. This dessert quickly became popular among the elite, prized for its richness and creamy consistency.
Over the years, the preparation of mousse evolved from a simple blend of chocolate and cream to more intricate variations, allowing for creativity in flavors and presentations. As culinary techniques advanced, recipes began to incorporate different types of chocolate, leading to delightful creations like the Triple Chocolate Mousse Cake we cherish today.
Culturally, this cake represents indulgence and celebration. It is often featured at gatherings and significant events, allowing hosts to showcase their culinary skills and elevate any dining experience. The cake embodies joy and the sweetness of life, making it a traditional favorite for moments of festivity.
Local variations of mousse can be found across many countries, with each culture adding its unique twist. From rich chocolate to fruity or coffee-infused versions, the basic concept remains constant—creating a luxurious dessert that embodies the art of indulgence and celebration.
Ingredient Deep Dive
Dark Chocolate
Dark chocolate is the star ingredient in this mousse cake, renowned for its rich flavor and health benefits. Originating from the cacao bean, dark chocolate is lower in sugar compared to its counterparts, making it the healthiest chocolate choice. It boasts a high antioxidant content, which can help reduce inflammation and improve heart health. When selecting dark chocolate, look for one that contains at least 70% cocoa for the richest flavor.
Proper storage of dark chocolate is essential to maintain its quality; keep it in a cool, dry place to avoid moisture absorption. If you need a substitute, consider using semi-sweet chocolate, but be aware this will alter the flavor profile.
Milk Chocolate
Milk chocolate brings a creamier, sweeter element to this recipe, creating balance among the chocolate layers. Known for its smooth texture and comforting flavors, it is loved by many and plays a crucial role in reducing the overall richness of the cake. Milk chocolate contains less cocoa than dark, but it still offers some health benefits, particularly due to its calcium content.
When choosing milk chocolate, opt for higher-quality brands as they tend to have better flavor and texture. Proper storage involves keeping it in a temperature-controlled environment to prevent blooming. If you wish to modify this cake, you could substitute white chocolate for a different flavor profile.
White Chocolate
While often debated, white chocolate has its place in this cake for its sweetness and smooth mouthfeel. It consists of cocoa butter, sugar, and milk solids, absent of cocoa solids, which gives it its unique creamy texture. It offers a lovely visual and flavor contrast to the darker chocolates, elevating the overall appeal.
Rather than focusing on the health benefits of white chocolate, consider it for enjoyment purposes. Properly store it in a cool, dry place away from strong odors. You can replace white chocolate with vanilla or butterscotch chips if you desire a twist, though this will change the flavor.
Common Mistakes to Avoid
Overheating Chocolate: Always melt chocolate gently to prevent it from seizing. Use a double boiler or low microwave settings.
Not Folding Properly: When incorporating whipped cream, fold gently to maintain the airy texture of the mousse.
Using Subpar Ingredients: Quality chocolate makes a significant difference; always use the best you can find for great results.
Ignoring Temperature: Ensure your eggs and cream are at room temperature for optimal mixing.
Skipping Chilling: Allowing the mousse to chill is essential, as it helps it set and develop flavors.
Overmixing: Mixing mousse too aggressively can deflate it, leading to poor texture.
Not Tasting: Always taste your mousse mixtures before final assembly to adjust sweetness or chocolate intensity.
Unbalanced Layers: Be mindful of thickness when layering; aim for an even distribution for visual appeal.
Improper Pan Preparation: Always line your springform pan well to facilitate easy removal after chilling.
Using a Thin Knife: Use a hot knife for slicing to ensure clean, beautiful layers when serving.
Essential Techniques
One key technique in this recipe is melting chocolate smoothly. Chocolate can easily seize if overheated; to master this, always melt at low temperatures, and avoid direct heat. A double boiler is an excellent tool for this, as it allows for gentle heating without burning.
Another essential technique is whipping cream. The goal is to achieve soft peaks without overwhipping, which can turn cream into butter. When whipping, start at a slower speed and gradually increase to maintain an even consistency. Stop when soft peaks form, and remember that it will be folded into the mousse, so it shouldn’t be overly stiff.
Pro Tips for Perfect Triple Chocolate Mousse Cake
1. Use high-quality chocolate for an intense flavor that shines through each layer.
2. Warm your mixing bowl slightly before whipping cream to help it whip faster.
3. Chill the cakes before assembly for easier layer handling and better structure.
4. If you want a glossy finish, consider glazing the top with ganache after chilling.
5. Let each layer cool completely before adding the next to avoid melting the mousse layer below.
6. For an added touch, sprinkle cocoa powder or grated chocolate on top before serving.
7. Always use room temperature eggs for a more stable mousse structure.
8. Use a serrated knife to slice the cake cleanly, enhancing the presentation.
Variations and Adaptations
You can explore many regional variations of this Triple Chocolate Mousse Cake. For instance, in Italy, mascarpone cheese can be added to the mousse for a richer texture and a hint of flavor. Seasonal adaptations might include incorporating fresh fruit, like raspberries or strawberries, which pair wonderfully with chocolate and add a burst of freshness.
For dietary modifications, consider making a vegan version using plant-based chocolate and aquafaba as a substitute for whipped cream. Flavor variations can be achieved by adding espresso, spices, or liqueurs like Kahlua for an adult twist. Texture modifications can involve adding a layer of crunchy nuts or a biscuit crust for a delightful contrast.
Finally, presentation alternatives include serving mousse in individual glasses instead of a cake format, which is perfect for parties and gatherings to create an elegant touch.
Serving and Presentation Guide
For an exquisite presentation of your Triple Chocolate Mousse Cake, consider using a decorative cake stand. When plating, place a slice of cake at an angle on the plate to create a visually appealing display. You can garnish each slice with chocolate curls, fresh berries, or a dollop of whipped cream for an elegant touch.
Traditional accompaniments like vanilla ice cream or a berry coulis can enhance the overall flavor profile. Warm chocolate sauce drizzled over the top or the side can elevate the dessert experience. Note that temperature plays a crucial role; serve this cake cold from the refrigerator to maintain its mousse texture and flavors.
For portion control, consider slicing the cake into smaller, bite-sized pieces, especially if serving alongside other desserts. This allows guests to enjoy a variety of treats without feeling overwhelmed.
Wine and Beverage Pairing
Pairing wine with your Triple Chocolate Mousse Cake can enhance the dessert experience. A rich Cabernet Sauvignon or a fruity Merlot complements the deep flavors of the dark chocolate, bringing out its nuances. Alternatively, a dessert wine like Port or a sweet Sherry will harmonize beautifully, accentuating the cake’s sweetness.
For non-alcoholic options, consider serving a rich hot chocolate or a coffee brewed with chocolate notes. Herbal teas can also provide a lovely palate cleanser to accompany the dessert. Ensure that drinks are served at the right temperature; warm beverages tend to contrast well with the chilled mousse.
Finally, for those coffee lovers, a smooth espresso can enhance the richness of the chocolate, creating a delightful combination of flavors that rounds off the dessert beautifully.
Storage and Shelf Life
To ensure your Triple Chocolate Mousse Cake stays fresh, store it in an airtight container in the refrigerator. This dessert generally lasts for about 3-5 days, but for the best flavor experience, it’s best enjoyed within the first couple of days.
Avoid leaving the cake exposed to air as this can lead to drying out. When freezing, wrap the cake in plastic wrap and aluminum foil to prevent freezer burn; it can last up to 1 month. However, note that the texture may change slightly after thawing.
When reheating, allow the cake to come to room temperature before serving, as the mousse is best enjoyed chilled. Keep an eye on the cake for any signs of spoilage, which might include an off smell or a change in texture.
Make Ahead Strategies
This dessert is an excellent make-ahead option. Begin by preparing the mousse layers in advance — they can be made up to a day ahead and kept in the fridge. Bake the cake layers the day before serving, allowing them to cool completely before storing.
Assembling the cake can also be done a few hours before serving, allowing you to focus on other elements of your meal. Carefully layer the mousse and cake, and chill the assembled cake to ensure stability. If desired, add any garnishes right before serving for an elegant finish.
Before serving, consider adding fresh elements, such as whipped cream or fresh fruit, to enhance presentation and flavor. Just remember that freshness is essential for the best-tasting dessert experience.
Scaling Instructions
Scaling this Triple Chocolate Mousse Cake recipe can be done without much complication. If halving the recipe, maintain proportions for the mousse and cake for best results; each layer should remain consistent for texture and flavor.
To double or triple the cake, ensure your equipment can accommodate the increased volume. Larger mixing bowls and pans will be necessary. Timing modifications may also be required, as larger cakes could take longer to bake and chill completely.
When considering storage, be mindful of increased batch sizes. Layered cakes may require additional cooling time, so prepare accordingly to enjoy this delectable dessert without compromising quality.
Nutritional Deep Dive
A thorough analysis of the nutritional content of the Triple Chocolate Mousse Cake reveals a rich dessert loaded with unique benefits. The macronutrient breakdown shows a balance of carbohydrates primarily from sugar and flour, fats from chocolate and cream, and a modest amount of protein from eggs.
Micronutrients offer beneficial elements; dark chocolate is particularly high in magnesium and antioxidants. However, due to its rich ingredients, it’s worth noting this cake is high in calories, so moderation is key when indulging.
For dietary considerations, it’s essential to acknowledge portion sizes when enjoying this decadent dessert. A small slice can be surprisingly satisfying due to the rich flavor, making it easy to control intake while still enjoying this luscious treat.
Dietary Adaptations
The Triple Chocolate Mousse Cake can be adapted for various dietary needs. A gluten-free option can be achieved by substituting traditional flour with almond flour or gluten-free flour blends, allowing for the same texture without compromising flavor.
For a dairy-free version, use plant-based chocolates and creams; ensure all ingredients are free from dairy preservatives. Vegan adaptations can include egg replacements like flaxseed or chia seeds, along with an emphasis on plant-based creams to create the mousse.
Low-carb and keto options might consider using sugar substitutes and almond flour, reducing carbohydrates while maintaining flavor. Keep in mind that these adaptations may slightly alter the flavor and texture, but experimentation can yield worthwhile results.
Troubleshooting Guide
If your mousse turns out grainy, it might be due to overheating the chocolate. To avoid this, melt chocolate gently and ensure it cools slightly before mixing with whipped cream. If your mousse is too runny, consider re-whipping the cream to add more volume.
Issues with separation in the layers can arise from improperly folding ingredients. Always fold gently to incorporate without losing air, as this is crucial for a proper mousse. If the cake layers collapse during assembly, ensure that they are adequately cooled before layering.
Timing concerns, such as mousse not setting, often stem from not chilling long enough. Allow the cake to chill adequately before serving to ensure each layer holds well. Lastly, if you find the flavor lacks richness, adjust by adding a bit more dark chocolate or a touch of espresso.
Recipe Success Stories
Community feedback on this Triple Chocolate Mousse Cake recipe has been overwhelmingly positive. Many home bakers have shared their joyful experiences of creating this dessert for special occasions, noting how it consistently impresses friends and family.
Some have successfully experimented with flavor variations, incorporating hazelnuts or coffee to enhance the chocolate, garnering rave reviews. Others have expressed satisfaction with the presentation, finding that the layered approach makes for a stunning centerpiece.
Readers suggest taking photos throughout the baking journey and sharing those with their social media communities, fostering engagement and showcasing the cake’s beauty. Each success story reiterates that this cake is more than just dessert; it’s a celebratory experience.
Frequently Asked Questions
Can I use different types of chocolate for the mousse?
Yes! You can customize the flavors by using various types of chocolate such as milk, dark, and even flavored chocolates like mint or orange. Just ensure that the ratios are balanced to maintain the structure of the mousse.
How do I know when the cake is properly baked?
A toothpick inserted in the center should come out clean or with a few moist crumbs attached. Avoid overbaking, as this can dry out the cake.
Is it necessary to chill the mousse before assembling?
While it’s not strictly necessary, chilling the mousse will help it to firm up, making the assembly process much easier and less messy.
Can I make this cake gluten-free?
Absolutely! Substitute the flour with a gluten-free blend or almond flour to achieve a similar texture without gluten.
How long does the mousse cake last in the fridge?
The cake can last about 3-5 days in the fridge when stored properly in an airtight container. For the best quality, enjoy it within the first couple of days.
Can I freeze the mousse cake?
Yes, this cake can be frozen! Wrap it well in plastic wrap and aluminum foil, and it can last for about a month in the freezer. Thaw it in the fridge before serving for the best texture.
What if my chocolate mousse is too thick?
If the mousse seems too thick, you can gently fold in a bit of whipped cream until you reach your desired consistency. This helps maintain the lightness of the mousse.
Can I use whipped topping instead of homemade whipped cream?
While you can use whipped topping, homemade whipped cream provides a fresher taste and better texture. If you’re short on time, though, whipped topping is a convenient alternative.
What’s the best way to serve this cake?
Serving the cake chilled is best. Consider garnishing with berries, chocolate shavings, or a drizzle of chocolate sauce to enhance the presentation and flavor.
Can I add fruit to this recipe?
Yes, fresh fruit such as raspberries or strawberries can be added between the layers or used as a garnish. They provide a refreshing contrast to the richness of the chocolate.
Additional Resources
For those looking to explore more, consider trying other chocolate-centered recipes like rich brownies, chocolate lava cake, or even a classic chocolate mousse. Each recipe offers a different take on the beloved ingredient and provides wonderful options for various occasions.
You might also be interested in technique guides focusing on mastering the art of baking cakes or creating different types of mousses. Familiarizing yourself with these techniques can enhance your skills and give you confidence in the kitchen.
Exploring ingredient information about high-quality chocolates and how to select the best ones can significantly impact your baking results. Additionally, seasonal variations might inspire unique adaptations to align flavors with changing seasons.
Finally, recommending essential baking equipment can enhance your kitchen toolkit, allowing you to create professional desserts from the comfort of home.
Join the Conversation
We’d love to hear about your experiences with the Triple Chocolate Mousse Cake! Share your creations on social media and tag us to showcase your delicious versions. Photography offers a great opportunity for beautiful presentation, so don’t forget to capture your culinary masterpieces.
Engage with our community by sharing your thoughts, tips, and suggested variations. Encourage others to try their hand at this decadent recipe, creating a dish that not only pleases the palate but also fosters connections during gatherings. Your feedback and experiences contribute to a collective journey of culinary exploration and joy.
The Recipe
Triple Chocolate Mousse Cake
Serves: 10
Prep Time: 30 mins
Cook Time: 60 mins
Total Time: 90 mins
Kitchen Equipment Needed
Springform pan
Double boiler
Mixing bowls
Hand or stand mixer
Rubber spatula
Serrated knife
Ingredients
8 oz dark chocolate, chopped
8 oz milk chocolate, chopped
4 oz white chocolate, chopped
4 large eggs, separated
1 cup heavy cream
1 cup powdered sugar
1 teaspoon vanilla extract
1/2 cup all-purpose flour
1/2 cup unsweetened cocoa powder
Directions
Preheat oven to 350°F (175°C) and grease a springform pan.
Melt dark chocolate over a double boiler, then let it cool slightly.
In a mixing bowl, whisk together egg yolks and half of the sugar until pale and creamy.
Fold in the melted dark chocolate and cocoa powder into the egg mixture.
In another bowl, whip the egg whites until soft peaks form, gradually adding the remaining sugar.
Gently fold the whipped egg whites into the chocolate mix until fully combined.
Pour mixture into the prepared pan and bake for 25-30 minutes. Let it cool.
Repeat the process for the milk and white chocolate layers.
For mousse, whip cream until soft peaks and fold into cooled chocolate mixtures layer by layer.
Chill each layer at least 1 hour before stacking them together.
Serve with toppings as desired.
Recipe Notes
You can replace chocolates with different flavors as desired.
Ensure each layer is cool before frosting to avoid melting.
Be creative with decorations; fresh berries or mint make festive garnishes.