Sweet and Savory Brown Sugar Potatoes Recipe to Try Today

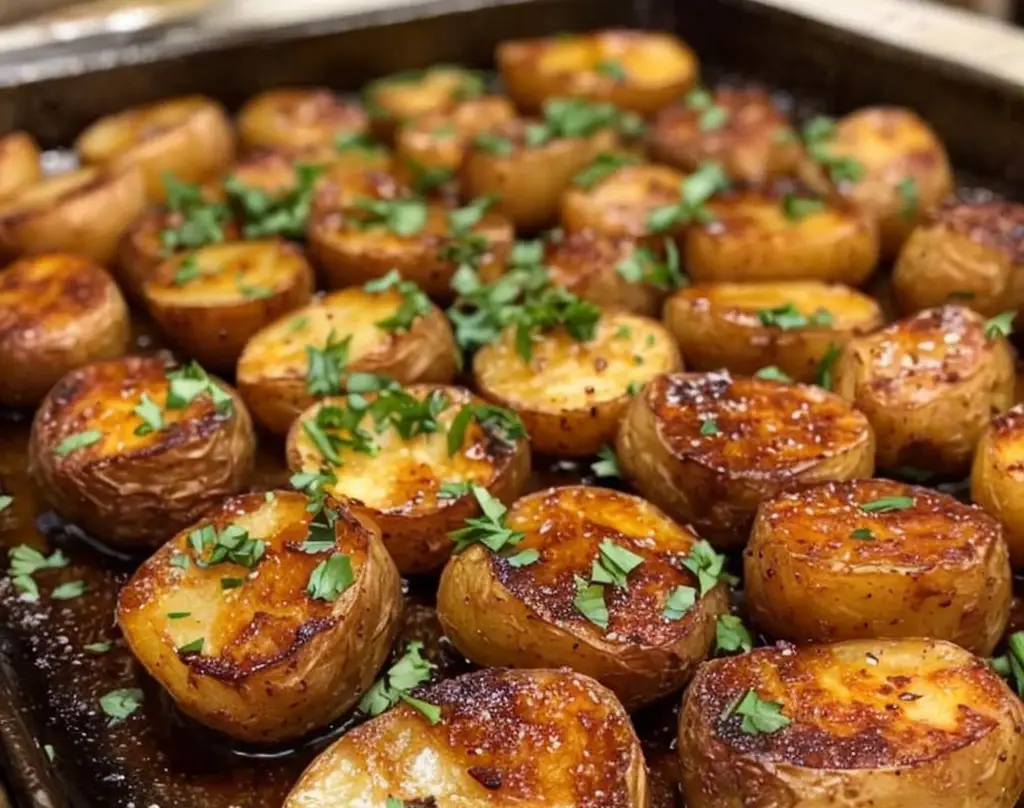
Sweet and Savory Brown Sugar Potatoes: A Comforting Delight

⚖️
Difficulty
Easy

⏲️
Prep Time
15 mins

🕒
Cook Time
30 mins

⏱️
Total Time
45 mins

🍽️
Servings
4

Brown sugar potatoes are the ultimate comfort food, combining the sweetness of brown sugar with the earthy flavor of potatoes. As the potatoes roast, they caramelize in a rich, buttery glaze that gives them a sweet and savory allure. This dish is not only simple to prepare but also makes for a delightful side that pairs well with various mains, making it a versatile addition to any meal.

Imagine the aroma wafting through your kitchen, a fragrant mix of buttery sweetness with a hint of caramelization as these beautiful brown sugar potatoes cook to perfection. Their golden-brown exterior and soft, tender inside create a sensory experience that is simply irresistible. Whether you are entertaining guests or enjoying a family dinner, these potatoes promise to elevate your menu.

Quick Recipe Highlights

  • Flavor Profile: Sweet and savory with a hint of spice, making for a delightful contrast.
  • Texture: Crispy on the outside, soft and fluffy on the inside—perfectly balanced.
  • Aroma: The sweet scent of brown sugar and butter fills your kitchen, inviting everyone to the table.
  • Visual Appeal: The golden hue of caramelized sugar on the potatoes glistens beautifully.
  • Skill Level Needed: Suitable for beginner and seasoned cooks alike, requiring only basic techniques.
  • Special Equipment: A baking sheet and aluminum foil for easy cleanup are recommended.

Recipe Overview

  • Difficulty Level: This recipe is classified as easy, making it perfect for those new to cooking or busy home chefs.
  • Category: A perfect side dish for family dinners or holiday gatherings, complementing various meat and vegetarian entrees.
  • Cuisine: Rooted in American home cooking, this dish adopts a sweet and savory approach often found in southern cuisine.
  • Cost: Inexpensive to prepare, this dish can be made with budget-friendly ingredients you likely already have on hand.
  • Season: Although delightful year-round, brown sugar potatoes shine best during the fall and winter months.
  • Occasion: Ideal for Thanksgiving dinners, casual family meals, and festive celebrations.

Why You’ll Love This Recipe

This recipe for brown sugar potatoes stands out because of its perfect harmony of taste and texture. The balance of sweet and savory makes every bite delicious, with aromas that add warmth to your home. The simplicity of the recipe allows for easy preparation, making it an ideal choice for busy nights or special occasions. Nutritionally, potatoes provide essential vitamins while the sweetness of brown sugar can satisfy your sweet tooth without overwhelming it.

When hosting gatherings, brown sugar potatoes serve as an excellent conversation starter. Their unique flavor invites questions and compliments alike, enhancing the dining experience. The affordability of this dish also contributes to its widespread appeal, as it requires minimal investment yet yields satisfying results.

Historical Background and Cultural Significance

The origins of brown sugar potatoes trace back to traditional American cooking, where simple ingredients are transformed into comforting fare. This dish reflects the essence of home-cooked meals, evoking memories of family gatherings and celebrations. Over time, this recipe has evolved, with families adding personal touches, making it unique to their heritage.

Culturally, brown sugar potatoes symbolize hospitality and community. They are often served during festive occasions and gatherings, fostering connections among friends and family. In many households, the preparation of this dish is passed down through generations, each adding their flair and techniques that honor their ancestors.

Different regions may have their interpretations of this dish, incorporating local ingredients that reflect their culinary traditions. This variation enhances its versatility, allowing it to fit seamlessly into diverse menus while remaining a favorite comfort food.

Ingredient Deep Dive

Potatoes: Potatoes are celebrated for their versatility and nutritional benefits. Rich in vitamins and potassium, they provide sustained energy and satisfy hunger. Choosing the right potato is crucial; starchy varieties like Russets are perfect for this recipe due to their fluffy texture when cooked.

Brown sugar: This ingredient infuses sweetness and depth to the dish. Brown sugar’s molasses content enhances flavor complexity, making it ideal in various recipes. Opting for light brown sugar will yield a milder taste, while dark brown provides a richer flavor. Store brown sugar in an airtight container to keep it moist and fresh, and if necessary, it can be substituted with coconut sugar for a unique twist.

Common Mistakes to Avoid

  • Not Preheating the Oven: Always preheat to ensure even cooking and proper caramelization.
  • Cutting Potatoes Unevenly: Cut potatoes into similar sizes to ensure uniform cooking.
  • Using Too Much Sugar: Balance is key; too much can overpower the dish.
  • Overcooking: Keep an eye on the potatoes to avoid mushiness; they should be tender yet firm.
  • Skipping Foil: Covering during part of the baking process can help steam the potatoes, enhancing texture.
  • Using the Wrong Type of Potato: Select starchy potatoes for the best results; waxy types won’t achieve the desired fluffiness.
  • Neglecting Seasoning: Don’t forget to season potatoes before baking; it elevates the flavor profile.
  • Not Tasting Before Serving: Always taste your dish before serving to ensure the flavors are to your liking.

Essential Techniques

Proper roasting is essential for achieving the perfect texture in brown sugar potatoes. Ensure your oven is adequately preheated; this promotes caramelization, resulting in a deliciously sweet crust. To master roasting, keep the potatoes in a single layer for even heat distribution, which prevents steaming and encourages crispiness.

Lifting the foil during the last minutes of cooking allows the potatoes to brown beautifully. Watch for visual cues—golden edges are a sign of delicious caramelization. If your brown sugar potatoes aren’t browning as desired, consider increasing the oven temperature slightly for the final minutes of baking for optimal results.

Pro Tips for Perfect Brown Sugar Potatoes

To ensure your brown sugar potatoes turn out perfectly every time, try the following tips. First, coat your potatoes with melted butter before adding sugar; this fosters an incredible glaze. Additionally, consider adding spices such as cinnamon or nutmeg for more depth and warmth.

For an extra crunch, sprinkle some breadcrumbs over the potatoes before baking. If allowed, let the potatoes sit after baking for a few minutes to let the flavors settle in, enhancing taste. Adding a splash of apple cider vinegar can balance the sweetness with a tangy note.

Variations and Adaptations

Brown sugar potatoes can be adapted to fit various culinary preferences. For a seasonal twist, add pecans or walnuts for crunch during the fall. If you prefer a healthier version, reduce the amount of brown sugar and substitute with a sugar alternative. For those with dietary restrictions, explore using sweet potatoes for a different flavor profile and added nutrients.

Incorporating seasonal vegetables like carrots or parsnips can create a colorful medley, appealing visually and nutritionally. On top of that, try infusing the dish with herbs such as rosemary or thyme for a sophisticated taste.

Serving and Presentation Guide

For beautiful presentation, arrange the brown sugar potatoes on a platter, garnished with fresh herbs. A sprig of parsley or a sprinkle of chopped chives adds color and elevates the dish’s presentation. Serve alongside grilled meats or roasted vegetables for a balanced plate.

When serving, consider temperature; brown sugar potatoes are best enjoyed warm, right from the oven. Portion control can be managed by using small bowls to allow guests to help themselves, creating a more inviting experience.

Wine and Beverage Pairing

Pairing beverages with brown sugar potatoes can enhance the dining experience. A Sauvignon Blanc with its crisp acidity can provide a lovely contrast to the sweetness of the potatoes. For red wine enthusiasts, consider a medium-bodied Pinot Noir that complements the dish’s flavors without overpowering it.

For non-alcoholic options, a sparkling water with a twist of citrus can refresh the palate, while a lightly brewed iced tea provides a comforting pair. Temperature plays a crucial role; serve wines chilled and non-alcoholic options at room temperature to highlight their flavors.

Storage and Shelf Life

Proper storage of brown sugar potatoes ensures they retain their deliciousness. Allow leftovers to cool completely before transferring to an airtight container. Store them in the refrigerator for up to three days. Reheating can be done in an oven to restore their crispy texture, avoiding the microwave which may make them soggy.

For long-term storage, consider freezing the dish. To do this, lay the potatoes flat on a baking sheet to freeze them individually before transferring to a freezer-friendly container. This method prevents clumping, allowing you to take out only what you need.

Make Ahead Strategies

For those looking to save time, preparing brown sugar potatoes a day in advance is entirely feasible. Cut and coat the potatoes in the brown sugar mixture, then store them in the refrigerator until ready to bake. This allows flavors to develop and eliminates hassle during mealtime.

Consider assembling the dish in the morning and popping it into the oven just before serving, ensuring it’s fresh from the oven when it’s time to eat. When reheating, if you’ve made it ahead, doing so on a lower temperature will help preserve its texture and flavor.

Scaling Instructions

Adjusting this recipe to serve more or fewer people is simple. To halve the recipe, use smaller potatoes and accordingly reduce the brown sugar and butter. When doubling or tripling, be aware of the size of your baking dish; you may need additional cooking time to ensure even cooking.

Timing modifications may be necessary based on the size of the dish. Monitor the potatoes closely as they may need a little longer to cook through without burning.

Nutritional Deep Dive

Brown sugar potatoes provide a hearty serving of carbohydrates, ideal for an energy boost. They also carry micronutrients such as vitamin C and potassium, which support overall health. While potatoes are naturally low in calories, the addition of brown sugar and butter should be considered for those monitoring their caloric intake.

Portion control is vital when enjoying this delicious side. Understanding serving sizes is essential for maintaining a balanced diet while indulging in this comforting dish. Opting for sweet potatoes can enhance the nutritional value by adding fiber and vitamins while keeping the familiar taste.

Dietary Adaptations

Brown sugar potatoes can be easily adapted for various dietary needs. A gluten-free version can be easily achieved, as this recipe naturally does not include gluten. For those needing dairy-free options, substitute butter with a non-dairy alternative.

Vegans can replace butter with coconut oil, preserving creaminess while maintaining the sweetness from brown sugar. Low-carb enthusiasts might explore using cauliflower instead of potatoes, adjusting cooking times accordingly. These adjustments maintain the spirit of the dish while accommodating diverse dietary preferences.

Troubleshooting Guide

If your brown sugar potatoes turn out too sweet, consider reducing the amount of brown sugar next time or balancing the sweetness with a pinch of salt. Should they become soggy during cooking, ensure they are not overcrowded on the baking sheet to avoid steaming.

If you’re struggling with uneven cooking, verify that your oven is accurately calibrated, and rotate the baking sheet halfway through. For flavor concerns, taste and adjust seasonings before serving; adding a splash of apple cider vinegar can enhance the flavor profile if it feels one-dimensional.

Recipe Success Stories

Many home cooks have embraced this brown sugar potatoes recipe, sharing their delightful experiences. One reader noted how the dish became a staple at family gatherings, often receiving rave reviews for its comforting flavors. Adaptations such as adding garlic and herbs have led to creative twists on the original, showcasing the recipe’s versatility.

Photographers in the community recommend presenting the dish in vibrant colored bowls or on textured wooden platters. Sharing these experiences not only celebrates individual creativity but also inspires others to put their spin on the beloved brown sugar potatoes.

Frequently Asked Questions

Can I use other types of sugar?
Yes, while brown sugar provides a unique flavor, coconut sugar or maple syrup can also work. Adjust measurements based on sweetness preference.

Are leftovers good the next day?
Leftovers will keep well for 3 days when stored correctly. Reheating can maintain texture and flavor if done in the oven.

Can I add other vegetables?
Absolutely! Consider adding carrots or parsnips for additional flavors and textures. Ensure they are cut to similar sizes for even cooking.

What types of potatoes are best?
Starchy potatoes like Russets or Yukon Gold are ideal due to their fluffy texture. Avoid waxy potatoes as they don’t caramelize well.

Is this recipe suitable for meal prep?
Yes, this dish can be prepared ahead of time and stored in the refrigerator, making it a convenient option for busy weeks.

How do I prevent the potatoes from burning?
Monitor cooking time closely and use foil to cover the potatoes if they brown too quickly, uncovering them for the last few minutes.

Can this recipe be made in a slow cooker?
Yes! You can adapt the recipe for a slow cooker, allowing the flavors to meld beautifully over several hours.

What spices work well in this recipe?
Cinnamon, nutmeg, or even paprika can be added for an extra flavor punch and warmth—feel free to experiment with your favorites!

How do I know when they are done?
The potatoes should be golden brown and easily pierced with a fork when they are finished cooking.

Can I freeze brown sugar potatoes?
Yes, they can be frozen for future use. Consider blanching before freezing to preserve texture, and reheat properly to retain the flavor.

Additional Resources

If you’re interested in exploring more recipes like brown sugar potatoes, check out our site for delicious side dishes that complement any meal. Additionally, several technique guides can aid in perfecting your cooking skills, helping you unlock new flavors. Dive into our ingredient information section for nutritional details and sourcing tips.

Our equipment recommendations will equip you with the necessary tools for successful cooking, ensuring you have everything you need to replicate this comforting dish. Seasonal variations can offer fresh ideas tailored to available ingredients, keeping your meals exciting.

Join the Conversation

We invite you to share your experiences and photographs of your brown sugar potatoes creations on social media with our community. Your feedback on this recipe inspires fellow cooks and contributes to an engaging community.

Recipe reviews are crucial, so please share your thoughts on how this dish turned out for you. If you’ve made variations or adaptations, we want to hear about those too! Join us in creating a vibrant network of culinary enthusiasts as we explore new flavors and celebrate the joys of cooking together.

The Recipe

Brown Sugar Potatoes

Serves: 4

Prep Time: 15 mins

Cook Time: 30 mins

Total Time: 45 mins

Kitchen Equipment Needed

  • Baking sheet
  • Aluminum foil
  • Mixing bowl
  • Measuring cups
  • Knife and cutting board

Ingredients

  • 4 medium potatoes, peeled and cubed
  • 1/2 cup brown sugar
  • 1/4 cup butter, melted
  • 1 teaspoon vanilla extract
  • 1/2 teaspoon salt
  • 1/4 teaspoon cinnamon (optional)

Directions

  1. Preheat your oven to 400°F (200°C).
  2. In a mixing bowl, combine melted butter, brown sugar, vanilla extract, salt, and cinnamon (if using).
  3. Add the cubed potatoes to the bowl and coat them evenly with the brown sugar mixture.
  4. Spread the potatoes in a single layer on a baking sheet, lining it with aluminum foil if desired for easy cleanup.
  5. Bake for 25 minutes, covered with foil, then uncover and bake for an additional 5-10 minutes until golden brown.
  6. Remove from the oven and let cool slightly before serving.

Recipe Notes

  • Feel free to add nuts or other spices for enhanced flavor.
  • These potatoes can be stored in the fridge for up to 3 days.
  • To reheat, place in the oven until warm; this helps retain crispness.

Lazy Girl Pecan Pie Bars: Quick, Delicious, and Perfect for Any Occasion

easy pecan pie bars, quick pecan dessert, no-fuss pecan bars, pecan pie squares, buttery pecan bars, lazy dessert recipes

Lazy Girl Pecan Pie Bars

Introduction

Lazy Girl Pecan Pie Bars are a simplified twist on the classic pecan pie, perfect for busy bakers or anyone looking for a quick, no-fuss dessert. With a buttery crust, gooey filling, and crunchy pecan topping, these bars deliver all the flavor of a traditional pecan pie in a fraction of the time.

For more quick and satisfying desserts, check out Raspberry Cheesecake Brownie Bites or Kentucky Butter Cake, both easy and crowd-pleasing options.


Ingredients and Tools

Ingredients:

  • Crust:
    • All-purpose flour, powdered sugar, melted butter.
  • Filling:
    • Eggs, brown sugar, light corn syrup, vanilla extract, and pecans.
  • Optional Additions:
    • Bourbon for depth of flavor, chocolate chips for extra sweetness.

Equipment:

  • 9×13 baking pan lined with parchment paper.
  • Mixing bowls, whisk, spatula.
  • Food processor (optional for crust).

Step-by-Step Recipe

  1. Prepare the Crust:
    • Combine crust ingredients in a bowl. Press into the baking pan and pre-bake at 350°F (175°C) for 10 minutes.
  2. Make the Filling:
    • Whisk eggs, brown sugar, corn syrup, and vanilla until smooth. Fold in pecans.
  3. Assemble and Bake:
    • Pour the filling over the pre-baked crust. Bake for 25–30 minutes until set.

Creative Variations

  • Chocolate Pecan Bars: Add a layer of chocolate chips to the crust before pouring the filling.
  • Maple Pecan Bars: Substitute corn syrup with maple syrup for a unique flavor.
  • Nut Medley Bars: Combine pecans with walnuts or almonds for a mixed-nut topping.

Tips for Perfect Bars

  • Preventing Soggy Crust: Ensure the crust is pre-baked before adding the filling.
  • Achieving Clean Slices: Let bars cool completely before cutting with a sharp knife.
  • Enhancing Flavor: Toast pecans lightly before incorporating into the filling.

Presentation and Serving


Storage and Freezing

  • Store in an airtight container at room temperature for up to 3 days.
  • Freeze individually wrapped bars for up to 2 months.
  • Reheat in the oven for a freshly baked texture.

FAQs

  1. Can I use store-bought pie crust?
    Yes, pre-made crusts can save time and work well.
  2. Can I make these bars gluten-free?
    Substitute all-purpose flour with a gluten-free blend.
  3. What’s the best way to cut clean squares?
    Use a sharp knife dipped in hot water, wiping between cuts.
  4. Can I replace corn syrup with honey or maple syrup?
    Yes, both work as alternatives but may alter the flavor slightly.
  5. Are these bars suitable for freezing?
    Absolutely. Wrap them individually for easy portioning.

Internal Linking Opportunities


Conclusion

Lazy Girl Pecan Pie Bars are a versatile and easy dessert that captures the essence of traditional pecan pie with less effort. Perfect for holidays, potlucks, or as a weekday treat, these bars are sure to impress and satisfy!

Delicious Homemade French Butter Cookies: Simple Recipe Inside!

Homemade French Butter Cookies Recipe: A Delightful Treat for Any Occasion

⚖️
Difficulty
Easy

⏲️
Prep Time
20 mins

🕒
Cook Time
12 mins

⏱️
Total Time
32 mins

🍽️
Servings
24 cookies

Indulging in Homemade French Butter Cookies brings an enchanting experience right to your kitchen. With rich buttery flavors and a melt-in-your-mouth texture, these cookies are a true testament to French baking. Each bite offers a perfect balance of sweetness and a delightful crumb that is sure to evoke feelings of warmth and comfort. These cookies can easily elevate any tea time or dessert spread with their elegant simplicity.

To create an inviting atmosphere, consider pairing these Homemade French Butter Cookies with a steaming cup of tea or coffee. Their buttery aroma fills the air as they bake, enticing your senses and promising a delightful treat. Perfectly golden and lightly crisped at the edges, these cookies not only taste delightful but look stunning on any platter, making them an excellent addition to celebrations or casual gatherings alike.

Quick Recipe Highlights

  • Flavor Profile: These cookies have a rich, buttery flavor complemented by a hint of vanilla, creating a perfect sweet treat.
  • Texture: Expect a tender, crumbly texture that melts in your mouth with every bite.
  • Aroma: A warm, buttery aroma fills your kitchen as they bake, making them irresistible.
  • Visual Appeal: Golden brown edges and a soft, pale center present a visually appealing dessert for any occasion.
  • Skill Level Needed: This easy recipe is suitable for bakers of all levels, making it beginner-friendly yet delightful for experienced cooks.
  • Special Equipment: A good quality baking sheet and parchment paper are essential for optimal baking.

Recipe Overview

  • Difficulty Level: This recipe’s simplicity makes it accessible for anyone. The straightforward steps and familiar ingredients help build confidence in novice bakers.
  • Category: Ideal for snacks, desserts, or tea time; these cookies fit a variety of edible categories.
  • Cuisine: French butter cookies, or “Sables,” are a classic French treat, showcasing the culinary tradition’s love for rich, indulgent flavors.
  • Cost: With minimal and affordable ingredients, you can create these luxurious cookies without breaking the bank.
  • Season: These cookies can be enjoyed anytime but especially shine during holidays and festive seasons.
  • Occasion: Perfect for birthdays, tea parties, or simply as a sweet treat at home, they suit multiple occasions.

Why You’ll Love This Recipe

The taste and texture of Homemade French Butter Cookies are unmatched. With their rich butter flavor enveloped in a light, crumbly exterior, each cookie delivers an exquisite sensation that both comforts and delights. The perfect sweetness complements a variety of beverages and makes every bite a moment of joy.

For those who love convenience, this recipe stands out. With a prep time of only 20 minutes, you can easily whip up a batch of cookies without extensive efforts. The process is straightforward, allowing you to engage in other activities while your cookies bake to perfection.

Nutritionally, while Homemade French Butter Cookies are definitely a treat, they can be enjoyed in moderation, offering a bit of joy without major guilt. The butter brings a richness that satisfies cravings effectively.

Socially, these cookies serve as an excellent addition to gatherings. Their classy appearance and delectable taste can ignite conversations and create joyful experiences. Whether you’re hosting friends or indulging with family, they’re sure to impress.

Cost-effectiveness is another bonus, as this recipe requires only a handful of basic ingredients. You won’t need to splurge on specialty items, making it accessible for everyone looking to enjoy a sophisticated dessert without monetary strain.

Historical Background and Cultural Significance

Homemade French Butter Cookies have a storied history that takes you on a journey through French culinary traditions. Originating in the 18th century, these cookies reflect the French love for butter and sugar in simple yet elegant treats. They demonstrate the French emphasis on elevating everyday ingredients into delightful confections.

The cultural significance of these cookies is profound, as they represent French baking’s artistic flair. Often enjoyed during gatherings and celebrations, they carry a sense of nostalgia and comfort that resonates across generations. Their presence in French literature and art further emphasizes their role in the nation’s cultural fabric.

Over the years, the recipe for these cookies has evolved, with several variations developing in different regions of France. Some locales impart unique flavors or shapes, but the essence remains the same—rich, buttery goodness.

Regional variations often include ingredients like chocolate or citrus zest, adding a local touch to the basic recipe. Each reinterpretation offers a glimpse into the unique culinary identities they represent, showcasing the versatility of this classic cookie.

Ingredient Deep Dive

The primary ingredient, butter, is the heart of the cookie, contributing not only flavor but also a tender texture. Historically, butter has been associated with indulgence and luxury in many cultures, including France, where the amount and quality of butter can greatly affect the final outcome of baked goods. Nutritionally, it provides fats that are essential for energy, but selection should focus on high-quality, unsalted butter for the best flavor.

Sugar, another key ingredient, serves not only as a sweetener but also as a tenderizer, helping to create the delicate crumb of the cookies. It has historical roots in ancient civilizations where it was considered a precious commodity. For optimal results, using granulated sugar allows for proper solubility and texture.

All-purpose flour is essential for structure, providing the necessary gluten formation to hold the cookies together. It’s widely used due to its versatility and availability. Whole wheat flour can be a healthier substitute, offering more fiber and nutrients, but may slightly alter the texture.

Vanilla extract adds aromatic depth to the cookies, embodying the essence of classic baking. This ingredient, derived from vanilla beans, carries a strong cultural significance in desserts, enhancing the overall sensory experience while offering its own unique health benefits, such as antioxidant properties.

Eggs play a crucial role in binding ingredients together, offering moisture and richness. Their use in cookies dates back centuries, making them a staple in baking. Understanding their role can help in selecting whether to use whole eggs or to substitute with eggless options for vegan recipes.

Common Mistakes to Avoid

  • Using cold butter: Ensure the butter is at room temperature for easy creaming, which leads to a light texture.
  • Overmixing the dough: This can result in tough cookies; mix just until combined.
  • Not chilling the dough: Skipping the chilling step can lead to cookies that spread too much during baking.
  • Ignoring oven temperature: A preheated oven ensures even baking and optimal cookie rise.
  • Baking on ungreased sheets: Use parchment paper to prevent sticking and promote even baking.
  • Wrong ingredient measurements: Always level ingredients accurately to ensure consistency in results.
  • Overbaking: Watch closely and remove cookies when they are lightly golden to retain their tenderness.
  • Storing improperly: Keep cookies in airtight containers to maintain their freshness and texture.

Essential Techniques

To achieve perfectly baked Homemade French Butter Cookies, mastering the creaming technique is paramount. Creaming butter and sugar until light and fluffy incorporates air, leading to a soft, light texture. Avoid the common pitfall of over-creaming, which can result in overly fluffy cookies rather than a tender crumb.

Another important technique is proper baking time management. Familiarize yourself with visual cues such as the color of the edges and the texture change of the cookies to determine doneness. Allow them to rest on the baking sheet briefly post-baking to firm up before transferring them to a cooling rack.

Pro Tips for Perfect Homemade French Butter Cookies

1. Use high-quality butter for the best flavor—real butter really makes a difference in taste.
2. Chill the cookie dough for at least 30 minutes before baking to prevent excessive spreading.
3. Experiment with flavorings—try almond extract or citrus zest for a unique twist.
4. Ensure even cookie size by using a cookie scoop for consistent portioning.
5. Store cookies in a cool, dry place to maintain freshness and prevent them from becoming stale.
6. For a decorative touch, sprinkle the tops with coarse sea salt before baking.
7. Double the batch and freeze half for a quick last-minute treat.
8. Try incorporating chocolate chips or nuts for added texture and taste variety.

Variations and Adaptations

To broaden the appeal of your Homemade French Butter Cookies, consider regional variations. In some French regions, spices like cinnamon or nutmeg can be incorporated for a warm flavor profile. During the holiday season, adding seasonal spices can enliven the classic cookie taste.

For a healthier adaptation, you could substitute part of the all-purpose flour with almond or oat flour. This modification can enhance nutrition while bringing a delightful nutty flavor to the cookies.

Dietary restrictions also allow for significant adaptations. Creating a vegan version by using plant-based butter, flaxseed meal, or applesauce as egg substitutes will lead to equally delicious results for dairy-free enthusiasts.

Texture modifications can be achieved by changing the baking time or experiment with the thickness of the dough when shaping cookies. Thicker cookies generally take longer to bake while remaining softer inside, while thinner ones will crisp up.

Additionally, consider seasonal adaptations by incorporating cranberries or pumpkin spice during fall, or lemon zest and blueberries in warmer months to create cookies that reflect their surroundings.

Serving and Presentation Guide

For a beautifully presented display of Homemade French Butter Cookies, consider using tiered serving platters to elevate their appearance. Garnish with fresh mint or edible flowers to enhance the visual appeal.

Offering additional accompaniments like chocolate dips or gourmet teas can enhance the overall experience. Plating techniques can include arranging cookies in a fan shape, or neatly stacking them, allowing guests easy access while adding visual interest.

Serve the cookies at room temperature, allowing the rich flavors to shine. For added enjoyment, consider portioning them into small boxes or bags tied with ribbons as charming take-home gifts for gatherings or special occasions.

Wine and Beverage Pairing

Pair your Homemade French Butter Cookies with a light dessert wine, such as a Moscato or a late harvest Riesling, which complements the sweetness of the cookies beautifully.

For a non-alcoholic alternative, serve them with a refreshing herbal tea, such as chamomile or peppermint, which contrasts nicely with the rich butter flavor.

If sharing these cookies with coffee lovers, consider brewing a classic espresso, as its boldness balances the sweetness. Ensure that all beverages served are at optimal temperatures to enhance the tasting experience.

Storage and Shelf Life

Homemade French Butter Cookies can be stored in an airtight container at room temperature for up to a week. If you wish to prolong their freshness, keeping them in the refrigerator can extend their shelf life.

For longer-lasting storage, these cookies freeze beautifully. Enter airtight freezer bags or containers, allowing you to enjoy a taste of homemade goodness even after weeks post-baking. Just ensure they are completely cooled before freezing to prevent condensation.

Signs of spoilage to look for include a change in texture or an off smell. When reheating, allow them to come to room temperature or give a quick burst in the microwave to revive their original softness.

Make Ahead Strategies

For those busy days, preparing Homemade French Butter Cookies can be made easier with strategic planning. You can prepare the dough in advance and keep it chilled in the refrigerator for a day before baking. This strategy not only saves time but also enhances the flavor as the dough rests.

Another option includes forming the cookies into shapes and freezing them before baking. This method means you can bake fresh cookies on a whim; just add an extra minute or two to the baking time.

Quality is maintained even when prepared ahead of time. Just remember to store any freshly baked cookies in airtight containers to maintain their texture and prevent staleness.

Scaling Instructions

If you’d like to adjust the quantity of your Homemade French Butter Cookies, scaling the recipe is straightforward. Halving the recipe is as simple as dividing the ingredients while maintaining the same ratios.

For larger gatherings, doubling or even tripling the recipe is easy. Just ensure you have enough oven space and baking sheets to accommodate larger batches, potentially requiring staggered baking times.

Equipment adjustments may involve larger mixing bowls and utensils to manage increased ingredient quantities. Timing modifications should be minimal, but be attentive to visual cues for doneness, as larger batches may require adjustments in baking time.

Nutritional Deep Dive

Understanding the nutritional profile of Homemade French Butter Cookies can help inform your enjoyment. Each cookie generally contains primarily carbohydrates and fats, with a balance of protein from butter and eggs. This combination provides a satisfying bite.

Micronutrient analysis can vary depending on added ingredients, but generally, cookies will lack substantial vitamins and minerals. To make them healthier, consider substituting some flour with whole grains or adding nuts for extra nutritional value.

Health benefits are mainly derived from moderation. When part of a balanced diet, these cookies can offer comfort and satisfaction without excessive calorie consumption.

Understanding portion sizes is beneficial for maintaining weight management goals. Consider enjoying a couple of cookies alongside a piece of fruit to create a balanced treat that satiates cravings without overindulgence.

Dietary Adaptations

For those following gluten-free diets, substituting traditional flour for a gluten-free blend or almond flour can yield delicious results without sacrificing taste. Ensure all other ingredients are also certified gluten-free.

Dairy-free versions can be achieved using plant-based butter and flaxseed eggs to replace traditional eggs, maintaining the flavor profile while adhering to dietary restrictions.

Vegans can delight in these cookies by utilizing similar substitutions, offering a rich and creamy taste without the use of animal products. Low-carb and keto adaptations could involve using almond flour and erythritol instead of granulated sugar.

For those with specific dietary needs, such as a low-FODMAP diet, consider adjusting the ingredient list to remove high FODMAP items while sticking to flavors that are gentle on the digestive system.

Troubleshooting Guide

Encountering problems while baking Homemade French Butter Cookies may seem daunting, but many issues are easily resolved. If your cookies turn out too tough, it’s likely due to overmixing the dough or adding too much flour. Ensuring proper measuring techniques and only mixing just until combined can help.

For flat cookies, check if your butter was too warm out of the fridge, leading to spreading during baking. Chilling your dough can help in achieving desired thickness.

If the flavors are off-balance, the addition of sweeteners or flavoring extracts may be necessary. Just a pinch of salt can elevate the overall flavor profile as well.

Texture issues can arise if the dough is not adequately chilled before baking. Adopting a chilling step in the preparation can ensure a better final outcome.

Recipe Success Stories

Listeners’ feedback on Homemade French Butter Cookies has been overwhelmingly positive! Many bakers report success with this recipe, raving about its simplicity and delectable taste. Variations using nut flours or citrus zest have garnered additional praise, highlighting the flexibility of this classic cookie.

Photography enthusiasts have also shared stunning images of their cookies, showcasing their golden-brown hue and elegant presentation. Homemade French Butter Cookies have become a crowd-pleaser at family gatherings, with stories of friends requesting the recipe after sampling these delightful treats.

Readily adaptable, bakers have experimented with various flavors, turning what began as a straightforward recipe into personal favorites, affirming that everyone should try to make these delicious cookies at home.

Frequently Asked Questions

Can I substitute the butter with margarine?

It is possible to substitute butter with margarine; however, the flavor and texture may not be as rich or authentic. If you choose to do so, opt for high-quality margarine to achieve better results.

How can I ensure my cookies are soft and chewy?

To achieve soft and chewy cookies, avoid overbaking. Remove them from the oven when they’re slightly underbaked; this allows them to continue cooking on the baking sheet.

Can I add chocolate chips to the dough?

Absolutely! Adding chocolate chips or chunks is an excellent way to customize the recipe and create variations that satisfy different taste preferences.

Is it necessary to chill the dough before baking?

Chilling the dough helps eliminate excess spreading, which results in cookies that are a more appealing shape. While not strictly necessary, it is highly recommended.

How should I store leftover cookies?

Store leftover cookies in an airtight container at room temperature for up to a week or freeze them for longer storage. Make sure they are completely cooled before storing.

What can I do if my cookies spread too much while baking?

If your cookies spread too much, try chilling the dough for longer before baking or reducing the amount of butter slightly in your next batch to see if it helps.

Can I use a different kind of flour?

Yes, you can use whole wheat flour for a healthier alternative, but be aware that it may slightly alter the texture and flavor. Gluten-free flour blends are also an option.

How do I know when the cookies are done baking?

Look for the edges to turn golden brown while the centers remain pale. The cookies should look slightly underbaked, as they will continue to set while cooling.

Can I freeze the cookie dough before baking?

Yes, you can freeze cookie dough! Shape it into balls, freeze them on a baking sheet, then transfer to an airtight container or bag for longer storage.

What is the best way to serve these cookies?

Presenting the cookies on a tiered platter with fresh herbs or flowers creates an inviting display. Pair them with tea or coffee for a delightful experience.

Additional Resources

For those eager to further explore baking, consider checking out related recipes for classic French pastries such as Madeleines or éclairs. These recipes carry similar techniques and flavors, making them excellent companions to your cookie-making experience.

Also, check out technique guides on how to create different dough textures or incorporating flavors into baking. Understanding your ingredients can also elevate your baking success, so delve into ingredient information, learning how butter, flour, and sugar interact.

If you’re fascinated by seasonal baking, explore recipes that reflect the changing seasons, combining fresh produce or festive spices to inspire your next baking adventure.

Join the Conversation

We love hearing from you! Share your experiences, tips, and photos of your Homemade French Butter Cookies on social media. Join our community of baking enthusiasts and engage in recipe discussions, share modifications, and inspire each other with creativity.

Post your cookies using dedicated hashtags for a chance to be featured, and offer your insights on variations that have worked well for you. Whether you’ve experimented with flavors or decorations, your feedback enriches our baking community!


The Recipe

Homemade French Butter Cookies

Serves: 24 cookies

Prep Time: 20 mins

Cook Time: 12 mins

Total Time: 32 mins

Kitchen Equipment Needed

  • Baking sheets
  • Parchment paper
  • Mixing bowls
  • Electric mixer or whisk
  • Cookie scoop (optional)

Ingredients

  • 1 cup unsalted butter, softened
  • 1/2 cup granulated sugar
  • 1/4 cup powdered sugar
  • 1 teaspoon vanilla extract
  • 2 cups all-purpose flour
  • 1/4 teaspoon salt

Directions

  1. Preheat your oven to 350°F (175°C) and line baking sheets with parchment paper.
  2. In a mixing bowl, cream together the softened butter, granulated sugar, and powdered sugar until light and fluffy.
  3. Add in the vanilla extract and mix until combined.
  4. Gradually add the all-purpose flour and salt to the mixture, folding until just combined.
  5. Chill the dough for 30 minutes in the refrigerator.
  6. Using a cookie scoop or spoon, drop rounded tablespoons of dough onto the prepared baking sheets, spacing them about 2 inches apart.
  7. Bake for 10-12 minutes, or until the edges are lightly golden.
  8. Remove from the oven and let cool on the baking sheets for a few minutes before transferring to wire racks to cool completely.

Recipe Notes

  • For added flavor, consider adding lemon or orange zest to the dough before baking.
  • For a decorative touch, sprinkle cookies with coarse sugar before baking.
  • Cookies can be stored in an airtight container for up to a week.

Lemon Raspberry Cheesecake Bars: A Perfectly Tangy and Sweet Dessert

raspberry lemon cheesecake, cheesecake bar recipes, raspberry swirl cheesecake, lemon dessert bars, fruity cheesecake bars, summer dessert recipes

Lemon Raspberry Cheesecake Bars

Introduction

Lemon Raspberry Cheesecake Bars are a refreshing and tangy dessert that brings the perfect balance of citrus and berry flavors. Their creamy cheesecake layer, infused with zesty lemon and complemented by a vibrant raspberry swirl, makes them an ideal treat for brunches, summer gatherings, or as a light and indulgent dessert.

For more delightful dessert recipes, check out Raspberry Cheesecake Brownie Bites and Pistachio Shortbread Cookies for more sweet inspiration.


Ingredients and Tools

Ingredients:

  • Crust:
    • Graham cracker crumbs, granulated sugar, melted butter.
  • Cheesecake Layer:
    • Cream cheese, sugar, eggs, vanilla extract, lemon zest, and juice.
  • Raspberry Swirl:
    • Fresh or frozen raspberries, sugar, cornstarch, and water.

Equipment:

  • 9×13 baking pan lined with parchment paper.
  • Electric mixer, mixing bowls, whisk, spatula.
  • Fine mesh strainer for preparing the raspberry swirl.

Step-by-Step Recipe

  1. Prepare the Crust:
    • Combine graham cracker crumbs, sugar, and melted butter.
    • Press the mixture firmly into the baking pan and pre-bake for 10 minutes at 325°F (163°C).
  2. Mix the Cheesecake Layer:
    • Beat cream cheese and sugar until smooth. Add eggs one at a time, then mix in vanilla, lemon zest, and juice.
  3. Create the Raspberry Swirl:
    • Cook raspberries with sugar, cornstarch, and water until thickened. Strain to remove seeds for a smooth sauce.
  4. Assemble and Bake:
    • Pour cheesecake batter over the crust, add dollops of raspberry sauce, and swirl with a toothpick for a marbled effect.
    • Bake for 30–35 minutes until set.

Creative Variations

  • Lemon-Blueberry Cheesecake Bars: Replace raspberries with blueberries for a twist.
  • No-Bake Lemon Raspberry Bars: Use gelatin to set the cheesecake layer.
  • Chocolate Drizzle: Add a layer of white or dark chocolate for added richness.

Tips for Perfect Bars

  • Chill the bars for at least 4 hours before slicing for clean cuts.
  • Use room-temperature ingredients for a smooth cheesecake texture.
  • Prevent overbaking to avoid cracks in the cheesecake layer.

Presentation and Serving


Storage and Freezing

  • Store in an airtight container in the refrigerator for up to 5 days.
  • Freeze individual bars wrapped tightly for up to 2 months.
  • Thaw frozen bars in the fridge overnight before serving.

FAQs

  1. Can I use frozen raspberries?
    Yes, thaw and drain them before use to avoid excess moisture.
  2. How do I prevent the cheesecake from cracking?
    Bake at a low temperature and avoid overmixing the batter.
  3. Can I make these bars gluten-free?
    Use gluten-free graham crackers for the crust.
  4. What’s the best way to slice cheesecake bars cleanly?
    Use a sharp knife dipped in hot water, wiping between cuts.
  5. Can I substitute the raspberries with other fruits?
    Yes, strawberries, blackberries, or blueberries work well as alternatives.

Internal Linking Opportunities


Conclusion

Lemon Raspberry Cheesecake Bars are a sophisticated yet simple dessert that combines the tanginess of lemon with the sweetness of raspberries. Whether served for a special occasion or enjoyed as a weekend indulgence, these bars are sure to impress.

Delicious Easy Homemade Crab Cakes Recipe for Seafood Lovers

Easy Homemade Crab Cakes: Deliciously Simple Seafood Delight

⚖️
Difficulty
Easy

⏲️
Prep Time
15 mins

🕒
Cook Time
20 mins

⏱️
Total Time
35 mins

🍽️
Servings
4

Crab cakes are a seafood lover’s dream, perfectly blending the sweetness of crab meat with spices and herbs to create a dish that’s as delightful to the palate as it is simple to prepare. These Easy Homemade Crab Cakes are not only full of flavor but also feature a light and crispy exterior, making them an excellent choice for a main dish or an appetizer at your next gathering. Each bite unleashes a medley of textures—from the tender meat to the crunchy breadcrumbs—ensuring a satisfying experience.

The beauty of these crab cakes lies in their versatility. Serve them with a zesty remoulade for a refreshing zing or nestle them on a bed of greens for a light, healthy meal. With minimal cooking involved, you can effortlessly whip up these crab cakes and impress your guests with your culinary skills. Whether you are planning a cozy dinner at home or a lively seafood feast, these crab cakes are bound to leave a lasting impression.

Quick Recipe Highlights

  • Flavor Profile: These crab cakes offer a fantastic balance of sweet, succulent crab meat and savory spices, combined with fresh herbs and a hint of lemon.
  • Texture: Enjoy a delightful crunch on the outside that gives way to a moist and tender interior bursting with flavor.
  • Aroma: The aromatic notes of sautéed onions and fresh herbs tantalize the senses, setting the stage for a delicious seafood experience.
  • Visual Appeal: Golden brown and beautifully crisp, these crab cakes are vibrant with flecks of green herbs, making them an eye-catching dish.
  • Skill Level Needed: With straightforward techniques and easily accessible ingredients, anyone can master this recipe!
  • Special Equipment: You’ll need a mixing bowl, skillet, and a baking sheet for optimal cooking results.

Recipe Overview

  • Difficulty Level: Easy and quick to prepare, this crab cake recipe is perfect for both beginner cooks and seasoned chefs looking for a simple dish.
  • Category: These crab cakes can be classified into appetizers or main dishes, making them versatile for any meal plan.
  • Cuisine: Rooted in coastal traditions, crab cakes showcase the flavors of the sea, commonly associated with the Eastern United States and Chesapeake Bay cuisine.
  • Cost: This recipe provides high-quality flavor at a reasonable price, with the main expense being quality crab meat, which can vary based on availability.
  • Season: Ideal for warm weather months, crab cakes are perfect for summer gatherings or as a seafood treat on special occasions.
  • Occasion: Perfect for parties, family dinners, and casual summer barbecues, these crab cakes cater to various dining experiences.

Why You’ll Love This Recipe

The taste and texture of these crab cakes are simply irresistible. The soft crab meat combined with a crispy breading provides an enjoyable contrast that makes each bite a pleasurable experience. Plus, the delightful addition of fresh herbs and spices elevates the flavor profile, delivering a dish that is both savory and refreshing.

Convenience is another winning feature of this recipe. With only 15 minutes of prep time and minimal cooking requirements, these crab cakes allow you to spend less time in the kitchen and more time with your guests. They can be prepared in advance and easily cooked right before serving, adding to their appeal for entertaining.

Nutritionally, crab is rich in protein and low in fat, making these crab cakes a smart choice for a satisfying meal. Packed with essential vitamins and minerals, they are a wholesome option that doesn’t sacrifice flavor for health benefits.

Socially, crab cakes are a crowd-pleaser, making them an excellent choice for gatherings. Their finger-food nature means they can be enjoyed casually, sparking conversations and laughter among guests.

Lastly, this recipe offers a stellar cost-to-flavor ratio. While fresh crab can be an investment, making crab cakes at home allows you to control costs and ingredient quality, offering a dining experience comparable to upscale seafood restaurants without the hefty price tag.

Historical Background and Cultural Significance

Crab cakes trace their roots to the coastal communities of the United States, especially in Maryland, where they are a staple in the local cuisine. Traditionally made with blue crab, these cakes symbolize regional identity and the bounty of local waters. The recipe has evolved over time, with each community adding its twist, making crab cakes a beloved dish across the nation.

The cultural importance of crab cakes extends beyond just food; they represent communal gatherings, summer celebrations, and coastal life. They are often associated with family traditions and are a popular feature at local seafood festivals.

The evolution of crab cakes reflects changes in culinary preferences and ingredient availability. Originally simple and straightforward, modern interpretations often feature gourmet ingredients and innovative cooking methods, accommodating diverse palates and dietary needs.

Regional variations of crab cakes abound. In Louisiana, for example, you might find them spiced with Cajun seasoning, while in the Pacific Northwest, salmon may take center stage. Such adaptations highlight the versatility of this dish and its ability to harmonize with different culinary traditions.

Ingredient Deep Dive

Crab meat is the star of any crab cake recipe, delivering rich flavor and a delightful texture. Sourced from various types of crabs, including blue, king, and lump crab, each variety imparts its unique taste profile. When selecting crab meat, freshness and quality are critical; look for pasteurized crab in vacuum-sealed packages or freshly picked from local seafood markets. Proper storage involves keeping it refrigerated and consuming within a few days of purchase.

Bread crumbs serve as a binder and help create a crispy exterior for the crab cakes. You can opt for store-bought or make your own from stale bread, which can add freshness and different flavor nuances to the cakes. When storage is necessary, keep them dry in an airtight container to prevent spoilage.

Mayonnaise adds creaminess and moisture to the mixture and elevates the flavor. Consider using homemade mayonnaise or high-quality store-bought varieties to enhance the taste. Always keep mayonnaise refrigerated, and check for the expiration date on store-bought jars for safe consumption.

Fresh herbs like parsley or dill contribute brightness and freshness. They also enhance the visual appeal of crab cakes. When purchasing herbs, opt for vibrant and fragrant bunches. Store them in the refrigerator wrapped in damp paper towels or in containers to extend shelf life.

Lemon juice is key for brightening flavors, balancing the richness of crab meat, and providing a refreshing touch. Use freshly squeezed juice for maximum flavor. Store unused lemons in the fridge, and they’ll keep for several weeks.

Common Mistakes to Avoid

  • Overmixing the crab cake batter, which can lead to a compact texture instead of the desired lightness.
  • Using excess filler, such as breadcrumbs, which can overpower the crab flavor and result in dry cakes.
  • Not allowing the crab cakes to chill before cooking, which can cause them to break apart during frying.
  • Cooking at too high a temperature, which can burn the outside before the inside is fully cooked.
  • Neglecting to taste the mixture before cooking to ensure seasoning balance.
  • Using canned crab meat without checking for quality, as it can have a fishy taste.
  • Cooking too many at once, overcrowding the pan can lower the cooking temperature and result in uneven browning.
  • Failing to preheat the pan before adding the crab cakes, which is essential for achieving a crispy exterior.
  • Not using a non-stick skillet or enough oil, making it difficult to flip the cakes without damaging them.
  • Ignoring the resting phase after cooking, overlooking the benefits of letting them sit briefly for improved flavor.

Essential Techniques

To achieve perfect crab cakes, mastering the technique of gently folding the mixture is crucial. This method allows you to incorporate ingredients without breaking the delicate crab meat, ensuring a light and airy texture. Tools like a rubber spatula are recommended for careful folding.

Chilling the crab cake mixture prior to cooking is another essential step. This process solidifies the mixture, enhancing the cakes’ structure. Aim for at least 30 minutes of chilling time in the refrigerator to produce a firmer cake that holds together during cooking.

Pan-frying is the preferred cooking method for achieving that coveted crispy exterior. A medium-high heat ensures proper browning without burning. Visual cues, such as golden edges, indicate that the cakes can be flipped; use a non-stick skillet to achieve optimal results.

Lastly, shaping the crab cakes uniformly is important for even cooking; aim for a consistent size, roughly the diameter of a hockey puck. Using a cookie cutter can help achieve uniformity in shape, leading to an attractive presentation.

Pro Tips for Perfect Easy Homemade Crab Cakes

Selecting high-quality crab meat is essential for flavor and texture. Choose fresh crab from local seafood markets when possible, as it typically has better taste compared to canned versions.

Chilling the formed crab cakes for at least 30 minutes before cooking helps them maintain their shape during frying. This extra step is critical for achieving the desired texture and preventing them from falling apart.

Experiment with different seasonings to customize flavor profiles—Old Bay seasoning is a classic choice, but adding a dash of Worcestershire sauce can give an additional depth of flavor.

Utilizing both panko and traditional breadcrumbs in your mixture can create a delightful texture, offering a satisfying crunch without compromising the crab flavor.

Mixing in small amounts of finely diced vegetables, such as bell peppers or green onions, can introduce an exciting freshness and color to your crab cakes.

Serve warm with a squeeze of fresh lemon juice over the top for a refreshing and zesty finish that elevates the overall taste.

Prepare a batch ahead of time and freeze them raw. They can be cooked straight from the freezer, making dinner quick and convenient on busy nights.

Use a non-stick skillet and a decent amount of oil to ensure the cakes brown beautifully without sticking—this is key to achieving that perfect golden crust.

Variations and Adaptations

Regional variations can significantly enhance the traditional crab cake recipe. For a Southern spin, add diced jalapeños and serve with a spicy remoulade. In the Pacific Northwest, consider incorporating smoked salmon for a unique flavor twist that celebrates local seafood.

Seasonal adaptations also allow you to exploit the freshest ingredients available. During summer, fresh corn could be added to the mixture for sweetness and texture, while in fall, diced apples can contribute a delightful crunch.

For dietary modifications, gluten-free bread crumbs or almond flour can replace traditional breadcrumbs for a gluten-free version. Vegan crab cakes can be made from chickpeas or hearts of palm mixed with seafood-inspired seasonings to mimic flavors.

Flavor variations are abundant; consider incorporating unique spices such as curry powder or smoked paprika for a bold twist. These simple changes can create a new dining experience while still honoring the classic crab cake foundation.

Texture modifications might include adding finely chopped nuts for crunch or incorporating a creamy ingredient like sour cream to enhance moisture and richness. Lastly, for an eye-catching presentation, consider stacking crab cakes with fresh salad greens or mango salsa for visual appeal.

Serving and Presentation Guide

When plating your crab cakes, aim for a rustic yet elegant presentation. Arrange them on a large platter with garnishes like lemon wedges, fresh herbs, or microgreens to add a pop of color.

Consider garnishing with a dollop of tartar sauce or the aforementioned remoulade for added flavor and visual interest. Drizzling a homemade sauce in artistic patterns can elevate your presentation game.

Traditional accompaniments for crab cakes include coleslaw, a tangy side salad, or crispy potato wedges, providing a harmonious balance to the meal. For a modern twist, serve with avocado crema or a lime vinaigrette.

Temperature considerations are crucial for serving crab cakes; they are best enjoyed fresh and warm. If baking for a crowd, keep them warm in the oven at a low temperature.

Portion control is essential for serving; aim for 1-2 crab cakes per person as an appetizer and 2-4 as a main course, depending on the size of the cakes and accompanying dishes.

Wine and Beverage Pairing

Pair your Easy Homemade Crab Cakes with a crisp white wine, such as a Sauvignon Blanc or a chilled Chardonnay. The acidity of these wines beautifully complements the richness of the crab, enhancing the overall dining experience.

If you prefer non-alcoholic options, consider sparkling water with a splash of lemon juice or a refreshing iced tea infused with herbs and citrus. These beverages will cleanse the palate between bites without overwhelming the dish.

For coffee or tea pairings, try serving a light herbal tea, such as chamomile or mint, alongside your meal for an inviting balance to the rich flavors of the crab cakes. The key is to choose beverages that highlight the seafood without overshadowing its delicate flavor.

When serving wine, ensure it is chilled to the right temperature—white wines are best served between 45°F to 50°F—and provide wine glasses that allow the aromas to be appreciated.

Storage and Shelf Life

Crab cakes can be stored in the refrigerator for up to 3 days. To maintain freshness, place them in an airtight container once they have cooled completely after cooking.

If you need to store them longer, consider freezing the uncooked cakes for up to three months. Ensure they are well-wrapped in plastic wrap and placed in a freezer-safe bag to prevent freezer burn.

When reheating, avoid microwaving as it can make the cakes soggy; instead, bake at 350°F for about 10-15 minutes until heated thoroughly or pan-fry them briefly to restore crispness.

Signs of spoilage include an off odor, discoloration, or a slimy texture. Always check your crab meat for freshness before use and discard any cakes that exhibit these signs.

If you choose to freeze cooked crab cakes, they can last for about a month. Just make sure to cool them completely and wrap them tightly before placing them in the freezer.

Make Ahead Strategies

For efficient meal prep, you can assemble the crab cake mixture a few hours in advance, allowing the flavors to meld beautifully. Store it in an airtight container in the fridge until you’re ready to shape and cook.

Consider forming the cakes and chilling them before your gathering for a stress-free cooking experience. This way, you can simply cook them right before serving without spending time prepping.

When preparing in advance, keep the mixture separate from wet ingredients like sauces until closer to serving time, as this will ensure a fresh taste.

Quality impact should be assessed when considering make-ahead methods; crab cakes are best enjoyed fresh, so keep that in mind when planning.

Make sure to follow proper storage techniques to preserve the quality of your crab cakes, ensuring they remain delicious and appealing.

Scaling Instructions

Adjusting the recipe to serve more guests is straightforward—doubling or tripling the ingredients is often easily manageable, but watch for changes in cooking time for larger batches.

When halving the recipe, ensure your seasonings are proportionally adjusted to maintain flavor balance. For herb-heavy recipes like these, the halving may seem less significant than it is.

Use larger or additional cooking equipment as needed; this may involve using multiple skillets or a griddle for efficient cooking.

Timing modifications may be necessary for larger quantities, as they often require a longer cooking time to ensure even heating throughout the crab cakes.

Remember that storage considerations differ; ensure leftovers are properly cooled, packed, and labeled for later use, particularly if you plan to serve them later.

Nutritional Deep Dive

Examining the macro breakdown of these crab cakes, they are primarily composed of protein from the crab meat, making them an excellent choice for filling meals. Each serving boasts a generous protein content while remaining relatively low in fat.

From the micronutrient perspective, crab meat is rich in vitamins such as B12 and minerals like zinc, supporting overall health. It’s a nutritious option that can fit perfectly into a balanced diet.

The health benefits of consuming crab include its anti-inflammatory properties and the presence of Omega-3 fatty acids. These components contribute positively to brain and heart health, making crab cakes a wholesome meal option.

For dietary considerations, these crab cakes can be incorporated into various eating patterns, particularly those focused on high protein or low-carb diets, responding to the needs of diverse eaters.

A portion analysis suggests that two crab cakes usually account for a satisfying meal, especially when served alongside a light salad or vegetable dish. This balance helps maintain healthy portions without feeling deprived.

Dietary Adaptations

For those requiring gluten-free options, substituting traditional breadcrumbs with gluten-free alternatives is key, ensuring the cake remains hearty while accommodating dietary restrictions.

Dairy-free adaptations are simple, too; use dairy-free mayonnaise, or skip creamy ingredients entirely while ensuring flavor depth with extra spices and herbs.

To create vegan-friendly crab cakes, you can substitute crab meat with chickpeas or jackfruit, seasoning liberally to mimic the crab’s unique flavor profile and texture.

Low-carb and keto adaptations can involve replacing breadcrumbs with almond flour, which keeps the dish low in carbohydrates while providing necessary binding.

Paleo-friendly versions can focus on whole food ingredients, removing processed fillers like breadcrumbs and using seeds for binding instead.

Exploring low-FODMAP options means choosing ingredients carefully, avoiding high-FODMAP items like onions and garlic while still packing in flavor with herbs and shallots.

Troubleshooting Guide

When facing texture issues, consider adjusting the wet-to-dry ratio in your mixture. If cakes are too dry, adding a tablespoon of mayonnaise can remedy it. Conversely, if too wet, increasing breadcrumbs can help solidify the mixture.

To ensure proper flavor balance, always taste the mixture before cooking. If it seems lacking, consider adding several pinches of salt, pepper, or spices to enhance the overall taste.

Temperature problems can be avoided by cooking at medium heat. If the cakes are browning too fast, reduce the heat to allow for more even cooking without burning.

Equipment challenges can arise with sticky pans; ensure non-stick skillets are treated with oil or cooking spray before adding the cakes, reducing the risk of sticking and breaking.

Ingredient substitutions can lead to unexpected results; if you use different types of crab meat, remember that flavors may differ based on freshness and quality, impacting the final taste.

Timing concerns can be addressed by preparing your accompaniments in advance, allowing you to focus on the crab cakes, preventing rush cooking that could lead to compromised quality.

Recipe Success Stories

Community feedback often highlights how accessible this recipe is for both home cooks and novices alike. Many have expressed gratitude for the simple steps and basic ingredients that yield stunning results.

Variation successes inspire readers to tailor this crab cake recipe to personal tastes. From spicy iterations to those featuring seasonal veggies, creativity is encouraged and celebrated within the community.

Adaptation stories demonstrate how locals have infused regional flavors into the traditional crab cake, showcasing the versatility of the recipe while respecting its origins.

Photography tips shared amongst readers focus on capturing the golden-brown exterior and vibrant colors of the dish, emphasizing presentation as much as taste, thus making it appealing for social media sharing.

Recipe reviews are overwhelmingly positive, with community members eager to share their own twists on ingredients or accompaniments, sparking further conversation and ideas for upcoming meals.

Frequently Asked Questions

Q: Can I use frozen crab meat instead of fresh?
A: Yes, you can use frozen crab meat for your crab cakes. Just ensure it’s fully thawed and well-drained before using it in the recipe to maintain a great texture and flavor.

Q: What’s the best type of crab for these cakes?
A: While blue crab is traditional, lump crab or Dungeness crab works wonderfully as well, offering rich flavor and a nice texture. Always opt for high-quality crab meat to maximize taste.

Q: Can I bake these crab cakes instead of frying them?
A: Absolutely! For a healthier version, bake them at 375°F for about 25-30 minutes, flipping halfway through until they are golden brown and cooked through.

Q: How do I prevent my crab cakes from falling apart?
A: Ensure you allow your mixture to chill before cooking, as this helps the cakes hold their shape. Additionally, don’t overmix the ingredients, or they could become too dense.

Q: Can I make these crab cakes in advance?
A: Yes, you can prepare the mixture ahead of time and refrigerate or freeze uncooked crab cakes. Just ensure to thaw them completely before cooking to ensure even cooking.

Q: What can I serve with crab cakes?
A: Crab cakes pair excellently with tartar sauce, remoulade, or any light salad. Serve with sides like coleslaw, grilled vegetables, or even a refreshing pasta salad.

Q: Are these crab cakes suitable for freezing?
A: Yes, both cooked and uncooked crab cakes freeze well. Just ensure they are sealed properly in airtight containers or bags to prevent freezer burn.

Q: How long do leftovers last?
A: Cooked crab cakes can last in the fridge for 3-4 days when stored correctly in an airtight container. Reheat in the oven or skillet for the best results.

Q: Can I customize the herbs and spices?
A: Definitely! Feel free to experiment with different herbs and spices, such as dill, cilantro, or Old Bay seasoning. Adjust according to your flavor preferences!

Q: What’s the secret to perfect crispy crab cakes?
A: The secret lies in the right temperature and plenty of fat for frying. Make sure your pan is preheated and use ample oil to create that golden crust.

Additional Resources

For those passionate about cooking, exploring related recipes can lead to new culinary adventures. Consider trying easy shrimp fritters or a classic clam chowder as companions to crab cakes.

Technique guides focusing on how to select and prepare seafood can enhance your skills and boost your confidence in the kitchen, enriching your overall culinary repertoire.

Ingredient information is vital—understanding the best sources for crab meat, especially in your local area, can ensure you’re always cooking with the freshest options available.

Equipment recommendations might suggest investing in quality skillets, knives, or kitchen scales that can aid in preparing flawless dishes not just crab cakes.

Don’t overlook the potential for seasonal variations; experimenting with different ingredients based on the time of year can keep your meals exciting and flavorful.

Join the Conversation

Sharing your crab cake creations on social media is a fantastic way to inspire others to join in and try the recipe themselves! Engage with fellow cooking enthusiasts by sharing your photos or personal tips.

Photography tips are beneficial for showcasing your culinary masterpieces. Highlighting the golden-brown exterior of your crab cakes can inspire others to cook.

Don’t shy away from leaving reviews or comments about your experience with the recipe. Communities thrive on shared experiences and learn from one another’s successes and failures.

Engage with your audience by asking questions about their variations or accompaniments, fostering a sense of community and shared enthusiasm for cooking.

Creating a space for recipe adaptations encourages others to experiment and customize based on their taste preferences and dietary needs, fostering a creative cooking environment.

The Recipe

Easy Homemade Crab Cakes

Serves: 4

Prep Time: 15 mins

Cook Time: 20 mins

Total Time: 35 mins

Kitchen Equipment Needed

  • Mixing bowl
  • Non-stick skillet
  • Spatula
  • Measuring cups and spoons
  • Baking sheet (if baking)

Ingredients

  • 1 lb fresh lump crab meat
  • 1 cup breadcrumbs
  • 1/4 cup mayonnaise
  • 1 tablespoon Dijon mustard
  • 1 tablespoon Worcestershire sauce
  • 2 teaspoons lemon juice
  • 1/4 cup finely chopped fresh parsley
  • 1/4 teaspoon cayenne pepper (optional)
  • Salt and pepper to taste
  • Olive oil for frying

Directions

  1. In a mixing bowl, gently combine crab meat, bread crumbs, mayonnaise, mustard, Worcestershire sauce, lemon juice, parsley, cayenne pepper, salt, and pepper until just mixed.
  2. Form the mixture into patties (about 2-3 inches in diameter) and place them on a plate. Chill in the refrigerator for at least 30 minutes.
  3. Heat oil in a non-stick skillet over medium heat. When hot, carefully add the crab cakes; cook until golden brown, about 4-5 minutes per side.
  4. Transfer cooked crab cakes to a baking sheet lined with paper towels to absorb excess oil.
  5. Serve warm with lemon wedges and your choice of sauce!

Recipe Notes

  • For a gluten-free option, substitute traditional breadcrumbs with gluten-free breadcrumbs.
  • Feel free to add your favorite spices to the mix to customize the flavor!
  • If using frozen crab, ensure it is well drained and thawed before using.