Cranberry Pineapple Upside-Down Cake: The Ultimate Festive Delight

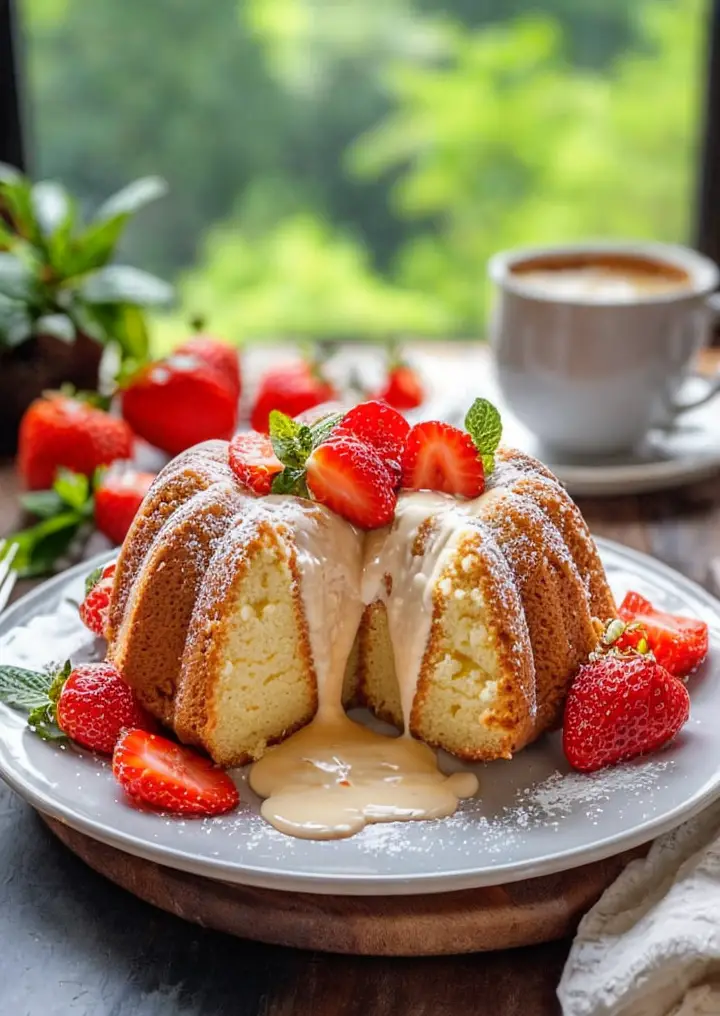
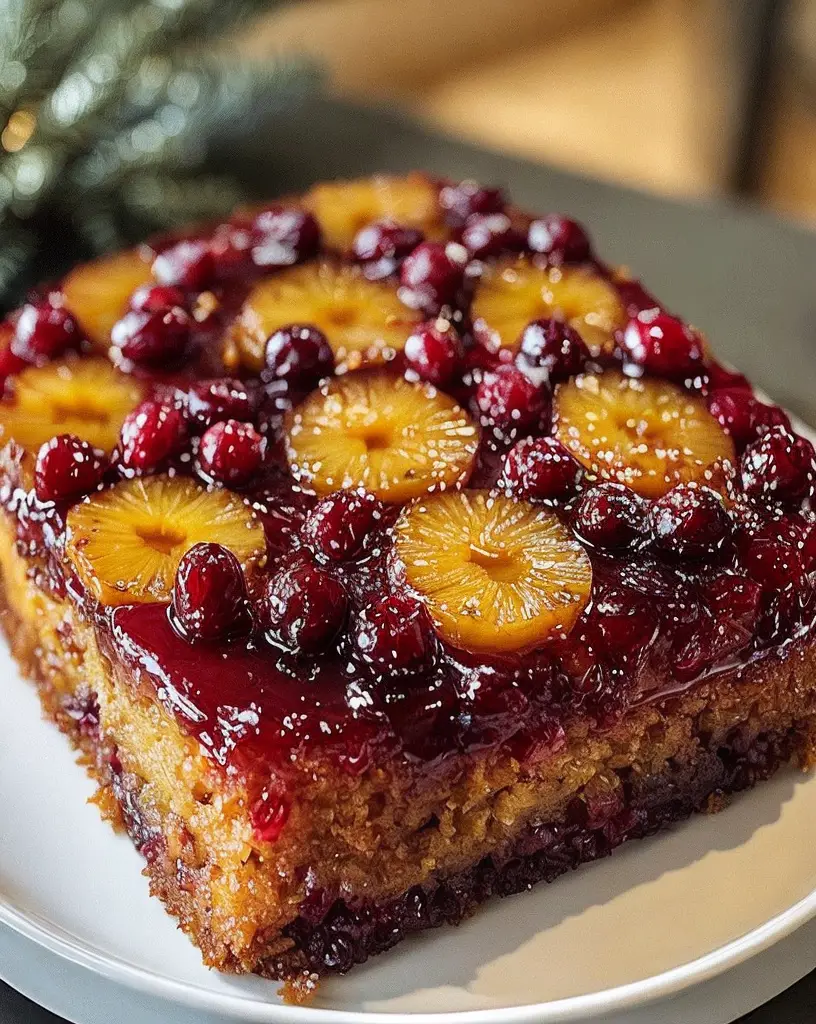
Cranberry Pineapple Upside-Down Cake – The Best Festive Dessert

⚖️
Difficulty
Intermediate

⏲️
Prep Time
20 mins

🕒
Cook Time
40 mins

⏱️
Total Time
60 mins

🍽️
Servings
8 servings

Welcome to the delightful world of desserts, where our Cranberry Pineapple Upside-Down Cake reigns supreme as the best festive dessert! Bursting with color and flavor, this show-stopping cake is a celebration of tropical harmony. The sweetness of ripe pineapple pairs harmoniously with the tartness of fresh cranberries, resulting in a mouthwatering combination that dances on your taste buds. This cake creates a stunning centerpiece for any festive gathering, enveloping the room in aromas of baked fruit and caramelized sugar.

This cake isn’t just a feast for the senses; it’s also a nostalgic nod to tradition. Upside-down cakes have long held a special place in dessert history, embodying comfort and the joy of sharing with loved ones. This particular rendition elevates the classic recipe, making it perfect for winter holidays, family gatherings, or simply indulging yourself. Just imagine slicing through the golden brown top to reveal the vibrant red cranberries nestled beneath, creating an impressive visual that captures the essence of festive celebration!

Quick Recipe Highlights

  • Flavor Profile: This cake features a delectable blend of sweet pineapple and tart cranberries, creating a perfect balance that excites the palate.
  • Texture: The cake has a moist crumb with a slight chewiness from the cranberries, combined with a rich caramel topping that adds contrast.
  • Aroma: The mingling scents of caramelized fruit, vanilla, and butter waft from the oven, enticing everyone in the vicinity.
  • Visual Appeal: The vibrant colors of the cranberries and golden pineapple create a stunning presentation, making it an eye-catching dessert.
  • Skill Level Needed: This cake requires intermediate baking skills, particularly in mastering the upside-down technique.
  • Special Equipment: Typically, a round cake pan is required along with basic baking utensils such as a mixer and spatula.

Recipe Overview

  • Difficulty Level: This intermediate-level recipe involves techniques such as caramelization and careful layering that may require some practice but yield impressive results.
  • Category: Perfect as a dessert, this cake can also double up as a brunch treat, making it versatile for various meal categories.
  • Cuisine: Rooted in American culinary traditions, this cake reflects seasonal ingredients, making it popular during festive times.
  • Cost: The ingredients for this Cranberry Pineapple Upside-Down Cake are relatively low-cost, making it accessible for all occasions.
  • Season: This dessert shines during winter months, particularly around holidays when both cranberries and pineapples are at their best.
  • Occasion: Whether it’s Thanksgiving, Christmas, or a seasonal picnic, this cake serves as a delightful ending to any festive meal.

Why You’ll Love This Recipe

The taste and texture of the Cranberry Pineapple Upside-Down Cake create an unforgettable experience with every bite. The moist, fluffy cake absorbs the fruity juices, while the caramelized pineapple and tart cranberries provide layers of flavor that keep you coming back for more. It impresses both family and guests, making any gathering feel special.

Convenience is a significant factor in this recipe’s appeal. The cake can be prepared ahead of time, allowing flavors to meld beautifully. With straightforward ingredients and clear steps, even novice bakers can succeed in creating this masterpiece. In addition, cleanup is minimal, so you can spend more time enjoying the festivities.

Nutritionally, this cake isn’t just indulgent; it also provides a unique mix of vitamins from cranberries and pineapples. These fruits offer antioxidants and dietary fiber that contribute to a balanced diet. Enjoying this dessert allows you to savor sweet moments without overwhelming guilt.

This cake is perfect for social gatherings, beautifully presented, and easy to share. Its vibrant colors and impressive layers naturally draw attention, making it a delightful talking point during parties and dinners. It’s a dessert that encourages conversations and memories around the table.

Cost-effectively, this recipe uses readily available ingredients that won’t break the bank. It’s an economical choice for festive occasions, allowing you to treat your guests without sacrificing quality. The satisfaction from creating such an impressive dessert on a budget is a reward in itself!

Historical Background and Cultural Significance

The origins of the upside-down cake can be traced back to the early 20th century, a time when home baking became popular in America. The use of canned fruit, common at the time, inspired bakers to create this centerpiece dessert that turned heads. This version with cranberries and pineapple reflects the seasonal consciousness of using available fruits.

Culturally, the upside-down cake stands as a symbol of resourcefulness in cooking. Traditionally, it embodies the idea of using what you have at hand, transforming simple ingredients into an impressive dish that dazzles at family gatherings. Its significance as a communal dish enhances its status during festive seasons.

Over the years, variations of this cake have emerged, incorporating different fruits and flavors, yet the essence remains rooted in its classic preparation. This includes adding spices or amending the fruits based on seasonal availability while still celebrating that delightful surprise when the cake is turned out.

Regional adaptations have resulted in numerous flavors and combinations, showcasing local produce and tastes. Today, you may find versions with peaches, cherries, or even a mix of tropical fruits that reflect the community’s preferences, but the core concept remains a beloved favorite among dessert enthusiasts.

Ingredient Deep Dive

Cranberries: These vibrant berries not only add a burst of color to the cake but also contribute to health benefits, including antioxidant properties that promote heart health. When selecting cranberries, look for firm, bright red berries. Store in the refrigerator for freshness, and if frozen, they can last several months. If fresh cranberries are unavailable, dried can serve as a suitable substitute, providing sweetness and a chewy texture.

Pineapples: Pineapples offer a tropical sweetness that perfectly complements tart cranberries. When using fresh pineapple, opt for those with a sweet aroma and a slight give when squeezed. To store, keep it at room temperature until ripe, then refrigerate. For a simplified version, canned pineapple is an excellent alternative, ensuring ease of preparation while still delivering delicious flavor.

Common Mistakes to Avoid

  • Using an incorrect pan size can lead to uneven baking; always match the pan size to the recipe.
  • Not preheating the oven causes cakes to cook unevenly; this step is crucial for a perfect rise.
  • Using fruit that is overly ripe may create a soggy texture and overly sweet cake.
  • Skipping the caramelization process can result in a less flavorful topping; take the time to caramelize thoroughly.
  • Overmixing the batter can lead to a dense cake; mix until just combined for a light and airy texture.
  • Not letting the cake cool slightly before inverting can cause the fruit to stick; a proper cooling time helps with the removal.
  • Using cold ingredients directly from the fridge can affect the batter’s consistency; bring ingredients to room temperature for best results.
  • Rushing the cooling process can compromise flavor; allow the cake to fully cool and soak up the juices for optimal taste.
  • Using imitation flavors instead of real extracts can ruin the cake’s true flavor profile; always use pure extracts.
  • Neglecting to read the entire recipe before starting can lead to missed steps; familiarity with the process ensures smoother execution.

Essential Techniques

Caramelization: Caramelization is essential for achieving that golden, sticky topping that adds depth to the cake’s flavor. To master this technique, be sure to use medium heat and constantly stir the sugar until it melts evenly. Watch for a deep amber color, as this indicates it’s ready.

Layering Fruits: Understanding how to properly layer fruits ensures an attractive presentation upon serving. Start with the firmer fruit at the bottom, allowing it to hold its shape during baking, while softer fruits like cranberries go on top to avoid disintegration.

Pro Tips for Perfect Cranberry Pineapple Upside-Down Cake

1. Use fresh cranberries when possible for the best flavor; frozen can work in a pinch but may release more liquid.

2. Allow the caramel to cool slightly before layering on the fruit to prevent steaming and maintain texture.

3. Experiment with different fruit combinations for personalization; berries, peaches, or even apples can work beautifully.

4. Once flipped, allow the cake to rest so the juices soak into the cake; this enhances flavor and moisture.

5. Serve with whipped cream or vanilla ice cream to elevate the dessert experience and balance flavors.

6. Consider adding spices like cinnamon or nutmeg into the batter for added warmth and depth.

7. Pay close attention to the baking time, as overbaking can dry out the cake; check for doneness with a toothpick.

8. Make sure to grease the pan well; a non-stick spray can help with easier cake removal.

Variations and Adaptations

Regional variations might include adding spices that reflect local traditions, such as ginger or cloves. Seasonal adaptations can be made by swapping cranberries for fresh strawberries in the spring or ripe peaches during summer. For dietary modifications, consider using whole wheat flour for a healthier twist or a gluten-free mix for dietary needs. Flavor variations can include adding orange zest for a citrus touch or even using flavored extracts like almond or coconut. Texture modifications may involve folding in chopped nuts for added crunch or substituting half the flour for ground oats. Presenting the cake in a cast-iron skillet lends a rustic look, while individual servings can be created with muffin-size portions.

Serving and Presentation Guide

Plating the Cranberry Pineapple Upside-Down Cake can be as simple as inverting onto a beautiful cake stand. Garnishing the top with mint leaves not only enhances color but offers a refreshing contrast. Traditional accompaniments include a dollop of whipped cream or a scoop of ice cream, which can also add a luscious contrast to the tangy flavors of the cake. For a modern twist, serving in slices alongside a warm berry compote provides additional flavors and visual textures. As for temperature, serving slightly warm is ideal to complement the fruits’ natural aromas, while allowing for easy portion control will keep servings consistent.

Wine and Beverage Pairing

When considering a wine to pair, opt for a sweet Riesling or a light Moscato, as both enhance the fruity notes of the cake without overpowering it. For non-alcoholic options, a sparkling cider or a refreshing iced tea can balance the sweetness of the dessert. If enjoying coffee or tea, consider a light-bodied brew, like a green tea or vanilla latte, which will add a comforting finish without clashing with the flavors. Temperature-wise, serve wines chilled and teas hot to provide a delightful contrast to the warm cake.

Storage and Shelf Life

To store, keep the Cranberry Pineapple Upside-Down Cake covered in an airtight container at room temperature for up to 3 days or in the refrigerator for up to a week. For longer storage, consider freezing individual slices wrapped in plastic wrap and stored in a freezer-friendly bag, where they can last up to 3 months. Signs of spoilage include mold formation or unusual smells. To reheat, pop slices in the microwave for about 20-30 seconds or warm gently in the oven until just heated through, ensuring it won’t dry out. Freezing the cake before icing can also be beneficial for maintaining moisture in the cake.

Make Ahead Strategies

Prep for the Cranberry Pineapple Upside-Down Cake can be done a day in advance by prepping the fruit and making the caramel ahead of time. Store the fruit in the refrigerator and the caramel in an airtight container. On the day of serving, simply assemble and bake the cake, allowing for rapid preparation and smooth execution on gathering day. If making ahead, consider underbaking slightly to prevent drying out upon reheating. Fresh elements like whipped cream can always be added right before serving for maximum freshness.

Scaling Instructions

Halving the recipe can work fine with a smaller cake pan, while doubling the quantities can turn it into a generous crowd-pleaser, using a larger pan such as a 9×13 inch. If tripling the amount, consider using multiple pans to ensure even baking or increase cooking time accordingly. Always adjust your oven temperature slightly when making larger quantities to ensure evenly baked results. Store leftovers in separate containers to maintain freshness, as larger portions tend to dry out more easily.

Nutritional Deep Dive

This cake primarily offers a balance of macronutrients; you can expect carbohydrates from the sugars and flour used, while enjoying small amounts of protein. The micronutrient profile includes vitamins C and A from the fruit, contributing to an overall healthier dessert option. Regular consumption of cranberries has shown to support heart health and immune function, further enhancing the nutritional benefits of this dessert. Portion control is essential, especially when monitoring sugar intake, but a slice of this cake can fit well into a balanced diet.

Dietary Adaptations

For gluten-free individuals, swap regular flour with a gluten-free blend to adapt this recipe accordingly. A vegan version can be created by substituting eggs with flax eggs and using plant-based butter. Dairy-free options include using coconut milk for moisture and creaminess without compromising flavor. Low-carb substitutes such as almond flour and sugar alternatives can make this dessert suitable for keto diets. Paleo enthusiasts can replace sugars with honey or maple syrup while using nut flours. For those monitoring FODMAPs, utilizing suitable fruits and gluten-free flour is recommended. Each adaptation maintains the integrity of the original recipe while ensuring dietary requirements are met.

Troubleshooting Guide

If your cake has a texture issue, it may be due to overmixing; ensure just to mix until ingredients are combined for a light and airy cake. Achieving the right flavor balance can take some adjustments; consider adding a pinch of salt to enhance sweetness without overwhelming. Temperature problems during baking often arise from incorrect oven settings; always preheat your oven to ensure consistency. If your fruit turns mushy, avoid overly ripened selections and ensure even layering. For ingredient substitutions, keep in mind that ratios might vary and always check consistency. Timing concerns can arise due to oven variances; use a toothpick to check for doneness at different intervals as needed.

Recipe Success Stories

Community feedback highlights how this cake not only tastes delicious but also serves as a memorable part of family gatherings. Many readers have shared their success stories using leftover fruit, illustrating the flexibility of this cake’s recipe. Variations abound; some have adapted it to use mixed berries or even chocolate. Readers often suggest sharing tips and tricks on how they’ve achieved flawless results, including photographic works showcasing their beautiful creations. Simple adaptations transform this cake into a family favorite, proving its versatility.

Frequently Asked Questions

Can I make this cake ahead of time? Absolutely! You can prepare the fruit and caramel in advance, allowing for a quick assembly before baking. Storing the cake overnight in the refrigerator also enhances the flavors.

What should I do if my cake sticks to the pan? If you experience sticking, ensure you’ve greased the pan well before pouring the caramel and fruit, and allow it to cool for a few minutes before inverting.

Can I use frozen cranberries? Yes, frozen cranberries work well, but be prepared for a bit more liquid after thawing. You may want to reduce some sugar if that happens.

What fruits can I substitute for pineapple? Other fruits like peaches or apples can work beautifully; just ensure they have a similar cooking time to achieve the right consistency during baking.

Is this cake suitable for freezing? Yes! This cake freezes well; simply wrap it tightly in plastic wrap and store in a freezer-safe container.

How can I check if my cake is done baking? A toothpick inserted into the center should come out clean or with a few moist crumbs for doneness.

What toppings do you recommend? Whipped cream or a scoop of vanilla ice cream enhances texture and flavor, balancing the tartness of the cranberries.

Can I reduce the sugar content? Certainly! Consider using a sugar substitute or simply cutting back while ensuring the cake remains balanced in taste.

How can I make this cake more festive? Adding holiday spices like cinnamon or nutmeg can provide a seasonal twist for winter gatherings.

Is this cake gluten-free friendly? Yes, easily replace regular flour with a gluten-free blend to suit dietary needs while maintaining delicious flavors.

Additional Resources

Explore related recipes such as classic blueberry or pineapple upside-down cakes for more fruity delights. Consider diving into technique guides for effective cake preparation, or browse ingredient information to grasp the capabilities of various fruits. Equipment recommendations can assist in selecting the right baking tools to enhance your experience in the kitchen. Embracing seasonal variations allows you to adjust the flavors to suit available produce, making your baking truly versatile.

Join the Conversation

We love hearing feedback and sharing recipes! Join our community by sharing your culinary creations on social media with the hashtag #CranberryPineappleUpsideDownCake. Post your photography tips and tricks and help others achieve picture-perfect desserts. Leave recipe reviews and let us know how your variations turned out, inspiring others to get creative in their baking. Your engagement enriches our community, making baking an even sweeter experience.

The Recipe

Cranberry Pineapple Upside-Down Cake

Serves: 8

Prep Time: 20 mins

Cook Time: 40 mins

Total Time: 60 mins

Kitchen Equipment Needed

  • 9-inch round cake pan
  • Mixing bowl
  • Electric mixer
  • Spatula
  • Measuring cups and spoons

Ingredients

  • 1 cup fresh cranberries
  • 1 cup pineapple slices (fresh or canned)
  • 1/2 cup unsalted butter
  • 1 cup sugar (divided)
  • 1 cup all-purpose flour
  • 1 tsp baking powder
  • 1/2 tsp salt
  • 2 large eggs
  • 1 tsp vanilla extract
  • 1/2 cup milk

Directions

  1. Preheat your oven to 350°F (175°C). Grease the cake pan with butter.
  2. In a small saucepan, melt butter along with 1/2 cup sugar over medium heat until bubbly, then pour into the bottom of the prepared pan.
  3. Arrange pineapple slices on top of the butter mixture, placing cranberries in between the pineapple pieces.
  4. In a mixing bowl, combine flour, baking powder, and salt; set aside.
  5. In another bowl, cream together remaining sugar and eggs until light and fluffy. Add vanilla and milk, combining well.
  6. Gradually add the flour mixture to the wet ingredients, mixing until just incorporated.
  7. Carefully pour the batter over the arranged fruit in the pan.
  8. Bake for 40 minutes, or until a toothpick comes out clean. Allow to cool in the pan for 10 minutes before inverting onto a serving plate.

Recipe Notes

  • Use a toothpick to test for doneness.
  • Feel free to adapt the fruits based on seasonality.
  • If using canned pineapple, be sure to drain well.
  • Could substitute almond flour for a gluten-free option.

Irresistibly Juicy Balsamic-Glazed Pork Loin Recipe for Flavorful Meals

Balsamic-Glazed Pork Loin – Irresistibly Juicy & Flavorful

⚖️
Difficulty
Intermediate

⏲️
Prep Time
15 mins

🕒
Cook Time
1 hour

⏱️
Total Time
1 hour 15 mins

🍽️
Servings
4-6 servings

Welcome to the ultimate flavor experience with our Balsamic-Glazed Pork Loin recipe! This dish combines the rich and savory flavors of pork with a tangy balsamic glaze that caramelizes beautifully during cooking. Imagine slicing into a tender, juicy piece of pork that is infused with the sweet and sour notes of balsamic vinegar, complemented by fragrant herbs and spices. It’s not just a meal; it’s a celebration of taste that your family and friends will rave about!

The beauty of this Balsamic-Glazed Pork Loin lies not only in its delicious taste but also in its ease of preparation. With just a handful of ingredients and a bit of oven time, you can create a dish that looks as stunning as it tastes. Ideal for weeknight dinners, festive gatherings, or special occasions, this recipe brings restaurant-quality results right to your kitchen. You’ll love how the aroma wafts through your home, enticing everyone to the table!

Quick Recipe Highlights

  • Flavor Profile: The pork loin is enhanced with a tangy balsamic glaze that strikes a perfect balance between savory and sweet, making every bite unforgettable.
  • Texture: Enjoy a juicy and tender texture that contrasts beautifully with the slightly caramelized glaze, delivering a satisfying mouthfeel.
  • Aroma: The dish fills your home with a warm, inviting aroma, featuring notes of garlic, herbs, and rich balsamic vinegar.
  • Visual Appeal: This dish boasts a stunning glossy finish, showcasing the beautiful caramelization against the golden-brown crust of the pork.
  • Skill Level Needed: This recipe is suitable for intermediate cooks, as it requires careful timing and attention to detail for the best results.
  • Special Equipment: You’ll need a roasting pan and a meat thermometer to ensure that the pork reaches the perfect internal temperature.

Recipe Overview

  • Difficulty Level: This recipe is categorized as intermediate due to the necessary cooking techniques and timing involved. However, it’s simple enough for those with some cooking experience!
  • Category: This fits well in the category of main dishes, perfect for both family dinners and festive occasions.
  • Cuisine: Influenced by Italian cuisine, this dish combines traditional methods with easily accessible ingredients, embodying a rustic charm.
  • Cost: The approximate cost of making this recipe is quite reasonable, with pork loin being a relatively affordable cut of meat, especially when prepared at home.
  • Season: Enjoy this delicious dish all year round, but it shines particularly during the fall and winter months, providing comfort and warmth.
  • Occasion: Ideal for holiday gatherings, family meals, or dinner parties, the Balsamic-Glazed Pork Loin is sure to impress your guests.

Why You’ll Love This Recipe

When it comes to flavor, the Balsamic-Glazed Pork Loin undoubtedly stands out. The combination of the richness of the pork and the tanginess of balsamic vinegar creates a symphony of taste that dances on your palate. As the pork bakes, the glaze thickens and intensifies, resulting in a luscious coating that keeps the meat moist and flavorful. Each bite delivers a perfect blend of sweet and savory, making it a dish the whole family will love.

One of the best aspects of this recipe is its convenience. With minimal prep work, you can easily marinate the pork loin in the balsamic mixture and let it enrich for a brief period. Once it’s in the oven, you’ll have time to prepare sides or even enjoy a quiet moment while waiting. The effortless cooking process is perfect for busy weeknights or when entertaining guests.

Nutritionally, pork loin is a lean source of protein that offers essential vitamins and minerals. This dish is not only satisfying but also provides energy and sustenance, making it a great option for those looking to maintain a balanced diet. Pairing this dish with vegetables and whole grains will further enhance the nutritional value of your meal.

Adding to the allure of the Balsamic-Glazed Pork Loin is its ability to be a showstopper when entertaining. The beautiful presentation, combined with the mouthwatering aroma during cooking, creates an inviting atmosphere for your guests. Sharing this meal at the table elevates your dining experience and encourages lively conversations and laughter.

From a cost-effectiveness standpoint, this recipe utilizes a single pork loin to serve multiple people which keeps expenses down while providing a hearty and filling dish. Plus, the easy-to-source ingredients are budget-friendly, ensuring you can enjoy gourmet flavors without breaking the bank.

Historical Background and Cultural Significance

The origins of Balsamic-Glazed Pork Loin can be traced back to the traditional Italian practice of using balsamic vinegar not just as a dressing, but as a flavorful glaze for meats. Balsamic vinegar, with its rich history in Modena, Italy, has been prized for its complex flavor profile and versatility throughout the centuries.

This dish reflects the cultural significance of combining simple, high-quality ingredients to elevate everyday meals. The use of balsamic vinegar in cooking speaks to the Italian philosophy of utilizing seasonal and local products to create layers of flavor while respecting culinary traditions.

Over time, this recipe has evolved, incorporating modern cooking techniques while retaining its rustic roots. Home cooks have adapted the traditional methods to fit their kitchens, and regional variations have emerged, showcasing the innovation and creativity of those who prepare it.

Ingredient Deep Dive

Pork Loin: This cut of pork is well-loved for its tenderness and versatility in various dishes. Rich in protein, it makes a nutritious addition to meals. When selecting pork loin, look for a cut that is firm to the touch with a pinkish color and minimal marbling. It should be stored in the refrigerator and used within a few days for optimal freshness. If you can’t find pork loin, you can substitute it with pork tenderloin, though cooking times may vary due to the smaller size.

Balsamic Vinegar: Known for its deep, complex flavor, balsamic vinegar adds a unique sweetness and tanginess to dishes. This vinegar is not only delicious but also packed with antioxidants and low in calories. When choosing balsamic vinegar, opt for higher-quality options for more intense flavors. Once opened, store it in a cool, dark place and use it within a year or so for the best taste. If you prefer, apple cider vinegar can be a suitable substitute in a pinch.

Common Mistakes to Avoid

  • Overcooking the Pork: One of the most common mistakes is overcooking the pork, which can lead to a dry end result. Always use a meat thermometer to check the internal temperature, aiming for 145°F (62°C) for perfect doneness.
  • Ignoring Marinade Time: Skipping or rushing the marinade process can result in a lack of flavor in the meat. Allowing the pork to marinate for at least an hour or overnight will enhance its taste significantly.
  • Using Low-Quality Balsamic Vinegar: The quality of balsamic vinegar greatly impacts the flavor of this dish. Cheap, low-quality vinegar may not offer the depth needed for an exceptional glaze, so invest in a good bottle.
  • Not Letting the Pork Rest: Cutting into the pork right after cooking can cause juices to spill out. Temperature should be allowed to equalize by resting the meat for at least 10 minutes before slicing.
  • Neglecting Aromatics: Skipping garlic or herbs can lessen the dish’s flavor complexity. Always include aromatic ingredients to elevate the overall taste profile.
  • Inaccurate Oven Temperature: Ovens can vary widely in temperature. Use an oven thermometer to ensure it is accurately set, which directly influences how the pork cooks.
  • Using Cold Meat: Beginning with cold pork can lead to uneven cooking. Allow the meat to sit at room temperature for about 20 minutes before cooking.
  • Forgetting to Adjust for Altitude: If you live at a higher altitude, cooking times may need adjusting. Be cautious and check for doneness earlier to avoid drying out the meat.

Essential Techniques

Marinating: Marinating the pork is vital for infusing flavor, particularly with balsamic vinegar, which tenderizes the meat. Aim to marinate for at least an hour, or up to a day for maximum flavor absorption. A good way to master marinating is to rotate the bag or container every so often, ensuring even coating.

Roasting: Roasting at the correct temperature is crucial for achieving that caramelized glaze. Preheat your oven adequately, and place your pork loin in a single layer in the roasting pan. Look for a golden-brown finish and use a meat thermometer to ensure proper cooking.

Pro Tips for Perfect Balsamic-Glazed Pork Loin

1. Choose a center-cut pork loin for uniform cooking and a better presentation.

2. Allowing the pork to marinate overnight can elevate the flavors even further.

3. For a deeper glaze, consider finishing the pork under the broiler for a couple of minutes at the end of the cooking process.

4. Baste the pork with the glaze during cooking to enhance flavor and moisture.

5. Balance the glaze with additional seasonings like crushed red pepper for a slight kick.

6. Use fresh herbs such as rosemary or thyme for an aromatic boost.

7. Slice against the grain to maximize tenderness and mouthfeel.

8. Pair the pork with seasonal vegetables for a colorful and nutritious side.

Variations and Adaptations

This recipe can easily be adapted to suit regional tastes. For a southwestern twist, consider adding chipotle seasoning and serving with grilled corn salsa. In fall, you can integrate apple slices or cider into the marinade for a seasonal flair. For dietary restrictions, opt for a gluten-free soy sauce in the marinade for those sensitive to gluten.

Serving and Presentation Guide

For an elegant presentation, slice the pork loin into medallions and fan them out on a neutral-colored platter. Garnish with fresh herbs or drizzles of extra balsamic glaze for added color and flavor. Serve it hot, accompanied by seasonal vegetables and a side of creamy mashed potatoes or rice to soak up the flavorful glaze.

Wine and Beverage Pairing

A medium-bodied red wine such as Pinot Noir or Chianti pairs beautifully with Balsamic-Glazed Pork Loin, complementing the savory notes while enhancing the dish’s flavors. For non-alcoholic options, sparkling grape juice or an herb-infused mocktail can add a refreshing touch.

Storage and Shelf Life

To store leftover Balsamic-Glazed Pork Loin, allow it to cool completely then wrap in plastic wrap or transfer to an airtight container. It can be stored in the refrigerator for 3-4 days. For longer storage, consider freezing portions and using them within three months, ensuring to thaw in the refrigerator before reheating.

Make Ahead Strategies

This dish can be prepared in stages, making it perfect for busy chefs. The pork can be marinated and stored in the fridge a day ahead, while the glaze can also be prepared in advance. When ready to cook, bring the pork to room temperature and proceed with roasting.

Scaling Instructions

If you’re hosting a larger gathering, doubling the recipe is straightforward. Adjust cooking times slightly, however, since larger cuts will take longer to roast. Ensure even spacing in the roasting pan to promote even cooking and crisp crust formation.

Nutritional Deep Dive

Balsamic-Glazed Pork Loin is rich in protein, essential for muscle repair and growth, while being lower in fat compared to other cuts. Incorporating this recipe into your diet can support weight management and provide energy for an active lifestyle. Pairing it with fiber-rich vegetables enhances its health benefits.

Dietary Adaptations

This recipe can be easily adapted for various dietary needs. For a gluten-free option, ensure your balsamic vinegar does not include added gluten. If you’re looking to reduce carbs, enjoying a smaller portion with roasted vegetables will keep it fitting for your diet.

Troubleshooting Guide

If your pork turns out dry, it can be a result of overcooking; utilize a probe thermometer in the future to ensure best results. Should flavors seem unbalanced, consider adjusting with additional balsamic vinegar or seasonings after cooking.

Recipe Success Stories

Readers have shared heartwarming feedback on their dinner successes, recounting family praises after serving Balsamic-Glazed Pork Loin. Variations have emerged from community creativity, with suggestions that add local influences or accommodate dietary preferences.

Frequently Asked Questions

1. Can I use a different cut of pork for this recipe? Absolutely! While pork loin is ideal, you can substitute it with pork tenderloin or even a bone-in loin for more flavor; adjust cooking times accordingly.

2. How can I tell when the pork is done cooking? A meat thermometer is your best friend; check that the internal temperature reaches 145°F. After taking it out, let it rest for 10 minutes to allow the juices to redistribute.

3. What sides pair well with this dish? This dish complements a variety of sides, such as roasted vegetables, garlic mashed potatoes, or a simple green salad that balances the rich flavors of the pork.

4. Can I prepare the glaze ahead of time? Yes! The balsamic glaze can be prepared a few days in advance and stored in the refrigerator. Reheat it before brushing it on the pork while it cooks.

5. Is there a vegetarian alternative to this recipe? While the main appeal of this dish centers on pork, a hearty roasted portobello mushroom could serve as a meat substitute, drizzled with balsamic glaze.

6. Can leftovers be reheated? Yes! To reheat, cover the pork with foil and warm in the oven at a low temperature to ensure it doesn’t dry out. Alternatively, use a microwave but enjoy it right away for the best taste.

7. How can I enhance the sweetness of the glaze? You can add a touch of honey or maple syrup to the balsamic mixture for an extra layer of sweetness that pairs well with the savory notes of the pork.

8. How long does leftover pork last? Properly stored, leftovers can last in the refrigerator for 3-4 days. For longer storage, freeze in portions for up to three months.

9. Can I adapt this recipe for slow cooking? Yes! For a slower cooking method, sear the pork first, then cook it on low heat in a slow cooker with the balsamic glaze for a few hours until tender.

10. What herbs work best with this dish? Fresh rosemary, thyme, or sage enhance the flavors beautifully. Feel free to experiment with your favorite herbs to customize the recipe.

Additional Resources

If you enjoyed this recipe, you might also love our collection of roasted vegetable sides or our savory gravy recipes that would pair delightfully with Balsamic-Glazed Pork Loin. Explore technique guides on marinating and roasting to further enhance your cooking skills, as well as seasonal recipe adaptations to keep your meals exciting all year round.

Join the Conversation

We invite you to share your own experiences with our Balsamic-Glazed Pork Loin in the comments! Post your cooking photos on social media and tag us; we love seeing your creativity and unique variations. Whether you stuck to the classic recipe or put your twist on it, your feedback helps build our community of passionate home cooks.

The Recipe

Balsamic-Glazed Pork Loin

Serves: 4-6 servings

Prep Time: 15 mins

Cook Time: 1 hour

Total Time: 1 hour 15 mins

Kitchen Equipment Needed

  • Roasting pan
  • Meat thermometer
  • Mixing bowl
  • Plastic wrap or resealable bag

Ingredients

  • 1 (3-4 pound) pork loin
  • 1 cup balsamic vinegar
  • 1/4 cup honey
  • 4 cloves garlic, minced
  • 2 tablespoons fresh rosemary, chopped
  • Salt and pepper to taste

Directions

  1. In a mixing bowl, whisk together balsamic vinegar, honey, garlic, rosemary, salt, and pepper.
  2. Place the pork loin in a resealable bag and pour the marinade over it. Seal and refrigerate for at least 1 hour, preferably overnight.
  3. Preheat your oven to 375°F (190°C).
  4. Remove the pork from the marinade and place it in a roasting pan. Reserve the marinade.
  5. Roast the pork for approximately 1 hour, basting with the reserved marinade every 20 minutes until the internal temperature reaches 145°F (62°C).
  6. Remove from the oven, tent with foil, and let rest for 10 minutes before slicing.
  7. Serve with additional balsamic glaze drizzled on top, if desired.

Recipe Notes

  • Feel free to add your favorite herbs to the marinade based on personal preference.
  • If you want a stronger balsamic flavor, consider adding more vinegar as per your taste.
  • This recipe freezes well, so feel free to make a larger batch!

Tender Classic Slow Cooker Pot Roast Recipe for Comfort Food

Classic Slow Cooker Pot Roast: A Perfect Comfort Food for Any Occasion

⚖️
Difficulty
Easy

⏲️
Prep Time
20 mins

🕒
Cook Time
8 hours

⏱️
Total Time
8 hours 20 mins

🍽️
Servings
6 servings

When it comes to classic comfort food, few dishes can hold a candle to the beloved pot roast. This Classic Slow Cooker Pot Roast recipe brings together the deep, rich flavors of marbled beef and hearty vegetables, all infused with aromatic herbs. As it simmers gently throughout the day, the anticipation builds, filling your kitchen with enticing scents that beckon everyone to gather around the dining table. The beauty of this dish lies not only in its comforting taste, but also in its hands-off preparation style, allowing busy home cooks to enjoy a satisfying meal without the fuss.

The slow cooker transforms tough cuts of meat into mouthwatering, tender delights, breaking down the fibers and creating that melt-in-your-mouth texture everyone craves. Paired with roasted carrots and creamy potatoes, each bite is a harmonious blend of savory and sweet, with a hint of umami from the beef and rich stock. Whether it’s a cozy family dinner or a festive occasion, this pot roast is sure to impress your guests and bring warmth to your home.

Quick Recipe Highlights

  • Flavor Profile: This pot roast features a savory blend of herbs and spices, paired with the natural sweetness of root vegetables.
  • Texture: The beef becomes incredibly tender, while the vegetables provide a hearty contrast, creating a satisfying experience with every bite.
  • Aroma: The fragrant notes of garlic, rosemary, and thyme mingle together for an irresistible scent that fills the air.
  • Visual Appeal: A beautifully browned roast surrounded by colorful veggies makes for a presentation that is as pleasing to the eyes as it is to the palate.
  • Skill Level Needed: This is an easy recipe suitable for beginners, requiring just basic knife skills and the ability to follow simple directions.
  • Special Equipment: All you need is a reliable slow cooker, which is a staple in any kitchen.

Recipe Overview

  • Difficulty Level: This recipe is classified as easy, making it perfect for novice cooks who want to impress with minimal effort.
  • Category: Ideal for family dinners, holiday feasts, or comforting weeknight meals, pot roast fits beautifully into any mealtime scenario.
  • Cuisine: Rooted in American culinary tradition, the pot roast has been a staple for generations, reflecting comfort and communal dining.
  • Cost: This recipe is budget-friendly, utilizing economical cuts of meat and seasonal vegetables to create a meal that is both satisfying and affordable.
  • Season: Pot roast is perfect for fall and winter months, embracing the heartiness of seasonal produce.
  • Occasion: Enjoy it on Sundays after a long week or during family gatherings where warmth and nostalgia reign supreme.

Why You’ll Love This Recipe

This Classic Slow Cooker Pot Roast delivers an explosion of flavor and texture that understandably makes it a household favorite. The rich, savory taste of the beef, perfectly complemented by the sweetness of the carrots and the heartiness of the potatoes, creates a symphony of flavors that dance on your palate. The slow cooking process ensures that the meat is incredibly tender, making even the tough cuts melt in your mouth. Whether you savor it solo or enjoy it with family, every bite is a comfort-filled journey.

The convenience factor is another reason to love this recipe. Simply prepare your ingredients, toss them into the slow cooker, and let the machine do its magic. Imagine coming home after a busy day to the enticing aroma of pot roast wafting through the house—a simple pleasure that adds joy to everyday life. There’s no need for constant monitoring; the slow cooker allows for flexibility in timing, making it a go-to for busy weeknights or special occasions when you want more time with your guests.

Nutritionally, this dish provides a balanced meal with protein from the beef and vitamins from the vegetables. It’s not only filling but nourishing, making it an ideal choice for families looking to ensure their meals support health and well-being. The combination of flavors and nutrients contributes to greater meal satisfaction, helping everyone feel full and content.

From a social and entertaining perspective, pot roast is designed for sharing. It brings people together, enhancing social connections and creating lasting memories around the table. Its ability to serve multiple guests makes it a perfect crowd-pleaser, whether for holidays, family gatherings, or potluck dinners. The ease of preparation combined with its rich taste makes it a staple recipe for social settings.

Cost-effectiveness is another undeniable advantage. With relatively inexpensive cuts of meat and simple ingredients, you can stretch your budget while still delivering a delightful meal. Plus, the leftovers can be enjoyed the next day, providing excellent value beyond the initial serving. The savings on meals mean you can splurge on sides or desserts without breaking the bank.

Historical Background and Cultural Significance

The pot roast has a long and cherished history in American kitchens, dating back to the original settlers who sought to create hearty meals to fuel their families. Traditionally made with less expensive cuts of beef that required slow cooking to enhance tenderness, pot roast became a staple dish in households across the nation. It symbolizes comfort and warmth, often being the centerpiece of family meals during cold months.

Culturally, this dish carries a significant value in communities that prioritize shared meals as a means to strengthen bonds. Pot roast has made its way into family traditions, often becoming the main attraction during holidays and celebratory events. The communal aspect of serving pot roast encourages gathering and interaction, emphasizing the importance of family and togetherness in American culture.

As times have evolved, so too has the preparation of pot roast. While it was once primarily cooked over an open flame, advancements such as electric slow cookers have transformed the way we approach this classic dish. Today, the slow cooker has become synonymous with convenience, allowing cooks to achieve the same savory results without as much active cooking time.

In various regions, pot roast has inspired different variations, incorporating local flavors and ingredients. Southern-style pot roast may include a kick of heat from peppers, while versions from the Midwest may focus on hearty root vegetables. Each region adds its twist, showcasing the versatility and cultural significance of this timeless dish!

Ingredient Deep Dive

Beef Chuck Roast

The beef chuck roast is a classic choice for pot roast, known for its rich flavor and marbling that enhances tenderness during cooking. Historically, tougher cuts of meat were favored for slow cooking as this method breaks down connective tissue and results in a delectable texture. Nutritionally, chuck roast is a good source of protein, iron, and other essential nutrients. When selecting, look for a cut that has good marbling, as this fat will render down and add moisture and flavor to the dish. Properly wrapping and freezing leftover roast can preserve its quality for later use.

Carrots

Carrots are not only a colorful addition to pot roast but they also lend a natural sweetness that balances the savory flavors of the meat. These roots have been cultivated for thousands of years, making them an important part of culinary traditions. Packed with vitamins A, K, and fiber, carrots contribute to a nutritious meal. When selecting, choose firm, smooth carrots with vibrant color and avoid those that are limp or have blemishes. Carrots can be stored in the refrigerator’s crisper drawer and can last several weeks if kept dry.

Potatoes

Potatoes are a classic accompaniment to pot roast, absorbing the savory broth and flavors during the cooking process. Originating in South America, potatoes have become a staple ingredient worldwide. They provide a good source of carbohydrates and potassium and can contribute to a well-rounded meal. When selecting, opt for firm, blemish-free tubers. Store potatoes in a cool, dark place, and avoid refrigerating them to prevent changes in taste and texture.

Onions

Onions add depth to the flavor of pot roast, enhancing the dish with a rich, aromatic profile. They have been celebrated in various cuisines for their versatility and ability to elevate numerous dishes. Nutritionally, onions are low in calories while providing vitamins C and B6, making them a healthy addition. Selecting onions should involve choosing firm bulbs without any soft spots or discoloration. Proper onion storage involves keeping them in a cool, dark area to increase their shelf life.

Common Mistakes to Avoid

  • Not searing the meat: Skipping this step can result in less flavor and a less appealing color. Searing the beef develops a rich crust and enhances the overall taste.
  • Overcrowding the slow cooker: Packing too many ingredients can lead to uneven cooking. Ensure there’s enough space for heat to circulate for optimal results.
  • Using low-quality meat: Cheap cuts may not break down properly during cooking. Invest in a good-quality chuck roast for the best texture and flavor.
  • Neglecting to season: A common mistake is under-seasoning. Ensure you season meat and vegetables adequately to maximize flavor.
  • Adding too much liquid: While some broth is essential, too much can result in a diluted flavor. Use just enough to cover the meat and vegetables.
  • Not allowing for resting time: Skipping this step will cause your roast to lose juices on cutting. Always let it rest after cooking for enhanced moisture.
  • Cutting meat too early: Slicing too soon can result in tough, dry pieces. Allow the meat to rest before slicing into it for best results.
  • Using vegetables that cook too long: Some veggies, like potatoes, cook faster than others. Cut them accordingly to ensure everything is perfectly tender.
  • Ignoring garnishing: A simple garnish can elevate presentation. Don’t shy away from finishing your pot roast with fresh herbs for a pop of color and flavor.

Essential Techniques

Searing the Meat

Searing is crucial as it enhances flavor and texture. Heat your pan until it’s hot, then sear the roast on all sides for a few minutes until it develops a rich crust. To master this, avoid moving the meat around too early, allowing it to form that nice brown color. Common pitfalls include overcrowding the pan, which can result in steaming instead of searing. Look for a golden-brown crust as a visual cue for success.

Building flavors involves adding seasonings, herbs, and aromatics at different stages. Start by seasoning your meat before searing it, and then add herbs and vegetables while cooking. To master flavor layering, introduce ingredients gradually and taste as you go. A common mistake is adding everything at once, which can mute distinct flavors. The aroma released during cooking serves as a reminder to monitor the balance of flavors.

Pro Tips for Perfect Classic Slow Cooker Pot Roast

1. Choose the right cut: A chuck roast is ideal due to its marbled fat, which breaks down beautifully during slow cooking.

2. Pat the meat dry: This will ensure a better sear and enhance browning.

3. Season generously: Don’t be afraid to add salt and pepper before cooking to elevate the flavor.

4. Allow the roast to rest post-cooking: This lets the juices redistribute, resulting in a more flavorful and juicy slice.

5. Experiment with herbs: Fresh rosemary, thyme, and bay leaves can take the flavor of your pot roast to the next level.

6. Store leftovers properly: Use an airtight container, and heat gently to preserve tenderness when reheating.

7. Use a meat thermometer: Ensure you reach the recommended temperature for optimum doneness.

8. Feel free to add mushrooms or celery: These ingredients will add depth and texture to your dish.

Variations and Adaptations

Pot roast is a versatile dish that can be adapted with ease. For a Southern twist, consider incorporating a spicy kick with Cajun seasoning and serving with cornbread. Seasonal adaptations can include swapping out root vegetables for a mix of seasonal produce, like butternut squash in the autumn. Dietary modifications can exist as well; for a gluten-free version, simply use gluten-free beef stock, and consider using vegetables that meet specific dietary needs.

To introduce flavor variations, consider marinating the meat overnight in red wine for an enhanced depth of flavor, or coating it with a dry rub of your favorite spices. If you prefer more texture, try adding lentils or beans, giving the dish a hearty feel. For presentation alternatives, serve in rustic bowls with fresh herbs sprinkled on top, enhancing both taste and visual appeal.

Serving and Presentation Guide

For an inviting presentation, slice the pot roast against the grain and arrange it artfully on a platter, surrounding it with the vegetables. Drizzle with the savory gravy made from the cooking liquid for added flavor and visual appeal. Use fresh herbs like parsley or thyme to garnish for an elegant touch. A warm bread basket alongside can provide a comforting contrast, while temperature considerations ensure that all components are served warm for a delightful experience. Aim for moderate portion control, allowing guests the option to return for seconds!

Wine and Beverage Pairing

When considering wine pairings for your classic pot roast, opt for a full-bodied red wine, such as Cabernet Sauvignon or Merlot, which harmonizes beautifully with the robust flavors. If you prefer non-alcoholic alternatives, consider a hearty grape juice or sparkling ginger ale that can provide a satisfying effervescence. For an additional option, a robust herbal tea served warm can complement the savory richness of the dish. Serve your beverages at the appropriate temperatures to ensure a delightful dining experience.

Storage and Shelf Life

To store leftover pot roast, place it in an airtight container and refrigerate. Consume within three to four days for best quality. If you plan to keep it longer, freezing is a great option; ensure you place in a freezer-safe container and consume within two to three months. Be mindful of signs of spoilage, such as an off smell or discoloration, which indicate that it’s time to discard. When you’re ready to savor again, gently reheat in a skillet or microwave, adding a splash of beef broth to retain moisture.

Make Ahead Strategies

To streamline your cooking process, consider prepping ingredients the night before. Chop vegetables, measure spices, and even sear the meat, allowing for an easier assembly in the morning. Proper storage between steps can enhance quality and flavor retention. Assessing the quality impact means understanding that some components, like fresh herbs, are best added just before serving. Always follow reheating guidelines to maintain texture and taste, and consider adding a fresh element just before serving to brighten flavors!

Scaling Instructions

When halving the recipe, ensure you maintain the same cooking time, as the roast size may affect tenderness. However, should you double or triple the recipe for larger crowds, you may need to adjust cooking times slightly, as larger quantities may take longer. Be sure your slow cooker is large enough to accommodate the increased volume, as an overcrowded cooker can lead to inconsistent cooking. Always remember to store any leftovers properly for future enjoyment.

Nutritional Deep Dive

The macro breakdown of this heartwarming meal provides a balanced profile of protein, carbs, and fats, making it satisfying and filling. A typical serving may include about 30 grams of protein from the roast, complemented by vegetables that enhance dietary fiber intake. In addition to macronutrients, pot roast offers micronutrient benefits, including vitamin A from carrots and potassium from potatoes. This dish supports a balanced diet, and mindful portion analysis can help maintain healthy eating practices, benefiting weight management.

Dietary Adaptations

For those needing a gluten-free option, simply replace any sauces or ingredients containing gluten with suitable substitutes, like gluten-free broth. Dairy-free individuals can enjoy the roast as-is or with plant-based milk gravies, ensuring an inclusive experience. If you’re vegan or vegetarian, consider creating a meatless version using hearty vegetables and legumes or seitan, allowing for a similarly satisfying dish without animal products. Adaptations can empower anyone to enjoy the comforts of pot roast.

Troubleshooting Guide

If your pot roast turns out tough, this could indicate it wasn’t cooked long enough; ensure you allow ample time for the meat to become tender. If the flavors are unbalanced, you may need to adjust seasoning and let it simmer longer to incorporate flavors properly. In case it’s overcooked, consider serving it with rich gravy to add moisture. Common equipment challenges can arise from using inefficient slow cookers; ensure you follow the manual for best practices.

Recipe Success Stories

Community feedback on this recipe often highlights the comforting nature and delightful ease of preparation. Readers share stories of family gatherings centered around this dish, celebrating simple traditions that make pot roast a beloved choice. Many enjoy experimenting with different cuts of meat and vegetable combinations, finding success with their own unique twists on this classic. For photography tips, ensuring ample natural light will showcase the inviting colors and textures beautifully, creating an appealing presentation for any audience.

Frequently Asked Questions

Can I use other cuts of meat for pot roast?
You can! While chuck roast is traditional, brisket, round, and even pork can yield delicious results, just ensure they are well-marbled for tenderness.

How long should I cook pot roast in a slow cooker?
For a whole roast, cooking on low for about 8 hours is ideal. Adjust time according to the size for tender, juicy results.

Can I add more vegetables?
Absolutely! Feel free to toss in any hardy vegetables that can withstand long cooking, like parsnips or turnips, for added flavor and nutrition.

Is it okay to freeze pot roast?
Yes! Pot roast freezes well. Just ensure it’s stored in air-tight containers or heavy-duty freezer bags.

How do I reheat the pot roast?
The best way to reheat is in a skillet over low heat with a little broth to keep it moist. Microwaving is also an option, just use a covered dish.

What sides go well with pot roast?
Classic sides include creamy mashed potatoes, green beans, or a simple salad. A crusty bread for dipping in gravy is always a winner!

Can I cook this recipe on high heat?
While it is possible, cooking on high heat for about 4-5 hours may not result in the same tenderness. Low and slow is the way to go!

Will leftovers taste good?
Yes! In fact, the flavors often deepen overnight, making leftovers just as delicious, if not better, than the first serving.

What’s the best way to store leftovers?
Keep leftovers in an airtight container in the refrigerator and aim to consume within 3-4 days for food safety.

Can I use a pressure cooker instead of a slow cooker?
Yes! If using a pressure cooker, cook under high pressure for about 60-70 minutes, depending on the size of the roast, for tender results.

Additional Resources

Explore related recipes that highlight hearty meals perfect for nurturing comfort, including classic mashed potatoes or savory green bean casseroles. Technique guides on mastering reductions can help transform leftover pot roast into delightful gravies. Learn about ingredient substitutions to accommodate dietary preferences, and upgrade your equipment with slow cookers designed for efficiency and ease of use. Embrace seasonal variations by adapting this recipe according to what’s fresh and available!

Join the Conversation

Share your pot roast experiences on social media using our hashtag, and don’t forget to tag us in your photography! Engage with fellow cooking enthusiasts, gather recipe reviews, and encourage a community that thrives on connecting through food. Discover variations from others and strengthen our shared appreciation for this timeless dish. Together, we can celebrate cooking and create lasting memories!

The Recipe

Classic Slow Cooker Pot Roast

Serves: 6 servings

Prep Time: 20 mins

Cook Time: 8 hours

Total Time: 8 hours 20 mins

Kitchen Equipment Needed

  • Slow cooker
  • Skillet
  • Cutting board
  • Knife
  • Measuring cups and spoons

Ingredients

  • 3-4 lb beef chuck roast
  • 4 medium carrots, chopped
  • 3 medium potatoes, peeled and cubed
  • 1 large onion, quartered
  • 4 cloves garlic, minced
  • 2 cups beef broth
  • 2 tbsp olive oil
  • 2 tsp dried thyme
  • 1 tsp rosemary
  • Salt and pepper to taste

Directions

  1. Start by searing the chuck roast in a hot skillet with olive oil until browned on all sides.
  2. Transfer the roast to the slow cooker.
  3. Add chopped carrots, potatoes, onion, and garlic around the roast.
  4. Pour beef broth over the top and add thyme, rosemary, salt, and pepper.
  5. Cover and cook on low for 8 hours, or until the meat is fork-tender.
  6. Once done, let rest for 15 minutes before slicing.

Recipe Notes

  • For extra flavor, consider marinating the roast overnight.
  • Leftover pot roast can be used in soups or sandwiches.
  • This recipe can be adapted for a pressure cooker; adjust the cooking time accordingly.

Indulge in Irresistible Cream Cheese Pound Cake Today

Cream Cheese Pound Cake: A Decadent Delight

⚖️
Difficulty
Easy

⏲️
Prep Time
15 mins

🕒
Cook Time
60 mins

⏱️
Total Time
75 mins

🍽️
Servings
10 servings

If you crave a rich, buttery cake that melts in your mouth, look no further than this delightful Cream Cheese Pound Cake. Dense yet airy, this cake boasts a creamy richness that elevates traditional pound cake to a whole new level. The sweet aroma of vanilla just adds to its charm, making it perfect for any occasion, whether it’s a family gathering or a cozy afternoon tea. Each bite offers a luscious blend of flavors, leaving you craving more.

The beauty of this Cream Cheese Pound Cake lies not only in its flavor but also in its versatility. Serve it plain, dusted with powdered sugar, or slathered with a fresh fruit compote for an effortless dessert. It’s an impressive yet simple treat that highlights the indulgence of cream cheese and butter, inviting everyone to indulge in its scrumptious layers. This cake isn’t just a dessert; it’s a memory waiting to happen!

Quick Recipe Highlights

  • Flavor Profile: The cake has a luscious, buttery flavor with a hint of tanginess from the cream cheese, balanced perfectly with vanilla notes.
  • Texture: Expect a delightfully dense yet moist crumb that holds its shape beautifully while every bite feels light and airy.
  • Aroma: The comforting smell of vanilla and baked butter fills the kitchen, making it irresistible from the moment it hits the oven.
  • Visual Appeal: With its golden brown crust and soft yellow interior, this cake is as beautiful as it is delicious, making it a stunning centerpiece.
  • Skill Level Needed: This recipe is perfect for beginners, as it requires simple techniques and minimal equipment.
  • Special Equipment: You’ll need a standard loaf pan and a mixer, making this cake accessible for anyone to create.

Recipe Overview

  • Difficulty Level: This Cream Cheese Pound Cake is classified as easy, making it suitable for novice bakers. With clear steps and basic ingredients, anyone can achieve great results.
  • Category: As a dessert, this cake is perfect for serving after meals or as a sweet snack at any time of day.
  • Cuisine: While pound cake enjoys universal popularity, its origins can be traced back to European baking traditions where simple ingredients were combined for maximum flavor.
  • Cost: The ingredients are affordable and commonly found, making this recipe budget-friendly without sacrificing taste or quality.
  • Season: Enjoy this cake year-round, but it shines particularly during the fall and winter months when cozy desserts are in high demand.
  • Occasion: Perfect for celebrations, family gatherings, or simply enjoying a quiet evening at home with a good cup of tea.

Why You’ll Love This Recipe

Taste and texture appeal: Each slice of this Cream Cheese Pound Cake offers a perfect balance of sweet richness and dense satisfaction. The incorporation of cream cheese adds an unforgettable creaminess that feels indulgent yet comforting. The smooth, moist texture makes it ideal for pairing with diverse accompaniments, from fresh jams to gourmet ice creams.

Convenience and preparation benefits: The simplicity of the ingredients and preparation makes this cake a favorites for those who want to whip up something special without spending hours in the kitchen. It requires minimal hands-on time, allowing you to focus on enjoying the process rather than getting overwhelmed by complexity.

Nutritional advantages: While this cake is certainly indulgent, using cream cheese instead of more traditional oils or fats can provide a richer flavor with less overall fat. When enjoying in moderation, it can fit into a balanced diet, offering a sweet treat without the overwhelming calories of other desserts.

Social and entertaining value: This Cream Cheese Pound Cake is perfect for sharing with friends and family, making everyone feel welcome and included. It’s a go-to dessert for potlucks and gatherings and can be easily sliced for serving, making it a hit during social occasions.

Cost-effectiveness and accessibility: The recipe’s ingredients are straightforward and affordable, making it an approachable choice for everyone. There’s also a high yield, ensuring that you can serve several guests without breaking the bank.

Historical Background and Cultural Significance

Origin story: The humble beginnings of pound cake date back to the early 18th century, with its name derived from the proportions used in its original recipe – a pound each of flour, butter, sugar, and eggs. Making the transition to cream cheese added a lovely twist to this classic cake.

Cultural importance: In many cultures, pound cake has been a staple at celebrations and gatherings. Its simplicity has allowed it to adapt and flourish in various culinary traditions, preserving its cultural significance across generations.

Evolution of the recipe: Over time, bakers have experimented with flavors beyond the original recipe, incorporating ingredients such as zest, spices, or, most notably, cream cheese. This evolution reflects the flexibility and creativity of home baking, pushing traditional boundaries.

Regional variations: Around the world, you may find unique interpretations of pound cake. Southern U.S. variations often elevate the basic concept with local ingredients like citrus or pecans, truly embracing the regional palate while maintaining the essence of the classic pound cake.

Ingredient Deep Dive

Cream cheese: A crucial ingredient in this recipe, cream cheese imparts a rich, tangy flavor to the cake. Originally created in the United States in the late 19th century, it offers a creamy texture and is lower in fat compared to butter, making it a popular choice for those looking to indulge lightly. When selecting cream cheese, opt for full-fat varieties for the best flavor; ensure proper storage in an airtight container to maintain freshness. If you need a substitute, mascarpone can work but offers a different flavor profile.

Butter: The use of good quality butter in this Cream Cheese Pound Cake cannot be overstated. Butter provides the foundational flavors that enhance the overall richness of the cake. When selecting butter, aim for unsalted varieties for better control over the sweetness, and be sure to store it properly in the refrigerator. For substitutes, coconut oil can provide the necessary fat content, although it may alter the flavor slightly.

Sugar: In this recipe, granulated sugar serves to sweeten the cake while also contributing to the structure. Being a simple yet essential ingredient, it caramelizes during baking to create a beautiful golden crust. Opt for organic sugar for a more natural option; if you’re looking for alternatives, brown sugar can add more depth of flavor due to its molasses content, yielding a more moist cake.

Eggs: Providing both moisture and structural integrity, eggs are vital to this Cream Cheese Pound Cake. Fresh, high-quality eggs offer the best results, providing richness and flavor. When selecting eggs, look for those that are free-range or organic to ensure quality; for egg replacements, consider using flax eggs or unsweetened applesauce as a vegan option.

Flour: All-purpose flour is the foundation of this cake, providing the necessary structure and texture. It’s essential to measure flour correctly to avoid a dry or dense cake. For a gluten-free option, consider using almond flour or a gluten-free all-purpose blend which can yield a slightly different texture but still delicious results.

Vanilla extract: A key flavor component, vanilla extract rounds out the cake with its warm, aromatic notes. When possible, use pure vanilla extract, as artificial varieties can result in a less vibrant flavor. Store vanilla extract in a cool, dark place to maintain its potency; if you’re in a pinch, consider using vanilla bean paste or homemade vanilla options.

Common Mistakes to Avoid

  • Overmixing the batter: This can lead to denser cake as it develops gluten in the flour. Mix until just combined to maintain an airy texture.
  • Using cold ingredients: Cold cream cheese or butter can result in uneven mixing. Make sure all ingredients are at room temperature for a smoother batter.
  • Not measuring flour correctly: Scooping directly from the bag can lead to using too much flour. Use the spoon and level method for precise measurements.
  • Skipping the creaming process: This step is crucial for incorporating air, resulting in a lighter cake. Cream the butter and cheese thoroughly before adding sugar.
  • Opening the oven too early: This can cause the temperature to drop and the cake to collapse. Wait until at least the minimum bake time to check on it.
  • Not using parchment paper: This can make it challenging to remove the cake from the pan without breaking it. Use parchment for easy release.
  • Not letting the cake cool: Cooling in the pan and then on a rack helps maintain its structure; removing it too soon can lead to crumbling.
  • Frosting too soon: Allow the cake to cool completely before frosting; otherwise, the frosting will melt. Patience is key!
  • Storing incorrectly: Improper storage can result in a dry cake. Wrap the cake well or store it in an airtight container.
  • Skipping flavor adjustments: Don’t hesitate to add flavorings like citrus or spice to personalize the cake to your taste palette.

Essential Techniques

Creaming: This technique combines soft butter and sugar until light and fluffy, incorporating air for a leavened texture. To master it, ensure both ingredients are at room temperature and use a stand or hand mixer for even blending. Watch for a pale, fluffy appearance as a visual cue for doneness.

Proper folding: When incorporating dry ingredients or whipped egg whites, use a gentle folding motion to preserve air bubbles. This technique is crucial for maintaining the cake’s lightness. Avoid vigorous stirring that can deflate the batter, and ensure an even mix while retaining some air.

Temperature control: Having all ingredients at room temperature aids in even mixing and baking. This is particularly important for butter and cream cheese. Achieve this by taking ingredients out of the fridge 30 minutes before you plan to start baking

Measuring flour: The correct flour measurement is vital for texture. Always spoon flour into your measuring cup and level it off with a knife for accuracy, avoiding packing or over-measuring, which could result in a dry cake.

Cooling: Allow your Cake to cool in the pan for a certain period before transferring it to a wire rack. This step helps maintain moisture without allowing it to become soggy on the bottom. Wait until it’s completely cool before frosting or slicing to ensure clean cuts.

Timing: Understanding baking timing is essential. Every oven is different; always use a toothpick test to check for doneness, ensuring that a few moist crumbs cling to the toothpick without wet batter when it comes out.

Pro Tips for Perfect Cream Cheese Pound Cake

Use high-quality ingredients: The fresher your ingredients, the better your cake will taste. Invest in genuine butter, fresh eggs, and cream cheese for maximum flavor impact.

Experiment with flavors: Don’t hesitate to modify the cake with lemon zest, almond extract, or even chocolate chips to suit your taste or occasion.

Sift your dry ingredients: This helps to aerate the flour and can result in a lighter cake. It’s especially beneficial in avoiding clumping of the flour and baking powder.

Use a good non-stick pan: A heavy-duty, non-stick loaf pan ensures even baking and also makes it easier to remove the cake. Consider lining with parchment for extra safety.

Let the cake rest: For improved flavor, allow your cake to rest overnight. The flavors deepen and spread for an even more enjoyable experience the following day.

Frost with care: If adding frosting or glaze, wait until the cake is completely cooled. Consider a simple vanilla icing or a cream cheese frosting for a lavish finish.

Adjust baking time as needed: If your cake is browning too quickly, cover it with aluminum foil without tight sealing to allow it to continue baking without burning.

Try different shapes: While a loaf pan is traditional, using a bundt or tube pan can offer a beautiful presentation. Just adjust baking times as necessary.

Variations and Adaptations

Regional variations: Explore variations like lemon pound cake by adding lemon zest and juice, giving it an exciting citrus twist typical of Southern desserts.

Seasonal adaptations: For fall, incorporate spices like cinnamon, nutmeg, and pumpkin puree to transform the cake into a festive treat that captures the flavors of the season.

Dietary modifications: If needed, create a lower-carb version with almond flour, adjusting the baking time. There are also numerous vegan-friendly substitutes available to ensure everyone can enjoy this cake.

Flavor variations: Enhance with chocolate by adding cocoa powder or chocolate chips. For a more decadent touch, swirl in a fruit jam or caramel before baking, adding an element of surprise.

Texture modifications: Consider creating a marble effect by dividing the batter and swirling in chocolate or a berry puree. This adds visual appeal along with varied textures.

Presentation alternatives: Serve the pound cake in loaf slices for a rustic look or transform it into elegant mini-cakes. Decorative garnishes such as fresh fruit or edible flowers can elevate its visual impact dramatically.

Serving and Presentation Guide

Plating techniques: For presentation, consider serving slices on a colorful cake stand, which adds charm. Layer slices on a plate in a fan shape for an exquisite display.

Garnishing ideas: Fresh berries, powdered sugar, or a drizzle of caramel or chocolate sauce can enhance the aesthetic and add an extra flavor burst.

Traditional accompaniments: Classic accompaniments include whipped cream, a scoop of vanilla ice cream, or even a side of fresh fruit to add freshness contrasting the richness of the cake.

Modern serving suggestions: Experiment by serving individual slices with unique twist touches, like adding a dollop of infused cream or a side of gourmet coffee for a contemporary dessert experience.

Temperature considerations: This cake can be served at room temperature or slightly warmed, depending on your preference. A good rule of thumb is to warm it slightly in the microwave for a few seconds just before serving.

Portion control tips: For party servings, cut your cake into thin slices for guests. Consider creating bite-sized cubes for easy handling, particularly if you serve multiple desserts at one gathering.

Wine and Beverage Pairing

Wine pairings: A lightly sweet dessert wine, such as a Moscato, pairs beautifully with the rich flavors of the Cream Cheese Pound Cake. Alternatively, a dry Riesling can complement the cake’s texture perfectly.

Non-alcoholic alternatives: Herbal teas, particularly chamomile or mint, make wonderful companions for a slice of pound cake, balancing sweetness with soothing flavors.

Coffee/tea pairings: This cake pairs beautifully with a rich roast coffee, balancing sweetness with its depth. Try it with a cappuccino or flat white for a cafe-style experience at home.

Temperature considerations: Serve your chosen beverage at its optimal temperature; hot teas and coffees will contrast nicely against the coolness of the cake.

Serving suggestions: Offer guests a choice of beverages to enhance their dessert experience, allowing for a variety of tastes. This approach encourages conversation and experimentation when savoring the cake.

Storage and Shelf Life

Storage methods: Store the Cream Cheese Pound Cake in an airtight container at room temperature for up to three days. This will prevent it from drying out while keeping the flavors intact.

Temperature requirements: Ensure your cake remains in a cool, dry area away from direct sunlight or heat sources to maintain its delicious texture and flavor.

Container recommendations: If you’ve cut into the cake, consider wrapping individual slices in plastic wrap or foil to preserve freshness. For longer storage, opt for an airtight container.

Signs of spoilage: Check for visible mold or off smells; these are clear signs the cake has gone bad. For the best quality, consume within a week of baking.

Reheating instructions: If you prefer a warm slice, pop it in the microwave for about 15-20 seconds, ensuring you keep an eye on it to avoid overcooking.

Freezing guidelines: You can freeze the Cream Cheese Pound Cake for up to three months. Wrap it tightly in plastic wrap and place it in an airtight container for best results when thawing later.

Make Ahead Strategies

Prep timeline: To prepare ahead, you can bake the cake one day before you plan to serve it. Allow it to cool completely before storage to enhance its flavor and texture.

Storage between steps: If you freeze the cake batter, it can be stored for up to a month. When ready to bake, thaw it overnight in the fridge, and then proceed with baking for a fresh cake.

Quality impact assessment: While the cake is best enjoyed fresh, making it ahead allows the flavors to meld; just be sure to store correctly to maintain moisture.

Assembly tips: If you want to layer additional flavors such as fruit compote, prepare that ahead of time and store it separately for an easy addition before serving.

Reheating guidelines: Cakes can often be reheated successfully. To retain moisture, cover with a damp paper towel when microwaving, allowing it to steam slightly and keep it tender.

Fresh element additions: Consider adding fresh fruit or topping your cake with whipped cream last minute, rather than prepping before, to enhance freshness and flavor when served.

Scaling Instructions

Halving the recipe: If you’re looking to make a smaller batch, simply half all ingredients while keeping the same method. Baking time might reduce slightly, so keep an eye on doneness.

Doubling or tripling: To make a larger batch, double or triple the ingredients, remembering that baking time will increase proportionately when using larger or multiple pans.

Equipment adjustments: Ensure you have adequate mixing bowls and pans if scaling up. For large batch baking, consider using a stand mixer for efficiency.

Timing modifications: Keep in mind that larger batches may need additional time in the oven. Always use visual and toothpick tests to check for doneness.

Storage considerations: If baking multiple cakes, store them separately, as crowding can lead to uneven cooling and moisture retention between cakes.

Nutritional Deep Dive

Macro breakdown: Each slice of this cake typically provides a balance of carbohydrates from the flour and sugar, along with fat from the cream cheese and butter, giving you a satisfying treat.

Micronutrient analysis: While this dessert is rich, it does offer some nutritional benefits, including calcium from the cream cheese and a small amount of vitamin D from eggs, contributing to your daily nutrient intake.

Health benefits: Enjoying cakes like this can be part of a balanced lifestyle when eaten in moderation; they can also enhance social connections during gatherings or celebrations.

Dietary considerations: It’s important to keep portion sizes in check, especially for those monitoring caloric intake. Sharing it at events is a great way to enjoy cake without overindulgence.

Portion analysis: Slices can vary significantly in size; consider standardizing your servings to maintain consistency and satisfy guests while respecting dietary goals.

Weight management tips: Being mindful of how often and how much you enjoy richer desserts helps maintain a healthy lifestyle. Consider smaller portion sizes, especially during gatherings, to help manage temptations.

Dietary Adaptations

Gluten-free: To cater to gluten-sensitive individuals, substitute all-purpose flour with certified gluten-free flour blends while also ensuring other ingredients adhere to dietary needs.

Dairy-free: Utilize dairy alternatives, such as coconut cream cheese or cashew cheese, to maintain creaminess without traditional dairy products. Adjust baking times as necessary based on moisture content.

Vegan: Replace eggs with flax eggs and use coconut or vegan butter for a completely plant-based version of the Cream Cheese Pound Cake.

Low-carb: Incorporate almond flour or coconut flour along with sugar substitutes to create a lower-carb variation. Experimenting with baking time is essential to achieve the right texture.

Keto: Adjusting sugar to erythritol or other keto-friendly sweeteners will create a low-carb cake ideal for those following ketogenic diets, maintaining flavor without excess carbohydrates.

Paleo: Opt for almond flour and honey or maple syrup as sweeteners for a paleo version of this cake, delivering similar taste preferences without the processed ingredients.

Low-FODMAP: Aim for lactose-free cream cheese and sugars to create a cake that remains enjoyable for those adhering to low-FODMAP diets while not sacrificing bakers.

Other specific diets: Seek out gluten-free and vegan baking mixes to simplify the process for differing dietary needs. Many mixes work similarly to traditional ones, ensuring a delicious outcome.

Troubleshooting Guide

Texture issues: If your cake is too dense, you may have overmixed the batter or added too much flour. Review your measuring techniques of both wet and dry ingredients to maintain balance.

Flavor balance: Should the cake taste bland, consider using fresher flavor-enhancers like spices, citrus zest, or high-quality vanilla extract to add depth to the flavor.

Temperature problems: Uneven baking can occur if your oven runs hot or cool. Invest in an oven thermometer to verify accuracy and adapt as needed for perfect results.

Equipment challenges: Using the wrong type of pan can affect your cake texture. Ensure to follow recommendations on pan material, shape, and size to achieve the desired outcome.

Ingredient substitutions: While many substitutions may work, not all will yield the same results. Always experiment with proven replacements rather than random alternatives for the best success.

Timing concerns: Overbaking can lead to a dry cake while underbaking results in gooeyness. Monitor the cake as it approaches the recipe’s end time, employing toothpick tests to catch early for optimal texture.

Recipe Success Stories

Community feedback: Many bakers have raved about how the Cream Cheese Pound Cake has become a family favorite, often requesting it time and time again during gatherings and holidays.

Variation successes: Readers have enjoyed personalizing this recipe with additional flavor variations – from berries to chocolate swirls – spurring creativity in their kitchens while celebrating this classic cake.

Adaptation stories: There are numerous accounts of how people modified the recipe to fit dietary needs without compromising taste, showing the cake’s flexibility in satisfying various preferences.

Reader suggestions: Feedback from the community has inspired variations such as lemon glaze or nut toppings, showcasing how the original recipe serves as a great foundation for creativity.

Photography tips: Many food lovers enjoy capturing this cake’s beauty, and sharing tips with each other, from angles to lighting, enhances the visual presentation in their home baked creations.

Frequently Asked Questions

Can I make this cake ahead of time? Yes! You can bake the cake a day in advance. Allow it to cool completely, then store it properly to maintain its freshness overnight.

What can I substitute for cream cheese? For a creamy texture, consider using mascarpone cheese or Greek yogurt as alternatives; while flavor may vary, texture will remain similar.

How should I store the cake? To maximize freshness, store it in an airtight container at room temperature for about three days or in the fridge for longer shelf life.

What should I do if my cake is too dense? Densely textured cakes typically result from overmixing the batter or adding too much flour. Ensure accurate measuring and light mixing techniques.

Can I freeze this pound cake? Absolutely! Wrap it tightly in plastic wrap and place it in a freezer-safe container to keep it fresh for up to three months.

What should I frost this cake with? Cream cheese frosting works beautifully, but you can also use chocolate or vanilla glaze, or keep it simple with whipped cream and berries.

Is there a gluten-free version? Yes! You can replace all-purpose flour with gluten-free flour blends to create a delicious gluten-free version of this pound cake.

How can I make this cake more flavorful? Enhance your cake with additional flavors by incorporating spices, citrus zest, or a flavored extract to deepen its taste profile.

What is the best way to serve pound cake? Slice the cake and serve it at room temperature with coffee, tea, or dessert wine, and consider garnishing with fresh fruit or compote.

Can I turn this recipe into cupcakes? Yes! Pour the batter into lined muffin tins for cupcakes, but be mindful of reduced baking time; check for doneness earlier than the full-sized cake.

Additional Resources

Explore related recipes featuring variations of pound cakes or similar desserts to switch things up. You can also find guides on essential baking techniques or ingredient information for better results in your own kitchen.

Equipment recommendations can guide you on which tools enhance your baking experience. Investing in quality measuring tools and mixing bowls can streamline the process while ensuring accuracy.

Seasonal variations also inspire creativity beyond the standard recipes, allowing you to utilize fresh ingredients as they come into season or adapt to upcoming holidays and celebrations.

Join the Conversation

Engage with our community on social media to share your success stories and colorful pictures of your baking endeavors! We love seeing how various flavors and visual styles emerge within this classic recipe, fostering creativity among home bakers.

Consider leaving a review or suggesting variations that you’ve tried. Your experiences help others feel inspired to dive into the kitchen and try their hand at making this delightful Cream Cheese Pound Cake!

The Recipe

Cream Cheese Pound Cake

Serves: 10 servings

Prep Time: 15 mins

Cook Time: 60 mins

Total Time: 75 mins

Kitchen Equipment Needed

  • Loaf pan
  • Mixing bowls
  • Electric mixer
  • Measuring cups and spoons
  • Spatula

Ingredients

  • 1 cup (8 oz) cream cheese, softened
  • 1 cup (2 sticks) unsalted butter, softened
  • 2 cups granulated sugar
  • 4 large eggs
  • 3 cups all-purpose flour
  • 1 teaspoon baking powder
  • 2 teaspoons vanilla extract

Directions

  1. Preheat your oven to 325°F (160°C) and grease the loaf pan.
  2. In a large bowl, mix the cream cheese and softened butter until well blended.
  3. Gradually add the sugar, creaming until light and fluffy.
  4. Beat in the eggs one at a time, mixing well after each addition.
  5. In a separate bowl, whisk together the flour and baking powder.
  6. Slowly add the dry mixture to the creamed mixture, combining until just mixed.
  7. Stir in the vanilla extract until fully incorporated.
  8. Pour the batter into the prepared loaf pan, smoothing the top with a spatula.
  9. Bake for 60-70 minutes, or until a toothpick inserted in the center comes out clean.
  10. Allow to cool in the pan for 10 minutes before transferring to a wire rack.

Recipe Notes

  • Ensure all ingredients are at room temperature for even mixing.
  • Feel free to experiment with additional flavors like lemon or chocolate.
  • Wrap any leftovers properly to maintain moisture and freshness.

Delicious Turkey Stuffing Balls for Your Holiday Table

Delicious Turkey Stuffing Balls: A Flavorful Twist for Your Holiday Table

⚖️
Difficulty
Easy

⏲️
Prep Time
20 mins

🕒
Cook Time
30 mins

⏱️
Total Time
50 mins

🍽️
Servings
6 servings

Turkey Stuffing Balls are a delightful addition to any holiday gathering, combining the savory flavors of traditional stuffing with the convenience of bite-sized portions. Picture a warm, golden-brown exterior with a soft, flavorful center, bursting with herbs and spices that evoke a cozy feel of family gatherings. These turkey stuffing balls are not just a side dish; they can easily stand alone, offering a hearty and satisfying option that pleases everyone at the table.

With mouthwatering notes of sage, thyme, and garlic, each bite transports you to a festive holiday feast, making it a perfect treat for potlucks and dinner parties. The aroma wafting through your kitchen will have your guests eager to dig into this delectable offering. Try them alongside cranberry sauce or a drizzle of gravy for an extra layer of flavor, ensuring that your Turkey Stuffing Balls are the highlight of your holiday spread.

Quick Recipe Highlights

  • Flavor Profile: Herbaceous tones of sage and thyme complement the savory turkey, while a hint of onion and garlic deepens the flavor complexity.
  • Texture: Crunchy on the outside with a moist, fluffy inside, these stuffing balls provide the perfect mouthfeel.
  • Aroma: The delightful fragrance of roasting turkey combined with fragrant herbs fills your kitchen, enhancing the anticipation of serving this dish.
  • Visual Appeal: Golden brown and perfectly shaped, these stuffing balls are not only delicious but also an inviting addition to your table.
  • Skill Level Needed: This recipe is easy enough for beginner cooks, making it accessible for everyone who wants to impress during the holiday season.
  • Special Equipment: A baking sheet and mixing bowls are all you need, keeping the preparation simple and stress-free.

Recipe Overview

  • Difficulty Level: This easy recipe stands out for its simplicity, allowing even novice chefs to create delicious results without overwhelming effort.
  • Category: These stuffing balls fit beautifully as a side dish or appetizer for any festive occasion, from Thanksgiving to Christmas dinners.
  • Cuisine: Rooted in traditional American cooking, these Turkey Stuffing Balls celebrate the culinary influences of holiday feasts across generations.
  • Cost: A breakdown of ingredients shows affordability, with basic pantry items and turkey creating a budget-friendly meal suitable for gatherings.
  • Season: Ideal for fall and winter festivities when flavors of herbs and hearty dishes dominate, these balls perfectly capture the spirit of the season.
  • Occasion: Enjoy them at family gatherings, potlucks, or as a comforting addition to holiday meals, providing universal appeal.

Why You’ll Love This Recipe

Delicious Turkey Stuffing Balls deliver a uniquely delightful taste and texture, making them an instant favorite on any dinner table. The savory turkey is complemented perfectly by a medley of aromatic herbs, creating a balance of flavors that leave guests wanting more. With each bite, you experience a satisfying crunch followed by a delightful moistness, perfectly encapsulating the essence of holiday comfort food.

Convenience is another major advantage of this dish; they can be prepared in advance, allowing you to focus on other elements of your meal. This flexibility not only saves time but also enables you to enjoy your time with family and friends without the stress of last-minute cooking. Reheating them is easy, ensuring they remain a delicious part of your holiday experience.

From a nutritional standpoint, these stuffing balls highlight the benefits of using turkey, a lean protein that provides essential nutrients while being low in fat. Additionally, the various herbs contribute to overall health, containing antioxidants and other beneficial compounds. This makes Turkey Stuffing Balls not just a tasty option but also a wholesome addition to your meal planning.

Socially, Turkey Stuffing Balls resonate well with family and friends, becoming an instant conversation starter during gatherings. Their appealing presentation and tasty profile encourage sharing and engagement, enhancing the atmosphere of holiday celebrations. This dish is perfect for both casual family dinners and more festive occasions.

Cost-effectiveness is another splendid feature, as these Turkey Stuffing Balls use basic, readily available ingredients. This not only makes them accessible financially but also allows for easy adaptation based on personal preference or budget constraints. As a result, they become a staple for a variety of gatherings without requiring extravagant spending.

Historical Background and Cultural Significance

The origins of Turkey Stuffing Balls can be traced back to traditional stuffing recipes used in early American cuisine. These recipes often stemmed from the necessity of stretching resources during the harvest season, using every part of the turkey to minimize waste. As families gathered for large celebrations, the stuffing became a cherished element of the feast, evolving over time into versatile variations such as these flavorful balls.

Culturally, stuffing holds significant importance during American holidays, symbolizing unity and hospitality. The act of sharing a meal with family and friends fosters community and strengthens bonds, making Turkey Stuffing Balls a beloved dish during the holiday season that pays homage to generations past.

As culinary practices evolved, so did the interpretation of stuffing. While many traditional recipes still focus on bread and spices, modernization has led to the incorporation of diverse ingredients, creating endless variations. Over the years, Turkey Stuffing Balls have become a popular adaptation, allowing cooks to express creativity while preserving the essence of this timeless dish.

Various regional variations exist, showcasing the distinct flavors and traditions across the United States. From Southern-style cornmeal stuffing to the herb-infused recipes of New England, Turkey Stuffing Balls can be customized to resonate with the diverse cultural backgrounds present at the table, ensuring that each bite tells a story.

Ingredient Deep Dive

Turkey, a lean protein, serves as the star ingredient. Its cultural significance in American cuisine is profound, commonly associated with Thanksgiving and holiday gatherings. Nutritionally, turkey is an excellent source of protein, low in fat, and rich in essential vitamins and minerals. When selecting turkey for this recipe, aim for fresh or high-quality frozen options; for storage, refrigerate leftovers and consume within three to four days. Additionally, ground turkey can be substituted for a more eclectic mix to suit personal tastes.

Stuffing usually includes ingredients such as breadcrumbs which serve as the base and binding agent in stuffing mixtures. This versatile ingredient has historical roots in a variety of cuisines worldwide. Its nutritional profile varies based on type, though it generally offers fiber and carbohydrates. Choose fresh bread for a unique flavor or whole-grain options for added health benefits. Store breadcrumbs in an airtight container to keep them fresh, while crusty bread can be frozen for prolonged preservation.

Herbs and spices play a vital role in flavoring the Turkey Stuffing Balls. Integral to culinary traditions across cultures, herbs like sage and thyme are not only aromatic but also beneficial for health. Fresh herbs provide more intense flavors, while dried herbs are convenient. Whether grown at home or purchased, store them in a cool, dark place for maximum freshness. Substituting fresh herbs for dried ones can amplify flavors, adapting this recipe to suit different taste preferences.

Onions and garlic are essential aromatics that enhance the flavor profile significantly. Both ingredients have cultural importance in varying cuisines and add a depth of flavor to dishes. Rich in antioxidants and beneficial compounds, they promote health and flavor. Select fresh options and store them in a cool, dry place; both ingredients can be diced and sautéed ahead of time to streamline the cooking process for this recipe.

Common Mistakes to Avoid

  • Overmixing the ingredients. This can lead to tough stuffing balls instead of a tender texture.
  • Using stale breadcrumbs, which can affect the flavor and moisture of the stuffing balls; make sure to use fresh ones.
  • Not seasoning adequately. Failing to add sufficient salt and herbs can result in bland flavors.
  • Sizing the balls inconsistently, causing uneven cooking; aim for uniform sizes for the best results.
  • Not preheating the oven. Skipping this essential step can lead to uneven cooking times.
  • Leaving ingredients unchopped for too long, which can affect both flavor and texture in the final dish; ensure they’re finely diced.
  • Skipping the cooking of onions and garlic before mixing; sautéing them brings out their sweetness and enhances the stuffing flavor.
  • Not testing the mixture for seasoning before forming them into balls, which could lead to unexpected blandness in the final dish.
  • Overcrowding the baking sheet, which can result in steaming instead of browning; use enough space for even cooking.
  • Not allowing the stuffing balls to cool slightly before serving; serving them too hot can mask flavors and texture.

Essential Techniques

Achieving the perfect Turkey Stuffing Balls requires understanding several key techniques. First, gentle mixing of the ingredients is essential; this helps to combine flavors without compromising the texture. Use your hands or a spatula to blend the mixture until just combined, avoiding overworking the dough which can make the balls dense.

Another critical technique involves the sautéing of aromatics like onions and garlic before combining them with other ingredients. Cooking these ingredients “sweats” them, releasing their natural sugars and creating a richer flavor. Ensure you sauté until they are soft and fragrant, which beautifully enhances the flavor profile of the final dish.

Correctly portioning the stuffing into uniform sizes allows for even cooking and attractive presentation. Use a scoop or your hands to shape the balls, ensuring they are compact but not overly dense. Proper sizing prevents some from cooking faster than others, maintaining a consistent texture across the board.

Lastly, baking at the proper temperature is crucial; preheat your oven to ensure even cooking and browning. Placing them in a preheated oven allows for a perfect golden crust to form while maintaining a moist interior. Aim for a balance of heat that crisps the outside while cooking the inside thoroughly.

Pro Tips for Perfect Turkey Stuffing Balls

Consider adding a touch of moisture to your mixture with broth or leftover gravy to enhance flavor and texture. This can make the stuffing balls more succulent and pleasing to the palate.

Using a mix of freshly chopped herbs with dried versions can take your flavor profile to another level, giving depth and brightness.

Experiment with different types of bread in your breadcrumbs. Whole-wheat or artisanal varieties can add unique flavors and textures.

Let the mixture rest in the fridge for at least 30 minutes before shaping; this helps the flavors meld together.

Try adding a pinch of crushed red pepper for a slight kick if you like a hint of heat in your stuffing.

Consider making a simple dip to serve alongside the Turkey Stuffing Balls, such as ranch or a herbed yogurt sauce, to elevate the dish further.

For an extra crunchy exterior, lightly spray the stuffing balls with cooking oil before baking them. This helps them crisp up beautifully.

Serve with seasonal accompaniments like cranberry sauce or gravy to enhance the flavors and provide a touch of tradition.

Variations and Adaptations

When making Turkey Stuffing Balls, consider regional variations to bring new twists to this classic dish. For a Southern touch, add cooked diced sausage or incorporate cornbread for a richer texture. A Southern-style stuffing gives a deliciously unique flavor that changes the texture and taste entirely.

Seasonal adaptations can also play a significant role; during fall, adding chopped apples or cranberries can lend a delightful sweetness that complements the savory turkey. During spring, replace heavier flavors with vibrant herbs like parsley or dill to reflect freshness and brightness.

For dietary modifications, swap turkey for plant-based alternatives to create vegan stuffing balls that still capture the essence of the original recipe. Ingredients like chickpeas or lentils can provide a hearty and satisfying alternative while maintaining the traditional flavors.

Flavor variations can also be implemented; consider using different herbs such as rosemary or adding spices like cumin for a unique twist on the traditional recipe. Each flavoring can introduce new depths, encouraging creativity in your cooking.

Texture modifications can be explored by incorporating nuts or seeds for crunch, enhancing the overall mouthfeel of the dish. Pine nuts or chopped walnuts can be tossed in to add both nutritional value and delightful texture.

For a presentation alternative, consider shaping Turkey Stuffing Balls into larger patties, creating a unique rustic style that could easily steal the show on any party platter.

Serving and Presentation Guide

The visual appeal of your Turkey Stuffing Balls can significantly impact the meal presentation. Consider arranging them on a large platter and garnishing with fresh herbs like parsley or thyme to add a splash of color and freshness. A drizzle of gravy or a small bowl of cranberry sauce nearby allows guests to customize their servings.

Plating techniques can vary, but a simple stacking method adds volume and makes the stuffing balls appear inviting. Portion control can help guests enjoy just enough without overindulging, ensuring all guests can have a taste.

For temperature considerations, serve the stuffing balls warm but not steaming hot to allow flavors to shine. Ensure guests can recognize the dish’s inviting texture and aroma without overwhelming their senses with heat.

Pair traditional accompaniments such as roasted vegetables or mashed potatoes alongside the stuffing balls for a complete holiday feast. Modern serving suggestions such as individual serving cups or small bowls can provide an elegant twist, enhancing the overall dining experience.

Wine and Beverage Pairing

When it comes to wine pairings, opt for a light white wine like Chardonnay, which complements the flavors of turkey while providing a refreshing balance. Alternatively, a light-bodied red wine such as Pinot Noir can enhance the savory notes found in the stuffing balls, making an excellent match for the dish.

For non-alcoholic alternatives, consider cranberry juice mixed with sparkling water. This provides a festive touch that perfectly balances the flavors of your Turkey Stuffing Balls without overpowering them.

If coffee or tea fits the meal, consider serving a light herbal tea that enhances the comforting, homey feel of the dish, allowing the stuffing balls to remain the star of the show.

Remember temperature considerations for each beverage; serving wines slightly chilled and non-alcoholic beverages over ice ensures they remain refreshing throughout your meal.

Storage and Shelf Life

Proper storage of Turkey Stuffing Balls is crucial to maintaining their flavor. Store leftover stuffing balls in an airtight container in the refrigerator for up to three days to ensure freshness. For longer preservation, freezing is an excellent option; wrapping them tightly in plastic wrap and then placing them in a freezer-safe container can extend their shelf life up to three months.

Temperature requirements should be observed when reheating them; ensure they reach an internal temperature of 165°F (74°C) for safe consumption. The best reheating method is using the oven, which allows them to regain their crispy exterior. Spread them out on a baking sheet and heat at 350°F (175°C) until thoroughly warmed.

Signs of spoilage include an off smell or changes in texture, indicating they shouldn’t be consumed. Take care to monitor storage times and appearance to avoid any health risks.

Make Ahead Strategies

To streamline preparation, consider making Turkey Stuffing Balls ahead of time. They can be formed and stored in the refrigerator for up to 24 hours before baking, breaking the cooking process into manageable steps. This strategy allows flavors to meld and enhances overall taste.

If preparing more than a day in advance, consider freezing the formed balls. This allows for assembly ahead of time without sacrificing quality. To successfully freeze them, place them on a baking sheet until solid, then transfer to a freezer-safe container.

When reheating, allow the stuffing balls to thaw in the refrigerator overnight for the best texture and flavor. This avoids freezer burn and maintains moisture.

Assemble them right before serving for an appealing presentation. This includes quickly popping them in the oven at your convenience, ensuring they arrive hot and fresh for your guests.

Scaling Instructions

Scaling your Turkey Stuffing Balls recipe can be seamless, whether to accommodate more guests or for meal prep. When halving the recipe, simply divide all ingredients by two while keeping an eye on the baking time; smaller batches typically require slightly less time.

Doubling or tripling the recipe might necessitate using larger mixing bowls and trays, as well as adjusting cooking times; use two baking sheets to ensure even cooking and browning.

Equipment adjustments, like larger roasting pans or more mixing bowls, may be necessary for larger quantities to prevent potential mishaps. Ensure that your oven has the capacity to handle extra trays at once for even cooking.

Timing modifications are essential, as larger quantities may require more time in the oven to achieve the desired level of crispiness. Always use a food thermometer to check that the center reaches the appropriate temperature.

Storage considerations should also be made; larger yields may need more airtight containers or freezer bags to ensure none spoil before consumption.

Nutritional Deep Dive

The macro breakdown of Turkey Stuffing Balls reveals a balance of protein, carbohydrates, and fats. Each serving provides a healthy dose of lean protein, essential for muscle repair and maintenance, alongside carbohydrates that offer energy to keep you fueled during festive gatherings.

Micronutrient analysis shows that turkey is a great source of B vitamins and selenium, essential for metabolic function and antioxidant protection. Additionally, the herbs add their own unique range of vitamins, enhancing the nutritional profile of each serving of stuffing balls.

Health benefits extend beyond basic nutrition; the lean protein from turkey supports healthy weight management while the fiber from breadcrumbs contributes to digestive health. This synergy makes Turkey Stuffing Balls both satisfying and nutritious.

Portion analysis is essential when serving these delicious balls. A standard serving size is typically around two or three balls, allowing for a balanced intake without overindulgence, especially during festive seasons.

Weight management tips suggest balancing the stuffing balls with lighter sides, such as fresh vegetables or salads, ensuring a hearty yet healthy meal that can delight all guests.

Dietary Adaptations

For a gluten-free version of Turkey Stuffing Balls, substitute traditional breadcrumbs with gluten-free alternatives, such as crushed gluten-free crackers or cornmeal. This allows those with dietary restrictions to enjoy the same delicious flavors without gluten concerns.

For a dairy-free adaptation, simply omit any butter from the recipe, as turkey and herbs provide sufficient moisture and flavor. You can enhance the dish by using dairy-free cheese options in the mixture.

Vegans can enjoy a plant-based variant by substituting turkey with lentils or chickpeas, allowing for the same texture and flavor profile while adhering to dietary preferences. Incorporating more vegetables and spices can further enhance the experience.

Low-carb diets can also be accommodated; replace breadcrumbs with almond flour or fine cauliflower rice to create a satisfying meal while keeping carb counts in check. This maintains texture and flavor with fewer carbs.

Keto adaptations can follow similarly by using a combination of high-fiber ingredients to create stuffing balls that align with dietary goals while still being enjoyable.

For those following Paleo diets, focus on whole ingredients such as nuts, seeds, and vegetables to craft a stuffing ball that adheres to the guidelines while providing flavor and satisfaction.

Other specific diets can also be accommodated by tailoring seasonings and ingredient proportions to fit personal health requirements while ensuring delightful flavors and enjoyable culinary experiences.

Troubleshooting Guide

Common texture issues can arise when turkey stuffing balls turn out too dry; this often occurs due to inadequate moisture in the mixture. Adjusting the amount of chicken broth can help achieve the desired consistency.

Flavor balance problems may yield bland stuffing balls, often due to insufficient seasoning. Always taste the mixture before shaping and adjust seasoning to ensure robust flavors come through.

Temperature problems could cause stuffing balls to undercook or overcook; using a food thermometer is invaluable. Cooking until the center reaches 165°F is the best strategy to prevent undercooking.

Equipment challenges can emerge while adapting to different ovens; ensure your baking tray is large enough to avoid overcrowding, enabling even cooking and browning of the stuffing balls.

Ingredient substitutions may create unexpected challenges in flavor or texture; when substituting, always test out in small batches to discover how they affect the dish.

Timing concerns are also worth addressing; if you are pressed for time, batch-cooking an initial trial run of stuffing balls allows for adjustments in both flavor and cooking methods going forward.

Recipe Success Stories

Community feedback on these Turkey Stuffing Balls has been overwhelmingly positive, with many highlighting the ease of preparation and delightful flavors. Enthusiastic home cooks share stories of modifying the recipe to suit their personal traditions, bringing a sense of family to their holiday gatherings.

Variation successes inspire creative adaptations. Many families have discovered new favorites by incorporating unique spices, reflecting their diverse culinary backgrounds while maintaining the traditional elements that add to nostalgia.

Reading adaptations, personal stories of culinary experimentation often bring humor and creativity to the kitchen. Tips shared among readers highlight the joy of finding new methods for enhancing flavors and presenting the dish attractively.

Photography tips enhance the overall engagement around Turkey Stuffing Balls, as social media platforms buzz with appetizing images that capture their golden-brown perfection, inspiring others to create their own.

Frequently Asked Questions

Can I make these Turkey Stuffing Balls ahead of time?

Yes, you can prepare the stuffing balls and refrigerate them for up to 24 hours before baking. This enhances flavors and simplifies cooking on the day of your event.

How long can I store leftover Turkey Stuffing Balls?

Leftover stuffing balls can be stored in the refrigerator for up to three days. For longer storage, freeze them for up to three months.

Can I use chicken instead of turkey?

Absolutely! Ground chicken can be substituted for turkey, providing a slightly different flavor while maintaining the overall appeal of the dish.

What herbs work best in this recipe?

While sage and thyme are traditional, feel free to experiment with rosemary or parsley for different flavor profiles. Adjust based on your personal preferences.

How do I prevent them from falling apart?

Ensure that you mix the ingredients until just combined, avoiding overmixing. The breadcrumbs help bind the ingredients, but you may also use an egg as an additional binder if needed.

Can I bake these at a different temperature?

While baking at 350°F is ideal, you can adjust the temperature slightly. Just keep an eye on them, as cooking times may vary.

Can I add vegetables to the stuffing mixture?

Absolutely! Feel free to incorporate finely chopped vegetables such as bell peppers or carrots for added flavor and nutrition.

What should I serve with Turkey Stuffing Balls?

These stuffing balls pair excellently with traditional accompaniments like cranberry sauce, gravy, or roasted vegetables for a complete holiday experience.

How can I enhance the dish?

Consider adding a splash of Worcestershire sauce or Dijon mustard to the mixture for an added depth of flavor.

Can I cook these in an air fryer?

Yes, cooking stuffing balls in an air fryer can yield a delicious outcome. Preheat the air fryer and cook at 350°F for about 10-15 minutes or until golden brown.

Are these suitable for freezing after cooking?

Yes, once cooked and cooled, freeze them in an airtight container. Reheat them in the oven or microwave when ready to serve.

Additional Resources

Looking for more inspiration? Check out related recipes that perfectly complement your Turkey Stuffing Balls, such as roasted root vegetables or a classic cranberry sauce. Further technique guides provide insights into ingredient selection and cooking methods enhancing your overall culinary skills.

Deep-dive into ingredient information, giving you a broader understanding of what enhances flavors and how to choose the best options for your dishes. Equipment recommendations facilitate efficiency in your kitchen, ensuring you have the right tools for creating delightful meals.

Seasonal variations highlight how you can adapt this recipe to suit any festive occasion, keeping the flavors fresh and exciting throughout the year.

Join the Conversation

We’d love to hear about your experiences with this Turkey Stuffing Balls recipe! Join our community by sharing your photos on social media, giving honest reviews, or suggesting any personal twists you’ve made. Engaging with others who appreciate good food enhances the cooking journey and opens opportunities for delightful experimentation.

Connect with fellow food lovers or share stories that inspire creativity in the kitchen. Celebrate the love of cooking and gather new ideas as this thriving community continues to grow and evolve around these cherished classics.

The Recipe

Turkey Stuffing Balls

Serves: 6 servings

Prep Time: 20 mins

Cook Time: 30 mins

Total Time: 50 mins

Kitchen Equipment Needed

  • Baking sheet
  • Mixing bowls
  • Measuring cups and spoons
  • Wooden spoon or spatula
  • Food thermometer (optional)

Ingredients

  • 1 lb ground turkey
  • 2 cups breadcrumbs
  • 1 cup sautéed onions and garlic
  • 1/4 cup fresh parsley, chopped
  • 1 tbsp dried sage
  • 1 tbsp dried thyme
  • 1/2 tsp salt
  • 1/4 tsp black pepper
  • 1/2 cup turkey broth (optional)

Directions

  1. Preheat the oven to 350°F (175°C) and line a baking sheet with parchment paper.
  2. In a large mixing bowl, combine ground turkey, breadcrumbs, sautéed onions and garlic, parsley, sage, thyme, salt, and pepper.
  3. If the mixture is too dry, slowly add turkey broth until a desired consistency is reached.
  4. Using your hands, shape the mixture into balls about 1.5 inches in diameter.
  5. Place the formed balls onto the prepared baking sheet, spaced apart.
  6. Bake for 25-30 minutes or until they reach an internal temperature of 165°F (74°C) and are golden brown.
  7. Remove from oven and let cool slightly before serving.

Recipe Notes

  • For added moisture, consider mixing in a beaten egg.
  • Feel free to experiment with different herbs and spices; red pepper flakes can add heat.
  • Store leftovers in an airtight container for up to 3 days, or freeze for longer storage.