Delicious Mediterranean Spaghetti with Hearty Meat Sauce Recipe

Mediterranean Spaghetti with Hearty Meat Sauce: A Flavorful Journey to the Mediterranean

⚖️
Difficulty
Medium

⏲️
Prep Time
15 mins

🕒
Cook Time
30 mins

⏱️
Total Time
45 mins

🍽️
Servings
4 servings

Introducing the Mediterranean Spaghetti with Hearty Meat Sauce, a recipe that transports your taste buds straight to the sun-soaked shores of the Mediterranean. This delightful dish marries perfectly cooked spaghetti with a rich, savory meat sauce bursting with flavors of garlic, herbs, and ripe tomatoes. Every bite of this pasta is a celebration of vibrant ingredients, making it an iconic meal for family gatherings or a cozy evening dinner. With its aromatic profile and hearty texture, this dish is guaranteed to become a favorite at your dining table.

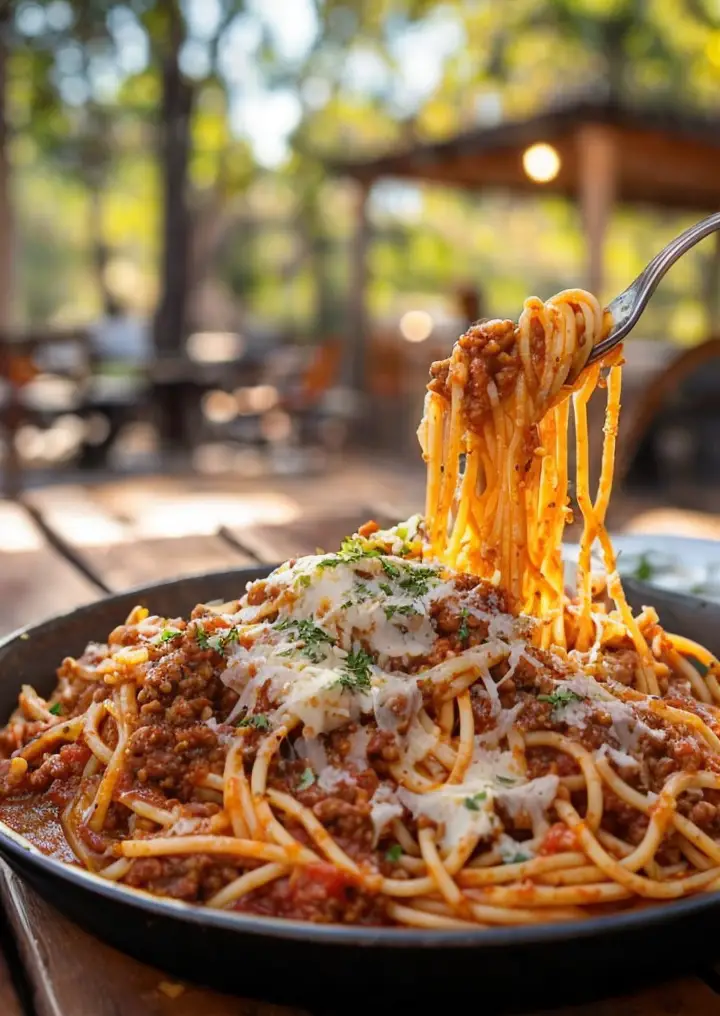
Imagine twirling strands of spaghetti around your fork, each twirl capturing the essence of the Mediterranean. The sauce is thick, rich, and comforting, crafted from ground beef simmered with tomatoes, aromatic vegetables, and a medley of spices that promise to tantalize your palate. Garnished with fresh basil and a sprinkle of Parmesan, this meal is not only delicious but also visually stunning, inviting everyone to dig in. Whether served on a casual weeknight or a special occasion, Mediterranean Spaghetti with Hearty Meat Sauce is a dish that unites everyone over good food and great company.

Quick Recipe Highlights

  • Flavor Profile: This dish features a robust flavor profile characterized by rich meatiness, acidity from tomatoes, and herbaceous notes from fresh basil and oregano.
  • Texture: The combination of tender spaghetti and hearty meat sauce creates a delightful contrast, making every bite comforting and satisfying.
  • Aroma: The enticing aroma of sautéed garlic, onion, and herbs fills your kitchen, creating an inviting atmosphere for your meal.
  • Visual Appeal: The vibrant red of the sauce against the backdrop of golden spaghetti makes this dish visually appealing and mouthwatering.
  • Skill Level Needed: With straightforward steps, this recipe is perfect for cooks of all skill levels, providing an opportunity for beginners to enhance their pasta cooking techniques.
  • Special Equipment: A large pot for cooking spaghetti and a skillet for preparing the meat sauce are essential, making this recipe easily manageable.

Recipe Overview

  • Difficulty Level: This recipe is categorized as medium difficulty due to the need for proper sauce preparation and pasta cooking, ideal for intermediate cooks looking to refine their skills.
  • Category: Mediterranean Spaghetti fits perfectly into the pasta category, serving as a fantastic main course for any meal.
  • Cuisine: This recipe draws its influences from Mediterranean cuisine, known for its use of fresh herbs and wholesome ingredients that celebrate natural flavors.
  • Cost: The ingredients for this recipe are relatively affordable, making it a cost-effective choice for families and individuals alike.
  • Season: While delicious year-round, this dish is particularly comforting in fall and winter when heartier meals are sought after.
  • Occasion: Mediterranean Spaghetti with Hearty Meat Sauce is excellent for cozy family dinners, gatherings with friends, or even festive occasions like birthdays and anniversaries.

Why You’ll Love This Recipe

Mediterranean Spaghetti with Hearty Meat Sauce perfectly balances taste and texture, providing a meal that is both indulgent and satisfying. The rich flavors from the meat sauce complement the al dente pasta, creating a culinary experience that speaks of warmth and comfort. With every bite, you’ll appreciate the depth of flavor crafted by fresh herbs and quality ingredients, pulling you into a world of delightful tastes.

Convenience is key with this recipe. From preparation to serving, this dish can be made in less than an hour, making it a perfect choice for busy weeknights or last-minute gatherings. The straightforward steps allow beginners and experienced cooks alike to create a home-cooked meal with ease. Plus, the versatility of the hearty sauce means you can prepare it ahead of time, allowing for quick reheating when needed.

Nutritionally, this dish boasts a good balance of protein, carbohydrates, and essential vitamins, thanks to the lean meat and tomato base enriched with vegetables. With the addition of fiber-rich spaghetti and the option for whole-grain versions, you can easily adapt it to suit your health needs without sacrificing flavor.

Socially, Mediterranean Spaghetti is a dish that brings people together. Its communal nature encourages sharing and conversation, making it perfect for dinner parties or family meals. You can easily scale the recipe to accommodate larger gatherings, ensuring that everyone enjoys a hearty meal.

Finally, this recipe is cost-effective and accessible, using ingredients commonly found in your pantry or local grocery store. With minimal investment, you can serve a filling dish that satisfies both the stomach and the soul, proving that great taste doesn’t have to come at a high price.

Historical Background and Cultural Significance

The roots of Mediterranean cuisine are as diverse as the countries that surround the Mediterranean Sea. Originating from a blend of cultures, this cuisine brings together the flavors of Greece, Italy, and North Africa, all of which emphasize fresh ingredients and wholesome cooking methods. Pasta, a staple in Italian tradition, transforms into a canvas for this rich meat sauce, showcasing the importance of regional culinary practices.

The cultural significance of spaghetti and meat sauce reflects a communal approach to dining, where meals are often enjoyed together. In many Mediterranean countries, sharing food reflects hospitality and brings people closer, turning dinner into a treasured ritual. With family-style servings and communal eating, Mediterranean spaghetti promotes togetherness and connection.

As the recipe has evolved, it has embraced modifications based on regional ingredients and preferences. For instance, variations of this dish might include the use of lamb or turkey instead of beef, or incorporating seasonal vegetables to enhance flavor and nutrition. The flexibility of this recipe demonstrates how traditional dishes can adapt while still remaining true to their origins.

Regional variations of Mediterranean Spaghetti are a testament to local tastes and preferences, with each region adding their unique twist. From the addition of olives in southern Italy to the use of spicy pepper in Spain, these adaptations not only reflect local ingredients but also celebrate the culinary diversity of the Mediterranean region.

Ingredient Deep Dive

Ground Beef: A key player in this dish, ground beef provides both flavor and protein. Historically, beef has been a staple protein across many cultures. Nutritionally, it offers essential vitamins and minerals, including iron and B12. When selecting ground beef, choose grass-fed options for superior flavor and health benefits. Store it in the coldest part of your refrigerator and consume it within a couple of days, or freeze it for longer preservation. If you’re looking for substitutions, ground turkey or lentils make great alternatives for lighter or vegetarian versions.

Spaghetti: This beloved pasta is the foundation of the dish, originating from Italy. Rich in carbohydrates, spaghetti serves as a great energy source. Opt for whole grain or gluten-free alternatives for extra nutrition. Store dried spaghetti in a cool, dry place, and keep fresh pasta in the refrigerator for a few days. If you’re out of spaghetti, alternatives like penne or fusilli work well, offering different textures to the dish.

Tomatoes: Tomatoes are crucial for the sauce, bringing acidity and brightness. Originating in South America, they became integral to Mediterranean cooking in the 16th century. Rich in vitamins C and K, tomatoes are also high in antioxidants. When selecting tomatoes, look for those that are firm and vibrant in color. Canned tomatoes are a great pantry staple that ensures you can cook this dish year-round. For a twist, consider substituting cherry tomatoes for added sweetness.

Garlic and Onion: These aromatics provide depth of flavor in the sauce. Both are known for their health benefits including heart health and immune support. When selecting, choose fresh garlic that is firm and free of sprouts. Store onions in a cool, dark place, and ideally separate from potatoes to extend their shelf life. If you need substitutes, shallots can offer a similar flavor profile.

Herbs (Basil and Oregano): Fresh herbs elevate the taste of Mediterranean dishes. They add freshness and aromatic qualities that enhance the overall flavor. Basil is often associated with Italian cuisine, while oregano has historical ties to Greece. When choosing herbs, fresh is preferred, but dried herbs work as a suitable substitute. Store fresh herbs in the refrigerator and dried ones in a cool, dark pantry. Both enhance the dish with their unique profiles.

Common Mistakes to Avoid

  • Overcooking the pasta: Make sure to test the spaghetti a minute or two before the package instructions suggest. Al dente pasta holds up better against the sauce.
  • Skimping on seasoning: Seasoning the sauce at each stage of cooking is crucial. Add salt and spices throughout to develop a more complex flavor.
  • Using low-quality meat: The meat is the star of the sauce, so investing in good-quality ground beef will greatly affect the dish’s taste and texture.
  • Not allowing flavors to develop: Take your time when simmering the sauce. Allowing it to cook longer helps meld the flavors together.
  • Adding cold meat to the pan: Let your meat come to room temperature before cooking; this ensures even browning.
  • Ignoring fresh herbs: Fresh herbs can elevate your sauce and adding them at the right moment enhances their flavor. Avoid overcooking them.
  • Skipping the garlic: Garlic adds depth to your sauce. Be cautious not to burn it, as it can turn bitter.
  • Not tasting as you go: Always taste your sauce before serving. Adjusting seasonings at the end can greatly improve the final outcome.
  • Forgetting to reserve pasta water: The starchy pasta water is perfect for adjusting the sauce consistency, ensuring it clings beautifully to every strand.
  • Overloading the sauce with too many ingredients: Less is often more. Stick to the core ingredients for best results and let their natural flavors shine.

Essential Techniques

Cooking Pasta: Properly cooking pasta is essential for achieving the right texture. Start with a large pot of boiling salted water, add the spaghetti, and stir occasionally. Cook until al dente—firm to the bite—then drain and reserve some pasta water. Avoid rinsing, as this removes the starch needed for sauce adherence.

Making a Hearty Meat Sauce: Begin by browning the ground beef in a skillet, breaking it apart for even cooking. Once browned, add onions and garlic, sautéing until translucent. Slowly add tomatoes and herbs, allowing the sauce to simmer so all flavors develop. Adjust the seasoning and let it cook until thickened to your desired consistency.

Pro Tips for Perfect Mediterranean Spaghetti with Hearty Meat Sauce

1. Always use a large pot for boiling your pasta to prevent sticking and allow for even cooking.
2. Opt for high-quality canned tomatoes—San Marzano are a favorite for their sweetness and richness.
3. When simmering your sauce, a longer cook time allows the flavors to enhance, but be careful not to let it dry out.
4. Don’t be afraid to add red wine to your meat sauce for depth; just let it reduce a little before serving to eliminate the alcohol taste.
5. Fresh herbs should be added toward the end of cooking to retain their flavor; dried herbs can be added earlier in the process.
6. If you plan on leftovers, store the pasta and sauce separately to prevent the pasta from becoming mushy.
7. For a spicy kick, consider adding red pepper flakes to the sauce while it simmers for an exciting flavor twist.
8. Take your time when sautéing vegetables; properly caramelized onions enhance the sweetness and complexity of the dish.

Variations and Adaptations

Regional variations of Mediterranean Spaghetti can include different types of meat, such as lamb or chicken, which add unique flavors and profiles. You can also experiment with seasonal adaptations; incorporating fresh vegetables like zucchini or bell peppers in the spring and summer can lighten the meal.

For those with dietary restrictions, gluten-free pasta options are widely available without sacrificing taste. Vegan adaptations could replace ground beef with lentils or mushrooms, providing a hearty alternative while keeping the essence of the dish intact.

Flavor variations can be added through spices and herbs, such as substituting basil with parsley or introducing a hint of cinnamon for a Moroccan twist. If you’re looking for a texture modification, adding crushed nuts or seeds can introduce a delightful crunch.

Lastly, presentation alternatives could include serving the spaghetti in individual bowls, garnished with a drizzle of olive oil and freshly grated cheese for a restaurant-quality finish.

Serving and Presentation Guide

Plating your Mediterranean Spaghetti beautifully enhances the dining experience. Start by twirling the spaghetti into a nest shape in the center of a warm plate, allowing the sauce to cascade around it. A sprinkle of freshly shredded Parmesan and torn basil leaves on top adds both flavor and visual appeal.

Traditional accompaniments like garlic bread or a side Greek salad can complement this dish well, rounding out the meal. You might also consider modern serving suggestions such as using single-serve cast iron skillets or mason jars for a rustic presentation.

Temperature is crucial; serve immediately after cooking to savor the pasta’s texture. For portion control, consider using kitchen scales to measure servings evenly, ensuring everyone gets their fair share.

Wine and Beverage Pairing

When it comes to wine pairings, a medium-bodied red wine like Chianti or Sangiovese complements the rich flavors of Mediterranean Spaghetti beautifully. Its acidity cuts through the meat sauce, enhancing the overall tasting experience.

For non-alcoholic alternatives, a sparkling water with a slice of lemon provides a refreshing balance. Additionally, if you wish to indulge in coffee or tea after the meal, a light herbal tea can aid digestion while providing a pleasant contrast to the robust flavors of the dish.

Temperature plays a role here too; red wines should ideally be served slightly cooler than room temperature for optimal enjoyment, while sparkling beverages can be chilled.

Storage and Shelf Life

To ensure the longevity of your Mediterranean Spaghetti, proper storage methods are essential. Place any leftovers in airtight containers and refrigerate, where they can last for up to three days. If you wish to keep it longer, freezing is an option; the dish will remain good for about three months when properly sealed.

Always check for signs of spoilage before consuming—look for off-odors or unusual colors. When reheating, ensure it’s done thoroughly to an internal temperature of 165°F, and consider adding a splash of water to rehydrate the pasta.

Freezing guidelines suggest separating the meat sauce and pasta before freezing, as they can maintain their texture better this way. Simply thaw and reheat when ready to serve again.

Make Ahead Strategies

For those short on time, several make-ahead strategies can be employed to facilitate cooking. You can prepare the meat sauce a day in advance, storing it in the refrigerator to allow the flavors to meld further. Cook the spaghetti fresh just before serving for the best texture.

If preparing ingredients beforehand, chop your vegetables and store them in airtight containers, ready for use. To ensure quality, keep a close watch on the timeline for each step, as preparing elements too far in advance can occasionally alter their taste and texture.

When assembling the dish, have everything ready to go. The last-minute touch of freshly chopped herbs can be added just before serving to maintain their vibrant flavor. For reheating, do so gently in a saucepan, adding pasta cooking water to restore moisture.

Scaling Instructions

If you’re looking to scale your Mediterranean Spaghetti recipe, adjusting ingredients becomes simple. For halving the recipe, use a kitchen scale to measure out ingredients accurately and reduce cooking times accordingly.

When doubling or tripling the recipe for larger gatherings, ensure you have a sufficiently large pot for boiling and a larger skillet for the sauce. This will allow for even cooking without overcrowding the pan.

Be mindful of timing modifications: while the cooking duration may stay consistent, preparing ingredients can take longer when larger batches are involved. Additionally, consider storage considerations; you may need to use multiple containers when freezing or refrigerating leftovers.

Nutritional Deep Dive

When analyzing the nutrition of Mediterranean Spaghetti with Hearty Meat Sauce, the macro breakdown reveals a good balance of macronutrients: carbohydrates from spaghetti, protein from ground beef, and healthy fats if olive oil is used.

Micronutrient analysis shows that this dish is rich in vitamins such as A, C, and K, mainly sourced from tomatoes and fresh herbs. Additionally, ground beef provides key minerals, including iron and zinc, instrumental for maintaining energy levels.

Health benefits include high protein content aiding muscle repair and maintenance, while dietary fiber from whole grain pasta supports digestive health. Portion analysis is vital; a serving of this dish typically contains around 600-700 calories depending on portion sizing.

For those on weight management journeys, balance is critical—consider pairing the dish with a side salad to increase volume while keeping calorie intake in check.

Dietary Adaptations

For those following a gluten-free diet, there are many great alternatives to traditional spaghetti, like zucchini noodles or gluten-free pasta brands that maintain great texture and flavor.

A dairy-free adaptation can be achieved by omitting cheese or using nutritional yeast as a cheese substitute, providing a similar umami flavor without the dairy content.

Vegetarians and vegans can replace the ground beef in the recipe with lentils or crumbled textured vegetable protein, ensuring protein needs are met without any meat.

For low-carb dieters, using spiralized vegetables as a base instead of traditional pasta is an excellent option, maintaining a comforting feel with much fewer carbohydrates.

For those adhering to a keto lifestyle, consider opting for cauliflower rice in lieu of pasta, while also being mindful of the tomato content to ensure carbohydrate levels stay low.

For paleo followers, swapping out the pasta for spiralized vegetables like zucchini or sweet potatoes preserves the dish’s integrity while adhering to dietary guidelines.

Troubleshooting Guide

If you find your sauce too watery, allow it to simmer uncovered for a while to reduce excess liquid, enhancing the overall flavor. For texture issues, if the spaghetti is mushy, ensure to cook for the recommended time next time and check for al dente during cooking.

If your dish tastes bland, it could be due to insufficient seasoning. Adjust this by adding salt, and consider including umami-rich ingredients like Worcestershire sauce or more herbs for depth.

Temperature problems can arise when serving; keeping the sauce heated while cooking the pasta is essential, preventing cold servings. Always taste before serving to ensure the temperature is just right.

If you experience equipment challenges, like a pot boiling over, reduce the heat slightly and stir to keep even bubbling. Ingredient substitutions may yield varied results, so approach swaps cautiously, always considering how flavors will meld together.

Timing concerns often stem from trying to multitask; ensure you have all ingredients prepped beforehand to facilitate a smoother cooking experience.

Recipe Success Stories

Our community has embraced Mediterranean Spaghetti with Hearty Meat Sauce, sharing feedback on the delightful flavors and comforting textures. Many have highlighted the ease of preparation, praising how quickly the dish comes together without compromising on taste, making it a go-to for weekday dinners.

Readers have also reported successful variations, such as incorporating local vegetables or swapping out proteins, proving the dish’s versatility. Sharing their adaptations has fostered a sense of community, creating a platform for engagement among food lovers.

Photography tips have proven invaluable too, with community members showcasing their final creations on social media. This not only inspires others to try the recipe but also reflects the personal touches people add to the dish, making each serving unique.

Feedback regarding the meal’s aroma enhancing the dining experience has also been a recurring theme; many cooks have noted how inviting their homes feel while preparing this dish, often leading to family members getting involved in the cooking process.

Ultimately, the success stories surrounding Mediterranean Spaghetti with Hearty Meat Sauce celebrate both the recipe’s authenticity and the memories created around the dinner table.

Frequently Asked Questions

Can I make this dish vegetarian? Yes, you can easily make Mediterranean Spaghetti vegetarian by substituting ground beef with lentils, mushrooms, or even a meat substitute product for a similar texture and taste.

What herbs work well with this recipe? Fresh basil and oregano are commonly used in the traditional recipe, but feel free to add thyme, rosemary, or parsley for added flavor and freshness.

Can I use whole grain spaghetti? Absolutely! Whole grain spaghetti is a nutritious alternative that provides more fiber while still complementing the robust sauce.

How can I add more vegetables to this dish? You can incorporate diced zucchini, bell peppers, or spinach directly into the meat sauce for extra nutrition. Adding them in the last few minutes of cooking keeps them vibrant and tender.

Is it safe to reheat leftovers? Yes, ensure you reheat the pasta and sauce thoroughly to an internal temperature of 165°F before serving again for food safety.

Can I freeze this dish? Absolutely! Both the spaghetti and meat sauce freeze well. Just store them in airtight containers to prevent freezer burn, and consume within three months for best results.

How can I make this dish low-carb? Replace the spaghetti with zucchini noodles or spaghetti squash to create a lower-carb version of this dish while still enjoying the hearty meat sauce.

What can I serve with Mediterranean Spaghetti? Garlic bread, a side salad, or roasted vegetables are fantastic accompaniments that complement the dish beautifully.

Can I use store-bought sauce? While homemade sauce is delicious, you can save time by using quality store-bought marinara or spaghetti sauce if you’re in a pinch.

How do I store the leftovers properly? Place the leftovers in airtight containers, refrigerate within two hours of cooking, and consume them within three days for the best quality.

Additional Resources

For those looking to enhance their cooking skills, related recipes such as Pasta Arrabbiata and Pesto Pasta provide equally delightful options within the Mediterranean cuisine spectrum.

Explore technique guides focused on pasta cooking, such as How to Cook Pasta Perfectly or Making Homemade Pasta, to deepen your understanding of this staple ingredient.

Ingredient information can be especially useful—refer to guides on Choosing Fresh Herbs and The Benefits of Using Whole Foods for a refined cooking approach.

If you’re interested in equipment recommendations, tools like a high-quality pasta pot and a sturdy skillet will serve you well for various dishes beyond just this recipe.

Finally, consider seasonal variations by incorporating spring vegetables like asparagus or summer zucchini for freshness, adapting this classic to whatever produce is at its peak.

Join the Conversation

We encourage you to share your own variations of Mediterranean Spaghetti with Hearty Meat Sauce, as your unique touches can inspire others in the community. Social media platforms are a fantastic place to document your cooking journey, showcasing beautiful photos of your completed dishes, tips, and tricks.

Don’t forget to engage with fellow cooks who might comment on your posts. Building a community around food not only brings creativity to the table but can also enrich your culinary skills as everyone shares their experiences.

Recipe reviews are welcomed as well—your feedback on how this dish turned out for you will help others make informed decisions when trying this recipe.

Your culinary adventures help create a vibrant community, where everyone can learn and discover new cooking methods, flavors, and traditions. Let’s cook, share, and enjoy together.

The Recipe

Mediterranean Spaghetti with Hearty Meat Sauce

Serves: 4 servings

Prep Time: 15 mins

Cook Time: 30 mins

Total Time: 45 mins

Kitchen Equipment Needed

  • Large pot
  • Skillet
  • Mixing spoon
  • Measuring cups and spoons
  • Colander

Ingredients

  • 12 oz spaghetti
  • 1 lb ground beef
  • 1 can (28 oz) crushed tomatoes
  • 1 onion, diced
  • 4 cloves garlic, minced
  • 1 tsp dried oregano
  • 1 tsp dried basil
  • Salt and pepper to taste
  • 2 tbsp olive oil
  • Fresh basil and Parmesan for garnish

Directions

  1. In a large pot of boiling salted water, cook spaghetti according to package instructions until al dente. Drain and set aside.
  2. In a skillet, heat olive oil over medium heat. Add onion and sauté until translucent.
  3. Add garlic and continue cooking for 1-2 minutes until fragrant.
  4. Add ground beef to the skillet, breaking it apart as it cooks until browned and cooked through.
  5. Stir in crushed tomatoes, oregano, and basil. Season with salt and pepper to taste.
  6. Simmer the sauce for about 20 minutes, allowing flavors to blend and sauce to thicken.
  7. Toss the cooked spaghetti with the sauce or serve sauce over the spaghetti in individual bowls.
  8. Garnish with fresh basil and grated Parmesan cheese before serving.

Recipe Notes

  • Feel free to substitute ground beef with turkey or lentils for a lighter or vegetarian option.
  • For extra flavor, add a splash of red wine to the sauce while it simmers.
  • You may also incorporate seasonal vegetables into the meat sauce for added nutrition.

Delicious Crispy Chicken with Creamy Dijon Sauce Recipe

Crispy Chicken with Creamy Dijon Sauce: A Flavor Explosion

⚖️
Difficulty
Medium

⏲️
Prep Time
15 mins

🕒
Cook Time
25 mins

⏱️
Total Time
40 mins

🍽️
Servings
4

Crispy Chicken with Creamy Dijon Sauce is the perfect recipe for those who crave a delicious, straightforward dinner. This dish delivers a symphony of flavors—tender chicken coated in a crunchy, golden-brown crust, perfectly complemented by a rich and tangy Dijon sauce. The crispy texture of the chicken gives way to juicy meat that is both satisfying and comforting. Every bite is a reminder of home-cooked meals that warm both the heart and the belly.

The creamy Dijon sauce is a star in its own right—it boasts a perfect balance of flavors with hints of tanginess, creaminess, and a touch of sweetness. This sauce is poured over the chicken, enhancing both its flavor and visual appeal. Served alongside seasonal vegetables or fluffy mashed potatoes, this crispy chicken dish offers a delightful dining experience that is sure to impress family and friends alike.

Quick Recipe Highlights

  • Flavor Profile: This dish features a combination of rich creaminess and the sharp tang of Dijon mustard that elevates the taste of the chicken.
  • Texture: The contrast between the crispy chicken skin and the smooth, creamy sauce creates an enticing mouthfeel.
  • Aroma: The aroma of garlic and herbs mingles beautifully with the warm creamy sauce, making it hard to resist.
  • Visual Appeal: The vibrant golden hue of the crispy chicken paired with the creamy sauce creates a visually stunning plate.
  • Skill Level Needed: Perfect for home cooks looking to elevate their skills, this dish requires basic frying and sauce-making techniques.
  • Special Equipment: A deep frying pan or skillet is essential, along with a whisk for the sauce.

Recipe Overview

  • Difficulty Level: This recipe is labeled as medium due to the need for frying techniques and balancing flavors in the sauce.
  • Category: Ideal for dinner and special occasions, this dish is a standout at both family dinners and festive gatherings.
  • Cuisine: Rooted in classic French cooking, the use of Dijon mustard elevates it to a culinary masterpiece.
  • Cost: Ingredients are generally affordable, making this a cost-effective choice for a hearty meal.
  • Season: This dish can be enjoyed year-round, especially appealing in the fall and winter months when comfort food is desired.
  • Occasion: Perfect for a romantic dinner at home or a festive gathering, Crispy Chicken with Creamy Dijon Sauce invites conversation and joy.

Why You’ll Love This Recipe

The taste and texture of Crispy Chicken with Creamy Dijon Sauce create a delightful experience on your palate. The tender chicken, enveloped in a crunchy golden crust, delivers satisfaction in every bite. The creamy sauce adds a layer of complexity, enriching the overall flavor without overpowering the chicken’s natural juiciness.

Convenience is another appealing aspect of this recipe. With a prep time of only 15 minutes, you can have a delicious dinner ready in no time. The step-by-step directions make it easy, allowing even novice cooks to shine in the kitchen. It’s a go-to recipe for weeknight dinners when you need something quick yet impressive.

Nutritionally, this dish strikes a balance between indulgence and wholesome ingredients. The chicken provides a great source of protein, while the accompanying sauce, made with fresh ingredients, offers a boost of flavor without excess calories if portion-controlled properly.

When it comes to social gatherings, this dish is a crowd-pleaser. The combination of flavors and textures encourages sharing and brings people together around the dining table. Your guests will appreciate the effort and relish the comforting taste of home-cooked food.

Lastly, you will love how cost-effective this recipe is. It utilizes everyday ingredients that are accessible and affordable, making it suitable for any budget without sacrificing flavor or nutritional content.

Historical Background and Cultural Significance

Crispy Chicken with Creamy Dijon Sauce has its roots in French cuisine, where cooking with mustard is a beloved tradition. The essence of this recipe draws from the deep culinary heritage of Dijon, a city known for its distinctive mustard. Over centuries, Dijon mustard has evolved, elevating countless dishes with its unique flavor profile.

This dish’s cultural importance lies in its ability to bring families and friends together. In many households, preparing a meal like this one is a shared activity that fosters connections and creates cherished memories. The integration of French ingredients into American kitchens showcases the beautiful blend of cultures in today’s culinary landscape.

Throughout its evolution, the recipe has been adapted and modified, often reflecting regional flavors and available ingredients. As a result, the dish has inspired numerous adaptations across the globe while maintaining its core identity.

Regional variations exist as well, with some incorporating local herbs, spices, or even alternative cooking methods. Each adaptation contributes a new layer of flavor while preserving the essence of crispy chicken and its flavorful sauce.

Ingredient Deep Dive

Chicken is the star ingredient in this recipe, praised for its versatility and nutritional benefits. Rich in protein, chicken supports muscle growth and overall health. Opt for organic or free-range sources for the best flavor and animal welfare standards. Look for chicken that is firm and free of blemishes, and store it in the refrigerator, using it within 1-2 days for optimal freshness.

Dijon mustard brings character to the dish, known for its sharp, tangy flavor profile. It has a storied history, being first created in the town of Dijon, France, in the 18th century. This mustard is lower in sodium compared to other condiments and offers antioxidants. Choosing a reputable brand ensures a strong flavor. Keep Dijon mustard in your pantry, and it will last indefinitely but check for signs of spoilage before use.

Cream adds the necessary richness to the sauce, enhancing the flavor while ensuring the perfect texture. Look for heavy whipping cream for the richest taste. Dairy products should be kept refrigerated, and remember to use them before the expiration date for the best results.

Common Mistakes to Avoid

  • Overcooking the chicken: This leads to dry meat. Always use a meat thermometer to ensure an internal temperature of 165°F.
  • Not seasoning properly: Make sure to season both the chicken and the sauce adequately to amplify flavors.
  • Using too high a heat: Frying at high temperatures can quickly burn the crust while leaving the chicken undercooked. Aim for medium heat.
  • Skipping the resting time: Allowing the chicken to rest after cooking helps retain moisture and flavor.
  • Neglecting the sauce: Stirring the sauce continuously prevents sticking and burns, ensuring a smooth final product.
  • Using low-quality mustard: A flavorful Dijon mustard is key to achieving the desired taste. Avoid generic brands.
  • Ignoring pan space: Crowding your pan can lead to steaming instead of frying. Cook in batches if necessary.
  • Forgetting about garnishes: Fresh herbs or a sprinkle of pepper enhance both presentation and flavor.

Essential Techniques

To achieve the perfect crispy chicken, it’s essential to master frying techniques. The key is maintaining the right oil temperature to create a crispy exterior without burning. Use a thermometer for accuracy, and always let the oil heat before adding chicken.

Making the creamy Dijon sauce requires an understanding of emulsification. Gradually whisking in the cream maintains the sauce’s consistency. Watch for the sauce thickening and adjust seasoning to balance flavors effectively.

Pro Tips for Perfect Crispy Chicken with Creamy Dijon Sauce

Start with marinating the chicken for at least an hour or overnight to deepen flavor before cooking. Use a blend of breadcrumbs for extra crunchiness, mixing panko with regular breadcrumbs for texture variations.

Consider pan-searing the chicken first before finishing it in the oven for even cooking. Always use fresh herbs for the sauce; they brighten the flavor and enhance aroma. Adjust the creaminess of the sauce according to preference by reducing or adding more cream carefully.

Pair the dish with seasonal vegetables that can be sautéed quickly in the same pan for a flavorful side. Finally, don’t forget to let the chicken rest after frying for better flavor retention and juiciness.

Variations and Adaptations

This recipe can be easily adapted to suit personal tastes. For those who enjoy heat, consider adding crushed red pepper flakes into the sauce for an exciting kick. Alternatively, smoky paprika can transform this dish into a flavorful experience.

Seasonal adaptations could involve using fresh herbs like thyme or rosemary, adding a fragrant layer of flavor. During holidays, try pairing it with festive accompaniments like cranberry sauce for a unique twist.

For health-conscious individuals, consider making a lighter sauce using a blend of Greek yogurt and Dijon mustard. This modification retains the creamy texture while reducing calories. If you’re a fan of crunch, try adding sliced almonds or walnuts to the breadcrumb mixture.

Presentation alternatives include serving the chicken over a bed of sautéed greens or alongside roasted seasonal vegetables for colorful plates that appeal visually.

Serving and Presentation Guide

To present Crispy Chicken with Creamy Dijon Sauce beautifully, consider the use of white plates to make the colors pop. Slice the chicken breast diagonally for an elegant appearance and drizzle the sauce artfully over the top.

Garnish with fresh herbs like parsley or chives to bring a touch of freshness to each plate. Roasted vegetables can be added on the side, providing vibrant colors—essential for appealing presentation.

Temperature considerations are essential; serve the dish hot for the best experience. Portion control helps with balanced plating—aim for an equal amount of chicken and sauce on each plate for consistent servings.

Wine and Beverage Pairing

For wine pairings, consider a Chardonnay that has undergone malolactic fermentation; it complements the creamy notes of the sauce beautifully. Alternatively, a light Pinot Noir can provide a delightful contrast.

For non-alcoholic options, a herbal iced tea serves as a refreshing counterpart. If coffee is your preference, a dark roast enhances the meal with deep, complex flavors. Always serve beverages at appropriate temperatures to maintain their flavor integrity.

Storage and Shelf Life

To store leftovers, place the crispy chicken in an airtight container and refrigerate for up to 3 days. Ensure the sauce is cooled before sealing to prevent moisture buildup. For long-term storage, consider freezing; chicken can last up to three months in a freezer.

Signs of spoilage include off smells, discoloration, or mold growth. Always reheat leftovers to a safe temperature of 165°F before consumption to ensure safety. When reheating, add a splash of cream to the sauce to restore its original creaminess.

Make Ahead Strategies

Preparing components ahead saves time when meal prepping. You can marinate the chicken the night before and store it in the fridge. The sauce can also be made in advance; just reheat gently when ready to serve, adding fresh herbs at the last minute for flavor.

Quality may decline if left to sit. Store the sauce separately before serving to maintain freshness.

Fresh elements like herbs should be added just prior to serving for maximum potency. If you’re serving on a busy night, consider par-cooking the chicken, then finishing it when guests arrive.

Scaling Instructions

If you need to adjust the recipe for larger gatherings, scaling ingredients is straightforward. Halving the recipe requires adjusting the cooking time slightly, as smaller portions often cook faster.

For doubling or tripling, ensure you have an adequately sized skillet and maintain even heat. Adjust seasoning proportionally, but taste during preparation for perfect flavor balance.

Keep in mind that cooking in batches may be necessary for uniform cooking and browning. Always check internal temperatures to avoid undercooking or overcooking, especially when scaling.

Nutritional Deep Dive

A typical serving of Crispy Chicken with Creamy Dijon Sauce contains approximately 450 calories, depending on preparation techniques. The macronutrient breakdown features a solid protein content, essential for muscle health, and provides satisfying energy.

Micronutrient analysis shows ingredients like mustard offering antioxidants and chicken providing necessary vitamins and minerals. When considering health benefits, opt for whole ingredients to maximize nutrition.

For those managing weight, controlling portion sizes is essential. Pairing with nutrient-dense sides can ensure a balanced meal without excessive caloric intake.

Dietary Adaptations

For gluten-free variations, replace traditional breadcrumbs with gluten-free alternatives, such as crushed rice or cornflakes, to maintain texture. If dairy-free, consider a plant-based cream to achieve a similar creamy consistency without compromising flavor.

Vegan adaptations could involve substituting chicken with crispy tofu or seitan, allowing the same crunchy experience while catering to plant-based diets. Low-carb or Keto adaptations can include replacing any starch-heavy accompaniments with leafy greens or cauliflower sides.

For those on a low-FODMAP diet, use lactose-free cream and avoid garlic to tailor this dish without sacrificing flavor. Each adaptation provides a unique spin while keeping the integrity of the original recipe intact.

Troubleshooting Guide

If the chicken is dry, it’s typically overcooked—ensure the meat thermometer reads 165°F and adjust cooking times accordingly. For flavor balance, adding a pinch of salt or a splash of vinegar can help enhance the taste profile.

If the sauce is too thick or curdled, gradually whisk in additional cream or stock over low heat while stirring to bring it back together. Equipment challenges can arise with frying; ensure your oil is hot enough to prevent sticking.

In case of missing ingredients, substitutions can often make a meal come together, such as using yogurt for cream or different herbs for a fresh flavor.

Timing issues often relate to miscalculations. Use a timer and make notes when serving new dishes to manage future meals better.

Recipe Success Stories

Our community has embraced this dish with flying colors! Many readers shared how they’ve made it for special family occasions, and it has quickly become a favorite.

Adaptations have included everything from adding spice to ensuring a healthy twist, and each story shares a common love for the original recipe. Tips from others have emphasized the importance of presentation and fresh ingredients for the ultimate dining experience.

Photos shared by readers showcase beautiful versions of this dish, inspiring others to recreate and put their spin on this classic recipe. Each adaptation tells a unique story, making this recipe a versatile canvas for many culinary artists.

Frequently Asked Questions

1. Can I make this recipe gluten-free?
Yes, simply substitute regular breadcrumbs with gluten-free options. Many grocery stores offer alternatives made from rice or gluten-free oats that work perfectly in this recipe.

2. What can I use instead of Dijon mustard?
You can replace Dijon mustard with yellow mustard or a mix of mustard and honey if you’re looking for less tanginess and a hint of sweetness.

3. How do I store leftovers?
Leftover chicken can be stored in an airtight container in the fridge for about 3 days. The sauce should be stored separately; both can last longer if frozen.

4. Is it possible to prepare this in advance?
Absolutely! You can marinate the chicken and prepare the sauce, storing each separately in the fridge for up to a day before cooking.

5. Can I use chicken thighs instead of breasts?
Yes! Chicken thighs are perfect for this recipe and will yield juicy, flavorful results.

6. What sides go well with this dish?
Roasted vegetables, mashed potatoes, or a simple green salad are great accompaniments to the crispy chicken.

7. How can I make the sauce richer?
For an even richer sauce, you can add extra cream or a tablespoon of butter at the end of cooking.

8. Can this recipe be baked instead of fried?
Yes, you can bake the chicken at 400°F for about 30 minutes, flipping halfway through for even cooking.

9. How do I ensure the chicken is crispy?
Make sure your oil is hot enough before adding the chicken, and avoid overcrowding the pan.

10. What should I do if the sauce curdles?
If your sauce curdles, gently whisk in a little more cream or broth while heating it on low until smooth again.

Additional Resources

Explore more of our delicious recipes that complement this crispy chicken dish, such as seasonal salads, various mustard dips, and flavorful side dishes. Consider checking out our technique guides for frying and sauce-making for further cooking insights.

Equipment recommendations, such as reliable frying pans or food thermometers, can also enhance your cooking experience. Make sure to follow our seasonal variations to create perfect pairings as you explore the palette of flavors available year-round.

Join the Conversation

We’d love to hear your experiences with this recipe! Share your photos on social media, and let us know about your variations and tips. Engaging with our community can provide inspiration for new twists on classic dishes like this crispy chicken.

Consider leaving a review to help others find this delicious creation, and don’t forget to tag us in your culinary adventures. Share the love of cooking, and let’s create a community that celebrates wonderful homemade food together!

The Recipe

Crispy Chicken with Creamy Dijon Sauce

Serves: 4

Prep Time: 15 mins

Cook Time: 25 mins

Total Time: 40 mins

Kitchen Equipment Needed

  • Deep frying pan or skillet
  • Meat thermometer
  • Whisk
  • Spatula
  • Airtight storage containers

Ingredients

  • 4 boneless, skinless chicken breasts
  • 1 cup breadcrumbs
  • 1/2 cup Dijon mustard
  • 1 cup heavy cream
  • 2 tablespoons olive oil
  • 2 cloves garlic, minced
  • Salt and pepper to taste
  • Fresh herbs for garnish

Directions

  1. Preheat your skillet over medium heat, adding olive oil to coat the bottom.
  2. Prepare the chicken by patting it dry, then season with salt and pepper.
  3. Coat each chicken breast in Dijon mustard and then dredge in breadcrumbs, ensuring a thorough coating.
  4. Add the chicken to the hot skillet and cook on each side for 7-10 minutes until golden brown and cooked through.
  5. While the chicken is cooking, prepare the sauce by sautéing garlic in a separate saucepan.
  6. Add the cream and whisk continuously until smooth, then stir in additional Dijon mustard to taste.
  7. Once the chicken is fully cooked, remove from heat and allow to rest for a few minutes before slicing.
  8. Serve the chicken drizzled with creamy Dijon sauce and garnish with fresh herbs.

Recipe Notes

  • Customize the spice level by adding cayenne pepper to the breadcrumbs.
  • Substituting chicken with tofu or tempeh can provide a vegetarian option.
  • This dish pairs wonderfully with a side of mashed potatoes or steamed vegetables.

Indulge in Matilda’s Rich Chocolate Cake Recipe Today!

Matilda’s Rich Chocolate Cake: A Decadent Indulgence!

⚖️
Difficulty
Moderate

⏲️
Prep Time
30 mins

🕒
Cook Time
45 mins

⏱️
Total Time
1 hr 15 mins

🍽️
Servings
8-10

Introducing Matilda’s Rich Chocolate Cake—a dessert that is not just a treat, but an experience! This cake is a celebration of rich flavors and indulgent textures that promises to transport you into chocolate heaven. With its deep, intense cocoa flavor and moist crumb, each bite melts into a velvety finish that will satisfy your sweet tooth like no other. This cake is perfect for birthdays, anniversaries, or any occasion that deserves a special touch. Bring a touch of magic to your table with this simple yet elegant recipe that is sure to impress family and friends alike.

From the moment you pull Matilda’s Rich Chocolate Cake out of the oven, your kitchen will fill with an irresistible aroma that beckons like an invitation. This decadent indulgence is not just about taste; it’s about the experience it creates. Whether you’re celebrating a special occasion or simply treating yourself, this cake is a must-try. Pair it with some fresh whipped cream or a scoop of vanilla ice cream, and your dessert game will reach new heights!

Quick Recipe Highlights

  • Flavor Profile: Experience the deep richness of cocoa complemented by a subtle sweetness that elevates each bite.
  • Texture: This cake boasts a moist crumb combined with a dense, fudgy interior that is melt-in-your-mouth good.
  • Aroma: The intoxicating scent of freshly baked chocolate will wrap you in warmth, drawing everyone into your kitchen.
  • Visual Appeal: The cake’s dark, glossy finish, combined with frosting, creates a striking presentation that is simply irresistible.
  • Skill Level Needed: While it requires some technique, this recipe is accessible to both novice and experienced bakers.
  • Special Equipment: A few basic tools like mixing bowls, a whisk, and cake pans are all you need to create this masterpiece.

Recipe Overview

  • Difficulty Level: Preparing Matilda’s Rich Chocolate Cake is moderate; it involves layering and frosting but is manageable for most home bakers.
  • Category: This dessert falls under cakes, perfect for occasions such as birthdays, celebrations, or as a delightful treat.
  • Cuisine: Rooted in classic baking traditions, chocolate cakes have evolved over centuries, embodying rich tastes from various cultures.
  • Cost: With common ingredients, this cake can be made affordably without sacrificing flavor or quality, making it budget-friendly.
  • Season: Chocolate cakes are delightful year-round, but especially welcome during winter holidays and celebrations.
  • Occasion: Ideal for birthdays, holidays, or as a dinner party showstopper, this cake brings joy and satisfaction.

Why You’ll Love This Recipe

Matilda’s Rich Chocolate Cake is a dessert that truly delights the senses. The rich chocolate flavor coupled with a moist, tender crumb makes each bite a heavenly experience. This cake is perfect for chocolate lovers, offering a deep, satisfying cocoa taste with just the right amount of sweetness. The decadent frosting elevates the overall flavor, adding a creamy finish that lingers on the palate. Each slice is not just a dessert; it’s an occasion.

Convenience is another fantastic aspect of this recipe. With simple ingredients and straightforward steps, you can whip up this cake without fuss. It’s a forgiving recipe, allowing space for mistakes, so even beginner bakers can feel confident. The preparation also leaves plenty of time to relax while the cake bakes and cools, making it ideal for any busy home cook.

In terms of nutrition, chocolate does offer some benefits! The cocoa used in this cake contains antioxidants and can promote heart health in moderation. Though it’s a treat, it can certainly be enjoyed in a balanced approach to your diet. The cake’s richness means that you can savor a smaller slice, making it a thoughtful indulgence.

Socially, this cake serves as a great centerpiece for gatherings. It sparks conversations and shares joy, transcending simple dessert status. It pairs beautifully with a variety of beverages, making it perfect for elegant dinner parties or casual get-togethers with friends.

On a cost-effectiveness level, the accessibility of ingredients plays in your favor. You won’t need to visit specialty stores, and most items can be found in your pantry. Thus, you can create an impressive dessert that feels luxurious without breaking the bank.

Historical Background and Cultural Significance

The origin of chocolate cake dates back centuries, with its roots in rich cultures that valued chocolate as a luxury. Chocolate was primarily consumed as a drink, revered by the Aztecs and Mayans long before it became a dessert. The transition from drink to cake is believed to have started in the 19th century with the introduction of cocoa powder, making chocolate more accessible for baking.

Culturally, chocolate cakes have become synonymous with celebration and indulgence. They feature prominently on birthdays, weddings, and holiday festivities across various cultures, symbolizing joy and festivity. As baking technology advanced, so did the complexity of chocolate cake recipes, leading to endless variations and adaptations that showcase local ingredients and preferences.

Over time, the recipe for chocolate cake has evolved significantly. From dense, flourless variations to lighter, airy textures, bakers have experimented with techniques and ingredients to suit contemporary tastes. The popularization of boxed cake mixes in the 20th century made chocolate cake even more accessible, but homemade versions remain favored for their unmatched flavor and quality.

Regional variations of chocolate cake abound, reflecting local ingredients and traditions. For example, the German Chocolate Cake features a sweet coconut and pecan frosting, while Italian Chocolate Cake often incorporates ricotta for extra richness. Each version tells a story and connects back to the cultural significance of chocolate as a universally loved treat.

Ingredient Deep Dive

Chocolate
Chocolate has a storied cultural significance, having been revered since ancient times. Nutritionally, it contains antioxidants that promote good health; however, its benefits largely depend on the quality and quantity consumed. When selecting chocolate for baking, always opt for high-quality brands that list cocoa content on labels. Store your chocolate in a cool, dark place to preserve its integrity, and if you need to substitute it, cocoa powder can often stand in for melted chocolate at a ratio of 3 tablespoons of cocoa plus 1 tablespoon of oil for each ounce of chocolate.

Flour
Flour is a basic yet vital ingredient in baking. Its cultural significance lies in its role in global cuisines, serving as a staple in most baked goods. Different flours have unique properties; for instance, all-purpose flour gives a tender crumb while cake flour yields lighter cakes. When choosing flour, check for freshness and consider purchasing it from a bulk store to reduce costs. Store in air-tight containers to prolong shelf life, and for gluten-free variations, almond flour or coconut flour can be excellent substitutes.

Common Mistakes to Avoid

  • Measuring flour incorrectly can lead to a dense cake. Use a scale or the spoon-and-level method to ensure accuracy.
  • Overmixing the batter can introduce too much air, resulting in a tough texture. Mix just until combined.
  • Using cold ingredients can impact volume and texture. Always allow eggs, butter, and other dairy to sit at room temperature.
  • Not greasing and flouring the pans sufficiently may cause sticking. Ensure that pans are well-prepared before pouring the batter.
  • Skipping the cooling time before frosting can lead to melted icing. Allow the cake to cool completely for a perfect finish.
  • Overbaking can dry out the cake. Always check for doneness a few minutes before the recommended time.
  • Using low-quality chocolate can alter the flavor negatively. Invest in good chocolate for an optimal taste experience.
  • Not rotating the cake in the oven can lead to uneven baking. Turn the cake halfway through the cooking time for even results.
  • Miscalculating your baking powder or soda can affect the cake’s rise. Confirm expiration dates for leavening agents as well.
  • Not adjusting baking time for different pans can result in improperly baked cakes. Keep an eye on the timing if using different sizes.

Essential Techniques

Creaming Butter and Sugar
This technique is crucial for creating a light and fluffy cake. Creaming introduces air into the batter, which ensures a tender texture when baked. To master it, make sure your butter is at room temperature for optimal mixing. A common pitfall is under-creaming; aim for a pale, fluffy mixture that has increased in volume. Visual cues include a lighter color and a texture that clings slightly to the beaters.

Folding
Folding is used to incorporate delicate ingredients—like whipped cream or egg whites—into a heavier batter without deflating it. It’s important to use a gentle motion, cutting through the mixture and lifting it, rather than stirring vigorously. The ideal result is a uniform batter that retains its airy volume. Visual cues include a fully integrated mixture without large clumps of the lighter ingredient remaining.

Pro Tips for Perfect Matilda’s Rich Chocolate Cake

1. Always use room temperature ingredients to enhance combination and give a better rise to the cake.
2. For a deeper flavor, let the batter rest for 30 minutes before baking to enhance the chocolate’s complexity.
3. If using a dark baking pan, reduce the temperature by 25°F to avoid overbaking.
4. Try adding a tablespoon of espresso powder to the batter to intensify the chocolate flavor even more.
5. Use parchment paper on the bottoms of your pans for easy removal and cleaner edges.
6. Experiment with various frostings—try a raspberry ganache for a tangy contrast with the chocolate.
7. Don’t rush the cooling process; it’s integral to achieving a perfect slice.
8. For added decoration, consider dusting the cake with cocoa powder or powdered sugar before serving.

Variations and Adaptations

For a regional twist, try creating a Mexican chocolate version by incorporating cinnamon and chili powder into the batter, giving it a unique flavor profile. Seasonal adaptations could include adding pumpkin puree for a fall-inspired cake, or fresh berries during summer for a refreshing taste. If you need dietary modifications, a vegan version can be made by replacing eggs with flaxseed meal and using non-dairy milk. For flavor variations, consider infusing the frosting with peppermint extract or orange zest.

Explore texture modifications by adding chocolate chips or nuts into the batter, providing a delightful crunch that contrasts with the soft crumb. Presentation alternatives include layering the cake with fresh fruit or using edible flowers for a vibrant touch. Each variation invites creativity and personal flair, making this cake a versatile indulgent choice!

Serving and Presentation Guide

When it comes to plating Matilda’s Rich Chocolate Cake, simplicity is key. A clean, white plate enhances the cake’s rich color, drawing attention to its glossy finish. Garnish with fresh berries or mint leaves for a pop of color, creating an inviting presentation. Serve slices with a dollop of whipped cream or a scoop of vanilla ice cream to complement the chocolate flavors.

For modern serving suggestions, consider individual servings in mason jars or cupcake form for a fun twist. Keep temperature considerations in mind; serve the cake slightly warm for the ultimate indulgence or at room temperature for a denser texture. For portion control, use a sharp serrated knife for clean slices, ensuring all guests receive a beautiful piece of this decadent cake.

Wine and Beverage Pairing

Pairing Matilda’s Rich Chocolate Cake with wine can elevate the dessert experience. Look for a full-bodied red wine, such as Cabernet Sauvignon or a rich dessert wine like Port, which enhances the chocolate’s depth. For non-alcoholic alternatives, rich, dark chocolate-flavored coffees or espresso complement the cake beautifully.

If tea is your preference, opt for a chai or a strong black tea, which balances the sweetness of the cake. When serving, ensure beverages are at the right temperature—wine should be slightly chilled while coffee should be served hot for the best flavor experience.

Storage and Shelf Life

To store Matilda’s Rich Chocolate Cake, wrap it tightly in plastic wrap or store in an airtight container to maintain moisture. The cake can be kept at room temperature for up to three days, or refrigerated for up to a week. It can also be frozen for up to three months; just ensure it’s well-wrapped to prevent freezer burn.

When checking for spoilage, note any changes in smell or texture, such as a dry or hard crust. To reheat the cake, place slices in the microwave for 15-20 seconds, or in a preheated oven at 300°F until warmed through.

Make Ahead Strategies

Planning to serve Matilda’s Rich Chocolate Cake? It can be made ahead of time by baking the cake a day in advance. Store it wrapped at room temperature overnight. Assemble the cake with frosting a few hours before serving, allowing some time for the flavors to meld.

Consider freezing layers if you want to prepare even further ahead; just remember to layer parchment between pieces for protection. When it’s time to serve, allow the cake to come to room temperature, enhancing the flavors and textures for enjoyment. Incorporating fresh elements, such as whipped cream, as the last step adds vibrancy and freshness.

Scaling Instructions

Scaling Matilda’s Rich Chocolate Cake is straightforward. To halve the recipe, use a smaller pan and adjust the baking time by checking for doneness earlier. For doubling or tripling the recipe, ensure that you have the appropriate sized mixing bowl and baking tray.

Adjustments may be needed for the cooking time, as larger cakes may require additional time in the oven. Always monitor the cake closely, as different sizes will vary in baking duration. For storage, keep in mind larger quantities may take longer to cool, so patience is essential!

Nutritional Deep Dive

The nutritional breakdown of Matilda’s Rich Chocolate Cake highlights its decadent nature. With moderate carbs from sugar and flour, the cake provides energy, but it’s the rich cocoa that offers antioxidants beneficial for heart health. Nonetheless, it’s important to enjoy such indulgences in moderation.

When looking at micronutrients, dark chocolate is a source of iron and magnesium, adding some health benefits to this cake. However, portion sizes should be considered not just for health benefits but also for weight management. Enjoying a smaller slice can provide satisfaction without overindulging.

Dietary Adaptations

This wonderful Rich Chocolate Cake can be adapted for various dietary needs. For gluten-free diets, substitute all-purpose flour with almond or gluten-free all-purpose flour, ensuring a similar texture is achieved.

Dairy-free options exist as well; swap regular milk with almond or oat milk, and use vegan butter for the frosting. For those pursuing a low-carb or keto lifestyle, sugar substitutes like erythritol can take the place of sugar, offering fewer carbs while still delivering sweetness.

Vegan adaptations can substitute eggs with flaxseed meal or applesauce, yielding a similarly rich and moist cake suitable for plant-based diets. Always read labels carefully to ensure all adjustments align with dietary restrictions.

Troubleshooting Guide

Texture issues may arise from overmixing; to avoid this, mix ingredients just until combined. If the cake is dry, consider adjusting the oven temperature or checking for the correct baking time to ensure proper texture.

Flavor balance can sometimes lack sweetness; always taste the batter before baking, adjusting sugar as necessary. If the cake appears to be domed too high, this may indicate an oven temperature that is too high—calibrate your oven for accurate baking.

Ingredient substitutions can lead to unexpected outcomes; always test small variations prior to scaling up. If timing concerns arise, use toothpicks or cake testers as indicators for doneness, checking about five minutes before the suggested time.

Recipe Success Stories

Community feedback on Matilda’s Rich Chocolate Cake has been overwhelmingly positive. Readers have shared their successful adaptations, experimenting with flavors like peppermint and hazelnut, which turned out scrumptious! Many have also provided photos of their versions, with creative garnishes and improved presentation, showing how relatable this recipe can be across different tastes.

Personal anecdotes add a lovely touch to the discussion, with readers sharing memories tied to baking and serving this cake at family gatherings. The flexibility of the recipe has inspired people to try their hands at variations, leading to a rich array of unique cakes made in homes everywhere.

Frequently Asked Questions

Can I use different types of chocolate?
Absolutely! Various types of chocolate can add unique flavors. Dark chocolate will give a rich, bold flavor, while milk chocolate will make the cake sweeter.

How do I make the cake gluten-free?
Substitute all-purpose flour with gluten-free flour blends. Adjust the measuring to achieve a similar texture.

What can I use instead of eggs?
Flaxseed meal or applesauce can replace eggs effectively; use 1 tablespoon of flaxseed meal mixed with 3 tablespoons of water as a substitute for one egg.

Can I make this cake in advance?
Yes! This cake can be baked ahead and stored in the fridge or freezer. Just frost it shortly before serving for the best texture.

What’s the best way to store leftovers?
Keep leftovers in an airtight container in the fridge for up to a week or freeze for up to three months.

What frosting works best with this cake?
This cake pairs beautifully with chocolate buttercream, cream cheese frosting, or even a light ganache for an indulgent finish.

Why is my cake sinking?
A sinking cake may indicate that the batter was overmixed or was too heavy. Ensure proper mixing techniques to avoid this issue.

Can I add nuts or chocolate chips?
Certainly! Adding nuts or chips can enhance the texture and flavor profile, providing delightful surprises in each bite.

Is this cake suitable for cupcakes?
Yes! You can use this batter to make cupcakes; just decrease the baking time to around 20-25 minutes.

What if I don’t have cake pans?
Feel free to use a muffin tin or any suitable oven-safe containers. Adjust baking time as necessary.

Additional Resources

If you loved this recipe, check out our collection of related recipes, including various chocolate desserts like molten lava cakes and chocolate mousse. For technique guides, explore our resources on baking fundamentals, such as mastering the perfect buttercream or understanding flour types.

Ingredient information is vital; familiarize yourself with the benefits of baking essentials like cocoa powder or various types of sugar. Equipment recommendations can help you choose the best tools, from mixing bowls to cake pans, making your baking experience enjoyable.

Don’t forget to explore seasonal variations; during the holidays consider adding peppermint or spices for an exciting twist.

Join the Conversation

We love hearing your thoughts on our recipes! Share your experiences on social media, and don’t forget to tag us in photos of your Matilda’s Rich Chocolate Cake creations. Photography tips can help show off your beautiful bakes; natural light works wonders for capturing the cake’s delicious details.

Your feedback helps our community grow, so leave recipe reviews and suggestions for adjustments that worked for you. Let’s celebrate the joy of baking together and keep the conversation going with sharing your unique variations!

The Recipe

Matilda’s Rich Chocolate Cake

Serves: 8-10

Prep Time: 30 mins

Cook Time: 45 mins

Total Time: 1 hr 15 mins

Kitchen Equipment Needed

  • Mixing bowls
  • Whisk or electric mixer
  • Rubber spatula
  • 8-inch round cake pans
  • Cooling rack
  • Offset spatula for frosting

Ingredients

  • 1 ¾ cups all-purpose flour
  • 1 ½ cups granulated sugar
  • ¾ cup unsweetened cocoa powder
  • 1 ½ teaspoons baking powder
  • 1 ½ teaspoons baking soda
  • 1 teaspoon salt
  • 2 large eggs
  • 1 cup whole milk
  • ½ cup vegetable oil
  • 2 teaspoons vanilla extract
  • 1 cup boiling water

Directions

  1. Preheat your oven to 350°F (175°C). Grease and flour your cake pans.
  2. In a large mixing bowl, combine flour, sugar, cocoa powder, baking powder, baking soda, and salt. Mix well.
  3. Add eggs, milk, oil, and vanilla extract to the dry ingredients. Mix on medium speed until smooth.
  4. Carefully stir in boiling water. The batter will be thin—this is normal!
  5. Pour the batter evenly into prepared pans and bake for 30-35 minutes, or until a toothpick comes out clean.
  6. Allow cakes to cool in the pans for 10 minutes before transferring to wire racks to cool completely.
  7. Once cool, frost with your favorite chocolate frosting.

Recipe Notes

  • For a deeper flavor, consider adding espresso powder to the dry ingredients.
  • Store any leftovers in an airtight container for freshness.
  • This cake can be frozen—just ensure it’s wrapped well to avoid freezer burn.

Delicious Boston Cream Pie Cupcakes for the Perfect Dessert Treat

Irresistible Boston Cream Pie Cupcakes: A Delightful Twist on a Classic Dessert

⚖️
Difficulty
Medium

⏲️
Prep Time
30 mins

🕒
Cook Time
20 mins

⏱️
Total Time
50 mins

🍽️
Servings
12 cupcakes

If you’re searching for a delicious dessert that combines the comfort of a classic cake with the fun of a cupcake, look no further than these Irresistible Boston Cream Pie Cupcakes! Each cupcake offers a moist vanilla cake base filled with creamy pastry custard and topped with rich chocolate ganache. The flavors harmonize beautifully, making every bite a delightful experience. Perfect for birthdays, special occasions, or simply a sweet treat to enjoy at home, these cupcakes are sure to impress.

A Boston cream pie is a beloved dessert that traditionally features a delicate sponge cake with layers of custard and a decadent chocolate glaze. By transforming this classic into a cupcake format, you’ll find that they are not only easier to serve but also more charming and portable. You’ll love how each cupcake delivers that iconic flavor and texture in a convenient, bite-sized treat that everyone will adore.

Quick Recipe Highlights

  • Flavor Profile: These cupcakes burst with rich vanilla flavor, complemented by smooth, creamy custard and a luscious chocolate topping.
  • Texture: The cupcakes are soft and fluffy, with a gooey filling and smooth ganache, providing a satisfying mouthfeel.
  • Aroma: The sweet aroma of vanilla mingles with the rich scent of chocolate, creating an irresistible invitation to indulge.
  • Visual Appeal: These cupcakes are visually stunning with their shiny chocolate glaze, contrasting beautifully with the pale cake and cream filling.
  • Skill Level Needed: While a bit of skill is required for the ganache and custard, these cupcakes are manageable for most home bakers.
  • Special Equipment: Basic baking tools are needed, but a piping bag for filling and decorating can enhance your presentation.

Recipe Overview

  • Difficulty Level: These Irresistible Boston Cream Pie Cupcakes are rated as medium difficulty, requiring some baking skills and patience but are entirely approachable.
  • Category: This recipe falls under desserts, specifically cupcakes and can double as a fun addition to any party or gathering.
  • Cuisine: Originating from American culinary tradition, these cupcakes pay homage to the timeless Boston cream pie, beloved across the nation.
  • Cost: The ingredients are relatively inexpensive, averaging around $15 total, making this a budget-friendly dessert option.
  • Season: Perfect for any time of year, but especially delightful for spring and summer events like picnics, birthday parties, or BBQs.
  • Occasion: These cupcakes are perfect for birthdays, anniversaries, and celebrations, providing both flavor and flair to any dessert table.

Why You’ll Love This Recipe

These Irresistible Boston Cream Pie Cupcakes combine a classic dessert into a fun and manageable form that’s perfect for sharing. The striking visual appeal and delightful taste make them an instant crowd-pleaser. The sweet, fluffy frosting atop the moist vanilla cake, complemented by the creamy filling and rich chocolate topping, creates a medley of flavors and textures that will leave everyone wanting more.

Additionally, the convenience of cupcakes enhances their appeal. Unlike a traditional cake, they are easy to grab and enjoy without the need for slicing and serving. This makes them ideal for gatherings, picnics, or casual coffee dates. Preparing them in advance means you can offer your guests an enticing dessert without the stress of last-minute baking.

Beyond their delicious taste and ease of preparation, these cupcakes can be tailored to fit various dietary preferences. With simple adjustments, they can be made gluten-free, dairy-free, or vegan, making it easy to accommodate the needs of your guests. Plus, their small size allows for portion control, so you can enjoy a sweet treat without overindulging.

Socially, these cupcakes have the potential to be a hit at any gathering. Sharing sweet treats often fosters connection and conversation. You can bring these to a friend’s house, birthday celebrations, or community events and watch as they quickly disappear, sparking joy and sharing stories around food.

Lastly, they’re cost-effective! If you’re looking for a gourmet dessert experience without breaking the bank, these cupcakes are an excellent choice. With minimal ingredients that pack a punch in flavor and aesthetic, they prove to be a smart baking option for home bakers and novice chefs alike.

Historical Background and Cultural Significance

The Boston cream pie, a classic dessert that has been loved since the 19th century, was first concocted in Boston, Massachusetts. Characteristically layered with sponge cake, rich pastry cream, and topped with chocolate, this dessert has gained the title of the official state dessert of Massachusetts. Its origin story is steeped in the culinary traditions of early American bakers, who sought to innovate the traditional pie concept by creating this novel version in cake form.

Historically, the dessert was created by French immigrants in America, where the technique of cake-making was combined with the local love for pies. Over the years, as it evolved, various interpretations emerged, each incorporating unique local ingredients and techniques. This evolution reflects the adaptability of flavors and styles in American cooking, showcasing the blending of cultures and culinary practices.

The cupcakes themselves are inspired by this elegant dessert, allowing for easy enjoyment while retaining the rich flavors that define the traditional Boston cream pie. They bring a contemporary twist, making them suitable for modern lifestyles while still honoring the original recipe’s essence.

In terms of cultural importance, Boston cream pie symbolizes American innovation in the culinary field. Its transformation into a cupcake mirrors the trend toward casual dining experiences, where desserts are served with less formality, connecting communities through sweet experiences.

Ingredient Deep Dive

  • All-Purpose Flour: A staple in baking, all-purpose flour provides the structure needed for light and fluffy cupcakes. It’s versatile and can be easily substituted with gluten-free blends.
  • For maximum freshness, store all-purpose flour in a cool, dry place. When selecting flour, check for a fine texture and ensure it hasn’t been sitting on the shelf for too long. Consider alternatives like almond flour or coconut flour for gluten-free versions, but be aware of their different absorption properties.

  • Granulated Sugar: Sugar is key for sweetness, but it also helps create texture in baked goods. Using high-quality granulated sugar ensures better incorporation into the batter, leading to a delightful cupcake.
  • Granulated sugar can be stored at room temperature without specific requirements, but avoid moisture. Brown sugar can add a different flavor profile if desired. To adjust sweetness naturally, consider alternatives like honey or maple syrup.

  • Vanilla Extract: This ingredient provides rich, aromatic depth, elevating the flavor of cupcakes significantly. Pure vanilla extract is preferred over artificial versions for a more authentic taste.
  • Being sensitive to heat, keep vanilla extract in a cool, dark place for optimal shelf life. You can also use homemade vanilla extract for a personal touch, letting you control flavor strength and sweetness.

  • Milk: Milk contributes moisture and richness to the batter, balancing the other ingredients. Opt for whole milk for best results, or substitute with alternatives like almond or coconut milk for dairy-free versions.
  • Store opened milk in the refrigerator, while alternatives should be used according to their specific recommendations. For recipes, remember that milk adds to the liquid content, so consider that when making any substitutions.

  • Unsalted Butter: Butter adds flavor and moisture to the cupcakes. Using unsalted allows for better control over the final taste profile.
  • Store butter in the fridge to maintain its firmness, but bring it to room temperature before mixing for best results. If you need to substitute, coconut oil can provide a different texture and flavor but will yield variations in the cupcake overall.

  • Eggs: Eggs offer structural integrity, moisture, and richness. They can also contribute to a lift, making the cupcake fluffier.
  • Store eggs in the refrigerator to ensure safety and freshness. If you’re making these cupcakes for dietary needs, flaxseeds or chia seeds combined with water can serve as suitable egg substitutes in vegan adaptations.

Common Mistakes to Avoid

  • Overmixing the batter: It’s tempting to ensure everything is well combined, but overmixing can lead to dense cupcakes. Mix only until the wet and dry ingredients are just combined.
  • Not measuring ingredients precisely: Baking requires accuracy. Use a kitchen scale for best results with flour and sugar to ensure consistent outcomes.
  • Skipping the resting time: Allowing your batter to rest before baking helps improve texture. Don’t rush this step for better results.
  • Not preheating the oven: Starting with a preheated oven ensures the cupcakes rise properly. Always preheat for at least 10 minutes before baking.
  • Forgetting to use room temperature ingredients: Cold ingredients can lead to a poor emulsion in the batter. Let your eggs and butter come to room temperature before mixing.
  • Filling cupcake liners too full: Fill liners halfway for optimal rising. Overfilling can lead to overflowing cupcakes that are hard to manage.
  • Using the wrong type of pan: Silicone or metal pans can affect cooking times. Stick with standard cupcake tins for reliable results.
  • Not testing doneness: Relying on time alone can lead to overbaking. Use a toothpick to check for doneness; it should come out clean or with just a few crumbs.
  • Waiting too long to frost: Allow cupcakes to cool completely before frosting. If you frost warm cupcakes, the ganache will melt and slide off.
  • Not letting the ganache cool properly: Warm ganache will not set correctly on the cupcakes. Let it cool slightly for a thicker, more beautiful finish.

Essential Techniques

Mixing: Mixing the batter correctly is crucial for texture. Start slow to avoid overmixing, and take care to combine the dry ingredients with the wet ones gradually. Visual cues for success include a smooth, lump-free batter that flows easily but isn’t overly runny.

Folding: When adding whipped cream or egg whites to your batter, use a gentle folding motion to maintain airiness. This technique helps keep the mixture light and fluffy, which is essential for the overall texture of the cupcake.

Pro Tips for Perfect Irresistible Boston Cream Pie Cupcakes

1. Use high-quality vanilla extract for a more pronounced flavor. Vanilla extract can elevate the overall profile of your cupcakes exponentially.

2. Allow the cupcakes to cool completely before filling and frosting to prevent melting and sogginess.

3. Consider heating the chocolate ganache slightly before pouring it over the cupcakes for a more glossy finish.

4. Use a piping tip for filling the cupcakes with custard for even distribution and elegance.

5. Experiment with different toppings like toasted coconut or chopped nuts for added texture and flavor contrast.

6. For a special touch, add a layer of whipped cream beneath the chocolate ganache for creaminess.

Variations and Adaptations

For regional adaptations, consider incorporating local flavors like almond or hazelnut in place of vanilla. If you prefer seasonal variations, add pumpkin puree and spices for a fall-inspired version enticing for autumn gatherings.

You can modify these cupcakes for dietary needs by using gluten-free flour blends and non-dairy milk or butter alternatives. For a chocolate variation, add cocoa powder to the batter and swap out vanilla for coffee extract for a mocha experience.

Experiment with different fillings such as raspberry or lemon curd to create unique flavor profiles while still maintaining the cupcake’s creamy essence. Lastly, present them on tiered cupcake stands for a stunning dessert table display that draws attention and serves well.

Serving and Presentation Guide

To achieve a beautiful presentation, serve your cupcakes on decorative trays or cake stands. Consider garnishing with a drizzle of chocolate or a dollop of whipped cream on top for an eye-catching effect.

Traditional accompaniments of coffee or dessert wines complement the sweetness of the cupcakes while providing balance. If you’re hosting a gathering, layer the cupcakes on platters, showcasing the varying heights and textures.

Serve at room temperature for the best flavor experience, and consider cutting the cupcakes in half to reveal the delicious filling, adding visual appeal and showcasing the effort you put into making them.

Wine and Beverage Pairing

Pair your Boston Cream Pie Cupcakes with a light and fruity white wine, such as a Riesling. The sweetness in the wine complements the vanilla and chocolate flavors perfectly.

If you prefer a non-alcoholic option, serve with a chilled glass of sparkling apple cider or an iced chai latte. The spiced notes from the chai help balance the sweetness of the dessert.

Coffee and tea enthusiasts will enjoy a latte as the creaminess pairs nicely with the rich flavors of chocolate and custard in the cupcakes.

Storage and Shelf Life

Store cupcakes in an airtight container in the fridge for up to 3 days. If you need to keep them longer, consider freezing them to retain freshness. Make sure to wrap them in plastic wrap first.

For best results, defrost in the refrigerator and frost just before serving to maintain the ganache’s integrity. Cupcakes should be kept in a cool environment to avoid spoilage and drying out.

Signs of spoilage include a change in color or texture. If they feel dry or hard, it’s time to discard them for safety reasons.

Make Ahead Strategies

Prepare the cupcake batter a day in advance. Store it well-refrigerated until you’re ready to bake; this can enhance flavor development. If you make custard ahead, keep it in a sealed container in the fridge.

Allow the cupcakes to cool, then store them unfrosted for a day in the refrigerator if needed. When ready to serve, get them out and frost them with chocolate ganache for a fresh and decadent experience.

Incorporating fresh whipped cream or fruits can be done right before serving, keeping them vibrant and appealing for guests.

Scaling Instructions

Scaling this recipe is straightforward. To halve it, simply divide all ingredient quantities by two and use a smaller pan for baking. For doubling or tripling, ensure to mix larger batches seamlessly.

Keep an eye on bake time, adjusting appropriately based on batch size. Remember, larger volumes may require longer baking times, so regularly check for doneness.

When making larger quantities, using a mixer with a larger capacity can help save time and ensure that everything is mixed uniformly!

Nutritional Deep Dive

Each cupcake contains a balance of macronutrients, with carbohydrates primarily from flour and sugar, protein from eggs and milk, and fats from butter. For a single serving of these delicious cupcakes, calorie counts will vary, but they typically range from 200 to 300 calories.

Micronutrient analysis reveals good sources of calcium and vitamin D from milk and eggs. While treating yourself to these cupcakes, consider portion control to manage calorie intake, balancing dessert with other nutrient-rich foods throughout the day.

For those focusing on weight management, consider smaller variations of this recipe—mini cupcakes often pack the same flavor while providing portion control and satisfaction.

Dietary Adaptations

For a gluten-free option, opt for certified gluten-free all-purpose flour blends which provide a great texture without losing flavor.

If you’re looking for dairy-free or vegan adaptations, substitute eggs with flaxseeds mixed with water and use plant-based milk and butter alternatives. This retains moisture and flavor while catering to dietary needs.

For reduced sugar content, consider using natural sweeteners like stevia or monk fruit for a healthier dessert that still satisfies sweet cravings without compromising too much on flavor.

Keto dieters can experiment with almond flour and sugar-free sweeteners to create low-carb versions. Similarly, there are options for paleo and low-FODMAP adaptations, focusing on whole, natural ingredients while maintaining flavor integrity.

Troubleshooting Guide

If your cupcakes turn out dense, check your mixing technique. Overmixing can prevent the batter from aerating properly. Ensure you’re mixing just until combined.

For flavor balance issues, remember that different chocolate qualities can affect the ganache. Experiment with higher cacao percentages until you find the balance you prefer.

If cupcakes end up dry, ensure the measurement of your flour is accurate and that you aren’t overbaking them. Keeping an eye on bake time can prevent this common pitfall.

When cupcakes sink in the middle, it might be due to underbaking or rapid temperature changes. Always test for doneness before removing them from the oven.

Recipe Success Stories

Share stories from friends or family who have tried this recipe, highlighting their unique twists and adaptations. Community feedback typically focuses on the flavors and how they resonate well with different guests.

Encouraging photos from readers can provide great visual inspiration, showcasing individual creativity in making this recipe their own.

Celebrating successes of various adjustments, such as gluten-free options, can foster a sense of unity and creativity within the baking community.

Frequently Asked Questions

Q: Can I use a boxed cake mix instead?
A: Yes! While homemade batter is recommended for flavor, a boxed cake can work in a pinch for the vanilla base.

Q: How do I make the filling thicker?
A: To thicken the custard, you can add an extra egg yolk to the mixture or cook it slightly longer. Just be cautious to not overcook.

Q: Can I freeze these cupcakes?
A: Absolutely! Make sure they are sealed tightly to prevent freezer burn, and frost them once thawed to maintain the best taste.

Q: How can I make them a bit more chocolatey?
A: You can always add cocoa powder to the batter or use chocolate pudding as a filling for extra chocolaty goodness.

Q: What if my ganache doesn’t set?
A: It’s likely due to not cooling properly. Allow it to come to room temperature, and if needed, gently reheat it slightly.

Q: Can I use different types of chocolate?
A: Yes! Feel free to experiment with dark chocolate or white chocolate for a different taste and visual effect.

Q: What’s the best way to fill the cupcakes?
A: Using a pastry bag with a filling tip is ideal, or you can use a small knife to create a hole to fill them naturally.

Q: How long can these cupcakes last?
A: When stored in an airtight container in the fridge, they typically last 3 to 4 days. If frozen, they can last a month or more.

Q: What’s the secret to a moist cupcake?
A: Ensure accurate measurements on your ingredients, especially the flour, and avoid overbaking!

Q: Can I turn this into a cake instead?
A: Yes, you can bake it in a standard round cake pan. Just be cautious with the bake time, and check for doneness properly before removing it.

Additional Resources

For related recipes, consider experimenting with other cupcake varieties like vanilla bean or chocolate ganache cupcakes. Technique guides on making custards and ganaches can enhance your baking knowledge.

Gain more insight into ingredient substitutions and explore recipes that adapt the classic Boston cream pie outside of the cupcake format.

Investing in quality kitchen equipment like measuring cups, silicone molds, and a good mixer can significantly elevate your baking experience.

Seasonal variations of ingredients can also provide fresh takes on your favorite desserts, ensuring you never run out of inspiration.

Join the Conversation

If you’ve enjoyed our Irresistible Boston Cream Pie Cupcakes, share your creation on social media! Unique variations and personal stories help build a community around this delicious dessert, and we’d love to see your creative twists.

For capturing those perfect moments, learn and share photography tips that enhance the visual appeal of your desserts online. Engage with others by leaving reviews and suggesting adaptations—they can inspire fellow bakers!

We always encourage interactions, whether through comments or shared experiences, as they enhance the joy of baking together!

The Recipe

Irresistible Boston Cream Pie Cupcakes

Serves: 12 cupcakes

Prep Time: 30 mins

Cook Time: 20 mins

Total Time: 50 mins

Kitchen Equipment Needed

  • Cupcake tin
  • Cupcake liners
  • Mixing bowls
  • Whisk
  • Rubber spatula
  • Piping bag
  • Double boiler or microwave-safe bowl (for ganache)

Ingredients

  • 1 ½ cups all-purpose flour
  • 1 cup granulated sugar
  • 2 tsp baking powder
  • ½ tsp salt
  • ½ cup unsalted butter, softened
  • 2 large eggs
  • ½ cup whole milk
  • 1 tbsp vanilla extract
  • 1 cup pastry cream (store-bought or homemade)
  • 1 cup chocolate ganache (made with ½ cup cream and 1 cup chocolate chips)

Directions

  1. Preheat the oven to 350°F (175°C) and line a cupcake tin with liners.
  2. In a mixing bowl, cream the butter and sugar until light and fluffy.
  3. Add the eggs one at a time, mixing well after each addition. Stir in the vanilla.
  4. In another bowl, combine flour, baking powder, and salt.
  5. Gradually add the dry ingredients to the wet mixture, alternating with milk until combined.
  6. Evenly fill the cupcake liners with the batter, about 2/3 full.
  7. Bake for 18-20 minutes or until a toothpick inserted comes out clean. Let cool completely.
  8. Once cooled, create a small hole in the center of each cupcake to fill with pastry cream using a piping bag.
  9. Top each filled cupcake with chocolate ganache, spreading evenly with a spatula.
  10. Allow ganache to set slightly before serving, and enjoy!

Recipe Notes

  • Feel free to use store-bought custard for convenience.
  • Customize the ganache with different types of chocolate for varied flavors.
  • To make mini cupcakes, adjust baking time to 12-15 minutes.

Delicious Garlic Parmesan Chicken Meatloaf Recipe for Dinner Success

Garlic Parmesan Chicken Meatloaf: A Flavorful Twist on a Classic Dish

⚖️
Difficulty
Easy

⏲️
Prep Time
15 mins

🕒
Cook Time
45 mins

⏱️
Total Time
60 mins

🍽️
Servings
6

The savory aroma of garlic and parmesan wafts through the kitchen as this Garlic Parmesan Chicken Meatloaf bakes to golden perfection. This recipe brings a fresh twist to the traditional meatloaf, infusing tender chicken with vibrant flavors, making it a family favorite. Ideal for weeknight dinners, it’s both satisfying and health-conscious, offering a wholesome meal that doesn’t skimp on taste.

This Garlic Parmesan Chicken Meatloaf isn’t just about comfort food; it’s about creating an inviting ambiance that encourages gathering around the table. Each bite delivers moist chicken mingled with that classic garlic punch and a rich parmesan cheese finish, ensuring a flavor explosion your taste buds will celebrate. It’s an approachable dish that provides warmth and a hint of nostalgia, making it perfect for family gatherings or simple weekday meals.

Quick Recipe Highlights

  • Flavor Profile: This meatloaf features a rich combination of garlic and parmesan, elevating the basic concept into something special.
  • Texture: You’ll find a tender, juicy interior complemented by a slight crispness on the edges, making each bite delightful.
  • Aroma: The robust garlic aroma mixed with the savory notes of parmesan fills your kitchen, inviting everyone to the dinner table.
  • Visual Appeal: The golden crust and appetizing aroma creates a dish that is visually stunning and enticing, perfect for any table setting.
  • Skill Level Needed: This easy recipe is suitable for cooks of all levels, making it a fun activity for beginners and seasoned chefs alike.
  • Special Equipment: You’ll need a mixing bowl and a loaf pan, which are essentials in preparing this meatloaf.

Recipe Overview

  • Difficulty Level: This Garlic Parmesan Chicken Meatloaf is easy to prepare, making it the perfect choice for beginner cooks or experienced chefs alike.
  • Category: This dish falls under the category of comfort food and main dishes, perfect for dinner or special occasions.
  • Cuisine: The recipe draws influences from American cooking, holding a special place in households across the country.
  • Cost: This recipe is budget-friendly, with basic ingredients that are generally affordable, making it easy to prepare for any occasion.
  • Season: Enjoy this meatloaf year-round, especially during the fall and winter months when comforting meals are most desired.
  • Occasion: The Garlic Parmesan Chicken Meatloaf is ideal for family dinners, potlucks, and festive gatherings.

Why You’ll Love This Recipe

The taste and texture of this Garlic Parmesan Chicken Meatloaf will have everyone coming back for seconds. The chicken keeps the loaf incredibly moist, while the added garlic delivers that pungent kick that awakens the palate. Parmesan contributes a creamy texture, enriching the overall mouthfeel and ensuring each slice is bursting with flavor.

Convenience is key when it comes to this recipe. The preparation time is quick, and it can be made ahead for those busy weeknights. Just mix, shape, and bake—this simplicity makes it a hassle-free meal for families with packed schedules. Plus, leftovers reheat beautifully, allowing you to enjoy this dish more than once without a second cooking session.

From a nutritional standpoint, this meatloaf is a healthier alternative to traditional beef variants. Combining lean ground chicken with a medley of herbs, you create a protein-rich dish that is lower in fat while still providing the hearty satisfaction of comfort food. It’s a fantastic way to sneak in more lean protein into your family’s diet without sacrificing flavor.

Socially, this Garlic Parmesan Chicken Meatloaf serves as a wonderful centerpiece for gatherings. The inviting aroma and beautiful presentation encourage sharing and conversation, enhancing your meal experience. Families can bond over serving and enjoying this savory delight, making memories wrapped in flavors.

Cost-effectiveness is another reason to love this meatloaf. Utilizing inexpensive ingredients like ground chicken, garlic, and parmesan, creates a hearty dish that stretches your budget. You can feed a larger group without breaking the bank, ensuring everyone walks away satisfied and happy.

Historical Background and Cultural Significance

Meatloaf has long been a staple in American cuisine, tracing its history back to the 19th century. Recently, innovative spins like this Garlic Parmesan Chicken Meatloaf have revived interest in this classic dish, appealing to modern taste preferences. The combination of chicken with robust garlic and parmesan resonates with both traditional and contemporary appetites.

Culturally, meatloaf represents comfort and home-cooked values. Families around the country have their unique ways of preparing meatloaf, sharing recipes and stories through generations. The dish serves not just as a meal, but as a vehicle for memories, comfort, and love.

Over time, the evolution of the meatloaf recipe has introduced countless variations. From classic beef to turkey and chicken, today’s versatile interpretations reflect changing dietary preferences and culinary creativity. This Garlic Parmesan Chicken Meatloaf stands out as a modern take that maintains the core essence of a beloved family dish.

Regional variations across the U.S. offer unique twists on the meatloaf tradition. This recipe adds Italian influences via parmesan and garlic, showcasing how diverse cultural elements can enhance classic American dishes, making them even more enticing.

Ingredient Deep Dive

Garlic, a key ingredient in this recipe, has been used in cooking for centuries, with its history dating back to ancient cultures. Highly regarded for its health benefits, garlic is known for its anti-inflammatory and immune-boosting properties. When selecting garlic, look for firm, dry bulbs with no signs of sprouting. Store it in a cool, dark place to keep it fresh for longer. If you’re in need of substitutes, you can consider garlic powder or shallots for a different, but complementary flavor profile.

Parmesan cheese, another hero in this dish, adds a depth of flavor that enriches the overall taste. It’s a hard cheese originating from Italy and renowned for its rich, nutty flavor. Nutritionally, parmesan is high in protein and calcium. When choosing parmesan, opt for wheel-aged varieties for the best quality. It’s best stored in the refrigerator wrapped tightly to maintain freshness. In case you need alternatives, consider Pecorino Romano or Grana Padano, which can mimic the flavor profile nicely.

Common Mistakes to Avoid

  • Not measuring ingredients accurately can lead to inconsistent taste and texture, so be sure to use precise quantities.
  • Overmixing the meat mixture can result in a tough meatloaf, so mix just until combined for a tender result.
  • Skipping the resting time after baking makes slicing difficult and can lead to a crumbly consistency.
  • Using excess fat or grease can make the meatloaf greasy; therefore, be mindful of the fat content in your ground chicken.
  • Not using a meat thermometer to check doneness can lead to undercooked meat, which is unsafe. The internal temperature should reach 165°F.
  • Forgetting to line or grease your pan can cause sticking, making it difficult to serve without breaking.
  • Inadequate seasoning will yield a bland flavor, so don’t forget to taste the mixture before baking.
  • Adding too many additional ingredients can disrupt the moisture balance, leading to dryness, so stick to the suggested ingredients for best results.
  • Not allowing for even cooking by not shaping the meatloaf properly can lead to unevenly baked results.
  • Using low-quality cheese could diminish the overall flavor; opt for freshly grated parmesan for best results.

Essential Techniques

Achieving the perfect meatloaf requires mastering the art of mixing. This technique is crucial to ensure that the flavors meld together without overworking the meat. Use a gentle folding motion and avoid excessive handling, which can lead to a dense texture. Visually, you want a homogenous mixture without noticeable clumps.

Shaping the meatloaf is another integral step. A well-shaped loaf ensures even cooking and desirable presentation. Use your hands to form a compact loaf without over-compressing the mixture, keeping it tender while maintaining flavor integrity. A uniform shape will bake evenly and produce an aesthetically pleasing final dish.

Pro Tips for Perfect Garlic Parmesan Chicken Meatloaf

1. Use day-old bread for breadcrumbs for a richer flavor and better texture.
2. Experiment with adding herbs like parsley or thyme to enhance the flavor profile further.
3. Let the meatloaf rest for 10 minutes post-cooking before slicing to retain juices.
4. Cover the meatloaf with foil during the first half of baking to avoid a burnt surface.
5. Incorporate a glaze made of ketchup and honey on top for a sweet finish.
6. Try adding finely diced vegetables like bell peppers or onions for extra moisture and nutrients.
7. Freeze individual slices for a quick, easy reheatable meal later on.
8. Use a parchment-lined pan for easy clean-up and perfect removal.

Variations and Adaptations

For regional variations, consider incorporating local spices or ingredients, such as using Cajun seasoning for a Southern twist. Seasonal adaptations can include adding fresh herbs in the spring or incorporating pumpkin puree for a fall flavor profile. For dietary modifications, lean turkey can replace chicken for a similar taste with a different texture.

Flavor variations can include substituting cheddar for parmesan or adding sun-dried tomatoes for an Italian flair. Texturally, mixing in finely chopped mushrooms can enhance moisture and provide a distinct earthy flavor. Presentation alternatives, such as serving the meatloaf in muffin tins, create delightful single-serving portions for social gatherings.

Serving and Presentation Guide

When plating, consider using a large serving platter and placing the meatloaf slices in a slightly overlapping array for visual appeal. Garnish with freshly chopped herbs like parsley or basil for a pop of color and freshness. Traditional accompaniments include mashed potatoes or steamed vegetables, making for a balanced meal.

Modern serving suggestions might entail serving the meatloaf with a side salad drizzled with balsamic vinaigrette for added freshness. Be mindful of temperature considerations; serve the meatloaf warm for the best taste experience. For portion control, aim to cut even slices to manage serving sizes effectively.

Wine and Beverage Pairing

For a delightful pairing, a medium-bodied red wine, such as Pinot Noir, complements the savory flavors in the Garlic Parmesan Chicken Meatloaf beautifully. If you prefer white wine, a Chardonnay offers enough richness to balance the meal. For non-alcoholic alternatives, consider pairing with sparkling water infused with lemon, which cleanses the palate nicely.

For coffee enthusiasts, a light roast coffee served black can highlight the savory notes in the meatloaf without clashing; serve it warm to enhance the flavors. Achieving temperature harmony in your beverages will elevate your dining experience, so be sure to serve them at ideal temperatures.

Storage and Shelf Life

Storing your Garlic Parmesan Chicken Meatloaf is straightforward. Allow it to cool completely before transferring it to an airtight container to preserve freshness. It can be kept in the refrigerator for up to 4 days. For longer storage, wrap individual portions tightly in plastic wrap and place them in the freezer, where they can last up to 3 months.

Signs of spoilage include an off smell or unusual texture, so always check before consuming. When reheating, ensure the internal temperature reaches 165°F for food safety. For best results, reheat in the oven to maintain texture, but microwave heating works for convenience.

Make Ahead Strategies

Planning to make ahead can save time during busy weeks. Mix the ingredients and shape the meatloaf the night before, then cover it tightly and refrigerate until ready to bake. This allows the flavors to meld beautifully, enhancing the overall taste.

Store leftovers separated by layers of parchment paper if stacking in one container, helping to maintain their shape and moisture. For reheating, do so in the oven with a splash of broth to keep it moist, or microwave individual servings with a damp paper towel over them to prevent drying.

Scaling Instructions

If you’re looking to halve the recipe, simply adjust the ingredients accordingly, keeping the same cooking temperature. Scaling to double or even triple the recipe for gatherings works beautifully, just ensure you use a larger loaf pan or split it across two pans for even cooking.

Make equipment adjustments where needed; a larger mixing bowl helps when scaling up. Modify cooking times slightly, checking doneness with a thermometer, as larger meatloaves may require additional time. Ensure proper storage for scaled batches, utilizing multiple containers if necessary.

Nutritional Deep Dive

A macro breakdown suggests that this Garlic Parmesan Chicken Meatloaf is high in protein due to its chicken base while remaining lower in fat than traditional recipes. Each serving offers a balanced amount of carbohydrates primarily from breadcrumbs, making it a wholesome option.

Micronutrient analysis reveals benefits from garlic, including vitamins C and B6, alongside calcium and magnesium from parmesan. Implementing this recipe into your diet can foster health benefits like improved immunity and bone health. Portion control is vital; for those managing weight, serving sizes can be adapted to individual dietary needs.

Dietary Adaptations

For gluten-free options, substitute traditional breadcrumbs with gluten-free varieties or ground oats. If you’re looking for dairy-free adaptations, try vegan cheese or omit cheese altogether, using additional herbs for flavor.

Vegetarians might adapt this recipe by using lentils or a mixture of beans as a protein source, creating a delicious meat-free loaf. For low-carb or keto diets, consider using crushed pork rinds as a breadcrumb alternative, offering a crunchy texture without the carbs. Paleo enthusiasts can simply omit breadcrumbs entirely, using grated vegetables for bulk.

Troubleshooting Guide

If you encounter texture issues, such as dryness, consider adding moisture in the form of broth or eggs next time. For flavor balance, if the loaf tastes bland, remember to season well and perhaps add a homemade glaze.

Temperature problems can arise—check your oven’s heat calibration to ensure even cooking. If ingredient substitutions land poorly, stick with similar flavors and textures. Should timing concerns arise, stick a thermometer in the center; it should read 165°F for chicken meatloaf.

Recipe Success Stories

Community feedback on this Garlic Parmesan Chicken Meatloaf has been overwhelmingly positive. Readers have noted successful adaptations, including veggie-loaded versions that sneak in extra nutrients without sacrificing taste. Suggestions have emerged about incorporating different cheeses or adding a spicy kick with jalapeños.

Photography tips shared by readers indicate that utilizing natural light enhances the appeal of the final dish. Many readers enjoy showing off their versions on social media, creating a community around this beloved recipe. Your stories and adaptations can contribute to the evolving legacy of this delicious meatloaf.

Frequently Asked Questions

Can I use ground turkey instead of chicken? Yes, ground turkey can be used in place of chicken for a slightly different taste while keeping the dish lean. Just be mindful of the slightly different cooking times.

What can I use instead of breadcrumbs? Alternatives include crushed crackers, oats, or ground flaxseed, depending on your dietary needs and texture preferences.

How do I make it gluten-free? Use gluten-free bread or oats as a substitute for traditional breadcrumbs.

What sides pair well with this meatloaf? Traditional sides include mashed potatoes or steamed veggies. A light green salad also works well to balance the meal.

Can I freeze leftovers? Yes, leftover meatloaf can be frozen for later enjoyment. Ensure it is well-wrapped to avoid freezer burn.

How do I prevent the meatloaf from drying out? Avoid overcooking and consider adding a layer of glaze or sauce on top during baking to maintain moisture.

Is there a vegetarian version of this meatloaf? Yes, you can substitute the chicken for lentils or a mixture of beans to create a wholesome vegetarian option.

How long does this meatloaf last in the fridge? Properly stored, it can last for up to four days in the refrigerator.

Can I cook this meatloaf in advance? Yes, you can prepare the meatloaf in advance and refrigerate it before baking for ease on a busy day.

What temperature should the meatloaf be when done? The internal temperature should reach 165°F to ensure the chicken is fully cooked and safe to eat.

Can I add other vegetables to the meatloaf? Absolutely! Diced bell peppers, carrots, or onions can add moisture and flavor to the meatloaf.

Additional Resources

Explore related recipes that embrace comfort food themes, such as beef meatballs or chicken burgers, to further inspire your culinary journey. Technique guides focusing on meat preparation and cooking methods can help troubleshoot any challenges encountered here.

Ingredient information on garlic and chicken, including selection tips, can enhance your cooking knowledge. Equipment recommendations can assist with choosing the best tools to streamline your kitchen workflow, ensuring you have quality at your fingertips. Seasonal variations allow you to adapt this meatloaf throughout the year, keeping it fresh and exciting.

Join the Conversation

We invite you to share your experiences with this recipe on social media! Upload your completed Garlic Parmesan Chicken Meatloaf and tag us to inspire others. Engage in the comments section to share tips, photography suggestions, and your unique adaptations to this recipe.

Community engagement can lead to new ideas and fresh variations, allowing this dish to evolve further. We love hearing about your cooking adventures and the cherished moments around the dinner table that this recipe brings.

The Recipe

Garlic Parmesan Chicken Meatloaf

Serves: 6

Prep Time: 15 mins

Cook Time: 45 mins

Total Time: 60 mins

Kitchen Equipment Needed

  • Mixing bowl
  • Loaf pan
  • Meat thermometer
  • Spatula or spoon for mixing
  • Oven

Ingredients

  • 1 lb ground chicken
  • 1 cup breadcrumbs
  • 1/2 cup grated parmesan cheese
  • 2 cloves garlic, minced
  • 1 egg
  • 1 tsp Italian seasoning
  • Salt and pepper to taste
  • Ketchup for topping (optional)

Directions

  1. Preheat the oven to 375°F (190°C).
  2. In a large mixing bowl, combine the ground chicken, breadcrumbs, parmesan cheese, minced garlic, egg, Italian seasoning, salt, and pepper.
  3. Mix until just combined, being careful not to overmix.
  4. Transfer the mixture to a loaf pan and shape it into a loaf.
  5. If using, spread a thin layer of ketchup on top of the meatloaf for added flavor.
  6. Bake for 45 minutes, or until the internal temperature reaches 165°F (75°C).
  7. Let the meatloaf rest for 10 minutes before slicing.

Recipe Notes

  • This meatloaf freezes well; wrap slices tightly to maintain freshness.
  • Feel free to add chopped vegetables to the mix for enhanced nutrition.
  • Adjust seasonings to your taste, especially the garlic!