Discover Luscious Lemon Zucchini Heaven Bread for a Refreshing Delight

Luscious Lemon Zucchini Heaven Bread: A Citrusy Delight

⚖️
Difficulty
Easy

⏲️
Prep Time
15 mins

🕒
Cook Time
45 mins

⏱️
Total Time
60 mins

🍽️
Servings
8

Imagine the fresh burst of lemon zest mingling with the subtle sweetness of zucchini, creating a bakery aroma in your kitchen that can only be described as heavenly. The Luscious Lemon Zucchini Heaven Bread is a delightful fusion of tangy lemon and tender zucchini, perfect for breakfast or a sweet snack any time of day. This quick and easy bread is sure to become a staple in your baking repertoire, bringing joy to every scrumptious slice.

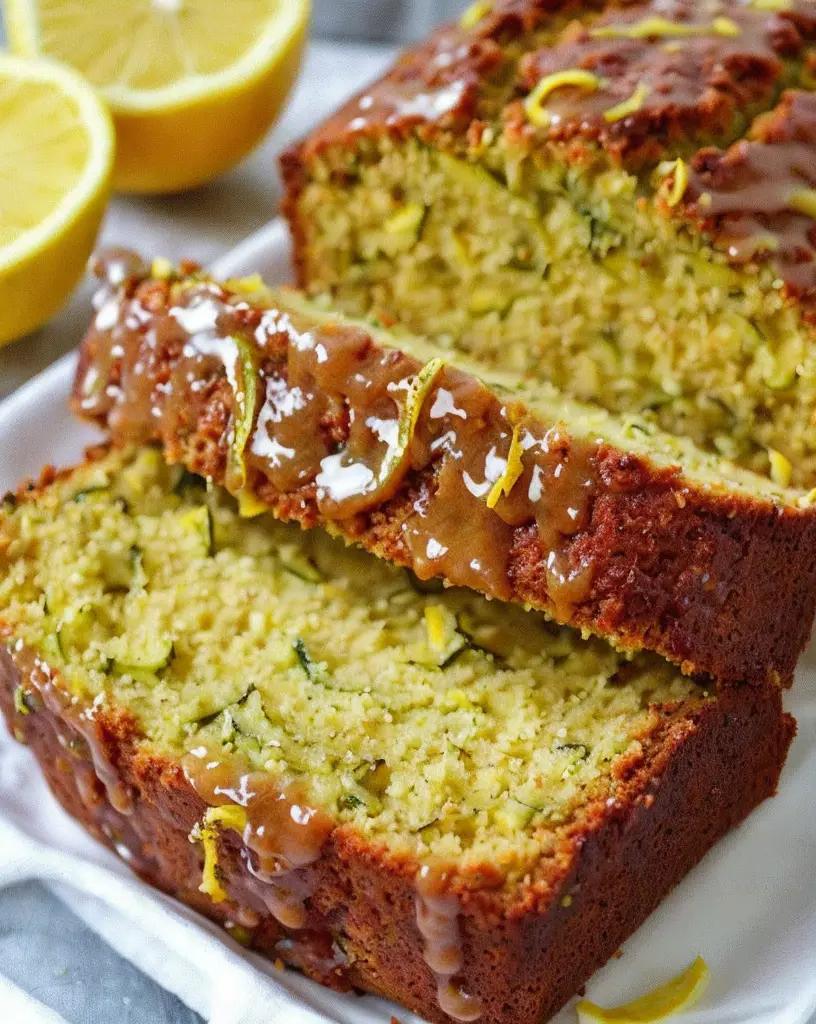
The combination of lemon and zucchini not only keeps the bread moist but also adds a vibrant, citrusy flavor that dances on your taste buds. The anticipation of tasting this delightful bread as it bakes to golden perfection is an experience that will bring the whole family to the kitchen.

Quick Recipe Highlights

  • Flavor Profile: The lemon provides a refreshing citrus kick, while the zucchini offers a gentle sweetness that balances the overall taste.
  • Texture: This bread has a moist, tender crumb with bits of zucchini spread throughout, adding a delightful juiciness.
  • Aroma: As it bakes, the kitchen fills with the invigorating scent of lemon zest and sweet pastry.
  • Visual Appeal: A golden crust with delicate flecks of green zucchini makes each slice visually appealing.
  • Skill Level Needed: Even novice bakers will find this recipe approachable, with simple instructions and ingredients.
  • Special Equipment: A grater for the zucchini and a simple loaf pan are the only specialized tools needed.

Recipe Overview

  • Difficulty Level: This recipe is rated as easy because it involves straightforward mixing techniques suitable for all levels.
  • Category: It falls under quick breads and can be enjoyed as a breakfast item or dessert.
  • Cuisine: This is a modern take on American quick bread, with a nod to classic lemon desserts.
  • Cost: The ingredients are affordable and commonly found in most pantries, making it a cost-effective treat.
  • Season: Best enjoyed in late summer when zucchini is in abundance, but delicious year-round.
  • Occasion: Perfect for brunch gatherings, afternoon teas, or a sweet complement to a savory breakfast.

Why You’ll Love This Recipe


The taste and texture of Luscious Lemon Zucchini Heaven Bread are what truly set it apart. You’ll love the way the zesty lemon flavor shines through, perfectly balanced by the mild sweetness of the zucchini. With a gentle crumb that’s soft and moist, each bite melts in your mouth, leaving a refreshing citrus aftertaste that tempts you to go for another slice.

Convenience is key with this recipe. It comes together in just about an hour, from preparation to pulling the loaf from the oven. With straightforward steps and minimal equipment, it’s ideal for both busy weekday baking and leisurely weekend projects. Plus, the ingredients are easily sourced, adding to its appeal as a spontaneous baking endeavor when the mood strikes.

Nutritional advantages are another reason to love this recipe. The inclusion of zucchini not only adds moisture but also brings essential vitamins and fiber to a sweet treat, offering a healthier option compared to traditional cakes or pastries. Lemon juice contributes vitamin C, providing an immune-boosting benefit as well.

On a social level, this bread is a wonderful addition to any gathering. Its delightful presentation and the enticing aroma will make it the star of any brunch table or coffee break. Sharing this home-baked goodness with friends and family is a guaranteed way to impress, fostering a sense of warmth and community.

Cost-effectiveness and accessibility make this recipe a home cook’s favorite. With zucchini often being one of the more wallet-friendly vegetables and lemons a grocery staple, you’ll find this recipe fits comfortably within a budget, yet delivers the flavorful punch that premium desserts offer.

Historical Background and Cultural Significance


The origin of combining zucchini in bread can be traced back to innovative American homemakers seeking to incorporate their summer garden surplus into everyday meals. This practical use of plentiful zucchini became a tradition in quick bread baking over the decades. Adding lemon to the mix creates a wonderful twist on the classic recipe, infusing it with a bright, modern flavor.

Culturally, lemon zucchini bread represents the versatility and resourcefulness of American culinary traditions. It highlights the tendency to adapt and evolve with seasonal ingredients, which has become a hallmark of many home-cooked meals in the United States. This bread celebrates the ingenuity of incorporating fresh produce into baking.

Over time, recipes for zucchini bread have diversified, influenced by regional preferences and available ingredients. Some versions embrace spices such as cinnamon and nutmeg, while others experiment with nuts and citrus, embodying a mélange of flavors that cater to various palates. The evolution of this recipe reflects the wider diversity in modern baking.

In contemporary kitchens, regional variations continue to emerge. Recipes from the South might emphasize sweetness, while those from the coastal areas might delve more into citrus combinations. This adaptability has ensured that lemon zucchini bread holds its place in the beloved catalog of go-to quick breads.

Ingredient Deep Dive


Zucchini’s cultural significance is tied closely to its versatility and abundance, making it a popular choice in diverse cuisines worldwide. Often featured in Mediterranean and American dishes, zucchini is celebrated for its ability to easily absorb flavors, making it a natural partner for citrus like lemon. Nutritionally, zucchini is rich in vitamins A and C, plus dietary fiber, which supports digestive health.

When selecting zucchini, look for small to medium-sized ones, as these are typically more tender and flavorful. Store zucchini in the refrigerator wrapped loosely in a plastic bag, which helps preserve its moisture. If fresh zucchini isn’t available, yellow squash can serve as a possible substitution, maintaining the moist texture while adding a slight sweetness to the bread.

Lemons have an extensive culinary history across various cultures, linked to both their versatility and distinctive taste. The bright acidity of lemons complements dishes from sweet to savory and their zest adds a fragrant oil that infuses into baked goods effortlessly. Nutritionally, lemons are an excellent source of vitamin C.

When choosing lemons, look for fruit that feels heavy for its size, indicating juiciness, with smooth, firm skin. To maximize juice yield, roll the lemon on the counter before cutting. Store lemons in the refrigerator in a drawer or on the counter if planning to use them within a week. If you find yourself short, bottled lemon juice can be a substitute but lacks the aromatic zest.

Common Mistakes to Avoid

  • Overmixing the batter can result in a dense bread. Mix just until ingredients are combined.
  • Skipping the grating step for the zucchini may lead to uneven moisture distribution.
  • Using too large zucchini can add extra moisture, impacting the texture negatively.
  • Forgetting to zest the lemon before juicing can make it difficult to get enough zest for flavor.
  • Not preheating the oven can result in uneven baking and a poorly risen loaf.
  • Using a dull grater can make extracting zest more difficult, leading to large pieces.
  • Opening the oven frequently to check on the bread can lead to sinking in the middle.
  • Neglecting to cool bread properly can make slicing difficult and messy.

Essential Techniques


A key technique in making Luscious Lemon Zucchini Heaven Bread includes properly grating the zucchini. This is important because it ensures the vegetable is well distributed throughout the batter, contributing to the bread’s moist texture without overwhelming it. To master this, use the fine side of the grater and evenly apply pressure, ensuring uniform strands.

Baking the bread includes carefully monitoring the mixing process to avoid overworking the gluten in the flour. This means folding ingredients gently and just until they are combined, ensuring the bread remains light and tender. Visual cues for successful mixing include a uniform batter that comes together without large pockets of flour or overly wet spots.

Pro Tips for Perfect Luscious Lemon Zucchini Heaven Bread


For optimal flavor, allow the bread to rest for a few hours after baking to let the flavors meld together. You’ll find this enhances both the lemon and zucchini profiles cohesively.

Grease the loaf pan with a combination of butter and flour for easy release once the bread is baked, preventing any of those delectable bits from sticking.

Test for doneness by inserting a toothpick into the center. If it comes out clean or with a few crumbs, the bread is ready. This prevents overbaking, which can dry out your bread.

If you find zucchinis are unusually water-rich, blot them with a paper towel after grating to manage moisture and achieve a better texture.

Experiment with a light glaze made from powdered sugar and lemon juice drizzled over the cooled bread for added sweetness and visual appeal.

When zesting, avoid the bitter white pith by gently rotating the lemon and only taking the outermost layer of the peel for the best flavor.

Store leftover slices individually wrapped for easy, grab-and-go portions that retain their freshness longer.

Variations and Adaptations


Regional variations of this bread highlight the versatility of the core recipe. In Italian-inspired adaptations, substituting some flour with almond meal adds a nutty depth. Meanwhile, those preferring a Southern twist might incorporate a touch of bourbon into the batter for an extra flavor layer.

Seasonal adaptations could reflect the bounty of a summer harvest, perhaps with the inclusion of summer berries like blueberries or strawberries folded into the batter, adding bursts of color and flavor.

For dietary modifications, a gluten-free flour blend can be substituted for all-purpose flour, allowing those with gluten sensitivity to still enjoy this treat without compromising on taste or texture.

To explore flavor variations, try adding spices such as ginger or cardamom for a warmer taste profile, or vanilla extract for a more traditional, comfort-baking feel.

For texture modifications, including chopped nuts like walnuts or pecans will add a delightful crunch, contrasting the soft bread nicely.

Experimenting with presentation alternatives such as bundt or mini loaf pans can elevate the bread from classic loaf to personalized servings, ideal for individualized settings or gifting.

Serving and Presentation Guide


When serving, consider slicing the bread into 1-inch thick pieces for a perfect balance of texture and flavor. Arrange slices on a platter with fresh lemon slices and a sprinkle of powdered sugar for a clean, classic presentation.

Garnishing with a bit of lemon zest on top will amplify the citrus aroma and provide a visual cue of the flavor within. Fresh mint leaves can also serve as a lovely contrast to the lemon’s brightness.

Traditional accompaniments for this bread might include a smear of cream cheese or lemon-infused butter, enhancing both the richness and citrus notes simultaneously.

For modern serving suggestions, consider pairing with a dollop of yogurt or fruit compote, which can balance the sweetness and make it more brunch-friendly.

Temperature-wise, the bread is best enjoyed slightly warm or at room temperature, allowing the flavors to shine through. If preparing in advance, briefly warming the slices before serving can reinvigorate the bread’s aroma and texture.

Portion control tips include pre-slicing the bread and serving on smaller plates, which can visually satisfy while managing portion sizes effectively, especially in larger gatherings.

Wine and Beverage Pairing


For wine pairings, a light, citrusy sauvignon blanc complements the lemon notes beautifully without overpowering the subtleties of the bread. Its crispness echoes the fresh zest, creating a harmonious flavor experience.

Non-alcoholic alternatives could include a simple herbal tea, such as chamomile or citrus green tea, both offering a soothing backdrop that pairs well with the bread’s flavors.

Coffee selections like a smooth Ethiopian blend mirror the bread’s complexity and provide a robust counterpoint to the lemon’s brightness, making it an ideal brunch choice.

Temperature considerations for beverages should lean towards chilled wine and warm teas, supporting the refreshing nature of the bread or enhancing its comforting attributes, respectively.

Serving suggestions include chilled fruit-infused water or sparkling water with a twist of lemon, adding a refreshing element that accentuates the bread’s innate citrus goodness.

Storage and Shelf Life


To store your Luscious Lemon Zucchini Heaven Bread, wrap it tightly in plastic wrap or place it in an airtight container to maintain moisture and freshness. It can be left at room temperature for up to three days, stored in the refrigerator for a week, or frozen for up to three months.

If refrigerating, use slightly damp paper towels between slices to prevent drying. For freezing, wrap the entire loaf or individual slices in aluminum foil before placing in a freezer bag for added protection against freezer burn.

Signs of spoilage include an off smell, significant changes in texture such as an unusually hard surface, or any visible mold. Checking regularly ensures you enjoy your bread at its best.

For reheating, individual slices can be warmed in a toaster oven or microwave for about 15 seconds, refreshing the bread’s aroma and moisture before serving. Avoid reheating in the oven as it can dry out the bread.

When freezing, labeling with the date can help keep track of freshness, ensuring you enjoy the bread while it’s at its peak. Once defrosted, it’s best to consume within a couple of days for optimal flavor and texture.

Make Ahead Strategies


A thoughtful prep timeline can enhance your baking experience. The batter can be prepared a day in advance and stored in the refrigerator, allowing the flavors to meld and reducing day-of preparation time.

For storage between steps, mix the dry ingredients and wet ingredients separately and combine them right before baking, ensuring a fresh, evenly prepared batter.

There is a negligible quality impact from pre-prepared batter, allowing you to enjoy the same delicious results even with a head start in preparation.

Assembly tips include grating the zucchini and zesting the lemon ahead of time, storing them separately to maintain freshness. This allows you to quickly assemble when ready for baking without sacrificing flavor.

Reheating your loaf just before serving can enhance its aroma, making for a delightful presentation. Gently warm the bread in the oven and, if desired, apply a fresh lemon glaze for a renewed burst of flavor.

Adding freshly zested lemon over the glaze or on individual slices before serving can elevate freshness, adding a bright, flavorful touch to pre-prepared bread.

Scaling Instructions


Scaling this recipe to suit different needs involves some simple adjustments. To halve the recipe, divide the ingredients equally and use a smaller loaf pan to retain baking times and consistency.

Doubling or tripling requires proportional increases in ingredients and possibly additional loaf pans to ensure even baking; you may need to adjust oven times slightly, monitoring closely as larger volumes may impact baking duration.

Equipment adjustments might include using a standing mixer to prepare larger batches efficiently, or dividing batter into multiple smaller pans for uniform cooking.

Timing modifications for varied batches should always include consistent preheating of the oven and proper rotation of pans halfway through baking for even heat distribution.

Storage considerations should keep in mind shelf life differences when freezing larger quantities, ensuring slices are properly wrapped and dated for efficient use over time.

Nutritional Deep Dive


In terms of nutrition, Luscious Lemon Zucchini Heaven Bread offers a delectable treat with a balance of macros. It provides carbohydrates mainly from flour and zucchini, a moderate touch of healthy fats from oil or any nut additions, and some protein from the bread’s additional elements.

Micronutrient analysis reveals the presence of vitamin C from lemons, supporting immune health, and small amounts of B vitamins from zucchini, which aid in energy production.

Health benefits include a fiber boost from zucchini, contributing to satiety and aiding digestion, with some antioxidant benefits from lemon zest that can provide a refreshing, wholesome treat.

Dietary considerations include possible gluten due to regular flour; however, modifications can adapt this recipe to suit gluten sensitivities or preferences.

Portion analysis reinforces that keeping slices at reasonable sizes upholds the balance of indulging in a sweet bread within a nutritious framework without overwhelming dietary guidelines.

For weight management tips, pairing slices with protein-rich sides like yogurt or nuts offers a more balanced meal, combining satisfying carbs with complementary proteins and fats.

Dietary Adaptations


Creating gluten-free Luscious Lemon Zucchini Heaven Bread requires using a high-quality gluten-free flour blend, which allows you to maintain texture and taste attributes similar to the standard recipe.

For a dairy-free version, substituting any dairy-based ingredients with plant-based alternatives ensures the bread remains just as delicious without impacting texture or moistness.

A vegan adaptation involves replacing any eggs with alternatives such as flaxseed meal mixed with water, ensuring the bread binds well while maintaining its structural integrity.

Low-carb considerations may involve reducing sugar content or replacing it with sugar substitutes, potentially lowering carbohydrate intake while retaining sweetness and flavor.

For keto adaptations, examining flours like almond flour not only cuts carb content but also enriches the loaf with additional flavor profiles consistent with the diet’s requirements.

Paleo variations involve integrating ingredients such as coconut flour and honey instead of wheat flour and sugar, preserving the bread’s core qualities while aligning with paleo dietary frameworks.

Low-FODMAP adjustments can be achieved by reducing high-FODMAP ingredients or substituting with approved alternatives, ensuring that digestive comfort is maintained alongside flavor.

Troubleshooting Guide


If you experience texture issues, it may be due to overmixing the batter. Ensure to fold gently and avoid overworking once liquids are added to the dry ingredients, helping preserve a tender crumb structure.

Taste balance can be addressed by adjusting the amount of lemon zest or sugar to suit personal preferences, enhancing tanginess or sweetness as necessary for individual palettes.

Temperature problems often arise from an inaccurately preheated oven, which can impede proper rising. Always ensure the oven reaches the correct temperature before introducing the loaf.

When facing equipment challenges such as uneven baking, rotating the loaf pan or using insulated sheets can contribute to more consistent heat distribution.

Ingredient substitutions require accuracy in measurement. For example, if replacing wheat flour with a gluten-free alternative, trial and error may be needed to get precise results in texture and rise.

Timing concerns generally come from mistimed baking. If your loaf is taking longer to bake than expected, be sure to test doneness and cover the top with foil if it threatens to brown too much early on.

Recipe Success Stories


In sharing Luscious Lemon Zucchini Heaven Bread recipes, many community feedbacks celebrate the ease and satisfaction of preparing such a flavorful treat with minimal fuss. Home bakers often note the rave reviews from friends who taste it, highlighting its perfect balance between lemon brightness and subtle sweetness.

Variation successes include incorporating blueberries for color and added flavor depth, becoming a beloved summer twist on the traditional loaf that resonates well with festive occasions.

Some recipe adaptations have been shared, replacing sugars with honey for those aiming for a less processed, more natural sweetener approach, yielding equally delightful results.

Readers suggest tips like using parchment paper-lined loaf pans for effortless removal and clean slices, contributing to presentation quality and ease of storage.

Photography tips involve capturing the golden crust and moist interior, with garnishes of fresh zucchini and lemon slices adding vibrancy for food blogging and social media sharing.

Frequently Asked Questions

Can I use frozen zucchini? Yes, but be sure to thaw and drain excess moisture to maintain the bread’s texture.

What if I don’t have a loaf pan? A muffin tin can work, baking for about 20-25 minutes instead, checking for doneness with a toothpick.

How do I prevent the bread from sticking? Greasing and flouring the pan, or using parchment paper, helps ensure easy removal.

Why is my bread dense? This could be due to overmixing, so be gentle when combining ingredients.

Can I add nuts or fruit? Absolutely! Chopped nuts or berries can add new flavors and textures.

Is whole wheat flour an option? Yes, but the flavor and texture might be slightly denser; consider balancing with half all-purpose flour.

How do I make it sweeter? Adding a bit more sugar or a glaze can enhance sweetness if desired.

Any tips for making it more lemony? Additional lemon zest or a few drops of lemon extract can heighten citrus notes.

What if my loaf sinks? Ensure accurate oven temperatures and proper leavening agent balances to prevent sinking.

How long does it keep fresh? Up to three days at room temperature, longer when refrigerated or frozen.

Can I use lemon juice instead of zest? While juice adds moisture, zest offers more concentrated flavor without altering batter consistency.

What’s the best way to glaze it? Mix powdered sugar with fresh lemon juice to a drizzling consistency and apply over the cooled bread.

Additional Resources


Enhance your baking repertoire with related recipes such as classic zucchini bread, adding more seasonal variations to your quick bread options. Incorporating other citrus fruits into similar recipes provides a delightful exploration of flavor contrasts.

Technique guides available online can expand on baking fundamentals, helping perfect methods like mixing and grating, to consistently achieve the best results in quick bread baking.

Ingredient information sheets may offer deeper insight into produce selection and storage, assisting in maintaining fresh ingredients for optimal baking experiences over time.

Equipment recommendations in specialty kitchen stores can supply upgraded cookware or tools, ensuring each baking endeavor is as smooth and successful as possible.

Seasonal variations explore different pairings and adaptations, encouraging creativity in flavor pairings and broadened applications for diverse palates and pantry supplies.

Join the Conversation


Engaging with fellow bakers is a delightful way to share successes and innovations with Luscious Lemon Zucchini Heaven Bread. Post your recipe variations and photos on social media platforms, tagging this community and spreading the joy of baking fresh, delicious bread.

Capture and share photography tips with fellow enthusiasts, focusing on golden crusts and bright lemons for dynamic visual stories of your baking journey.

Recipe reviews are always welcome, offering various takes and adaptations that inspire new combinations among shared social circles and baking forums.

Community engagement can include responding to queries, participating in recipe challenges, and sharing insights, ensuring a connected space for all levels of bakers.

Joining recipe variations discussions often leads to surprising discoveries and mutual appreciation for the creative potential inherent in every loaf of Luscious Lemon Zucchini Heaven Bread.

The Recipe

Luscious Lemon Zucchini Heaven Bread

Serves: 8

Prep Time: 15 mins

Cook Time: 45 mins

Total Time: 60 mins

Kitchen Equipment Needed

  • Loaf pan
  • Grater
  • Mixing bowls
  • Whisk
  • Spatula
  • Measuring cups and spoons

Ingredients

  • 1 cup grated zucchini
  • 1 cup all-purpose flour
  • 1/2 cup sugar
  • 1/4 cup vegetable oil
  • 1 egg
  • 1 teaspoon baking powder
  • 1/2 teaspoon salt
  • Zest from 1 lemon
  • 2 tablespoons lemon juice

Directions

  1. Preheat your oven to 350°F (175°C) and grease a loaf pan.
  2. In a large mixing bowl, combine flour, sugar, baking powder, and salt.
  3. In another bowl, whisk together vegetable oil, egg, lemon zest, and juice.
  4. Gently fold in the grated zucchini.
  5. Pour the wet ingredients into the dry ingredients, mixing until just combined.
  6. Transfer the batter into the prepared loaf pan, smoothing the top.
  7. Bake for 45 minutes or until a toothpick inserted in the center comes out clean.
  8. Allow to cool in the pan for 10 minutes before transferring to a wire rack to cool completely.

Recipe Notes

  • For a refreshing glaze, mix powdered sugar with lemon juice and drizzle over the cooled loaf.
  • Store leftover slices in an airtight container to maintain moisture.
  • Try adding blueberries or chopped nuts for variation.

Savor Authentic Greek Flavor with Homemade Lamb Gyros Recipe

Lamb Gyros: A Delightfully Savory Mediterranean Treat

⚖️
Difficulty
Moderate

⏲️
Prep Time
20 mins

🕒
Cook Time
15 mins

⏱️
Total Time
35 mins

🍽️
Servings
4

Imagine biting into a tender, juicy lamb gyro enveloped in a soft, warm pita, with lush layers of fresh vegetables and aromatic tzatziki. Lamb gyros offer a journey of flavors inspired by Mediterranean cuisine. This classic recipe incorporates savory, spiced lamb, which is roasted to perfection, releasing aromatics that transport you straight to the bustling streets of Greece. With every bite, the rich flavors and textures are perfectly balanced, making it an ideal meal for both casual dining and gourmet praise.

Quick Recipe Highlights

  • Flavor Profile: A harmonious blend of earthy spices, tender lamb, and refreshing cucumber yogurt sauce.
  • Texture: The juicy and tender lamb contrasts with crisp, fresh veggies and fluffy pita.
  • Aroma: Delightful scents of garlic, herbs, and spices permeate the air.
  • Visual Appeal: Vibrant greens, deep-hued lamb, and creamy tzatziki create an inviting presentation.
  • Skill Level Needed: Manageable for home cooks with intermediate skills due to marinating and grilling requirements.
  • Special Equipment: A grill or grill pan is recommended to achieve authentic Mediterranean flavors.

Recipe Overview

  • Difficulty Level: Lamb gyros require precise marinating and grilling, considered a moderate skill level task by many enthusiasts.
  • Category: Perfect as a main course for lunches and dinners.
  • Cuisine: Stemming from Greek culinary tradition with Middle Eastern influences.
  • Cost: A cost-effective dish using lamb cuts that are often reasonably priced or even budget-friendly.
  • Season: While enjoyable year-round, they shine in spring and summer, pairing well with seasonal veggies.
  • Occasion: Suitable for family meals, entertaining guests, and a festive BBQ setting.

Why You’ll Love This Recipe


Dive into a world of flavors with lamb gyros that offer a perfect mix of taste and texture. The lamb’s tender juiciness pairs beautifully with the crispness of fresh veggies and the creaminess of tzatziki. These homemade gyros provide the convenience of familiar street food right at home, allowing you to explore new culinary horizons with ease. Packed with protein and served with a variety of veggies, they offer a nutritious meal choice.

Entertaining family or friends? Lamb gyros serve as a crowd-pleaser, with customizable ingredients to cater to varied preferences. The preparation is straightforward, keeping your culinary endeavors stress-free. In terms of cost, they are surprisingly economical. Opt for tender lamb cuts without breaking the bank, especially when you balance with budget-friendly sides.

Historical Background and Cultural Significance


Lamb gyros trace back to the heart of Greek street food culture, echoing the traditional preparation of skewered meats dating back to ancient times. Throughout history, the gyro has become a symbol of Mediterranean gastronomy, celebrated for its simplicity and flavor appeal. The concept has evolved through geographical migrations and cultural exchanges.

Regional variations have emerged, with notable differences in spices used or the choice of accompanying sauces. Yet, the base remains authentically Greek, rooted in a people’s love for fresh and aromatic dishes that bring communities together.

Ingredient Deep Dive


Lamb, the star of this dish, carries a rich cultural heritage, frequently featured in celebratory and communal meals across Mediterranean societies. Loaded with high-quality protein and essential vitamins, it’s a nutrient powerhouse. Opt for fresh boneless lamb shoulder or leg for the best flavor and tenderness, storing it refrigerated, and using it within a couple of days for peak freshness.

Tzatziki, a Greek staple, adds a refreshing and creamy dimension. Made from yogurt, cucumber, and garlic, it’s both flavorful and nutritious, a source of probiotics and a great way to add moisture to your dish. Make in advance and store in an airtight container, keeping its flavors intact for up to three days in the fridge.

Common Mistakes to Avoid

  • Over-marinating lamb can lead to an overpowering flavor that masks its natural taste.
  • Using stale pita bread impacts texture; opt for fresh or homemade versions.
  • Skimping on herbs and spices deprives the meat of authentic gyro flavors.
  • Incorrect grilling temperatures can leave the lamb either dry or undercooked.
  • Neglecting to rest the cooked meat for a few minutes affects tenderness.
  • Overloading the pita with filling leads to messy eating; balance is key.
  • Using low-fat yogurt in tzatziki reduces its creamy texture.
  • Forgetting to pat the cucumber dry in tzatziki can make it watery.
  • Skipping the cooling time for tzatziki hinders full flavor development.
  • Failing to season veggies impacts overall taste complexity.

Essential Techniques


Grilling the lamb to perfection is crucial, ensuring a tender texture and deep flavor. Begin with a preheated grill to create a deep sear, locking juicy goodness inside. Resting the cooked lamb before serving lets the juices redistribute, enhancing every bite’s luxury.

Tzatziki’s freshness defines the gyro’s profile— mastering it requires patience and balance, using high-quality yogurt and properly strained cucumber to achieve a creamy and thick consistency. Combining herbs and garlic requires a touch of restraint to prevent overpowering the sauce.

Pro Tips for Perfect Lamb Gyros


Allow marinades to soak into lamb for at least two hours for optimal infusion of flavors without overpowering. Choose high-quality bread for the best gyro experience; lightly toasting can add a delightful crunch. When assembling gyros, layer ingredients thoughtfully to showcase textures and visual appeal.

Experiment with spices to tailor flavor combinations to personal preference. For busy cooks, prep components a day ahead—this reduces kitchen stress and enhances flavors as they meld in storage. When making tzatziki, consider incorporating a splash of fresh lemon juice before serving for vibrant acidity that revitalizes the dish.

Variations and Adaptations


Regional gyro variations abound: the Middle Eastern take may introduce hummus, while some might opt for sweet notes like cinnamon or nutmeg in their spice blend. Seasonal adaptations include incorporating summer-fresh bell peppers or opting for fall-spiced lamb with a hint of clove.

For dietary considerations, substitute traditional pita with gluten-free alternatives or explore low-carb wraps. Vegans can recreate the dish using seasoned seitan or tofu. Enhancing flavors could involve smoked paprika or roasted garlic for added depth, and a swap of lamb for chicken caters to lighter dining preferences.

Serving and Presentation Guide


For an elegant presentation, consider rolling gyros tightly to retain the fillings, slicing each for bite-sized servings. Garnish with fresh herbs like parsley or dill for a pop of color. Traditional accompaniments such as olive salad or a small dollop of tzatziki on the side can elevate the visual appeal and flavor pairing.

Modern iterations might include serving deconstructed gyros in a bowl format, offering a refreshing twist. Serve chilled beverages alongside this dish to contrast the hearty flavors—consider a serving platter to manage portions easily for groups.

Wine and Beverage Pairing


Pair lamb gyros with full-bodied red wines, such as a Greek Xinomavro or Merlot, to complement the meat’s richness. For those preferring non-alcoholic options, a chilled glass of mint-infused lime juice adds a refreshing counterbalance.

Coffee drinkers may appreciate a Greek-style frappe, its bold flavors harmonizing with the gyro’s savory elements. All beverages should be served cool to accentuate the gyro’s flavor profile without overpowering it. Offering a variety ensures accommodation of all guests’ preferences.

Storage and Shelf Life


Store cooked lamb and tzatziki separately in airtight containers to prevent cross-contamination of flavors. Keep refrigerated for up to three days, ensuring they remain sealed to maintain freshness. Signs of spoilage include a sour smell or change in color, both calling for disposal.

For reheating, gently warm lamb over low heat to avoid drying out. Tzatziki should be served cold for the best taste balance. Lamb can be frozen for longer storage, though fresh is preferred for noticeable flavor differences.

Make Ahead Strategies


You can efficiently incorporate lamb gyros into your meal prep cycle, marinating lamb a day in advance to intensify its flavor. Store chopped vegetables separately to maintain crispness, assembling all elements shortly before mealtime for peak freshness.

Once assembled, artisanal gyros can maintain quality when slightly cooled, enhancing the natural blending of flavors. Aim to add fresh elements like herbs only before serving to preserve their vibrancy and aromatic appeal.

Scaling Instructions


For halving the recipe, maintaining precise measurements is key, specifically with spices, to preserve the authentic balance. When doubling or tripling the recipe, ensure your kitchen equipment can accommodate the increased volume, such as larger grill space or storage capacity.

Timing may need adjusting; grill larger portions more slowly to ensure uniform cooking. When storing larger batches, divide servings into smaller containers for ease, avoiding spoilage and promoting efficient reheating.

Nutritional Deep Dive


Protein-packed lamb gyros offer sustained energy and muscle repair benefits. Rich in zinc, iron, and B vitamins, these nutrients support immune function and energy production. Tzatziki contributes beneficial probiotics and calcium through yogurt.

For those managing caloric intake, mindful portion control of pita and additional toppings can balance a healthier meal approach. Vegetarians can use plant-based proteins to modify while retaining nutritional density.

Dietary Adaptations


For those gluten-sensitive, opting for gluten-free pita allows continued enjoyment. Dairy-free tzatziki is achievable by using coconut yogurt alternatives, ensuring similar textures. Vegans can duplicate the gyro essence using marinated tofu or jackfruit.

Low-carb versions replace pita with lettuce wraps, maintaining a satisfying crunch without extra carbohydrates. Keto enthusiasts benefit from high-fat, low-carb yogurt options in their tzatziki, complementing the lamb’s nutritious profile.

Troubleshooting Guide


Resolve dry lamb issues by marinating properly and not overcooking. Tighten weak spices by revisiting measurements, ensuring adherence to blending recommendations. Adjust cooking temperature if grill settings introduce inconsistencies, using visual cues like color and texture.

Relieve timing struggles with a practice run prior to a main event, developing proficiency. Equipment shortages can often be creatively bypassed using household items like a stovetop grill pan if a true grill is unavailable.

Recipe Success Stories


Community members have shared joy in mastering lamb gyros, with tales of simple yet stunning kitchen triumphs. Substitute success is common, with lamb swaps to other proteins seamlessly complementing Mediterranean spirit.

Engaged readers contribute valuable insights, offering tips such as freezing leftover lamb for future creations. Capture these special occasions with photography that showcases contrasts of colors and textures—visual records that inspire and inform.

Frequently Asked Questions

Can I make gyros with a different type of meat?
Absolutely! Chicken and beef are popular alternatives, adjusting marinade spices to suit the meat choice.

How do I prevent the lamb from being chewy?
Ensure you’re using the correct lamb cuts—shoulders or legs are ideal. Also, do not overcook and rest before slicing to relax the meat fibers.

Can tzatziki be prepared in advance?
Yes, preparing tzatziki a day prior allows flavors to meld, enhancing taste and ensuring it’s ready when needed.

What’s the best way to reheat lamb gyros?
Gently warm the lamb in a skillet or over a grill, avoiding high heat to prevent drying. Tzatziki should remain chilled.

Do I need a special grill for lamb gyros?
No special equipment is needed; a stove-top grill pan suffices if a traditional grill is unavailable.

Are there plant-based gyro options?
Yes, plant-based proteins like seasoned tofu or seitan can successfully recreate the gyro texture and taste.

Can lamb gyros be made spicy?
Integrate chili powder or crushed red pepper into the marinade for an added kick, adjusting to your spice preference.

How can I keep pitas fresh?
Store pitas in a sealed bag to prevent drying or heat briefly for added softness before serving.

Can leftovers be frozen?
Cooked lamb can be frozen, maintaining quality, though fresh preparations offer superior taste.

What side dishes complement gyros?
Greek salad, orzo, or roasted vegetables make excellent companions, enhancing the Mediterranean experience.

Should gyros be served warm or cold?
They are typically enjoyed warm with chilled tzatziki, providing a dynamic temperature contrast.

How can I add more greens to my gyros?
Layer spinach or arugula into the gyro for an extra nutritional boost and vibrant color.

Additional Resources


For more inspiration, explore related Mediterranean recipes such as falafel or couscous salad. Consider technique guides focusing on perfecting grill marks or mastering the art of homemade pita bread.

Delve into ingredient choices like exploring different lamb breeds and their flavor profiles, enhancing your understanding of how to achieve authentic culinary experiences. Seasonal variations offer fresh takes on traditional recipes, keeping your kitchen adventurous and exciting.

Join the Conversation


Engage with fellow cooking enthusiasts by sharing your lamb gyro creations on social media. Use filters and lighting techniques for captivating food photography that highlights your dish’s vibrant details, and invite others to review and comment on your recipe adventures.

Encourage community members to suggest innovative gyro variations or time-saving tips. Participate in recipe swaps, broadening your palate and repertoire with shared knowledge and diverse perspectives.

The Recipe

Lamb Gyros

Serves: 4

Prep Time: 20 mins

Cook Time: 15 mins

Total Time: 35 mins

Kitchen Equipment Needed

  • Grill or stovetop grill pan
  • Mixing bowls
  • Sharp knife
  • Cutting board

Ingredients

  • 1 lb lamb shoulder or leg, thinly sliced
  • 4 pita breads
  • 1 cup tzatziki sauce
  • 2 tablespoons olive oil
  • 1 teaspoon ground cumin
  • 1 teaspoon ground coriander
  • 1 teaspoon paprika
  • Salt and pepper to taste
  • 1 cup sliced tomatoes
  • 1 cup sliced red onions
  • 1 cup shredded lettuce

Directions

  1. Combine olive oil, cumin, coriander, paprika, salt, and pepper in a bowl. Add lamb slices, and coat evenly. Marinate for at least 2 hours.
  2. Preheat grill to medium-high heat. Grill lamb slices for 3-4 minutes on each side until cooked through and tender.
  3. Warm pita breads on the grill for about 1 minute on each side.
  4. Assemble gyros by layering lamb, tomatoes, onions, lettuce, and tzatziki onto each pita.
  5. Wrap pitas tightly and serve warm.

Recipe Notes

  • For added spice, include a pinch of chili flakes in the marinade.
  • Consider a side of hummus or roasted vegetables for a complete meal.

Irresistible Strawberry Cream Cheese Cookies for Perfectly Sweet Indulgence

Delicious Strawberry Cream Cheese Cookies: A Sweet Summer Treat

⚖️
Difficulty
Easy

⏲️
Prep Time
15 mins

🕒
Cook Time
12 mins

⏱️
Total Time
27 mins

🍽️
Servings
24 cookies

There’s nothing quite like Strawberry Cream Cheese Cookies to encapsulate the essence of summer. These delightful cookies are soft, chewy, and bursting with strawberry flavor, making them a perfect treat for any occasion. With the rich creaminess of cream cheese and the sweet, fruity taste of fresh strawberries, these cookies are an indulgence that will leave you craving more. Perfect for picnics, parties, or a simple afternoon snack, they are easy to make, yet satisfyingly complex in taste.

The Strawberry Cream Cheese Cookies combine a buttery, creamy base with the freshness of strawberries, which brings a burst of flavor to every bite. The combination of tart and sweet will delight your taste buds, while the pillowy texture provides a satisfying chew that keeps you reaching for another. As you bake these cookies, your kitchen will be filled with the heavenly aroma of strawberries and cream, transporting you to a sun-drenched garden.

Quick Recipe Highlights

  • Flavor Profile: The cookies deliver a harmonious blend of sweet strawberries with the creamy richness of cheese, layered with a touch of vanilla essence.
  • Texture: These cookies strike the perfect balance between soft and chewy, with the cream cheese adding a delightful richness.
  • Aroma: As they bake, they exude a mouth-watering aroma of sugary strawberries and vanilla, inviting everyone into the kitchen.
  • Visual Appeal: With their delicate pink hue and enticing glossy finish, they are as visually appealing as they are delicious.
  • Skill Level Needed: This recipe requires basic baking skills, making it suitable for beginner bakers and experienced cooks alike.
  • Special Equipment: A stand mixer is ideal for achieving a smooth dough, but a handheld mixer will also do the trick.

Recipe Overview

  • Difficulty Level: Easy. With straightforward steps and minimal preparation, these cookies are simple to whip up for any occasion.
  • Category: Dessert or Snack. Perfect for enjoying at any time of the day.
  • Cuisine: While these cookies are a modern take, they draw inspiration from traditional American baking techniques, enhanced by seasonal fresh ingredients.
  • Cost: Affordable. Using common pantry staples and seasonal strawberries keeps the cost low.
  • Season: Best enjoyed in the summer when strawberries are at their peak, though they can be made year-round with frozen berries.
  • Occasion: Ideal for casual gatherings, picnics, or as a sweet surprise in the lunchbox.

Why You’ll Love This Recipe


These Strawberry Cream Cheese Cookies are a summer staple due to their perfect blend of taste, texture, and aroma. The luscious cream cheese not only enhances the flavor but also contributes to a delightfully smooth cookie that melts in your mouth. Preparing these cookies is a breeze, taking only a few minutes to mix and bake, allowing you to spend more time enjoying the sunny weather.

Aside from their scrumptious flavor, these cookies also offer some nutritional benefits, with strawberries being a great source of vitamin C and antioxidants. They are low in saturated fat compared to traditional cookies, giving you a guilt-free dessert option. Moreover, they are versatile enough for various occasions, providing a sophisticated snack for social gatherings or a comforting treat for a quiet evening at home.

Their cost-effectiveness and accessibility are part of their charm, using ingredients you likely already have in your kitchen. Plus, they can be adapted for special diets, making this recipe inclusive for those with dietary restrictions. The ease of preparation, combined with the unique blend of sweet and savory elements, makes these cookies a winning recipe for any baking enthusiast.

Historical Background and Cultural Significance


The origins of Strawberry Cream Cheese Cookies can be traced back to traditional American baking practices where using fresh produce in desserts is a beloved tradition. Over time, bakers have experimented with different methods to incorporate seasonal fruits into their recipes seamlessly, leading to variations like this one that marry classic flavors with innovative techniques.

Culturally, these cookies have become synonymous with summer barbecues and Fourth of July celebrations, often seen gracing the dessert tables with their vibrant color and rich flavor. As baking has evolved, so too has the popularity of adding cream cheese to baked goods, which enhances the taste and texture without overpowering the natural sweetness of the strawberries.

This recipe has been adapted across the globe, with variations that highlight regional ingredients, showing the universal appeal of combining fruit and cheese in desserts. In America, they symbolize a celebration of the farming bounty and communal family meals, evoking nostalgia and warmth through shared culinary experiences.

Ingredient Deep Dive


The strawberries in this recipe are the star ingredient, providing a natural sweetness and a pop of color. Historically, strawberries were revered by ancient Romans for their medicinal properties, and today they continue to offer numerous health benefits, being rich in vitamins and antioxidants. When selecting strawberries, opt for ones that are bright red, firm, and fragrant, and store them in the refrigerator to maintain freshness.

Cream cheese adds a luxurious creaminess to the cookies, a quality ingredient that has been a staple in American kitchens since the early 1900s. Its origins lie in dairy-rich regions of Europe, but it has been embraced worldwide for its versatile culinary applications. Its balance of tangy and mild flavors makes it an ideal component in not just savory dishes, but in sweets like these cookies.

Common Mistakes to Avoid

  • Over-mixing the dough can result in tough cookies by activating too much gluten.
  • Not chilling the dough can lead to cookies spreading excessively during baking.
  • Using cold cream cheese can lead to lumps; ensure it’s at room temperature before mixing.
  • Failure to dry strawberries properly can add excess moisture, affecting texture.
  • Oven temperature inaccuracies can lead to underbaked or burnt cookies.
  • Ignoring dough resting time can compromise flavor development.
  • Substituting key ingredients without adjustments can alter the recipe’s balance.
  • Lack of precision in measurements can drastically change the outcome.

Essential Techniques


Creaming the butter and cream cheese is a crucial step; it ensures that the cookies have a smooth texture and are well-risen. This technique involves beating the two together until light and fluffy, incorporating air to aid in leavening. Visual cues include a pale color and a noticeable increase in volume. Avoid incorporating too much air, which can result in crumblier cookies.

Pro Tips for Perfect Strawberry Cream Cheese Cookies


Room temperature ingredients achieve a cohesive dough and optimal texture in baked goods. Use silicon mats or parchment paper to prevent sticking and allow cookies to bake evenly. For an extra pop of flavor, consider adding a splash of lemon zest to the dough. Chilling dough for at least 30 minutes contributes to firmer cookies that retain shape. Try adding white chocolate chips for a more decadent twist. To preserve vibrant strawberry color, fold in gently after removing excess moisture.

Variations and Adaptations


Regional variations of Strawberry Cream Cheese Cookies integrate local flavors, like adding macadamia nuts in Hawaii. For a winter adaptation, use frozen strawberries to maintain the fruity touch when fresh produce is scarce. Modify the recipe for a low-carb diet using almond flour and sugar substitutes. Enhancing the flavor with complementary herbs like basil can provide an unusual twist. For crunch, incorporate some oats into the dough, or finish with a dusting of powdered sugar for elegance.

Serving and Presentation Guide


For a polished presentation, use a small ice cream scoop to ensure uniform cookie sizes. Garnish with a thin slice of fresh strawberry or a sprinkle of pink sugar to accentuate their color. Traditionally, these cookies pair well with a light tea, but a dollop of whipped cream provides a richer indulgence. Serve slightly warm or at room temperature to accentuate their softness. To manage portions, consider smaller cookie sizes for moderate snacking.

Wine and Beverage Pairing


A crisp white wine such as Sauvignon Blanc complements the sweet and tangy notes of Strawberry Cream Cheese Cookies. Non-alcoholic options include savoring these cookies with a fresh mint lemonade, which balances the sweetness while refreshing the palate. Tea pairings include a delicate jasmine or green tea that enhances the cookies’ fruity and creamy notes without overpowering them.

Storage and Shelf Life


Store these cookies in an airtight container in a cool, dry place, ideally for up to five days. To maintain their moisture and chewy texture, place wax paper between layers of cookies. Signs of spoilage include excessive hardening or an off smell, indicating it’s time to discard them. While best enjoyed fresh, they can also be frozen for up to three months; thaw at room temperature before serving.

Make Ahead Strategies


The dough for Strawberry Cream Cheese Cookies can be made ahead and frozen for up to a month. Portion the dough into individual cookies, freeze on a baking sheet, then transfer to a zip-lock bag. Before baking, allow cookies to sit at room temperature for 15 minutes. Assemble freshly cut strawberries just before serving to ensure the best flavor and texture.

Scaling Instructions


To halve the recipe, carefully measure and adjust all ingredients, especially leavening agents, to maintain balance. Doubling or tripling is possible, though uniform mixing might require batch division. Pay attention to oven capacity when scaling up to avoid uneven baking. Storage considerations include ensuring you have enough space to preserve larger quantities conveniently.

Nutritional Deep Dive


These cookies offer a well-rounded treat, with protein from cream cheese and antioxidants from strawberries. The carbohydrate content can be moderated by opting for whole flour substitutes. They support dietary considerations like vegetarian menus naturally. Each serving, which consists of two cookies, aligns with typical dessert calories, balanced with fresh fruit.

Dietary Adaptations


For gluten-free Strawberry Cream Cheese Cookies, substitute all-purpose flour with a gluten-free alternative like almond flour. Dairy-free adaptations can use vegan cream cheese without compromising flavor or texture. Keto dieters can consider low-carb flours and sweeteners to align this recipe with their dietary goals without losing its essential sweetness.

Troubleshooting Guide


Texture issues, such as hard cookies, often result from overbaking or insufficient moisture. Ensure the right balance by testing bake times with a small batch first. Achieve flavor balance through precise strawberry and cheese measurements to prevent one from dominating. Maintain oven accuracy with a reliable thermometer to manage temperature concerns. Equipment challenges like mixer burnouts can be mitigated with manual mixing in small batches.

Recipe Success Stories


Community feedback highlights the versatility of these cookies, with many home cooks adapting them for holidays by adding festive decorations. Variation successes include adding a crumb topping for extra crunch, as shared by reader Mia from Ohio. Suggestions range from adding lemon zest for a citrusy flair to swapping strawberries with other berries for diverse interpretations. Photography tips focus on natural lighting to capture their inviting pink tones beautifully.

Frequently Asked Questions

Can I use frozen strawberries?

Yes, frozen strawberries can be used. Ensure they are well-drained and patted dry before incorporating into the dough to avoid excess moisture.

Do I need to refrigerate leftover cookies?

It’s best to store these cookies in a cool, dry place, but refrigerating them in airtight containers can extend their shelf life slightly, if desired.

What is the best substitute for cream cheese?

Vegan cream cheese or mascarpone are good substitutes if you’re looking to keep this recipe dairy-free.

How can I prevent the cookies from spreading too much?

Chill the dough for at least 30 minutes before baking to help maintain structure and prevent excessive spreading.

Is it possible to add nuts?

Yes, chopped nuts such as almonds or pecans can be added for additional texture and flavor contrast.

How can I adjust sweetness if my strawberries aren’t sweet?

Add a teaspoon of honey or sugar during mixing if the strawberries lack natural sweetness.

Can I prepare the dough ahead of time?

Absolutely, prepare the dough and refrigerate for up to three days or freeze for longer storage, up to a month.

What pairs well with these cookies for dessert tables?

Complement these cookies with other summer treats like lemon bars or berry tarts for a fresh dessert spread.

Are there any decorations you recommend?

A light drizzle of white chocolate or a dusting of powdered sugar can add a refined touch to the cookies’ appearance.

What type of vanilla extract is best?

Pure vanilla extract is recommended for its quality and depth of flavor over artificial variants.

Additional Resources


Explore other delightful recipes on our blog including Easy Lemon Bars and Berry-Infused Pies, which pair beautifully with Strawberry Cream Cheese Cookies. Our technique guides offer insights on perfecting baking fundamentals like achieving the ideal creaming consistency. For those interested in nutritional benefits, a detailed article on seasonal ingredient importance is available.

Join the Conversation


We invite you to share your own Strawberry Cream Cheese Cookies stories with us on social media. Whether it’s a photo from your latest batch or a unique twist you’ve employed, we’d love to hear from you. Rate this recipe and leave a comment with any creative variations you’ve tried. Engage in our community discussions for tips and inspiration, and become part of our baking family.

The Recipe

Strawberry Cream Cheese Cookies

Serves: 24 cookies

Prep Time: 15 mins

Cook Time: 12 mins

Total Time: 27 mins

Kitchen Equipment Needed

  • Stand mixer or handheld mixer
  • Baking sheets
  • Silicone mats or parchment paper
  • Cooling rack

Ingredients

  • 1 cup unsalted butter, softened
  • 6 oz cream cheese, softened
  • 1 1/4 cups granulated sugar
  • 1 egg
  • 2 tsp vanilla extract
  • 2 1/4 cups all-purpose flour
  • 1/2 tsp baking powder
  • 1/2 tsp salt
  • 1 cup diced strawberries

Directions

  1. Preheat your oven to 350°F (175°C) and prepare baking sheets with silicone mats or parchment paper.
  2. In a mixer bowl, cream together the butter and cream cheese until smooth and fluffy.
  3. Add sugar and beat until incorporated. Then add the egg and vanilla, mixing well.
  4. Sift in the flour, baking powder, and salt, and mix until a uniform dough forms.
  5. Gently fold in the strawberries until evenly distributed.
  6. Scoop tablespoon-sized portions of dough onto prepared baking sheets, spacing them apart.
  7. Bake for 12-15 minutes or until edges are lightly golden. Do not overbake.
  8. Transfer cookies to a cooling rack. Serve warm or at room temperature.

Recipe Notes

  • Substitute cream cheese with mascarpone for a slightly different flavor.
  • Enhance the experience with a sprinkle of cinnamon or cardamom.

Irresistible Maraschino Cherry Chocolate Chip Cookies for a Sweet Delight

Maraschino Cherry Chocolate Chip Cookies: A Sweet Delight

⚖️
Difficulty
Easy

⏲️
Prep Time
15 mins

🕒
Cook Time
12 mins

⏱️
Total Time
27 mins

🍽️
Servings
24 cookies

There’s nothing more comforting than the delightful taste of homemade cookies, and these Maraschino Cherry Chocolate Chip Cookies are a treat that your taste buds will thank you for. Infused with the juicy sweetness of maraschino cherries and the rich depth of semi-sweet chocolate chips, this cookie recipe is guaranteed to elevate your cookie game. Imagine the pleasant aroma wafting through your kitchen as these cookies bake to perfection, leaving you impatiently waiting to take the first bite.

These cookies boast a chewy interior with perfectly crisp edges, creating a perfect balance of textures that cookie lovers crave. The bursts of cherry sweetness complement the decadent chocolate chips, making every bite a celebration of flavors. Whether enjoyed with a cold glass of milk or a cup of hot tea, Maraschino Cherry Chocolate Chip Cookies are bound to become a favorite family recipe cherished for generations.

Quick Recipe Highlights

  • Flavor Profile: The cookies offer a wonderful combination of cherry sweetness and chocolate richness, perfect for satisfying sweet cravings.
  • Texture: These cookies feature a chewy middle with crisp edges, while each bite includes a juicy maraschino cherry chunk.
  • Aroma: The aroma of baking cherries combined with melting chocolate fills your kitchen with a tantalizing scent.
  • Visual Appeal: Dotted with vibrant red cherries and dark chocolate chips, these cookies are visually appetizing.
  • Skill Level Needed: Suitable for beginners, this recipe requires basic baking techniques and measurements.
  • Special Equipment: A standard baking sheet and electric mixer are recommended for optimal results.

Recipe Overview

  • Difficulty Level: Easy to prepare, manageable for budding home bakers and seasoned chefs alike.
  • Category: Desserts, Cookies
  • Cuisine: American cuisine with a contemporary twist.
  • Cost: Economical, with most ingredients likely already in your pantry. Estimated cost is under $10.
  • Season: Enjoy these cookies year-round, particularly delightful during the festive season when cherries can add a festive touch.
  • Occasion: Ideal for cookie exchanges, holiday parties, or as a sweet addition to any gathering.

Why You’ll Love This Recipe

The combination of maraschino cherries and chocolate chips creates a sweet, tangy, and rich cookie that satisfies a variety of taste preferences. A mix of chewy and crunchy textures makes each bite an enjoyable experience for cookie aficionados.

The simplicity of the recipe makes it perfect for quick preparation without sacrificing flavor. These cookies can be whipped up last-minute for unexpected guests or as a spontaneous sweet treat after dinner.

Despite their sweet nature, these cookies offer a bright and mildly tangy flavor from the cherries, providing a bit of vitamin C and fiber in each bite. This subtly offsets the richness of the chocolate.

Whether you’re hosting a party or spending a cozy evening in, these cookies are a delight to share. Gift them to friends or family, and watch them become a memorable part of your gatherings.

Cost-effective ingredients make achieving a tasty outcome both accessible and affordable, letting you indulge without hurting your budget. These cookies freeze well, allowing you to make them ahead and save for future enjoyment.

Historical Background and Cultural Significance

The tradition of pairing fruit with chocolate has been a staple in sweets and desserts, dating back to early culinary practices of combining naturally sweet elements with cocoa. This particular combination accentuates the concept beautifully in cookie form.

Maraschino cherries, originally from Italy, have been sweet dessert additions since the early 19th century, transforming traditional recipes into sophisticated treats. As time progressed, cherries and chocolate became a popular combination in American baking.

Over time, the addition of maraschino cherries to chocolate chip cookies emerged as a refreshing twist on the classic chocolate chip cookie, allowing for fruity notes that enhance the rich cocoa flavor.

With regional variations around the world, the integration of fruit into chocolate and cookies highlights cultural creativity in adapting classic favorites to local tastes and traditions.

Ingredient Deep Dive

Maraschino Cherries: These cherries carry history from their preservation in a liqueur, making them a luxurious ingredient over the years. Bursting with unique sweetness, they offer vitamins and antioxidants, crucial for both taste and slight health benefits.

Selecting the right jar—dark red and firm—is essential for freshness, while larger quantities can be stored unopened in a cool pantry. Once opened, refrigeration is ideal to maintain longevity and flavor. A possible substitute could be dried cherries soaked in a simple syrup.

Chocolate Chips: Used globally as a base for many confections, chocolate chips bring the irreplaceable, rich cocoa flavor. Opt for high-quality semi-sweet chips, boasting a balance of bitterness and sweet tones while upgrading the cookie’s profile.

Store chocolate in a cool, dry place to maintain quality. If out of chocolate chips, chopped chocolate chunks or dark chocolate varieties can offer an elevated variation of your cookies.

Common Mistakes to Avoid

  • Over-mixing the dough can lead to tough cookies; mix just until combined for best results.
  • Using room-temperature cherries ensures even distribution and prevents excessive moisture.
  • Don’t skip chilling the dough as it helps control spreading in the oven.
  • Avoid substituting fresh cherries without adjusting sugar, as maraschino cherries are sweetened.
  • Bake one sheet at a time in the center of the oven for evenly cooked cookies.
  • Overbaking can result in dry cookies; remove from the oven when edges start to brown.
  • Let cookies cool completely on a wire rack to enhance texture and flavor.
  • Ensure even-sized dough balls for consistent baking.

Essential Techniques

Creaming the butter and sugar is crucial for creating light, airy cookies. Proper mixing incorporates air, resulting in an ideal chewy texture. Avoiding over-mixing is key to maintaining dough structure.

Understanding how to fold cherries and chocolate into the dough prevents bruising and breakage, essential for maintaining individual flavors and textures. A gentle hand ensures an even and delicious end product.

Pro Tips for Perfect Maraschino Cherry Chocolate Chip Cookies

For incredibly moist cookies, refrigerate dough for at least one hour before baking. This step enhances flavors and stabilizes the butter, reducing excessive spreading.

Substituting almond extract for vanilla introduces an additional layer of nutty flavor complementing the cherries. Be cautious to balance with vanilla for a nuanced taste combination.

Toasted nuts, such as pecans or walnuts, can be added for a crunchy contrast. Ensure nuts are cooled completely before adding to the dough to prevent melting the chocolate chips.

Consider adding a pinch of sea salt to the tops of cookies before baking, enhancing the sweet and savory balance and intensifying the chocolate experience.

Always use parchment paper or silicone baking mats for consistent baking and easy cleanup. This also prevents the cookies from sticking, maintaining their perfect shape.

Experiment with different maraschino cherry brands to find a balance of sweetness and texture that suits personal preference best. Each brand can uniquely influence the final taste outcome.

Variations and Adaptations

Regional Cherries: Experiment with local cherry varieties for a fresh take, altering sugar content to suit the sweetness level of fresh cherries versus maraschino.

Seasonal Adaptations: Infuse autumn spices, such as cinnamon or nutmeg, during colder months, adding warmth and depth to the cookies.

Dietary Modifications: Substitute a plant-based butter and egg alternative for a vegan adaptation without compromising the delightful taste of the original recipe.

Flavor Variations: For a tropical twist, incorporate shredded coconut, which pairs wonderfully with both cherries and chocolate, creating a vibrant combination.

Texture Modifications: Incorporate rolled oats to the dough for a rustic, hearty texture, transforming cookies into a multidimensional dessert and snack option.

Presentation Alternatives: For elegant gatherings, drizzle with a white chocolate glaze post-baking, adding a visual and flavorful contrast that complements the tart-sweet cherries beautifully.

Serving and Presentation Guide

For beautiful presentation, consider a stackable platter showcasing cookies at varying heights, creating a tempting visual display for guests.

Edible flower garnishes or a light dusting of powdered sugar can elevate the aesthetic, offering a refined touch to any serving environment.

Pair with a selection of artisan teas or freshly brewed coffee for a European tea-time vibe, enhancing both flavor and occasion significance.

Regarding temperature, these cookies can be served slightly warmed with melted chocolate chunks or at room temperature for a firm yet luscious bite.

Mindful portion control suggests sticking with two to three cookies per serving, ensuring each guest can savor the intricacies of flavor without overwhelming the palate.

Traditional accompaniments like milk or cream help mellow the cookie’s sweetness while maintaining perfect balance when served as part of larger spreads or afternoon teas.

Wine and Beverage Pairing

For wine connoisseurs, consider serving with a light Pinot Noir, whose berry notes will harmonize with the cherries while providing a light, acidic contrast to the rich chocolate.

Non-alcoholic options could include cherry-flavored sparkling water or a mild raspberry tea, both of which complement the cookies’ flavor profile without overpowering.

Coffee enthusiasts may opt for a rich, medium-bodied brew or a velvety latte that cuts through the sweetness with its inherent bitter and smooth notes. Recommended serving warmth lends a pleasant contrast to the chewy cookies.

Proper serving suggestions lean toward moderate wine pours or small coffee/tea servings, allowing guests to indulge without feeling overly full, particularly after a main meal or celebration spread.

Storage and Shelf Life

Store cooled cookies in an airtight container at room temperature for up to one week, maintaining their fresh texture and flavor as long as possible.

Chill optional dough for up to two days, ensuring tightly wrapped or in a sealed container to prevent drying out from refrigerating.

Containers with a tightly fitted lid preserve cookies’ freshness, preventing air from affecting texture and moisture levels.

Signs of spoilage include hard-textured cookies or lost flavor intensity; frozen versions maintain consistency when wrapped and thawed at room temperature.

For reheating, a quick warm-up in the oven at low temperature will refresh cookies, retrieving the gooey chocolate sensation experienced when freshly baked.

Cookies freeze exceptionally well, maintaining form and flavor for up to three months when wrapped tightly in foil or a freezer-safe bag.

Make Ahead Strategies

Prepare dough a day in advance for easier baking, storing in a refrigerator to save time and create a more cohesive flavor profile.

Segmented dough balls spaced on a flat tray, then frozen and stored in a container, provide easy access to baking fresh cookies anytime.

Despite chilling, assure to allocate room-temperature time before baking for dough to relax, adjusting baking time as necessary.

Consider incorporating fresh elements, such as zest or nuts, post-bake to maintain textures and freshness when dealing with ready-made dough.

Reheat stored cookies briefly in the oven, bringing back their freshly baked attributes and boosting warmth, allowing flavors to emerge confidently.

Strong taste elements such as sea salt or chili powder can be added before baking to customize stored dough based on time and event requirements.

Scaling Instructions

To halve the recipe, cut ingredient measurements proportionally, ensuring balance remains proportionate and baking results maintain intended flavor and texture.

Doubling requires careful attention to butter and sugar ratios for consistent results, with batch division advised for even baking outcomes.

Increased batches may necessitate larger equipment or additional bowl use, ensuring proper mixing without overcrowding ingredients.

Adjust cooking times slightly when producing oversized batches, testing cookies for doneness by observation and aroma rather than strict timing behavior.

Half batches are ideal for quick dessert trials or smaller gatherings; full-sized versions offer bulk for events or larger families.

Considering storage needs, space saved by freezing dough instead of baked cookies provides fresher reputations and easier adjustment of final results.

Nutritional Deep Dive

A macro breakdown reveals basic carbohydrates from flour and sugar, contributing primarily to the cookie’s energy content, balanced marginally by fat from butter and chocolate.

Micronutrient content includes trace amounts of vitamins from cherries, antioxidants from chocolate, and calcium fortified through added dairy components.

Despite the refined sweetness, cherries and occasional nut additions provide health benefits, improving cookie indulgence without guilt.

Portion analysis suggests respecting serving sizes to manage caloric intake while indulging moderately in a pleasurable taste experience.

For weight-conscious enthusiasts, incorporating fewer chocolate chips or reduced sugar options maintains cookie integrity while adhering to dietary goals.

Balance with non-sweet snacks or beverages when indulging’s essential, encouraging accountability through sharing or moderating consumption when presented with servings.

Dietary Adaptations

Gluten-free: Replacing standard flour with a gluten-free blend achieves an identical taste and texture profile, ensuring inclusivity in dietary constraints.

Dairy-free: Substituting plant-based margarine and a suitable non-dairy milk alternative prevents lactose exposure and maintains flavor authenticity.

Vegan: An egg replacer such as flaxseed meal combined with water successfully replicates binding properties without compromising appeal.

Low-carb: Utilizing almond flour and alternative sweeteners contributes to a significantly reduced carbohydrate count for diet compatibility.

Keto: Focus on unsweetened chocolate chips and erythritol variants further enhances keto-friendliness while retaining signature flavors.

Paleo: Almond flour and coconut oil attain flour consistency; maple or honey variations adjust sweetness amid paleo compliance.

Low-FODMAP: Adopting lactose-free and almond butter versions aligns with suitable digestion without forfeiting dessert artistry.

Exploring these alternatives contributes necessary insight into ingredient conversion without disregarding the essential qualities that garner esteemed affection.

Troubleshooting Guide

Baked cookies emerging flat solve effectively through appropriate dough chilling, controlling spreading habits and retaining form during baking.

Flavor balance concerns resolve by accurately measuring vanilla extract and salt quantities, fine-tuning sweetness and savory dynamics for ideal results.

Temperature consents like undercooked centers correct with precise temp assessments and adjusting Parchment layer interactions ensuring insulation.

Ingredients refuse to combine if creaming butter inadequately prepared causes a lumpy outcome, necessitating room-temperature elements achieve ideal blending.

Time adjustments adapt to oven variances while monitoring progress, averting frustration through adjusted cooking schedules and attention to visual transformations.

Resourceful substitutions such as butter transmuting to oil solve unavailability yet consider selectively, averting alterations on underlying flavor or texture.

Equipment Challenges Initiating diverse tool solutions resolves ergonomic action: Unifying bowl flexibility, hand mixing alternatives fosters efficiency.

Recipe Success Stories

This community has showcased delightful takes on this beloved recipe, adding crushed nuts for texture enhancement and extra cherries for bursts of sweetness, to elicit flavors that blend personal preference and festive moments.

Reader suggestions of incorporating subtle herb hints, like rosemary or lavender, created a sophisticated twist, making these cookies a high-end treat for tea parties.

Photography tips include capturing the vibrant red cherries against the contrasting chocolate under natural light for a stunning, shareable image on social media platforms.

Adaptations with alternative sweeteners intended for individuals monitoring sugar intake were praised for retaining flavor depth without detracting from the enjoyment factor.

User testimonials highlight success with gifting these cookies during holiday seasons, receiving high praise and requests for additional batches, showcasing the power of this recipe to spread joy.

Frequently Asked Questions

Can I use fresh cherries instead of maraschino cherries?

While fresh cherries alter the sweetness and moisture levels, these can be used with adjustments like added sugar and reduced liquid elsewhere to maintain cookie integrity.

Is chilling the dough necessary?

Chilling is vital to prevent excessive spreading and maintain the cookie’s structure and chewy texture, allowing flavors to meld.

Are there alternatives for chocolate chips?

Substitute chocolate chunks, white chocolate, or other flavored chips, or even an alternative like caramel bits, adjusting combinations to taste.

What’s the best way to store them for long-term freshness?

Store airtight at room temperature for short-term use or freeze for extended periods, maintaining moisture and taste when sealed thoroughly.

Can I add spices for extra flavor?

Yes, cinnamon, nutmeg, or cloves accentuate the chocolate and cherry flavors warmly, introducing holiday notes or personal preferences.

Do these cookies pair well with other desserts?

Yes, serving alongside chocolate mousse or vanilla ice cream complements the taste experience, maximizing the chocolate flavor and cherry undertones.

How can I make them thicker or chewier?

Extend chilling time for denser cookies and replace brown sugar with molasses for further chewability, ensuring structural consistency.

Can I make these cookies without eggs?

Substitute eggs with alternative binders containing chia seeds, water, or pre-mixed substitutes like aquafaba for vegan compatibility without significant texture loss.

Should I use salted or unsalted butter?

Prefer unsalted butter for precise salt control and best flavor development. Adjust blandness accordingly if using salted variants.

Can they be baked in a microwave?

Although microwaving isn’t optimal for consistent results, small quantities can be trialed using cautious timing adaptations to avoid overcooking.

Additional Resources

Check out related recipes like almond-cherry cake or rich chocolate truffles for expanded dessert offerings integrating similar ingredients.

Technique guides focusing on dough-handling and chocolate tempering present additional skills, refining expertise and promoting baking successes.

Ingredient information on alternative sweeteners and flour substitutes rounds out the knowledge base, enabling precise and health-conscious baking approaches.

Equipment recommendations aim to simplify cooking, optimizing ergonomic choices and diverse convenience additions beneficial to experienced and novice bakers.

Seasonal variations such as spring berry shortcake complement cookie collections, varied enough to suit thematic gatherings, enhancing diverse dessert consumption.

Join the Conversation

Share your unique twists on Maraschino Cherry Chocolate Chip Cookies on social media using hashtags, connecting with fellow dessert lovers and inspiring others.

Upload pictures of your creations to galleries and digital engagements, exploring new techniques and learning noteworthy tips from a supportive community.

Offer feedback through recipe reviews, suggesting amendments or alternative flavor combinations, contributing to ongoing dialogue and improvement.

Engage through open forums focusing on dessert variations, fostering appreciation, tips, and shared satisfaction for delivering joyous cookie successes and memories.

Enlist through subscription services for regular recipe updates, ensuring innovative flavor solutions such as savory-cookie experiments receive direct attention.

The Recipe

Maraschino Cherry Chocolate Chip Cookies

Serves: 24 cookies

Prep Time: 15 mins

Cook Time: 12 mins

Total Time: 27 mins

Kitchen Equipment Needed

  • Electric Mixer
  • Baking Sheet
  • Parchment Paper or Silicone Baking Mat
  • Mixing Bowls
  • Cooling Rack
  • Rubber Spatula

Ingredients

  • 1 cup unsalted butter, room temperature
  • 1 cup granulated sugar
  • 1 cup brown sugar, packed
  • 2 eggs
  • 1 teaspoon vanilla extract
  • 3 cups all-purpose flour
  • 1 teaspoon baking soda
  • 1/2 teaspoon salt
  • 1 cup semi-sweet chocolate chips
  • 1 cup maraschino cherries, chopped and drained

Directions

  1. Preheat the oven to 350°F (175°C). Line baking sheets with parchment paper or silicone baking mats.
  2. In a large mixing bowl, cream together the butter, granulated sugar, and brown sugar until light and fluffy.
  3. Beat in the eggs, one at a time, followed by vanilla extract, mixing until well combined.
  4. In a separate bowl, whisk together flour, baking soda, and salt. Gradually add to the butter mixture, mixing until just combined.
  5. Gently fold in the chocolate chips and maraschino cherries, ensuring even distribution.
  6. Drop tablespoon-sized dough balls onto prepared baking sheets, spacing evenly apart.
  7. Bake in the preheated oven for 10-12 minutes, or until edges begin to brown and centers are set.
  8. Remove from oven and allow cookies to cool on a baking sheet for 5 minutes, then transfer to a wire rack to cool completely.

Recipe Notes

  • Chilling the dough before baking is optional but recommended for improved texture.
  • Adjust sugar content if using alternatives or sweetened cherries.
  • For a longer shelf life, store cookies in an airtight container at room temperature or freeze for future enjoyment.

Delectable Classic Chocolate Cake Recipe for Every Occasion

Classic Chocolate Cake: The Ultimate Indulgence

⚖️
Difficulty
Moderate

⏲️
Prep Time
20 mins

🕒
Cook Time
30 mins

⏱️
Total Time
50 mins

🍽️
Servings
8

Step into a world of chocolaty bliss with this Classic Chocolate Cake. Perfect for any chocolate lover, this cake offers layers of moist, rich texture coupled with a hint of sweetness that dances on your palate. A delectable treat that’s suitable for all occasions, from casual afternoon tea to lavish celebrations.

Quick Recipe Highlights

  • Flavor Profile: A perfect balance of rich cocoa with subtle notes of vanilla creating a sophisticated and luscious taste.
  • Texture: Velvety and moist with a tender crumb that melts in your mouth, leaving you craving for the next bite.
  • Aroma: The enchanting scent of freshly baked chocolate greets you with hints of vanilla, heightening your anticipation.
  • Visual Appeal: Dark, glossy, and tempting with a rustic charm that promises handmade goodness.
  • Skill Level Needed: Suitable for bakers with moderate experience, ensuring a rewarding challenge with spectacular results.
  • Special Equipment: A stand mixer or hand-held electric mixer, along with basic baking tools such as cake pans and spatulas.

Recipe Overview

  • Difficulty Level: This classic chocolate cake recipe is moderate in difficulty because it requires careful attention to mixing and baking times, ensuring the perfect crumb and even rise.
  • Category: Ideal for dessert, this cake serves as a centerpiece for celebratory meals and family gatherings.
  • Cuisine: A staple in American baking, influenced by global culinary traditions that deeply cherish chocolate.
  • Cost: Moderately priced, as it involves common baking ingredients readily available in most supermarkets.
  • Season: Best in winter months when a rich, chocolaty dessert offers comforting warmth, yet delightful any time of the year.
  • Occasion: Perfect for birthdays, anniversaries, or just because you deserve a little indulgence.

Why You’ll Love This Recipe

This chocolate cake stands out because of its perfectly balanced sweetness harmonized with deep cocoa flavors. The tender crumb and moist layers provide a satisfying texture, making each bite a treat to the senses. This cake is highly convenient, with easy-to-follow steps and minimal equipment requirements. You’ll appreciate the joy of making something from scratch that is both indulgent and rewarding.

On the nutritional side, using quality dark chocolate and cocoa powder offers antioxidants and minerals, allowing the cake to provide a healthful treat option, especially when mindful portion sizes are adhered to. Socially, this cake serves as an excellent choice for creating cherished moments, as sharing a homemade dessert brings people together, fostering warmth and connection in any gathering.

From a cost perspective, this recipe is not only easy to continue returning to but also efficient in using common pantry items. Accessibility to ingredients and straightforward steps mean that even those new to baking can craft a cake that’s genuinely memorable. Engaging in the process strengthens skills, promising both delicious results and increased baking confidence.

Historical Background and Cultural Significance

Originating as a symbol of luxury, chocolate cakes have come a long way. The art of chocolate cake-making dates back to the 17th century when chocolate became accessible to a broader audience. Initially a delicacy reserved for the elite, this confectionary masterpiece evolved, with many cultures contributing diverse variations to the recipe.

The cultural importance of chocolate cake transcends simple enjoyment. It represents celebration, indulgence, and love, often marking special occasions with its presence. The evolution of the chocolate cake showcases the blending of culinary techniques and ingredients, such as vanilla and sugar, which highlight the rich and varied traditions influencing contemporary recipes.

Around the globe, regional adaptations show the versatility of the chocolate cake. In Europe, it boasts layers of dense ganache, while in the Americas, it’s defined by its airy texture and layered construction. Each version offers a glimpse into how cherished this dessert has become and how it continues to evolve with cultural influences.

Ingredient Deep Dive

Let’s delve into the ingredients that make this classic chocolate cake irresistible:

Cocoa Powder: Known for its rich flavor, cocoa powder provides the signature chocolatey base that’s essential for this recipe. It has a storied history, originating from ancient Mesoamerican cultures where it was revered as a divine gift. Modern bakers appreciate its nutritional benefits, which include antioxidants that contribute to overall health.

When selecting cocoa powder, opt for unsweetened and preferably Dutch-processed for a more robust taste. Store it in a cool, dry place to maintain its potency and flavor. As an alternative, cacao powder can offer a slightly different flavor profile and increased nutritional benefits.

Butter: Butter adds a rich, creamy texture, contributing to the cake’s tenderness. It is best to use unsalted butter to control the salt content. Butter is packed with fat-soluble vitamins and is an integral component in achieving that melt-in-your-mouth quality.

For selection, choose high-quality butter with a higher fat content for optimal results. Keep it refrigerated and bring to room temperature for easy mixing. Should you need a substitute, margarine can provide similar results, though flavor and texture may vary.

Common Mistakes to Avoid

  • Over-mixing: Mixing too much can create a dense cake by developing too much gluten. Mix just until combined.
  • Not preheating the oven: Proper heat is crucial for the perfect rise and texture. Always preheat before placing the cake inside.
  • Using cold ingredients: All ingredients should be at room temperature to ensure even mixing and baking.
  • Ignoring measurements: Precise measurements are key in baking. Use scales or standard measuring tools for accuracy.
  • Skipping the sift: Sifting dry ingredients helps eliminate lumps and leads to a smoother batter.
  • Opening the oven door too early: This can cause the cake to collapse. Wait until it’s set before peeking.
  • Not testing for doneness: Rely on visual cues and a skewer test—insert in the center, ensuring it comes out clean.
  • Improper cooling: Cool on a rack to avoid a soggy base from trapped steam.

Essential Techniques

Creaming Butter and Sugar: This step is crucial for incorporating air, providing a light and fluffy cake texture. To master it, start with room-temperature butter and beat with sugar until it becomes pale and fluffy. Avoid low-quality ingredients since they can affect the fluffiness.

Proper Folding: Incorporate dry ingredients gently by folding to retain the delicate air bubbles. Use a spatula to fold, preventing overburdening the batter which can deflate it, risking a dense outcome.

Pro Tips for Perfect Classic Chocolate Cake

Accurate Measuring: Weighing ingredients ensures consistency and proper chemical reactions for the ideal cake texture.

Room Temperature Ingredients: Achieve smoother batter and better rise by allowing ingredients to reach room temperature.

Temperature Control: Use an oven thermometer to verify your oven’s accuracy, avoiding inconsistent baking results.

Use Good Quality Cocoa: The flavor depth depends significantly on the cocoa you employ; high-quality cocoa ensures a more intense chocolate experience.

Check Freshness of Ingredients: Fresh baking powder and baking soda provide the right lift and texture; verify their efficacy before use.

Experiment with Fillings: Add a layer of your favorite jam or frosting for a delightful twist on this classic cake.

Variations and Adaptations

Regional Variations: Experiment with fillings unique to specific regions, like ganache or fruit preserves, to complement the rich chocolate.

Seasonal Adaptations: Incorporate seasonal fruits as toppings or within the layers for a fresh take on this classic cake.

Dietary Modifications: Swap sugar for alternatives like agave or coconut sugar to suit your dietary preferences, or choose gluten-free flour to accommodate dietary needs.

Flavors and Fillings: Add coffee or espresso powder to enhance the chocolate profile, or a splash of rum or liqueur for a sophisticated touch.

Presentation Alternatives: Transform this cake into cupcakes for individual servings or a bundt cake for an eye-catching design.

Serving and Presentation Guide

Plating Techniques: Serve slices with a dollop of fresh whipped cream or a scoop of vanilla ice cream for a heavenly pairing.

Garnishing Ideas: Sprinkle powdered sugar or cocoa on top for a classic touch, or decorate with chocolate shavings and fresh berries.

Traditional Accompaniments: Serve with a side of rich caramel sauce or a warm fruit compote for an elegant finish.

Wine and Beverage Pairing

Wine Pairings: A robust red, like a Cabernet Sauvignon, complements the rich chocolate flavors. Alternatively, try a sweet dessert wine for a balanced pairing.

Non-Alcoholic Alternatives: A creamy hot chocolate or a rich espresso provide a delightful contrast to the cake’s sweetness.

Coffee/Tea Pairings: A full-bodied coffee or a robust black tea can enhance the flavor complexities of the chocolate cake.

Storage and Shelf Life

Proper storage is vital to maintaining freshness and flavor. Keep the cake covered with plastic wrap in a cool, dry place for up to three days. In warm climates, consider refrigerating but bring it to room temperature before serving. For extended storage, freeze perfectly sliced layers wrapped in foil and place them in an airtight container.

Make Ahead Strategies

Planning and preparing parts of the cake in advance can save time. Bake the cake layers up to two days ahead and store appropriately. Prepare the frosting a day before and let it sit at room temperature for easy spreading. Assembling on the day of serving ensures optimal freshness and presentation.

Scaling Instructions

To double or halve the recipe, adjust ingredient quantities precisely and use appropriately sized baking pans to ensure even baking. When increasing the recipe, consider extending bake time slightly while monitoring closely.

Nutritional Deep Dive

This classic chocolate cake provides a balance of macronutrients. Despite being a treat, it offers some health benefits due to the antioxidants in cocoa. Opt for moderate serving sizes to enjoy it as part of a balanced diet.

Dietary Adaptations

For a gluten-free version, substitute with almond flour or a blend of gluten-free flours. Veganize by using plant-based milk and egg substitutions such as flax eggs.

Troubleshooting Guide

If the cake turns out dense, ensure you are not overmixing during batter preparation. To combat dryness, experiment with slightly reducing bake time and verify oven temperature accuracy. For frosting issues, if it’s too stiff, add a small amount of milk to reach desired consistency.

Recipe Success Stories

Readers love experimenting with this cake, often sharing photos of their decorated versions or creative uses of different frostings. Community feedback highlights successful adaptations with regional spices or holiday-themed presentations, showcasing the versatility and universal joy this cake brings.

Frequently Asked Questions

What is the best type of cocoa to use? High-quality, unsweetened cocoa powder provides the richest flavor and is highly recommended.

How can I make the cake more moist? Ensure you’re using fresh ingredients, measuring accurately, and not overbaking. Consider adding sour cream for additional moisture.

Can I substitute butter for oil? Yes, using oil can result in a moist texture, but the flavor and structure might differ.

What type of frosting pairs best with this cake? A classic chocolate buttercream or whipped ganache complements it perfectly.

Can This Cake Be Made Ahead? Absolutely, bake the layers and prepare the frosting separately a day or two ahead, and assemble just before serving.

Additional Resources

Explore further with guides on frosting techniques, the benefits of different cocoa types, or seasonal cake recipes that align with holiday baking. The community adds value by sharing their experiences, and our instructional video series supports beginners seeking visual guidance.

Join the Conversation

Share your chocolate cake adventure on social media using our dedicated hashtag, connect with fellow bakers, and enjoy feedback on your creations. Participate in our monthly recipe challenge and inspire others by showcasing your cake variations.

The Recipe

Classic Chocolate Cake

Serves: 8

Prep Time: 20 mins

Cook Time: 30 mins

Total Time: 50 mins

Kitchen Equipment Needed

  • 9-inch round cake pans
  • Mixing bowls
  • Electric mixer
  • Spatula
  • Cooling rack

Ingredients

  • 1 and 3/4 cups all-purpose flour
  • 3/4 cup unsweetened cocoa powder
  • 2 cups granulated sugar
  • 1 and 1/2 teaspoons baking soda
  • 1 and 1/2 teaspoons baking powder
  • 1 teaspoon salt
  • 2 large eggs
  • 1 cup whole milk
  • 1/2 cup vegetable oil
  • 2 teaspoons vanilla extract
  • 1 cup boiling water

Directions

  1. Preheat the oven to 350°F (175°C) and grease two 9-inch round cake pans.
  2. In a large bowl, mix flour, cocoa powder, sugar, baking soda, baking powder, and salt.
  3. Add eggs, milk, oil, and vanilla to the dry ingredients and beat on medium speed for 2 minutes. Stir in boiling water until the batter is thin.
  4. Pour batter evenly into prepared pans.
  5. Bake for 30-35 minutes, or until a toothpick inserted into the center comes out clean.
  6. Cool the cakes in the pans for 10 minutes, then remove to wire racks to cool completely before frosting.

Recipe Notes

  • For a richer flavor, use coffee instead of water.
  • Storing the cake in the fridge can enhance the taste and texture over time.
  • Try pairing with a whipped ganache for a luxurious finish.