Loaded Cowboy Pasta Salad: A Hearty and Flavor-Packed Dish for Any Occasion

cowboy pasta salad, loaded pasta recipe, Tex-Mex pasta salad, creamy BBQ pasta salad, hearty salad recipe, bacon pasta salad, picnic pasta salad

Article: Loaded Cowboy Pasta Salad

Introduction: The Ultimate Comfort Dish

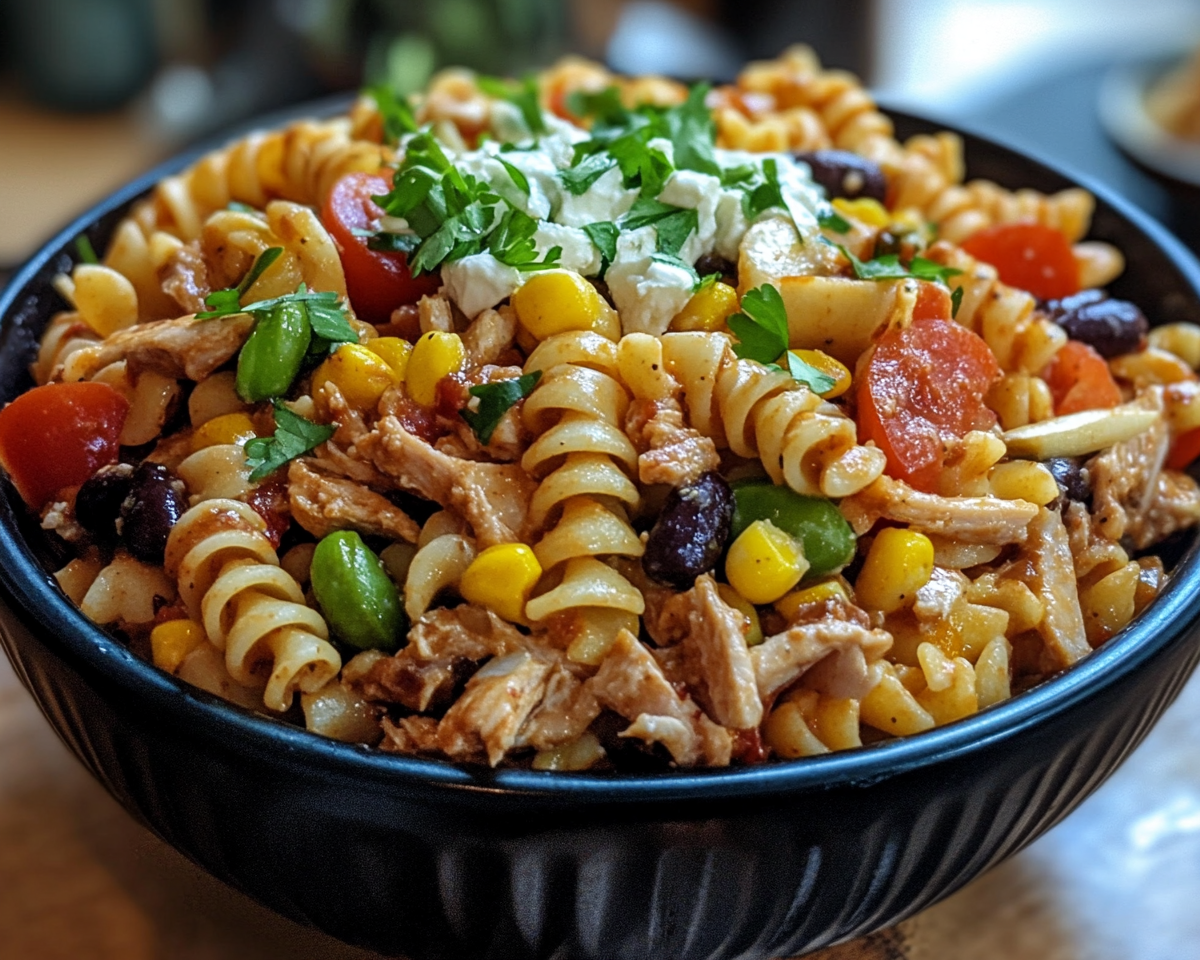
Loaded Cowboy Pasta Salad combines bold flavors, satisfying textures, and a medley of ingredients to create a dish that’s perfect for gatherings, potlucks, or family meals. Imagine the richness of pasta mingling with zesty ranch dressing, the smoky allure of bacon, and the crunch of fresh vegetables, all in one bowl. Whether you’re planning a summer barbecue or simply craving comfort food with a twist, this salad won’t disappoint.

To explore other hearty cowboy-inspired meals, try our “Cowboy Cornbread Casserole” for a baked option that pairs beautifully with this salad.


Ingredients Breakdown

Key Ingredients

  • Pasta Base: Opt for rotini or penne for their ability to hold the dressing and flavors.
  • Protein Punch: Ground beef and crispy bacon.
  • Vegetable Crunch: Cherry tomatoes, bell peppers, and corn.
  • Flavor Boosters: Black beans, shredded cheddar cheese, and jalapeños.
  • Signature Dressing: A blend of ranch dressing, BBQ sauce, and a splash of lime juice.

Tip: For healthier alternatives, substitute ground turkey or plant-based protein for the beef. Check out “Healthy Ranch Dressing Alternatives” for dressing inspiration.


Step-by-Step Preparation

  1. Cook the Pasta
    • Bring a pot of salted water to a boil and cook pasta until al dente. Drain and rinse under cold water.
  2. Prepare the Proteins
    • Brown ground beef with seasoning. Cook bacon until crispy and crumble once cooled.
  3. Chop the Vegetables
    • Dice bell peppers, halve cherry tomatoes, and slice jalapeños.
  4. Mix the Dressing
    • Combine ranch dressing, BBQ sauce, and lime juice in a bowl. Adjust to taste with salt and pepper.
  5. Assemble the Salad
    • In a large bowl, toss together pasta, proteins, vegetables, and cheese. Pour dressing over the top and mix thoroughly.
  6. Chill and Serve
    • Refrigerate for at least 30 minutes to let flavors meld.

Cowboy Flavor Profile

This salad is a harmonious mix of tangy ranch, smoky BBQ, and the zing of lime. The creamy dressing clings to the pasta and binds the medley of textures, from crunchy vegetables to juicy tomatoes. For a crunchier variation, top with tortilla strips or serve alongside our “Homemade Pizza Sticks”.


Customizing Your Cowboy Salad

Dietary Modifications

  • Vegetarian: Swap meat with black beans, roasted chickpeas, or grilled tofu.
  • Low-Carb: Use zucchini noodles or cauliflower rice as a base.
  • Spice Adjustment: Include more jalapeños or drizzle with hot sauce.

Optional Additions

  • Avocado slices for creaminess.
  • Crumbled tortilla chips for extra crunch.
  • A sprinkle of paprika or chili powder for smoky depth.

Serving Suggestions

Pair your Loaded Cowboy Pasta Salad with our “Slow Cooker Chicken and Gravy” for a complete comfort food feast. For lighter meals, serve it alongside cornbread or grilled vegetables.


Storage and Make-Ahead Tips

This salad tastes even better the next day as the flavors deepen. Store it in an airtight container in the refrigerator for up to 3 days. Avoid freezing as the dressing may separate.


FAQs About Loaded Cowboy Pasta Salad

1. Can I make this ahead of time?

Yes, prepare the salad a day in advance for the best flavor.

2. What other toppings can I add?

Consider tortilla strips, avocado, or shredded lettuce for added texture.

3. How do I make it spicier?

Increase the jalapeños or add a splash of hot sauce.

4. What pasta is best for this salad?

Rotini, penne, or bowtie pasta work well to hold the dressing.


Conclusion

Loaded Cowboy Pasta Salad is a vibrant, versatile dish that’s as easy to prepare as it is to enjoy. Whether for a casual weeknight dinner or a festive gathering, this recipe promises to be a crowd-pleaser. Customize it to suit your taste, and don’t forget to share it with friends and family!

Easy Italian Sub Sliders: Perfect for Parties and Quick Meals

mini Italian sandwiches, slider recipes, party sub sliders, Italian sandwich sliders, easy sub sliders, Italian deli sliders, quick Italian snacks

Italian Sub Sliders: Bite-Sized Italian Flavor in Every Bite

When hosting a party, planning a game-day spread, or just satisfying a craving for bold Italian flavors, Italian Sub Sliders are the perfect choice. Packed with deli meats, fresh vegetables, gooey cheese, and the richness of Italian dressing, these sliders are an easy yet crowd-pleasing recipe.

Learn how to create the perfect sliders with this detailed guide and explore related recipes like Italian Stromboli for even more delicious ideas.


Why Italian Sub Sliders Are a Must-Try

Sliders are the ultimate fusion of convenience and flavor. Whether served as appetizers, snacks, or a main course, they pack a punch. Here’s why Italian Sub Sliders shine:

  • Versatility: Customize the ingredients to match your preferences.
  • Easy Preparation: Minimal effort, maximum impact.
  • Authentic Flavors: Classic Italian elements in a compact form.

For another take on easy Italian meals, check out these French Bread Pizzas.


Ingredients for Perfect Italian Sub Sliders

You’ll need:

  • Slider Buns: Soft, buttery rolls that hold the fillings without falling apart.
  • Deli Meats: A combination of salami, pepperoni, and capicola.
  • Cheese: Provolone or mozzarella for melt-in-your-mouth texture.
  • Toppings: Crisp lettuce, fresh tomatoes, banana peppers, and red onions.
  • Seasonings: Oregano, basil, and Italian seasoning.
  • Italian Dressing: Adds a tangy and savory kick to every bite.

Step-by-Step Guide to Making Italian Sub Sliders

1. Prepping the Slider Buns

  • Slice the slider buns in half and arrange them on a baking sheet.
  • Brush the bottom half with olive oil or melted butter.

2. Assembling the Sliders

  • Spread a generous layer of Italian dressing on both sides.
  • Layer the meats, starting with capicola, then salami, and finally pepperoni.
  • Add slices of provolone cheese, ensuring full coverage.

3. Adding the Finishing Touches

  • Sprinkle dried oregano and basil over the assembled sliders.
  • Add lettuce, tomatoes, and banana peppers for a fresh crunch.

4. Baking to Perfection

  • Cover the sliders with foil and bake at 350°F for 10 minutes to melt the cheese.
  • Remove the foil and bake for another 5 minutes to toast the tops.

Serve warm and watch them disappear from the table!


Customizing Your Sliders

Variations to Try:

  1. Vegetarian Option: Use grilled zucchini, eggplant, and roasted red peppers instead of meat.
  2. Spicy Twist: Add jalapeños or a layer of spicy giardiniera for a fiery kick.
  3. Sweet and Tangy: Drizzle with balsamic glaze before serving.

Pairing Ideas for Italian Sub Sliders

Make your meal complete with:

  • Sides: Garlic Parmesan fries, Caprese salad, or baked zucchini chips.
  • Dips: Marinara sauce or a creamy Italian dressing.
  • Beverages: Pair with sparkling water, lemonade, or Italian soda.

Explore another handheld favorite like these Spaghetti Stuffed Subs.


FAQs About Italian Sub Sliders

1. Can I prepare Italian Sub Sliders in advance?

Yes! Assemble them a day before and bake just before serving.

2. What’s the best way to reheat sliders?

Wrap them in foil and warm in an oven at 300°F for 10 minutes.

3. Can I freeze Italian Sub Sliders?

You can freeze the assembled sliders without the fresh vegetables. Thaw and bake when ready to serve.


Tips for Perfect Sliders Every Time

  • Toast the Buns: Prevent sogginess by lightly toasting the buns before assembling.
  • Balance Flavors: Use high-quality meats and cheeses for the best results.
  • Serve Fresh: Italian sliders taste best when served immediately after baking.

Related Recipes to Try

If you enjoyed this recipe, you’ll love these:


Conclusion: Elevate Your Snacking Game

Italian Sub Sliders are an effortless way to bring the bold flavors of Italy to your table. Their versatility and taste make them a favorite for any occasion, from casual dinners to festive gatherings. Customize them, pair them with delicious sides, and enjoy the compliments that are sure to come your way.

No Bake Turtle Lush: A Decadent Layered Dessert Everyone Will Love

no bake dessert, turtle dessert bars, layered turtle lush, no bake layered treat, caramel pecan dessert, easy no bake recipe, no bake chocolate dessert

Article: No Bake Turtle Lush: The Ultimate Layered Dessert

Introduction

Desserts that deliver on indulgence without the hassle of baking are a dream come true, and No Bake Turtle Lush ticks all the boxes. This easy, decadent dessert combines an Oreo crust with layers of creamy fillings, rich chocolate, gooey caramel, and crunchy pecans. Whether you’re hosting a gathering or craving a sweet treat, this recipe ensures maximum satisfaction with minimal effort.

Internal Link Opportunity: Enhance your dessert repertoire with this Easy No Bake Banana Pudding Cheesecake for another no-bake delight.


What is No Bake Turtle Lush?

A decadent, layered dessert inspired by classic turtle candies, No Bake Turtle Lush is as visually appealing as it is delicious. With no oven required, it’s perfect for warm weather or last-minute party prep. Its rich, velvety layers make it a favorite for gatherings, family dinners, and celebrations.

Internal Link Opportunity: For a savory counterpart to your dessert, explore Chicken Bacon Ranch Potatoes to complete your menu.


Ingredients You’ll Need

To create this indulgent treat, gather the following:

  • Crust: Crushed Oreo cookies (regular or gluten-free) and melted butter.
  • Cream Cheese Filling: Cream cheese, powdered sugar, and whipped topping.
  • Chocolate Layer: Chocolate pudding mix and milk.
  • Toppings: Caramel sauce, chocolate drizzle, and chopped pecans.

Optional Additions

  • Whipped cream for extra fluffiness.
  • Mini chocolate chips for additional texture.
  • Sea salt for a hint of contrast to the sweetness.

Step-by-Step Guide

1. Prepare the Oreo Crust

  • Blend the Oreo cookies into fine crumbs using a food processor.
  • Mix the crumbs with melted butter until combined.
  • Press the mixture firmly into the base of a 9×13-inch dish.
  • Chill in the refrigerator to set.

2. Make the Cream Cheese Layer

  • Beat softened cream cheese and powdered sugar together until smooth.
  • Fold in whipped topping gently for a light, airy texture.
  • Spread evenly over the chilled crust.

3. Whisk Up the Chocolate Pudding

  • Combine chocolate pudding mix with cold milk.
  • Whisk until it thickens, then spread over the cream cheese layer.

External Link: Learn more about perfect pudding preparation techniques on Taste Cooking.

4. Top with Caramel and Pecans

  • Drizzle generous amounts of caramel sauce and chocolate syrup.
  • Sprinkle chopped pecans for a crunchy finish.
  • Optionally, garnish with whipped cream.

5. Chill and Serve

  • Refrigerate the dish for at least 4 hours or overnight for the best results.
  • Slice into squares and serve chilled.

Why This Recipe Works

  • No Baking Needed: No oven means less time and effort.
  • Customizable Layers: Swap ingredients like gluten-free cookies or almond milk.
  • Show-Stopping Presentation: The layered look is impressive yet easy to achieve.

Internal Link Opportunity: Pair this dessert with a fun twist like Smores Jars for a complete party spread.


Customization Ideas

  • Nut-Free Version: Replace pecans with crushed pretzels or candy pieces.
  • Extra Chocolate: Add a ganache layer or mini chocolate chips.
  • Fruit Lovers: Top with sliced strawberries or bananas.

FAQs About No Bake Turtle Lush

Can I prepare this dessert in advance?

Yes, making it a day ahead enhances the flavor and texture.

How long does it last in the fridge?

Stored properly, it can stay fresh for up to 5 days.

Can I freeze No Bake Turtle Lush?

Yes, freeze in an airtight container for up to 2 months. Thaw overnight in the refrigerator before serving.

What can I substitute for Oreos?

Try graham crackers, vanilla wafers, or gluten-free cookies for the crust.


Serving and Storage Tips

  • Serve chilled to enjoy the firm yet creamy textures.
  • Store leftovers in the fridge covered with plastic wrap.
  • For larger gatherings, consider preparing individual servings in mason jars.

External Link: Discover creative jar dessert ideas on Food Network.


Nutrition Information

  • Serving Size: 1 slice (approx. 150g)
  • Calories: 350
  • Fat: 18g
  • Carbs: 45g
  • Protein: 5g

Conclusion

No Bake Turtle Lush offers a delightful balance of creamy, crunchy, and sweet flavors, making it a must-try dessert for any occasion. Its no-bake nature ensures ease of preparation, while its customizable layers cater to diverse preferences. Whether you’re hosting or indulging solo, this treat guarantees smiles all around.

Slow Cooker Brisket: Perfectly Tender and Easy to Make

crockpot brisket, slow-cooked beef brisket, tender brisket recipe, easy beef brisket, one-pot brisket meal, brisket in a slow cooker

Perfectly Tender Slow Cooker Brisket: A Comfort Food Classic

Slow cooker brisket is the epitome of comfort food—deliciously tender meat cooked to perfection with minimal effort. Whether you’re hosting a gathering or preparing a hearty family meal, mastering the art of slow-cooked brisket is an essential skill for any home cook.


What is Slow Cooker Brisket?

Brisket, a cut of beef known for its marbling and deep flavor, becomes a melt-in-your-mouth delight when cooked low and slow. The slow cooker method ensures consistent tenderness while preserving the meat’s juices.


Why Use a Slow Cooker for Brisket?

  1. Even Cooking: The slow cooker maintains a consistent temperature for evenly cooked brisket.
  2. Convenience: Set it and forget it—perfect for busy schedules.
  3. Enhanced Flavors: Cooking low and slow allows the spices and seasonings to penetrate the meat fully.

Selecting the Perfect Brisket

Flat Cut vs. Point Cut

  • Flat Cut: Ideal for uniform slices; leaner with a thick fat cap.
  • Point Cut: Juicier with more marbling; better for shredding.

Choosing the Right Size

  • Ensure the brisket fits your slow cooker with some room for liquids.

Read more about choosing beef cuts.


Preparing Your Brisket for Cooking

1. Trimming Excess Fat

  • Leave a thin layer of fat for flavor, but remove large, thick sections.

2. Seasoning

  • Use a dry rub with a blend of paprika, garlic powder, and black pepper.
  • Let the brisket sit for at least 30 minutes to absorb flavors.

3. Searing for Flavor

  • Sear the brisket in a hot pan for 2-3 minutes per side to create a flavorful crust.

Cooking Slow Cooker Brisket: Step-by-Step Guide

Ingredients Needed

  • 3-4 lbs brisket
  • 1 cup beef broth
  • 2 onions, sliced
  • 4 garlic cloves, minced
  • Optional: BBQ sauce, soy sauce, or Worcestershire for added flavor.

Instructions

  1. Layer Aromatics: Add onions and garlic to the base of the slow cooker.
  2. Add Liquids: Pour in beef broth and any additional sauces.
  3. Cook:
    • Low setting: 8-10 hours.
    • High setting: 4-6 hours.

Serving Suggestions

  1. Slicing Against the Grain: This ensures tender bites.
  2. Side Dish Ideas: Serve with mashed potatoes, roasted veggies, or cornbread.

Try this perfect mashed potato recipe.


Storage and Reheating Tips

  • Refrigeration: Store brisket in an airtight container for up to 3 days.
  • Freezing: Wrap tightly in plastic wrap and foil; freeze for up to 3 months.
  • Reheating: Use an oven at 300°F to prevent drying out.

Common Mistakes to Avoid

  1. Overcooking on high heat.
  2. Skipping the resting period after cooking.
  3. Using insufficient liquid, leading to dryness.

FAQs

1. How much brisket per person?

Plan for ½ pound of raw brisket per person.

2. Can I skip searing the brisket?

While optional, searing enhances flavor.

3. What liquid should I use?

Beef broth is standard, but wine or beer can add depth.


Internal Linking Opportunities

From the Exorecipes Sitemap, link to relevant content:

  1. Slow Cooker Chicken and Gravy“Explore this slow-cooker chicken dish for more comfort food inspiration.”
  2. Perfect Ribeye Steak“Master other beef recipes like this ribeye steak.”
  3. Twice-Baked Potato Casserole“Pair your brisket with this creamy potato casserole.”

Conclusion

Slow cooker brisket is the ultimate comfort food. Its tender, juicy texture and rich flavors make it a must-have recipe in your repertoire. With proper preparation and patience, you can create a dish that delights every palate.

Creamy Crack Chicken Penne: The Ultimate Comfort Food Recipe

cheesy chicken pasta, creamy chicken penne, one-pot chicken pasta, ranch chicken pasta, chicken and bacon pasta

Article: Crack Chicken Penne – A Creamy, Flavor-Packed Delight


Introduction
Crack Chicken Penne has captured the hearts of food lovers everywhere with its creamy, cheesy, and bacon-loaded goodness. This easy-to-make dish brings together simple ingredients to create a comforting meal that satisfies all taste buds. Perfect for busy weeknights, this recipe offers a flavorful twist to traditional pasta dishes.

For an even deeper dive into perfect pasta dishes, check out Master One-Pot Recipes.


What Makes Crack Chicken Penne So Irresistible?

This dish is the perfect combination of bold flavors, creamy textures, and hearty ingredients:

  • Bacon: Smoky and crispy, it elevates the dish’s flavor profile.
  • Ranch Seasoning: The secret ingredient that ties the recipe together with its tangy notes.
  • Cream Cheese & Cheddar: The creamy duo that coats every piece of penne to perfection.

To add more variety to your pasta repertoire, explore Creative Pasta Dishes.


Step-by-Step Guide to Making Crack Chicken Penne

Ingredients You’ll Need

  • 12 oz penne pasta
  • 2 cups shredded chicken
  • 1 packet ranch seasoning
  • 1 cup chicken broth
  • 8 oz cream cheese
  • 2 cups shredded cheddar cheese
  • 1 cup cooked, crumbled bacon

Instructions

  1. Cook the Pasta: Boil the penne pasta according to package instructions.
  2. Prepare the Sauce: In a large pot, combine cream cheese, chicken broth, and ranch seasoning. Whisk until smooth.
  3. Add the Chicken and Pasta: Stir in shredded chicken, cooked pasta, and cheddar cheese until everything is coated.
  4. Top with Bacon: Sprinkle the crumbled bacon over the dish and serve warm.

Variations and Customizations

Spicy Twist

  • Add crushed red pepper flakes or diced jalapeños for heat.

Vegetarian Option

  • Replace chicken with mushrooms and use vegetable broth.

Gluten-Free Adaptation

  • Swap penne with gluten-free pasta options.

Pro Tips for the Perfect Crack Chicken Penne

  1. Use freshly grated cheese for a smoother sauce.
  2. Stir frequently to avoid the pasta sticking to the pot.
  3. Serve immediately for the best texture and flavor.

FAQs About Crack Chicken Penne

1. Can I freeze Crack Chicken Penne?

Yes, store it in an airtight container and freeze for up to three months. Reheat with a splash of chicken broth to restore creaminess.

2. What other pasta types can I use?

Rotini, farfalle, or rigatoni work well.

3. Can I make this dairy-free?

Yes, substitute cream cheese and cheddar with plant-based alternatives.


Storage and Reheating Tips

  • Refrigerator: Store leftovers in an airtight container for up to 3 days.
  • Reheating: Warm on the stovetop with additional chicken broth or cream to maintain the creamy texture.

For expert advice on pasta cooking, check out Essential Cooking Tips for Pasta.


Internal Linking Opportunities

From the Exo Recipes site, consider linking to these related recipes for context and engagement:

  1. Slow Cooker Chicken and Gravy Over Noodles – Use anchor text: “Try this comforting slow cooker chicken and gravy recipe.”
  2. Dorito Chicken Casserole – Use anchor text: “For a crunchier twist, check out Dorito Chicken Casserole.”
  3. One-Pot Cheesy Smoked Sausage Pasta – Use anchor text: “Explore another one-pot pasta delight with cheesy smoked sausage.”

Conclusion

Crack Chicken Penne is a crowd-pleasing dish that combines creamy, cheesy, and smoky flavors into one irresistible meal. Whether you’re hosting a family dinner or looking for a quick weeknight fix, this recipe is sure to become a favorite in your household.