Zesty Mojito Lime Cheesecake Delight: A Refreshing Dessert Recipe

Zesty Mojito Lime Cheesecake Delight: A Refreshing Treat for All Occasions

⚖️
Difficulty
Medium

⏲️
Prep Time
30 mins

🕒
Cook Time
60 mins

⏱️
Total Time
90 mins

🍽️
Servings
8 servings

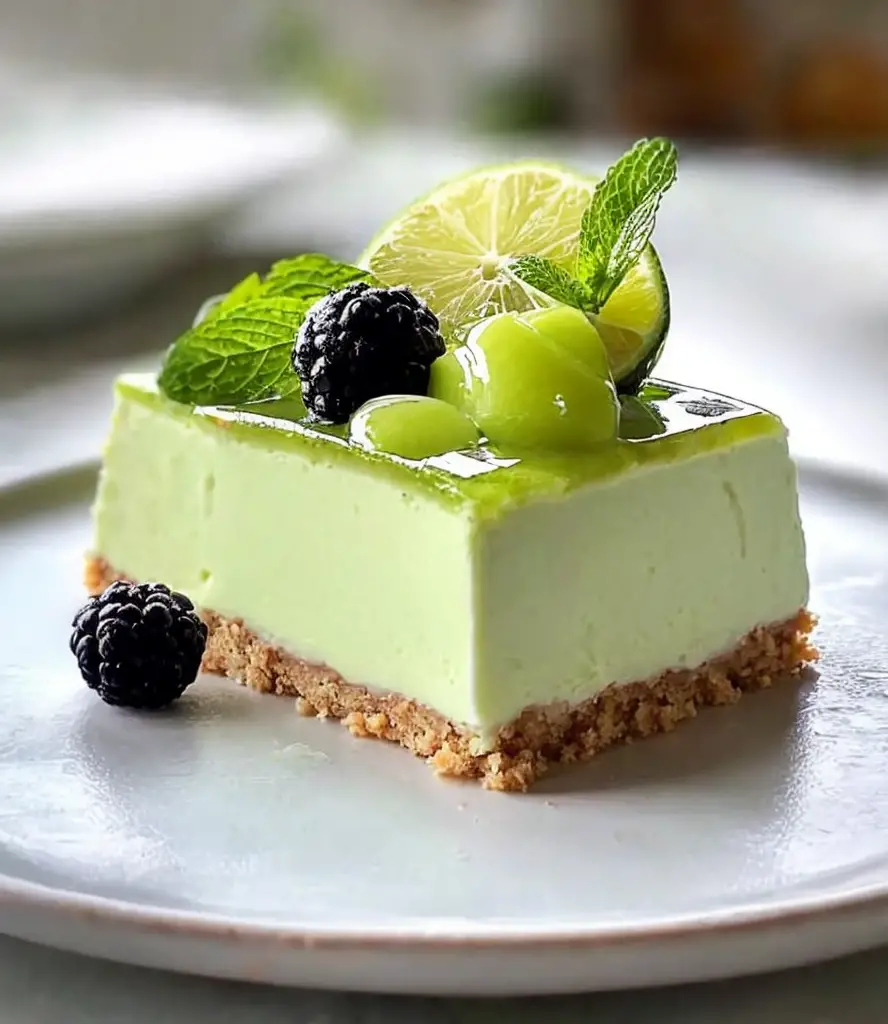
The Zesty Mojito Lime Cheesecake Delight is a tantalizing dessert that takes the classic cheesecake to new heights with refreshing flavors inspired by the beloved mojito cocktail. Imagine a creamy cheesecake infused with zesty lime juice and freshly chopped mint, adorned with a crumbly graham cracker crust. Each slice is a burst of flavor, transporting you to a tropical paradise with every bite. This cheesecake perfectly balances the richness of the cream cheese with the bright acidity of lime, delivering a harmonious dessert that is sure to impress family and friends.

Crafting the perfect Zesty Mojito Lime Cheesecake is not only about the flavors but also about the experience. The meticulous preparation allows for each layer to come together seamlessly. The doughy crust is complemented by the smooth, velvety filling, while a mint garnish adds a fresh touch. Ideal for balmy summer evenings or festive gatherings, this dessert reaches beyond the ordinary and creates lasting memories for those lucky enough to enjoy a piece.

Quick Recipe Highlights

  • Flavor Profile: The combination of tangy lime and refreshing mint creates a vibrant, zesty flavor that dances on the palate, making it a perfect dessert for summer.
  • Texture: The creamy filling contrasts beautifully with the crunchy graham cracker crust, providing a delightful mouthfeel that is both smooth and satisfying.
  • Aroma: The bouquet of fresh mint and citrus notes fills the air, inviting everyone to savor a slice of this delicious cheesecake.
  • Visual Appeal: With its bright lime green color and fresh mint garnish, this cheesecake is a stunning centerpiece for any dessert table.
  • Skill Level Needed: This recipe requires basic baking skills, but the detailed steps make it accessible even for novice bakers.
  • Special Equipment: A springform pan is essential for creating this luscious cheesecake, along with a mixer for achieving the perfect creaminess.

Recipe Overview

  • Difficulty Level: This Zesty Mojito Lime Cheesecake is classified as medium difficulty due to the layering of flavors and the precise cooking process involved in achieving the perfect texture.
  • Category: This dessert falls under both dessert and cake categories, making it a versatile choice for various occasions.
  • Cuisine: This dish draws inspiration from Latin American and Caribbean cuisines, where lime and mint feature prominently in drinks and desserts.
  • Cost: The estimated cost is moderate, as the ingredients are relatively affordable, making it an accessible recipe for most home bakers.
  • Season: This cheesecake is best enjoyed during the warmer months when fresh mint and limes are in season, enhancing the flavors.
  • Occasion: Perfect for summer gatherings, birthday parties, or even just a treat to enjoy at home, this cheesecake is bound to delight.

Why You’ll Love This Recipe

The Zesty Mojito Lime Cheesecake offers a delightful blend of tangy and refreshing flavors that invigorate the senses. The smooth cheesecake base provides a rich backdrop for the zingy lime, while the mint brings a vibrant freshness that complements the overall experience, making it an unforgettable dessert. Each bite is a balanced mixture of creamy and zesty, leaving your taste buds craving for more.

The preparation process is as enjoyable as the final product. With easy-to-follow steps, you can create a dessert that feels luxurious without needing expert baking skills. The result is a delectable cheesecake that will have friends and family talking about your culinary skills. Plus, the ingredients are straightforward to work with, allowing for a stress-free baking experience.

Nutritionally, this cheesecake can be considered a slightly healthier dessert option compared to other traditional cakes. It incorporates natural ingredients like fresh lime juice and mint, offering a burst of vitamin C and antioxidants. While it remains indulgent, being able to enjoy a tasty dessert that doesn’t feel overly heavy is a win.

Socially, this dessert is perfect for sharing. Whether you bring it to a potluck, a barbecue, or serve it at dinner parties, the Zesty Mojito Lime Cheesecake becomes a conversation starter. It’s a unique offering that stands out from the usual dessert fare and invites joyful exchanges about flavor combinations and recipe secrets.

Moreover, the affordability and accessibility of the ingredients make this cheesecake an excellent choice for those looking to impress without breaking the bank. With just a few key ingredients, you can create a stunning and delicious dessert that feels high-end yet is easy on your wallet.

Historical Background and Cultural Significance

The origins of the mojito cocktail date back to 16th-century Cuba, where it was enjoyed by locals and later gained international popularity. This sweet and refreshing drink is typically made with lime, mint, sugar, and rum, and its vibrant flavors make it a perfect inspiration for various culinary creations, including desserts. The melding of cheesecake with mojito elements honors this rich heritage while bringing a modern twist to a classic dish.

In culinary traditions, lime and mint are frequently used in tropical cuisines to create refreshing pairings, especially in desserts meant to be served chilled. This Zesty Mojito Lime Cheesecake taps into those flavors, reflecting the spirit of celebration that accompanies summer gatherings and festive occasions. Each bite embodies the essence of a refreshing cocktail turned into a delightful dessert.

Over the years, the cheesecake has evolved significantly from its origins. Originally, cheesecakes were made with simple, locally sourced ingredients. Today, they come in various styles and flavors, frequently incorporating creative elements that reflect a diverse culinary landscape. The Zesty Mojito Lime Cheesecake showcases this evolution by blending traditional baking techniques with innovative flavors, appealing to modern palates.

Regional variations of cheesecake can be found globally, each reflecting the local culture and available ingredients. From the classic New York-style to fruity interpretations, this Zesty Mojito Lime Cheesecake adds its unique flair to the spectrum of cheesecake flavors, inviting home bakers and dessert lovers into its refreshing world.

Ingredient Deep Dive

– **Cream Cheese:** A staple in cheesecake recipes, cream cheese adds a rich and creamy texture. Its mild flavor pairs beautifully with sweet and tangy ingredients, making it an ideal base for this dessert. Look for full-fat cream cheese for a smoother, richer result. Store cream cheese in the refrigerator, and always check the expiration date before using.

– **Lime Juice:** Fresh lime juice adds the essential tang and brightness to the cheesecake. Limes are rich in vitamin C and are known for their antiseptic properties. Choose firm, glossy limes that yield slightly when pressed, indicating freshness.

– **Mint:** Fresh mint elevates the mojito flavors in this cheesecake, bringing a refreshing aroma and taste that complements the tanginess of lime. Packed with antioxidants, mint supports digestion and overall wellness. To keep mint fresh, store it in a glass of water in the fridge.

– **Graham Crackers:** Used for the crust, graham crackers provide a sweet, crunchy texture that contrasts beautifully with the creamy filling. Look for whole graham cracker varieties for added flavor and nutrition. Store leftover crackers in an airtight container to maintain their crispness.

– **Sugar:** The sweetness in this recipe comes from granulated sugar, balancing the tartness of the lime. While sugar adds calories, using it in moderation can fit into a balanced diet. If you’re looking for alternatives, consider natural sweeteners like honey or agave nectar.

Common Mistakes to Avoid

  • Not softening the cream cheese: Always ensure your cream cheese is at room temperature before mixing; otherwise, you’ll end up with a lumpy filling that lacks the desired smoothness.
  • Overmixing the batter: Mix just until combined to avoid incorporating too much air. Overmixing can lead to cracks in the cheesecake as it bakes and cools.
  • Skipping the chilling step: Allow your cheesecake to chill properly before serving. This step is crucial for achieving the creamy texture and allows the flavors to meld beautifully.
  • Not using a water bath: For the creamiest results and to prevent cracks, bake your cheesecake in a water bath to regulate the temperature and maintain moisture.
  • Pulling the cheesecake out too soon: Always check for doneness. If it’s too jiggly in the middle, it needs more time. An undercooked cheesecake can turn runny once cooled.
  • Skimping on flavors: Use fresh lime juice and mint for the best flavor. Bottled juice lacks the vibrant taste of fresh ingredients and may result in a dull cheesecake.
  • Not cooling properly: Let the cheesecake cool gradually in the oven with the door ajar to help prevent cracks and maintain a creamy, smooth texture.
  • Not waiting to slice: The cheesecake will be very soft if you slice it too soon. Cool it in the fridge for several hours or overnight for best results.

Essential Techniques

– **Softening Cream Cheese:** It’s important to bring cream cheese to room temperature to ensure easy mixing and a smooth texture. Place it out for about 30 minutes to soften naturally, or microwave it in short 10-second bursts. Be cautious to not melt it, as this will affect the final texture.

– **Mixing Technique:** When blending the filling, mix on a low speed to combine the ingredients without incorporating too much air into the mixture. This will create a denser and creamier cheesecake. Always scrape down the sides of the bowl to ensure an even mix.

– **Water Bath Method:** Using a water bath (bain-marie) helps regulate the baking temperature, ensuring even cooking. To create this, wrap the outside of your springform pan with aluminum foil to prevent leaks, then place it in a larger pan filled with hot water.

– **Chilling Time:** Patience is key for a cheesecake. After baking, let the cheesecake cool in the oven with the door slightly open, then chill in the fridge for a minimum of four hours or overnight. This helps set the filling for a firm slice.

Pro Tips for Perfect Zesty Mojito Lime Cheesecake Delight

– Always use fresh ingredients, especially lime and mint, to achieve the best flavor profile.
– If you prefer a different crust, consider using crushed vanilla wafers or chocolate cookies for a unique twist.
– To intensify the lime flavor, add lime zest to the filling for an extra punch.
– Consider adding a layer of lime gelee on top for an added visual appeal and a burst of tanginess.
– Experiment with garnishes—candied lime slices or mint sprigs add visual appeal and a touch of elegance.
– When slicing, dip your knife in hot water for a clean cut, which helps to present a beautiful cheesecake.
– For a fun twist, try using coconut cream instead of cream cheese for a lighter, dairy-free version.
– Serve individual slices with a drizzle of lime syrup for an extra treat that looks impressive.

Variations and Adaptations

– **Regional Variations:** Add local flavors like coconut or passion fruit for a tropical spin that complements the original mojito theme.
– **Seasonal Adaptations:** Substitute fresh berries for mint during the berry season for a fruity variation that pairs well with lime.
– **Dietary Modifications:** To make it gluten-free, substitute the graham crackers with almond flour or gluten-free cookie crumbs.
– **Flavor Variations:** Infuse the cream cheese with other citrus flavors, such as grapefruit or tangerine, for a different profile while maintaining that refreshing zing.
– **Texture Modifications:** For a fluffier texture, beat egg whites separately and fold them into the filling before baking. This addition provides a lighter cheesecake.
– **Presentation Alternatives:** For a trendy look, serve mini cheesecakes in jars with layered graham cracker crumbs for an individual portion that’s easy to share.

Serving and Presentation Guide

Creating the perfect presentation for your Zesty Mojito Lime Cheesecake will make it irresistible. Consider a clean and elegant plating technique using a large spatula to gently transfer a slice onto the plate. Garnish your cheesecake with freshly whipped cream, lime slices, and a sprig of mint on the side to enhance visual appeal. The contrasting colors of the lime-green cheesecake, the golden crust, and the vibrant green mint create an eye-catching dish.

For special occasions, opt for a beautiful cake stand that elevates your cheesecake, embodying sophistication. When serving, it’s essential to allow each slice to come to room temperature for that creamy texture and full flavor profile. Remember to adjust the portion size depending on the occasion; larger slices work well for parties, while smaller portions may suit a dinner party setting.

If serving at a large gathering, consider creating a dessert buffet where guests can choose their cheesecake slice, along with other refreshing summer desserts. This interactive approach not only enhances the dining experience but allows for social interaction among guests.

Wine and Beverage Pairing

Selecting the right beverages to enjoy with your Zesty Mojito Lime Cheesecake can elevate the entire experience. A chilled sauvignon blanc, with its citrus notes and crisp acidity, pairs wonderfully with the lime flavors in the cheesecake. For a more festive option, a sparkling wine like Prosecco complements the dessert’s lightness and freshness.

For non-alcoholic alternatives, consider serving a mint limeade or lime sparkling water, which will mimic the minty and tart qualities of the cheesecake while providing a refreshing contrast. Iced tea with fresh mint or citrus-infused water also makes for delightful pairings that accommodate everyone.

If coffee is your preference, a light roast coffee blends beautifully with the cheesecake, as its subtle flavors won’t overpower the dessert. When serving these beverages, make sure they are chilled and served in elegant glassware to match the refined nature of the cheesecake.

Storage and Shelf Life

Proper storage of your Zesty Mojito Lime Cheesecake is crucial to maintain its delicate flavor and texture. Store the cheesecake in an airtight container in the refrigerator for up to one week. If you plan to keep it longer, consider freezing it to extend its shelf life up to three months.

To freeze cheesecake, allow it to cool completely, then wrap it tightly in plastic wrap followed by aluminum foil to prevent freezer burn. When ready to serve, thoroughly thaw it in the refrigerator overnight; then allow it to come to room temperature before slicing to enjoy the best texture.

Keep an eye out for signs of spoilage, such as an off smell or unusual texture. If the crust becomes soggy, or if there are any visible signs of mold, it is best to discard the cheesecake to ensure food safety.

Reheating cheesecake is generally not recommended, but if you prefer a warm dessert, slice a piece and place it in the microwave for a few seconds to achieve a slightly softened texture.

Make Ahead Strategies

Planning ahead is key when preparing your Zesty Mojito Lime Cheesecake for an event. You can make the cheesecake a day or two in advance. After baking and cooling, cover it properly and let it chill in the refrigerator. This chilling period allows the flavors to meld beautifully, enhancing the overall taste.

Consider preparing the graham cracker crust a day before. Store it in the refrigerator until you’re ready to pour in the filling. If you have any additional toppings—like whipped cream or fruit—prepare them ahead of time and store them separately to maintain freshness.

For the ultimate convenience, bake and cool the cheesecake in advance, then freeze. It will stay fresh, and you can pull it out to thaw when you need it without compromising its flavor. Just remember to finish any decorative garnishes just before serving to ensure they look their best.

Scaling Instructions

Depending on your needs, scaling this recipe can be effortlessly achieved without compromising the integrity of the Zesty Mojito Lime Cheesecake. For smaller gatherings, halve the ingredients; this should be fine, but adjust your baking time slightly to accommodate the smaller size.

For larger parties, consider doubling or tripling the recipe. Use a larger baking pan, but you will need to monitor the baking time more carefully for doneness. Test with a toothpick inserted in the center—if it comes out mostly clean, you’re good to go.

When increasing the recipe, ensure you still whip the filling in batches if you’re using a standard mixer. Overloading the mixing bowl can lead to unevenly mixed batter. Lastly, remember to adjust serving portions accordingly, as larger quantities may lead to different slice sizes.

Nutritional Deep Dive

Understanding the nutritional elements of your Zesty Mojito Lime Cheesecake can help you appreciate its benefits. Each slice provides a good source of calcium and protein due to the cream cheese, essential for bone health and muscle function. However, it’s essential to manage portion sizes, as the dessert does contain added sugars.

Vitamin C is also plentiful from the lime, supporting the immune system and skin health. The refreshing mint complements this with additional antioxidants, potentially supporting digestive health and providing a low-calorie flavor enhancer.

If you’re monitoring your dietary intake, it’s important to be aware of the macronutrient distribution in this dessert. A slice can contain around 300 calories, depending on portion size and ingredients, making it an occasional treat rather than an everyday snack.

For those managing weight, consider having smaller portions, and pairing them with fresh fruit or a light salad to round out the meal—keeping decadent desserts special and enjoyable without feeling overly indulgent.

Dietary Adaptations

Transforming the Zesty Mojito Lime Cheesecake to accommodate different dietary needs can be simple. For gluten-free versions, replace traditional graham crackers with crushed gluten-free cookies or almond meal for the crust.

If you’re catering to dairy-free preferences, creamy coconut milk or cashew cream can be used instead of cream cheese, while ensuring cohesion in texture. Similarly, opt for dairy-free whipped cream for garnishing without dairy content.

For vegans, replace eggs with flaxseed meal and use dairy-free cream cheese alternatives. The rest of the flavor profile remains intact, making it an inclusive dessert option.

Low-carb adaptations can be made by using almond flour for the crust and natural sugar substitutes like erythritol to cut down carbohydrates while keeping the sweetness intact. These modifications make this delightful cheesecake suitable for various lifestyles without sacrificing taste.

Troubleshooting Guide

– **Texture Issues:** If your cheesecake turns out too dense, consider incorporating less cream cheese, or try adding whipped cream for airiness. Avoid overmixing during preparation, as this can make it heavy.
– **Flavor Balance:** If the cheesecake lacks flavor, increase the lime juice and zest for a more pronounced tang. Add an additional splash of mint extract for enhanced freshness.
– **Temperature Problems:** If the cheesecake browns on top too quickly during baking, reduce the oven temperature to avoid an overly cooked crust while ensuring the filling sets properly.
– **Equipment Challenges:** If using a non-springform pan, line it well with parchment paper to facilitate easy removal. Consider purchasing a reliable springform pan for future cheesecakes.
– **Ingredient Substitutions:** Not having fresh lime juice? Consider using bottled juice in a pinch, but use less as it can be more concentrated. However, fresh is always best for taste.
– **Timing Concerns:** If you find the cheesecake is cooking too fast, cover the top with foil to prevent it from getting too dark while the interior continues to bake.
– **Chilling Durations:** After baking, if your cheesecake isn’t cooling well, make sure it’s not placed near warm spots in the kitchen. Let it rest on the counter before transferring it to the fridge.
– **Cracks in the Cheesecake:** If cracking occurs, ensure proper chilling is done and avoid overbaking. A water bath while baking can significantly decrease the chance of cracks.

Recipe Success Stories

Community feedback is a crucial aspect of crafting perfect recipes. Many readers have expressed their joy in making the Zesty Mojito Lime Cheesecake and have loved how refreshing it is compared to traditional desserts. A reader shared how they found that doubling the mint gave an even more impactful flavor, making it the talk of their last BBQ.

Variations have also taken off in the community. Some suggest adding a layer of raspberry on top for a beautiful contrast, while others have opted for a chocolate crust, proving that this recipe is versatile and open to personal touches. Readers often upload their creations on social media, providing inspiration and encouraging others to experiment.

Photography tips have emerged through the community, emphasizing the importance of good light when snapping your final dish. The bright colors of the cheesecake shine under daylight, making it an appealing visual treat that begs to be photographed.

Engagement in the comments section is often enthusiastic, creating a wonderful support circle among home bakers. Encouraging readers to share their adaptations, they contribute variations that inspire others to make the Zesty Mojito Lime Cheesecake their own.

Frequently Asked Questions

Can I use bottled lime juice instead of fresh?

While bottled lime juice can be used, fresh lime juice provides a brighter flavor and is recommended for the best results. Fresh juice captures the vibrant essence that makes this dessert stand out.

How do I know when my cheesecake is done baking?

Check for doneness by gently shaking the cheesecake; the edges should be set while the center remains slightly jiggly, as it will continue to set as it cools.

What should I do if my cheesecake cracks?

If you notice cracks, don’t worry! You can cover them with whipped cream or fruit to mask them, or use a ganache to create a smooth finish.

Can I freeze leftover cheesecake?

Yes! To freeze, ensure it’s completely cooled, then wrap it tightly in plastic wrap and foil. It can last in the freezer for about three months.

What can I use instead of mint?

If you don’t have mint, consider using basil for a unique twist. Alternatively, omit the herb altogether and simply enhance the lime flavor.

What’s the best way to serve the cheesecake?

Serving the cheesecake slightly chilled with a dollop of whipped cream and a garnish of lime and mint enhances its refreshing profile. Serve on elegant plates for added appeal.

Can I use other citrus fruits besides lime?

Absolutely! This recipe can be adapted to use other citrus fruits like lemon or grapefruit, just adjust the sugar level depending on the fruit’s tartness.

Is this cheesecake safe for pregnant women?

This cheesecake contains cream cheese; consult with your doctor about soft cheeses. Ensure it’s made with pasteurized products for safety.

How long does the cheesecake need to chill?

For best results, let your cheesecake chill in the fridge for at least four hours or ideally overnight to allow the flavors to meld and the texture to set.

Can I make this cheesecake ahead of time?

Yes! The cheesecake can be made a couple of days in advance and stored in the fridge until you’re ready to serve it. It tends to taste even better after chilling!

Additional Resources

As you dive into the world of cheesecakes, consider exploring other related recipes to expand your dessert repertoire. For instance, try a classic New York cheesecake, a rich chocolate cheesecake, or a fruity berry cheesecake. Each of these can provide a different experience while remaining true to the concept of creamy desserts.

Technique guides are invaluable when honing your baking skills. Understanding pie crust techniques or the perfect way to create a water bath for cheesecakes can significantly enhance your ability to create perfect desserts every time.

Ingredient information is also vital—learning about various cheese types, such as mascarpone or ricotta, can inspire you to create new flavors and textures in your cheesecakes or other desserts.

For those eager to experiment with tools, investing in a quality stand mixer and using a good springform pan can make the process easier and yield professional results.

Finally, seasonal variations can spark creativity. In fall, consider adding pumpkin to the cheesecake filling, or during winter, spice up the base with cinnamon or nutmeg for a cozy feel.

Join the Conversation

Engaging with your readers transforms your recipe blog into a vibrant community. Encourage social media sharing by creating a dedicated hashtag for the Zesty Mojito Lime Cheesecake, allowing you to compile user-generated content easily. This interaction fosters a sense of belonging, as readers can share their triumphs or adaptations.

Photography tips are essential post-baking, as many readers want to showcase their desserts. Create a beginner’s guide to food photography that highlights lighting, angles, and staging.

Invite feedback and recipe reviews, allowing readers to share their experiences and what worked for them. This valuable exchange can help others learn while strengthening the community aspect of your blog.

Encourage recipe variations by asking readers to submit their adaptations or innovative twists on the classic Zesty Mojito Lime Cheesecake. Sharing personal stories related to food can make the recipe even more meaningful.

By fostering strong community engagement, you create an enthusiastic atmosphere that makes both your blog and recipes come alive, encouraging more people to participate and share their culinary adventures.

The Recipe

Zesty Mojito Lime Cheesecake Delight

Serves: 8 servings

Prep Time: 30 mins

Cook Time: 60 mins

Total Time: 90 mins

Kitchen Equipment Needed

  • Springform pan
  • Mixer
  • Mixing bowls
  • Measuring cups and spoons
  • Rubber spatula
  • Aluminum foil (for water bath)
  • Sharp knife (for slicing)

Ingredients

  • 1 ½ cups graham cracker crumbs
  • ½ cup unsalted butter, melted
  • 2 (8-ounce) packages cream cheese, softened
  • 1 cup granulated sugar
  • 3 large eggs
  • 1 cup fresh lime juice
  • Zest of 2 limes
  • ⅓ cup fresh mint, chopped
  • 1 teaspoon vanilla extract

Directions

  1. Preheat the oven to 325°F (160°C). Prepare the springform pan by wrapping the outside with aluminum foil to prevent leaking.
  2. In a mixing bowl, combine the graham cracker crumbs and melted butter until well blended. Press firmly into the bottom of the springform pan to form the crust.
  3. In a large bowl, beat the cream cheese and sugar until smooth and creamy. Add the eggs one at a time, mixing until just blended.
  4. Stir in the fresh lime juice, lime zest, chopped mint, and vanilla extract until combined.
  5. Pour the cheesecake mixture over the crust in the prepared springform pan.
  6. Place the springform pan inside a larger pan. Fill the larger pan with hot water until it reaches halfway up the sides of the springform pan.
  7. Bake for 60 minutes or until the center is slightly jiggly but set.
  8. When done, turn off the oven and allow the cheesecake to cool inside with the door ajar for about 1 hour.
  9. Remove the cheesecake from the oven and refrigerate for at least 4 hours, preferably overnight, before serving.

Recipe Notes

  • Can replace mint with basil for a different flavor.
  • For a dairy-free version, use coconut cream instead of cream cheese.
  • Add powdered sugar to whipped cream for garnishing.

Ultimate Tremendous BLT Sandwich Recipe for Bacon Lovers

Tremendous BLT Sandwich: The Ultimate Bacon, Lettuce, and Tomato Delight

⚖️
Difficulty
Easy

⏲️
Prep Time
10 mins

🕒
Cook Time
15 mins

⏱️
Total Time
25 mins

🍽️
Servings
2

The Tremendous BLT Sandwich is a classic that evokes warm memories of summer picnics and backyard barbecues. This sandwich features perfectly crisp bacon, fresh greens, luscious tomatoes, and creamy mayo, all stacked high between toasted bread, creating a satisfying crunch with every bite. Imagine biting into this delicious creation: the smokiness of the bacon mingles with the juicy sweetness of ripe tomatoes, while the crisp lettuce adds a refreshing contrast. This incredible combo makes for a delightful experience that is sure to please anyone craving a tasty, hearty meal.

Making the ultimate BLT goes beyond just layering ingredients; it’s about using fresh, high-quality components that harmonize perfectly. The secret lies in perfecting each element, from selecting the ripest tomatoes to achieving the ideal bacon crispiness. The simplicity of the ingredients showcases their flavors, ensuring that each bite is as good as the last. Whether you’re serving it for lunch, brunch, or a quick dinner, the Tremendous BLT Sandwich is bound to become a favorite in your household.

Quick Recipe Highlights

  • Flavor Profile: The BLT features a delicious combination of salty, savory, and slightly sweet flavors from the bacon and tomatoes.
  • Texture: Experience a perfect mix of crunch from the bacon and lettuce alongside the soft, toasted bread.
  • Aroma: The sizzling bacon aroma will fill your kitchen, inviting everyone to the table.
  • Visual Appeal: The vibrant colors of the fresh vegetables and the golden-brown bacon create an eye-catching sandwich.
  • Skill Level Needed: This recipe is beginner-friendly, requiring basic kitchen skills to prepare.
  • Special Equipment: All you need is a frying pan for the bacon and a knife for cutting the sandwich!

Recipe Overview

  • Difficulty Level: The Tremendous BLT sandwich is easy to prepare, making it perfect for novice cooks and busy families alike.
  • Category: This is a lunch or brunch sandwich that is perfect for any time of year.
  • Cuisine: The BLT sandwich has roots in American cuisine, symbolizing a classic comfort food enjoyed across the country.
  • Cost: Making a BLT is budget-friendly, as it primarily uses simple ingredients that are often on hand.
  • Season: Enjoy this sandwich year-round, but it shines brightest in summer months when tomatoes are in season.
  • Occasion: Ideal for casual family meals, picnics, and gatherings with friends.

Why You’ll Love This Recipe

The Tremendous BLT sandwich is a delightful mix of flavors and textures that’s hard to resist. The salty, crispy bacon pairs perfectly with juicy tomatoes and crisp lettuce, creating a symphony on your palate. Each layer adds to the overall experience, leaving you craving a second helping. Additionally, you can customize this classic to cater to your taste preferences, whether you prefer extra mayo or additional toppings.

Beyond taste, the preparation is simple and incredibly quick. With just a handful of ingredients and a few steps, you can whip up this satisfying sandwich in no time. This convenience makes it perfect for busy weekdays or lazy weekends, allowing you to enjoy a delicious meal without spending hours in the kitchen.

On the health front, this sandwich is surprisingly nutritious. Using fresh vegetables not only enhances flavor but also adds valuable vitamins and minerals. Bacon, when consumed in moderation, offers protein and can be part of a balanced diet. Plus, you can even make healthier modifications, such as using whole grain bread or turkey bacon, for a lighter option.

Socially, the Tremendous BLT sandwich is a crowd-pleaser. Bringing people together over food is timeless, and this sandwich is perfect for gatherings and parties. Its simple yet delicious nature encourages sharing and conversation, making it a delightful addition to any table.

Lastly, this sandwich is budget-friendly, allowing you to satisfy your cravings without breaking the bank. Ingredients such as lettuce, tomatoes, and bread are typically low-cost, making the BLT an accessible recipe for everyone. It proves that you can enjoy gourmet flavors without the gourmet price tag.

Historical Background and Cultural Significance

The origins of the BLT sandwich can be traced back to the early 1900s, with bacon, lettuce, and tomato sandwiches appearing in various forms. However, it wasn’t until after World War II that the BLT gained popularity across America. Factories began to mass-produce bacon, making it more accessible and popular. This sandwich quickly became a common feature on diner menus, solidifying its status in American culinary culture.

Culturally, the BLT represents the simplicity and satisfaction of American cuisine. It embodies the spirit of casual dining and backyard cookouts, often associated with summertime gatherings and lunch on the go. Over the years, it has been celebrated for its straightforwardness and the freshness of its ingredients, making it a beloved choice for many households.

The recipe for the BLT has evolved over the years, adapting to new culinary trends and consumer preferences. Today, variations may include avocado for added creaminess or different types of bread for a modern twist. As food sustainability comes to the forefront, many people are also opting for locally sourced ingredients to create their BLTs, further enhancing its cultural significance.

Different regions in the United States have their own variations of the classic BLT. In the Southwest, for instance, jalapeños or avocado may be added, while in the South, fried green tomatoes provide a unique twist. Each adaptation reflects local tastes and production, showcasing how this simple sandwich can transcend culinary boundaries.

Ingredient Deep Dive

Bacon: This beloved ingredient has a rich history, often regarded as a symbol of comfort food in many households. It is a great source of protein and contains essential vitamins such as B12, zinc, and potassium. When purchasing bacon, look for high-quality, thick-cut varieties for the best flavor and texture. Store it in the refrigerator, and consider freezing to extend shelf life.

Lettuce: Essential for freshness in the BLT, lettuce has been cultivated for thousands of years. It offers hydration due to its high water content and includes nutrients like vitamins A and K. When selecting lettuce, opt for vibrant green leaves and avoid wilting. Store it in a plastic bag in the fridge and use it within a week for the best quality.

Tomatoes: Known as the star of the sandwich, fresh tomatoes provide a juicy sweetness that contrasts beautifully with the savory bacon. Tomatoes are rich in antioxidants like lycopene, which can promote heart health. When choosing tomatoes, look for plump, firm varieties and avoid blemishes. To store, keep them at room temperature and only refrigerate once cut to maintain flavor.

Bread: The foundation of the BLT, bread varies per personal preference. Whole grain options provide dietary fiber, while white bread offers a classic taste and texture. Choosing bread should be based on desired taste and health benefits. Store bread in a cool, dry place, and consider freezing it for longer shelf life.

Common Mistakes to Avoid

  • Using stale bread: Always use fresh bread to ensure the best texture and flavor. Stale bread can result in an unappealing sandwich.
  • Overcooking bacon: Be careful not to overcook bacon, as it can become too greasy and lose its desirable crispness. Aim for a golden-brown finish for the perfect crunch.
  • Skipping seasoning: Do not forget to season the tomatoes with a pinch of salt; it enhances their flavor dramatically.
  • Layering incorrectly: Ensure you layer the ingredients logically to create a balanced sandwich; put the lettuce closest to the bread to prevent sogginess.
  • Using low-quality ingredients: The BLT relies on fresh, high-quality components. Avoid using subpar bacon or limp vegetables.
  • Not toasting the bread: Toasting adds texture and flavor, making all the difference in your sandwich.
  • Forgetting the mayo: A good layer of mayo adds moisture and flavor; don’t skimp on it!
  • Overstuffing: While it might be tempting to add extra ingredients, overstuffing can lead to a messy sandwich that’s hard to handle.
  • Neglecting freshness: Always opt for garden-fresh tomatoes and lettuce to maximize flavor; wilted ingredients will ruin your sandwich.
  • Serving too cold: Let your sandwich sit for a moment after making it; a cold sandwich loses some of its flavor. Try serving at room temperature.

Essential Techniques

Cooking Bacon: Cooking bacon correctly is crucial for achieving that perfect crunch. Use medium heat to slowly render the fat, allowing it to crisp evenly. Avoid high heat as it can burn quickly. A good visual cue is a rich golden brown color – this signals that it’s perfectly cooked.

Layering Ingredients: Layering your sandwich correctly is key to keeping it stable and delicious. Start with the mayo on the bread, then add the lettuce to keep moisture away from the bread. Follow with the tomatoes and bacon. Practice assembling it in this order to achieve the structural integrity of the sandwich.

Pro Tips for Perfect Tremendous BLT Sandwich

Use thick-cut bacon for optimal crispiness; it holds its shape and flavor better than thin slices.
Choose the freshest, ripest tomatoes you can find; they will enhance the overall taste significantly.
Use a hearty bread, such as sourdough or whole grain, to add flavor and structure that stands up to the fillings.
Experiment with flavored mayonnaise, such as garlic or chipotle, to add a unique twist to your sandwich.
For a gourmet touch, try adding slices of avocado or cheese for additional creaminess.
Serve the sandwich immediately after assembling to maintain texture and freshness.
Don’t rush the bacon cooking stage; patience is key to achieving perfect crispiness.
When layering, ensure sharp flavors like tomato and bacon are visible for a more appetizing presentation.

Variations and Adaptations

In different regions, the BLT may take on various flavors. In the Southwest, adding jalapeño slices or sriracha sauce can provide a spicy kick that excites the taste buds. A Mediterranean twist might involve using fresh basil and slices of mozzarella, transforming the classic into a Caprese spin.

For seasonal adaptations, consider swapping out tomatoes for grilled peaches during late summer, enhancing the sweetness and creating a juicy alternative. If you want a healthier version, opt for turkey bacon, whole grain bread, and a spread of hummus instead of mayo for a lower-calorie option.

Dietary modifications can easily be incorporated; for a vegan alternative, substitute bacon with tempeh bacon or smoked tofu and use vegan mayo. You can also create a gluten-free BLT by using gluten-free bread varieties available in stores.

Serving and Presentation Guide

Plating your Tremendous BLT sandwich can make all the difference. Serve it on a rustic wooden board or a colorful plate for a vibrant presentation. Consider cutting the sandwich diagonally to expose the layers, which adds visual appeal. Garnish with a side of pickles or a small salad to elevate the dish.

You can also add a sprig of fresh herbs, such as parsley or basil, for decoration. Serve with crispy sweet potato fries or a refreshing coleslaw to create a more balanced meal. Consider the serving temperature as well; a BLT is best enjoyed warm or at room temperature.

Wine and Beverage Pairing

A classic Tremendous BLT pairs beautifully with a crisp, chilled white wine such as Sauvignon Blanc; its bright acidity complements the richness of the bacon and freshness of the vegetables perfectly. For a more casual pairing, consider an ice-cold pale ale or a light lager that balances flavors.

For non-alcoholic options, a sparkling lemonade or iced tea can provide a refreshing counterpoint. These beverages cut through the richness while enhancing the delicious elements of the sandwich. If pairing with coffee, opt for a light roast to offset the savory flavors of the sandwich.

Storage and Shelf Life

To maximize the freshness of your Tremendous BLT sandwich, it’s best to assemble it right before serving. If storing leftovers, place ingredients separately in airtight containers. Store cooked bacon in the refrigerator for up to five days, while fresh vegetables are best consumed within three to four days.

If you’ve prepped extra bacon, you can freeze it. Lay strips flat on a baking sheet, freeze until solid, then transfer to a zip-top bag. Reheat bacon in a skillet when ready to use. If reheating a complete sandwich, use an oven or toaster oven to maintain crispiness—microwaving can make it soggy.

Make Ahead Strategies

To prepare for a busy week, cook a batch of bacon in advance and store it in the fridge. Toast and slice your bread and prepare mayonnaise or flavored spreads the day before. When it’s time to assemble, make sure you have fresh lettuce and tomatoes on hand.

Consider making a BLT salad by chopping the sandwich ingredients and tossing them together in a bowl, which can be done ahead of time. Keep the dressing separate until ready to serve to prevent sogginess. This way, you maintain freshness while enjoying all the flavors of a classic BLT.

Scaling Instructions

If you wish to prepare a larger batch of the Tremendous BLT sandwich for a gathering, doubling the recipe is straightforward. Simply increase each ingredient proportionally, and cook additional bacon accordingly.

Adjust cooking times for bacon slightly to ensure even cooking, as multiple pieces will need more space in the pan. Be mindful of portions—consider preparing them on a platter and allowing guests to build their sandwiches for a fun, interactive experience.

For a smaller scale, you can easily cut the recipe in half, ensuring you still enjoy the same delicious flavors without wasting ingredients. Just remember to adjust the ingredient measurements and cooking times slightly as needed.

Nutritional Deep Dive

The Tremendous BLT sandwich can be satisfying in terms of macronutrients. With crispy bacon providing protein and healthy fats, combined with fibrous lettuce and nutrient-rich tomatoes, each component contributes to your daily dietary needs. A single sandwich is generally moderate in calories, making it a suitable option for lunch.

When examining micronutrient content, tomatoes offer a wealth of vitamins such as C and K. The addition of fresh lettuce increases your fiber intake, promoting digestive health. Additionally, by substituting ingredients, such as using whole grain bread, you can increase its fiber content further.

Understanding portion size is essential in managing calorie intake. A standard serving of a BLT sandwich can be enjoyed as a hearty meal without guilt, especially if balanced with a side of fresh fruit or a light salad.

Dietary Adaptations

For individuals following a gluten-free diet, gluten-free bread options are widely available and work beautifully for creating a BLT. Replace traditional mayo with a gluten-free spread for a worry-free meal.

Vegans can easily adapt this recipe too; using marinated tofu or tempeh can replace bacon, offering a similarly satisfying crunch. Coconut or avocado-based spreads provide creamy texture without animal products.

People on a low-carb or keto diet can eliminate the bread altogether and opt for lettuce wraps, delivering all the flavors of a BLT without the carbs. Slicing vegetables into sticks and pairing with a mayonnaise dip can also create a fun and flavorful snack.

Troubleshooting Guide

If your bacon ends up chewy instead of crispy, ensure you are cooking it over medium heat and allowing enough time for the fat to render properly. Avoid overcrowding the pan, as this can lead to steaming rather than crisping.

For sandwiches that become soggy, consider adding lettuce as a barrier. This prevents moisture from the tomatoes from soaking into the bread. Allow the tomatoes to drain on a paper towel before adding them to the sandwich for extra precaution.

If you find your sandwich ingredients don’t marry well in flavor, consider seasoning your tomatoes and applying mayo generously. This can significantly enhance the sandwich’s overall taste and improve the balance of flavors.

Recipe Success Stories

Community feedback for the Tremendous BLT sandwich has been overwhelmingly positive. Many have shared their variations, from adding fried eggs to their sandwiches to using artisan bread and gourmet aioli in place of mayonnaise for a unique twist.

Readers have noted the ease of preparation, allowing them to whip up a fresh meal in no time. Photography tips shared among enthusiasts all point to showcasing the layers clearly; capturing the crispy bacon and vibrant veggies makes for a stunning display.

Social media posts highlight creative presentations with colorful salads and seasoned potato fries served alongside, making this classic not only satisfying to eat but also beautiful to serve.

Frequently Asked Questions

Can I make a BLT sandwich ahead of time? Yes, you can prepare components ahead of time, but it’s best to assemble the sandwich shortly before serving to maintain freshness. Store ingredients separately to avoid sogginess.

What type of bacon is best for BLTs? Thick-cut bacon is recommended for BLTs as it provides a satisfying crunch without becoming overly greasy.

Can I substitute ingredients for dietary needs? Absolutely! Feel free to substitute ingredients based on your dietary requirements, such as using turkey bacon, vegan mayo, or gluten-free bread.

Are there healthier options for a BLT sandwich? Yes, you can make a healthier BLT by using whole grain or gluten-free bread, adding more vegetables, or replacing bacon with a more plant-based option.

What is the best way to toast bread for a BLT? For optimal crunch, toast the bread in the oven or a toaster until golden brown. This helps prevent the sandwich from becoming soggy.

How do I keep the sandwich from getting soggy? Layer lettuce closest to the bread and avoid overly wet tomatoes or spreads. You can also let ingredients rest on paper towels to absorb excess moisture.

Can I use pre-cooked bacon for this recipe? While pre-cooked bacon is convenient, cooking from raw allows for better texture and crispiness, which enhances the sandwich.

What can I serve with a BLT? Consider pairing with a side of potato chips, sweet potato fries, or a simple green salad for a well-rounded meal.

Can I freeze a BLT sandwich? It’s not recommended to freeze the entire BLT sandwich, but you can freeze individual components, like bacon or bread, to use later.

How do I know when my bacon is perfectly cooked? Keep an eye on the color; perfect bacon should be crispy and golden brown. Timing varies depending on thickness, so adjust accordingly.

Additional Resources

For further culinary exploration, consider trying related recipes such as the Caprese Sandwich or a classic Club Sandwich. Techniques and guides on creating homemade mayonnaise or crispy bacon can elevate your cooking skills.

Explore ingredient information for seasonal vegetables to enhance your sandwich offerings each season. Investing in quality kitchen equipment, such as a well-made skillet or sharp knife, will also make your cooking experience much more enjoyable.

Keep an eye out for seasonal variations; during summer, try using heirloom tomatoes or locally sourced greens to create an impressive signature BLT!

Join the Conversation

We’d love to hear your thoughts on the Tremendous BLT Sandwich! Share your favorite variations, photography tips, or feeding experiences on social media. Join our community by tagging us in your BLT photos or posting reviews of your attempts at this classic sandwich.

Don’t forget to experiment and have some fun with the recipe. Each twist brings its own flavor, and we encourage collaboration and sharing ideas with fellow sandwich lovers. Let’s celebrate this timeless meal by keeping the conversation alive!

The Recipe

Tremendous BLT Sandwich

Serves: 2

Prep Time: 10 mins

Cook Time: 15 mins

Total Time: 25 mins

Kitchen Equipment Needed

  • Frying pan
  • Knife
  • Cutting board
  • Spatula

Ingredients

  • 4 slices of thick-cut bacon
  • 2 slices of bread (your choice)
  • 2 slices of ripe tomato
  • 2 leaves of romaine or iceberg lettuce
  • 2 tablespoons mayonnaise
  • Salt and pepper to taste

Directions

  1. Cook bacon in a skillet over medium heat until crispy, about 7-10 minutes. Drain on paper towels.
  2. Toast the bread slices until golden brown.
  3. Spread mayonnaise on one side of each slice of toasted bread.
  4. Layer the lettuce leaves on one slice of bread.
  5. Place bacon strips on top of the lettuce.
  6. Add tomato slices, season with salt and pepper, then top with the second slice of bread.
  7. Slice in half and serve immediately.

Recipe Notes

  • Feel free to add avocado for creaminess or switch up the mayo with flavored varieties.
  • Make sure to let the tomatoes drain on paper towels if they are overly juicy to prevent a soggy sandwich.
  • For a spicy kick, add a few slices of jalapeño or a drizzle of sriracha.

Delicious Swedish Meatballs Recipe: A Taste of Tradition

Swedish Meatballs: A Comforting Culinary Delight

⚖️
Difficulty
Medium

⏲️
Prep Time
30 mins

🕒
Cook Time
20 mins

⏱️
Total Time
50 mins

🍽️
Servings
4 servings

Swedish meatballs are a classic dish that combines the rich flavors of ground beef and pork with a delectable creamy sauce. This recipe captures the essence of traditional Swedish cuisine while delivering comfort and warmth in every bite. Perfectly seasoned and pan-fried, these meatballs exhibit a tender texture that is paired beautifully with a thick, savory gravy, making it an ideal meal for both family dinners and gatherings.

In this Swedish meatballs recipe, you’ll not only savor the delicious blend of spices and savory flavor but also find an inviting aroma that fills your kitchen as they cook. The call of fresh herbs and spices melds harmoniously, inviting you to relish this iconic dish. Whether you serve these mouthwatering meatballs over a bed of fluffy mashed potatoes or with a side of lingonberry sauce, you’re sure to experience a taste of Sweden that resonates with warmth and comfort.

Quick Recipe Highlights

  • Flavor Profile: These Swedish meatballs feature a delightful combination of ground beef and pork, infused with hints of allspice, nutmeg, and fresh parsley.
  • Texture: They boast a tender yet slightly chewy consistency, enhanced by the creamy sauce that envelopes each meatball.
  • Aroma: Expect a nostalgic aroma that mingles savory meat with aromatic spices, instantly evoking a sense of homeliness.
  • Visual Appeal: The meatballs are golden brown and glossy when finished, typically served over a snowy blanket of mashed potatoes or noodles.
  • Skill Level Needed: This recipe is accessible for home cooks with a medium skill level, encouraging exploration of various cooking techniques.
  • Special Equipment: Basic kitchen tools such as a skillet, mixing bowl, and measuring cups are all you need to create this delightful dish.

Recipe Overview

  • Difficulty Level: The medium difficulty of this Swedish meatballs recipe comes from balancing flavors and mastering the cooking technique, ensuring a savory outcome.
  • Category: This dish is perfect for dinner and makes a hearty meal, especially during the colder months.
  • Cuisine: Rooted in Swedish tradition, these meatballs reflect the country’s penchant for comfort food and culinary creativity.
  • Cost: Ingredients are generally affordable and accessible, making this a budget-friendly meal option.
  • Season: While suitable for any time of year, Swedish meatballs are particularly comforting in the fall and winter seasons.
  • Occasion: Ideal for family gatherings, holiday dinners, and potlucks, this dish resonates with nostalgia and camaraderie.

Why You’ll Love This Recipe

Swedish meatballs are an irresistible blend of flavors and textures that make them a favorite among meat lovers. The savory meatballs are often accompanied by a light and creamy sauce that elevates the overall taste. Perfectly seasoned with allspice and nutmeg, they offer the warmth of home-cooked meals while providing a comforting balance of richness and earthiness that never fails to please the palate.

Convenience is another great aspect of this Swedish meatballs recipe. It requires simple ingredients that are likely already in your pantry, and the preparation is straightforward, making it accessible for busy weeknights or leisurely weekends. Whether served atop mashed potatoes, on buttered noodles, or alongside roasted vegetables, the versatility of this dish makes it an excellent choice for any meal.

Nutritionally, these meatballs provide a satisfying serving of protein from the meat, while the accompanying sauce can be enhanced with ingredients like low-fat cream for a healthier twist. This dish not only satisfies hunger but delivers essential nutrients, allowing you to enjoy comfort food without sacrificing your dietary needs.

The social aspect of enjoying Swedish meatballs with loved ones can’t be understated. The familiar aroma wafting through the kitchen often invites family and friends to gather, share stories, and create lasting memories over their plates. This dish has become a staple at many gatherings, providing a sense of comfort, warmth, and connection.

Cost-effectiveness is an additional benefit of making Swedish meatballs at home. Ingredients are readily available and affordable, allowing you to create satisfying meals for a whole family without breaking the bank. Furthermore, any leftovers can be easily stored and enjoyed later, extending the deliciousness beyond just one meal.

Historical Background and Cultural Significance

Swedish meatballs have a rich history that dates back to the early 18th century. The dish was influenced by various European traditions, particularly from Italy and Greece, but it was Swedes who perfected the art of crafting these tender morsels. The adaptation of spices such as allspice and nutmeg provided a unique twist that defines Swedish meatballs today.

In Swedish culture, meatballs symbolize homeliness and comfort. They are often made during festive occasions such as Christmas and family gatherings, connecting generations through shared recipes and traditions. This beloved dish speaks to the heart of Swedish hospitality, where a warm meal is synonymous with love and care.

As culinary trends evolved, so did the recipe for Swedish meatballs. Over the years, variations emerged, incorporating different types of meat like turkey or chicken, and alternative grains like quinoa for modern interpretations. Despite these changes, the essence of the dish remains prevalent in Swedish homes across the globe.

Regional variations of Swedish meatballs can be found, showcasing local ingredients and preferences. For example, some recipes may include lingonberries as a sweet contrast to the savory meat, while others may prefer variations of gravies and sauces. Such adaptations highlight the dish’s continued evolution in a global culinary landscape, allowing it to remain relevant and cherished.

Ingredient Deep Dive

– Ground beef: Rich in protein, ground beef is a staple meat that adds depth and flavor. When selecting, look for lean cuts for a healthier option while enjoying its full-bodied taste. Proper storage includes refrigerating leftovers and freezing for longer shelf life.
– Ground pork: This meat adds moisture and tenderness, which is essential in achieving the best texture for Swedish meatballs. Choose fresh pork for the best flavor and ensure to freeze any unused portions properly.
– Bread crumbs: Serving as a binding agent, bread crumbs help maintain the meatball’s structure while contributing to a tender bite. Store in a cool, dry place and opt for whole grain for added nutrition.
– Onion: Aromatic and versatile, onions provide a flavor base for many dishes. Use fresh onions for the best taste and store them in a cool, dark place to prolong freshness.
– Heavy cream: This ingredient elevates sauce and adds richness to the overall dish. Choose a high-quality cream for optimal flavor, but consider alternatives like Greek yogurt for lower fat content.

Common Mistakes to Avoid

  • Overmixing the meat: This can lead to tough meatballs; mix just until combined for the best texture.
  • Not chilling the mixture: Refrigerating the meat mixture helps it firm up and hold its shape while cooking.
  • Under-seasoning: Ensure you’re adequately seasoning the mixture; don’t be afraid to taste and adjust before cooking.
  • Using low-quality meat: The flavor of your meatballs relies heavily on the quality of the meat; opt for fresh, good-quality ingredients.
  • Skipping the browning step: Browning adds depth and prevents the meatballs from becoming grey and unappealing.
  • Cooking at the wrong temperature: Cook on medium heat to achieve a golden crust without burning or undercooking the insides.
  • Ignoring gravy consistency: Make sure the gravy is creamy and thick enough; you can adjust with flour or cornstarch if needed.
  • Rushing the cooking time: Take your time to ensure that the meatballs cook thoroughly, keeping them juicy and tender.

Essential Techniques

– Proper meatball shaping: Ensuring uniform size is key for even cooking. Use a scoop to measure and roll gently without overmixing. Look for visual cues like a tight, smooth surface for the best results.
– Browning: This step creates a flavorful crust, adding layers of taste. Heat oil in a pan and place the meatballs with space in between to avoid steaming instead of searing. A golden-brown exterior signifies success.
– Sauce creation: An excellent sauce is integral to this dish. In the same pan where you browned the meatballs, sauté onions, add flour, then gradually mix in broth and cream for a rich, savory sauce.
– Flavor balancing: Tasting as you go is vital; adjust salt, sugar, or creaminess according to your preference. A balanced flavor leads you to the perfect Swedish meatball experience.

Pro Tips for Perfect Swedish Meatballs

– Use a mix of meats for added complexity in flavor; combining beef and pork yields the most delicious results.
– Experiment with spices. While allspice and nutmeg are classic, adding thyme or dill can give a fresh twist.
– Opt for fresh herbs instead of dried ones for enhanced aroma and flavor—every little detail counts!
– Prepare the meatball mixture ahead of time and refrigerate overnight for even richer flavors.
– Don’t skip the lingonberry sauce; it provides a sweet contrast to the savory meatballs that elevates the dish.
– For a gluten-free version, replace the bread crumbs with gluten-free alternatives such as almond flour.
– Use a thermometer to ensure meatballs maintain the right internal temperature; they should be cooked to an internal temperature of 160°F (70°C).
– Test-cook one meatball before the rest to ensure flavor and texture meet your standards.

Variations and Adaptations

– Regional variations may include the addition of aromatic spices unique to Swedish locality or different meat combinations.
– Seasonal adaptations could focus on incorporating vegetables such as roasted carrots or seasonal greens as a side.
– Dietary modifications can cater to gluten-free options by using alternative breadcrumbs or making a low-carb version with zucchini.
– Flavor variations might involve adding cheese such as feta or a touch of sweet barbecue sauce for a unique twist.
– To alter texture, adjust cooking methods; consider baking instead of frying for a different consistency.
– Presentation alternatives can range from serving on plates with elegant garnishes to casual serving on skewers for gatherings.

Serving and Presentation Guide

Plating of Swedish meatballs can elevate the dining experience. Use a large serving dish and nestle the meatballs in a bed of creamy mashed potatoes, drizzling the luscious gravy generously over them. Add a sprinkle of parsley for a pop of color. You may choose to serve them individually on plates garnished with fresh dill for a more elegant presentation.

Garnishing ideas include fresh parsley, dill, and a side of lingonberry sauce which offers a welcome acidity that contrasts beautifully with the rich meatballs. Traditional accompaniments such as boiled potatoes or egg noodles enhance the dish’s presentation and create a fulfilling meal.

When it comes to temperature considerations, serve the meatballs warm right after cooking for the best flavor experience. Keeping food at the right temperature ensures everyone enjoys the dish as intended. For portion control, consider serving small portions to allow for variety and encourages guests to come back for seconds.

Wine and Beverage Pairing

For wine pairings, a light-bodied red like Pinot Noir complements the savory elements without overpowering the dish. If you prefer whites, a crisp Sauvignon Blanc can balance the creaminess of the sauce.

Non-alcoholic alternatives such as sparkling water with a slice of lemon or a fruity iced tea offer refreshing contrasts to the richness of Swedish meatballs. For those who enjoy coffee, a mild and well-balanced brew can enhance the overall dining experience.

When serving drinks, consider temperature—wine should be served chilled to enhance flavors, while hot beverages should always be brewed fresh.

Storage and Shelf Life

Leftover Swedish meatballs can be stored in an airtight container in the refrigerator for up to three days. Ensure they are cooled before refrigeration to maintain freshness.

For longer storage, freezing cooked meatballs is an excellent option. Place them in a freezer-safe container or bag, and they’ll keep for up to three months. When reheating, ensure to warm thoroughly to retain flavors and ensure safety.

Signs of spoilage include an off smell or changes in texture, so always check before consuming. Reheat in a skillet with a splash of broth to keep them moist and flavorful.

Make Ahead Strategies

Preparing Swedish meatballs ahead of time can save you precious moments during busy days. Start by mixing the meat mixture and refrigerating it overnight. This allows the flavors to meld beautifully.

Store shaped, uncooked meatballs in the fridge for up to a day or freeze them before cooking for future convenience. When ready to cook, simply thaw in the refrigerator overnight before pan-frying.

Reheating is equally easy; be sure to warm slowly in your sauce on low heat to retain moisture. Add fresh elements like herbs or a squirt of lemon just before serving to brighten flavors.

Scaling Instructions

Scaling your Swedish meatballs recipe can be done easily. For smaller gatherings, halve the recipe and serve as an intimate meal. Conversely, for larger crowds, simply double or even triple the ingredients while ensuring equal cooking times.

When adjusting, use larger or multiple pans to accommodate more meatballs at once. Keep an eye on the cooking time, as larger batches may require minor adjustments.

For storage, ensure containers are appropriately sized to avoid overcrowding, and label them with dates for your convenience.

Nutritional Deep Dive

A typical serving of Swedish meatballs is rich in protein due to the meat content, offering essential building blocks for muscle and overall health. The fat content mainly comes from the meat and cream, providing energy and flavor.

Micronutrients like iron and zinc are present due to the inclusion of quality meats, crucial for immune function and energy levels. For those conscious of dietary concerns, these can be adjusted by using lean meats or alternative grains.

Understanding portion analysis can aid in weight management; balancing servings with vegetables can help maintain a nutritious diet while enjoying this classic comfort food.

Dietary Adaptations

For gluten-free options, swap breadcrumbs with ground oats or gluten-free breadcrumbs, ensuring everyone can enjoy the dish without dietary restrictions.

A dairy-free alternative can be achieved by using coconut cream instead of heavy cream, allowing for a rich texture without the lactose.

For a heart-healthy twist, consider using lean turkey or chicken in place of beef and pork, providing a lower fat content while maintaining delicious flavors.

Keto adaptations involve keeping the carb content low by skipping traditional sides and using cauliflower mash instead of potatoes, satisfying cravings without straying from dietary preferences.

For vegan variations, consider using lentils or mushrooms as a base, creating a plant-based version that maintains the robust flavors beloved in traditional meatballs.

Troubleshooting Guide

If your meatballs turn out tough, avoid overmixing the ingredients; gently combine for the best texture. If flavor balance feels off, adjust seasoning after tasting, as under-seasoning can dampen the overall dish.

Temperature problems can occur if meatballs are cooked too fast on high heat. Lowering heat allows for even cooking without burning the exterior, ensuring everything is tender inside.

If you encounter ingredient challenges, remember simple substitutions can maintain taste, like replacing cream with broth or yogurt as needed. Timing issues can be resolved by testing doneness with an instant-read thermometer to ensure thorough cooking.

Recipe Success Stories

The community has shared numerous adaptations of this Swedish meatball recipe, showcasing the flexibility of flavors and personal touches. Many readers have pointed out their success in hosting dinner parties where this dish stole the spotlight.

Feedback has highlighted the ease of preparation and the widespread appeal of the flavors, with families praising its comfort and nostalgic value. Recipe adaptations have emerged, exploring different herbs and sauces, showing how these meatballs can be personalized.

Photography of the dish has also inspired home cooks to elevate their presentation, emphasizing garnishes and serving methods to create visually appealing meals that impress guests.

Frequently Asked Questions

Q1: Can I freeze Swedish meatballs?
Yes, Swedish meatballs can be frozen for up to three months. It’s best to freeze them after cooking for maximum flavor retention. Ensure they are in airtight containers to prevent freezer burn.

Q2: How do I reheat leftover meatballs?
Reheating is simple; warm the meatballs in the skillet with a bit of broth or water on low heat until heated through. Alternatively, use the microwave, but cover the dish to maintain moisture.

Q3: Can I make meatballs ahead of time?
Absolutely! Prepare the meatball mixture ahead of time and refrigerate, or shape the meatballs and freeze them for later cooking. They can be cooked from frozen or thawed overnight before use.

Q4: What can I serve with Swedish meatballs?
Popular sides include mashed potatoes, egg noodles, or roasted vegetables. For traditional Swedish flavor, lingonberry sauce is typically served alongside.

Q5: Are Swedish meatballs healthy?
When made with lean meats and lower-fat ingredients, Swedish meatballs can be a healthy option. Adjusting recipe components allows for controlling calorie and fat content while still enjoying delicious flavors.

Q6: How do I know when meatballs are cooked through?
Use a meat thermometer; meatballs should reach an internal temperature of 160°F (70°C). Cutting one open is also a good way to check for signs of doneness.

Q7: Can I use a slow cooker for this recipe?
Yes, slow cooking is an excellent method to develop flavors; simply sear the meatballs first and then place them in the slow cooker with the sauce to simmer.

Q8: How can I make this recipe gluten-free?
Substituting breadcrumbs with gluten-free alternatives or using oats can help maintain the texture and flavor without gluten.

Q9: What sauces pair well with Swedish meatballs?
While crème sauce is traditional, experimenting with BBQ sauce or a spicy mustard sauce brings variety to the table.

Q10: Can I use turkey instead of beef and pork?
Yes, turkey is a healthier alternative, making the meatballs lower in fat while still providing deliciousness. Adjust seasoning to compensate for the milder taste of turkey.

Additional Resources

Explore related recipes such as a classic mashed potato recipe or a delightful lingonberry sauce. Technique guides on meatball shaping and sauce-making can enhance your cooking skills while ingredient information on selecting the best meats can refine your culinary knowledge.

If you want to continue exploring Swedish cuisine, consider recipes for gravlax or Scandinavian potato pancakes that complement the flavors of Swedish meatballs. Seasonal variations and ingredient substitutions can also offer new perspectives on preparing this dish creatively.

Join the Conversation

We invite you to share your experiences making Swedish meatballs! Join us on social media to post your variations, photos, and tips. Your engagement fuels our community, inspiring others to explore culinary delights.

Don’t forget to leave a review or comment on this recipe to help others discover the joys of cooking Swedish meatballs. Share your best photography tips for capturing the magic of this beloved dish, and let’s celebrate together the art of home cooking.

The Recipe

Swedish Meatballs

Serves: 4 servings

Prep Time: 30 mins

Cook Time: 20 mins

Total Time: 50 mins

Kitchen Equipment Needed

  • Skillet
  • Mixing bowl
  • Measuring cups and spoons
  • Spatula

Ingredients

  • 1/2 lb ground beef
  • 1/2 lb ground pork
  • 1/2 cup breadcrumbs
  • 1/4 cup finely chopped onion
  • 1/4 cup heavy cream
  • 1 egg
  • 1 tsp allspice
  • 1 tsp nutmeg
  • Salt and pepper to taste
  • 2 tbsp vegetable oil for frying

Directions

  1. In a mixing bowl, combine ground beef, ground pork, breadcrumbs, chopped onion, heavy cream, egg, allspice, nutmeg, salt, and pepper.
  2. Mix gently until just combined, avoiding overmixing the meat.
  3. Shape the mixture into meatballs, about 1-inch in diameter.
  4. Heat vegetable oil in a skillet over medium heat. Sear the meatballs for about 2-3 minutes on each side until browned.
  5. Add remaining broth (if making sauce) and simmer for an additional 10 minutes until cooked through.
  6. Remove the meatballs from the skillet and add heavy cream to the pan juices, stirring to create a creamy sauce.
  7. Serve warm over mashed potatoes or noodles, drizzled with the sauce.

Recipe Notes

  • For extra flavor, mix in some fresh herbs like parsley or dill.
  • For lower fat, substitute heavy cream with Greek yogurt or low-fat milk.
  • These meatballs freeze well; just make sure to thaw them before reheating.

Vibrant Roasted Beet and Goat Cheese Log Recipe Delight

Vibrant Roasted Beet & Goat Cheese Log: A Colorful Culinary Delight

⚖️
Difficulty
Easy

⏲️
Prep Time
20 mins

🕒
Cook Time
40 mins

⏱️
Total Time
60 mins

🍽️
Servings
8 servings

Experience a burst of color and flavor with our Vibrant Roasted Beet & Goat Cheese Log. This eye-catching dish combines roasted beets and creamy goat cheese into an exquisite roll that’s perfect for entertaining or elevating your everyday meals. With its rich, earthy flavor from the beets and the tangy creaminess of goat cheese, this recipe is both visually stunning and deliciously satisfying.

The warm, roasted beets lend a tender texture that harmonizes beautifully with the smooth goat cheese, and each bite reveals a delightful medley of flavors. Whether served as an elegant appetizer or a sophisticated side dish, this roasted beet and goat cheese log is sure to impress. Let’s dive into this vibrant recipe and explore what makes it a must-try!

Quick Recipe Highlights

  • Flavor Profile: The sweetness of roasted beets perfectly complements the tanginess of goat cheese, creating a balance that tantalizes the taste buds.
  • Texture: The creamy interior contrasts with the soft and slightly crunchy exterior, providing an engaging mouthfeel that lingers.
  • Aroma: A warm, earthy aroma fills the kitchen, enhanced by the freshness of herbs and the richness of cheese.
  • Visual Appeal: The striking red and purple colors of the beets make this dish a feast for the eyes, ideal for festive occasions.
  • Skill Level Needed: This dish is beginner-friendly, making it accessible for cooks of all levels.
  • Special Equipment: A food processor or blender for smooth mixing, and parchment paper for rolling.

Recipe Overview

  • Difficulty Level: This recipe is classified as easy, allowing even novice cooks to create a stunning dish with minimal effort.
  • Category: It falls under appetizers, but can also serve as a unique side dish at any gathering.
  • Cuisine: Drawing from Mediterranean influences, this dish highlights the use of fresh, vibrant ingredients common in that region.
  • Cost: The ingredients are generally affordable, making this an economical option for entertaining.
  • Season: Best enjoyed in cooler months when beets are in season and roasted flavors are most comforting.
  • Occasion: Perfect for holidays, dinner parties, or as a showstopper at potlucks.

Why You’ll Love This Recipe

The Vibrant Roasted Beet & Goat Cheese Log offers a delightful blend of taste and texture that is hard to resist. With its gently roasted beets, the natural sweetness pairs beautifully with the tangy goat cheese, creating a perfect harmony of flavors. Each bite reveals layers of creamy richness and earthy goodness, making it a standout among appetizers. The contrast of the smooth filling against the soft exterior presents an engaging texture that excites the palate.

This recipe boasts remarkable convenience, requiring just a few straightforward steps to prepare. Simply roast the beets, blend the filling, and roll it all together—all while creating an impressive dish that requires minimal culinary skills. It’s a fantastic way to impress guests without spending hours in the kitchen. Serve this delightful log chilled, letting the flavors meld beautifully as it sets in the refrigerator.

The nutritional advantages of beets make this dish even more appealing. Beets are low in calories yet high in essential nutrients, including vitamins, minerals, and antioxidants. Goat cheese, being lower in fat compared to other cheeses, adds a creamy element while also contributing calcium and protein. Together, they create a dish that not only satisfies but also nourishes.

This recipe shines in a social setting, effortlessly elevating any gathering. Its stunning presentation encourages sharing and conversation around the table, bringing loved ones closer together over a delicious creation. As a visually impressive dish, it is bound to become the highlight of your next event, creating lasting memories.

Cost-effectiveness is also a key benefit. The ingredients are inexpensive, and a single roll provides ample servings, maintaining a budget-friendly approach to entertaining. With the seasonality of the beets, this dish is both accessible and environmentally conscious, making it a smart choice for the conscious cook.

Historical Background and Cultural Significance

The origin of beets can be traced back to ancient civilizations where they were cultivated for their leaves and roots. However, the vibrant root vegetables gained popularity across Europe with the Romans adopting them for culinary use. Over centuries, their distinct color and flavor made them a staple in many kitchens, ultimately leading to diverse regional dishes centered around beets.

In Mediterranean cultures, beets are celebrated not only for their nutritional qualities but also for their visual appeal. They often appear in salads, spreads, and appetizers, showcasing the harmony of colors and flavors that define many of these culinary traditions. The combination of beets and cheese has become a classic pairing, resonating through generations.

The evolution of the roasted beet and goat cheese log reflects contemporary culinary trends, where vibrant colors and health-conscious ingredients are paramount. This dish represents the modern movement that seeks to balance aesthetics with health, providing a wholesome eating experience without sacrificing taste.

Regional variations of this dish often include additional herbs, spices, or even nuts, showcasing local ingredients and preferences. Over time, it has adapted to various culinary approaches, embracing the creativity of individual cooks while staying true to its roots.

Ingredient Deep Dive

Beets: Beets have been revered since ancient times, praised for their rich flavor and vivid color. They are versatile and can be roasted, boiled, or pickled. Nutritionally, beets are excellent sources of vitamins A and C, folate, and potassium. When selecting beets, look for firm roots without soft spots or blemishes. Store them unwashed in the fridge for up to two weeks. If you’re in a pinch, you can swap them with cooked and canned beets, though fresh offers the best flavor.

Goat Cheese: Goat cheese is known for its unique flavor profile, which can range from tangy to creamy. This cheese is rich in probiotics and lower in fat compared to cow’s milk cheese, making it a healthy option. When selecting goat cheese, seek options that are fresh, stored in brine, to maintain moisture. It should be kept in the fridge for a few weeks. For substitutes, cream cheese or ricotta can work in a pinch, but adjust the seasoning accordingly to mimic the tangy flavor.

Common Mistakes to Avoid

  • Overcooking the Beets: Ensure to roast your beets just until fork-tender; overcooking can lead to a mushy texture that doesn’t hold up well in the log.
  • Underseasoning: Don’t forget to season your goat cheese mix well. A pinch of salt and herbs can elevate the flavors significantly.
  • Skipping the Chilling Time: Let the log chill properly in the fridge before slicing. This helps it to set and makes slicing much smoother.
  • Not Using Fresh Ingredients: Fresh herbs and cheese will provide the best flavor profile. Always opt for high-quality ingredients, especially the cheese.
  • Not Peeling the Beets: Make sure to peel the beets post-roasting; the skins can be tough and unappealing in the final dish.
  • Improper Rolling Technique: When rolling the log, be gentle and keep the shape tight to avoid cracks and prevent the filling from spilling out.
  • Using Too Much Filling: Fill the log just right; too much can cause it to burst during the rolling process.
  • Ignoring Texture: Pay attention to the goat cheese’s texture; it should be creamy yet stable enough to hold the structure when rolled.

Essential Techniques

Roasting Beets: Roasting brings out the natural sweetness of beets while caramelizing their sugars. Cut them into similar-sized pieces to ensure even cooking. Wrap them in foil and bake at 400°F until fork-tender. Keep an eye out for a slightly charred exterior as a cue of deliciousness.

Rolling Techniques: When forming the log, ensure to work quickly and with gentle pressure. Use parchment paper to assist in rolling, providing support and preventing sticking. A unified seal will help maintain the shape while chilling.

Pro Tips for Perfect Vibrant Roasted Beet & Goat Cheese Log

1. Choose the freshest beets for the best flavor; firm and vibrant-colored beets yield the most delicious results.

2. Experiment with flavor by adding herbs like thyme or dill to your goat cheese mixture for an aromatic twist.

3. For heat lovers, consider adding a pinch of red pepper flakes to the goat cheese for extra kick.

4. Garnish with nuts or seeds for added crunch and another layer of flavor.

5. Allow the log to sit at room temperature briefly before serving to enhance the flavors further.

6. Consider pairing this dish with homemade crackers for added texture and taste contrast.

7. Play with presentation by slicing the log at an angle for more aesthetic appeal.

8. Don’t rush the chilling step; the longer it sets, the more the flavors meld and improve.

Variations and Adaptations

For a regional twist, consider adding nuts such as walnuts or pecans, known for their crunchy texture, to complement the creamy goat cheese. Seasonal adaptations can include adding fresh herbs or subtle spices to highlight farm-fresh summer flavors. For those with dietary restrictions, sub out the goat cheese for a vegan cheese alternative, making it entirely plant-based.

Flavor variations are endless—think of incorporating sun-dried tomatoes or olives for a Mediterranean flair, or even a drizzle of balsamic glaze before serving. Texture modifications can be achieved by adding crispy fried onions for garnish or crunchy vegetables on the side. Presentation alternatives may include serving individual portions in small bowls or elegant bites on skewers for easy appetizer handling.

Serving and Presentation Guide

For plating, consider using elegant boards or slate platters to enhance visual appeal. Garnishing the log with fresh herbs or microgreens will not only brighten the presentation but also echo the flavors within the dish. Traditional accompaniments might include earthy whole-grain crackers or slices of baguette, encouraging guests to indulge. Modern suggestions could involve serving alongside assorted nuts or colorful vegetable sticks for a contemporary twist.

Temperature considerations are key; serve the log chilled or slightly at room temperature to bring out the flavors. For portion control, aim for even slices, allowing guests to savor the dish without overwhelming their appetite.

Wine and Beverage Pairing

For wine pairings, a crisp Sauvignon Blanc complements the earthy beets while cutting through the creaminess of the goat cheese. A light Pinot Noir can also forge a delightful harmony with the herbaceous notes. For non-alcoholic alternatives, sparkling water infused with lemon creates a refreshing balance, while a herbal iced tea provides a soothing complement.

Storage and Shelf Life

Store the beet and goat cheese log in an airtight container, keeping it in the fridge for up to a week. Ensure the container is sealed to maintain freshness. Look for signs of spoilage, such as an off odor or discoloration. If desired, freezing is possible, but for best quality, it’s advisable to consume it fresh or before the week is up. To reheat, let the log sit at room temperature before serving, or lightly warm to room temperature for enhanced flavors.

Make Ahead Strategies

This recipe shines as a make-ahead option! Prepare the log a day in advance, allowing flavors to meld beautifully overnight. Keep it stored properly in the fridge—this can save you precious time on the day of your gathering. To ensure optimal quality, avoid adding any garnishes until the log is ready to serve, allowing for freshness in textures and flavors.

Scaling Instructions

When scaling the recipe, halving or doubling can be easily managed by adjusting the beet and cheese quantities accordingly. For larger gatherings, triple the ingredients and consider using a taller log or a wider platter for a grand presentation. Keep an eye on roasting times that may vary with different batch sizes, and adjust ingredients proportionately for balanced flavors.

Nutritional Deep Dive

This dish is both filling and nutritious. Beets contribute low calories, high fiber, and essential minerals, making the log a guilt-free option. Goat cheese, while creamy, offers protein and calcium without excess fat, making it a smart choice for health-conscious eaters. When considering portion sizes, understanding the macro breakdown is beneficial for those monitoring their diets. This recipe is great for maintaining balanced meals while enjoying robust flavors.

Dietary Adaptations

This recipe can be easily modified to suit various diets. For a gluten-free version, serve with gluten-free crackers or vegetable sticks. Those with a dairy intolerance can swap out the goat cheese with cashew-based cream cheese alternatives. Vegan adjustments are also simple by using plant-based cheeses or nut spreads. For Keto enthusiasts, reducing the amount of beets and pairing with low-carb snacks maintains adherence while enjoying.

Troubleshooting Guide

If your log ends up too soft, consider adding more goat cheese or a stabilizing agent like gelatin to enhance firmness. For flavor balance, always taste as you mix, adjusting while incorporating your ingredients. Equipment challenges can arise, so ensure your processor or blender is powerful enough to achieve a smooth blend, preventing lumps in your filling.

Recipe Success Stories

Many home cooks have shared enthusiastic feedback about their experiences making this log. Suggestions often highlight variations like adding herbs or spices tailored to their taste. Photography tips shared by readers underscore how capturing the vibrant colors can allure guests even more—using natural light can elevate food photography quality and highlight the dish’s elegance.

Frequently Asked Questions

Can I prepare this in advance?

Absolutely! Prepare the log a day ahead to allow flavors to meld. Just ensure it’s properly stored in the refrigerator.

How long does this log last in the fridge?

Stored correctly, this dish can last up to a week in an airtight container.

Can I freeze it?

Yes, but forbest quality, it’s recommended to consume fresh. If freezing, ensure proper sealing to avoid freezer burn.

Are there any substitutes for goat cheese?

Cream cheese or vegan cheese alternatives can work well. Adjust seasonings to immerse the desired flavor.

What should I serve it with?

Serve with whole-grain crackers, crostini, or vegetables for a delightful snack combination.

Is this suitable for a vegan diet?

Yes, simply replace goat cheese with a plant-based cheese or nut spread to maintain the creamy texture without dairy.

Can I use canned beets instead of fresh?

While fresh is ideal for flavor, canned beets can be a convenient option if you’re short on time; just drain and rinse first.

What herbs pair well with this dish?

Thyme, dill, or even chives enhance the flavors beautifully and complement the cheese wonderfully.

How do I know when the beets are done roasting?

Beets are done when they can be easily pierced with a fork but are not falling apart.

Can I add nuts to the log?

Yes! Chopped nuts can add an extra crunch and flavor depth when mixed with the goat cheese.

What if I don’t have parchment paper?

You can use plastic wrap or simply roll the log by hand, although it requires a steadier approach.

Additional Resources

For more delicious offerings, consider exploring our other beet recipes, like Beet Hummus or Beet Salad. Check out our technique guides on roasting vegetables to achieve the best flavors. Explore our seasonal ingredient guide for incorporating fresh, local produce into your meals. Conscious cooking often means utilizing seasonal ingredients—make the most out of each season!

Join the Conversation

We encourage you to share your experiences and variations on this recipe! Post your beautiful photographs on social media with our hashtag and connect with other passionate cooks. Engage with our community by commenting on what worked best for you or suggesting additional ingredients you loved. Your feedback enriches our cooking community, inspiring others to try their hands at this delightful recipe!

The Recipe

Vibrant Roasted Beet & Goat Cheese Log

Serves: 8 servings

Prep Time: 20 mins

Cook Time: 40 mins

Total Time: 60 mins

Kitchen Equipment Needed

  • Food processor or blender
  • Parchment paper
  • Baking tray
  • Knife for slicing

Ingredients

  • 4 medium-sized beets
  • 8 oz goat cheese, softened
  • 2 tbsp fresh herbs (thyme, dill, or chives)
  • 1 tbsp olive oil
  • Salt and pepper to taste

Directions

  1. Preheat your oven to 400°F (200°C). Wrap each beet in aluminum foil and roast for about 40-50 minutes until tender.
  2. Let the beets cool, peel the skin, and chop them into small pieces.
  3. In a food processor, blend the roasted beets with goat cheese, olive oil, and herbs until creamy.
  4. Lay out parchment paper and place the beet mixture onto it. Form it into a log shape.
  5. Roll the parchment around the log tightly, securing the ends. Chill in the fridge for at least 1 hour.
  6. After chilling, remove from the parchment, slice, and serve with crackers or fresh vegetable sticks.

Recipe Notes

  • Feel free to mix in chopped nuts for added texture.
  • If serving for a special occasion, consider drizzling balsamic reduction on the log.

Wholesome Hearty Sausage and Veggie Stew Recipe for All

Hearty Sausage and Veggie Stew: A Comforting Meal for All Seasons

⚖️
Difficulty
Easy

⏲️
Prep Time
15 mins

🕒
Cook Time
45 mins

⏱️
Total Time
60 mins

🍽️
Servings
6 servings

Welcome to the heartwarming world of Hearty Sausage and Veggie Stew! This delightful stew is not just a meal; it’s a cozy hug in a bowl. Infused with rich flavors of savory sausage, vibrant vegetables, and aromatic herbs, each spoonful invites warmth and comfort. This recipe is perfect for chilly nights, providing both nourishment and satisfaction, making it ideal for family dinners or meal prepping for the week ahead.

Imagine yourself on a cold evening, returning home to the inviting aroma of a bubbling pot of stew. The scent of sautéed onions and garlic mingles with the robust essence of sausage, creating an irresistible invitation to gather around the dinner table. As you ladle the stew into bowls, the colorful medley of carrots, potatoes, and celery brings a visual feast that promises a delicious and hearty experience.

Quick Recipe Highlights

  • Flavor Profile: The combination of smoky sausage and earthy vegetables creates a balanced and satisfying dish that warms the soul.
  • Texture: The tender chunks of sausage combined with the soft but still slightly firm vegetables provide a hearty mouthfeel.
  • Aroma: Expect a blend of savory and herbal notes that will fill your kitchen and welcome everyone to the table.
  • Visual Appeal: Bright orange carrots and green celery against the golden broth make for a visually appetizing dish.
  • Skill Level Needed: Even novice cooks can tackle this recipe, thanks to simple techniques and accessible ingredients.
  • Special Equipment: A large pot or Dutch oven is recommended to hold all the ingredients as they simmer together.

Recipe Overview

  • Difficulty Level: The Hearty Sausage and Veggie Stew is categorized as easy due to its straightforward steps and forgiving nature.
  • Category: This dish falls under the stews category, perfect for comforting meals especially on cold nights.
  • Cuisine: This hearty stew is inspired by rustic European culinary traditions, celebrating the use of seasonal vegetables and meats.
  • Cost: With accessible ingredients, the total cost per serving remains budget-friendly, making it great for families on a budget.
  • Season: This stew shines in the fall and winter seasons, utilizing root vegetables and warm spices.
  • Occasion: Ideal for cozy family dinners, game nights, or gatherings with friends.

Why You’ll Love This Recipe

This Hearty Sausage and Veggie Stew brings an enticing flavor experience that’s sure to please any palate. The smoky sausage adds depth and richness, while the fresh vegetables contribute brightness and texture. Each bite is a harmonious blend of savory goodness that fills you up, inside and out.

This stew is incredibly convenient. Prep time is minimal, and once everything is in the pot, you can relax while it cooks. Meal prepping? This dish keeps well, making it perfect for lunches throughout the week or a quick dinner solution after a busy day.

Nutritionally, the colorful array of vegetables means you’re getting a variety of vitamins and minerals, along with protein from the sausage. This stew not only satisfies your hunger but also nourishes your body, making it a wholesome choice for family meals.

Whether you’re gathering with family or entertaining friends, serving a hearty stew creates a warm and inviting atmosphere. This dish invites everyone to share stories around the table, making it a centerpiece for connection and joy.

Cost-effectiveness is another reason to love this recipe. Using affordable ingredients, especially in the winter months when vegetables are in season, allows you to create a delicious meal without breaking the bank.

Historical Background and Cultural Significance

The hearty stew has a long and rich history, often associated with the peasant foods of Europe designed to be filling and nutritious. Originating from humble beginnings, recipes for stews have evolved over centuries, influenced by the regions they hail from and the ingredients available.

Culturally, stews are often seen as a communal dish, bringing families and friends together. Throughout history, sharing a stew was more than a meal; it was a tradition that fostered togetherness and warmth in communities.

Over time, this recipe has adapted to include a variety of ingredients depending on local preferences, showcasing the beauty of culinary evolution. From adding seasonal vegetables to incorporating diverse spices, each version carries the fingerprints of its origins.

Regional variations also exist, with countries like France, Italy, and Ireland boasting their unique takes on stew. Nonetheless, the core idea of a hearty, warming dish remains constant, symbolizing comfort in every culture.

Ingredient Deep Dive

Sausage: Sausage is a beloved ingredient across cultures, with origins dating back to ancient civilizations. It’s rich in protein and can be made from various meats, offering a hearty base for stews. When selecting sausage, look for quality products with minimal additives. Fresh sausage is best used immediately, while cooked varieties can be stored for longer periods. Consider swapping pork sausage for turkey or vegan options for lighter, healthier alternatives.

Vegetables: The vegetables in this stew—carrots, potatoes, and celery—are all staples in many households. They provide essential nutrients like fiber and vitamins. Fresh vegetables are ideal, but frozen can be a convenient and equally healthy option. Store fresh veggies in a cool, dark place and use them within a week for optimal freshness. Don’t hesitate to experiment with seasonal vegetables to give the stew a unique twist!

Common Mistakes to Avoid

  • Skipping the browning of the sausage can lead to a lack of depth in flavor. It’s crucial to caramelize the meat to develop its full essence.
  • Overcrowding the pot can steam the vegetables instead of sautéing them, resulting in a soggy texture instead of the desired crunch.
  • Not seasoning adequately at every stage can leave the stew lacking flavor. Adjust tasting as ingredients are combined.
  • Using old or wilted vegetables can diminish the quality of the dish, leading to undesired flavors. Always choose fresh produce.
  • Rushing the cooking process may not allow the flavors to meld properly. Give it the time it needs for a delightful outcome.
  • Neglecting to stir occasionally could cause the stew to stick to the bottom of the pot or scorch, altering the flavor.
  • Overcooking vegetables will lead to mushiness and loss of texture. Keep an eye on cooking times!
  • Forgetting to let the stew sit for a moment after cooking allows the flavors to improve with residual heat.

Essential Techniques

Browning the Sausage: This is vital for enhancing the flavor of the stew. Brown the sausage until it develops a rich, dark color. Avoid overcrowding the pan, which can cause steam instead of browning. Look for a nice crust on the meat before moving on to the next step.

Sautéing Vegetables: Beginning with onions and garlic builds a flavor base for the stew. Sauté until they are translucent and fragrant, which helps release the natural sweetness of the vegetables. Keep an eye on the heat to avoid burning.

Simmering: A low-and-slow simmer is essential for melding the flavors. Cover the pot to retain moisture while allowing the stew to develop a robust taste. Stir periodically, and try not to lift the lid too often, as this will release steam.

Tasting and Adjusting: As the stew cooks, periodically taste and adjust seasoning. This ensures balanced flavors and prevents it from being bland or overly salty. Trust your palate and make the stew your own!

Pro Tips for Perfect Hearty Sausage and Veggie Stew

1. Use a variety of colorful vegetables to elevate the nutritional value and visual appeal of the dish.

2. If time allows, let the stew cool completely before refrigerating. This helps flavors continue to develop even after cooking.

3. To enhance the herb profile, experiment with fresh herbs like thyme or rosemary right before serving.

4. Consider adding a splash of vinegar or lemon juice at the end to brighten the flavors.

5. For a richer broth, you can deglaze the pan with white wine after browning the sausage, scraping to release the tasty bits.

6. If you prefer a thicker stew, mash a portion of the vegetables against the pot’s side before serving to add creaminess.

7. Top with fresh parsley or grated cheese for a delightful finish.

8. Pair with crusty bread or a simple salad for a complete meal.

Variations and Adaptations

Regional variations such as adding beans or lentils can enhance the stew’s protein content and make it even heartier. Adjust the spices to regional preferences, such as paprika for a smoky Spanish flair.

Seasonal adaptations allow you to swap vegetables based on what’s fresh in your area. Winter root vegetables like parsnips can stand in for regular potatoes, while summer zucchinis can become a part of the mix when in season.

For dietary modifications, consider using vegan sausage or plant-based proteins to cater to vegetarian or vegan diets. This keeps the hearty essence while accommodating diverse preferences.

Flavor variations can also include introducing unique elements like curry powder for an Indian twist or adding some heat with crushed red pepper flakes.

For texture modifications, try blending a portion of the stew after cooking; this creates a creamy consistency while leaving some chunks for a satisfying mouthfeel.

Presentation alternatives might involve serving the stew in individual bread bowls or pairing it with artisanal cracker sides to elevate the dining experience.

Serving and Presentation Guide

Plating techniques can include serving the stew in large bowls with a sprinkle of fresh herbs on top to add color contrast. Consider using rustic bread bowls that complement the hearty feel of the dish.

Garnishing ideas like a dollop of sour cream or a drizzle of balsamic glaze can enhance both flavor and presentation. Pair the stew with crusty bread or freshly baked rolls to complete the meal.

Traditional accompaniments like a mixed greens salad or roasted vegetables can create a rounded dining experience, while modern serving suggestions include upscale touches like gourmet olive oil or truffle salt.

Temperature considerations are vital; this stew is best served piping hot. Keep it covered until ready to serve, and offer additional hot bread for eager guests.

Portion control tips can include serving smaller amounts initially to entice guests back for seconds. Consider pairing the stew with lighter sides to complement rather than overwhelm the dish.

Wine and Beverage Pairing

For wine pairings, a medium-bodied red such as Merlot or Zinfandel complements the flavors of the sausage beautifully. Look for wines with soft tannins that won’t overpower the dish.

Non-alcoholic alternatives like infused sparkling water or herbal teas serve as refreshing pairings that cleanse the palate without competing with the stew.

If applicable, coffee or tea could make an excellent after-dinner option to round off the meal. Consider serving a light, herbal tea to aid digestion post-stew.

Temperature considerations should include serving wine at proper temperatures; reds around 60-65°F to highlight their fruity flavors.

Finally, serving suggestions can extend to themed meals. Host a stew night and pair the dish with various wines to explore flavor profiles together.

Storage and Shelf Life

Storage methods include keeping the stew in an airtight container once it has cooled to room temperature. Properly stored, it can last in the refrigerator for up to three days.

Temperature requirements dictate reheating the stew gently on the stove or microwave, ensuring it’s warmed through completely. Stir occasionally to avoid hot spots.

Container recommendations should highlight using glass or BPA-free plastic to avoid contaminating flavors. Consider labeling containers with dates to monitor freshness.

Signs of spoilage include an off smell or unintended texture change, indicating that it’s best to discard the product.

For those interested in freezing guidelines, this stew freezes well. Divide into serving sizes and store for up to three months, ensuring to leave space for expansion.

Make Ahead Strategies

For a prep timeline, consider chopping vegetables a day before and storing them in the fridge to streamline cooking day preparations.

Storage between steps can include pre-cooking the sausage in advance to expedite the overall cooking process on the final day.

Quality impact assessment reveals that while you can make the stew ahead, allowing it to rest overnight enhances its flavors through melding.

Assembly tips involve preparing all ingredients in advance so you can simply combine everything when ready to cook.

Reheating guidelines suggest gently warming up the stew on low, avoiding high heat to prevent losing moisture or flavor.

Fresh element additions can be made just before serving, such as tossing in some fresh spinach or herbs to enhance freshness.

Scaling Instructions

Halving the recipe is straightforward; use smaller quantities of each ingredient while remaining consistent on cooking times and methods.

Doubling or tripling the recipe requires ensuring your pot is big enough to accommodate the increase in ingredients to prevent overflow.

Equipment adjustments could involve using larger stockpots or multiple pots to manage the increased volume appropriately.

Timing modifications may need to account for the larger batch, as cooking might take slightly longer to reach the desired depth of flavor.

Storage considerations entail using the extra stew within three days or freezing the leftovers in manageable portions for future meals.

Nutritional Deep Dive

The macro breakdown of this stew highlights a balanced mix of carbohydrates from the vegetables, protein from the sausage, and essential fats if using any oil in preparation.

Micronutrient analysis shows that the variety of vegetables not only adds vitamins but also provides essential fiber to the dish, promoting digestive health.

Health benefits include the stew working as a hearty source of nutrients, providing sustained energy and satisfaction while being nutrient-dense.

Dietary considerations should include attention to portion sizes and total caloric intake, particularly if served with bread.

Portion analysis can help ensure a balanced diet, making it easy to enjoy the stew in moderation alongside other healthy choices.

Weight management tips can include serving the stew with a side salad to enhance nutrition while minimizing calorie density.

Dietary Adaptations

For gluten-free options, ensure that all ingredients, including the sausage, are free from gluten. This can be done by choosing certified products.

Dairy-free adaptations might involve replacing any cream or dairy elements with coconut milk or a dairy-free alternative for creaminess.

Vegan adaptations replace sausage with plant-based proteins such as lentils, beans, or vegan sausage, maintaining heartiness without animal products.

Low-carb options can include omitting potatoes and using cauliflower as a replacement to keep the stew filling while reducing carbohydrate content.

Keto modifications would emphasize higher fat content through the use of more sausages and less vegetable bulk for lower carbs.

Paleo diets would allow for the same hearty ingredients while avoiding processed items like traditional sausages, opting for natural alternatives.

Low-FODMAP adaptations can be achieved by eliminating high-FODMAP vegetables like onions and substituting with green onions for flavor.

Other specific diets can find accommodations in this recipe through creative ingredient substitutions while keeping its warming, comforting essence.

Troubleshooting Guide

For texture issues, such as the stew being too watery, let it simmer uncovered for a while to reduce the liquid. This will thicken up the stew naturally.

If the flavor balance seems off, adding a splash of vinegar or a sprinkle of salt can help enhance the flavors and resolve blandness.

Temperature problems can arise if the stew boils instead of simmers, which can make it tough instead of tender. Adjust the heat accordingly.

Equipment challenges like using the wrong pot can lead to uneven cooking. A heavy-bottomed pot helps distribute heat evenly.

Ingredient substitutions can lead to unwanted flavors; test small adjustments before adding large quantities to avoid overpowering the stew.

Timing concerns can result in overcooked ingredients. Keep track of times carefully, especially for the vegetables that should retain some crunch.

Recipe Success Stories

Community feedback from those who have made this Hearty Sausage and Veggie Stew highlights its satisfying flavor and ease of preparation. Many share their variations and enhancements, making the recipe feel personal.

Variation successes often include readers mentioning how adding different spices offered new flavor profiles, keeping the dishes fresh and exciting each time.

Adaptation stories include families making it a weekly tradition, showcasing how a simple meal can cultivate togetherness among loved ones.

Photography tips suggest capturing the stew while steaming hot and garnished beautifully, allowing its vibrant colors to shine through.

Frequently Asked Questions

Can I make this stew in a slow cooker? Yes, you can; browning the sausage and vegetables first enhances flavor, but after that, you can transfer everything to the slow cooker for hours on low heat.

How do I store leftovers? Store leftovers in airtight containers in the fridge for up to three days, or freeze for longer storage. Thaw completely before reheating.

What can I use instead of sausage? You can use ground turkey, chicken sausage, or plant-based sausage for a lighter or vegetarian version while maintaining the stew’s heartiness.

Is this stew gluten-free? Yes, if you ensure that all components, especially any broth or seasoning, are gluten-free products.

Can I add more vegetables? Absolutely! Feel free to add any seasonal vegetables you enjoy; just be mindful of adjusting cooking times as needed.

Does this recipe require any special skills? No, this recipe is designed for cooks of all skill levels with straightforward steps and accessible techniques.

Can I prepare it ahead of time? Yes, you can make the stew ahead of time; it often tastes even better the next day as the flavors meld.

Can I add beans for extra protein? Yes, adding chickpeas or white beans can enhance protein levels and give the stew a nutritious boost.

What’s the best way to reheat the stew? Reheat slowly on the stove over low heat, stirring occasionally, until warmed through.

How spicy is this dish? The recipe is not inherently spicy, but you can add spices or hot sauce to suit your preference.

Additional Resources

For those interested in related recipes, consider exploring variations like a vegetable soup or chili for more comforting meals. Technique guides on sautéing and braising can further enhance your cooking skills.

Ingredient information about seasonal vegetables can inspire creativity in your cooking, leading to delightful, fresh variations of this stew.

Equipment recommendations include durable Dutch ovens or slow cookers, which are great for creating hearty meals consistently.

Seasonal variations can include summer vegetable stews or fall harvest recipes that highlight local produce during different times of the year.

Join the Conversation

Engaging with your audience through social media sharing can spread the love for your Hearty Sausage and Veggie Stew. Encourage readers to post their versions with unique hashtags.

Photography tips of finished dishes can also draw attention and garner interest from fellow food enthusiasts, building a community around your recipe.

Recipe reviews can enhance credibility, allowing new readers to feel comfortable trying your stew knowing others have enjoyed the experience.

Lastly, foster community engagement by sharing variations, inviting readers to share their suggestions on how they customize their stew experiences.

The Recipe

Hearty Sausage and Veggie Stew

Serves: 6 servings

Prep Time: 15 mins

Cook Time: 45 mins

Total Time: 60 mins

Kitchen Equipment Needed

  • Large pot or Dutch oven
  • Cutting board
  • Sharp knife
  • Wooden spoon
  • Measuring cups and spoons

Ingredients

  • 1 lb of sausage (Italian or your choice)
  • 2 cups carrots, chopped
  • 2 cups potatoes, diced
  • 2 cups celery, chopped
  • 1 onion, diced
  • 4 cloves garlic, minced
  • 4 cups chicken or vegetable broth
  • 1 tsp thyme
  • 1 tsp rosemary
  • Salt and black pepper to taste
  • Fresh parsley, for garnish

Directions

  1. In a large pot, brown the sausage over medium heat until fully cooked. Remove and set aside.
  2. In the same pot, sauté the onions and garlic until translucent.
  3. Add the chopped carrots, potatoes, and celery to the pot. Stir and cook for an additional 5 minutes.
  4. Pour in the broth, add the cooked sausage, thyme, and rosemary, and season with salt and pepper.
  5. Bring to a boil, then reduce to a simmer and cover. Cook for 30-35 minutes until vegetables are tender.
  6. Serve hot, garnished with fresh parsley.

Recipe Notes

  • Feel free to substitute the sausage with your preferred meat or plant-based alternative.
  • Add any seasonal vegetables you have on hand for extra nutrition and variety.
  • Leftovers can be stored in an airtight container in the fridge for up to 3 days.