Decadent Cherry Cheesecake Brownies: A Perfect Dessert for Any Occasion
Article: Cherry Cheesecake Brownies – A Decadent Dessert Delight
Introduction to Cherry Cheesecake Brownies
Cherry Cheesecake Brownies bring together the best of three worlds: rich chocolate, creamy cheesecake, and sweet cherries. Perfect for parties, holidays, or indulging at home, these layered delights are as beautiful as they are delicious.
For another delectable dessert, check out Kentucky Butter Cake – a Southern classic!
The Origins of Cheesecake Brownies
Cheesecake brownies emerged as a creative twist on traditional brownies.
Adding cherries elevates the flavor profile, creating a fruity balance against the rich chocolate and creaminess.
A dessert that combines the aesthetics of a swirl with the indulgence of layered textures.
Complement these brownies with Italian Stromboli for a savory counterbalance at your next gathering.
Ingredients and Preparation
Essential Ingredients
For the Brownie Layer:
Butter, cocoa powder, sugar, eggs, vanilla extract, and flour.
For the Cheesecake Layer:
Cream cheese, sugar, egg, and vanilla.
For the Cherry Swirl:
Cherry pie filling or fresh cherries cooked down with sugar.
Tools Needed
A 9×13 baking dish, mixing bowls, spatula, and whisk.
Parchment paper for easy removal and clean slicing.
Step-by-Step Recipe
Ingredients:
Brownie Layer:
1 cup butter
1 cup cocoa powder
2 cups sugar
4 eggs
1 tsp vanilla
1 cup flour
Cheesecake Layer:
8 oz cream cheese, softened
½ cup sugar
1 egg
1 tsp vanilla
Cherry Swirl:
1 cup cherry pie filling
Instructions:
Prepare the Brownie Batter: Melt butter and cocoa powder together. Stir in sugar, eggs, vanilla, and flour until smooth.
Make the Cheesecake Layer: Beat cream cheese, sugar, egg, and vanilla until creamy.
Assemble Layers: Pour brownie batter into the baking dish. Layer cheesecake mixture on top and add dollops of cherry filling. Use a skewer to create a swirl effect.
Bake and Cool: Bake at 350°F for 35–40 minutes. Let cool completely before slicing.
Creative Variations
1. Gluten-Free Cherry Cheesecake Brownies
Replace regular flour with almond flour or a gluten-free mix.
2. Vegan Option
Use plant-based butter and cream cheese. Substitute eggs with flaxseed meal.
3. Decadent Additions
Add chocolate chips or nuts to the brownie layer.
Incorporate almond extract for a cherry-almond flavor profile.
Serving Suggestions and Storage
Best Pairings
Serve with whipped cream or vanilla ice cream.
Pair with hot chocolate, coffee, or dessert wine.
Storage Tips
Store in an airtight container in the refrigerator for up to 5 days.
Freeze individually wrapped slices for up to 2 months.
FAQs About Cherry Cheesecake Brownies
1. Can I use fresh cherries instead of pie filling?
Yes, cook fresh cherries with sugar and cornstarch to create a thick filling.
2. How can I create perfect swirls?
Use a toothpick or skewer to gently swirl the cheesecake and cherry layers.
3. Can these brownies be made ahead?
Absolutely! Prepare and refrigerate up to two days in advance.
4. Are these brownies freezer-friendly?
Yes, freeze in airtight containers for up to two months.
5. How do I prevent the cheesecake layer from cracking?
Ensure the oven temperature is consistent and avoid overbaking.
Add Italian Stromboli to your dessert night for a mix of sweet and savory treats.
Conclusion
Cherry Cheesecake Brownies are a decadent, versatile dessert that combines the best of chocolate, cream cheese, and cherries. Whether for a holiday gathering or an indulgent snack, they’re sure to be a hit.
Crockpot Angel Chicken: A Creamy, Comforting Slow-Cooker Recipe
Article: Crockpot Angel Chicken – A Heavenly Comfort Food
Introduction to Crockpot Angel Chicken
Crockpot Angel Chicken is a creamy, savory, and easy-to-make dish that brings comfort to any dinner table. Combining tender chicken with a rich sauce made of cream cheese, butter, and Italian dressing mix, this slow-cooker recipe has gained popularity for its simplicity and indulgent flavors.
Pair this delightful recipe with Crockpot Baked Ziti for a complete slow-cooker dinner spread.
The Origins and Popularity of Angel Chicken
Originating as a simple, family-friendly recipe, Angel Chicken has evolved into a versatile dish suitable for various occasions.
Its name reflects its heavenly taste and texture, making it a favorite comfort food.
The introduction of crockpot cooking has made this recipe even more accessible to busy families.
Explore other creamy comfort meals like Slow Cooker Potato Soup to add variety to your weekly menu.
Ingredients and Tools for Success
Essential Ingredients
Chicken: Boneless, skinless breasts or thighs.
Creamy Sauce Base: Cream cheese, butter, and cream of chicken soup.
Flavor Enhancers: Italian dressing mix, garlic powder, and white wine or broth.
Optional Add-Ins
Mushrooms for earthy flavor.
Spinach or kale for added nutrition.
Red pepper flakes for a hint of spice.
Tools You’ll Need
A crockpot (preferably 6 quarts).
Mixing bowls for preparing the sauce.
A whisk for ensuring a smooth mixture.
Step-by-Step Recipe for Crockpot Angel Chicken
Ingredients:
4 boneless, skinless chicken breasts
½ cup butter (melted)
1 packet Italian dressing mix
1 can (10.75 oz) cream of chicken soup
8 oz cream cheese (softened)
½ cup white wine or chicken broth
Instructions:
Melt the butter and mix it with cream cheese, cream of chicken soup, Italian dressing mix, and white wine. Whisk until smooth.
Place the chicken breasts in the crockpot and pour the sauce over them.
Cook on low for 6-7 hours or high for 3-4 hours until the chicken is tender.
Serve over angel hair pasta, rice, or mashed potatoes.
Delicious Variations
1. Low-Carb Angel Chicken
Serve over cauliflower rice or steamed vegetables instead of pasta.
2. Vegan Angel Chicken
Replace chicken with tofu or jackfruit and use plant-based cream cheese and soup.
3. Spicy Angel Chicken
Add red pepper flakes, paprika, or sriracha to the sauce for a kick of heat.
Serving Suggestions
Perfect Pairings
Garlic bread or crusty rolls for soaking up the creamy sauce.
Steamed broccoli or roasted asparagus as a side.
A light green salad with Italian dressing.
Plating Tips
Garnish with chopped parsley or Parmesan for a pop of color.
Serve in shallow bowls to showcase the creamy sauce.
FAQs About Crockpot Angel Chicken
1. Can I use frozen chicken in the crockpot?
Yes, but ensure it reaches a safe internal temperature of 165°F before serving.
2. What’s the best way to store leftovers?
Store in an airtight container in the refrigerator for up to 3 days.
3. Can I make this gluten-free?
Yes, use gluten-free soup and dressing mix.
4. Is it possible to prepare this recipe in advance?
Absolutely! Assemble the ingredients in the crockpot insert, refrigerate overnight, and cook the next day.
5. Can I substitute cream of chicken soup?
Yes, use cream of mushroom or a homemade roux as an alternative.
Crockpot Angel Chicken is a timeless comfort food that’s easy to make and customizable for any palate. Whether you’re hosting a dinner or preparing a weeknight meal, this recipe promises to deliver satisfaction with every bite.
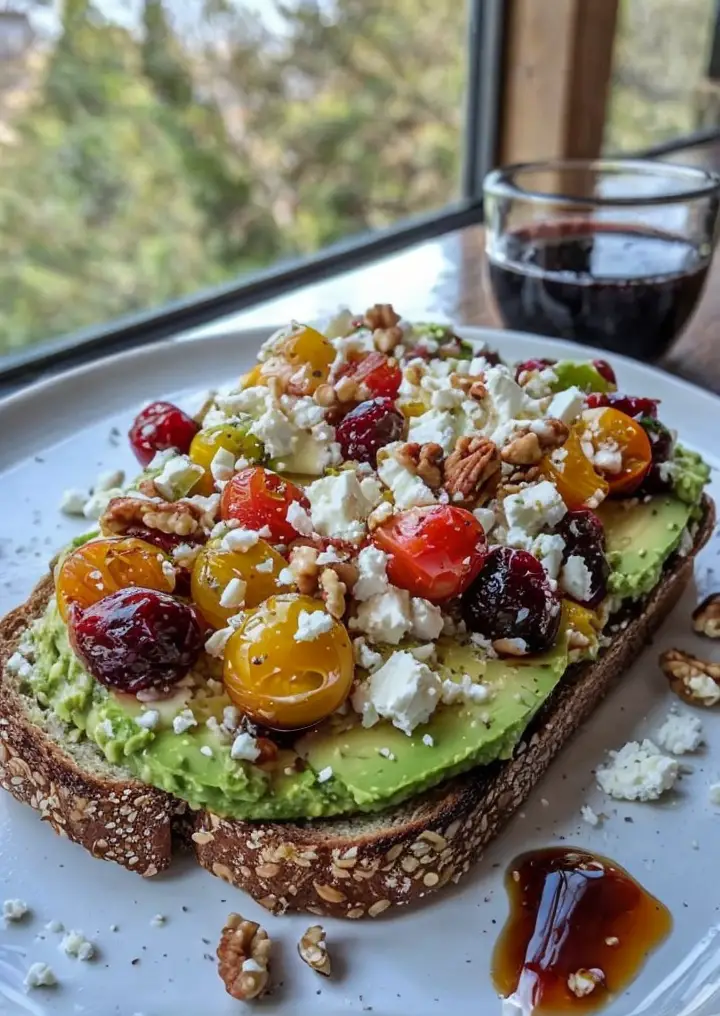
Delicious Avocado Toast with Feta, Tomatoes, Cranberries, and Walnuts
Delicious Avocado Toast with Feta Cheese, Cherry Tomatoes, Cranberries, and Walnuts
⚖️
Difficulty
Easy
⏲️
Prep Time
10 mins
🕒
Cook Time
5 mins
⏱️
Total Time
15 mins
🍽️
Servings
2
Avocado toast has taken the culinary world by storm, and for good reason. This easy-to-make dish not only bursts with flavors but also offers a delightful mix of textures. Imagine creamy avocado perfectly spread over crisp toasted bread, topped stylishly with tangy feta cheese, juicy cherry tomatoes, sweet cranberries, and crunchy walnuts. This recipe combines nutritious ingredients that create a balanced meal or snack, making it a favorite for brunch or a quick breakfast on the go.
The vibrant colors and fresh ingredients of this avocado toast make it visually appealing, perfect for impressing guests or simply treating yourself. The creamy avocado serves as a perfect base that allows the other flavor components to shine, creating a delicious harmony you won’t soon forget.
Quick Recipe Highlights
Flavor Profile: This avocado toast features a beautiful balance of creamy, salty, sweet, and nutty flavors that awaken your taste buds and leave you craving more.
Texture: The creamy avocado contrasts beautifully with the crunchy walnuts and juicy tomatoes, creating a satisfying mouthfeel.
Aroma: The dish is elevated with earthy notes from the walnuts alongside the fresh aroma of cherry tomatoes, making it hard to resist.
Visual Appeal: With its vibrant colors and layers of texture, this dish is not just food—it’s art on a plate.
Skill Level Needed: This recipe is perfect for beginners and anyone looking to whip up a quick meal without any hassle.
Special Equipment: A toaster or a grill pan to toast your bread and a simple knife for spreading and chopping.
Recipe Overview
Difficulty Level: This avocado toast recipe is easy, with no complicated techniques involved, making it ideal for anyone in the kitchen.
Category: Enjoy this dish as a healthy breakfast, satisfying lunch, or nutritious snack at any time of the day.
Cuisine: Originating from various influences, avocado toast gains its diverse character from Mediterranean flavors and modern brunch culture.
Cost: The ingredients are affordable, with estimates of around $5 to $10 depending on seasonality and location.
Season: This recipe can be enjoyed year-round, with fresh ingredients readily available at local markets.
Occasion: Perfect for brunch gatherings, picnics, or even quiet weekdays, this toast is versatile enough for any setting.
Why You’ll Love This Recipe
The taste of avocado toast with feta cheese and cherry tomatoes is simply divine. The creaminess of the avocado pairs perfectly with the tangy feta, while the tomatoes add a burst of flavor. The sweetness of the cranberries and the crunch of the walnuts elevate each bite, making it a memorable experience. This recipe is the epitome of comfort food, providing a healthy dose of nutrition without sacrificing flavor.
In terms of convenience, this recipe shines. It requires minimal preparation, making it perfect for busy mornings or leisurely brunches. With its quick assembly and no-cook elements, you can whip it up in just 15 minutes. Providing a healthy and satisfying meal has never been so easy!
Nutritionally, avocado toast packs a punch. Avocados are rich in healthy fats and fiber, helping to keep you full and satisfied. Combined with the protein from the feta and the antioxidants from the cherry tomatoes, this meal is nourishing and energizing, giving you a great start to your day.
Socially, this dish is perfect for entertaining. Its beautiful presentation allows you to impress your guests effortlessly. Serve it on a stylish platter for gatherings, and watch as everyone shares their enthusiasm over this delicious dish.
Lastly, this avocado toast is cost-effective. The ingredients are easy to find and affordable, allowing you to create a gourmet-level meal at home without breaking the bank. It’s a winning combination of deliciousness and practicality that makes this recipe a must-try!
Historical Background and Cultural Significance
Avocado toast has rapidly become a staple in many culinary scenes around the world, particularly in the United States and Australia. Originating in the 19th century, avocados were first introduced as a food source in Central America, where the fruit has been consumed for centuries. Over time, their popularity spread globally due to their creamy texture and nutritional value.
The cultural significance of avocado toast is profound, symbolizing a move towards healthier eating habits and plant-based diets. As people become more aware of nutrition and wellness, dishes like avocado toast represent a shift in culinary trends, promoting whole foods and vibrant ingredients.
The evolution of this recipe has seen numerous iterations, with different regions adding their own flavor components. In Mediterranean cultures, for example, the addition of olives and grilled vegetables creates a more robust flavor, while the classic American version embraces simplicity with just salt and pepper.
Regional variations have emerged as culinary creativity brings forth exciting new toppings and bases. In California, you’ll find variations topped with radishes, while in Europe, ingredients like smoked salmon or poached eggs might be included with the avocado base.
Ingredient Deep Dive
Avocado: Avocados are a great source of healthy fats, fiber, and essential vitamins like vitamin K. They originated in Central America and are now cultivated in many warm climates worldwide. When selecting avocados, look for ones that yield slightly when pressed—this indicates ripeness. Store unripe avocados at room temperature and refrigerate them once ripe.
Feta Cheese: Feta cheese is a crumbly, tangy cheese that originated in Greece. Rich in calcium and protein, it adds a punch of flavor to dishes. When selecting feta, opt for cheese sold in brine for the best flavor. Store feta in its container or submerged in brine to maintain freshness, and consider using cream cheese or goat cheese as alternatives.
Cherry Tomatoes: Known for their sweet flavor, cherry tomatoes add the perfect pop to avocado toast. Originating from South America, they are rich in vitamins A and C. Choose firm, brightly colored tomatoes. To store, keep them at room temperature away from direct sunlight, and avoid refrigeration until cut to maintain sweetness.
Cranberries: Dried cranberries are a great source of antioxidants and add a delightful sweet-tart flavor. Historically, they have been a staple in Native American diets. Look for unsweetened varieties to reduce sugar intake. Store in a cool, dark place, and they can easily be substituted with raisins or chopped dried figs.
Walnuts: Walnuts are a nutrient-dense nut containing healthy fats, protein, and omega-3 fatty acids. They originated in Persia and have been increasingly popular in culinary dishes. When selecting walnuts, choose those that are whole and unbroken. Store them in a cool, dark place, and consider substituting with pecans or almonds for different flavors.
Common Mistakes to Avoid
Using unripe avocados can lead to a less creamy texture; always check for ripeness by giving a gentle squeeze.
Not toasting the bread properly can result in a soggy base; ensure your bread is golden brown for the best textural contrast.
Skimping on seasoning is a common mistake; don’t forget to add salt and pepper to enhance the flavors of the toppings.
Overloading the toast with too many toppings can make it difficult to eat; aim for balance with your ingredient proportions.
Not utilizing fresh ingredients can lead to a lackluster taste; always opt for fresh produce, especially avocados and tomatoes.
Assembling the toast too far in advance can lead to sogginess; serve immediately for the best experience.
Neglecting the addition of acidity, like lemon juice, may diminish flavor depth; a splash brightens the dish significantly.
Forgetting to chop the cherry tomatoes before placing them on the toast can lead to uneven flavors; always slice them for even distribution.
Storing leftover toast without proper wrapping can result in stale bread; cover tightly if you need to save any part of it.
Using too much feta can overpower the other flavors; find the right balance to ensure a harmonious taste.
Essential Techniques
Toasting Bread: Toasting bread is key for creating your avocado toast foundation. Choose a heavy bread that can hold toppings without becoming soggy. Toast until golden, ensuring a satisfying crunch. Common pitfalls include under-toasting, which leads to a mushy base, or over-toasting, which makes it difficult to bite through.
Slicing Avocados: Mastering the slice of an avocado enhances presentation. Cut around the pit, twist to separate, and carefully scoop the flesh out. The key is to be gentle to avoid bruising, and a sharp knife is essential for clean cuts. Practice will help you develop the skill, and always cut just before serving for freshness.
Pro Tips for Perfect Avocado Toast with Feta Cheese
1. Choose ripe avocados for a creamy texture; they should give slightly when squeezed.
2. Toast your bread until it’s golden brown for the best flavor and crunch.
3. Use a mixture of both sliced and crushed walnuts for varied texture.
4. Experiment with different types of bread, such as sourdough, whole grain, or gluten-free.
5. Add a drizzle of balsamic reduction for an extra flavor dimension.
6. Garnish with fresh herbs like basil or cilantro for added freshness.
7. To prevent browning, squeeze fresh lemon juice on your avocado spread before topping.
8. Keep it fun and colorful by adding edible flowers or microgreens as a finishing touch.
Variations and Adaptations
There are numerous regional variations of this avocado toast recipe that can keep your lunchtime delight fresh and exciting. For example, you can add a touch of Mexican flair by including sliced radishes and a sprinkle of chili flakes. In the summer, consider incorporating seasonal ingredients like grilled zucchini or asparagus for a refreshing twist.
Seasonal adaptations can make this dish equally exciting. In the fall, try topping your avocado toast with roasted pumpkin seeds and a hint of cinnamon for a cozy feel. Additionally, winter can welcome a layer of cooked spinach or kale for a hearty experience that warms you up.
Dietary modifications are also simple. If you’re looking to make this dish vegan, replace feta cheese with a homemade cashew cheese or nutritional yeast for a cheesy flavor. If you’re watching your carbs, consider walking a low-carb line by serving the avocado spread in lettuce wraps instead of toast.
For flavor variations, think about using sun-dried tomatoes instead of fresh cherry tomatoes for a robust, umami-rich experience. In the mood for something spicy? Add sliced jalapeños or chili flakes for an extra kick!
Serving and Presentation Guide
Plating techniques matter, especially when enjoying a dish as colorful as avocado toast. Start with a clean, white plate that allows the vibrant colors to pop. Stack your toast atop a small mound of fresh arugula or microgreens for added height.
Garnish ideas include fresh herbs such as dill or parsley, a drizzle of high-quality olive oil, or a sprinkle of sesame seeds. This not only enhances flavor but also adds visual appeal. Traditional accompaniments like a side of fresh fruit or yogurt can elevate your plate further.
For modern serving suggestions, consider cutting the toast into bite-sized pieces for sharing. This way, it can serve as a main dish or an appetizer for your next gathering.
When it comes to temperatures, serve your avocado toast immediately for the best taste. If you need to delay service, keep the components separate until closer to serving time to maintain freshness.
For portion control, consider splitting one toast topped with different toppings to allow your guests to indulge in various flavors without overcommitting!
Wine and Beverage Pairing
For a refreshing wine pairing, consider a Sauvignon Blanc or a light rosé that complements the creamy avocado without overpowering it. The citrus notes in these wines work beautifully with the toppings, enhancing the overall taste experience.
Non-alcoholic alternatives include sparkling water with a slice of lemon or cucumber, which keep the experience light and refreshing. If you prefer a warm beverage, a light herbal tea like chamomile or mint can serve as a perfect complement to this delightful dish.
When serving wine or beverages, ensure they are chilled and served in appropriate glassware, enhancing the dining atmosphere alongside the beautiful presentation of your avocado toast.
Storage and Shelf Life
To maximize freshness, store leftovers in an airtight container in the refrigerator. Typically, avocado toast is best enjoyed fresh, but you can save unassembled components like cherry tomatoes and walnuts separately for a quick meal later.
Always store your sliced avocados with a little lemon juice to slow down the browning process. To prevent sogginess, avoid wet ingredients touching the toast if you’re storing it for later.
Signs of spoilage to note include browning of the avocado and any unpleasant odors. Reheating is not recommended; instead, assemble fresh ingredients quickly and enjoy them once they come together again.
For longer preservation, consider freezing separate components like walnuts and cranberries to extend shelf life, allowing you to enjoy this dish in the future.
Make Ahead Strategies
Prepping ingredients ahead of time can save crucial minutes during busy mornings. Slice your vegetables and store them in airtight containers in the refrigerator for up to two days.
For the avocado, consider making an avocado spread by mashing it with lemon juice and storing it for a brief time. However, for the freshest taste, it’s recommended to prepare it just before serving.
Keep toppings like feta cheese, nuts, and dried cranberries stored separately, so you can easily throw everything together when ready to eat.
Reheating your bread is also an option; toast it fresh so it retains its crunch as you layer on the toppings for a delightful finish.
Scaling Instructions
To halve the recipe, adjust the quantities of each ingredient proportionally, ensuring balance remains. For doubling or tripling the recipe, consider using larger baking sheets if you’re preparing multiple toasts at once, or use multiple frying pans for efficient toasting.
Timing adjustments will come into play when cooking larger batches. Keep an eye on the toasting process to avoid burning as multiple pieces are often involved.
If you make too much, store all components separately to prevent sogginess and keep them fresh for the next meal. Removing avocados from the equation quickly for storage is key to maintaining flavor.
Nutritional Deep Dive
The avocado toast offers a balanced nutritional profile. On average, one serving contains healthy fats from the avocado, fiber from both the bread and cranberries, and a good source of protein from feta cheese.
Micronutrient analysis reveals that you’re getting essential vitamins and minerals, including potassium from avocados and vitamin C from cherry tomatoes. These nutrients contribute significantly to daily dietary needs.
The health benefits encompass cardiovascular support from healthy fats and antioxidants that help combat inflammation and support overall wellbeing.
Portion analysis suggests that one serving of this delicious toast can keep you satisfied throughout your morning, making it an excellent option for weight management.
This recipe is suitable for various dietary lifestyles, allowing for easy adaptations that align with personal health objectives.
Dietary Adaptations
For gluten-free options, substitute regular bread with gluten-free varieties or even large lettuce leaves to make open-faced bites. This can still provide the satisfying crunch without gluten-heavy ingredients.
If you’re looking for a dairy-free alternative, simply replace feta cheese with a nut cheese spread or nutritional yeast to maintain rich flavors without the dairy.
Vegan adjustments are simple since avocado provides creaminess. Add a hint of garlic powder or zesty spices to crank up the flavor.
For those on a low-carb or keto diet, zucchini slices or cauliflower bread can serve as an alternative to the traditional bread base, remaining low in carbs while still providing a base for your toppings.
Similarly, for a paleo diet, opt for sprouted bread or fresh vegetables as a base to avoid grains entirely.
Troubleshooting Guide
When faced with texture issues in your avocado spread, consider the ripeness of your fruit. If too firm, it won’t achieve that smooth, creamy consistency. Let them ripen before preparing.
Flavor balance is essential; if your toast tastes bland, double-check your seasoning. A sprinkle of salt, pepper, and even a splash of lemon juice can elevate the dish significantly.
If it becomes too warm and presentation suffers, serve components separately, allowing your guests to assemble themselves, keeping the fondness for freshness alive.
Equipment challenges are common; ensure you have a reliable toaster, as underwhelming toasting can ruin the experience. If using a grill pan, keep the heat constant for even cooking.
Ingredient substitutions should maintain harmony. If you’re out of feta, opt for a similarly textured cheese. Avoid radical changes that disrupt the intended taste profile.
Recipe Success Stories
Community feedback on this avocado toast recipe underscores its approachability and flavor. Many readers have shared photos of their creations, emphasizing how easy it is to customize according to personal tastes.
Variation successes are noteworthy, with users adapting the simple base to include additions like poached eggs or smoked salmon, elevating the dish further while maintaining the original beauty.
Adaptation stories showcase creativity; readers share how they transformed the toast to align with dietary preferences, highlighting the versatility of ingredients.
Photography tips have also emerged, with appetizing and colorful presentations shared across social media, emphasizing how a bit of styling can turn this simple dish into a showstopper.
Frequently Asked Questions
Q: Can I make avocado toast ahead of time?
A: It’s best to assemble avocado toast right before serving for the freshest taste. However, you can prepare the toppings in advance and store them separately to minimize preparation time.
Q: How can I keep avocados from browning?
A: Squeeze fresh lemon or lime juice over your cut avocado to slow down the browning process. Store the avocado in an airtight container in the refrigerator for the best results.
Q: What bread is best for avocado toast?
A: Whole grain, sourdough, or gluten-free bread options provide the best flavor and texture. Choose a hearty bread that can support the toppings without becoming soggy.
Q: Can I freeze avocado toast?
A: It is not recommended to freeze prepared avocado toast as they can become mushy. Instead, freeze individual components and assemble fresh when ready to enjoy.
Q: What variations can I make to this recipe?
A: Feel free to customize by adding different toppings like radishes, leafy greens, or a drizzle of balsamic vinegar for flavor enhancements.
Q: Is avocado toast a healthy breakfast option?
A: Yes, avocado toast is rich in healthy fats, fiber, vitamins, and minerals, making it a nutritious and satisfying breakfast choice.
Q: How do I know if my avocado is ripe?
A: A ripe avocado should yield slightly to gentle pressure when squeezed. If it feels hard, it’s not ripe yet, and if it’s mushy, it may be overripe.
Q: Can I add protein to my avocado toast?
A: Absolutely! Adding a poached egg, smoked salmon, or even chickpeas can boost the protein content and make it a more filling meal.
Q: How long does it take to make avocado toast?
A: This delicious dish can usually be prepared in about 15 minutes, including prep and assembly time, making it a quick meal option.
Q: What should I serve with avocado toast?
A: Pairing it with a side salad, smoothie, or a fresh fruit bowl can create a well-rounded meal, great for breakfast or lunch!
Additional Resources
For those interested in exploring more, check out these related recipes that incorporate healthy fats and vibrant flavors. Creative options inspired by avocado toast include variations featuring hummus and seasonal veggies, or even sweet alternatives using almond butter and fruits.
Technique guides can enhance your culinary skills, offering tips on toast making, presentations, or even more advanced techniques like poaching eggs or preparing various spreads.
Ingredient information will give you deeper insights into the benefits of each element, including their nutritional profiles and how they contribute to overall health.
Take the time to explore equipment recommendations; essential kitchen tools can make meal prep easier and more enjoyable, securing your success in crafting beautiful dishes.
Seasonal variations are also worth exploring, maximizing fresh, locally sourced ingredients to keep each meal exciting and new!
Join the Conversation
We’d love to see your versions of this delicious Avocado Toast! Share your photos on social media, tag us, and join our community of food lovers celebrating this delightful dish. Your unique takes and variations keep the conversation lively!
Your recipe reviews and feedback on what worked for you or how you adapted the recipe are invaluable. Each share enriches our collective cooking experience, allowing us to learn and grow together.
For those looking to experiment, don’t be afraid to mix up flavors or add additional toppings that speak to your taste. Lets connect and inspire each other to enjoy cooking and flavor exploration.
The Recipe
Avocado Toast with Feta Cheese, Cherry Tomatoes, Cranberries, and Walnuts
Serves: 2
Prep Time: 10 mins
Cook Time: 5 mins
Total Time: 15 mins
Kitchen Equipment Needed
Toaster or grill pan
Knife
Cutting board
Bowl for mixing
Ingredients
2 ripe avocados
4 slices of bread (your choice)
1/2 cup feta cheese, crumbled
1 cup cherry tomatoes, halved
1/4 cup dried cranberries
1/4 cup walnuts, chopped
Salt and pepper to taste
Juice of 1 lemon (for seasoning)
Directions
Toast the bread slices until golden brown.
While the bread toasts, cut the avocados in half, remove the pit, and scoop the flesh into a bowl.
Mash the avocado with a fork, adding a pinch of salt, pepper, and lemon juice to taste.
Spread the mashed avocado evenly over the toasted bread slices.
Top each slice with crumbled feta cheese, halved cherry tomatoes, cranberries, and chopped walnuts.
Optional: Drizzle with a little extra olive oil or balsamic vinegar for added flavor.
Serve immediately and enjoy your delicious creation!
Recipe Notes
Feel free to customize the toppings based on what you have on hand!
For added protein, consider topping with a poached egg or sliced turkey.
This recipe can easily be doubled for larger groups; just tweak the ingredient amounts accordingly.
How to Make Perfect Bacon Wrapped Pineapple Bites: A Sweet and Savory Delight
Article: Bacon Wrapped Pineapple Bites – A Sweet and Savory Appetizer
Introduction to Bacon Wrapped Pineapple Bites
Few appetizers bring together the perfect combination of sweet and savory as effectively as Bacon Wrapped Pineapple Bites. This dish combines the juicy sweetness of pineapple with the smoky richness of crispy bacon, creating a flavor explosion that’s perfect for parties, holidays, or casual snacking.
Bacon Wrapped Pineapple Bites are the ultimate appetizer for any occasion. With their perfect balance of flavors, ease of preparation, and endless customization options, they’re sure to become a staple in your recipe collection.
How to Make Perfect Cheesy Bread: Recipes, Tips, and Variations
Article: Cheesy Bread – A Delicious, Versatile Comfort Food
Introduction to Cheesy Bread
Few dishes are as universally loved as cheesy bread. Combining the comforting texture of freshly baked bread with the savory richness of melted cheese, this dish is a go-to for appetizers, snacks, or a side for hearty meals. Its versatility allows for endless customization, from simple garlic-cheese combos to extravagant stuffed versions.
Cheesy bread is the epitome of comfort food. With its simple ingredients and endless variations, it’s a dish that can be tailored to suit any occasion. Whether served as an appetizer, a snack, or a side dish, it’s guaranteed to impress.