Savory Spicy Honey Jalapeño Chicken Skewers for Summer Grilling

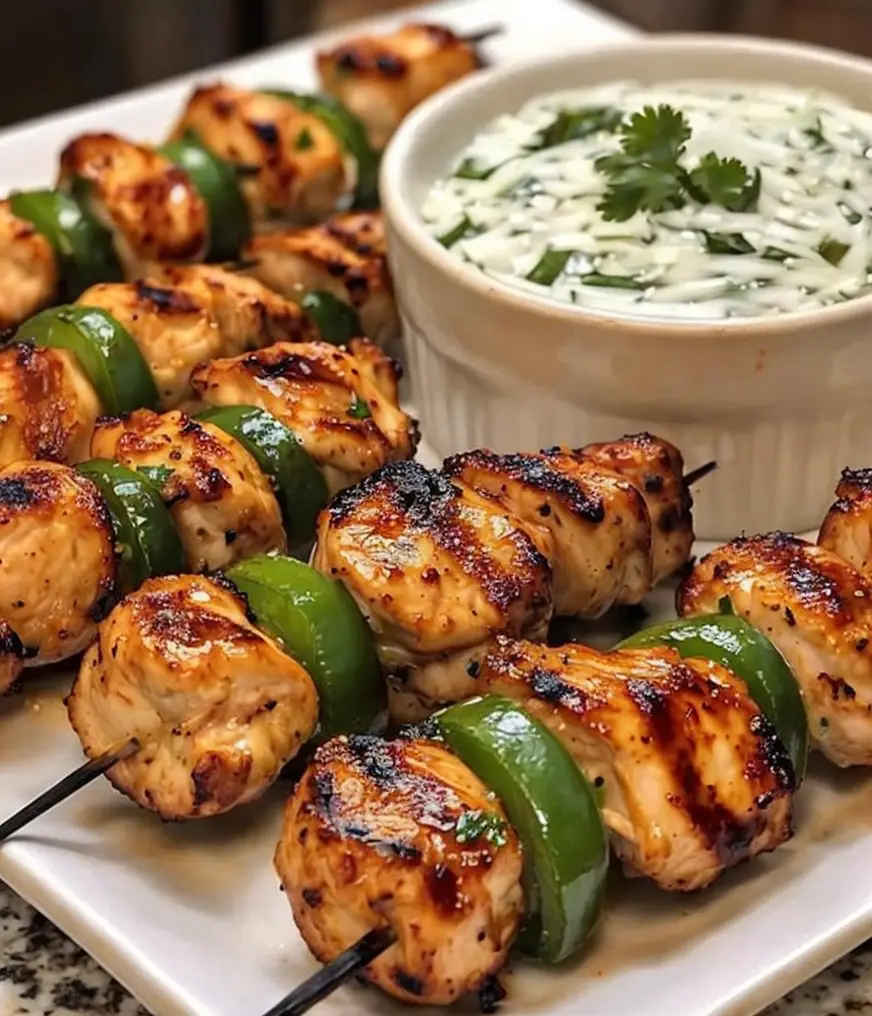
Spicy Honey Jalapeño Chicken Skewers: A Sweet and Fiery Delight

⚖️
Difficulty
Easy

⏲️
Prep Time
20 mins

🕒
Cook Time
15 mins

⏱️
Total Time
35 mins

🍽️
Servings
4

Get ready to tantalize your taste buds with our Spicy Honey Jalapeño Chicken Skewers! This recipe combines the sweet and sticky goodness of honey with the fiery kick of jalapeños, making for a mouthwatering dish that’s perfect for summer grilling or a cozy family dinner. The succulent chicken mingles beautifully with the zesty marinade, ensuring every bite is bursting with flavor. Whether you’re hosting a casual backyard BBQ or prepping a satisfying weekday meal, these skewers are sure to impress and become a family favorite.

The marriage of sweetness from the honey and the heat from the jalapeños creates a sophisticated flavor profile that is both addictive and satisfying. As you grill, the aromas wafting through the air will spark excitement, and the vibrant colors of your skewers will make for an eye-catching dish that begs to be shared. These skewers are not only delicious but also incredibly easy to prepare, making them perfect for both novice cooks and seasoned chefs alike.

Quick Recipe Highlights

  • Flavor Profile: This dish boasts a delightful blend of sweet, spicy, and savory flavors that dance on your palate, with honey balancing out the heat from the jalapeños.
  • Texture: The chicken remains tender and juicy while the slightly charred edges add a satisfying crunch, creating a delightful contrast in every bite.
  • Aroma: Expect a fragrant mix of caramelized honey and spicy jalapeños that will fill your kitchen and draw your guests towards the grill.
  • Visual Appeal: The skewers flaunt a gorgeous golden-brown color, speckled with bright green from the jalapeños, creating a visually stunning dish.
  • Skill Level Needed: This recipe is easy to follow, making it accessible for beginner cooks looking to elevate their culinary skills.
  • Special Equipment: A grill or grill pan is essential for achieving that perfect char and smoky flavor that defines these chicken skewers.

Recipe Overview

  • Difficulty Level: With only a few simple steps involved, making Spicy Honey Jalapeño Chicken Skewers is straightforward. It requires minimal cooking techniques, making it perfect for beginners.
  • Category: This dish fits perfectly into the categories of appetizers, main dishes, and finger foods, making them versatile for various meal occasions.
  • Cuisine: Rooted in fusion cuisine, this recipe brings together elements from Mexican and American traditions, celebrating bold flavors and communal eating.
  • Cost: The approximate cost of this recipe is budget-friendly, typically ranging from $10 to $15, depending on local pricing of ingredients.
  • Season: Ideal for warmer months, these skewers shine at summer cookouts, but they can also be enjoyed year-round for any festive gathering.
  • Occasion: Perfect for outdoor BBQs, parties, and casual gatherings, they can also be served at family dinners or game day celebrations.

Why You’ll Love This Recipe

The combination of sweet and spicy is incredibly appealing, with the honey providing a luscious glaze that complements the juicy chicken and fiery jalapeños. The skewers have a tender texture which is inviting, and when grilled to perfection, they have just the right amount of char that enhances their flavor profile. This dish is easy to prepare, making it convenient for cooks who want delicious results without spending hours in the kitchen.

In terms of nutrition, chicken is a great source of lean protein, while jalapeños may offer health benefits including improved metabolism and potential anti-inflammatory properties. Enjoying these skewers is a fun way to savor healthy ingredients without compromising on taste. Not to mention, they present beautifully, making them a fantastic centerpiece for social gatherings, where they can be easily shared amongst guests.

Cost-effectiveness is also a highlight here. Using affordable ingredients while achieving a gourmet feel means you can delight your friends and family without breaking the bank. The ability of the skewers to cater to various diets makes them a universally loved dish, ensuring that everyone at your gathering can enjoy them.

Historical Background and Cultural Significance

The origin of chicken skewers can be found in various cultures around the world, with many regions utilizing skewers for grilling meats. The blend of spicy and sweet elements in this recipe is reminiscent of traditional dishes found in Mexico, where jalapeños are a staple ingredient. The simplicity and versatility of skewered foods have made them popular throughout history for their ease of preparation and communal presentation.

In Mexican cuisine, the use of ingredients like jalapeños and honey reflects regional flavors that highlight the nation’s love for balance in taste. Historically, grilling over an open flame has been a method for preserving meats and vegetables, making these skewers a dish rich in tradition and culture.

Over the years, variations of chicken skewers have evolved, incorporating different spices, marinations, and side dishes based on personal preferences and regional ingredients. Each iteration tells a story, making them a dish that transcends borders and celebrates diversity in culinary experiences.

Regional variations can be found where the spice level or accompanying elements change, catering to local palates. This adaptability of the recipe not only makes it significant in various cultures but also enhances its popularity among food lovers around the globe.

Ingredient Deep Dive

Chicken, as the main ingredient, has significant cultural relevance, being one of the most widely consumed meats globally. It serves as an excellent source of protein and is versatile in many cuisines. When selecting chicken, it’s advisable to look for high-quality, free-range options where possible. For storage, keep chicken refrigerated and consume within a few days, or freeze it for later use. If you prefer, it can be substituted with turkey or tofu for a different take.

Jalapeños are another star of this recipe, known for their vibrant flavor and health benefits. They contain capsaicin, which may provide health benefits such as pain relief and improved digestion. When choosing jalapeños, select firm, unblemished peppers, as they tend to be fresher and more flavorful. Store them in the refrigerator to maintain their crispness. If jalapeños are too hot for your taste, consider using milder peppers or omitting them altogether, customizing the heat to your preference.

Common Mistakes to Avoid

  • Not marinating long enough – Ensure your chicken is marinated for at least 30 minutes for maximum flavor infusion.
  • Using wooden skewers without soaking – Soak wooden skewers in water for at least 30 minutes to prevent them from burning on the grill.
  • Overcrowding the skewers – Allow enough space between the pieces to ensure even cooking and thorough browning.
  • Incorrect temperature for grilling – Preheat the grill to medium-high heat for the best sear and to lock in flavors.
  • Not checking for doneness – Chicken should be cooked to an internal temperature of 165°F. Use a meat thermometer to ensure safety.
  • Skipping the resting time – Letting the skewers rest after grilling allows juices to redistribute, keeping the meat tender.
  • Overbasting with marinade – Use the marinade primarily for marinating rather than repeated basting while grilling to prevent flare-ups.
  • Failing to adjust for variations in jalapeño heat – Remember that jalapeños can vary in heat level; taste them before using to adjust the quantity accordingly.

Essential Techniques

Marinating chicken is crucial for enhancing flavor and moisture. Allowing the chicken to soak in a mixture of honey, jalapeños, and spices adds depth to the dish. To master marinating, aim for at least an hour and the longer, the better. Be mindful of the marinade’s acidity, as overly potent acidic ingredients could lead to mushy chicken.

Grilling is where the magic happens. Achieving the perfect grill marks and smoky flavor enhances the sensory experience of your skewers. Ensure your grill is preheated and clean to prevent sticking. Look for visual cues such as a nice char and clear juices flowing to know when your chicken is ready to come off the grill. Pay attention to the flare-ups from dripping marinade and adjust cooking techniques accordingly.

Pro Tips for Perfect Spicy Honey Jalapeño Chicken Skewers

1. For extra flavor, consider adding fresh herbs like cilantro or parsley to your marinade.

2. Alternate your chicken with colorful vegetables like bell peppers, onion, or zucchini for added variety and nutrition.

3. Preheat your grill thoroughly to establish a nice sear on your skewers.

4. Baste your skewers with extra marinade during grilling to amplify flavors, but ensure you do so safely to avoid cross-contamination.

5. Experiment with different sauces after grilling, such as barbecue or ranch, for added flavor layers.

6. Before serving, sprinkle some lime juice over the skewers to enhance the flavors and add a refreshing touch.

7. Use citrus zest in your marinade for a brightness that balances the heat of the jalapeños.

8. Allow your skewers to rest for a few minutes after grilling before serving to optimize juiciness.

Variations and Adaptations

Explore regional variations like adding different cultural spices such as cumin or paprika to the marinade to give it a unique twist. Seasonal adaptations can include grilled summer vegetables like corn or squash for a vibrant dish bursting with color. For dietary modifications, swap out chicken for shrimp or tofu, maintaining the same marinade for a different protein experience.

You can also adjust the flavor profile by experimenting with different heat levels by incorporating spicier peppers or a spicy sauce. Texture modifications can include blanching vegetables slightly before grilling to ensure a tender crunch while keeping the skewers intact. For presentation, consider arranging skewers on a platter with colorful dipping sauces for an interactive dining experience.

Serving and Presentation Guide

When plating the Spicy Honey Jalapeño Chicken Skewers, consider arranging them vertically in a tall glass for a stunning visual display. Garnishing with fresh cilantro or green onions not only adds color but also enhances aroma. Traditional accompaniments like lime wedges serve to brighten the flavors when squeezed over the cooked skewers.

For modern servings, consider incorporating fancy toothpicks or mini skewers for cocktail parties or appetizer trays. Temperature is key; serve the skewers warm off the grill alongside cooling dips like yogurt-based sauces to balance the heat of the dish. Remember portion control as well—3-4 pieces per person can ensure everyone has enough to enjoy while allowing for a variety of other dishes.

Wine and Beverage Pairing

When it comes to wine pairings, a chilled Riesling or an off-dry Sauvignon Blanc complements the spicy and sweet flavors beautifully. For those who prefer cocktails, a light mojito or a spicy margarita can add an extra kick while balancing the heat. Non-alcoholic options may include sparkling water with lime for refreshing sips or a mocktail with fruit juices and soda water.

If coffee or tea is more your style, a lightly brewed iced tea can serve as a refreshingly sweet counterpart to the heat of the skewers, especially if infused with honey or mint. Ensure that beverages are chilled and served in ample quantities for guests to enjoy with their skewers.

Storage and Shelf Life

To store leftovers of Spicy Honey Jalapeño Chicken Skewers, place them in an airtight container and refrigerate for up to two days. For longer storage, they can be frozen for up to three months. Ensure they’ve cooled down before placing them in the freezer to maintain quality. When reheating, use an oven or grill to restore the skewer’s integrity, avoiding a microwave which could make them rubbery.

Check for spoilage by ensuring there are no off smells or discolorations after thawing. When reheating, heat to an internal temperature of 165°F to guarantee safety. If you’ve made extra marinade, consider using it as a base sauce while reheating for added flavor enhancement.

Make Ahead Strategies

To streamline your cooking process, consider marinating the chicken a day in advance, allowing flavors to develop fully. Store the marinated chicken in the refrigerator until you’re ready to grill. If preparing skewers ahead of time, assemble them but wait to grill until shortly before serving to maintain the juiciness of the chicken and the texture of the vegetables.

For an optimal dining experience, consider serving fresh components, such as herbs or garnishes, separately to be added just before eating. Adjusting this way preserves their freshness and enhances the end presentation, ensuring that flavors pop at the time of serving.

Scaling Instructions

To halve the recipe, simply divide all ingredients by two, which works seamlessly for the marinade and chicken. For those wanting to double or triple the recipe, ensure you have adequate skewers and space on the grill. Be mindful of adjusting cook times based on the increased volume; larger batches may require longer cooking times to reach the appropriate internal temperature.

When scaling, also consider the dimensions of your grill and whether you need to cook in batches to maintain even cooking and avoid crowding. Storage considerations remain the same; keeping leftovers in airtight containers allows for easy reheating and enjoyment later.

Nutritional Deep Dive

Analyzing the macro breakdown of Spicy Honey Jalapeño Chicken Skewers reveals a high protein content due to the chicken, coupled with carbohydrates from the honey. This dish is relatively low in fat, making it a healthy choice suitable for various diets. Furthermore, chicken breast provides essential amino acids for muscle repair and growth, while jalapeños may support metabolism with their heat components.

Micronutrient analysis shows that this recipe offers vitamins and minerals such as vitamin C from jalapeños and B vitamins from chicken. Being mindful of portion sizes allows for enjoyment without overindulgence. Overall, this dish can be a smart addition to a weight management regimen when paired with a variety of sides like grilled vegetables or a fresh salad.

Dietary Adaptations

This recipe can easily be made gluten-free by checking all marinade ingredients to ensure they contain no gluten. For those with dairy restrictions, simply using an oil-based marinade keeps it compliant. To cater to vegan diets, swap the chicken for firm tofu or tempeh while using the same spicy marinade, allowing flavors to penetrate the meat alternatives effectively.

For low-carb or keto-friendly variations, consider using zucchini noodles or grilled vegetables in place of traditional side dishes. You can also omit the honey or use a sugar substitute to keep things keto while still maintaining the sweet-heat balance. These adaptations prevent exclusion while ensuring the recipe fits various dietary needs.

Troubleshooting Guide

If you encounter texture issues with your chicken skewers, ensure you’re not overcooking them. Always check the internal temperature to prevent dryness. If your flavors are unbalanced, adjust before serving using lime juice to add brightness or honey to enhance sweetness as necessary.

For problems with uneven cooking, ensure your grill is preheated sufficiently and that skewers are spaced appropriately to allow heat circulation. Equipment challenges like flare-ups can be mitigated by managing the heat level of your grill and moving skewers away from direct flames when necessary.

Recipe Success Stories

Community feedback on the Spicy Honey Jalapeño Chicken Skewers has been overwhelmingly positive, with many home cooks praising the ease and flavorful result. Some have shared variations, adding their choice of herbs or marinating the chicken overnight to boost flavor intensity. Adaptation stories include using different proteins, such as shrimp, resulting in delightful seafood skewers filled with the same sweet and spicy notes.

Readers have also contributed to photography tips that enhance the visual appeal of the finished dish, emphasizing the vibrant colors of jalapeños and grilled chicken. Many enjoyed sharing their success with friends and family, making these skewers a centerpiece for summer gatherings and social events.

Frequently Asked Questions

Q: Can I use other meats for this recipe?

A: Absolutely! This marinade works wonderfully with pork, shrimp, or even tofu for a vegetarian option. Adjust cooking times accordingly for different proteins.

Q: How do I store leftovers of the skewers?

A: Store them in an airtight container in the refrigerator for up to two days. You can also freeze them for up to three months.

Q: What can I serve with these skewers?

A: These skewers pair perfectly with a fresh green salad, grilled vegetables, or a side of rice or quinoa for a complete meal.

Q: Can I make the marinade ahead of time?

A: Yes, the marinade can be prepared up to a week in advance and stored in the refrigerator for convenience.

Q: What variations can I experiment with in the marinade?

A: Feel free to switch up spices or add extra elements like lime zest, cilantro, or even sriracha for an extra kick.

Q: How do I ensure my jalapeños are not too spicy?

A: Remove the seeds and inner membranes of the jalapeños before adding them to the marinade, as these parts contain the majority of the heat.

Q: Is it better to grill or bake the skewers?

A: Grilling provides a smoky flavor and desirable char, but baking is still an option. If baking, use a high temperature for best results.

Q: Can I use pre-cut chicken for the skewers?

A: Yes, pre-cut chicken works well and saves prep time, but ensure it’s consistent in size for even cooking.

Q: What can I do if my skewers are drying out on the grill?

A: Make sure to not overcook the skewers and use a marinade to baste them as they cook, helping retain moisture.

Q: Can I grill from frozen?

A: It’s best to thaw the skewers in the refrigerator overnight for even cooking. Grilling from frozen may lead to uneven cooking.

Additional Resources

For more delicious and creative recipes, check out our section on grilled dishes and barbeque favorites. For beginners, our technique guides can help you master grilling skills and marinades, ensuring that your chicken skewers come out perfect every time.

Looking to dive deeper into ingredient information? We have in-depth articles exploring the health benefits of honey, the nutritional advantages of chicken, and even more on jalapeños. Don’t forget to explore the equipment recommendations to find the best grills or tools to use for your cooking adventures.

Join the Conversation

We encourage our readers to share their photos and experiences with Spicy Honey Jalapeño Chicken Skewers on social media. Tag us in your delicious creations and inspire others with your unique twists on the classic recipe! Feedback is invaluable, so leave comments about your experiences—whether it be praise, adjustments, or personal stories tied to this scrumptious dish.

The Recipe

Spicy Honey Jalapeño Chicken Skewers

Serves: 4

Prep Time: 20 mins

Cook Time: 15 mins

Total Time: 35 mins

Kitchen Equipment Needed

  • Grill or grill pan
  • Wooden or metal skewers
  • Measuring cups and spoons
  • Mixing bowl
  • Brush for basting

Ingredients

  • 1 lb. chicken breast, cut into 1-inch cubes
  • 2-3 jalapeños, seeded and chopped
  • 1/4 cup honey
  • 2 tablespoons olive oil
  • 2 tablespoons soy sauce (or tamari for gluten-free)
  • 1 teaspoon garlic, minced
  • 1 teaspoon lime juice
  • Salt and pepper to taste
  • Wooden skewers, soaked in water for 30 minutes

Directions

  1. In a mixing bowl, combine honey, olive oil, soy sauce, minced garlic, lime juice, jalapeños, salt, and pepper.
  2. Add chicken cubes to the marinade. Mix well, ensuring each piece is coated. Let marinate for at least 30 minutes (or up to overnight in the refrigerator).
  3. Preheat the grill to medium-high heat. Thread marinated chicken onto skewers, leaving a little space between each piece.
  4. Place skewers on the grill. Grill for about 5-7 minutes on each side or until the chicken is cooked through and has nice grill marks (internal temperature should reach 165°F).
  5. Remove skewers from the grill and let them rest for a few minutes before serving.

Recipe Notes

  • Feel free to adjust the number of jalapeños based on your heat preference.
  • Add vegetables like bell peppers or onions onto the skewers for extra flavor and nutrition.
  • Extra marinade can be brushed over the skewers while grilling for enhanced flavor.

Delicious Creamy Potato Soup with Bacon for Comforting Meals

Creamy Potato Soup with Bacon: A Comforting Delight

⚖️
Difficulty
Easy

⏲️
Prep Time
15 mins

🕒
Cook Time
30 mins

⏱️
Total Time
45 mins

🍽️
Servings
6 servings

Discover the irresistible warmth and flavors of this creamy potato soup with bacon. Perfect for chilly evenings or family gatherings, this delightful soup combines the heartiness of potatoes with the rich, smoky goodness of bacon. Each spoonful offers a velvety texture that envelops your taste buds, providing comfort in every bite. This potato soup recipe stands out not only for its taste but for its ability to bring loved ones together, inviting joy and warmth into your kitchen.

As the bacon sizzles and potatoes soften, the aroma fills your home with a delicious promise. The soup boasts a beautiful creaminess balanced with crispy bits of bacon that add depth and flavor. Whether served as a standalone dish or as a starter, this soup will quickly become a favorite. Make it your own by adjusting spices or exploring different toppings, and watch as it transforms your dinner table into a heartwarming gathering.

Quick Recipe Highlights

  • Flavor Profile: A delightful blend of creamy potato goodness with salty, crispy bacon, making every bite deeply satisfying.
  • Texture: Silky smooth potatoes combined with crunchy bacon pieces offer a satisfying mouthfeel.
  • Aroma: A deliciously comforting blend of savory bacon and fresh herbs wafts through the air.
  • Visual Appeal: Golden chunks of potato, colorful herbs, and crispy bacon make for a visually enticing dish.
  • Skill Level Needed: Perfect for beginners with straightforward steps and little specialized technique required.
  • Special Equipment: A large pot and a blender or immersion blender for smooth perfection.

Recipe Overview

  • Difficulty Level: This potato soup recipe is easy enough for novice cooks, requiring basic ingredients and minimal cooking techniques.
  • Category: Ideal as a cozy comfort food dinner or a satisfying starter for any meal.
  • Cuisine: This soup reflects classic American comfort food traditions, cherished for its homestyle appeal.
  • Cost: Featuring budget-friendly ingredients like potatoes and bacon, this dish is economical for weeknight dinners.
  • Season: It shines during autumn and winter months, perfect for warming up on cold days.
  • Occasion: Great for casual family dinners, gatherings, or even cozy date nights at home.

Why You’ll Love This Recipe

When it comes to flavor and texture, this creamy potato soup will leave you craving more. The comforting blend of creamy potatoes with savory bacon delivers a taste that warms the soul. With each spoonful, you’ll experience the soft, velvety potatoes mingling harmoniously with the crunch of bacon, making it a textural delight.

Convenience is another reason to adore this recipe. With just a few simple steps, you can have a hearty soup ready in under an hour, making it an excellent option for busy weeknights. The straightforward preparation requires minimal equipment and provides maximum flavor, allowing you to focus on spending time with family and friends rather than complicated cooking techniques.

This creamy potato soup also delivers nutritional benefits. Potatoes provide essential vitamins and minerals, while the bacon adds a source of protein and flavor that makes this dish satisfying. Enjoy it guilt-free with the knowledge that you’re nourishing your body while delighting your taste buds!

The social aspect of sharing a warm soup is undeniable. This recipe is perfect for gatherings, where everyone can gather around a bowl of soup together, creating a heartwarming atmosphere. The sensation of comfort food sparks conversations and memories, enhancing your dining experience.

Furthermore, this soup is incredibly cost-effective. It requires standard ingredients that you likely have at home, making it accessible for everyone. The wholesome nature of potatoes, combined with the luxurious texture, makes this dish feel indulgent without breaking the bank.

Historical Background and Cultural Significance

The origins of potato soup can be traced back to regions where potatoes have been a staple for centuries. First domesticated in the Andean mountains of South America, potatoes made their way to Europe in the late 16th century, becoming a crucial ingredient in many cuisines.

Throughout history, potato soup has been embraced for its simplicity and the comfort it brings, especially during times of hardship. Various cultures have made it their own, often incorporating local ingredients to enhance the flavor profile uniquely.

As recipes evolved, regional variations emerged, incorporating ingredients such as cream, cheese, and different spices that define specific areas. This adaptability showcases the potato’s versatility and the ability of different culinary traditions to embrace it within their kitchens.

Today, creamy potato soup with bacon serves not only as a delicious meal but also as a reminder of the potato’s rich history and the cultural significance of comfort food across generations.

Ingredient Deep Dive

Potatoes: Potatoes are the heart of this soup, providing creaminess and substance. With a long history as a staple food, they are high in carbohydrates, vitamin C, and potassium. When selecting potatoes, look for firm, smooth skins and avoid any signs of bruising. Store them in a cool, dark place, and they can last several weeks. If you’re in need of substitutions, sweet potatoes can be a delightful variation.

Bacon: Bacon enhances the soup with a smoky, savory flavor that balances the richness of the potatoes. Known for its social significance, bacon has been a part of culinary traditions across cultures for centuries. When purchasing bacon, look for thick-cut varieties that offer a satisfying crunch. Store it in the refrigerator and consume within a week or freeze for longer storage. Alternatives include turkey bacon or plant-based bacon for different dietary needs.

Common Mistakes to Avoid

  • Not prepping the potatoes properly: Always wash and peel potatoes before cooking to remove dirt and pesticides.
  • Overcooking the potatoes: Keep an eye on cooking time; overcooked potatoes will break down too much and ruin the soup’s texture.
  • Skipping the bacon render: Ensure you render the bacon thoroughly to achieve a crispy texture that enhances the soup’s flavor.
  • Not seasoning at each step: Layering salt and pepper throughout the cooking process ensures an even and well-balanced flavor.
  • Using low-quality ingredients: Fresh, high-quality ingredients make all the difference in flavor and overall success of the dish.
  • Blending the soup too much: Blend to the desired consistency; a little chunkiness adds texture and visual appeal.
  • Neglecting the aromatics: Onions and garlic are essential for foundational flavor—don’t skip them!
  • Ignoring the final tasting: Always taste before serving to make adjustments to seasoning and creaminess.

Essential Techniques

Blending: This technique is crucial for achieving the right texture in potato soup. Use either a regular blender or immersion blender, blending until smooth. Start with small batches in a traditional blender to avoid overflow. When using an immersion blender, move it around the pot for an even consistency.

Rendering Bacon: Rendering is vital to get crispy bacon pieces that complement the creamy soup. Begin by cooking bacon on medium heat to allow the fat to render slowly, ensuring it remains tender. Pay attention to visual cues, like a golden color, indicating optimal doneness, and avoid burning for best flavor.

Pro Tips for Perfect Creamy Potato Soup with Bacon

1. For an extra creamy texture, add a splash of heavy cream or half-and-half at the end of cooking.

2. Experiment with different spices like paprika or thyme to enhance flavor.

3. Keep some bacon pieces aside for garnishing to add a crunchy topping to the soup.

4. For a more complex flavor, sauté onions before adding potatoes to deepen the soup base.

5. Add a bit of sour cream before serving for a tangy twist.

6. Use a variety of potatoes such as Yukon Gold for creaminess and russet for texture.

7. For a vegan version, replace cream with coconut milk and omit bacon, adding smoked paprika for flavor.

8. Serve with crusty bread for dipping, making for a complete meal.

Variations and Adaptations

Regional variations can include the addition of local herbs or spices, such as dill or chives, providing a unique twist to the classic recipe. Seasonal adaptations can utilize summer vegetables like corn or carrots to add color and nutrition, while heavy winter ingredients can be swapped in during colder months.

For dietary modifications, feel free to adjust ingredients for gluten-free or low-carb diets. Substituting potatoes with cauliflower can create a lower-carb version of this delicious soup, while coconut milk can cater to a dairy-free option.

Flavor variations include adding roasted garlic for a deeper flavor profile or incorporating cheese blends for a rich, cheesy potato soup experience.

Texture modifications like adding crispy shallots or fresh herbs as garnishes can elevate the visual appeal and add freshness, while presentation alternatives might involve serving it in bread bowls for a fun and unique dining experience.

Serving and Presentation Guide

When plating the creamy potato soup, use deep bowls for an inviting presentation. Swirl in a bit of heavy cream before serving to create a beautiful marbled effect. Garnishing with crispy bacon bits and fresh herbs can enhance both visual and flavor profiles.

For accompaniments, consider serving with a side salad or crusty bread to elevate the meal. Temperature is essential; ensure the soup is hot but not boiling when served, maintaining comfort for your guests while allowing the flavors to shine.

To control portions, consider using smaller bowls for starters to encourage multiple servings, perfect for parties or gatherings.

Wine and Beverage Pairing

Pairing this creamy potato soup with bacon calls for a medium-bodied white wine like Chardonnay, which complements the richness of the soup. Alternatively, a light red wine like Pinot Noir also works beautifully, bringing out the savory bacon flavors.

For non-alcoholic beverages, consider a sparkling apple cider, which balances the creamy soup’s richness with a refreshing palate cleanser. If serving during brunch, a classic Mimosa can also be a delightful pairing.

When it comes to coffee or tea, a light herbal tea, such as chamomile, provides a soothing accompaniment, while a coffee with mild notes can enhance the eating experience without overpowering the soup.

Storage and Shelf Life

Store any leftover creamy potato soup in an airtight container and keep it in the refrigerator for up to five days. Ensure the soup is cooled to room temperature before placing it in the fridge to maintain freshness.

When storing, use glass containers for easy reheating in the microwave or on the stovetop, ensuring even warming. Signs of spoilage include an off smell or a change in texture, such as excess separation or curdling due to dairy products.

For longer storage, consider freezing the soup in freezer-safe bags, eliminating excess air to prevent freezer burn. Properly stored, the soup can last for up to three months in the freezer. When reheating, mild heat is recommended to preserve texture and flavor.

Make Ahead Strategies

If you’re looking to prepare this creamy potato soup in advance, chop the vegetables and bacon the night before to save time on cooking day. Cook the bacon and store separately to maintain its crispy texture until serving.

For the best flavor, make the soup up to two days in advance; this allows the flavors to meld beautifully. Store it in the fridge and reheat gently on the stove before serving. Consider adding fresh herbs or additional seasoning just before serving for a vibrant finish.

Fresh elements like chopped green onions or cheese can be added just before serving to enhance the final presentation and flavor.

Scaling Instructions

Scaling this recipe is simple; to halve the quantity, just divide the ingredient amounts in half, adjusting the cooking time accordingly. While cooking, taste during the process to ensure flavor consistency remains balanced.

For doubling or tripling the recipe, ensure you have a pot large enough to accommodate the extra ingredients without overflowing. Adjust timing as needed, particularly for cooking the potatoes; larger quantities may take a few extra minutes.

When scaling the recipe, consider how you will store leftovers as larger batches may require more storage space, such as larger containers or freezing portions for future meals.

Nutritional Deep Dive

This creamy potato soup with bacon provides a comforting blend of macronutrients, offering carbohydrates from potatoes, protein from bacon, and fat from cream. A typical serving contains approximately 300 calories, making it a fulfilling meal option.

Micronutrient-wise, this soup boasts vitamins C and B6 from potatoes, along with essential minerals like potassium. The addition of cream contributes calcium for strong bones, while bacon adds iron for beneficial nutrition.

For those considering dietary choices, keep in mind portion sizes to maintain a balanced intake. Pairing the soup with a salad or vegetables can enhance its overall nutritional profile.

Incorporating this dish into a well-rounded diet can be satisfying and nutritious, particularly when supplemented with fresh ingredients or paired with side salads.

Dietary Adaptations

This creamy potato soup can easily cater to dietary needs. For a gluten-free version, simply ensure all ingredients, including broths, are gluten-free. Opt for gluten-free bacon options available at many stores.

For those dairy-free, replace the cream with coconut milk or nut-based milk alternatives, and skip the bacon for a lighter option. To maintain flavor, add smoked paprika for a hint of smokiness.

Vegans can enjoy this recipe using plant-based ingredients without sacrificing flavor; consider mashing the potatoes with almond milk for a creamy texture.

If focusing on low-carb options, zucchinis or cauliflower can replace potatoes, creating a similar experience while decreasing carbohydrate content significantly.

Troubleshooting Guide

If your potato soup has an unbalanced texture, it may be due to over-blending. Stop blending once you reach the desired consistency, leaving some chunks for textural contrast.

Flavor balance may be an issue if the soup tastes bland. Add salt and pepper gradually during cooking, tasting frequently to bring out the flavors without over-salting.

Whenever the soup is too thick, whisk in additional broth or cream to reach the preferred consistency. Heat gently, ensuring it’s well-mixed without compromising texture.

If the soup tends to separate when refrigerated, stir well before serving to recombine ingredients. Whisking in extra broth or cream while reheating can help restore its creamy nature.

When cooking equipment fails or seems inadequate, use a manual immersion blender if an electric one is malfunctioning to blend soup directly in the pot, saving time on pot transfers.

Recipe Success Stories

Community feedback highlights how this creamy potato soup has become a weeknight staple for many families. Readers have reported modifying ingredients, resulting in unique twists while still retaining the core comforting essence of the dish.

Adaptation stories include adding seasonal vegetables like carrots or spinach to pack more nutrition, showcasing how versatile this dish can be. Many have shared their success stories, detailing how the recipe contributes to family traditions and gatherings.

Photography tips have also emerged, with suggestions for garnishing the soup with fresh herbs like parsley or basil to elevate visual appeal, making it more Instagram-worthy.

Frequently Asked Questions

Can I freeze creamy potato soup? Yes, this soup can be frozen for up to three months. Ensure it’s stored in airtight containers to prevent freezer burn.

How do I prevent my potato soup from becoming watery? Use a firm, starchy potato such as Russet, and do not add too much broth initially; adjust as needed while cooking.

What’s the best type of potato for soup? Starchy potatoes like Russet or Yukon Gold work best for a creamy texture; avoid waxy potatoes as they do not mash well.

Can I add other vegetables to this soup? Absolutely! Carrots, corn, or celery can be added for extra flavor and nutrition.

Is this soup gluten-free? Yes, as long as you use gluten-free bacon and broth, this soup can be enjoyed on a gluten-free diet.

How can I make this soup spicier? Feel free to add cayenne pepper or chili flakes for a spicy variation, adjusting to taste.

What herbs pair well with potato soup? Fresh herbs like chives, thyme, and parsley complement the soup beautifully and add freshness.

Can I create a vegan version of this soup? Yes, use plant-based bacon and coconut milk or a nut-based alternative to create a delicious vegan option.

How do I thicken potato soup? Blend part of the soup to enhance creaminess, or add additional potatoes to achieve the desired thickness.

What can I serve with creamy potato soup? This soup pairs nicely with crusty bread, fresh salads, or a light sandwich for a complete meal experience.

Additional Resources

Looking for related recipes? Explore other comforting soups like butternut squash soup, clam chowder, or a classic tomato basil soup. Each offers unique flavors and comforting experiences perfect for various occasions.

For technique guides, consider checking out resources on proper vegetable chopping techniques or tips for sautéing that will enhance your overall cooking skills.

Ingredient information is available for those curious about the nutritional content of potatoes or bacon, essential for making informed dietary choices.

Equipment recommendations for blenders can elevate your kitchen dynamics and ensure easier processing of soups and sauces.

For seasonal variations, experiment with fresh herbs and vegetables that reflect the current season’s bounty, making your cooking experience ever-changing and exciting.

Join the Conversation

We encourage you to share your experiences and variations of this creamy potato soup with bacon on social media! Use the hashtag #CreamyPotatoSoup to join a community of fellow food lovers.

Photography tips such as using natural light can enhance your dish’s visual appeal, showcasing the inviting colors and inviting nature of your soup.

Share a recipe review or suggest modifications that worked well for you! Engaging with our community allows everyone to learn and evolve as cooks.

Have fun experimenting with this recipe, and we look forward to hearing your success stories as you enjoy this comforting dish!

The Recipe

Creamy Potato Soup with Bacon

Serves: 6 servings

Prep Time: 15 mins

Cook Time: 30 mins

Total Time: 45 mins

Kitchen Equipment Needed

  • Large pot
  • Blender (or immersion blender)
  • Cutting board and knife
  • Measuring cups and spoons
  • Wooden spoon

Ingredients

  • 4 large russet potatoes, peeled and diced
  • 6 slices of bacon, chopped
  • 1 medium onion, diced
  • 2 cloves garlic, minced
  • 4 cups chicken or vegetable broth
  • 1 cup heavy cream
  • Salt and pepper to taste
  • Chopped parsley for garnish

Directions

  1. In a large pot, cook the bacon over medium heat until crispy. Remove and set aside, leaving the drippings in the pot.
  2. Add diced onion to the pot with the bacon drippings and sauté until translucent, about 5 minutes.
  3. Stir in minced garlic and cook for another minute until fragrant.
  4. Add diced potatoes and broth to the pot. Bring to a boil, then reduce the heat and simmer until potatoes are tender, about 15-20 minutes.
  5. Once the potatoes are tender, use an immersion blender to blend the soup until smooth, or transfer to a blender in batches.
  6. Return the soup to low heat and stir in heavy cream, seasoned with salt and pepper to taste.
  7. Serve hot, garnished with reserved bacon and chopped parsley.

Recipe Notes

  • For a lighter version, swap heavy cream for half-and-half or milk.
  • Profoundly flavor the soup as desired with herbs like thyme and rosemary.
  • Consider topping with crispy onions or cheese for added texture and flavor.

Hearty Cowboy Soup Recipe: A Comforting One-Pot Delight

Cowboy Soup: Hearty Comfort in a Bowl

⚖️
Difficulty
Easy

⏲️
Prep Time
10 mins

🕒
Cook Time
30 mins

⏱️
Total Time
40 mins

🍽️
Servings
6 servings

Cowboy Soup is the ultimate warming dish, perfect for chilly days or cozy gatherings. With its variety of ingredients, including hearty meats, vegetables, and spices, this cowboy classic delivers a satisfying flavor that harkens back to the rugged kitchens of the West. The thick, filling broth and colorful veggies make each bowl visually appealing and absolutely delicious. It’s a soup that tells stories, combining simple elements to create something truly heartwarming.

As you dive into a bowl of Cowboy Soup, you can expect rich notes of tender beef, zesty tomatoes, and the vibrant crunch of bell peppers. Every bite offers a delightful marriage of flavors, while the robust nature of the dish gives it a comforting weight. Whether served on a busy weekday or for a weekend feast, this soup is bound to become a family favorite, exemplifying the joys of home-cooked meals.

Quick Recipe Highlights

  • Flavor Profile: Rich and savory with a hint of spice from chili seasoning and the freshness of herbs.
  • Texture: Thick and hearty, combining tender meat with crunchy vegetables, ensuring a satisfying mouthfeel.
  • Aroma: A fragrant blend of sautéed onions, garlic, and spices that fills your kitchen with warmth.
  • Visual Appeal: Bursting with color from red tomatoes, green peppers, and a golden hue from corn.
  • Skill Level Needed: Perfect for beginners; requires basic cooking skills and attention to detail.
  • Special Equipment: A large pot or Dutch oven to accommodate the hearty ingredients.

Recipe Overview

  • Difficulty Level: Easy – Ideal for novice cooks looking to explore the art of soup-making.
  • Category: Main Dish – A complete meal that can stand alone or be paired with crusty bread.
  • Cuisine: American – Rooted in Western culinary traditions, reflecting the hearty, rustic style of cowboy cooking.
  • Cost: Budget-friendly with affordable ingredients available at local markets.
  • Season: Best enjoyed in fall and winter when warming meals are most appealing.
  • Occasion: Perfect for family dinners, gatherings, or when you need a quick, comforting meal.

Why You’ll Love This Recipe

The Cowboy Soup offers both taste and texture appeal that make each bowl a delightful experience. The combination of tender meats and fresh vegetables creates a hearty dish that fills you up without feeling heavy. As the flavors meld, you’ll savor the rich, savory broth that warms you from the inside out. This soup is not only delicious but also provides convenience; it comes together in just 40 minutes, making it a fantastic weeknight meal option.

Aside from being convenient, Cowboy Soup packs a nutritional punch. With a mix of protein from the beef and vitamins from the vegetables, it’s a wholesome choice for any dinner table. Each serving offers a good balance of macronutrients, ensuring you not only enjoy a scrumptious meal but also cater to your dietary health.

When it comes to social and entertainment value, Cowboy Soup is a crowd-pleaser. It’s easy to make in large batches, perfect for parties or family get-togethers. Serve it alongside bread or cornbread, and you’ve got a complete, shareable meal that ignites conversation and camaraderie.

Cost-effectiveness is another reason you’ll appreciate this recipe. Using basic, widely available ingredients, you can create a filling dish that feeds a crowd without breaking the bank. So, whether you’re feeding a family or hosting friends, this Cowboy Soup will meet your needs without compromising on taste or quality.

Historical Background and Cultural Significance

Cowboy Soup has its origins in the American West, where cowboys needed hearty meals that were easy to prepare over an open fire. The simplicity and abundance of ingredients reflect the rugged lifestyle and resourcefulness of ranch life. From beans to beef, every component of the soup tells a story about the culture it came from, emphasizing traditions of using locally sourced produce and meats.

This soup is culturally significant as it embodies the spirit of the American frontier, showcasing resilience, creativity, and community. It has evolved over generations, with families incorporating personal touches and regional ingredients reflecting local culinary influences. This adaptation not only preserves the rustic nature of the dish but also keeps it vibrant and modern.

As the recipe spread across the country, variations began to emerge, from spicy renditions in southwestern kitchens to more subdued versions in the Midwest. Each area added its unique twist, resulting in a diverse range of cowboy soup that continues to be enjoyed today.

Regional variations of Cowboy Soup highlight the ingredients specific to local agriculture, showcasing pride in those bounties. As seasonal vegetables come into play, you’ll find that this recipe embodies how traditional cooking embraces the hands that cultivate the earth.

Ingredient Deep Dive

Beef: Chosen for its robust flavor and protein content, beef has long been favored in traditional cowboy cooking. It’s significant for providing the necessary sustenance in hearty dishes, especially for active lifestyles. Nutritionally, it offers essential amino acids and vital vitamins like B12. When selecting beef, look for cuts like ground beef or stew meat; they are more economical and perfect for soups. Store it properly to prevent spoilage and consider alternatives like turkey or beans for lighter options.

Vegetables: Fresh veggies, such as bell peppers and tomatoes, not only add essential nutrients but also vibrance to the dish. Each vegetable chosen plays a crucial role in the flavor profile, offering fiber and vitamins. Choose organic for better quality and lasting freshness. Store your vegetables in a cool place, and if possible, use seasonal produce for the best taste and environmental impact. For substitutions, consider zucchini or corn based on what’s available.

Common Mistakes to Avoid

  • Not browning the meat: Skipping this step can lead to a less flavorful broth. Browning adds depth and richness to the soup.
  • Overcooking vegetables: This can result in mushy textures. Add harder vegetables first, then softer ones later to maintain texture.
  • Insufficient seasoning: Under-seasoned soup can taste bland. Taste and adjust seasoning throughout the cooking process for best results.
  • Using low-quality ingredients: Quality ingredients elevate the dish significantly. Always choose the freshest produce and good-quality meat.
  • Skipping the simmering step: Allowing the soup to simmer enhances flavor and melds the ingredients effectively.
  • Not letting it rest: The flavors benefit from sitting for a few minutes post-cooking, so let it rest before serving.
  • Not keeping an eye on the consistency: Adjust the thickness by adding more broth or vegetables to ensure the right balance.
  • Assuming all soups are similar: While the technique is similar, each soup has its unique character and temperatures for serving.

Essential Techniques

Sauteing Vegetables: This method is vital for building flavors at the beginning of your soup. Start by heating oil in a pot and adding onions and garlic until fragrant. To master this technique, ensure your pot is preheated; this helps in releasing the natural sweetness of the vegetables. Watch for signs of browning—overcooking can lead to bitterness.

Simmering: Essential for combining the flavors of the ingredients, simmering involves cooking soup over low heat. The magic happens as the dish cooks gently, allowing time for flavors to meld. Be sure to keep the heat low; boiling can rupture delicate ingredients, making them undesirable in texture.

Pro Tips for Perfect Cowboy Soup

1. Use fresh herbs for seasoning—they’ll elevate the flavor profile exponentially.

2. Prepare a large batch and freeze portions for quick meals later in the week.

3. For a smoky flavor, consider adding a bit of smoked paprika or chipotle powder.

4. Balance richness by serving with a splash of lime juice or vinegar at the end.

5. Customize according to your palate by adding more heat with jalapeños or hot sauce.

6. Serve with cornbread for a delicious accompaniment that completes the cowboy experience.

Variations and Adaptations

Regional variations abound, with some areas incorporating beans for added heartiness, while others may showcase local game meats for a richer flavor. Seasonal adaptations are equally tempting; in summer, consider using zucchini and corn for a fresh twist. Dietary modifications can include swapping beef for lentils or chickpeas for a plant-based version, making the soup accessible to vegan eaters.

Flavor variations are easy to implement; cilantro and lime can bring a zesty flair, while a dash of Worcestershire sauce deepens the umami notes. Texture modifications can be achieved by pureeing part of the soup for a creamier consistency, or simply incorporating cream or yogurt as a garnish. For presentation alternatives, serve in rustic bowls garnished with fresh herbs or paired with a side salad.

Serving and Presentation Guide

Plating techniques for Cowboy Soup can turn a simple meal into a culinary delight. Use shallow bowls, pile high with soup, and add fresh herbs and a dollop of sour cream or Greek yogurt for a pop of color. Traditional accompaniments include crackers or cornbread, while modern takes could feature avocado slices or jalapeños for an exciting twist. Temperature considerations are crucial; serve soup piping hot for maximum enjoyment, and for portion control, offer smaller servings as part of a multi-course meal.

Wine and Beverage Pairing

When it comes to wine pairings, a bold red such as a Cabernet Sauvignon complements the savory flavors of Cowboy Soup beautifully. If you prefer non-alcoholic alternatives, consider a sparkling water with some citrus for a refreshing touch. For coffee enthusiasts, a robust dark roast contrasts wonderfully with the rich soup, enhancing the overall experience. Remember to serve beverages chilled or at room temperature based on preference.

Storage and Shelf Life

For proper storage of your Cowboy Soup, allow it to cool completely before transferring to airtight containers. Refrigerate for up to three days or freeze for several months. Choose freezer-safe containers to prolong shelf life effectively. Signs of spoilage include off-smells or an unusual texture in the broth. When reheating, do so gradually on the stove or microwave, and add a splash of water or broth to revive the consistency—especially if frozen.

Make Ahead Strategies

Planning ahead is simple with Cowboy Soup. Prep your ingredients a day in advance—chop vegetables and brown the meat, storing them separately in the refrigerator. The quality won’t suffer, and it saves time when you’re ready to cook. Consider batch cooking to simplify your weeknight meals—just double the recipe and enjoy the leftovers later. For maximum freshness, reheat only what you plan to serve to keep the dish vibrant and enjoyable.

Scaling Instructions

Halving this recipe is easy—just reduce the ingredient amounts accordingly and maintain cooking times. Doubling or tripling will require a larger pot and may alter cooking times slightly due to increased volume; ensure an even simmer by stirring occasionally. Be mindful of storage considerations; larger batch sizes necessitate appropriate containers to avoid spoiling or freezer burn.

Nutritional Deep Dive

The macro breakdown of Cowboy Soup shows its filling nature—each serving offers ample protein, carbohydrates, and healthy fats depending on ingredient ratios. Micronutrient analysis reveals it’s packed with essential vitamins and minerals, especially from the vegetables. This soup is a powerhouse when it comes to nutritional benefits, supporting energy levels and promoting overall health.

Dietary Adaptations

For gluten-free options, simply ensure your bouillon or broth is certified gluten-free. Dairy-free adaptations are also straightforward; coconut milk can replace any dairy elements for a creamy consistency. For those following vegan diets, employ lentils or chickpeas as meat substitutes. Low-carb and keto-friendly approaches can limit the starchy vegetables or beans in the recipe while emphasizing meats and leafy greens to enhance the dish’s appeal without compromising taste.

Troubleshooting Guide

If you experience texture issues, such as overly mushy vegetables, ensure to add them at different cooking stages based on their cooking times. Address flavor balance by gradually adjusting seasonings throughout the cooking process to prevent overwhelming the dish. For temperature problems, ensure your stove is adequately heated and that the soup is simmering, not boiling, to maintain the integrity of the ingredients.

Recipe Success Stories

Community feedback on Cowboy Soup has been overwhelmingly positive, with many sharing their unique adaptations and variations based on family traditions. Some readers have discovered that their children, originally picky about vegetables, enjoyed this soup due to its flavorful nature and presentation. Others have shared tips on photography, helping to highlight the colorful ingredients and hearty nature of the soup, making it as visually appealing as it is delicious.

Frequently Asked Questions

Can I make Cowboy Soup in a slow cooker?

Yes! Simply brown the meat and sauté the vegetables according to the recipe before transferring everything to a slow cooker. Cook on low for 6-8 hours or high for 3-4 hours, allowing the flavors to develop beautifully over time.

What spices work best in Cowboy Soup?

Common spices include chili powder, cumin, and oregano. Feel free to personalize this by adding your favorite spices or herbs to match your taste preference!

Can I freeze leftovers?

Absolutely! Cowboy Soup freezes well. Let it cool completely before transferring to freezer-safe containers. Store for up to three months, reheating as needed.

How can I make this dish spicier?

Add diced jalapeños or hot sauce to the soup for extra heat. You can also adjust spices as per your preference while cooking.

What sides pair well with Cowboy Soup?

Crusty bread, cornbread, or a fresh salad make great side dishes. They balance the hearty soup and provide additional texture to your meal.

Is it possible to make this a vegetarian dish?

Yes! By substituting beef with lentils or beans and using vegetable broth instead of meat broth, you can easily create a delicious vegetarian Cowboy Soup.

Can I use canned ingredients?

Canned beans, tomatoes, and even corn can be excellent time-savers and can add great flavor to your Cowboy Soup without compromising quality.

What is the best way to store Cowboy Soup?

Store cooled soup in airtight containers in the fridge for up to 3 days, or freeze for future meals. Make sure to cool it down first to avoid condensation.

Can I add different meats?

Certainly! Ground turkey, pork, or even chicken can be utilized in place of beef, bringing different flavors and textures to the dish.

How do I know if my soup is done?

Your Cowboy Soup is ready when the meat is tender, and the vegetables are cooked but still keeping their shape. The flavors should meld perfectly, creating a well-rounded taste.

Additional Resources

Explore other hearty recipes that complement Cowboy Soup, such as homemade cornbread or savory biscuits. Additionally, check out ingredient guides to learn more about nutritious choices and seasonal produce that works best in soups. Equipment recommendations can also help you choose the right tools for making healthy dishes efficiently.

Join the Conversation

We’d love to see your Cowboy Soup creations—share them on social media with the hashtag #CowboySoupChallenge. Join our community by leaving feedback or suggestions based on your own experiences. Whether it’s photography tips or your favorite adaptations, engaging with fellow cooking enthusiasts is what makes sharing recipes so rewarding!

The Recipe

Cowboy Soup

Serves: 6 servings

Prep Time: 10 mins

Cook Time: 30 mins

Total Time: 40 mins

Kitchen Equipment Needed

  • Large pot or Dutch oven
  • Wooden spoon or spatula
  • Knife and cutting board

Ingredients

  • 1 pound ground beef
  • 1 onion, diced
  • 2 garlic cloves, minced
  • 1 bell pepper, chopped
  • 1 can (15 oz) diced tomatoes
  • 2 cups beef broth
  • 1 can (15 oz) corn, drained
  • 1 can (15 oz) black beans, drained and rinsed
  • 1 tablespoon chili powder
  • 1 teaspoon cumin
  • Salt and pepper to taste

Directions

  1. In a large pot over medium heat, brown the ground beef until fully cooked. Drain excess fat.
  2. Add the onion and garlic to the pot, sautéing until soft and translucent.
  3. Incorporate the bell pepper and cook for an additional 2 minutes.
  4. Stir in the diced tomatoes, beef broth, chili powder, cumin, corn, and black beans.
  5. Bring to a boil, then reduce heat and let simmer for 20 minutes, stirring occasionally.
  6. Season with salt and pepper to taste, then serve hot with your favorite sides.

Recipe Notes

  • This soup can be customized with different vegetables or legumes according to your palette!
  • Add a splash of lime juice before serving for a refreshing kick.
  • Store leftovers in an airtight container in the fridge for up to three days.

Easy Savory Slow Cooker Beef Stroganoff Recipe for Comfort Food Lovers

Savory Slow Cooker Beef Stroganoff: A Comforting Delight for All Occasions

⚖️
Difficulty
Easy

⏲️
Prep Time
15 mins

🕒
Cook Time
6 hours

⏱️
Total Time
6 hours 15 mins

🍽️
Servings
4-6 servings

The Savory Slow Cooker Beef Stroganoff is a heartwarming recipe that envelops tender beef in a creamy, savory sauce enriched with mushrooms and onions. The secret to its incredible flavor lies in the slow cooking process, which allows all the aromatic ingredients to meld perfectly together, creating a dish that is bursting with flavor. When you walk into the kitchen after hours of letting it simmer away, the air will be filled with the comforting aroma of beef and spices that beckon everyone to the dining table.

One of the most appealing aspects of slow cooker beef stroganoff is its effortless preparation. Just gather your ingredients, toss them into the slow cooker, and allow the magic to happen. This dish not only feeds the hungry bellies in your home but also brings people together, offering a cozy atmosphere whether for a family dinner or a gathering with friends. The creamy texture of the sauce, combined with the juiciness of the beef and the earthiness of mushrooms, makes it a delightful meal that feels like a hug in a bowl.

Quick Recipe Highlights

  • Flavor Profile: Rich, creamy, and savory with tender beef and earthy mushrooms that create a well-balanced meal.
  • Texture: A harmonious blend of velvety sauce enveloping fork-tender beef and hearty mushrooms.
  • Aroma: A comforting mix of sautéed onions, garlic, and herbs wafting through your kitchen.
  • Visual Appeal: Creamy golden sauce poured over slices of beef with flecks of herbs and dark mushrooms.
  • Skill Level Needed: Perfect for beginners; minimal cooking skills are required for a rewarding experience.
  • Special Equipment: A reliable slow cooker is essential to achieve the depth of flavor.

Recipe Overview

  • Difficulty Level: Easy, making it accessible for cooks at any level. The slow cooker does most of the work, allowing you to focus on gatherings or tasks at hand.
  • Category: A fulfilling main dish, ideal for family dinners or entertaining guests.
  • Cuisine: This dish is rooted in Russian culinary traditions, showcasing classic flavors that have been adopted worldwide.
  • Cost: Budget-friendly, especially since it’s made with affordable cuts of beef and everyday ingredients.
  • Season: Perfect for fall and winter seasons, the dish is warm and satisfying when cooler weather kicks in.
  • Occasion: Great for weeknight dinners, holiday gatherings, or cozy weekends at home with loved ones.

Why You’ll Love This Recipe

The taste and texture of Savory Slow Cooker Beef Stroganoff create a memorable experience. Each bite offers the richness of the creamy sauce complemented by the tenderness of the beef, which melts in your mouth. The mushrooms add an earthy depth to the dish, enhancing both the flavor and the overall satisfaction.

The convenience of this recipe is one of its major advantages. You can prepare it in the morning, set it and forget it while going about your day. When it comes time to eat, a deliciously savory meal awaits you, ready to be served with minimal effort. This slow cooker dish is perfect for those with busy schedules, allowing you to enjoy home-cooked meals without spending hours in the kitchen.

In terms of nutrition, beef is a great source of protein, iron, and zinc, contributing to a well-rounded diet. When paired with whole grains or greens, this dish becomes a hearty and nourishing meal that supports energy levels. You can enjoy this dish guilt-free, knowing it provides essential nutrients while still feeling indulgent.

Socially, this recipe serves as a fantastic centerpiece for gatherings. The comforting flavors spark conversations and encourage sharing. As guests savor each bite, it creates a warm, inviting atmosphere perfect for bonding over a shared meal. Its simplicity and generous servings make it easy to entertain without tireless multitasking in the kitchen.

This dish’s cost-effectiveness stems from using affordable ingredients, including budget-friendly cuts of beef, which become tender and flavorful through the slow cooking process. You can feed a large group without breaking the bank, making it a practical choice for family nights or special occasions.

Historical Background and Cultural Significance

Beef stroganoff has an intriguing origin story linking back to 19th century Russia, where it was named after the Stroganov family, a wealthy and influential family of merchants. The dish gained popularity through the aristocracy, often featuring at formal dinners. Its development stemmed from the need for sophisticated yet simple recipes that could impress guests while being easy to prepare.

Culturally, beef stroganoff reflects the essence of Russian cuisine, which emphasizes hearty flavors and comforting ingredients. Over the years, it has transcended its borders, becoming a staple in various international culinary practices. Each region boasts its unique take, but the fundamental flavors remain ever-popular, uniting different cultures through a shared love for good food.

As times progressed, beef stroganoff has evolved from its traditional recipes into countless modern versions, reflecting contemporary taste preferences and dietary needs. Variations include everything from vegetarian adaptations using mushrooms and plant-based ingredients to international fusions incorporating different spices and sauces.

Regional variations can be found worldwide, with different countries putting their spin on the classic. In American households, for instance, it’s often served over egg noodles or rice, showcasing how the recipe has evolved in different cultural settings while still honoring its roots.

Ingredient Deep Dive

Beef: This primary ingredient is not only a rich protein source but also holds cultural significance in many cuisines. When selecting beef for stroganoff, it’s essential to look for cuts that are tender and marbled, such as sirloin or tenderloin. Freshness is key; always check for bright color and subtle smell. For storage, keep the beef in the coldest part of the refrigerator and use it within a few days for best quality.

Mushrooms: Mushrooms add not just flavor, but also texture and depth to beef stroganoff. Rich in nutrients like vitamin D and selenium, they are excellent for boosting the dish’s health benefits. When buying mushrooms, look for firm, unblemished specimens. Store them in a paper bag in the refrigerator and avoid washing them until just before use to prevent them from becoming soggy.

Sour Cream: This ingredient brings creaminess and tang to the stroganoff sauce. It’s essential for achieving the signature flavor profile. Be mindful to select high-quality sour cream, as it affects the overall taste of the dish. Sour cream should be kept refrigerated and can last about two weeks, but check for any signs of separation or off-smell before use.

Onions: Onions add sweetness and depth to the flavor. Always opt for fresh, firm bulbs without soft spots or discoloration. When stored in a cool, dry place, onions will last several weeks. They can also be substituted with shallots for a milder flavor or green onions as a garnish.

Common Mistakes to Avoid

  • Overcooking the beef: Cooking it for too long can dry out the meat, making it tough. Always check for tenderness.
  • Skipping the browning step: Browning the meat and onions adds depth of flavor, so don’t skip this crucial step.
  • Using cheap quality ingredients: Since this dish relies heavily on the flavor of each component, poor-quality ingredients will result in subpar stroganoff.
  • Not adding enough seasoning: Taste and adjust the seasoning as needed throughout the cooking process; layers of flavor are key!
  • Neglecting to monitor liquid levels: Make sure there’s enough liquid in the slow cooker to cook the beef properly; it prevents burning.
  • Not thickening the sauce: If the sauce turns out too thin, you can easily thicken it with a cornstarch slurry at the end.
  • Forgetting to stir occasionally: While slow cookers do their job well, a little stirring can help distribute flavors more effectively.
  • Allowing leftovers to sit out: Always refrigerate leftovers promptly to prevent spoilage and foodborne illness.
  • Using pre-packaged sauces: Making your sauce adds a personal touch and allows you to control the flavor profile.
  • Skipping the herb enhancement: Fresh herbs can elevate the dish’s flavor significantly; don’t hesitate to add them in moderation for a finishing touch.

Essential Techniques

Browning the meat is a crucial technique that enriches the flavors of the beef stroganoff. This step caramelizes the surface of the meat, locking in juices and enhancing taste. To master this, cook in batches if necessary to avoid steaming the meat. Look for a nice brown crust, which indicates that the Maillard reaction is taking place—a key component in building depth of flavor.

Sautéing the onions and garlic before adding them to the slow cooker helps release their natural sweetness and aroma, adding another layer to the dish. Ensure that the onions are soft and translucent before transferring them. Avoid burning them, as this can lead to a bitter taste, ruining your sauce.

Adding sour cream at the right moment is essential. Stir it in at the end of the cooking process, off the heat to prevent curdling, which can alter the sauce’s texture. Look for a smooth and creamy consistency.

Thickening the sauce may sometimes be necessary to achieve the perfect texture. An easy mix of cornstarch and water can create a slurry that thickens the sauce after cooking. Keep stirring continuously until it reaches desired thickness. Monitor the consistency closely to avoid making it too gloopy.

Pro Tips for Perfect Savory Slow Cooker Beef Stroganoff

Use high-quality beef for best results. A marbled cut will yield tenderness and juiciness, contributing to a richer flavor. Choosing fresh ingredients enhances the overall taste and quality of the final dish.

To intensify the flavor of the stroganoff, consider deglazing the pan used to brown the meat with a splash of white wine or beef broth before adding it to the slow cooker. This carries the fond from the bottom of the pan into the dish, enriching the sauce.

If you prefer a creamy texture, replace some of the beef broth with heavy cream. This will create a richer sauce that will ultimately elevate your stroganoff experience.

To incorporate a hint of sweetness, add a teaspoon of sugar or a splash of balsamic vinegar. This counterbalances the savory aspect of the dish and elevates the flavor profile without overwhelming it.

Feel free to enhance the depth of flavor by adding Worcestershire sauce, mustard, or fresh herbs like thyme or parsley towards the end of cooking. Each of these additions will provide a layer of complexity that makes the dish stand out.

For a little extra texture, consider garnishing with crispy fried onions or fresh herbs just before serving. This not only adds visual appeal but also an exciting crunch that contrasts with the creamy sauce.

Variations and Adaptations

For a regional twist, consider trying a Hungarian variation by using paprika and swapping sour cream for creme fraiche. This adds a distinctly hearty flavor that resonates with traditional Eastern European taste.

If you want to introduce seasonal adaptations, consider adding seasonal vegetables like carrots or green beans during the last hour of cooking. This not only adds nutrition but also vibrancy to the dish.

Dietary modifications can easily be made by opting for leaner cuts of beef or using chicken to lighten the dish. For a vegetarian version, substitute beef with hearty ingredients like lentils or mushrooms for a robust flavor.

For those looking to boost the flavor, try adding a splash of soy sauce or mushroom broth for a deeply umami-rich base. You can also play with spices, such as incorporating a hint of cayenne or smoked paprika for a subtle kick.

Texture modifications could involve serving the stroganoff over a bed of zoodles (zucchini noodles) instead of traditional egg noodles, making it a refreshing low-carb option.

Presentation alternatives can elevate your dish; serve it in a hollowed-out bread bowl or top it with a sprinkle of finely chopped parsley for an elegant finishing touch.

Serving and Presentation Guide

Plating your Savory Slow Cooker Beef Stroganoff beautifully will enhance the dining experience. Consider using a wide, shallow bowl to showcase the creamy sauce and robust chunks of beef.

For garnish, a sprinkle of fresh parsley or chives adds a pop of color and freshness. Place a dollop of sour cream on top for an appealing touch and an additional layer of flavor.

Offering traditional accompaniments like egg noodles or mashed potatoes allows guests to serve themselves in a customizable fashion. Alternatively, serve with crusty bread for dipping into the rich sauce.

Modern serving suggestions include pairing it with a fresh green salad on the side, balancing the hearty dish with vibrant, tangy flavors.

Temperature considerations are essential. Serve the stroganoff warm, as the flavors meld beautifully at a proper serving temperature. Preheat your serving bowls if possible for added warmth.

For portion control tips, consider serving in individual ramekins, allowing guests to enjoy personal portions without waste, while also enhancing presentation.

Wine and Beverage Pairing

A full-bodied red wine such as a Cabernet Sauvignon or Merlot pairs beautifully with Savory Slow Cooker Beef Stroganoff. The rich flavors of the wine complement the dish’s savory notes, creating a delightful pairing for a cozy evening.

For non-alcoholic alternatives, consider serving sparkling water with a slice of lemon or iced tea with mint. These options are refreshing and will cleanse the palate between bites.

If you enjoy coffee or tea, a bold black coffee works wonderfully alongside the stroganoff, enhancing the richness of the dish.

Temperature considerations are important; if serving wine, ensure it’s appropriately chilled for white wines or slightly warmer for red to enhance the flavor during the meal.

Don’t hesitate to offer a fun cocktail pairing such as a classic Moscow Mule, made with ginger beer, to invigorate the meal with its zesty flavors.

Storage and Shelf Life

To store leftovers of your Savory Slow Cooker Beef Stroganoff, place the dish in an airtight container. It can stay fresh in the refrigerator for up to three to four days.

For longer storage, consider freezing the stroganoff. Ensure it cools to room temperature before transferring to a freezer-safe container, where it can last for up to three months.

Temperature requirements are essential; always refrigerate leftovers promptly to avoid spoilage. Reheat thoroughly until steaming before consuming again.

Container recommendations include glass or heavy-duty plastic to prevent flavor absorption and allow for quick reheating. Avoid using metal containers that can react with the sauce.

Signs of spoilage to look out for include off-smells, discoloration, or unusual textures. When in doubt, it’s best to err on the side of caution and discard.

Reheating instructions suggest using the microwave or stovetop for even heating. Add a splash of beef broth or water to keep the sauce creamy, ensuring that it does not dry out.

Freezing guidelines indicate that while the dish can be frozen, avoid freezing dishes containing sour cream until reheating, as it may affect the texture and flavor once thawed.

Make Ahead Strategies

To effectively prepare your Savory Slow Cooker Beef Stroganoff, consider starting with a meal prep timeline. You can marinate the beef and chop the vegetables the night before, storing everything in the refrigerator to deepen the flavors.

Storage between steps can simplify the process. Keep your beef and sauce separately until you’re ready to cook. This helps maintain the texture of the beef while allowing flavors to meld before cooking.

Quality impact assessment is key; marinating the beef overnight not only allows for enhanced flavor but also tenderizes the meat, making for a better overall dish.

When assembling your slow cooker, layer ingredients for optimal flavor. Start with the beef, followed by mushrooms, onions, and pour the liquids on top for even distribution.

Reheating guidelines advise that when making ahead, it’s best to reheat slowly over low heat, allowing the flavors to come back together without overcooking the beef.

For fresh element additions, consider preparing a side salad with seasonal greens to complement the stroganoff. This adds freshness to your meal while enhancing the overall dining experience.

Scaling Instructions

If you need to halve the recipe, adjust the ingredients accordingly, using the same cooking method. The slow cooker may still require the same cooking time, but monitor for tenderness.

Doubling or tripling the recipe is straightforward; simply adjust the quantities of the ingredients accordingly. Ensure that your slow cooker can accommodate the increased volume without overcrowding.

Equipment adjustments may be necessary if increasing the recipe size. Consider using a larger slow cooker or cooking in batches to maintain the dish’s quality.

Timing modifications could include slightly extending the cooking time for larger quantities, monitoring the beef for tenderness to ensure even cooking.

Storage considerations are crucial when scaling up. Make sure to have extra containers ready for leftovers or to prepare additional sides that can balance the meal efficiently.

Be sure to note that while scaling, maintaining the flavor profile is equally important, so be generous with seasoning adjustments as necessary.

Nutritional Deep Dive

When analyzing the macros of Savory Slow Cooker Beef Stroganoff, you’ll find that the dish is rich in protein from the beef, essential for muscle health and recovery. Each serving can provide around 25-30 grams of protein, making it a satisfying option for dinner.

Micronutrient analysis shows a good source of iron from the beef, important for blood health, combined with B vitamins that help with energy metabolism. The addition of mushrooms and onions also provides essential vitamins, minerals, and antioxidants.

In terms of health benefits, this dish can be a comforting meal that provides a balance of protein, fats, and carbohydrates when served with appropriate sides like whole grains or a fresh salad.

Dietary considerations are critical; while delicious, be mindful of portion sizes, especially if served with calorie-dense sides. Balancing this dish with lighter options can help keep overall calorie intake in check.

When analyzing each serving, beef stroganoff can be calorically dense, especially when served with rich sides. Therefore, weighing your portions can aid in managing caloric intake, especially for those watching their diet.

Weight management tips include maintaining balanced portions and ensuring a well-rounded meal by pairing with more vegetables or whole grains. Aim for a satisfying plate without overwhelming calories.

Dietary Adaptations

If you’re looking for gluten-free options, consider substituting flour with cornstarch to thicken the sauce, and serve it over gluten-free noodles or rice.

For a dairy-free version, replace sour cream with coconut cream or a cashew cream alternative. This can create a creamy texture without using dairy while maintaining a delightful flavor.

Vegans can substitute beef with lentils or mushrooms while using non-dairy yogurt in place of sour cream. This offers a hearty meal packed full of plant-based nutrients.

For those following a low-carb or keto diet, skip the noodles and serve the beef stroganoff over zoodles or cauliflower rice, preserving the richness without the carbohydrates.

Paleo enthusiasts can adopt this recipe by using compliant ingredients like coconut flour instead of regular flour for thickening and ensuring the broth is free from preservatives.

Low-FODMAP adaptations are possible by using garlic-infused oil instead of onions and ensuring all ingredients adhere to the dietary guidelines, allowing for easier digestion.

Other specific diets can be addressed by opting for lean cuts of meat, ensuring the sauce remains as healthy as possible while retreating from processed ingredients wherever possible.

Troubleshooting Guide

If you encounter texture issues with the beef, ensure that the meat is not overcooked. Check for tenderness using a fork; it should break apart easily. If not tender, allow additional time in the slow cooker.

For flavor balance, if the dish is too salty, add a bit of sugar or vinegar to cut through the excess. Tasting while cooking enables you to adjust seasonings gradually, avoiding overpowering results.

Temperature problems can arise if the slow cooker isn’t calibrated correctly. Invest in a slow cooker thermometer to ensure cooking is happening at the right temperatures.

If faced with equipment challenges, ensure that your slow cooker is functioning properly. Old or faulty slow cookers can lead to uneven cooking, resulting in tougher meat or undercooked veggies.

Ingredient substitutions can affect flavors; taste as you go to ensure that the final result turns out as expected. It’s often wise to tweak the included flavors based on what’s available.

Timing concerns are valid; starting too late in the day can lead to undercooked dinners. Allow ample time for cooking by planning ahead and following your ideal slow cooker cooking times.

Recipe Success Stories

Community feedback around Savory Slow Cooker Beef Stroganoff has been overwhelmingly positive. Many have expressed how the dish has become a family favorite, perfect for gatherings and busy weeknights.

Variation successes include adaptions such as mushroom stroganoff from readers who swapped the beef for lentils, highlighting the flexibility of the recipe without sacrificing flavor.

Readers have shared adaptation stories that showcase personal touches, such as adding more vegetables or different spices, ultimately allowing others to adjust the dish to their taste.

Photography tips often mention using natural light for showcasing the dish, emphasizing its rich color and creaminess. Beautifully presented food often enhances the appeal and encourages sharing online.

Social media platforms have seen countless versions of this recipe, where home cooks proudly showcase their iteration of the dish, offering tips and encouragement to others who want to try it at home.

Frequently Asked Questions

Q: Can I freeze leftover Beef Stroganoff?
A: Yes, you can freeze leftover beef stroganoff for up to three months. Be sure to cool it completely, store it in a freezer-safe container, and label it with the date. When ready to eat, thaw in the refrigerator before reheating.

Q: Is it necessary to brown the meat before slow cooking?
A: While not strictly necessary, browning the meat enriches the flavor and adds depth to the dish. It’s worth taking the extra step to improve the final taste of your beef stroganoff.

Q: How can I thicken my sauce if it’s too thin?
A: If your sauce turns out too thin, mix a tablespoon of cornstarch with equal parts water to create a slurry and stir it into the slow cooker. Allow it to cook for a few more minutes until thickened.

Q: Can I make this dish dairy-free?
A: Absolutely! Substitute the sour cream with dairy-free alternatives like coconut cream or cashew cream to maintain a creamy texture while keeping it dairy-free.

Q: What sides pair well with Beef Stroganoff?
A: Traditional accompaniments like egg noodles or mashed potatoes pair well. You can also serve it with crusty bread or a green salad for freshness and balance.

Q: Can I use different types of meat for this recipe?
A: Yes, you can adapt this recipe by using chicken, turkey, or even mushrooms for a vegetarian option. Just adjust the cooking time accordingly based on the meat used.

Q: How long does it take to cook in a slow cooker?
A: For this beef stroganoff, it typically takes about 6-8 hours on low heat or 3-4 hours on high heat to achieve tender, flavorful meat.

Q: What is the best way to store leftovers?
A: Store leftovers in an airtight container in the refrigerator for up to four days. If you want to save it longer, portion it for freezing to extend its shelf life.

Q: Can I line my slow cooker for easier cleaning?
A: Yes, using slow cooker liners can simplify cleanup after cooking, reducing mess and effort in maintaining your slow cooker.

Q: How do I adjust seasoning for a larger batch?
A: When scaling up the recipe, increase seasonings incrementally, tasting as you go to ensure the flavor remains balanced without becoming overwhelming.

Additional Resources

For those looking to explore related recipes, consider other comforting dishes that can be made in a slow cooker, such as chicken curry or vegetable stew. These recipes often share similar cooking techniques and flavors.

Technique guides for preparing tender meat or creating creamy sauces can enhance your cooking skills, making these elements easier next time. Understanding these fundamentals makes each dish even more enjoyable.

Ingredient information, particularly on sourcing quality beef and vegetables, is vital for getting the best flavors in your recipe. Look for local sources or specialty markets for the freshest ingredients.

Equipment recommendations should focus on finding a reliable slow cooker that suits your cooking needs. Consider models with searing capabilities for added convenience.

Seasonal variations can inspire you to switch up your ingredients based on what is freshest and most available, fostering a new appreciation for these comforting recipes.

Join the Conversation

We invite you to share your experiences and photography of your Savory Slow Cooker Beef Stroganoff. Social media is a great platform for showcasing your culinary creations and connecting with other food lovers.

Readers are encouraged to leave comments with their adaptations and suggestions, as these interactions enrich our community and inspire others to try their variations.

Don’t forget to check for recipe reviews and feedback. Positive experiences help new cooks feel confident about trying this dish and making it their own.

Engaging with our community also helps foster creativity; feel free to ask questions or share tips on different ingredient substitutions that worked well for you.

Lastly, remember the joy of home cooking lies not only in the food itself but also in the memories and connections made during shared meals. Let’s celebrate the love for food, one scrumptious recipe at a time!

The Recipe

Savory Slow Cooker Beef Stroganoff

Serves: 4-6 servings

Prep Time: 15 mins

Cook Time: 6 hours

Total Time: 6 hours 15 mins

Kitchen Equipment Needed

  • Slow cooker
  • Skillet
  • Cutting board
  • Knife
  • Measuring cups and spoons
  • Mixing spoon

Ingredients

  • 2 pounds beef chuck, cut into cubes
  • 1 onion, sliced
  • 8 ounces mushrooms, sliced
  • 3 cloves garlic, minced
  • 2 cups beef broth
  • 1 tablespoon Worcestershire sauce
  • 1 teaspoon Dijon mustard
  • 1 cup sour cream
  • Salt and pepper, to taste
  • 1 tablespoon flour (optional, for thickening)
  • Fresh parsley, for garnish

Directions

  1. In a skillet over medium heat, brown the beef cubes until all sides are seared. Transfer to the slow cooker.
  2. Add onions, mushrooms, and garlic on top of the beef.
  3. Pour beef broth, Worcestershire sauce, and Dijon mustard into the slow cooker. Season with salt and pepper.
  4. Cover and cook on low for 6-8 hours or until the beef is tender.
  5. Once cooked, stir in sour cream and flour (if using) to thicken. Adjust seasoning as necessary.
  6. Garnish with fresh parsley before serving.

Recipe Notes

  • For a richer sauce, consider adding a splash of white wine during cooking.
  • Feel free to experiment with additional veggies such as carrots or bell peppers.
  • Leftovers can be refrigerated for up to 4 days or frozen for later use.

Indulge in Delicious Garlic Butter Lobster and Scallops Delight

Garlic Butter Lobster & Scallops: A Seafood Delight for Special Occasions

⚖️
Difficulty
Intermediate

⏲️
Prep Time
15 mins

🕒
Cook Time
20 mins

⏱️
Total Time
35 mins

🍽️
Servings
4 servings

Indulge in the exquisite flavors of garlic butter lobster and scallops, a dish that captures the essence of coastal cuisine. This recipe features succulent lobster and tender scallops, both lovingly bathed in a rich and aromatic garlic butter sauce. With every bite, you’ll experience the luxurious interplay of the ocean’s bounty and the indulgent warmth of melted butter, creating a delightful symphony that is simply irresistible.

This dish is perfect for special occasions, romantic dinners, or when you simply want to impress your guests with a gourmet experience right at home. The ease of preparation combined with the sophisticated flavors makes this garlic butter lobster and scallops recipe accessible for all skill levels, bringing a touch of elegance to your dining table.

Quick Recipe Highlights

  • Flavor Profile: The sweetness of the lobster and scallops balances beautifully with the richness of garlic and butter, creating a delectable sauce that’s hard to resist.
  • Texture: Enjoy the contrast between the tender lobster meat and the succulent scallops; each bite is a perfect blend of buttery richness and fresh sea flavor.
  • Aroma: The fragrant aroma of garlic and butter wafting through your kitchen will have your mouth watering in anticipation as it cooks.
  • Visual Appeal: Golden brown lobster and scallops served in a luscious garlic butter sauce create a visually stunning dish, perfect for impressing guests.
  • Skill Level Needed: Intermediate skills in seafood preparation and sautéing are helpful, though the comprehensive instructions make it easy to follow.
  • Special Equipment: A large skillet or sauté pan is necessary for cooking the seafood evenly, while tongs or a slotted spoon will help with serving.

Recipe Overview

  • Difficulty Level: While this recipe is marked as intermediate due to the timing of cooking seafood perfectly, it is manageable for those with basic kitchen skills.
  • Category: This recipe falls under seafood entrees, ideal for both casual and formal dining occasions.
  • Cuisine: Celebrating classic coastal cuisine, this recipe draws inspiration from various culinary traditions found in seaside regions globally.
  • Cost: High-quality lobster can be an investment, but the overall cost is reasonable considering the dish serves multiple people and elevates any dining experience.
  • Season: This recipe shines during summer and early fall when seafood is freshest and most readily available in local markets.
  • Occasion: Perfect for anniversaries, holidays, or any gathering where you want to showcase fine dining right at home.

Why You’ll Love This Recipe

Tantalizing taste and texture await you with every bite of garlic butter lobster and scallops. The sweet, succulent lobster harmonizes with the tender, juicy scallops, all enveloped in a luxurious garlic-infused butter sauce that makes each mouthful an unforgettable experience. This dish is a true celebration of seafood, providing a delightful combination of flavors that will leave your guests raving about the dinner.

In addition to its remarkable taste, the convenience of this garlic butter lobster and scallops recipe is unbeatable. With just a handful of ingredients and quick cooking steps, you can whip up a restaurant-quality meal in under an hour. This makes it perfect for those busy weekdays or spontaneous weekend guest invitations, allowing you to impress without the stress.

From a nutritional perspective, seafood is renowned for its high protein and omega-3 fatty acids, making this dish a healthy choice without sacrificing flavor. The incorporation of garlic adds its own health benefits, aiding in immune support and providing additional antioxidants alongside the delectable taste.

This recipe also serves as a stunning centerpiece when entertaining guests. Its gourmet appeal showcases your culinary skills without requiring extensive time in the kitchen. Friends and family will appreciate the thoughtfulness and elegance behind such a dish, enhancing both the dining experience and your reputation as a host.

Finally, garlic butter lobster and scallops offer a cost-effective way to enjoy a lavish seafood dinner at home. While seafood can be expensive, preparing it at home allows you to enjoy premium dining without the hefty price tag often seen at restaurants. This balance of luxury and accessibility makes it a recipe you’ll want to return to again and again.

Historical Background and Cultural Significance

The origins of garlic butter lobster date back to the traditions of coastal regions where both lobster and scallops thrive. These ingredients have been cherished as staples in various cuisines, thanks to their abundance in the ocean. The practice of cooking seafood with butter, especially in French culinary traditions, laid the groundwork for what would become a beloved method in seafood dishes worldwide.

Culturally, seafood holds a prominent place in many societies, often symbolizing prosperity and celebration. In some cultures, lobster is reserved for special occasions, reflecting its luxurious status. Dishes featuring seafood are often associated with gatherings and communal celebrations, bringing people together to enjoy the fruits of the sea.

Over time, garlic butter recipes have evolved from simple cooking techniques to more complex iterations that incorporate herbs and spices. The combination of garlic and butter remains popular, harmonizing with various proteins, but its pairing with sweet, briny seafood is particularly delightful. The evolution of garlic butter sauce has thus shaped how we enjoy seafood today.

Regionally, variations of garlic butter seafood dishes exist globally, with adaptations based on local ingredients and cultural preferences. From Italian versions featuring herbs to Asian interpretations that include chili and ginger, garlic butter seafood transcends borders while maintaining its essential deliciousness. This versatility underlines its significance in the culinary world.

Ingredient Deep Dive

Lobster: This luxury ingredient has long been a favorite in seafood cuisine, often associated with fine dining. Lobsters are rich in protein while being low in calories, making them an excellent source of nutrition. When selecting lobster, look for those with a fresh ocean scent and ensure they are lively in the tank. Store live lobsters in the refrigerator and consume them within 1-2 days for optimal freshness.

Scallops: These small, sweet shellfish are a favorite for their tender texture and mild flavor. Nutritionally, scallops are high in protein and rich in vitamins B12 and magnesium, contributing to overall health. When selecting scallops, fresh and plump varieties are best, and they should not have a strong fishy smell. Store in the coldest part of the refrigerator and use within a day or two.

Garlic: A staple in cuisines around the world, garlic holds substantial health benefits, including anti-inflammatory properties and immune boosting capabilities. When selecting garlic, choose firm bulbs without soft spots, and store in a cool, dark place to prolong freshness. Fresh garlic is favored for its robust flavor, but garlic powder can serve as a convenient substitute in a pinch, though the flavor profile may differ.

Butter: As the heart of the sauce in this dish, butter provides richness and depth of flavor. Opt for unsalted butter to control the saltiness of your dish. Choosing high-quality butter will yield the best results, enhancing the overall appeal of the garlic butter sauce. Store in the refrigerator for optimal freshness, and only bring it to room temperature before preparing your recipe for easy spreading or mixing.

Parsley: Often used as a garnish, fresh parsley brightens up the dish visually and adds a hint of freshness. This herb is rich in vitamins A, C, and K. When selecting parsley, choose vibrant green leaves without yellowing. Store fresh parsley in a glass of water in the fridge to keep it fresh longer.

Common Mistakes to Avoid

  • Overcooking seafood: Seafood cooks quickly. Overcooking lobster and scallops can make them rubbery. Aim for a cooking time of 3-4 minutes per side for scallops and a slightly longer time for lobster.
  • Not using fresh ingredients: Fresh seafood results in better flavor and texture. Frozen seafood can be used but thaw it properly before cooking to maintain quality.
  • Ignoring seasoning: While garlic and butter are flavorful, be sure to season adequately with salt and pepper for the best flavor profile.
  • Not letting the butter brown: Browning the butter slightly before adding garlic enhances the overall flavor, but be careful not to burn it.
  • Skipping the resting period: Allow cooked seafood to rest for a few minutes to retain moisture and improve flavors.
  • Inadequate heat: Make sure your skillet is hot enough before adding seafood to ensure a good sear and prevent sticking.
  • Overcrowding the pan: Cooking too much seafood at once can cause steaming rather than browning. Cook in batches if necessary.
  • Neglecting garnishing: A sprinkle of fresh parsley adds freshness and color to your dish, enhancing the final presentation.

Essential Techniques

Sautéing: This cooking method is crucial for achieving that perfect sear on your seafood. High heat allows for caramelization, which adds depth and flavor. To master it, ensure your skillet is preheated and avoid overcrowding. Look for golden-brown color as a visual cue for doneness.

Butter Emulsion: Creating a smooth butter sauce is an art. To do this, add the butter in stages and ensure to whisk vigorously while combining with the garlic. This technique locks in the flavors and prevents separation. Watch for a creamy texture to ensure success.

Cooking Seafood: Pay attention to the timing for cooking lobster and scallops. Scallops should be cooked until they are opaque, while lobster should be bright and firm. The fish needs to lose its translucent quality. Both should rest slightly off heat before serving.

Plating: Presentation matters immensely for this stunning dish. Use a wide, shallow plate to showcase the lobster and scallops beautifully arranged in the garlic butter sauce. Sprinkle with fresh parsley for a pop of color and freshness, which elevates the dish aesthetically and makes it more appetizing.

Pro Tips for Perfect Garlic Butter Lobster & Scallops

1. Use high-quality seafood: Fresh seafood ensures the best flavor and texture; visit a trusted fish market to get the best possible ingredients.
2. Don’t skimp on the butter: Use generous amounts of butter to create a rich and silky sauce that elevates the dish’s flavor.
3. Fresh garlic is key: Always opt for fresh garlic for a more intense flavor, and mince it finely to enhance its aroma.
4. Monitor the cooking time closely: Scallops and lobster should only take a few minutes to cook perfectly; overcooking results in a compromised texture.
5. Bed the seafood in butter: Serve your lobster and scallops in a pool of the garlic butter sauce to maintain moisture and flavor throughout the meal.
6. Allow for flavor infusion: Let the garlic sauté in the butter before adding your seafood; this builds a stronger flavor base for the dish.
7. Pair with delicious sides: Consider serving this dish with a light salad or crusty bread to soak up the luxuriously flavored butter sauce.
8. Experiment with herbs: In addition to parsley, consider adding fresh lemon thyme or dill for an aromatic twist to the dish.

Variations and Adaptations

Regional variations of garlic butter lobster and scallops can be found across many cultures, each adding unique local spices. In some coastal areas, a hint of chili or paprika could be added for a spicy kick, while in French cuisine, a splash of white wine can elevate the sauce further. Seasonal adaptations might involve using rare spring herbs or substituting summer vegetables alongside the seafood, adding colorful and nutritious elements to the dish.

For dietary modifications, those looking for gluten-free options can easily enjoy this recipe, as it naturally does not include gluten-containing ingredients. Low-carb variations can be found by serving with a salad rather than traditional starches. If you’re vegan, consider using plant-based butter and substituting the seafood with hearty vegetables, like mushrooms or jackfruit, and adjust the seasoning to maintain flavor.

Flavor variations can include replacing the garlic with shallots for a sweeter profile or adding a splash of citrus for brightness. Texture modifications could involve a quick broil after cooking for added color and elegance, or serving with a risotto for a creamy counterpart. Presentation alternatives include using a cast iron skillet for serving, offering a rustic touch to the dining experience that complements the dish beautifully.

Serving and Presentation Guide

Highlighting your garlic butter lobster and scallops can significantly enhance the dining experience. Use wide, shallow bowls for plating, allowing the sauce to pool and showcasing the vibrant colors of the seafood. For garnishing, consider a sprinkle of freshly chopped parsley and lemon zest, which not only adds color but a refreshing hint of citrus.

Traditional accompaniments might include a light, dressed salad or crusty bread, perfect for sopping up the garlic butter—its richness warrants a refreshing balance from lighter sides. Temperature considerations are crucial; serve immediately after cooking to ensure the seafood remains warm, and avoid letting it sit, which can lead to a loss of flavor and texture.

Portion control tips include serving two scallops per person and an appropriate amount of lobster that fits on the plate without overwhelming it. This keeps the presentation elegant and manageable, ensuring everyone can savor the rich flavors without feeling overly stuffed.

Wine and Beverage Pairing

Pairing wine with garlic butter lobster and scallops enhances the overall dining experience. A crisp, chilled Chardonnay is an excellent choice; its buttery notes harmonize beautifully with the dish’s richness. For white wine lovers, a Sauvignon Blanc with its zesty acidity can cut through the richness while complementing the seafood’s sweetness.

For those looking for non-alcoholic alternatives, consider serving sparkling water with a twist of lemon or an herbal iced tea, both of which refresh the palate without overpowering the dish. If coffee or tea is served after the meal, a light herbal tea could offer a soothing end to the rich flavors of the seafood.

Temperature considerations are key; keep white wines well-chilled before serving, and avoid serving red wines, which can overpower the delicate flavors of the seafood dish. For an elegant touch, consider chilling the glasses as well—this detail will impress your guests and enhance their experience.

Storage and Shelf Life

Proper storage of leftover garlic butter lobster and scallops is essential for maintaining freshness. Store any leftovers in an airtight container in the refrigerator and consume within 1-2 days to avoid spoilage. For longer preservation, freezing the dish is possible, but it’s best to do this before adding the garlic butter sauce for optimal texture once reheated.

When reheating, do so gently. The microwave can work in a pinch, but stovetop reheating on low heat with a bit of added butter can help preserve flavor and texture, avoiding overcooking. Look for signs of spoilage, such as off-smells or changes in texture, before consuming any leftovers.

For freezing guidelines, ensure the seafood is cooled to room temperature before placing it in a freezer-safe container. Label the container with the date to keep track of freshness and ensure enjoyment within the recommended timeframe.

Make Ahead Strategies

Planning ahead for garlic butter lobster and scallops can ease the cooking process on the day of serving. Prepare your seafood by cleaning and pre-cutting everything before the event; this allows for quick cooking when guests arrive. Store prepared seafood in the refrigerator until you’re ready for cooking.

While it’s recommended to cook seafood fresh for best results, you can make the garlic butter sauce ahead of time. Keep it stored in an airtight container, then gently reheat when you’re ready to cook the seafood. This allows all the flavors to meld and strengthens the overall profile of the dish.

Additionally, gather any garnishes and side dishes you plan to serve with the seafood in advance; timing these elements will ensure everything is ready simultaneously. This makes the cooking process smoother, allowing you to focus on the final presentation and enjoying your meal with guests.

Scaling Instructions

Scaling garlic butter lobster and scallops is straightforward and allows flexibility based on gathering sizes. For halving the recipe, adjust the ingredient quantities proportionately but maintain the same cooking techniques and times for best results. If doubling or tripling the recipe, increase the number of seafood pieces accordingly and ensure your skillet can accommodate the additional volume without overcrowding.

Timing modifications may be necessary if increasing the batch size; you may need to extend cooking times slightly to ensure all lobster and scallops are cooked evenly. For any adjustments in seasoning or flavors, taste as you go to ensure consistency and balance among the increased ingredients.

Storage considerations remain the same as for a single batch; you can store leftovers securely based on the same principles previously outlined, ensuring longevity and flavor remain intact for future meals.

Nutritional Deep Dive

Garlic butter lobster and scallops is a meal rich in nutritional value, favoring high protein content. A typical serving can range between 30-40 grams of protein, which is crucial for muscle repair and overall health. Additionally, seafood is a fantastic source of omega-3 fatty acids, contributing to heart health and cognitive function.

Micronutrient analysis reveals that this dish is rich in vitamins and minerals. Lobster provides zinc and vitamin B12, essential for immune function and energy metabolism. Scallops add another layer of nutrition with high levels of magnesium and potassium, important for cardiovascular health.

For health benefits, the garlic in this dish not only enhances flavor but also adds antioxidant properties, potentially reducing inflammation and lowering cholesterol levels. This combination of seafood and garlic produces a nutrient-dense meal that supports overall well-being.

While the dish is indulgent, portion analysis is crucial for maintaining a balanced diet. Moderation in serving size mitigates calorie intake while still enjoying the luxurious flavors. Aim for a well-rounded plate by pairing with vegetables or salads to increase fiber intake without compromising on flavors.

Weight management tips when consuming this dish could involve adapting the sides to be lighter or focusing on smaller portions of the rich garlic butter sauce without forgoing the delicious taste entirely.

Dietary Adaptations

For those following specific dietary guidelines, garlic butter lobster and scallops can be easily adapted. For a gluten-free version, this recipe is naturally gluten-free, making it suitable for those with gluten sensitivities. Ensure that any additional side dishes also adhere to gluten-free standards, such as replacing bread with gluten-free options.

Dairy-free adaptations are possible by substituting the butter with a plant-based alternative or oil. Coconut oil or vegan spreads can create a similar effect while providing richness without dairy. The flavor may vary slightly, so incorporate herbs and seasoning to find a delicious balance.

If you’re looking for a vegan option altogether, consider using jackfruit or hearty mushrooms, sautéed in garlic-infused coconut oil. While sticking to the core flavors, adjusting the protein source creates an inclusive dish that everyone can enjoy.

For those engaged in low-carb or keto diets, simply enjoy the lobster and scallops with a low-carb vegetable side, avoiding starchy accompaniments while focusing on healthy fats in the butter sauce. For those on a paleo diet, use ghee or clarified butter to maintain the dish’s essence while following dietary restrictions.

Finally, for low-FODMAP dieters, avoid excessive garlic by using garlic-infused oil rather than whole garlic cloves, allowing for flavor while adhering to dietary limitations.

Troubleshooting Guide

If you encounter texture issues with your seafood, the primary culprit could be overcooking. If the lobster or scallops are chewy or rubbery, be sure to adjust your cooking times. Aim for a quick sear on high heat to keep the seafood tender.

Flavor balance is essential—if the dish turns out too salty, consider adding a splash of lemon juice to the garlic butter sauce to offset saltiness with acidity. Conversely, if it’s bland, additional seasoning may be required to amplify the seafood flavor.

Temperature problems can arise during cooking; ensure your skillet is adequately heated before adding seafood to prevent steaming. Visual cues such as seafood turning opaque or the color changing can assist in indicating doneness.

Equipment challenges, especially with non-stick pans, could arise. If your food is sticking, it may be beneficial to ensure a proper heat level before introducing the butter and seafood.

Ingredient substitutions need to be handled carefully; when adjusting for gluten-free or dairy-free options, aim for ingredients that replicate the texture and flavor profiles closely, ensuring a satisfying dish regardless of dietary needs.

Timing concerns can cause chaos in the kitchen; prepare seafood last and only when side dishes are nearly complete. Coordinating precisely aligns everything for a seamless and incredible meal experience.

Recipe Success Stories

Community feedback for garlic butter lobster and scallops highlights its versatility and flavor, often praised for becoming a family favorite. Many home cooks share their unique twists, from the addition of herbs and spices to inventive side dishes that elevate the meal experience. Tailoring this dish to individual tastes shows how adaptable it can be while preserving its core deliciousness.

Variations success extends, with some culinary experimenters incorporating regional ingredients like citrus zest from local farms or adjusting cooking methods to create stovetop or oven versions. Recipe adaptations not only showcase culinary creativity but also emphasize the essential flavors when preparing seafood dishes.

Reader suggestions further diversify the dish, with plenty of fans opting for different vegetable pairings, like asparagus or peas, to accompany the lobster and scallops. Photography tips shared within the community focus on capturing the vibrant colors and glossy details of the dish, aimed at showcasing the meal beautifully for social media.

This success reinforces how garlic butter lobster and scallops are more than just a recipe; they become an avenue for culinary exploration, family bonding, and memorable gatherings while reinforcing the joy of good food enjoyed together.

Frequently Asked Questions

What is the best way to choose fresh lobster?
Choose lobster that is lively and has a clean ocean smell. The shells should be hard and unbroken, indicating freshness.

Can I use frozen scallops for this recipe?
Yes, frozen scallops can work well. Just ensure they are fully thawed and patted dry before cooking to achieve a nice sear.

How do I prevent overcooking my seafood?
Monitor cooking times closely; scallops take only about 3 minutes per side, while lobster should be cooked until opaque and slightly firm.

What kind of butter is best for the sauce?
Unsalted butter is recommended for greater control over the seasoning of your dish, allowing the flavors of the seafood to shine.

Can I make the garlic butter sauce ahead of time?
Absolutely, the sauce can be made ahead and stored in the refrigerator. Just reheat it gently when ready to serve.

What sides pair well with this dish?
Light salads, crusty bread, or steamed vegetables complement garlic butter lobster and scallops beautifully.

Can I substitute the lobster?
If lobster isn’t available, you can use shrimp or crab as alternatives, adjusting cooking times as needed.

Is this dish suitable for meal prep?
While best enjoyed fresh, leftovers can be stored in the fridge and consumed within a couple of days; reheating is best done slowly.

How can I add spice to the dish?
Consider adding crushed red pepper flakes or a dash of hot sauce to the garlic butter for added heat.

What’s the best way to reheat leftover garlic butter lobster and scallops?
Reheat gently on the stovetop over low heat, adding a little more butter if necessary to keep the dish moist and flavorful.

Additional Resources

For those interested in expanding their culinary repertoire, explore related seafood recipes that highlight other crustaceans like shrimp scampi or crab cakes, demonstrating similar cooking techniques and flavor profiles. Technique guides focused on seafood preparation will provide invaluable skills for your cooking journey.

Additionally, ingredient information on sourcing fresh seafood can guide you in selecting the best options at your local markets. Equipment recommendations for high-quality cookware, such as heavy-duty pans, will enhance your cooking experience further.

Seasonal variations, particularly around the holidays, can inspire your seafood preparations beyond the summer months, suggesting ways to incorporate seasonal flavors and ingredients into classic recipes.

Join the Conversation

Engaging with the culinary community around garlic butter lobster and scallops can open doors to sharing experiences and gathering tips. Connect through social media, sharing your successes and observations on photography techniques that capture the dish beautifully.

Leave reviews, providing valuable insights for others looking to try this recipe, highlighting any unique adaptations you made. Participation in community forums can foster creativity and inspiration, allowing cooks to explore endless possibilities in their culinary adventures.

Sharing recipes and engaging with others allows the joy of cooking together, creating bonds through shared tastes and stories associated with meals crafted from the heart.

The Recipe

Garlic Butter Lobster & Scallops

Serves: 4 servings

Prep Time: 15 mins

Cook Time: 20 mins

Total Time: 35 mins

Kitchen Equipment Needed

  • Large skillet or sauté pan
  • Tongs or slotted spoon
  • Sharp knife (for cutting)
  • Measuring spoons
  • Wooden spoon (for mixing)

Ingredients

  • 2 lobster tails, split
  • 1 pound sea scallops
  • 1/2 cup unsalted butter
  • 4 cloves fresh garlic, minced
  • 1 tablespoon fresh parsley, chopped
  • Salt and pepper, to taste
  • 1 lemon, zested and juiced (for garnish)

Directions

  1. Heat a large skillet over medium heat and add the butter, allowing it to melt.
  2. Add the minced garlic and sauté for about 1-2 minutes, until fragrant but not browned.
  3. Season the lobster tails with salt and pepper; add them to the skillet cut side down. Cook for about 5-7 minutes.
  4. Add the scallops to the skillet, cooking until golden brown, about 3-4 minutes per side.
  5. Once cooked through, drizzle with lemon juice and zest, and gently toss to coat.
  6. Garnish with fresh parsley before serving.

Recipe Notes

  • Feel free to substitute lobster with shrimp for a different take on flavors.
  • For a spicier kick, add crushed red pepper flakes to the garlic butter as it cooks.
  • Ensure that the skillet isn’t overcrowded for even cooking; work in batches if necessary.